457405
1
Verklein
Vergroot
Pagina terug
1/11
Pagina verder
GB
15
Important safeguards
This appliance is designed for home air conditioning and must not be used for other purposes.
It is dangerous to modify or alter the characteristics of the appliance in any way.
•The appliance must be installed in conformity with legislation in force in the country concerned.
If the appliance requires repair, contact a Service Centre authorised by the manufacturer only.
Repairs carried out by unauthorised personnel may be dangerous.
•If the power cable is damaged, it must be replaced by the manufacturer, an authorised service cen-
tre or a qualified electrician in order to eliminate all risk.
This appliance must be used exclusively by adults.
Do not allow children or unfit persons to use the appliance without adequate supervision.
Do not allow children to play with the appliance.
•The appliance must be connected to an efficient earth system.
Have your electrical circuit checked by a qualified electrician.
Do not use extension cables.
Before cleaning or maintenance operations, always unplug the appliance from the mains socket.
Do not move the appliance by pulling the power cable.
Do not install the appliance in rooms containing gas, oil or sulphur. Do not install near sources of heat.
Do not rest heavy or hot objects on top of the appliance.
•Clean the anti-microbial filters at least once a week.
•Avoid using heating appliances near the air conditioner.
Always transport the appliance upright or resting on one side.
•Use the appliance as described in this instruction manual only.
•As with all electrical equipment, whilst the instructions aim to cover as many eventualities as possible,
caution and common sense should be applied when operating and installing this appliance.
•At the end of its working life, take the appliance to a special collection centre.
The materials used for packaging can be recycled.
•You are therefore recommended to dispose of them in special differentiated waste collection con-
tainers.
The refrigerant gas R407c conforms to EC regulations on the environment.
•Avoid perforating the refrigerant circuit of the appliance.
Keep the appliance at least 50 cm away from flammable substances (alcohol etc) or pressurised
containers (e.g. aerosol cans).
DESCRIPTION
1 air outlet grille
2 control panel
3 castors
4 handles
5 filter
6 evaporator air intake grille
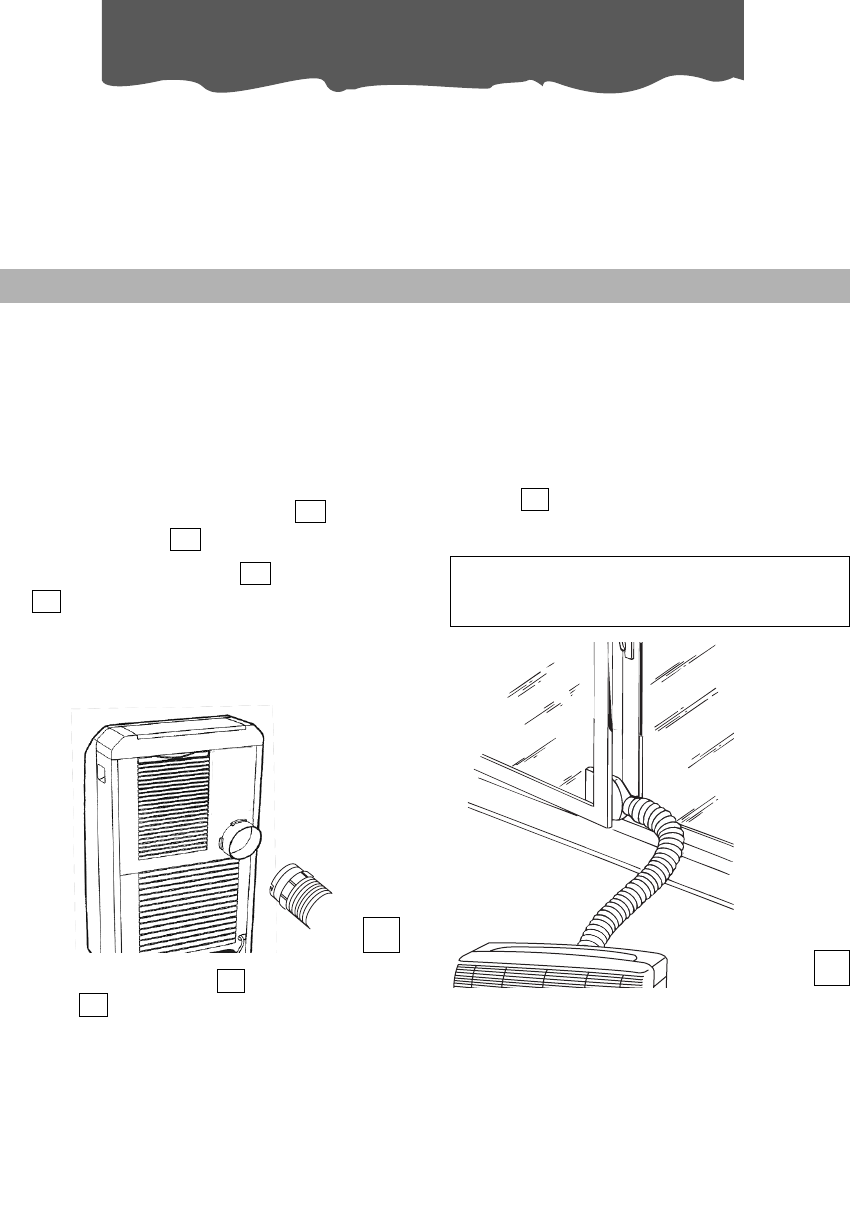
7 air exhaust hose housing
8 condenser air intake grille
9 power cable
10 drainage hose
11 Flange
12 flange cap
13 air exhaust hose
14 air exhaust hose coupling
15 window outlet
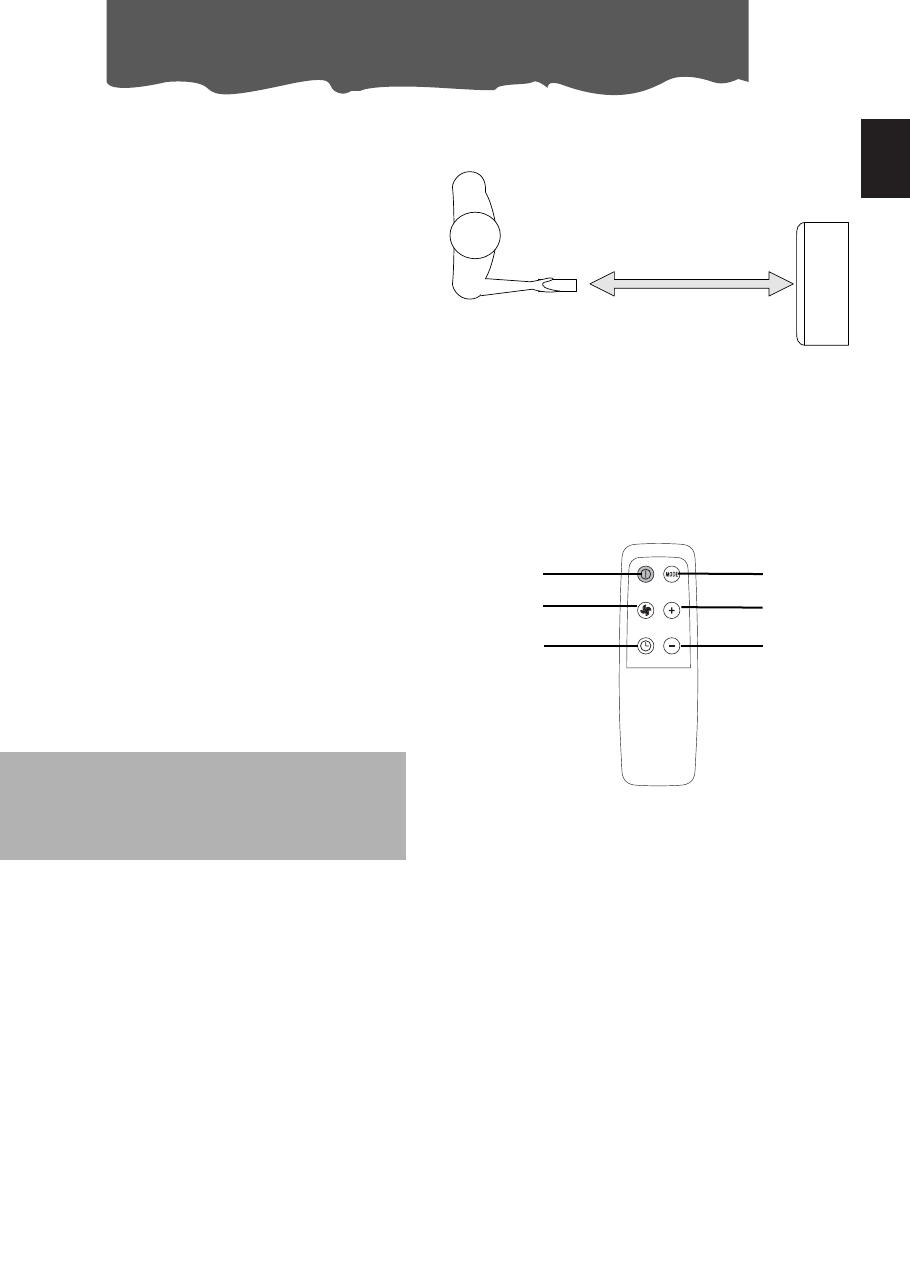
16 remote control unit
16
The instructions below will enable you to prepare your air conditioner for operation as efficiently
as possible.
Before use, make sure the air intake and outlet grilles are unobstructed.
AIR-CONDITIONING WITHOUT INSTALLATION
Just a few simple steps and your comfort is
ensured with your air conditioner:
Fit the air exhaust hose coupling
onto the
air exhaust hose .
Fit the air exhaust hose in the housing
at the back of the appliance.
Insert it as shown in figure A.
7
13
13
14
Fit the window outlet to the end of the
hose .
Place the air conditioner near a window
or French window.
Make sure the air exhaust hose is unob-
structed.
15
13
A
Preparing for use
B
Keep the air hoses as short and free of
curves as possible to avoid constrictions.
ELECTRICAL CONNECTIONS
Before plugging the appliance into the mains socket, check that:
The mains power supply corresponds to the value indicated on the rating plate on the back of the appliance;
The mains socket and electrical circuit are adequate for the appliance;
The mains socket matches the plug. If this is not the case, have the plug replaced;
The mains socket is adequately earthed. Failure to follow these important safety instructions absolves the
manufacturer of all liability.
The power cable must be replaced by a qualified professional only.
Open the window or French window sligh-
tly and position the outlet as shown in figu-
re B .
15
GB
17
Preparing for use
AIR-CONDITIONING WITH INSTALLATION
If required, your appliance can also be instal-
led semi-permanently (Fig. C).
Fit the flange accessory provided in
the hole.
Fit the hose in the housing at the back
of the appliance (fig. A page 16).
Fit the end of the hose to the flange
as shown in fig. E.
11
13
13
10
Proceed as follows:
Drill a hole in an outside wall or through a
window pane.
Respect the height and dimensions of the
hole given in figure D.
30 cm
30 cm
111
MAX100 cm
MIN 35
c
When the hose is not fitted, the hole can
be closed with the flange cap .
NOTE.
When installing the air conditioner semi-per-
manently, you should leave a door slightly
open (as little as 1 cm) to guarantee correct
ventilation.
12
13
in the window
pane
in the wall: you are
recommended to
insulate the sec-
tion of wall using
suitable insulation.
in the woo-
den kick-
board of a
French win-
dow
D
E
Keep the air hoses as short and free of
curves as possible to avoid constrictions.
C
18
Control panel
DESCRIPTION OF THE CONTROL PANEL
A ON/OFF button
B MODE selection button
Air conditioning, dehumidifying, fan.
C Fan speed selection button (HIGH/MED/LOW)
DTimer button
E Programmed operation increase temperature/time button
F Programmed operation decrease temperature/time button
G Display Displays the temperature values set and the programmed operating time
HTimer in operation indicator light
I/L/M Fan speed lights
N Fan mode light
O Air-conditioning mode light
P Dehumidifying mode light
Q Alarm light
BA
H
C
N
D
E
THE CONTROL PANEL
F
I
L
M
P
O
Q
G
19
GB
Operation
TURNING THE APPLIANCE ON
Plug the appliance into the mains.
Press the ON/OFF button (A) (when turned on, the air conditioner
starts operating in the same mode as when it was turned off).
The display shows the room temperature.
Press the MODE button (B) until the indicator light corresponding
to the required mode lights up:
Light (O): air-conditioning mode
Light (N): fan mode
Light (P): dehumidifying mode
AIR-CONDITIONING MODE
Ideal for hot humid weather when you need to cool and dehu-
midify the room.
To set operation of the appliance correctly, press the + (E) or - (F)
buttons until the desired temperature is displayed.
Then select the fan speed by pressing the FAN button (C) until the
indicator light corresponding to the required fan speed lights up:
HIGH: the air conditioner operates at maximum to reach the
required temperature as rapidly as possible
MED: reduces noise levels but still maintains a good level of
comfort
LOW: for silent operation
The most suitable temperature for the room during the summer
varies from 24 to 27°C. You are recommended, however, not to
set a temperature much below the outdoor temperature.
20
Operation
FAN MODE
Adjust fan speed by pressing the FAN button (C) as described for the air-conditioning mode.
Remember that the higher the speed, the more air is filtered. If you select "LOW" speed, less air is
filtered but the appliance is also less noisy.
DEHUMIDIFYING MODE
Ideal for reducing the humidity in a room without lowering or raising the temperature (spring or
autumn, damp rooms, rainy spells, etc).
When the dehumidifying mode is selected, the light (P) comes on.
At the same time, the "LOW" fan speed light (M) comes on. In this mode, other speeds cannot be
selected.
PROGRAMMING THE TIMER
The timer can be used to delay appliance start up or shut down. This avoids wasting electricity by
optimising operating periods.
How to programme delayed start up
Plug the appliance into a mains socket and press the ON/OFF button (A), then select the requi-
red operating mode and other settings (temperature, fan speed, etc).
•Press the ON/OFF button (A) again to place the appliance in standby mode.
•Press the timer button (D). The timer light "H" flashes.
Use the + (E) or - (F) buttons to set the number of hours delay before the appliance comes on.
The time increases or decreases in steps of one hour.
The indicator light (H) flashes until the appliance starts up.
You can set the appliance to come on with a delay of up to 12 hours.
To cancel the timer programme, press the timer button (D) again.
Light (H) stops flashing.
How to programme delayed shut down
Delayed shut down can be programmed in any operating mode (air conditioning / fan/ dehu-
midifying).
•Press the timer button (D). The timer light "H" flashes.
Use the + (E) or - (F) buttons to set the number of hours delay before the appliance goes off.
The time increases or decreases in steps of one hour.
The light (H) flashes until the appliance turns off as programmed.
At the set time, the air conditioner shuts down and remains in standby.
To cancel the timer programme, press the timer button (D) again.
Light (H) stops flashing.
21
GB
Using the remote control unit
(Certain models only)
19
18
20
22
17
21
MODELS WITH REMOTE CONTROL
Point the remote control at the receiver on
the air-conditioner.
The remote control should be handled
with extreme care and respect. Do not
drop it, expose it to direct sunlight, or
leave it near sources of heat.
DESCRIPTION OF THE REMOTE CONTROL
17) "ON/OFF" button
18) "MODE" button
19) Programmed operation temperature
increase button
20) Programmed operation temperature
decrease button
21) "TIMER" button
22) Fan speed selection button
(HIGH/MED/LOW).
Replacing the batteries
Remove the cover on the rear of the
remote control;
Replace the old batteries with two new
LR03 “AAA” 1.5V batteries, inserting them
correctly (see the instructions inside the
battery compartment);
Replace the cover.
If the remote control unit is replaced or
discarded, the batteries must be removed
and disposed of in accordance with current
legislation as they are harmful to the envi-
ronment.
TURNING THE APPLIANCE ON
Plug the appliance into the mains.
Press the ON/OFF button (17) (when turned on, the air conditioner starts operating in the same
mode as when it was turned off).
Press the MODE button (18) to select the required mode
COOLING
DEHUMIDIFYING
FAN ONLY
On the control panel, the light corresponding to the selected mode comes on.
For air conditioning/dehumidifying/fan only settings and programming the timer, see page.19-20
22
To get the best from your air conditioner, fol-
low these recommendations:
•close the windows and doors in the room to
be air conditioned.
The only exception is when the appliance is
installed through a hole in the wall.
In this case, you are recommended to
leave a slight draught through a door or
window to guarantee correct ventilation.
•Protect the room from direct exposure to
the sun by partially closing curtains and/or
blinds to make the appliance much more
economical to run;
Never rest objects of any kind on the air
conditioner;
Never obstruct the air intake or outlet
grilles;
Make sure there are no heat sources in the
room.
1
6
Never use the appliance in very damp
rooms (laundries for example).
Never use the appliance outdoors.
Tips
close doors and windows
close blinds or curtains
do not cover
the appliance
Make sure the air conditioner is on a level
floor.
23
GB
Before cleaning or maintenance, turn the
appliance off by pressing the ON/OFF button
(A) or in models with remote control unit, by
pressing the ON/OFF button , then always
unplug the appliance from the mains socket.
CLEANING THE CABINET
You should clean the appliance with a slightly
damp cloth then dry with a dry cloth.
For safety reasons, never wash the air condi-
tioner with water.
Precautions
Never use petrol, alcohol or solvents to clean
the appliance. Never spray insecticide liquids
or similar.
CLEANING THE AIR FILTERS
To keep your air conditioner working efficien-
tly, you should clean the dust filter every week
of operation.
The filter is housed in the intake grille.
To clean the filters, proceed as follows:
1. Remove the filter as shown in figure F
17
Use a vacuum cleaner to remove the dust
collected on the filter.
If it is very dirty, immerse in warm water and
rinse a number of times.
The water should never be hotter than 40°C.
After washing, leave the filter to dry.
Put the filter back in its housing.
START OF SEASON CHECKS
Make sure the power cable and plug are
undamaged and the earth system is efficient.
Follow the installation instructions precisely.
END OF SEASON OPERATIONS
To empty water from the appliance circuit
completely, remove the hose on the back of
the appliance and remove the cap.
Run off any water left completely (figure G).
When all the water has been drained, put the
hose back in its housing.
Clean the filter and dry thoroughly before
putting back.
F
Cleaning
G
24
Troubleshooting
PROBLEM CAUSE REMEDY
The air conditioner
does not come on
no electricity
it is not plugged into the mains
the safety device has tripped
wait
plug into the mains
contact your service centre
The air conditioner
works for a short
time only
the air exhaust hose has a constriction
the air exhaust hose is blocked
there are bends in the air exhaust hose
position the exhaust hose cor-
rectly
check there are no obstacles
obstructing air discharge
eliminate the bends
The air conditioner
works, but does not
cool the room
window open
there are heat sources in the room (burner,
lamp, etc)
the exhaust hose is detached
air filter clogged
the air conditioner is not powerful enough for
the conditions or size of the room
close the window
eliminate the heat source
connect the exhaust hose
•clean or replace the filter
pulire il filtro o sostituirlo
Particular odour in
the room
il filtro dell’aria è intasato
The air conditioner
does not operate
for about three
minutes after turning
it on
the safety device has tripped wait for three minutes
The alarm light Q
comes on
the tank inside the appliance is full.
empty the tank by means of
the hose on the back of the
appliance (see "End of season
operations) on page 23).
25
GB
Guarantee/technical specification
GUARANTEE AND TECHNICAL ASSISTANCE
The conditions of the guarantee and techni-
cal assistance are given on the certificate
supplied with your appliance.
LIMIT CONDITIONS
Room temperature for
air conditioning 21 ÷ 35°C
TECHNICAL SPECIFICATION
Power supply voltage see rating plate
Max. absorbed power
during air conditioning
Refrigerant
Cooling capacity
Appliance dimensions:
width 460 mm
height 840 mm
depth 320 mm
weight 36 kg
Transport, filling, cleaning, recovery and disposal of refrigerant should be performed by a tech-
nical service centre appointed by the manufacturer only.
The appliance should be disposed of by a specialist centre appointed by the manufacturer only.
1

Hulp nodig? Stel uw vraag in het forum

Spelregels

Misbruik melden

Gebruikershandleiding.com neemt misbruik van zijn services uitermate serieus. U kunt hieronder aangeven waarom deze vraag ongepast is. Wij controleren de vraag en zonodig wordt deze verwijderd.

Product:

Bijvoorbeeld antisemitische inhoud, racistische inhoud, of materiaal dat gewelddadige fysieke handelingen tot gevolg kan hebben.

Bijvoorbeeld een creditcardnummer, een persoonlijk identificatienummer, of een geheim adres. E-mailadressen en volledige namen worden niet als privégegevens beschouwd.

Spelregels forum

Om tot zinvolle vragen te komen hanteren wij de volgende spelregels:

Belangrijk! Als er een antwoord wordt gegeven op uw vraag, dan is het voor de gever van het antwoord nuttig om te weten als u er wel (of niet) mee geholpen bent! Wij vragen u dus ook te reageren op een antwoord.

Belangrijk! Antwoorden worden ook per e-mail naar abonnees gestuurd. Laat uw emailadres achter op deze site, zodat u op de hoogte blijft. U krijgt dan ook andere vragen en antwoorden te zien.

Abonneren

Abonneer u voor het ontvangen van emails voor uw DeLonghi CF 190 bij:


U ontvangt een email met instructies om u voor één of beide opties in te schrijven.


Ontvang uw handleiding per email

Vul uw emailadres in en ontvang de handleiding van DeLonghi CF 190 in de taal/talen: Engels als bijlage per email.

De handleiding is 0,22 mb groot.


U ontvangt de handleiding per email binnen enkele minuten. Als u geen email heeft ontvangen, dan heeft u waarschijnlijk een verkeerd emailadres ingevuld of is uw mailbox te vol. Daarnaast kan het zijn dat uw internetprovider een maximum heeft aan de grootte per email. Omdat hier een handleiding wordt meegestuurd, kan het voorkomen dat de email groter is dan toegestaan bij uw provider.

Stel vragen via chat aan uw handleiding

Stel uw vraag over deze PDF

Andere handleiding(en) van DeLonghi CF 190

DeLonghi CF 190 Gebruiksaanwijzing - Nederlands - 11 pagina's

DeLonghi CF 190 Gebruiksaanwijzing - Deutsch - 11 pagina's


Uw handleiding is per email verstuurd. Controleer uw email

Als u niet binnen een kwartier uw email met handleiding ontvangen heeft, kan het zijn dat u een verkeerd emailadres heeft ingevuld of dat uw emailprovider een maximum grootte per email heeft ingesteld die kleiner is dan de grootte van de handleiding.

Er is een email naar u verstuurd om uw inschrijving definitief te maken.

Controleer uw email en volg de aanwijzingen op om uw inschrijving definitief te maken

U heeft geen emailadres opgegeven

Als u de handleiding per email wilt ontvangen, vul dan een geldig emailadres in.

Uw vraag is op deze pagina toegevoegd

Wilt u een email ontvangen bij een antwoord en/of nieuwe vragen? Vul dan hier uw emailadres in.


Info