486279
5
Verklein
Vergroot
Pagina terug
1/10
Pagina verder
MICORWAVE OVEN KOR-121QOS
More
Fresh
Vesetable
Dinner
Plate
Baked
Potato
Soup Beverage
Muffin
Frosen Pizza
Less
AUTO
DEF.
POWER
START
STOP/
CLEAR
CLOCK/
A.START
123
456
78
0
9
SPEEDY
COOK
STAGE
1 2
DEFROST
WEIGHT TIME
LOCK NO CUPS
g
AUTO
START
MICROWAVE OVEN
OPERATING INSTRUCTIONS
Model No.:KOR-121QOS
Before operating this oven, please read these instructions completely.
1 2
TABLE OF CONTENTS
PRECAUTIONS TO AVOID POSSIBLE EXPOSURE TO EXCESSIVE MICROWAVE ENERGY ···1
EARTHING INSTRUCTIONS ····································2
INSTALLATION ···········································2
SPECIFICATIONS ········································· 3
IMPORTANT ············································ 3
SAFETY INSTRUCTIONS FOR GENERAL USE ·························· 4
FEATURES DIAGRAM ·······································5
OPERATION PROCEDURE ····································7
CONTROLS ············································8
SETTING THE CLOCK ·····································8
WEIGHT DEFROSTING ·····································8
TIME DEFROSTING ·······································9
COOKING IN ONE STAGE ···································9
COOKING IN TWO STAGE ·································· 10
WEIGHT DEFROSTING AND COOKING IN TWO STAGE ···················10
AUTO START ········································· 11
TO CHECK AUTO START TIME ································ 12
SPEEDY COOK ········································12
ONE TOUCH COOKING ···································· 12
MORE, LESS ··········································14
CHILD SAFETY LOCK ·····································14
TO STOP THE OVEN WHILE THE OVEN IS OPERATING ···················14
UTENSIL TEST ··········································15
MICROWAVE UTENSILS ····································· 15
CARE OF YOUR MICROWAVE OVEN ······························ 16
USE YOUR MICROWAVE OVEN SAFELY ···························· 17
BEFORE YOU CALL FOR SERVICE ······························· 18
QUESTIONS AND ANSWERS ·································· 18
PRECAUTIONS TO AVOID POSSIBLE
EXPOSURE TO EXCESSIVE MICROWAVE
ENERGY.
(a) Do not attempt to operate this oven with the door open since open-door operation can
result in harmful exposure to microwave energy. It is important not to defeat or tamper with
the safety interlocks.
(b) Do not place any object between the oven front face and the door or allow soil or cleaner
residue to accumulate on sealing surfaces.
(c) Do not operate the oven if it is damaged.
It is particularly important that the oven door close properly and that there is no damage to
the: (1) door (bent), (2) hinges and latches (broken or loose), (3) door seals and sealing
surfaces.
(d) The oven should not be adjusted or repaired by anyone except properly qualified service
personnel.
INSTALLATION
Steady, flat location
This oven should be set on a steady, flat surface. This oven is designed for counter top use only.
Leave space behind and side
All air vents should be kept a clearance. If all vents are covered during operation, the oven may
overheat and, eventually, oven failure.
Away from radio and TV sets
Poor television reception and radio interference may result if the oven is located close to a TV, Radio
antenna, feeder and so on.
Position the oven, as far from them as possible.
Away from heating appliance and water taps
Keep the oven away from hot air, steam or splash when choosing a place to position it, or the
insulation might be adversely affected and breakdowns occur.
Power supply
• Check your local power source. This oven requires a current of approximately 6 amperes, 230V
50Hz.
• Power supply cord is about 1.1 meters long.
• The voltage used must be the same as specified on this oven. Using a higher voltage may result in a
fire or other accident causing oven damage. Using low voltage will cause slow cooking. We are not
responsible for damage resulting from use of this oven with a voltage of ampere fuse other than
those specified.
• This appliance is supplied with cable of special type, which, if damaged, must be repaired with cable
of same type. Such a cable can be purchased from DAEWOO and must be installed by a Qualified
Person.
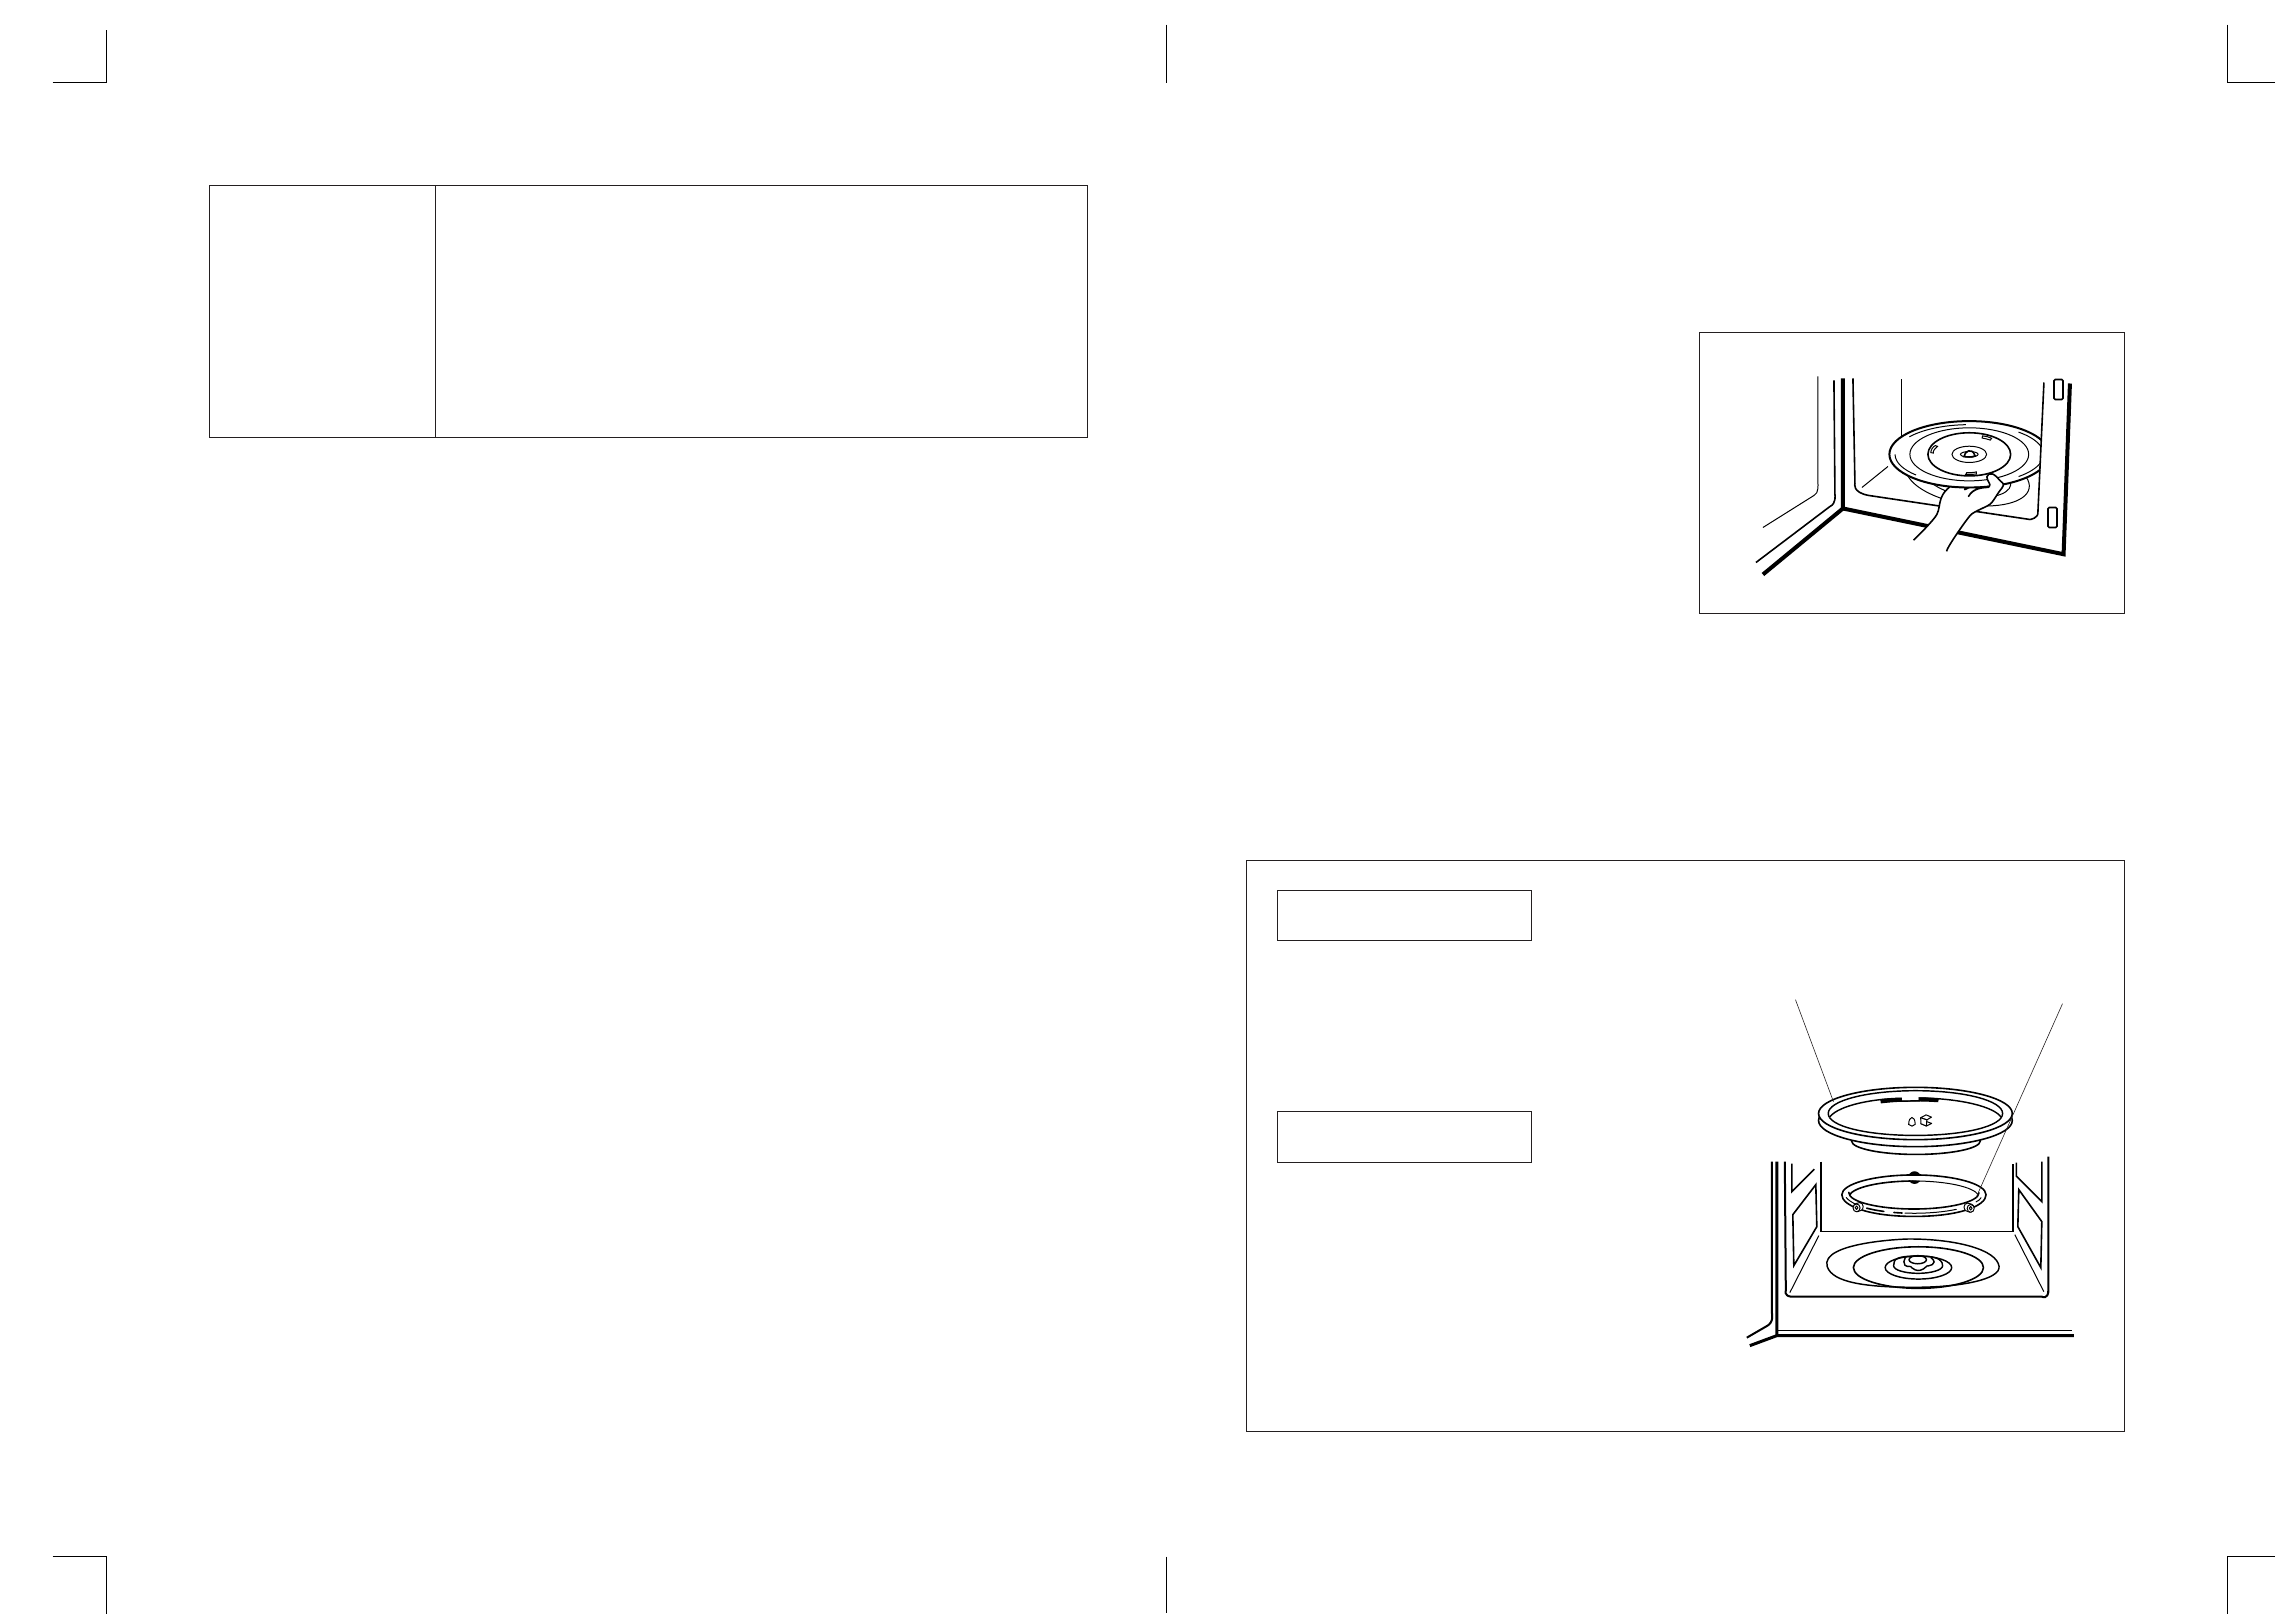
Examine the oven after unpacking for any damage such as:
A misaligned door, Broken door, A dent in cavity. If any of the above are visible, DO NOT INSTALL,
and notify dealer immediately.
Do not operate the oven if it is colder than room termperature.
(This may occur during delivery in cold weather.) Allow the oven to become room temperature before
operating.
EARTHING INSTRUCTIONS
This appliance must be earthed. In the event of an electrical short circuit, earthing reduces the risk of
electric shock by providing an escape wire for the electric current. This appliance is equipped with a cord
having a earthing wire with a earthing plug. The plug must be plugged into an outlet that is properly
installed and earthed.
1
2
3
4
5
6
7
WARNING: Improper use of the earthing plug can result in a risk of electric shock. Consult a
qualified electrician or serviceman if the earthing instructions are not completely
understood, or if doubt exists as to whether the appliance is properly earthed. If it is
necessary to use an extension cord, use only a 3-wire extension cord that has a 3-
blade earthing plug, and a 3-slot receptacle that will accept the plug on the appliance.
The marked rating of the extension cord should be equal to or greater than the
electrical rating of the appliance.
3 4
SAFETY INSTRUCTIONS FOR GENERAL USE
Listed below are, as with all appliances, certain rules to follow and safeguards to assure top
performance from this oven:
1. Do not use the oven for any reason other than food preparation, such as for drying clothes, paper, or
any other nonfood items or for sterilizing purposes.
2. Do not use the oven when empty, this could damage the oven.
3. Do not use the oven cavity for any type of storage, such as papers, cookbook, cookware, etc.
4. Do not operate the oven without the glass tray in place. Be sure it is properly sitting on the rotating
base.
5. Make sure you remove caps or lids prior to cooking when you cook food sealed in bottles.
6. Do not put foreign material between the oven surface and door. It could result in excessive leakage of
microwave energy.
7. Do not use recycled paper products for cooking. They may contain impurities which could cause
sparks and/or fires when used during cooking.
8. Do not pop popcorn unless popped in a microwave approved popcorn popper or unless it's
commercially packaged and recommended especially for microwave ovens. Microwave popped corn
produces a lower yield than conventional popping; there will be a number of unpopped kernels. Do not
use oil unless specified by the manufacturer.
9. Do not cook any food surrounded by a membrane, such as egg yolks, potatoes, chicken livers, etc.,
without first piercing them several times with a fork.
10. Do not pop popcorn longer than the manufacturer's directions. (popping time is generally below 3
minutes).
Longer cooking does not yield more popped corn, it can cause scorchings and fire.
Also, the cooking tray can become too hot to handle or may break.
11. Should the microwave oven emit smoke in quantity to indicate a fire, keep the oven door shut, switch
the appliance off and disconnect the mains lead from the outlet.
12. When flammable food containers are used in the oven (e.g. packet popcorn) be sure to check the
cooking process periodically in case fire has occurred.
13. Always stir and/or shake the containers of baby foods prior to testing their temperature and serving
the contents.
14. Always test the temperature of food or drink which has been heated in a microwave oven before you
give it to somebody, especially to children or elderly people. This is important because things which
have been heated in a microwave oven carry on getting hotter even though the microwave oven
cooking has stopped.
* Specifications subject to change without notice.
POWER SUPPLY 230V~50Hz, SINGLE PHASE WITH EARTHING
MICROWAVE POWER CONSUMPTION 1380 W
OUTPUT POWER 900 W (IEC 705)
FREQUENCY 2450 MHz
OUTSIDE DIMENSIONS (W X H X D) 564 X 310 X 413 mm
CAVITY DIMENSIONS (W X H X D) 374 X 233 X 372 mm
NET WEIGHT APPROX. 18 Kg
TIMER 59 min. 99 sec.
POWER SELECTIONS 10 LEVELS
SPECIFICATIONS
IMPORTANT
The wires in this mains lead are coloured in accordance with the following code.
Green-and-yellow : Earth
Blue : Neutral
Brown : Live
As the colours of the wires in the mains lead of this appliance may not correspond with the coloured
markings identifying the terminals in your plug, proceed as follows:
The wire which is coloured green-and-yellow must be connected to the terminal in the plug which is
marked with the letter 'E' or by the earth symbol or green-and-yellow. The wire which is coloured
blue must be connected to the terminal which is marked with the letter 'N' or coloured black.
The wire which is coloured brown must be connected to the terminal which is marked with the letter
'L' or coloured red.
WARNING: This appliance must be earthed.
5 6
1. Door latch-When the door is closed it will
automatically lock shut. If the door is
opened while the oven is operating.
The magnetron will automatically shut off.
2. Door seal-The door seal maintains the
microwaves within the oven cavity and
prevents microwave leakage.
3. Oven cavity
4. Spatter shield-Protects the microwave
outlet from splashes of cooked foods.
5. Safety interlock system-Prevents the
oven from operating while the door is
opened.
6. Door release button-Pushing this button
stops oven operation and opens the door.
7. Glass cooking tray-The tray must always
be in proper position before operating.
Do not cook food directly on the tray.
8. Roller guide-Supports the glass cooking
tray.
9. Door screen-Allows viewing of food.
The screen is designed so that light can
pass through, but not the microwaves.
FEATURES DIAGRAM
MICORWAVE OVEN KOR-121QOS
More
Fresh
Vesetable
Dinner
Plate
Baked
Potato
Soup Beverage
Muffin
Frosen Pizza
Less
AUTO
DEF.
POWER
START
STOP/
CLEAR
CLOCK/
A.START
1 2 3
4 5 6
7 8
0
9
SPEEDY
COOK
STAGE
1 2
DEFROST
WEIGHT TIME
LOCK NO CUPS
g
AUTO
START
1 2 3 4 5
6
7
9
8
10. Time set pad-Used to set the cooking
time and the present time.
11. Display-Cooking time power level,
present time are displayed.
12. Speedy cook-Touch to set the desired
reheat time.
13. One touch-Used to cook or reheat
specific quantities of food. See pages 13-
15.
14. More-Used to add time to one touch
cooking.
15. Less-Used to remove time from one
touch cooking.
16. Auto defrost-Used to defrost foods.
17. Power-Used to set power level.
18. Clock/A.start (Auto Start)-Used to set
clock and also used to set a delayed auto
start.
19. Stop/Clear-Used to stop the oven
operation or to delete the cooking data.
20. Start-Used to start a selected operation.
FEATURES DIAGRAM (continued)
r
t
y
w
u
o
q
e
0
i
p
MICORWAVE OVEN KOR-121QOS
More
Fresh
Vesetable
Dinner
Plate
Baked
Potato
Soup Beverage
Muffin
Frosen Pizza
Less
AUTO
DEF.
POWER
START
STOP/
CLEAR
CLOCK/
A.START
1 2 3
4 5 6
7 8
0
9
SPEEDY
COOK
STAGE
1 2
DEFROST
WEIGHT TIME
LOCK NO CUPS
g
AUTO
START
7 8
When the oven door is opened, the light turns
off.
The oven door can be opened at any time
during operation by touching the door release
button on the control panel. The oven will
automatically shut off. To restart the oven,
close the door and then touch START.
Each time a pad is touched, a BEEP will sound
to acknowledge the touch.
The oven automatically cooks on full power
unless set to a lower level.
The display will show ":0" when the oven is
plugged in.
Time clock returns to the present time when
the oven turns off.
When the STOP/CLEAR pad is touched during
the oven operation, the oven stops cooking and
all information retained.
To erase all information (except the present
time), touch the STOP/CLEAR pad once more.
If the oven door is opened during the oven
operation, all information is retained.
If the START pad is touched and the oven does
not operaate, check the area between the door
and door seal for obstructions and make sure
the door is closed securely.
The oven will not start cooking until the door is
completely closed or the program has been
reset.
OPERATION PROCEDURE
This section includes useful information about oven operation.
1. Plug power supply cord into a 230V AC 50Hz power outlet.
2. After placing the food in a suitable container, open the oven door and put it on the glass tray.
The glass tray must always be in place during cooking.
3. Shut the door. Make sure that it is firmly closed.
1
2
3
4
5
6
7
8
Make sure the oven is properly installed and
plugged into the electrical outlet.
Wattage output chart
• The power-level is set by pressing the POWER pad. The chart shows the display, the power level and
the percentage of power.
Power Level (Display) Approximate Percentage of Power
Touch POWER pad,
Once the Touch
POWER P-HI 100%
9 P-90 90%
8 P-80 80%
7 P-70 70%
6 P-60 60%
5 P-50 50%
4 P-40 40%
3 P-30 30%
2 P-20 20%
1 P-10 10%
0 P-0 0%
CONTROLS
SETTING THE CLOCK
When the oven is first plugged in, the display will flash ":0" and a beep will sound. If the AC power
ever goes off, the display will flash ":0" when the power comes back on.
1. Touch CLOCK/A.START pad.
This is a 12 hour clock system.
2. Touch CLOCK/A.START pad
once more.
3. Enter the correct time of day by touching the numbers
in sequence.
4. Touch CLOCK/A.START pad.
NOTE: If you attempt to enter an incorrect time, the time will not be set and a error signal tone will
sound. Touch the CLOCK/A.START pad and re-enter the time.
The display will stop blinking, and the colon
start blinking. If you selected 12 hour clock
system, this digital clock allows you to set
from 1:00 to 12:59. If you selected 24 hour
clock system, this digital clock allows you to
set from 0:00 to 23:59.
WEIGHT DEFROSTING
WEIGHT DEFROST lets you easily defrost food by eliminating guesswork in determining defrosting
time. The minimum weight for WEIGHT DEFROST is 0.5 pounds. The maximum weight for
WEIGHT DEFROST is 6.5 pounds. Follow the steps below for easy defrosting.
The defrosting time is automatically determined by weight entered.
The g indicator goes off and the weight defrost indicator blinks and the defrosting time counts down
turned or rearranged. When the defrosting time ends, you will hear 3 beeps.
NOTE: This oven is multiple clock
system. If you want 12 hour
clock system, can be omitted this
step. (step2)
1. Touch AUTO DEFROST pad.
2. Touch number pads for the desired defrosting weight
want.
3. Touch START pad.
The WEIGHT DEFROST indicator lights
and "0" is displayed and the g indicator
starts blinking.
The display will show the numbers you
pressed in the order you touched.
WEIGHT DEFROST begins.
CLOCK/
A.START
CLOCK/
A.START
AUTO
DEFROST
9 10
TIME DEFROSTING
When TIME DEFROST is selected, the automatic cycle divides the defrosting time into periods of
alternating defrost and stand times by cycling on and off.
When you touch START pad, the TIME DEFROST indicator starts bliking to show theoven is in the TIME
DEFROST mode.The display counts down the time to show you how much defrosting time is left in the
TIME DEFROST mode. The oven beeps during the defrosting cycle to signal that the food needs to be
turned or rearranged. When the defrosting time ends, you will hear 3 beeps.
1. Touch AUTO DEFROST pad.
2. Touch AUTO DEFROST pad once more.
3. Touch number pads, for the desired defrosting time.
4. Touch START pad.
The WEIGHT DEFROST indicator light and
"0" is displayed and the g indicator starts
blinking.
The WEIGHT DEFROST indicator lights
and ":0" is displayed.
The display will show the numbers you
pressed in the order you touched.
COOKING IN ONE STAGE
When you touch START pad, the STAGE 1 indicator starts blinking to show the oven is cooking. The
display counts down the time to show how much cooking time is left. When the cooking time ends, you
will hear 3 beeps.
1. Touch POWER pad.
2. Touch the number pad for the power level you want.
3. Touch number pads for the cooking time.
4. Touch START pad.
The STAGE 1 indicator lights and "P-" is
displayed.
This dispay will show what you touched.
This example shows power level 3.
Note: If steps 1 and 2 are omitted, the oven
will cook at full power.
The display will show the numbers you
pressed in the order you touched.
Note: Your oven vcan be programmed for
59 minutes 99 seconds.(59:99)
3
NOTE: Using lower power levels increase the cooking time which is recommended for foods such
as cheese, milk and slow cooking of meats.
COOKING IN TWO STAGES
For best results, some recipes call for one Power Level for a certain length of time and another
power level for a different length length of time.
Your microwave oven can be set to change from one to another.
When you touch START pad, both STAGE 1 & 2 indicator lights come on, STAGE 1 indicator light starts
blinking to show you that the oven is cooking in the first of two cook stages. The oven will cook at the
power you selected for stage one. At the end of stage one, the oven will beep and start stage 2, the
STAGE 1 indicator goes off and the STAGE 2 indicator starts blinking. The display counts down the time
remaining in stage two when stage two ends, you will hear 3 beeps.
1. Touch number pads for the
cooking time you want in the
first stage.
2. Touch POWER pad once more.
3. Touch the number pads for the power level you want in
the second stage.
4. Touch the number pads for the cooking time you want
in the second stage.
5. Touch START pad.
The STAGE 1 indicator lights and the
display will show the numbers you pressed
in the order you touched.
This example shows 5 minutes 30 seconds
at full power.
The STAGE 2 indicator lights and "P-" is
displayed.
The display will show what you touched.
The display will show the number you
pressed in the order you touched.
WEIGHT DEFROSTING AND COOKING IN TWO STAGES
Some recipes require frozen foods to thawed before cooking.
This oven can be programmed to automatically defrost foods before cooking.
1. Touch AUTO DEFROST pad.
2. Touch number pad for the defrosting weight you want.
5. Touch number pads for the cooking time you want in
the first stage.
3. Touch POWER pad.
4. Touch POWER pad once more.
The WEIGHT DEFROST indicator lights
and "0" is displayed. And the g indicator
starts blinking.
The display will show the numbers you
pressed in the order you touched.
The STAGE 1 indicator lights and "P-" is
displayed.
"P-HI" will appear in the displayed.
This example shows full power(100%).
The display will show the numbers you
pressed in the order you touched.
5 3 0
AUTO
DEFROST
POWER
AUTO
DEFROST
POWER
11 12
WEIGHT DEFROSTING AND COOKING IN TWO STAGES (CONTINUED)
When you touch START pad, the WEIGHT DEFROST, STAGE 1 and STAGE 2 indicators come on to
confirm the power levels selected. The WEIGHT DEFROST indicator starts blinking to show you that the
oven is in WEIGHT DEFROST mode. The display counts down the time remaining in WEIGHT
DEFROST mode.
When the oven beeps, turn over, break a part and or redistrtbute the food. At the end of WEIGHT
DEFROST mode, the oven will beep and start stage one. The WEIGHT DEFROST indicator goes off and
the STAGE 1 indicator starts blinking. The display counts down the time remaining in stage one.
At the end of stage one, the oven will beep and start stage two.
The STAGE 1 indicator goes off and the STAGE 2 indicator starts blinking. The display counts down the
time remaining in stage two when stage two ends, you will hear 3 beeps.
6. Touch POWER pad.
7. Touch the number pads for the power level you want in
the second stage.
8. Touch the number pads for the cooking time you want
in the second stage.
9. Touch START pad.
The STAGE 2 indicator lights and 'P-" is
displayed.
The display will show what you touched.
The display will show the numbers you
pressed in the order you touched.
When you touch START pad, the present time appears in the display and the cooking program indicators
come on. The AUTO START indicator and the colon start blinking. When the selected start time arrives
the oven begins operating and the oven light turns on. The AUTO START indicator goes off and the next
stage indicator begins to blink. When the cooking is completed you will hear 3 beeps. The oven turns off
and the present time appears in the display.
AUTO START
Auto start can be programmed for up to two cooking stages.
Auto start can be not be programmed for auto start.
1. Program the desired power level and cooking time for food to be cooked.
2. Touch CLOCK/A.START pad.
3. Enter the desired start time by pressing the number.
4. Touch START pad.
The AUTO START indicator lights and ":0"
is displayed.
The display will show the numbers you
pressed in the order you touched.
NOTE: AUTO START can be used for time cooking, if clock is set. If the oven door is opened after
programming AUTO START, it is necessary to touch the START pad for the time of day to
appear in the readout so that the oven will automatically begin programmed cooking at the
chosen AUTO START time.
Before setting, check to make sure the clock is showing the correct time of day.
TO CHECK AUTO START TIME
Once you have correctly programmed oven for AUTO START, the present time will appear on the
display.
1. Touch CLOCK/A.START pad. The programmed AUTO START time will
appear on the display for 3 seconds.
SPEEDY COOK
SPEEDY COOK allows you to reheat for 30 seconds at 100% (full power) by simply touching the
SPEEDY COOKpad.
By repeatedly touching the SPEEDY COOK pad, you can also extend reheating time to 5 minutes
by 30 second increments.
1. Touch SPEEDY COOK pad. When you touch SPEEDY COOK, ":30" is
displayed.
After 1.5 seconds, the oven starts reheating.
ONE TOUCH COOKING
One touch cook allows you to cook or reheat many of your favorite foods by touching just one pad.
To increase quantity, touch chosen pad until number in display is same as desired quantity to
cook.(except for MUFFIN & DINNER PLATE)
POWER
CLOCK/
A.START
CLOCK/
A.START
SPEEDY
COOK
1. Touch FROZEN PIZZA pad
once for a 200g pizza or twice
for a 300g pizza.
FROZEN
PIZZA
When you touch FROZEN PIZZA pad once,
"200" is displayed.
After 1.5 seconds, the display shows the
cooking time and the oven starts cooking.
1. Touch BEVERAGE pad once
for a 1 cup, or twice for a 2
cups or three times for 3 cups.
BEVERAGE
When you touch BEVERAGE pad once, "1"
is displayed.
After 1.5 seconds, the display changes into
cooking time of quantity and the oven starts
cooking.
* FROZEN PIZZA *
• 200g Touch FROZEN PIZZA once.
• 300g Touch FROZEN PIZZA twice within 1.5 seconds.
NOTE: 1.Use only one frozen pizza at a time.
2.Use only frozen pizza for microwave oven.
3.If the cheese of frozen pizza does not melt sufficiently, cook a few seconds longer.
4.Some brands of frozen pizza may require more or less cooking time.
13 14
ONE TOUCH COOKING (CONTINUED)
1. Touch MUFFIN pad once to
cook 5 muffins.
MUFFIN
When you touch MUFFIN pad once, "5" is
displayed.
After 1.5 seconds, the display shows the
cooking time and the oven starts cooking.
1. Touch DINNER PLATE pad
once for an 300g dinner plate
of food.
DINNER
PLATE
When you touch DINNER PLATE pad
once, "300" is displayed.
After 1.5 seconds, the display shows the
cooking time and the oven starts cooking.
* BEVERAGE * (250ml/cup)
• 1 cup(mug) Touch BEVERAGE once.
• 2 cups(mugs) Touch BEVERAGE twice within 1.5 seconds.
• 3 cups(mugs) Touch BEVERAGE three times within 1.5 seconds.
NOTE: 1. This setting is good for restoring cooled beverage to a better drinking temperature.
2. Stir after cooking.
ONE TOUCH COOKING (CONTINUED)
1. Touch SOUP pad once for a
250g soup or twice for a 350g
SOUP
When you touch SOUP pad once, "250" is
displayed.
After 1.5 seconds, the display shows the
cooking time and the oven starts cooking.
1. Touch FRESH VEGETABLE
pad once for a 200g of fresh
vegetable or twice for a 300g of
fresh vegetable.
FRESH
VEGETABLE
When you touch FRESH VEGETABLE pad
once, "200" is displayed.
After 1.5 seconds, the display shows the
cooking time and the oven starts cooking.
1. Touch BAKED POTATO pad
once for each 160g~180g
baked potato.
BAKED
POTATO
When you touch BAKED POTATO pad
once, "1" is displayed.
After 1.5 seconds, the display shows the
cooking time and the oven starts cooking.
* SOPAS *
• 250g Touch SOUP once.
• 350g Touch SOUP twice within 1.5 seconds.
* FRESH VEGETABLE *
• 200g Touch FRESH VEGETABLE once.
• 300g Touch FRESH VEGETABLE twice within 1.5 seconds.
NOTE: For best results, consult the cookbook.
* BAKED POTATO * (160g~180g/EA.)
• 1NO(ea.) Touch BAKED POTATO once.
• 2NO(ea.) Touch BAKED POTATO twice within 1.5 seconds.
• 3NO(ea.) Touch BAKED POTATO three times within 1.5 seconds.
NOTE: For best results, consult the cookbook.
MORE, LESS
MORE pad: adds 10 seconds to 20 seconds.
LESS pad: reduces 10 seconds to 20 seconds.
This pad only works with one touch cooking.
Always input prior to one touch sequence.
CHILD SAFETY LOCK
The safety lock prevents oven operation by small children.
To set, Press STOP/CLEAR for 3 seconds, LOCK indicator lights.
To cancel, press STOP/CLEAR for 3 seconds, LOCK indicator goes off.
TO STOP THE OVEN WHILE THE OVEN IS OPERATION
1. Press STOP/CLEAR pad.
• You can restart the oven by touching START pad.
• Touch STOP/CLEAR once more to erase all instructions.
• You must enter in new instructions.
2. Open the door.
• You can restart the oven by closing the door and touching START.
NOTE: Oven stops operating when door is opened.
15 16
MICROWAVE UTENSILS
Glass, Ceramic and China
Ovenproof glass or ceramic baking dishes are the most used microwave utensils.
Many of these items are readily available in most homes : glass measure, custard cups, mixing bowls,
covered casseroles, pie plates and round or square cake dishes. Ovenproof dinner ware is usually safe to
use in the microwave.
Do not heat or cook in glass jars or bottles.
Do not use dishes with silver, gold, platinum or other metal trim. Arcing may occur and /or the dish may
break.
Do not use delicate or stemmed glassware. Although the glass may be transparent to microwave energy,
heat from the food may cause the glassware to crack.
Plastics
Plastic dishes, cups, mugs and bowls may be used in the oven for short periods of time. None of these
should be used in the oven for prolonged periods because distortion and melting may occur.
Check manufacturer's recommendations concerning microwave safety.
Plastic wrap can be used to cover dishes in most recipes if the dish is deep enough to avoid plastic wrap
touching the food. Always vent the wrap by folding back one corner to allow excess steam to escape.
Plastic cooking bags should be slit before cooking so excess steam can escape.
Do not use wire twist ties to close the bag. Wire twist ties can cause arcing which can damage the oven.
Paper
Paper cups, wax paper, napkins, paper towels, and plates may be used for short cooking. Prolonged time
in the oven can cause paper to burn. Do not use recycled paper products, such as brown paper bags.
They contain impurities which may cause arcing and damage the oven.
Metal
Metal utensils should not be used in the oven. Metal reflects microwave energy so foods will not cook so
foods will not cook evenly.
Metal can cause arcing and damage the oven.
UTENSIL TEST Dishes that do not absorb microwave energy are best for microwave
cooking. Lock on the label to verify that particular cups, glasses, plates
are indeed suitable, especially paper goods. If you are not sure, try this
utensil test to check.
· Put the empty utensil in the microwave oven.
· Put one cup of water in a glass measure next to the empty utensil.
· Heat on HI for 1 minute.
· After 1 minute the water should be warm but the utensil should not.
If the utensil is warm, it is not suitable for microwave cooking.
CARE OF YOUR MICROWAVE OVEN
Turn the oven off before cleaning.
Keep the inside of the oven clean. When food
spatters or spilled liquids adhere to oven walls,
wipe with a damp cloth. Mild detergent may be
used if the oven gets very dirty. The use of
harsh detergent or abrasives is not
recommended.
The outside oven surface should be cleaned
with soap and water, rinsed and dried with a
soft cloth. To prevent damage to the operating
parts inside the oven, water should not be
allowed to seep into the ventilation openings.
If the Control Panel becomes wet, clean with a
soft, dry cloth. Do not use harsh detergents or
abrasives on Control Panel.
If steam accumulates inside or around the
outside of the oven door, wipe with a soft cloth.
This may occur when the microwave oven is
operated under high humidity conditions and
in no way indicates malfunction of the unit.
It is occasionally necessary to remove the
glass tray for cleaning. Wash the tray in warm
sudsy water or in a dishwasher.
1
2
3
4
5
6
7
The roller guide and oven cavity floor should
be cleaned regularly to avoid excessive noise.
Simply wipe the bottom surface of the oven
with mild detergent or window cleaner and dry.
The roller guide may be washed in mild sudsy
water or in a dishwasher.
ROLLER GUIDE
GLASS TRAY
Glass Tray
Roller Guide
The ROLLER GUIDE and oven floor should
be cleaned frequently to prevent excessive
noise.
The ROLLER GUIDE MUST ALWAYS be
used for cooking together with the Glass Tray.
DO NOT operate the oven without the Glass
Tray in place.
DO NOT use any other Glass Tray with this
oven.
If the Glass Tray is hot, ALLOW TO COOL
before cleaning or placing it in water.
DO NOT cook directly on the Glass Tray.
1
2
1
2
3
4
17 18
USE YOUR MICROWAVE OVEN SAFELY
GENERAL USE
Do not attempt to defeat or tamper with safety interlocks.
Do not place any object between the oven front frame and the door or allow residue to build up on sealing
surfaces. Wipe with a mild detergent, rinse and dry. Never use abrasive powders or pads.
Do not subject the oven ddor strain or weight such as a child hanging on an open door.
This could cause the oven to fall forward resulting in injury to you and damage to the oven.
Do not operate the oven if door seals or sealing surfaces are damaged; or if door is bent; or if hinges are
loose or broken.
Do not operate the oven empty. This will damage the oven.
Do not attempt to dry clothes, newspapers or other materials in the oven. They may catch on fire.
Do not use recycled paper products as they may contain impurities which may cause sparks or fires.
Do not hit or strike the control panel with hard objects. This can damage the oven.
FOOD
Never use your microwave oven for HOME CANNING. The oven is not designed to permit proper.
canning.
Improperly canned food may spoil and be dangerous to consume.
Always use the minimum recipe cooking time. It is better to undercook rather than over cook foods.
Undercooked foods can be returned to the oven for more cooking. If food is overcooked, nothing can be
done.
Heat small quantities of food or foods with low moisture carefully. These can quicky dry out, burn or catch
on fire.
Do not heat eggs in the shell. Pressure may build up and eggs can explode.
Potatoes, apples, egg yolks and sausages are examples of food with non-porous skins.
These must be pierced before cooking to prevent bursting.
Do not attempt to deep fat fry in your microwave oven.
Always stir liquids before heating. Heated liquids can erupt, if not mixed with air.
BEFORE YOU CALL FOR SERVICE
Refer to following checklist, you may prevent an unnecessary service call.
* The oven doesn't work;
1. Check that the power cord is securely plugged in.
2. Check that the door firmly closed.
3. Check that the cooking time is set.
4. Check for a blown circuit fuse or tripped main circuit breaker in your house.
* Sparking in the cavity;
1. Check that utensils are metal containers or dishes with metal trim.
2. Check that metal skewers touch the interior walls.
If there is still a problem, contact the service station.
A list of these stations is included in the oven.
QUESTIONS AND ANSWERS
* Q : I accidentally ran my microwave oven without any food in it. Is it damaged?
* A : Running the oven empty for a short time will not damage the oven.
However, it is not recommended.
* Q : Can the oven be used with the glass tray or roller guide removed?
* A : No. Both the glass tray and roller guide must always be used in the oven before cooking.
* Q : Can I open the door when the oven is operating?
* A : The door can be opened anytime during the cooking operatiion. Then microwave energy will be
instantly switched off and the time setting will maintain until the door is closed.
* Q : Why do I have moisture in my microwave oven after cooking?
* A : The moisture on the side of your microwave oven is normal. It is caused by steam from cooking food
hitting the cool oven surface.
* Q : Does microwave energy pass through the viewing screen in the door?
* A : No. The metal screen bounces back the energy to the oven cavity. The holes are made to allow light
to pass through. They do not let microwave energy pass through.
DO NOT ATTEMPT TO SERVICE THE OVEN YOURSELF!
5

Hulp nodig? Stel uw vraag in het forum

Spelregels

Misbruik melden

Gebruikershandleiding.com neemt misbruik van zijn services uitermate serieus. U kunt hieronder aangeven waarom deze vraag ongepast is. Wij controleren de vraag en zonodig wordt deze verwijderd.

Product:

Bijvoorbeeld antisemitische inhoud, racistische inhoud, of materiaal dat gewelddadige fysieke handelingen tot gevolg kan hebben.

Bijvoorbeeld een creditcardnummer, een persoonlijk identificatienummer, of een geheim adres. E-mailadressen en volledige namen worden niet als privégegevens beschouwd.

Spelregels forum

Om tot zinvolle vragen te komen hanteren wij de volgende spelregels:

Belangrijk! Als er een antwoord wordt gegeven op uw vraag, dan is het voor de gever van het antwoord nuttig om te weten als u er wel (of niet) mee geholpen bent! Wij vragen u dus ook te reageren op een antwoord.

Belangrijk! Antwoorden worden ook per e-mail naar abonnees gestuurd. Laat uw emailadres achter op deze site, zodat u op de hoogte blijft. U krijgt dan ook andere vragen en antwoorden te zien.

Abonneren

Abonneer u voor het ontvangen van emails voor uw Daewoo KOR-121QOS bij:


U ontvangt een email met instructies om u voor één of beide opties in te schrijven.


Ontvang uw handleiding per email

Vul uw emailadres in en ontvang de handleiding van Daewoo KOR-121QOS in de taal/talen: Engels als bijlage per email.

De handleiding is 0,06 mb groot.


U ontvangt de handleiding per email binnen enkele minuten. Als u geen email heeft ontvangen, dan heeft u waarschijnlijk een verkeerd emailadres ingevuld of is uw mailbox te vol. Daarnaast kan het zijn dat uw internetprovider een maximum heeft aan de grootte per email. Omdat hier een handleiding wordt meegestuurd, kan het voorkomen dat de email groter is dan toegestaan bij uw provider.

Stel vragen via chat aan uw handleiding

Stel uw vraag over deze PDF

Uw handleiding is per email verstuurd. Controleer uw email

Als u niet binnen een kwartier uw email met handleiding ontvangen heeft, kan het zijn dat u een verkeerd emailadres heeft ingevuld of dat uw emailprovider een maximum grootte per email heeft ingesteld die kleiner is dan de grootte van de handleiding.

Er is een email naar u verstuurd om uw inschrijving definitief te maken.

Controleer uw email en volg de aanwijzingen op om uw inschrijving definitief te maken

U heeft geen emailadres opgegeven

Als u de handleiding per email wilt ontvangen, vul dan een geldig emailadres in.

Uw vraag is op deze pagina toegevoegd

Wilt u een email ontvangen bij een antwoord en/of nieuwe vragen? Vul dan hier uw emailadres in.


Info