767426
44
Verklein
Vergroot
Pagina terug
1/174
Pagina verder
DEENITFRNLPLHUCZSKPT ES
SOLUTION Z i-FIX
User guide
UN R129/03, 100 150 cm (ca. 3 12 Y)
PT ES
2
3
DEENIT
51 | INHOUD
51 | ZAWARTOŚĆ
92 | TARTALOM
93 | OBSAH
93 | OBSAH
FRNLPLHUCZSK
134 | ÍNDICE
135 | CONTEÚDO
ESPT
6 | INHALT
7 | CONTENT
7 | ARGOMENTI
50 | SOMMAIRE
Kurzanleitung
Short instruction
Sommario
Instructions résumées
Stručný návod
Resumen de instrucciones
Manual reduzido
Korte handleiding
Instrukcja skrócona
Rövid tájékoztató
Zkrácený návod
CLICK!
7 8
3
11
12 13 14 1615
4 5
CLICK!
MAX
1 2
610
1800
4
EN - WARNING! Without the approval of the certication o󰀩ce, the child seat may not be modied or added to in any way. Repairs may only be
performed by person authorised to this e󰀨ect. Only original parts and accessories may be used for repairs. Failure to comply with the above will result
in the protective function of the child seat no longer being guaranteed.
WARNING! The child seat only o󰀨ers optimum protection for your child if you follow the usage instructions precisely.
DE - WARNUNG! Ohne Genehmigung der Zulassungsstelle dürfen keine Veränderungen am Kindersitz vorgenommen und keine Ergänzungen
hinzugefügt werden. Reparaturen dürfen ausschließlich durch Personen vorgenommen werden, die hierfür autorisiert sind. Dabei dürfen stets nur
original Bau- und Zubehörteile verwendet werden. Die Schutzfunktion des Kindersitzes ist sonst nicht mehr gewährleistet.
WARNUNG! Der Kindersitz bietet nur dann den bestmöglichen Schutz für Ihr Kind, wenn Sie die Gebrauchsanweisung genau befolgen.
FR - ATTENTION ! Ce siège auto ne saurait être modié sans l’autorisation préalable de l’organisme de certication compétent. Toute réparation ne
peut être e󰀨ectuée que par une personne habilitée. Seuls des pièces détachées et des accessoires d’origine peuvent être utilisés. Toute entorse aux
règles précitées compromettra la fonction de protection du siège auto.
ATTENTION ! Le siège auto n’o󰀨re une protection optimale que si vous suivez précisément les instructions d’utilisation.
NL - BELANGRIJK! Zonder de goedkeuring van het certiceringsinstelling mag het autostoeltje niet worden aangepast en mag er niets aan worden
toegevoegd. Reparaties mogen alleen worden uitgevoerd door personen die daartoe bevoegd zijn. Er mogen uitsluitend originele onderdelen en
accessoires worden gebruikt voor reparaties. Niet-naleving van het bovenstaande heeft tot gevolg dat de beschermende functie van het autostoeltje
niet langer gegarandeerd is.
BELANGRIJK! Het autostoeltje biedt uw kind alleen optimale bescherming als u de handleiding precies volgt.
PL - OSTRZEŻENIE! Bez zgody instytucji certykującej produkt, fotelik nie może być w żaden sposób modykowany lub zmieniany. Naprawy
dokonuje tylko specjalnie upoważniona do tego osoba. Tylko oryginalne części i akcesoria mogą być użyte do naprawy. Niezastosowanie się do tych
zasad może spowodować utratę funkcji ochronnej fotelika oraz utratę gwarancji.
OSTRZEŻENIE! Fotelik zapewnia optymalną ochronę tylko w przypadku postępowania zodnie z instrukcją.
IT - ATTENZIONE! Senza l’approvazione dell’u󰀩cio di certicazione il seggiolino non può subire modiche o aggiunte di alcun genere. Eventuali
riparazioni dovranno essere e󰀨ettuate solo da persone autorizzate, utilizzando soltanto componenti ed accessori originali. Il mancato rispetto di
quanto sopra avrà come conseguenza il termine della garanzia della funzione protettiva del seggiolino.
ATTENZIONE! Il seggiolino o󰀨re la protezione ottimale per il bambino solo qualora vengano seguite precisamente le istruzioni per l’uso.
HU - FIGYELMEZTETÉS! A hitelesítő intézet jóváhagyása nélkül a terméken semmilyen módosítás nem végezhető. Javítást csak az erre
felhatalmazott személy végezhet. Kizárólag eredeti alkatrészek és tartozékok használhatók javításhoz. A fentiek be nem tartásával már nem
garantálható a gyermekülés védelmi funkciója.
FIGYELMEZTETÉS! A gyermekülés akkor nyújt megfelelő védelmet gyermekének, ha pontosan követi a használati utasításokat.
5
CZ - VAROVÁNÍ! Bez povolení certikačního úřadu nesmí být autosedačka jakkoliv upravována. Opravy mohou provádět pouze autorizované osoby.
K opravám lze používat pouze originální náhradní díly a příslušenství. Při nedodržení výše uvedených podmínek nelze zaručit ochrannou funkci
dětské autosedačky.
VAROVÁNÍ! Dětská autosedačka poskytuje Vašemu dítěti optimální ochranu pouze při důkladném dodržení pokynů k použití.
SK - VAROVANIE! Bez povolenia certikačného úradu nesmie byť autosedačka akokoľvek upravovaná. Opravy môžu vykonávať len autorizované
osoby. K opravám možné používať len originálne náhradné diely a príslušenstvo. Pri nedodržaní vyššie uvedených podmienok nemožno zaručiť
ochrannú funkciu detskej autosedačky.
VAROVANIE! Detská autosedačka poskytuje Vášmu dieťaťu optimálnu ochranu len pri dôkladnom dodržaní pokynov na použitie.
ES - ¡ATENCIÓN! La silla de auto no puede ser modicada ni se le pueden añadir componentes sin la aprobación de la ocina de certicación. Las
reparaciones las realizará únicamente una persona autorizada para ello. Sólo se utilizarán recambios y accesorios originales en las reparaciones. El
incumplimiento de lo expuesto anteriormente resultará en la pérdida de cobertura por garantía sobre la silla.
¡ATENCIÓN! La silla de coche solo ofrece una protección óptima para su hijo si sigue las instrucciones de uso de forma precisa.
PT - ATENÇÃO! Sem expressa autorização, a cadeira infantil não poderá ser modicada de nenhuma maneira. As reparações só podem ser feitas
por pessoas autorizadas para este efeito. Apenas partes e acessórios originais devem ser utilizados nas reparações. Não ir de encontro ao descrito
anteriormente irá fazer com que a proteção da criança não possa ser assegurada.
ATENÇÃO! A cadeira auto só oferece proteção ótima para a criança quando segue todas as instruções corretamente.
6
ZULASSUNG
CYBEX Solution Z i-Fix
UN R129/03
Größe: 100 – 150 cm
Alter: ca. 3 – 12 Jahre
Nur geeignet für Fahrzeugsitze
mit Dreipunkt-Automatik-Gurt,
die nach UN Regelung Nr. R16
oder gleichwertigem Standard
zugelassen sind.
HOMOLOGATION
CYBEX Solution Z i-Fix
UN R129/03
Size range: 100 – 150 cm
Age: approx. 3 – 12 years
Only suitable for vehicle seats
with automatic three-point belts,
approved in accordance with
UN regulation no. R16 or a
comparable standard.
OMOLOGAZIONE
CYBEX Solution Z i-Fix
UN R129/03
Gamma di altezza: 100 – 150 cm
Età: dai 3 ai 12 anni circa
Adatto soltanto per veicoli con
sedili dotati di cinture di sicurezza
automatiche a 3 punti omologate
ECE R16 o standard equivalente
SEHR GEEHRTE KUNDIN, SEHR GEEHRTER KUNDE!
Solution Z i-Fix
Vielen Dank, dass Sie sich bei der Wahl eines Kindersitzes
für den Solution Z i-Fix entschieden haben. Bei der
Entwicklung des Kindersitzes standen Sicherheit, Komfort
und Bedienfreundlichkeit im Vordergrund. Das Produkt wird
unter besonderer Qualitätsüberwachung hergestellt und erfüllt
strengste Sicherheitsanforderungen.
HINWEIS! Bewahren Sie die Anleitung immer gri󰀨bereit in
dem dafür vorgesehenen Fach am Kindersitz auf.
HINWEIS! Durch länderspezische Anforderungen
(z.B. Farbkennzeichnungen am Kindersitz) können
Produktmerkmale in ihrer äußeren Erscheinung variieren. Die
korrekte Funktionsweise des Produktes wird davon jedoch
nicht beeinusst.
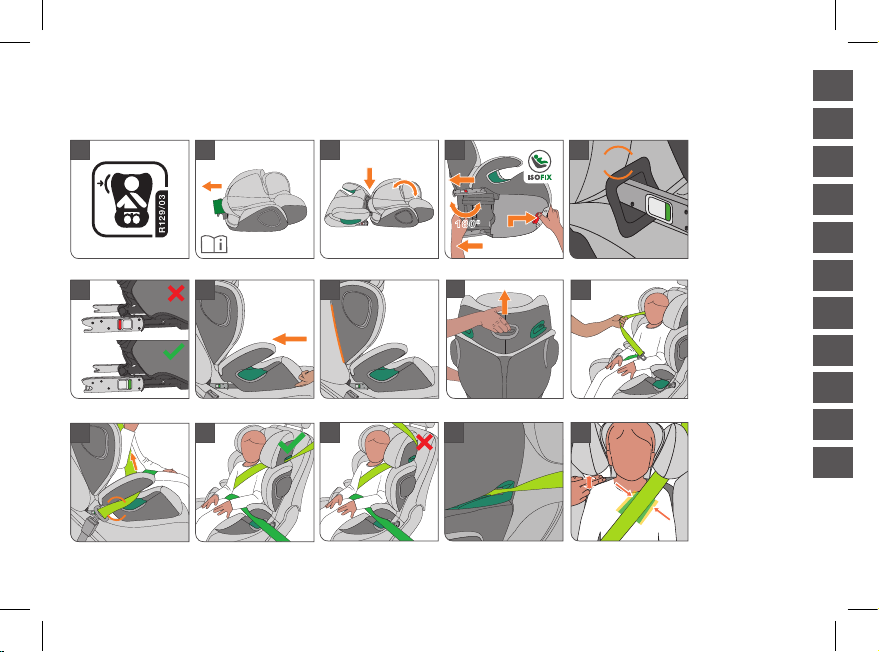
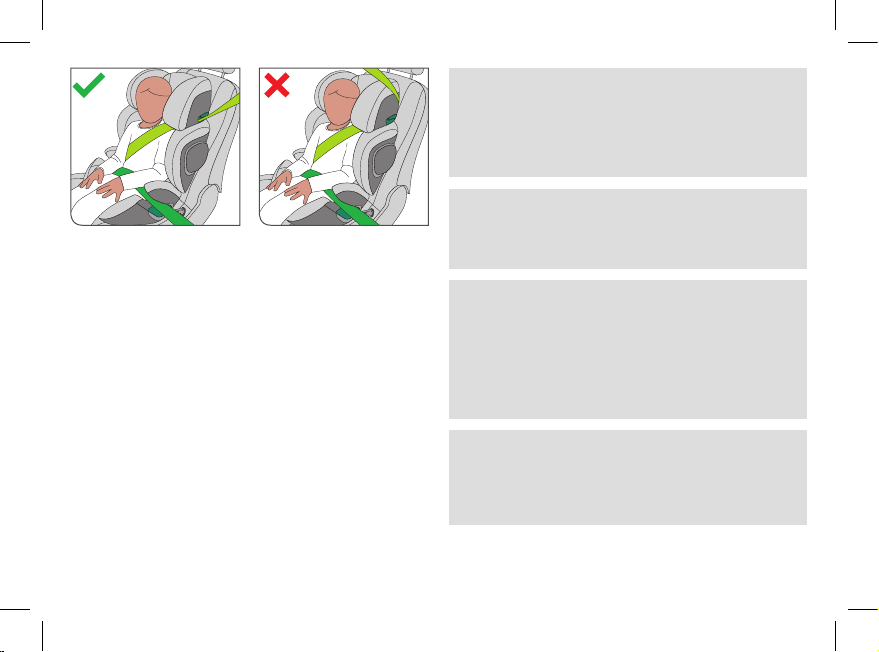
HINWEIS! Der Dreipunktgurt darf nur durch die dafür
vorgesehenen Führungen verlaufen. Die Gurtführung wird
in diesem Handbuch genau beschrieben und ist zudem am
Kindersitz grün markiert.
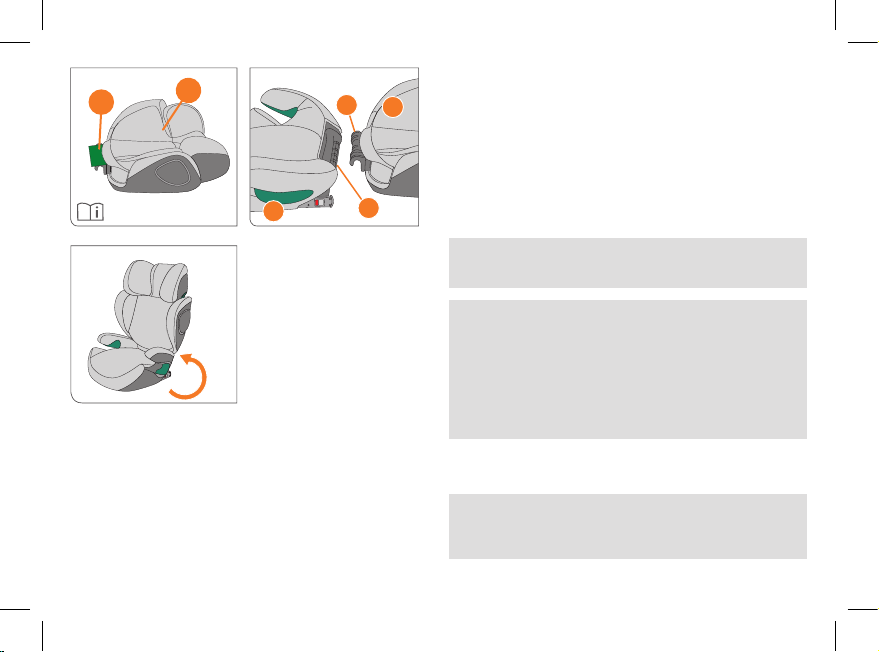
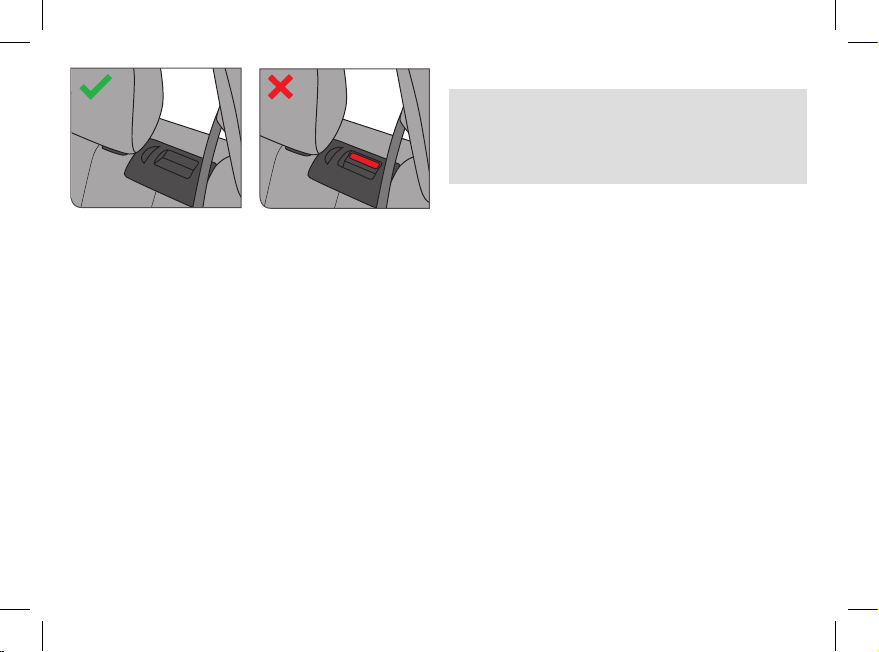
HINWEIS! Es ist möglich, den Kindersitz ohne „Linear Side-
Impact Protection“-System (L.S.P.) zu verwenden. Dieses
kann abgenommen werden, um mehr Platz im Fahrzeug zu
scha󰀨en. Zum Abnehmen des „Linear Side-Impact Protection“-
Systems (L.S.P.) siehe Kapitel: „DER RICHTIGE PLATZ IM
FAHRZEUG“.
!WARNUNG! Damit Ihr Kind richtig geschützt werden
kann, ist es unbedingt notwendig, den Kindersitz so zu
verwenden, wie es in dieser Anleitung beschrieben wird.
SOLUTION Z I-FIX
Specific Vehicle
Booster Seat
100-150 cm
030036
UN Regulation
No. 129/03
Cybex GmbH
Riedingerstr. 18, 95448 Bayreuth
Germany
7
DEENIT
Thank you for buying the Solution Z i-Fix. We can assure
you that safety, comfort and ease of use were our highest
priorities when developing the car seat. This product is
manufactured under exceptional quality control and meets the
strictest safety requirements.
Grazie per avere scelto Solution Z i-Fix. Le assicuriamo che
nel progettare il seggiolino auto i nostri principali obiettivi sono
stati la sicurezza, il comfort e la facilità di utilizzo. Il prodotto
è stato elaborato sotto uno stretto controllo qualitativo e
risponde ai più severi standard di sicurezza.
NOTE! Always keep this Instruction Manual at hand in the
compartment that has been provided for that purpose on the
car seat.
NOTA BENE! Raccomandiamo di tenere il manuale sempre
a portata di mano e di conservarlo nell’apposito alloggiamento
del seggiolino.
NOTE! Due to country-specic requirements (e.g. colour
labelling on the car seat), the product features may vary in
their external appearance. This, however, does not a󰀨ect the
correct functioning of the product.
NOTA BENE! In base alle diverse normative nazionali
l’aspetto di alcune caratteristiche del prodotto potrebbe
di󰀨erire (es. colori delle etichette sul seggiolino). Ciò tuttavia
non inuisce sul corretto funzionamento del prodotto.
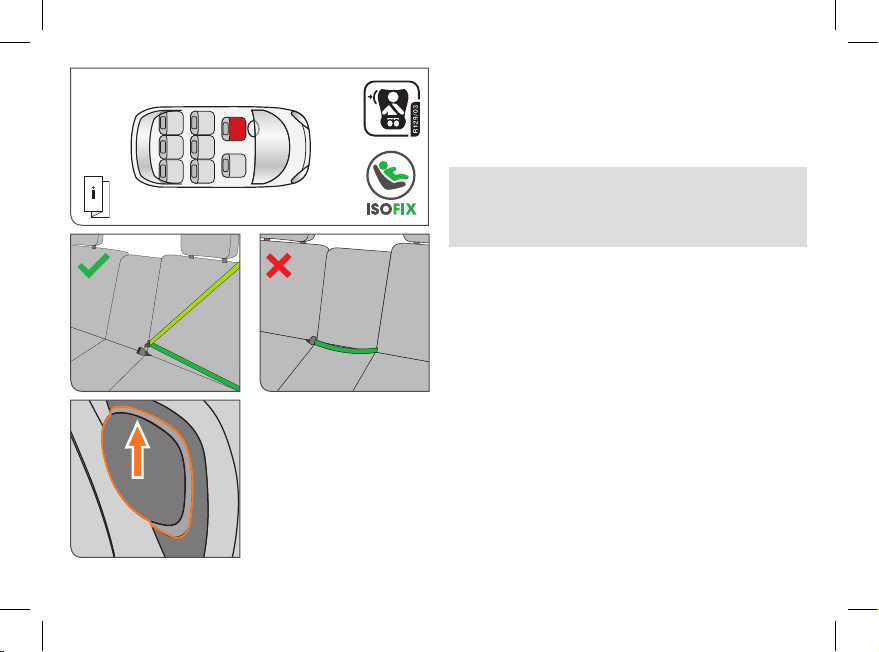
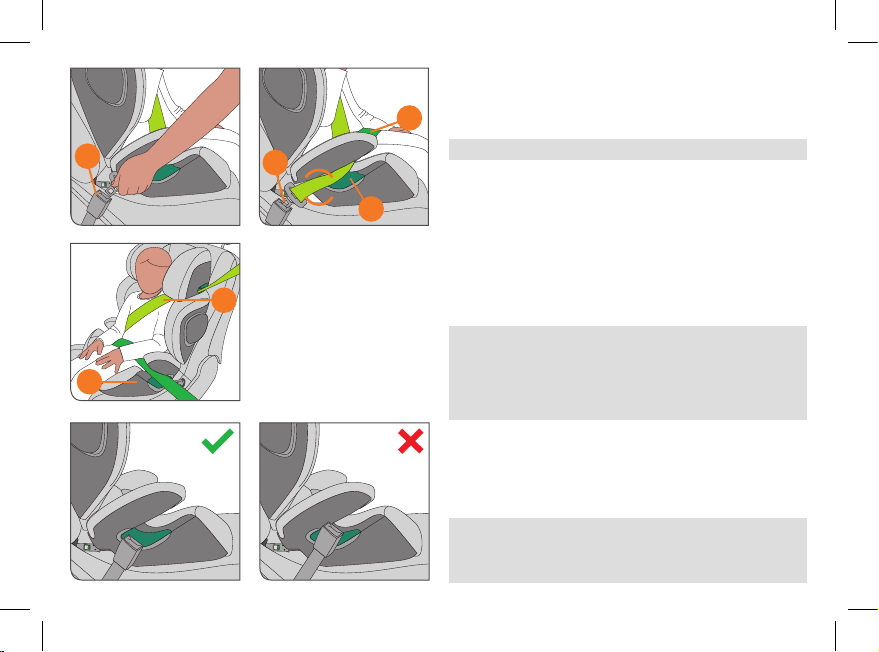
NOTE! The three-point belt must only be passed through the
designated routings. The belt routings are described in detail
in this manual and are marked in green on the car seat.
NOTE! You can use the car seat without the “Linear Side-
Impact Protection” System (L.S.P.). It can be detached to
gather more space in the vehicle. For detaching the “Linear
Side-Impact Protection” System (L.S.P.) see chapter:
“CORRECT POSITION IN THE VEHICLE”.
NOTA BENE! La cintura automatica a tre punti deve
passare attraverso le guide designate. Le guide per la cintura
sono descritte in dettaglio nel presente manuale e sono
contrassegnate in verde sul seggiolino.
NOTA BENE! Il seggiolino può essere utilizzato senza
sistema di protezione lineare negli impatti laterali (Linear
Side-Impact Protection, L.S.P.), il quale può essere smontato
per ottenere più spazio nel veicolo. Per la rimozione del
sistema L.S.P., vedere il capitolo: “POSIZIONE CORRETTA
NEL VEICOLO”.
DEAR CUSTOMER! GENTILE CLIENTE,
!WARNING! In order to keep your child properly
protected it is absolutely essential that you use the car
seat as described in this manual.
!ATTENZIONE! Per la massima sicurezza del bambino
è essenziale usare il seggiolino secondo quanto
descritto in questo manuale.
8
INHALTDE
KURZANLEITUNG ...................................................................................................... 3
ZULASSUNG ................................................................................................................6
ERSTMONTAGE .......................................................................................................10
ZUM SCHUTZ DES FAHRZEUGS .........................................................................12
DER RICHTIGE PLATZ IM FAHRZEUG................................................................14
SICHERHEIT IM FAHRZEUG .................................................................................20
EINBAU DES KINDERSITZES INS FAHRZEUG.................................................22
EINBAU DES KINDERSITZES MIT ISOFIX .........................................................24
AUSBAU DES KINDERSITZES AUS DEM FAHRZEUG ....................................26
ANPASSEN AN DIE KÖRPERGRÖSSE ............................................................... 28
EINSTELLEN DER NEIGUNGSVERSTELLBAREN KOPFSTÜTZE ...............30
ANSCHNALLEN MITTELS FAHRZEUGGURT .................................................... 32
IST IHR KIND RICHTIG GESICHERT? ................................................................. 34
ENTFERNEN DES SITZBEZUGS ..........................................................................36
REINIGUNG................................................................................................................38
PFLEGE.......................................................................................................................40
VERHALTEN NACH EINEM UNFALL .................................................................... 40
PRODUKTINFORMATION.......................................................................................42
PRODUKTLEBENSDAUER .................................................................................... 42
ENTSORGUNG ......................................................................................................... 44
GARANTIEBESTIMMUNGEN .................................................................................46
9
DEENIT
CONTENTEN
SHORT INSTRUCTION .............................................................................................. 3
HOMOLOGATION ....................................................................................................... 6
FIRST INSTALLATION.............................................................................................. 11
PROTECTING THE VEHICLE ................................................................................13
CORRECT POSITION IN THE VEHICLE..............................................................15
SAFETY IN THE VEHICLE ...................................................................................... 21
INSTALLING THE CAR SEAT IN THE VEHICLE ................................................. 23
INSTALLING THE CAR SEAT WITH ISOFIX SYSTEM ......................................25
REMOVING THE CAR SEAT FROM THE VEHICLE ..........................................27
ADJUSTING TO THE BODY SIZE .........................................................................29
ADJUSTING THE RECLINING HEADREST ........................................................ 31
STRAPPING WITH VEHICLE SEAT BELT ...........................................................33
IS YOUR CHILD CORRECTLY SECURED? ........................................................35
REMOVING THE SEAT COVER .............................................................................37
CLEANING .................................................................................................................. 39
PRODUCT CARE ......................................................................................................41
WHAT TO DO AFTER AN ACCIDENT ...................................................................41
PRODUCT INFORMATION .....................................................................................43
PRODUCT LIFESPAN ..............................................................................................43
DISPOSAL .................................................................................................................. 45
WARRANTY................................................................................................................ 47
IT
SOMMARIO .................................................................................................................. 3
OMOLOGAZIONE ....................................................................................................... 6
PRIMA INSTALLAZIONE.......................................................................................... 11
PER LA SAVAGUARDIA DELL’AUTO .................................................................... 13
LA POSIZIONE CORRETTA NELL’AUTO ............................................................. 15
SICUREZZA NELL’AUTO .........................................................................................21
INSTALLAZIONE DEL SEGGIOLINO ....................................................................23
INSTALLAZIONE CON IL SISTEMA ISOFIX ........................................................ 25
RIMOZIONE DEL SEGGIOLINO DALL’AUTO ..................................................... 27
REGOLAZIONE IN BASE ALLA CORPORATURA ............................................. 29
REGOLARE LA RECLINAZIONE DEL POGGIATESTA ...............................31
ALLACCIARE IL BAMBINO CON LA CINTURA ................................................... 33
IL BAMBINO È POSIZIONATO CORRETTAMENTE? ........................................ 35
RIMOZIONE DEL RIVESTIMENTO .......................................................................37
PULIZIA .......................................................................................................................39
CURA DEL PRODOTTO...........................................................................................41
COSA FARE A SEGUITO DI UN INCIDENTE ...................................................... 41
INFORMAZIONI SUL PRODOTTO ........................................................................ 43
DURATA DEL PRODOTTO ......................................................................................43
SMALTIMENTO ..........................................................................................................45
GARANZIA .................................................................................................................. 47
ARGOMENTI
10
ERSTMONTAGE
Der Kindersitz besteht aus einem Sitzkissen (1) und
einer Rückenlehne (2). Die Rückenlehne verfügt über
eine höhenverstellbare Kopfstütze mit integrierter
Schulterbreitenverstellung. Nur die Kombination von
Sitzkissen und Rückenlehne bietet Ihrem Kind den
bestmöglichen Schutz und Komfort.
HINWEIS! Bitte bewahren Sie die Gebrauchsanweisung
immer in der dafür vorgesehenen Tasche (3) auf der
Vorderseite des Sitzes auf.
!WARNUNG! Stellen Sie sicher, dass Sie diese
Gebrauchsanweisung sorgfältig lesen, verstehen und
befolgen.
!WARNUNG! Die Bestandteile des CYBEX Solution
Z i-Fix dürfen weder einzeln noch in Verbindung mit
Sitzkissen, Rückenlehnen oder Kopfstützen anderer
Hersteller oder anderer Baureihen verwendet werden.
Die Zulassung würde in solch einem Fall sofort
erlöschen. Eine Fehlanwendung kann zu ernsthaften
bis hin zu tödlichen Verletzungen des Kindes führen.
Bitte bewahren Sie diese Gebrauchsanweisung zur
zukünftigen Verwendung auf.
!WARNUNG! Achten Sie immer darauf, dass die
Einzelteile des Kindersitzes niemals gestaucht
oder eingeklemmt werden (z.B. beim Schließen der
Fahrzeugtür oder beim Verstellen der Rückbank).
Die Rückenlehne (2) wird mit der Führungsnase (4) auf der
Achse (5) des Sitzkissens (1) eingehakt.
3
2
1
2
4
5
11
DEENIT
FIRST INSTALLATION PRIMA INSTALLAZIONE
The car seat consists of a booster seat (1) and a backrest (2).
The backrest integrates a combined height-adjustment of the
headrest and width-adjustment of the shoulder parts. Only
the combination of booster seat and backrest provides best
protection and comfort to your child.
Il seggiolino auto comprende una seduta (1), e uno
schienale (2). Lo schienale è dotato di un sistema integrato
di regolazione dell’altezza del poggiatesta e di regolazione
dell’ampiezza della zona spalle. Solo la combinazione di
rialzo e schienale o󰀨re la migliore protezione e il miglior
comfort per il bambino.
Connect the backrest (2) to the booster (1) by hooking the
guide lug (4) on the axis (5) of the booster (1).
Collegare lo schienale (2) alla seduta (1) agganciando la
guida (4) all’asse (5) della seduta (1).
NOTE! Please keep the instruction manual close by for future
reference by storing it in the pocket (3) in the front of the seat.
NOTA BENE! Tenere sempre a portata di mano queste
istruzioni e conservarle nell’apposita tasca (3) davanti al
seggiolino.
!WARNING! Make sure to read, understand and follow
the instruction manual.
!WARNING! The parts of the CYBEX Solution Z i-Fix
must not be used alone or in combination with boosters,
backrests or headrests from other manufacturers or
from different product series. In such instances, the
certification expires immediately. Misapplication can
lead to serious injury or death of your child. Please keep
these instructions for future reference.
!ATTENZIONE! Assicuratevi di leggere, capire e seguire
scrupolosamente le istruzioni contenute in questo
manuale.
!ATTENZIONE! Le parti del seggiolino CYBEX Solution
Z i-FIX non devono essere modificate, usate da sole o
in combinazione con sedute, schienali o poggiatesta
di altri produttori o di altri modelli . In tali circostanze,
l’omologazione perde automaticamente validità. Un uso
scorretto del prodotto può portare a gravi lesioni, anche
fatali, per il bambino. Tenere le istruzioni a portata di
mano per riferimento futuro.
!WARNING! Always ensure that the individual
components of the child seat are never compressed
or jammed (e.g. by jamming in the car door or when
adjusting the back seat).
!ATTENZIONE! Verificare sempre che le singole parti
del seggiolino non siano mai bloccatie o compresse (ad
esempio tra la portiera dell’auto o durante la regolazione
del sedile).
12
ZUM SCHUTZ DES FAHRZEUGS
An einigen Autositzen aus empndlichem Material
(z.B. Velours, Leder, etc.) können durch die Benutzung
von Kindersitzen mögliche Gebrauchsspuren und/oder
Abfärbungen auftreten. Um das zu vermeiden, können Sie
z.B. eine Decke oder ein Handtuch unterlegen. Ferner weisen
wir in diesem Zusammenhang auf unsere Reinigungshinweise
hin, die vor der ersten Verwendung des Kindersitzes
unbedingt beachtet werden sollten.
13
DEENIT
Traces of use and/or discoloration can appear on some
vehicle seats made from delicate materials (e.g. velour,
leather, etc.) if car seats are used. You can avoid this by
putting, e.g. a blanket or a towel underneath the car seat. In
this context also see our cleaning directions. It is essential
that these are followed before the rst use of the car seat.
L’uso del seggiolino in auto con sedili realizzati in materiali
delicati (come velluto, pelle, ecc.) può lasciare tracce e/o
causare scoloriture. Questo è evitabile utilizzando ad esempio
un telo o un asciugamano sotto al seggiolino. A riguardo,
vedere anche le istruzioni per la pulizia: è essenziale seguire
quanto in esse indicato prima dell’uso del seggiolino.
PROTECTING THE VEHICLE PER LA SAVAGUARDIA DELL’AUTO
14
DER RICHTIGE PLATZ IM FAHRZEUG
!WARNUNG! Der Sitz ist nicht für die Verwendung mit
einem 2-Punkt- oder Beckengurt geeignet. Wird der Sitz
mit einem 2-Punkt-Gurt gesichert, kann es bei einem
Unfall zu schweren oder gar tödlichen Verletzungen des
Kindes kommen.
Der Kindersitz ist auf Fahrzeugplätzen verwendbar, die
mit einem Dreipunkt-Automatikgurt ausgestattet sind.
Zugelassene Fahrzeuge und Sitzpositionen entnehmen Sie
bitte der beigelegten Fahrzeugtypenliste. Die aktuelle Version
erhalten Sie auf www.cybex-online.com.
Auch ohne „Linear Side-Impact Protection“-System (L.S.P.) ist
der Seitenaufprallschutz gewährleistet.
Für optimalen Schutz, empfehlen wir jedoch das „Linear Side-
Impact Protection“-System (L.S.P.) möglichst immer zu nutzen.
HINWEIS! Ab einer Körpergröße von 135 cm kann die
Kompatibilität des SOLUTION Z i-FIX mit ihrem Fahrzeug
eventuell eingeschränkt sein. Bitte vergewissern Sie
sich anhand der Fahrzeugtypenliste, ob der Sitz in allen
Kopfstützenpositionen uneingeschränkt verwendbar ist.
Falls Ihr Fahrzeug nicht genug Platz bietet, kann das „Linear
Side-Impact Protection“-System (L.S.P.) abmontiert werden,
in dem Sie dieses nach oben schieben und somit aus seiner
Verankerung lösen.
Falls Ihr Fahrzeug nicht über ISOFIX Anbindungspunkte
verfügt, besteht jederzeit die Möglichkeit den SOLUTION Z
i-FIX mit eingeklappten ISOFIX Rastarmen zu verwenden.
L
.
S
.
P
.
S
Y
S
T
E
M
15
DEENIT
CORRECT POSITION IN THE VEHICLE LA POSIZIONE CORRETTA NELL’AUTO
!WARNING! The car seat is not suitable for use with a
two-point or lap belt. If the seat is secured using a two-
point belt, an accident may result in severe or even fatal
injuries to the child.
!ATTENZIONE! Il seggiolino non può essere installato
con cinture a due punti o soltanto con quella ventrale.
Gli incidenti possono causare lesioni gravi o mortali al
bambino in caso installazione con una cintura a due
punti.
The child seat can be used on vehicle seats which are
equipped with an automatic three point belt. Please refer
to the enclosed vehicle type list for approved vehicles.
You can obtain the latest version from www.cybex-online.com.
Il seggiolino per bambini può essere utilizzato sui sedili
del veicolo dotati di cintura automatica a tre punti. Fare
riferimento all‘elenco delle tipologie di veicoli allegato per
conoscere i veicoli approvati. La versione più aggiornata della
lista è disponibile nel nostro sito al link: www.cybex-online.com.
In case your car does not o󰀨er enough space, you can detach
the “Linear Side-Impact Protection”- System (L.S.P.) by
pushing it upwards to release it from its anchorage points.
Nel caso in cui l‘auto non o󰀨ra spazio su󰀩ciente, è possibile
smontare il sistema di protezione lineare negli impatti laterali
(Linear Side-Impact Protection, L.S.P.) spingendolo verso
l‘alto per rilasciarlo dai punti di ancoraggio.
NOTE! Above a child‘s stature of 135 cm, the compatibility
between the SOLUTION Z i-FIX and your vehicle might be
reduced. Please review the vehicle type list to check
whether the child seat can be used in all headrest
positions without restrictions.
NOTA BENE! Per bambini di altezza superiore ai 135 cm, la
compatibilità tra la SOLUZIONE Z i-FIX e il veicolo potrebbe
essere ridotta. Controllare l‘elenco dei tipi di veicolo per
vericare se il seggiolino per bambini può essere utilizzato in
tutte le posizioni del poggiatesta senza restrizioni.
However, for optimized safety, we strongly recommend to
keep the “Linear Side-Impact Protection“ System (L.S.P.) on
the seat whenever possible.
Tuttavia, per una sicurezza ottimizzata, consigliamo
vivamente di mantenere il sistema L.S.P. sul seggiolino
quando possibile.
Even without the “Linear Side-Impact Protection” System
(L.S.P.), a side impact protection is ensured.
Anche senza il sistema L.S.P., la protezione contro gli impatti
laterali è garantita.
In case your car is not equipped with ion points, there is
always the possibility to use the SOLUTION Z i-FIX with
retracted ISOFIX locking arms.
Nel caso in cui l‘auto non sia dotata di punti di connessione
ISOFIX, è sempre possibile utilizzare la SOLUZIONE Z i-FIX
con i bracci di bloccaggio ISOFIX ritratti.
16
In Ausnahmefällen kann der Kindersitz auch vorne am
Beifahrersitz verwendet werden. Beachten Sie dabei die
folgenden Punkte:
Bei Fahrzeugen mit Airbag sollten Sie den Beifahrersitz
so weit wie möglich nach hinten schieben. Beachten Sie
jedoch, dass der obere Gurtpunkt des Fahrzeuggurtes
hinter der Gurtführung des Kindersitzes bleibt.
Die Empfehlungen des Fahrzeugherstellers sind unbedingt
zu befolgen.
17
DEENIT
In exceptional cases, the car seat may also be used on the
front passenger seat. Please note the following in this case:
In cars with airbags, you should push the passenger seat
back as far as possible. When doing so, however, ensure
that the upper belt point of the safety belt is behind the belt
feed point of the car seat.
Always comply with the recommendations of the vehicle
manufacturer.
In casi eccezionali, il seggiolino può essere utilizzato anche
sul sedile del passeggero anteriore. In questo caso tenere
conto di quanto segue:
Nelle auto dotate di airbag il sedile del passeggero va spinto
il più indietro possibile. Nel fare ciò accertarsi però che il
punto di snodo superiore della cintura di sicurezza si trovi
dietro alla guida della cintura del seggiolino.
Rispettare sempre le raccomandazioni del costruttore del
veicolo.
18
!WARNUNG! Der Diagonalgurt muss schräg nach
hinten verlaufen und darf nie nach vorn zum oberen
Gurtpunkt in Ihrem Fahrzeug führen. Sollte dies nicht
einzustellen sein, z.B. durch Vorschieben des Autositzes
oder Verwendung auf einem anderen Sitzplatz, so ist
der Kindersitz für dieses Fahrzeug nicht geeignet. Im
Zweifelsfall wenden Sie sich an den Kindersitzhersteller.
!WARNUNG! Gepäckstücke oder andere Gegenstände
im Fahrzeug, welche bei einem Unfall Verletzungen
verursachen können, müssen immer gut befestigt
werden. Sie können zu tödlichen Geschossen im
Fahrzeug werden.
!WARNUNG! Auf Fahrzeugplätzen, die quer zur
Fahrtrichtung angeordnet sind, ist die Verwendung
des Sitzes nicht zulässig. Auf rückwärtsgerichteten
Fahrzeugsitzen, wie z.B. in einem Van oder Minibus, ist
die Verwendung zulässig, sofern der Fahrzeugsitz für
die Beförderung eines Erwachsenen zugelassen ist. Zu
beachten ist, dass die Kopfstütze des Fahrzeugs bei
Nutzung auf rückwärtsgerichteten Fahrzeugsitzen nicht
entfernt werden darf!
!WARNUNG! Bitte lassen Sie Ihr Kind nie
unbeaufsichtigt im Fahrzeug zurück. Die Teile des
Kindersitzes heizen sich in der Sonne auf. Ihr Kind
kann sich daran verbrennen. Schützen Sie Ihr Kind und
den Kindersitz vor intensiver Sonneneinstrahlung (z.B.
indem Sie ein helles Tuch über den Sitz legen).
19
DEENIT
!WARNING! The diagonal belt must run back at a
recline and must never run forward to the upper belt
point in your vehicle. If it is not possible to adjust the
seat in this way, e.g. by pushing the car seat forward
or using it on another seat, this car seat is not suitable
for your vehicle. Contact the car seat manufacturer if
in doubt.
!WARNING! Luggage or other objects present in the
vehicle that may cause injury in the event of an accident
must always be firmly secured. Otherwise, they may be
thrown, causing fatal injuries.
!ATTENZIONE! La cintura diagonale deve scorrere
all’indietro e mai in avanti rispetto al punto di aggancio
superiore del veicolo. Nel caso non sia possibile
regolare il sedile in questo modo, ad esempio spingendo
avanti il sedile o usando un altro sedile, il seggiolino non
sarà adatto all’uso in questo veicolo. In caso di dubbio
consultare il produttore del seggiolino.
!ATTENZIONE! Bagagli o altri oggetti presenti nel
veicolo che possono causare lesioni in caso di incidente
devono essere fissati saldamente. In caso contrario
potrebbero essere scagliati e causare lesioni mortali.
!WARNING! The car seat may not be used on vehicle
seats facing to the side of the direction of travel. Use of
the car seat is permitted on rearfacing seats, e.g. in a
van or minibus, provided that the seat is permitted for
transporting an adult. It is essential to ensure that the
vehicle headrest is not removed when the child seat is
installed in a rearward facing vehicle seat.
!ATTENZIONE! Il seggiolino non è utilizzabile sui sedili
rivolti lateralmente rispetto alla direzione di marcia.
L’uso del seggiolino è ammesso sui sedili rivolti contro
il senso di marcia, ad esempio nei minibus, a patto che
il sedile sia abilitato al trasporto di adulti. E’ importante
che il poggiatesta del sedile non venga rimosso quando
il seggiolino è installato su sedili rivolti contro il senso
di marcia.
!WARNING! Never leave your child unattended in the
car. The parts in the child restraint system heat up in
sun and the child may sustain burns. Protect your child
and the car seat from direct sun exposure (e.g. by
covering it with a light colored cloth).
!ATTENZIONE! Non lasciare mai il bambino incustodito
nell’auto. Le parti del seggiolino tendono a riscaldarsi
se esposte al sole diretto con pericolo di scottature per
il bambino. Proteggere il bambino ed il seggiolino da
un’eccessiva esposizione al sole diretto (per esempio
stendendo un telo chiaro sopra il seggiolino).
20
SICHERHEIT IM FAHRZEUG
Achten Sie zum Schutz aller Fahrzeuginsassen stets darauf,
dass …
die umklappbaren Rückenlehnen der Fahrzeugsitze
eingerastet sind und sich in einer aufrechten Position
benden.
bei Einbau des Kindersitzes auf dem Beifahrersitz dieser in
der hintersten Position steht.
im Fahrzeug alle beweglichen Gegenstände gesichert sind.
alle Personen im Fahrzeug angeschnallt sind.
!WARNUNG! Der Kindersitz muss, auch dann
wenn er nicht benutzt wird, immer korrekt mit dem
Fahrzeuggurt im Fahrzeug befestigt sein. Bereits
bei einer Notbremsung oder einem geringen Aufprall
können unbefestigte Teile andere Mitfahrer und Sie
selbst verletzen.
21
DEENIT
SAFETY IN THE VEHICLE SICUREZZA NELL’AUTO
In order to guarantee the best possible safety for all
passengers make sure that …
Per garantire la massima sicurezza di tutti i passeggeri
nell’auto è indispensabile vericare che …
foldable backrests in the vehicle are locked in their upright
position.
when installing the car seat on the front passenger seat,
adjust the vehicle seat in rearmost position.
you properly secure all objects likely to cause injury in the
case of an accident.
all passengers in the vehicle are buckled up.
gli schienali reclinabili siano ben ssati e nella posizione
eretta
nel caso il seggiolino sia installato sul sedile passeggero
anteriore, vericare che questo si trovi nella posizione più
arretrata possibile.
tutti gli oggetti che potrebbero costituire pericolo in caso di
incidente siano ssati in modo adeguato
tutti i passeggeri abbiano le cinture allacciate.
!WARNING! The car seat must always be secured
correctly with the vehicle belt in the vehicle even when
not in use. In case of an emergency brake or accident,
an unsecured car seat may injure other passengers or
yourself.
!ATTENZIONE! Il seggiolino deve sempre essere
allacciato con la cintura di sicurezza dell’auto, anche
quando non utilizzato. In caso di brusche frenate o
di incidente, un seggiolino non fissato può ferire i
passeggeri o il guidatore.
22
EINBAU DES KINDERSITZES INS FAHRZEUG
Stellen Sie den Kindersitz auf den entsprechenden
Fahrzeugsitz im Auto.
Achten Sie unbedingt darauf, dass die Rückenlehne
des Kindersitzes vollächig an der Rückenlehne des
Fahrzeugsitzes anliegt.
Sollte die Kopfstütze des Fahrzeuges störend sein, ziehen
Sie diese ganz heraus oder nehmen Sie diese ganz ab
(zu beachten ist, dass die Kopfstütze des Fahrzeugs bei
Nutzung auf rückwärtsgerichteten Fahrzeugsitzen nicht
entfernt werden darf!). Die Rückenlehne passt sich optimal
stufenlos nahezu jeder Neigung des Fahrzeugsitzes an.
!WARNUNG! Die Rückenlehne des Kindersitzes muss
an der Lehne des Fahrzeuges flächig aufliegen. Um den
größtmöglichen Schutz für das Kind zu gewährleisten,
muss sich der Sitz in einer normalen aufrechten Position
befinden!
!WARNUNG! Benutzen Sie niemals andere als die in
der Bedienungsanleitung beschriebenen und am Sitz
markierten Punkte, um den Kindersitz zu befestigen.
23
DEENIT
INSTALLING THE CAR SEAT IN THE VEHICLE INSTALLAZIONE DEL SEGGIOLINO
Place the car seat on the appropriate seat in the vehicle. Collocare il seggiolino sul sedile dell’auto appropriato.
Always ensure that the entire surface of the backrest of the
car seat is placed fully against the backrest of the vehicle
seat.
If the headrest of the vehicle is in the way, pull it out all the
way or remove it completely (it is essential to ensure that
the vehicle headrest is not removed when the child seat is
installed in a rearward facing vehicle seat). The backrest will
perfectly adapt to practically any recline of the vehicle seat.
Accertare sempre che l’intera supercie dello schienale del
seggiolino appoggi completamente contro lo schienale del
sedile dell’auto.
Se il poggiatesta del veicolo è d’intralcio, estrarlo completa-
mente, allontanarlo o rimuoverlo del tutto (è essenziale
assicurarsi che il poggiatesta del veicolo non venga rimosso
quando il seggiolino per bambini è installato in un sedile
del veicolo rivolto all‘indietro). Lo schienale si adatterà
perfettamente a praticamente qualsiasi inclinazione del
sedile veicolare.
!WARNING! The full surface of the backrest of the car
seat must be against the backrest of the vehicle. To
ensure maximum protection for your child, the car seat
must be in a normal upright position! !ATTENZIONE! L’intera superficie dello schienale
del seggiolino deve poggiare contro lo schienale del
veicolo. Per assicurare la massima protezione per il
bambino il sedile deve trovarsi nella normale posizione
eretta!
!WARNING! Do not use any load bearing contact points
other than those described in the instructions and
marked in the child restraint. !ATTENZIONE! Non utilizzare punti di contatto portanti
diversi da quelli descritti nelle istruzioni e contrassegnati
sul sistema di ritenuta.
24
EINBAU DES KINDERSITZES MIT ISOFIX
Betätigen Sie den Verstellgri󰀨 (7) unter dem Sitzkissen (1)
des Kindersitzes.
Ziehen Sie die beiden ISOFIX Rastarme (8) bis zum
Endanschlag aus.
Drehen Sie nun die ISOFIX Rastarme (8) um 180°, damit
diese in Richtung der ISOFIX Befestigungspunkte zeigen.
Mit dem ISOFIX System können Sie den Kindersitz mit dem
Fahrzeug verbinden und so die Sicherheit Ihres Kindes
erhöhen. Ihr Kind muss weiterhin mit dem 3-Punkt-Gurt Ihres
Fahrzeuges angeschnallt werden.
HINWEIS! Die ISOFIX Befestigungspunkte (6) sind zwei
Metalllaschen pro Sitzplatz und benden sich zwischen
Rückenlehne und Sitzäche des Fahrzeugsitzes. Im
Zweifelsfall nehmen Sie die Bedienungsanleitung Ihres
Fahrzeuges zu Hilfe.
HINWEIS! Überprüfen Sie vor dem Verbinden der ISOFIX
Rastarme (8) mit den ISOFIX Befestigungspunkten
(6) deren Entriegelungstasten (9). Sind die grünen
Sicherheitsindikatoren (10) zu sehen, müssen Sie vor dem
Verbinden zunächst die ISOFIX Rastarme entriegeln, indem
Sie die Entriegelungstaste (9) drücken und zurückziehen.
HINWEIS! Sind die ISOFIX Befestigungspunkte in ihrem
Fahrzeug schwer zu erreichen, können Sie die mitgelieferten
ISOFIX Einführhilfen verwenden.
Hängen Sie die mitgelieferten ISOFIX Einführhilfen (11)
mit der längeren Lasche nach oben in den beiden ISOFIX
Befestigungspunkten (6) ein. In manchen Fahrzeugen
eignet sich eine entgegengesetzte Einbaurichtung der
ISOFIX Einführhilfen (11) besser.
8
6
9
10
1
8
7
11
25
DEENIT
Using the ISOFIX system, you can x the car seat to the
vehicle, thereby increasing your child’s safety. The child still
needs to be secured with the three-point belt of your vehicle.
Con il sistema ISOFIX è possibile ssare il seggiolino al
veicolo, aumentando così la sicurezza del bambino. Il
bambino deve essere allacciato utilizzando la cintura a tre
punti del veicolo.
Use the adjustment button (7) under the seat cushion (1) of
the car seat.
Pull the two ISOFIX locking arms (8) as far as they will go.
Now twist the ISOFIX locking arms (8) 180° so that they are
facing the direction of the ISOFIX anchorage points (6).
Usare il pulsante di regolazione (7) situato sotto il cuscino di
seduta (1) del seggiolino.
Estrarre completamente il carrello con i due braccetti
ISOFIX (8).
Ruotare quindi i connettori ISOFIX (8) di 180° verso i punti
di ancoraggio ISOFIX (6).
NOTE! The ISOFIX anchorage points (6) are two metallic
clips for each seat and are positioned between the backrest
and the seating surface of the vehicle seat. In case of doubt,
please refer to the driver’s manual of your vehicle.
NOTA BENE! I punti di ancoraggio ISOFIX (6) sono due clip
metalliche per ogni sedile, posizionate tra lo schienale e la
seduta del sedile del veicolo. In caso di dubbio consultare il
manuale istruzioni del proprio veicolo.
NOTE! Before clicking the ISOFIX locking arms (8) into the
ISOFIX anchorage points (6), check the release buttons (9). If
the green safety indicator (10) is visible, you must rst release
the ISOFIX locking arms before joining by pressing and
pulling back the release button (9).NOTA BENE! Prima di agganciare i connettori ISOFIX (8)
ai punti di ancoraggio ISOFIX (6), controllare i pulsanti di
rilascio (9). Se l‘indicatore di sicurezza verde (10) è visibile,
è necessario prima rilasciare i bracci di bloccaggio ISOFIX
premendo e tirando all‘indietro il pulsante di rilascio (9).
INSTALLING THE CAR SEAT WITH ISOFIX SYSTEM INSTALLAZIONE CON IL SISTEMA ISOFIX
NOTE! Are the ISOFIX anchorage points hard to reach in
your vehicle, you can use the supplied ISOFIX guides.
NOTA BENE! Se i punti di ancoraggio ISOFIX sono di󰀩cili da
raggiungere nel veicolo, è possibile utilizzare le guide ISOFIX
fornite in dotazione.
Insert the supplied ISOFIX guides (11) with the longer strap
upwards into the two ISOFIX anchorage points (6). In some
vehicles, it is better to mount the ISOFIX guides (11) in the
opposite direction. Inserire le guide ISOFIX in dotazione (11) con la cinghia più
lunga verso l‘alto nei due punti di ancoraggio ISOFIX (6). In
alcuni veicoli, è meglio montare le guide ISOFIX (11) nella
direzione opposta.
26
AUSBAU DES KINDERSITZES AUS DEM
FAHRZEUG
HINWEIS! Durch das Einklappen der ISOFIX Rastarme
schonen Sie nicht nur den Fahrzeugsitz, sondern schützen
auch die ISOFIX Rastarme des ISOFIX Systems vor
Verunreinigung und Beschädigung.
Führen Sie die Einbauschritte in umgekehrter Reihenfolge
durch.
Entriegeln Sie die ISOFIX Rastarme beidseitig, indem
Sie die Entriegelungstasten drücken und gleichzeitig
zurückziehen.
Ziehen Sie den Sitz aus den ISOFIX Befestigungspunkten.
Drehen Sie die ISOFIX Rastarme um 180°.
Betätigen Sie den Verstellgri󰀨 des Kindersitzes und
schieben Sie die ISOFIX Rastarme bis zum Anschlag
hinein.
Schieben Sie die beiden ISOFIX Rastarme (8) in die ISOFIX
Befestigungspunkte (6) bis diese mit einem hörbaren
„KLICK“ einrasten.
Vergewissern Sie sich, dass der Sitz gut hält, indem Sie
versuchen ihn herauszuziehen.
Der grüne Sicherheitsindikator (10) muss nun an den beiden
Entriegelungstasten (9) gut sichtbar sein.
Betätigen Sie den ISOFIX Verstellgri󰀨 (7) und schieben Sie
den Kindersitz an den Fahrzeugsitz.
Achten Sie unbedingt darauf, dass die Rückenlehne
des Kindersitzes vollächig an der Rückenlehne des
Fahrzeugsitzes anliegt.
7
CLICK!
6
8
9 10
27
DEENIT
REMOVING THE CAR SEAT FROM THE VEHICLE RIMOZIONE DEL SEGGIOLINO DALL’AUTO
Perform the installation steps in the reverse order.
Unlock the ISOFIX locking arms on both sides by pushing
the release buttons and pulling them back simultaneously.
Pull the car seat out of the ISOFIX anchorage points.
Rotate the ISOFIX locking arms 180°.
Operate the adjustment button of the car seat and push the
connectors in as far as they will go.
Seguire il procedimento per l’installazione nell’ordine inverso.
Sbloccare i connettori ISOFIX su ambo i lati premendo
i pulsanti di rilascio e contemporaneamente tirandoli
all’indietro.
Estrarre il seggiolino dai punti di ancoraggio ISOFIX.
Ruotare di 180° i connettori ISOFIX.
Azionare il pulsante di regolazione del seggiolino e spingere
completamente all’interno i connettori.
NOTE! By folding in the ISOFIX locking arms, you are not just
protecting the vehicle seat but also the ISOFIX locking arms
of the ISOFIX system from dirt and damage.
NOTA BENE! Ripiegando i connettori ISOFIX, proteggerete
da possibili danni non solo il sedile dell’auto, ma anche da
danneggiamento e sporcizia i connettori ISOFIX stessi.
Spingere i due bracci di bloccaggio ISOFIX (8) nei punti di
ancoraggio ISOFIX (6) no a quando questi si bloccano in
posizione con un “CLIC” udibile.
Assicurarsi che il seggiolino sia ssato in sicurezza
cercando di estrarlo.
L’indicatore di sicurezza verde (10) deve essere
chiaramente visibile su entrambi i pulsanti di rilascio (9).
Utilizzare la maniglia di regolazione ISOFIX (7) e spingere il
seggiolino contro il sedile del veicolo.
Assicurarsi sempre che l‘intera supercie dello schienale del
seggiolino sia posizionata il più possibile a contatto con lo
schienale del sedile del veicolo.
Push the two ISOFIX locking arms (8) into the ISOFIX
anchorage points (6) until these lock into place with an
audible “CLICK.”
Ensure that the car seat is secure by trying to pull it out.
The green safety indicator (10) must now be clearly visible
on the two release buttons (9).
Use the ISOFIX adjustment handle (7) and push the car
seat against the vehicle seat.
Always ensure that the entire surface of the backrest of
the car seat is placed fully against the backrest of the
vehicle seat.
28
ANPASSEN AN DIE KÖRPERGRÖSSE
Anpassen der Kopfstütze
HINWEIS! Nur eine in optimaler Höhe eingestellte Kopfstütze
(12) gewährt Ihrem Kind größtmöglichen Schutz und Komfort.
Die Höhenverstellung kann in 12 Positionen erfolgen.
HINWEIS! Die Seitenwangen sind fest mit der Kopfstütze
verbunden und müssen nicht separat eingestellt werden.
Die Kopfstütze muss so eingestellt werden, dass der
Abstand zwischen den Schultern des Kindes und der
Kopfstütze 3 cm (ca. 2 Finger) nicht überschreitet.
Betätigen Sie die Einstelltaste (13) an der Rückseite
der Kopfstütze (12) und führen Sie die Kopfstütze in die
gewünschte Position.
13
12
MAX
29
DEENIT
ADJUSTING TO THE BODY SIZE REGOLAZIONE IN BASE ALLA CORPORATURA
Adjusting the Headrest Regolazione del poggiatesta
NOTE! The headrest (12) ensures the best possible
protection for your child only if it is adjusted to the optimum
height. There are 12 height positions that can be set.
NOTA BENE! Il poggiatesta (12) garantisce la protezione
ottimale per il bambino soltanto se regolato all’altezza
corretta. Il poggiatesta può essere regolato in 12 diverse
posizioni.
NOTE! The shoulder wings of car seat are connected with the
headrest and do not have to be moved separately. NOTA BENE! Le ali proteggi spalle del seggiolino sono
collegate al poggiatesta e non devono essere regolate
separatamente.
The headrest must be adjusted so that max. 3 cm (ca. two
nger’s width) or less remains free between the child’s
shoulder and the headrest.
Activate the adjustment handle (13) on the back side of the
headrest (12) and move it into the required position.
Il poggiatesta deve essere regolato in modo che tra le spalle
del bambino e la base del poggiatesta possano passare al
massimo due dita (max 3 cm).
Attivare la maniglia di regolazione (13) sul lato posteriore
del poggiatesta (12) per spostarlo nella posizione richiesta.
30
EINSTELLEN DER NEIGUNGSVERSTELLBAREN
KOPFSTÜTZE
Die neigungsverstellbare Kopfstütze hilft, das gefährliche
Nach-Vorne-Kippen des Kopfes im Schlaf zu verhindern.
Bei einem Aufprall folgt die Kopfstütze der Kopfbewegung
Ihres Kindes nach vorne, rastet ein und fängt somit die
anschließende Rückwärtsbewegung des Kopfes ab. Die
Neigung der Kopfstütze lässt sich in drei Positionen einstellen.
Nach vorne lässt sie sich in die zweite bzw. dritte Position
verstellen, indem sie nach vorne geschoben wird, bis sie in
der jeweiligen Position einrastet. Zum Zurückstellen in die
Ausgangsposition muss die Kopfstütze nach oben und hinten
gezogen werden.
HINWEIS! Achten Sie bitte darauf, dass der Kopf des Kindes
immer in Kontakt mit der neigungsverstellbaren Kopfstütze
bleibt, da die Kopfstütze nur so ihre optimierte Seitenaufprall-
Schutzfunktion erfüllen kann.
!WARNUNG! Auf keinen Fall darf die Einrastvorrichtung
(15) mit Gegenständen blockiert werden! Im
Falle eines Unfalls muss die Leichtgängigkeit der
Neigungsverstellung gewährleistet sein, da es sonst
eventuell zu Verletzungen Ihres Kindes kommen kann.
15
31
DEENIT
ADJUSTING THE RECLINING HEADREST REGOLARE LA RECLINAZIONE DEL POGGIATESTA
The reclining headrest helps to prevent the child’s head from
dangerously tipping forward during sleep. In the event of a
collision, the headrest will follow the movement of your child’s
head forwards, lock into place and absorb the subsequent
backwards motion of your child’s head. The recline angle
of the headrest can be set to one of three positions. It can
be moved forward to the second or third position until the
headrest locks in the corresponding position. To return it to
the original position, the headrest ap must be lifted and
pulled back.
Il poggiatesta reclinabile aiuta a prevenire la pericolosa
cadura in avanti della testa del bambino durante il sonno. In
caso di incidente, il poggiatesta segue il movimento in avanti
della testa del bambino e si ssa in posizione assorbendo il
successivo movimento all’indietro della testa del bambino.
L‘angolo di inclinazione del poggiatesta può essere regolato
su una delle tre posizioni. Si può spostare in avanti nella
seconda o terza posizione nché il poggiatesta non si blocca
nella posizione corrispondente. Per riportarlo nella posizione
originale, sollevare il risvolto del poggiatesta e tirare indietro.
NOTE! Ensure that your child’s head is always in contact with
the reclining headrest, as this is the only way that the headrest
can provide optimum protection in case of side collisions.
NOTA BENE! Accertarsi che la testa del bambino sia
sempre a contatto con il poggiatesta reclinabile: solo così il
poggiatesta potrà o󰀨rire la protezione ottimanle in caso di
collisioni laterali.
!WARNING! Never block the locking mechanism (15)!
In the event of an accident, the recline adjustment
mechanism must move smoothly, or else your child may
be injured!
!ATTENZIONE! Non bloccare mai il meccanismo (15)!
In caso di incidente il meccanismo di reclinazione deve
operare scorrevolmente per evitare che il bambino
possa essere ferito!
32
ANSCHNALLEN MITTELS FAHRZEUGGURT
Setzen Sie ihr Kind in den Kindersitz. Ziehen Sie den
Dreipunktgurt weit heraus und führen Sie diesen vor Ihrem
Kind entlang zum Gurtschloss (16).
Der Beckengurt (18) muss auf beiden Seiten des Sitzkissens
(1) in den unteren Gurtführungen (19) liegen.
Stecken Sie die Gurtzunge (17) in das Gurtschloss (16).
Dieses muss mit einem hörbaren „KLICK“ einrasten.
Als nächstes legen Sie den Beckengurt (18) in die unteren
grünen Gurtführungen (19) des Kindersitzes ein.
Ziehen Sie nun kräftig am Diagonalgurt (20), um den
Beckengurt (18) zu stra󰀨en. Je enger der Gurt anliegt, desto
besser kann er vor Verletzungen schützen. Auf der Seite des
Gurtschlosses (16) müssen der Diagonalgurt (20) und der
Beckengurt (18) zusammen in die untere Gurtführung (19)
eingelegt sein.
HINWEIS! Bringen Sie Ihrem Kind von Anfang an bei, immer
auf eine stra󰀨e Gurtführung zu achten und bei Bedarf selbst
den Gurt festzuziehen.
!WARNUNG! Den Gurt auf keinen Fall verdrehen.
!WARNUNG! Der Beckengurt (18) muss auf beiden
Seiten so tief wie möglich über der Leistenbeuge Ihres
Kindes verlaufen, um im Falle eines Unfalls optimal
wirken zu können.
!WARNUNG! Das Fahrzeuggurtschloss (16) darf
keinesfalls über die Armlehne reichen. Ist die
Gurtpeitsche zu lang, ist der Kindersitz für eine
Verwendung auf dieser Position im Fahrzeug nicht
geeignet. Bitte wenden Sie sich im Zweifelsfall an den
Hersteller Ihres Fahrzeugs.
CLICK!
20
1
18
19
17
16
33
DEENIT
STRAPPING WITH VEHICLE SEAT BELT ALLACCIARE IL BAMBINO CON LA CINTURA
Place your child in the car seat. Pull the three-point belt right
out and feed it in front of your child towards the belt buckle (16).
Posizionare il bambino nel seggiolino. Estrarre
abbondantemente la cintura a tre punti davanti al bambino
e ssarla alla bbia (16).
The lap belt (18) needs to be fed through the lower belt guides
(19) on both sides of the seat cushion (1).
La cintura addominale (18) deve passare attraverso le guide
inferiori (19) su entrambi i lati della seduta del seggiolino (1).
Insert the belt tongue (17) into the belt buckle (16). It must
lock into place with an audible “CLICK”.
Next, place the lap belt (18) in the lower belt guides (19) of
the car seat.
Now pull the diagonal belt (20) rmly to tighten the lap belt
(18). The tighter the belt sits, the better it provides protection
from injury. On the side of the belt buckle (16), the diagonal
belt (20) and the lap belt (18) must be inserted together in the
lower belt guide (19).
Inserire la linguetta della cintura (17) nella bbia della cintura
(16). Si deve ssare con un sonoro “CLICK”.
Collocare successivamente la cintura subaddominale (18)
nelle guide della cintura inferiori (19) del seggiolino.
Ora tirare saldamente la cintura diagonale (20)per tendere la
cintura subaddominale (18). Più è tesa la cintura, maggiore
è la protezione dalle lesioni. Sul lato della bbia della cintura
(16), la parte diagonale (20) e quella subaddominale (18)
della cintura vanno inserite assieme nella guida della cintura
inferiore (19).
NOTE! Teach your child from the start to always ensure that
the belt is tight and, if neccessary, how to tighten the belt
themselves. NOTA BENE! Insegnare al bambino n dall’inizio a
controllare sempre che la cintura sia ben tesa e a tenderla
autonomamente se necessario.
!WARNING! Never twist the belt. !ATTENZIONE! Non torcere mai la cintura.
!WARNING! The vehicle belt buckle (16) must never
cross the arm rest. If the belt system is too long, the car
seat is not suitable for use in this position in the vehicle.
In case of doubt, please consult the manufacturer of
your vehicle.
!ATTENZIONE! La fibbia della cintura (16) del veicolo
non deve mai attraversare il bracciolo. Se il sistema di
cinture è troppo lungo il seggiolino non è adatto all’uso
in questa posizione nel veicolo. In caso di dubbio
consultare il costruttore del proprio veicolo.
!WARNING! The lap belt (18) must run as low as
possible on both sides along your child’s groin to have
optimum effect in the event of an accident. !ATTENZIONE! La cintura subaddominale (18) deve
scorrere più bassa possibile su ambo i lati lungo
l’inguine del bambino per la massima efficacia in caso
di incidente.
34
Nun führen Sie den Diagonalgurt (20) durch die obere grüne
Gurtführung (21) in der Kopfstütze (12) bis er sich innerhalb
der Gurtführung bendet. Achten Sie darauf, dass der
Diagonalgurt (20) zwischen Schulteraußenkante und Hals
Ihres Kindes verläuft. Falls erforderlich, passen Sie durch
Verstellen der Kopfstützenhöhe den Gurtverlauf an. Die Höhe
der Kopfstütze (12) kann auch im eingebauten Zustand im
Auto eingestellt werden.
IST IHR KIND RICHTIG GESICHERT?
Um die bestmögliche Sicherheit Ihres Kindes zu
gewährleisten, prüfen Sie bitte vor Beginn der Fahrt, ob …
die Rückenlehne des Kindersitzes vollächig an der
Rückenlehne des Fahrzeugsitzes anliegt.
der Beckengurt auf beiden Seiten des Sitzkissens in den
unteren grünen Gurtführungen verläuft.
der Diagonalgurt auf der Gurtschlossseite auch in der
unteren grünen Gurtführung des Sitzes verläuft.
der Diagonalgurt durch die grün markierte Gurtführung der
Schulterstütze verläuft.
der Diagonalgurt schräg nach hinten verläuft.
der gesamte Gurt stra󰀨 ist und nicht verdreht am Körper des
Kindes anliegt.
der Beckengurt möglichst niedrig an der Hüfte anliegt.
die Position der Kopfstütze ordnungsgemäß eingestellt
wurde.
bei Verwendung von ISOFIX der Sitz beidseitig mit
den Konnektoren in den ISOFIX Befestigungspunkten
eingerastet ist und die beiden grünen Sicherheitsindikatoren
deutlich zu sehen sind.
21
CLICK!
20
12
35
DEENIT
Now feed the diagonal belt (20) through the green upper belt
guide (21) in the headrest (12) until it is inside the belt guide.
Ensure that the diagonal belt (20) runs between the outside of
the shoulder and the neck of your child. If necessary, adjust
the height of the headrest to change the position of the belt.
The height of the headrest (12) can still be adjusted while in
the car.
La cintura diagonale (20) deve passare attraverso la guida
superiore verde (21) nel poggiatesta (12) nché non è
completamente inserita nella guida. Vericare che la cintura
diagonale (20) scorra tra l’esterno della spalla e il collo del
bambino. Se necessario regolare l’altezza del poggiatesta per
modicare la posizione della cintura. L’altezza del poggiatesta
(12) è regolabile anche in auto.
IS YOUR CHILD CORRECTLY SECURED? IL BAMBINO È POSIZIONATO CORRETTAMENTE?
To ensure optimum safety for your child, please always check
before commencing travel that …
the backrest of the child seat lies completely ush with the
backrest of the car seat.
the lap belt has been fed through the green lower belt
guides on both sides of the seat cushion.
the diagonal belt on the belt buckle side has also been fed
through the green lower belt guide of the seat.
the diagonal belt has been fed through the belt guide
marked green in the shoulder rest.
the diagonal belt is at a recline backwards.
the entire belt is tightly against your child’s body and is not
twisted.
the lap belt sits low on the pelvis.
the headrest has been adjusted to the correct height.
if using ISOFIX the seat has locked into place on both sides
with the connectors into the ISOFIX anchorage points and
both green safety indications can be seen clearly.
Per garantire la massima sicurezza del bambino, prima di
iniziare il viaggio è necessario vericare che …
lo schienale del seggiolino sia perfettamente aderente a
quello del sedile dell’auto.
la cintura addominale passi attraverso le guide verdi inferiori
in entrambi i lati della seduta del seggiolino.
sul lato della bbia della cintura anche la cintura diagonale
passi attraverso la guida inferiore della cintura del
seggiolino.
la cintura diagonale passi attraverso la guida
contrassegnata in verde all’altezza delle spalle.
la cintura diagonale sia inclinata all’indietro
l’intera cintura poggi tesa contro il corpo del bambino e non
sia attorcigliata.
la cintura subaddominale appoggi sull’inguine.
il poggiatesta sia regolato all’altezza corretta.
se si utilizza ISOFIX, il seggiolino sia bloccato in posizione
su entrambi i lati con i connettori nei punti di ancoraggio
ISOFIX ed entrambe le indicazioni di sicurezza verdi
chiaramente visibili.
36
ENTFERNEN DES SITZBEZUGS
Der Bezug besteht aus fünf Teilen, die entweder mit Klettband,
Druckknöpfen oder elastischen Bändern am Kindersitz
befestigt sind. Sobald Sie alle Befestigungen lösen, können die
Einzelteile abgenommen werden. Zum Abziehen der Einzelteile
des Bezugs führen Sie folgende Schritte durch:
Nehmen Sie das „Linear Side-Impact Protection“-System
(L.S.P.) ab indem sie es nach oben schieben und somit aus
seiner Verankerung lösen.
Lösen Sie die Druckknöpfe an der Unterseite des Bezugs
für die verstellbare Kopfstütze. Danach können Sie den
Bezug nach oben hin abziehen.
Betätigen Sie den Verstellgri󰀨 für die Kopfstütze und stellen
Sie diese in die höchste Position.
Ö󰀨nen und lösen Sie auf der Rückseite des Kopfstützen-
bezugs sämtliche Druckknöpfe. Danach ziehen Sie den
Bezug nach vorne ab.
Ziehen Sie am linken und rechten Seitenteil der Schulter-
stütze den Bezug herab. Dann lösen Sie auf der Innenseite
der Schulterügel die Druckknöpfe, um den Bezug gänzlich
entfernen zu können.
Bevor Sie den Lehnenbezug vom Sitz nehmen können,
lösen Sie die zugehörigen Befestigungen auf der Rückseite.
Abschließend fädeln Sie auf der Unterseite der Sitzäche
die elastischen Gummibänder heraus und ziehen den
Sitzkissenbezug nach vorne hin ab.
HINWEIS! Achten Sie vor dem Abziehen aller Einzelteile des
Bezugs darauf, dass dieser bereits oberhalb der silbernen
Dekorteile liegt. Um den Bezug wieder zu befestigen,
verfahren Sie in umgekehrter Reihenfolge. Stellen Sie sicher,
dass die grüne Gurtführung (21) immer sichtbar oberhalb des
Bezugs anliegt.
!WARNUNG! Der Kindersitz darf keinesfalls ohne Bezug
verwendet werden.
21
37
DEENIT
REMOVING THE SEAT COVER RIMOZIONE DEL RIVESTIMENTO
NOTE! Before removing the separate parts of the seat cover,
please ensure that the cover is already positioned above the
decorative silver parts. To put the covers back on the seat,
proceed as above in reverse order. Make sure that the green
belt guide (21) always rests visible above the seat cover.
NOTA BENE! Prima di rimuovere le varie parti del rivestimento
vericare che le estremità siano già state estratte dalle parti
decorative argentate. Per riposizionare il rivestimento sul
seggiolino, ripetere i passaggi precedentemente descritti
nell’ordine inverso. Assicurarsi che la guida verde della cintura
(21) sia sempre visibile sopra il rivestimento del seggiolino.
The seat cover consists of ve parts which are xed to the
seat with velcro, press studs or button holes. One you have
released the fasteners, the cover parts can be removed. To
remove the covers, please follow the instructions below:
Take o󰀨 the “Linear Side-Impact Protection” System
(L.S.P.) by pushing it upwards to release it from its
anchorage points.
Undo the press studs on the lower side of the cover for
the adjustable headrest. Then you can remove the cover
upwards.
Activate the adjustment handle for the headrest and move
this to its highest position.
Open and loosen all the press buttons on the rear side of
the headrest. Then pull the cover o󰀨 forwards.
Pull down the cover on the left and right side panel of the
shoulder rest. Then undo the press studs on the interior of
the shoulder wings in order to be able to entirely remove
the cover.
Before you can remove the backrest cover from the seat,
undo the associated fastenings its rear side.
Then thread the elastic bands out on the underside of the
seat area, and withdraw the seat cushion cover forwards.
Il rivestimento è composto da cinque parti ssate alla scocca
con velcro, bottoni a pressione o asole. Una volta sganciati tutti i
punti di ssaggio è possibile rimuovere ciascuna delle parti per il
lavaggio. Per rimuovere il rivestimento eseguire i seguenti passaggi:
Per rimuovere il sistema di protezione lineare negli impatti
laterali (Linear Side-Impact Protection, L.S.P.) spingere
verso l‘alto per staccarlo dai punti di ancoraggio.
Sganciare i perni a pressione sul lato inferiore del
rivestimento del poggiatesta regolabile. Rimuovere il
rivestimento verso l’alto.
Attivare la maniglia di regolazione del poggiatesta e
spostare quest’ultimo nella posizione più alta.
Aprire e allentare tutti i bottoni a pressione nella parte posteriore
del poggiatesta. Quindi togliere il rivestimento tirandolo in avanti.
Tirare verso il basso il rivestimento su ambo i lati del
pannello destro e sinistro della protezione per le spalle.
Quindi slacciare i bottoni automatici nella parte interna delle
ali di protezione per le spalle in modo da poter rimuovere
completamente il rivestimento.
Per rimuovere il rivestimento dello schenale dal seggiolino
è necessario slacciare tutti gli agganci associati nella sua
parte posteriore.
Quindi slare le fascette elastiche sul lato inferiore dell’area
seduta e tirare il rivestimento seduta in avanti.
!WARNING! The infant car seat must under no
circumstances be used without the cover. !ATTENZIONE! Non usare MAI il seggiolino di sicurezza
senza il rivestimento.
38
REINIGUNG
Es ist darauf zu achten, dass nur ein original Sitzbezug
verwendet wird, da auch der Bezug ein wesentlicher
Bestandteil der Funktion ist. Ersatzbezüge erhalten Sie im
Fachhandel.
!WARNUNG! Bitte auf keinen Fall chemische
Reinigungs- oder Bleichmittel verwenden!
HINWEIS! Bitte den Bezug vor der ersten Verwendung
waschen. Der Bezug darf bei 30 °C im Schonwaschgang
gewaschen werden. Sollten Sie mit mehr als 30 °C waschen,
kann es zu Ausfärbungen kommen. Bitte den Bezug
gesondert von anderer Wäsche waschen und keinesfalls
maschinell trocknen! Den Bezug keinesfalls in der prallen
Sonne trocknen! Die Kunststo󰀨teile können mit einem milden
Reinigungsmittel und warmen Wasser gewaschen werden.
39
DEENIT
CLEANING PULIZIA
It is important to use an original seat cover only since the
cover is an essential part of the function. You may obtain
spare covers at your retailer.
Il rivestimento è una parte importante per la funzionalità del
seggiolino ed è indispensabile utilizzare solo rivestimenti
originali. Rivestimenti di ricambio originali sono disponibili su
ordinazione presso i nostri rivenditori.
NOTE! Please wash the cover before you use it the rst time.
Seat covers are machine washable at max. 30°C on delicate
cycle. If you wash it at higher temperature, the cover fabric
may lose colour. Please wash the cover separately and never
dry it mechanically! Do not dry the cover in direct sunlight! You
can clean the plastic parts with a mild detergent and warm
water.
ATTENZIONE! Consigliamo sempre un lavaggio dei
rivestimenti prima del primo utilizzo. I rivestimenti sono
lavabili in lavatrice con cliclo delicato a max 30°. L’uso
di temperature più elevate può scolorire i tessuti. Lavare
separatamente e non asciugare mai a macchina. Non fare
asciugare il rivestimento alla luce solare diretta. Le parti in
plastica possono essere pulite con un detergente neutro e
acqua tiepida.
!WARNING! Please do not use chemical detergents or
bleaching agents under any circumstances! !ATTENZIONE! Raccomandiamo di non usare
detergenti chimici o agenti sbiancanti.
40
PFLEGE
VERHALTEN NACH EINEM UNFALL
Um die größtmögliche Schutzwirkung Ihres Kindersitzes
zu gewährleisten, ist es unbedingt notwendig, dass Sie
Folgendes beachten:
Alle wichtigen Teile des Kindersitzes sollten regelmäßig auf
Beschädigungen kontrolliert werden. Die mechanischen
Bauteile müssen einwandfrei funktionieren.
Es ist unbedingt notwendig darauf zu achten, dass der
Kindersitz nicht zwischen harten Teilen wie Fahrzeugtür,
Sitzschiene usw. eingeklemmt wird und dadurch beschädigt
werden könnte.
Der Kindersitz muss nach einem Sturz, Unfall oder einer
anderen Form der direkten Beeinträchtigung unbedingt vom
Hersteller überprüft werden.
!WARNUNG! Der Bezug ist integraler Bestandteil des
Kindersitz-Sicherheitskonzeptes. Der Kindersitz darf
aus diesem Grund keinesfalls ohne Bezug oder mit dem
Bezug eines anderen Kindersitzes verwendet werden.
!WARNUNG! Aufgrund eines Unfalls können am
Kindersitz Beschädigungen auftreten, die mit bloßem
Auge nicht erkennbar sind. Bitte tauschen Sie nach
einem Unfall unbedingt den Sitz aus. Im Zweifelsfall
wenden Sie sich an den Händler oder Hersteller.
41
DEENIT
!WARNING! The cover is an integral component of the
car seat’s safety design. The car seat must therefore
never be used without the cover or with a cover of a
different car seat.
!ATTENZIONE! La fodera è parte integrante e un
componente essenziale per il design di sicurezza del
seggiolino auto. Il seggiolino quindi non deve mai
essere usato senza il rivestimento o con un rivestimento
non originale.
!WARNING! An accident may cause damage to the
car seat that is not visible to the naked eye. Please
exchange the seat without fail after an accident. In case
of doubt contact the retailer or manufacturer.
!ATTENZIONE! Un incidente può causare danni al
seggiolino non identificabili a occhio nudo. Dopo un
incidente il seggiolino dev’essere subito sostituito. Se in
dubbio, contattare il rivenditore o il produttore.
PRODUCT CARE CURA DEL PRODOTTO
WHAT TO DO AFTER AN ACCIDENT COSA FARE A SEGUITO DI UN INCIDENTE
To guarantee that your car seat provides the maximum
protection, it is essential to comply with the following points:
All major components of the car seat must be regularly
checked for damage. The mechanical parts must work
without problems.
Make sure that the car seat is not jammed between hard
parts such as the car door, seat rails etc., which can
damage it.
If e.g. the car seat is dropped, it must be tested by the
manufacturer before being used again.
Perchè il seggiolino continui ad o󰀨rire la massima protezione
è necessario tenere presente quanto segue:
Tutte le parti principali del seggiolino devono essere
sottoposte ad un regolare controllo per vericare eventuali
danni. I componenti meccanici devono funzionare
correttamente.
E’ essenziale che il seggiolino non venga mai schiaccia-
to tra oggetti rigidi, come le portiere dell’auto, i binari del
sedile, ecc. perchè ne sarebbe danneggiato.
Nel caso il seggiolino dovesse cadere, dovrà essere
controllato dal produttore prima di poter essere riutilizzato.
42
PRODUKTINFORMATION
Bei Fragen wenden Sie sich zuerst an Ihren Händler.
Folgende Angaben sollten Ihnen vorliegen:
Seriennummer (siehe Aufkleber)
Marke und Typ des Autos und die Position des Sitzes, auf
dem der Kindersitz benutzt wird
Gewicht, Alter und Größe des Kindes
Weitere Informationen zu unseren Produkten nden Sie auch
unter www.cybex-online.com.
PRODUKTLEBENSDAUER
Dieser Kindersitz ist so ausgelegt, dass er bei gewöhnlicher
Nutzung für die gesamte Produktlebensdauer von ca.
9 Jahren seine Funktion erfüllt. Durch den langsamen
Verschleiß des Kunststo󰀨s, beispielsweise durch
Sonneneinstrahlung (UV), können sich die Eigenschaften
des Produkts geringfügig verschlechtern. Da in Fahrzeugen
sehr große Temperaturschwankungen herrschen und andere
unvorhersehbare Belastungen auftreten können, ist es
notwendig, folgende Punkte zu beachten:
Wenn das Fahrzeug längere Zeit der prallen Sonne
ausgesetzt ist, muss der Kindersitz aus dem Fahrzeug
entfernt oder mit einem hellen Tuch abgedeckt werden.
Prüfen Sie regelmäßig alle Kunststo󰀨- und Metallteile des
Kindersitzes auf Beschädigung oder Veränderung von
Form oder Farbe. Stellen Sie eine Veränderung fest, ist der
Kindersitz zu entsorgen oder muss vom Hersteller geprüft
und gegebenenfalls ausgetauscht werden.
Veränderungen des Sto󰀨es, insbesondere das Ausbleichen,
sind normal und stellen keine Beeinträchtigung dar.
43
DEENIT
PRODUCT INFORMATION INFORMAZIONI SUL PRODOTTO
If you have any questions contact your retailer rst. You
should have the following details ready:
Serial number (see sticker)
Make and model of the vehicle and the position of the
vehicle seat on which the car seat is used
Weight, age and height of the child
Per qualsiasi dubbio o informazione rivolgersi al rivenditore.
Accertandovi di avere a portata di mano questi dati:
Numero di serie (vedi etichetta adesiva)
Marca e modello dell’auto e posizione in cui il seggiolino
viene normalmente installato
Peso, età e altezza del bambino
Further information about our products can be found at
www.cybex-online.com.
Maggiori informazioni sui prodotti nel sito
www.cybex-online.com.
PRODUCT LIFESPAN DURATA DEL PRODOTTO
This child seat has been designed to be able to fulll its
intended functions by ordinary use for a product life span
of approx. 9 years. Gradual wear of the plastic, for example
caused by exposure to sunlight (UV), can cause slight
deterioration of the product’s properties. Since very high
temperature uctuations and other unforeseeable stresses are
common in vehicles, it is necessary to observe the following
points:
If the vehicle is directly exposed to strong sunlight for long
periods, the child seat must be removed from the vehicle or
covered with a light cloth.
Check all plastic and metal parts of the seat regularly for
damage or change of shape or colour. If you notice any
change in the child seat, the seat must be disposed or
checked and possibly replaced by the manufacturer.
Changes to the fabric, especially fading, are normal when
used in a vehicle and do not impair the seat’s function.
Questo seggiolino è progettato per soddisfare le proprie
speciche l’intera vita utile, pari a circa 9 anni. Nel tempo le
parti in plastica tendono ad usurarsi, es. per l’esposizione
al sole (UV) e le caratteristiche del prodotto possono subire
leggere variazioni. Alla luce delle possibili uttuazioni
massicce di temperatura e degli sforzi imprevedili nei veicoli,
devono essere tenuti in considerazione i punti seguenti:
Se il veicolo viene lasciato al sole per un periodo di tempo
prolungato, il seggiolino deve essere rimosso dall’abitacolo
o coperto con un panno chiaro.
Controllare regolarmente tutte le parti di plastica e metallo
del seggiolino alla ricerca di eventuali danni, deformazioni
o cambiamenti di colore. Qualora si scopra qualsiasi
cambiamento, il seggiolino dovrà essere smaltito o
controllato e, possibilmente, sostituito dal produttore.
Modiche del tessuto, in particolare la scoloritura, sono
perfettamente normali in caso di uso in un veicolo e non
intaccano il funzionamento del seggiolino.
44
ENTSORGUNG
Aus Umweltschutzgründen bitten wir den Benutzer zu Beginn
(Verpackung) und am Ende (Produktteile) der Lebensdauer
des Kindersitzes, den anfallenden Abfall zu trennen und
zu entsorgen. Die Abfallentsorgung kann kommunal
unterschiedlich geregelt sein. Um eine vorschriftsmäßige
Entsorgung des Kindersitzes zu gewährleisten, setzen Sie
sich mit Ihrer kommunalen Abfallentsorgung bzw. Verwaltung
lhres Wohnortes in Verbindung. Beachten Sie auf jeden Fall
die Entsorgungsbestimmungen lhres Landes.
!WARNUNG! Bewahren Sie Verpackungsmaterial
aus Kunststoff außer Reichweite Ihres Kindes auf, da
Erstickungsgefahr besteht!
44

Hulp nodig? Stel uw vraag in het forum

Spelregels

Misbruik melden

Gebruikershandleiding.com neemt misbruik van zijn services uitermate serieus. U kunt hieronder aangeven waarom deze vraag ongepast is. Wij controleren de vraag en zonodig wordt deze verwijderd.

Product:

Bijvoorbeeld antisemitische inhoud, racistische inhoud, of materiaal dat gewelddadige fysieke handelingen tot gevolg kan hebben.

Bijvoorbeeld een creditcardnummer, een persoonlijk identificatienummer, of een geheim adres. E-mailadressen en volledige namen worden niet als privégegevens beschouwd.

Spelregels forum

Om tot zinvolle vragen te komen hanteren wij de volgende spelregels:

Belangrijk! Als er een antwoord wordt gegeven op uw vraag, dan is het voor de gever van het antwoord nuttig om te weten als u er wel (of niet) mee geholpen bent! Wij vragen u dus ook te reageren op een antwoord.

Belangrijk! Antwoorden worden ook per e-mail naar abonnees gestuurd. Laat uw emailadres achter op deze site, zodat u op de hoogte blijft. U krijgt dan ook andere vragen en antwoorden te zien.

Abonneren

Abonneer u voor het ontvangen van emails voor uw Cybex SOLUTION Z i-FIX bij:


U ontvangt een email met instructies om u voor één of beide opties in te schrijven.


Ontvang uw handleiding per email

Vul uw emailadres in en ontvang de handleiding van Cybex SOLUTION Z i-FIX in de taal/talen: Nederlands, Duits, Engels, Frans, Italiaans, Portugees, Spaans, Pools als bijlage per email.

De handleiding is 6,73 mb groot.


U ontvangt de handleiding per email binnen enkele minuten. Als u geen email heeft ontvangen, dan heeft u waarschijnlijk een verkeerd emailadres ingevuld of is uw mailbox te vol. Daarnaast kan het zijn dat uw internetprovider een maximum heeft aan de grootte per email. Omdat hier een handleiding wordt meegestuurd, kan het voorkomen dat de email groter is dan toegestaan bij uw provider.

Stel vragen via chat aan uw handleiding

Stel uw vraag over deze PDF

Uw handleiding is per email verstuurd. Controleer uw email

Als u niet binnen een kwartier uw email met handleiding ontvangen heeft, kan het zijn dat u een verkeerd emailadres heeft ingevuld of dat uw emailprovider een maximum grootte per email heeft ingesteld die kleiner is dan de grootte van de handleiding.

Er is een email naar u verstuurd om uw inschrijving definitief te maken.

Controleer uw email en volg de aanwijzingen op om uw inschrijving definitief te maken

U heeft geen emailadres opgegeven

Als u de handleiding per email wilt ontvangen, vul dan een geldig emailadres in.

Uw vraag is op deze pagina toegevoegd

Wilt u een email ontvangen bij een antwoord en/of nieuwe vragen? Vul dan hier uw emailadres in.


Info