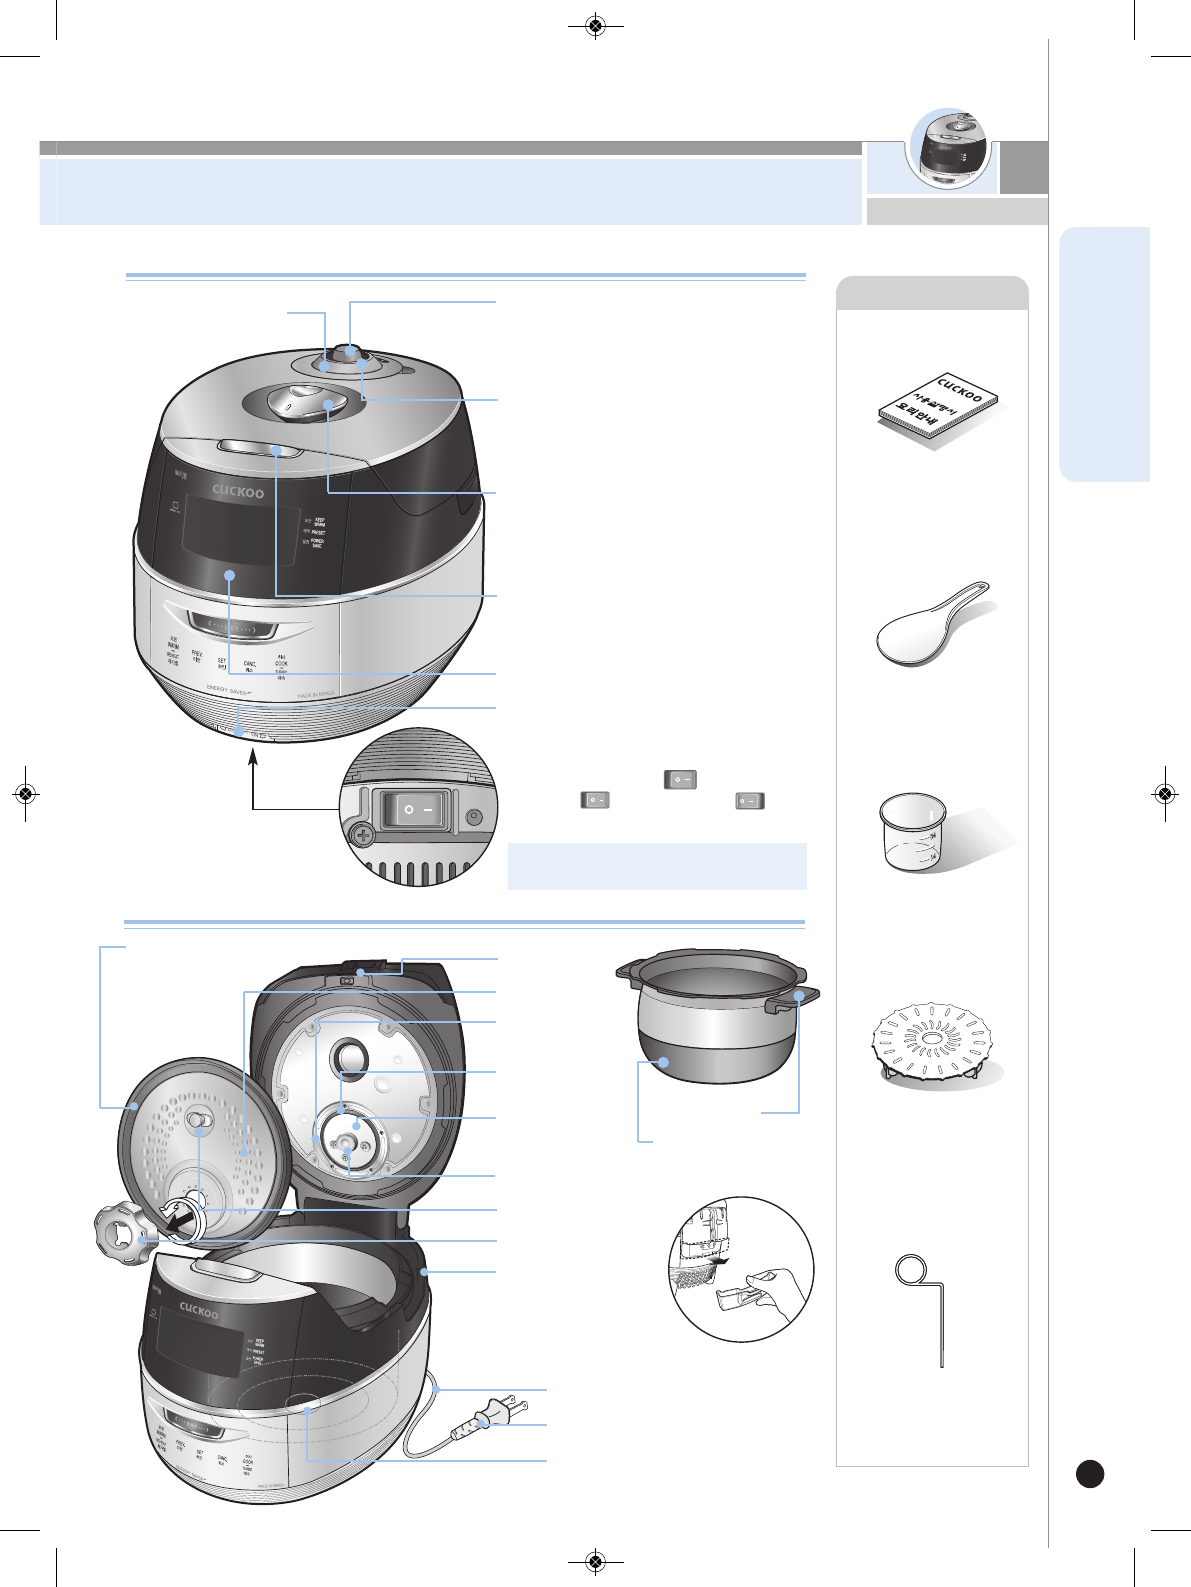
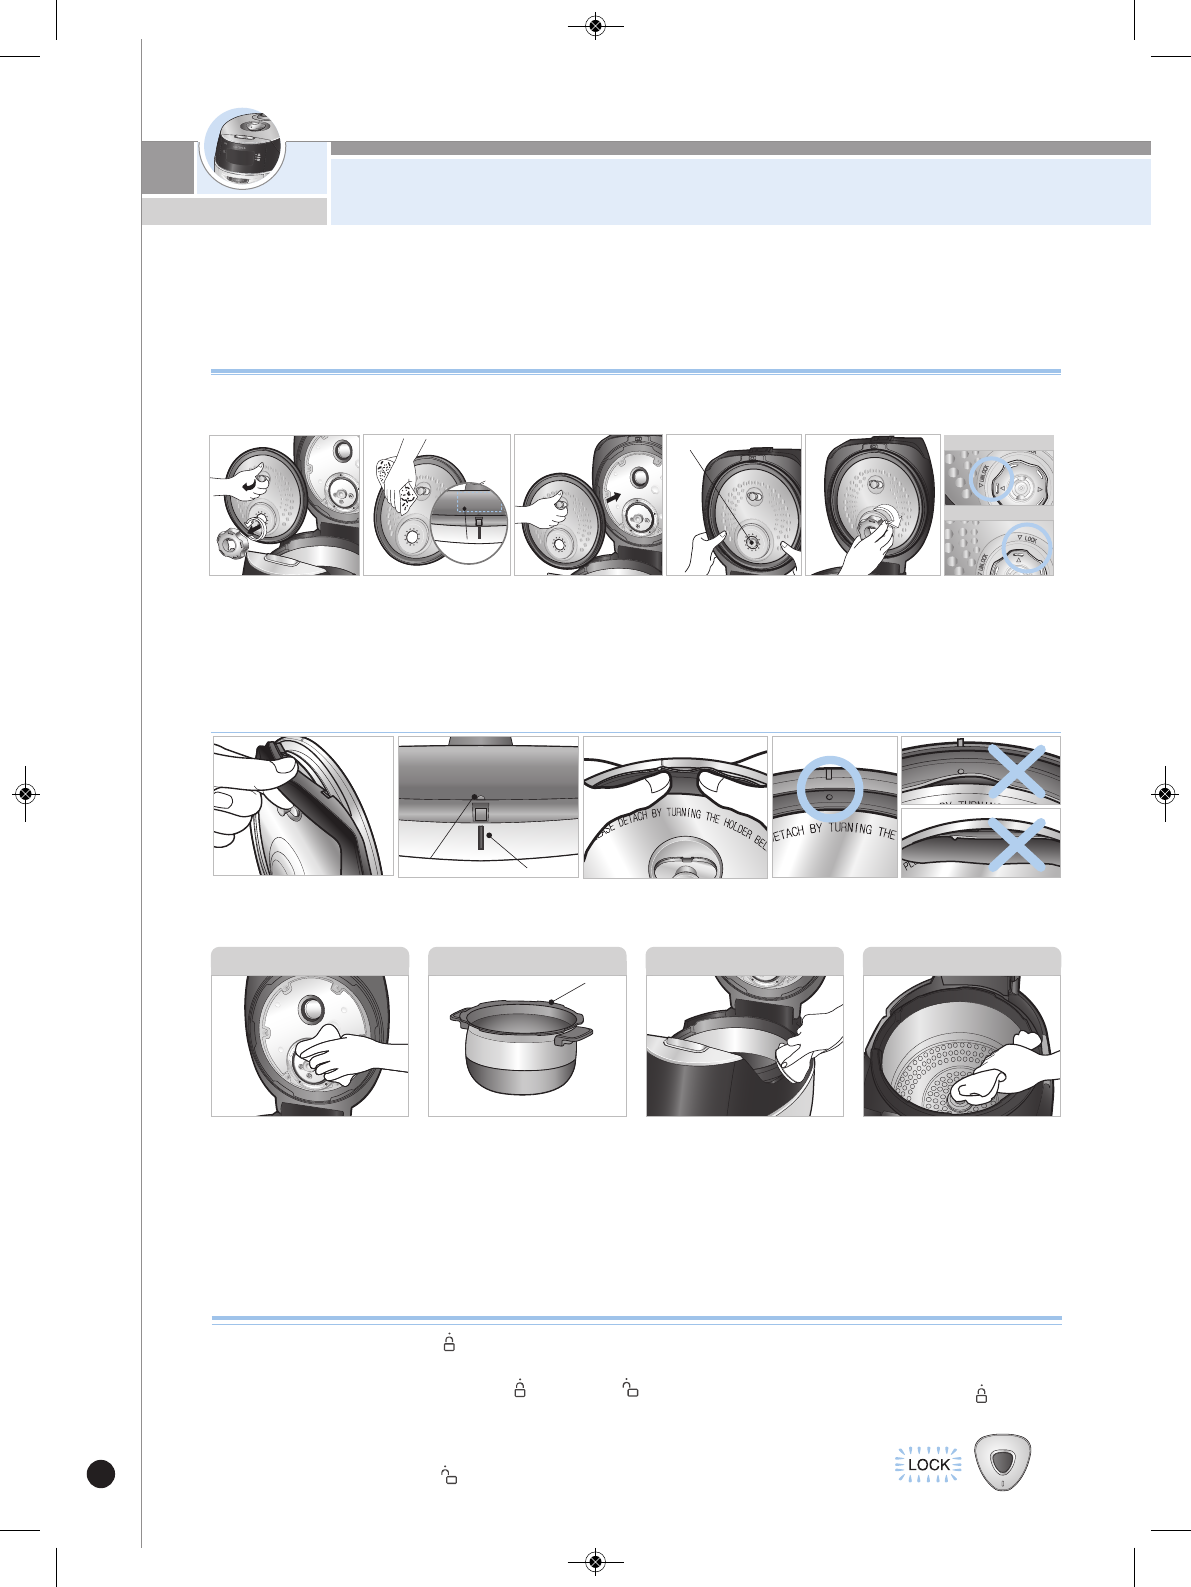
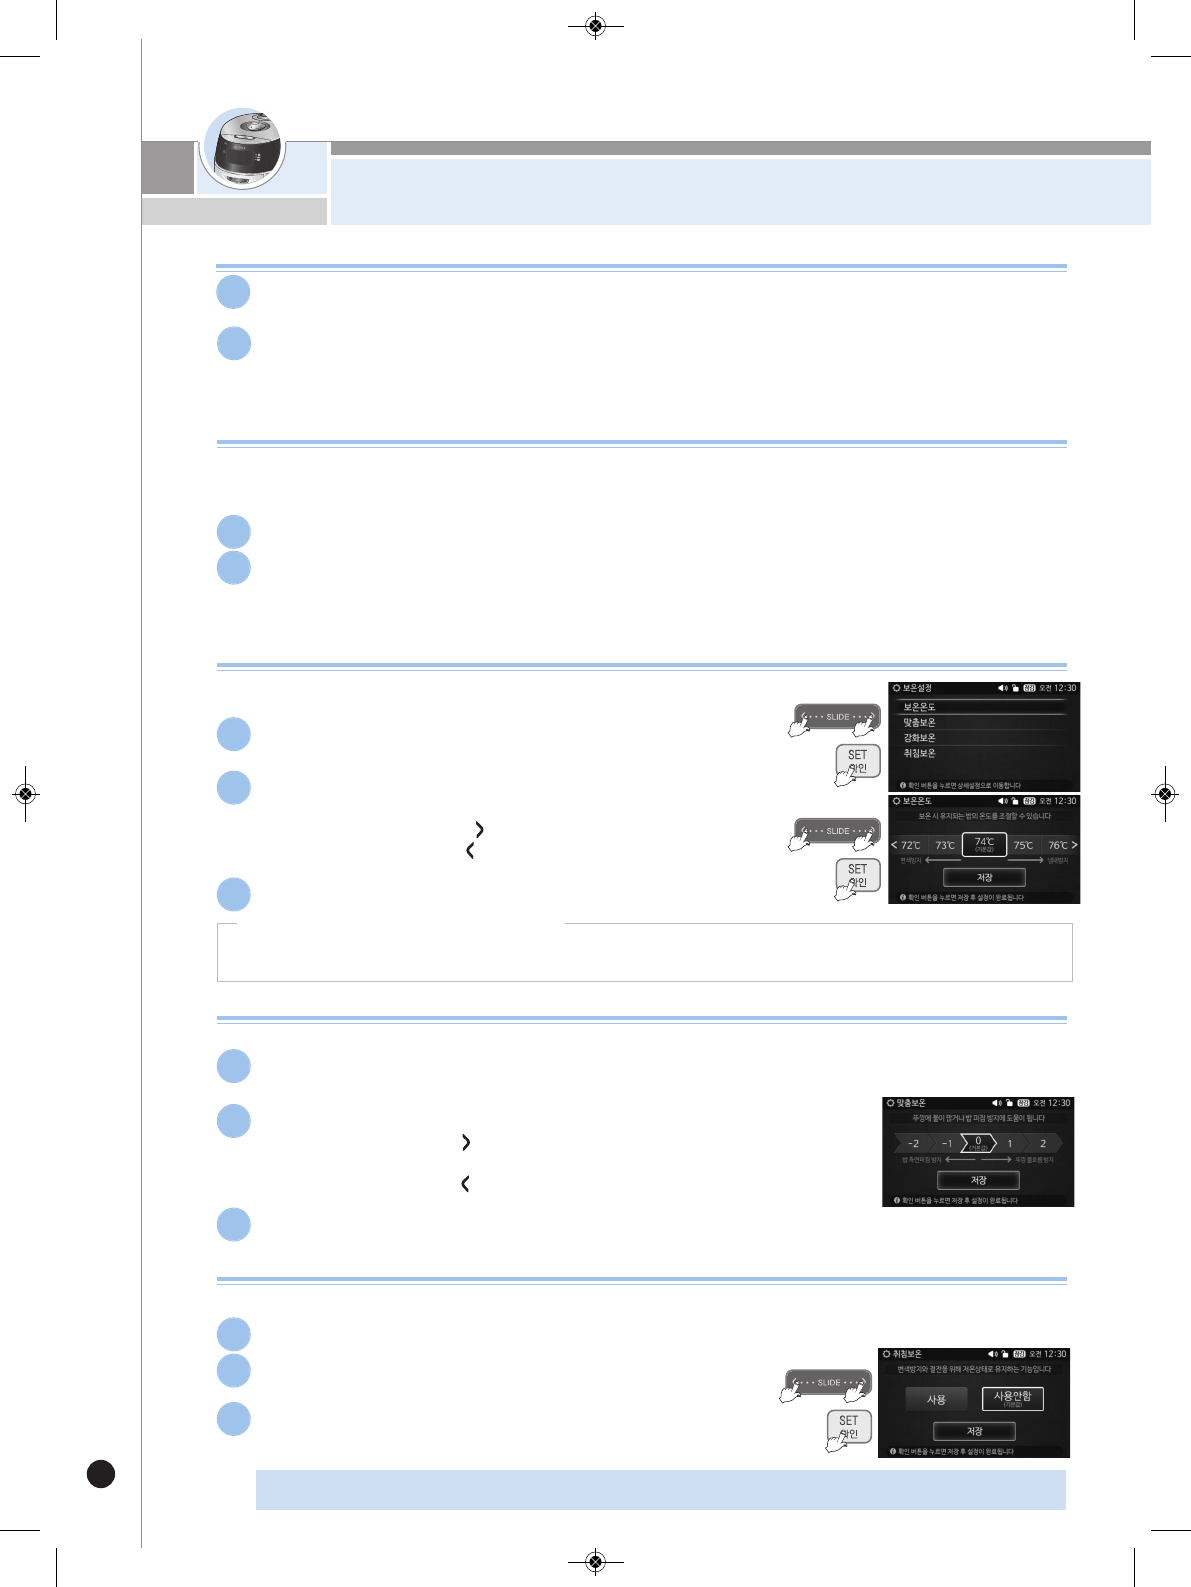
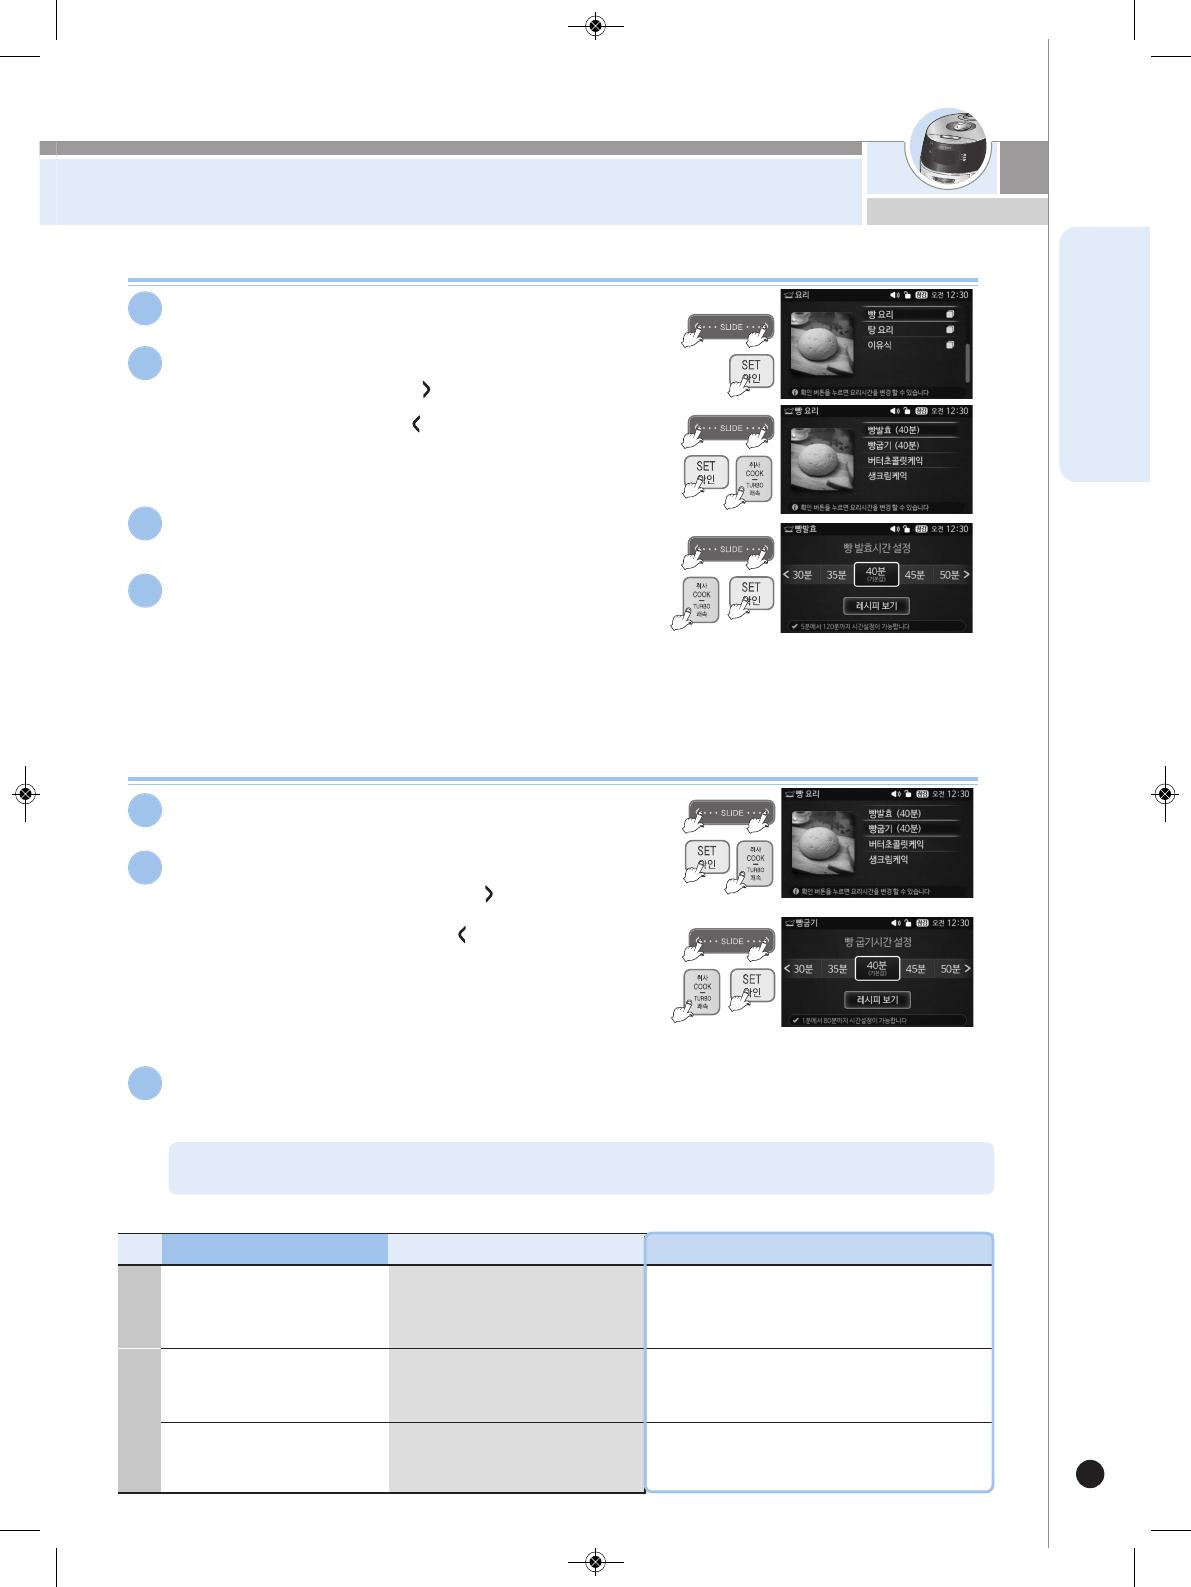
723530
4
Verklein
Vergroot
Pagina terug
1/32
Pagina verder
CRP-FH06 Fuzzy Series
1.08L(2~6Persons) / 1.08L(2~6
)
Operating Instructions
NO.1 CUCKOO
CUCKOO IH PRESSURE JAR COOKER
IH 압력보온밥솥애용셔서
감사립니다.
이 사용설명서는 잘 보관하여 주십시오.
사용 중에 모르는 사항이 있을 때나 기능이 제대로
발휘되지
않을 때 많은 도움이 될 것입니다.
Thank you very much for purchasing
CUCKOO
IH PRESSURE JAR COOKER
Read the following instruction manual before use.
Save this instruction manual for future reference. This
manual will be useful if you have any questions or have
problems operating the rice cooker.
383-987F.rev.0.qxp_383-915G rev.0 190*260.qxp 2017. 6. 26. 오전 9:39 페이지 1
…………………………………
3
………………………………………………………
9~10
……………………………………………………
59
………………………………………………
60~61
…………………………………………
62
………………………
62
……………………
63
………………………………
64
…………………
65
…………………………………………………
66~67
……………………
68
…………………………………
69
………………………………
70
………………………………………………………
71
………………………………
72
…………………
73
………………………………………………………
74
………………………
75
……………………………………
75
용하기전
IMPORTANT SAFEGUARDS
…………………………………
3
…………………………………………………………
4
…………………………………………………
7~8
…………………………………………………
35
…………………………………………
36~37
……………………………………
38
/
…………………
38
/ /
……
39
/
………………………
40
/
……………………
41
…………………………………
42~43
/
44
/ MY
………………
45
MY /
………
46
……………………………………
47
/
………
48
/
………
49
………………………………………
50
/
…………………
51
/
…………
51
………………………………
52~54
리안
……………………………………………………
55~58
CONTENTS
BEFORE USING
IMPORTANT SAFEGUARDS
………………………………
3
SPECIFICATIONS
……………………………………………
4
SAFETY PRECAUTIONS
…………………………………
5~6
P
ARTS DESCRIPTION
…………………………………
1
1
HOW TO CLEAN
………………………………………
12~13
MENU FUNCTION OVERVIEW
……………………………
14
WHEN USING
DAYTIME AND NIGHTTIME VOICE VOLUME SETTING
……
14
POWER SAVING / ENERGY EYE FUNCTION
…………
15
LANGUAGE SETTING FUNCTION
…………………………
15
HOW TO SET CURRENT TIME / SIMPLE SOFT FUNCTION
………
16
BEFORE COOKING RICE / FOR THE BEST TASTE OF RICE
……
17
HOW TO COOK
……………………………………………
18~19
MY MODE(CUCKOO Customized taste function)
………………
20
MY MODE(CUCKOO Customized cooking function)
………
20
HOW TO USE GABA RICE / MULTI-COOK FUNCTION
21
HOW TO USE MY RECIPE FUNCTION / RECENT COOK FUNCTION
……
22
HOW TO USE HOME BAKERY
……………………………
23
HOW TO USE PRESET COOKING
………………………
24
POWER-SAVING STANDBY FUNCTION
…………………
24
HOW TO USE POWER SAVE SCREEN LIGHT MODE
……
25
PRESET REHEATING FUNCTION
…………………………
25
TO KEEP COOKED RICE WARM AND TASTY
…………
26
REMAINING COOKING TIME DISPLAY / LOCK BUTTONS
……
27
PRODUCT INITIALIZATION / HELP FUNCTION
…………
27
BEFORE ASKING FOR SERVICE
CHECK BEFORE ASKING FOR SERVICE
…………
28~30
COOKING GUIDE
RECIPE
…………………………………………………
31~34
CONTENTS
/
/
/
/
/
/
………………………………………
76~78
……………………………………………………
79~82
IMPORTANT SAFEGUARDS
383-987F.rev.0.qxp_383-915G rev.0 190*260.qxp 2017. 6. 26. 오전 9:39 페이지 2
1
. Read all instructions before using this appliance.
2. Do not touch hot surfaces. Use handles or knobs.
3. To protect against fire, electric shock and / or injury to persons do not immerse cord, plugs, or Pressure
4. Close supervision is necessary when this appliance is used by or near children.
T
his appliance is not intended for use by young children without supervision.
5. Unplug from outlet when not in use and before cleaning.
Allow appliance to cool before putting on or taking off parts, and before cleaning the appliance.
6. Do not operate any appliance with a damaged cord or plug, after the appliance malfunctions, or has
been damaged in any manner. Return the appliance to the nearest authorized service facility for
examination, repair or adjustment.
7. The use of accessory attachments not recommended by the appliance manufacturer may result in fire,
electric shock, and / or injury to persons.
8. If the supply cord is damaged, it must be replaced by a special cord or assembly available from the
manufacturer or your service agent.
9. Do not use outdoors.
10. Do not let the cord hang over the edge of a table or counter, or touch hot surfaces.
11. Do not place on or near a hot gas, electric burner, or in a heated oven.
12. Always attach the plug to the appliance first, then plug the cord into the wall outlet. To disconnect, or
set all control to off, then remove the plug from the wall outlet.
13. Do not use this appliance for other than its intended use.
14. Extreme caution must be used when moving an appliance containing hot oil or any hot liquids.
15. Oversized foods, metal foil packages, or utensils must not be inserted into the appliance as they are a
risk of fire or electric shock.
16. A fire may occur if the appliance is covered or touching flammable material, including curtains,
draperies, walls, etc while in operation.
17. To reduce the risk of electric shock, cook only in the provided removable container.
18. This appliance cooks under pressure. Improper use may result in scalding injury.
Before operating the unit, properly secure and close the unit. See “Operating Instructions.”
19. Do not cook foods such as applesauce, cranberries, cereals, macaroni, spaghetti, or other foods.
These foods tend to foam, froth, and sputter, and may block the pressure releasing device.
20. Before use always check the pressure releasing device for clogging.
21. Do not open the pressure cooker until the unit has cooled and internal pressure has been reduced.
See “Operating Instructions.”
22. Do not use this pressure cooker to fry in oil.
23. Be sure that handles are assembled and fastened properly before each use.
Cracked, broken or charred handles should be replaced.
SAVE THESE INSTRUCTIONS
THIS APPLIANCE IS FOR HOUSEHOLD USE ONLY
WARNING : This appliance generates heat and releases steam during use. Use proper precaution to
prevent risk of burns, fires, other injuries, or damage to property.
1. Keep hands and face away from the Pressure Release Valve when releasing pressure.
2. Take extreme caution when opening the Lid after cooking. Severe burns can result from steam inside.
3. Never open the Lid while the unit is in operation.
4. Do not use without the Inner Pot in place.
5. Do not cover the Pressure Valve with anything as an explosion may occur.
6. Do not touch the inner pot nor any heating parts, immediately after use.
Allow the unit to cool down completely first.
ADDITIONAL IMPORTANT SAFEGUARDS
IMPORTANT SAFEGUARDS
383-987F.rev.0.qxp_383-915G rev.0 190*260.qxp 2017. 6. 26. 오전 9:39 페이지 3
4
SPECIFICATIONS / 제품규격
CRP-FH06 Fuzzy Series
AC120V, 60Hz
1090W
GLUTIN. RICE
(백미)
HIGH
HEAT GLUTIN. RICE ()
MIXED RICE
(잡곡)
HIGH
HEAT MIXED RICE (잡곡고화력)
SOFT GLUTIN.
(
SOFT
미)
TURBO GLUTIN. RICE
(백미쾌속)
TURBO MIXED RICE
(잡곡쾌속)
GABA RICE
(현미발아)
BROWN RICE
(현미)
HIGH HEAT BROWN RICE (현미고화력)
NUTRI. RICE
(영양밥)
BLACK BEAN RICE
(검은콩밥)
0.36L~0.72L(2~4cups)
0.36L~1.08L(2~6cups)
0.36L~0.72L(2~4cups)
0.18L~0.27L(1~1.5cups)
0.09L~0.18L(0.5~1cups)
1.4m
98.0kPa(1.0kgf/)
6.4kg
26.5cm
37.9cm
25.8cm
Model Name
(모델명)
Power Supply
(전원)
Power Consumption
(소비전력)
Power Cord Length
(전원 코드 길이)
Pressure
(사용압력)
Weight
(중량)
Width
(폭)
Length
(길이)
Height
(높이)
Cooking Capacity
(취사용량)
Dimension
(치수)
Note :
A. A short power-supply cord (or cord set) is provided to reduce the hazards from entanglement by a longer cord.
B. Extension cord should be used properly.
C. Extension cord usage for the rice cooker :
(1) The correct rated voltage should be used for the rice cooker.
(2) If the appliance is set on the ground, the extension cord should also be set on the ground.
(3) The cord wires and extension cord should always be arranged to prevent hazards to children.
This appliance has a polarized plug : (one blade is wider than the other).
As a safety feature, this plug will fit in a polarized outlet only one way.
If the plug does not properly fit in the outlet, turn the plug over.
If it still does not fit, contact a qualified electrician.
Please, keep this safety feature.
HOW TO USE EXTENSION CORD
HOW SERVICE IS HANDLED
The East and the Central Districts
The West and the Central Districts
TORONTO
VANCOUVER
USA Canada
PORRIDGE (죽)
Thick porridge
()
Thin porridge
(죽)
Design and Color of product maybe subject to change without notice.
383-987F.rev.0.qxp_383-915G rev.0 190*260.qxp 2017. 6. 26. 오전 9:39 페이지 4
SAFETY PRECAUTIONS
5
www.cuckooworld.com
ENGLISH











󰥋
󰥋
Warning
Caution
Use a single socket with the rated current above 15A.




Do not cover the automatic steam outlet or pressure
weight with your hand or face.


Please pay careful attention against water and
chemicals

Do not use the cooker near hot things such as stove,
gas stove or direct ray of light.


Do not alter, reassemble, disassemble or repair.


Warning Do Not
Do not use a rice cooker at a place where dust is
trapped or chemical material is located.



Do not use damaged power cord, plug, or loose socket.



Do not clean the product with water or pour water in
the product.



Do not unplug and plug the power cord over and
over.

Do not turn the Lock/Unlock Handle to
Unlock” while cooking.




Do not insert metal objects such as pins and wires
or any other external substances in the automatic
steam exhaust outlet or any other slot.
Keep the cooker out of reach of children.

Do not use cooker without the inner pot.




To separate the rubber packing, please pull it out from
the cover plate as shown in the picture.


Keep plug and power cord clean from any stains or
foreign objects by cleaning regularly with a clean cloth.



Don’t spray or put any insecticides or chemicals.



Don’t let foreign substances such as needle, cleaning pin,
or metal get in or block the in let/out let pipe or gape.



Do not open the LID while in heating and cooking.




Do not use pots that are not designed for the cooker.
Do not use abnormal pot and do not use without the
inner pot.

Do not bend, tie, or pull the power cord by force.


Do not cover the automatic steam outlet or pressure
weight with a duster, a towel, or apron, etc.




383-987F.rev.0.qxp_383-915G rev.0 190*260.qxp 2017. 6. 26. 오전 9:39 페이지 5
SAFETY PRECAUTIONS
6
Clean any dust or external substances off the
temperature sensor and inner pot.

D
o not use cooker on a rice chest or a shelf.
Do not plug or pull out the power cord with wet hands.

Do not place heavy objects on the power cord.


Do not change, extend or connect the power cord
without the advice of a technical expert.






Caution Remember
Do not move the product by pulling or using the
power cord.

Please contact a dealer or service center when there
is a strange smell or smoke.


Do not use over the maximum capacity.



Please call customer service if the inner pot coating peels off.



Do not place on rough top or tilted top.


Do not hold the cooker by the inner pot handle.



Always turn the Lock/Unlock Handle to "Lock"
when not in use.

After you finish cooking, do not try to open the cooker
by force until the steam is completely released.


Cautiously open the top cover after cooking is completely
finished to avoid dangerous steam and burns.
Be cautious when steam is being released.
If possible, only use warming function when cooking
white rice. Other foods are easily discolored.
When you pull out the power plug, dont pull the
power cord. Please, safely pull out the power plug.




Please clean the body and other parts after cooking.











Wipe off any excessive water on the cooker after
cooking.


In case of a blackout during cooking, steam from
a rice cooker will be released automatically.
Thus, the quality of rice is lower than normal.





Don’t use the cooker near a magnetic field.

Do not drop or impact the cooker.

Use product on a flat surface. Do not use on a cushion.
Please avoid using cooker on unstable location prone to
falling down.


Use inner pot only for intended use.
And do not heat up the inner pot on the gas stove.


Please pull out the plug when not in use.
Please use the cooker for it’s intended purpose.


Do not touch metallic surface of the inner pot and
pressure weight after cooking or warming.



Recommended detergent for inner pot cleaning
(inside, outside)


 





383-987F.rev.0.qxp_383-915G rev.0 190*260.qxp 2017. 6. 26. 오전 9:39 페이지 6
PARTS DESCRIPTION
11
www.cuckooworld.com
ENGLISH
Interior Parts Description
Accessories
Manual & Cooking
Guide
Rice Scoop
Rice Measuring Cup
Cleaning Pin
(Attached on the
bottom of the unit)
Empty excess water from
dew dish after cooking or
keep warming. Leaving water in
the dew dish without cleaning will result in strange odor.
Dew Dish
DET.
C
over Holder
Handle
Place inner pot into the
body property.
Inner Pot(Oven)
Pressure
Packing
Pressure
Control Plate
Holder Guide
Power Plug
Power Cord
Temperature Sensor
Control Plate
Packing
Control Plate
Packing Cover
Pot Handle
DET. Cover
Lid Assy
Steam Plate
Exterior Parts Description
Pressure Weight
Stabilizes steam inside oven. When
cooking pressure weight will twist and
rotate to release steam.
Soft Steam Cap
Automatic Steam Exhaust Outlet
(Solenoid Valve)
Automatically releases steam after cooking /
warming is completely finished.
Lock/Unlock Handle
(Set the handle to lock when
cooking or warming the rice)
Handle must be turned to 'Lock' in order for
cooker to operate.
Lid Clamp
Turn handle to 'Unlock', and press down
the lid clamp to open cooker.
Control Panel
Standby Power Blocking Switch
When the power is not supplied
after the power cable is connected,
check if the switch is (ON).
-Enabled: (ON) -Disabled: (OFF)
(The standby power is blocked, saving the energy)
In case of blackout during cooking, steam from
rice cooker will automatically be released.
383-987F.rev.0.qxp_383-915G rev.0 190*260.qxp 2017. 6. 26. 오전 9:39 페이지 11
HOW TO CLEAN
12
- To prevent foul odor clean the lid assy after the rice cooker has cooled and the rice cooker is unplugged.
- Clean the body of rice cooker and the cover with a dry towel. Do not use benzene or thinner to clean the
r
ice cooker. The layer of starch, which is the residue from rice cooking, may appear on the detachable
cover or inside of rice cooker. This layer does not cause any health risk.
- Do not put materials like screws into holes of detachable cover. Check the back cover and front cover.
Detachable Cover & Pressure Packing
After cleaning detachable over, make sure to place it back unto the lid.
Unless detachable cover is mounted, preset cooking cannot be done. (Alarm may sound while keeping warm.)
Make sure to clean the clean steam
vent after/before use. Do not try to
pull out the clean steam vent and
safety packing, clean it with care.
Make sure the clean steam vent
and safety packing are installed
completely after/before use. If the
steam vent is detached, or not
attached completely, please
contact customer service.
When washing inner pot use a soft
sponge/clothe with dish detergent. Do
not use harsh sponge or brushes, as it
can cause scratches and damage the
coating. Make sure to completely dry
off excess water from the Inner Pot
after cleaning.
Use a damp cloth to wipe down the
top edges of the main body interior.
Make sure that body interior is
dry and clean before and after
using the cooker.
Steam Vent Inner Pot
Pressure Packing
Inside of the Main body
Please re-install a rubber packing into the cover plate after washing or replacing the rubber packing.
After aligning rubber packing to the packing
guide and pressing down on all 6 indicators,
completely press down the rubber packing
until it is completely inserted
To re-install rubber packing,
align all the rubber packing to
the to packing guide and press
down on all 6 markers.
Rubber packing guide Oven cover point
To separate rubber packing,
pull out the cover plate as
shown on image.
Please check to make sure that the rubber packing is
properly fitted to the cover plate. If improperly fitted,
steam will leak when cooking.
To ensure your cooker lasts longer, make sure
to clean and maintain your rice cooker regularly.
Rubber
packing
contact
surface.
1. Handle must be turned to “ ”(Lock) during cooking.
When the Lock sign is turned on it means that it is ready to cook.
2. After cooking, turn the handle from “ ”(Lock) to “ ”(Unlock) to
open lid.
If there is unreleased steam inside the Inner Pot it might be
hard to turn the handle. In this case twist the pressure weight and let
the excess steam out. Do not open by force.
Handle must be turned to “ ”(Unlock) when opening and closing.
If the lamp does not turn on, it would not
operate the “COOK/TURBO” button. Make
sure the handle is located in “ ”(Lock).
Caution
Do not use or place any sharp objects in the inner pot (fork, spoon,
chopsticks, etc.).
- The coating of the inner pot may peel off.
When it attaching, hold the
detachable cover knob
and align it with the hole in
the lid, then press it down
firmly.
Wash the cover with soft dish
detergent and sponge frequently,
and wipe
off moisture with dry cloth.
Make sure to clean the edge of the rubber
packing to ensure consistent cooking results
and extended lifespan of the cooker.
To remove and clean
detachable cover,
turn the cover holder
counter clockwise to
release cover.
As shown in the figure,
align the center of the
detachable cover with the
center of the protrusion
and press the left and right
sides of the detachable
cover firmly so that the
protrusions come out as
far as possible.
Align the holder
with the arrow
mark and turn it
clockwise to fix it.
Inner pot
contact surface.
The protrusion
H
OLDER OPEN
H
OLDER CLOSED
As depicted
in the picture,
please align
holder with
arrow mark
to open and
close.
383-987F.rev.0.qxp_383-915G rev.0 190*260.qxp 2017. 6. 26. 오전 9:40 페이지 12
HOW TO CLEAN
13
www.cuckooworld.com
ENGLISH
How to Clean the Pressure Weight Nozzle.
2.
To close the lid turn the 'Lock
/Unlock' handle counter-clockwise.
1. Check to make sure the inner pot is
placed correctly inside the main body.
3. If there is excess steam inside the
inner pot it might be difficult to lock
the handle. Twist the pressure
weight and allow excess steam
to release. Then try to turn the
handle again.
Do not try to close the lid by force. It can damage the cooker and cause problems.
When Lid Does Not Close Perfectly
Remove the dew
dish from the
cooker.
Detach the dew dish
by pushing down.
Clean the dew dish
with soft dish
detergent.
Securely fit the dew
dish back to the
cooker after
cleaning.
Re-insert the dew dish
by following the arrow
found on the image
above.
How to Clean Dew Dish
neutral detergent
The valve hole of the pressure weight allows steam to release. Check regularly to ensure that it is not
blocked. If the valve hole of the pressure weight is blocked, hot steam and hot content within the cooker can
cause serious injury.
Do not purpose the cleaning pin for any other purpose except to clean the valve hole of the pressure weight.
Cleaning Pin
If the pressure valve hole is clogged, puncture it with the cleaning pin
How to
Disassemble
Pressure Weight
Twist the 'Lock/Unlock' handle to 'Lock' and pull the pressure weight upwards and twist counter-
clockwise to unscrew and remove the pressure weight.
Puncture the clogged valve hole with the cleaning pin and reassemble the Pressure Weight it by
turning it clockwise.
When the pressure weight is properly assembled, it can freely be turned.
Pressure Weight
A
tta
c
h
e
d
o
n
th
e
b
o
tto
n
o
f th
e
u
n
it.
Alien
Substance
Soft steam cap
How to Clean the Soft Steam Cap
Do not touch the surface of the soft steam cap right after cooking. You can get burned.
Detach the soft
steam cap as
shown on the
image.
Press the hooks in the front in direction of arrow to detach
the bottom case. Clean the parts frequently with a sponge
or a neutral detergent.
Before reassembling the packing with the bottom case, make
sure to put the packing into the packing groove.
In order to separate the steam cap into parts, pull bottom part
downward by pressing the extrusion parts on both sides.
Before reattaching the
parts, fit the bottom case
into the groove of steam
cap perfectly. Press the
hooks according to the
arrow to assemble the
parts together.
After attaching the
soft steam cap on
the lid as shown in
the image press
the cap firmly to
reassemble cap
back into the
product.
packing
groove of steam cap
packing groove
383-987F.rev.0.qxp_383-915G rev.0 190*260.qxp 2017. 6. 26. 오전 9:40 페이지 13
MENU FUNCTION OVERVIEW /DAYTIME AND NIGHTTIME VOICE VOLUME
SETTING
14
MENU FUNCTION DESCRIPTION
When you see a similar image like the one on the right side on the menu display,
it means the cooker is in 'Waiting' mode.
PressCancelbutton to enter therWaiting’ mode.
Press down the button until you hear the buzzer sound.
The image of the plate may differ depending on model.
(Screen on standby)
Warm/Reheat
Button
Use to warm or reheat.
(Refer to page 26)
Previous Button
Allows you to navigate to
the previous screen or
section of the selected
mode.
Move Left Button
Cook/Turbo Button
Use to start cooking.
Set Button
Allows you save and
set the selected mode
setting.
Move Right Button
Status LED
Color LED screen
displays current cooker
status. (Refer to page
15)
Cancel Button
Allows you to cancel current
selection setting or release
remaining steam inside the
inner pot. (Refer page 29)
Display
Nighttime Voice Volume Setting Function
Select 'Nighttime Voice Volume' using the touch slider arrow and press the SET button.
2
Adjust your volume level using the touch slider arrows.
3
Press SET button to save settings.
4
Nighttime volume level will depend on the volume set for the daytime and will be noticeable during a set
time (10:00pm ~ 5:59am.).
Daytime Voice Volume Setting Function
Adjust your volume level using the touch slider arrows.
3
Press SET button to save settings.
4
Volume will increase(right)/decrease(left) by one step each time you
press the touch slide arrows.
Enter 'Setting' in the home screen by selecting the 'Volume Setting' and press
the SET button.
1
Select 'Daytime Voice Volume' using the touch slider
arrow and press the SET button.
2
Control the volume of your cooker by following the instructions below.
If left idle for 15 seconds or during setting, you will hear voice guidance.
If still left idle after an additional 15 seconds, settings will be canceled without saving the changed value.
Control the nighttime volume (10:00pm ~ 5:59am) of your cooker by following the instructions below.
Control the volume of your cooker by following the instructions below.
1
383-987F.rev.0.qxp_383-915G rev.0 190*260.qxp 2017. 6. 26. 오전 9:40 페이지 14
POWER SAVING / ENERGY EYE / LANGUAGE
SETTING FUNCTION
15
www.cuckooworld.com
ENGLISH
Power Save Screen Light
Automatically adjusts screen brightness to reduce power consumption.
If cooker is left idle for a certain period of time while power is still on, cooker will
enter screen saver mode.
1
Th
i
s
f
u
n
ct
i
o
n
m
a
y
b
e
t
u
r
n
e
d
o
n
/
o
f
f
i
n
t
h
e
S
e
t
t
i
n
g
s
f
u
n
ct
i
o
n
.
(
R
e
f
e
r
t
o
p
a
g
e
2
5
)
Power Save Screen Automatic
If you do not press any button for a long time, this function turns OFF the screen to reduce power consumption.
If you want to manually enter the power-saving mode, select "Power-Saving" in the home screen, and press SET button.
If you do not press any button for a long time while standby mode or selecting
menu is under way, the product will enter the screen saver mode automatically.
2
If you do not press any button for a long time while keep warm mode and preset, the germination
(Gaba Rice) is under way, the product will enter the screen saver mode automatically.
1
The color of the current mode is displayed in the Status LED.
-
keep warm mode : KEEP WARM LED
-
Preset / germination Gaba Rice mode : PRESET LED
The product will enter the power-saving mode after the preset standby time.
"Power-Saving LED" will be displayed.
In Cook or Reheat mode, the product will not enter the screen saver mode.
3
If you press a button during this mode or turn the Lock/Unlock handle, screen
saver mode will be canceled.
4
STATUS LED Display Function
Notifies current status of the product with back lit LED.
Keep Warm
Cook / Reheating / Auto Clean
Power Save
Preset / Germination
Keep Warm LED
LED OFF
Power Save LED
Preset LED
Product Status Status LED
STATUS LED will not display during
COOK, REHEATING, AUTO CLEAN
since the screen will always be on.
Energy Eye Function
The luminance sensor automatically recognizes ambient brightness during standby, cooking, warming and preset timer for minimizing
power consumption of the product. If you want the power saving mode to start when it’s darker than the current level(Step 2), set the
mode to Step 1. If you want the mode to start when it’s brighter than the current level, set the mode to Step 3.
Select the step you want using the touch slider. The default value is 'Step 2.'
2
Enter 'Setting' in the home screen, select the 'Energy Eye', and press SET button.
1
Press SET button to save setting.
3
Language Setting Function
Choose between Korean and Chinese language for screen text and voice navigation.
Enter 'Setting' in the home screen, select the 'Voice setting', and press SET button.
1
Select the voice you want using the touch slider.
2
Press SET button to save setting.
3
If left idle for 15 seconds or during setting, you will hear voice guidance.
If still left idle after an additional 15 seconds, settings will be canceled without
saving the changed value.
383-987F.rev.0.qxp_383-915G rev.0 190*260.qxp 2017. 6. 26. 오전 9:40 페이지 15
HOW TO SET CURRENT TIME /
SIMPLE SOFT FUNCTION
16
Enter 'Setting' in the home screen, select the
'current time setting', and press SET button.
1
How to Set Current Time
You can set the hour with the touch slider and
press SET button. After that you can set the
minutes.
2
In case of 12:00 it is 12:00 pm.
If left idle for 15 seconds or during setting, you will hear voice
guidance.
If still left idle after an additional 15 seconds, settings will be canceled
without saving the changed value.
Press SET button after it's finished to save current
setting.
3
Press BACK button to move from the 'minute' to 'hour' screen.
About Lithium Battery
This product contains lithium battery for improving
blackout compensation and time. Lithium battery lasts
for 3 years.
When current time is not displayed on the screen, it
means the batter is expired and needs replacement.
What is Blackout Compensation
This product remembers and maintains previous settings and
processes. After finishing blackout, it operates immediately.
If blackout happens during cooking, the cooking time will be
delayed depending on blackout time.
If the rice became cold because of blackout, warming will be
canceled.
You can soak grains before starting cooking by setting a desired time with this function.
SIMPLE SOFT FUNCTION
Enter 'Rice' in the home screen, Select your
desired menu and Press COOK/TURBO button.
CUCKOO started the menu for glutinous rice, mega heat glutious
rice, mixed rice, mega
heat mixed rice, nutritious rice, black bean rice.
1
If you select Add Soaking Time in 5 seconds after
starting cooking and then press SET button, it will
enter the setting mode for the additional soaking time.
You can select among 0, 10, 30 and 60 minutes.
2
Adjust the soaking time with the touch slider.
If you press SET button after setting the soaking time, the product will immediately
show the cooking status screen.
If you press the 'CANCEL' button while setting the time, it will shift into the cooking
status screen without saving the set value.
If you press the 'CANCEL' button for a second or longer during soaking, it will
cancel cooking and return to the home screen.
By adding soaking time, the selected value will be added to the default soaking time for each menu.
Soaking time is counted by 1 minuite unit.
The longer the soaking time, the melanoizing effect.
If you unlock the Lock/Unlock Handlle during the Soaking Function, the cooking will be canceled.
3
383-987F.rev.0.qxp_383-915G rev.0 190*260.qxp 2017. 6. 26. 오전 9:40 페이지 16
BEFORE COOKING RICE / FOR THE
BEST TASTE OF RICE
17
www.cuckooworld.com
ENGLISH
It will be hard to open the lid during warming, or right after it has
finished cooking, So push the pressure weight to the side and
allow the steam to release.
Make sure the handle is in the “Lock” position during warming
or reheating.
It is recommended to evenly stir the cooked rice after cooking.
The rice taste is improved. (For a small quantity of rice, pile up
the rice on the center area of the inner pot to keep warm)
Do not keep the rice spatula inside the pot while warming the rice.
When using a wooden rice spatula, it can create serious bacteria
and odors.
The mixed and brown rice cannot be in such good condition as
white rice while in warm function due to their characteristics.
During warm mode, the rice can rise and turn white. In this case,
mix the rice.
It would be better to warm the rice for less than 12 hours because of odors
and color change. The cooked rice, which cooked by pressure cooker, is
more prone to changing color than the rice cooked by general cooker.
After 24 hours of heat preservation, the lamp of heat preservation time lapse
blinks, indicating that long time has passed in heat preservation condition.
If you have cooked rice with a separate electric heating appliance or fire with
gas, put the cooked rice in the pot and start Keep Warm mode according to
the warming instruction.
It is recommended to evenly stir the cooked rice after cooking.
The rice taste is improved.
(For a small quantity of rice, pile up the rice on the center area
of the inner pot to keep warm).
Cautions for Keeping Warm
When Odors are Noticeable During the Warming Mode
Clean the lid frequently. It can cause growth of bacteria and odors.
Ev
en though exterior looks clean, there might be germs and it can cause odor so please be sure to use automatic sterilization
(steam cleaning) menu for cleaning. Clean the inner pot completely after automatic cleaning function is done. (Refer to page 18)
Clean the inner pot properly to prevent rice from smelling after you cook and steamed dishes.
Cautions for Cooking
If possible, buy a small amount of rice and keep the rice some
place where it ventilates well and avoids a direct ray of light. It
can prevent evaporation of rice moisture.
If the rice has been unsealed for long, rice can be dry and stale.
In this case, you should pour the half of water more. It’s tastier.
If possible, do not use the preset time function when rice is too
dry and pour the half of water more. If you cook over the
10 hours or dried rice, rice can be crisp or half cooked.
Even worse condition, rice can be cooked different tastes each
level.
For the best taste of rice, check the following points carefully.
Rice for 4 persons (4 cups)
BEFORE COOKING RICE
1
Use a dry cloth to clean inner pot.
Use a soft sponge/cloth to wash the inner pot.
2
Use measuring cup to measure desirable cooking amount.
Make the rice flat to the top of measuring cup and it is serving for
1 person. (ex: for 3 servings 3 cups, for 6 servings 6 cups)
3
Use another container to wash the rice.
4
Adjust water level.
Place inner pot on the flat surface to adjust water level.
The marked lines in the inner pot are water level.
If you want to cook old or soft rice, pour more water than measured scale.
Glutinous rice for 4 people (4 cups) pour water to ‘4’.
Overcooked rice: pour less water than measured scale.
When rice is undercooked or firm/hard: It is caused by differences in rice varieties or
water content (old rice). In this case, please add 1~10% of more water.
※ GLUTIN. RICE : When using "long grain", it is recommended to cook for
less than 4 servings On the basis of “MIXED RICE" water scale.
5
Please plug the power cord before inserting inner
pot in the rice cooker.
Put the inner pot correctly.
Wipe off or remove any substances on the temperature sensor or bottom of the inner pot.
Please place the inner pot correctly into the rice cooker.
6
Plug the power cord and turn the handle to ''Lock''.
383-987F.rev.0.qxp_383-915G rev.0 190*260.qxp 2017. 6. 26. 오전 9:40 페이지 17
18
HOW TO COOK
The cooked rice can be light yellow at the bottom of the oven, because this product is designed to improve
pleasant flavor and taste. Especially, melanoizing is more serious at the Preset Cooking than just Cooking.
It does not mean malfunction.
When mixing other rice with Glutinous, Melanoizing effect could increase more than Glutinous cook setting.
Melanoizing effect
How to use AUTO CLEAN (Steam Cleaning)
Press SET button in the home screen (Rice) and the
'Rice Menu' will appear.
Check if the removable cover is installed.
Before cooking, check that the pressure weight well placed horizontally.
Each time you touch the slider on the right, the menu shifts from
Glutin.
RiceHigh Heat Glutin. RiceSoft Glutin. RiceMixed
RiceHigh Heat Mixed RiceBrown RiceHigh Heat Brown
RiceGABA Rice(3hour)Black Bean RiceNutri. RiceFive-Frain
Rice
Boiled BarleyPea RiceBoiled Brown Rice with Red
BeansRice PorridgeChinese Porridge in order.
1
Press the 'COOK/TURBO' button after selecting your
desired Rice menu, and the product will start cooking.
You must turn lid handle to lock before cooking. Then press the pressure
Cook/Turbo button.
Unless lid handle is not turned to close, you get alarm with “E01 ”, and
sound “turn lid handle to lock”
If you select Turbo within 5 seconds in Glutinous or Mixed Rice mode and then press the 'COOK/TURBO'
button or SET button, it will shift into the Turbo Glutinous or Turbo Mixed mode and will start cooking again.
During cooking, the expected time will be displayed on the screen.
The actual cooking time may vary depending on the cooking capacity, water temperature, and cooking conditions.
2
E
x) In case of selecting Glutious Rice.
You can hear a voice, Glutinous rice.
Cooking thoroughly.
The cooktime remaining on the display is shown from
cooking thoroughly. The cook time is different according
to the menu.
Be careful not to burn yourself from the automatic steam
outlet.
3
The end of cooking.
When cooking is completed, warming will start.
The status LED will get turned ON.
If you don't want to keep the cooked rice warm, press Cancel for 1 seconds.
When cooking ends, stir rice equally and immediately.
If you don't stir rice at once and keep it stagnant, rice will
go bad and smell bad.
If the lid handle is not working well, take out the steam completely out of inner pot by turning over pressure weight.
Do not press ‘Cancel’ button during cooking.
4
Ex) In case of cooking Glutinous.
-
Pour water up to scale 2, make sure to close and lock the cover.
-
If you press the 'COOK/TURBO' Button after selecting the Automatic
Sterilization mode, it starts cleaning immediately.
-
If you Press SET button after selecting the Automatic Sterilization mode,
you will hear the voice guidance and then press SET or COOK/TURBO
button to start automatic cleaning.
-
If you press the 'CANCEL' button in cleaning mode for about 1 second,
the mode will be canceled and it will return to the home screen.
Ex) When the steam starts to get discharged
383-987F.rev.0.qxp_383-915G rev.0 190*260.qxp 2017. 6. 26. 오전 9:40 페이지 18
HOW TO COOK
19
www.cuckooworld.com
ENGLISH
MENU CAPACITY COOKING TIME
2 ~ 6 persons
AUTO CLEAN (Steam Cleaning)
Pour water up to the line 2 for GLUTIN. RICE
When keeping warm, press Cancel to stop and select the desired function.
When you cook after using options like Multi Cook, Home bakery, and baby food the odor may stick.
(refer to the product care method section to wipe the packing and cover and clean with the auto sterilization function).
Cooking time for each option may vary depending on user's environment such as voltage, amount/temperature of water, etc.
When you seeEdo on display, turn the Lock/Unlock handle towards (Unlock), and then turn it back towards (Lock) for
it to work properly. (This does not apply when you turned the handle towards (Unlock) once or more after finishing cooking
in the previous cooking.)
See detailed guide to cooking by the menus.
WATER LEVEL
SOFT GLUTIN. RICE
GLUTIN. RICE
MIXED RICE
GLUTIN. RICE
-
BROWN RICE RICE
After cooking in white rice turbo mode or cooking of small serving, discard water. In case of small servings white rice turbo
cooking, more water may be required than other menu.
MIXED RICE
GLUTIN. RICE
Used to cook sticky and nutritious rice.
SOFT GLUTIN. RICE
Used to cook a little sticky and nutritive white rice than Glutinous rice.
How to Use the Cooking Menu
GABA RICE
Used to cook germinated brown rice.
Used to cook a variation of mixed or brown rice.
BABY FOOD
It starts cooking baby food.
NUTRI. RICE
Used to cook nutritious rice.
RICE RORRIDGE
In this mode you can make thick porridge.
AUTO CLEAN
(Steam Cleaning)
This menu is used to eliminate small
soaked after cooking or warming.
TURBO
GLUTIN.
RICE
·
Pressing ‘COOK/TURBO’ button twice will switch to quick cooking ‘PRESSURE COOK’ button twice will switch to
quick cooking and shorten the cooking time.
(It takes about 14 minutes when you cook the Glutinous rice for 2 persons.)
Use this turbo cooking function only for cooking rice for less than 4persons. (The condition of the rice will not be
good for more than 4 persons.)
If you soak the rice in water for about 20minutes before cooking the rice and then cook the rice in turbo cooking
course, the rice will taste good.
HIGH HEAT
(GLUTIN.RICE/
M
IXED RICE/
BROWN RICE)
Used to cook more sticky and soothing cooked rice.
TURBO
MIXED
RICE
·
If selected turbo mixed rice, total cooking time will be reduced.
(It takes about 26minutes for cooking mixed rice for 2 people.)
Turbo mixed rice cooking lessens the quality of food, so only use for less than 4 people.
If you soak the rice in water before cooking the rice and bean then cook, the rice will taste good.
BLACK BEAN RICE
Used to cook Black bean rice.
HOME BAKERY
This menu is used to either ferment or bake the bread.
CHINESE PORRIDGE
In this mode you can make thin porridge.
BROWN RICE RICE
Used to cook variation of brown rice.
GLUTIN. RICE
TURBO GLUTIN. RICE
HIGH HEAT GLUTIN. RICE
NUTRI. RICE
MIXED RICE
TURBO MIXED RICE
HIGH HEAT MIXED RICE
BLACK BEAN RICE
SOFT GLUTIN. RICE
BROWN RICE RICE
HIGH HEAT BROWN RICE
RICE RORRIDGE (Thick Porridge)
CHINESE PORRIDGE (Thin Porridge)
BABY FOOD
HOME BAKERY
Thick porridge
Thin Porridge
2 ~ 4 persons
2 ~ 6 persons
2 ~ 4 persons
2 ~ 4 persons
2 ~ 4 persons
2 ~ 4 persons
2 ~ 4 persons
2 ~ 4 persons
2 ~ 4 persons
2 ~ 4 persons
1 ~ 1.5 cups
0.5 ~ 1 cups
Approx.
25~31
min
Approx
22
min
Approx.
14~19
min
Approx.
31~42
min
Approx.
29~33
min
Approx.
40~46
min
Approx.
29~35
min
Approx.
43~48
min
Approx.
43~47
min
Approx.
49~54
min
Approx.
52~54
min
Approx.
51~56
min
Approx.
77~104
min
Approx.
85~96
min
383-987F.rev.0.qxp_383-915G rev.0 190*260.qxp 2017. 6. 26. 오전 9:40 페이지 19
MY MODE(CUCKOO Customized taste function) /
MY MODE(CUCKOO Customized cooking function)
20
- The level increases/decreases by one step each time you slide it.
The higher the level, the softer and richer the taste gets.
- You may select your preferred level for the 'Soft' taste with the touch
slider and then press SET button to select the level for the 'Rich' taste.
How to Use
''
MY MODE
''
CUCKOO’s patented technology based on variable circuit design. User can select the degree of
“softness” and “glutinosity & tastiness” to meet a user’s desire.
What is
''
MY MODE
''
?
Longer “SOFT” Time : rice becomes soft and glutinous. (selectable in 4 steps)
Longer “SWEET” Time : rice becomes tastier(selectable in 4 steps) [melanoizing will occur]
Both functions above can be selected simultaneously or separatetly
MY MODE Function
When setting your preferred taste, the cooking time may get longer depending on
the selected time.
Selecting the level 1 (default value) would disable My Mode
Enter 'Setting' in the home screen, select 'Cook Setting' and then select 'My Mode.'
1
Select your desired menu and Press SET button.
2
You may select your preferred level for each 'Soft'
and 'Rich' taste with the touch slider.
3
Press SET button after it's finished to save the current
setting.
4
Disabling Customized Taste mode
5
In another 15 seconds after it's finished, it will be canceled without saving the changed value.
Cuckoo Customized Cooking Function
In another 15 seconds after it's finished, it will be canceled without saving the changed
value.
The level increases/decreases by one step each time you slide it.
:
melanoising prevention
:
be half-cooked prevention
Enter 'Setting' in the home screen, select 'customized cooking' and then select 'My Mode.'
1
Select your desired menu and Press SET button.
2
Press SET button after it's finished to save the current setting.
4
Select the step you want using the touch slider.
3
1. ‘CUCKOO customized cooking function’ applies to GLUTIN. RICE, HIGH HEAT GLUTIN. RICE, TURBO GLUTIN. RICE, NUTRI
RICE, MIXED RICE, HIGH HEAT MIXED RICE, TURBO MIXED RICE, BROWN RICE, HIGH HEAT BROWN RICE, GABA RICE,
BLACK BEAN RICE collectively.
2. Set up the step of customized cooking function to taste. The scorch can occur when cooking in high level mode.
3. Cook is subject to be set differently depending on the percentage of water content and the condition of rice.
While cooking, you can control the heating temperature (both high and low) depending on your preference.
CUCKOO Customized taste functionapplies to GLUTIN. RICE, HIGH HEAT GLUTIN. RICE, MIXED RICE, HIGH HEAT
MIXED RICE, BROWN RICE, HIGH HEAT BROWN RICE, GABA RICE, BLACK BEAN RICE collectively.
383-987F.rev.0.qxp_383-915G rev.0 190*260.qxp 2017. 6. 26. 오전 9:40 페이지 20
HOW TO USE GABA RICE/MULTI-COOK FUNCTION
21
www.cuckooworld.com
ENGLISH
Using
''
GABA
''
Menu
Enter 'Rice' menu in the home screen, select the 'Gaba Rice' and press the
'COOK/TURBO' button.
1
When the
''
GABA
''
is selected,
''
3H
''
is indicated in the display
If you don't want to grow the size of the sprout germinated and want to eat earlier, select the GABA Rice
while skipping the pre-germination phase, and then press the 'COOK/TURBO' button.
(nutrients ingredients do not vary significantly by the size of germ).
During hot seasons, longer germination time may generate odor. Reduce germination time.
GABA cooking feeds up to 4 people.
City water can be used for germination. However, filtered or drinkable water is recommended.
Germination may not be properly performed in hot or boiled water even after cooking.
Germination rate and germ growth may differ by the type of brown rice, condition, or period of storing.
- The brown rice should be within 1 year from harvest, and not long since pounded.
In GABA mode, preset on 3H may not be possible. If you want to preset the GABA, set up BROWN RICE menu.
The taste of rice could be different depending on a kind of brown rice.
Use customized taste function or control the amount of water for your taste. (Refer to Page 20)
Depending on the user’s environment or the condition of the rice, the sprout may not be visible.
If you press the 'COOK/TURBO' button, it will start cooking immediately for the displayed germination time.
Press SET button and then you can view the recipe.
Press the 'COOK/TURBO' or SET button in View Recipe mode and it will start cooking.
When starting cooking, the remaining time will be displayed with the unit of minutes.
Enter 'Dishes' menu in the home screen, select
the 'MY Multi-Cook' and press the 'COOK/TURBO'
button.
1
Press SET and then 'COOK/TURBO' button to start cooking.
3
In Multi Cook mode, the remaining time will be displayed.
If you press SET button after selecting the cooking time, the value will be
saved and you can view the recipe.
Press the 'COOK/TURBO' or SET button in View Recipe mode and it will
start cooking.
Set your desired cooking time with the touch slider.
E
ach
t
ime you
press
t
he
ri
ght
arrow (
), the steaming time will
increase by one step.
E
ach
t
ime you
press
t
he
lef
t
arrow (
),
t
he steaming time will
decrease by one step. (If you keep pressing the button, it will
change
cont
i
nuousl
y.
)
Y
ou
can
set
t
he ti
me f
or
Mul
ti
Cook from 10 minutes to 120 minutes.
Y
ou
can
set
t
he ti
me f
rom
10 mi
nutes
to 90 minutes with the unit of
five minutes, and can set the time from 90 minutes to 120 minutes with
t
he
uni
t
of
10
m
i
nut
es.
If you press the 'CANCEL' button, it will return to the home screen
without saving the time.
2
Multi-Cook Function
383-987F.rev.0.qxp_383-915G rev.0 190*260.qxp 2017. 6. 26. 오전 9:40 페이지 21
Select My Recipe in the home screen and then press SET button.
In My Recipe mode, select 'Add Menu' and press SET button.
Select the menu you want to add to My Recipe, and press SET button.
-
Menu : Rice, My multi-cook, Rice dishes, Porridges, Noodles, Steamed dishes,
Home bakery, Stews, Baby food
-
For Multi Cook menu : Press SET button and you can change the cooking time.
-
For others : Press SET button and you can view more items.
Y
ou can add up to 8 items for My Recipe. In this case if you want to add another menu, please delete one first before adding it.
In case it's overlapped, the current menu will replace the previous one.
Press SET button during cooking and you can add the menu to My Recipe
If you add a menu when your My Recipe list is full, it will replace automatically the one with low priority.
HOW TO USE MY RECIPE FUNCTION /
RECENT COOK FUNCTION
22
My Recipe Function
This function allows you to add your favorite menu for which you could jump start cooking.
Select 'My Recipe' in the home screen, and press SET button.
How to Use
''
My Recipe
''
You can add up to 8 items to My Recipe.
-
You may delete the default Glutinous/Mixed/Brown rice options.
-
For any unsaved menu, the blank will be displayed as 'Add menu.'
You can select the menu added to My Recipe when you
enter the mode. If you press SET button, the product will
shift into the View Recipe mode, and then press the
'COOK/TURBO' button to start cooking.
(For GABA Rice/Multi Cook/Bread Fermentation/Baking mode,
default time value is applied and it does not offer
personalized setting option)
Adding menu to My Recipe
Delete a menu to My Recipe
Select My Recipe in the home screen and then press SET button.
In My Recipe mode, select 'Delete Menu' and press SET button.
Select the menu you want to delete from My Recipe and press SET button.
Recent Cook Function
Press the 'COOK/TURBO' button in the home screen (Rice) to view the meals
that are cooked recently.
Three recent items will be displayed with the most recent one being displayed on the top.
If there is no menu cooked, the 'Glutinous rice' option will be displayed.
Saving new options will automatically delete the ones at the bottom.
1
Select the menu you want using the touch slider.
Press SET button after selecting the menu and then you can view the recipe.
Press the 'COOK/TURBO' or SET button in View Recipe mode and it will start cooking.
2
Press SET and then 'COOK/TURBO' button to start cooking.
3
383-987F.rev.0.qxp_383-915G rev.0 190*260.qxp 2017. 6. 26. 오전 9:40 페이지 22
HOW TO USE HOME BAKERY
23
www.cuckooworld.com
ENGLISH
Enter 'Cook' in the home screen, select 'Home
bakery' and then select 'Bread Fermentation.'
1
Press SET and then 'COOK/TURBO' button to start cooking.
3
W
he
n fir
s
t fe
r
me
ta
tion is
c
omple
te
d, pr
e
s
s
the
dough s
oftly
to r
e
mov
e
ga
s
a
nd r
e
pe
a
t pr
oc
e
s
s
2
-3
for
s
e
c
ond fe
r
me
nta
tion.
Af
t
er
t
he
pr
imar
y
f
er
ment
at
ion
is
done,
s
elec
t
'C
ook
,
'
'H
ome
bak
er
y
,
'
and
'Br
ead
Fer
ment
at
ion'
in
or
der
and
Pr
es
s
SET
but
t
on.
Then,
a
pop
up
s
ay
ing
"Mov
e
t
o
t
he
nex
t
phas
e.
"
w
ill
s
how
and
t
he
pr
oduc
t
s
hif
t
s
int
o
t
he
f
er
ment
at
ion
t
ime
s
et
t
ing
mode.
After s
ec
ond ferm
entati
on, open the l
i
d and m
ak
e s
ure dough s
i
z
e i
s
1.5 to 2 ti
m
es
.
After the s
ec
ondary
ferm
entati
on i
s
done, y
ou wi
l
l
hear the v
oi
c
e s
ay
i
ng "
Chec
k
the progres
s
of ferm
entati
on
fi
rs
t and then perform
addi
ti
onal
ferm
entati
on or s
el
ec
t the bak
i
ng m
ode.“
4
Using Fermentation
If you Press SET button after selecting the Fermentation time,
the value will be saved and you can view the recipe.
Select the Fermentation time you want using the touch slider.
Each time you press the right arrow ( ), the Fermentation time will increase by
one step.
Each time you press the left arrow ( ), the Fermentation time will decrease by
one step.
(If you keep pressing the button, it will change continuously.)
You can set the time for Fermentation from 5 minutes to 120 minutes.
You can set the time from 5 minutes to 90 minutes with the unit of five minutes,
and can set the time from 90 minutes to 120 minutes with the unit of ten minutes.
2
Using Bread Baking
Enter 'Cook' in the home screen, select 'Home
bakery' and then select 'Bread Baking.'
1
Press SET and then 'COOK/TURBO' button to start cooking.
3
If you Press SET button after selecting the Baking time, the value will be saved and you can view the recipe.
Press the 'COOK/TURBO' or SET button in View Recipe mode and it will start cooking.
Select the Baking time you want using the touch slider.
Each time you press the right arrow ( ), the Fermentation time
will increase by one step.
Each time you press the left arrow ( ), the Fermentation time will
decrease by one step.
(If you keep pressing the button, it will change continuously.)
You can set the time for Baking from 1 minutes to 80 minutes.
You can set the time from 1 minutes to 20 minutes with the unit of one minutes, and
can set the time from 20 minutes to 80 minutes with the unit of five minutes
.
If you press SET button during baking, it will be saved in My Recipe.
Once the baking begins, the cooking icon will be displayed along with the remaining time.
2
When the “Bread Baking” process is complete. Immediately remove the bread from inner pot.
After the “Bread Baking” is complete, the bread is hot and you should be careful.
Case Check point Do the following
When dough is not inflated
When bread is small and stiff.
When bread is dry and hard
When bread was undercooked.
When bread was overcooked.
When the bottom of the bread is not
brown or cooked
When the bread is too sticky and
undercooked.
Is capacity of the material accurate?
Is the fermentation time long or short?
Does the dough become elastic or loose?
Are measurements and cook timing correct?
Fermentation time and kneading time set correctly?
Did you set short fermentation time or baking time?
Did you set long fermentation time or baking time?
Did you put the dough in the middle of
inner pot. Did you set short baking time?
Did you remove baked bread immediately?
When the second fermentation is complete, the dough should
be left in the middle of the inner pot. Extend baking time.
When the "Bread Baking" process is complete,
immediately remove the bread from the inner pot.
Follow the correct ingredient volumes and directions for
fermentation and baking time.
Check the volume of the ingredients and knead the dough
well.
Please cook according to the Cooking Guide (Page 34) to ensure it's properly baked.
D
O
U
G
H
B
A
K
E
D
B
R
E
A
D
If there is a problem of fermentation / bread baking, check the following details.
383-987F.rev.0.qxp_383-915G rev.0 190*260.qxp 2017. 6. 26. 오전 9:41 페이지 23
HOW TO USE PRESET COOKING /
POWER-SAVING STANDBY FUNCTION
24
The preset cooking time is set for the maximum portion for each menu.
Therefore, the smaller the quantities of ingredients, the earlier the cooking time
may be completed than the preset time.
Enter 'Preset' in the Home Screen, select the Preset menu, and press SET button.
You can preset cooking only for the rice menu
(Turbo Glutinous, Turbo Mixed and GABA rice NOT included).
2
Press SET or 'COOK/TURBO' button to start
cooking.
4
How to Preset Timer for Cooking
Check if the current time and menu are correct.
1
Select the Baking time you want using the touch
slider.
You can set the hour first with the touch slider and press SET
button. After that you can set the minutes.
Press BACK button to move from the 'minute' to 'hour' screen.
The hour is changed with the unit of one hour, and the minute is
changed with the unit of ten minutes.
Please be careful not to change frome AM to PM.
3
Preset
Reheating
180
min
~13hours
Precautions for Preset Cooking
In case of preset cooking
If the rice is old and dry, the result may not be good
If the rice is not well cooked, add more water by about half-scale.
If the preset time is longer, melanization could be increased.
1
G
L
UT
I
N.
RI
CE
(36
min
+
My mode time
)
~13
hours
SOFT GLUTIN.
RICE
50
min
~13hours
HIGH HEAT
MIXED RICE
(53
min
+
My mode time
)
~13
hours
BROWN
RICE
(59
min
+
My mode time
)
~13
hours
MIXED
RICE
(51
min
+
My mode time
)
~13
hours
NUTRI.
RICE
38
min
~13hours
PEA
RICE
36
min
~13hours
FIVE-GRAIN
RICE
51
min
~13hours
Boiled Brown
Rice with
Red Beans
PRESET
COOK
TIME
PRESET COOKTIME
ME
N
U
HIGH HEAT
BROWN RICE
(61
min
+
My mode time
)
~13
hours
HIGH HEAT
GLUTIN. RICE
(47
min
+
My mode time
)
~13
hours
51
min
~13hours
BOILED
BARLEY
59
min
~13hours
52
min
~13hours
BLACK BEAN
RICE
RICE PORRIDGE
(Thick Porridge)
109
min
~13hours
CHINESE
PORRIDGE
(Thin Porridge)
101
min
~13hours
Power-Saving Standby Mode
Press SET button and it will be saved.
If it's left idle for 15 seconds or so during setting, you will hear voice
guidance. In another 15 seconds after it's finished, it will be canceled
without saving the changed value.
3
Disabling Power Saving Mode
1. If you press every button, the mode will be canceled and the product will
return to the home screen.
2. If you turn the handle, the power saving mode will be canceled and the
product will return to the home screen.
3. If the power is supplied again after blackout, it will return to the home screen.
4. If the power cable is plugged out and then plugged in again in the power-saving
mode, the mode will be canceled and the product will return to the Home Screen.
If the selected time has passed in the Standby status, it will automatically enter the power saving mode.
Enter 'Setting' in the home screen, select 'Screen
Setting' and then select 'Power-Saving Standby.'
1
Select the Power-Saving Standby time you want using
the touch slider.
“1 minute(default)”, “3 minute”, “5 minute”
2
383-987F.rev.0.qxp_383-915G rev.0 190*260.qxp 2017. 6. 26. 오전 9:41 페이지 24
HOW TO USE POWER SAVE SCREEN LIGHT MODE /
PRESET REHEATING FUNCTION
25
www.cuckooworld.com
ENGLISH
How to Use Preset Reheating Function
The preset time will be saved whether the preset reheat process is
completed or canceled in the middle. (However, if it exceeds 13 hours,
the previously memorized time will be maintained.)
When the preset reheat process is completed, the product will enter the Keep Warm mode.
Use this function when the cooked rice is not kept warm in the rice cooker but you still want to enjoy
a hot meal at your convenience.
It takes 100 minutes before it's fully warmed up:
Please use the function at least 100 minutes before you enjoy your meal.
Enter 'Preset' in the home screen, select the Preset Reheating menu, and press SET button.
2
Press SET or 'COOK/TURBO' button to start cooking.
4
Press the touch slider to preset the completion time of reheating.
3
You can set the hour first with the touch slider and press SET
button. After that you can set the minutes.
Press BACK button to move from the 'minute' to 'hour' screen.
The hour is changed with the unit of one hour, and the minute is
changed with the unit of ten minutes.
Please be careful not to change from AM to PM.
Check if the current time and the menu are correct.
1
“13Ho” will be displayed and the preset time will be changed to 13 hours automatically. If cooking
is preset to AM07:00 of the following day at PM5:00 of the day, where preset time is 14 hours,
“13Ho” will be displayed, and preset time
Precautions for Preset Reheating
\In case of preset reheating.
When leaving cooked rice at ambient temperature for a prolonged period of time, moisture is evaporated from cooked
rice. In such a case, the reheating preset may cause dehumidifying or melanosis (slightly burnt) of cooked rice.
If there is an excessive amount of cooked rice in the pot, it may not sufficiently be reheated.
It is recommended to set reheating for no more than 5 people. (approx. half of the inner pot)
Reheating of cold- or frozen-stored cooked rice may cause insufficient heating, dehumidifying or
melanosis (slightly burnt) after completion of reheating.
Reheating of frozen-stored cooked rice shall be performed only after thawing the rice.
1
Changing preset time.
If the preset time is shorter than the available range(100 minutes),
reheating will begin immediately.
2
If the preset time is shorter than available range.
If the preset time is shorter than the available range(100 minutes), reheating will begin immediately.
3
In case the preset time is over 13 hours.
4
Power Save Screen Light Mode
Enter 'Setting' in the home screen, select
'
Screen Setting' and
then select
'
Screen saver Power-Saving Standby.'
1
S
e
l
e
c
t
'
E
n
a
b
l
e
'
o
r
'
D
i
s
a
b
l
e
'
w
i
t
h
t
h
e
t
o
u
c
h
s
l
i
d
e
r
.
2
Press SET button and it will be saved.
If you press the 'CANCEL' button during setting, it will return to the home
screen without saving the changed value.
If left idle for 15 seconds or during setting, you will hear voice guidance.
If still left idle after an additional 15 seconds, settings will be canceled
without saving the changed value.
It lowers the total brightness of the LCD to 50%.
Screen Saver On: If it's left idle for a certain amount of time, the screen will be darker.
3
In Standby, Cooking, Keep Warm and Preset cooking mode, this function reduces power consumption
by lowering the brightness of the screen after a certain amount of time has passed.
The default value is ‘Enable’.
383-987F.rev.0.qxp_383-915G rev.0 190*260.qxp 2017. 6. 26. 오전 9:41 페이지 25
TO KEEP COOKED RICE WARM AND TASTY
26
How to Keep Warm
Press the Warm/Reheat button or select the 'Keep Warm/Reheat' mode from the home screen.
After that press SET or the 'COOK/TURBO' button.
1
In this mode, the screen will display 'Keep Warm’.
The warming time is displayed with the unit of one minute.
If the power is supplied again after blackout, it will start from Keep Warm mode again. But, when the rice is
cooled down, the mode will be canceled and the product will return to the home screen.
2
How to Reheating
Press the 'COOK/TURBO', SET or the 'Warm/Reheat' button during Keep Warm, and it will start reheating.
If you want to have warm rixe, press the “REHEAT/ WARM” button.
Reheating will be done for nine minutes, and then the Keep Warm mode begins again.
The frequent use of the “Reheat” function may cause the cooked rice to be discolored or dried. Use it once or
twice per day.
1
If you Press, however, SET or the 'Warm/Reheat' button again in the middle, Reheating will be canceled
and the product will return to the Keep Warm mode.
2
If the lid combining hand grip is turned to open status during reheating, function display will show “E01”. At this time,
reheating will be cancelled, and heat preservation will proceed.
Keep Warm Temperature Setting Function
If the temperature in the rice cooker is not set properly, an odor or the color of the rice may change
even though it is cleaned frequently and boiled up. Temperature needs to be set.
Customized Taste Keep Warm Setting Function
Use it while opening the lid when there is too much water or rice becomes too soft.
Enter 'Setting' in the home screen, select 'Keep Warm
Setting' and then select 'Keep Warm Temperature'.
1
Select the temperature you want using the touch slider.
The default value is '74℃'
Each time you press the right arrow ( ), the warming temperature will increase by one degree.
Each time you press the left arrow ( ), the warming temperature will decrease by one degree.
The reference temperature programmed when the product is shipped may differ from the Instruction
.
2
Press SET button to save setting.
3
Enter 'Setting' in the home screen, select
'
Keep Warm Setting' and then select
'Customized Taste Keep Warm .'
1
Select the temperature you want using the touch slider.
Each time you press the right arrow ( ), the controlling temperature for top heater will increase by one degree, and
you can set values from Step -2 to Step 2.(Use it when the water flows excessively when you open the lid.)
Each time you press the right arrow ( ), the controlling temperature for top heater will increase by one degree, and
you can set values from Step -2 to Step 2. (Use it when you find that the rice is partially over cooked on the side.)
2
Press SET button and it will be saved.
3
Device Temperature Control
How to Set
''
Sleeping
''
Function
Enter 'Setting' in the Home Screen, select
'
Keep Warm Setting' and then select
'
Sleeping Keep Warm
'
.
1
Press SET button and it will be saved.
If it enters the Keep Warm mode while you are sleeping, however, this function will
be not applied function will be not applied.
3
When keeping rice warm for a long time, set up the temperature low to prevent the following quality of rice:
smelly, dry, change of color; from PM10:00 ~ AM 04:00.
Select 'Enable' or 'Disable' with the touch slider.
2
The default value is 'Disable'
If you need to keep the rice warm during sleeping, do not use this function. This function makes the rice cooler than normal. In summer, the rice can be
spoiled and may smell bad because of high temperature. If possible, do not use theCustom-Made Warmingmode while sleeping.
1.
When you smell bad odors and the rice is too watery : The keep warm temperature is too low. In this case, increase the “Keep Warm” temperature by 1-2 .
2. When the rice has a yellowish color or is too dry : The Keep Warm temp is too high.In this case decrease the “Keep Warmtemperature by 1-2 .
383-987F.rev.0.qxp_383-915G rev.0 190*260.qxp 2017. 6. 26. 오전 9:41 페이지 26
REMAINING COOKING TIME DISPLAY / LOCK BUTTONS /
PRODUCT INITIALIZATION / HELP FUNCTION
27
www.cuckooworld.com
ENGLISH
1.If you press the 'PREV.' button for three seconds or longer in
Standby, Cooking, Presetting, and Keep Warm/Reheat mode,
it will enter the Button unLock mode.
2. You will here the voice guidance that says “Button unLock
Activated.” Here, a lock icon will be displayed as “ ” on the top
of the screen.
How to Set
''
LOCK BUTTONS
''
1. If you press the 'PREV.' button for three seconds or longer in
Standby, Cooking, Presetting, and Keep Warm/Reheat mode,
it will enter the Button Lock mode.
2. You will here the voice guidance that says "Button Lock
Activated." Here, a lock icon will be displayed as “ ” on the top
of the screen.
Lock can be set for touch button to prevent accidental touch during cleaning or by children.
If you press any other button than the 'PREV.' button while the button lock is selected, a buzzer sound will be made, and the
screen notifying that it is in the locked status will be displayed.
You may unlock the buttons by pressing the 'PREV.' button for three seconds or longer.
If you pull out and put in the Power Plug again after setting the button lock, the Button Lock Function will be canceled.
Setting Method
How to set and unset the mode
REMAINING COOKING TIME DISPLAY FUNCTION
E
nter 'Setting' in the home screen, select ‘Screen Setting' and then select ‘Remaining cooking time display.'
Enter 'Setting' in the home screen, select 'Screen
Setting' and then select 'Remaining cooking time
display.'
1
Select whether to display remaining time with the
touch slider.
2
Press SET button and it will be saved.
If left idle for 15 seconds or during setting, you will hear voice
guidance. If still left idle after an additional 15 seconds, settings
will be canceled without saving the changed value.
3
How to Use
''
Product Initialization
''
Set the default values of multiple customization functions and user option functions.
How to initialize set values
Enter 'Setting' in the home screen and select Product innitialization, and Press SET button.
Select 'Yes' when it says "the product will be reset to its factory default settings. Will you continue?", and press SET button.
If you initialize the product, the current time will also be initialized. Therefore, set the current time before
using the product. (Refer to Page 16)
The default value is 'Disable'
CHECK BEFORE ASKING : The items are classified according to the ch
aracteristics of the problem. When cooking is not well, When thewarm is not well,
When the reservation is not well,Whenthe operationis not well , When errors occur.
FOR SERVICE HOW TO CLEAN DETACHABLE COVER
HOW TO REPLACE PRESSURE PACKING
PRODUCTION INFORMATION : You cansee the Model, Service Center, Phone
numbers, Websiteaddress.
Help Function
Enter 'Help' in the home screen and select your desired category, and Press SET button.
You may refer to the information listed in the selected category.
383-987F.rev.0.qxp_383-915G rev.0 190*260.qxp 2017. 6. 26. 오전 9:41 페이지 27
If there is a problem with your cooker, check the following details before requesting service to your dealer.
Sometimes the cooker may not operate as desired if used incorrectly.
Case
When the rice is not cooked.
When the rice is not well
cooked.
Bean (other grains)is half
cooked.
Rice is too watery or stiff.
Check points
COOK/TURBO’ button is pressed?
Is there power cut while in cooking?
Is bean (other grains) too dry?
Is the menu selected correctly?
Did you properly measure water?
Did you open the top cover before
cooking was finished?
Do the following
When the water overflows.
Did you use the measuring cup?
Did you use proper amount of water?
Is the menu selected correctly?
P
ress the ‘COOK/TURBO’ button once.
Refer to page 16 for blackout compensation.
Refer to page 17
Add water about half the notch and then cook.
Soak or steam beans and other grains before
cooking in the pressure cooker in order to
avoid.
partially cooked beans or grains. Beans should
be soaked for -2-minutes or steamed for-2-
minutes prior to cooking, depending on your
taste.
Select the correct menu.
Properly measure water.
Open the top cover after cooking finished
Refer to page 17
Did you use the measuring cup for the rice?
Did you put proper amount of water?
Did you rinse the rice before cooking?
Did you put rice in water for a long time?
Is the rice old or dry?
Brown rice is not germinated
Properly.
When the rice is badly sticky.
Does the amount of rice exceed the
specified maximum capacity?
Is bean(other grains) too dry?
Is there any rice or any other alien
substance on the temperature sensor or
the bottom surface of the inner pot?
Did you clean it after cooking?
When smell after and
before cooking?
Clean all the alien substances on the
temperature sensor or the bottom surface of the
inner pot.
Put the specified maximum capacity of brown rice.
Old rice or contaminated rice may not be
germinated properly.
Please clean it after cooking.
28
CHECK BEFORE ASKING FOR SERVICE
383-987F.rev.0.qxp_383-915G rev.0 190*260.qxp 2017. 6. 26. 오전 9:41 페이지 28
ENGLISH
29
www.cuckooworld.com
CHECK BEFORE ASKING FOR SERVICE
Is the inner pot correctly inserted
in the main body?
Is the Lock/Unlock handle on the
top cover set to “Lock”?
Is there hot food in the inner pot?
If there is a problem with your cooker, check the following details before requesting service to your dealer.
Sometimes the cooker may not operate as desired if used incorrectly.
Case Check points Do the following
When you smell odors
while warming.
Warming passed time mark
blinks during keeping warm.
Rice has gotten cold or a lot of
water flow during Keeping warm
Did you close the top cover?
Please check it the power cord is plugged.
Did it warm over 12 hours?
Is there any other substance such as
rice scoop or cold rice?
24 hours has not passed yet after Keeping
warm
Keeping warm was set in “Sleeping” mode
Detachable cover is not mounted
Alarm sounds or reheating does
not work while keeping warm
Is the current time correct?
Is AM or PM set properly?
Did you set the reservation time over
13 hours?
When the time cannot be
preset.
When cannot turn to
“Unlock”.
Close the top cover perfectly.
Always keep the power on while warming.
As possible, keep warming time within 12 hours.
Don’t warm rice with other substance.
This function alarms if the rice remained warm for
more than 24 hours.
Keep warm after cancelling or setting “Sleep
Keeping Warm” mode depending on the necessity.
Mount detachable cover(Refer to page 12).
Set the current time.
Check the AM and PM.
Maximum reservation time is 13 hours.
Please put in the inner pot perfectly.
Please turn the “Lock/Unlock”
handle to “Lock”.
Pull the pressure handle to aside once.
When the top cover
cannot be closed.
Don’t open the top cover while cooking.
If you want to open top cover while
cooking, press the “Cancel” button more
than 1 seconds and release the steam.
Pull the pressure handle to the side once
and allow the steam to release.
Did you turn the “Lock/Unlock”
handle while cooking?
• Did you turn the “Lock/Unlock” handle
before exhausting steam perfectly?
When the “Cancel” button
does not operate while
cooking.
Is the inner pot hot?
Is currently the setting to lock
button mode?
Keep pressing the “Cancel” button for
1 seconds for safety reason if you want
to cancel while cooking.
Be careful of hot steam emission or hot
contents spattered from the automatic
steam outlet during cancellation.
Please press “Set” button for over
3 seconds to release.
When the top cover
cannot open although
the Lock/Unlock handle
is turned to "Unlock".
When the steam exhausted
between the top cover.
Is there an external substance on
the packing?
Is packing too old?
Clean the packing with duster.
Keep the packing clean.
If the steam is exhausted through the
top cover, please power off and contact
the service center and dealer.
Packing life cycle is 12 month,
please replace the packing once a year.
Because of the pressure.
Pull the pressure handle to aside once
and exhaust the steam completely.
383-987F.rev.0.qxp_383-915G rev.0 190*260.qxp 2017. 6. 26. 오전 9:41 페이지 29
30
CHECK BEFORE ASKING FOR SERVICE
If there is a problem with your cooker, check the following details before requesting service to your dealer.
Sometimes the cooker may not operate as desired if used incorrectly.
Case
When you hear weird
noises during cooking
and warming
If “ ” sign
is appears.
“ ” sign shows up
When the Pressure “Cook/Turbo”
Timer button does not operate
with “ ”
Check points
Is there a wind blowing sound when
cooking the rice?
Is there a “Chi” sound when warming the
rice?
It shows on the display when pressing
“Start” button again, or when the cooking
has finished and you ve never turned the
handle to ‘Unlock’.
Detachable cover is not mounted
Did you turn the lid Handle to “Lock”
Is “Lock” lamp on?
W
hen
the
b
utto
n
canno
t
o
p
er
ate
wi
th
I
s
t
he
inner
pot
ins
ert
ed?
C
hec
k
t
he
rat
ed
v
olt
age?
Do the following
Please turn the “lid” handle to “Lock”.
Pleas
e
ins
ert
inner
pot
.
T
his
produc
t
is
120V
only
.
Mount detachable cover(Refer to page 12)
If “ ” sign is displayed continuously even
though you already installed detachable cover,
please contact customer service.
It can be solved by turning handle to
‘Unlock’ and then turn to ‘Lock’.
T
his is the sound of the fan motor to cool the
internal parts. This is normal.
The “Chi” sound during the warming process is
the sound of IH cooker operating. This is normal.
It appears when there is a problem
with MICOM transmission.
When “ ” are shown on
the LCD by turns
, ,
Signs show up.
The sensor is broken
Micom memory is out.
” ,“ ” ,“
Signs show up.
” sign shows up
Temperature sensor or fan motor does
not work properly.
fan motor does not work properly.
When“ , ”are
shown on the LCD by turns
Is there any foreign material other than
inner pot inside the cooker?
If “ ” sign is appears.
It appears when there is a problem
with touch buttons.
If “ ” sign is appears.
Nothing appears on LCD screen.
All the buttons except the slide
touch button are blinking,
Please cut the power and contact customer
service.
Please cut the power and contact customer
service.
Is there power cut while in cooking?
Please cut the power and contact customer service.
Unplug the power cord and call the Service
center.
Unplug the power cord and call the Service
center.
Unplug the power cord and call the Service
center.
Unplug the power cord and call the Service
center.
Unplug the power cord and call the Service
center.
If “ ” sign is appears.
Unplug the power cord and call the Service
center.
It appears when there is
a problem with LCD transmission.
If “ ” sign is appears.
Micom power is out.
Please cut the power and contact customer
service.
The power is not on after plug in
the power cord,
Please turn on the standby power switch button.
383-987F.rev.0.qxp_383-915G rev.0 190*260.qxp 2017. 6. 26. 오전 9:41 페이지 30
RECIPE
31
www.cuckooworld.com
ENGLISH
SELECT MENU
COOKING TIMEMENU TO COOK
INGREDIENTS DIRECTIONS
1.
Put clean-washed rice in the inner pot and pour water
up to the line 4 for GLUTINOUS.
2.
Close the lid, select the Rice or High heat Glutin.Rice
menu in 'Rice' from the display panel, and press the
'COOK/TURBO' button.
RICE
GLUTIN.
RICE
Approx.
3
0min
Rice 4 cups
The“ cup”in ingredients means a measuring cup in
the rice cooker. 1 cup (180cc) is for one person.
SOFT
GLUTIN. RICE
Approx.
54min
Rice 4 cups
1.
Put clean-washed rice in the inner pot and pour water up to
the line 4 for Soft GLUTIN.
2. Close the lid, select the ‘SOFT Glutinous rice
menu in ‘Rice
from the display panel, and press the 'COOK/TURBO' button.
MIXED RICE
Approx.
46min
Rice 2 cups, Brown rice 2 cups
1.
Put clean-washed rice in the inner pot and pour water
up to the line 4 for MIXED RICE.
2.Close the lid, select the ‘Mixed Rice
or ‘High Heat
Mixed Rice’menu in ‘Rice
from the display panel, and
press the 'COOK/TURBO' button.
BROWN RICE
Approx. 53min
Brown rice 4 cups
HIGH HEAT
BROWN RICE
Approx.
55min
Brown rice 4 cups
1.
Put clean-washed rice in the inner pot and pour water up to the line 4 for
GABA RICE.
2.
Close the lid, select the 'Brown rice' or High hear Brown rice
menu in
'Rice' from the display panel, and press the '
COOK/TURBO' button.
GABA
RICE
-
Brown rice 4 cups
1.
Put clean-washed rice in the inner pot and pour water up to the
line 4 for GABA RICE.
2.Close the lid, select the GABA rice
menu in 'Rice' from the display
panel, and press the '
COOK/TURBO' button.
BLACK
BEAN
RICE
Approx.
47min
Rice 4 cups, Black bean 1 cups, 1.5 tablespoons
Of clear rice wine, 1.5 teaspoons of salt.
*If you want softer beans, soak black beans in
water or boil them.
When cooking black rice, add 1/2 measuring cup of
water for two people, 3/4 measuring cup for four
and one cup for six people.
1.
Put clean-washed rice in the inner pot and pour water up
to the line 4 for GLUTINOUS.
2.
Put washed black beans on top of that, additionally pour
1 cup of water, and mix the rice and the black beans.
3.
Close the lid, select the ‘BLACK BEAN rice
menu in 'Rice'
from the display panel, and press the '
COOK/TURBO' button.
NUTRI.
RICE
Approx.
32min
4 cups of rice, 4 roots of Fresh Ginsengs, 4 chestnuts, 4 jujubes, 12
ginkgo nuts, 2 tablespoons Of clear rice wine
*Seasoning sauces : soy sauce 4 tablespoons, chopped
scallion 2 tablespoons, crushed garlic 1/2 tablespoon,
red pepper powder 1/2 teaspoon, ground sesame mixed
with salt 2 teaspoons, sesame oil 1 teaspoon
1.
Put clean-washed rice in the inner pot and pour water up
to the line 4 for GLUTINOUS.
2.
Close the lid, select the ‘NUTRI. rice
menu in 'Rice' from
the display panel, and press the '
COOK/TURBO' button.
1.
Put clean-washed rice in the inner pot and pour water up
to the line 3 for Mixed Rice.
2.
Close the lid, select the
'
relevant menu' menu in 'Rice' from the
display panel, and press the '
COOK/TURBO' button.
1.
Put clean-washed rice in the inner pot and pour water up to the line 3 for Glutinous Rice.
2.
Close the lid, select the ‘Pea rice' menu in 'Rice' from the display
panel, and press the '
COOK/TURBO' button.
Chinese Rice
porridge
Approx.
85min
Rice 0.5 cup
PEA RICE
Approx.
29min
3 cups of rice, 1/2 cup of pea, ,
1 tablespoons Of clear rice wine.
1.5 teaspoonful of salt.
*Boil pea before cooking.
1. Put the prepared ingredients in the Inner Pot and pour water up to the appropriate water
level depending on the quantity of food to be served. [Rice porridge: water up to the line 1
for Thick porridge, Chinese porridge: water up to the line 1 for Thin porridge]
*Note: The maximum quantity for rice porridge is 1.5cups, and the maximum
quantity for Chinese porridge is 1 cups.
2.
Close the lid, select the ‘Rice porridge’ OR ‘Chinese porridge’ menu in
'Rice' from the display panel, and press the '
COOK/TURBO' button.
FIVE-GRAIN
RICE
Approx.
40min
1.5 cup of rice, millet 1/3 cup, glutinous rice
1/2cup, red beans 1/3cup, sorghum 1/3cup
and salt 1 teaspoon
BOILED BARLEY
Approx.40min
2 cup of rice, 1 cup of barley
Rice
porridge
Approx.
79min
Rice 1 cup
1.
Put clean-washed rice in the inner pot and pour water up
to the line 3 for GABA Rice.
2.
Close the lid, select the ‘Boiled Brown Rice with Red
Beans' menu in 'Rice' from the display panel, and press
the '
COOK/TURBO' button.
Boiled Brown
Rice with
Red Beans
Approx.
44min
Brown rice 1 cup, rice 2 cup and red beans
1/3 cup
HIGH HEAT
GLUTIN. RICE
Approx.
37min
Rice 4 cups
HIGH HEAT
MIXED RICE
Approx.
48min
Rice 2 cups, Brown rice 2 cups
Please refer to our website (www.cuckoo.co.kr) for more information.
After cooking reter to page 12 of the notes upon the inner pot washing.
1.
Put the prepared ingredients in the inner pot.
2.
Close the lid, select the ‘My multi-cook’ menu in
'Cooking' from the display panel, and press the
'
COOK/TURBO' button.
MY
MULTI-
COOK
10~120
min
You can set the time for Multi Cook from
10 minutes to 120 minutes.
MY
MULTI-
COOK
Nut Rice
Approx.
32min
4 cups of rice, 4 walnuts, pine nut 2 tablespoon, almond
2 tablespoon, cashew nut 2 tablespoon, 15 ginkgo nuts
*Seasoning sauces : soy sauce 4 tablespoons, chopped
scallion 2 tablespoons, crushed garlic 1/2 tablespoon,
red pepper powder 1/2 teaspoon, ground sesame mixed
with salt 2 teaspoons, sesame oil 1 teaspoon
1.
Put clean-washed rice in the inner pot and pour
water up to the line 4 for Glutious Rice.
2.Close the lid, select the 'Rice cooking' option in
'Cooking' from the display panel, and press the
'
COOK/TURBO' button.
COOK
ING
RICE
COOKING
383-987F.rev.0.qxp_383-915G rev.0 190*260.qxp 2017. 6. 26. 오전 9:41 페이지 31
RECIPE
32
SELECT MENU
COOKING TIMEMENU TO COOK
INGREDIENTS DIRECTIONS
C
O
O
K
I
N
G
1.
Put clean-washed rice in the inner pot and pour
water up to the Line 4 for Glutinous Rice.
2. Close the lid, select the ‘Rice cooking’ menu in
‘Cooking’ from the display panel, and press the
'
COOK/TURBO' button.
*
Seasoning sauces : soy sauce 4 tablespoons, chopped
scallion 2 tablespoons, crushed garlic 1/2 tablespoon,
red pepper powder 1/2 teaspoon, ground sesame
mixed with salt 2 teaspoons, sesame oil 1 teaspoon
Assorted
Mushroom
Rice
Approx.
32min
4 cups of rice, 600g of beech mushroom,
40g of enoki mushroom, 4 button
mushrooms
Green Tea Rice
Blended with
Chicken Chest
Flesh
Approx.
53min
2 cups of brown rice, 3g of green tea leaf,
10g of green tea powder, 4 nuggets of chicken chest flesh, a
little bit of olive oil, a little bit of salt, a little bit of pepper, 5g of
celery, a little bit of lime, a little bit of rosemary
1.
Put clean-washed rice in the inner pot and pour
water up to the Line 2 for Gaba Rice.
2.
Close the lid, select the ‘Rice cooking menu in
‘Cooking’ from the display panel, and press the
'
COOK/TURBO' button.
*
Seasoning sauces : soy sauce 4 tablespoons, chopped
scallion 2 tablespoons, crushed garlic 1/2 tablespoon, red
pepper powder 1/2 teaspoon, ground sesame mixed with
salt 2 teaspoons, sesame oil 1 teaspoon
Mushroom
Tian
Approx.
53min
2 cups of brown rice, 20g of brown gravy sauce, a little bit of salt, 2 sheets
of sesame leaves, 1/3 pieces of pumpkin, a pack of shimeji mushroom
Saessak
Bibimbap
(rice with sprout
and vegetables)
Approx.
53min
2 cups of brown rice and some sprouts and vegetables.
*
Seasoning red pepper paste : Red pepper paste
1/2cup, beef (crushed)40g, sesame oil 1
tablespoon, honey 1 tablespoon and sugar 1
tablespoon, 1/3 cup of water
1. Put the prepared ingredients in the Inner Pot and pour
water up to the appropriate water level depending on
the quantity of food to be served.
[Chicken Rice Porridge: water up to the line 1 for Thick porridge,
Pine Nut Porridge: water up to the line 1.5 for Thick porridge,
Abalone Rice Porridge: water up to the line 1 for Thick porridge,
Adzuki-Bean: water up to the line 1.5 for Thick porridge]
2.
Close the lid, select the ‘Porridge cooking’ menu in
‘cooking’ from the display panel, and press the
'
COOK/TURBO' button.
1. Put the prepared ingredients in the inner pot.
2. Close the lid, select the ‘STEAMED cooking’ menu
in ‘cooking’ from the display panel, and press the
'
COOK/TURBO' button.
RICE
COOKING
PORRIDGE
COOKING
Abalone Rice Porridge
Approx. 87min
1 cups of rice, sesame oil 1 tablespoon, 1ea abalone , some salt
STEAM
COOKING
Steamed Rice Cake
2.5 cups nonglutinous rice powder, 2 cups adzuki beans, salt
1/2tablespoons, Sugar 2.5 tablespoons, water 1.5 tablespoons
Braised
Short Ribs
1.2 kg of beef rib (pork rib), refined rice wine 3 tablespoons, soy
sauce 5 tablespoons, chopped garlic 1 tablespoon, sesame oil 1
tablespoons, onion juice 3 tablespoons, pear juice 3 tablespoons,
sugar 3 tablespoons, 5 tablespoons of chopped green onion, ground
sesame 1 tablespoons, ground pepper 1/2 teaspoons, carrot 1ea,
Chestnut 10ea, ginkgo nut 20ea, pine nut powder 1 tablespoons
Five Spice Sliced
Steamed Pork
400g of pork, soy sauce 1/3 cups, sugar 2
tablespoons, water 1.5 cups, a little machine cotton
*five spice: six whole peppers, 7cm of whole cinnamon, 4ea star anise
S eamed POTATO
Potato 3EA (less than 200g)
Steamed corn
Corn 2ea
Mushroom
Bamboo shoot
Rice
Approx.
32min
4 cups of rice, 200g of oyster mushroom,
100g of bamboo shoot, 10 ginkgo nuts
Chicken
Rice
Porridge
Approx.
97min
1 cups of rice, 100g of chicken, 300 cc of chicken broth, 1ea green
chili, 1ea red pepper, some salt
*Seasoning sauces : chopped scallion 1 tablespoons, crushed
garlic 1 tablespoon, soy sauce 2 tablespoons, red pepper powder
1/2 teaspoon, some ground sesame, sesame oil 2 teaspoon
Pine Nut Porridge
Approx. 95min
1 cups of rice, 1 cups Pine Nut, some salt
Adzuki-Bean
Approx. 91min
1 cups of rice, 1/3 cups Adzuki-Bean, 1 cups glutinous rice flour
Steamed
Chicken
a chicken (700g) , 50g of potato, 50g of carrot,
Sugar 1 tablespoons, 1 teaspoons of chopped green onion,
crushed garlic 1 teaspoon, soy sauce 3 tablespoons, ginger
juice 1 teaspoon, some ground pepper, ground sesame 1/2
tablespoons, sesame oil 1 teaspoon
Approx.
35min
Approx.45min
Approx.
35min
Approx.
30min
Approx.30min
Approx.30min
1. Pour 1.5 cups of water in the inner pot and place
the steam plate. Put the prepared
ingredients on top of the plate.
2. Close the lid, select the ‘STEAMED cooking’ menu
in ‘cooking’ from the display panel, and press the
'
COOK/TURBO' button.
Steamed
Clam
Clam 2ea, 15g of beef, 1/2 egg white, egg
1/2ea, 1 teaspoons of chopped green onion,
1/2 teaspoon of crushed garlic, salt 1/4
teaspoons, some ground pepper
Approx.
25min
Steamed Blue Crab
blue crab 1ea, 150g of beef, 1/4 piece of tofu, a half of green chili, a
half of red pepper, a half of egg yolk, some flour
Approx.30min
Boiled
Pork
Slices
400g of pork (shin fore shank or
pork belly), ginger 1ea, some garlic,
onion 1ea, spring onion, 1ea, some
kimchi
Approx.
30min
Approx.
30min
Multi-Flavor
Glutinous
Rice
3 cups of glutinous rice, 60g of raisin,
15 chestnuts, 10 jujubes, pine nut 1
tablespoon, 100g of black sugar, thick soy 1
tablespoon, sesame oil 3 tablespoons, some
salt, cinnamon powder 1/2 teaspoon
1.
Put the prepared ingredients in the inner pot.
2. Close the lid, select the ‘STEAMED cooking’ menu
in ‘cooking’ from the display panel, and press the
'
COOK/TURBO' button.
383-987F.rev.0.qxp_383-915G rev.0 190*260.qxp 2017. 6. 26. 오전 9:41 페이지 32
RECIPE
33
www.cuckooworld.com
ENGLISH
SELECT MENU
COOKING TIMEMENU TO COOK
INGREDIENTS DIRECTIONS
C
O
O
K
I
N
G
STEAM
COOKING
Steamed
Sweet Potato
Sweet potato 3EA *When sweet potato is large
(more than 150g), cut it into two pieces.
Steamed Chestnut
Chestnut 15EA
Steak
Beef(for steak) 200g, some steak
sauce, some salt,
some ground pepper
A
pprox.
20min
Approx.
25min
Approx.
20min
Approx.
20min
Approx.
20min
Approx.25min
Approx.15min
Approx.
15min
Approx.
15min
Approx.
15min
Approx.
15min
Approx.
20min
Fist
(40min)
Approx.20min
Approx 20min
1.
Pour 1 cups of water in the inner pot and place the steam
plate. Put the prepared ingredients on top of the plate.
2.
Close the lid, select the STEAMED cooking menu incooking
from the display panel, and press the
'
COOK/TURBO
'
button.
Steamed
Fish
One sea bream, 50g of beef, One sea
bream 3EA, manna lichen 2EA, red pepper
1EA, egg 1EA, some chopped green onion,
some soy sauce, some sesame, some oil,
some salt, some ground pepper
1.
Pour 1.5 cups of water in the inner pot and place
the steam plate. Put the prepared ingredients on
top of the plate.
2.
Close the lid, select the ‘STEAMED cooking’ menu
in ‘cooking’ from the display panel, and press the
'
COOK/TURBO' button.
Steamed Dumpling
Dumplings 20EA
Rice Cake
Gratin
50g of rice cake for tteokguk, 1 boilde egg, 1
sweet patato, 40g of mozzarella cheese, 1 slice
of cheddar cheese, some olive oil,
1/2 cup of white sauce, some parsley powder
*White sauce : 10g of flour, 10g of butter,
100g of milk, pinch of salt and white pepper
(Melt butter, add flour and stir it, add milk
and boil it until it gets thick, and apply salt
and white pepper for seasoning.)
Rice Pizza
* Dough ingredients : 100g of rice.
* Topping ingredients : 2 slices of ham, 2 button
mushrooms, canned corn 2 tablespoons, 1 tick
of crabmeat, 40 of mozzarella cheese, pizza
sauce 4 tablespoons
Boiled-
Down
Cuttlefish
* One squids, 70g of spinach, 80g of carrot, egg 1EA,
some salt, some sesame oil, some wheat flour
*Seasoning sauces : two tablespoons of red pepper
paste,
1 tablespoons soy sauce, 1 tablespoons suger, 1/2
teaspoons
of sesame oil, 1/2 teaspoons of pepper powder.
Steamed
Egg
2 eggs, 1 cup of water or kelp water, salted shrimps 1/2
teaspoon, some salt, 10g of carrot, 10g of green onion .
Shrimp stir
the
ketchup
Tteokbokki
(spicy and
sweet
rice cake)
200g of rice cake bars (soft), 2 pieces of fish
cake, 1/4 onion, 1/4 green onion, 40g of carrot
Seasoning sauce : red pepper paste 2 tablespoons,
starch syrup 1.5 tablespoon, sugar
1 tablespoon,
soy sauce 1/2 teaspoon, 1/3 cup of anchovy
water, some sesame salt
Medium size shrimp 10EA, green onion 1/4EA, 20g
of onion, 20g of carrot
*Seasoning sauces : ketchup 3 tablespoon, sugar 1
tablespoon, Starch flour 1 tablespoon, some salt,
some soy sauce, some ground pepper
1.
Put the prepared ingredients in the inner pot.
2.
Close the lid, select the ‘STEAMED cooking’
menu in ‘Cooking' from the display panel, and
press the
'
COOK/TURBO
'
button.
a chicken (700g) , 50g of potato, 50g of carrot,
Sugar 1 tablespoons, 1 teaspoons of chopped
green onion,
crushed garlic 1 teaspoon, soy sauce 3
tablespoons, ginger
juice 1 teaspoon, some ground pepper, ground
sesame 1/2 tablespoons, sesame oil 1
teaspoon
Steamed
Tofu
1 piece of tofu, some salt
* Seasoning Sauces: 1 tablespoon thick soy,
1/2 red pepper, 1/2 green chilli, 1/2
tablespoon of red pepper powder, 1/2
tablespoon of vinegar, a little bit of ground sesame mixed with salt, 1/4
pieces of welsh onion, 2 pieces of garlic, 1 teaspoon of sugar
Steamed
Eggplant/
Steamed
Pumpkin
Eggplant 2EA / Pumpkin 1/2EA
1.
Put the egg, vinegar and water in the inner pot.
2.
Close the lid, select the ‘STEAMED cooking menu in ‘cooking’
from the display panel,and press the
'
COOK/TURBO
'
button.
Boiled Egg
6 eggs, 2 cups of water, 1~2
drops of vinegar
[First fermentation]
1.
Sift wheat flour (strong flour).
2.
Leave butter at the room temperature to make it softer.
3. Put wheat flour (strong flour) into a bowl, put
nonfat dry milk, sugar, yeast, and water, butter,
and knead the dough.
Bread
Fermentati
on
200g of wheat flour (strong flour),
2g of yeast, 5g of sugar, 2g of salt,
15g of butter, 8g of milk powder,
100g of water
1.
Pour 1.5 cups of water in the inner pot and
place the steam plate. Put the prepared
ingredients on top of the plate.
2. Close the lid, select the ‘STEAMED cooking’
menu in ‘cooking’ from the display panel, and
press the
'
COOK/TURBO
'
button.
383-987F.rev.0.qxp_383-915G rev.0 190*260.qxp 2017. 6. 26. 오전 9:41 페이지 33
RECIPE
34
SELECT MENU
COOKING TIMEMENU TO COOK
INGREDIENTS DIRECTIONS
C
O
O
K
I
N
G
(Knead the dough by repeating extending and folding the
dough. Finish when the surface of the dough is smooth and is
not cut, and when the dough can be extended to be thin.)
4. Roll the dough and put it into the center of the Inner Pot.
5.
Close the lid, and select 'Bread Fermentation' in the 'Home baking' option in
'Cooking' from the display panel.
6.
Set your desired fermentation time, and press the 'COOK/TURBO' button.
First fermentation]
1. After the primary fermentation is done, open the lid, lightly
press the dough, and discharge gas.
2.
Roll the dough again and put it into the center of the Inner Pot.
3. Close the lid, and select 'Bread Fermentation' in the 'Home
baking' option in 'Cooking' from the display panel.
4. Set your desired fermentation time, and press the
'
COOK/TURBO
'
button.
1. When the fermentation is completed by the 'Bread Fermentation'
menu, open the lid to check if the dough is expanded to be around
double the size before the second fermentation.
2. Close the lid, and select 'Bread Baking' in the 'Home baking' option in
'Cooking' from the display panel.
3. Set your desired baking time and press the
'
COOK/TURBO
'
button.
4. When the baking is completed, take the bread out and cool it down.
1. Put the prepared ingredients in the inner pot.
2. Close the lid, select the ‘Bread cooking’ menu in
‘Cooking’ from the display panel, and press the
'
COOK/TURBO' button.
Bread
cooking
Bread
fermentation
200g of wheat flour (strong flour),
2g of yeast, 5g of sugar, 2g of
salt,15g of butter, 8g of milk
powder,100g of water
Bread
baking
fermentation is completed daugh
Butter Chocolate
cake
200g of butter, 90g of sugar, egg 2EA, 110g
of pancake powder, 70g of chocolate
Approx.
45min
Japchae
(stir-fried
vegetables, and
shredded meat)
250g of cellophane, paprika (green, red) each
1EA, 100g of carrot, 100g of onion, some spinach,
100g of enoki mushroom, oil 2 tablespoon, 1/2
cup water Seasoning sauce : some sugar, some
soy sauce, some sesame oil, some sesame salt
Approx.
20min
Cream
cake
1/2cups of wheat flour (soft flour),
Egg 2EA, 1/2 tablespoon butter,
1/2 tablespoon milk, some vanilla
flavor, 1/2cup of sugar, some salt
Approx.
40min
Second
(40min)
40min
noodle
dishes
1. Put the prepared ingredients in the inner pot.
2. Close the lid, select the ‘Noodle dishes’ menu in
‘Cooking’ from the display panel, and press the
'
COOK/TURBO' button.
1. Put the prepared ingredients in the inner pot.
2. Close the lid, select the ‘Baby food’ menu in
‘Cooking’ from the display panel, and press
the
'
COOK/TURBO
'
button.
baby food
Sweet Potato
Apple
Porridge
70g of Sweet potato, 70g of apple,
2 tablespoons water, some honey
Tuna-
vegetable
Soft Rice
50g of rice, 30g of tuna(can), 10g of paprika,
10g of carrot, 1/2 cup of water, some butter,
Some laver powder
Sweet
Pumpkin
Soup
100g of sweet pumpkin, bread crumbs 1
tablespoon, 1/3 cup water, some salt,
some milk
Steamed
Rice,
Tofu, and
Vegetables
5
0g
of rice, 30g of bean curd,
10g of carrot, 10g of green pumpkin, 1/2
e
g
g
, Milk 4 tablespoons
Approx.
10min
Approx.
15min
Approx.
10min
Approx.
15min
383-987F.rev.0.qxp_383-915G rev.0 190*260.qxp 2017. 6. 26. 오전 9:41 페이지 34
83
www.cuckooworld.com
MEMO
383-987F.rev.0.qxp_383-915G rev.0 190*260.qxp 2017. 6. 26. 오전 9:45 페이지 83
100% Recycled paper 383-987F Rev.0
CRP-FH06
383-987F.rev.0.qxp_383-915G rev.0 190*260.qxp 2017. 6. 26. 오전 9:45 페이지 84
4

Hulp nodig? Stel uw vraag in het forum

Spelregels

Misbruik melden

Gebruikershandleiding.com neemt misbruik van zijn services uitermate serieus. U kunt hieronder aangeven waarom deze vraag ongepast is. Wij controleren de vraag en zonodig wordt deze verwijderd.

Product:

Bijvoorbeeld antisemitische inhoud, racistische inhoud, of materiaal dat gewelddadige fysieke handelingen tot gevolg kan hebben.

Bijvoorbeeld een creditcardnummer, een persoonlijk identificatienummer, of een geheim adres. E-mailadressen en volledige namen worden niet als privégegevens beschouwd.

Spelregels forum

Om tot zinvolle vragen te komen hanteren wij de volgende spelregels:

Belangrijk! Als er een antwoord wordt gegeven op uw vraag, dan is het voor de gever van het antwoord nuttig om te weten als u er wel (of niet) mee geholpen bent! Wij vragen u dus ook te reageren op een antwoord.

Belangrijk! Antwoorden worden ook per e-mail naar abonnees gestuurd. Laat uw emailadres achter op deze site, zodat u op de hoogte blijft. U krijgt dan ook andere vragen en antwoorden te zien.

Abonneren

Abonneer u voor het ontvangen van emails voor uw Cuckoo CRP-FH06 Fuzzy series bij:


U ontvangt een email met instructies om u voor één of beide opties in te schrijven.


Ontvang uw handleiding per email

Vul uw emailadres in en ontvang de handleiding van Cuckoo CRP-FH06 Fuzzy series in de taal/talen: Engels als bijlage per email.

De handleiding is 7,28 mb groot.


U ontvangt de handleiding per email binnen enkele minuten. Als u geen email heeft ontvangen, dan heeft u waarschijnlijk een verkeerd emailadres ingevuld of is uw mailbox te vol. Daarnaast kan het zijn dat uw internetprovider een maximum heeft aan de grootte per email. Omdat hier een handleiding wordt meegestuurd, kan het voorkomen dat de email groter is dan toegestaan bij uw provider.

Stel vragen via chat aan uw handleiding

Stel uw vraag over deze PDF

Uw handleiding is per email verstuurd. Controleer uw email

Als u niet binnen een kwartier uw email met handleiding ontvangen heeft, kan het zijn dat u een verkeerd emailadres heeft ingevuld of dat uw emailprovider een maximum grootte per email heeft ingesteld die kleiner is dan de grootte van de handleiding.

Er is een email naar u verstuurd om uw inschrijving definitief te maken.

Controleer uw email en volg de aanwijzingen op om uw inschrijving definitief te maken

U heeft geen emailadres opgegeven

Als u de handleiding per email wilt ontvangen, vul dan een geldig emailadres in.

Uw vraag is op deze pagina toegevoegd

Wilt u een email ontvangen bij een antwoord en/of nieuwe vragen? Vul dan hier uw emailadres in.


Info