15077
1
Verklein
Vergroot
Pagina terug
1/61
Pagina verder
Optical Equipment Group
KYOCERA OPTICS, INC.
Tel:(03) 3708-4506
http://www.kyocera.co.jp/
Tel:(732) 560-0060
2-14-9 Tamagawadai, Setagaya-ku, Tokyo 158-8610 Japan
2301-200 Cottontail Lane, Somerset, New Jersey 08873, U.S.A.
KYOCERA OPTICS, INC.
Tel:(626) 812-8888
6020 Irwindale Avenue, Unit A-C, Irwindale, California 91706, U.S.A.
KYOCERA OPTICS, INC.
Tel:(905) 564-9385
6200 Dixie Road, Unit 11 Mississauga, Ontario, L5T 2E1, Canada
YASHICA Kyocera GmbH
Eiffestraße 76, D-20537 Hamburg, F.R.Germany
Tel:(040) 25 15 07 0
Tel:(01) 728 09 260
YASHICA Handelsges. mbH Rustenschacherallee 38, A-1020 Wien, Austria
Tel:(01) 720 34 34
YASHICA AG. Zürcherstraße 73, CH-8800 Thalwil, Switzerland
KYOCERA YASHICA (U.K.) Ltd.
Unit 7, Suttons Industrial Park, Sutton Park
Avenue,
Earley Reading, RG6 1AZ, U.K. Tel:(0118) 935 6300
B.P. 40067 Tremblay en France 95913 Roissy CDG Cedex France Tel: (01) 49 89 38 60
KYOCERA YASHICA (FRANCE) S.A. ZAC de Paris Nord l l -13, rue de la perdrix
Av. Bernardino de Campos No. 98, 5-Andar Paraiso,S ão Paulo CEP: 04004-000,
KYOCERA YASHICA DO BRASIL-INDUSTRIA E COMERCIO LTDA.
133 Hoi Bun Road, Kwun Tong, Kowloon, Hong Kong Tel: 2343 5151
UNIVERSAL OPTICAL INDUSTRIES LTD. 14/FL. Piazza Industrial Building,
Brazil Tel: (011) 889-8055
Printed in JapanRI110010
Instruction manual • Bedienungsanleitung
GB /D
01-1BC(E)_Cover 11/15/01 7:26 PM Page 1
ENGLISH
ENGLISH
We greatly appreciate your purchase of this Contax NX camera. The
Contax NX is an autofocus single lens reflex camera based on the Contax'
fundamental principle of "building cameras for creating works of art".
Automatic or manual focus can be selected according to the subject and
setting so that the user can achieve the desired results with accuracy.
Read these instructions carefully before using the camera to ensure proper use
and a long service life.
This camera incorporates ‘Custom Functions’ which may be used in applica-
tions beyond the normal requirements of photography. See page 87 for
details.
The abbreviation ‘ used throughout this manual indicates a custom func-
tion.
Safety warnings
This manual contains the following warnings to ensure safe use of the camera. Please
read the explanations thoroughly before use.
Caution
Warning
Failure to use the product correctly may result in serious injury
and/or death of the user.
Failure to use the product correctly may result in injury to the
user or damage to property.
Cautions in Handling
<Cautions when using the camera>
Any foreign matter on the lens or mount should be removed with a blower or by wiping
with a soft lens cloth. Fingerprints should be removed by wiping gently with a commercial-
ly available lens paper. Foreign matter on the mirror should be removed by wiping gently
with a soft lens cloth.
Remove dust and dirt from the camera body by wiping with a soft cloth. Use of organic
solvents such as benzene or thinners may result in damage to the body and should be
avoided under all circumstances.
2
01-1BC(E)_Cover 11/15/01 7:26 PM Page 2
3
Clean the camera thoroughly after use at the beach or in dusty
areas. Salt spray may corrode metal components, and may
result in damage to, and short-circuit of, electronic components,
with the possibility of smoke or fire. The presence of sand in the
mechanism of the camera will cause problems in operation.
The lens may fog-up if the camera is moved immediately from a
cold area into a warm room. The condensation on the lens will
disappear after a few minutes, however if this process is repeat-
ed water droplets will form in the lens and camera body, and
may result in damage to, and short-circuit of, electronic compo-
nents, with the possibility of smoke or fire. Avoid moving the
camera suddenly between areas of differing temperature.
Do not place the camera in direct sunlight. The focusing effect of
the lens on nearby objects may result in damage or fire. Always
fit the lens cap, and store out of direct sunlight.
The camera contains precision electronic equipment. Damage to
the electronic circuits may result in smoke or fire and consequent
damage to the mechanism, and care should be taken to avoid
dropping the camera or subjecting it to physical shocks.
Check operation of the camera, or take test photographs
before using it for important occasions such as overseas
trips or weddings. Always carry spare batteries.
Caution
Warning
If the batteries becomes overheated the camera may emit smoke
or a burning smell. In this case, remove the batteries immediate-
ly to prevent fire or burns (take care to avoid burns when remov-
ing the batteries).
Do not use the camera in locations where it will be in direct con-
tact with water or in locations with a high moisture content, and
do not use the camera with wet hands. Use under such condi-
tions may result in electric shock, short-circuit of electronic com-
ponents, overheating, smoke, fire, or corrosion. (Note that it is
particularly important to be careful when using the camera in
rain, snow, or at the beach.)
Do not use the camera in the vicinity of inflammable gases. Use
in such situations may result in fire.
Do not disassemble or modify the camera. The camera employs
high voltage, and modification may result in electric shock.
The camera contains high-voltage circuits. If it has been
dropped, care must be taken not to touch the internal mecha-
nism as this may result in electric shock.
During flash photography, ensure that the flash is not close to
the human eye (particularly the eyes of infants). Use of the flash
near the eyes may result in vision disorders.
Do not look directly at the sun or a strong light source through
the camera. Such use may result in vision disorders.
02-1BC(E)_P003-007 11/15/01 7:27 PM Page 3
54
<Storing the camera>
Leaving the camera in a warm place (e.g. at the beach during the summer, in direct
sunlight inside a vehicle) for a long period of time will result in deterioration of the
film and batteries, having a negative effect on the camera.
If the camera is to be left unused for a long period of time, remove the batteries to
guard against damage from fluid leakage.
Caution
Warning
<Notes on the Shutter Curtain>
The shutter curtain is made of very thin material. Never push it with a finger, or touch or
wipe it. When changing film, take care to ensure that the film tip does not touch the
shutter curtain. When using an air blower, ensure that only a gentle jet of air is used. If
the jet is too strong it may damage or deform the curtain. Never use a pressurized
blower.
<Photography using infrared film>
The characteristics of this camera prevent the use of infrared film for photography.
<Microcomputer Protective Circuit>
This camera incorporates a safety circuit to protect its microcomputer again strong
external static electricity. Operation of the circuit may prevent operation of the camera
in rare cases. In this case, set the main switch to OFF, remove and reload the batteries,
and continue using the camera.
Warning
Avoid storing the camera in humid and dusty locations,
wardrobes containing insecticide, or laboratories containing
chemicals. Storage under these conditions may result in damage
to, and short-circuit of, electronic components, with the possibility
of smoke or fire. Ensure that the camera is stored in a location
with good ventilation.
Do not touch the battery terminals with conductive metal objects
(e.g. tweezers). This will reduce the life of the batteries, and may
result in a short-circuit.
Adhere strictly to the following requirements. Failure to do so
may result in damage to the batteries, fire, injury or contamina-
tion of the immediate surroundings.
Use only the specified batteries in the camera.
Do not throw batteries in the fire, short-circuit while charging,
dismantle, or heat under any circumstances.
Do not mix new and used batteries, batteries from different
manufacturers, or different types of batteries, in the camera.
CR2 batteries (3V lithium batteries) must not be charged
under any circumstances.
When disposing of batteries, insulate the terminals by covering
with tape etc. to prevent contact with other metal objects which
may result in splitting of the batteries, or fire.
Store batteries out of reach of children. Contact a doctor immedi-
ately if a battery is swallowed. Swallowing may result in a leak in
the battery, causing damage to the stomach and intestines.
<Cautions for handling batteries>
Battery performance generally deteriorates as temperature is reduced. In cold areas, the
camera should be placed under thermal protective covering, or inside the clothing, before
and after use. Batteries which have deteriorated due to low-temperature will recover if
returned to normal temperatures.
Contamination of the + and - terminals of the batteries with sweat and oils may prevent
good contact. Always wipe the terminals thoroughly with a dry cloth before using the bat-
teries.
Always take new, spare batteries on long trips etc.
The camera will not operate if the battery contacts do not match those in the battery com-
partment.
Caution
Do not take photographs while moving. In particular, do not move
while looking through the viewfinder. Use in such situations may
result in a fault in the camera.
Do not pay excessive attention to the subject at the expense of
your surroundings during photography.
Do not leave the camera within reach of infants or children. Take
particular attention when using the camera near infants or chil-
dren, and do not leave it unattended. Infants and children do not
understand the safety warnings and cautions, and this may result
in the following.
The camera dropping or falling, with consequent injury.
The camera strap being wrapped around the neck, resulting in
suffocation.
02-1BC(E)_P003-007 11/15/01 7:27 PM Page 4
BASIC OPERATIONS PRIOR
TO SHOOTING
BASIC OPERATIONS
SIMPLE SHOOTING PROCEDURE
FOCUSING
SELECTING THE METERING MODE
APPLIED PHOTOGRAPHIC
TECHNIQUES
FLASH PHOTOGRAPHY
CUSTOM FUNCTIONS
REFERENCE
MAIN ACCESSORIES
6 7
Safety warnings ....................................................2
Cautions in Handling ............................................2
1. Fitting the strap and viewfinder shade
adapter............................................................14
2. Fitting the eye cup/diopter correction lens......15
1. Main switch .....................................................26
2. Shutter release button ....................................27
3. Position dial.....................................................28
Using the “ ”(green) setting on the
position dial.....................................................36
1. Selecting focus frames ...................................39
1. Types of metering modes and their features ..48
1. Autoexposure photography
<1. Taking photographs with the aperture
priority mode “Av” (aperture priority auto
exposure)> ...............................................51
<2. Taking photographs with shutter speed
priority settings “Tv” (shutter priority auto
exposure) mode> .....................................52
<3. Taking photographs in the program auto
mode “P” (program auto exposure)
mode> ......................................................53
1. Taking photographs using the internal flash ...72
2. Taking photographs using a Contax TLA flash..76
1. List of custom functions ..................................87
1. Basic information on photography ..................91
1. Contax Data back D-11...................................96
2. Contax Cable switch LA type..........................97
3. Contax Power pack P-8, P-8D........................98
Names of Parts........................................8
3. Inserting the batteries and checking
the battery power...............................16
4. Mounting and removing lenses..........18
5. Holding the camera............................19
4. F and R dials .....................................29
5. Mode button and mode details ..........30
6. Selecting the mode ............................31
2. Focusing in the autofocus mode .......40
2. Metering range...................................49
2. Manual exposure photography
<1. Taking photographs with the
exposure set manually “M”
(manual exposure) mode> ..........55
<2. Using the bulb exposure
mode> .........................................57
3. Taking photographs with exposure com-
pensation
<1. Setting exposure compensation
manually (with Av, Tv, P)>...........58
3. Taking photographs using other
flashes with the X contact..................81
2. Setting custom functions ...................89
2. Troubleshooting .................................92
4. Contax Power pack adapter GP-1...101
5. Contax Mount adapter NAM-1.........102
6. Contax Flexible case C-9 ................103
Display Panel and Viewfinder Display...10
6. Loading film .......................................20
7. Setting the film speed manually.........23
8. Removing film ....................................24
7. ABC/ button..................................33
8. Focus button ......................................33
9. Sync switch........................................33
4. Focusing manually.............................44
<2. Taking photographs with the AE
lock>............................................60
<3. Taking photographs with the
Exposure Autobracketing Expoure
Mode (ABC Exposure mode)> ....62
4. Using the selftimer .............................65
5. Date and time imprinting....................66
6. Checking the depth of field ................68
7. Cable switch socket ...........................69
8. Replacing the camera back ...............69
4. Flash photography techniques ..........82
3. Shutter speed and aperture value
display................................................94
Main specifications ..............................104
CONTENTS
02-1BC(E)_P003-007 11/15/01 7:27 PM Page 6
9
Names of Parts
Internal flash (page 72) Sync switch (page 73, 84)
Position dial
(page 28)
Strap lug
(page 14)
ABC Exposure/ button (page 62,75)
Mode button (page 30)
Display panel (page 10)
R dial (page 29)
Light button
(page 12)
Strap lug (page 14)
Shutter release
button (page 27)
F dial (page 29)
Dedicated flash contact (page 76)
Direct X contact (page 81)
Accessory shoe (page 76)
Internal flash
(page 72)
Lens mark
(page 18)
Lens released
button
(page 18)
Mount
(page 18)
Selftimer LED (page 65)
Aperture stop-down button (page 68)
AF supplementary light (page 38)
Viewfinder contacts (page 11)
DX contact (page 22)
Film chamber
(page 20)
Cable switch socket
(page 97)
Film tip mark (page 21)
Spool (page 21)
Eye cup F-3 (Page 15)
Battery cover/ Battery
compartment
(page 16)
Rewind button
(page 24)
Tripod socket
Camera back release
button (page 20)
Film check window
Camera back opening
lever (page 20)
Sync terminal (page 81)
Cable switch socket (page 97)
Film fixing shaft (page 20)
Data back contacts (page 96)
Shutter curtain (page 20)
Focusing frame select lever (page 40)
R dial (page 29)
Focus button (page 45)
Camera back
release pin
(page 69, 96)
Camera back
(page 21)
Main switch
(page 26)
8
03-1BC(E)_P008-012 11/15/01 7:27 PM Page 8
1110
Display Panel and Viewfinder Display
<Display panel>
Exposure counter (page 21)
Selftimer remaining time (page 65)
ABC shooting order (page 62)
Bulb exposure time (page 57)
Film loading indicators
• Film advance error (page 21)
• Film advance normal (page 21)
• Film advancing (display increments)
• End of film (page 24)
• Film rewinding (display decrements)
• End of rewind (page 24)
Focusing mode (page 30)
• “ ” Manual focus
• “ ” Single autofocus
• “ ” Continuous autofocus
Exposure mode (page 30)
• “ ” Manual exposure
• “ Aperture priority auto
• “ ” Shutter priority auto
• “ ” Program auto
Metering mode (page 30)
• “ ” Center divied partial
metering
• “ ” Center-weighted average
metering
• “ ” Evaluative metering
Drive mode (page 30)
• “ ” Selftimer photography
(page 65)
• “ ” Single frame photography
(page 45)
• “ ” Continuous photography
(page 45)
Aperture value (page 51)
ABC setting and compensation range (page 62)
Internal flash compensation (page 75)
Shutter speed (page 52)
Film speed
• DX : For automatic setting (page 22)
• ISO : For manual setting (page 23)
Custom functions (page 87, 89)
(This page describes the contents of the displays. All the information is indicated
on these diagrams for explanation purposes. The display will not show all this
information at once but only pertinent information for settings and modes.)
<Viewfinder display>
Flash mark (pages 72, 76)
Internal flash compensation
mark (page 75)
Focus indicators (page 40)
“”
lit: In focus
“”
flashing: Focusing not
possible
Metering mode (page 48)
• Evaluative metering
• Center-weighted average
light metering
• Center divied partial
metering
AE lock (page 60)
Exposure compensation
(page 58)
Shutter speed (page 52)
Aperture value (page 51)
Exposure counter (page 21)
Selftimer remaining time (page 65)
ABC shooting order (page 62)
Film loading indicators (page 21)
Exposure compensation
value (page 58)
• 1/3 EV increments
• 1/2 EV increments
Exposure meter (page 55)
Metering difference
(page 87)
Manual exposure (page 55)
Focus frame (normally displayed)
(page 39)
Battery remaining (page 17)
Focus frame selection
indicators (page 39)
Exposure compensation
value (page 58)
• 1/3 EV increments
• 1/2 EV increments
03-1BC(E)_P008-012 11/15/01 7:27 PM Page 10
12
The display in the viewfinder incorporates a variety of information - as well as
the focus, aperture, and shutter speed, it also shows the exposure meter and
exposure counter.
The viewfinder display turns on when the operations below are performed, then
automatically turns off after 16 seconds to save power.
When the main switch is turned on.
When the shutter button is half-pressed while the main switch is turned on.
If any dial is changed while the viewfinder display is switched over while the
viewfinder display is lit, the display time is extended another 16 seconds.
” Display time may be changed. (Power hold time, page 87).
The viewfinder display turns off in the following cases:
Photography, Film finished, Rewinding, Rewinding finished, Film advance failure, Battery
discharged
<Display panel illumination>
The display panel has an illumination
function. Press the “LIGHT” button once
to light the display panel, and press it
again to extinguish it. The panel is
cleared automatically after 16 seconds.
If other dials or buttons are operated while
the display panel is lit, the duration of illumi-
nation is automatically extended. The dis-
play panel light turns off as soon as the
shutter is released.
” Illumination time may be changed.
(Power hold time, page 87)
“LIGHT” button
03-1BC(E)_P008-012 11/15/01 7:27 PM Page 12
13
BASIC OPERATIONS PRIOR TO
SHOOTING
This section describes procedures that should be taken prior to photographing
and includes basic operations of this camera. If you already have basic knowl-
edge on handling a camera and wish to start taking photographs immediately,
proceed to “SIMPLE SHOOTING PROCEDURE” on page 35.
04-1BC(E)_P013-024 11/15/01 7:27 PM Page 13
14 15
1. Fitting the strap and viewfinder shade adapter
First pass the strap through the viewfinder shade adapter supplied with the
camera, and then attach the strap to the camera as shown below.
2. Fitting the eye cup/diopter correction lens
The eye cup F-3 is fitted as shown below.
When using the selftimer, light entering the viewfinder when the eye is
moved away may interfere with a correct reading of incident light. In such
cases, fit the viewfinder shade adapter to the viewfinder.
The separately available FL diopter correction lenses (+3, +2, +1, 0, -2, -3,
-4, -5 available) are fitted as shown below. The eye cup may be fitted on the
diopter correction lens.
04-1BC(E)_P013-024 11/15/01 7:27 PM Page 14
1716
3. Inserting the batteries and checking the battery
power
<Inserting the batteries>
Turn the main switch off before inserting the batteries.
Open the battery compartment
cover.
Use a coin to turn the battery cover in
the direction of the arrow.
Insert two 3V lithium batteries
(CR2) into the battery compart-
ment. Ensure that the battery con-
tacts and those in the battery com-
partment match.
The camera will not operate, and may mal-
function, if the batteries are inserted in the
wrong direction.
Close the battery compartment
cover.
The “”mark appears in the display
panel.
Even when using new batteries, during con-
tinuous shooting or at low temperatures, the
voltage may decrease momentarily and the
” mark may light. If this happens, set
the main switch to OFF then back ON two
or three times. If the “ ” mark lights there
is enough battery power.
<Checking the battery power>
The meaning of the battery marks are as follows:
Check the battery power with the main switch turned ON.
Battery compart-
ment cover
Display panel
Battery (CR2)
Display when main
switch is on
(flashing)
(flashing)
Meaning
There is sufficient battery power.
Camera will not operate.
Replace with a new battery.
Battery power is low and will need replacement soon.
04-1BC(E)_P013-024 11/15/01 7:27 PM Page 16
<Removing lenses>
Press the lens release button and turn
the lens counterclockwise all the way
until it stops, then pull it forward to
remove it.
Be careful not to touch the lens surface or
the inside of the body when mounting and
removing lenses.
When replacing the lens while film is loaded
in the camera, do so in the shade, avoiding
direct sunlight.
18 19
<Mounting lenses>
Remove the camera's body cap
and the lens rear cap.
Line up the mount mark on the
lens with the lens mark on the
camera, insert the lens, then turn it
clockwise until a click is heard and
the lens is firmly engaged.
Use Contax N-mount lenses.
Contax 645 system lenses can be used by
mounting on an NAM-1 mount adapter.
(page 102)
4.Mounting and removing lenses
Mount mark Lens mark
Lens release button
<Removing lenses>
5. Holding the camera
Tuck in your elbows and stabi-
lize the camera.
Hold your breath when pressing
the shutter button.
Keep your arms and hands
relaxed and press the shutter
button gently.
It is important to hold the camera firmly in order to achieve sharp pho-
tographs. Unsharp photographs are often due to camera shake caused by
the photographer's abrupt motion when taking a picture.
Practice working with the camera and making both vertical and horizontal com-
positions. Find positions that are comfortable for you. Propping yourself or the
camera against a building or tree can often be effective.
When taking photographs in dark places or in other cases where the shutter speed is
slow, use a tripod to avoid camera shake.
04-1BC(E)_P013-024 11/15/01 7:27 PM Page 18
Pulling on the tip of the film, draw
out the film to the position of the
orange “ I ” mark, then set it over the
spool.
Make sure the film is flush (not bulging
out), as shown in the diagram.
If the drawn out section of the film is too
long, do not try to continue loading the film.
Wind it back up into the film cartridge to
adjust the length.
Securely close the camera back,
turn the main switch on and press
the shutter release button.
The film is automatically advanced to
the first frame and the exposure counter
is set to “01”.
If “00” still flashes on the exposure counter,
the film has not been properly loaded. Open
the camera back and reload the film.
2120
6. Loading film
Open the camera back by lifting
the camera back release knob
while sliding the camera back open-
ing lever downwards.
The first time you use the camera be sure to
remove the protective sheet inside the cam-
era before loading film.
Be careful not to touch the DX and data
back contacts. If they become dirty clean
them off with a soft cloth.
Load and remove film out of direct sunlight.
Insert the film at an angle as
shown on the diagram.
Insert the film fixing shaft onto the pro-
jection in the film cartridge.
Shutter curtain
The shutter curtain is a precision part. Be extremely careful not to touch it or
poke it with the tip of the film or your finger. In particular, never press the
shutter release button when the tip of the film is positioned over the shutter
curtain.
Camera back release knob
“ I ” mark
Display panel
04-1BC(E)_P013-024 11/15/01 7:27 PM Page 20
22 23
Use the procedure described below to set the film speed for film with no DX
code or when you want to set a different ISO from the one indicated for the film.
The manual ISO setting range is ISO 6 to 6400.
If you set the film speed manually this setting will be used even when using film with a DX
code.
Turn the position dial to “ISO”.
“DX” or “ISO” and the film speed appear
on the display panel.
Move the R dial to set the film
speed to the desired value.
DX 6 ←→ 8 ←→ 10 ←→ ←→ 5000
←→ 6400 ←→ DX ←→ 6 (repeated)
Film speed determined automatically when
set to DX.
Return the position dial to “
(white) or “ ” (green). Setting is
now complete.
The display panel returns to the normal
display.
Once the film speed is set, it is stored in
memory until it is changed again.
Photographs cannot be taken if the position
dial is set to “SET”, “ISO”, or “CF”.
<Automatic setting of the ISO
film speed>
When “DX” is displayed on the dis-
play panel, the camera reads the DX
code and sets the film speed auto-
matically.
The automatic film speed settings range
from ISO 25 to 5000.
When film with no DX code is loaded, the
film speed is automatically set to ISO 100.
If “DX” is not displayed on the display panel,
be sure to set the ISO manually. (See page
23.)
<Checking the film speed>
To check the ISO of the film loaded in
the camera, set the position dial to
“ISO”.
“DX” or “ISO” and the speed of the film
loaded in the camera appear on the dis-
play panel.
7. Setting the film speed manually
Film with DX code
<Checking the film speed>
Position dial
Display panel
Film speed
R dial
Position dial
04-1BC(E)_P013-024 11/15/01 7:27 PM Page 22
24
8. Removing film
Once the film has been fully exposed
it is automatically rewound.
The numbers on the exposure counter
decrease while the film is rewinding.
Once the film is completely rewound,
the motor stops and “00” flashes on the
exposure counter.
Check that the motor has stopped
and that “00” is flashing on the expo-
sure counter, then open the camera
back and remove the film.
Remove the film in a place out of direct sun-
light.
Be sure to remove the film after rewinding it.
After the film has been rewound, the cam-
era will not operate until the camera back
has been opened.
After removing the film, have it developed
as soon as possible.
Note that if more photographs than the reg-
ular number of frames on the film have been
taken, the last frame may be cut during the
developing process.
<Rewinding mid-way through the
film>
To rewind film mid-way through the film,
first make sure that the main switch is
ON, and using a coin or a fingernail,
press the rewind button “R” on the base
of the camera (do not use a sharp point-
ed object for this purpose).
” It is also possible to use the Custom Functions to prevent automatic rewind (page
88). Once the film has been fully exposed, film advance stops and the first and sec-
ond digits of the exposure counter flash alternately. Rewind as described in
<Rewinding mid-way through the film>.
” It is possible to rewind and leave the film tip protruding from the film cartridge when
rewinding with the Custom Functions (page 88).
‘00’ flashes
Rewind
button “R”
04-1BC(E)_P013-024 11/15/01 7:27 PM Page 24
25
BASIC OPERATIONS
05-1BC(E)_P025-034 11/15/01 7:27 PM Page 25
The shutter release button operates
in two steps.
When the shutter button is half-
pressed, the viewfinder display turns
on and the autofocus and metering
functions are activated. When
pressed further (full pressure), the
shutter is released and the photo-
graph is taken.
Before loading film, practice pressing the shutter release button to get used to the half-
pressed position.
To prevent camera shake, use a smooth motion when pressing the shutter release button.
The main switch is used to turn the
power on and off and to activate the
AEL (AE lock) mode.
Set the main switch at the click position to
prevent accidental operation.
OFF: When the red mark is not visible
The camera's power is off.
ON: The camera's power is on.
AEL: Use this when you want to lock
the exposure (AE lock). It is often used
when photographing backlit subjects. It
is also used when a subject that is con-
stantly lit moves through a background
with varied brightness values. (page 60)
<Power hold time>
If no action is taken, the panel is cleared
automatically after 16 seconds to
reduce power consumption. The follow-
ing occurs in the wait state.
The display in the viewfinder is cleared.
The aperture and shutter speed values
in the display panel are cleared.
The F and R dials cannot be used.
The display is activated again when the
shutter button is half-pressed.
” The power hold time in Custom
Functions may be changed (page
87).
2726
1. Main switch 2. Shutter release button
Power ON
Waiting
Display panel
“OFF”
“ON”
Red mark
“AEL”
Shutter
release button
Half pressure
Full
pressure
05-1BC(E)_P025-034 11/15/01 7:27 PM Page 26
The position dial may be set at any
one of five positions - “ ” (white),
” (green), “SET”,
“ISO”, or “CF”.
<1. Photography>
The “ ” (white) and “ ” (green) settings are for photography.
” (white): Stores the current photography mode (focus, exposure, metering,
drive) in memory. When the main switch is set to ON, the camera
begins operation in the previously set mode.
” (green): The same combination of photography modes (focus, exposure,
metering, drive) is selected each time the main switch is set to
ON.
When shipped from the factory the modes are focusing mode “ ”, exposure mode
”, metering mode “ ”, and drive mode “ ”.
The details of each mode may be altered as necessary (page 31, 37).
<2. SET>
Setting details for “ ” (green).
<3. ISO>
Checking film speed, and setting film speed manually.
<4. CF>
Setting “ ” (Custom Functions) (page 86).
The F dial (front command dial) and R dial (rear command dial) are used for a
variety of settings.
F dial (front command dial)
Exposure correction settings
Selecting the photography mode
(focusing mode, exposure mode,
metering mode, drive mode).
ABC settings
Internal flash metering correction
“” Custom function settings
R dial (rear command dial)
Shutter speed settings
Selecting the photography mode
(focusing mode, exposure mode,
metering mode, drive mode).
Film speed settings
“” Custom function settings
2928
3. Position dial 4. F and R dials
R dial
F dial
Position dial
05-1BC(E)_P025-034 11/15/01 7:27 PM Page 28
Set the main switch to ON and set
the position dial to “ ” (white)
or “ ” (green).
Press the mode button.
“Focusing mode details” appears on the
display panel and the current focusing
mode flashes.
Turn the F dial to the desired
focusing mode. The selected
focusing mode flashes (select the
focusing mode details).
Turn the R dial in the direction of
the arrow to display “Exposure
mode details”.
“Exposure mode details” appears on the
display panel, and the current exposure
mode flashes.
Turn the F dial to the desired
exposure mode. The selected
exposure mode flashes (select the
exposure mode details).
The mode button is used to select
the focusing mode, exposure mode,
metering mode, or drive mode.
Press the “MODE” button and set with
the F or R dial as necessary.
[Mode details]
<1. Focusing mode>
: Single autofocus (page 41)
Used for general photography, e.g. photographing stationery subjects.
: Continuous autofocus (page 41)
Used for continuous photography of moving subjects.
: Manual focus (page 44)
Used for manual focusing.
<2. Exposure mode>
: Aperture priority auto (page 51). Used for automatic photography with a
fixed aperture.
: Shutter priority auto (page 52). Used for automatic photography with a
fixed shutter speed.
: Program auto (page 53). Used for automatic photography without inter-
vention by the user.
: Manual exposure (page 55). Used for photography with the exposure
(aperture and shutter speed) controlled by the user.
<3. Metering mode> (page 48)
: Evaluative metering : Center-weighted average metering
: Spot metering
<4. Drive mode> (page 45)
: Single frame photography
A single photograph is taken, and the film advanced and stopped, with each press
of the shutter button.
• : Continuous photography
Continuous photography at a maximum rate of approximately 2.3 frames per sec-
ond while the shutter button is pressed. (The rate varies with shutter speed, film
speed, whether or not data back is used, and the state of the batteries.)
: Selftimer photography (page 65)
Used for selftimer photography.
3130
5. Mode button and mode details 6. Selecting the mode ( )
Mode button
focusing mode, exposure mode,
metering mode, drive mode
Focusing mode details
F dial
R dial
Exposure mode
details
05-1BC(E)_P025-034 11/15/01 7:27 PM Page 30
Used for ABC setting (page 62). Press
the ABC button, and set with the F dial.
This button may also be used for flash
correction (page 75).
Used for focus lock during autofocusing
(page 43).
Also used for one-shot autofocus with
manual focusing (page 45).
Selects first curtain synchronization
(NORMAL) or second curtain synchro-
nization (page 84). Normally set to
“NORMAL”.
Turn the R dial in the direction of
the arrow to display “Metering
mode details”.
“Metering mode details” appears on the
display panel, and the current metering
mode flashes.
Turn the F dial to the desired
metering mode. The selected
metering mode flashes (select the
metering mode details).
Turn the R dial in the direction of
the arrow to display “Drive mode
details”.
“Drive mode details” appears on the dis-
play panel, and the current drive mode
flashes.
Turn the F dial to the desired
drive mode. The selected drive
mode flashes (select the drive mode
details).
Press the mode button to
return to the normal display.
The details of the selected modes are
displayed, and setting is complete.
Setting may also be completed by half-
pressing the shutter button.
3332
7. ABC/ button
8. Focus button
9. Sync switch
ABC/ button
Focus button
Sync switch
05-1BC(E)_P025-034 11/15/01 7:27 PM Page 32
34
05-1BC(E)_P025-034 11/15/01 7:27 PM Page 34
35
SIMPLE SHOOTING
PROCEDURE
USING THE “ ” (GREEN) SETTING
ON THE POSITION DIAL
Used the “ ” (green) position for simple photography. This setting is recom-
mended if you are using a camera for the first time, or if you wish to take pho-
tographs without worrying about aperture and shutter speed settings.
06-1BC(E)_P035-37 11/15/01 7:27 PM Page 35
37
<Changing details for “ ” (green) position>
The mode details for “ ” (green) on
the position dial are changed as
described below. Create your own
mode details as required for your
unique type of photography.
Set the main switch to “ON”, and
set the position dial to “SET”.
The mode details appear on the display
panel, and the current focusing mode
details flash.
Set the F dial to the desired
focusing mode. The selected
focusing mode flashes.
Set the R dial to the desired expo-
sure mode. The selected expo-
sure mode appears on the display
panel. Set the F dial to the desired
exposure mode. The selected expo-
sure mode details flash on the dis-
play panel.
Set the R dial to the desired metering
mode and drive mode details in the
same way. The desired mode details
flash on the F dial.
Set the position dial to “
. The
mode details are now changed.
36
Set the main switch to “ON”, and
turn the position dial to “
(green).
The camera is set to the following
modes when shipped from the factory.
Focusing mode :
Exposure mode :
Metering mode :
Drive mode :
The mode details appear on the display
panel. If the display differs from the mode
details shown above, reset in accordance
with <Changing details for “ ” (green)
position> on the next page.
Push the focusing frame select
lever to select the central portion.
The selected position appears on the
display panel. The selected focus frame
flashes red once in the viewfinder.
Point the focus frame in the cen-
ter of the viewfinder towards the
subject and half-press the shutter
button.
When the subject is focused the
focus frame at the center of the
viewfinder flashes red once, a beep
is heard, and the “ ” mark indicat-
ing focusing is lit in the viewfinder.
Press the shutter button to take
the photograph.
Using the “ (green) setting on the position dial
(In the “ ” (green) position on the position dial, the same combination of photogra-
phy modes (focusing, exposure, metering, drive) are selected when the main switch
is set to ON.)
Focus indicators
Viewfinder
Display panel
F dial
R dial
Position
dial
Display panel
<Changing mode details>
Position
dial
06-1BC(E)_P035-37 11/15/01 7:28 PM Page 36
This camera has five focusing frames:
the frame at the center of the picture,
and four peripheral frames positioned
diagonally.
The most appropriate frame for the posi-
tion of the subject is selected.
When the auto select mode is switched,
the selected focusing frames flash red
once.
<Selecting focus frames>
Select the desired focusing frame using
the manual select lever. Select the diag-
onally opposite focusing frame by mov-
ing the lever in that direction.
Push the lever to select the center
focusing frame. The camera is focused
at the selected point.
Select the focusing frame while the display
in the viewfinder is lit. The frame position
cannot be changed unless the viewfinder is
lit. (Half-press the shutter button to display
the content of the viewfinder (page 11).)
” Locking a selected frame
A lock may be applied to prevent acci-
dental movement of the selected focus
frame while setting custom functions
(page 87). When making this setting,
select the frame with the focusing frame
select lever while pressing the “LIGHT”
button.
38 39
FOCUSING
This camera offers two types of focusing: autofocus (AF), in which the camera
adjusts the focus automatically, and manual focus (MF) in which the user
adjusts the focus manually.
There are two AF modes: “SAF” (single AF) which is convenient for general
photography when photographing stationary subjects, and “CAF” (continuous
AF) which comes in handy for taking photographs of moving subjects. Use them
according to the subject and scene.
1. Selecting focus frames
AF supplementary If the subject is dark, or contrast is so low that it is dif-
ficult to focus, it is illuminated automatically with AF supplementary light to
increase the precision of autofocusing. The center of the viewfinder is illumi-
nated. The effective distance of AF supplementary light is approximately 4m.
Focus frame
(select one of five)
Display in viewfinder
Focusing frame select lever
Viewfinder
07-1BC(E)_P038-46 11/15/01 7:28 PM Page 38
The autofocus mechanism is activated when the shutter button is half-pressed
while the focus dial is at the “SAF” or “CAF” position.
The focusing frame selected when the shutter button is half-pressed lights red
momentarily. After the distance is measured, the frame for which the focus was
adjusted lights red momentarily.
Set the focus dial to "SAF" (single
autofocus) or "CAF" continuous
autofocus).
See page 31 for setting details.
Selecting a focus frame for focus-
ing.
Select the focus frame with the focusing
frame select lever (page 39).
Point the selected focus frame in
the viewfinder at the subject to be
focused, and half-press the shutter
button. The subject is focused auto-
matically and the selected focus
frame flashes red once, a beep is
heard (*), and the “ ” mark indicat-
ing focusing is lit in the viewfinder.
“” lit : Focused
“” flashing : Cannot focus
* The beep is emitted only with SAF.
” It is possible to make settings without
the beep (page 87)
Now press the shutter button all
the way in to take the picture.
41
<
“SAF”
(
single autofocus
)>
This mode is recommended for general photography (still life, portraits,
landscapes, etc.).
Half-press the shutter button to focus. Once the subject is in focus, the focus is
locked at that position.
The shutter cannot be released if the subject is not in focus.
It is not possible to focus on the desired subject if “ ” is flashing. Focus on a different
object at the same distance as the subject, lock the focus, then recompose and photo-
graph the original subject. (Page 42)
If “ ” is flashing but you want to take the photograph anyway, the shutter can be
released by pressing the shutter button while pressing the focus button.
When the drive mode is set to “C”, the focus is locked at the first focusing distance and
remains at that set distance for subsequent photographs.
<“CAF” (continuous autofocus)>
This mode is recommended for photographing moving subjects.
When the shutter button is half-pressed, the focus is adjusted continuously.
Check that the subject is in focus before taking the picture.
In the “C” (continuous shooting) mode, the focus is continuously adjusted as you shoot.
In this mode, the shutter is released when the shutter button is pressed, even if “ ” is
flashing.
In some instances, depending on the movement or change in the subject position, the
camera may not be able to keep the subject in focus during continuous shooting.
40
2. Focusing in the autofocus mode
Focus indicators
Focus frame
Focusing frame
select lever
Focus frame
<Dual focusing mechanism>
When using lenses fitted with the dual focusing mechanism, manually turning
the distance ring while the “ ” mark indicating focusing is lit and the SAF
focusing mode is selected automatically selects the dual focusing mecha-
nism for fine focus adjustment.
Display panel
Viewfinder
07-1BC(E)_P038-46 11/15/01 7:28 PM Page 40
43
In the “CAF” (continuous autofocus) mode
Point the camera at the subject on which you want to focus, position
the subject within the focusing frame, then half-press the shutter but-
ton.
The focus is adjusted continuously while the shutter button is half-pressed.
Check that the focus display in the viewfinder is lit, then press the
focus button.
The focus is locked when the focus button is pressed.
Still pressing the focus button, position the camera to achieve the
desired composition.
The focus is locked as long as the focus button is pressed.
Press the shutter button all the way in to take the picture.
<Subjects that may cause problems for the autofocusing system>
For the subjects described below, the camera may not be able to focus auto-
matically and the “ ” (focusing not possible) display may flash. In such cases,
either use the focus lock function to first focus on a different object at the same
distance as the subject or adjust the focus in the manual focus mode.
Extremely bright or extremely dark subjects.
Subjects which have little or no contrast.
When the sun or other strong light sources are within or near the focusing
frame.
When there are two or more subjects at extremely different distances within
the focusing frames.
A very small subject in relation to the focus frame.
Subjects with repeating patterns.
When the ambient light level is very low or an ND or polarizing filter is used.
42
<Focus lock>
If the subject is not within a focusing frame with the desired composition, use
the procedure described below to lock the focus on that subject.
In the “SAF” (single autofocus) mode
Point the camera at the subject on which you want to focus, position
the subject within a focusing frame, then half-press the shutter button.
The focus is adjusted automatically. When the subject is in focus, the focus dis-
play (“ ”) lights in the viewfinder and the focus is locked at that position.
Still half-pressing the shutter button, position the camera to achieve
the desired composition, then press the shutter button all the way in to
take the picture.
The focus is locked as long as the shutter button is half-pressed, so it does not change
when the camera is repositioned.
The focus lock is canceled when you release your finger from the shutter button.
Half-press
Example: Center focus frame selected.
07-1BC(E)_P038-46 11/15/01 7:28 PM Page 42
<One-shot autofocus>
When a lens fitted with the dual focus mechanism is
used the autofocus mechanism can be used while in
the manual focusing mode. To use autofocusing,
press the focus button. The camera adjusts the focus
automatically while the focus button is pressed, and
when the subject is in focus the focus is locked in that
position (SAF: focusing with single autofocus).
Use for one-shot autofocus.
” The focusing method may be changed to CAF (contin-
uous autofocus) (page 88).
4544
<Adjusting the focus>
Set the focus dial to “MF” (see page
31 for details).
Adjust the focus by turning the lens'
focus ring manually.
The image on the matte surface is
clearly visible when the subject is in
focus, blurry when subject is out of
focus.
<Focus display with manual focusing>
The focus display in the viewfinder with manual focusing displays the distance
measured for the selected focusing frame.
When the object in the selected focusing frame is in focus, the focusing frame lights red.
Picture is in focus. Picture is not in focus.
” lit : Focused on subject
No display : Not focused on subject
” flashing : Cannot focus
“”
<Relationship between the focus mode and drive mode>
“” “”
“”
single
frame
mode
When the shutter but-
ton is half-pressed, the
focus is adjusted. Once
the subject is in focus,
the focus is locked at
that position (focus
lock).
The shutter cannot
be released if the
subject is not in
focus.
The focus is adjusted
continuously while the
shutter button is half-
pressed.
The shutter can be
released even if the
subject is not in
focus.
The focus is
adjusted by turning
the lens' focus ring
by hand.
“”
continuous
shooting
mode
Focusing is performed
in the same way as in
the single frame mode.
In the continuous
shooting mode, the
focus is locked at the
distance at which the
first frame (photograph)
was exposed and
remains at that position
for subsequent frames.
Focusing is performed
in the same way as in
the single frame mode.
In the continuous
shooting mode, the
focus is readjusted for
each new frame of film
exposed.
3. Focusing manually
Focusing button
07-1BC(E)_P038-46 11/15/01 7:28 PM Page 44
46
<Using lenses with an AF/MF select switch>
It is not necessary to set both the lens and the camera to MF when using manu-
al focus on a lens incorporating an AF/MF select switch with the NX. When set-
ting the camera to AF (SAF or CAF)
AF or MF may be selected immediately with the switch on the lens. When the
camera is set to MF, setting the switch on the lens to AF allows use of one shot
autofocus.
Operation with each combination is as shown below. Select the appropriate
combination for your photography.
AF
Operation in SAF
mode. Focus is
locked while the
focus button is
pressed.
Operation in CAF
mode. Focus is
locked while the
focus button is
pressed.
AF operation is not
possible with the
shutter button. One
shot autofocus possi-
ble with the focus
button.
Fine adjustment is
not possible with
the focus ring fol-
lowing AF opera-
tion.
MF
Manual focus with focus ring.
After focusing with AF, set the lens to MF for
fine focus adjustment. One shot autofocus
not possible with the focus button.
MF using the focus
ring for focusing.
One-shot AF is not
possible using the
focus button.
Setting on lens
Camera focusing mode setting
* To indicate the setting (SAF or CAF) on the camera, the display panel shows focus mode
is set display with auto power OFF displays the setting on the camera.
[Display example] Lens set to MF, camera set to SAF
Lens setting Power hold
Auto power OFF
07-1BC(E)_P038-46 11/15/01 7:28 PM Page 46
47
SELECTING THE METERING
MODE
This camera is equipped with three metering modes: evaluative metering, cen-
ter-weighted average metering, and center divided partial metering. See page
31 for setting details.
To achieve highly effective photographs with higher precision, read “Types of
metering modes and their features” on the next page carefully and select the
metering mode according to the shooting conditions and your desire to achieve
a certain exposure effect.
08-1BC(E)_P047-49 11/15/01 7:28 PM Page 47
<Evaluative metering ( mark)>
With evaluative metering, the picture is divided into
five sections, as illustrated. The autoexposure sys-
tem calculates the appropriate exposure based on
an analysis of subject conditions and positioning.
Because of this, evaluative metering can be
used not only for general photography but
also when the subject is lit from behind, with
virtually no exposure compensation or adjust-
ment required.
The exposure meter in the viewfinder may
be changed to display evaluative metering
and center-weighted average metering, or
the difference between center divided par-
tial metering and the measured value.
<Center-weighted average metering)
( mark)>
In this mode, the light is measured with emphasis
on the brightness of the subject at the center of
the viewfinder. To a certain extent it also takes into
consideration the brightness of the area surround-
ing the center to determine the exposure value.
This mode can be used for general photogra-
phy but also for easily determining the expo-
sure for subjects in motion.
<Center divided partial metering>
(
mark)
Only the brightness value of the subject corre-
sponding to an area of approximately 5% of the
scene is measured.
Use spot metering when the difference between
the brightness value of the subject and the
background is high. A good example is people
lit from behind or standing in spotlights on
center stages. It can also be used for making
very selective readings of specific areas within the
scene.
49
<Automatic metering range>
This table shows the mutual relationship between aperture, shutter speed and
EV (exposure value). For example, when using ISO 100 film and an 50mmF1.4
lens in the average metering mode, the automatic metering range is the range
indicated by the points where the line extending diagonally from “16” (the Planar
T *50 mm minimum aperture is F16) and “1.4” (the maximum aperture) on the
aperture table's ISO 100 section intersects with the vertical line (the EV line)
and horizontal line (the shutter speed line). Thus, that is EV “0” to EV “20”.
* The EV expresses the combinations of aperture and shutter speed that achieve the same
exposure effect on film. For example, the table shows that at EV 13 the same exposure
effect can be achieved at F16 at 1/30 and F8 at 1/125 second. While the EV represents
an equivalent exposure the image effects of faster and slower shutter speeds and larger
and smaller apertures differ.
48
6400
3200
1600
800
400
200
100
50
25
12
6
ISO
1.4
2
1.4
2.8
2
1.4
4
2.8
2
1.4
5.6
4
2.8
2
1.4
8
5.6
4
2.8
2
1.4
11
8
5.6
4
2.8
2
1.4
16
11
8
5.6
4
2.8
2
1.4
22
16
11
8
5.6
4
2.8
2
1.4
32
22
16
11
8
5.6
4
2.8
2
1.4
32
22
16
11
8
5.6
4
2.8
2
1.4
32
22
16
11
8
5.6
4
2.8
2
32
22
16
11
8
5.6
4
2.8
32
22
16
11
8
5.6
4
32
22
16
11
8
5.6
32
22
16
11
8
32
22
16
11
32
22
16
32
32
22
1/2000
1/1000
1/500
1/250
1/125
1/60
1/30
1/15
1/8
1/4
1/2
1
2
4
8
16
32
1/4000
2120191817161514131211109876543210
1. Types of metering modes and their features 2. Metering range
Center divided partial metering
The autoexposure system in the camera
measures light in a shutter speed range
of 32 seconds to 1/4000 second in the
auto exposure mode.
The parts indicated in color within the
range indicate the automatic metering
range when using ISO 100 film and an
F1.4 lens.
Center-weighted average metering
Center divided partial metering range
Evaluative metering
Metering sensitivity chart
Image
field bottom
Image field
top
Image
field bottom
Image
field top
Difference between center-weighted aver-
age metering and the measured value.
Metering sensitivity chart
Image field
bottom
Image field top
Exposure meter in viewfinder
shutter speed (second)
EV value
08-1BC(E)_P047-49 11/15/01 7:28 PM Page 48
51
Set the exposure mode lever to
“AV”.
See page 31 for setting details.
Turn the lens’ aperture ring to set
the aperture, then take the pic-
ture.
The aperture you have set and the auto-
matically selected shutter speed are
indicated on the display panel and the
viewfinder.
50
<1. Taking photographs with the aperture priority mode “Av”
(aperture priority auto exposure)>
(Av is the abbreviation of “Aperture value”, and is the degree of aperture)
for “Aperture value”.)
In this mode, when the aperture is set the camera automatically sets the
shutter speed for a correct exposure.
Example 1: When photos are taken with a larger aperture, the zone of sharpness (* Depth
of Field, page 68) is narrowed. Use a larger aperture when you want the sub-
ject to stand out against a less sharp background.
Example 2: When photos are taken with a small aperture, the zone of sharpness (* Depth
of Field, page 68) is increased. Use a small aperture when you want both the
subject and the background to be sharp.
APPLIED PHOTOGRAPHIC
TECHNIQUES
This camera allows for a wide range of creative possibilities.
1. Autoexposure photography
Example 1: Large aperture Example 2: Small aperture
09-1BC(E)_P050-70 11/15/01 7:28 PM Page 50
<3. Taking photographs in the program auto mode “P” (program
auto exposure) mode>
In this mode, the camera automatically selects the combination of the
aperture and shutter speed most suitable for the brightness of the subject.
This mode is convenient when you want to take photographs easily with-
out worrying about the exposure settings.
Set the exposure mode to “P”.
See page 31 for setting details.
Take the photograph.
The aperture value selected automati-
cally by the camera, and the shutter
speed, are displayed on the display
panel and in the viewfinder.
<Program auto-control diagram>
The aperture and shutter speed combinations with program auto are shown in
the diagram below. The program line moves with the focusing distance of the
lens in use (set to ISO100 with an F1.4/50mm lens).
Set the exposure mode to “Tv”.
See page 31 for setting details.
Turn the R dial to set the shutter
speed and take the photograph.
The aperture scale may be set at any
position.
The set shutter speed and automatically
set aperture value are displayed on the
display panel and in the viewfinder.
5352
<2. Taking photographs with shutter speed priority settings “Tv”
(shutter priority auto exposure) mode>
(“Tv” stands for “Time value”.)
When the shutter speed is set the camera automatically sets the aperture
in accordance with the brightness of the subject. Suitable for photography
of moving subjects.
Adjust the shutter speed to your application while referring to the examples below.
Example 1 : To freeze the action of a moving subject, set a fast shutter speed.
Example 2 :To express the movement of water, for example, set a slow shutter speed.
When using a slow shutter speed, use a tripod to prevent camera shake.
4 5 6 7 8 9 10 11 12 13 14 15 16 17 18 19 20 21
F16
F11
F8
F5.6
F4
F2.8
F2
F1.4
32”
16”
8”
4”
2”
1”
1/2
1/4
1/8
1/15
1/30
1/60
1/125
1/250
1/500
1
/1000
1
/2000
1
/4000
3
2
1
0
Example 1: Fast shutter speed Example 2: Slow shutter speed
Set the shutter speed.
Set to “P”.
Display panel
Automatically set aperture and shut-
ter speed displayed.
shutter speed (second)
EV value
aperture value
09-1BC(E)_P050-70 11/15/01 7:28 PM Page 52
55
<1.Taking photographs with the exposure set manually “M” (man-
ual exposure) mode>
In this mode, you set the aperture and shutter speed yourself. This mode
can also be used to intentionally achieve over- or under-exposure effects.
Refer to the exposure meter display in the viewfinder to set the exposure.
Set the exposure mode to “M”.
See page 31 for setting details.
Set the aperture and shutter
speed, and take the photograph.
The aperture is set with the lens aper-
ture ring, and the shutter speed is set
with the R dial.
The set shutter speed and aperture are
displayed in the viewfinder and on the
display panel.
The exposure meter in the viewfinder
displays the difference with the standard
exposure. Change the shutter speed or
lens aperture to obtain “Recommended”
on the exposure meter display
54
<Warnings displayed with auto exposure>
Over-exposure warning
Shutter speed “4000” flashes during aperture priority auto photography,
“Minimum aperture value” for the attached lens flashes during shutter priority
auto photography, and shutter speed “4000” flashes during program priority auto
photography, to warn of over-exposure. As the subject is too bright, adjust the
aperture or shutter speed until the flashing display is lit continuously. Optional or
other commercially available ND filters (light reduction filters) may also be used
for this adjustment.
Under-exposure warning
Shutter speed “32" ” flashes during aperture priority auto photography,
“Maximum aperture value” for the attached lens flashes during shutter priority
auto photography, and shutter speed “32" ” flashes during program priority auto
photography, to warn of under-exposure. As the subject is too dark, increase the
brightness of the subject, or change the shutter speed and aperture until the
flashing display is lit continuously. Note that the use of the internal flash, or a
separate flash, improves the brightness and clarity of photographs.
The shutter button may be pressed even when the over or under-exposure warning is dis-
played.
“32" ” flashes “32" ” flashes“Maximum aperture”
flashes
Under-exposure
warning
Under-exposure
warning
Under-exposure
warning
“4000” flashes “4000” flashes“Minimum aperture”
flashes
Over-exposure
warning
Over-exposure
warning
Over-exposure
warning
<>
<><>
2. Manual exposure photography
3EV or more under 1EV over
Exposure meter display example
Recommended
Display in viewfinder
09-1BC(E)_P050-70 11/15/01 7:28 PM Page 54
<2.Using the bulb exposure
mode buLb>
Use the bulb mode for nighttime or
astronomical photography requiring
long exposure times.
Set the exposure mode to “M”.
See page 31 for setting details.
Turn the R dial to “buLb”.
Set the aperture with the lens
aperture ring, and take the photo-
graph.
The shutter is released and the film is
exposed while the shutter button is
pressed.
To prevent the camera from shaking, either
fix it to a tripod or place it on a stable sur-
face, and connect a separately sold LA type
cable switch to the camera and use it when
taking the picture.
While the film is being exposed, the display
panel’s exposure counter switches to a
timer display indicating the elapsed bulb
shooting time. The counter counts from “00”
to “59” (59 seconds), then starts over from
“00”.
The entire viewfinder display remains off
while the film is being exposed.
[Taking photographs with exposure compensation in the manual
exposure mode]
The exposure compensation appears
on the display panel.
The “+/-” exposure compensation
mark flashes in the viewfinder.
The exposure difference obtained
with the aperture and shutter speed
combination set for the camera is dis-
played in relation to the set exposure
compensation value on the exposure
meter in the viewfinder.
The “M” mark indicating the manual
exposure mode is displayed in the
viewfinder.
5756
Display panel
Exposure compensation display
Exposure meter in viewfinder
Manual exposure display
Exposure difference display
“+/-” flashes
Display panel
09-1BC(E)_P050-70 11/15/01 7:28 PM Page 56
59
Example
When the subject is lit from behind
Compensate within the range of “+1/3
EV or +1/2 EV to +3 EV”.
In the average metering mode, when
the percentage of the picture occupied
by a bright background is large (for
example people with a light, a bright sky
or the sea behind them, people in front
of a window, etc.), the people tend to be
under-exposed and appear as dark sil-
houettes. In such cases, compensate
the exposure within the range of +1/3
EV or +1/2 EV to +3 EV to increase the
exposure on the main subject.
When the background is dark
Compensate within the range of “-1/3
EV or -1/2 EV to -3 EV”.
When the percentage of the picture
occupied by a dark background is large
(people standing in spotlights, etc.), if
the photograph is taken in the average
metering mode the people tend to be
over-exposed. In such cases, compen-
sate the exposure within the range of -
1/3 EV or -1/2 EV to -3 EV to reduce the
exposure.
58
When the correct exposure cannot be obtained for the primary subject
due to extreme differences in brightness between the subject and back-
ground, or when deliberate over or under-exposure is required, exposure
can be compensated using the three methods described below.
<1. Setting exposure compensation manually (with Av, Tv, P)>
Turn the F dial to set the amount of exposure compensation.
Compensation may be set in 1/3 EU steps within a range of +3EV~-3EV.
The set compensation appears in the
display panel, and the compensation
and the “+/-” mark are displayed in the
exposure meter in the viewfinder.
Always return the exposure compensation
value to “0” when photography is complete.
The exposure compensation remains until
the main switch is turned OFF.
Be careful to ensure that the compensation
value is not changed accidentally.
See page 56 for details of the exposure
compensation display in the manual expo-
sure mode.
” The exposure compensation may be set to remain until cleared (page 88).
” Press the “LIGHT” button while turning the F dial to prevent exposure compensation
being changed accidentally (page 88).
” Exposure compensation is changed in half-steps (page 87).
3. Taking photographs with exposure compensation
Exposure mode What is compensated
Aperture priority auto (Av) Shutter speed
Shutter priority auto (Tv) Aperture
Program auto (P) Aperture and shutter speed
Example : Setting a compensation
value of -2/3EV.
Display panel
Exposure meter in viewfinder
1/2EV step display
(+ compensation)
(no compensation)
(- compensation)
(no compensation)
09-1BC(E)_P050-70 11/15/01 7:28 PM Page 58
61
Reposition the camera for the desired composition, then take the pic-
ture.
When the exposure is locked, the exposure remains in the memory and photographs can
be taken as many times as you want with the same exposure value. To save energy, the
mark turns off after 16 seconds.
In the continuous shooting mode (drive mode “C”) the exposure can be locked on a mov-
ing subject so that it is possible to take multiple photographs with the same exposure
regardless of changes in the background.
When AE Lock is set the camera stores the exposure determined by the combination of
the shutter speed and aperture. In the “Av” mode, if the aperture is changed after the
exposure is locked, the shutter speed is shifted so that the overall exposure remains con-
stant.
If the position of the exposure compensation dial is changed while the exposure is locked,
the exposure compensation changes, depending on the exposure mode, as shown below.
” Half-press the shutter button to change to “AE lock”. (page 87)
60
<2.Taking photographs with the AE lock>
AE lock allows you to hold a certain exposure value even if the light
changes or the composition is altered. It allows you to customize exposure in
autoexposure modes. Use it when the subject is lit from behind or when you
want to take a series of photographs of a moving subject with a constant expo-
sure.
Point the camera so that the cen-
ter of the viewfinder is on the
area for which the exposure is
required, turn the main switch “ON”
and select “AEL”. The exposure is
then locked (AE lock).
When you want to set the exposure on
a select area within the frame, set the
center divided partial metering mode
then lock the exposure.
See page 31 for setting details.
When the exposure is locked, the metering
mark in the viewfinder flashes.
Set the AE lock mode while the display in
the viewfinder is lit.
Exposure mode What is compensated
Aperture priority auto (Av) Shutter speed
Shutter priority auto (Tv) Aperture
Program auto (P) Aperture and shutter speed
This locks the exposure (AE lock)
Metering mark
Viewfinder
09-1BC(E)_P050-70 11/15/01 7:28 PM Page 60
The exposure counter changes as fol-
lows to indicate the photography
sequence in the ABC Exposure mode.
Standard : Both digits flash.
Over : Left digit flashes
Under : Right digit flashes
Press the ABC button to set the
ABC mode.
The exposure counter and ABC mark
appear on the display panel, and the
exposure counter flashes in the
viewfinder.
Focus on the subject and press
the shutter button.
Photographs are taken with standard
exposure, over-exposure, and under-
exposure in the selected drive mode.
To cancel during operation, set the ABC
compensation range to “0.0”.
Always return the ABC compensation
range to “0.0” after the ABC Exposure
mode is terminated. The set ABC compen-
sation range is stored in memory until the
camera power supply is switched “OFF”.
6362
<3. Taking photographs with the Autobracketing Exposure Mode (ABC Exposure mode)>
The ABC Exposure mode can be used to take a series of three pho-
tographs with three exposures: standard, overexposed, and underex-
posed. This mode allows photography under very subtle lighting condi-
tions without the need to determine exposure. Continue pressing the shut-
ter button to catch that important shot.
* ABC stands for Automatic Bracketing Control.
In the ABC Exposure mode, the shutter speed and aperture are controlled for automatic
exposure compensation.
Press the ABC button to select
the ABC mode. The “ABC” and
“0.0”(compensation range) appear on
the display panel.
Turn the F dial to select the com-
pensation range.
The “0.3” (1/3EV), “0.5” (1/2EV) and
“1.0” (1EV) compensation ranges are
available.
ABC button
F dial
Power-saving display
ABC mark lights.
ABC mode is set.
The exposure counter and ABC
mark flash.
Example of viewfinder display
Drive mode ABC Exposure mode
S ABC Exposure mode set for each frame.
C
ABC Exposure mode set for three frames and then terminat-
ed.
ABC Exposure mode set with continuous photography after
ten seconds.
Exposure mode What is controlled
Aperture priority auto (Av) Shutter speed
Shutter priority auto (Tv) Aperture
Program auto (P) Aperture and shutter speed
Manual exposure (M) Shutter speed
Display panel
09-1BC(E)_P050-70 11/15/01 7:28 PM Page 62
For example, if the ABC Exposure is used at the 18th frame, the exposure
counter is as follows:
1st frame 2nd frame 3rd frame 4th frame
Focus position Standard Over Under (repeated)
Standard
Counter 18 19 20 21
Display Both left and Left flashing Right flashing Both left and
right flashing right flashing
When used with exposure compensation in the ABC Exposure mode, the exposure value
is used as the base value for autobracketing.
Metering is repeated for each photograph, and compensation determined for the metered
value at that time. It is recommended that the AE lock be set before beginning photogra-
phy if autobracketing without the effects of changing brightness is required.
If the compensation range exceeds the compensation limits of the camera, photographs
are taken at the limit of the possible compensation values.
If the main switch is turned “OFF” and “ON” again in the ABC Exposure mode, ABC pho-
tography begins again from the first frame for three frames.
The flash cannot be used in the ABC Exposure mode.
” The compensation sequence may be changed to over-exposure standard expo-
sure under-exposure (page 87).
65
Use this mode to include yourself in the photograph.
Set the drive mode to " ".
For instructions on setting the drive
mode, see page 31.
Adjust the focus, then press the
shutter button.
The selftimer is activated and the shut-
ter is released after 10 seconds. The
selftimer LED on the front of the camera
flashes while the selftimer is operating.
64
Standard UnderOver
Display panel
Set to selftimer mode
Selftimer LED
4. Using the selftimer
When using the selftimer, light entering the viewfinder when the eye is moved away may
interfere with a correct reading of incident light. In such cases, fit the viewfinder shade
adapter to the viewfinder before taking photographs. (page 14)
Use a tripod when taking photographs with the selftimer.
The selftimer cannot be used when the bulb mode is set.
If the shutter button is pressed after the selftimer has been activated, the selftimer time is
reset.
To cancel the selftimer after it has been activated, turn the main switch off.
09-1BC(E)_P050-70 11/15/01 7:28 PM Page 64
67
<Changing the date and time>
The date and time are changed as follows.
Press the mode select button to display the date.
Press the select button until the item to be changed flashes.
Press the set button to change to the correct value.
(The seconds may be changed when “:” appears on the time display. Press the set but-
ton at the tone for accurate adjustment.)
When the time and date have been changed, press the select button
until the numbers no longer flash.
<Replacing the Data back battery>
As a long-life lithium battery (CR2025) is used in the Data back, it only needs
to be replaced at 3-4-year intervals. As the battery deteriorates the date and
time display become faint, and the LCD no longer functions in the normal man-
ner. When this stage is reached, the battery should be replaced in the diagram
(battery replacement every 2 to 3 years is recommended if the Data back is
used frequently).
Remove the screw holding the
battery cover on the data back,
and open the cover.
With the + terminal of the new
battery facing outwards, place it
in the battery compartment and
replace the cover and screw.
Always reset the date and time after replac-
ing the battery.
66
The date and time may be imprinted during photography in cameras fitted with
the data back. The separately available Contax Data Back D-11 may be fitted to
cameras not supplied with this option.
The data back contains a battery when shipped from the factory.
Select the imprint mode.
A different mode is selected each time the mode select button is pressed.
Selection is in the following order.
Year Month Date Date Hour Minute ------ (No imprint) Month Date Year
Date Month Year
Press the shutter button to take a photograph.
The “ ” mark flashes at the top-right of the display window to indicate that the display
has been imprinted on the photograph.
The “M” mark on the numbers indicates the month, and is not imprinted.
Select ------ if the date or time is not required.
The date or time is printed at the bottom-right of the photograph. If the photograph is
bright (e.g. white or yellow) in this area the numbers may be difficult to read.
Date Hour Minute Month Date Year
Year Month Date Date Month Year
No imprint
MODE select button
SELECT button
SET button
Warning
It is particularly important to ensure that the date battery
(CR2025) is kept out of the reach of children. Contact a
doctor immediately if the battery is swallowed.
5. Date and time imprinting
09-1BC(E)_P050-70 11/15/01 7:28 PM Page 66
The camera back can be removed
and replaced with the separately
available D-11 data back (page 96).
Remove the camera back by pressing
down on the release pin.
Connect an LA type cable switch.
When taking photographs using an LA type
cable switch and shooting automatically
without looking through the viewfinder, it
may not be possible to achieve the proper
exposure due to light entering through the
eyepiece. In such cases, fit the viewfinder
shade adapter to the viewfinder before tak-
ing the photograph (page 14).
Do not use a commercially available
mechanical cable release with the cable
switch socket as it may result in a fault.
6968
When a lens is focused on the subject,
objects within a range in front of, and
behind, the subject are also in focus.
This range is referred to as the “depth of
field”.The aperture remains fully open in
the viewfinder, however when the aper-
ture stop-down button is pressed the
aperture is closed down to the previ-
ously set value to allow checking of
the depth of field and the fuzziness
of the background.
The viewfinder becomes darker in accordance with the aperture value.
Checking the exposure, and taking a photograph, with the aperture button pressed, will
not result in the standard exposure.
<Depth of field>
Depth of field for a given lens varies as follows.
Depth of field increases as the aperture is closed down, and is reduced as the
aperture is opened.
The depth of field is increased as the distance to the subject increases, and is
reduced as the distance to the subject decreases.
Depth of field for a subject in focus is greater behind than in front of the subject.
Depth of field is greater for lenses with short focal lengths, and shorter for lenses
with long focal lengths.
6. Checking the depth of field 7. Cable switch socket
8. Replacing the camera back
Aperture stop-down button
Cable switch socket
F1,4 F16
09-1BC(E)_P050-70 11/15/01 7:28 PM Page 68
70
09-1BC(E)_P050-70 11/15/01 7:28 PM Page 70
71
FLASH PHOTOGRAPHY
Use of the flash is recommended with indoor and night-time photography when
the shutter speed is 1/30 second or shorter. The camera incorporates the “TTL
direct metering” function for controlling the built-in flash automatically from the
camera when it is used together with a Contax TLA flash system.
When using the TLA360 flash, be sure to read “2. Taking photographs using a
Contax TLA360 flash” (page 78).
Refer to page 81 when using a non-dedicated flash with only an X contact.
10-1BC(E)_P071-85 11/15/01 7:29 PM Page 71
73
M (manual), modes
In the “M” mode, the shutter speed is not set automatically. Be sure to set it to 1/125 sec-
onds or slower.
The set shutter speed is displayed in the viewfinder.
Set sync select switch to “NOR-
MAL”.
Set the aperture or shutter speed
in accordance with the following
table, and take the photograph.
The “”mark flashes (twice per second) while the internal flash is charging. The shutter
will not operate while the internal flash is charging.
If the light is adjusted following photography, the
“”mark flashes rapidly (four times per
second) for two seconds.
If the
“”mark does not flash following photography, the subject is too far away result-
ing in under-exposure. Either move the camera closer to the subject, or open the aper-
ture, and take the photograph. The distance range for photography is reduced if using
reversal film, and photographs should be taken within the flash photography range shown
on the following page.
Over-exposure may still occur even if the
“”mark flashes following close-up photogra-
phy. Photographs should be taken within the flash photography range shown on the fol-
lowing page.
The ABC Exposure mode cannot be used with the flash.
When drive mode “C”(continuous photography mode) is selected, the shutter operates
repeatedly only waiting for the flash to charge.
Use ISO25 to 800 film (does not include exposure compensation).
When photography is complete, close the internal flash by pressing it.
72
<1. Taking photographs using the TTL auto flash function with the
internal flash>
The amount of light from the flash reflected off the subject onto the film is mea-
sured (TTL direct metering) to control the flash intensity.
When the internal flash is raised
manually the flash power supply
is switched ON and charging begins.
Once the flash is charged, the “
mark lights in the viewfinder and the
shutter speed is set automatically as fol-
lows in accordance with the selected
exposure mode.
1. Taking photographs using the internal flash
Sync select switch
Metered value of ambient light Automatically set shutter speed Display
32 to 1/60 sec. 1/60 sec. “60” lit
1/60 to 1/125 sec. 1/60 to 1/125 sec. “60” to “125” lit
1/125 to 1/4000 sec. 1/125 sec. “125” flashes (*)
Set shutter speed Automatically set shutter speed Display
32 to 1/125 sec.
32 to 1/125 sec.
Set shutter speed
1/125 to 1/4000 sec. 1/125 sec. “125” lit
Metered value of ambient light Automatically set shutter speed Display
32 to 1/60 sec. 1/60 sec. “60” lit
1/60 to 1/125 sec. 1/60 to 1/125 sec. “60” to “125” lit
1/125 to 1/4000 sec. 1/125 sec. “125” lit
Exposure mode Aperture or shutter speed
P Set automatically by camera.
Av, M Set the aperture. Take the photograph at the set aperture.
Tv
The aperture is set automatically to the standard value for ambient
light. Closed down automatically in bright light.
AV (aperture priority auto) mode
Tv (shutter priority auto)
P (program auto) mode
* “125” flashes to indicate overexposure. Close the aperture until the flashing ceases and
the LED is lit continuously.
10-1BC(E)_P071-85 11/15/01 7:29 PM Page 72
75
<2. Light compensation with the internal flash>
The internal flash may be used for light compensation with the camera in
the same way as exposure compensation. The compensation range is -3EV
to +1EV.
Raise the internal flash and press
the button to select the light
compensation setting mode.
Turn the F dial to set the compen-
sation value.
Press the button to set light
compensation.
± ” is added to the display panel.
± ” is displayed in the viewfinder.
The set light compensation is saved in
memory until the camera is switched OFF
or the internal flash is retracted. Always
cancel the setting after photography with
light compensation.
The compensation value is returned to
“0.0” after it is cancelled.
Check that “ ± ” is lit in the
viewfinder (charging complete)
before taking the photograph.
74
” The flash may be set to reduce red-eye (*).
* The pupil of the eye may sometimes appear red (red-eye) when taking photographs of
people in dark locations. This setting reduces this problem.
The flash is lit twice at approximately 0.7 second intervals, and the shutter operated
simultaneously with the second flash. Take care to ensure that the camera and the sub-
ject remain stationary after the first flash.
The effects of red-eye reduction differ between individuals.
Range for internal flash photography (units in m)
Illumination from the built-in flash is insufficient for use with the Vario-Sonnar 17-35mm
F2.8 lens. Use a Contax TLA flash (except the TLA200) with this lens.
When the distance to the subject is greater than the range of the internal flash, the light
may not reach the subject and it will therefore be under exposed. In such cases, use an
external Contax TLA flash with a high guide number.
The built-in flash cannot be used simultaneously with a Contax TLA flash fitted on the
accessory shoe.
Close the internal flash before fitting a Contax TLA flash.
button
Display panel
Compensation setting mode
Compensation value set
Compensation setting completed
Display in viewfinder
ISO 100 ISO 400
F1.4 2.0 ~ 9.6 (m) 4.0 ~ 19.0 (m)
F2 1.4 ~ 6.7 (m) 2.8 ~ 13.4 (m)
F2.8 1.0 ~ 4.8 (m) 2.0 ~ 9.5 (m)
F4 1.0 ~ 3.3 (m) 1.5 ~ 6.6 (m)
F5.6 1.0 ~ 2.4 (m) 1.0 ~ 4.8 (m)
Film speed (ISO)
Aperture
• The angle of illumination of the built-in flash is such that the angle of view is covered
with a focal length of 28mm. When using wide-angle lenses of less than 28mm the
edges of the scene will appear darker.
• When using the built-in flash, always remove the hood before taking photographs.
Using the flash with the lens hood in place will restrict illumination of the scene, and
the shadow of the hood may appear in some photographs.
Always stand at least 1m from the subject when using the built-in flash. Photographs
may appear darker if the distance to the subject is less than 1m.
10-1BC(E)_P071-85 11/15/01 7:29 PM Page 74
M (manual exposure)
The shutter speed is not set automatically with “M” selected. Always set to 1/125 sec. or
less.
The set shutter speed is displayed in the viewfinder.
Set the aperture or shutter speed in accordance with the table below,
and take the photograph.
If the light is adjusted following photography, the “”mark flashes for two seconds.
If the
“”mark does not flash following photography the subject is under exposed.
Change the aperture and distance to the subject and take another photograph.
Over-exposure may still occur even if the
“”mark flashes following close-up photogra-
phy. Photograph within the range described in the manual supplied with the flash unit.
The ABC Exposure mode cannot be used with the flash.
Check the flash performance when selecting drive mode “C” (continuous photography
mode).
Use ISO 25~800 film (does not include exposure compensation).
7776
A Contax flash unit is controlled from the camera in the same way as an
internal flash to permit simple flash photography.
A flash unit separated from the camera is recommended when pho-
tographing subjects at a distance beyond the range available with the
internal flash.
<1. Taking photographs using the TTL auto flash function>
The amount of light from the flash reflected off the subject onto the film is mea-
sured (TTL direct metering) to control the intensity of the flash.
Fit the TLA flash to the camera
accessory shoe shown and
switch the flash power supply ON.
The built-in flash cannot be used simultane-
ously with a Contax TLA flash fitted on the
accessory shoe.
Set the flash to the “TTL auto
mode”.
When the flash is charged the “
mark is lit in the viewfinder and the shut-
ter speed is set automatically in accor-
dance with the camera exposure mode.
2. Taking photographs using a Contax TLA flash
Metered value of ambient light Automatically set shutter speed Display
32 to 1/60 sec. 1/60 sec. “60” lit
1/60 to 1/125 sec. 1/60 to 1/125 sec. “60” to “125” lit
1/125 to 1/4000 sec. 1/125 sec. “125” flashes (*)
Set shutter speed Automatically set shutter speed Display
32 to 1/125 sec. 32 to 1/125 sec. Set shutter speed
1/125 to 1/4000 sec. 1/125 sec. “125” lit
Metered value of ambient light Automatically set shutter speed Display
32 to 1/60 sec. 1/60 sec. “60” lit
1/60 to 1/125 sec. 1/60 to 1/125 sec. “60” to “125” lit
1/125 to 1/4000 sec. 1/125 sec. “125” lit
Exposure mode Aperture or shutter speed
P Set automatically by camera.
Av, M Set the aperture. Take the photograph at the set aperture.
Tv
The aperture is set automatically to the standard value for ambient
light. Closed down automatically in bright light.
Tv (shutter priority auto)
P (program auto)
* “125” flashes to indicate overexposure. Close the aperture until the flashing ceases and
the LED is lit continuously.
Av (aperture priority auto)
10-1BC(E)_P071-85 11/15/01 7:29 PM Page 76
79
Auto setting of the angle of illumination
The flash’s angle of illumination is set automatically according to the focal
length of the lens mounted on the camera.
Making the setting
Mount the flash on the camera’s
accessory shoe and turn it “on” the
flash. The angle of illumination is set
automatically according to the lens
mounted on the camera.
The flash display panel indicates the
automatically set angle of illumination
for the focal distance of a 35 mm lens.
The focal length of the lens is set to 24 mm, 28 mm, 35 mm, 50 mm, 70 mm or 85 mm.
When a zoom lens is mounted, this function works automatically in conjunction with the
lens setting within the above range.
If the lens is replaced when “AUTO ZOOM” is indicated on the flash, the angle of illumina-
tion is reset according to the new lens.
Manual setting of the angle of illumination
When the flash’s zoom button is pressed, the manual setting mode is set.
The zoom focal length switches each time the zoom button is pressed.
Display the desired focal distance on the display panel.
78
<2.Taking photographs using a Contax TLA360 flash>
The TLA360 flash has a guide number 36 (ISO 100/35 mm lens angle of
view). When used with this camera it offers the six functions described
below in addition to regular TTL auto flash photography.
These functions can be used when the flash unit is directly attached to the accessory
shoe on the camera top.
The flash system is not automatically set when it is used off the accessory shoe and
through the TLA extension code or TLA lighting system.
With Contax TLA flashes equipped with the auto flash function, the flash mount has five
contacts.
Auto set function
: The camera’s settings are automatically set for the
flash as well (after the flash is charged).
: The flash is not automatically set.
Auto setting of
film speed
Auto setting of
aperuture value
TTL auto
External metering
auto
Manual
Multi-flash
Function
Flash photography
mode
10-1BC(E)_P071-85 11/15/01 7:29 PM Page 78
81
Shoe stopper
The TLA360’s “mount” is equipped with
a shoe stopper that prevents the flash
from accidentally coming off the camera.
When attaching and removing the flash
from the camera, be sure to line up the
flash’s “mount” mark with the mark on
the shoe lock ring.
Fit the flash to the camera, select
“M” as the exposure mode, and
set the shutter speed to a maximum
of “X125”.
Set the aperture and take the pic-
ture.
Determine the aperture by following the
flash’s operating instructions.
For non-direct contact flashes requiring
cords, connect the flash to the synchroniza-
tion terminal on the side of the camera.
80
Flash intensity compensation
This is available only in the TTL auto flash photography mode.
Compensation is not possible in other modes.
The flash intensity can be compensated within the range of -3 EV to +1 EV in 1/3 EV
steps.
The flash intensity is compensated in conjunction with the camera’s exposure compensa-
tion value. If for example the camera’s exposure compensation is “+1” and the flash’s
compensation is set to “+1”, the flash intensity compensation is “+2EV”.
Press the flash’s “SEL” button.
The compensation scale appears on the display panel and the “+/-” mark flashes.
Use the flash’s “” and “” (up and down) buttons to set the compen-
sation scale to the desired value.
Press the “SEL” button again.
The “+/-” mark stops flashing, remaining lit, and the compensation is
set.
The compensation scale on the flash’s display panel indicates the compensation value for
the flash.
If the flash’s compensation value is set to “0” (no compensation), the compensation scale
turns off after 8 seconds.
“Auto off” and “auto on” functions
When the flash’s power switch is set to “auto off”, the flash’s power turns
off automatically after approximately 80 seconds. When the camera’s shut-
ter release button is half-pressed, the flash automatically turns on and
charging starts.
These functions help save power when using the flash for long periods of
time.
* The TLA360 is equipped with a variety of other functions as well. Be sure to read the
TLA360’s operating instructions to take advantage of all the flash photography possi-
bilities the TLA360 has to offer.
3. Taking photographs using other flashes with the X
contact
10-1BC(E)_P071-85 11/15/01 7:29 PM Page 80
83
<2. Daylight synchronization photography>
When taking photographs outdoors, for example of people in bright sun-
light or lit from behind, the people tend to be dark in the resulting photo-
graph. In such cases, photographs in which both the people and the back-
ground are well exposed can be achieved by using the internal flash or
the TLA flash in the TTL auto mode.
When the exposure mode is set to “P”
In bright scenes, the aperture and shutter speed are adjusted automatically and
the daylight synchronization mode is set.
When the exposure mode is set to “Tv”
In bright scenes, the aperture is adjusted automatically and the daylight syn-
chronization mode is set.
When the exposure mode is set to “Av”
If “125” flashes in the shutter speed indication after the flash is charged, the pic-
ture will likely be overexposed. Decrease the aperture so that a shutter speed of
under “125” is displayed, then take the picture.
When the exposure mode is set to “M”
When in the “M” mode, set the shutter dial to 1/125(125) or less. Adjust the
aperture so that the exposure meter in the viewfinder indicates that the expo-
sure is appropriate, then take the photograph.
82
<1. Slow synchronization photography>
Slow synchronization with the shutter speed set at 1/30 second or slower
less can be effective for shooting evening or night views using a flash.
Slow synchronization often adds more ambient light to the final picture.
When the TLA flash’s TTL auto mode is used, photographs can easily be
taken with slow synchronization.
When the exposure mode is set to “P” or “Av”
Determine the composition, then set the main switch to “AEL”. The shutter
speed is locked at the metered value of the ambient light. Check that the flash
is charged, then take the photograph.
When the exposure mode is set to “Tv”
Set the shutter speed to 1/30 sec. or less. Compose the picture and then set
the main switch to “AEL”. The aperture is locked at the metered value of the
ambient light. Check that the flash is charged, and then take the photograph.
When the exposure mode is set to “M”
Set the shutter speed to 1/30 seconds or less. Adjust the aperture to set the
exposure to the metered value of the ambient light so that the exposure meter
indicates that the exposure is appropriate, then check that the flash is charged
and take the photograph.
The shutter speed is slow when slow synchronization is used, so use a tripod to prevent
camera shake.
4. Flash photography techniques
Slow synchronization photography
Normal flash photography
Daylight synchronization photogra-
phy
When no flash is used
10-1BC(E)_P071-85 11/15/01 7:29 PM Page 82
Second curtain synchronization photography with a Contax TTL
auto flash
Set the sync select switch to
“”.
Check that the “ ” mark in the
viewfinder is lit (flash is charged),
and take the photograph.
Exposure control is the same as for normal
flash photography (first curtain synchroniza-
tion).
<4. Use with exposure compensation>
The flash intensity is compensated in
conjunction with the camera's F dial
exposure compensation with TTL auto
flash photography. Use the F dial to
adjust flash intensity for maximum
effect.
8584
<3. Second curtain synchronization>
Taking photographs with second curtain synchronization is effective for
shooting moving subjects using slow synchronization.
Normally with flash photography the flash is emitted directly after the shutters
front curtain has finished traveling (first curtain synchronization).
When an internal flash or a Contax flash equipped with the second curtain syn-
chronization function is used, the flash can be triggered immediately before the
shutter's rear curtain begins movement (second curtain synchronization).
The “ghost” movement of the subject thus appears more natural.
Second curtain synchronization photography with the internal
flash
Set the sync select switch to
“”.
Check that the “ ” mark in the
viewfinder is lit (flash is charged),
and take the photograph.
Exposure control is the same as for normal flash photography (first curtain synchroniza-
tion).
Second curtain synchronization
First curtain synchronization
Sync select switch
F dial
10-1BC(E)_P071-85 11/15/01 7:29 PM Page 84
86 87
This camera is equipped with the 20 custom functions, shown on the table
below. When the camera is first purchased, these are all set to the stan-
dard or “default” functions (standard setting number “0”). (Note that all the
explanations in this manual assume the detail numbers are set to “0”). To
change the custom functions, refer to “Setting custom functions” (page 89).
When the custom functions are set, the camera’s functions and operating procedures
change. Read this section carefully and be sure to use these features to your best advan-
tage.
<List of Custom Functions>
CUSTOM FUNCTIONS
The functions of this camera can be customized to match your shooting style.
As you work with this camera you will develop your own personal approach.
Standard set-
ting (0)
Power hold time
• Illumination time
also changed.
16 sec.
Changed set-
ting (1)
12 sec.
Changed set-
ting (2)
8 sec.
Changed set-
ting (3)
4 sec.
AE lock by half-
pressing the shut-
ter button
No AE lock AE lock on
Detail number
Function number
1. List of custom functions
Shutter time set-
ting step
1 Tv 1/2 Tv
Exposure compen-
sation step
1/3 EV 1/2 EV
Evaluative meter-
ing display
Exposure com-
pensation
value
Difference to the
center divided
partial metering
Difference to
center-weighted
average metering
ABC Exposure
order
Standard
over under
Over stan-
dard under
AF target setting
Focus frame
select lever
LIGHT button +
focus frame
select lever
AF supplementary
light
On Off
AF focus beep
On Off
Superimpose
when shutter but-
ton half-pressed
On Off
11-1BC(E)_P086-89 11/15/01 7:29 PM Page 86
89
Set the position dial to “CF”.
The display panel is as shown at left
(custom function setting mode).
Turn the R dial to select
“Function number”.
Turn the F dial to select “Detail
number”.
Set the position dial to a position
other than “CF”.
The custom function is set.
Return the dial to “ ” (white) or “
(green) and take the photograph.
The display panel returns to the normal
display.
To initialize all set functions, display
“CLE” as previously described in 2,
and set to a position other than “CF”.
88
2. Setting custom functions
Detail number
Function number
Detail number
Detail
Display panel
Function num-
ber
Custom function setting mode
Standard set-
ting (0)
Changed set-
ting (1)
Changed set-
ting (2)
Changed set-
ting (3)
Detail number
Function number
Superimpose
when focused
On Off
Rewind auto return
Auto return on Auto return off
Leave film tip
when rewinding
Film tip not left Film tip left
Selection of aper-
ture stop-down
button operation
Aperture
stopped down
while pressed
Aperture switches
between stopped
down and open
each time button
is pressed
Focus button
function in “MF”
mode
SAF CAF
Red-eye reduc-
tion with internal
flash
Off On
Exposure com-
pensation setting
(with Av, P)
F dial
F dial and
R dial
Exposure value
display when zoom
lens is fitted (*)
Align aperture
ring
Link to zooming
Continued exposure
compensation
Until power
supply OFF
Until setting
cancelled
Exposure com-
pensation setting
F dial
Set with F dial
while pressing
LIGHT button
CLE: Resetting cus-
tom functions
The custom functions ( ~ ) are always set to the standard settings.
Note that if the exposure mode selector lever is set to any posi-
tion other than “CF” at this time, all the custom functions are
reset to the standard settings (i.e. to “0”).
* When using lenses for which the open aperture value (brightness) with zooming varies
(eg. Vario Sonnar 28-80mm F3.5-5.6), the actual aperture is controlled by the camera so
that it assumes the value set with the aperture ring, rather than being controlled by zoom-
ing. Set Custom Function to (1) to vary the aperture with zooming.
11-1BC(E)_P086-89 11/15/01 7:29 PM Page 88
90 91
<Exposure>
Exposure is the act of exposing the film to light, thus converting brightness val-
ues in a scene to tonal values on film. Exposure is composed of the size of the
opening in the lens (the aperture) and the duration of time in which the light
passes through the lens to strike the film (the shutter speed.)
<Shutter speed>
The camera adjusts the amount of light to which the film is exposed by adjusting
the length of time in which the shutter is open. The length of time that the shut-
ter is open is called the shutter speed.
<Aperture value>
The aperture is an opening in the lens. The amount of light passing through the
aperture to the film is adjusted by increasing or decreasing the diameter of the
opening. The size of this opening is called the aperture value.
<Film speed or sensitivity (ISO value)>
The film speed indicates the extent to which the film reacts to light, and is
expressed as a figure determined by the ISO (International Standardization
Organization).
REFERENCE
1. Basic information on photography
12-1BC(E)_P090-94 11/15/01 7:29 PM Page 90
9392
If there seems to be a problem, check the following table before assuming
the camera is malfunctioning.
2. Troubleshooting
Cause
1. Nothing appears
on the display
panel
No battery is
loaded.
Battery is fully
spent.
Battery is loaded
upside-down.
Solution
Insert battery.
Replace the bat-
tery with a new
one.
Insert the battery
properly.
See page
16
16
16
Symptom
2. Battery mark
(“ ”) is flashing
Battery is spent. Replace the bat-
tery with a new
one.
17
3. Exposure counter
flashes “00” when
film is loaded and
camera back is
closed
Film has not been
advanced proper-
ly.
Reload the film. 20
4. Viewfinder display
is not clear
Diopter is not
properly adjusted.
Turn the diopter
adjustment dial to
adjust.
15
5. Shutter cannot be
released
Drive mode is set
to the “selftimer”
mode.
Internal flash is
charging.
Switch to a differ-
ent drive mode.
Wait until charging
is complete (i.e.
” lit) before tak-
ing the photo-
graph.
31
73
Cause
6. Photographs are
blurry
Focus is not prop-
erly adjusted.
Camera is shak-
ing when shutter
button is pressed.
Shutter speed is
slow.
Solution
Adjust the focus
properly.
Press the shutter
button gently so
that the camera
does not shake.
Use a tripod.
See page
38
19, 27
Symptom
8.
Shutter speed or
aperture value
flashes during auto
photography
Subject is either
too bright or too
dark.
Adjust the expo-
sure as described
on page 54.
54
9. Exposure counter
is flashing (other
than “00”)
ABC mode is set. Set ABC compen-
sation back to
“0.0”.
62
10. Metering mark
flashes when
shutter button is
half-pressed
“AE lock on”
selected when
half-pressed.
Set custom func-
tion to “2-0”.
87
7. Exposure com-
pensation mark is
displayed.
Exposure com-
pensation is still
set.
Set the exposure
compensation
back to “0.0”.
Turn the main
switch OFF.
58
58
12-1BC(E)_P090-94 11/15/01 7:29 PM Page 92
94
The shutter speed and aperture value are displayed as described below.
The shutter speed display indicates shutter speeds between “4000” (1/4000 second) and
“32" ” (32 seconds). When the camera's exposure mode is set to “Av” or “P”, the shutter
speed value with respect to the aperture is displayed in steps of 1/2, and when the expo-
sure mode is set to “Tv” or “M”, the set shutter speed value is displayed at every step
(may also be displayed in steps of 1/2 with modes “Tv” and “M” in the “CF” mode).
The aperture value is displayed in steps of 1/2 within the aperture range of the currently
mounted lens. When operating with a precision of greater than 1/2 step, the closest value
is displayed. For example, when the aperture is 3.3, the aperture is displayed “3.5”.
3. Shutter speed and aperture value display
Shutter speed Aperture value
Av or P (displayed in steps
of 1/2Tv as custom function
with Tv and M)
Shutter speed set in modes
Tv and M
All modes
4000
2800
2000
1400
1000
700
500
350
250
180
125
90
60
45
30
20
15
10
8
6
4
3
2
0” 7
1”
1” 4
2”
2” 8
4”
5” 6
8”
11
16
22
32
4000
2000
1000
500
250
125
60
30
15
11
8
4
2
1”
2”
4”
8”
16
32
1.2
1.4
1.7
2.0
2.4
2.8
3.5
4.0
4.5
5.6
6.5
8.0
9.5
11
13
16
19
22
27
32
38
45
12-1BC(E)_P090-94 11/15/01 7:29 PM Page 94
95
MAIN ACCESSORIES
This section describes the main accessories for expanding the range of photo-
graphic possibilities.
13-1BC(E)_P095-107 11/15/01 7:29 PM Page 95
97
The Cable switch LA type can be used for close-up or tele photograph photog-
raphy when using a tripod or to release the shutter remotely from the camera. It
is especially suited for close-up or tele photograph photography because it elim-
inates the risk of camera shake when the shutter is released.
Photographs are taken using the cable switch’s shutter button (which also has a
half-press function). The slide switch offers convenience for extended exposures
and continuous shooting.
The cord length is 50 cm for the LA-50, 5 meters for the LA-500.
<Attaching>
Insert the cable switch’s plug into the camera’s cable switch socket.
<Taking photographs>
The cable switch’s shutter button functions in the same way as the camera’s
shutter button. Half-press it to measure the distance or light or to lock the focus,
press it all the way in to release the shutter.
When taking long-time exposures or using continuous advance, use the slide
switch for convenience. The shutter operates continuously when the slide switch
is pulled forward (when the red mark is visible), and closes (exposure stops)
when the switch is set back to its original position.
96
The D-11 is a quartz clock-controlled LCD data back mounted on the camera in
place of the Contax NX camera back.
The auto date mechanism allows automatic imprinting of the date and time on
the film.
<Fitting to the camera>
Open the standard camera back, hold the release pin down, and
remove the back.
Insert the bottom of the shaft on the data back into the corresponding
hole in the camera, hold the release pin down, align the top of the
shaft with the corresponding hole in the camera, and release the pin. The
data back is now fitted to the camera.
Data back specifications
Type: Quartz clock-controlled (auto calendar) LCD data back
Imprint function: Year Month Date, Date Hour Minute, No imprint, Month Date Year, Date
Month Year
Imprint method: Automatic imprinting linked to shutter movement
Film speed setting: Automatic
Battery: 3V lithium (CR2025)
Dimensions: 139mm (width) x 62mm (height) x 12mm (depth)
Weight: 75g (excluding battery)
* Specifications and appearance liable to change without prior notice.
SET button
SELECT button
MODE select
button
Display window
1. Contax Data back D-11 2. Contax Cable switch LA type
Plug
Slide switch
Shutter button
13-1BC(E)_P095-107 11/15/01 7:29 PM Page 96
99
2. Load the batteries in the Power pack.
[P-8]
Insert four AA-size batteries in the battery case (supplied with the P-8
power pack) as shown, and fit to the P-8.
Place the P-8 main unit inside a jacket (case).
[P-8D]
Insert the batteries as described in the manual supplied with the P-8D.
3. Insert the plug on the power pack cord in the socket on the GP-1
adapter.
When shooting, place the power pack in a thermal cover to prevent heat loss.
When replacing batteries, do not mix different types of batteries, or old batteries with
new batteries. Replace all four batteries at the same time with new batteries of the
same type.
When not using the power pack for a long period of time, remove the batteries from
the battery case to prevent leakage of battery fluid.
Hold the plug when disconnecting. Do not pull on the cord.
P-8 specifications
Configuration: Power pack body, battery case, jacket (with strap), cord (1.5m).
Power supply: Four 1.5V AA-size alkali batteries, or four 1.2V AA-size NiH batteries
(cheap AA-size manganese batteries have insufficient capacity and should
not be used).
98
3. Contax Power pack P-8, P-8D
Battery case
GP-1
<Power pack P-8>
<Power pack P-8D>
Battery case
Power pack
Jacket
(with strap)
The Power pack P-8 is an external power supply using four 1.5V LR6/AA
NiH batteries or four 1.2V LR6/AA Ni-Cd batteries. This pack allows the
camera to be used with a remote power supply kept in a warm place. This
prevents loss of battery performance due to the influence of cold working
conditions.
The Power pack P-8D is an external power supply using four 1.5V D-size
NiH batteries. Use it as required when large numbers of photographs are
to be taken.
* The separately available GP-1 Contax power pack adapter is required when using the P-
8D in conjunction with the Contax NX.
<Mounting>
1. Fit the GP-1 Contax power pack adapter to the camera.
Remove the lithium batteries from the camera, insert the GP-1, and turn to
lock in place.
Keep the battery cover in a safe place.
13-1BC(E)_P095-107 11/15/01 7:29 PM Page 98
Batteries and Films
Lens : VS28-80/3.5-5.6
Film : 24-exposure cartridge
Battery type : 1.5V AA-size alkali dry battery
Battery type : 5V AA-size lithium battery
101
The GP-1 adapter is used in combina-
tion with the Contax power packs P-8
and P-8D when used as external power
supplies for the Contax NX.
100
Battery type : 1.2V AA-size NiH battery (fully charged)
P-8D specifications
Type: Contax camera external power supply, cord (1.5m)
Power supply: Four 1.5V D-size dry batteries, or four 1.2V D-size NiH batteries (D-size
manganese batteries have insufficient capacity and should not be used).
Cord: Approximately 1.5m
Dimensions: 148mm (width) x 84mm (height) x 58mm (depth)
Weight: 160g (excluding batteries)
4. Contax Power pack adapter GP-1
Normal temperature (20°C) Low temperature (-10°C)
Approx. 20 rolls Approx. 12 rollsNot using flash
Approx. 10 rolls Approx. 6 rollsUsing flash 50% of time
Approx. 8 rolls Approx. 4 rollsUsing flash 100% of time
Condition A: Close-up →→close-up, single shutter release, leave for 16 seconds.
Normal temperature (20°C) Low temperature (-10°C)
Approx. 50 rolls Approx. 25 rollsNot using flash
Approx. 15 rolls Approx. 8 rollsUsing flash 50% of time
Approx. 10 rolls Approx. 5 rollsUsing flash 100% of time
Condition B: Close-up →→close-up, single shutter release, leave for 4 seconds.
Normal temperature (20°C) Low temperature (-10°C)
Approx. 30 rolls Approx. 25 rollsNot using flash
Approx. 15 rolls Approx. 12 rollsUsing flash 50% of time
Approx. 10 rolls Approx. 8 rollsUsing flash 100% of time
Condition A: Close-up →→close-up, single shutter release, leave for 16 sec-
onds.
Normal temperature (20°C)
Low temperature (-10°C)
Approx. 80 rolls Approx. 60 rollsNot using flash
Approx. 20 rolls Approx. 15 rollsUsing flash 50% of time
Approx. 15 rolls Approx. 10 rollsUsing flash 100% of time
Condition B: Close-up →→close-up, single shutter release, leave for 4 seconds.
Normal temperature (20°C) Low temperature (-10°C)
Approx. 60 rolls Approx. 25 rollsNot using flash
Approx. 25 rolls Approx. 15 rollsUsing flash 50% of time
Approx. 15 rolls Approx. 12 rollsUsing flash 100% of time
Condition A: Close-up →→close-up, single shutter release, leave for 16 seconds.
Normal temperature (20°C) Low temperature (-10°C)
Approx. 150 rolls Approx. 50 rollsNot using flash
Approx. 40 rolls Approx. 20 rollsUsing flash 50% of time
Approx. 20 rolls Approx. 15 rollsUsing flash 100% of time
Condition B: Close-up →→close-up, single shutter release, leave for 4 seconds.
13-1BC(E)_P095-107 11/15/01 7:29 PM Page 100
103
By extending or contracting the tip of
the case, the NX can be placed in the
case with the Data back D-11 and the
following Carl Zeiss T* lenses mounted
(645 mount lenses require the NAM-1
mount adapter).
102
This adapter allows the use of Contax 645 System lenses with the Contax NX.
Usable with all NX models.
<Mounting the mount adapter and lens>
1. Line up the body mount mark on the mount adapter with the camera’s lens
mark Insert, then turn in the direction of the arrow to mount.
2. Line up the mark on the lens (red) with the lens mount mark on the
adapter , then turn in the direction of the arrow to mount.
<Removing>
1. To remove the lens, slide the mount adapter’s release button , hold it there,
then turn the lens counterclockwise and remove it.
2. To remove the mount adapter, turn it counterclockwise while pressing the
camera’s lens release button.
1
2
1
2
3
4
5
6
5. Contax Mount adapter NAM-1 6. Contax Flexible case C-9
TipCase
Contracted
N mount lens
VS28-80/3.5-5.6
P50/1.4
645 mount lens
P80/2
Extended
VS70-200/3.5-4.5
VS24-85/3.5-4.5
VS17-35/2.8*
(* without hood)
S140/2.8
D55/3.5
C-9
Lenses (with one filter, lens cap, and hood (reversed))
* Use the C-8 flexible case (for the N1) when the MS100/2.8, VS70-300/4.0-5. 6, and 645
mount lens AMP 120/4, D45/2.8, D3.5/3.5 (* without hood) lenses are fitted.
13-1BC(E)_P095-107 11/15/01 7:29 PM Page 102
105
Viewfinder: Pentaprism eye-level (long-eye point)
Field of view 93% Magnification 0.78x
(with 50mm standard lens at infinity, -1D diopter)
Diopter correction: Eight different FL type lenses are available
Focusing screen: Fixed, full matte
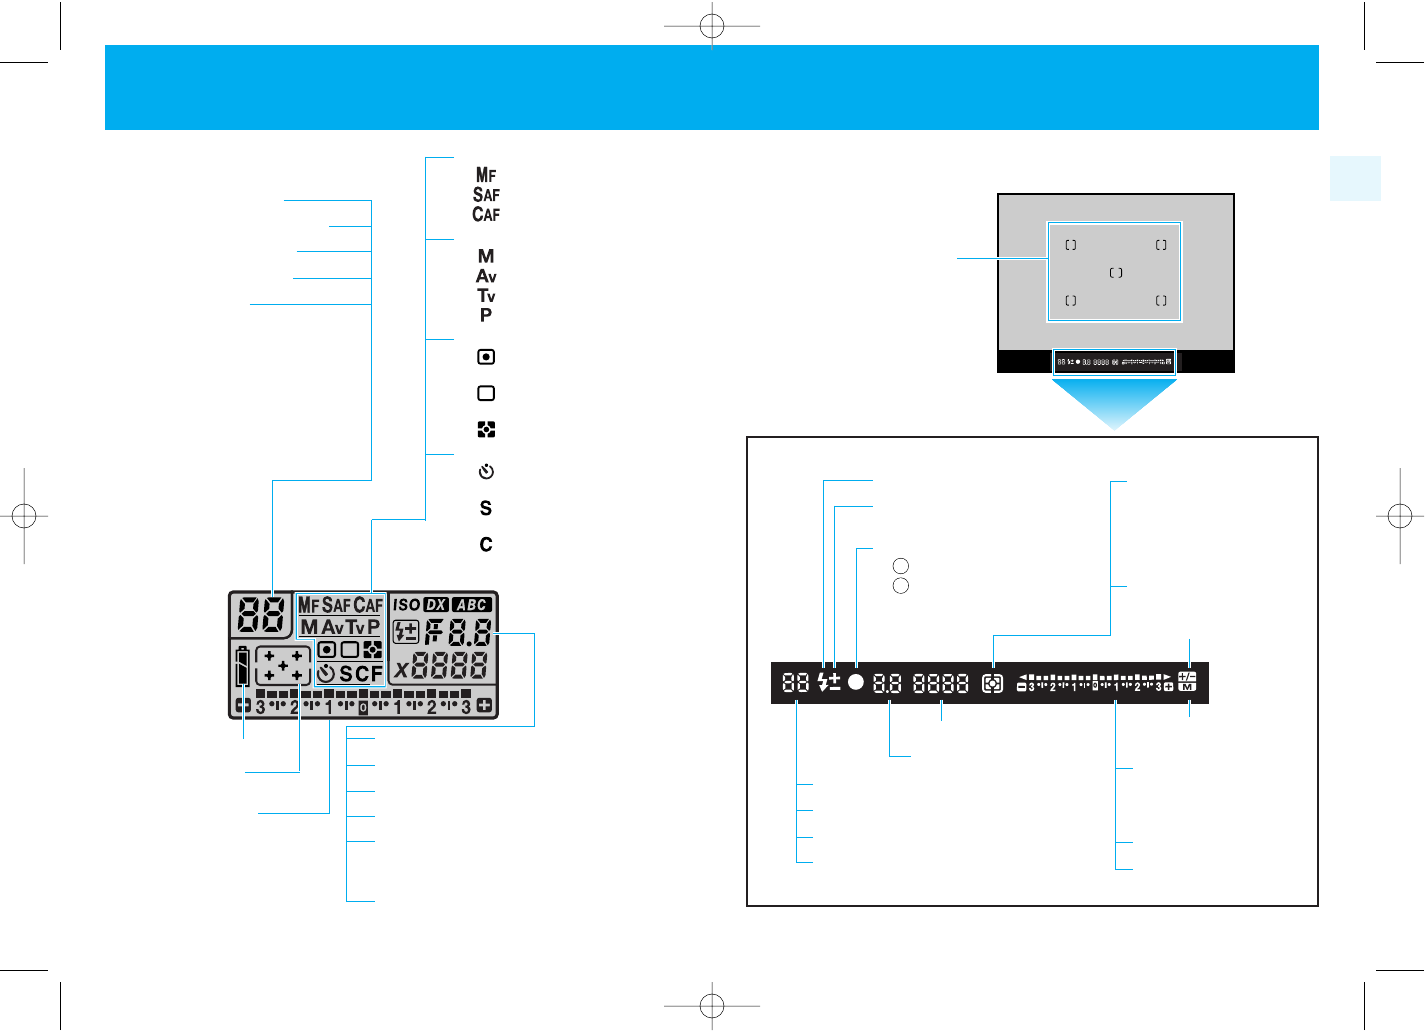
Viewfinder display:
Focus frame, exposure counter/selftimer time/ABC shooting order/film
loading, flash mark, compensation mark, focus display, aperture value,
shutter speed, metering mark, exposure meter, exposure compensation
mark, manual exposure mark
Display panel: Exposure counter/selftimer time/ABC shooting order/bulb elapsed
time/film loading, battery mark, distance display, focus mode (manual
focus, single autofocus, continuous autofocus), exposure mode (manu-
al exposure, aperture priority auto, shutter priority auto, program auto),
metering display (center divided partial metering, center-weighted aver-
age metering, evaluative metering), drive mode (selftimer photography,
single-frame photography, continuous photography), DX/ISO mark, ABC
compensation mark, internal flash intensity compensation mark, aper-
ture value/ABC compensation/internal flash intensity compensation,
shutter speed/film speed/custom functions, exposure compensation, CF
mark
Film loading: Auto loading with automatic advance to exposure counter 01
Film advance: Automatic with built-in motor
Film rewind: Automatic with built-in motor (with auto return/auto stop function), mid-
roll rewinding possible
Drive modes: Single frame, continuous, 10 sec. delay selftimer
Winding speed: Up to approximately 2.3 frames/sec. continuous shooting (C mode)
(using a new battery, at normal temperature, and based on Contax test-
ing standards)
Exposure counter:Auto reset additive type for display panel and viewfinder
Accessory shoe: Direct X contact (with TLA flash interlocking contacts)
Custom functions:See list of custom functions on page 86
Camera back: Opened and closed with camera back release lever, removable, with
film check window
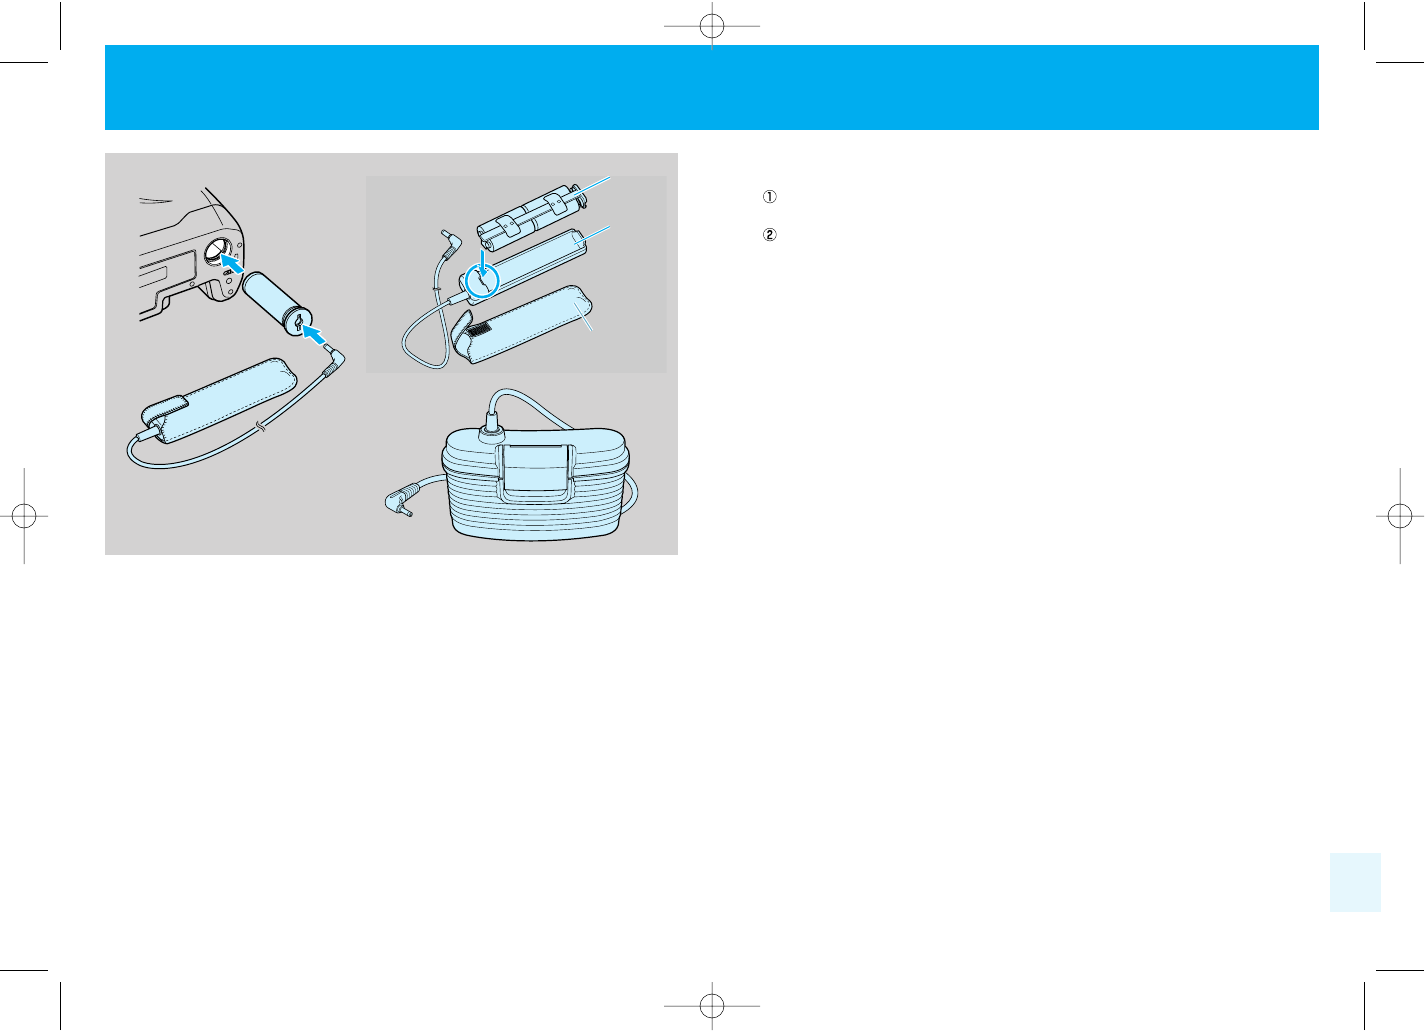
Batteries: 3V lithium battery (CR2) x 2
Battery check: Auto check, indicated on display panel
104
Type: 35mm focal plane type AF/AE single lens reflex camera
Picture size: 24 x 36mm
Lens mount: Contax N mount
Shutter type: Vertical travel focal plane shutter
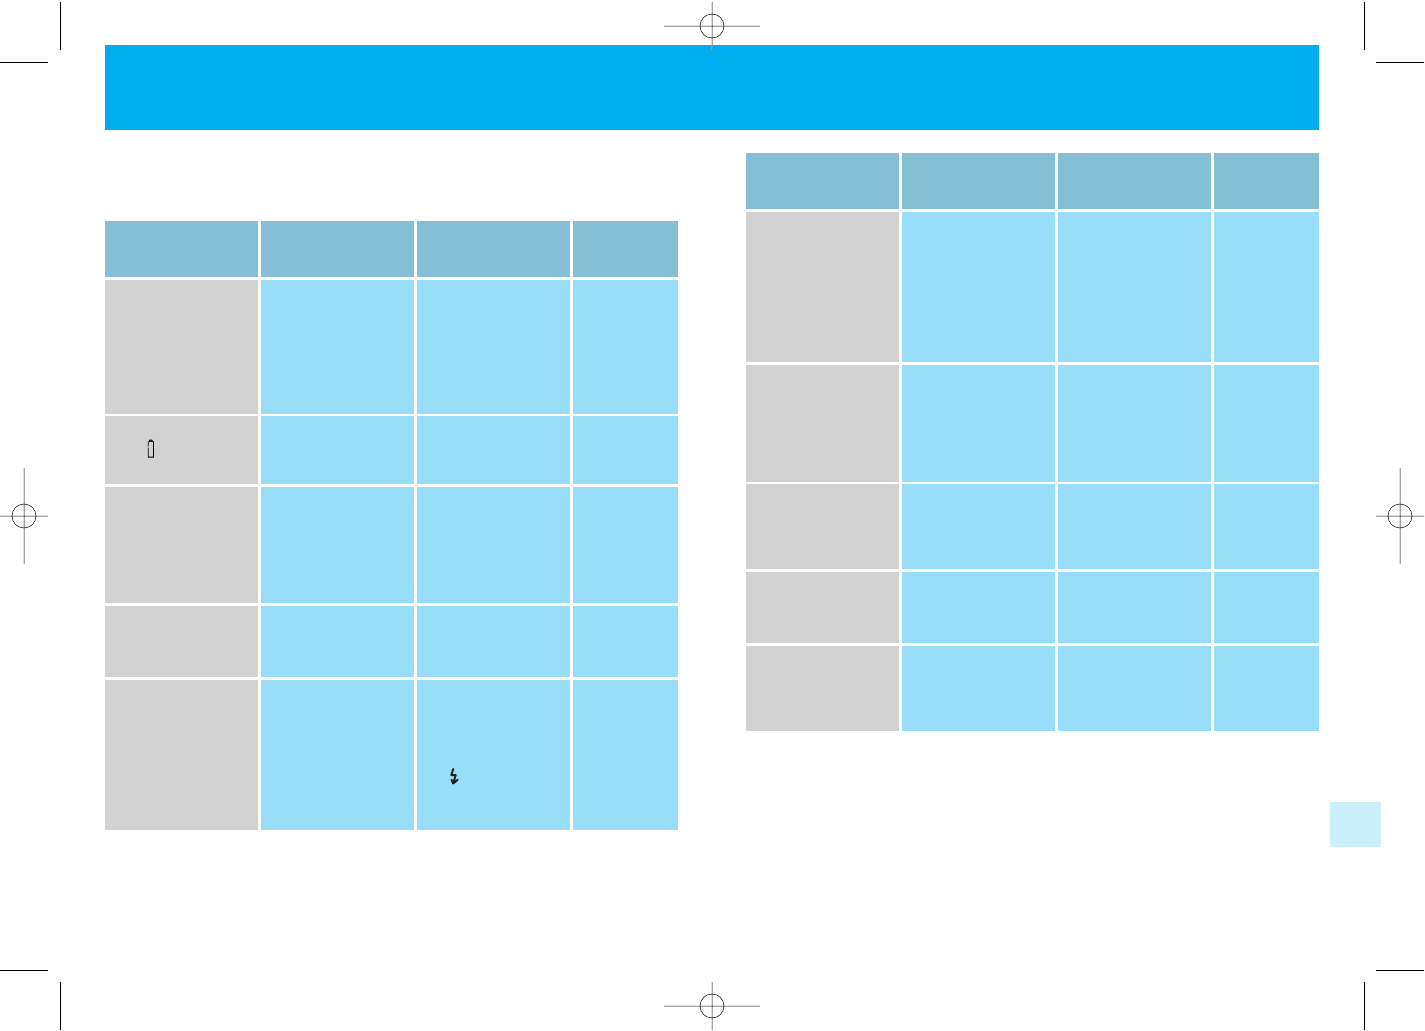
Shutter speed: Av, Tv and P: 32~1/4000 sec.
M: 32~1/4000 sec. and bulb
X: 1/125 sec. (M mode)
Sync contact: X contact (synchronized at up to 1/125 sec.)
Direct contact and synchronization terminal included
Selftimer: Electronic type, 10 sec. delay
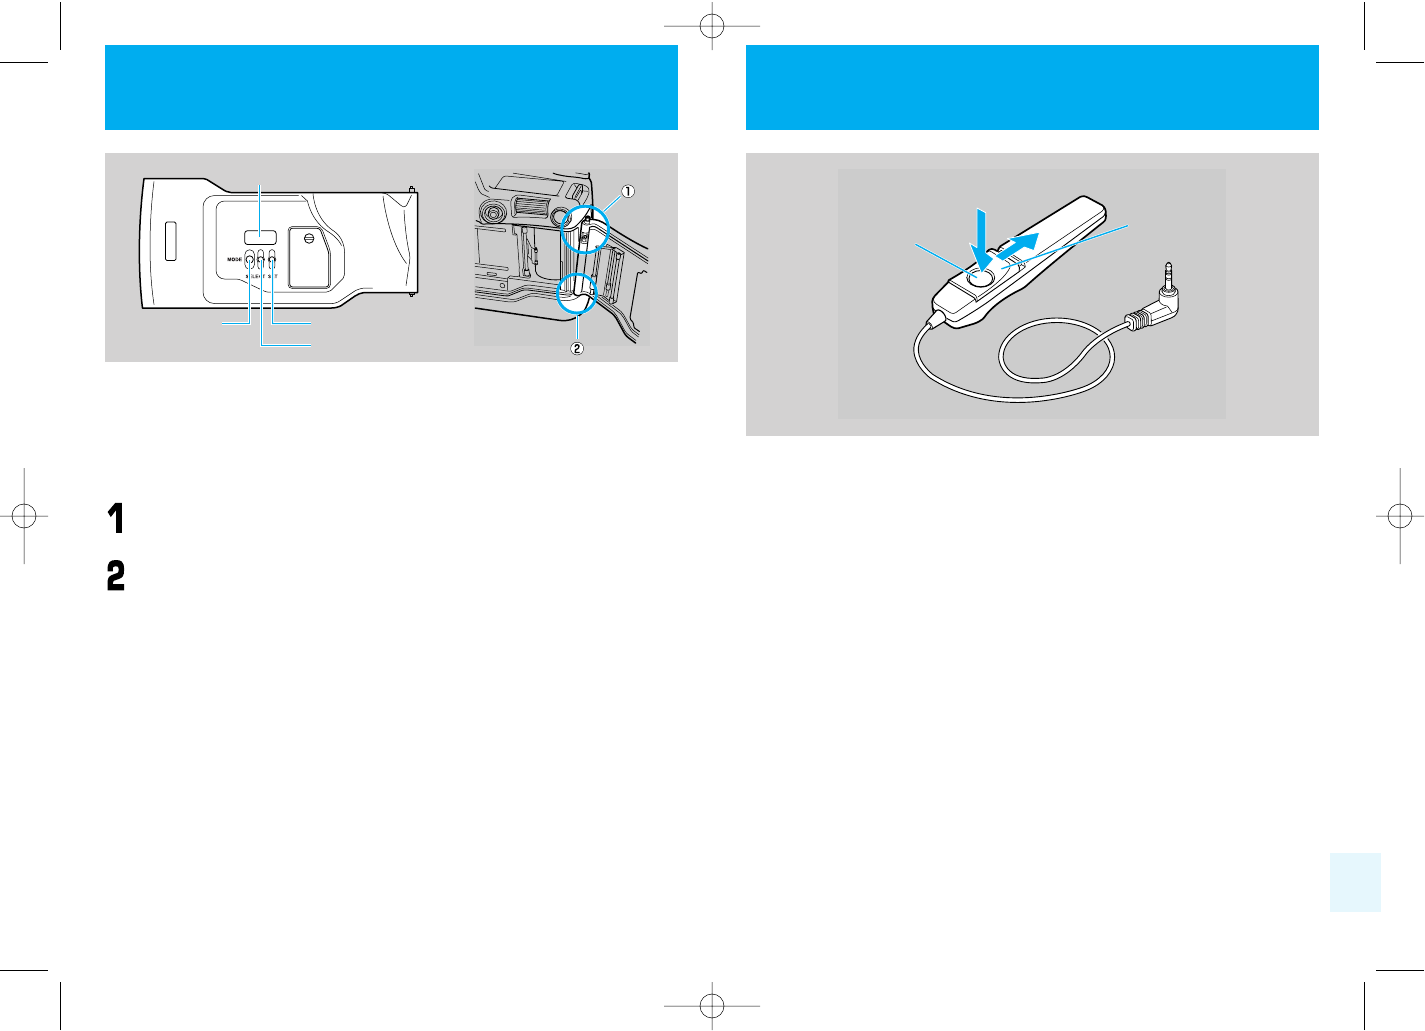
Shutter release: Electronic release, with dedicated cable switch socket
Exposure control: Aperture priority auto Shutter priority auto Program auto
Manual exposure TTL auto flash
Metering system: TTL evaluative metering, center-weighted average metering, or center
divided partial metering selectable
Metering range (ISO 100, F1.4):
Evaluative metering : EV 0~21
Center-weighted average metering : EV 0~20
Center divided partial metering : EV 3~20
Film speed range: Automatic setting with DX code ISO 25~5000
Manual setting ISO 6~6400
AE lock: Image surface value memory
Exposure compensation:
+3EV~-3EV (in steps of 1/3 or 1/2)
ABC mechanism: Exposure compensation with ABC button and F dial setting
Compensation range ±1/3EV/±1/2EV/±1EV
Internal flash: Guide number 13.5 (ISO 100), angle of illumination up to a focal length
of 28mm, red-eye reduction flash
Automatic flash intensity adjustment:
TTL direct metering
Flash synchronization:
Automatic selection of shutter speed when flash charged
Flash auto setting function:
Possible by combination with Contax flash unit with flash auto setting
function
Second curtain synchronization:
Possible with internal flash or Contax flash unit with second curtain
synchronization function
Autofocus: 5-point TTL phase difference detection
Main specifications
13-1BC(E)_P095-107 11/15/01 7:29 PM Page 104
107106
Number of films: Using a new battery based on Contax testing standards
Lens: VS28-80/3.5-5.6
Film: 24-exposure cartridge
Miscellaneous: Aperture stop-down button, AF supplementary light
Dimensions and weight:
NX : 142mm (width) x 113mm (height) x 66mm (deapth)
605g (Not including batteries)
NXD : 142mm (width) x 113mm (height) x 66mm (deapth)
625g (with Data back, not including batteries)
* Note that specifications and design are subject to change without notice. In order to take
full advantage of the functions of this product, we recommend using Carl Zeiss inter-
changeable lenses and Contax accessories. Contax warranties do not cover accidents or
damage resulting from the use of products of other manufacturers, even when such prod-
ucts are sold for use with Contax products.
Normal temperature (20°C) Low temperature (-10°C)
Approx. 25 rolls Approx. 12 rollsNot using flash
Approx. 8 rolls Approx. 5 rollsUsing flash 50% of time
Approx. 5 rolls Approx. 3 rollsUsing flash 100% of time
Condition A: Close-up →→close-up, single shutter release, leave for 16 seconds.
Normal temperature (20°C)
Low temperature (-10°C)
Approx. 60 rolls
Approx. 25 rollsNot using flash
Approx. 10 rolls
Approx. 8 rollsUsing flash 50% of time
Approx. 7 rolls Approx. 4 rollsUsing flash 100% of time
Condition B: Close-up →→close-up, single shutter release, leave for 4 seconds.
13-1BC(E)_P095-107 11/15/01 7:29 PM Page 106
1

Hulp nodig? Stel uw vraag in het forum

Spelregels

Misbruik melden

Gebruikershandleiding.com neemt misbruik van zijn services uitermate serieus. U kunt hieronder aangeven waarom deze vraag ongepast is. Wij controleren de vraag en zonodig wordt deze verwijderd.

Product:

Bijvoorbeeld antisemitische inhoud, racistische inhoud, of materiaal dat gewelddadige fysieke handelingen tot gevolg kan hebben.

Bijvoorbeeld een creditcardnummer, een persoonlijk identificatienummer, of een geheim adres. E-mailadressen en volledige namen worden niet als privégegevens beschouwd.

Spelregels forum

Om tot zinvolle vragen te komen hanteren wij de volgende spelregels:

Belangrijk! Als er een antwoord wordt gegeven op uw vraag, dan is het voor de gever van het antwoord nuttig om te weten als u er wel (of niet) mee geholpen bent! Wij vragen u dus ook te reageren op een antwoord.

Belangrijk! Antwoorden worden ook per e-mail naar abonnees gestuurd. Laat uw emailadres achter op deze site, zodat u op de hoogte blijft. U krijgt dan ook andere vragen en antwoorden te zien.

Abonneren

Abonneer u voor het ontvangen van emails voor uw Contax NX bij:


U ontvangt een email met instructies om u voor één of beide opties in te schrijven.


Ontvang uw handleiding per email

Vul uw emailadres in en ontvang de handleiding van Contax NX in de taal/talen: Engels als bijlage per email.

De handleiding is 2,08 mb groot.


U ontvangt de handleiding per email binnen enkele minuten. Als u geen email heeft ontvangen, dan heeft u waarschijnlijk een verkeerd emailadres ingevuld of is uw mailbox te vol. Daarnaast kan het zijn dat uw internetprovider een maximum heeft aan de grootte per email. Omdat hier een handleiding wordt meegestuurd, kan het voorkomen dat de email groter is dan toegestaan bij uw provider.

Stel vragen via chat aan uw handleiding

Stel uw vraag over deze PDF

Uw handleiding is per email verstuurd. Controleer uw email

Als u niet binnen een kwartier uw email met handleiding ontvangen heeft, kan het zijn dat u een verkeerd emailadres heeft ingevuld of dat uw emailprovider een maximum grootte per email heeft ingesteld die kleiner is dan de grootte van de handleiding.

Er is een email naar u verstuurd om uw inschrijving definitief te maken.

Controleer uw email en volg de aanwijzingen op om uw inschrijving definitief te maken

U heeft geen emailadres opgegeven

Als u de handleiding per email wilt ontvangen, vul dan een geldig emailadres in.

Uw vraag is op deze pagina toegevoegd

Wilt u een email ontvangen bij een antwoord en/of nieuwe vragen? Vul dan hier uw emailadres in.


Info