100834
64
Verklein
Vergroot
Pagina terug
1/66
Pagina verder
www.concord-camera.com
User’s Guide
User’s Guide
Downloaded from www.Manualslib.com manuals search engine
1
CONGRATULATIONS
Congratulations on the purchase of your new camera. Your
camera has been carefully engineered and manufactured to give
you dependable operation. Read this manual before operating the
camera to become more familiar with it.
This manual has been written and formatted with depth and detail
so that you can easily follow the instructions to maximize the
features of your camera.
ENGLISH
Downloaded from www.Manualslib.com manuals search engine
2
CAMERA OVERVIEW
CAMERA OVERVIEW
Bottom/Back
15
6
7
8
9
10
11
2
3
4
12
19
20
21
22
23
24
25
26
27
13
14
15
16
17
18
LCD ICONS
A. Resolution G. Image Quality
B. Camera Mode H. Frame Counter
C. Memory card I. Macro
D. Flash J. Self-Timer
E. White Balance K. Zoom Bar
F. Battery Level L. Date / Time
A
AWB
2048
07 04 2003 02:40
G
J
K
L
A
B
C
D
E
F
I
H
0005
A
AWB
0005
07 04 2003 02:40
2048
: Single Shot
: Continuous Shot
: Review
: Video Clips
12. Flash Ready LED
13. Viewfinder
14. Diopter wheel
15. Auto-Focus LED
16. LCD
17. Tripod Socket
18. Reset Button
19. LCD On/Off Button
20. Menu Button
21. Memory Card Slot
22. Battery
Compartment
23. Battery/Memory
Card Door
24. Wrist Strap Holder
25. Joystick/OK
button/Zoom button
26. Mode Switch
27. Flash/Thumbnail
Button
1. Flash Sensor
2. 2-step Shutter Button
3. Flash
4. On/Off switch
5. Lens/Lens Cover
6. Microphone
7. Viewfinder
8. Self-Timer/Red-Eye
Reduction LED
9. Mini-USB port
10.TV-Out port
11.Speaker
Top/Front
Note: Press the shutter button half-way to focus until the green AF light is steady. Press down
fully to take picture.
Downloaded from www.Manualslib.com manuals search engine
3
Table of Contents
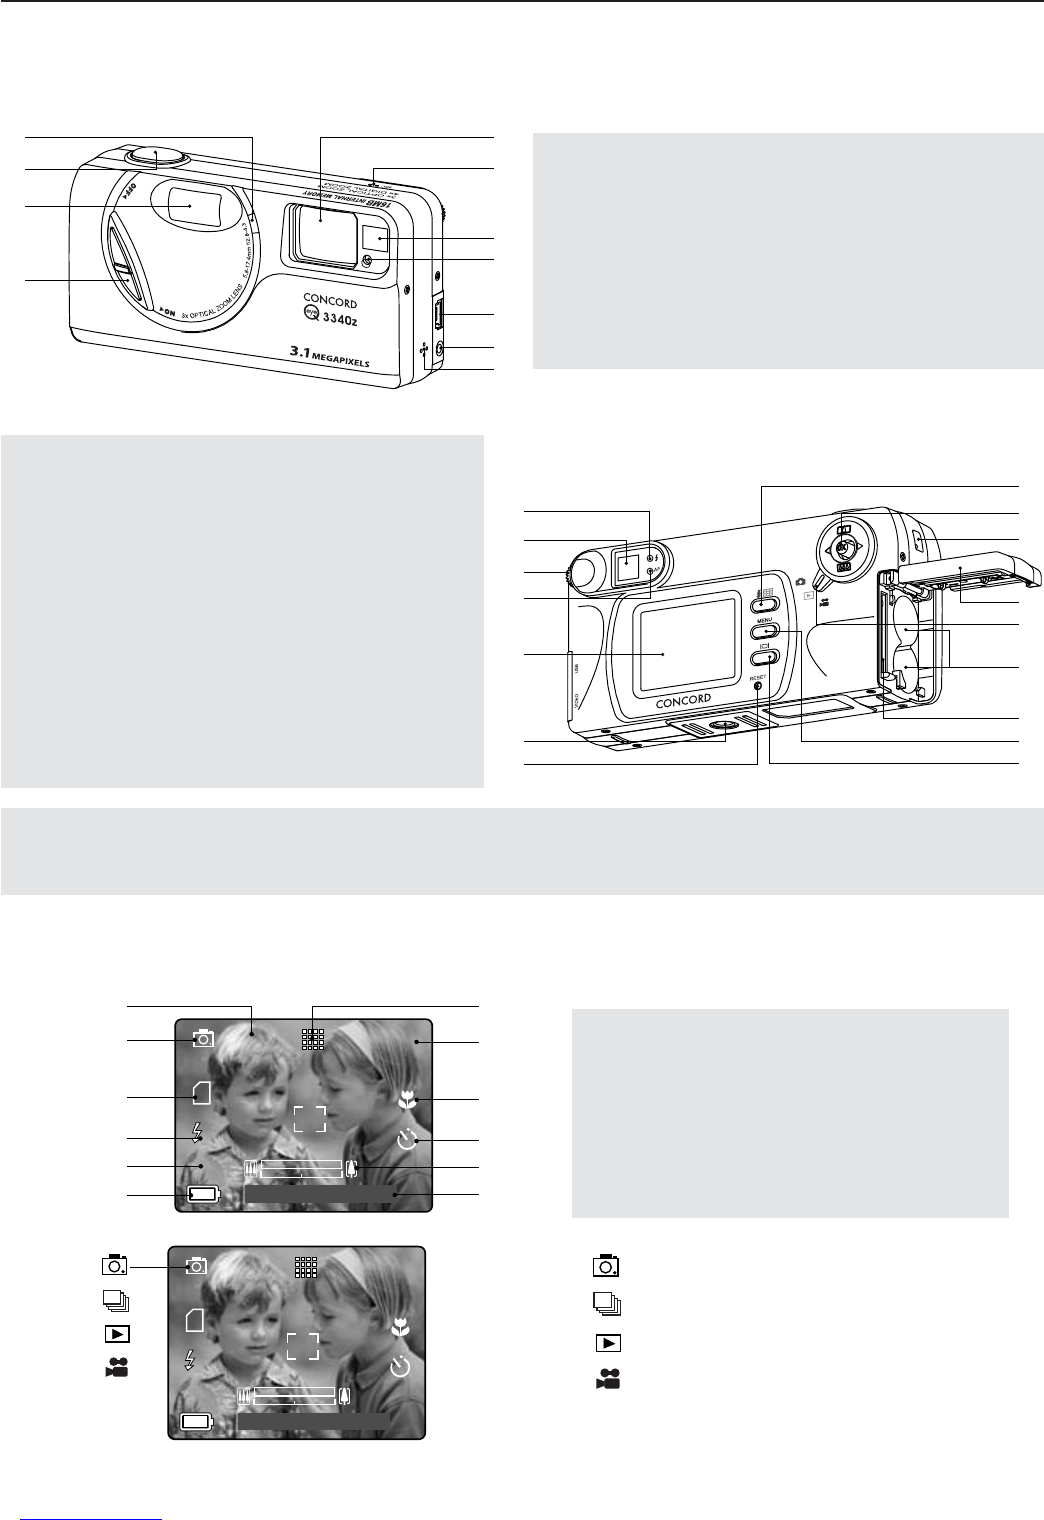
CAMERA OVERVIEW ..............................................................................................................................2
Top/Front ..........................................................................................................................................2
Bottom/Back ......................................................................................................................................2
LCD ICONS.......................................................................................................................................2
GETTING STARTED ................................................................................................................................5
Package Contents ............................................................................................................................5
Camera Features ..............................................................................................................................5
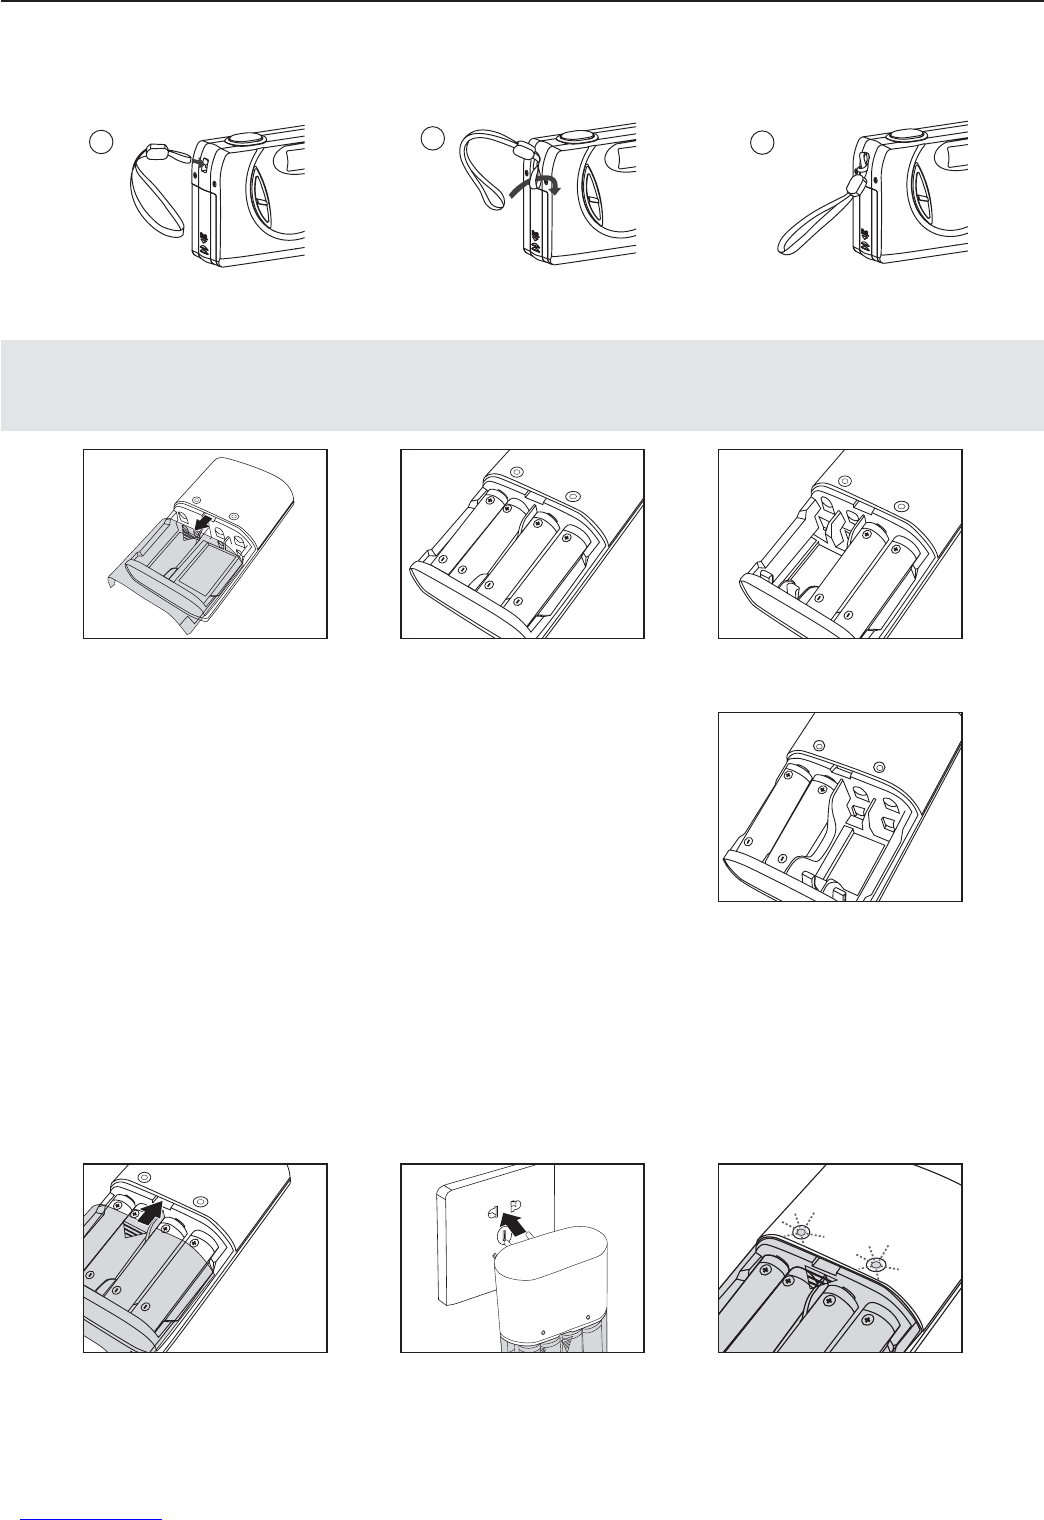
Attaching the Wrist Strap ..................................................................................................................6
Charging the Rechargeable Batteries ..............................................................................................6
Loading the Batteries ........................................................................................................................8
Checking the Battery Level ..............................................................................................................8
Internal Memory/Inserting the Memory Card ....................................................................................9
Turning the Camera On and Off ....................................................................................................10
Removing the Protective Plastic Film ............................................................................................10
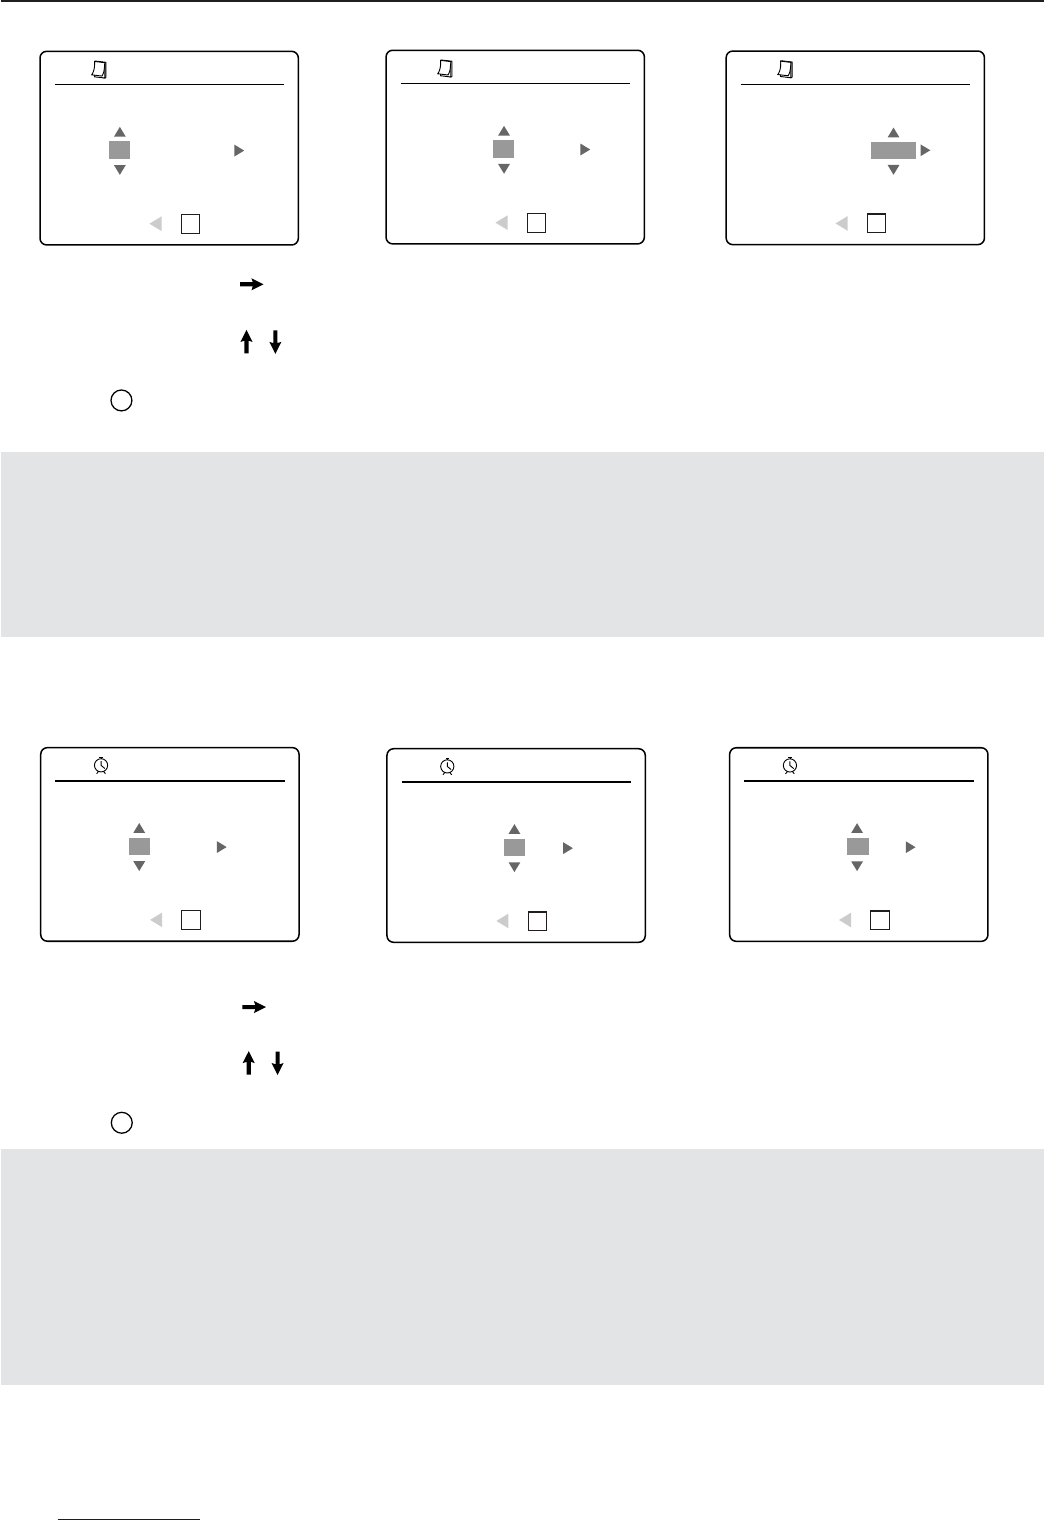
Setting the Language, Date and Time ............................................................................................10
Turning the LCD On and Off ..........................................................................................................12
Setting the camera’s operational mode ..........................................................................................12
TAKING PICTURES ................................................................................................................................13
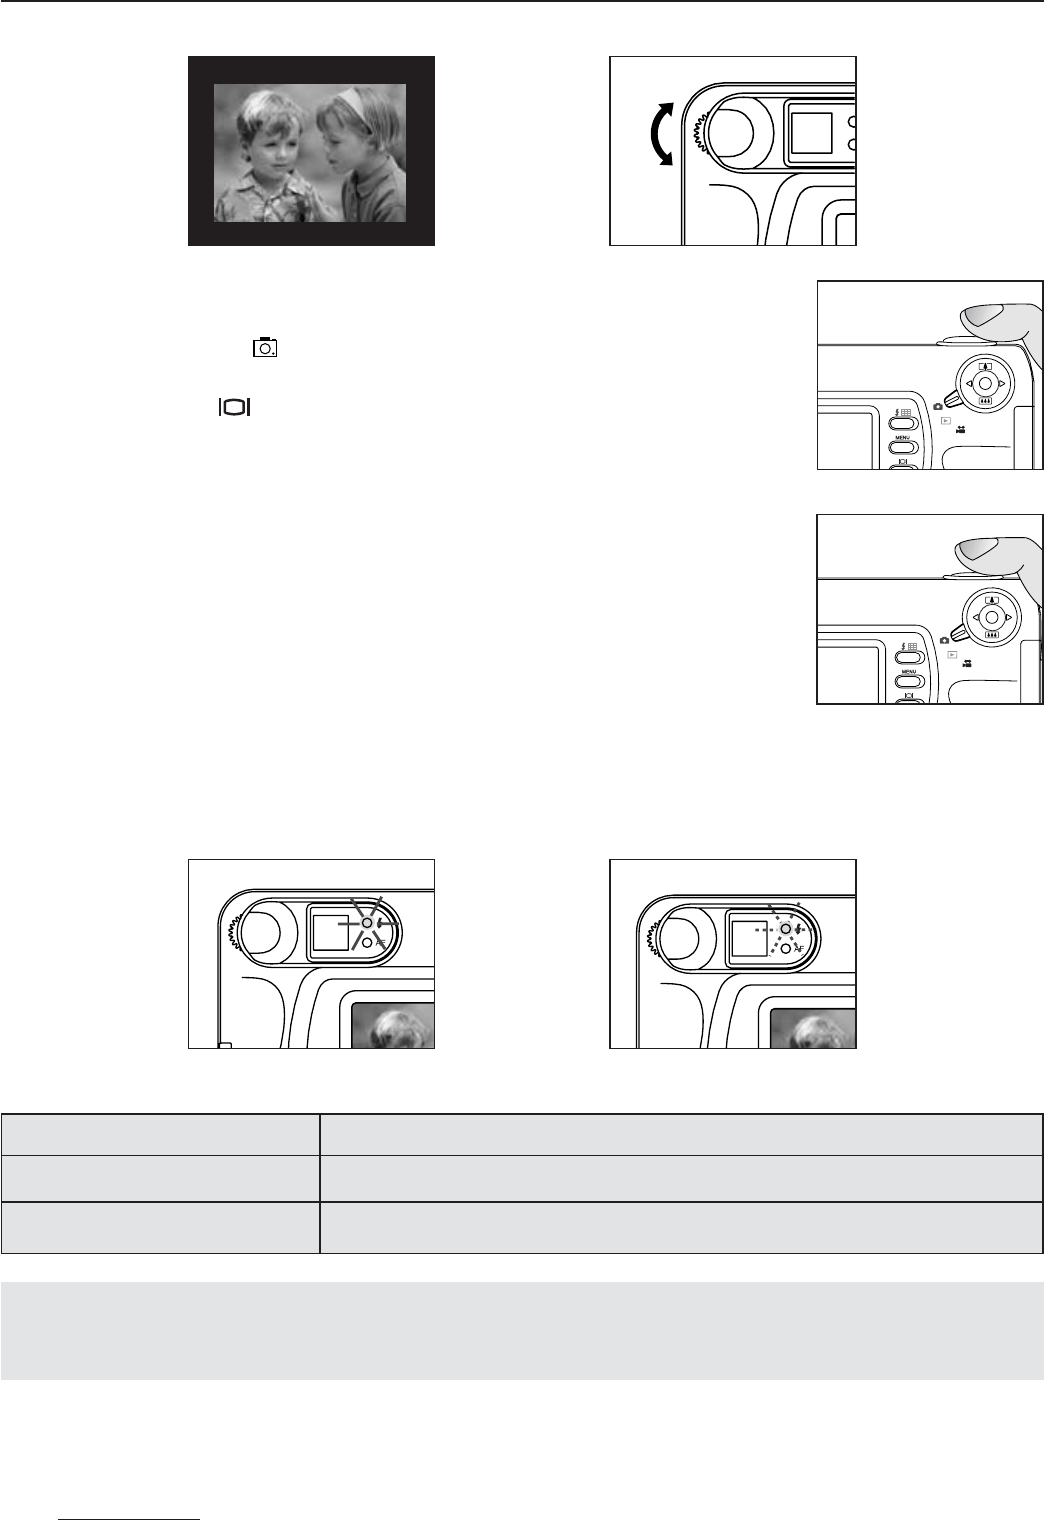
Taking a Picture with the Viewfinder ..............................................................................................13
Flash Ready LED............................................................................................................................13
Taking a Picture with the LCD ........................................................................................................14
Auto-Focus Lock ............................................................................................................................14
Setting the Flash ............................................................................................................................15
Optical Zoom ..................................................................................................................................15
Digital Zoom ....................................................................................................................................16
Using the main menu in camera mode ..........................................................................................17
Capture mode options ....................................................................................................................18
Self Timer ........................................................................................................................................19
Macro Mode ....................................................................................................................................20
Continuous shooting ......................................................................................................................21
Image Resolution ............................................................................................................................22
Image Quality ..................................................................................................................................23
White Balance ................................................................................................................................24
EV Compensation ..........................................................................................................................25
Scene Selection ............................................................................................................................26
TAKING VIDEO CLIPS............................................................................................................................27
REVIEWING YOUR FILES......................................................................................................................28
Using Review Mode ........................................................................................................................28
Reviewing Video Clips ....................................................................................................................28
Enlarging Stored Pictures ..............................................................................................................29
Using the Delete Menu ..................................................................................................................30
Deleting Your Files ..........................................................................................................................31
Using Thumbnail Mode ..................................................................................................................32
Downloaded from www.Manualslib.com manuals search engine
4
CUSTOMIZING THE CAMERA SETTINGS............................................................................................33
Setup Menu and Features ..............................................................................................................35
Setting the Auto Off Time................................................................................................................36
Setting the Language......................................................................................................................36
Setting the Date ..............................................................................................................................37
Setting the Time ..............................................................................................................................37
Setting the LCD Brightness ............................................................................................................38
Formatting the internal memory or memory card............................................................................38
RESTORE THE CAMERA TO FACTORY DEFAULT SETTINGS ..........................................................39
INSTALLATION GUIDE ..........................................................................................................................40
Computer System Requirements....................................................................................................40
Installation Requirements................................................................................................................40
Using the installer splash screen ....................................................................................................41
Flow diagram for software installation ............................................................................................42
Identifying your operating system ..................................................................................................43
Installing the driver and DirectX 9 - Windows 98/98SE..................................................................44
Installing DirectX 9 - Windows 2000 ..............................................................................................46
Installing ArcSoft PhotoImpression - all Windows users ................................................................47
Installing Adobe Acrobat Reader 5.1 - all Windows users (optional)..............................................48
CONNECTING THE CAMERA TO THE COMPUTER............................................................................51
Downloading pictures and video clips onto your computer ............................................................51
Using ArcSoft PhotoImpression ......................................................................................................52
Unplugging your camera from the computer ..................................................................................53
TV MODE ................................................................................................................................................54
Connecting the camera to the television ........................................................................................55
Using the TV as a Live Viewfinder..................................................................................................55
Reviewing pictures and video clips on your TV ..............................................................................55
ERROR MESSAGES ..............................................................................................................................55
TROUBLESHOOTING ............................................................................................................................56
GETTING HELP ......................................................................................................................................60
CAMERA SPECIFICATIONS ..................................................................................................................61
SAFETY TIPS AND MAINTENANCE ....................................................................................................62
Safety Tips ......................................................................................................................................62
Precautions for the camera ............................................................................................................62
Precautions for batteries ................................................................................................................63
Precautions for SD Memory Cards ................................................................................................63
REGULATORY INFORMATION ..............................................................................................................64
Downloaded from www.Manualslib.com manuals search engine
5
GETTING STARTED
GETTING STARTED
Package Contents
Concord Eye-Q 3340z
Mini-USB Cable
TV Out Cable
User’s Guide/Quick Start Guide/Warranty Card
Camera Case
Wrist Strap
Overnight Battery Charger and 4x AA Rechargeable Batteries
CD-ROM (for Windows users only)
USB Mass Storage Driver
ArcSoft PhotoImpression 2000
Adobe Acrobat Reader 5.1
Microsoft DirectX 9
View User's Guide (Multilingual)
Visit Concord Support Web Site
Camera Features
3.1 Megapixels, 2048 x 1536 Resolution
1.5” Color LCD
3x Optical Zoom
4x Digital Zoom
Video Clips
Compatible with Secure Digital (SD) memory cards (not included)
Downloaded from www.Manualslib.com manuals search engine
6
GETTING STARTED
Attaching the Wrist Strap
Please attach the wrist strap to prevent dropping the camera.
Charging Rechargeable Batteries
NOTE! : The supplied rechargeable Ni-MH batteries are not charged when you receive them.
Charge them before loading into the camera.
How to Charge the Rechargeable Batteries:
1. Open the charger’s battery door by pressing on the OPEN
area and sliding to the direction of arrow. (fig. 1.1)
2. Insert the rechargeable Ni-MH batteries into the charger with
its (+) and (-) ends matching with the polarity indication
engraved inside the charger. (fig. 1.2 - 1.4)
The bottom row of battery contacts is designed for AAA
batteries. Do not force the AA batteries into the bottom row.
3. Replace the battery door. (fig. 1.5)
4. Plug the charger into a standard AC power outlet.(fig. 1.6) Check if the green LED indicator
lights up. If not, unplug the charger and ensure the batteries are properly inserted. (fig. 1.7)
If there are two pairs of batteries charging, both green LED indicators will light up.
5. The first time you charge the batteries, charge them for 24 hours. For repeated use, it is
recommended to charge the batteries for 24 hours for best performance.
• When the green LED indicator light up, it indicates the charger is under operation. As long
as the batteries are kept in contact with the charger, the LED will not turn off.
2
fig.1.1
fig.1.2 (correct loading way 1)
fig.1.3 (correct loading way 2)
fig.1.5
fig.1.6
fig.1.7
fig.1.4 (correct loading way 3)
Downloaded from www.Manualslib.com manuals search engine
7
GETTING STARTED
6. After the batteries are fully charged, unplug the charger from AC outlet first, and then remove
the batteries. (fig. 1.8 -1.10)
Important Tips
1. This charger is designed for indoor use only. Do not expose it to rain or snow.
2. Do not touch the charger with wet hands, especially while plugging or unplugging the charger
to or from AC outlet.
3. Charge only the suggested type of rechargeable batteries. Other types of batteries may burst
causing personal injury and damage. And do not charge different brand batteries or batteries
of different capacities at the same time.
4. Remove batteries from the charger if it is not going to be used for a long time.
5. If the performance of the batteries decreases substantially, it is time to replace the batteries.
fig.1.8
fig.1.9
fig.1.10
Downloaded from www.Manualslib.com manuals search engine
8
GETTING STARTED
Loading the Batteries
The camera can use 2x AA alkaline, lithium or Ni-MH rechargeable batteries to operate.
1. Open the Battery/Memory Card door. (fig.1.1)
Press the Battery/Memory Card door, slide the door down and lift it open.
2. Insert the batteries according to the polarity indicators on the inner side of theBattery/Memory
Card door. (fig.1.2)
3. Shut the Battery/Memory Card door and press it up to close it securely. (fig.1.3)
Checking the Battery Level
The battery level is displayed on the LCD.
Note:
Remove the batteries from the camera if they will not be used for an extended period of
time to prevent corrosion or battery leaks.
To extend battery life, the camera will automatically power off after 30 seconds of inactivity.
To change this setting please refer to p.36.
For better performance, please use NiMH rechargeable batteries.
The camera's battery level indicator may not accurately reflect the state of a low current
rating alkaline battery.
fig.1.1 fig.1.2 fig.1.3
FULL
Batteries are full
and ready to use.
LOW
Batteries are low
and need to be
replaced soon.
EMPTY
Batteries are
empty blinking red
and need to be
replaced
Downloaded from www.Manualslib.com manuals search engine
9
GETTING STARTED
Internal Memory/Inserting the Memory Card
Internal Memory
The camera is equipped with 16MB of internal memory, which can be used right away.
Status Memory in Use
Memory card is not inserted Internal Memory
Memory card is inserted Memory Card
NOTE!: When the memory card is inserted, the images and video clips stored in the internal
memory will be transferred automatically onto the memory card. Please insert a memory card
with 16MB or greater of available memory.
Inserting the Memory Card
In addition to having a 16MB internal memory, the camera uses Secure Digital (SD) memory
cards to store images and video clips.
1. Open the Battery/Memory Card door.
Press the Battery/Memory Card door, slide the door down and lift it open. (fig.1.1)
2. Insert the memory card as indicated by the diagram. (fig.1.2)
Please insert the card in straight, not on an angle.
3. Shut the Battery/Memory Card door and press it up to securely shut it. (fig.1.3)
Note: The camera can support SD cards up to 512 MB.
How to take out the SD card
1. Open the Battery/Memory Card door.
2. Pull the memory card out. Referring to fig. 1.4.
(fig. 1.4)
3. Close the Battery/Memory Card door.
If the memory card or internal memory is corrupted, the memory needs to be formatted.
(p.38)
fig.1.1 fig.1.2
fig.1.4
fig.1.3
!
Downloaded from www.Manualslib.com manuals search engine
10
GETTING STARTED
TURNING THE CAMERA ON AND OFF
The On/Off Switch is located in the front of the camera.
1. Slide the On/Off Switch down to power the camera on. (fig.1.1)
The lens cover will open.
The LCD will turn on automatically
2. To turn the camera off, slide the On/Off Switch upwards. (fig.1.2)
Note: The camera will automatically power off after 30 seconds of
inactivity even the ON/OFF switch is in the "ON" position. Press the
shutter button to power the camera back on.
REMOVING THE PROTECTIVE PLASTIC FILM
To prevent the viewfinder and LCD from damaging during
transportation, both the view finder and LCD is covered with a clear plastic
film. To get a more clear view of subject while taking pictures, please
remove the protective film.
SETTING THE LANGUAGE, DATE AND TIME
When the camera is powered on for the first time, the Language, Date and Time menus will
appear.
Setting the Language
1. Turn the camera on.
The Language Setup screen will appear on the LCD.
2. Press the joystick , to highlight the language you would like to use.
3. Press to select by pressing the joystick in.
4. The next screen will read “Are You Sure?” press the joystick to select No or Yes.
5. Press to select.
If you select No, you will return to the Language select screen.
If you select Yes, all menu screens will be displayed in the new language.
Each language will set the default setting for date format and TV option. To change these
settings, please refer to the Customizing the Camera Settings section on p.33.
Language(s) Date Format Setting TV Option
English / Español MM/DD/YYYY NTSC
Français / Deutsch / Italiano DD/MM/YYYY PAL
YYYY/MM/DD PAL
YYYY/MM/DD NTSC
LANGUAGE OPTION
OK
English
Français
Deutsch
Italiano
RETURN SET
Español
Nederlands
RETURN SET
LANGUAGE OPTION
OK
Are You Sure?
No
Yes
RETURN SET
OK
O
K
O
K
fig.1.1 Camera On
fig.1.2 Camera Off
Downloaded from www.Manualslib.com manuals search engine
11
GETTING STARTED
Setting the Date
1. Press the joystick to highlight the month, day or year.
The selection will blink when it is highlighted.
2. Press the joystick to change the number in the blinking position until you reach the
desired setting.
3. Press to set the date.
Note:
If the battery is removed or dead for more than 4 minutes, the date will return to its default
setting. When you power on the camera again, the "Set Date/Time" message will flash on
LCD. You can either reset date/time by manually changing it in the Setup menu (p.37), or
skip the date & time setting by pressing the shutter button once.
Setting the Time
The time is displayed in hour, minute format.
1. Press the joystick to highlight the hour (HH), minutes (MM) or AM/PM.
The selection will blink when it is highlighted.
2. Press the joystick to change the selection in the blinking position until you reach the
desired setting.
3. Press to select.
Note:
The time can be displayed in a 12-hour or 24-hour format. Please go to p.37 to change this
setting.
If the battery is removed or dead for more than 4 minutes, the time will return to its default
setting. When you power on the camera again, the "Set Date/Time" message will flash on
LCD. You can either reset date/time by manually changing it in the Setup menu (page 37), or
skip the date & time setting by pressing the shutter button once.
ADJUST DATE
1
OK
01 Ú 01 Ú 2002
RETURN SET
ADJUST DATE
1
OK
01 Ú 01 Ú 2002
RETURN SET
01 Ú 02 Ú 2002
RETURN SET
ADJUST DATE
1
OK
ADJUST TIME
OK
01:01 AM
RETURN SET
ADJUST TIME
OK
01:01AM
RETURN SET
01:02AM
RETURN SET
ADJUST TIME
OK
O
K
O
K
Downloaded from www.Manualslib.com manuals search engine
12
Review Mode
Use the review mode
setting to browse
through images and
video clips or to delete
images from the
internal memory or
memory card.
Video Clip Mode
Use video clip mode to
capture video clips.
GETTING STARTED
Turning the LCD On and Off
The camera has a 1.5” LCD which can frame subjects for image and video clip capture, review
stored images and video clips and to display the current camera settings.
1. Use the ( ) button to toggle the LCD mode. The LCD mode changes each time the
button is pressed as follows:
Ð
c Icons off
Ð
d LCD off
Ð
e LCD on with icons
Note: In order to save battery power, you may turn off the LCD display.
SETTING THE CAMERA’S OPERATIONAL MODE
The camera has 3 operational modes Camera Mode, Review Mode and Video Clip Mode.
A
AWB
2040
07 04 2003 02:40
SD
O
K
O
K
O
K
O
K
1. To change the camera
operational mode, slide
the mode dial back and
forth.
Camera Mode
Use the camera mode
setting to take pictures or
to customize your camera
settings for picture taking.
Downloaded from www.Manualslib.com manuals search engine
13
TAKING PICTURES
TAKING A PICTURE WITH THE VIEWFINDER
Taking a picture with the viewfinder:
1. Turn the camera on.
2. Set the camera to ( ) Camera Mode.
The LCD can be switched off to conserve battery power by
pressing the ( ) button.
3. Frame the subject in the viewfinder.
If the subject appears blurry, adjust the viewfinder focus by turning
the diopter wheel.
4. Press the shutter button half-way to activate the auto-focus until the
green AF LED stops blinking. (For information on Focus Lock, please
go to p.14) (fig.1.1)
5. Press the shutter button fully to capture the image. (fig.1.2)
The camera will beep when the image is captured if sound is
activated.
The camera will make a click sound.
FLASH READY LED
Flash Ready LED Status Description
Steady (fig.1.1) The camera is capturing a video clip.
Blinking (fig.1.2) The flash is recharging. You may move the camera in this mode.
Note: Do not power the camera off or switch modes while the camera is capturing or storing
a picture or video clip to prevent corrupting the picture or video clip being stored.
O
K
O
K
fig.1.1
Diopter Adjusting
fig.1.2
fig.1.1
fig.1.2
Downloaded from www.Manualslib.com manuals search engine
TAKING PICTURES
TAKING A PICTURE WITH THE LCD
Taking a picture with the LCD:
1. Set the camera to ( ) camera mode.
2. Frame the subject in the LCD.
3. Press the shutter button half-way to activate the auto-focus lock until the
green AF LED stops blinking. (For more information on Focus Lock,
please go to p.14) (fig.1.1)
4. Press the shutter button fully to capture the image. (fig.1.2)
The camera will beep when the image is captured if sound is activated.
The camera will make a click sound.
A preview of the image will be displayed on the LCD for 1 second and
the picture counter number displayed in the LCD will be updated.
Note: The number showing on the frame counter can vary with the change of
quality and resolution setting. Please refer to p.22 (Image Resolution) for details
AUTO-FOCUS LOCK
This feature can be used to freeze the focus when the subject is not located in the center of the picture.
To use the focus lock:
1. Position the subject in the center of the frame
located in the LCD. (fig.1.1)
2. Press the shutter button half-way. (fig.1.2)
When the shutter button is pressed half-
way, the auto-focus feature will be activated
and the Auto Focus (green) LED will
display the status of the auto focus lock.
3. Recompose your picture. (fig.1.5)
Keep the shutter pressed half-way while
recomposing the picture.
4. Press the shutter button fully to capture the
picture. (fig.1.6)
Photography Tips: To get better focus, please
follow advise below:
1. If there are several subjects at different
distances within the focus lock area,
recompose the picture by moving the camera slightly.
2. If there is no color contrast, recompose the picture with a subject that contains more color.
3. If there is insufficient lighting, increase the lighting in the surrounding area.
O
K
O
K
fig.1.1
fig.1.2
A
AWB
2048
07 04 2003 02:40
00000000 0000
Capture Mode
Quality Setup
Image Size
Digital Zoom
Scenes Select
RETURN SELECT
CAMERA MODE
S
Q
+
+
+
RETURN SET
SINGLE SHOT
OK
O
K
O
K
fig.1.6
fig.1.2
Auto Focus Description
LED Status
Blinking The camera is setting the focus. (fig.1.3)
Steady The subject is in focus. (fig.1.4)
14
fig.1.3
fig.1.4
A
AWB
0005
07 04 2003 02:40
2048
A
AWB
0005
07 04 2003 02:40
2048
fig.1.1
fig.1.5
Downloaded from www.Manualslib.com manuals search engine
15
TAKING PICTURES
SETTING THE FLASH
How to set the flash:
1. Press the Flash button next to the LCD repeatedly until the desired mode appears on the LCD.
Flash Mode Description
Auto Flash The camera judges if a flash is required. If the environment is too dark, the flash will
fire.
Red-Eye Use this mode to significantly reduce the occurrence of “red- eye” in flash
photography. The camera will automatically detect when the flash is needed and the
flash will fire after a short delay.
Fill-in Flash Flash will fire in any lighting condition.
Flash off The flash will not fire in this mode. Please use this mode if you want to capture the
mood of the ambient lighting or to use the available light in places where flash
photography is prohibited, such as museums.
To prevent blurry pictures in low light situations, hold the camera steady when
pressing the Shutter button or mount the camera on a tripod.
Night Mode A slow shutter speed is used in this mode to capture the lights in night scenes.
To prevent blurry pictures in low light situations, hold
the camera steady when pressing the Shutter button
or mount the camera on a tripod.
Note: The flash needs to recharge after it is fired. If the Shutter button is pressed while the
flash is charging, the Flash Ready LED will blink. Please wait a few moments and press the
Shutter button again to take a picture.
TAKING A PICTURE WITH OPTICAL ZOOM
The camera can use up to 3x optical zoom to take pictures.
How to use optical zoom:
1. Press the joystick towards the ( ) tele position.
The zoom bar will display the zoom position on the LCD.
2. Press the joystick to zoom towards the ( ) wide-angle position.
Note: The folded optics allows the lens to be compact and contained in the camera. The
lens does not extend while using optical zoom.
O
K
A
AWB
2048
07 04 2003 02:40
00000000 0000
A
AWB
2048
07 04 2003 02:40
00000000 0000
A
A
Reduction
A
AWB
2048
07 04 2003 02:40
00000000 0000
A
AWB
2048
07 04 2003 02:40
00000000 0000
A
AWB
2048
07 04 2003 02:40
00000000 0000
Downloaded from www.Manualslib.com manuals search engine
16
TAKING PICTURES
TAKING A PICTURE WITH DIGITAL ZOOM
The 4x digital zoom combined with the 3x optical zoom can give up to 12x magnification to your
pictures.
How to use digital zoom:
1. At the maximum optical zoom level, continue to press the joystick until the digital zoom is
activated.
There will be a short delay before the digital zoom is activated.
The zoom bar will turn orange when digital zoom is being used.
Photography Hints -
Hold your camera steady or use a tripod while using Digital Zoom to prevent blurriness in the
photograph due to camera movement.
Also, please note that the image quality may degrade slightly with digital zoom.
Note: The digital zoom can only be monitored with the LCD and not through the optical
viewfinder.
Activating/Deactivating Digital Zoom
The digital zoom feature can be turned off by following the steps below.
How to activate or deactivate Digital Zoom:
1. In Camera Mode, press MENU to display the Main Menu.
2. Press the joystick until Digital Zoom is highlighted, then press the joystick
to enter its submenu.
3. Press the joystick to highlight Off or On.
The default setting for this is On.
4. Press to select.
A
AWB
2048
07 04 2003 02:40
00000000 0000
A
AWB
2048
07 04 2003 02:40
00000000 0000
A
AWB
2048
07 04 2003 02:40
0000
Capture Mode
Quality Setup
Image Size
Digital Zoom
Scenes Select
RETURN SELECT
CAMERA MODE
S
Q
ON
OFF
RETURN SET
DIGITAL ZOOM
OK
O
K
Downloaded from www.Manualslib.com manuals search engine
Capture Mode
Quality Setup
Image Size
Digital Zoom
Scenes Select
RETURN SELECT
CAMERA MODE
S
Q
Fine
Normal
Economy
RETURN SET
QUALITY SETUP
OK
Q
2048 x 1536
1600 x 1200
1280 x 960
640 x 480
RETURN SET
RESOLUTION
OK
ON
OFF
RETURN SET
DIGITAL ZOOM
OK
Party Indoor
Beach Snow
Sunset
Night Landscape
RETURN SET
SCENES SELECT
OK
S
OFF
S
Fireworks
Night Portrait
RETURN SET
SCENES SELECT
OK
Auto
Sunny
Fluorescent
Tungsten
RETURN SET
WHITE BALANCE
A
OK
EV COMPENSATION
+
00 EV
+
SET
OK
+
+
+
RETURN SET
SINGLE SHOT
OK
+
+
RETURN SET
SELF-TIMER+MACRO
OK
White Balance
EV Compensatiion
Setup
RETURN SELECT
CAMERA MODE
+
17
TAKING PICTURES
USING THE MAIN MENU IN CAMERA MODE
Downloaded from www.Manualslib.com manuals search engine
18
TAKING PICTURES
USING THE MAIN MENU IN CAMERA MODE
Follow the steps below to set the advanced shooting options in the camera through the Main
Menu.
Using the ( ) Main Menu:
1. Turn the camera on.
2. Set the mode dial to ( ).
3. Press MENU to display the main menu.
4. Press the joystick until the desired option is highlighted.
5. Press the joystick to enter the submenu.
6. Press the joystick in the submenu to toggle between the options.
7. Press to make a selection.
All selections will be marked by a red dot.
8. To return to the previous menu, press the joystick .
9. To exit the menu at any time press the MENU button.
CAPTURE MODE OPTIONS
The capture mode menu has 7 features to choose from for taking pictures.
Capture Mode Option Description
( ) Single shot The camera will take 1 picture at a time.
( ) Single shot with Self-timer The camera will take 1 picture with Self-timer. (p.19)
( ) Single shot with Macro The camera will take 1 picture at a time in
Macro mode. (p.20)
( ) Continuous Shooting The camera will take 7 pictures (at 1600 x 1200 pixels)
in a row when the shutter button is fully pressed. The
flash is disabled in this mode. (p.21)
( ) Continuous Shooting The camera will take 7 pictures in a row
with Self-timer. (p.19)
( ) Continuous Shooting The camera will take 7 pictures in a row in
with Macro Macro mode. (p.20)
( ) Self-timer with Macro The camera will take 1 picture in Macro
mode with Self-timer. (p.20)
Note: Flash will be deactivated in continuous shot.
O
K
Downloaded from www.Manualslib.com manuals search engine
19
TAKING PICTURES
SELF-TIMER
How to use self-timer:
1. In ( ) Camera Mode, press MENU to display the main menu.
2. Press the joystick to enter capture mode.
3. Press the joystick to highlight:
( ) Single Shot with Self-timer
( ) Continuous Shot with Self-timer
OR
( ) Self-timer with Macro
4. Press .
5. Place the camera on a flat surface or tripod.
6. Use the LCD to compose the picture, and then press the Shutter button to activate the
self-timer.
The Self-timer LED will blink for 10 seconds and then the image will be captured.
Note:
The self-timer is automatically deactivated once the image is taken.
To deactivate the self-timer before taking a picture, follow the steps above and highlight
another option in the Capture Mode menu.
Photography Hints -
Since the Self-timer LED indicator on the front of the camera flashes, you have time to join in
the photograph and know when the camera is done taking a picture when the Self-timer LED
light stops blinking.
A
AWB
2048
07 04 2003 02:40
0000
Capture Mode
Quality Setup
Image Size
Digital Zoom
Scenes Select
RETURN SELECT
CAMERA MODE
S
Q
+
+
+
RETURN SET
SINGLE+SELF-TIMER
OK
O
K
Downloaded from www.Manualslib.com manuals search engine
20
TAKING PICTURES
MACRO MODE
This mode enables the camera to capture pictures in close distances.
Setting Macro Mode:
1. In the ( ) main menu. Press the joystick to enter the capture mode submenu.
2. Press the joystick to highlight:
( ) Single shot with Macro
( ) Continuous shot with Macro
OR
( ) Self-timer with Macro
3. Press to enter the mode
The Macro icon ( ) will be displayed on the LCD.
Taking a picture in Macro Mode:
1. Frame the subject in the LCD.
The minimum shooting distance can vary based on the zoom
position.
In the ( ) wide-angle position, you can get as close as
0.1m(3.9 inches).
2. Press the shutter button half-way to activate the focus until the
green AF LED stops blinking.
You can monitor the focus range through the LCD.
3. Press the shutter button fully to take the picture.
A
AWB
2048 0000
07 04 2003 02:40
A
AWB
2048
07 04 2003 02:40
0000
0000 0000
Capture Mode
Quality Setup
Image Size
Digital Zoom
Scenes Select
RETURN SELECT
CAMERA MODE
S
Q
+
+
+
RETURN SET
SINGLE+MACRO
OK
O
K
Downloaded from www.Manualslib.com manuals search engine
21
TAKING PICTURES
CONTINUOUS SHOOTING
This feature enables the camera to capture a continuous series of pictures while the shutter
button is pressed down.
Using Continuous shooting:
1. In the ( ) Main Menu, press the joystick to enter the Capture Mode submenu.
2. Press the joystick until Continuous Shot is highlighted, then press joystick to enter the
mode.
3. Frame the subject in the LCD screen and press the shutter button half-way to activate the
focus until the green AF LED stops blinking.
4. Press the shutter button fully to capture the pictures.
The camera will capture images at approximately 3 images per second for a maximum of
7 images.
Note:
In continuous shooting mode the flash is disabled as the recharging time will slow it down.
The camera will only capture the pictures in the 1600 x 1200 resolution setting in this
mode.
A
AWB
2048 0000
07 04 2003 02:40
Capture Mode
Quality Setup
Image Size
Digital Zoom
Scenes Select
RETURN SELECT
CAMERA MODE
S
Q
+
+
+
RETURN SET
CONTINUOUS SHOT
OK
Downloaded from www.Manualslib.com manuals search engine
IMAGE RESOLUTION
Image Resolution determines the size of a captured image. Higher resolution images contain
more details and have larger file sizes.
How to change the resolution:
1. When Resolution is highlighted in the ( ) Main Menu, press the joystick arrow to enter
the ( ) Resolution submenu.
2. Press the joystick or until the desired setting is highlighted.
3. Press to select the mode.
4. Press MENU to return to picture taking mode.
Note: Resolution icon will be displayed according to the resolution you have selected. For
example, if you selected resolution of 1600 x 1200, '1600' will be shown on the left upper
corner of the LCD.
22
TAKING PICTURES
A
AWB
2040
A
AWB
2048
A
AWB
2048
A
AWB
2048
A
AWB
2048
AWB
2048
A
AWB
2048
07 04 2003 02:40
A
AWB
2048
0000
0000 0000
0000 0000
00000000 0000
A
AWB
2040
A
AWB
2048
Capture Mode
Quality Setup
Image Size
Digital Zoom
Scenes Select
RETURN SELECT
CAMERA MODE
S
Q
A
AWB
2048
A
AWB
2048
A
AWB
2048
AWB
2048
A
AWB
2048
A
AWB
2048
0000
0000 0000
0000 0000
0000 0000
A
AWB
2040
A
AWB
2048
A
AWB
2048
2048 x 1536
1600 x 1200
1280 x 960
640 x 480
RETURN SET
RESOLUTION
OK
A
AWB
2048
A
AWB
2048
AWB
2048
A
AWB
2048
A
AWB
2048
0000
0000 0000
0000 0000
0000 0000
O
K
Kimba UGuide(big size)-E1 4/30/04 10:09 AM Page 20
Downloaded from www.Manualslib.com manuals search engine
23
IMAGE QUALITY
IMAGE QUALITY
The Image Quality setting determines the amount of compression used to reduce the size of the
stored image file in order to economize the space in the internal memory or memory card.
JPEG
Quality Compression Description
Ratio
Fine 4:1 Fine image quality can be used for printing images. To
print pictures up to 11" x 14", select fine image quality
and high resolution (2048 x 1536).
Normal 8:1 Normal image quality can be used for general purpose
pictures.
Economy 16:1 Economy image quality can be used for pictures that
will be sent via e-mail.
How to change the quality:
1. When ( ) Quality is highlighted, press the joystick to enter the
( ) Quality Setup submenu.
2. Press the joystick or until the desired setting is highlighted.
3. Press to select the Quality mode
4. Press MENU to return to picture taking mode.
A
AWB
2048
07 04 2003 02:40
00000000 0000
Capture Mode
Quality Setup
Image Size
Digital Zoom
Scenes Select
RETURN SELECT
CAMERA MODE
S
Q
Fine
Normal
Economy
RETURN SET
QUALITY SETUP
OK
Q
Q
Q
O
K
Downloaded from www.Manualslib.com manuals search engine
24
WHITE BALANCE
WHITE BALANCE
By default the camera uses Auto White Balance to best reproduce colors under different lighting
conditions. For mixed lighting conditions you can use the Auto White Balance.
White Balance Mode Description
Auto The camera will automatically choose the
white balance setting. Use this setting in
variable conditions.
Sunny Use outdoors with sufficient sunlight.
Fluorescent Use indoors with fluorescent or ambient light
conditions.
Tungsten Use indoors with tungsten light conditions.
How to change the White Balance:
1. When White Balance is highlighted, press the joystick to enter its submenu.
2. Press the joystick or until the desired setting is highlighted.
3. Press to select the White Balance mode
4. Press MENU to return to picture taking mode.
A
AWB
2048
07 04 2003 02:40
0000
White Balance
EV Compensatiion
Setup
RETURN SELECT
CAMERA MODE
+
Auto
Sunny
Fluorescent
Tungsten
RETURN SET
WHITE BALANCE
A
OK
A
O
K
Downloaded from www.Manualslib.com manuals search engine
25
EV COMPENSATION
EV COMPENSATION
The camera uses Auto Exposure to give you well exposed pictures under most conditions. If the
main subject turned out too light or too dark, you can use the EV Compensation feature to
improve the result.
Exposure
Compensation Description
Mode
Increasing the Exposure in pictures that are too dark, will make the
picture lighter.
Decreasing the Exposure in pictures that are too light will make the
picture darker.
How to use EV Compensation:
1. Press the joystick in the Main Menu until ( ) EV Compensation is highlighted.
2. Press the joystick to display the EV Compensation bar on the LCD.
3. Press the joystick to change the EV Compensation between - 1.8 to +1.8.
4. Press to select the desired value.
The camera will return to picture taking mode automatically after selecting.
+
A
AWB
2048
07 04 2003 02:40
00000000 0000
White Balance
EV Compensatiion
Setup
RETURN SELECT
CAMERA MODE
+
EV COMPENSATION
+
00 EV
+
SET
OK
+
O
K
Downloaded from www.Manualslib.com manuals search engine
26
SCENE SELECTION
SCENE SELECTION
The default options in the camera can be used in most settings. The scene modes are helpful to
quickly optimize the various settings to best capture specific scenes.
Preset Scene Description
OFF No Scene Selection (default).
Party/Indoor Use this mode in to capture the details of candlelit scenes or other indoor background
light conditions.
Beach/Snow Use this mode to capture the details in high glare scenes such as snow or shining water.
Night Landscape A slow shutter speed is used to capture the lights in night scenes.
Photography Tip: With the slow shutter speed there is a possibility of getting blurry images
due to camera movement.
To reduce blurring, you may do the following:
1. Set your camera to Night Landscape mode.
2. Place your camera on a tripod or sturdy surface area.
3. Set the camera to self-timer mode.
4. Press the shutter button.
Sunset This mode captures the deep hues and color variations in sunsets and sunrises.
Fireworks Use this mode to capture the burst of light from fireworks with a slower shutter speed.
Night Portrait Use this mode to capture a subject illuminated with the lights in a night scene with a slow
shutter speed.
- Due to the slow shutter speed, place the camera on a
tripod for better picture quality.
How to set the scene selection:
1. When Scenes Select is highlighted, press the joystick to enter the its submenu.
2. In the Scenes Select menu, press joystick to choose between the options.
3. Press to select the Scene mode.
4. Press MENU to return to picture taking mode.
Note: The scene selection mode will override the flash setting set by the flash button for one
picture only.
A
AWB
2048
07 04 2003 02:40
0000
Capture Mode
Quality Setup
Image Size
Digital Zoom
Scenes Select
RETURN SELECT
CAMERA MODE
S
Q
Party Indoor
Beach Snow
Sunset
Night Landscape
RETURN SET
SCENES SELECT
OK
S
OFF
O
K
Downloaded from www.Manualslib.com manuals search engine
TAKING VIDEO CLIPS
27
TAKING VIDEO CLIPS
The camera can capture video clips.
Note: Video clips with audio feature is optional and it is available in some models only.
To record a video clip:
1. Slide the Mode Switch to ( ) Video Clip Mode.
2. Position the subject in the viewfinder or LCD screen.
3. Press the shutter button half-way to activate the focus until the green AF LED stops blinking.
4. Press the shutter button fully to capture a continuous video clip. The time limit is showing on
the upper right corner of the screen
Internal Memory: The camera can take video clips for 10 seconds only.
SD Memory Card: The camera can take video clips until the memory card is full and the
recording time remaining will be displayed on the upper right hand corner of the LCD
monitor.
To stop recording:
1. Press the Shutter button again to stop recording.
OR
2. The camera will continue recording until the memory limit has been reached.
Video Clip Information
Resolution: QVGA (320 x 240)
Frame rate: 30fps
File Format: AVI (Motion Picture)
Note: [Transferring Files] will be displayed on the LCD monitor when the camera is storing
the video clip.Do not open the battery door or turn the camera off while transferring files, or
the video clip may not be stored.
Note:
Higher capacity memory cards can take longer video clips.
The Flash, Menu and LCD on/off buttons are deactivated in this mode.
The focus and the zoom cannot change during recording.
O
K
O
K
07 04 2003 02:40
Shutter to Rec
Rec
0:50
Downloaded from www.Manualslib.com manuals search engine
REVIEWING YOUR FILES
28
REVIEWING YOUR FILES
Using Review Mode
In ( ) review mode, you can review your stored pictures and video clips through the LCD.
Using REVIEW mode:
1. Slide the Mode Switch towards ( ) .
In review mode, the sequence number and the total number of the still pictures and or video
clips will be shown on the top right of the LCD. For example, on the illustration above, the
'0001-0006' represents the current picture is the first shot, and there are total 6 pictures or
video clips.
2. Press the joystick or to scroll through each file.
3. The file type can be found in the upper left hand corner of the LCD.
File Format File Type
JPG Picture
AVI Video Clip
Reviewing Video Clips
How to review a video clip:
1. In ( ) Review Mode, press the joystick and to scroll through the stored pictures
and video clips.
Only the first image of the video clip is shown.
2. When a video clip (AVI) is displayed on the LCD, press to play.
O
K
O
K
JPG
0001-0005
2048
07 04 2003 02:40
AVI
OK to view AVI
0001/0005
O
K
Downloaded from www.Manualslib.com manuals search engine
29
REVIEWING YOUR FILES
Enlarging Stored Pictures
How to enlarge:
1. In ( ) Review Mode, press the joystick or to scroll through the stored pictures
and video clips.
2. While viewing a stored image (JPG), Press to use the " Enlargement" feature. Press
again to get different magnifications in the following order
Ð
c 2x Enlargement
Ð
d 4x Enlargement
Ð
e 6x Enlargement
Ð
f Normal Mode
3. In 2x, 4x and 6x mode you may press the joystick , , , to navigate in the
picture.
Resolution Maximum Enlargement
2048 x 1536 6x
1600 x 1200 4x
1280 x 960 4x
640 x 480 2x
X2
X4
X6
O
K
Downloaded from www.Manualslib.com manuals search engine
30
REVIEWING YOUR FILES
USING THE DELETE MENU
Using the Delete Menu in Review mode:
1. Turn the camera on.
2. Set the mode dial to ( ).
3. Press MENU to display the main menu.
4. Press the joystick to enter the Delete submenu.
5. To exit the menu, press the joystick .
6. Press the MENU button to return to the ( ) Main Menu.
Are You Sure?
Delete One
Delete All
Setup
RETURN SELECT
REVIEW
No
Yes
RETURN SET
OK
Are You Sure?
No
Yes
RETURN SET
OK
Delete
OK
Yes
No
RETURN SET
DELETE ALL
OK
Downloaded from www.Manualslib.com manuals search engine
!
REVIEWING YOUR FILES
DELETING YOUR FILES
Delete One
Once a file is deleted, it cannot be recovered.
1. Set the Mode Dial to the Review Mode.
2. Press the joystick when Delete One is highlighted.
3. The next screen will display the stored pictures and video clips
as thumbnails. Press the joystick , , , to highlight
the file you want to delete.
4. Press to select.
5. The next screen will read "Are You Sure?" press the joystick
or to highlight No or Yes.
6. Press to select.
If No is selected, no change will be made, and you will return to the Delete One thumbnail view.
If Yes is selected, the selected file will be deleted.
7. After selection, the screen will return to thumbnail display mode. Press MENU once to return
to the submenu, then press or MENU again to return to review mode
Delete All
Once all files are deleted, they cannot be recovered.
How to delete all files:
1. Set the Mode Dial to the Review Mode.
2. Press the joystick until Delete All is highlighted and press
the joystick .
3. The next screen will read "Are You Sure?" press the joystick
or to highlight No or Yes.
4. Press to select.
If No is selected, no change will be made, and you will return
to the Delete File Menu.
If Yes is selected, the next screen will read, "Are you sure?"
5. Press the joystick to select No or Yes.
If No is selected, no change will be made, and you will return to the Delete File Menu.
If Yes is selected, ALL FILES will be deleted.
6. After selection, the screen will return to thumbnail display mode. Press MENU once to return
to the submenu, then press or MENU again to return to review mode.
JPG
0001-0005
2048
07 04 2003 02:40
Delete One
Delete All
Setup
RETURN SELECT
REVIEW
Delete
OK
Are You Sure?
No
Yes
RETURN SET
OK
!
O
K
O
K
O
K
JPG
0001-0005
2048
07 04 2003 02:40
Delete One
Delete All
Setup
RETURN SELECT
REVIEW
Yes
No
RETURN SET
DELETE ALL
OK
Are You Sure?
No
Yes
RETURN SET
OK
31
Downloaded from www.Manualslib.com manuals search engine
32
USING THUMBNAIL MODE
How to view your files:
1. While in Review Mode, press the ( ) button to have nine thumbnail images or video clips
appear at once on the LCD display.
2. Press the joystick to highlight a picture or video clip.
When the joystick is pressed up in the top row of thumbnails, the previous 9 files will be
displayed
When the joystick is pressed down in the bottom row of thumbnails, the next 9 files will be
displayed.
3. Press the button to view the enlarged picture or video clip.
O
K
0001/0012
O
K
Downloaded from www.Manualslib.com manuals search engine
33
CUSTOMIZING THE CAMERA SETTINGS
White Balance
EV Compensatiion
Setup
RETURN SELECT
CAMERA MODE
+
Set Auto OFF Time
TV Option
Speaker
Language Option
Restore Default
RETURN SELECT
SETUP
T
LCD Brightness
Card Format
Camera Info
Adjust Date
Adjust Time
RETURN SELECT
SETUP
1
Time Format
Date Format
RETURN SELECT
SETUP
D
M
12
24
NTSC
PAL
RETURN SET
TV OPTION
OK
OFF
30 SEC
60 SEC
90 SEC
RETURN SET
SET AUTO OFF TIME
T
OK
ON
OFF
RETURN SET
SPEAKER
OK
YES
NO
RETURN SET
RESTORE DEFAULT
OK
English
Français
Deutsch
Italiano
RETURN SET
LANGUAGE OPTION
OK
Español
Nederlands
RETURN SET
LANGUAGE OPTION
OK
Downloaded from www.Manualslib.com manuals search engine
34
CUSTOMIZING THE CAMERA SETTINGS
FW Version B06
FW P/N 2F0049-09
Date 2003 4 28
Comment EP3 FW
MA4 MA5 PA5 PA6
RETURN SET
CAMERA INFO
OK
ADJUST TIME
OK
01:01 AM
RETURN SET
ADJUST DATE
1
OK
01 Ú 01 Ú 2002
RETURN SET
12 Hours
24 Hours
RETURN SET
TIME FORMAT
12
24
OK
DD Ú MM Ú YYYY
MM Ú DD Ú YYYY
YYYY Ú MM Ú DD
RETURN SET
DATE FORMAT
D
M
OK
LCD BRIGHTNESS
OK
+
SET
Yes
No
RETURN SET
CARD FORMAT
OK
White Balance
EV Compensatiion
Setup
RETURN SELECT
CAMERA MODE
+
Set Auto OFF Time
TV Option
Speaker
Language Option
Restore Default
RETURN SELECT
SETUP
T
LCD Brightness
Card Format
Camera Info
Adjust Date
Adjust Time
RETURN SELECT
SETUP
1
Time Format
Date Format
RETURN SELECT
SETUP
D
M
12
24
CUSTOMIZING THE CAMERA SETTINGS
Downloaded from www.Manualslib.com manuals search engine
35
CUSTOMIZING THE CAMERA SETTINGS
Using the Setup menu:
1. Turn the camera on.
2. Set the mode dial to ( ) or ( ).
3. Press MENU to display the main menu.
4. Press the joystick until Setup is highlighted.
5. Press the joystick to enter the Setup submenu.
6. In the Setup menu, press the joystick to highlight the option you wish to customize.
7. Press the joystick to enter the submenu of the highlighted option.
8. Use the joystick to adjust the setting and press to select.
9. Press the joystick to return to the previous menu OR press MENU to exit.
Setup Menu and Features
Setup Setting Options Description
Set Auto Off 30, 60, 90 This feature enables the camera to
Time automatically turn off when it is idle.
Off Deactivates the automatic power off
option.
TV Option NTSC, PAL Sets the mode the camera needs to
adapt to your TV. (p.54)
Speaker On, Off Activates or deactivates the audio
feature in the camera. Note: Audio is
an optional feature available in some
models only.
Language , Sets the language in your camera.
Option English,
Français,
Español,
Italiano,
Deutsch,
Nelerlands,
Restore Default Yes/No Sets all camera settings to the factory default.
LCD Brightness Sets the LCD brightness level.
Card Format Yes/No Formats internal memory or the memory card
by deleting all files.
Camera Info FW Version Displays the camera version information.
FW Part No. This is for information purposes only.
Date
Comment
Adjust Date Month, Day Changes the date in your camera.
Year
Adjust Time Hour, Minute, Changes the time in your camera.
AM or PM
Time Format 12 Hours, Changes the time format.
24 Hours
Date Format DD/MM/YYYY, Changes the date display.
MM/DD/YYYY,
YYYY/MM/DD
O
K
T
1
12
24
D
M
Downloaded from www.Manualslib.com manuals search engine
36
CUSTOMIZING THE CAMERA SETTINGS
SETTING THE AUTO OFF TIME
Notes:
When the camera is in auto off mode, press the shutter button to turn the camera back on.
When the camera automatically turns off, the lens cover will not close automatically.
Please turn the camera off manually to close the lens cover.
The default setting is 30 seconds to conserve battery power.
SETTING THE LANGUAGE
To set the Language:
1. In the Setup menu, press the joystick until Language is highlighted.
2. Press the joystick to enter the Language submenu.
3. Press the joystick to highlight the desired language.
4. Press to select the language.
All menu screens will be displayed in the new language.
To quit the selection, press the MENU button or the joystick .
White Balance
EV Compensatiion
Setup
RETURN SELECT
CAMERA MODE
+
Set Auto OFF Time
TV Option
Speaker
Language Option
Restore Default
RETURN SELECT
SETUP
T
Set Auto OFF Time
TV Option
Speaker
Language Option
Restore Default
RETURN SELECT
SETUP
T
LANGUAGE OPTION
OK
English
Français
Deutsch
Italiano
RETURN SET
OFF
30 SEC
60 SEC
90 SEC
RETURN SET
SET AUTO OFF TIME
T
OK
Español
Nederlands
RETURN SET
LANGUAGE OPTION
OK
O
K
Downloaded from www.Manualslib.com manuals search engine
37
CUSTOMIZING THE CAMERA SETTINGS
SETTING THE DATE
1. In the Setup menu, press the joystick until Adjust Date is
highlighted.
2. Press the joystick to highlight the month (MM), date (DD) or
year (YYYY).
The selection will blink when it is highlighted.
3. Press the joystick to change the data in the blinking
position until you reach the desired setting.
4. Press to set.
Note:
The date can be displayed in MM/DD/YYYY; DD/MM/YYYY or YYYY/MM/DD.
If the battery is removed for more than 4 minutes, the date will return to its default setting.
Set Date/Time! will appear on the LCD when the camera is turned on. Press the Shutter
button slightly to turn the reminder off.
SETTING THE TIME
1. In the Setup menu, press the joystick until Adjust Time is
highlighted.
2. Press the joystick to highlight the hour (HH), minutes (MM)
or AM/PM.
The selection will blink when it is highlighted.
3. Press the joystick to change the data in the blinking
position until you reach the desired setting.
4. Press to set.
Note:
The time can be displayed in a 12-hour or 24-hour respectively format.
If the battery is removed for more than 4 minutes, the time will return to its default setting.
Set Date/Time! will appear on the LCD when the camera is turned on. Press the Shutter
button slightly to turn the reminder off.
ADJUST TIME
OK
01:01 AM
RETURN SET
ADJUST DATE
1
OK
01 Ú 01 Ú 2002
RETURN SET
O
K
O
K
Downloaded from www.Manualslib.com manuals search engine
38
CUSTOMIZING THE CAMERA SETTINGS
SETTING THE LCD BRIGHTNESS
How to set the LCD Brightness:
1. In the Setup menu, press the joystick until LCD Brightness is highlighted.
2. Press the joystick to display the LCD Brightness bar on the LCD.
3. Press the joystick / to adjust the brightness.
4. Press to set.
The camera will return to picture taking mode or review mode.
FORMATTING THE INTERNAL MEMORY OR MEMORY CARD
CAUTION:
1. In the Setup menu, press the joystick until Card Format is highlighted.
2. Press the joystick to enter the Format submenu.
3. Press the joystick to highlight No or Yes.
4. Press to select.
If No is selected, no change will be made, and you will return to the Main Menu.
If Yes is selected, ALL FILES will be deleted.
Note: If MEMORY ERROR! is displayed on the LCD screen, this indicates that he internal
memory or the memory card is corrupted. Please format the memory to continue.
!
1. Formatting deletes all pictures and video clips from the internal memory or
memory card.
2. Removing the card during formatting may damage the card.
3. Selecting the formatting feature while there is no memory card in the
camera, will cause the internal memory to format. All pictures and video
clips on the internal memory will be lost.
White Balance
EV Compensatiion
Setup
RETURN SELECT
CAMERA MODE
+
LCD Brightness
Card Format
Camera Info
Adjust Date
Adjust Time
RETURN SELECT
SETUP
1
Yes
No
RETURN SET
CARD FORMAT
OK
O
K
O
K
White Balance
EV Compensatiion
Setup
RETURN SELECT
CAMERA MODE
+
LCD Brightness
Card Format
Camera Info
Adjust Date
Adjust Time
RETURN SELECT
SETUP
1
LCD BRIGHTNESS
OK
+
SET
Downloaded from www.Manualslib.com manuals search engine
39
RESTORE THE CAMERA TO FACTORY DEFAULT SETTINGS
To restore the default settings in your camera:
1. Press the joystick when Restore Default is highlighted in the camera.
2. Press the joystick to select No or Yes.
When No is selected, no change is made.
When Yes is selected, the Default settings will be restored. Please refer to the table below
for the default settings.
OPTION DEFAULT STATUS
Capture mode Single Shot
Quality Fine
Resolution 2048 X 1536
Digital Zoom ON
Scene Selection OFF
White Balance Auto
Exposure Compensation 0
Auto Off 30 SEC
LCD Brightness Center
Speaker ON (Audio is an optional feature
available in some models only.)
Time Format 12 Hours
Note: After the camera is set to default, the Language, Date and Time menus will appear
when the camera is turned on.
Q
S
+
T
Downloaded from www.Manualslib.com manuals search engine
40
INSTALLATION GUIDE
INSTALLATION GUIDE
Computer System Requirements
Windows
133MHz Pentium MMX processor or equivalent (300MHz Pentium II or better recommended)
Microsoft Windows 98/98SE, Windows Me, Windows 2000 Professional, Windows XP Home /
Professional / Media Center
275MB free hard disk space (extra 30MB for Adobe Acrobat Reader 5 and 65MB for Microsoft
DirectX 9.0 if required)
64MB of RAM (128MB or more recommended)
Minimum 800 x 600 display with 16-bit color (1024 x 768 with 24-bit color or better
recommended)
USB Port
CD-ROM Drive
Macintosh
Mac OS 9.0, 9.1, 9.2, 9.3 and X or later
Power PC-based
32MB of RAM
640 x 480 display with Thousands of colors (Millions of colors recommended)
Built-In USB Port
Installation Requirements
The installer will automatically detect which software applications need to be installed or if they
are not necessary. Please read the installation requirements before proceeding with the
installation process.
System Windows Windows Windows Windows Macintosh
98/98SE Me 2000 XP
Install Camera X
Driver
Install DirectX 9 X X
Install ArcSoft X X X X
PhotoImpression
Install Adobe
Acrobat Reader 5.1
Camera automatically XXXX
detected by the
computer (no driver
installation required)
Downloaded from www.Manualslib.com manuals search engine
41
INSTALLATION GUIDE
USING THE INSTALLER SPLASH SCREEN
The installer will automatically detect which software
applications need to be installed or if they are not necessary.
This will be indicated by the buttons on the splash screen that
appears when the CD-ROM is inserted into the computer:
Color Description
Yellow ( ) Required or highly
recommended to install.
Gray ( ) Already installed or not necessary
Option Description
Camera Drivers The USB Mass Storage camera drivers enable the
camera to become an external drive on your computer.
Microsoft DirectX 9 DirectX 9 enables the movie playback applications on
your computer to playback video clips that are captured
with the camera.
ArcSoft PhotoImpression 2000 This photo software enables you to edit and enhance
pictures.
Adobe Acrobat Reader 5.1 Adobe Acrobat Reader enables you to view the electronic
version of the User’s Guide.
User’s Guide Direct link to the electronic version of the User’s Guide in
different languages. (All User’s Guides are saved in PDF
format.)
Concord Support Website Direct link to our camera support website.
Please establish an internet connection
before clicking on the link.
Downloaded from www.Manualslib.com manuals search engine
42
INSTALLATION GUIDE
FLOW DIAGRAM FOR SOFTWARE INSTALLATION
To transfer the pictures and video clips from the memory card or the camera internal memory,
the camera must be connected to a computer with the provided Mini-USB cable. Additional
setup maybe required by some operating systems before connecting the camera to the
computer for the first time.
Identifying your operating system
Windows Windows 2000 Windows Mac OS
98/98SE p.43 Professional p.43 Me/XP p.43 9.x/10.x p.43
Installing the USB Installing
Mass Storage Drivers DirectX 9 p.46
and DirectX 9 p.44
Installing ArcSoft PhotoImpression 2000 p.47
Installing Adobe Acrobat Reader 5.1 (if needed) p.48
Connecting the camera to the computer p.51
Downloading pictures and video clips onto the computer p.51
Disconnecting the camera from the computer p.53
Data transfer may not function correctly if you have one of the operating systems listed below or
you are using an add-on USB adapter or USB hub.
Windows 95
Windows NT 3.51/4.0
Mac OS 8.6 or lower
Home built computer systems or computer systems without a factory installed operating
system
Home installed operating system or upgrade to the operating system.
Downloaded from www.Manualslib.com manuals search engine
43
INSTALLATION GUIDE
IDENTIFYING YOUR OPERATING SYSTEM
Windows
1. Right click the My Computer icon on your desktop, and go to
Properties.
2. The System Properties Box will appear.
The information about your computer is listed under the system
area.
3. Confirm that your computer is running one of the following
operating systems and proceed to the page in the chart for
installation instructions:
System Proceed to page
Windows 98, Windows 98 Page 44
Second Edition
Windows 2000 Page 46
Windows Millennium Edition, Page 47
Windows XP Home Edition,
Windows XP Professional Edition,
Windows XP Media Center Edition
4. Press to close the window.
If the My Computer icon is not on your desktop, click Control Panel icon from the Start Menu
and double click on the System icon to open the System Property Box.
Macintosh
1. In the Apple Menu on the Menu bar, select About this Computer.
2. A window will appear with the computers operating system version. Confirm that your
computer is version 9 or higher.
No installation of software is necessary for Macintosh users, please go to Page 51 to connecting
your camera to the computer.
O
K
Downloaded from www.Manualslib.com manuals search engine
44
INSTALLATION GUIDE
INSTALLING THE DRIVER AND DIRECTX 9 – WINDOWS 98/98SE
NOTE: Do not connect the camera to your computer before the camera drivers and Microsoft
DirectX 9 installation is completed.
Step 1 Make sure your camera is powered off and not connected to the computer.
Step 2 Make sure the computer is powered on and Windows 98 or 98SE is running.
Step 3 Close any other applications or software you may be running.
Step 4 Insert the CD-ROM included in your camera’s packaging into your computer’s
CD-ROM Drive.
NOTE: If the installer does not start automatically within 30 seconds after the
CD-ROM has been inserted, click on "My Computer" either on the Desktop or
in the Start Menu and locate the CD-ROM Drive. Double click on the CD-ROM
Drive icon for installation. Double-click on the file named Install and proceed
to Step 5.
Step 5 The installation screen will appear,
Click on Install Camera Drivers
Step 6 Click [Next >].
Step 7 The next dialog will prompt you to select
the components that will be installed.
USB Mass Storage Driver and DirectX 9
will be preselected. The files will be saved
in the Concord Eye-Q 3340z directory
automatically.
OR
You may change the default folder by
clicking [Browse…] and selecting a
different folder in your computer.
Click [Next >]
Downloaded from www.Manualslib.com manuals search engine
45
INSTALLATION GUIDE
Step 8 Click [Install]
Step 9 Install progress bar
Step 10 The next screen will begin the DirectX
setup. Click [Next >]
Step 11 Click [Next >]
Step 12 Click [Finish]
Your computer will automatically
reboot.
Downloaded from www.Manualslib.com manuals search engine
46
INSTALLATION GUIDE
INSTALLING DIRECTX 9– WINDOWS 2000
Step 1 Make sure your camera is powered off and not connected to the computer.
Step 2 Make sure the computer is powered on and Windows 2000 is running.
Step 3 Close any other applications or software you may be running.
Step 4 Insert the CD-ROM included in your camera’s packaging into your computer’s
CD-ROM Drive.
NOTE: If the installer does not start automatically within 30 seconds after the
CD-ROM has been inserted, click on "My Computer" either on the Desktop or in the
Start Menu and locate the CD-ROM Drive. Double click on the CD-ROM Drive icon
for installation. Double-click on the file named Install and proceed to Step 5.
Step 5 The installation screen will appear, click
on Install Microsoft DirectX 9.0
Step 6 The next screen will begin the DirectX
setup. Click [Next >]
Step 7 Click [Next >]
Step 8 Click [Finish]
Your computer will automatically reboot.
Downloaded from www.Manualslib.com manuals search engine
47
INSTALLATION GUIDE
INSTALLING ARCSOFT PHOTOIMPRESSION – ALL WINDOWS USERS
Step 1 Make sure your camera is powered off and not connected to the computer.
Step 2 Make sure the computer is powered on and Windows is running.
Step 3 Close any other applications or software you may be running.
Step 4 Insert the CD-ROM included in your camera’s packaging into your computer’s
CD-ROM Drive.
NOTE: If the installer does not start automatically within 30 seconds after the
CD-ROM has been inserted, click on "My Computer" either on the Desktop or
in the Start Menu and locate the CD-ROM Drive. Double click on the CD-ROM
Drive icon for installation. Double-click on the file named Install and proceed to
Step 5.
Step 5 The installation screen will appear, Click
on Install ArcSoft PhotoImpression
2000
Step 6 The Set- Up language window will appear,
select the language from the drop down box and
click OK.
Step 7 Click [Next >]
Step 8 Click [Yes]
Downloaded from www.Manualslib.com manuals search engine
48
INSTALLATION GUIDE
Step 9 Click [Next >]
Step 10 Make sure all two applications are checked
and then click [Next >]
Step 11 Click [Next >]
Step 12 The screen will show the status of the
installation
Step 13 Click [Finish]
Downloaded from www.Manualslib.com manuals search engine
49
INSTALLATION GUIDE
INSTALLING ADOBE ACROBAT READER 5.1- ALL WINDOWS USERS
(OPTIONAL)
Step 1 Make sure your camera is powered off and not connected to the computer.
Step 2 Make sure the computer is powered on and Windows is running.
Step 3 Close any other applications or software you may be running.
Step 4 Insert the CD-ROM included in your camera’s packaging into your computer’s
CD-ROM Drive.
NOTE: If the installer does not start automatically within 30 seconds after the
CD-ROM has been inserted, click on "My Computer" either on the Desktop or
in the Start Menu and locate the CD-ROM Drive. Double click on the CD-ROM
Drive icon for installation. Double-click on the file named Install and proceed to
Step 5.
Step 5 The installation screen will appear,
Click on Install Adobe Acrobat
Reader 5.1
Step 6 Status bar.
Step 7 Click [Next >].
Downloaded from www.Manualslib.com manuals search engine
50
INSTALLATION GUIDE
Step 8 The files will be saved into C:\Program
Files\Adobe\Acrobat 5.1 automatically.
OR
You may change the default folder by
clicking [Browse…] and selecting a different
folder in your computer.
Click [Next >]
Step 9 Installation progress
Step 10 Select Yes, to restart the computer or No, to
restart the computer later.
Click [Finish >]
Downloaded from www.Manualslib.com manuals search engine
CONNECTING THE CAMERA TO THE COMPUTER
NOTE: Do not connect the camera to your computer before the camera drivers and Microsoft
DirectX 9 installation is completed.
1. Power the camera off.
The batteries must be in the camera.
2. Connect the camera to the computer with the Mini-USB cable
provided.
Plug the larger end of the Mini-USB cable that is included with the
camera into your PC’s USB port. (Please refer to your computer’s
documentation for more information on the location of the USB
port.)
Plug the small end of the Mini-USB cable into the USB port located
in the Cable Connection panel on the side of the camera.
3. When the camera is connected to the computer for the first time, the camera USB Mass
Storage driver installation will begin. Please follow the on-screen instructions to complete the
installation.
DOWNLOADING PICTURES AND VIDEO CLIPS ONTO YOUR COMPUTER
Note: Windows 98/98SE users must install the camera driver first. Page 44
Note: Windows 2000 users must install DirectX 9 to view video clips on the computer. Page 46
Downloading files from the camera:
Internal memory: Do not insert the memory card.
Memory Card: Insert the memory card.
Caution: Do not attempt to open the battery/memory door to insert or remove the memory
card and/or batteries when the camera is connected to the computer.
FOR WINDOWS USERS
Downloading Pictures and Video Clips onto your computer:
1. Connect the camera to the computer.
2. Double-click on My Computer.
3. Double-click Removable Disk.
4. Double-click DCIM.
5. Double-click 100CD330.
The stored pictures (JPG) and video clips (AVI) stored in the internal memory or the
memory card will be displayed
6. Click and drag the files into a directory in your computer to save them.
To select all files, click Edit > Select all.
51
Downloaded from www.Manualslib.com manuals search engine
52
CONNECTING THE CAMERA TO THE COMPUTER
FOR MACINTOSH USERS
1. Connect the camera to the computer. (p.51)
After a few moments, the external hard drive will appear on the desktop.
2. Double-click the “untitled” removable drive that is on your desktop.
3. Double-click DCIM.
4. Double-click 100CD330.
The stored pictures (JPG) and video clips (AVI) stored in the internal memory or the
memory card will be displayed.
5 . Drag and drop the image you want to save in the computer.
To select all files, click Edit > Select all.
Note: You may also transfer the stored pictures and video clips on your memory card onto
your computer by using a memory card reader (sold separately.)
USING ARCSOFT PHOTOIMPRESSION
Windows Only
1. Connect the camera to the computer. (p.51)
2. Launch ArcSoft PhotoImpression software
by clicking on Start-Programs-ArcSoft
Camera Suite and choosing
PhotoImpression from the application list on
your screen.
3. When the Application opens.
4. Click on the [Camera/ Scanner] button.(a)
5. Click on the drop-down list under Select
Source and choose Concord Camera.(b)
6. Click on the Camera/ Scanner Icon. (c)
A second window will appear showing
the contents (pictures) in the internal
memory or the memory card, and options
on how to handle them. (d)
7. Select the picture you would like to view, edit or save by clicking on it. The
selected image will be highlighted by a border. You may also click on Select All
(f) to choose all pictures.
8. Click on Get Photos (e).
9. The pictures will then be added to your album at the bottom of the application
(g). To access these, click CLOSE on the Camera Controls windows. Doubleclic
on the thumbnail to open.
10.You may now edit, save, print or further enhance your pictures using the buttons
on the left hand side of the screen. Please refer to ArcSoft's Software help
secton for a tutorial on all the features PhotoImpression offers.
Downloaded from www.Manualslib.com manuals search engine
53
CONNECTING THE CAMERA TO THE COMPUTER
UNPLUGGING YOUR CAMERA FROM THE COMPUTER
Windows 98/98SE:
1. Double-click on My Computer
2. Right-click on Removable Disk to display the menu.
3. Click on Eject in the menu.
4. Unplug the Mini-USB from the camera.
Windows ME/2000/XP:
1. Turn the camera off.
2. Click once on the "Unplug or Eject Hardware" icon on the right hand
side of your task bar. (fig.1.1)
3. Select “Stop Concord Eye-Q 3340z USB Mass Storage Device”
4. Click [OK] in the “Safe to Remove Hardware” prompt.
5. Unplug the Mini-USB from the camera. (fig.1.2)
Macintosh:
1. Drag the “untitled” removable drive icon on the desktop to the Trash.
2. Unplug the Mini-USB cable from the camera.
fig.1.1
fig.1.2
Downloaded from www.Manualslib.com manuals search engine
54
TV MODE
TV MODE - VIEWING AND DELETING YOUR FILES ON TV
The camera allows you to view individual files and record clips on the television. To begin, check
your television documentation to determine what video standard you should set your camera to
either NTSC or PAL.
Changing the TV Mode setting:
1. Slide the Mode Switch to ( ).
2. Press MENU to view the ( ) Main Menu.
3. Press the joystick until Setup is highlighted.
4. Press the joystick to enter the Setup menu.
5. In the Setup menu press the joystick until TV is highlighted
6. Press the joystick to enter the TV submenu.
7. Press the joystick to change the setting to NTSC or PAL.
8. Press MENU to exit.
Note: If the TV is not properly grounded, the camera may malfunction while it is connected
to the TV. Press the shutter button OR press the reset button with a pointed object such as a
pen, then turn the camera off then back on with the On/Off switch. Please contact your TV
service provider for more information on grounding your TV.
White Balance
EV Compensatiion
Setup
RETURN SELECT
CAMERA MODE
+
Set Auto OFF Time
TV Option
Speaker
Language Option
Restore Default
RETURN SELECT
SETUP
T
NTSC
PAL
RETURN SET
TV OPTION
OK
Downloaded from www.Manualslib.com manuals search engine
55
TV MODE / ERROR MESSAGES
CONNECTING THE CAMERA TO THE TELEVISION
Connecting the camera to the television:
1. Connect the TV-Out cable into the jack marked VIDEO or VIDEO IN
on your television.
2. Turn on your television.
3. Set the television to video mode according to the instructions in the
owner’s manual. (This is usually channel 3, 4 or AV).
4. Turn the camera on by sliding the On/Off Switch.
5. Connect the other end of the cable into the VIDEO port located in the
cable connection panel. (fig.1.1)
Using the TV as a Live Viewfinder:
1. Connect the camera to the TV.
2. Turn the camera on.
3. Slide the Mode Switch to ( ).
4. The TV will become a live viewfinder.
Note: You may record your TV Mode session by using your VCR. Please refer to your VCR
documentation to learn more about recording.
Reviewing pictures and video clips on your TV:
1. In TV Mode, slide the Mode Switch to ( ).
2. Press the joystick to scroll through the saved pictures and video clips.
3. To customize your camera settings and to view more options, press MENU to display the TV
Menu on the TV screen.
The TV menu will display the same Delete menu and Setup menu used in the camera.
Please refer to pages 30 and 33 for further information.
Viewing video clips:
1. When an AVI file is displayed on the TV, press to view.
ERROR MESSAGES
Error Messages on the LCD indicate if the memory is full or if there is a problem with the
memory.
Note: If the internal memory or the memory card is corrupted, the LCD will read ERROR!
The memory needs to be formatted. Please format all files to continue. (Page.38)
fig.1.1
O
K
07 04 2003 02:40
Memory Error
07 04 2003 02:40
Memory Full
07 04 2003 02:40
Card Full
fig.1.2
fig.1.3
fig.1.1
Downloaded from www.Manualslib.com manuals search engine
56
TROUBLESHOOTING
TROUBLESHOOTING
POSSIBLE CAUSE
Batteries were not installed
correctly
Batteries are dead or weak
Batter compartment door was
not closed correctly
The camera needs to be reset.
The batteries are drained of
power.
The Auto time off setting is too
short.
Poor Lighting.
Lens is dirty.
Subject too close.
Subject is too close.
The flash is not needed.
Lighting condition is too bright.
SYMPTOM
Cannot turn on the camera
The camera/buttons do not
work.
The camera turns off
during usage.
Picture/Video clip has poor
image quality
Flash picture taken is too
light.
POSSIBLE SOLUTION
Install batteries correctly using
the direction indicators on the
inside of the battery door.
Replace batteries
Close the battery compartment
properly.
Press the reset button on the
back of the camera with a pointed
object such as a pen, then power
the camera on and off.
Replace the batteries with new
ones.
Your camera comes with an Auto
Time Off setting, so if the camera
is inactive for a certain amount of
time, it powers off to conserve
battery power. Please refer to the
Time-Out section on p.36. to set
your time limit.
Increase the lighting in the
surrounding area when taking
picture and video clips.
Clean the lens with a soft cloth.
See the Camera Maintenance
section.
Stand at least 3.9 ft. (1.2m) away
from the subject.
Move the subject further away
from the camera.
Change the camera setting to
Auto Flash. See p.15.
Decrease exposure
compensation. See p.25.
CAMERA
PICTURES/VIDEO CLIPS
TAKING PICTURES
Downloaded from www.Manualslib.com manuals search engine
TROUBLESHOOTING
57
POSSIBLE CAUSE
The subject is too far away for
the flash to be affective.
Flash is not on.
The subject is in front of a
bright light.
Lighting condition is too dark.
There was sufficient flash for the
picture and the flash did not fire.
This happens when the camera
is set to Auto Flash.
Camera’s flash has been turned
off.
Flash did not charge.
Subject or camera was moved as
the picture was taken.
The focus was not locked
before taking the picture.
White balance is not set
properly.
Memory is full
Camera is not set in
picture/video clip taking mode.
Power is off.
Camera is in Auto Power off
mode.
SYMPTOM
Flash Picture taken is too
dark.
Flash did not work.
Picture taken is blurry.
There is something wrong
with the color of your
photographs.
Cannot take a picture or a
video clip
POSSIBLE SOLUTION
Move the subject closer to the
camera, or move the camera
closer to the subject.
Turn the flash On.
Change the subject's position.
Increase the exposure
compensation. See p.25.
This is normal as your cameras
electronic light sensor is
programmed to only fire the
flash when needed.
Turn the flash to Auto flash.
Verify that the Ready LED has
stopped blinking before taking
a picture.
Hold camera steady until
picture is taken.
Before taking a picture, press
the shutter button half-way to
lock the focus, and press the
shutter button fully to capture
the picture. (p.14)
Reset the white balance
feature to Auto, or for the
specific lighting in the
surrounding area.
Delete all pictures and continue
shooting.
Download the stored files to
your PC and delete the files
from the cameras internal
memory or memory card.
Insert a memory card with
sufficient memory available.
Set the camera to the proper
mode for recording video clips,
or taking photographs.
Turn the Power on.
Turn the power on.
Downloaded from www.Manualslib.com manuals search engine
58
TROUBLESHOOTING
POSSIBLE CAUSE
The SD card is locked or write
protected.
Viewfinder is dirty.
Viewfinder needs to be
focused.
Something was blocking the
lens when taking the picture.
The picture was not centered
correctly in the viewfinder.
The battery level is low and
the camera does not have
sufficient power to complete
picture capture.
The camera is not turned on.
The camera is processing a
picture; the ready LED light is
still blinking.
Protective plastic film still in
place on the camera.
The LCD brightness level is
set too low.
Protective plastic film still in
place on the camera.
LCD is turned off.
The battery level is low.
Video playback files are
missing.
SYMPTOM
Cannot take a picture or a
video clip when using an
SD memory card
Picture is blurred when
looking through the
viewfinder.
Part of the picture/ video
clip is missing.
Camera is not responding
during picture capture.
The shutter button does
not work.
The LCD display is dark.
The LCD screen looks
milky and/or scratched.
The LCD is not displaying
anything.
Cannot playback stored
video clips on the
computer
POSSIBLE SOLUTION
Remove the SD card from the
card slot and slide the lock
switch to off.
Clean the viewfinder with a soft
cloth or cotton swab. See the
Camera maintenance section.
Use the diopter wheel next to
the viewfinder to adjust the
focus.
Keep hands, fingers, etc. away
from the lens when taking a
picture.
Leave space around the
subject when centering the
picture in the viewfinder.
Replace batteries.
Turn the camera on.
Wait until the light stops
blinking before attempting to
take another picture.
Make sure the protective
plastic film covering the LCD
during shipment, has been
removed.
Increase the brightness level
on your LCD to meet your
personal needs. See p.38 for
setting the brightness.
Make sure the protective
plastic film covering the LCD
during shipment, has been
removed.
Turn the LCD on,
by pressing ( )
Replace the batteries.
Install Microsoft DirectX 9.
(p.44)
LCD
VIEWING VIDEO CLIPS ON THE COMPUTER (WINDOWS 98/98SE/2000)
Downloaded from www.Manualslib.com manuals search engine
59
TROUBLESHOOTING
POSSIBLE CAUSE
The operating system may not
be allocating adequate
resources to download the
pictures.
The Mini-USB cable is not
plugged into the camera.
The Mini-USB cable is not
plugged into the computer.
The computer is not powered
on.
The Software is not installed on
the computer.
Software is not fully or correctly
installed on the computer.
The card may not be SD
certified.
The card may be corrupted.
No card is inserted in the
camera.
SYMPTOM
Camera is not
responding during
picture download to the
PC.
Cannot transfer pictures
to the computer. The
New Hardware Wizard
cannot locate drivers.
(Windows 98/98SE)
The camera does not
recognize your SD Card.
POSSIBLE SOLUTION
Reset the camera by pressing
the reset button with a pointed
object such as a pen. Reboot
the computer.
Check that the Mini-USB cable
is plugged into the camera.
Check that the USB cable is
plugged into the computer.
Turn your computer on.
Disconnect the Mini-USB cable
from the camera and the
computer. Install the camera
software and drivers. (p.44)
Disconnect the Mini-USB cable
from the camera and the
computer. Uninstall the
software: Start-Settings-Control
Panel-Add/ Remove Programs.
Re-install the camera drivers.
See p.44.
Purchase a certified SD card.
Reformat the card. Caution:
Formatting erases all pictures
on the card. (p.38)
Insert a card into the card slot.
See p.9.
SD CARDS
INSTALLING SOFTWARE AND DRIVERS
Downloaded from www.Manualslib.com manuals search engine
60
GETTING HELP
GETTING HELP
You can get help from our troubleshooting section, FAQ on our website or by contacting a customer
support representative.
Troubleshooting Section
If you need help with your camera, refer to the Troubleshooting section of this manual on page p.57
Website Customer Support/FAQ
Please visit our customer support website at: www.support.concord-camera.com to view the
FAQ section. Most support issues are answered in the Frequently Asked Questions (FAQ) section.
Customer Support
Before You E-mail or Call us
If you have questions concerning the operation of the camera or software installation, you can
speak to or e-mail a customer service representative. Please have the following information
available:
Camera Information: Computer Information:
Name of camera model Operating System
Camera Serial Number Processor Speed (MHz)
Camera Info in camera (p.33): Computer Make and Model
FW Version Amount of memory
FW Part Number Exact Error message received
Date CD-ROM Part Number
Comment
For Camera Support please contact:
Toll Free in the US and Canada:
• (866) 522-6372
Monday – Friday 8:00am – 8:00pm
Saturday: 9am – 5pm
Sunday: 12pm – 4pm
Web: www.concord-camera.com
Email:
support@concord-camera.com
For ArcSoft Technical Support on Photo Editing Software, please contact:
In the USA and Canada: In Europe:
ArcSoft, Inc. Arcsoft, Inc.
46601 Fremont Blvd. Unit, Shannon Industrial
Fremont, CA 94538 Estate
Monday – Friday Shannon, Co. Clare, Ireland
8:30AM - 5:30PM (PST) Tel: +353 (0) 61 702087
Tel: (510) 440-9901 Fax: +353 (0) 61 702001
Fax: (510) 440-1270 E-mail: europe@arcsoft.com
Web: www.arcsoft.com
E-mail: support@arcsoft.com
Note: Working hours are subject to change without prior notice.
Toll Free in Europe:
• UK: 0800-1696482
• Spain: 900-973195
• Germany: 0800-1800563
• Italy: 800-781883
• France: 0800-917599
Toll:
• 31-53-4829779
Monday – Friday 09:00 – 18:00
Saturday & Sunday: closed
(Central European Time)
Email:
support@concord-camera.com
Downloaded from www.Manualslib.com manuals search engine
61
CAMERA SPECIFICATION
CAMERA SPECIFICATIONS
Sensor
Image Resolution
Lens
Zoom
Focusing Range
Exposure
Internal Memory
Removable
Storage
Output Picture
File Format
Viewfinder
Self-Timer
Flash Unit
Power Source
Connectivity
System
Compatibility
Video Clips
Dimensions
PC Software
Accessories
3.1 Megapixels (2048 x 1536 resolution), 1/2.7" CCD sensor
2048 x 1536 3.1 Megapixels
1600 x 1200 2 Megapixels
1280 x 960 1.2 Megapixels
640 x 480 VGA
5.8 - 17.4 mm f/2.8 - f/4.3, 3x Optical Zoom with bent light path, 12
elements all glass
3x Optical Zoom and 4x Digital Zoom
Auto focus from 0.5 m(1.6 feet) to infinity, macro from approx. 10cm
Auto exposure and auto white balance with manual presets
16 MB non-volatile memory
SD memory card slot
JPG/EXIF
Optical 3x Zoom viewfinder with 80% coverage
Approximately 10 seconds with blinking red LED
Flash off, auto flash, fill-in flash, red-eye reduction and night mode
2x AA Batteries
Mini-USB connection direct to PC or Mac SD connection to SD card reader
Video connection direct to TV (NTSC/PAL)
Windows 98, 98SE, 2000, ME, XP and Mac OS 9.0, 9.1, 9.2, 9.3 and X or
later
QVGA resolution, 30fps, AVI (Motion JPEG) format
113mm x 56mm x 30mm
ArcSoft PhotoImpression, Adobe Acrobat Reader 5
CD-ROM for Windows:
Camera Drivers
Microsoft DirectX 9
ArcSoft PhotoImpression 2000
Adobe Acrobat 5
–View User's Guide (Multilingual)
–Visit Concord Support Web Site
Multilingual User’s Guide
Multilingual Quick Start Guide
Mini-USB Cable
TV Cable
Wrist Strap
Pouch
2 x NiMH AA Rechargeable Batteries
Kimba UGuide(big size)-E1 4/30/04 10:09 AM Page 59
Downloaded from www.Manualslib.com manuals search engine
62
SAFETY TIPS AND MAINTENANCE
Cleaning the camera body:
1. Please use a soft dry cloth to clean the camera.
Cleaning the lens, viewfinder and LCD:
1. Blow off dirt or dust with a blower or canned air.
2. Gently wipe the lens, viewfinder and/or LCD with a micro-fiber cloth.
3. To remove dirt or residue, moisten the cloth with lens cleaning fluid and gently wipe the lens,
viewfinder and/or LCD.
CAUTION: Do not apply the fluid directly onto the lens, viewfinder or LCD.
Safety Tips
Precautions for the camera:
Do not attempt to modify this camera in any way. This may cause a fire or electric shock or
severe damage to the camera.
Do not use the flash in close proximity to people or animals. Positioning the flash too close to
your subject's eyes may cause eyesight damage.
When taking photographs, never point the lens of the camera directly into very strong light.
This may result in permanent damage to the camera or your eyesight.
Please do not use this product in close proximity to flammable or explosive gases as this
could increase the risk of explosion.
For safety reasons keep this product and accessories out of reach of children or animals to
prevent accidents.
Do not swallow batteries or small camera accessories.
Keep the camera away from water and other liquids, and never let it get wet. Do not use
outdoors when it is raining or snowing.
Should any form of liquid enter the camera, do not use it. Switch the camera off, and then
remove the batteries. Do not continue to use the camera as this may cause a fire or electric
shock.
Do not insert or drop metallic or inflammable foreign objects into the camera through access
points e.g. card slot and battery chamber. This may cause a fire or electric shock.
Do not operate this camera with wet hands. This could pose a risk of electric shock.
Under the environment with electrostatic discharge, the camera may malfunction and require
the user to reset the camera.
Shielded cables must be used with this unit to ensure compliance with the Class B FCC
limits.
Please avoid using the camera in high or low temperature. Operation temperature range
32ºF - 104ºF (0ºC - 40ºC).
It is normal that the temperature of the camera body rises after being in use for a long period.
Do not leave this camera in places subject to extremely high temperatures such as in a
sealed vehicle, direct sunlight or other places with extreme variances in temperature.
Exposure to extreme temperatures may adversely affect the camera's internal components
and could cause a fire.
Always use the camera and its accessories in a well-ventilated area.
Downloaded from www.Manualslib.com manuals search engine
63
SAFETY TIPS AND MAINTENANCE
Precautions for batteries:
Use 2x AA batteries only.
Dispose of the batteries in a manner that complies with applicable laws.
Leakage, overheating, or burst batteries could result in fire or injury.
Do not short circuit, heat or dispose of batteries in fire.
Do not use old batteries with new ones, or mix brands of batteries.
Ensure the batteries are positioned correctly with regard to polarity (+/-).
Allowing dust to accumulate in the camera over a long period is hazardous and in extreme
circumstances may cause a fire. It is best to clean your camera prior to seasonal periods of
high humidity.
Batteries may lose power if kept inside the camera for a long time without using. Please
remove the batteries while the camera is not in use.
Do not use manganese batteries as they cannot supply sufficient power to support the
camera's operations. Batteries may not work normally under 32ºF (0ºC).
Precautions for SD Memory Cards:
In the event of malfunction or damage, it is possible that data may be lost. Concord Camera
is not responsible in any way for such data loss.
Do not touch the terminals with hands or metal objects.
Keep dust, water and foreign objects away from the terminal section.
Avoid heat, liquid and direct sunlight when using and for storage.
Do not open the battery/card cover or remove the SD Memory Card while data is being read
or written.
Do not dismantle or modify.
The recorded data may be lost if the card is affected by strong static electricity or electrical
shock, or during card repair or malfunction.
When using SD Memory Cards do not change the attributes (read-only, etc.) of the files
(pictures (JPEG) or video clips (AVI) on the card. Doing so may prevent the camera from
working properly when deleting, etc.
Do not change the file names or the directory name of the pictures or video clips using a
computer or save files other than pictures or video clips taken by this camera onto the SD
memory card. Pictures or video clips that have been edited or added to the SD memory card
with the computer may not play back and it may cause the camera to malfunction.
The SD Memory Card includes a write-protect switch. Sliding this switch downward prevents
data from being written to the card and pictures and video clips saved on the card are
protected.
Please note that pictures and video clips cannot be taken or deleted when the write-protect
switch is on.
When using a large-capacity card, writing, reading and deletion may take some time.
Do not store the card in places with high humidity, dusty places or where static electricity or
electromagnetic fields are likely to occur.
Images stored in the memory card may be ruined or damaged if you turn off the camera while
it is in process of reading, writing or formatting etc.
SD cards are delicate electronic devices. Please do not bend or drop them
Please do not place the SD card in or near to an environment of strong electronic or magnetic
fields such as loud speakers or TV receivers.
Please keep the SD card in its bag or case when not in use.
It's normal that the SD card is warm after use.
Please make sure you switch off the camera before you remove the SD card.
Do not open the battery/memory card door or remove the SD Memory Card while the camera
is reading, writing or formatting the card.
Downloaded from www.Manualslib.com manuals search engine
64
REGULATORY INFORMATION
FCC INFORMATION
FCC WARNING: This equipment meets the limits for a Class B digital device, pursuant to Part
15 of FCC rules. Only the cable supplied with the camera should be used. Operation with other
cables is likely to result in interference to radio and TV reception and could void the user’s
authorization to operate this equipment. This device complies with Part 15 of the FCC Rules.
Operation is subject to the following two conditions:
This device may not cause harmful interference.
This device must accept any interference received, including interference that may cause
undesired operation.
Tested to comply
with FCC standards
for HOME OR OFFICE USE
Changes or modifications not expressly approved by the manufacturer may void the user’s
authority to operate this equipment.
USER INFORMATION
NOTE: This equipment has been tested and found to comply with the limits for a class B digital
device, pursuant to Part 15 of the FCC Rules. These limits are designed to provide reasonable
protection against harmful interference in a residential installation. This equipment generates,
uses and can radiate radio frequency energy and, if not installed and used in accordance with
the instructions, may cause harmful interference to radio communications. However, there is no
guarantee that interference will not occur in a particular installation.
If this equipment does cause harmful interference to radio or television reception, which can be
determined by turning the equipment on and off, the user is encouraged to try to correct the
interference by one or more of the following measures:
Reorient or relocate the receiving antenna.
Increase the separation between the equipment and receiver.
Connect the equipment into an outlet on a circuit different from that to which the receiver is
connected.
Consult the dealer or an experienced radio/TV technician for help.
VCCI INFORMATION
This is a Class B product, to be used in a domestic environment, based on the Technical
Requirement of the Voluntary Control Council for Interference (VCCI) from Information
Technology Equipment. If this is used near a radio or television receiver in a domestic
environment, it may cause radio interference. Please install and use the equipment according to
this instruction manual.
- This product is in conformity with Directive 89/336/EEC.
Concord, Concord Eye-Q and the Concord Eye-Q logo are registered trademarks or trademarks of Concord Camera
Corp., in the United States and/or other countries. Microsoft and Windows are either registered trademarks or
trademarks of Microsoft Corporation in the United States and/or other countries. Mac and Macintosh are registered
trademarks or trademarks of Apple Computer, Inc. in the U.S. and other countries. All other brands and product names
are either registered trademarks or trademarks of their respective owners.
Downloaded from www.Manualslib.com manuals search engine
Visit Concord on the Internet
www.concord-camera.com
Concord Eye-Q 3340z User’s Guide
Copyright 2003 Concord Camera Corp.
Downloaded from www.Manualslib.com manuals search engine
64

Hulp nodig? Stel uw vraag in het forum

Spelregels

Misbruik melden

Gebruikershandleiding.com neemt misbruik van zijn services uitermate serieus. U kunt hieronder aangeven waarom deze vraag ongepast is. Wij controleren de vraag en zonodig wordt deze verwijderd.

Product:

Bijvoorbeeld antisemitische inhoud, racistische inhoud, of materiaal dat gewelddadige fysieke handelingen tot gevolg kan hebben.

Bijvoorbeeld een creditcardnummer, een persoonlijk identificatienummer, of een geheim adres. E-mailadressen en volledige namen worden niet als privégegevens beschouwd.

Spelregels forum

Om tot zinvolle vragen te komen hanteren wij de volgende spelregels:

Belangrijk! Als er een antwoord wordt gegeven op uw vraag, dan is het voor de gever van het antwoord nuttig om te weten als u er wel (of niet) mee geholpen bent! Wij vragen u dus ook te reageren op een antwoord.

Belangrijk! Antwoorden worden ook per e-mail naar abonnees gestuurd. Laat uw emailadres achter op deze site, zodat u op de hoogte blijft. U krijgt dan ook andere vragen en antwoorden te zien.

Abonneren

Abonneer u voor het ontvangen van emails voor uw Concord EYE Q 3340 Z bij:


U ontvangt een email met instructies om u voor één of beide opties in te schrijven.


Ontvang uw handleiding per email

Vul uw emailadres in en ontvang de handleiding van Concord EYE Q 3340 Z in de taal/talen: Engels als bijlage per email.

De handleiding is 1,69 mb groot.


U ontvangt de handleiding per email binnen enkele minuten. Als u geen email heeft ontvangen, dan heeft u waarschijnlijk een verkeerd emailadres ingevuld of is uw mailbox te vol. Daarnaast kan het zijn dat uw internetprovider een maximum heeft aan de grootte per email. Omdat hier een handleiding wordt meegestuurd, kan het voorkomen dat de email groter is dan toegestaan bij uw provider.

Stel vragen via chat aan uw handleiding

Stel uw vraag over deze PDF

Uw handleiding is per email verstuurd. Controleer uw email

Als u niet binnen een kwartier uw email met handleiding ontvangen heeft, kan het zijn dat u een verkeerd emailadres heeft ingevuld of dat uw emailprovider een maximum grootte per email heeft ingesteld die kleiner is dan de grootte van de handleiding.

Er is een email naar u verstuurd om uw inschrijving definitief te maken.

Controleer uw email en volg de aanwijzingen op om uw inschrijving definitief te maken

U heeft geen emailadres opgegeven

Als u de handleiding per email wilt ontvangen, vul dan een geldig emailadres in.

Uw vraag is op deze pagina toegevoegd

Wilt u een email ontvangen bij een antwoord en/of nieuwe vragen? Vul dan hier uw emailadres in.


Info