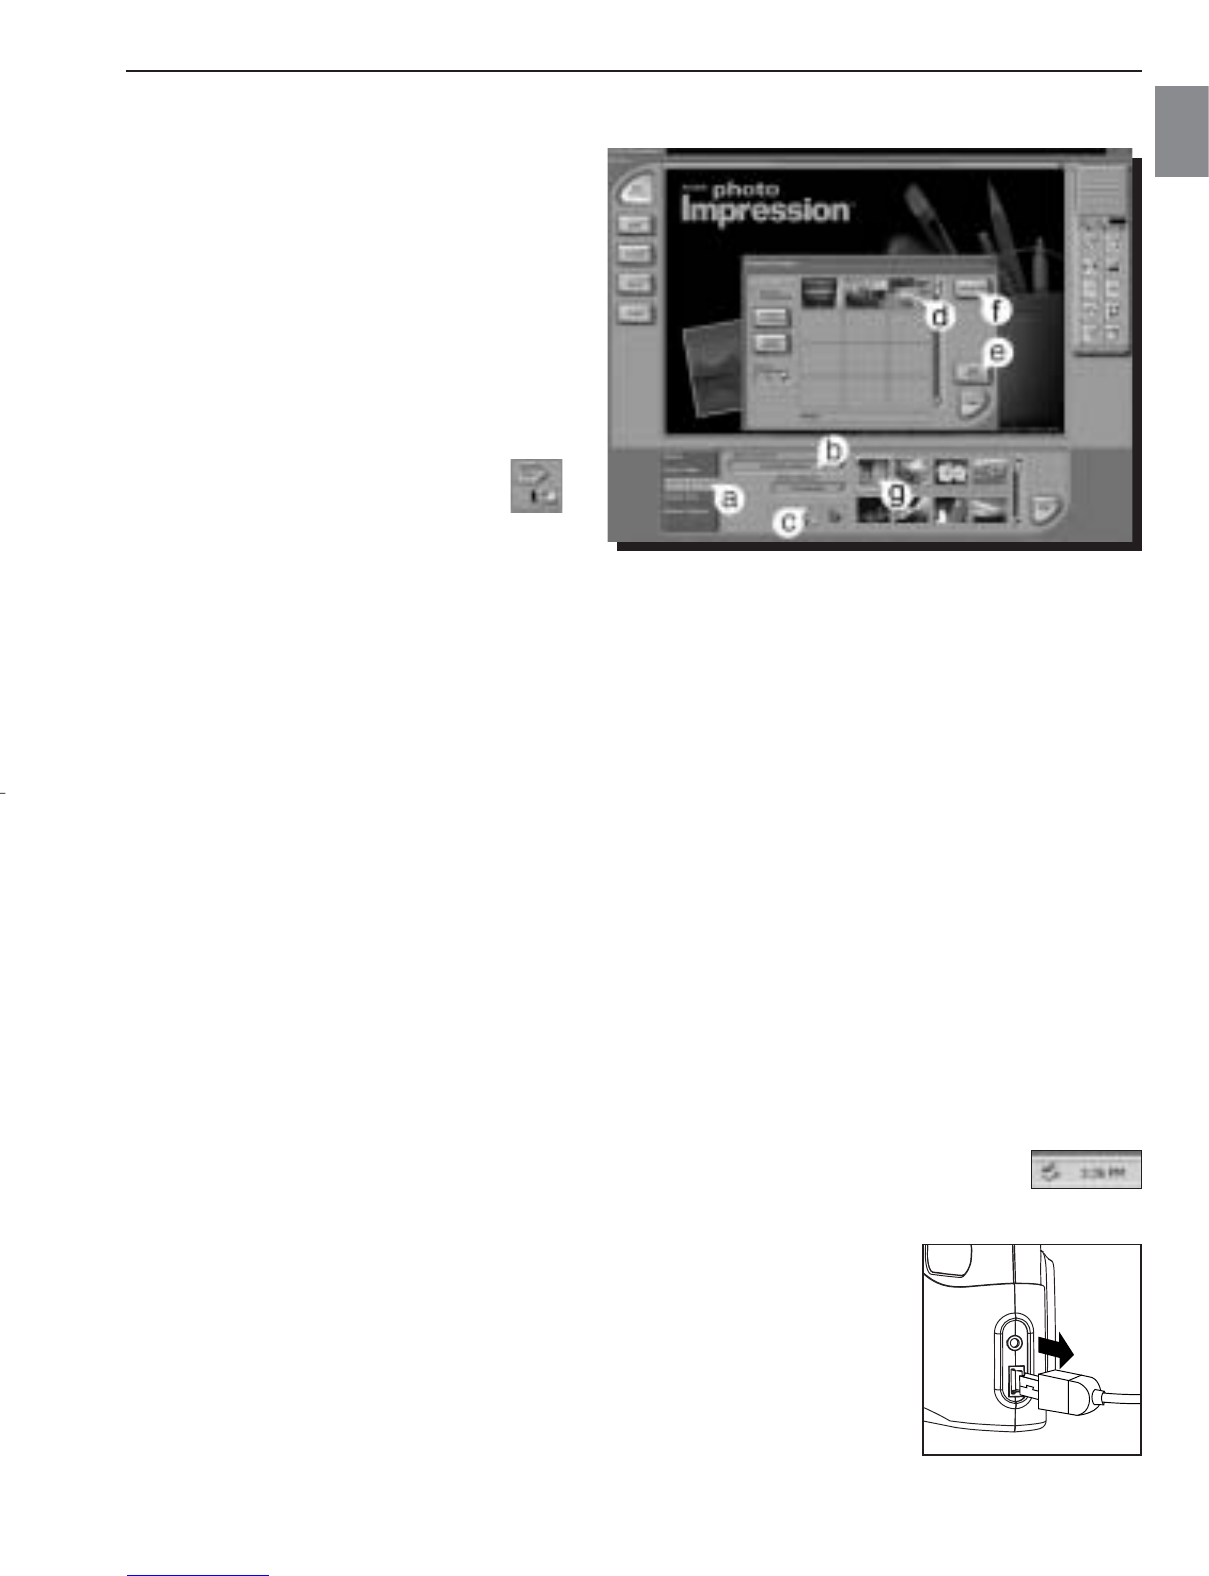
100830
15
Verklein
Vergroot
Pagina terug
1/51
Pagina verder
User’s Guide
User’s Guide
www.concord-camera.com
Downloaded from www.Manualslib.com manuals search engine
En
CONGRATULATIONS
Congratulations on the purchase of your new camera. Your camera
has been carefully engineered and manufactured to give you
dependable operation. Read this manual before operating the camera
to become more familiar with it.
This manual has been written and formatted with depth and detail so
that you can easily follow the instructions to maximize the features of
your camera.
ENGLISH
1
2040 Manual-4L (512950-00) 2003:09:06 2:05 PM Page 1
Downloaded from www.Manualslib.com manuals search engine
2
CAMERA OVERVIEW
En
CAMERA
CAMERA
OVER
OVER
VIEW
VIEW
Top/Front
Bottom/Back
2
4
5
6
7
8
1
3
A
AWB
1600
000/009
1x 2x 4x
9
14
15
16
17
20
18
19
10
11
12
13
A
AWB
1600
000/009
1x 2x 4x
LCD ICONS
A
AWB
E
H
I
A
B
C
D
G
F
1600
000/009
1x 2x 4x
1. Shutter Button
2. Viewfinder
3. Ir Filter and
Lens
4. Self-timer
LED
5. Flash
6. Flash Sensor
7. TV-out Port
8. Mini-USB Port
9. Flash Ready
10. LCD
11. LCD On/Off
Button
12. OK Button
13. Tripod Socket
14. Mode Slide
Switch
15. Power Button
16. Wrist Strap
Holder
17. Navigation
Button
18. Menu Button
19. Memory Card
Slot
20. Battery
Compartment
A: Camera Mode
B: Flash
C: White Balance
D: Battery Level
E: Quality
F: Resolution
G: Slef Timer
H: Memory Card
I: Frame Counter
2040 Manual-4L (512950-00) 2003:09:06 2:05 PM Page 2
Downloaded from www.Manualslib.com manuals search engine
En
3
TABLE OF CONTENTS
CAMERA OVERVIEW
Fop/Front ..............................................................................................................................2
Bottom/Back..........................................................................................................................2
LCD Icons ............................................................................................................................2
GETTING STARTED
Package Contents ................................................................................................................5
Camera Feature....................................................................................................................5
Attaching the Wrist Strap......................................................................................................5
Loading the Batteries............................................................................................................6
Checking the Battery Level ..................................................................................................6
Internal Memory / Inserting the Memory Card ....................................................................7
Turning the Camera On and Off ..........................................................................................8
Turning the LCD display On and Off ..................................................................................8
Setting the Camera’s Operational Mode ............................................................................9
TAKING A PICTURE
Taking a picture with the Viewfinder ..................................................................................10
Taking a picture with the LCD ............................................................................................11
Digital Zoom........................................................................................................................11
Using the Main Menu in Camera Mode..............................................................................12
Setting the Flash ................................................................................................................14
Self Timer............................................................................................................................15
Image Resolution................................................................................................................15
Image Quality......................................................................................................................16
White Balance ....................................................................................................................17
Exposure Compensation ....................................................................................................18
Taking Video Clips ..............................................................................................................18
REVIEWING YOUR FILES
Using Review Mode............................................................................................................19
Reviewing Video Clips........................................................................................................19
Enlarging Stored Images ....................................................................................................20
Deleting Your Files..............................................................................................................22
Using Thumbnail Mode ......................................................................................................23
CUSTOMIZING THE CAMERA SETTINGS
Setting the LCD Brightness ................................................................................................23
Setup Menu and Features ..................................................................................................25
Setting the Auto Off Time....................................................................................................25
Play Logo............................................................................................................................26
Setting the Language ........................................................................................................26
Formatting the Internal Memory or Memory Card ..............................................................27
Restore the Camera to Factory Default Settings................................................................28
2040 Manual-4L (512950-00) 2003:09:06 2:05 PM Page 3
Downloaded from www.Manualslib.com manuals search engine
En
4
INSTALLATION GUIDE
Computer System Requirements ......................................................................................29
Installation Requirements ..................................................................................................29
Identifying your Operating System ....................................................................................30
Using the Installer Splash Screen ......................................................................................30
Flow Diagram for Software Installation ..............................................................................31
Installing Driver and DirectX9 for Windows 98 User ..........................................................32
Installing DirectX9 for Windows 2000 User ........................................................................34
Installing ArcSoft PhotoImpression ....................................................................................35
Installing Adobe Acrobat Reader 5 ....................................................................................37
CONNECTING THE CAMERA TO THE COMPUTER
Connecting Your Camera to the Computer ........................................................................39
Downloading Pictures and Video Clips onto your Computer ............................................39
Using ArcSoft PhotoImpression ..........................................................................................40
Unplugging your camera from the computer ......................................................................40
TV MODE
Connecting the Camera to the Television ..........................................................................41
Using the TV as a Live Viewfinder ....................................................................................41
Reviewing Pictures and Video Clips on your TV................................................................42
ERROR MESSAGE ..................................................................................................................42
TROUBLE-SHOOTING ............................................................................................................43
GETTING HELP ........................................................................................................................46
CAMERA SPECIFICATIONS ....................................................................................................47
SAFETY TIPS AND MAINTENANCE
Safety Tips ..........................................................................................................................48
Precautions for the Camera................................................................................................48
Precautions for Batteries ....................................................................................................49
Precautions for Memory Card ............................................................................................49
REGULATORY INFORMATION................................................................................................50
2040 Manual-4L (512950-00) 2003:09:06 2:05 PM Page 4
Downloaded from www.Manualslib.com manuals search engine
5
GETTING STARTED
En
GETTING ST
GETTING ST
ARTED
ARTED
PACKAGE CONTENTS
Concord Eye-Q 2040 camera
Mini-USB Cable
TV Cable
•Wrist Strap
2-x AA Alkaline batteries
Camera Pouch
Users Guide
Quick Start Guide
•Warranty Card
CD-ROM for Windows
Camera drivers
Adobe Acrobat 5
ArcSoft PhotoImpression 2000
DirectX 9
User’s Guide (Multilingual)
CAMERA FEATURES
Stores approximately 9 Fine, 14 Normal or 47 Economy pictures in 1600 x 1200 resolution
with 7MB internal memory.
•Virtually unlimited storage using the removable MultiMediaCard (MMC) or Secure Digital
(SD) memory cards. Memory cards are sold separately.
1.5" Color LCD
Up to 4X Digital Zoom
•Video Clips
ATTACHING THE WRIST STRAP
Please attach the supplied strap to prevent dropping the camera.
A
AWB
1600
005/042
1
A
AWB
1600
005/042
3
2040 Manual-4L (512950-00) 2003:09:06 2:05 PM Page 5
Downloaded from www.Manualslib.com manuals search engine
LOADING THE BATTERIES
The camera uses 2x AA batteries.
1. Slide the Battery/Memory Card Door towards the center of the camera, and lift the
Battery/Memory Card Door to open.
2. Insert the batteries with the positive terminal toward the ( + ) sign, and the negative
terminal toward the ( – ) sign.
3. Close the battery/memory card door.
CHECKING THE BATTERY LEVEL
The battery level is displayed on the LCD.
(Green, Full) (Red, Low)
Note:
Remove the battery from the camera if it will not be used for an extended period of time
to prevent corrosion or battery leaks.
•To extend battery life, the camera will automatically power off after 60 seconds of
inactivity. To change this setting, please refer to page 25.
6
GETTING STARTED
En
The battery is full
and ready to use.
The battery is low
and it needs to
be replaced soon
fig.1.1 fig.1.2
fig.1.3
2040 Manual-4L (512950-00) 2003:09:06 2:05 PM Page 6
Downloaded from www.Manualslib.com manuals search engine
7
GETTING STARTED
En
INTERNAL MEMORY
The camera is equipped with 7MB of internal memory to store pictures and video clips in the
camera.
Status Memory in Use
Memory card is not inserted Internal Memory
Memory card is inserted Memory Card
How to Insert Memory Card
In addition to having a 7MB internal memory, the camera can use MultiMediaCard (MMC) or
Secure Digital (SD) memory cards to store images and video clips. Memory cards are sold
separately and can be purchased from major electronic or computer retailers.
1. Slide the Battery/Memory Card Door towards the center of the camera and lift the
Battery/Memory Card Door to open. (fig.1.1)
2. Insert the memory card into memory card slot with its metal contacts exposed side down
and its printed side facing outward. (fig.1.2)
3. Close the battery/memory card door. (fig.1.3)
NOTE!: When memory card is inserted, the images and video
clips stored in the internal memory will be transferred
automatically onto the memory card. Please insert a memory card
with 8MB or greater memory, or delete images. The camera can
support SD cards up to 512 MB. If the camera is turned on, the
LCD shows “transferring …” while transferring the pictures. After
that, the memory card indicator is shown on LCD, and the frame
counter number will be updated automatically. (fig.1.4) However, if the memory card
inserted is not recognizable, the card indicator will not be shown on LCD. In this case,
please re-insert the memory card correctly or to replace it with another one.
How to Take Out the Memory Card:
1. Slide the Battery/Memory Card Door towards the center of the
camera and lift the Battery/Memory Card Door to open.
2. Take the memory card out by finger tips. (fig.1.5)
3. Close the battery/memory card door.
005/042 005/042
005/042 005/042
A
AWB
1600
005/042
A
AWB
1600
A
AWB
1600
A
AWB
1600
005/042
A
AWB
1600
005/042
005/042
Press OK Play AVI
005/042
fig.1.1
fig.1.2
fig.1.3
fig.1.4
fig.1.5
2040 Manual-4L (512950-00) 2003:09:06 2:05 PM Page 7
Downloaded from www.Manualslib.com manuals search engine
8
GETTING STARTED
En
TURNING THE CAMERA ON AND OFF
The power button is located in the back of the camera.
1. Press the ( ) Power button to turn the camera on. (fig.1.1)
The LCD will turn on automatically. (fig.1.2)
The camera is ready for picture taking when the flash ready
LED stops blinking. (fig.1.3)
2. To turn the camera off press the ( ) Power button for a few
seconds
Note:
•To extend battery life, the camera will automatically power off
after 60 seconds of inactivity. To change this setting, please refer
to page 25.
Digital cameras use much more power than traditional cameras.
It is highly recommended that you use the automatic power off
feature. It is also recommended that the LCD display be turned
off or brightness tuned down to save power.
•To protect the LCD from damage during transportation, the LCD
is covered with a thin plastic film. For clearer view of pictures,
please peel off the protective film before use.
TURNING THE LCD ON AND OFF
The camera has a 1.5” LCD which can frame subjects for image and video clip capture,
review stored images and video clips and displays the current camera settings.
Use the ( ) button to toggle through the LCD modes. The LCD mode changes each time
the button is pressed as follows:
"
# Icons off
"
$ LCD off
"
% LCD on with icons
Note: In Review mode, press the ( ) button, the LCD or icons can’t be turned off.
A
AWB
1600
005/042
fig.1.1 Camera On
fig.1.2
A
AWB
1600
005/042
fig.1.3
A
AWB
1600
005/042
A
AWB
1600
005/042
A
AWB
1600
005/042
005/042 005/042
005/042 005/042
A
AWB
1600
005/042
A
AWB
1600
A
AWB
1600
A
AWB
1600
005/042
A
AWB
1600
005/042
005/042
Press OK Play AVI
005/042
2040 Manual-4L (512950-00) 2003:09:06 2:05 PM Page 8
Downloaded from www.Manualslib.com manuals search engine
9
GETTING STARTED
En
SETTING THE CAMERA’S OPERATIONAL MODE
The camera has 2 operational modes: Camera Mode, Review Mode.
1. To change the camera operational mode, slide the mode slide
switch left and right.
Camera Mode
Use the camera mode setting to take pictures or to customize your
camera settings for picture taking.
Review Mode
Use the review mode setting to browse through images and video
clips or to delete images from the internal memory or memory card.
A
AWB
1600
005/042
A
AWB
1600
005/042
A
AWB
1600
005/042
2040 Manual-4L (512950-00) 2003:09:06 2:06 PM Page 9
Downloaded from www.Manualslib.com manuals search engine
10
TAKING A PICTURE
En
T
T
AKING
AKING
A
A
PICTURE
PICTURE
TAKING A PICTURE WITH THE VIEWFINDER
How to take picture with the viewfinder:
1. Press ( ) Power button to turn the camera on.
2. Set the camera to ( ) Camera Mode.
The LCD can be switched off to conserve battery power by pressing the ( ) button.
3. Frame the subject in the viewfinder
4. Press the shutter button to capture the image.
When the image has been captured, the Flash Ready LED next to the viewfinder will
blink to indicate that the image is being stored.
Flash Ready LED Status Description
Steady The camera is in capture mode. Hold the camera steady to
prevent blurry pictures.
Blinking The flash is recharging. You may move the camera in this
mode.
Note: Do not power the camera off or switch modes while the camera is capturing or
storing a picture or video clip to prevent corrupting the stored image.
A
AWB
1600
005/042
A
AWB
1600
005/042
2040 Manual-4L (512950-00) 2003:09:06 2:06 PM Page 10
Downloaded from www.Manualslib.com manuals search engine
11
TAKING A PICTURE
En
TAKING A PICTURE WITH THE LCD
How to taking a picture with the LCD:
1. Press ( ) Power button to turn the camera on.
2. Set the camera to ( ) Camera Mode.
3. Frame the subject in the LCD.
4. Press the shutter button to capture the image.
When the image has been captured, the Flash Ready LED next to the viewfinder will
blink once to indicate that the image is being stored.
•Apreview of the image will be displayed on the LCD for 1 second and the frame counter
number displayed in the LCD will be updated.
Note: Do not power the camera off or switch modes while the camera is capturing or
storing a picture or video clip to prevent corrupting the stored image.
TAKING PICTURE WITH DIGITAL ZOOM
The camera can use up to 4x digital zoom to magnify into the subject.
How to use digital zoom:
1. Set the camera to ( ) Camera Mode.
2. Position the subject in the LCD.
3. Press to zoom into the subject.
4. Press to zoom out or to return to normal mode.
The digital zoom bar displayed on the LCD monitor can indicate the change and the scale of
magnification.
Resolution Maximum Digital Zoom
1600 x 1200 4x
1280 x 960 4x
640 x 480 No Zoom
A
AWB
1600
005/042
A
AWB
1600
005/042
005/042 005/042
005/042 005/042
A
AWB
1600
005/042
A
AWB
1600
A
AWB
1600
A
AWB
1600
005/042
A
AWB
1600
005/042
005/042
Press OK Play AVI
005/042
005/042 005/042
005/042 005/042
A
AWB
1600
005/042
1x 2x 4x
A
AWB
1600
A
AWB
1600
A
AWB
1600
005/042
A
AWB
1600
005/042
005/042
Press OK Play AVI
005/042
005/042 005/042
005/042
005/042 005/042
A
AWB
1600
005/042
A
AWB
1600
1x 2x 4x
A
AWB
1600
A
AWB
1600
005/042
A
AWB
1600
005/042
005/042
Press OK Play AVI
005/042
005/042 005/042
005/042
005/042
A
AWB
1600
005/042
A
AWB
1600
A
AWB
1600
1x 2x 4x
A
AWB
1600
005/042
A
AWB
1600
005/042
005/042
Press OK Play AVI
005/042
2040 Manual-4L (512950-00) 2003:09:06 2:06 PM Page 11
Downloaded from www.Manualslib.com manuals search engine
12
TAKING A PICTURE
En
Photography Hints -
Hold your camera steady or use tripod while using Digital Zoom to prevent blurriness in the
photograph due to camera movement.
The image quality may degrade slightly with digital zoom.
Note: The digital zoom can only be monitored with the LCD and not through the optical
viewfinder.
USING THE MAIN MENU IN CAMERA MODE
Follow the steps below to set the advanced shooting options in the camera through the Main
Menu.
1. Press ( ) Power button to turn the camera on.
2. Set the Mode Switch to ( ) Camera mode.
3. Press the MENU button to display the main menu.
4. Press or until the desired option is highlighted.
5. Press to enter the submenu.
6. Press or in the submenu to toggle between the options.
7. Press the OK button to make a selection. All selections will be marked by red dot ( • ).
8. Press the MENU button to exit. OR
Press until ( ) Main Menu is highlighted then press to return to the Main
Menu.
2040 Manual-4L (512950-00) 2003:09:06 2:06 PM Page 12
Downloaded from www.Manualslib.com manuals search engine
13
TAKING A PICTURE
En
MAIN MENU IN CAMERA MODE
Exit
MAIN MENU
AWB
Sunny
Fluorescent
! OK! MENU
WB
Tungsten
Main Menu
! OK! MENU
WB
EXPOSURE VALUE +
Brightness +
EV
WB
Brightness
Setup
MAIN MENU
+
WB
Mode
Size
Quality
Flash
MAIN MENU
M
Video Clip
Self-timer
Main Menu
MODE
1600 x 1200
1280 x 960
640 x 480
! OK! MENU
IMAGE SIZE
Fine
Normal
Economy
! OK! MENU
QUALITY
Auto
Flash
Flash Off
! OK! MENU
FLASH
A
Main Menu
! OK! MENU
IMAGE SIZE
Main Menu
! OK! MENU
QUALITY
Main Menu
! OK! MENU
FLASH
2040 Manual-4L (512950-00) 2003:09:06 2:06 PM Page 13
Downloaded from www.Manualslib.com manuals search engine
14
TAKING A PICTURE
En
SETTING THE FLASH
Flash Mode Description
Auto Flash The camera judges if a flash is required. If the environment is too dark,
the flash will fire.
Forced Flash
Flash will fire in any lighting condition.
Flash off The flash will not fire in this mode. Please use this mode if you want to
capture the mood of the ambient lighting or to use the available light in
places where flash photography is prohibited, such as museums.
•To prevent blurry pictures in low light situations, hold the camera
steady when pressing the Shutter button or mount the camera on a
tripod.
How to set the flash:
1. Press the MENU button in the ( ) Camera Mode.
2. Press until Flash is highlighted.
3. Press to enter its submenu.
4. Press or to highlight a flash mode.
5. Press the OK button to select.
6. Press the MENU button or press until ( ) Main Menu is highlighted then press
to exit.
7. Position the subject in the camera.
8. Press the shutter button.
Note:
The flash needs to recharge after it is fired. If the Shutter button is pressed while the flash
is charging, the Flash Ready LED will blink. Please wait a few moments and press the
Shutter button again to take a picture.
A
Mode
Size
Quality
Flash
MAIN MENU
M
Auto
Flash
Flash Off
! OK! MENU
FLASH
A
2040 Manual-4L (512950-00) 2003:09:06 2:06 PM Page 14
Downloaded from www.Manualslib.com manuals search engine
15
TAKING A PICTURE
En
Mode
Size
Quality
Flash
MAIN MENU
M
1600 x 1200
1280 x 960
640 x 480
! OK! MENU
IMAGE SIZE
SELF-TIMER
How to use self-timer:
1. Press MENU to display the main menu in ( ) Camera Mode,.
2. Press to enter the Mode menu.
3. Press to highlight Self-timer.
4. Press to enter the submenu.
5. Press or to highlight Off or On.
6. Press the OK button to select.
7. Place the camera on a flat surface or tripod.
8. Use the LCD to compose the picture, and then press the Shutter button to activate the
self-timer.
The Self -timer LED will blink for 10 seconds and then the picture will be captured.
Note:
The Self -timer is automatically deactivated once the image is taken.
•To deactivate the self-timer before taking a picture, follow the steps above and select Off
in the Self-timer submenu, or simply turn the camera off by pressing ( ) Power
button.
Photography Hints -
Since the Self-timer LED indicator on the front of the camera flashes, you have time to join in
the photograph and know when the camera is done taking a picture when the self-timer LED
light stops blinking.
IMAGE RESOLUTION (SIZE)
Image Resolution determines the size of a captured image. Higher resolution images contain
more details and have larger file sizes.
Mode
Size
Quality
Flash
MAIN MENU
M
Video Clip
Self-timer
Main Menu
MODE
SELF-TIMER
Self-timer
! Off
! On
005/042 005/042
005/042 005/042
A
AWB
1600
005/042
A
AWB
1600
A
AWB
1600
A
AWB
1600
005/042
A
AWB
1600
005/042
005/042
Press OK Play AVI
005/042
2040 Manual-4L (512950-00) 2003:09:06 2:06 PM Page 15
Downloaded from www.Manualslib.com manuals search engine
16
TAKING A PICTURE
En
Images Stored on 7MB memory (approx.):
1600 x 1200 1280 x 960 640 x 480
Fine 921 42
Normal 14 33 63
Economy 47 111 178
How to change the resolution:
1. Press the MENU button in the ( ) Camera Mode.
2. Press to highlight Size.
3. Press to enter the submenu.
4. Press or until the desired resolution is highlighted.
5. Press the OK button to select.
6. Press the MENU button or press until ( ) Main Menu is highlighted then press
to return to picture taking mode.
IMAGE QUALITY
The image Quality setting determines the amount of compression that is used to reduce the
size of the stored image file in order to economize space in the internal memory or the
memory card.
Quality JPG Description
Compression Ratio
Fine 5.1:1 Fine image quality can be used for prints and
enlargements.
Normal 12:1 Normal image quality can be used for general
purpose pictures.
Economy 24:1 Economy image quality can be used for pictures that
will be sent via e-mail.
Resolution
Quality
Mode
Size
Quality
Flash
MAIN MENU
M
Fine
Normal
Economy
! OK! MENU
QUALITY
2040 Manual-4L (512950-00) 2003:09:06 2:06 PM Page 16
Downloaded from www.Manualslib.com manuals search engine
17
TAKING A PICTURE
En
How to change the quality:
1. Press the MENU button in the ( ) Camera Mode.
2. Press to highlight Quality.
3. Press to enter the submenu.
4. Press or until the desired setting is highlighted.
5. Press the OK button to select.
6. Press the MENU button or press until ( ) Main Menu is highlighted then press
to return to picture taking mode.
WHITE BALANCE
The Auto White Balance feature provides optimal color reproduction under different lighting
conditions. This is the default setting. You can change this setting for specific lighting
conditions.
White Balance Mode Description
AWB Auto The camera will automatically choose the white balance setting.
Use this setting in variable conditions.
Sunny Use outdoors with sufficient sunlight.
Fluorescent Use indoors with fluorescent or ambient light conditions.
Tungsten Use indoors with tungsten light conditions.
How to change the White Balance:
1. Press the MENU button in ( ) Camera Mode.
2. Press until WB is highlighted.
3. Press to enter its submenu.
4. Press or until the desired setting is highlighted.
5. Press the OK button to select.
6. Press the MENU button or press until ( ) Main Menu is highlighted then press
to return to picture taking mode.
Mode
Size
Quality
Flash
MAIN MENU
M
EV
WB
Brightness
Setup
MAIN MENU
+
WB
AWB
Sunny
Fluorescent
! OK! MENU
WB
2040 Manual-4L (512950-00) 2003:09:06 2:06 PM Page 17
Downloaded from www.Manualslib.com manuals search engine
En
18
+
TAKING A PICTURE
EXPOSURE COMPENSATION
The camera uses Auto Exposure to provide optimally exposed pictures under most conditions.
If the main subject turned out too light or too dark, you can use the Exposure Compensation
feature to improve the result.
Exposure
Compensation Description
Mode
Increasing the Exposure in pictures that are too dark, will make
the picture lighter.
Reducing the Exposure in pictures that are too light will make the
picture darker.
How to use Exposure Compensation:
1. Press the MENU button in the ( ) Camera Mode.
2. Press until ( ) EV is highlighted.
3. Press to display the Exposure Compensation bar on the LCD.
4. Press or to change the Exposure Compensation.
5. Press the OK button to confirm the selection.
The camera will return to picture taking mode.
TAKING VIDEO CLIPS
The camera can capture video clips.
To record a video clip:
1. Press the MENU button in the ( ) Camera Mode.
2. Press to enter the Mode menu.
3. Press to enter video clip mode.
4. Position the subject in the viewfinder or LCD.
5. Press the Shutter button to begin recording a continuous video clip.
+
EV
WB
Brightness
Setup
MAIN MENU
+
WB
EXPOSURE VALUE +
Mode
Size
Quality
Flash
MAIN MENU
M
Video Clip
Self-timer
Main Menu
MODE
2040 Manual-4L (512950-00) 2003:09:06 2:06 PM Page 18
Downloaded from www.Manualslib.com manuals search engine
En
19
TAKING A PICTURE / REVIEWING YOUR FILES
To stop recording:
Press the Shutter button again to stop recording.
OR
The camera will continue recording until the memory is almost full.
Video Clip Information
Resolution: QVGA
Frame rate: 15fps
File Format: AVI
Note:
Do not open the Battery/Memory Card Door or turn the camera off before the video clip
is stored.
Higher capacity memory cards can take longer video clips.
•To exit video clip mode before beginning to record, press the MENU button to return to
the Main Menu.
USING REVIEW MODE ( )
In Review mode, you can review your stored pictures and video clips
through the LCD.
Using Review Mode:
1. Slide the Mode switch towards ( ).
2. Press or to scroll through each file. The file type can be
found in the upper left hand corner of the LCD. The frame counter
varies with the operation.
File Format File Type 005/042
JPEG Picture
AVIVideo Clip
REVIEWING VIDEO CLIPS
How to review a video clip:
1. In ( ) Review mode, press and to scroll through the
stored pictures and video clips.
Only the first image of the video clip is shown.
2. When a video clip (AVI) is displayed on the LCD, press OK to
play.
005/042 005/042
005/042 005/042
A
AWB
1600
005/042
A
AWB
1600
A
AWB
1600
JPEG
A
AWB
1600
005/042
A
AWB
1600
005/042
005/042
Press OK Play AVI
005/042
005/042 005/042
005/042 005/042
A
AWB
1600
005/042
A
AWB
1600
A
AWB
1600
A
AWB
1600
005/042
A
AWB
1600
005/042
005/042
AVI
Press OK Play AVI
005/042
A
AWB
1600
005/042
Number of the total
pictures/video clips
Number of the current
pictures/video clip
2040 Manual-4L (512950-00) 2003:09:06 2:06 PM Page 19
Downloaded from www.Manualslib.com manuals search engine
En
20
REVIEWING YOUR FILES
MAGNIFYING STORED PICTURES
In review mode, you can zoom into a section of the stored picture to get a closer look at the
subject and its surroundings.
How to magnify:
1. In the ( ) Review mode, press or to scroll through the stored pictures and
video clips.
2. While viewing a stored image (JPG), press the OK button to use the "Enlargement"
feature. Press the OK button again to get different magnifications in the following order:
"
# 2x Enlargement
"
$ 4x Enlargement
"
% Normal mode
3. In 2x and 4x mode you may press , , or to navigate in the picture.
Resolution Maximum Enlargement
1600 x 1200 4x
1280 x 960 4x
640 x 480 No zoom
005/042 005/042
005/042 005/042
A
AWB
1600
005/042
A
AWB
1600
A
AWB
1600
JPEG
A
AWB
1600
005/042
A
AWB
1600
005/042
005/042
Press OK Play AVI
005/042
1x 2x 4x
JPEG
005/042 005/042
005/042 005/042
A
AWB
1600
005/042
A
AWB
1600
A
AWB
1600
A
AWB
1600
005/042
A
AWB
1600
005/042
005/042
Press OK Play AVI
005/042
005/042
1x 2x 4x
JPEG
005/042
005/042 005/042
A
AWB
1600
005/042
A
AWB
1600
A
AWB
1600
A
AWB
1600
005/042
A
AWB
1600
005/042
005/042
Press OK Play AVI
005/042
En
2040 Manual-4L (512950-00) 2003:09:06 2:06 PM Page 20
Downloaded from www.Manualslib.com manuals search engine
En
21
REVIEWING YOUR FILES
USING MAIN MENU IN REVIEW MODE
Enter the Main Menu screen
1. Press ( ) Power button to turn the camera on.
2. Set the Mode switch to ( ) Review mode.
3. Press the MENU button to display the main menu.
4. Press or to highlight an option.
5. Press to enter the submenu of the highlighted option.
6. Press or to toggle between the options.
7. Press the OK button to select an option.
To exit the menu
Press until Exit is highlighted, then press to return to review mode.
OR
Press the MENU button again.
Delete
Thumbnail
Brightness
Exit
MAIN MENU
Delete One
Delete All
Main Menu
DELETE
DELETE
THIS FILE?
! No
! Yes
DELETE
ALL FILES?
! No
! Yes
Brightness +
2040 Manual-4L (512950-00) 2003:09:06 2:06 PM Page 21
Downloaded from www.Manualslib.com manuals search engine
En
22
REVIEWING YOUR FILES
DELETING YOUR FILES
Delete One
Once a file is deleted, it cannot be recovered.
1. In the ( ) Review mode, press or until the picture or
video clip that you want to delete is displayed on the LCD.
2. Press the MENU button to display the Main Menu in Review
mode.
3. When Delete is highlighted, press to enter the Delete
submenu.
4. When Delete One is highlighted, press to enter its submenu.
5. The next screen will read “THIS FILE?” Press or to highlight No or Yes.
6. Press OK to select.
If No is selected, no change will be made, and you will return to the Main Menu.
If Yes is selected, the LCD shows “deleting …” for a few seconds, then the selected file
will be deleted and the next picture or video clip will be displayed.
Delete All
Once the files are deleted, it cannot be recovered.
1. Press the MENU button to enter Main Menu in Review mode.
2. When Delete is highlighted, press to enter the Delete
submenu.
3. Press until Delete All is highlighted.
4. Press to enter its submenu.
5. The next screen will read “ALL FILES?” Press or to
highlight No or Yes.
6. Press OK to select.
If No is selected, no change will be made, and you will return to the Main Menu.
If Yes is selected, all the stored files will be deleted. The LCD shows “deleting …” for a
few seconds, then shows “No Files”. Slide the Mode switch to ( ) Camera mode to
take pictures or video clips.
!
005/042 005/042
005/042 005/042
A
AWB
1600
005/042
A
AWB
1600
A
AWB
1600
JPEG
A
AWB
1600
005/042
A
AWB
1600
005/042
005/042
Press OK Play AVI
005/042
Delete
Thumbnail
Brightness
Exit
MAIN MENU
Delete One
Delete All
Main Menu
DELETE
DELETE ONE
THIS FILE?
! No
! Yes
005/042 005/042
005/042 005/042
A
AWB
1600
005/042
A
AWB
1600
A
AWB
1600
JPEG
A
AWB
1600
005/042
A
AWB
1600
005/042
005/042
Press OK Play AVI
005/042
Delete
Thumbnail
Brightness
Exit
MAIN MENU
Delete One
Delete All
Main Menu
DELETE
DELETE ALL
ALL FILES?
! No
! Yes
!
2040 Manual-4L (512950-00) 2003:09:06 2:06 PM Page 22
Downloaded from www.Manualslib.com manuals search engine
En
23
REVIEWING YOUR FILES
USING THUMBNAIL MODE
How to use thumbnail view:
1. Press the MENU button in the ( ) Review Mode.
2. Press until Thumbnail is highlighted.
3. Press to have 4 thumbnail pictures or video clips appear at once on the LCD display.
4. Press , , or to highlight a picture or video clip.
5. Press the OK button to view the picture or video clip in original size on one screen.
SETTING THE LCD BRIGHTNESS
You can set the brightness of the LCD to make it brighter or darker depending on the light
settings.
1. Set the Mode Switch to ( ) or ( ).
2. Press the MENU button to display the main menu.
3. Press until ( ) Brightness is highlighted.
4. Press to display the Brightness bar on the LCD.
5. Press or to set choose the brightness setting.
The brightness level will be displayed on the LCD.
6. Press the OK button to select.
005/042 005/042
005/042 005/042
A
AWB
1600
005/042
A
AWB
1600
A
AWB
1600
JPEG
A
AWB
1600
005/042
A
AWB
1600
005/042
005/042
Press OK Play AVI
005/042
Delete
Thumbnail
Brightness
Exit
MAIN MENU
EV
WB
Brightness
Setup
MAIN MENU
+
WB
Brightness +
2040 Manual-4L (512950-00) 2003:09:06 2:06 PM Page 23
Downloaded from www.Manualslib.com manuals search engine
En
24
CUSTOMIZING THE CAMERA SETTINGS
USING THE SETUP MENU
Entering setup menu
1. Press ( ) Power to turn the camera on.
2. Set the Mode Switch to ( ) camera mode.
3. Press the MENU button to display the main menu.
4. Press until Setup is highlighted.
5. Press to enter the Setup submenu.
6. Press or to highlight the option you wish to customize.
7. Press to change the setting.
To exit the setup menu:
Press until ( ) Main Menu is highlighted, then press to return to the Main
Menu.
OR
Press the MENU button to exit and to return to picture taking mode.
F
Default
Format
Main Menu
SETUP
Format
Time-out! 60S
TV! PAL
PlayLogo! Off
Language
SETUP
Language
Deutsch
Italiano
Language
NTSC
PAL
On
Off
15S
30S
60S
90S
None
This operation will
delete all images
! No
! Yes
Exit
MAIN MENU
EV
WB
Brightness
Setup
MAIN MENU
+
WB
Mode
Size
Quality
Flash
MAIN MENU
M
English
Français
Español
2040 Manual-4L (512950-00) 2003:09:06 2:06 PM Page 24
Downloaded from www.Manualslib.com manuals search engine
En
25
CUSTOMIZING THE CAMERA SETTINGS
SETUP MENU AND FEATURES
Setup Setting Options Description
Time-out 15, 30, 60, 90 This feature automatically turns the camera off when it
is idle.
None Deactivates the automatic power off option.
TV NTSC, PAL Select the correct setting according to your
geographical region.
Play Logo Off, On Turns the start up animation on or off.
Language , Sets the language in your camera.
English,
Français,
Español,
Deutsch,
Italiano,
Default Sets all camera settings to the factory default.
Format Formats the internal memory or the memory card by
deleting all files.
SETTING THE AUTO OFF TIME
Notes: The default setting is 60 seconds to conserve battery power.
How to set auto off time:
1. Slide the mode switch to ( ) Camera mode.
2. Press the MENU button to enter main menu.
3. Press until Setup is highlighted.
4. Press to enter Setup menu.
5. Press until Timeout is highlighted.
6. Press to change the auto off setting through 15, 30, 60, 90 seconds and None.
7. Press the MENU button to exit.
F
EV
WB
Brightness
Setup
MAIN MENU
+
WB
Time-out! 60S
TV! PAL
PlayLogo! Off
Language
SETUP
2040 Manual-4L (512950-00) 2003:09:06 2:06 PM Page 25
Downloaded from www.Manualslib.com manuals search engine
En
26
CUSTOMIZING THE CAMERA SETTINGS
PLAY LOGO
How to turn on or off logo-playing:
1. Slide the mode switch to ( ) Camera mode.
2. Press the MENU button to enter main menu.
3. Press until Setup is highlighted.
4. Press to enter Setup menu.
5. Press until PlayLogo is highlighted.
6. Press to turn the start up animation Off or On.
7. Press the MENU button to exit.
When PlayLogo feature is turned on, Concord logo will be seen when the camera is turned on
by pressing ( ) Power button.
SETTING THE LANGUAGE
How to set the Language:
1. Slide the mode switch to ( ) Camera mode.
2. Press the MENU button to enter main menu.
3. Press until Setup is highlighted.
4. Press to enter submenu.
5. Press until Language is highlighted.
6. Press to enter submenu.
7. Press or to highlight the desired language.
8. Press the OK button to select.
9. Press or to select No or Yes.
10.Press the OK button to select
If you select No, the camera will return to the Language menu.
If you select Yes, the camera will return to the Setup menu and all menu screens will be
displayed in the new language.
11. Press the MENU button to exit.
EV
WB
Brightness
Setup
MAIN MENU
+
WB
Time-out! 60S
TV! PAL
PlayLogo! Off
Language
SETUP
EV
WB
Brightness
Setup
MAIN MENU
+
WB
Time-out! 60S
TV! PAL
PlayLogo! Off
Language
SETUP
Language
English
Français
Español
2040 Manual-4L (512950-00) 2003:09:06 2:06 PM Page 26
Downloaded from www.Manualslib.com manuals search engine
En
27
CUSTOMIZING THE CAMERA SETTINGS
FORMATTING THE INTERNAL MEMORY AND MEMORY CARD
CAUTION:
How to format internal memory or memory card:
1. Set the Mode Switch to the ( ) Camera mode.
2. Press the MENU button.
3. Press until Setup is highlighted.
4. Press to enter the submenu.
5. Press until Format is highlighted.
6. Press to enter format submenu.
7. Press or to select No or Yes.
8. Press the OK button to select
9. Press the MENU button to exit.
Note: If MEMORY ERROR! is displayed on the LCD screen, this indicates that the internal
memory or the memory card is corrupted. Please format the memory to continue.
!
1. Formatting deletes all pictures and video clips from the internal
memory or memory card.
2. Removing a card during formatting may damage the card.
3. Selecting the formatting feature while there is no memory card in the
camera, will cause the internal memory to format. All pictures and
video clips on the internal memory will be lost.
EV
WB
Brightness
Setup
MAIN MENU
+
WB
Default
Format
Main Menu
SETUP
F
Format
This operation will
delete all images
! No
! Yes
2040 Manual-4L (512950-00) 2003:09:06 2:07 PM Page 27
Downloaded from www.Manualslib.com manuals search engine
En
28
CUSTOMIZING THE CAMERA SETTINGS
TO RESTORE THE DEFAULT SETTINGS
1. In the Setup menu, press until Default is highlighted.
2. Press to restore the default settings. Please refer to the table below for the default
settings.
OPTION DEFAULT STATUS
Size 1600 x 1200
Quality Fine
EV 0
White Balance AWB (Auto White Balance)
Brightness 3
Time-out 60 sec
TV NTSC (North and South America, Japan), PAL (Europe, Asia)
Play Logo Off
Language English
+
WB
2040 Manual-4L (512950-00) 2003:09:06 2:07 PM Page 28
Downloaded from www.Manualslib.com manuals search engine
En
29
INSTALLATION GUIDE
COMPUTER SYSTEM REQUIREMENTS
Windows
300MHz Pentium II or better (450MHz Pentium II processor or equivalent is recommended).
Microsoft Windows 98 SE, Windows Me, Windows 2000 Professional, Windows XP Home
/ Professional/Media Center.
570MB free hard disk space (include extra 30MB for Adobe Acrobat Reader 5 and 65MB
for Microsoft DirectX 9.0) (770MB free hard disk space is recommended).
64MB of RAM (128MB or more recommended)
Minimum 800 x 600 display with 16-bit color (1024 x 768 with 24-bit color or better
recommended)
USB Port
CD-ROM Drive (4x CD-ROM drive is recommended).
Macintosh
Mac OS 9.0 or higher
PowerPC CPU with 32 MB (minimum) of RAM
Minimum 640 x 480 display with thousands of colors (millions of colors recommended).
Built –in USB Port
INSTALLATION REQUIREMENTS
The installer will automatically detect which software applications need to be installed or if
they are not necessary. Please read the installation requirements before proceeding with the
installation process.
System Windows Windows Windows Windows Macintosh
98SE Me 2000 XP
Install Camera Driver X
Install DirectX 9 X X
Install ArcSoft X X X X
PhotoImpression
Install Adobe Acrobat
Reader 5 (To read the
Users Guide)
Camera Driver automatically X X X X
detected by the computer
(no driver installation required)
Note:
1. The drivers and application software CD-ROM bundled with the camera do not support
Mac OS.
Mac OS 9 and 10 have inherent support for USB Mass Storage device (no driver needed).
2. An AVI created by the camera will not play on Windows Media Player under Windows 98
SE and Windows 2000 without the installation of an appropriate Motion JPEG CODEC or
an upgrade of DirectX to DirectX 8.1b or 9.0.
3. The entire camera package will neither support versions of Windows earlier than Windows
98 Second Edition, nor support Apple Mac OS versions earlier than Mac OS 9.
2040 Manual-4L (512950-00) 2003:09:06 2:07 PM Page 29
Downloaded from www.Manualslib.com manuals search engine
En
30
INSTALLATION GUIDE
IDENTIFYING YOUR OPERATING SYSTEM
Windows
1. Right click the My Computer icon on your desktop, and go to Properties.
2. The System Properties Box will appear. The information about your computer is listed
under the system area.
3. Confirm that your computer is running one of the following operating systems and proceed
to the page in the chart for installation instructions:
System Proceed to page
Windows 98 SE Page 32
Windows 2000 Page 34
Windows Millennium Edition, Windows XP Page 35
4. Press OK to close the window
If the My Computer icon is not on your desktop, click Control Panel icon from the Start Menu
and double click on the System icon to open the System Property Box.
USING THE INSTALLER SPLASH SCREEN
The installer will automatically detect which software applications need to be installed or if
they are not necessary. This will be indicated by the buttons on the splash screen that appear
when the CD-ROM is inserted into the computer:
Option Description
Camera Drivers The camera drivers enable the camera to transfer pictures and
video clips to the computer with the provided Mini-USB cable.
Microsoft DirectX 9 DirectX 9 enables the movie applications on your computer to
playback video clips that are captured with the camera.
ArcSoft Software This software bundle contains ArcSoft PhotoImpression 2000
which enables you to edit and enhance pictures.
Adobe Acrobat Adobe Acrobat Reader enables you to view the electronic version
Reader 5 of the Users Guide.
Users Guide Direct link to the electronic version of the Users Guide. The
Users Guide be displayed in the language that was selected when
the CD-ROM was first inserted. (All Users Guides are saved in
PDF format.)
Concord Support Direct link to our camera support website. Please establish an
Website internet connection before clicking on the link.
2040 Manual-4L (512950-00) 2003:09:06 2:07 PM Page 30
Downloaded from www.Manualslib.com manuals search engine
En
31
INSTALLATION GUIDE
FLOW DIAGRAM FOR SOFTWARE INSTALLATION
To transfer the pictures and video clips from the memory card or the cameras internal memory
the camera must be connected to a computer with the provided USB cable. Additional setup
maybe required by some operating systems before connecting the camera to the computer for
the first time.
Identifying your operating system
Windows 98SE Windows 2000 Windows ME/XP
Installing camera driver Installing DirectX 9
p.32 p.34
Installing ArcSoft PhotoImpression p.35
Installing Adobe Acrobat Reader 5 (if needed) p.37
Connecting the camera to the computer p.39
Downloading pictures and video clips onto the computer p.39
Disconnecting the camera from the computer p.40
2040 Manual-4L (512950-00) 2003:09:06 2:07 PM Page 31
Downloaded from www.Manualslib.com manuals search engine
En
32
INSTALLATION GUIDE
INSTALLING THE DRIVER AND DIRECTX 9 – WINDOWS 98 SE
NOTE:
Do not connect the camera to your computer before the camera drivers and Microsoft
DirectX 9.0 installation is completed.
The installation Windows messages displayed on the computer screen may vary due to
the different operating systems, but the installation procedures should be the same to
each another.
Step 1 Make sure your camera is powered off and not connected to the computer.
Step 2 Make sure the computer is powered on and Windows is running.
Step 3 Close any other applications or software you may be running.
Step 4 Insert the CD-ROM included in your camera’s packaging into your computer’s
CD-ROM Drive.
NOTE: If the installer does not start automatically within 30 seconds after the
CD-ROM has been inserted, click on "My Computer" either on the Desktop
or in the Start Menu and locate the CD-ROM Drive. Double click on the CD-
ROM Drive icon for installation.
Step 5 Select the language. Click [OK].
Step 6 The installation screen will appear.
Click on Install Camera Drivers.
Step 7 Click [Next >].
Step 8 The next dialog will prompt you to select the
components that will be installed. The files will be
saved in the Concord Eye-Q 2040 directory
automatically. OR
You may change the default folder by clicking
[Browse…] and selecting a different folder in your
computer.
Click [Next>].
2040 Manual-4L (512950-00) 2003:09:06 2:07 PM Page 32
Downloaded from www.Manualslib.com manuals search engine
En
33
INSTALLATION GUIDE
Step 9 Click [Install].
Step 10 Install progress bar.
Step 11 The next screen will begin the DirectX setup.
Click on "I accept the agreement" to go on the
installation, then click [Next >].
Step 12 Click [Next >].
Step 13 Click [Finish].
Your computer will automatically reboot.
2040 Manual-4L (512950-00) 2003:09:06 2:07 PM Page 33
Downloaded from www.Manualslib.com manuals search engine
En
34
INSTALLATION GUIDE
INSTALLING DIRECTX 9 – WINDOWS 2000
Step 1 Make sure your camera is powered off and not connected to the computer.
Step 2 Make sure the computer is powered on and Windows is running.
Step 3 Close any other applications or software you may be running.
Step 4 Insert the CD-ROM included in your camera’s packaging into your computer’s
CD-ROM Drive.
NOTE: If the installer does not start automatically within 30 seconds after the
CD-ROM has been inserted, click on "My Computer" either on the Desktop
or in the Start Menu and locate the CD-ROM Drive. Double click on the CD-
ROM Drive icon for installation.
Step 5 Select the language. Click [OK].
Step 6 The installation screen will appear.
Click on Install Microsoft DirectX 9.0.
Step 7 The next screen will begin the DirectX setup.
Click [Next >].
Step 8 Click [Next >].
Step 9 Click [Finish].
Your computer will automatically reboot.
2040 Manual-4L (512950-00) 2003:09:06 2:07 PM Page 34
Downloaded from www.Manualslib.com manuals search engine
En
35
INSTALLATION GUIDE
INSTALLING ARCSOFT PHOTOIMPRESSION – ALL WINDOWS USERS
Step 1 Make sure your camera is powered off and not connected to the computer.
Step 2 Make sure the computer is powered on and Windows is running.
Step 3 Close any other applications or software you may be running.
Step 4 Insert the CD-ROM included in your camera’s packaging into your computer’s
CD-ROM Drive.
NOTE: If the installer does not start automatically within 1 minute after the
CD-ROM has been inserted, click on Start, select My Computer and locate
the CD-ROM Drive. Double click on the CD-ROM Drive icon to show its
contents.
Step 5 Select the language. Click [OK].
Step 6 The installation screen will appear
Click on Install PhotoImpression 2000.
Step 7 Click [Next >].
Step 8 Click [Yes].
2040 Manual-4L (512950-00) 2003:09:06 2:07 PM Page 35
Downloaded from www.Manualslib.com manuals search engine
En
36
INSTALLATION GUIDE
Step 9 Click [Next >].
Step 10 Make sure the application is checked and then
click [Next >].
Step 11 Click [Next >].
Step 12 The screen will show the status of the
installation.
Step 13 Win 98SE
Click [Finish].
The screen will automatically reboot.
Win 2000/ME/XP
Click [Finish].
2040 Manual-4L (512950-00) 2003:09:06 2:07 PM Page 36
Downloaded from www.Manualslib.com manuals search engine
En
37
INSTALLATION GUIDE
INSTALLING ADOBE ACROBAT READER 5 – ALL WINDOWS USERS
(OPTIONAL)
Step 1 Make sure your camera is powered off and not connected to the computer.
Step 2 Make sure the computer is powered on and Windows is running.
Step 3 Close any other applications or software you may be running.
Step 4 Insert the CD-ROM included in your camera’s packaging into your computer’s
CD-ROM Drive.
NOTE: If the installer does not start automatically within 1 minute after the
CD-ROM has been inserted, click on Start, select My Computer and locate
the CD-ROM Drive. Double click on the CD-ROM Drive icon to show its
contents.
Step 5 Select the language. Click [OK].
Step 6 The installation screen will appear, Click
on Install Adobe Acrobat Reader 5
Step 7 Status bar.
Step 8 Click [Next >].
2040 Manual-4L (512950-00) 2003:09:06 2:07 PM Page 37
Downloaded from www.Manualslib.com manuals search engine
En
38
INSTALLATION GUIDE
Step 9 The files will be saved into C:\Program
Files\Adobe\Acrobat 5 automatically.
OR
You may change the default folder by clicking
[Browse…] and selecting a different folder in
your computer.
Click [Next >].
Step 10 Installation progress.
Step 11 Click [OK >].
2040 Manual-4L (512950-00) 2003:09:06 2:07 PM Page 38
Downloaded from www.Manualslib.com manuals search engine
En
39
CONNECTING THE CAMERA TO THE COMPUTER
CONNECTING THE CAMERA
T
T
O THE COMPUTER
O THE COMPUTER
Note for Windows 98SE/2000 users: Do not connect the camera to your computer before
the camera drivers and Microsoft DirectX 9.0 installation is completed.
1. Power the camera on.
2. Connect the camera to the computer with the Mini-USB cable
provided.
Plug the larger end of the Mini-USB cable into your PC’s USB
port.
(Please refer to your computers documentation for more
information on the location of the USB port.)
Plug the small end of the Mini-USB cable into the USB port
located on the side of the camera.
DOWNLOADING PICTURES AND VIDEO CLIPS ONTO YOUR COMPUTER
Caution: Do not insert or remove the memory card when the camera is connected to the
computer.
FOR WINDOWS USERS
1. Connect the camera to the computer.
2. Double-click on My Computer.
3. Double-click Removable Disk.
4. Double-click DCIM.
5. Double-click 100_2040.
The stored pictures (JPG) and video clips (AVI) stored in the internal memory or the
memory card will be displayed.
6. Click and drag the files into a directory in your computer to save them.
•To select all files, click Edit > Select all.
FOR MACINTOSH USERS
1. Connect the camera to the computer.
After a few moments, the external hard drive will appear on the desktop.
2. Double-click the "untitled" removable drive that is on your desktop.
3. Double-click DCIM.
4. Double-click 100_2040.
The stored pictures (JPG) and video clips (AVI) stored in the internal memory or the
memory card will be displayed.
5. Drag and drop the image you want to save in the computer.
•To select all files, click Edit > Select all.
Note: You may also transfer the stored pictures and video clips on your memory card onto
your computer by using a memory card reader (sold separately.)
2040 Manual-4L (512950-00) 2003:09:06 2:07 PM Page 39
Downloaded from www.Manualslib.com manuals search engine
En
40
CONNECTING THE CAMERA TO THE COMPUTER
USING ARCSOFT PHOTOIMPRESSION
1. Connect the camera to the computer.
2. Launch ArcSoft PhotoImpression
software by clicking on Start-
Programs-ArcSoft Camera Suite and
choosing PhotoImpression from the
application list on your screen.
3. When the Application opens, click on
the [Camera/Scanner] button. (a)
4. Click on the drop-down list under
Select Source and choose Concord
Camera. (b)
5. Click on the Camera/ Scanner
Icon. (c)
•Asecond window will appear
showing the contents (pictures) in
the memory card, and options on how to handle them. (d)
6. Select the picture you would like to view, edit or save by clicking on it. The selected image
will be highlighted by a border. You may also click on Select All (f) to choose all pictures.
7. Click on Get Photos (e).
8. The pictures will then be added to your album at the bottom of the application (g). To
access these, click CLOSE on the Camera Controls windows. Double click on the
thumbnail to open.
9. You may now edit, save, print or further enhance your pictures using the buttons on the left
hand side of the screen. Please refer to ArcSoft's Software help section for a tutorial on all
the features PhotoImpression offers.
UNPLUGGING YOUR CAMERA FROM THE COMPUTER
Windows98SE:
1. Double-click on My Computer
2. Right-click on Removable Disk to display the menu.
3. Click on Eject in the menu.
4. Unplug the Mini-USB from the camera.
Windows ME/2000/XP:
1. Turn the camera off.
2. Click once on the "Unplug or Eject Hardware" icon on the right
hand side of your task bar. (fig.1.1)
3. Select “Stop Concord Eye-Q 2040 USB Mass Storage Device”
4. Click [OK] in the “Safe to Remove Hardware” prompt.
5. Unplug the Mini-USB from the camera. (fig.1.2)
fig.1.1
fig.1.2
2040 Manual-4L (512950-00) 2003:09:06 2:07 PM Page 40
Downloaded from www.Manualslib.com manuals search engine
En
41
TV MODE
CHANGING TV MODE SETTING
The camera allows you to view individual files and record clips on the television. To begin,
check your television documentation to determine what video standard you should set your
camera to either NTSC or PAL.
How to change the TV Mode setting:
1. Slide the Mode Switch to ( ).
2. Press the MENU button to view the ( ) Main Menu.
3. Press until Setup is highlighted.
4. Press to enter the Setup menu.
5. In the Setup menu press until TV is highlighted
6. Press to change the setting to NTSC or PAL.
7. Press the MENU button to exit.
CONNECTING THE CAMERA TO THE TV
Connections
1. Connect the TV-Out cable into the jack marked VIDEO or VIDEO
IN on your television.
2. Turn on your television.
3. Set the television to video mode according to the instructions in
the owners manual. (This is usually channel 3, 4 or AV).
4. Turn the camera on by pressing the ( ) Power button.
5. Connect the other end of the cable into the VIDEO port located in
the cable connection panel. (fig.1.1)
Using the TV as a Live Viewfinder:
1. Connect the camera to the TV.
2. Turn the camera on.
3. Slide the Mode Switch to ( ) Review mode.
4. The TV will become a live viewfinder.
Note: You may record your TV Mode session by using your VCR. Please refer to your
VCR documentation to learn more about recording.
fig.1.1
EV
WB
Brightness
Setup
MAIN MENU
+
WB
Time-out! 60S
TV! NTSC
PlayLogo! Off
Language
SETUP
Time-out! 60S
TV! PAL
PlayLogo! Off
Language
SETUP
2040 Manual-4L (512950-00) 2003:09:06 2:07 PM Page 41
Downloaded from www.Manualslib.com manuals search engine
En
42
TV MODE / ERROR MESSAGES
Reviewing pictures on your TV
1. Slide the Mode Switch to ( ) Review mode.
2. Press or to scroll through the saved pictures and video clips.
Viewing video clips
When an AVI file is displayed on the TV, press the OK button to view.
Note: To customize your camera settings and to view more options, press the MENU
button to display the Menu on the TV screen. The TV menu will display the same menu as
that shown on the LCD of the camera.
ERROR MESSAGES
ERROR MESSAGES
Error Messages on the LCD indicate if the memory is full or if there is a problem with the
memory.
Note: If the internal memory or the memory card is corrupted, the LCD will read ERROR!
The memory needs to be formatted. Please format all files to continue. (P.27)
Memory Full
1. Insert a memory card with 8MB or greater memory. Or
2. Replace the memory card with a new one. Or
3. Download the pictures/video clips onto your computer. Or
4. Delete some pictures/ video clips.
Error
Format the memory (p.27)
MEMORY FULL
ERROR!
2040 Manual-4L (512950-00) 2003:09:06 2:07 PM Page 42
Downloaded from www.Manualslib.com manuals search engine
43
TROUBLESHOOTING
En
TROUBLESHOOTING
TROUBLESHOOTING
POSSIBLE CAUSE
Battery is not installed correctly.
Battery is dead or weak.
Battery compartment door was not
closed correctly.
The camera needs to be reset.
The battery is drained of power.
The Auto time off setting is too
short.
Poor Lighting.
Lens is dirty.
Subject too close.
Subject is too close.
The flash is not needed.
Lighting condition is too bright.
The subject is too far away for the
flash to be affective.
Flash is not on.
The subject is in front of a bright
light.
Lighting condition is too dark.
SYMPTOM
Cannot turn on the camera.
The camera buttons do not
work.
The camera turns off during
usage.
Picture/Video clip has poor
image quality.
Flash picture taken is too
light.
Flash Picture taken is too
dark.
POSSIBLE SOLUTION
Install battery correctly using the
direction indicator inside the battery
compartment.
Replace battery.
Close the battery compartment
properly.
Open and close the
battery/memory card door.
Replace the battery with a new
one.
Your camera comes with an Auto
Time Off setting, so if the camera is
inactive for a certain amount of
time, it powers off to conserve
battery power. Please refer to the
Time-Out section on to set your
time limit.
Increase the lighting in the
surrounding area when taking web
camera/picture and video clips.
Clean the lens with a soft cloth.
See the Camera Maintenance
section.
Stand at least 3.9 ft. (1.2m) away
from the subject.
Move the subject further away from
the camera.
Change the camera setting to Auto
Flash.
Decrease exposure compensation.
Move the subject closer to the
camera, or move the camera closer
to the subject.
Turn the flash On.
Change the subject’s position.
Increase the exposure
compensation.
CAMERA DOES NOT WORK
PICTURES/VIDEO CLIPS
TAKING PICTURES
2040 Manual-4L (512950-00) 2003:09:06 2:07 PM Page 43
Downloaded from www.Manualslib.com manuals search engine
44
TROUBLESHOOTING
En
POSSIBLE CAUSE
There was insufficient flash for the
picture and the flash did not fire.
This happens when the camera is
set to Auto Flash.
Camera’s flash has been turned
off.
Flash did not charge.
Subject or camera was moved as
the picture was taken.
White balance is not set properly.
Memory is full.
Camera is not set in picture/video
clip taking mode.
Power is off.
Camera is in Auto Power off mode.
The SD card is locked or write
protected.
Viewfinder is dirty.
Something was blocking the lens
when taking the picture.
The picture was not centered
correctly in the viewfinder.
The battery level is low and the
camera does not have sufficient
power to complete picture capture.
The camera is not turned on.
The camera is processing a
picture; the ready LED light is still
blinking.
SYMPTOM
Flash did not work.
Picture taken is blurry.
There is something wrong
with the color of your
photographs.
Cannot take a picture or a
video clip.
Cannot take a picture or a
video clip when using an SD
memory card.
Picture is blurred when
looking through the
viewfinder.
Part of the picture/video clip
is missing.
Camera is not responding
during picture capture.
The shutter button does not
work.
POSSIBLE SOLUTION
This is normal as your cameras
electronic light sensor is
programmed to only fire the flash
when needed.
Turn the flash to Auto flash.
Verify that the Ready LED has
stopped blinking before taking a
picture.
Hold camera steady until picture is
taken.
Reset the white balance feature to
Auto, or for the specific lighting in
the surrounding area.
Delete all pictures and continue
shooting.
Download the stored files to your
PC and delete the files from the
camera internal memory or
memory card.
Insert a memory card with
sufficient memory available.
Set the camera to the proper mode
for recording video clips, or taking
photographs.
Turn the power on.
Remove the SD card from the card
slot and slide the lock switch to
unlock.
Clean the viewfinder with a soft
cloth or cotton swab. See the
Camera maintenance section.
Keep hands, fingers, etc. away
from the lens when taking a
picture.
Leave space around the subject
when centering the picture in the
viewfinder.
Replace battery.
Turn the camera on.
Wait until the light stops blinking
before attempting to take another
picture.
2040 Manual-4L (512950-00) 2003:09:06 2:07 PM Page 44
Downloaded from www.Manualslib.com manuals search engine
45
TROUBLESHOOTING
En
POSSIBLE CAUSE
Protective plastic film still in place
on the camera.
The LCD brightness level is set too
low.
Protective plastic film still in place
on the camera.
LCD is turned off.
The battery level is low.
Video playback files are missing.
The operating system may not be
allocating adequate resources to
download the pictures.
The Mini-USB cable is not plugged
into the camera.
The Mini-USB cable is not plugged
into the computer.
The computer is not powered On.
The Software is not installed on the
computer.
Software is not fully or correctly
installed on the computer.
The card may not be SD certified.
The card maybe corrupt.
No card is inserted in the camera.
SYMPTOM
The LCD display is dark.
The LCD screen looks milky
and/or scratched.
The LCD is not displaying
anything.
Cannot playback stored video
clips on the computer.
Camera is not responding
during picture download to
the PC.
Cannot transfer pictures to
the computer. The New
Hardware Wizard cannot
locate drivers. (Windows
98SE)
The camera does not
recognize your SD Card.
POSSIBLE SOLUTION
Make sure the protective plastic
film covering the LCD during
shipment has been removed.
Increase the brightness level on
your LCD to meet your personal
needs.
Make sure the protective plastic
film covering the LCD during
shipment has been removed.
Turn the LCD on by pressing
( ).
Replace the battery.
Install Microsoft DirectX 9.
Check that the Mini-USB cable is
plugged into the camera.
Check that the USB cable is
plugged into the computer.
Turn your computer On.
Disconnect the Mini-USB cable
from the camera and the computer.
Install the camera software and
drivers.
Disconnect the Mini-USB cable
from the camera and the computer.
Uninstall the software: Start-
Settings-Control Panel-
Add/Remove Programs. Re-install
the camera drivers.
Purchase a certified SD card.
Reformat the card.
Caution: Formatting erases all
pictures on the card.
Insert a card into the card slot.
LCD
VIEWING VIDEO CLIPS ON THE COMPUTER
INSTALLING SOFTWARE AND DRIVERS
SD/MMC CARDS
2040 Manual-4L (512950-00) 2003:09:06 2:07 PM Page 45
Downloaded from www.Manualslib.com manuals search engine
En
46
GETTING HELP
GETTING HELP
GETTING HELP
You can get help from our troubleshooting section, FAQ on our website or by contacting a
customer support representative.
Troubleshooting Section
If you need help with your camera, refer to the Troubleshooting section of this manual.
Website Customer Support/FAQ
Please visit our customer support website at: www.support.concord-camera.com to view
the FAQ section. Most support issues are answered in the Frequently Asked Questions (FAQ)
section.
Customer Support
Before You E-mail or Call us
If you have questions concerning the operation of the camera or software installation, you can
speak to or e-mail a customer service representative. Please have the following information
available:
Computer Information:
Operating System
Processor Speed (MHz)
Computer Make and Model
Amount of memory
Exact Error message received
CD-ROM Part Number
For Camera Support please contact:
Toll Free in the US and Canada:
• (866) 522-6372
Monday – Friday 8:00am – 8:00pm
Saturday: 9am – 5pm
Sunday: 12pm – 4pm
Web: www.concord-camera.com
Email: support@concord-camera.com
Toll Free in Europe:
• UK: 0800-1696482
• Spain: 900-973195
• Germany: 0800-1800563
• Italy: 800-781883
• France: 0800-917599
Toll:
• +31-53-4829779
Monday – Friday 09:00 – 18:00
Saturday & Sunday: closed
(Central European Time)
Email: support@concord-camera.com
For ArcSoft Technical Support, please contact:
In the USA and Canada:
ArcSoft, Inc.
46601 Fremont Blvd.
Fremont, CA 94538
Monday – Friday
8:30AM - 5:30PM (PST)
Tel: (510) 440-9901
Fax: (510) 440-1270
Web: www.arcsoft.com
E-mail: support@arcsoft.com
In Europe:
Arcsoft, Inc.
Unit, Shannon Industrial
Estate
Shannon, Co. Clare, Ireland
Tel: +353 (0) 61 702087
Fax: +353 (0) 61 702001
E-mail: europe@arcsoft.com
2040 Manual-4L (512950-00) 2003:09:06 2:07 PM Page 46
Downloaded from www.Manualslib.com manuals search engine
En
47
CAMERA SPECIFICATIONS
CAMERA
CAMERA
SPECIFICA
SPECIFICA
TIONS
TIONS
Sensor 2.0 Megapixels (1600 x 1200 resolution), CMOS sensor
Image Resolution 1600 x 1200 2 Megapixels
1280 x 960 1.2 Megapixels
640 x 480 VGA
Lens 9.9 mm f/3.2 glass lens, 5 elements in 5 groups (equivalent to 48mm lens on
35mm format)
Zoom 4x Digital Zoom in 0.2 steps
Focusing Range Focus free, 1.2m to infinity
Exposure Auto exposure and auto white balance
Internal Memory 7 MB Flash
Storage Capacity / 1600 x 1200 1280 x 960 640 x 480
Fine 9 images 21 images 42 images
Normal 14 images 33 images 63 images
Economy 47 images 111 images 178 images
Removable Storage SD/MMC card slot
Output File Format JPEG compression, AVI
Viewfinder Optical reversed Galilean type with 85% coverage and 0.45 X magnification
Self-Timer Approximately 10 seconds with blinking red LED
Flash Unit Auto-flash / Flash-off / Always-Flash, 2.5 maximum distance
Power Source 2x AA Batteries
Connectivity USB 1.1 connection direct to PC or Mac
SD/MMC connection to SD card reader
Video connection direct to TV (NTSC/PAL)
System Compatibility Windows 98SE, 2000, ME, XP and Mac OS 9 and higher
Video Clips QVGA resolution, 15fps, AVI format
Dimensions 123mm x 61mm x 34mm
PC Software ArcSoft PhotoImpression
Accessories CD-ROM for Windows:
Camera Drivers
Microsoft DirectX
ArcSoft PhotoImpression
Adobe Acrobat 5
Multilingual User’s Guide in PDF format
Multilingual Users Guide
Multilingual Quick Start Guide,
Mini-USB Cable,
TV Cable
Wrist Strap
Pouch
2x AA Alkaline Batteries
Resolution
Quality
Internal Memory
(Approx. with 7MB
of memory)
2040 Manual-4L (512950-00) 2003:09:06 2:07 PM Page 47
Downloaded from www.Manualslib.com manuals search engine
En
48
SAFETY TIPS AND MAINTENANCE
SAFETY
SAFETY
TIPS
TIPS
AND MAINTENANCE
AND MAINTENANCE
Cleaning the camera body:
1. Please use a soft dry cloth to clean the camera.
Cleaning the lens, viewfinder and LCD:
1. Blow off dirt or dust with a blower or canned air.
2. Gently wipe the lens, viewfinder and/or LCD with a micro-fiber cloth.
3. To remove dirt or residue, moisten the cloth with lens cleaning fluid and gently wipe the
lens, viewfinder and/or LCD.
CAUTION: Do not apply the fluid directly onto the lens, viewfinder or LCD.
Safety Tips
Precautions for the camera:
Do not attempt to modify this camera in any way. This may cause a fire or electric shock or
severe damage to the camera.
Do not use the flash in close proximity to people or animals.
When taking photographs, never point the lens of the camera directly into very strong light.
Please do not use this product in close proximity to flammable or explosive gases as this
could increase the risk of explosion.
For safety reasons keep this product and accessories out of reach of children or animals to
prevent accidents.
Keep the camera away from water and other liquids, and never let it get wet. Do not use
outdoors when it is raining or snowing.
Should any form of liquid enter the camera, do not use it. Switch the camera off, and then
remove the battery. Do not continue to use the camera as this may cause a fire or electric
shock.
Do not insert or drop metallic or inflammable foreign objects into the camera through
access points e.g. card slot and battery chamber. This may cause a fire or electric shock.
Do not operate this camera with wet hands. This could pose a risk of electric shock.
Under the environment with electrostatic discharge, the camera may malfunction and
require the user to reset the camera.
Under the environment with electrical fast transients (EFT), the camera may loss function
and require user to reset the camera.
Shielded cables must be used with this unit to ensure compliance with the Class B FCC
limits.
Please avoid using the camera in high or low temperature. Operation temperature range
32ºF - 104ºF (0ºC - 40ºC).
It is normal that the temperature of the camera body rises after being in use for a long
period.
Do not leave this camera in places subject to extremely high temperatures such as in a
sealed vehicle, direct sunlight or other places with extreme variances in temperature.
Exposure to extreme temperatures may adversely affect the camera's internal components
and could cause a fire.
Always use the camera and its accessories in a well-ventilated area.
2040 Manual-4L (512950-00) 2003:09:06 2:07 PM Page 48
Downloaded from www.Manualslib.com manuals search engine
En
49
SAFETY TIPS AND MAINTENANCE
Precautions for battery:
Use 2 x AA battery only.
Dispose of the battery in a manner that complies with applicable laws.
Leakage, overheating, or burst battery could result in fire or injury.
Do not short circuit, heat or dispose of battery in fire.
Do not use old battery with new ones, or mix brands of battery.
Ensure the battery are positioned correctly with regard to polarity (+/-).
Allowing dust to accumulate in the camera over a long period is hazardous and in extreme
circumstances may cause a fire. It is best to clean your camera prior to seasonal periods
of high humidity.
Battery may lose power if kept inside the camera for a long time without using. Please
remove the battery while the camera is not in use.
Do not use manganese battery as they cannot supply sufficient power to support the
camera's operations. Battery may not work normally under 32ºF (0ºC).
Precautions for Memory Cards:
In the event of malfunction or damage, it is possible that data may be lost. Concord
Camera is not responsible in any way for such data loss.
Do not touch the terminals with hands or metal objects.
Keep dust, water and foreign objects away from the terminal section.
•Avoid heat, liquid and direct sunlight when using and for storage.
Do not open the battery/memory card door or remove the Memory Card while data is being
read or written.
Do not dismantle or modify.
The recorded data may be lost if the card is affected by strong static electricity or electrical
shock, or during card repair or malfunction.
When using Memory Cards do not change the attributes (read-only, etc.) of the files
(pictures (JPEG) or video clips (AVI) on the card. Doing so may prevent the camera from
working properly when deleting, etc.
Do not change the file names or the directory name of the pictures or video clips using a
computer or save files other than pictures or video clips taken by this camera onto the SD
memory card. Pictures or video clips that have been edited or added to the SD memory
card with the computer may not play back and it may cause the camera to malfunction.
The SD Memory Card includes a write-protect switch. Sliding this switch downward
prevents data from being written to the card and pictures and video clips saved on the
card are protected. Please note that pictures and video clips cannot be taken or deleted
when the write-protect switch is on.
When using a large-capacity card, writing, reading and deletion may take some time.
Do not store the card in places with high humidity, dusty places or where static electricity
or electromagnetic fields are likely to occur.
Images stored in the memory card may be ruined or damaged if you turn off the camera
while it is in process of reading, writing or formatting etc.
SD and MMC cards are delicate electronic devices. Please do not bend or drop them
Please do not place the card in or near to an environment of strong electronic or magnetic
fields such as loud speakers or TV receivers.
Please keep the card in its bag or case when not in use.
It's normal that the card is warm after use.
Please make sure you switch off the camera before you remove the card.
2040 Manual-4L (512950-00) 2003:09:06 2:07 PM Page 49
Downloaded from www.Manualslib.com manuals search engine
En
50
REGULATORY INFORMATION
REGULA
REGULA
T
T
OR
OR
Y
Y
INFORMA
INFORMA
TION
TION
FCC INFORMATION
FCC WARNING: This equipment meets the limits for a Class B digital device, pursuant to Part
15 of FCC rules. Only the cable supplied with the camera should be used. Operation with
other cables is likely to result in interference to radio and TV reception and could void the
users authorization to operate this equipment. This device complies with Part 15 of the FCC
Rules. Operation is subject to the following two conditions:
This device may not cause harmful interference.
This device must accept any interference received, including interference that may cause
undesired operation.
Tested to comply
with FCC standards
for HOME OR OFFICE USE
Changes or modifications not expressly approved by the manufacturer may void the users
authority to operate this equipment.
USER INFORMATION
NOTE: This equipment has been tested and found to comply with the limits for a class B
digital device, pursuant to Part 15 of the FCC Rules. These limits are designed to provide
reasonable protection against harmful interference in a residential installation. This equipment
generates, uses and can radiate radio frequency energy and, if not installed and used in
accordance with the instructions, may cause harmful interference to radio communications.
However, there is no guarantee that interference will not occur in a particular installation.
If this equipment does cause harmful interference to radio or television reception, which can
be determined by turning the equipment on and off, the user is encouraged to try to correct
the interference by one or more of the following measures:
Reorient or relocate the receiving antenna.
Increase the separation between the equipment and receiver.
Connect the equipment into an outlet on a circuit different from that to which the receiver is
connected.
Consult the dealer or an experienced radio/TV technician for help.
VCCI INFORMATION
This is a Class B product, to be used in a domestic environment, based on the Technical
Requirement of the Voluntary Control Council for Interference (VCCI) from Information
Technology Equipment. If this is used near a radio or television receiver in a domestic
environment, it may cause radio interference. Please install and use the equipment according
to this instruction manual.
- This product is in conformity with Directive 89/336/EEC.
Concord, Concord Eye-Q and the Concord Eye-Q logo are registered trademarks or trademarks of Concord Camera
Corp., in the United States and/or other countries. Microsoft and Windows are either registered trademarks or
trademarks of Microsoft Corporation in the United States and/or other countries. All other brands and product names
are either registered trademarks or trademarks of their respective owners.
2040 Manual-4L (512950-00) 2003:09:06 2:07 PM Page 50
Downloaded from www.Manualslib.com manuals search engine
15

Hulp nodig? Stel uw vraag in het forum

Spelregels

Misbruik melden

Gebruikershandleiding.com neemt misbruik van zijn services uitermate serieus. U kunt hieronder aangeven waarom deze vraag ongepast is. Wij controleren de vraag en zonodig wordt deze verwijderd.

Product:

Bijvoorbeeld antisemitische inhoud, racistische inhoud, of materiaal dat gewelddadige fysieke handelingen tot gevolg kan hebben.

Bijvoorbeeld een creditcardnummer, een persoonlijk identificatienummer, of een geheim adres. E-mailadressen en volledige namen worden niet als privégegevens beschouwd.

Spelregels forum

Om tot zinvolle vragen te komen hanteren wij de volgende spelregels:

Belangrijk! Als er een antwoord wordt gegeven op uw vraag, dan is het voor de gever van het antwoord nuttig om te weten als u er wel (of niet) mee geholpen bent! Wij vragen u dus ook te reageren op een antwoord.

Belangrijk! Antwoorden worden ook per e-mail naar abonnees gestuurd. Laat uw emailadres achter op deze site, zodat u op de hoogte blijft. U krijgt dan ook andere vragen en antwoorden te zien.

Abonneren

Abonneer u voor het ontvangen van emails voor uw Concord EYE Q 2040 bij:


U ontvangt een email met instructies om u voor één of beide opties in te schrijven.


Ontvang uw handleiding per email

Vul uw emailadres in en ontvang de handleiding van Concord EYE Q 2040 in de taal/talen: Engels als bijlage per email.

De handleiding is 0,87 mb groot.


U ontvangt de handleiding per email binnen enkele minuten. Als u geen email heeft ontvangen, dan heeft u waarschijnlijk een verkeerd emailadres ingevuld of is uw mailbox te vol. Daarnaast kan het zijn dat uw internetprovider een maximum heeft aan de grootte per email. Omdat hier een handleiding wordt meegestuurd, kan het voorkomen dat de email groter is dan toegestaan bij uw provider.

Stel vragen via chat aan uw handleiding

Stel uw vraag over deze PDF

Uw handleiding is per email verstuurd. Controleer uw email

Als u niet binnen een kwartier uw email met handleiding ontvangen heeft, kan het zijn dat u een verkeerd emailadres heeft ingevuld of dat uw emailprovider een maximum grootte per email heeft ingesteld die kleiner is dan de grootte van de handleiding.

Er is een email naar u verstuurd om uw inschrijving definitief te maken.

Controleer uw email en volg de aanwijzingen op om uw inschrijving definitief te maken

U heeft geen emailadres opgegeven

Als u de handleiding per email wilt ontvangen, vul dan een geldig emailadres in.

Uw vraag is op deze pagina toegevoegd

Wilt u een email ontvangen bij een antwoord en/of nieuwe vragen? Vul dan hier uw emailadres in.


Info