497697
7
Verklein
Vergroot
Pagina terug
1/19
Pagina verder
1312
6.1 Getting Started 6.1 Getting Started
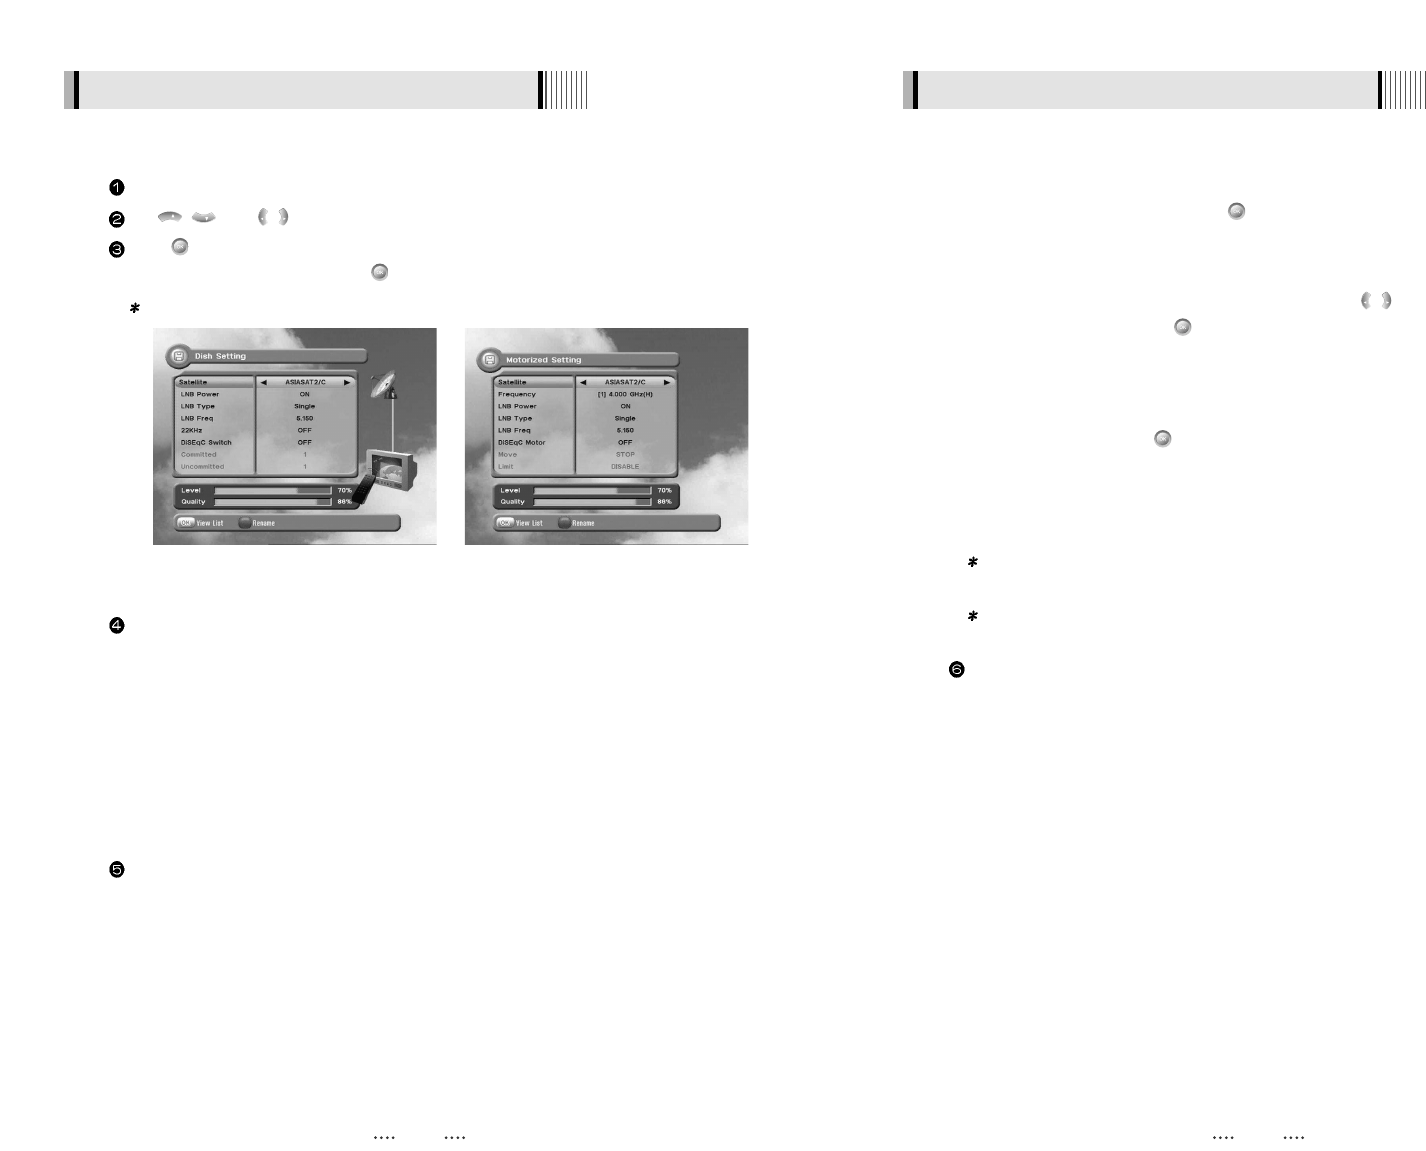
Select the item that you want to edit, and set its parameters as desired. <Dish Setting>
- LNB Power : Select among ON/OFF/13V/18V.
- LNB Type : Select among Single/Universal/OCS.
- LNB Freq : Set the frequency of the LNB oscillator.
- 22KHz : When not AUTO, set the signal path from LNB or switch by selecting a control signal
among 0/22KHz.
- DiSEqC switch : Select DiSEqC protocol among OFF/1.0/1.1 as appropriate for your
configuration.
- Committed/Uncommitted : Select the DiSEqC port.
Select the item that you want to edit and set its parameters as desired. <Motorized Setting>
- Frequency : If the default TP frequency is not appropriate, you can select another TP
frequency at which to check for signal.
- DiSEqC Motor : Select DiSEqC protocol among OFF/1.2/USALS as appropriate for your
Motor.
(
When the DiSEqC Motor parameter is set as 1.2
)
- Move : You can move the dish to the West/East.
- Limit : If you want to set limits, press .
- Disable Limit : You can disable the East and West limits.
- Goto Center : Move the dish to the initial 0 position.
- Set East / West Limit : Move the dish East or West using / .
Press to set East or West limit.
(
When the DiSEqC Motor parameter is set as USALS
)
- Sat Degree : Satellite location.
- Antenna Position : Press .
- Goto Reference : Move the dish to the reference 0 position.
- Antenna Longitude : Your longitude at present.
- Antenna Latitude : Your latitude at present.
Note : You need to know what LNB you are using to correctly set the L.O. (local
oscillator) frequency.
Note : You need to understand how your receiver is connected to properly set the
22KHz and DiSEqC.
When you are done, press the EXIT button.
VOL
VOL
<Figure 6-2> <Figure 6-3>
Press the MENU button to display the main menu.
Use / and / to move in the menu.
Press on ‘Dish Setting’. The following window will appear. <Figure 6-2>
If you have a motorized dish, press on ‘Motorized Setting’. < Figure 6-3>
Note : Enter a 4-Digit password if need arise. The default password is ‘0000’.
VOL
VOL
CH
CH
2) Antenna Setup
7

Hulp nodig? Stel uw vraag in het forum

Spelregels

Misbruik melden

Gebruikershandleiding.com neemt misbruik van zijn services uitermate serieus. U kunt hieronder aangeven waarom deze vraag ongepast is. Wij controleren de vraag en zonodig wordt deze verwijderd.

Product:

Bijvoorbeeld antisemitische inhoud, racistische inhoud, of materiaal dat gewelddadige fysieke handelingen tot gevolg kan hebben.

Bijvoorbeeld een creditcardnummer, een persoonlijk identificatienummer, of een geheim adres. E-mailadressen en volledige namen worden niet als privégegevens beschouwd.

Spelregels forum

Om tot zinvolle vragen te komen hanteren wij de volgende spelregels:

Belangrijk! Als er een antwoord wordt gegeven op uw vraag, dan is het voor de gever van het antwoord nuttig om te weten als u er wel (of niet) mee geholpen bent! Wij vragen u dus ook te reageren op een antwoord.

Belangrijk! Antwoorden worden ook per e-mail naar abonnees gestuurd. Laat uw emailadres achter op deze site, zodat u op de hoogte blijft. U krijgt dan ook andere vragen en antwoorden te zien.

Abonneren

Abonneer u voor het ontvangen van emails voor uw Clarke-tech 1500 bij:


U ontvangt een email met instructies om u voor één of beide opties in te schrijven.


Ontvang uw handleiding per email

Vul uw emailadres in en ontvang de handleiding van Clarke-tech 1500 in de taal/talen: Engels als bijlage per email.

De handleiding is 2,83 mb groot.


U ontvangt de handleiding per email binnen enkele minuten. Als u geen email heeft ontvangen, dan heeft u waarschijnlijk een verkeerd emailadres ingevuld of is uw mailbox te vol. Daarnaast kan het zijn dat uw internetprovider een maximum heeft aan de grootte per email. Omdat hier een handleiding wordt meegestuurd, kan het voorkomen dat de email groter is dan toegestaan bij uw provider.

Uw handleiding is per email verstuurd. Controleer uw email

Als u niet binnen een kwartier uw email met handleiding ontvangen heeft, kan het zijn dat u een verkeerd emailadres heeft ingevuld of dat uw emailprovider een maximum grootte per email heeft ingesteld die kleiner is dan de grootte van de handleiding.

Er is een email naar u verstuurd om uw inschrijving definitief te maken.

Controleer uw email en volg de aanwijzingen op om uw inschrijving definitief te maken

U heeft geen emailadres opgegeven

Als u de handleiding per email wilt ontvangen, vul dan een geldig emailadres in.

Uw vraag is op deze pagina toegevoegd

Wilt u een email ontvangen bij een antwoord en/of nieuwe vragen? Vul dan hier uw emailadres in.


Info