mittelt. (Anzeige von 50-200) nur zur Orientierung,
keine medizinisch verwertbaren Daten).
Time/Zeit: Zeigt die Trainingszeit in Minuten und
Sekunden an
Distance/Entfernung: Zeigt die Entfernung in km
an
Calories/Kalorien: Zeigt den ca. Kalorienverbrauch
in kcal. an
Speed/Geschwindigkeit: Zeigt die Geschwindig-
keit in km/h an
Kinomap APP
Kinomap APP ermöglicht mit Android oder IOS Endgeräten
unterhaltsam und interaktiv zu trainieren und Trainingsdaten
abzuspeichern.Scannen Sie den nebenstehenden QR Code
oder Verwenden Sie die Suchfunktion beim Playstore (Android)
oder APP Store (IOS) um die Kinomap APP herunterzuladen.
Registrieren Sie sich und folgen Sie den Anweisungen der APP.
Aktivieren Sie Bluetooth auf dem Smartphone oder Tablet und
wählen Sie in der APP über das Menü den Gerätemanager aus
und dann dort die Kategorie „Laufband„ an. Wählen Sie dann
über das Hersteller- Logo „Christopeit Sport„ IhreTypbezeich-
nung aus um das Sportgerät zu verbinden. Je nach Sportgerät
werden unter-schiedliche Funktionen über Bluetooth von der
App erfasst, bzw. Daten ausgetauscht.
Achtung:Die Kinomap APP bietet
eine kostenlose Testversion für 14
Tage. Danach fallen Gebühren an
welche auf der Homepage von
Kinomap aufgeführt sind. Weitere
Informationen finden Sie unter:
https://www.kinomap.com/de/
11
Deutsch
Drücken der Stop-Taste beendet/pausiert das Programm und das Laufband verringert die Geschwindigkeit bis die Lauffläche steht. Es erscheint ein
Pause Symbol im Display und es besteht die Möglichkeit durch Drücken der Start-Taste das Programm fortzusetzen oder durch Drücken der Stop-
Taste das Programm zu beenden. Erneutes Drücken der Stop-Taste zeigt die erreichten Daten der vorherigen Trainingseinheit an und nochma-
liges Drücken der Stop-Taste setzt dann die Anzeige auf Null zurück.
Manuelles Programm mit Vorgabe von Trainingszielen
Drücken Sie die “ ” -Taste 1-3 mal, um eine Zeit/Entfernung oder Kalorienverbrauch für Ihr Training als Ziel einzustellen.
Target/Ziel-Anzeige:
Wenn ein Trainingsziel wie Zeit, Entfernung oder Kalorien vorgegeben wurde, dann zeigt diese
Anzeige immer aktuell an, wieviel % von dem Ziel bisher erreicht wurde.
Wählen Sie die „Zeitprogramm“ (Time) mittels der -Taste aus und es erscheint der
Vorgabewert 15:00Min. Geben Sie Ihre gewünschte Trainingszeit ein. Drücken Sie die Start-
Taste um dieses Programm zu trainieren. Die Trainingszeitanzeige wird aufsteigend bis
auf die eingestellte Zeit gezählt und bei Erreichen schaltet sich das Laufband aus. Die Zeit kann
von 5-99Min. eingestellt werden.
Time window
Wählen Sie das „Entfernungsprogramm“ (Distance) mittels der -Taste aus und es
erscheint 1.00Km. Geben Sie Ihre gewünschte Entfernung ein. Drücken Sie die Start-Taste
um dieses Programm zu trainieren. Die Entfernungsanzeige aufsteigend bis auf die eingestellten
Entfernung gezählt und bei erreichen schaltet sich das Laufband aus. Die Entfernung kann von
0.50 -- 99.9Km eingestellt werden.
Wählen Sie das „Kalorienprogramm“ (Calories) mittels der -Taste aus und es erscheint
der Vorgabewert 50.0kcal. Geben Sie Ihr gewünschtes Kalorienziel ein. Drücken Sie die Start-
Taste um dieses Programm zu trainieren. Die Kalorienanzeige wird aufsteigend bis auf
den eingestellte Kalorienewert gezählt und bei erreichen schaltet sich das Laufband aus. Der
Kalorienwert kann von 10.0 -- 999.0 kcal eingestellt werden.
Distance
window
Calories
window
12
Wettkampfprogramme
Drücken Sie die “ ” -Taste 4 mal, um zum ersten Wettkampfprogramm 3,0km zu gelangen. Mit jedem weiteren Drücken der “ ”-Taste erscheinen
die weiteren Wettkampfprogramme 5.0km, 10.0km, 15.0km, 21,1km (Halbmarathon) und 42,19km (Marathon).
Nutzer C ist
das System
Anzeige der Entfernung
in % für den Nutzer C
(System)
Nutzer U ist
der Benutzer
Anzeige der Entfernung
in % für den Nutzer U
(Benutzer)
Die Zeit der Wettbewerbsprogramme variiert je nach Modell und dient nur zur Orientierung.
Verändern Sie die Zeit mittels der +/- Tasten oder s / t-Tasten. auf Ihr gewünschtes Wettbewerbsziel. Drücken Sie die Start-Taste
um dieses Programm zu trainieren.
Anzeige des Programmes und der Trainingszeit. Geben Sie Ihre gewünschte Trainingszeit mittels der +/- Tasten
oder s / t-Tasten ein. Drücken Sie die Start-Taste um dieses Programm zu trainieren. Die Trainingszeit-
anzeige wird aufsteigend gezählt. Die Zeit kann von 5-99Min. eingestellt werden.
Schematische Darstellung der Geschwindigkeit und Steigung bei den Trainingsprogrammen. Die 24 Trainings- und 3
User-Programme sind unterteilt in 10 Balken. Die eingestellte Trainingszeit teilt sich auf die 10 Balken auf, sodass z.B.
bei 10Min. Trainingszeit jeder Balken 1Min. dauert, bei z.B. 20Min. Trainingszeit jeder Balken 2Min usw.
Hellblauer Balken zeigt die Höhe der Geschwindigkeit an. Die Geschwindigkeit kann während des Programmablaufes
durch Drücken der +/- Tasten. beeinflusst werden, schaltet aber bei Erreichen des nächsten Balken auf die im
Trainingsprogramm vorgegebene Geschwindigkeit um.
Dunkelblauer Balken zeigt die Höhe der Steigung an. Die Steigung kann während des Programmablaufes durch
Drücken der s / t-Tasten. beeinflusst werden, schaltet aber bei Erreichen des nächsten Balken auf die im
Programm vorgegebene Steigung um.
Verändern Sie die Trainingszeit mittels der +/- Tastenoder s / t-Tastenauf Ihr gewünschtes Trainingsziel. Drücken Sie die Start-
Taste um dieses Programm zu trainieren. Nach Ablauf des Programmes stoppt das Laufband langsam und zeigt die erreichten Daten an.
Trainingsprogramme
Drücken Sie die “ ”-Taste einmal, um zum ersten Programm der 24 verschiedenen Trainingsprogramme zu gelangen. Mit jedem weiteren Tasten-
druck erscheint das nächste Programm. Nach den 24 Trainingsprogrammen folgen die 3 individuelle Benutzerprogramme (U1-U3), gefolgt von 2 Herzfre-
quenzprogrammen (HP1+HP2) und der BMI Berechnung.
13
Deutsch
Übersicht von Geschwindigkeit und Steigung der 24 Trainingsprogramme
Die Trainingszeit der 24 Trainingsprogramme ist
aufgeteilt in 10 Balken
12345678910
P1
km/h2434354253
ISteigungs-
stufe
1233122322
P2
km/h2546464242
Steigungs-
stufe
1233223422
P3
km/h2545454232
Steigungs-
stufe
1223122221
P4
km/h3675859643
Steigungs-
stufe
2233224622
P5
km/h3675867643
Steigungs-
stufe
1243224521
P6
km/h2864597543
Steigungs-
stufe
2262342221
P7
km/h2674474242
Steigungs-
stufe
456699101263
P8
km/h2468786232
Steigungs-
stufe
3544344332
P9
km/h2455656332
Steigungs-
stufe
3534234232
P10
km/h2353353633
Steigungs-
stufe
4436788633
P11
km/h25810695322
Steigungs-
stufe
13581076323
P12
km/h2554464234
Steigungs-
stufe
3567129111163
P13
km/h2747894532
Steigungs-
stufe
5664658942
P14
km/h2654865233
Steigungs-
stufe
56584551063
P15
km/h2654875332
Steigungs-
stufe
3456355643
P16
km/h2575865242
Steigungs-
stufe
156812910953
P17
km/h25678910534
Steigungs-
stufe
3568658753
P18
km/h2356869652
Steigungs-
stufe
57586591062
P19
km/h3765976352
Steigungs-
stufe
35685651283
P20
km/h37910111210852
Steigungs-
stufe
2567658632
P21
km/h36879105832
Steigungs-
stufe
36899681063
P22
km/h358691081263
Steigungs-
stufe
26810121012852
P23
km/h359111286532
Steigungs-
stufe
268109781063
P24
km/h381011121010853
Steigungs-
stufe
368910129632
Die Trainingszeit der 24 Trainingsprogramme ist
aufgeteilt in 10 Balken
12345678910
Balken
ProgrammÕ
Õ
Balken
ProgrammÕ
Õ
14
Verändern Sie zunächst die Trainingszeit mittels der +/- Tastenoder s / t -Tastenauf Ihr gewünschtes Trainingsziel und bestätigen
Sie die Eingabe durch Drücken der “ ” -Taste. Dann kann dem ersten Balken eine Geschwindigkeit mittels der +/- Tastenoder Direktwahl-
tasten , , , zugeordnet werden. Gleiches gilt für die Steigung, welche mittels ders / t -Tastenoder Direktwahltasten für
Steigung , , , eingestellt werden kann. Bestätigen Sie die Eingaben durch Drücken der “ ” -Taste und dem zweiten Balken
kann die Geschwindigkeit und Steigung zugeordnet werden. Sind alle Balken eingestellt, drücken Sie die Start-Taste um dieses Programm zu trainie-
ren. Nach Ablauf des Programmes stoppt das Laufband langsam und zeigt die erreichten Daten an.
Herzfrequenzprogramme (HP1-HP2)
Durch Drücken der “ ” -Taste gelangen Sie nach den 24 Trainingsprogrammen und den 3 individuellen Benutzerprogramme (U1-U3) zu den Pulspro-
grammen HP1 und HP2. Diese funktionieren ausschließlich mit Pulsmessung und sind pulsgesteuert. Solange wie der aktuelle Puls dann niedriger ist als
der eingestellte Pulswert, wird die Geschwindigkeit alle 10 Sekunden um 0,5km/h erhöht. Das Programm HP 1 stellt eine maximale Laufgeschwindigkeit
von 10km/h ein während das Programm HP 2 bis max. 12km/h funktioniert. Ist bis zur max. Geschwindigkeit der Programme HP 1/HP 2 der eingestellte
Pulswert noch nicht erreicht wird die Steigung anstatt der Geschwindigkeit stufenweise erhöht. Wenn der aktuelle Puls höher ist als der eingestellte Puls-
wert wird die Geschwindigkeit/Steigung reduziert.
Individuelle Benutzerprogramme U1-U3
Durch Drücken der “ ”-Taste gelangen Sie nach den 24 Trainingsprogrammen zu den 3 individuellen Benutzerprogramme (U1-U3). Hier können Sie
Ihr eigenes Trainingsprofil einstellen, welches dauerhaft gespeichert bleibt oder bei Bedarf überschrieben werden kann.
Verändern Sie die Trainingszeit mittels der +/- Tastenoder s / t -Tastenauf Ihr gewünschtes Trainingsziel und bestätigen Sie die
Eingabe durch Drücken der “ ”-Taste. Stellen Sie dann Ihr Alter mittels der +/- Tasten oder s / t -Tasten ein und bestätigen
Sie die Eingabe durch Drücken der “ ”-Taste. Die Target Pulse Anzeige macht dann einen Vorschlag für eine Pulsobergrenze entsprechend Ihrer
Alterseingabe. Diese können Sie mittels der +/- Tastenoder s / t -Tastenauf Ihre gewünschte Pulsobergrenze verändern und durch
Drücken der “ ”-Taste bestätigen. Drücken Sie die Start-Tasteum dieses Programm zu trainieren. Die erste Trainingsminute mit 1km/h gilt
als Aufwärmphase und dabei verstellt sich die Geschwindigkeit nicht. Nach Ablauf des Programmes stoppt das Laufband langsam und zeigt die erreich-
ten Daten an.
Anzeige der Trainingszeit: Die Trai-
ningszeit wird aufsteigend gezählt und
angezeigt. Die Zeit kann von 5-99Min.
eingestellt werden.
Anzeige des Alters: Stellen Sie Ihr Alter
ein. (15-80Jahren)
Anzeige der Pulsobergrenze: Stellen Sie
Ihren gewünschten Trainings-puls ein.
(Der Einstellbereich zwischen min./ max.
ist altersabhängig.)
Anzeige der max. Geschwindigkeit: Bei
Programm HP1 ist die max. Geschwin-
digkeit 10.0km/h und bei HP 2 ist diese
12.0km/h
15
Deutsch
BMI-Berechnung
Durch Drücken der “ ” -Taste gelangen Sie nach den 24 Trainingsprogrammen, den 3 individuellen Benutzerprogramme (U1-U3) und den Pulspro-
grammen HP1/HP2 zu dem BMI Rechner. Geben Sie nacheinander Ihre persönlichen Daten wie Geschlecht, Alter, Größe und Gewicht mittels der +/-
Tasten ein und bestätigen Sie die Eingaben jeweils mit der -Taste. Dann umgreifen Sie mit beiden Händen die Handpulsmessung und das
Display zeigt die Bereitschaft für die Funktion an „-- --“ und dann nach ca. 8Sek. den BMI Wert.
AnzeigeDaten
F-1Sex - Geschlecht Male - Männlich Female -
Weiblich
F-2Age - Alter 10 — 99 Jahre
F-3Height - Größe 100 — 200cm
F-4Weight - Gewicht 20 — 150kg
F-5BMI
≤19Untergewicht
=(20—25)Untergewicht
=(26—29)Übergewicht
≥30Adipös
Musik/Video abspielen
Drücken Sie die Anwahl-Taste einmal um zu den Audiodateien (MP3) zu gelangen. Erneutes Drücken der Anwahl-Taste ruft dann die Video-
dateien auf und durch nochmaliges Drücken gelangt man wieder zum Startbild.
Durch Drücken der Wiedergabe/Pause-Taste startet die Audio- oder Videodatei und ist grün hinterlegt. Die blaue Linie zeigt vorne den aktuellen Ab-
spielstatus auf und am Ende die gesamte Abspieldauer. Auch wird die Datengröße der Dateien angezeigt. Erneutes Drücken der Wiedergabe/Pause-Taste
stoppt/pausiert die Audio- oder Videodatei. Drücken der Vorwärts-Taste wählt das nächste Lied/Video aus. Drücken der Rückwärts-Taste
wählt das vorherige Lied/Video aus. Es sind seitens des Herstellers 2 Lieder und ein Video im Speicher hinterlegt. Weitere Audio- oder Videodateien kön-
nen über den USB Anschluss (MP3,ape, /MP4,mov,-Dateien) geladen und abgespielt werden. Mit den Lautstärke-Tasten für Leiser und Lauter
kann die gewünschte Lautstärke eingestellt werden. Bitte berücksichtigen Sie, dass ein Video anschauen Ihren Laufrhythmus beeinträchtigen kann.
Um Audio-/Video-Daten in den Computer hochzuladen, stecken Sie Ihr Speichergerät an den USB-Anschluss, welcher sich auf der Unterseite links am
Computer auffindet. Sobald die Verbindung hergestellt wurde wird im unteren Bereich des Displays der Ladevorgang angezeigt.
16
Einstellungsmöglichkeiten/Information des Displays
Information zur Wartung der Lauffläche mit Silicon-Öl.
Alle 300km werden Sie durch diesen Hinweis daran erinnert,
dass eine Laufflächen-Wartung durchgeführt werden muss.
Siehe Rubrik: Pflegen der Lauffläche. Der Hinweis kann
durch Drücken der Stop-Taste für 3 Sekunden entfernt
werden.
Die Entfernungs- und Schritte- Anzeige kann deaktiviert werden. Seitens des Herstellers zeigt der Laufbandcomputer nur Schritte und Entfernung an
wenn auch darauf gelaufen wird. Das Symbol unten rechts im Display bei Real Run zeigt die Aktivierung oder Deaktivierung an.
Die Aktivierung/Deaktivierung ist wie folgt.
Drücken Sie nacheinander folgende Tastenkombination:
dann und
Das Laufband verfügt über eine Information der Gesamtlaufleistung und Wartungserinnerung für die Lauffläche.
Um die Gesamtlaufleistung, den Wartungs-intervall, sowie die
verbleibende Entfernung bis zur nächsten Wartung einzusehen,
drücken Sie folgende Tastenkombination:
dann
Anzeige des Systems/Software.
Um die installierte Software einzusehen drücken Sie folgende
Tastenkombination:
dann
Startbildanzeige ändern
Um die Startbildanzeige zu verändern drücken Sie folgende
Tastenkombination:
dann und
17
Deutsch
E01 – Kommunikationsstörung
-Verbindungskabel prüfen
-Verbindungskabel austauschen
-Computer austauschen
-Steuerplatine austauschen
E02 - Überlastungsstörung
-Motorkabel prüfen
-Motor prüfen
-Steuerplatine prüfen
E03 – Geschwindigkeitsstörung
-Sensorkabel prüfen
-Sensorkabel austauschen
-Steuerplatine austauschen
E04 – Steigungsstörung
-Steigungsmotorkabel prüfen
-Steigungsmotor austauschen
-Steuerplatine austauschen
E05 – Überlastungsschutz
-Entlasten des Nutzergewichtes
-Antrieb prüfen/Lauffläche warten
-Motoraustausch
-Austausch der Steuerplatine
E06 - Motorstörung
-Motorkabel prüfen
-Motor austauschen
E08 – Speicherstörung
-Speicher IC überprüfen
-Austausch der Steuerplatine
E09 – Klappfunktionsstörung
-Klappen Sie das Laufband aus
-Austausch der Steuerplatine
Fehlercodes und Fehlerdiagnose
Bei Funktionsstörungen kann nebenstehende Auflistung von Fehlermeldungen eine Hilfe für versierte Personen sein. Grundsätzlich gilt, dass elektrische
Reparaturarbeiten nur unter Einhaltung der einschlägigen Sicherheitsvorschriften durchzuführen sind. Nähere Informationen und Hilfestellung bei Funkti-
onsstörungen gibt unsere Service-Abteilung (Kontaktdaten siehe letzte Seite).
18
Berechnungsformeln: Maximalpuls = 220 - Alter
90% des Maximalpuls = (220 - Alter) x 0,9
85% des Maximalpuls = (220 - Alter) x 0,85
70% des Maximalpuls = (220 - Alter) x 0,7
Trainingsanleitung
Um spürbare körperliche und gesundheitliche Verbesserungen zu erreichen,
müssen für die Bestimmung des erforderlichen Trainingsaufwandes die
folgenden Faktoren beachtet werden:
1. Intensität:
Die Stufe der körperlichen Belastung beim Training muß den Punkt der
normalen Belastung überschreiten, ohne dabei den Punkt der Atemlosig-
keit und /oder der Erschöpfung zu erreichen. Ein geeigneter Richtwert für
ein effektives Training kann dabei der Puls sein. Dieser sollte sich während
des Trainings in dem Bereich zwischen 70% und 85% des Maximalpulses
befinden (Ermittlung und Berechnung siehe Tabelle und Formel).
Während der ersten Wochen sollte sich der Puls während des Trainings
im unteren Bereich von 70% des Maximalpulses befinden. Im Laufe der
darauffolgenden Wochen und Monate sollte die Pulsfrequenz langsam bis
zur Obergrenze von 85% des Maximalpulses gesteigert werden. Je größer
die Kondition des Trainierenden wird, desto mehr müssen die Trainingsan-
forderungen gesteigert werden, um in den Bereich zwischen 70% und 85%
des Maximalpulses zu gelangen. Dieses ist durch eine Verlängerung der Trai-
ningsdauer und/oder einer Erhöhung der Schwierigkeitsstufen möglich.
Wird die Pulsfrequenz nicht in der Computeranzeige angezeigt oder wollen
Sie sicherheitshalber Ihre Pulsfrequenz, die durch eventuelle Anwendungs-
fehler o.ä. falsch angezeigt werden könnte, kontrollieren, können Sie zu
folgenden Hilfsmitteln greifen:
a. Puls-Kontroll-Messung auf herkömmliche Weise (Abtasten des Pulsschla-
ges z.B. am Handgelenk und zählen der Schläge innerhalb einer Minute).
b. Puls-Kontroll-Messung mit entsprechend geeigneten und geeichten
Our products are all TÜV-GS tested and therefore represent the highest
current safety standards. However, this fact does not make it unnecessary
to observe the following principles strictly.
1. Assembly the machine exactly as described in the installation instructions
and use only the enclosed, specific parts of the machine contained in the
parts list. Before assembling, verify the completeness of the delivery against
the delivery notice and the completeness of the carton against the montage
steps in the installation and operating instructions. In case of repair please
ask your dealer for advice.
2.Check the firm seating off all screws, nuts and other connections before
using the machine for the first time and at regular intervals (every 1-2 months)
to ensure that the trainer is in a safe condition. Replace defective compo-
nents immediately and/or keep the equipment put of the use until repair.
3. Set up the machine in a dry, level place and protect it from moisture and
water. Uneven parts of the floor must be compensated by suitable measures
and by the provided adjustable parts of the machine if such are installed.
Ensure that no contact occurs with moisture or water.
4.Place a suitable base (e.g. rubber mat, wooden board etc.) beneath the
machine if the area of the machine must be specially protected against
indentations, dirt etc.
5.Before beginning training, remove all objects within a radius of 2 metres
from the machine.
6. Do not use aggressive cleaning agents to clean the machine and employ
only the supplied tools or suitable tools of your own to assemble the machine
and for any necessary repairs. Remove drops of sweat from the machine
immediately after finishing training.
7.WARNING! Systems of the heart frequency supervision can be inexact.
Excessive training can lead to serious health damage or to the death. Consult
a doctor before beginning a planned training programme. He can define
the maximum exertion (pulse, Watts, duration of training etc.) to which you
may expose yourself and can give you precise information on the correct
posture during training, the targets of your training and your diet. Never
train after eating large meals.
8. Only train on the machine when it is in correct working order. Use original
spare parts only for any necessary repairs. WARNING: Replace the worm
parts immediately and keep this equipment out of use until repaired.
9.When setting the adjustable parts, observe the correct position and the
marked, maximum setting positions and ensure that the newly adjusted
position is correctly secured. Please remove the Tools you need to adjust
after adjusting a new position.
10.Unless otherwise described in the instructions, the machine must only
be used for training by one person at a time. The exercise time should not
overtake 90 min./daily.
11.Wear training clothes and shoes which are suitable for fitness training
with the machine. Your clothes must be such that they cannot catch dur-
ing training due to their shape (e.g. length). Your training shoes should be
appropriate for the trainer, must support your feet firmly and must have
non-slip soles.
12.WARNING! If you notice a feeling of dizziness, sickness, chest pain or
other abnormal symptoms, stop training and consult a doctor.
13.Never forget that sports machines are not toys. They must therefore
only be used according to their purpose and by suitably informed and
instructed persons.
14.People such as children, invalids and handicapped persons should
only use the machine in the presence of another person who can give aid
and advice. Take suitable measures to ensure that children never use the
machine without supervision.
15. Ensure that the person conducting training and other people never move
or hold any parts of their body into the vicinity of moving parts.
16.At the end of its life span this product is not allowed to dispose over
the normal household waste, but it must be given to an assembly point for
the recycling of electric and electronic components. You may find the symbol
on the product, on the instructions or on the packing.
The materials are reusable in accordance with their marking. With the re-use,
the material utilization or the protection of our environment. Please ask the
local administration for the responsible disposal place.
17. To protect the environment, do not dispose of the packaging materials,
used batteries or parts of the machine as household waste. Put these in
the appropriate collection bins or bring them to a suitable collection point.
18.This machine is a speed-dependant machine, i.e. the power increases
with increasing speed, and the reverse.
19.The maximum permissible load (=body weight) is specified as 150 kg.
Evaluate your body weight before you starting the exercise.
20.If the connecting cable of this item is damaged, this must be replaced
by the manufacturer or the customer service or with an electrically certified
person.
21.This machine has been tested in compliance with EN ISO 20957-1:2013,
EN 957-6:2010/A1:2014 + EMC Directive 2014/30/EU.
22. The assembly and operating instructions is part of the product. If selling
or passing to another person the documentation must be provided with
the product.
Contents
1.Important Recommendations and Safety Information Page 22
2.Assembly Instructions With Exploded DiagramsPage 23 - 26
3.The method of using the ShelfPage 28
4.Computer instructionsPage29 - 37
5.Training Instructions / Warm upPage38
6.Parts List (List of spare parts)Page 39 - 41
7.Summary of PartsPage 43
Dear customer,
We congratulate you on your purchase of this home training sports unit and
hope that we will have a great deal of pleasure with it. Please take heed
of the enclosed notes and instructions and follow them closely concerning
assembly and use.
Please do not hesitate to contact us at any time if you should have any
questions.
Top-Sports Gilles GmbH
Friedrichstr. 55
42551 Velbert
23
English
Installation instructions
Put everything clearly on the ground and control the comple-
teness based on the assembly steps.
Some screws are already at the mounting locations for an
easy assignment. Assembly time is approximately 40 min.
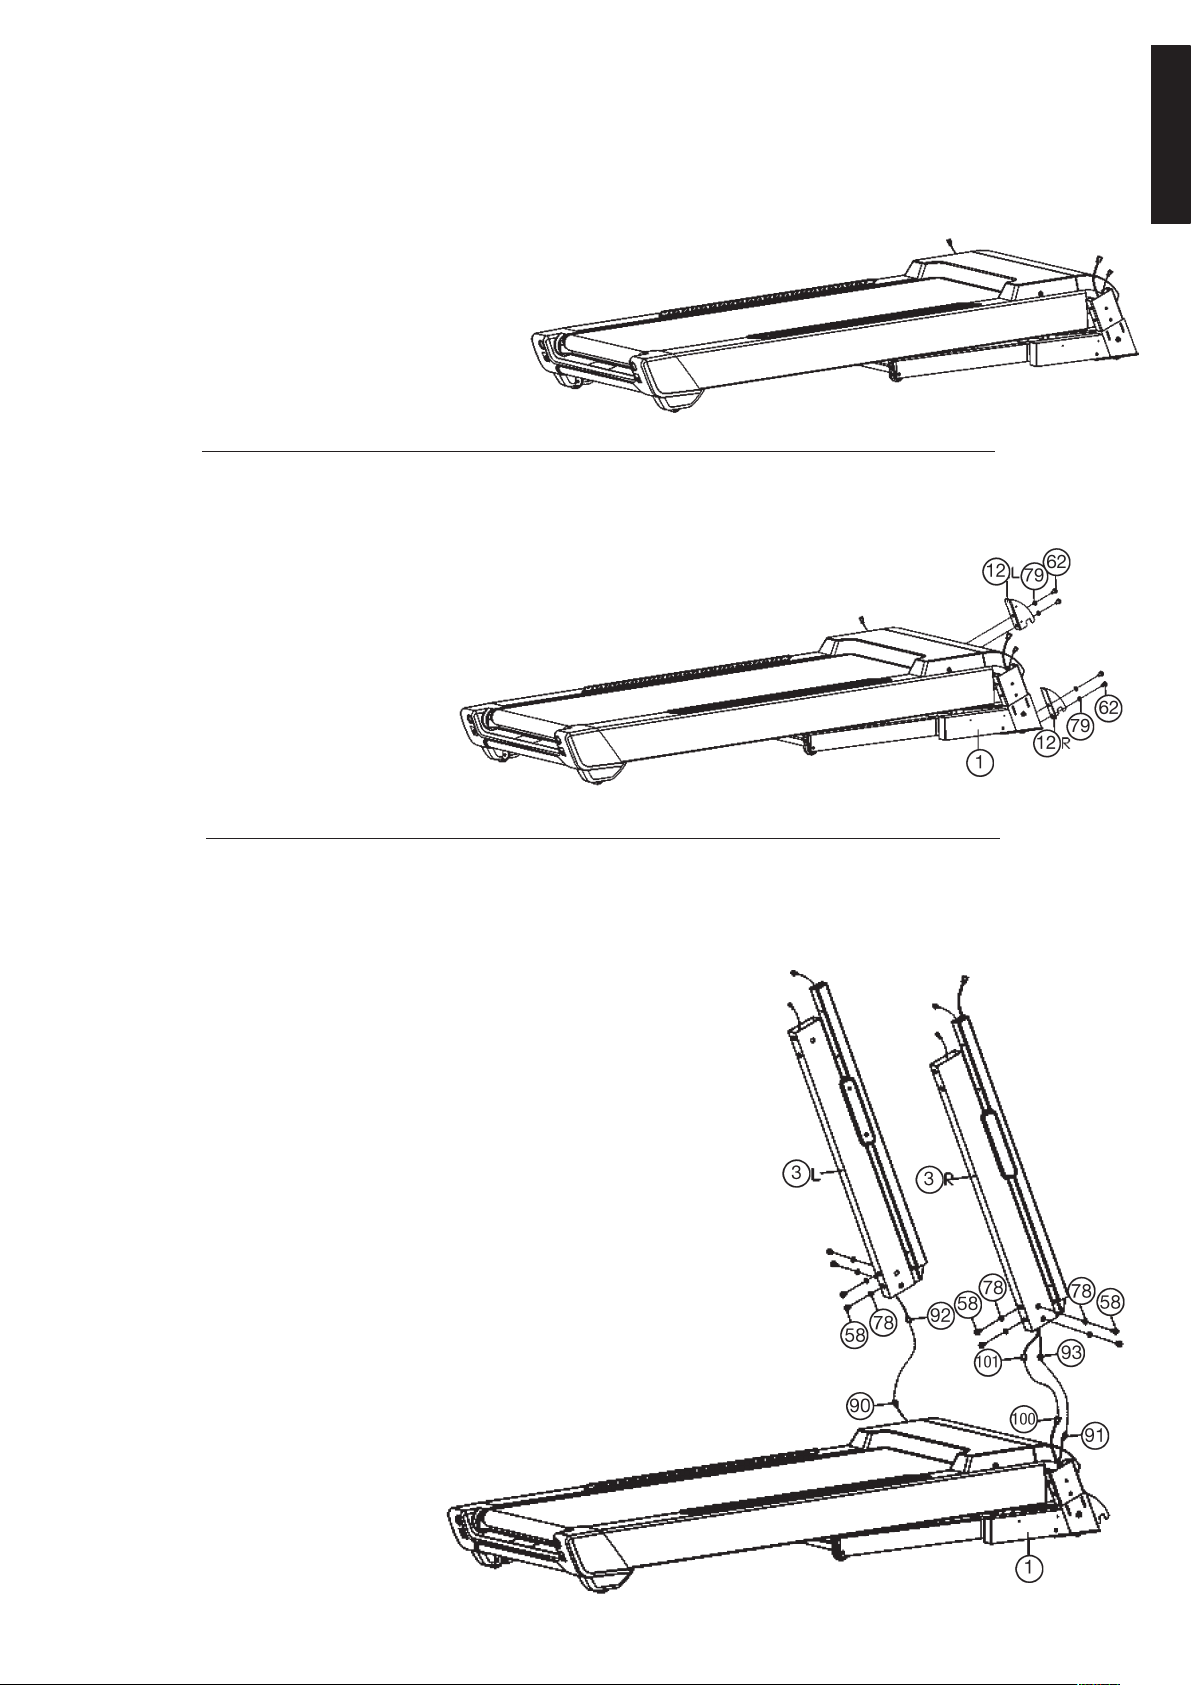
Step 1:
1. Remove all small parts, loose packing material out of the box
and then take out with help of a second person the base frame
(1)of packaging. Don’t cut the cable ties for removal yet!
Step 2:
1. Now cut the cable ties and don’t move the treadmill anymore
for assembly. Put the right and left base cover metal plates
(12L+R) at front side of base frame (1) and tighten them with
screws M8x15 (62) and washers 8//16 (79).
Step 3:
1.Lead the right support tube (3R) with the inserted connection
cables (93+101) to the right side of base frame (1) and connect
with suitable plugs of cables (91+100) projecting from base fra-
me (1).
2. Insert the right support tube (3R) into the base frame (1) (wit-
hout squeezing a cable) so that the holes pattern and screw the
connection tightly with screws M10x15 (58) and washers 10//20
(78).
3.Lead the left support tube (3L) with the inserted connection ca-
ble (92) to the left side of base frame (1) and connect with suita-
ble plug of cables (90) projecting from base frame (1).
4.Insert the left support tube (3L) into the base frame (1) (without
squeezing a cable) so that the holes pattern and screw the con-
nection tightly with screws M10x15 (58) and washers 10//20
(78).
24
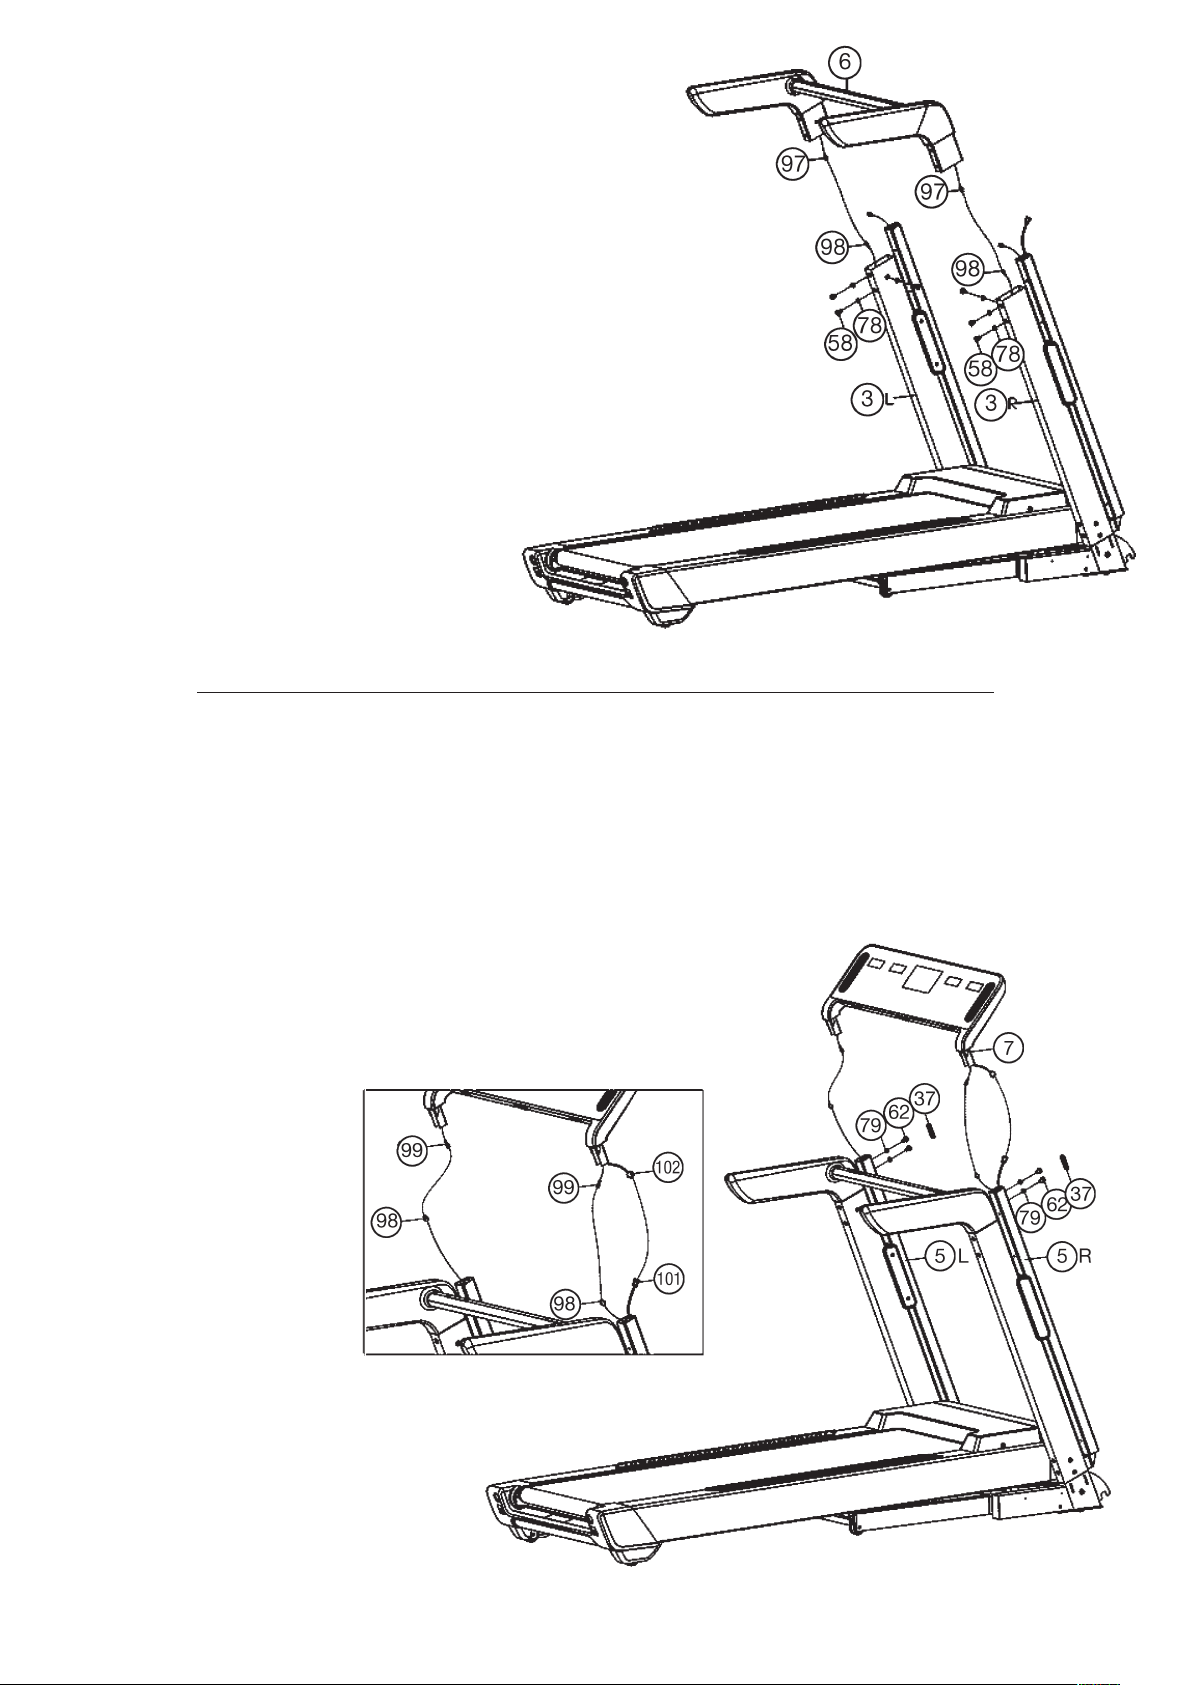
Step 4:
1. Place the pulse grip (6) with the help of a second person to the
support tubes left and right (3L+R) and connect the plugs of
pulse cable (97) with pulse connection cable 1 (98).
2. Insert the pulse grip (6) into the supports (3L+R) (without squee-
zing a cable) so that the holes pattern and screw the connection
tightly with screws M10x15 (58) and washers 10//20 (78).
Step 5:
1. Place the computer (7) with the help of a second person to the
support tubes left and right (3L+R) and connect the plugs of pulse
cable 2 (99) with pulse connection cable 1 (98) and computer
cable (102) with computer connection cable (101).
2. Insert the computer (7) into the computer holder (5L+R) (without
squeezing a cable) so that the holes pattern and screw the con-
nection tightly with screws M8x15 (62) and washers 8//16 (79).
3. Insert the rubber plug (37) at computer holder (5L+R)
25
English
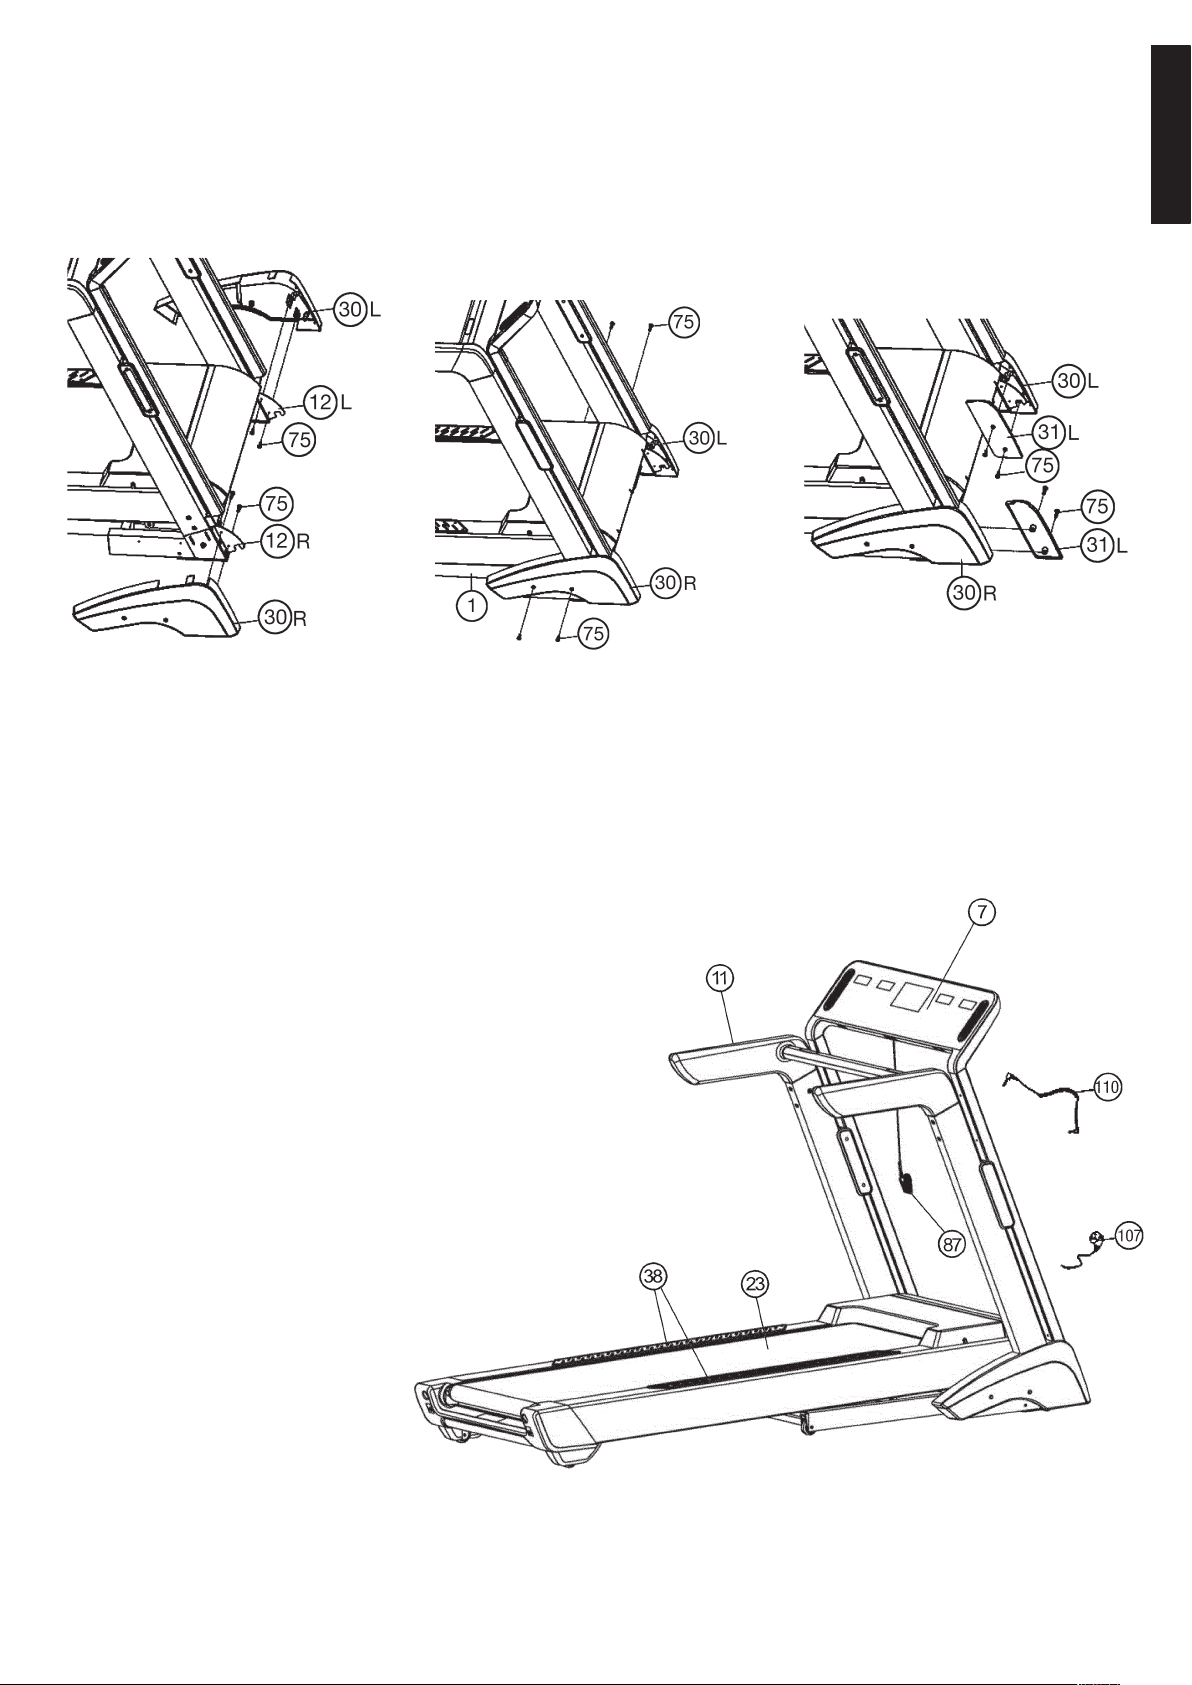
Step 7:
Checks
1.Check the correct installation and function of all screwed and
plug connections.
2.When everything is in order, connect the power supply cable
(107)with wall power (220-240V~50-60Hz) and switch on the
main switch below the front frame.
3.Lock the safety key (87) at computer into “on” position. Put the
safety clip (87) at your exercising cloth and stand on the side rails
(38). Slide with your hand over the computer so that the computer
switch on into Start mode. Press Start-Button and after a 3sec
count down the treadmill start moving. Start walking onto the
walk surface (23) when speed is slowly and follow the speed.
Familiarize yourself with the machine at a low speed settings.
4. Run in the middle of the running surface (23), hold yourself tight at
hand grips (11) if you feel insecure and don’t step on the side
foot rails (38). Only run with look at the Computer on the tread-
mill during the running. In emergency case, step of the treadmill
lateral and hold on to the hand grips (11).
5.If you like to use an external MP3 player for example, connect
with cable (110) and computer.
Note:
Please keep the tool set and the instructions in a safe place as
these may be required for repairs or spare parts orders becoming
necessary later.
Step 6:
1.Put the base covers left and right (30L+R) in the correct position
to the supports left and right (3L+R) and attach them by using
screws 4x16 (75).
2.Put the bottom frame covers left and right (31L+R) in the correct
position to the base metal plates (12L+R) and attach them by
using screws 4x16 (75).
26
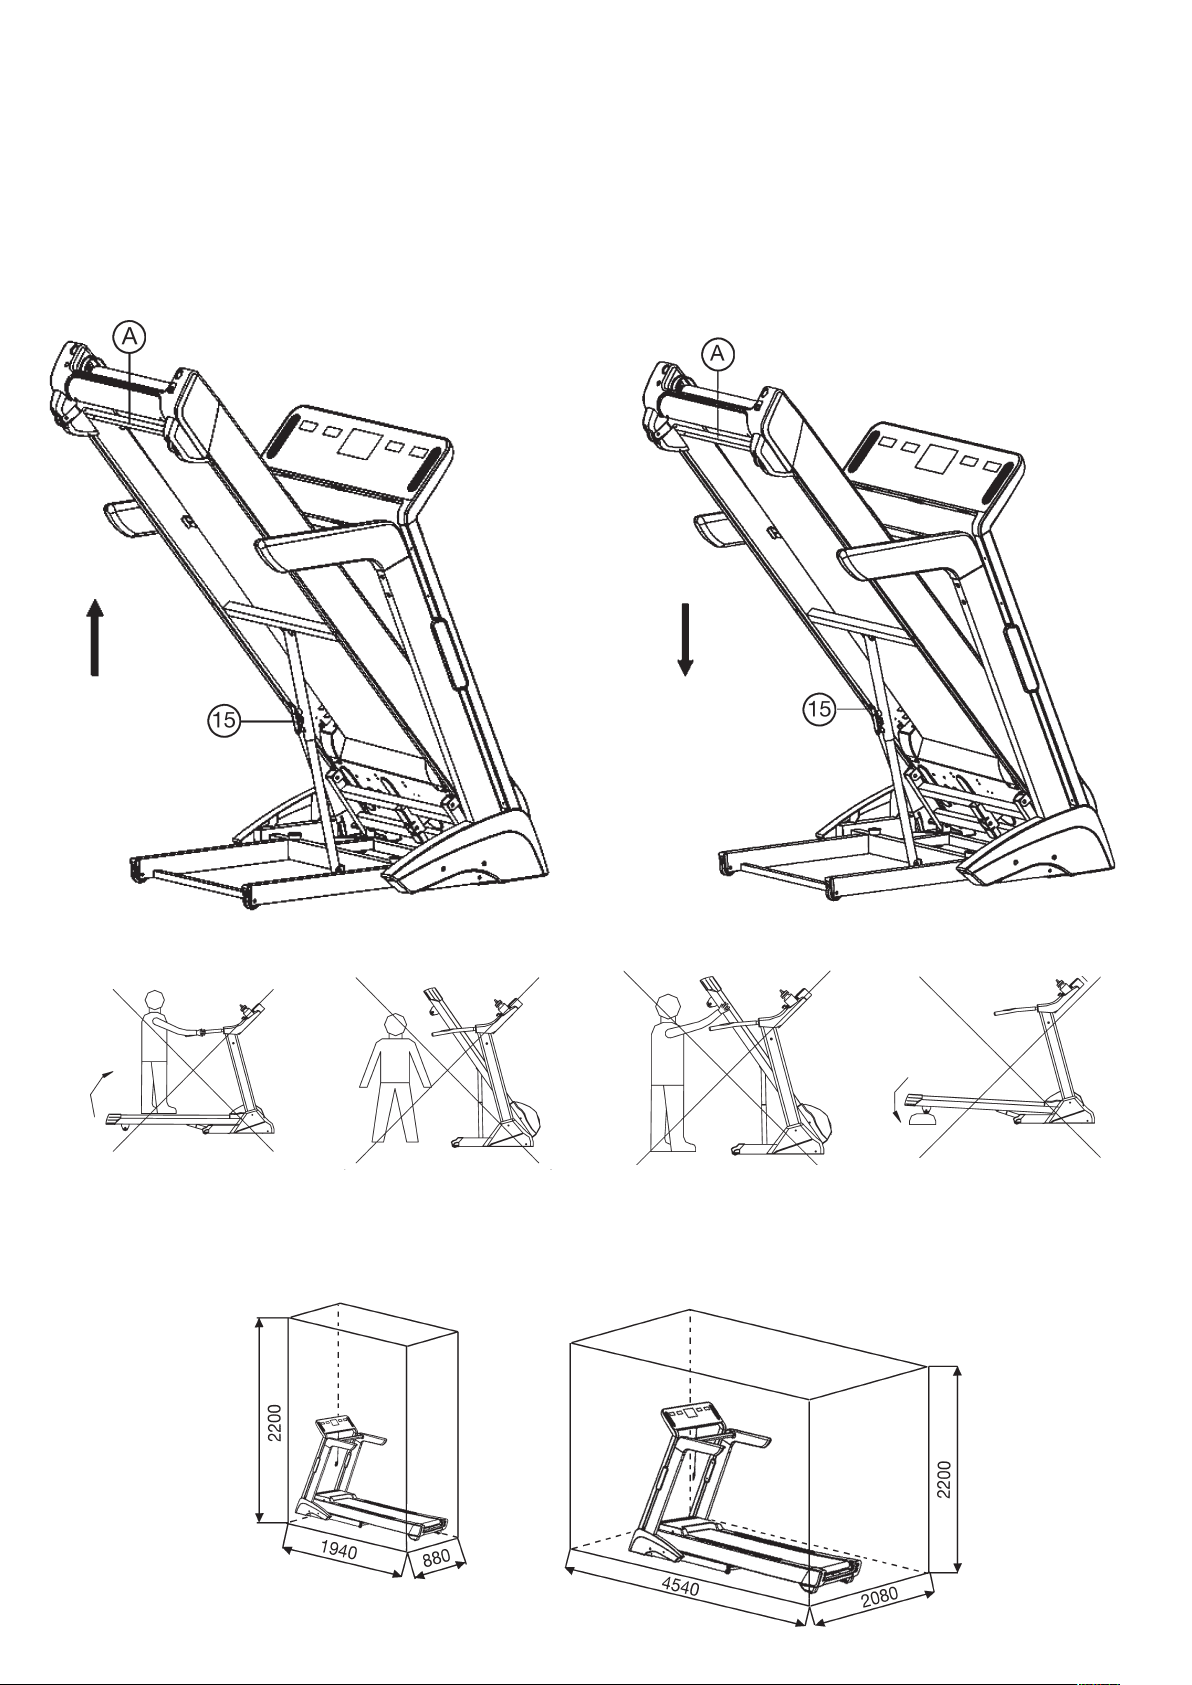
Folding / unfolding and transport of the treadmill
1.Fold down for exercising:
Put your hands at the treadmills position „A“ and press the sa-
fety button (15) to unlock it. Let the treadmill going down until is
unfolded completely.
2.Fold up for saving space and move:
Raise the treadmill at position „A“ and push the treadmill into
vertically position until the locking knob (15) locks up.
By completely folding out, the front transport rollers automati-
cally come into function, so that you can easy move to another
location.
Warning:
Before folding up the treadmill switch off and wait until the running
surface totally stopped. Don’t start the treadmill in fold up position!
Training area in mm
(for home trainer and user)
Free area in mm
(Training area and security area
(circulating 600mm and to rear side 2000mm))
27
English
Maintenance and adjusting
1. Lubrication for the running belt:
In order to keep the machine in the best condition, please add
some Silicone oil between the running belt and the running board
after 50 hours or 1 to 2 month of use. But the running belt may
slip, if you lubricate too much. To lubricate the belt please pull
the walking belt up and injection the silicone oil into the gap
between belt and walking deck.
2. Adjusting running belt:
You need to adjust the walking belt to the normal position, per
the following steps if it is off.
1. Set speed at 3-5km.
2. Using the Allen key (114) to adjust the belt tension bolt on the
end cap of the system frame.
3. If you want to move the belt towards left, turn the right tension
bolt clockwise.
4. If you want to move the belt towards right, turn the left tension
bolt clockwise.
5. If you have already done according to the steps above and
it is still not at the good range, then the running belt should be
damaged already, please contact your local dealer for replace-
ment.
Note: Make sure that the running surface is as centered as possible.
Once these moves too far from the center, (about 10 mm) it should
be readjusted into the center.
3. Running belt slips:
1. Make sure the walking belt is not too loose.
2. Make sure the motor belt is not too loose.
4. No light on the Display:
1. Check if the power plug is properly connected.
2. Check if the safety key on the computer is in place.
3.Check if the wire in the right post is properly connected.
Remind ! Before you inspect any wire or electrician part, ple-
ase ensure that the Power supply has been turned off.
5. Abnormal noise from the machine
1. Check if any screw of machine is loose.
2. Check if the motor belt is off.
3. Check if the running belt is off.
Note:
Please contact your local dealer if you have checked all the
above listed things but the problem is still there.
28
Step one:
Hold the boss of the board A, pull the extended frame B and sup-
ported frame C out from the computer. (the position of the boss is
showed as picture 4).
Step one:
Pull out the board A as the direction of the arrow in the picture,
take away the PAD/Phone.
The method of using the Shelf:
The method of putting away the Shelf:
Part. No Description Qty
A Board 1
B Extended frame 1
C Supported frame 1
D PAD/Phone 1
Step three:
Put the PAD/Phone on the extended frame B and supported
frame C, clamp it with board A.
Step two:
Rotate the board A as the direction of the arrow in the picture 2,
then push it to the left.
Step three:
Hold the board A, let the extended frame B and supported frame
C turn back in the computer.
Step two:
Push the board A to the right, then rotate it as the direction of the
arrow in the picture.
29
English
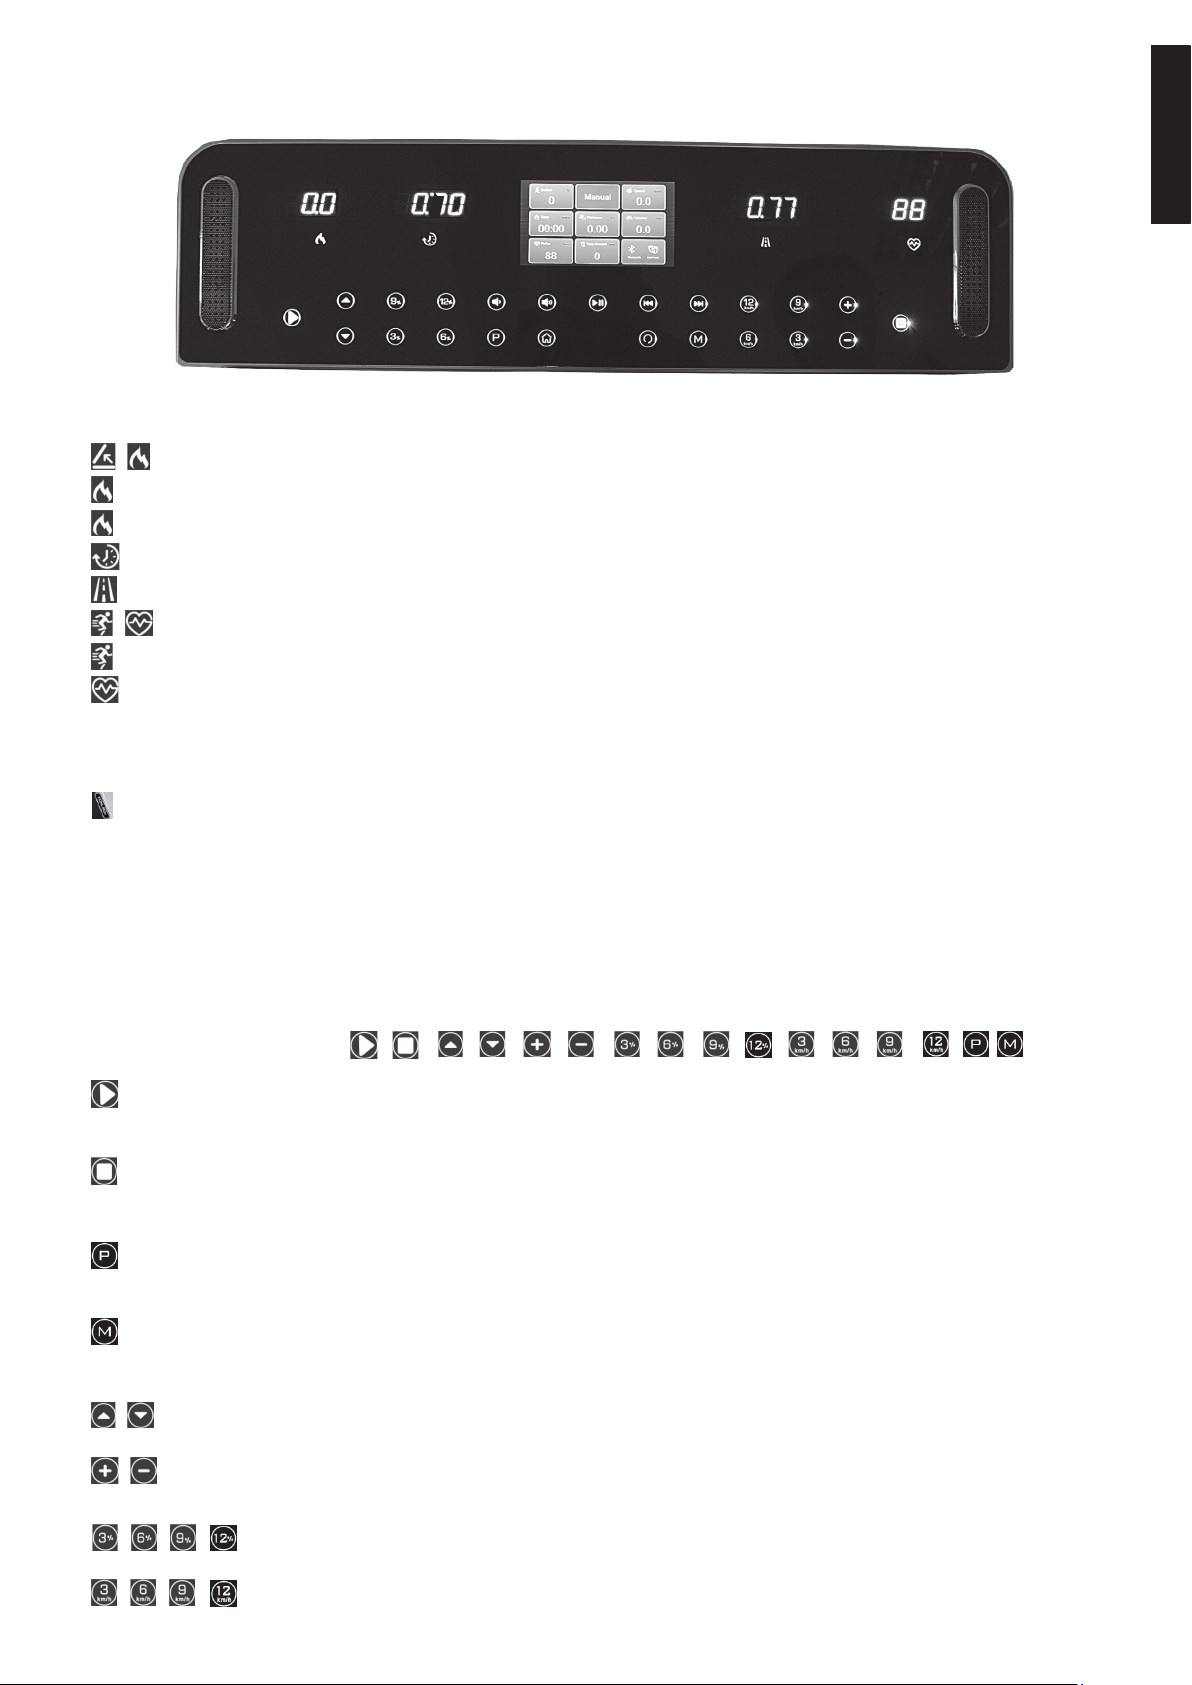
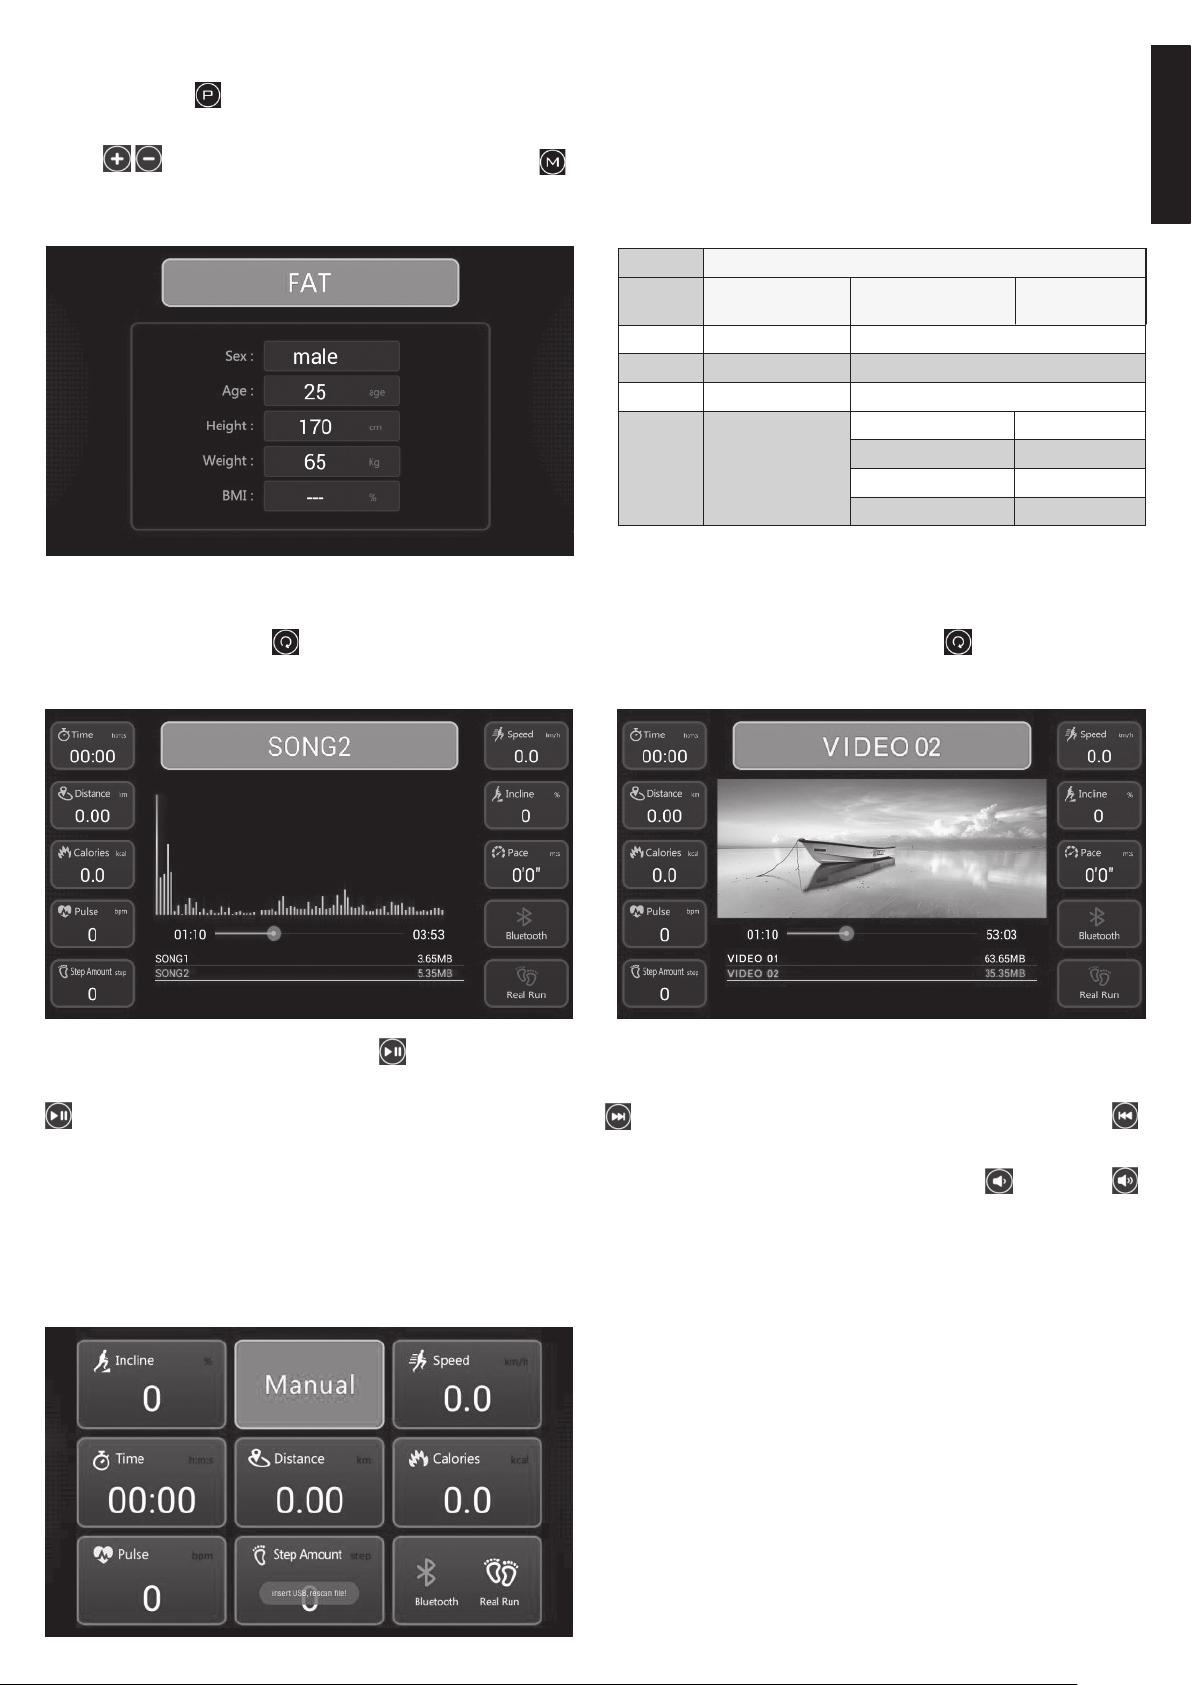
1.Window Display
1.1 | Window: Show current Incline Level or Calorie value
indicator on, window shows the current Incline Level;
indicator on, window shows the current Calorie value, 5secs switch.
1.2Window: Show total running Time.
1.3 Window: Show total running Distance.
1.4 | Window: Show current running Speed or Heart Rate value
indicator on, window shows the current Speed value;
indicator on, window shows the current Heart Rate value (Value for Reference only, NOT for Medical Purpose). After detecting a Heart Rate
signal, will priority show the Heart Rate value.
1.5 7” TFTWindow: Multimedia Display Window, for more Specific Functions referring following details. (Note: The TFT-Screen Does NOT Include
WIFI Internet Access and Touch Operating functions.)
1.6 Logo Indicator: Indicate the current Running Status of the treadmill
Standby mode, Logo on white light, means treadmill OK to be used;
Running mode, Logo on Red light, means treadmill is under using, please wait.
The computerdisplay switch off after 10Min. without any action. Background music keep going on. To activate the display touch any key keyboard area.
2.Button Functions
2.1 Running Function Buttons:
START: Under Shutdown State, press START button, TFT screen prompts 3secs Countdown along with „Di-Di-Di“ sound, and then treadmill
will Start Up at lowest speed 1.0km/h.
STOP: Under Running State, press STOP button, the treadmill will Slowly Stop.
PROGRAM: Under Shutdown State, automatic program order is P1-P24-U1-U3-HP1-HP2-FAT
MODE: Under Shutdown State, select motion mode.
| INCLINE +/-: Adjust the INCLINE via running;
Adjust the value via Parameter Setting.
| SPEED +/-: Adjust the SPEED via running;
Adjust the value via Parameter Setting.
, , Quick-Incline: Set Incline Level by single Press via Running or select Incline Level during User Program.
, , Quick-Speed: Set Speed by single Press via Running or select Speed during User Program.
2.2 Media Function Buttons:
Lower the Volume;
Turn Up the Volume;
PLAY/ PAUSE: Play or Pause the Background Music/Video
PREV: Play Previous Track;
OPERATION INSTRUCTIONS TM 5000S
30
2.3 TFT Function Buttons:
HOME: Back to Main Interface;
Switch: Switch Function Interface for music and video.
3.USB/MP3/Earphone Function
: USB Socket, to read audio and video from the USB flash drive;
: Audio input interface;
Audio output (Earphone) interface.
USB
MP3
4.Start treadmill
Turn on the power switch, attach the safety key to the safe lock position below the panel.
After startup, the screen shows the main interface.
Press , the treadmill starts running at the lowest speed and incline, the speed of the running machine can be adjusted, with to add the speed,
to decrease the speed. Using to increase and to decrease the incline of the treadmill.
Incline: display the incline value
Pulse: display users heart rate value; hold the Heartbeat induction
handlebar or optionally wear a pulse belt with tranmit 5,0-5,5kHz,
window will show sporter’s pulse after 5 seconds, display range: 50-
200 times / min(Value for Reference only, NOT for Medical Purpose).
Time: display exercise time
Distance: display exercise mileage
Calories: display calorie value consumed by exercise
Speed: display speed value
Real running: users need to run on the treadmill and the system will
record the mileage
Bluetooth: use Bluetooth connect mobile sports APP(Optional)
Step Amount: display user running steps
Pace: display the current running speed value
Kinomap APP
The product can be used with the Kinomap app. This enables
entertaining and interactive training with Android or IOS devices
and saving training data. Scan the adjacent QR code with your
smartphone / tablet or use the search function at the Playstore
(Android) or APP Store (IOS) to download the Kinomap APP.
Register and follow the instructions in the APP. Activate
Bluetooth on the smartphone or tablet and select the device
manager via the menu in the APP and then select the
„Treadmill“ category. Then select your type designation via the
manufacturer logo „Christopeit Sport“ in order to connect the
sports equipment. Depending on the sports equipment, different
functions are recorded by the APP via Bluetooth or data is
exchanged.
Attention: The Kinomap APP offers a
free trial version for 14 days. After that,
fees will apply which are listed on the
Kinomap homepage. Further
information can be found at:
https://www.kinomap.com/en/
31
English
Target window:
When entering the counter mode, the manual mode will switch to
the target window, and the target value will be displayed next to the
target.:
For example, the countdown time is 5 minutes. The progress bar
shows the percentage of the movement completed at 40%.
u Forward timing:
Display the running time, the display range is from 0:00 to 18:00h,
when the timing reaches the maximum, reset the forward timing, the
treadmill will not stop.
uCountdown mode:
Press“ ”key to the “Time”, window to display“15:00”and when it
flashes, it indicates entering the time counter mode.
s The time setting range is: 5:00 -- 99.00 minutes;
s The default setting time of the treadmill decreases from 15:00 to
zero.
u Forward timing: display the running distance, the display range is
from 0.00 to 99.9km. When the count reaches the maximum, clear the
zero and count forward again. The treadmill will not stop.
u Distance counting mode:
Press the “ ”key repeatly, when the “Distance “window show
“1.00”and flashes, it indicates entering the distance counter mode.
s The distance setting range is: 0.5 -- 99.9 km;
s The default value of the treadmill is reduced from 1.00km to zero.
uforward timing : the calories consumed are displayed, ranging from
0 to 999 kcal. When the count reaches the maximum, clear the zero
and count forward again. The treadmill will not stop.
u Calorie counting mode:
Press the “ ”key repeatly, and when the “Calories”window show
“50.0”and flashes, it indicates entering the calorie counter mode.
s Distance setting range: 10.0 -- 999.0 calories;
s The default value of the treadmill is reduced from 50.0 Kcal to zero.
Time window
Distance
window
Calories
window
Press key to stop the treadmill. Continue Exercising by press . Repress, the system can calculate the sports achievements, then enter
standby mode.
Manually Progams
In standby mode, directly press key to manual mode. The treadmill will start running at the lowest speed and incline, and other windows count
forward from 0. Pressandkey to change incline and speed. When you finish or pause the running, the system will automatically calculate
the performance.
Operation of counter mode:
Press the“ ”Mode key to enter the countdown mode, and continue to press the button to select the cycle countdown mode of time calorie com-
pletion and manual modes. Select one of the three counter modes and press the start key, the treadmill will start running after “3, 2, 1, GO”. Speed and
incline can be adjusted by pressingand during operation. During running, if you want to pause, please press key to slow down
and enter the pause. If you want to continue running, press key, and the treadmill will continue running at the lowest speed and incline. If you want
to stop the exercise, press key in the pause state, and the system will automatically calculate the performance of the exercise, and then enter the
standby state.
32
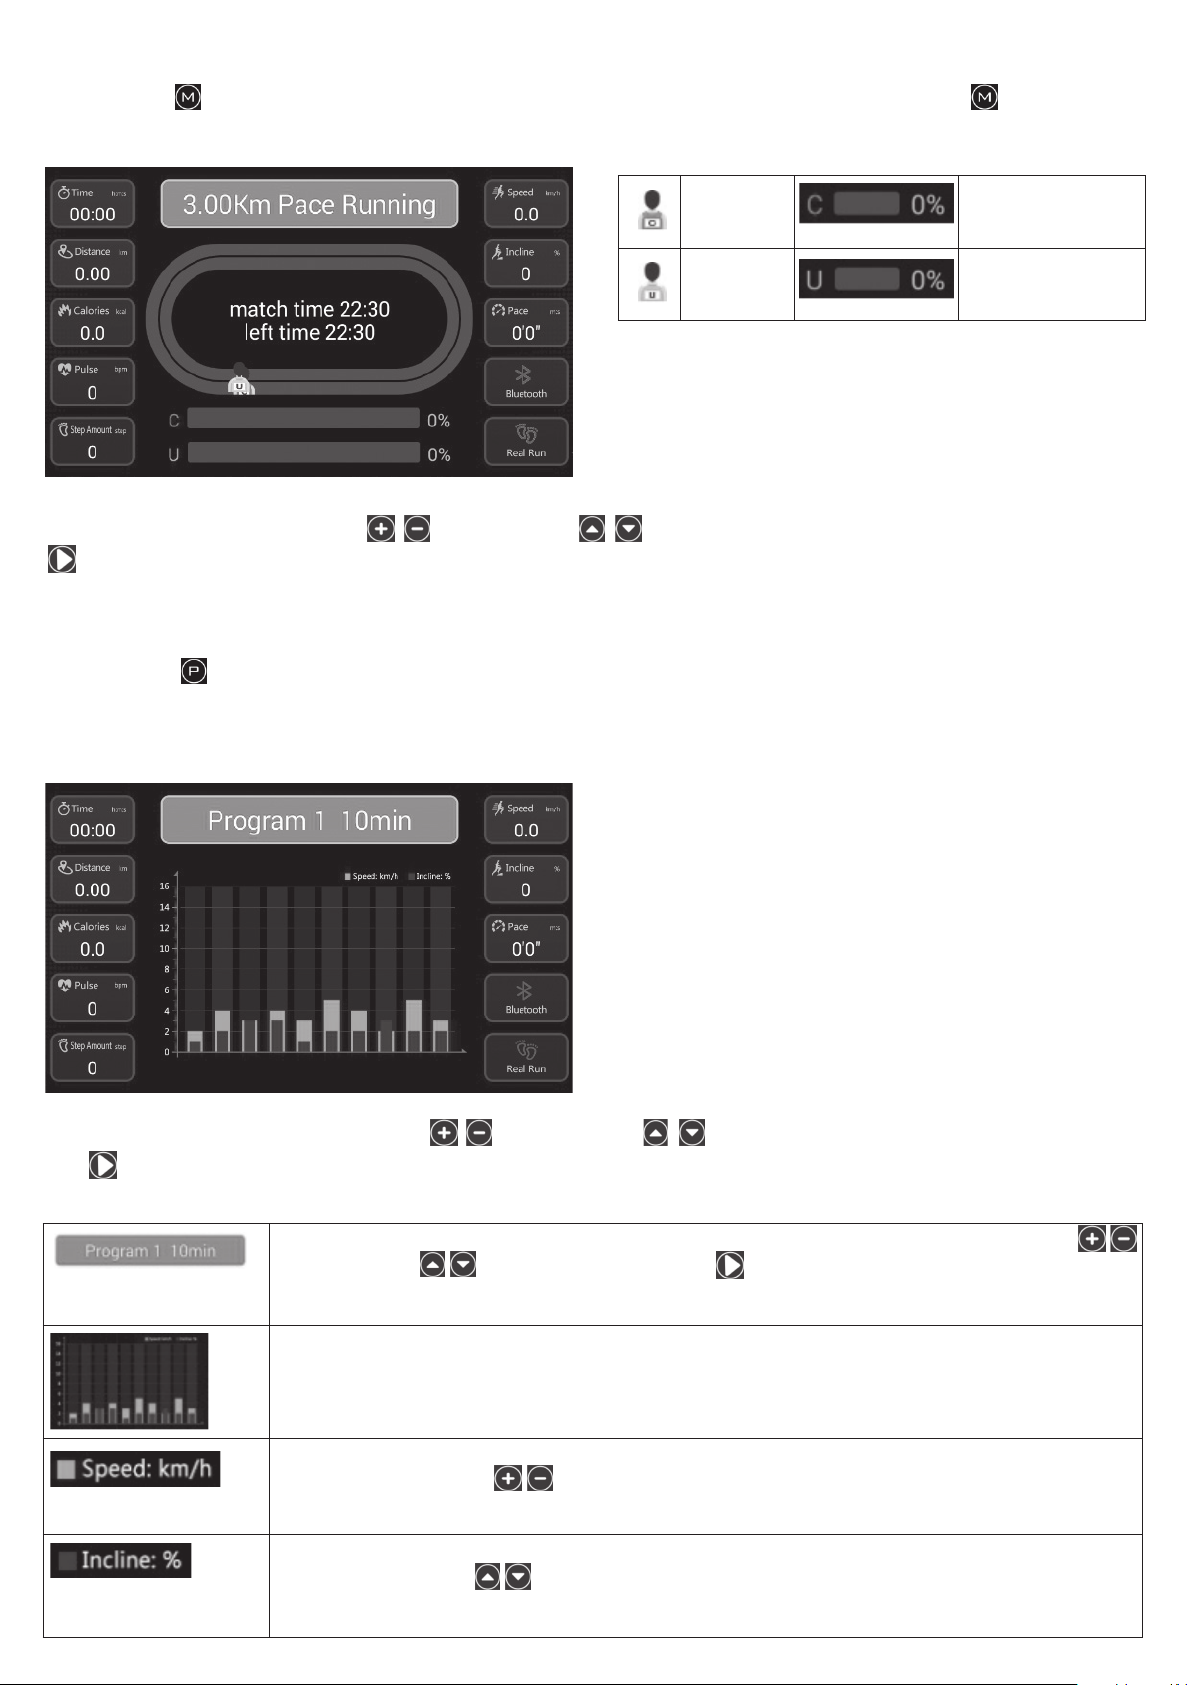
Competition mode
Press“ ”key to the competition mode, The system has six built-in motion distances, namely“ 3.0km, 5.0km, 10.0km, 15.0km, 21.1km and 42.19km „.
The competition time in the chart varies according to the model, it’s only for reference.
C stands for
system
Displays the percen-
tage of miles for the
current system
U stands for
user
Displays the percen-
tage of miles fort the
current user
Controls profiles
Press the key to select the mileage you like, and directly press the key to start the treadmill; or press the or key to set the dura-
tion of the competition mode, and then press the key, the treadmill will start running after“ 3, 2, 1, GO „.
The system built-in contest mileage and contest duration: When you finish or pause the running, the system will automatically calculate the performance.
Exercise Programs
Press the key to the program mode. Continue to press this key to select „Program1-24, U1-U2-U3, HP1-2, FAT“ and a total of 30 different built-in
programs; P1- P24 is 24 built-in programs, U1-U3 is a user program, HP1-2 is a heart rate control program, and FAT is a physique detection function.
Press the program key,Interface display „Program 1-24“ Program bar schematic diagram. After selecting your favorite program, press the key
to start the built-in program, press the , to increase or decrease the incline of the current segment, or press key to increase or decrease
the speed of the current segment. After running one segment into the next, the speed and incline of the system will change with the program segment.
After running a program, the treadmill will slow down smoothly and stop running. The system will automatically calculate the score of this exercise and
pop up the interface of relevant transcript.Each program divides the movement time into 10 equal parts, and each time period has corresponding speed
and incline.
Title bar:
The left side shows the program name, the right side shows the total time of running. The preset time of the system is
10 minutes (adjustable range is 5~99 minutes);
Press or key to increase or decrease the exercise time.
Schematic diagram of program bar:
built-in 24 programs: Program 1—24, three user programs. Each built-in program is divided into 10 segments, each
segment of the movement time is equal to set time divide 10;
Light blue block: represents the speed value, and the adjustment range is 0.1km/time. When the “ ”key is con-
tinuously pressed and held for more than 0.5 seconds, it will automatically continuously increase or decrease.
Dark blue block: represents the incline value, and the adjustment range is 1 segment/time. When the “ ” key is
continuously pressed and held for more than 0.5 seconds, it will automatically continuously increase or decrease.
33
English
Exercise Programs
Set the time divide 10 is equal to the operation
time of each segment
12345678910
P1
SPEED2434354253
INCLINE1233122322
P2
SPEED2546464242
INCLINE1233223422
P3
SPEED2545454232
INCLINE1223122221
P4
SPEED3675859643
INCLINE2233224622
P5
SPEED3675867643
INCLINE1243224521
P6
SPEED2864597543
INCLINE2262342221
P7
SPEED2674474242
INCLINE456699101263
P8
SPEED2468786232
INCLINE3544344332
P9
SPEED2455656332
INCLINE3534234232
P10
SPEED2353353633
INCLINE4436788633
P11
SPEED25810695322
INCLINE13581076323
P12
SPEED2554464234
INCLINE3567129111163
P13
SPEED2747894532
INCLINE5664658942
P14
SPEED2654865233
INCLINE56584551063
P15
SPEED2654875332
INCLINE3456355643
P16
SPEED2575865242
INCLINE156812910953
P17
SPEED25678910534
INCLINE3568658753
P18
SPEED2356869652
INCLINE57586591062
P19
SPEED3765976352
INCLINE35685651283
P20
SPEED37910111210852
INCLINE2567658632
P21
SPEED36879105832
INCLINE36899681063
P22
SPEED358691081263
INCLINE26810121012852
P23
SPEED359111286532
INCLINE268109781063
P24
SPEED381011121010853
INCLINE368910129632
Set the time divide 10 is equal to the operation
time of each segment
12345678910
Segment
ProgramÕ
Õ
Segment
ProgramÕ
Õ
34
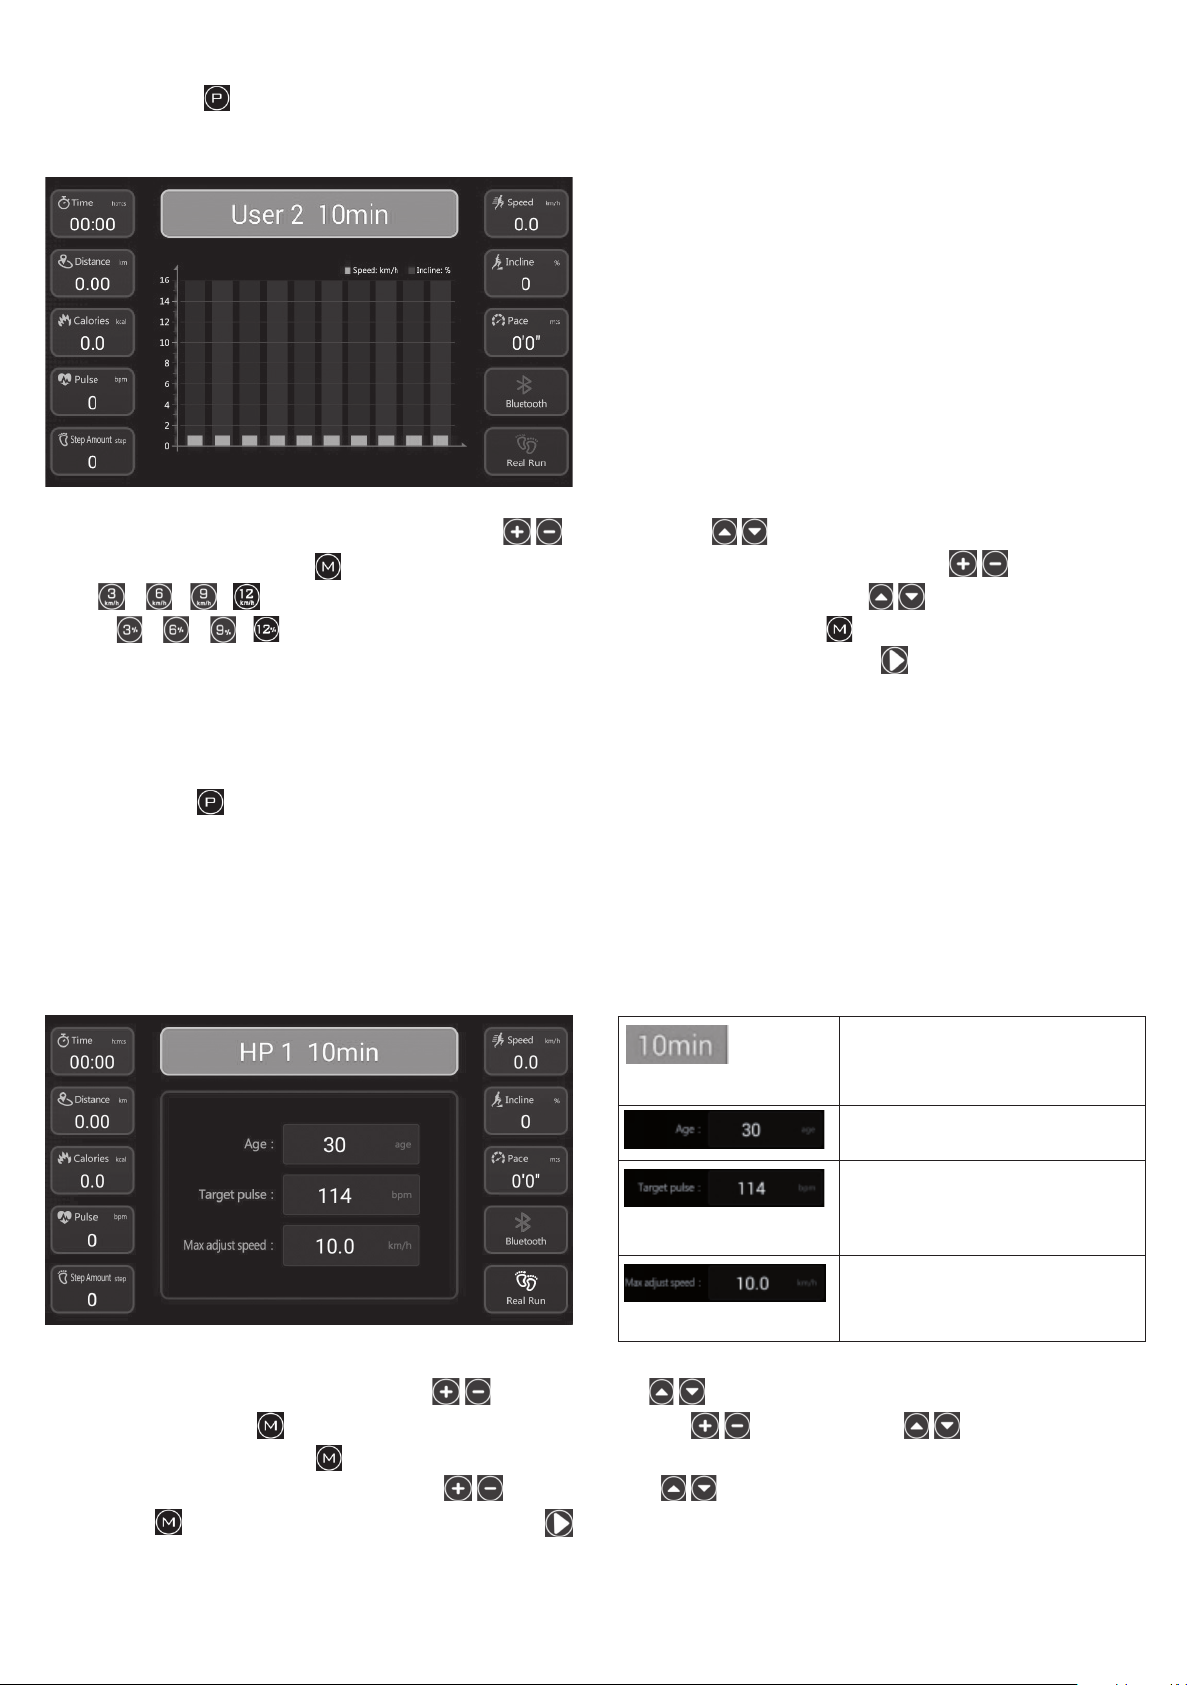
User program
There are 3 user-defined programs in the system, which allow the users to set their own settings according to their personal circumstances;
User-defined programs are: User1, User2, User3. Press the key continuously until User 1 is displayed in the title bar at the top of the interface;
The right side of the program name shows the preset time 10:00, press or key to change the required movement time;
Press the key to set parameters for the first time interval. The key can be used to set the speed, the key can be used to set the in-
cline. After finishing the setting of the first time, press key to enter the setting of the second time until completing the setting of the tenth time. Press
the key to set the running time; After all the Settings are completed, the data will be saved permanently until you reset it next time. This data will not
be lost due to power failure.
Heart rate Control Programs (HP1-HP2)
Heart rate control is to monitor the heart rate to control the operation of the treadmill, so as to achieve the best effect of exercise.
In standby mode, press the “ ” key continuously until the interface displays“HP1”,“HP2”;
Exercise time: set the exercise time and
adjust the range from 05:00 to 99:00
minutes
Age: set the age and adjust the range
from 15 to 80 years old
Target heart rate: set the target heart rate
and adjust the range 84-133 times/min
Maximum adjust-
ment speed:
Maximum speed of
heart rate program
is 3.0km/h-
maximum speed
of electronic meter
(default 10.0)
Press the key to enter the age setting. The default age is 30.Users can select the appropriate age by pressing or ;
After the user selects a good age, press the the system will automatically recommend a suitable target heartbeat to display in the interface according
to the user‘s choice of a good age, for the user to reference; Users can also select the desired target heartbeat value by pressing or
key according to their own situation. After the user selects the age and target heart rate, press the“ ” key to enter the setting of the maximum adjust-
ment speed, the range is 3.0km/h- the maximum speed of the electronic table; press the or key to choice the maximum speed you want;
After the user selects the maximum speed, press the“ ”key to enter the TIME setting. The “TIME” displays the preset TIME at 10:00, and press
the or key to adjust the running TIME. After setting the three parameters, press the key to start the treadmill;
Under the running state of HRC program, when the user presses the or key to adjust the speed and incline, the system will auto matically
adjust the speed and incline so that the user‘s heartbeat is close to the target heartbeat value.
The first minute is the warm up state, the system will not automatically adjust the speed and incline, and can only manually adjust. After 1 minute, every
10 seconds the system will according to your current heart rate value 0.5 km/h to automatically to each frequency acceleration. When „the heart rate
speed velocity“ to set the highest speed, if this time is not close to the target heart rate value, the frequency of the system will automati cally to 1 period/
time to increase the incline, and improve exercise way users heart beating heart get close to the target value; until the heartbeat reaches the target heart-
beat value, the incline and speed will remain unchanged in the current state. If the heart rate exceeds the target heart rate, the system will automatically
reduce the slope at a frequency of 1 segment/time every 10 seconds. If the slope is 0, the system will automatically reduce the speed at a frequency of
0.5km/h each time until the running speed is the lowest speed of the machine. If there is no heart rate more than 30 seconds and the slope value is not 0,
the slope will automatically reduce the frequency by 1 segment at a time, the speed by 0.5km/h at a time, the frequency by 1 time every 10 seconds, and
repeat this step until the lowest speed.
35
English
BMI Physical test
Press the “ ”key to enter the body mass index (FAT) detection function. The system first to SEX settings, press the “ ”key to change the ge-
nder. After setting, press the key, and the right side of AGE show “25”as flash, indicating entering the setting Age parameter, and press the“”
key to adjust the age value. (Setting range: 10-99 years old); Press the key, and the right side of HEIGHT shows “170”as flash; indicating enter the
setting height, press the “” key to adjust the height value.(Setting range: 100-200cm); Press the key, and the right side of WEIGHT show
“65”as flash, indicating enter the setting weight, press the “”key to adjust the weight value.(Setting range :20-150kg); After setting them in turn,
press the key again, The „-- --“ on the right side of BMI is shown in flash, indicating the function of body fat in the test. At this time, put your hands
on the arm rest of the sensor plate of the test heartbeat, and the body fat value of the tested person will be displayed within 8 seconds.
F-1Sex malefemale
F-2Age 10 — 99 years old
F-3Height 100 — 200cm
F-4Weight 20 — 150kg
F-5BMI
≤19 Underweight
=(20—25) Normalweight
=(26—29) Overweight
≥30 Obesity
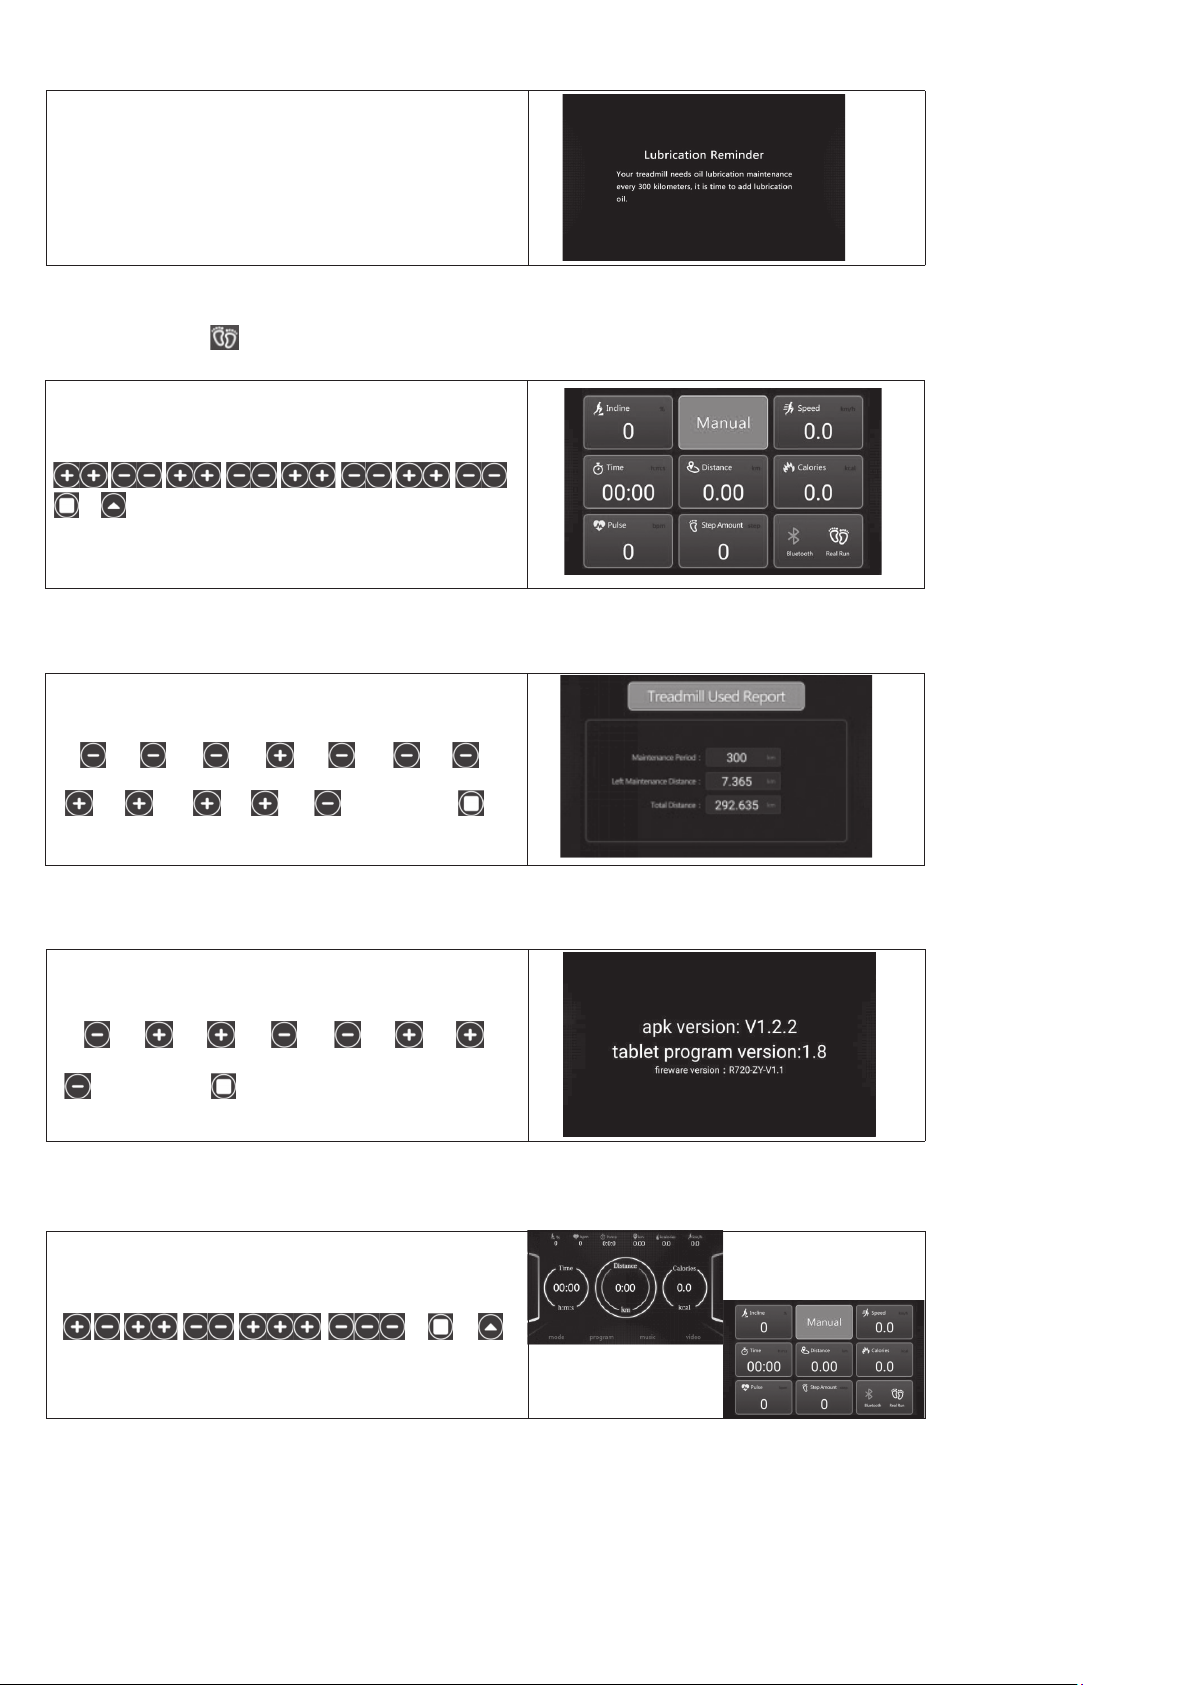
Music/Video
Press the key to switch audio mode. Support to play mp3, ape and
other formats music, and other common video format files; In the pro-
cess of exercise, music with bright rhythm should be selected as far as
possible, and it is best to adapt to the running rhythm. Music with large
sudden rhythm change is easy to have adverse effects on the running
rhythm.
Song1
3.65MB
The green font represents the name and size of the song
being played
The white font represents the name of the song to be
selected and the size of the song.
01:10
03:53
The progress of the song is currently playing
The total length of the song is currently playing
the current playback progres
Press the key to switch the video mode; Support to play mp4, mov
and other common video format files;Please not to watch video when
running, which is easy to be distracted and may cause danger of running
too fast or too slow.
Body mass index (FAT) is a measure of the relationship between a person‘s height and weight, not body proportion. FAT is suitable for any man or wo-
man, and together with other health indicators, provides a basis for people to adjust their weight. The ideal FAT should be between 20 and 25, if less than
19 means too thin, if 26 and 29 means overweight, and if more than 30 means obese. (data are for reference only, not as medical data)
If using USB-
socket a note
display data input.
36
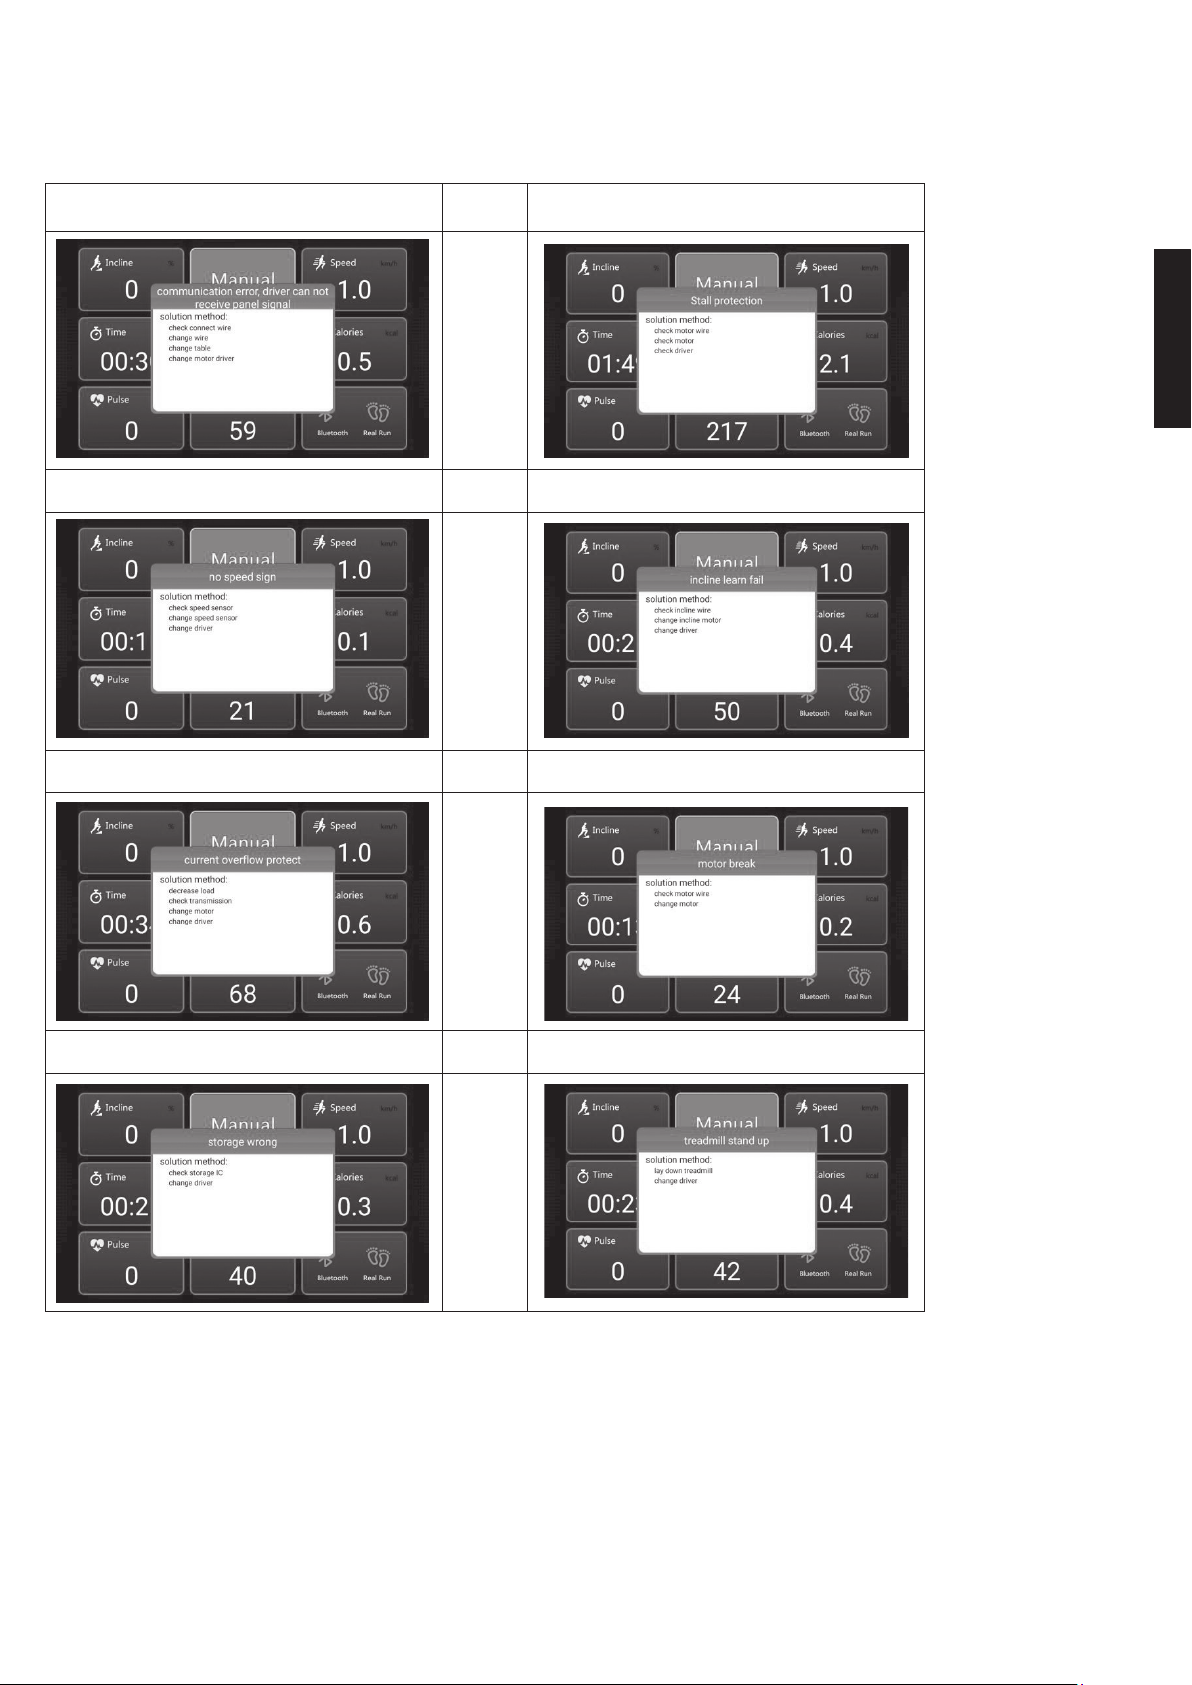
Operation Instructions
In standby state
Press combination key
/ , open/close the real running program ;
Real Running Switch:
Turn on Real Running , user need to run in the treadmill, the system wiil calculate kilometer and running steps.
Enter the interface as shown on the right picture;
If 300km are gone the display show an note and reminder to
lubricate the backside of running surface.
You can cancel this information by pressing Stop key for 3
seconds.
Under standby mode, press
“ ” “ ” “ ” “ ” “ ” “ ” “ ”
“ ” “ ” “ ” “ ” “ ”, then press ” ”,
Enter the interface as shown on the right picture;
Under standby mode, press
“ ” “ ” “ ” “ ” “ ” “ ” “ ”
“ ”, then press ” ”
Switch UI interface
Under standby mode, press
„ „ /
37
EnglishEnglish
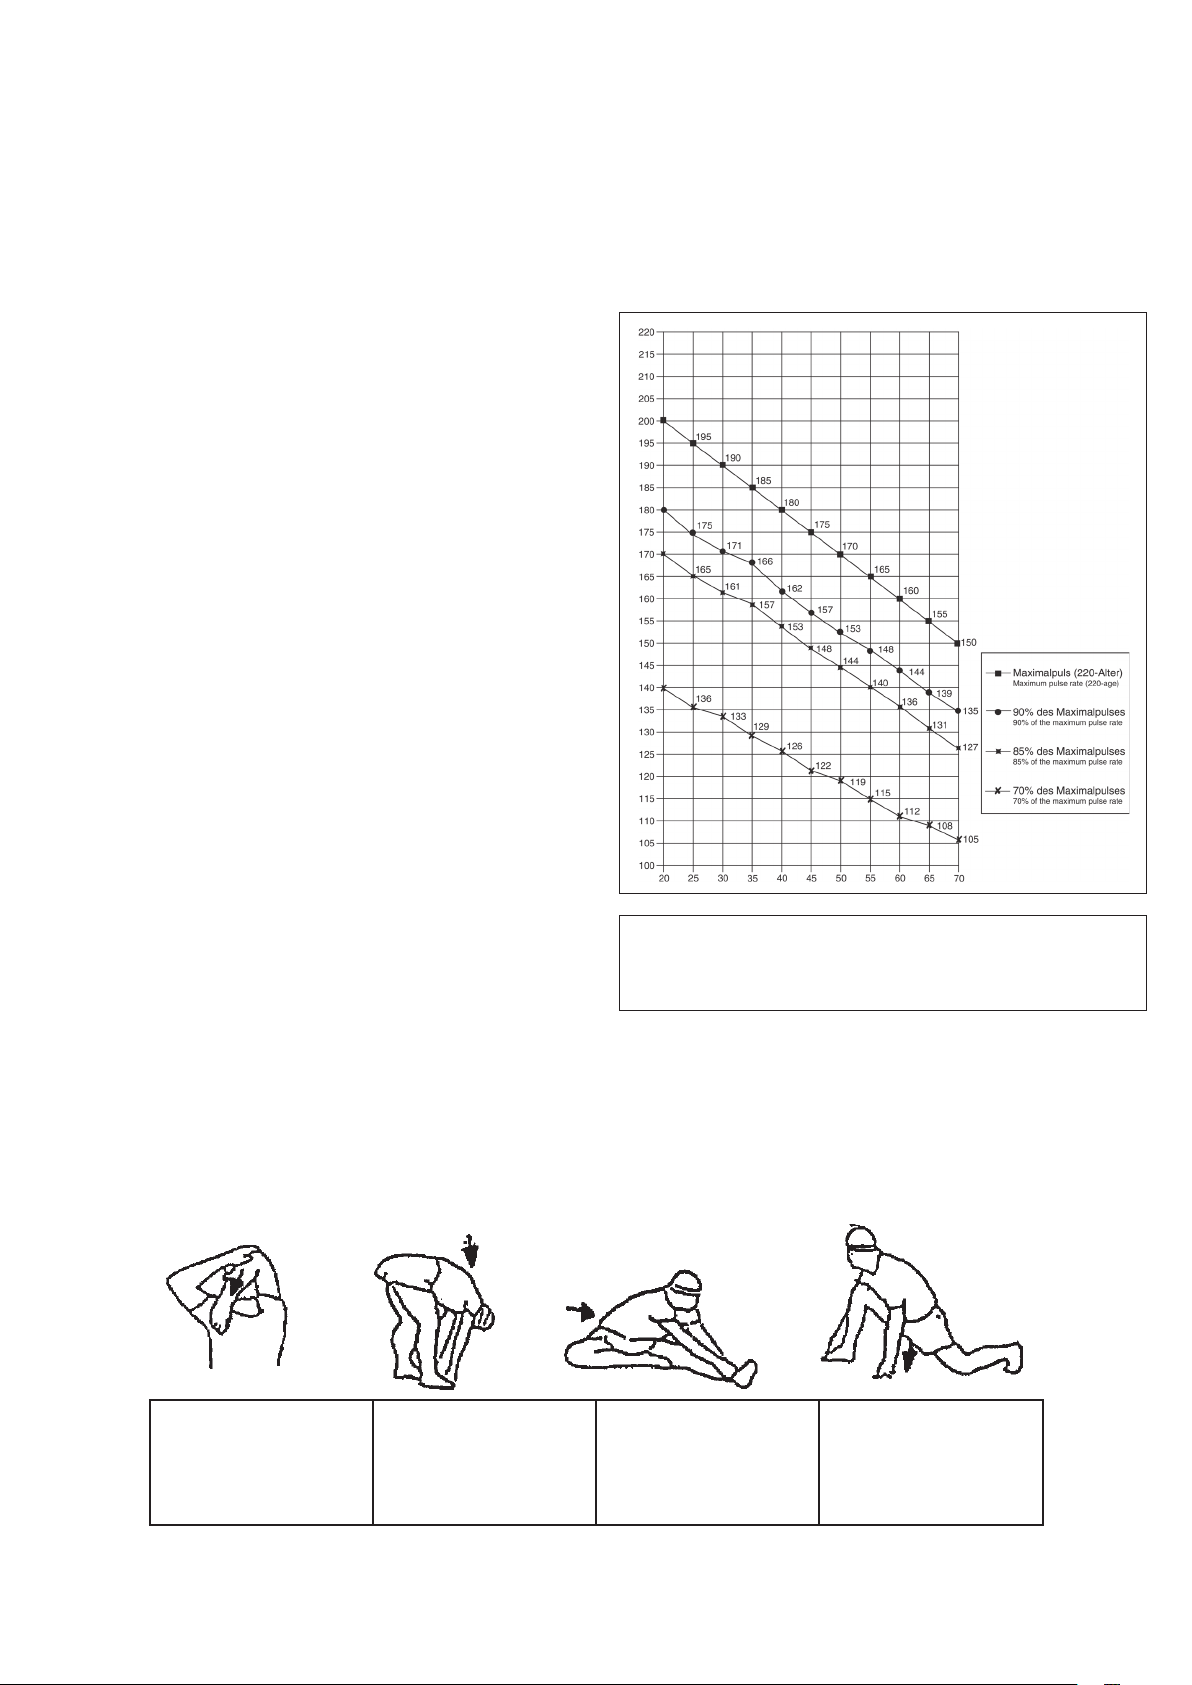
Simple troubleshooting method for treadmill
Note: when using the treadmill, if there is any abnormality, the interface will have corresponding error reporting tips and solutions.(depending on the
model, some abnormalities may not occur).
E01 Communication failure,
electronic meter to driver;
E02 Stall protection;
E03 No speed signal;E04 Failure in incline;
E05 Overcurrent protection;E06 Motor open circuit;
E08 Storage error;E09 Machine folding;
38
Warm up exercises (Warm Up)
Start your warm up by walking on the spot for at least 3 minutes and then perform the following gymnastic exercises to the body for the training phase to
prepare accordingly. The exercises do not overdo it and only as far run until a slight drag felt. This position will hold a while.
Reach with your left hand
behind your head to the right
shoulder and pull with the
right hand slightly to the left
elbow. After 20sec. switch
arm.
Bend forward as far forward
as possible and let your
legs almost stretched. Show
it with your fingers in the
direction of toe. 2 x 20sec.
Sit down with one leg
stretched out on the floor
and bend forward and try
to reach the foot with your
hands. 2 x 20sec.
Kneel in a wide lunge for-
ward and support yourself
with your hands on the
floor. Press the pelvis down.
Change after 20 sec leg.
After the warm-up exercises by some arms and legs shake loose.
Don’t finish the exercise phase abruptly, but will cycle leisurely something without resistance from to return to the normal pulse-zone. (Cool down) We re-
commend the warm-up exercises at the end of the training be conducted and to end your workout with shaking of the extremities.
Training instructions
You must consider the following factors in determining the amount of training
effort required in order to attain tangible physical and health benefits:
1.Intensity:
The level of physical exertion in training must exceed the level of normal
exertion without reaching the point of breathlessness and / or exhaustion.
A suitable guideline for effective training can be taken from the pulse rate.
During training this should rise to the region of between 70% to 85% of
the maximum pulse rate (see the table and formular for determination and
calculation of this).
During the first weeks, the pulse rate should remain at the lower end of this
region, at around 70% of the maximum pulse rate. In the course of the follo-
wing weeks and months, the pulse rate should be slowly raised to the upper
limit of 85% of the maximum pulse rate. The better the physical condition
of the person doing the exercise, the more the level of training should be
encreased to remain in the region of between 70% to 85% of the maximum
pulse rate. This should be done by lengthening the time for the training and
/ or encreasing the level of difficulty.
If the pulse rate is not shown on the computer display or if for safety reasons
you wish to check your pulse rate, which could have been displayed wrongly
due to error in use, etc., you can do the following:
a. Pulse rate measurement in the conventional way (feeling the pulse at the
wrist, for example, and counting the number of beats in one minute).
b. Pulse rate measurement with a suitable specialised device (available from
dealers specialising in health-related equipment).
2.Frequency
Most experts recommend a combination of health-conscious nutrition, which
must be determined on the basis of your training goal, and physical training
three times a week. A normal adult must train twice a week to maintain his
current level of condition. At least three training sessions a week are required
to improve one’s condition and reduce one’s weight. Of course the ideal
frequency of training is five sessions a week.
3.Planning the training
Each training session should consist of three phases: the warm-up phase,
the training phase, and the cool-down phase. The body temperature and
oxygen intake should be raised slowly in the warm-up phase. This can be
done with gymnastic exercises lasting five to ten minutes.
Then the actual training (training phase) should begin. The training exertion
should be relatively low for the first few minutes and then raised over a period
of 15 to 30 minutes such that the pulse rate reaches the region of between
70% to 85% of the maximum pulse rate.
In order to support the circulation after the training phase and to prevent
aching or strained muscles later, it is necessary to follow the training phase
with a cool-down phase. This should be consist of stretching exercises and
/ or light gymnastic exercises for a period of five to ten minutes.
You find further information on the subject warm-up exercises, stretch exer-
cises or general gymnastics exercises in our download area under www.
christopeit-sport.com
Calculation formula: Maximum pulse rate = 220 - age
(220 minus your age)
90% of the maximum pulse rate = (220 - age) x 0.9
85% of the maximum pulse rate = (220 - age) x 0.85
70% of the maximum pulse rate = (220 - age) x 0.7
4.Motivation
The key to a successful program is regular training. You should set a fixed
time and place for each day of training and prepare yourself mentally for the
training. Only train when you are in the mood for it and always have your goal
in view. With continuous training you will be able to see how you are progres-
sing day by day and are approaching your personal training goal bit by bit.
39
English
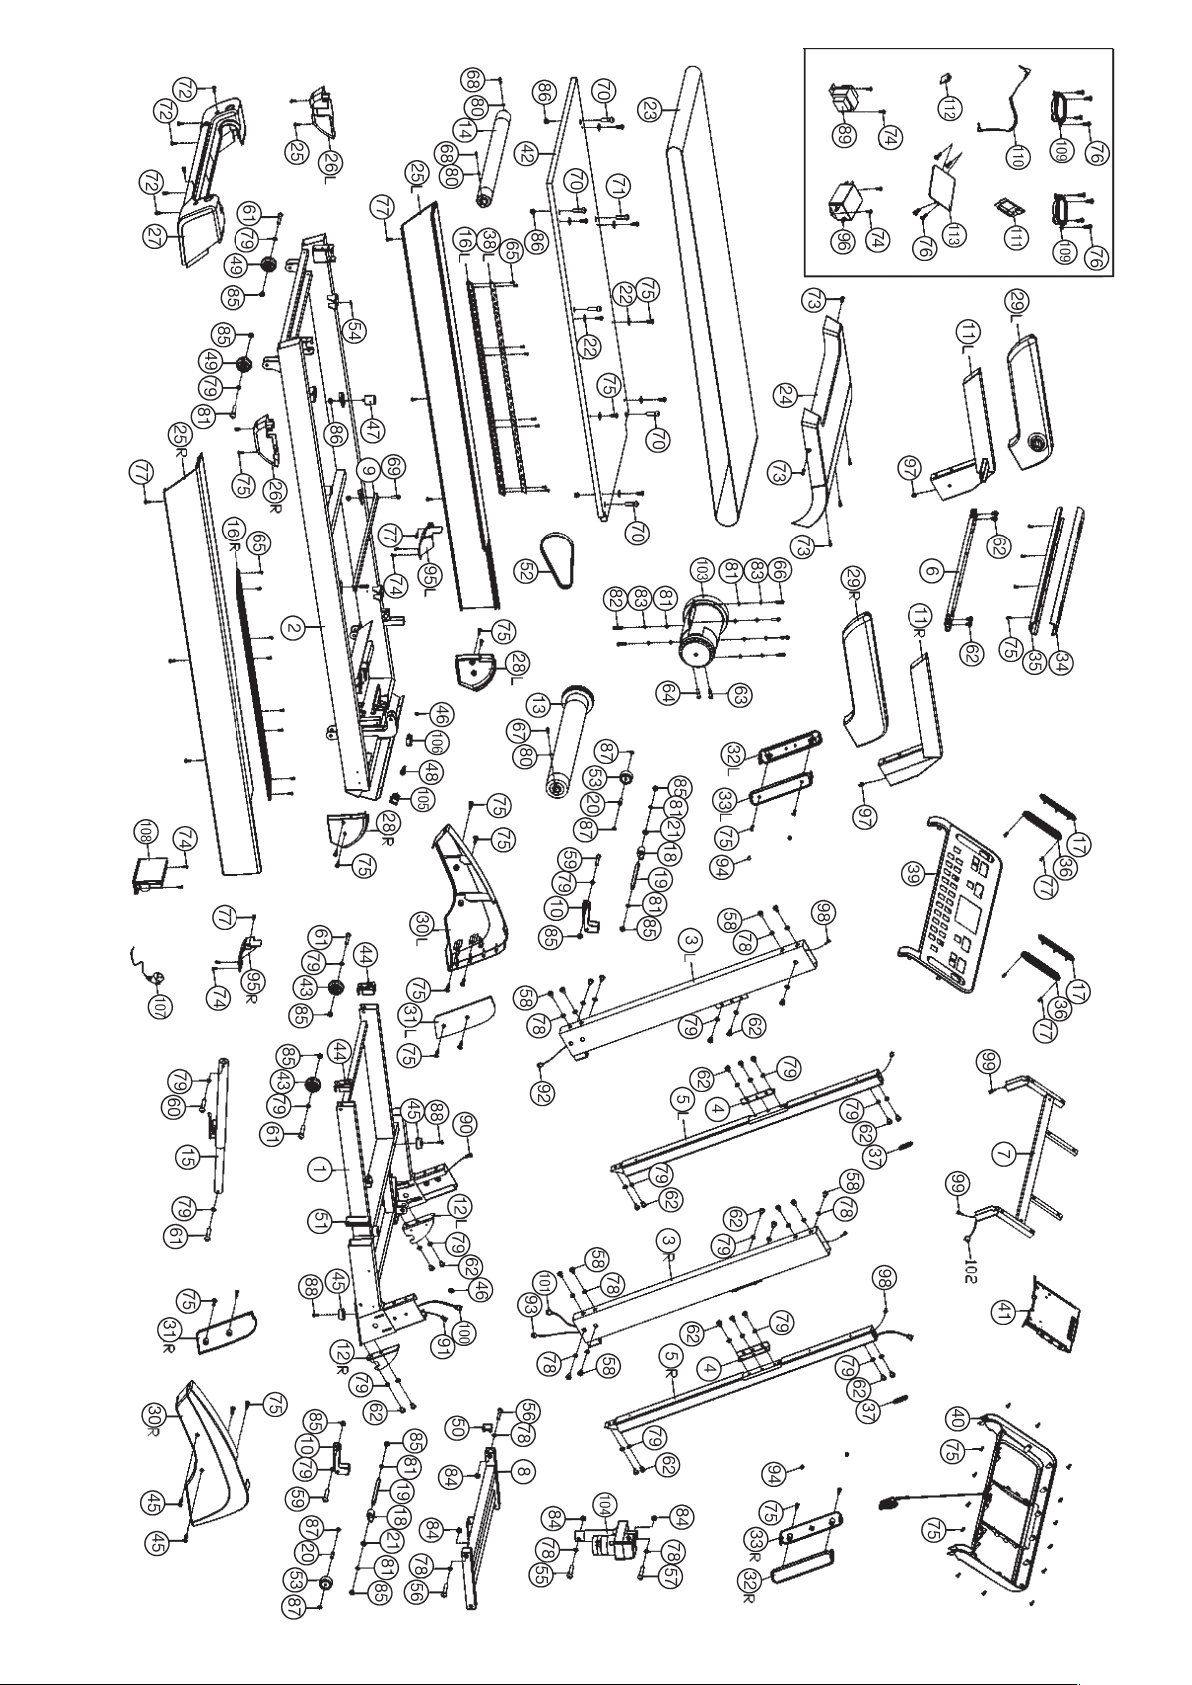
Parts List – Spare Parts List
TM 5000S Order No. 1840A
Technical data: Issue:
• 2,25 HP Motor continuous (1,7kw), maximum 4 HP Motor Peak (3kW)
• Speed from 1 km/h - 22 km/h (adjustable in 0,1 km/h steps)
• 3 individual programs (punkt 5)
• 6 competition programs (punkt 4)
• 24 installed programs with different speed (punkt 3)
Gebruikershandleiding.com neemt misbruik van zijn services uitermate serieus. U kunt hieronder aangeven waarom deze vraag ongepast is. Wij controleren de vraag en zonodig wordt deze verwijderd.
Product:
Spelregels forum
Om tot zinvolle vragen te komen hanteren wij de volgende spelregels:
lees eerst de handleiding door;
controleer of uw vraag al eerder door iemand anders is gesteld;
probeer uw vraag zo duidelijk mogelijk te stellen;
heeft u een probleem en al geprobeerd om dit op te lossen, vermeld dit erbij aub;
heeft u een oplossing gekregen van een bezoeker dan horen wij dat graag in dit forum;
wilt u een reactie geven op een vraag of antwoord, gebruik dan niet dit formulier maar klik op de knop 'reageer op deze vraag';
uw vraag wordt direct op de website gezet; vermijd daarom persoonlijke gegevens in te vullen;
Belangrijk! Als er een antwoord wordt gegeven op uw vraag, dan is het voor de gever van het antwoord nuttig om te weten als u er wel (of niet) mee geholpen bent! Wij vragen u dus ook te reageren op een antwoord.
Belangrijk! Antwoorden worden ook per e-mail naar abonnees gestuurd. Laat uw emailadres achter op deze site, zodat u op de hoogte blijft. U krijgt dan ook andere vragen en antwoorden te zien.
Abonneren
Abonneer u voor het ontvangen van emails voor uw Christopeit TM 5000S bij:
nieuwe vragen en antwoorden
nieuwe handleidingen
U ontvangt een email met instructies om u voor één of beide opties in te schrijven.
Ontvang uw handleiding per email
Vul uw emailadres in en ontvang de handleiding van Christopeit TM 5000S in de taal/talen: Duits, Engels als bijlage per email.
De handleiding is 4.58 mb groot.
U ontvangt de handleiding per email binnen enkele minuten. Als u geen email heeft ontvangen, dan heeft u waarschijnlijk een verkeerd emailadres ingevuld of is uw mailbox te vol. Daarnaast kan het zijn dat uw internetprovider een maximum heeft aan de grootte per email. Omdat hier een handleiding wordt meegestuurd, kan het voorkomen dat de email groter is dan toegestaan bij uw provider.
Stel vragen via chat aan uw handleiding
Stel uw vraag over deze PDF
Uw handleiding is per email verstuurd. Controleer uw email
Als u niet binnen een kwartier uw email met handleiding ontvangen heeft, kan het zijn dat u een verkeerd emailadres heeft ingevuld of dat uw emailprovider een maximum grootte per email heeft ingesteld die kleiner is dan de grootte van de handleiding.
Er is een email naar u verstuurd om uw inschrijving definitief te maken.
Controleer uw email en volg de aanwijzingen op om uw inschrijving definitief te maken
U heeft geen emailadres opgegeven
Als u de handleiding per email wilt ontvangen, vul dan een geldig emailadres in.
Uw vraag is op deze pagina toegevoegd
Wilt u een email ontvangen bij een antwoord en/of nieuwe vragen? Vul dan hier uw emailadres in.