Weitere Informationen zum Thema Aufwärmübungen, Dehnungsübungen
oder allgemeine Gymnastikübungen finden Sie in unserem Downloadbereich
unter www.christopeit-sport.com
4. Motivation
Der Schlüssel für ein erfolgreiches Programm ist ein regelmäßiges Training.
Sie sollten sich einen festen Zeitpunkt und Platz pro Trainingstag einrichten
und sich auch geistig auf das Training vorbereiten. Trainieren Sie nur gut
gelaunt und halten Sie sich stets Ihr Ziel vor Augen. Bei kontinuierlichem
Training werden Sie Tag für Tag feststellen, wie Sie sich weiterentwickeln
und Ihrem persönlichen Trainingsziel Stück für Stück näher kommen.
Aufwärmübungen (Warm Up)
Starten Sie Ihre Aufwärmphase durch Gehen auf der Stelle für mind. 3 Minuten und führen Sie danach folgende gymnastische Übungen durch um den
Körper auf die Trainingsphase entsprechend vorzubereiten. Bei den Übungen nicht übertreiben und nur soweit ausführen bis ein leichtes Ziehen zu spüren
ist. Diese Position dann etwas halten.
Greifen Sie mit der linken
Hand hinter den Kopf an die
rechte Schulter und ziehen
Sie mit der rechten Hand
etwas an der linken Arm-
beuge. Nach 20Sek. Arm
wechseln.
Beugen Sie sich soweit wie
möglich nach vorn und las-
sen Sie die Beine fast durch-
gestreckt. Zeigen Sie dabei
mit den Fingern in Richtung
Fußspitze. 2 x 20Sek.
Setzen sie sich mit einem
Bein gestreckt auf den Bo-
den und beugen Sie sich vor
und versuchen Sie den Fuß
mit den Händen zu errei-
chen. 2 x 20Sek.
Knien Sie sich in weitem
Ausfallschritt nach vorn und
stützen Sie sich mit den
Händen auf dem Boden ab.
Drücken Sie das Becken
nach unten. Nach 20 Sek.
Bein wechseln.
Nach den Aufwärmübungen durch etwas schütteln die Arme und Beine lockern.
Hören Sie nach der Trainingsphase nicht abrupt auf, sondern radeln Sie gemütlich noch etwas ohne Widerstand aus um wieder in die normale Puls-Zone
zu gelangen. (Cool down) Wir empfehlen die Aufwärmübungen zum Abschluss des Trainings erneut durchzuführen und das Training mit Ausschütteln der
Extremitäten zu beenden.
Deutsch
14
GB
Important Recommendations and
Safety Instructions
Our products are all tested and therefore represent the highest current safety
standards. However, this fact does not make it unnecessary to observe the
following principles strictly.
1. Assembly the machine exactly as described in the installation instructions
and use only the enclosed, specific parts of the machine. Before assembling,
verify the completeness of the delivery against the delivery notice and the
completeness of the carton against the assembly steps in the installation
and operating instructions.
2. Check the firm seating off all screws, nuts and other connections before
using the machine for the first time and at regular intervals to ensure that
the trainer is in a safe condition.
3. Set up the machine in a dry, level place and protect it from moisture and
water. Uneven parts of the floor must be compensated by suitable measures
and by the provided adjustable parts of the machine if such are installed.
Ensure that no contact occurs with moisture or water.
4. Place a suitable base (e.g. rubber mat, wooden board etc.) beneath the
machine if the area of the machine must be specially protected against
indentations, dirt etc.
5. Before beginning training, remove all objects within a radius of 2 metres
from the machine.
6. Do not use aggressive cleaning agents to clean the machine and employ
only the supplied tools or suitable tools of your own to assemble the machine
and for any necessary repairs. Remove drops of sweat from the machine
immediately after finishing training.
7.WARNING! Systems of the heart frequency supervision can be inexact.
Excessive training can lead to serious health damage or to the death. Consult
a doctor before beginning a planned training programme. He can define
the maximum exertion (pulse, Watts, duration of training etc.) to which you
may expose yourself and can give you precise information on the correct
posture during training, the targets of your training and your diet. Never
train after eating large meals.
8. Only train on the machine when it is in correct working order. Use original
spare parts only for any necessary repairs. WARNING! Replace the worm
parts immediately and keep this equipment out of use until repaired.
9. When setting the adjustable parts, observe the correct position and the
marked, maximum setting positions and ensure that the newly adjusted
position is correctly secured.
10. Unless otherwise described in the instructions, the machine must only
be used for training by one person at a time. The exercise time should not
overtake 60 min./daily.
11. Wear training clothes and shoes which are suitable for fitness training
with the machine. Your clothes must be such that they cannot catch dur-
ing training due to their shape (e.g. length). Your training shoes should be
appropriate for the trainer, must support your feet firmly and must have
non-slip soles.
12.WARNING! If you notice a feeling of dizziness, sickness, chest pain or
other abnormal symptoms, stop training and consult a doctor.
13. Never forget that sports machines are not toys. They must therefore
only be used according to their purpose and by suitably informed and
instructed persons.
14.People such as children, invalids and handicapped persons should
only use the machine in the presence of another person who can give aid
and advice. Take suitable measures to ensure that children never use the
machine without supervision.
15. Ensure that the person conducting training and other people never move
or hold any parts of their body into the vicinity of moving parts.
16. At the end of its life span this product is not allowed to dispose over
the normal household waste, but it must be given to an assembly point for
the recycling of electric and electronic components. You may find the symbol
on the product, on the instructions or on the packing.
The materials are reusable in accordance with their marking. With the re-use,
the material utilization or the protection of our environment. Please ask the
local administration for the responsible disposal place.
17. To protect the environment, do not dispose of the packaging materials,
used batteries or parts of the machine as household waste. Put these in
the appropriate collection bins or bring them to a suitable collection point.
18. This machine is a speed-dependant machine, i.e. the power increases
with increasing speed, and the reverse.
19.The machine is equipped with 8-speed resistance adjustment. This
makes it possible to reduce or increase the braking resistance and thereby
the training exertion. Turning the adjusting knob for the resistance setting
towards stage 1 reduces the braking resistance and thereby the training
exertion. Turning the adjusting knob for the resistance setting towards
stage 8 increases the braking resistance and thereby the training exertion.
20. The maximum permissible load (=body weight) is specified as 100 kg.
This machine has been tested and certified in compliance with EN ISO
20957-1 and EN 957-9 „H,C“. This item’s computer corresponds to the
basic demands of the EMV Directive of in 2014/30EU.
21. The assembly and operating instructions is part of the product. If selling
or passing to another person the documentation must be provided with
the product.
Contents
1. Summary of Parts Page 3 - 4
2. Important Recommendations and Safety Information Page 14
3. Parts List (List of spare parts) Page 15 - 16
4. Assembly Instructions With Exploded Diagrams
mount, Use & Dismount Page 17 - 20
5. Computer instructions Page21
6. Cleaning, Checks and Storage Page 22
7. Training Instructions, Warm up Page23
Dear customer,
We congratulate you on your purchase of this home training sports unit and
hope that we will have a great deal of pleasure with it. Please take heed
of the enclosed notes and instructions and follow them closely concerning
assembly and use.
Please do not hesitate to contact us at any time if you should have any
questions.
Top-Sports Gilles GmbH
Friedrichstr. 55
42551 Velbert
15
English
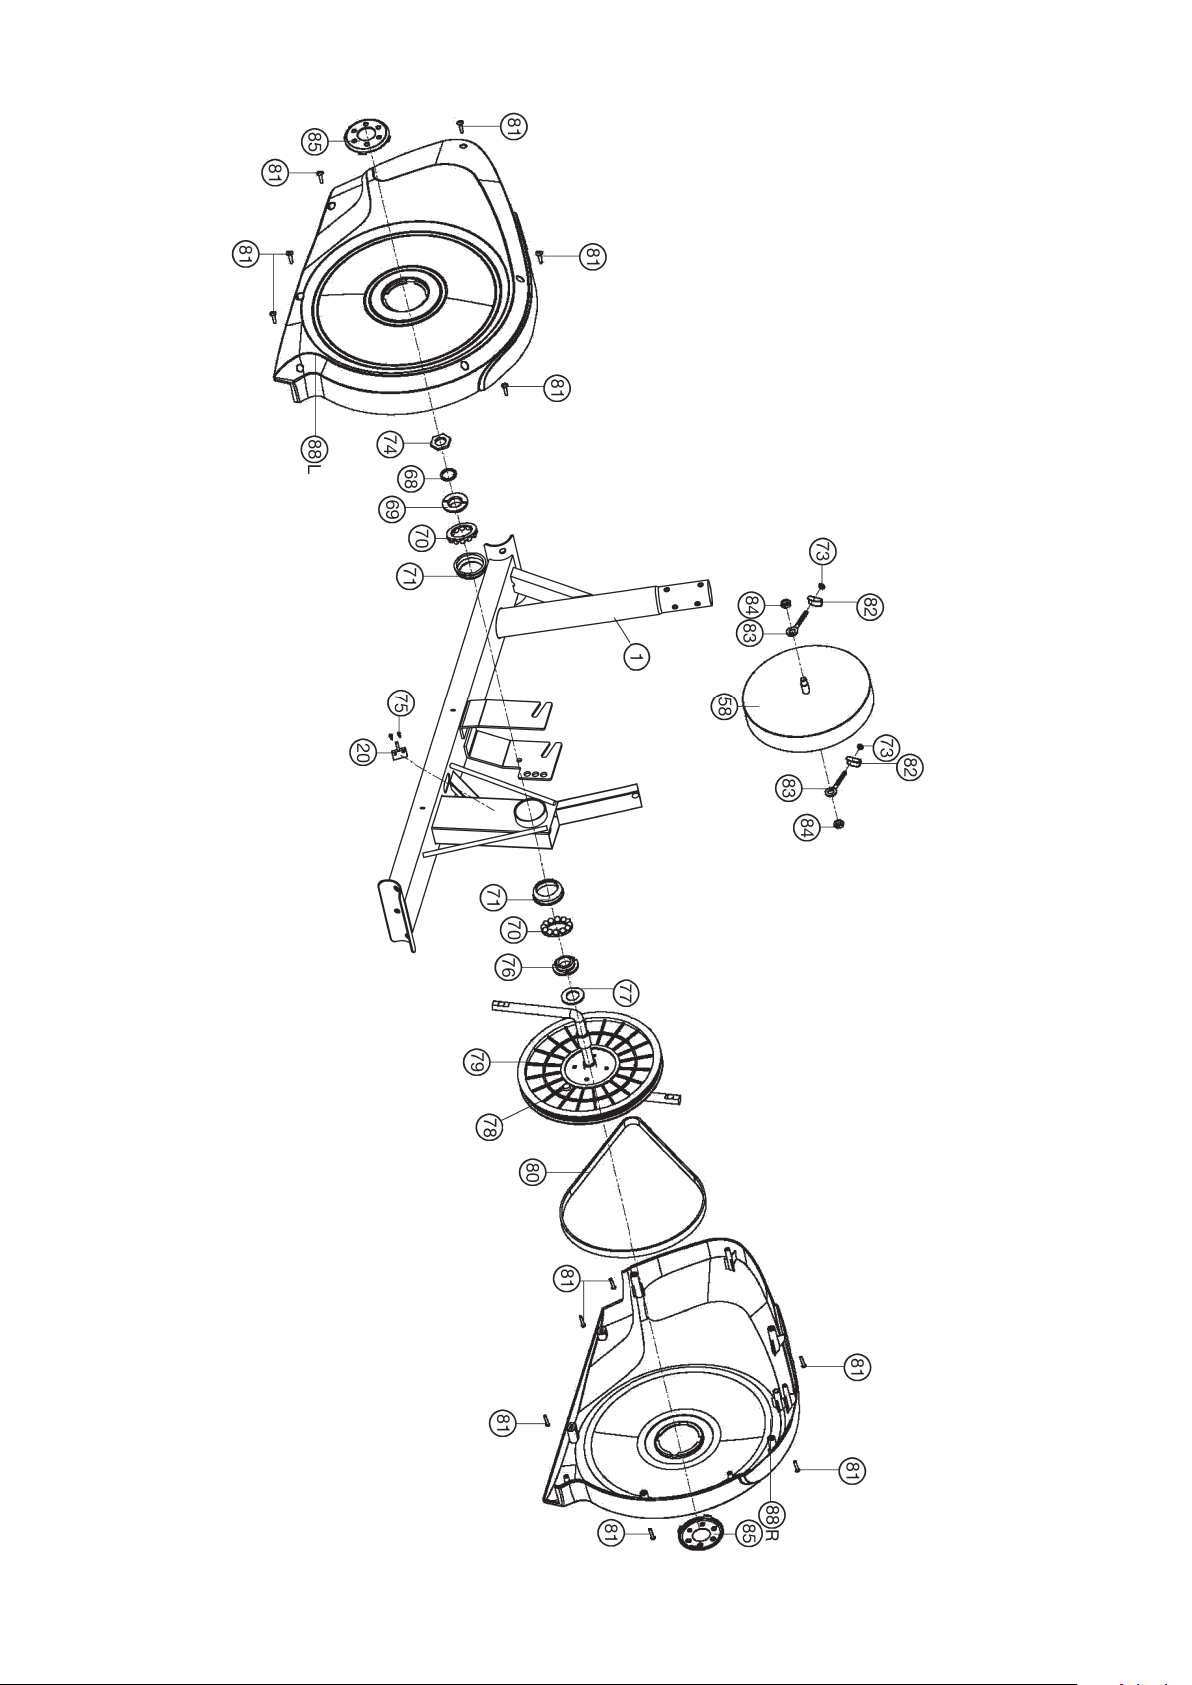
Parts List – Spare Parts List
CT 3 Order No. 1803
Technical data: Issue: 01. 08. 2018
Combination of jogging belt, home trainer and stepper
Elliptical movements forwards and backwards
Joint-protecting training of the leg, buttock, hip,
thigh and arm muscles
• Magnetic brake system
• approx. 7 KG flywheel
• 8-manually adjustable load steps
• Hand Pulse measurement
• moveable hand grips for exercising forward and backwards
• seperate fixed handgrips
• Wheels for easier transportation
• Floor level adjustment
• Big LCD Computer showing speed, time, distance, approx calories
or pulse frequency, Holder for smartphone / tablet
• Input of limits for time, distance, approx calories and upper
puls limit. Announcement of higher limits
Max. body weight 100 KG
Space requirement approx. L 111, W 66, H 152 cm
Weight of item approx. 28Kg
Exercise space approx: min. 3,5 m²
Illustration Designation Dimensions Quantity Attached to ET number
No. mm illustration No.
1 Main frame 1 33-1803-01-WS
2 Handlebar post 1 1 33-1803-02-WS
3 Front stabilizer 1 1 33-1321-03-WS
4 Rear stabilizer 1 1 33-1803-05-WS
5 L Pedal support left 1 6L+40L 33-1321-05-WS
5 R Pedal support right 1 6R+40R 33-1321-06-WS
6 L Swing bar left 1 5L+7L 33-1321-07-WS
6 R Swing bar right 1 5R+7R 33-1321-08-WS
7 L Hand grip left 1 6L 33-1321-09-WS
7 R Hand grip right 1 6R 33-1321-10-WS
8 Armrest 1 2 33-1803-04-WS
9 Computer 1 2 36-1803-03-BT
10 L Pedal left 1 5L 36-1803-04-BT
10 R Pedal right 1 5R 36-1803-05-BT
11 Front end cap 2 3 36-1321-06-BT
12 Carriage bolt M10x60 4 1,3+4 39-10026
13 Arc washer 10//20 4 12 39-10233-CR
14 Cap nut M10 4 12 39-10021
15 Rear end cap 2 4 36-1321-07-BT
16 Allen screw M8x16 12 2+6 39-9913-SW
17 Tension controller 1 2 36-1803-06-BT
18 Connection cable 1 9+20 36-1122-08-BT
19 Tension cable 1 17 36-1321-09-BT
20 Sensor wire 1 18 36-1122-06-BT
21 Cross screw M5x45 1 17 39-10406
22 Crank 1 79 33-1122-04-SI
23 Nut cap for M8/14 4 24+30 36-9214-33-BT
24 Hex bolt M8x15 2 27 39-9886-CR
25 Washer 8//32 2 24 39-10166
26 Axle bushing 6 2+6 36-1122-16-BT
27 Hand grip axle 1 2+6 33-1321-12-SI
28 Round end cap 28 2 6 36-1122-09-BT
29 Square end cap 40x25 4 5 36-9214-09-BT
30 Hex bolt M8x55 2 5+6 39-10056
31 Washer 8//16 4 30+51 39-9962-CR
32 Nylon nut M8 2 30 39-9918-CR
33 Hex bolt M10x45 4 10 39-10131
34 Flat washer 10//20 6 33+37 39-9989-CR
35 Nylon nut M10 6 33+37 39-9981
0 5 10 15 20 25 30 35 40 50 60 70 80 90 100 mm
This product is created only for private Home sports activity
and not allowed to us in a commercial or professional area.
Home Sport use class H/C
Please check after opening the packing that all the parts shown in
the following assembly steps are there. Once you are sure that this
is the case, you can start assembly.
Please contact us if any components are defective or missing, or if
you need any spare parts or replacements in future:
Internet service- and spare parts data base:
www.christopeit-service.de
Adresse:Top-Sports Gilles GmbH
Friedrichstr. 55
42551 Velbert
Telefon: +49 (0) 2051 - 6 06 70
Telefax: +49 (0) 2051 - 6 06 74 4
e-mail: info@christopeit-sport.com
www.christopeit-sport.com
16
Illustration Designation Dimensions Quantity Attached to ET number
No. mm illustration No.
36 Nut cap for M10/16 4 33+37 36-9214-34-BT
37 Hex bolt M10x50 2 40 39-10400
38 L Pedal axle screw left 1 22+40L 36-1320-07-BT
38 R Pedal axle screw right 1 22+40R 36-1320-08-BT
39 Axle bushing 16x20x24 4 40 36-9111-12-BT
40 L Pedal support bracket left 1 5L 33-1321-13-WS
40 R Pedal support bracket right 1 5R 33-1321-14-WS
41 Spring washer for ½” 2 38 36-9111-18-BT
42 L Nylon nut left ½” 1 38L 36-9111-19-BT
42 R Nylon nut right ½” 1 38R 36-9111-20-BT
43 Nut cap for ½” 2 42 39-10402
44 Arc washer 8//19 4 16 39-9966-CR
45 Metal bushing 4 6 36-1321-18-BT
46 Hand grip end cap 2 7 36-9111-25-BT
47 Hand grip foam 2 7 36-9111-22-BT
48 Armrest foam grip 2 8 36-1321-10-BT
49 Round end cap 25 2 8 36-9211-21-BT
50 Pulse sensor with cable 2 8 36-1321-11-BT
51 Hex bolt M8x30 2 2+8 39-9906
52 Spring washer for M8 16 16,24+51 39-9864-VC
53 Handlebar cover 1 8 36-9110-13-BT
54 Waveform washer 20/28 2 27 36-9217-31-BT
55 Cross screw M4x12 4 9 39-10188
56 Arc washer 8/20 8 16 39-9966-CR
57 Nut cap for M8/13 2 32 36-9214-33-BT
58 Flywheel 1 1 33-1321-17-SI
59 Arc washer 5//14 1 21 39-10111-VC
60 Tension controller cover 1 2 36-1321-12-BT
61 Metal bushing 14x10x10 4 5 36-1122-12-BT
62 Waveform washer 17//23 2 38 39-9918-22-BT
63 Hex bolt M6x45 2 3+65 39-10410-CR
64 Nylon nut M6 2 63 39-9861
65 Wheel 2 63 36-9825212-BT
66 Washer 4/10 4 55 39-10097
67 Spring washer for M10 4 12 39-9995-CR
68 Washer 22/35 1 22 36-9713-04-BT
69 Bearing cover 2 M22 1 22 36-9713-03-BT
70 Ball bearing 30/45 2 22 36-9713-02-BT
71 Tool set 1 36-1321-16-BT
72 Square cap 1 1 36-1321-15-BT
73 Nut M6 2 83 39-9861-VZ
74 Nut M22 1 22 36-9713-05-BT
75 Cross screw 3,5x20 2 20 39-9909-SW
76 Bearing cover 1 M23 1 22 36-9713-06-BT
77 Washer 23/38 1 22 36-9713-07-BT
78 Magnet 1 79 36-1122-23-BT
79 Belt wheel 1 22 36-1321-13-BT
80 Belt 1 58+79 36-1321-14-BT
81 Cross screw 4,2x18 5 88 36-9111-38-BT
82 U washer 2 83 36-9713-56-BT
83 Eye bolt M6 2 58 39-10000
84 Flange nut 2 58 39-9820-SW
85 Crank cap 2 88 36-1102-04-BT
86 Screw 4 1+88 36-1102-04-BT
87 Washer 4 86 36-1102-04-BT
88 L Chain cover left 1 1+88 R 36-1803-11-BT
88 R Chain cover right 1 1+88 L 36-1803-12-BT
89 Assembly and exercise instruction 1 36-1803-10-BT
17
English
Step 2:
Attach the support (2) at the main frame (1).
1. Place screws M8x16 (16), curved washers 8//20 (56) and spring
washers for M8 (52) accessibly beside the front part of the main
frame (1).
2. Place the lower end of the support (2) against the holder of main
frame (1). Plug the ends of the two computer cables (20) and
(18) projecting from (1) and support (2) together.
(Note:The computer cable harness (18) projecting from the
support (2) must not slide into the tube, as it is required for later
steps of installation.)
3. Connect the tension cable of resistance control (17) to the
bracket of lower section cable of tension (19) (See figure A1-A3).
Before this step of the installation, it is advisable to adjust the
resistance setting to the position, at which the cable extends
furthest from the sheath. Put the lowest part of cable (17) into
the small hook of lower tension cable (19) (figure A1). Pull it until
the small hook get in higher position (figure A2) and then insert
the cable (17) onto the bracket (19) (figure A3). When joining the
tubes, ensure that the cable connection is not trapped.
4. Put one spring washer (52) and one washer (56) on each screw
(16). Push the screws (16) through the holes in the support (2),
screw into the threaded holes of the main frame (1) but don’t
tighten them firmly. (This screw connection point will screw
tightly at least in Step 4)
Assembly Instructions
Remove all the separate parts from the packaging, lay them
on the floor and check roughly that all are there on the base of
the assembly steps. Please note that a number of parts have
been connected directly to the main frame and preassembled.
In addition, there are several other individual parts that have
been attached to separate units. This will make it easier and
quicker for you to assemble the equipment.
Assembly time: 35 - 45 min.
Step 1:
Attach the stabilizer (3+4) at main frame (1).
1. Attach the front foot (3) with the preassembled end caps (11)
to the main frame (1). Do this with the two screws M10x60 (12),
curved washers 10//20 (13), spring washers for M10 (67) and
cap nuts M10 (14).
2. Attach the rear foot (4) with height adjustable foot caps (15) to
the main frame (1). Do this with the two screws M10x60 (12),
curved washers 10//20 (13), spring washers for M10 (67) and
cap nuts M10 (14). After assembly has been completed, you
can compensate for minor irregularities in the floor by turning
the eccentric cap (15). The equipment should be set up that the
equipment does not move of its own accord during a training
session.
18
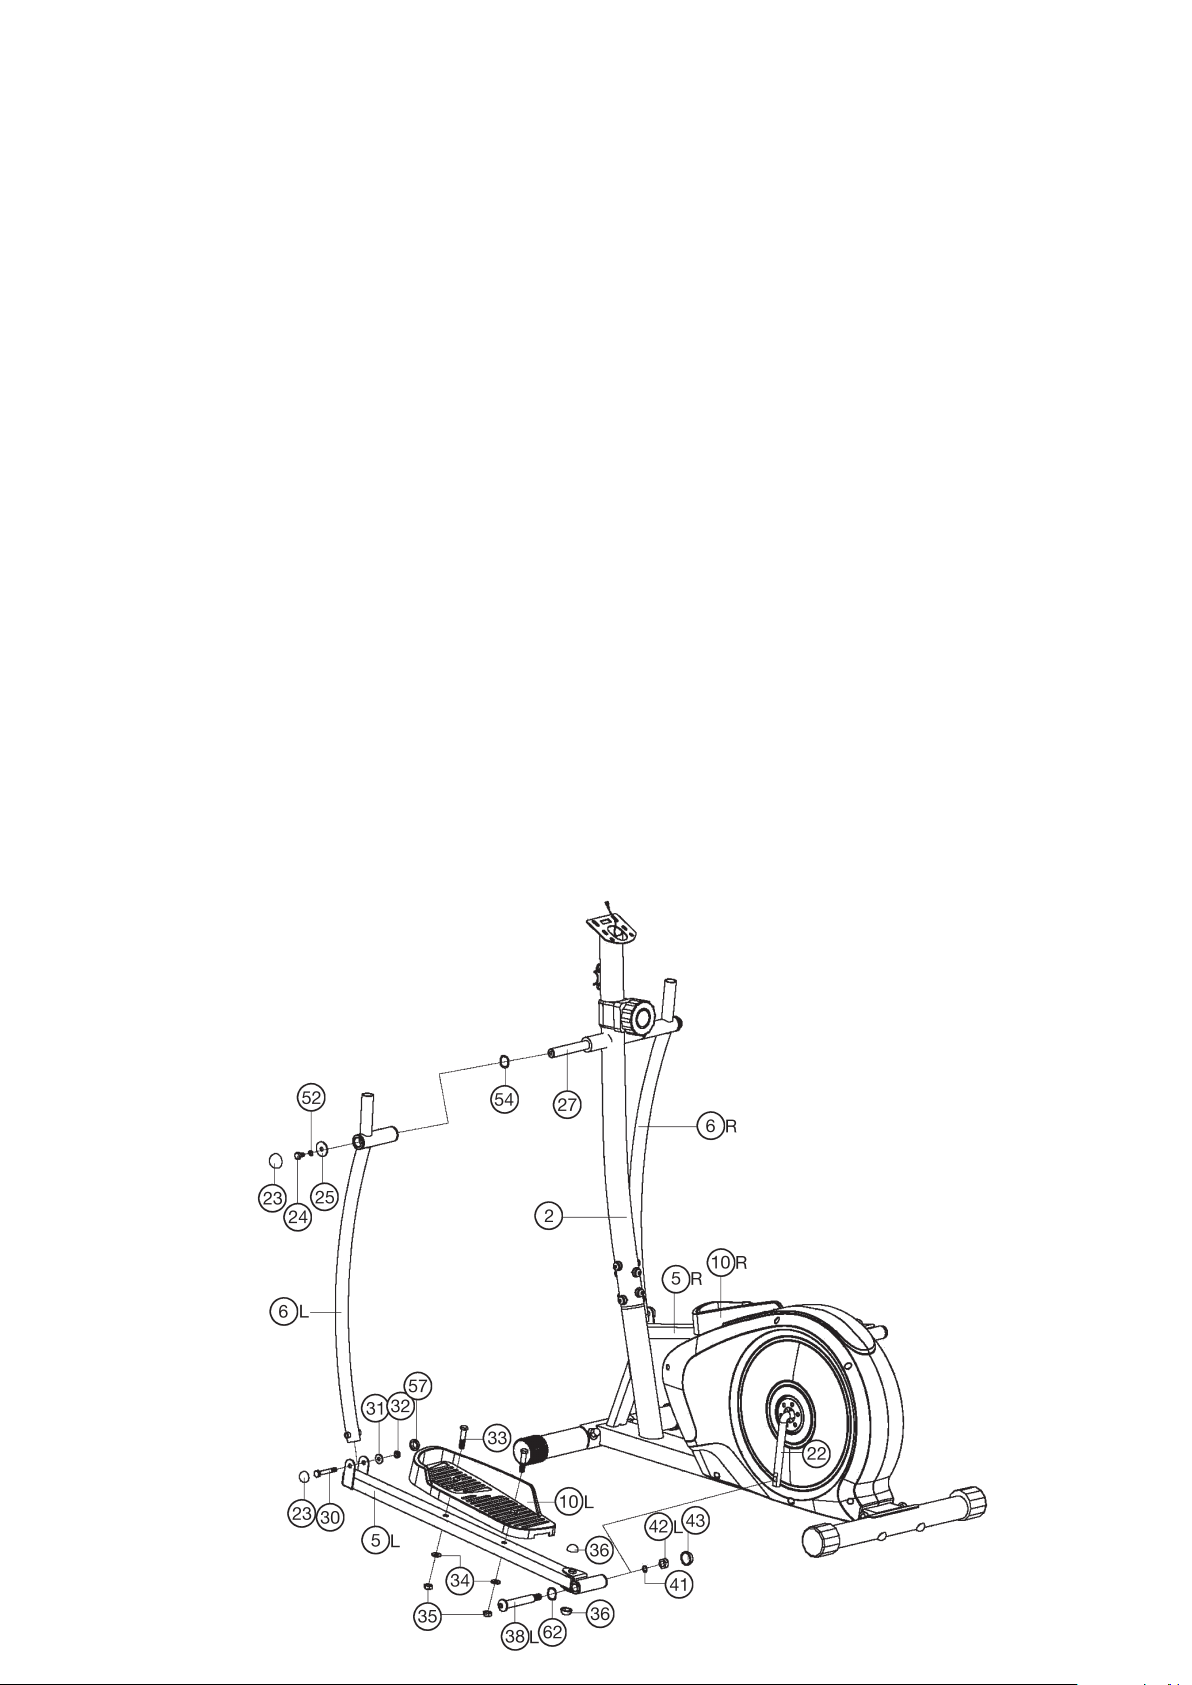
Step 3:
Attach the footrest holder (5) at the connecting tubes (6).
1. Put the holder of footrest holder left (5L) at lower end of
connecting tube left (6L) and adjust the holes in the tubes so
that they are aligned.
2. Push the bolts M8x55 (30) through the holes and tighten the
footrest holder left (5L) at connection tube left (6L) with washer
8//16 (31) and nut M8 (32) firmly. (This connection point has to
move easily. So please don’t tighten the screw too much.)
3. Install the footrest holder right (5R) incl. all additionally required
parts on the right hand side of the machine as described in 1. – 2.
4. Push the screw caps M8-14 (23) onto the screw head of screw
(30) and the screw caps M8-13 (57) onto the nuts (32).
Step 4:
Attach the footrest holder (5) and connecting tubes (6).
1. Place the preassembled unit of the right footrest holder (5R) and
connecting tube right (6R) at the right hand side of the main frame
(1). (Note: Right is specified as viewed standing on the machine
during training.)
2. Put the axle (27) into the center of support (2) and push the wave
washer (54) onto the axle (27).
3. Push the connection tube right (6R) onto the axle (27) an put on
the screw M8x15 (24) a spring washer for M8 (52) and a washer
8//32 (25) and tighten it firmly. Push the screw cap M8-14 (23)
onto the screw head of screw (24).
4. Place the footrest holder right (5R) near to the pedal crank (22).
Put onto the axle’s screw right (38R) a wave washer (62) and
screw the foot pedal holder (5R) at the pedal crank (22) firmly.
Step 5:
Attach the foot pedal (10) at the footrest holder (5).
1. Push the right footrest (10R) onto the right footrest holder (5R).
Adjust the holes in the parts so that they are aligned.
2. Push the screws M10x45 (33) from above through the holes.
Push on a washer 10//20 (34) from the opposite side, screw on
a nut M10 (35) and tighten firmly.
3. Install the left footrest (10L) on the left footrest holder (5L) as
described in 1.– 2. (Note: The right and left footrests can be
discerned by the edges of the longitudinal sides of the footrests.
The high edges of the footrests (10L+10R) must point inwards
(towards the main frame (1).))
4. Push the screw caps M10 (36) onto the screw head of screw (37)
and nuts (35).
Finally tighten them with spring washer (41) and self locking nut
right (42R) firmly. Then put a screw cap ½” (43) onto the nut
(42R).
(Note: The screws (38L&R) are marked with “L” for left and “R”
for right. Please use appropriate nut for left and right screw. On
right side the axle screw and nut have to screw clock wise.)
5. Install the left footrest holder left (5L) incl. all additionally required
parts on the left hand side of the machine as described in 3. – 4.
(Note: The screw direction on left side for axle screw and nut is
anti-clock wise.)
6. Now cycle 3-4 movements carefully by hand and tighten the
pre-connected screws (16) of step 2 firmly.
19
English
Step 7:
Attach the computer (9) at support (2).
1. Take the computer (9) that has been supplied out of the
packaging and insert the batteries (Type “AAA”-1.5 V pencells)
by watching for the right polarity on the back of the computer (9).
(Batteries for the computer are not included in this item. Please
buy them at your located market.)
2. Place the computer (9) to support (2) and put the plug of
connection cable (18) into the socket from monitor (9) backside
and insert the plugs of pulse (50) too. Push the computer (9) to
top monitor bracket of front post (2) and secure with screws
M4x12 (55) and washer 4//10 (66).
(Attention: Ensure that the cable looms are not crunched or
pinched during installation. The screws for computer you find
on backside of computer)
Step 6:
Attach the pulse grip (8) and handgrips (7).
1. Put the handgrip bars (7L+7R) onto the connecting tubes (6L+6R)
and adjust the holes in the tubes so that they are aligned. (Note:
the handgrip bars must be aligned after assembly so that the
upper ends are inclined outwards (away from the support (2)).
2. Push the bolt M8x16 (16) through the holes and tighten the
handgrip bars (7) at connection tubes (6) with washers 8/19 (44),
and spring washers M8 (52) firmly.
3. Guide the pulse grip (8) through the appropriate holder of support
(2) and adjust the holder so that the holes and threats align. Put
on each screw M8x30 (51) one spring washer M8 (82) and one
washer 8/16 (31) and tighten the pulse grip (8) at the support (2)
firmly.
4. Put the pulse cable (50) through the holes at support (9) into top
position and attach the grip cover (53) onto pulse grip connection
point.
20
Mount, Use & Dismount
Transportation of Equipment:
There are two rollers equipped on the front foot. For moving, you can
lift up the rear foot and drive it to where you would like to locate or
store it. (Attention: If this item hasn’t got a fixed handlebar, please
use carefully the left and right arms for procedure.)
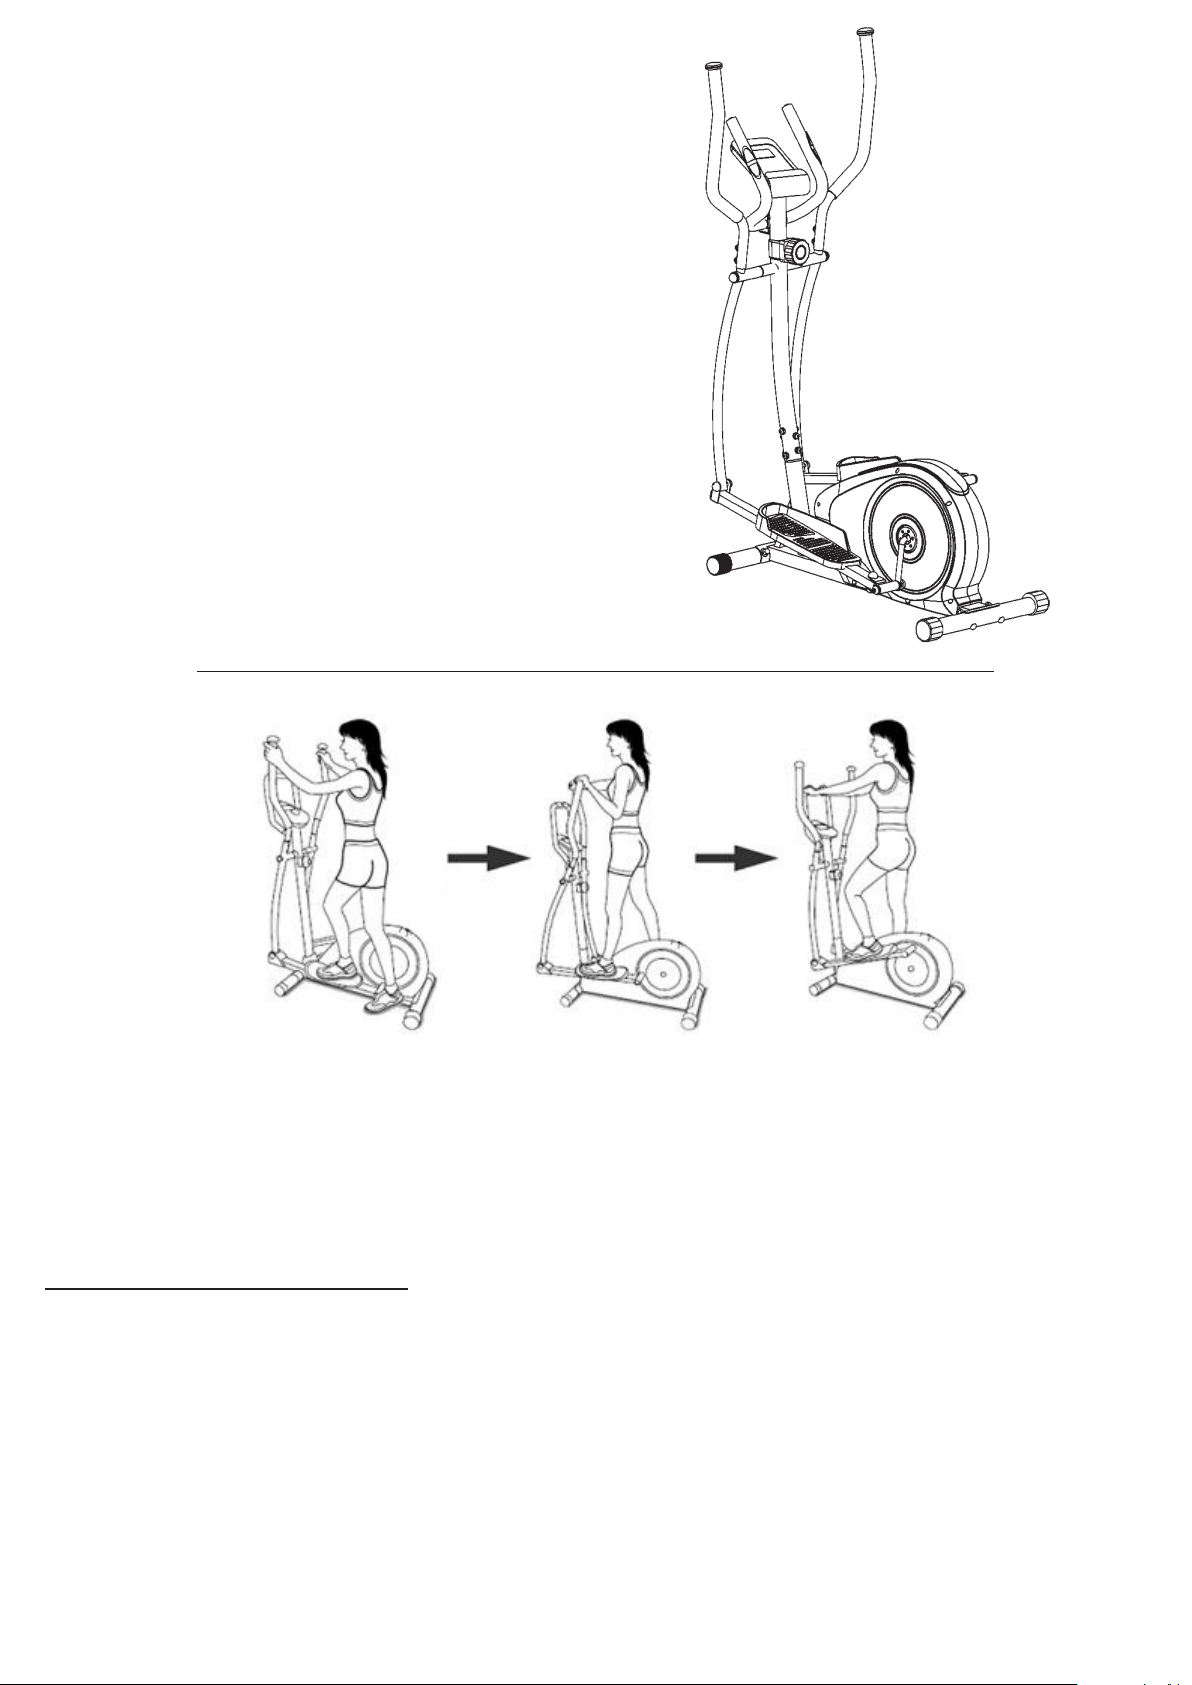
Mount, Use & Dismount
Mount:
a. Stand beside the item, put the nearest footrest into deepest
position and hold the fixed handlebar tightly.
b. Put your foot onto the footrest, try to put whole body weight
on your foot and simultaneously cross over
with your another foot on the other side footrest and place
there on the footrest too.
c. Now you are in the position to start your training.
Use:
a. Keep your hands in desired position on the fixed handlebar.
b. Pedal your exercise item by step your feet on footrests and
balance the body weight to left and right side of footrest
c. If you like to exercise the upper body too, you can place the
hands from fixed handle bar to the left and right handle grips.
d. Then you can increase the pedaling speed gradually and adjust
braking resistance levels to increase the exercise intension.
e. Keep always your hands on fixed handle bar or hand grips left
and right.
Dismount:
a. Slow down the pedaling speed until it comes to rest.
b. Keep the hands grabbing the fixed handlebar tightly, put one
foot cross over the equipment and land on the floor, then
land the other one.
This training equipment is a stationary exercise machine used to
simulate a combination of biking, stepping and walking without
causing excessive pressure to the joints, hence decreasing the risk
of impact injuries.
Exercise this item offer a non-impact cardiovascular workout that
can vary from light to high intensity based on the resistance pre-
ference set by the user. It will strengthen your muscles of upper
and lower body and increase cardio capacity and maintain fitness
of your body also.
Step 8:
Checks
1. Check the correct installation and function of all screwed and
plug connections. Installation is thereby complete.
2. When everything is in order, familiarise yourself with the ma-
chine at a low resistance setting and make your individual
adjustments.
Note:
Please keep the tool set and the instructions in a safe place as
these may be required for repairs or spare parts orders becoming
necessary later.
21
English
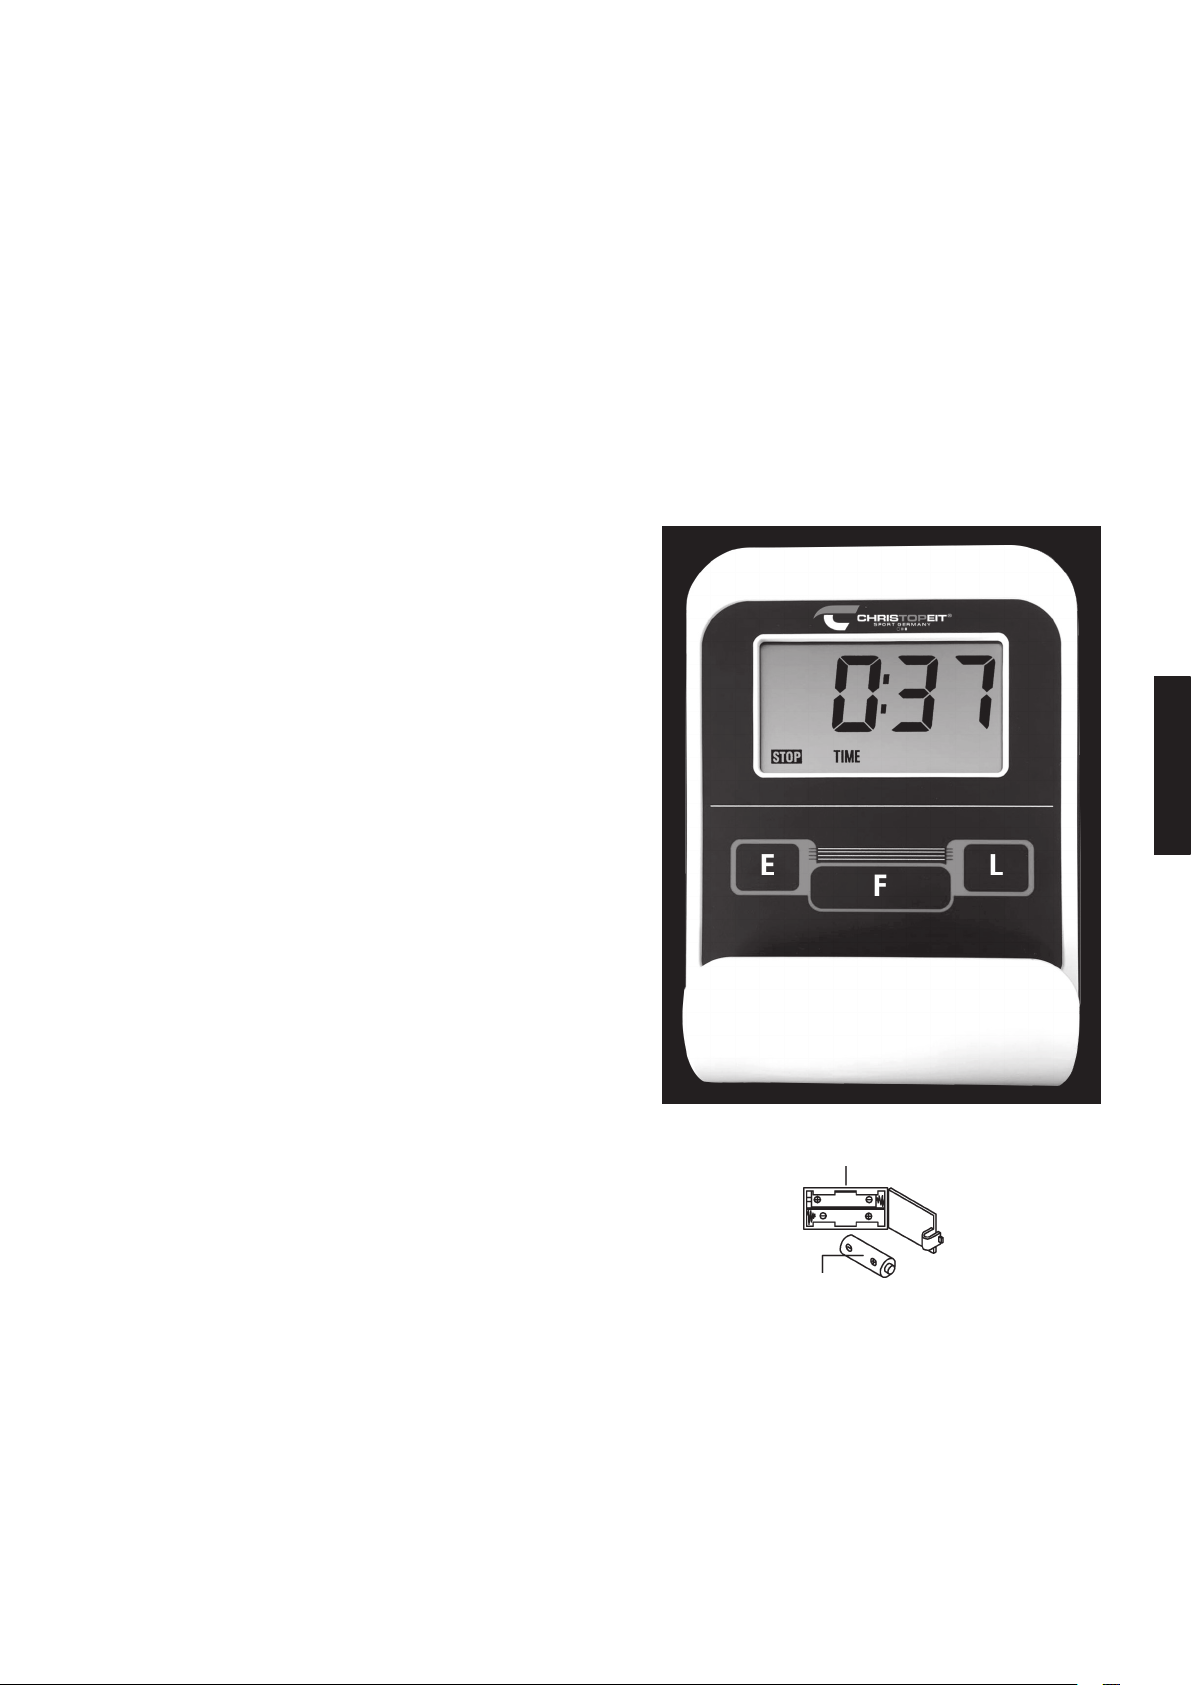
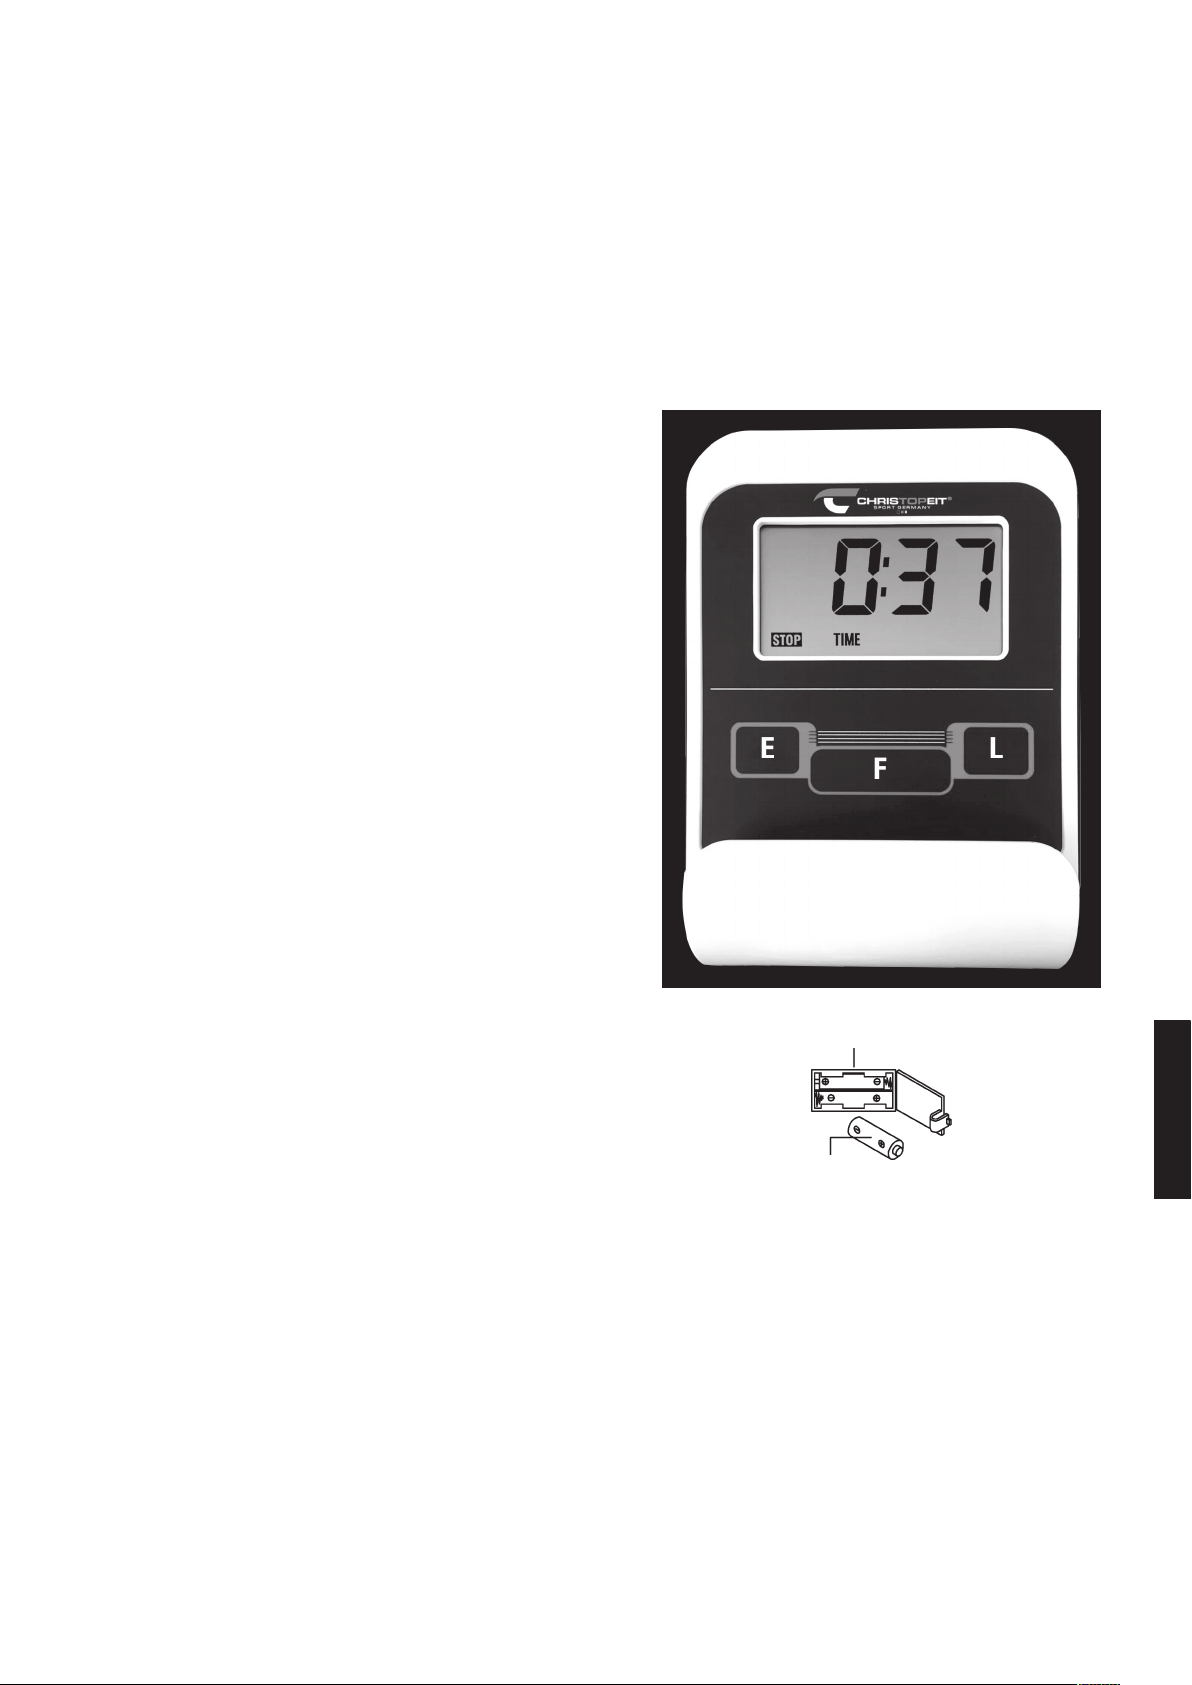
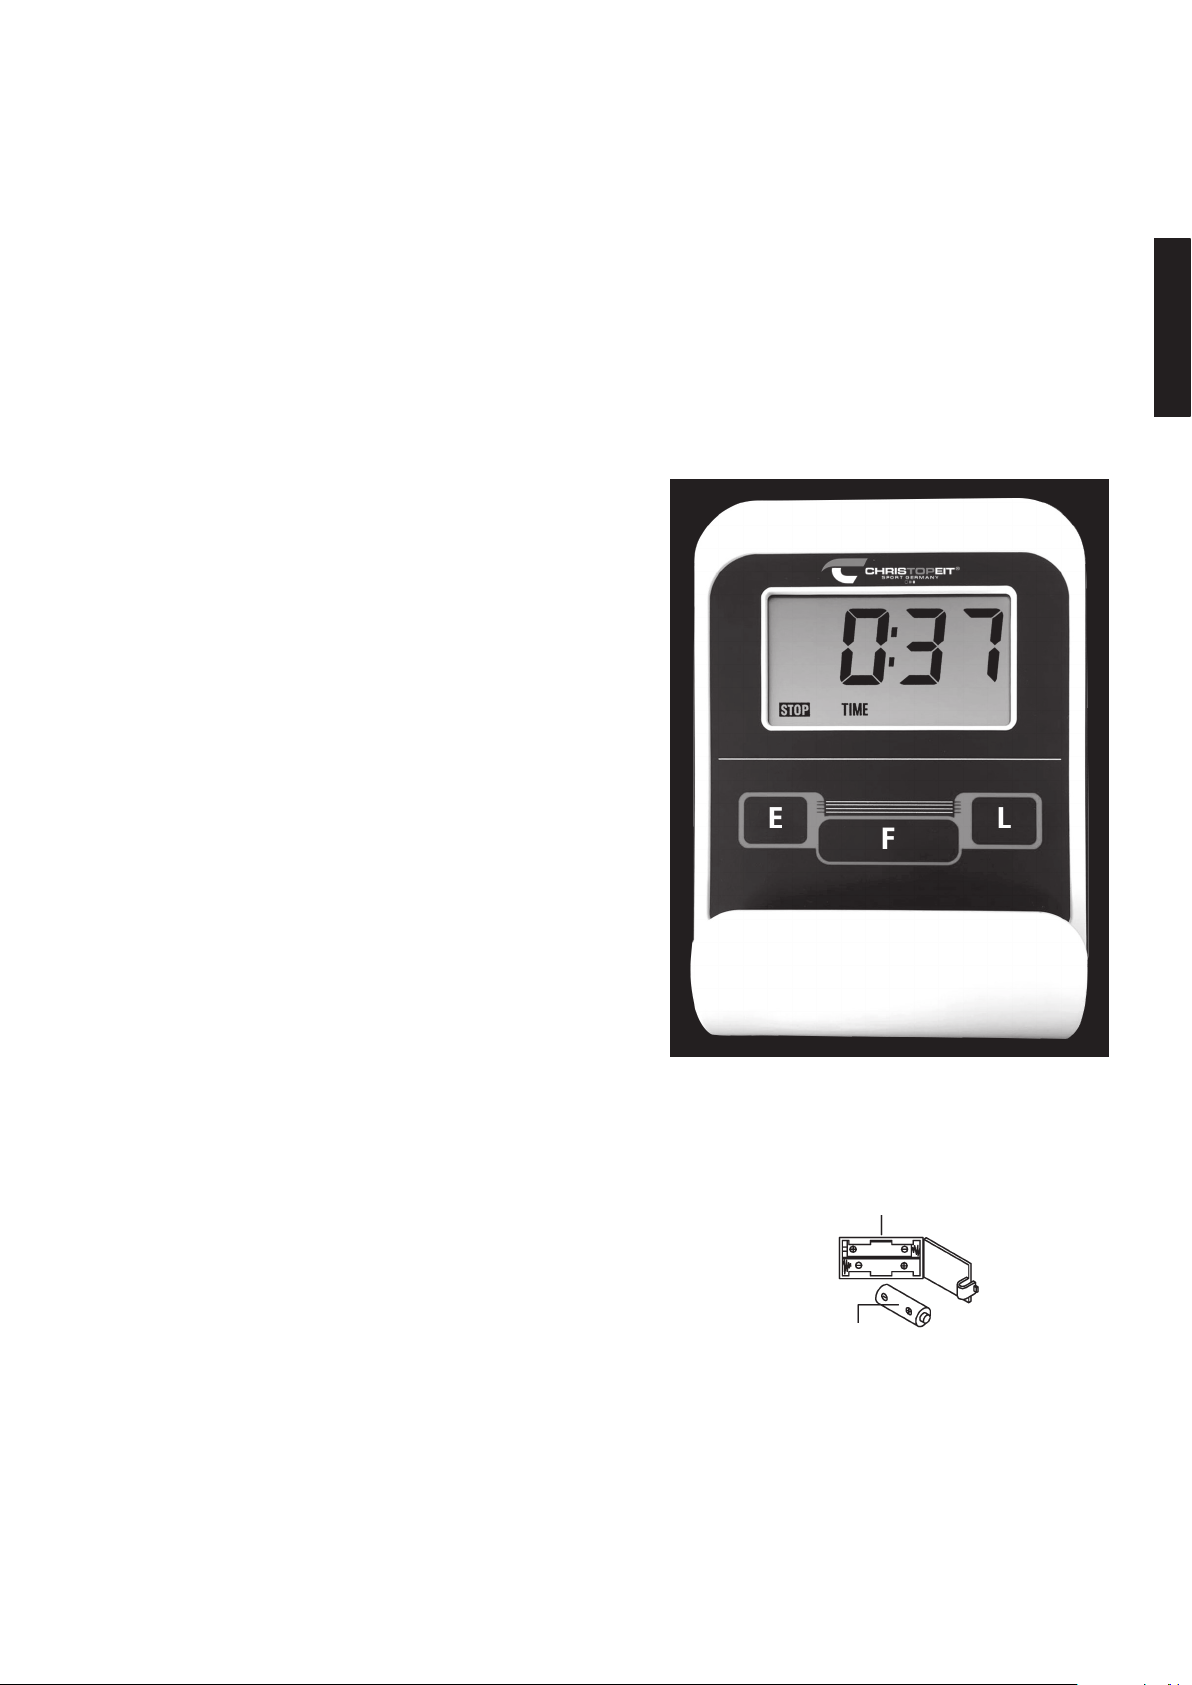
Computer instructions
The supplied computer allows the most convenient training. Every value
relevant to training is displayed in a corresponding window.
From the beginning of the training session, the required time, the current
speed, the approximate calorie consumption, the travelled distance ad the
current pulse rate are displayed. All values are counted from zero upwards.
If you wish to see one value displayed constantly during training, select this
with the „F“ key. If you wish to see these values in constant alternation,
select the „SCAN“ function. The display then changes from one function to
the next at intervals of approx. 6 seconds.
The computer is switched on by briefly pressing the F- key or simply by
beginning training. The computer begins to register and display all values.
To stop the computer, just stop training. The computer stops all
measurements and retains the last attained values. The last attained values in
the functions TIME, CALORIES and KM are stored and training can continue
with these values when training is resumed.
The computer switches of automatically approx. 4 minutes after training
is stopped. All values attained until that time are stored and are displayed
again when training is resumed. It is then possible to continue training from
these values or to reset all functions to zero using the L- key.
Displays:
1. „SPEED“ (KM/H) display:
The current speed is displayed in kilometres per hour. It is not possible to
specify a particular value using the „E“ key. The values last attained by this
function are not stored. (Limit of the display: 999.9 km/h.)
2. „TIME“ (ZEIT) display:
The currently required time is displayed in minutes and seconds. It is possible
to specify a particular value using the „E“ key. If a particular time
has been specified, the remaining time is displayed. When the specified value
is attained, this is indicated by an acoustic signal. The values last attained
by this function are stored. (Limit of the display: 99 minutes.)
3. „DIST (KM)“ display:
The current status of the travelled distance is displayed. It is possible to
specify a particular value using the „E“ key. If a particular distance has been
specified, the remaining distance is displayed. When the specified value is
attained, this is indicated by an acoustic signal. The values last attained by
this function are stored. (Limit of the display: 999,9 km.)
4. „CALORY“ (CAL) display:
The current status of the consumed calories is displayed. It is possible to
specify a particular value using the „E“ key. If a particular consumption
has been specified, the remaining number of calories to be consumed
is displayed. When the specified value is attained, this is indicated by an
acoustic signal. The values last attained by this function are stored. (Limit
of the display: 999,0 calories.)
5. „PULSE“ display:
The current pulse rate is displayed in beats per minute. It is possible to
specify a particular value using the „E“ key.
The values last attained by this function are not stored. (Limit of both displays:
40 – 240 pulse beats per minute.)
Note:
For pulse measurement, the two contact surfaces of the pulse measuring
handle unit must be gripped simultaneously. The contact surfaces should
be located centrally in the palms of the hands.
6. „SCAN“ function:
If this function is selected, the current values of all functions are displayed
successively in a constant sequence approx. every 5 seconds.
7. „STOP“ display:
Display of Stopmode. Presets can be set.
Keys:
1. „F“ key (Fuction):
Pressing this key once briefly makes it possible to change from one function
to another, i.e. the respective functions can be selected for which entries
can be made using the „E“ key. The currently selected function is indicated
in the window.
2. „E“ key (Enter):
By pressing this key once, it is possible to specify values step by step in the
respective functions. For this, the desired function must firstly be selected
using the „F“ key.
Holding the key pressed activates faster running. When training begins, the
specified values are then counted down to zero.
3. „L“-key = (Delete):
When this key is pressed briefly, the values chosen with the „F“ key are
reset to zero. If the key is held longer (approx. 3 seconds), all last attained
values are deleted.
Battery compartment
AAA batteries
Replacing the batteries:
1. Open the battery compartment cover and then remove the used Batteries.
(If the batteries should leak remove them under increased considering that
the battery acid is not into contact with skin come and clean the battery
compartment thoroughly.)
2. Insert the new batteries (type (AAA) 1.5 V in the correct order and taking
into account the polarity in the battery compartment and close the battery
cover so that it clicks into place.
3. If the computer does not pick up immediately, the function should Batteries
are removed for 10 seconds and re-inserted.
4. The empty batteries properly in accordance with the disposal regulations
disposed of and do not give residual waste.
22
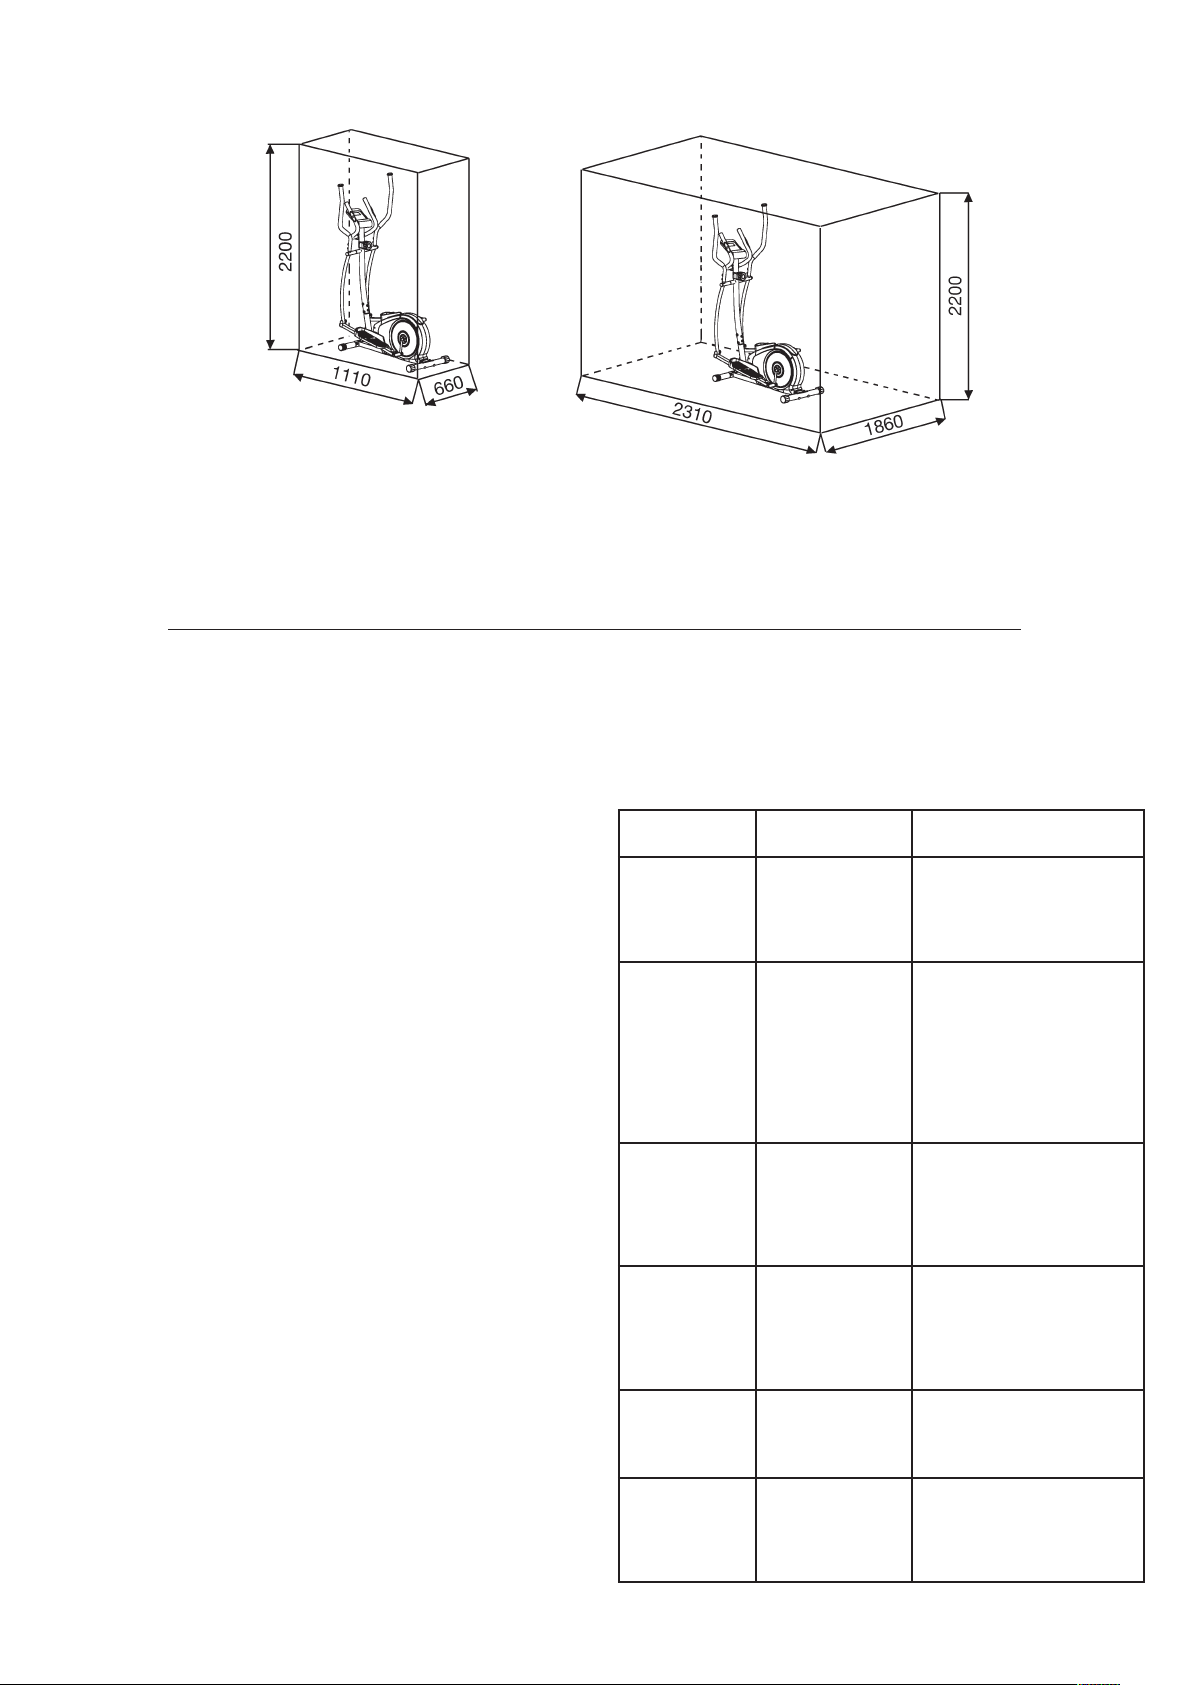
Training area in mm
(for home trainer and user)
Free area in mm
(Training area and security area
(rotating 60cm))
Cleaning, Checks and Storage of the exercise pro-
duct:
1. Cleaning
Use only a less wet cloth for cleaning.
Caution: Never use benzene, thinner or other aggressive cleaning
agents for surface cleaning as this damage caused.
The device is only for private home use and for use suitable indoors.
Keep the unit clean and moisture from the device.
2. Storage
Remove the batteries from the computer while intending the unit
for more than 4 weeks not to use. Choose a dry storage in-house
and put some spray oil at front & rear foot tube connection point
and hand grip axle. Cover the bike to protect it from being discolor
by any sunlight and dirty through dust.
3. Checks
We recommend every 50 hours to review the screw connections for
tightness, which were prepared in the assembly. Every 100 operating
hours, you should put some spray oil at front & rear foot tube con-
nection point and hand grip axle.
Troubleshooting
If you cannot solve the problem with the following information,
please contact the authorized service center.
ProblemPossible CauseSolution
Computer
has no value
at Display if
you press any
key.
No Batteries insert
or batteries empty
Check the position of batte-
ries at battery compartment or
replace batteries.
Computer is
not counting
data and do
not switch
on after start
cycling.
Sensor impulse
missing base on
not well plugged
connection
Check the plug connections at
computer and inside of handle-
bar support.
Computer is
not counting
data and do
not switch
on after start
cycling.
Sensor impulse
missing base on
not correct position
of sensor.
Überprüfen Sie das Bremsband
auf ordnungsgemäße
Einstellung wie in Montage
Schritt 5 beschrieben.
No pulse
value
Pulse cable is not
plugged in.
Check the separately pulse
cable is well connected with
computer.
No pulse
value
Pulse sensors not
well connected
Screw out the screw for pulse
measurement and check if
plugs are well connected and no
damage at pulse cable.
Resistance
don’t change
Connection of resi-
stance not well
Check the resistance connec-
tion inside of handlebar support
as manual mention.
23
Training instructions
You must consider the following factors in determining the amount of trai-
ning effort required in order to attain tangible physical and health benefits:
1. Intensity:
The level of physical exertion in training must exceed the level of normal
exertion without reaching the point of breathlessness and / or exhaustion.
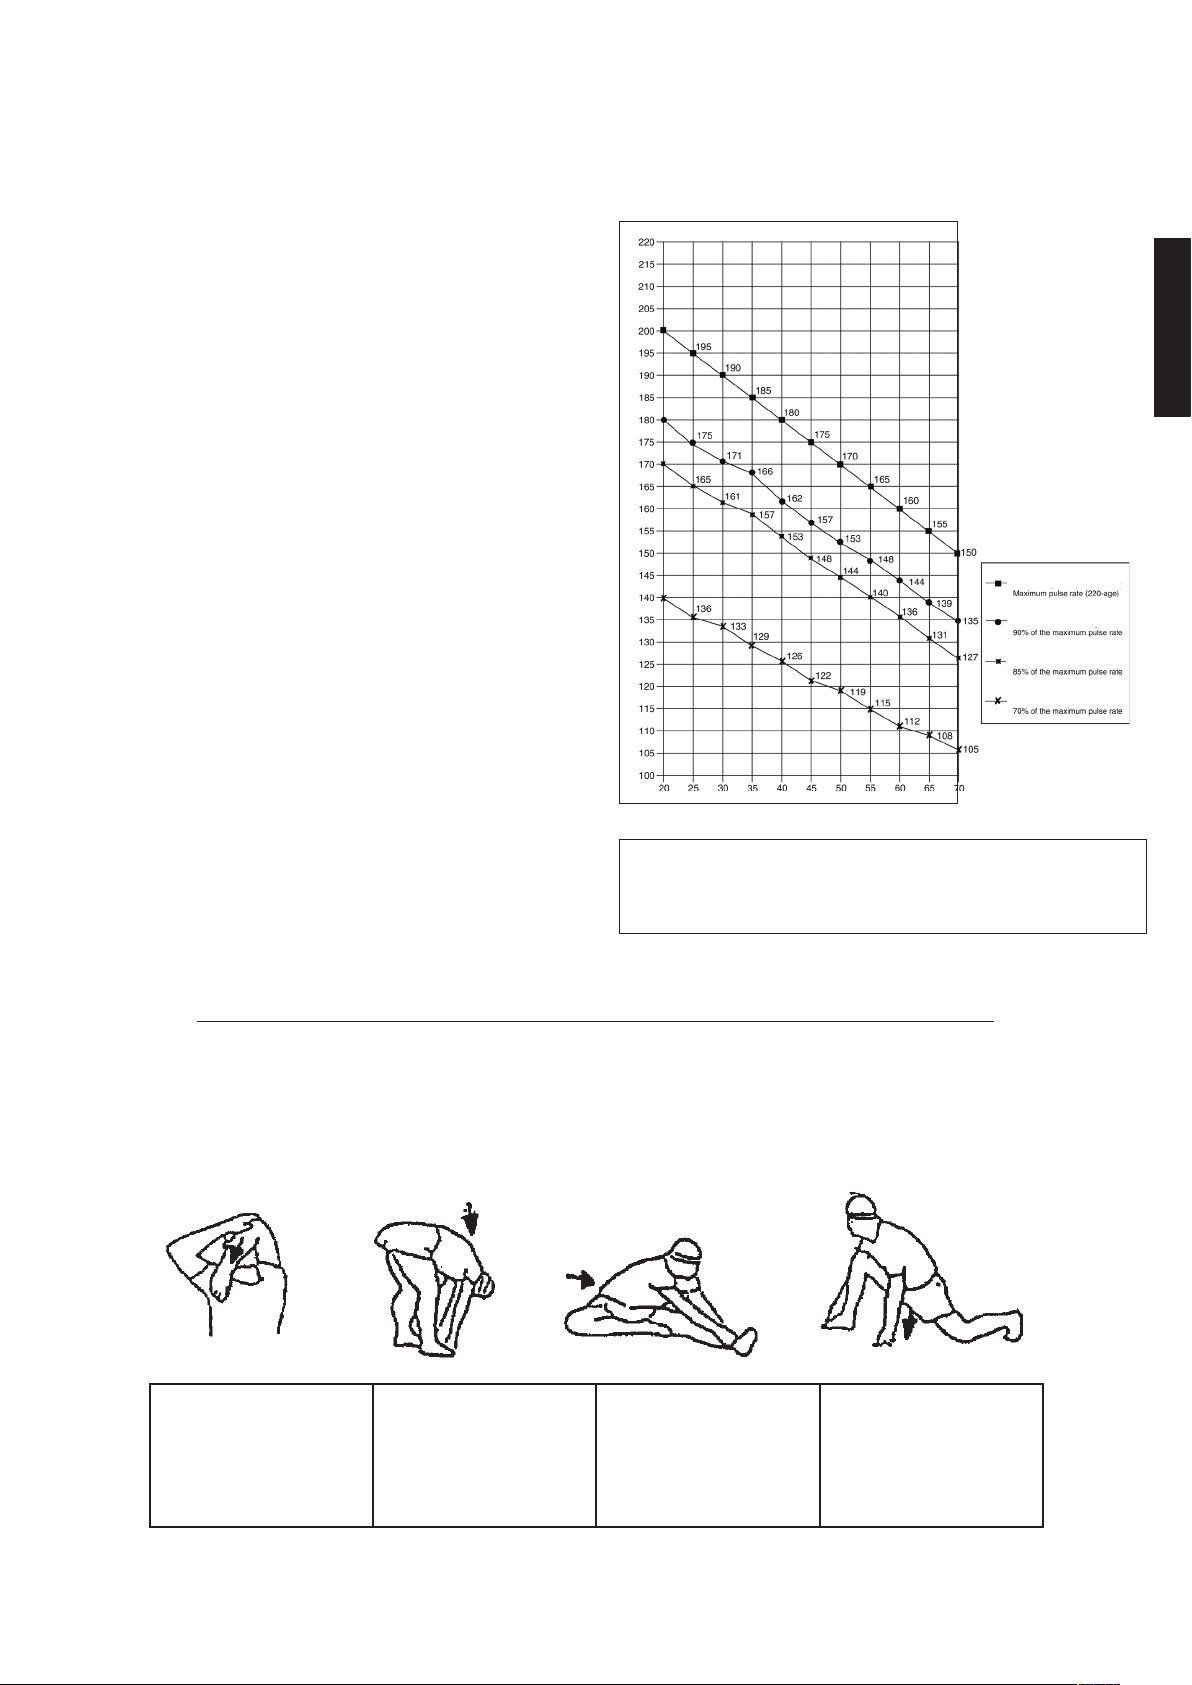
A suitable guideline for effective training can be taken from the pulse rate.
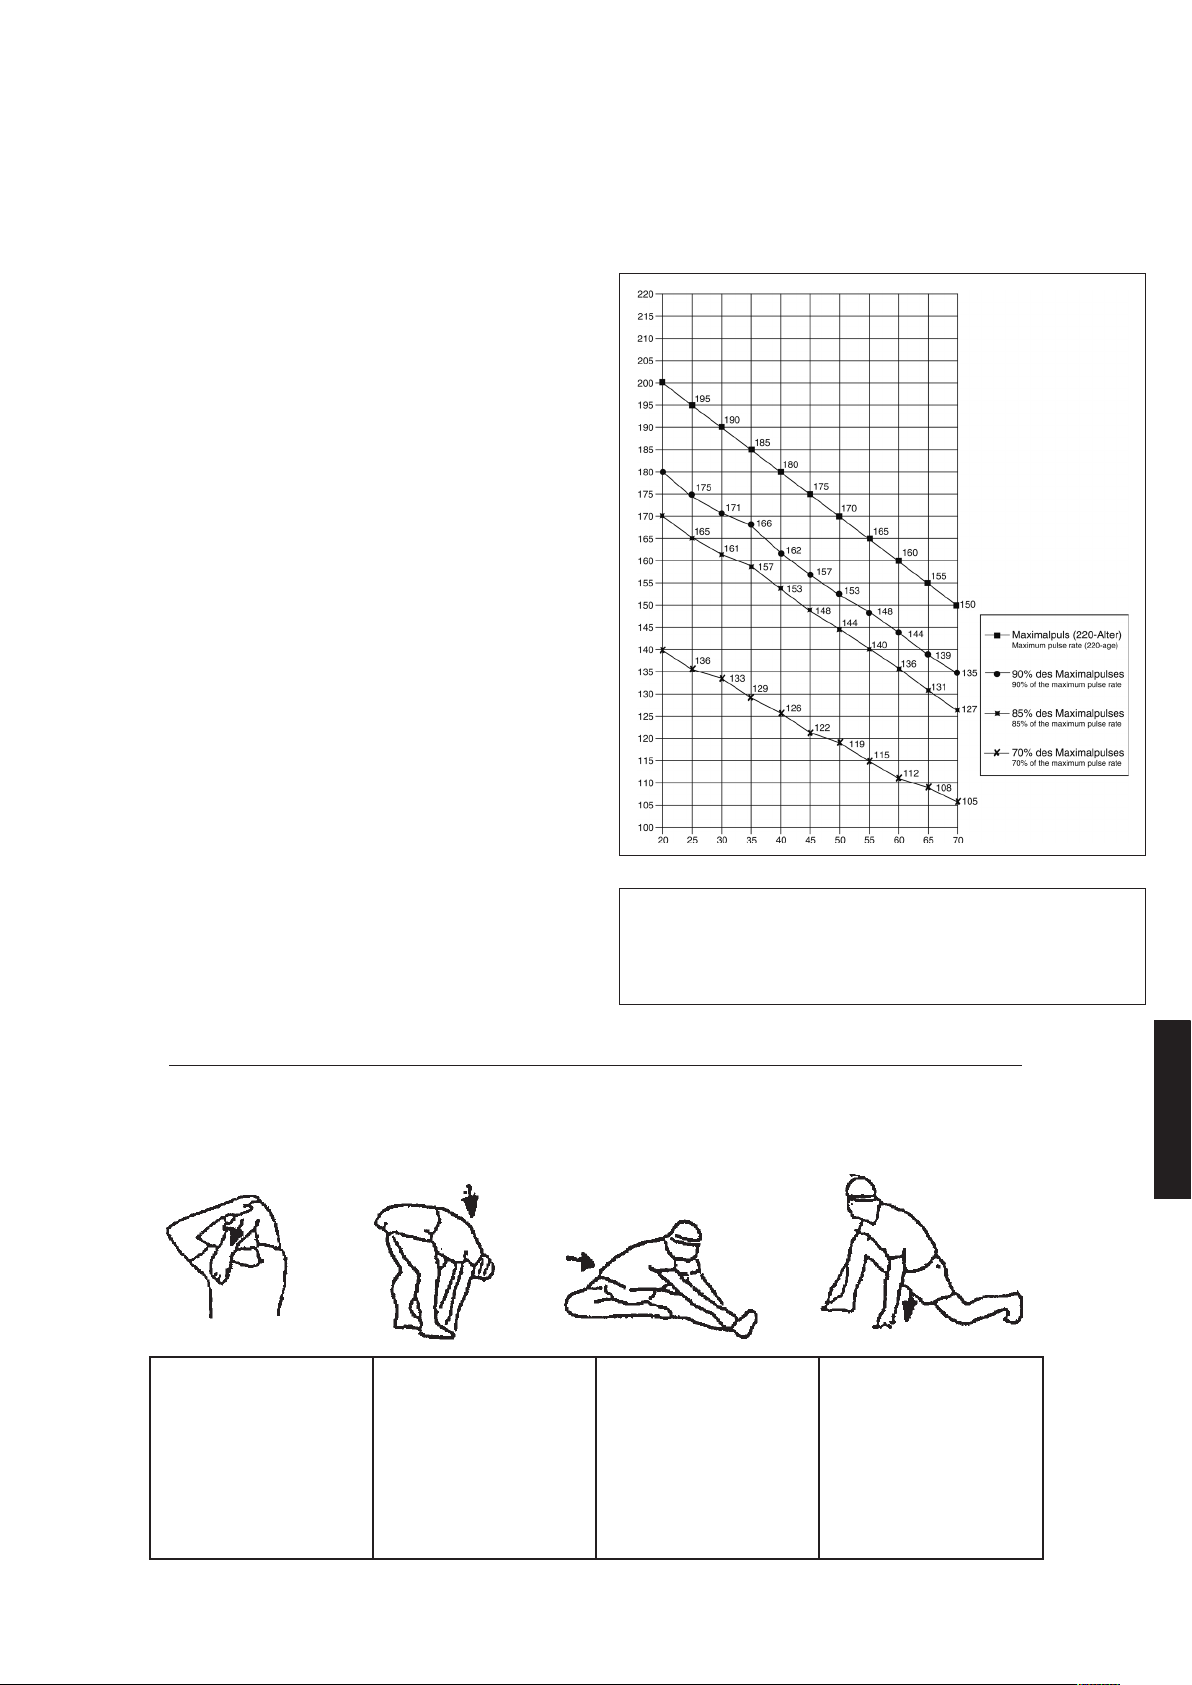
During training this should rise to the region of between 70% to 85% of
the maximum pulse rate (see the table and formular for determination and
calculation of this).
During the first weeks, the pulse rate should remain at the lower end of
this region, at around 70% of the maximum pulse rate. In the course of
the following weeks and months, the pulse rate should be slowly raised to
the upper limit of 85% of the maximum pulse rate. The better the physical
condition of the person doing the exercise, the more the level of training
should be encreased to remain in the region of between 70% to 85% of
the maximum pulse rate. This should be done by lengthening the time for
the training and / or encreasing the level of difficulty.
If the pulse rate is not shown on the computer display or if for safety reasons
you wish to check your pulse rate, which could have been displayed wrongly
due to error in use, etc., you can do the following:
a. Pulse rate measurement in the conventional way (feeling the pulse at
the wrist, for example, and counting the number of beats in one minute).
b. Pulse rate measurement with a suitable specialised device (available from
dealers specialising in health-related equipment).
2.Frequency
Most experts recommend a combination of health-conscious nutrition, which
must be determined on the basis of your training goal, and physical training
three times a week. A normal adult must train twice a week to maintain his
current level of condition. At least three training sessions a week are required
to improve one’s condition and reduce one’s weight. Of course the ideal
frequency of training is five sessions a week.
3. Planning the training
Each training session should consist of three phases: the warm-up phase,
the training phase, and the cool-down phase. The body temperature and
oxygen intake should be raised slowly in the warm-up phase. This can be
done with gymnastic exercises lasting five to ten minutes.
Then the actual training (training phase) should begin. The training exertion
should be relatively low for the first few minutes and then raised over a
period of 15 to 30 minutes such that the pulse rate reaches the region of
between 70% to 85% of the maximum pulse rate.
In order to support the circulation after the training phase and to prevent
aching or strained muscles later, it is necessary to follow the training phase
with a cool-down phase. This should be consist of stretching exercises and
/ or light gymnastic exercises for a period of five to ten minutes.
You find further information on the subject warm-up exercises, stretch
exercises or general gymnastics exercises in our download area under
www.christopeit-sport.com
Calculation formula: Maximum pulse rate = 220 - age
(220 minus your age)
90% of the maximum pulse rate = (220 - age) x 0.9
85% of the maximum pulse rate = (220 - age) x 0.85
70% of the maximum pulse rate = (220 - age) x 0.7
Warm up exercises (Warm Up)
Start your warm up by walking on the spot for at least 3 minutes and then perform the following gymnastic exercises to the body for the training phase to
prepare accordingly. The exercises do not overdo it and only as far run until a slight drag felt. This position will hold a while.
Reach with your left hand
behind your head to the right
shoulder and pull with the
right hand slightly to the left
elbow. After 20sec. switch
arm.
Bend forward as far forward
as possible and let your
legs almost stretched. Show
it with your fingers in the
direction of toe. 2 x 20sec.
Sit down with one leg
stretched out on the floor
and bend forward and try
to reach the foot with your
hands. 2 x 20sec.
Kneel in a wide lunge for-
ward and support yourself
with your hands on the
floor. Press the pelvis down.
Change after 20 sec leg.
After the warm-up exercises by some arms and legs shake loose.
Don’t finish the exercise phase abruptly, but will cycle leisurely something without resistance from to return to the normal pulse-zone. (Cool down) We re-
commend the warm-up exercises at the end of the training be conducted and to end your workout with shaking of the extremities.
4. Motivation
The key to a successful program is regular training. You should set a fixed
time and place for each day of training and prepare yourself mentally for
the training. Only train when you are in the mood for it and always have
your goal in view. With continuous training you will be able to see how you
are progressing day by day and are approaching your personal training
goal bit by bit.
English
24
F
Recommandations importantes et
consignes de sécurité
Nos produits sont systématiquement soumis au contrôle et sont ainsi
conformes aux normes de sécurité actuelles les plus élevées. Cependant,
cela ne dégage pas de l’obligation de suivre strictement les indications
suivantes.
1. Monter l’appareil en suivant exactement les instructions de montage et
n’utiliser que les pièces spécifiques à l’appareil et ci-jointes pour le mon-
tage de l’appareil. Avant le montage en lui-même, contrôler l’intégralité
de la livraison à l’aide du bon de livraison et l’intégralité des emballages
en carton à l’aide de la instructions de montage dans les instructions de
montage et d’utilisation.
2. Avant la première utilisation et à intervalles réguliers, contrôler si tous les
écrous, vis et autres raccords sont bien serrés, afin d’assurer un état de
service sûr de l’appareil d’entraînement.
3. Mettre en place l’appareil à un endroit sec et plan, et le protéger contre
l’humidité. Les inégalités du sol doivent être compensées par des mesures
appropriées et par les pièces réglables de l’appareil, prévues à cet effet, si
présentes. Il faut exclure tout contact avec l’humidité et l’eau.
4. Dans la mesure où le lieu de montage doit être protégé contre des points
de pression, des saletés ou autres, prévoir un support antidérapant (p. ex.
tapis en caoutchouc, plaque en bois etc.) sous l’appareil.
5. Avant de commencer l’entraînement, enlever tous les objets dans un
rayon de 2 mètres autour de l’appareil.
6. Pour nettoyer l’appareil, ne pas utiliser de détergents agressifs, et pour le
montage ainsi que d’éventuelles réparations, n’utiliser que les outils fournis
ou des outils appropriés. Les traces de sueur sur l’appareil doivent être
enlevées tout de suite après l’entraînement.
7.RESPECT! Des systèmes de la fréquence de coeur peuvent être in-
exacts. Le fait de s‘entraîner excessif sait dommage de santé sérieux ou
mènent vers la mort
Un entraînement inadapté ou excessif peut entraîner des risques pour la
santé. C’est pourquoi, avant de commencer un entraînement précis, il faut
consulter un médecin. Ce dernier peut définir les sollicitations maximales
(pouls, watts, durée d’entraînement etc.) auxquelles on peut se soumettre,
et donner des renseignements exacts sur les conditions de l’entraînement,
les objectifs et l’alimentation. Il ne faut pas s’entraîner après un repas lourd.
8. Ne s’entraîner avec l’appareil que lorsque celui-ci est en parfait état de
fonctionnement. Pour les réparations éventuelles, n’utiliser que des pièces
de rechange originales. RESPECT! Si des parties sont excessivement
chaudes à l‘utilisation de l‘appareil ils remplacent immédiatement celui-ci
et sûr cet équipement de l‘utilisation jusqu‘à réparé.
9. Pour le réglage des pièces, faire attention à régler la bonne position ou
la position de réglage maximale marquée, et à bloquer correctement la
nouvelle position réglée.
10. Si rien d’autre n’est indiqué dans le mode d’emploi, l’appareil ne doit être
utilisé que par une personne pour l’entraînement. Le temps d‘entraînement
ne devait pas dépasser au total 60 Min./ chaque jour.
11. Il faut porter des vêtements et des chaussures adaptés à un entraînement
fitness avec l’appareil. Les vêtements doivent être conçus de manière à ce
que de par leur forme (p. ex. longueur), ils ne puissent pas rester accrocher
pendant l’entraînement. Les chaussures d’entraînement doivent être choisies
en fonction de l’appareil, doivent systématiquement bien tenir le pied et
posséder une semelle antidérapante.
12.RESPECT! Si des sensations de vertige, des nausées, des douleurs
dans la poitrine ou d’autres symptômes anormaux se font sentir, arrêter
l’entraînement et consulter un médecin adapté.
13. Il faut savoir que les appareils de sport ne sont pas des jouets. C’est pour-
quoi, ils ne doivent être utilisés que de manière conforme à l’emploi prévu
et uniquement par des personnes informées et initiées en conséquence.
14. Les personnes, telles que les enfants, les invalides ou les handicapés,
ne doivent utiliser l’appareil qu’en présence d’une autre personne qui peut
fournir son aide ou donner des instructions. Il faut exclure l’utilisation de
l’appareil par des enfants sans surveillance, par des mesures appropriées.
15. Il faut faire attention à ce que la personne qui s’entraîne, ainsi que
d’autres personnes, ne se trouvent jamais dans la zone des pièces encore
en mouvement.
16. Ce produit ne peut pas être enlevé les déchets à la fin de sa durée
de vie sur les déchets budgétaires normaux, main doit être livre à un point
collectif pour le recyclage des appareils électriques et électroniques. Le
symbole sur le produit du mode d’emploi ou de l’emballage fait rem arguer
sur cela.
Les matières sont réutilisables conformément à leur marquage. Avec le
réemploi, la valorisation matérielle ou d’autres formes de valorisation vous
apportez des appareils de contralto, une contribution importante à la pro-
tection a notre environnement. Veuillez demander lors de l’administration
communale le poste d’enlèvement des déchets constant.
17. Les matériaux d’emballage, les piles vides et les pièces de l’appareil
doivent être évacués en respectant l’environnement, pas avec les ordures
ménagères, mais dans les containers de collecte prévus à cet effet, ou remis
aux services de collecte adaptés.
18. Cet appareil est un appareil dépendant de la vitesse, c.-à-d. la perfor-
mance augmente avec la croissance de la vitesse et inversement.
19. L’appareil est équipé d’un réglage de résistance à 8 niveaux. Cela per-
met de réduire ou d’augmenter la résistance de freinage et ainsi le niveau
d’entraînement. En tournant le bouton de réglage de la résistance vers
niveau 1, cela entraîne une diminution de la résistance de freinage et ainsi
du niveau d’entraînement. En tournant le bouton de réglage de la résistance
vers le niveau 8, cela entraîne une augmentation de la résistance de freinage
et ainsi du niveau d’entraînement.
20. La charge (=poids) maximale admise a été fixée à 100 kg. Cet appareil
a été contrôlé et certifié suivant les normes EN ISO 20957-1 et EN 957-9
„H,C“. Cet ordinateur d‘appareils correspond aux demandes fondamentales
d‘elle EMV Directive en in 2014/30EU.
21. Les instructions de montage et d‘utilisation doivent être considérées
comme faisant partie du produit. Cette documentation doit être fournie lors
de la vente ou du passage du produit.
Sommaire
1. Aperçu des pièces Page 3 - 4
2. Recommandations importantes et règles
de sécurité Page 24
3. Nomenclature Page 25 - 26
4. Notice de montage avec écorchés Page 27 - 30
monter, utiliser & descendre
5. Manuel d’utilisation du calculateur électronique Page 31
6. Nettoyage, Entretien et stockage Page 32
7. Recommandations pour l’entraînement, Warm up Page 33
Chère cliente, cher client,
Nous vous félicitons pour l’achat de ce cycle d’entraînement intérieur et
nous vous souhaitons beaucoup de plaisir avec.
Veuillez respecter et suivre les indications et les instructions de montage
et d’emploi.
Si vous avez des questions, vous pouvez bien sûr vous adresser à nous.
Très cordiales salutations
Top-Sports Gilles GmbH
Friedrichstr. 55
42551 Velbert
25
Français
Liste des pièces - Liste des pièces de rechange
CT 3 N° de réf. 1803
Caractéristiques techniques : Version : 01. 08. 2018
Ensemble composé d’un tapis roulant, d’un vélo de fitness et d’un stepper,
Enchaînement elliptique avant et arrière des mouvements Entraînement prenant
particulièrement soin des articulations des muscles des jambes, du fessier, de la
hanche, des cuisses et des bras.
• Système de freinage magnétique
• masse tournante : environ 7 kg
• Changement de cran à 8 degrés
• Mesure des pulsations
• Poignées ergonomiques optimisées
• Roulettes de déplacement à l’avant,
• bras de poignée portatifs pour le mouvement vers l‘avant et vers l‘arrière
• Poignée-Extra
• Réglage de la hauteur au niveau du sol
• Ordinateur à grand affichage numérique de : la vitesse, la distance, du temps, de la
consumation approximative des calories brûlées, du pouls, et du scan, Support pour
Smartphone / Tab
• Entrée de limites telles que la durée, la distance et la consommation de
calories et pouls. Affichage du dépassement des limites.
Adapté pour des poids jusqu’environ 100 kg.
Dimensions approximatives Longueur 111 x Largeur 66 x Hauteur 152 cm
Poids produit environ 28kg
Espace de formation: au moins 3,5 m²
Schéma Désignation Dimensions Quantité Monté sur Numéro ET
n° en mm Unités schéma n°
1 Cadre de base 1 33-1803-01-WS
2 Tube support 1 1 33-1803-02-WS
3 Tube du pied avant 1 1 33-1321-03-WS
4 Tube de pied arrière 1 1 33-1803-05-WS
5 L Logement de coque gauche 1 6L+40L 33-1321-05-WS
5 R Logement de coque droit 1 6R+40R 33-1321-06-WS
6 L Tube de jonction gauche 1 5L+7L 33-1321-07-WS
6 R Tube de jonction droit 1 5R+7R 33-1321-08-WS
7 L Poignée gauche 1 6L 33-1321-09-WS
7 R Poignée droite 1 6R 33-1321-10-WS
8 Poignée de maintien 1 2 33-1803-04-WS
9 Ordinateur 1 2 36-1803-03-BT
10 L Coque gauche 1 5L 36-1803-04-BT
10 R Coque droite 1 5R 36-1803-05-BT
11 Chapeaux finaux pied avant 2 3 36-1321-06-BT
12 Boulon brut à tête bombée et collet carré M10x60 4 1,3+4 39-10026
13 Rondelle intercalaire 10//20 4 12 39-10233-CR
14 Ecrou borgne M10 4 12 39-10021
15 Coiffe 2 4 36-1321-07-BT
16 Vis an six pans M8x16 12 2+6 39-9913-SW
17 Réglage de la résistance 1 2 36-1803-06-BT
18 Câble de connexion de tube support 1 9+20 36-1122-08-BT
19 Câble de transmission 1 17 36-1321-09-BT
20 Câble de palpeur 1 18 36-1122-06-BT
21 Vis M5x45 1 17 39-10406
22 Bras de pédale 1 79 33-1122-04-SI
23 Coiffe de vis pour M8/14 4 24+30 36-9214-33-BT
24 Vis a six pans M8x15 2 27 39-9886-CR
25 Rondelle 8//32 2 24 39-10166
26 Roulement de plastic 6 2+6 36-1122-16-BT
27 Axe de poignées 1 2+6 33-1321-12-SI
28 Bouchon ronde 28 2 6 36-1122-09-BT
29 Bouchon carre 40x25 4 5 36-9214-09-BT
30 Vis a six pans M8x55 2 5+6 39-10056
31 Rondelle 8//16 4 30+51 39-9962-CR
32 Ecrou auto blanc M8 2 30 39-9918-CR
33 Vis à six pans M10x45 4 10 39-10131
34 Rondelle 10//20 6 33+37 39-9989-CR
35 Ecrou auto blanc M10 6 33+37 39-9981
36 Coiffe de vis pour M10/16 4 33+37 36-9214-34-BT
0 5 10 15 20 25 30 35 40 50 60 70 80 90 100 mm
Ce product à seulement pour le domaine de sport de maison
privé de manière souvenue et non pour l‘utilisation industrielle
ou commerciale convenable. Utilisation de sport de maison la
classe H/C
Après avoir ouvert l’emballage, veuillez contrôler s’il y a toutes les
pièces conformément à la montage. Si c’est le cas, vous pouvez
commencer l’assemblage.
Si une pièce n’est pas correcte, s’il manque une pièce ou si vous
avez besoin d’une pièce de rechange à l’avenir, veuillez vous
adresser à :
Service- Internet et les pièces de rechange base de données
www.christopeit-service.de
Adresse:Top-Sports Gilles GmbH
Friedrichstr. 55
42551 Velbert
Telefon: +49 (0) 2051 - 6 06 70
Telefax: +49 (0) 2051 - 6 06 74 4
e-mail: info@christopeit-sport.com
www.christopeit-sport.com
26
Schéma Désignation Dimensions Quantité Monté sur Numéro ET
n° en mm Unités schéma n°
37 Vis a six pans M10x50 2 40 39-10400
38 L Vis d’axe gauche 1 22+40L 36-1320-07-BT
38 R Vis d’axe droite 1 22+40R 36-1320-08-BT
39 Roulement à acier 16x20x24 4 40 36-9111-12-BT
40 L Etrier de logement de coque gauche 1 5L 33-1321-13-WS
40 R Etrier de logement de coque droit 1 5R 33-1321-14-WS
41 Rondelle élastique bombée pour ½” 2 38 36-9111-18-BT
42 L Ecrou borgne gauche ½” 1 38L 36-9111-19-BT
42 R Ecrou borgne droite ½” 1 38R 36-9111-20-BT
43 Coiffe de vis pour ½” 2 42 39-10402
44 Rondelle intercalaire 8//19 4 16 39-9966-CR
45 Roulement d’acier 4 6 36-1321-18-BT
46 Bouchon d’extrémité 2 7 36-9111-25-BT
47 Revêtement de poignée 2 7 36-9111-22-BT
48 Revêtement de poignée d maintien 2 8 36-1321-10-BT
49 Bouchon ronde 25 2 8 36-9211-21-BT
50 Unité de pouls 2 8 36-1321-11-BT
51 Vis à six pans M8x30 2 2+8 39-9906
52 Rondelle élastique bombée pour M8 16 16,24+51 39-9864-VC
53 Revêtement de tube de support 1 8 36-9110-13-BT
54 Rondelle ondulée 20/28 2 27 36-9217-31-BT
55 Vis M4x12 4 9 39-10188
56 Rondelle intercalaire 8/20 8 16 39-9966-CR
57 Coiffe de vis pour M8/13 2 32 36-9214-33-BT
58 Roue volante 1 1 33-1321-17-SI
59 Rondelle intercalaire 5//14 1 21 39-10111-VC
60 Revêtement 1 2 36-1321-12-BT
61 Roulement d’acier 14x10x10 4 5 36-1122-12-BT
62 Rondelle ondulée 17//23 2 38 39-9918-22-BT
63 Vis à six pans M6x45 2 3+65 39-10410-CR
64 Ecrou auto blanc M6 2 63 39-9861
65 roulette de transport 2 63 36-9825212-BT
66 Rondelle 4/10 4 55 39-10097
67 Rondelle élastique bombée pour M10 4 12 39-9995-CR
68 Rondelle 22/35 1 22 36-9713-04-BT
69 Pièce de roulement 2 M22 1 22 36-9713-03-BT
70 Roulement à billes de pédalier 30/45 2 22 36-9713-02-BT
71 Jeu d’outils 1 36-1321-16-BT
72 Bouchon 1 1 36-1321-15-BT
73 Ecrou M6 2 83 39-9861-VZ
74 Ecrou M22 1 22 36-9713-05-BT
75 Vis 3,5x20 2 20 39-9909-SW
76 Pièce de roulement 1 M23 1 22 36-9713-06-BT
77 Rondelle 23/38 1 22 36-9713-07-BT
78 Magnétique 1 79 36-1122-23-BT
79 Plateau-manivelle de pédalier 1 22 36-1321-13-BT
80 Câble plat 1 58+79 36-1321-14-BT
81 Vis à six pans 4,2x18 5 88 36-9111-38-BT
82 Pièce d’U 2 83 36-9713-56-BT
83 Vis de serres M6 2 58 39-10000
84 Ecrou d’axe 2 58 39-9820-SW
85 Revêtement caoutchouc 2 88 36-1102-04-BT
86 Vis 4 1+88 39-10190
87 Rondelle 4 86 39-10510
88 L Revêtement gauche 1 1+88 R 36-1803-11-BT
88 R Revêtement droite 1 1+88 L 36-1803-12-BT
89 Instructions de montage et mode d’emploi 1 36-1803-10-BT
27
Instructions de montage
Sortez toutes les pièces de l’emballage, posez-les sur le sol et
contrôlez si rien ne manque en vous basant grossièrement sur
la étapes de montage. Il faut tenir compte du fait que certaines
pièces ont été reliées au cadre et prémontrés. Quelques autres
pièces ont également déjà été jointes. Ceci afin de faciliter et
d’accélérer le montage définitif. Temps de Montage: 35 - 45 min.
Etape n° 1:
Montage du pied avant et arrière (3+4) sur le cadre de base (1).
1.Attachez le pied avant (3) aux coiffe (11) sur le corps de l’appareil
(1). Servez-vous des deux vis M10x60 (12), rondelles intercalaires
10//20 (13), rondelle élastique bombée M10 (67) et écrou chapeau
M10 (14).
2. Attachez le pied arrière (4) avec des capuchons de protection
déjà assemblés (15) au corps de l’appareil (1). Servez-vous des
deux vis M10x60 (12), rondelles intercalaires 10//20 (13), rondelle
élastique bombée M10 (67) et écrou chapeau M10 (14). Une fois
le montage complètement terminé, vous pouvez égaliser les
petites irrégularités du sol en faisant tourner les deux capuchons
de protection égalisation de la hauteur (15). L’appareil est alors
ajusté de sorte qu’il ne puisse pas se mettre à bouger au cours
de l’entraînement.
Etape n° 2 :
Montage du tube support (2) sur le cadre de base (1).
1.Placer les vis M8x16 (16) ainsi que de rondelles 8//20 (56) et
rondelles élastiques bombées (52) à la portée de la main, à côté
de la partie frontale du cadre de base (1).
2. Diriger l’extrémité inférieure du tube support (2) vers le cadre de
base (1) et fixer les extrémités des deux faisceaux de câbles de
l’ordinateur ensemble (20) et (18), dépassant du cadre de base
(1) et du tube support (2). (Attention! L’extrémité du faisceau
de câble de l’ordinateur (18) dépassant de la partie supérieure
du tube de support (2) ne doit pas glisser dans le tube car elle
sera indispensable pour poursuivre le montage.)
3. Dirigez l’extrémité du réglage de la résistance (17) vers le
logement du câble de transmission (19) et raccordez-les
ensemble conformément aux schémas (A1-A3). Avant d’entamer
cette phase, nous vous conseillons de régler la résistance au
niveau, auquel le câble est le plus éloigné de son enveloppe.
Mettez le dessous du câble (17) dans le petit crochet (figure A1).
Tirez le câble jusqu’à ce que le petit crochet s’élance (figure A2)
et placez ensuite le câble (17) dans le support (19) (figure A3).
4. Placer une rondelle élastique bombée (52) ainsi qu’une rondelle
(56) sur chacune des vis (16). Introduire les vis (16) à travers
les trous de forage du cadre de base (1), visser dans les trous
taraudés du tube support (2) puis serrer à bloc. (Ce point
d’assemblage à vis sera vissé solidement au moins dans la
phase 4.)
Français
28
Etape n° 3:
Montage des logements de la coque (5) sur les tubes de
communication (6).
1.Placer le logement de la coque droit (5R) sur le tube de
communication (6R) en veillant à ce que les trous de forage des
tubes soient situés les un au-dessus des autres.
2. Introduire les vis M8x55 (30) à travers les trous de forage à
rondelles 8//16 (31) et écrou M8 (32) et serrer à bloc. (Il faut que
ce point d’assemblage puisse bouger facilement. Pour cette
raison ne vissez pas trop solidement le vis)
3. Monter le logement de la coque gauche (5L) sur le tube de
communication (6L) conformément aux instructions figurant aux
points 1.-2.
4. Placer les bouchons M8-13 (57) sur l’assemblage par écrou (32)
et les bouchons M8-14 (23) sur l’assemblage par vis (30)
Etape n° 4 :
Montage des logements de la coque (5) et des tubes de jonction
(6).
1. Placer l’unité composée du logement de la coque de la pédale
droite (5R) et d’un tube de communication (6R), assemblée
préliminairement, sur la partie latérale droite du cadre de base
(1). (Attention! La direction de visée est à droite lorsque l’on se
trouve sur l’appareil et que l’on s’entraîne.)
2. Introduire l’essieu (27) sur le tube de support (2) et poser de
rondelle ondulée (54) sur l’essieu (27).
3. Placer le tube de communication (6R) sur l’essieu (27). Poser
une rondelle élastique bombée (52) et rondelle 8/32 (25) sur les
vis M8x15 (24) et serrer à bloc. Placer les bouchons (23) sur
l’assemblage par vis (24).
4. Placer le logement de la coque droit (5R) sur la manivelle de
pédale (22) et placer une rondelle ondulée (62) sur le vis de axe
droit (38R). Introduire les vis droit (38R) à le logement de la coque
(5R) et monter avec le rondelle élastique bombée ½’’ (41) et de
écrou droit ½’’ (42R). Placer le bouchon ½‘’ (43) sur l’assemblage
par écrou (42R). (Remarque: Les vis sont marquées „L“ pour la
gauche et „R“ pour le droit attribuez ce droit en conformité avec
les écrous sur le côté droit, le boulon de l‘axe (38R) et l‘écrou
d‘axe (42R) vissés dans le sens horaire.)
5. Monter le logement de la coque de la pédale gauche (5L) avec
l’ensemble des pièces supplémentaires nécessaires sur la partie
latérale gauche de l’appareil conformément aux instructions
figurant aux points 3.-4. Assurez-vous que la gauche vis d’axe
(38L) et l‘écrou d‘axe à gauche (42L) sont vissés dans le sens
antihoraire.
6. Tournez doucement le lecteur par la main 3-4 tours et terminer
l‘installation de l‘étape 2 et visser du tube support (2) aux vis (16)
sur cadre de base (1) et serrer à bloc.
Etape n° 5:
Montage de la coque de la pédale (10) sur le logement de la
coque de la pédale (5).
1.Poser la coque de la pédale droite (10R) sur le logement de la
coque de la pédale (5R) en veillant à ce que les trous de forage
des pièces soient situés les uns au-dessus des autres.
2. Sur la partie supérieure, introduire les boulons M10x45 (33) à
travers les trous de forage. Du côté opposé, poser une rondelle
10//20 (34) sur chacun d‘eux, desserrer un écrou M10 (35) et
serrer à bloc.
3. Monter la coque de la pédale gauche (10L) sur le logement de la
coque de la pédale (5L) conformément aux instructions figurant
aux points 1.-2.
(Attention!Les bords situés sur les parties longitudinales
des coques des pédales permettent de distinguer les coques
des pédales droite (10R) et gauche (10L). Les bords élevés
des coques des pédales (10) doivent être chacun dirigés vers
l’intérieur (en direction du cadre de base (1)).
4. Placer les bouchons M10 (36) sur l’assemblage par écrou (35)
et par vis (37).
29
Etape n° 6:
Montage des manches (7) et du poignée de maintien (8).
1. Placer les manches (7L+7R) sur les tubes de communication
(6L+6R) en veillant à ce que les trous de forage des tubes soient
situés les uns au-dessus des autres. (Attention ! Après le montage
des manches, veillez à ce que leurs extrémités supérieures soient
courbées vers l‘extérieur (du tube de support (2)).
2. Introduire les boulons bruts à brut à tête bombée et collet carré
M8x16 (16) à travers les trous de forage à rondelles 8//19 (44)
et rondelles élastique bombée (52) et serrer à bloc.
3. Conduire au poste de guidon supérieure (2) de la poignée main-
tien (8), et l‘aligner de sorte que le modèle de trou du poignée
maintien (8) et le tube de support (2) coïncident. Les vis M8x30
(51) attacher chacun une rondelle élastique (52) et la rondelle
8//16 (31) et donc le poignée maintien (8), serrer le tube de sup-
port supérieur (2).
4. Insérez le câble de pulsation (50) à travers les trous dans la partie
supérieure soutenez tube (2) et tirer vers le haut pour le retirer.
Par la suite couvrant le poignée maintien (8) avec le revêtement
de poignée maintien (53).
Etape n° 7:
Montage l’ordinateur (9) sur le tube de support (2).
1. Prenez l‘ordinateur fourni (9) de l‘emballage et insérer les piles
(type AAA - 1,5 V) par rapport au réel polarité à l‘arrière de
l‘ordinateur (9). (Piles pour l’ordinateur ne sont pas à la livraison.
S‘il vous plaît se référer cette dans le commerce.)
2. Placer l’ordinateur (9) sur le tube de support (2) e prenez ensuite
et fixez son câble de connexion (18) et son câble de pulsation (50)
à l’arrière de l’ordinateur (9). Monter l’ordinateur (9) au tube de
support (2) avec de vis M4x12 (55) et rondelle 4//10 (66). Evitez
ce faisant d’abîmer le câble. (Les vis de l‘ordinateur sont situées
à l‘arrière de l‘ordinateur.)
Français
30
Monter, utiliser & descendre
Transport de la machine:
La machine est équipée de 2 rouleaux sur le pied avant. Si vous
voulez transporter la machine, soulevez le pied postérieur et rou-
lez la machine vers la destination désirée. (Respect: Si l‘appareil
d‘entraînement est équipé sans poignée d‘appui s‘ils utilisent
prudemment les gestes des links et le droit pour la manutention.)
Monter, utiliser & descendre
Monter :
a. Tandis que vous vous trouvez à côté de la machine, mettez
le repose-pied qui se trouve à votre côté dans la position la plus
basse. Saisissez solidement la poignée fixe.
b. Placez votre pied sur le repose-pied, essayez de mettre votre
poids entier sur ce pied et en même temps, levez l’autre jambe et
mettez ce pied sur l’autre repose-pied.
c. Vous êtes maintenant dans la correcte position pour commencer
votre entraînement.
Utiliser :
a. Tenez vos mains dans la position désirée sur la poignée fixe.
b. Pédalez sur la machine en marchant sur les repose-pieds, alter-
nant votre poids corporel sur les deux repose-pieds.
c. Si vous voulez également entraîner la partie supérieure du corps,
placez vos mains sur les poignées mobiles, au lieu de la poignée fixe.
d. Ensuite, augmentez graduellement la vitesse et modifiez la rési-
stance afin d’intensifier l’exercice.
e. Tenez toujours vos mains sur la poignée fixe ou sur les poignées
mobiles.
Descendre :
a. Ralentissez graduellement jusqu’à ce que vous vous êtes
arrêté(e).
b. Saisissez solidement la poignée fixe, lancez un pied par-dessus
la machine et placez-le par terre. Ensuite, mettez également l’autre
pied par terre.
Cette machine d’exercice stationnaire simule la combinaison cycler
– marcher – promener. La pression sur les articulations est moins
élevée, diminuant les risques de blessures d’impact.
Cette machine propose des entraînements cardiovasculaires non-
impact, dont l’intensité peut varier de basse à très haute, selon les
préférences de l’utilisateur. Les muscles de la partie inférieure et
supérieure du corps deviendront plus forts, la capacité cardiova-
sculaire augmentera et votre corps restera en pleine forme.
Etape n° 8:
Contrôle
1. Vérifier si les assemblages et connexions ont été effectués
correctement et fonctionnent. Le montage est maintenant
terminé.
2. Si tout est en ordre, se familiariser avec l’appareil en effectuant
de légers réglages de la résistance et effectuer les réglages
individuels.
Remarques:
Veuillez à conserver soigneusement le jeu d’outils ainsi que les
instructions de montage dont vous aurez éventuellement besoin
ultérieurement pour effectuer les réparations nécessaires et com-
mander des pièces de rechange.
31
Français
Mode d’emploi de l’ordinateur
L’ordinateur livré vous offre le plus grand confort d‘entraînement. Chaque
valeur importante pour l’entraînement est affichée dans une fenêtre.
Le temps nécessaire, la vitesse actuelle, la consommation de calories
approximative, la distance parcourue et le pouls actuel sont affichés dès le
commencement de l’entraînement. Toutes les valeurs sont sauvegardées
à partir du nombre zéro.
L’ordinateur se met en marche dès que l’on appuye brièvement sur la touche
F ou que l’on commence tout simplement l’entraînement. L’ordinateur
commence à saisir l’ensemble des valeurs et à les afficher.
Pour éteindre l’ordinateur, terminer simplement l’entraînement. L’ordinateur
arrête l’ensemble des mesures et sauvegarde les dernières valeurs obtenues.
Les dernières valeurs obtenues dans les fonctions ZEIT, KALORIEN
et KM sont sauvegardées et peuvent être réutilisées pour redémarrer
l’entraînement.
L’ordinateur s’éteint automatiquement au bout d’environ 4 minutes
d’interruption de l’entraînement. L’ensemble des valeurs obtenues jusqu’à
présent sont sauvegardées et sont réaffichées lors de la reprise de
l’entraînement.
Affichages :
1. Affichage „TIME“ (affichage du temps) :
Permet d’afficher le temps nécessaire actuellement en minutes et en
secondes. La touche « E » permet de fixer préalablement une valeur
déterminée. Si une valeur déterminée est fixée préalablement, le temps
qu’il reste à parcourir est affiché. Si la valeur fixée est atteinte, un signal
acoustique l’indique. Cette fonction permet de sauvegarder les valeurs
obtenues jusqu’à présent. Affichage limité au maximum à 99 minutes.)
2. Affichage „SPEED“ (affichage des km/h) :
Permet d’afficher la vitesse actuelle en kilomètres par heure. La touche
« E » ne permet pas de fixer préalablement une valeur déterminée. Cette
fonction ne permet pas de sauvegarder les valeurs obtenues jusqu’à présent.
(Affichage limité au maximum à 999,9 km/h)
3. Affichage „CAL“ (affichage des calories) :
Permet d’afficher l’état actuel des calories consommées. La touche « E »
permet de fixer préalablement une valeur déterminée. Si une valeur de
consommation déterminée est fixée préalablement, la quantité de calories
qu’il reste à consommer est affichée. Si la valeur fixée est atteinte, un signal
acoustique l’indique. Cette fonction permet de sauvegarder les valeurs
obtenues jusqu’à présent. (Affichage limité au maximum à 999,0 calories)
4. Affichage „DIST“ (affichage des km) :
Permet d’afficher les kilomètres parcourus jusqu’à présent. La touche
« E » permet de fixer préalablement une valeur déterminée. Si un parcours
déterminé est fixé préalablement, la distance qu’il reste à parcourir est
affichée. Si la valeur fixée est atteinte, un signal acoustique l’indique. Cette
fonction permet de sauvegarder les valeurs obtenues jusqu’à présent.
(Affichage limité au maximum à 999,9 km)
5. Affichage „PULSE“ (affichage du pouls) :
Permet d’afficher le pouls actuel par battement par minute. La touche « E »
permet de fixer préalablement une valeur déterminée.
Cette fonction ne permet pas de sauvegarder les valeurs obtenues jusqu’à
présent. (Les Affichages limité au maximum à 40- 240 battements par minute)
Attention :
Pour pouvoir mesurer votre pouls, vous devrez appliquer simultanément
les paumes de vos deux mains sur les surfaces de contact à cet effet que
comporte l’ordinateur. Veillez à ce que les surfaces de contact se trouvent
au milieu de vos paumes.
6. Fonction „SCAN“:
Si l’on sélectionne cette fonction, les valeurs actuelles de l’ensemble des
fonctions sont affichées les unes après les autres toutes les 5 secondes
environ.
7. Affichage „STOP“:
Affichage du mode Arrêt. Les données par défaut peuvent être rétablies.
Touches :
1. Touche „F“ (Fonction):
Pour passer d’une fonction à une autre, appuyer une fois et brièvement
sur cette touche ; c’est-à-dire qu’il est possible de sélectionner la fonction
en question permettant d’effectuer des entrées à l’aide de la touche „E“.
En appuyant plus longuement sur cette touche (pendant environ 3 secondes),
il est possible d’effacer la totalité des valeurs atteintes jusqu’à présent.
Toutes les valeurs affichées sont remises à zéro.
2. Touche „E“ (préalablement):
Pour fixer préalablement et par étape des valeurs dans les fonctions
individuelles, appuyer une fois sur cette touche. A cet effet, il faut d’abord
sélectionner la fonction souhaitée à l’aide de la touche „F“.
Si l’on appuie longuement, un déroulement rapide se produit lequel peut être
ré interrompu en appuyant de nouveau. Dès le début de l’entraînement, le
comptage s’effectue en arrière en partant de ces valeurs fixées.
3. Touche „L“(effacement):
En appuyant brièvement sur cette touche, la valeur sélectionnée à l’aide de
la touche „E“ est remise à zéro. Si l’on presse la touche „L“ pendant plus
de trois secondes, toutes les valeurs seront remises à zéro.
compartiment de
la batterie
AAA batteries
Remplacement des piles:
1. Ouvrez le couvercle du compartiment de la batterie, puis retirez le utilisée
Batteries. (Si les piles fuient les supprimer sous augmenté étant donné que
l‘acide de la batterie n‘est pas en contact avec la peau venir et nettoyez le
compartiment de la batterie à fond.)
2. Insérez les nouvelles piles (type (AAA) 1,5 V dans le bon ordre et en tenant
compte de la polarité dans le compartiment à piles et fermer le couvercle
de la batterie pour qu‘elle s‘enclenche.
3. Si l‘ordinateur ne prend pas immédiatement, la fonction devrait Piles sont
retirées pendant 10 secondes et réinsérés.
4. Les batteries vides correctement en conformité avec les règlements
d‘élimination éliminés et ne pas donner les déchets résiduels.
32
Nettoyage, Entretien et stockage de l‘exercice:
1. Nettoyage
Utilisez uniquement un chiffon humide pour le nettoyage.
Attention: Ne jamais utiliser de benzène, de diluant ou autre agents
de nettoyage agressifs pour le nettoyage de surface comme ce les
dommages causés.
L‘appareil est uniquement pour un usage domestique privé et pour
un usage intérieur appropriés. Gardez l‘appareil propre et l‘humidité
de l’appareil.
2. Stockage
Retirez les piles de l‘ordinateur tout en entendant l‘unité pour de 4
semaines de ne pas utiliser. Choisissez un stockage a sec dans la
maison et mettre un peu d‘huile de pulvérisation pour les connexion
de tube de pied avant a et arrière et sur le axe de poignée. Couvrir
le dispositif pour le protéger d‘être décolores par la lumière du soleil
et de la poussière.
3. Entretien
Nous recommandons toutes les 50 heures pour examiner les conne-
xions a vis pour l‘étanchéité, qui ont été préparés dans l‘ensemble.
Toutes les 100 heures de fonctionnement, vous devriez au peu
d‘huile de pulvérisation pour les connexion de tube de pied avant
a et arrière et sur le axe de poignée.
Corrections:
Si vous ne pouvez pas résoudre en utilisant les informations
énumérées à l‘dysfonctionnement, s‘il vous plaît contactez votre
revendeur ou fabricant.
ProblèmeCausePossible Solution
L‘ordinateur ne
s‘allume pas en
appuyant sur
un bouton.
Pas de piles ou de
batteries insérées
vide.
Vérifiez les piles dans le com-
partiment de la batterie pour
un bon ajustement ou de les
remplacer.
L‘ordinateur ne
compte pas et
ne s‘allume pas
par le début
de la formation
d‘un.
Manquant impul-
sion du capteur
en raison de
mauvais connec-
teur ou dissous.
Vérifiez le connecteur sur
l‘ordinateur et le connecteur
dans le tube de support pour un
bon ajustement.
L‘ordinateur ne
compte pas et
ne s‘allume pas
par le début
de la formation
d‘un.
Manquant impul-
sion du capteur
en raison de la
position incorrec-
te du capteur.
Vissez le capot gauche et véri-
fiez-le si le crochet du capteur
avec le volant d‘inertie
et fait tourner le câble du cap-
teur ne est pas endommagé.
Pas de lecture
du pouls
Prise d‘impulsion
n‘est pas branché.
Branchez le connecteur du
câble d‘impulsion séparée dans
le connecteur approprié sur
l‘ordinateur.
Pas de lecture
du pouls
Capteur de pouls
n‘est pas connec-
té correctement.
Visser les capteurs cardia-
ques tactiles et vérifier l‘., Les
connecteurs sont correctement
et que le câble d‘éventuels
dommages.
La résistance
ne change
pas sensible-
ment lors de
l‘ajustement
Câble de conne-
xion n‘est pas
correctement
connecté.
Vérifiez la connexion du câble
fait dans le tube de support
pour bon état selon les instruc-
tions de montage.
Centre d‘entraînement en mm
(Pour appareil et l‘utilisateur)
Surface libre en mm
(Zone de la formation et de la zone
de sécurité (60cm rotation))
33
Recommandations pour l’entraînement
Les facteurs ci-après doivent être pris en compte pour la détermination de
l’entraînement indispensable afin d’améliorer concrètement son physique
et sa santé:
1. Intensité:
L’entraînement n’aura d’effets positifs que si les efforts déployés dépassent
ceux de la vie quotidienne, mais sans être hors d’haleine et/ou se sentir épui-
sé. Le pouls peut constituer un repère valable pour un entraînement efficace.
Au cours de celui-ci le pouls devrait se situer entre 70 % et 85% du pouls
maximum (le déterminer et le calculer au moyen du tableau et de la formule).
Pendant les premières semaines, le pouls devrait tourner autour de 70%
du maximum. Pendant les semaines et les mois suivants, le pouls devrait
augmenter lentement pour atteindre la limite supérieure, c.-à-d. 85% du
pouls maximum. Plus la condition physique de la personne qui s’entraîne
est bonne, plus il faut accroître l’entraînement pour rester entre 70 et 85%
du pouls maximum. On y arrive en allongeant la durée de l’entraînement et/
ou en renforçant la difficulté de celui-ci.
Si la fréquence cardiaque n’est pas affichée sur le visuel de l’ordinateur ou
si, pour des raisons de sécurité, vous souhaitez la contrôler, car elle aurait
pu être incorrectement indiquée suite à des erreurs d’utilisation, etc., vous
pouvez alors procéder comme suit:
a. Mesure de contrôle du pouls de manière classique (c.-à-d. en posant le
pouce sur la veine du poignet et en comptant les battements en une minute).
b Mesure de contrôle du pouls au moyen d’un dispositif approprié (vendu
dans un magasin spécialisé).
2. Fréquence
La majorité des experts recommandent de combiner une alimentation comme
pour la santé, qui sera choisie en fonction de l’objectif recherché par l’en-
traînement, et les exercices physiques trois ou quatre fois par semaine. Un
adulte normal doit s’entraîner deux fois par semaine pour conserver la forme
actuelle. Mais au moins trois fois par semaine pour améliorer et modifier son
poids. Cinq fois par semaine étant idéal.
3. Programmation de l’entraînement
Chaque séance d’entraînement devrait comprendre trois phases:
«phase d’échauffement», «phase d’entraînement» et «phase de ralentisse-
ment». La température du corps et l’absorption d’oxygène doivent augmenter
lentement durant la phase «d’échauffement». Ce qui est possible en effec-
tuant de la gymnastique pendant cinq à dix minutes.
L’entraînement proprement dit («phase d’entraînement») devant commen-
cer ensuite. Choisir une faible résistance pendant quelques minutes puis
accroître entre 15 et 30 minutes de sorte que le pouls se situe entre 70%
et 85% de son maximum.
Afin de faciliter la circulation après la «phase d’entraînement» et d’éviter
des courbatures ou des muscles noués, la «phase d’entraînement» doit
être suivie d’une «phase de ralentissement». Celle-ci devrait englober des
exercices d’élongation et/ou de la gymnastique sans forcer, et ce entre cinq
et dix minutes.
Vous trouvez les autres informations au sujet exercices pour réchauffer,
aux exercices de distension ou les exercices de gymnastique généraux
dans notre domaine de téléchargement sous le www.christopeit-sport.com
Formules de calcul: Pouls maximum = 220 - âge
90% du pouls maximum = (220 - âge) x 0,9
85% du pouls maximum = (220 - âge) x 0,85
70% du pouls maximum = (220 - âge) x 0,7
4. Motivation
Un entraînement régulier est la clef de la réussite de votre programme.
Vous devriez prévoir votre entraînement à heure fixe chaque jour et vous y
préparer mentalement. Il est primordial d’être de bonne humeur au moment
de l’entraînement et de ne pas perdre l’objectif visé. Jour après jour, en
vous entraînant continuellement, vous verrez les progrès accomplis et votre
objectif se rapprocher progressivement.
Exercices d‘échauffement (Warm Up)
Commencez votre échauffement en marchant sur place pendant au moins 3 minutes puis effectuer les exercices de gymnastique suivantes à l‘organisme
pour la phase de formation pour se préparer en conséquence. Les exercices ne faites pas trop et que dans la mesure fonctionnent jusqu‘à une légère rési-
stance sentir. Cette position va tenir quelque chose.
Atteindre avec votre main
gauche derrière votre tête
vers l‘épaule droite et tirez
avec la main droite légère-
ment au coude gauche.
Après 20sec. Mettez bras
Penchez-vous aussi loin
que possible et laissez vos
jambes presque tendue.
Montrez-le avec vos doigts
dans la direction de l‘orteil. 2
x 20sec.
Asseyez-vous avec une jam-
be allongée sur le sol et se
pencher en avant et essayer
d‘atteindre le pied avec vos
mains. 2 x 20sec.
Agenouillez-vous dans une
grande fente avant et vous
soutenir avec vos mains sur
le sol. Appuyez sur le bassin
vers le bas. Changer après
20 jambe sec.
Après les exercices d‘échauffement par des bras et des jambes tremblent lâche.
Écouter après la phase de formation n‘est pas brusquement, mais le cycle de volonté quelque chose tranquillement sans résistance de la part de revenir à
l‘impulsion de la zone normale. (Refroidir) Nous recommandons les exercices d‘échauffement à la fin de la formation se déroule et à la fin de votre séance
d‘entraînement avec le tremblement des extrémités.
Français
34
NL
Belangrijke aanbevelingen en veiligheids
instructies
Onze producten werden in principe door de gecontroleerd en voldoen bi-
jgevolg aan de actuele, hoogste veiligheidsnorm. Dit feit impliceert echter
niet dat de hierna volgende beginselen niet strikt in acht genomen moeten
worden.
1. Het toestel nauwkeurig in overeenstemming met de montage-instructies
opbouwen en uitsluitend de voor de opbouw van het toestel bijgevoegde,
specifiek voor het toestel bestemde onderdelen gebruiken. Vóór de eigenlijke
opbouw de volledigheid van de levering aan de hand van de leveringsnota en
de volledigheid van de kartonnen verpakking aan de hand van de montage-
staps van de montage-instructies en van de gebruiksaanwijzing controleren.
2. Vooraleer het toestel voor het eerst gebruikt wordt en met regelmatige
tussentijden nakijken of alle schroeven, moeren en overige verbindingen vast
zitten, opdat een veilige operationele toestand gewaarborgd is.
3. Het toestel op een droge, effen plaats installeren en het toestel tegen
vochtigheid en vocht beschermen. Oneffenheden van de vloer dienen door
gepaste maatregelen op de vloer en, voor zover beschikbaar bij dit toestel,
door daarvoor bestemde, regelbare onderdelen van het toestel geneutra-
liseerd te worden. Het contact met vochtigheid en vocht dient uitgesloten
te worden.
4.Voor zover de opstellingsplaats in het bijzonder tegen drukplaatsen,
verontreiniging en dergelijke beschermd moet worden, een geschikt, slipvrij
support (bijvoorbeeld rubberen mat, houten plaat of dergelijke) onder het
toestel leggen.
5. Vóór het begin van de training alle voorwerpen binnen een omtrek van 2
meter rond het toestel verwijderen.
6. Voor de reiniging van het toestel geen agressieve reinigingsmiddelen
gebruiken. Voor de opbouw en voor eventuele herstellingen uitsluitend het
respectievelijk bijgeleverde of geschikte, eigen gereedschap gebruiken.
Residu door het lassen aan het toestel dient onmiddellijk verwijderd te
worden zodra de training beëindigd werd.
7.Waarschuwing! Systemen van hart koers kan zijn onnauwkeurig. Buiten-
sporige kunnen opleiden tot een ernstige aandoeningen of door overlijden
In geval van een ondeskundige en bovenmatige training zijn nadelige ge-
volgen voor de gezondheid mogelijk. Vóór het begin van een doelgerichte
training dient daarom een geschikte geneesheer te worden geraadpleegd.
Deze geneesheer kan bepalen, aan welke maximale belasting (impulsie,
watt, duur van de training enz.) men zich mag blootstellen, en kan nauw-
keurige inlichtingen met betrekking tot een correcte lichaamshouding bij de
training, de doelstellingen van de training en de voeding geven. Er mag niet
na uitgebreide maaltijden getraind worden.
8. Met het toestel slechts trainen wanneer het foutloos functioneert. Voor
eventuele herstellingen uitsluitend van originele reserveonderdelen gebruik
maken. Waarschuwing! Delen moeten worden warm voor het gebruik van
de beveiligingsinrichting overdreven vervanging van dit meteen en u zult
krijgen. De beveiligingsinrichting tegen het gebruik, zolang het nog niet in
cabine is vastgesteld.
9. Bij de instelling van verstelbare onderdelen op respectievelijk de correcte
positie of de gemarkeerde, maximale instelpositie alsook op een reglementair
voorgeschreven positie letten.
10. Voor zover in de gebruiksaanwijzing niet anders beschreven, mag het
toestel met het oog op de training uitsluitend door één persoon gebruikt
worden. De totale uitoefening tijd mag niet hoger dan 60 min. /dagelijks.
11. Er moeten trainingskledij en schoenen gedragen worden, die voor een
fitnesstraining met het toestel geschikt zijn. De kleding moet zodanig zijn,
dat deze omwille van de vorm (bijvoorbeeld lengte) ervan tijdens de training
niet kan blijven hangen. De trainingschoenen moeten in overeenstemming
met het trainingstoestel gekozen worden, uw voeten in principe een vaste
passing geven en een slipvrije zool hebben.
12. Waarschuwing! Wanneer duizeligheid, misselijkheid, borstpijn en an-
dere abnormale symptomen ondervonden worden, de training vroegtijdig
beëindigen en u tot een geschikte geneesheer wenden.
13. Over het algemeen geldt dat sporttoestellen geen speelgoed zijn. Ze
mogen daarom uitsluitend in overeenstemming met de bepalingen en door
op gepaste wijze geïnformeerde en geïnstrueerde personen gebruikt worden.
14. Personen zoals kinderen, mindervaliden en gehandicapten mogen het
toestel uitsluitend gebruiken in bijzijn van een tweede persoon, die hulp kan
verlenen en instructies kan geven. Het gebruik van het toestel door kinderen
zonder toezicht dient door gepaste maatregelen te worden uitgesloten.
15. Er dient op gelet te worden dat de trainer en andere personen zich nooit
met één of ander lichaamsdeel binnen het bereik van nog in beweging zijnde
onderdelen begeven of bevinden.
16. Dit produkt kan aan het einde van de levensduur niet via het ge-
wone huisafval worden afgevoerd, maar dient naar een verzamelpunt voor
recycling electrische apparaten gebracht te worden.Het symbool op het
produkt, de gebruiksaanwijzing, of de verpakking wijst u daarop.
De grondstoffen zijn volgens hun kenmerken verwerkbaar. Met de verwer-
king, van deze oude apparaten, doet u een bijdrage aan de bescherming
van ons milieu Vraagt u bij de gemeente naar de desbetreffende verwer-
kingsplaats.
17. De verpakkingsmaterialen, lege batterijen en onderdelen van het toestel
omwille van het milieu niet samen met het huishoudelijk afval evacueren,
maar in daarvoor bestemde opslagtanks werpen of op geschikte inzamel-
punten afgeven.
18. Bij dit toestel betreft het een van de snelheid afhankelijk toestel. Dit
betekent dat het prestatievermogen toeneemt wanneer het toerental hoger
is. Omgekeerd geldt hetzelfde.
19. Het toestel is met een 8-trappige weerstandsinstelling uitgerust. Deze
maakt respectievelijk een verlaging en een verhoging van de remweerstand
en daardoor van de trainingsbelasting mogelijk. Darbij leidt het draaien van
de instelknop van de weerstandsinstelling in de richting van niveau 1 tot
een verlaging van de remweerstand en daardoor van de trainingsbelasting.
Het draaien van de instelknop van de weerstandsinstelling in de richting van
niveau 8 leidt tot een verhoging van de remweerstand en daardoor van de
trainingsbelasting.
20. De toegelaten maximale belasting (= lichaamsgewicht) werd op 100 kg
bepaald. Dit toestel werd conform de EN ISO 20957-1 en EN 957-9 „H,C“
gekeurd en gecertificeerd en in overeenstemming is met het EG-richtlijn in
(2014/30EU).
21. De montage- en bedieningsinstructies worden als onderdeel van het
product beschouwd. Deze documentatie moet worden met gegeven bij het
verkopen of doorgeven van het product.
Inhoudsopgave
1. Overzicht van de losse delen pagina 3 - 4
2. Belangrijke aanbevelingen en veiligheidsinstructies pagina 34
3. Stuklijst pagina 35 - 36
4. Montagehandleiding met explosietekeningen
Opstappen, Gebruiken & Afstappen pagina 37 - 40
5. Handleiding bij de computer pagina 41
6. Reiniging, onderhoud en opslag pagina 42
7. Trainingshandleiding, warm up pagina 43
Geachte klant
Wij willen u van harte gelukwensen met de aanschaf van uw hometrainer en
hopen dat u hier veel plezier aan zult beleven. Neem a.u.b. de instructies
en aanwijzingen uit deze montage- en bedieningshandleiding in acht en
volg deze op.
Bij eventuele vragen kunt u natuurlijk altijd contact met ons opnemen.
Met vriendelijke groeten,
Top-Sports Gilles GmbH
Friedrichstr. 55
42551 Velbert
35
Nederlands
Stuklijst – lijst met reserveonderdelen
CT 3 bestelnr. 1803
Technische gegevens: stand: 01. 08. 2018
Combinatie van loopband, hometrainer en stepper Ellipsvormige verloop
van de beweging vooruit en achteruit Gewrichtsbesparende training van
been-, bil-, heup-, bij- en armspieren.
• Magnetisch remsysteem
• ca. 7 kg vliegwielmassa
• 8-traps vergrendeling
• Handpolsslag meting
• bewegbare handgreeparmen voor voorwaartse en achterwaartse
90% van de maximale hartslag = (220 - leeftijd) x 0,9
85% van de maximale hartslag = (220 - leeftijd) x 0,85
70% van de maximale hartslag = (220 - leeftijd) x 0,7
Voor meer informatie over uitoefening van warme up, oefening te rekken
of algemene gymnastische oefenen in onze downloadarea onder www.
christopeit-sport.com
4. Motivatie
De sleutel tot een succesvol programma is een regelmatige training. U kunt
het beste een vaste tijd en plaats per trainingsdag vaststellen en u ook
geestelijk op de training voorbereiden. Train alleen met een goed humeur
en houd uw doel voor ogen. Met een continue training zult u zien dat u per
dag vooruitgang boekt, dat u zich verder ontwikkelt en dat u uw persoonlijke
trainingsdoel beetje bij beetje nadert.
Warming-up oefeningen (Warm Up)
Begin uw warming-up door te lopen op de plek voor minimaal 3 minuten en voer de volgende gymnastische oefeningen om het lichaam voor de opleidingsfase
dienovereenkomstig te bereiden. De oefeningen overdrijf het niet en alleen zo ver draaien tot een lichte weerstand gevoeld. Deze positie zal iets vast te houden.
Bereik met je linkerhand
achter je hoofd naar rechts
en trek met de rechterhand
iets naar links elleboog. Na
20sec. Switch arm
Buig naar voren zo ver
mogelijk naar voren en laat
je benen bijna gestrekt.
Toon het met je vingers in
de richting van de teen. 2 x
20sec.
Ga zitten met een been ge-
strekt op de grond en buig
naar voren en proberen om
de voet te bereiken met je
handen. 2 x 20sec
Knielen in een breed lunge
naar voren en ondersteunen
jezelf met je handen op de
grond. Druk op de bekken
naar beneden. Veranderen
na 20 sec been.
Na de warming-up oefeningen door sommige armen en benen los te schudden.
Luister na de training fase is niet abrupt, maar wil cyclus ontspannen iets zonder verzet van om terug te keren naar de normale hartslag-zone. (Afkoelen)
Wij raden de warm-up oefeningen op het einde van de training worden uitgevoerd en om uw workout te beëindigen met het schudden van de ledematen.
Nederlands
44
Важные рекомендации и указания
по безопасности
Наши изделия принципиально подвергаются испытаниям со стороны
и тем самым отвечают актуальному, самому высокому стандарту
безопасности. Однако этот факт не освобождает от обязанности строго
соблюдать приведенные ниже принципиальные указания.
1.Монтировать тренажер в точном соответствии с монтажной
инструкцией и использовать только те относящиеся к тренажеру детали,
которые приложены для монтажа тренажера и указаны в спецификации.
Перед проведением монтажа проверить комплектность поставки на
основании накладной и комплектностьсодержимого картонной коробки-
упаковки на основании спецификации, приведенной в руководстве по
монтажу и эксплуатации.
2.Перед первым использованием и через регулярные интервалы
времени проверять прочность посадки всех винтов, гаек и прочих
соединений с тем, чтобы обеспечить надежное эксплуатационное
состояние тренажера.
3.Разместить тренажер в сухом, ровном месте и предохранить
его от влаги и сырости. Скомпенсировать неровности пола за счет
соответствующих мер, осуществляемых на полу, и предусмотренных
для этого, юстируемых деталей тренажера, если они есть на данном
тренажере. Исключить контакт с влагой и сыростью.
4. Если следует защитить место размещения тренажера в особенности
от продавливания, загрязнений и тому подобного, подложить под
тренажер подходящую, нескользящую прокладку (например, резиновый
коврик, деревянную плиту или т. п.).
5. Перед тренировкой удалить все предметы в радиусе 2 метров вокруг
тренажера.
6. Для очистки тренажера нельзя пользоваться агрессивными очистными
средствами, а для монтажа и возможного ремонта использовать только
поставленный вместе с ним или подходящий собственный инструмент.
Удалить с тренажера следы пота сразу же после окончания тренировки.
7. ВНИМАНИЕ!Неквалифицированная и чрезмерная тренировка
может причинить вред здоровью. Поэтому перед тем, как приступать
к целенаправленной тренировке, проконсультироваться с
соответствующим врачом. Он может определить, каким максимальным
нагрузкам (пульс, ватт, продолжительность тренировки и т. д.)
разрешается подвергаться, и дать точную информацию о правильном
положении тела во время тренировки, о целях тренировки и о питании.
Запрещается тренироваться после обильной еды. Примите во внимание,
что тренажер не предназначен для терапевтических целей.
8.Тренироваться на тренажере только тогда, когда он работает
безупречно. Для возможного ремонта использовать только оригинальные
запасные части. ВНИМАНИЕ! Если во время пользованием тренажером
какая-либо часть нагревается, необходимо срочно заменить ее и не
пользоваться тренажером до тех пор, пока он не будет приведен в
рабочее состояние.
9.Настраивая регулируемые детали, следить за правильным
положением или, соотв., учитывать помеченную максимальную позицию
настройки и обеспечивать надлежащую фиксацию заново настроенного
положения.
10.Если в руководстве не указано иного то тренажером может
пользоваться только один человек. Время тренировки не должно
превосходить в целом 60 Min./ежедневно.
RU
11.Необходимо носить тренировочную одежду и обувь, которые
подходят для оздоровительной тренировки на тренажере. Одежда
должна такой, чтобы по своей форме (например, длине) она не могла
зацепиться во время тренировки. Следует подбирать тренировочную
обувь, которая подходит к тренажеру, обеспечивает устойчивость для
ног и имеет нескользящую подошву.
12. ВНИМАНИЕ: Если возникнут головокружение, тошнота, боли в груди
и другие аномальные симптомы, прервать тренировку и обратиться к
соответствующему врачу.
13.Следует принципиально учесть, что спортивные снаряды – не
игрушки. Поэтому их разрешается использовать только в соответствии
с назначением и лицами, которые располагают соответствующей
информацией и которые прошли соответствующий инструктаж.
14.Таким лицам как дети, инвалиды и люди с увечьями следует
пользоваться тренажером только в присутствии еще одного человека,
который может оказать помощь и дать руководящие указания. Исключить
возможность использования тренажера детьми без надзора, приняв
соответствующие меры.
15. Следить за тем, чтобы тренирующиеся и другие лица никогда не
попадали какими-либо частями своего тела в зону еще движущихся
деталей или чтобы они не находились там.
16. В конце срока службы этот продукт не должен быть утилизирован
в домашние отходы, а должен быть отдан на сборный пункт утилизации
использованных электрических и электронных приборов. На это
указывает символ на продукте, на инструкции по эксплуатации или на
упаковке. Все материалы могут быть снова использованы согласно
маркировке. При повторном использовании, вторичной переработке или
других формах вторичного использования старых приборов Вы вносите
свой вклад в защиту окружающей среды.
Пожалуйста, узнайте в коммунальном управлении адрес близлежащего
сборного пункта утилизации.
17. Учитывая требования экологии, не удалять упаковочный материал,
израсходованные батарейки и детали тренажера вместе с бытовыми
отходами, а класть их в предусмотренные для этого контейнеры-
сборники или сдавать их в соответствующие пункты сбора утильсырья.
18. Этот тренажер является тренажером, действующим в зависимости
от скорости вращения, что означает, при увеличении числа оборотов,
Zobrazuje aktuální stav spotřebovaných kalorií. Nastavení určité konkré-
tní hodnoty pomocí tlačítka „E“ je možné. Pokud je nastavena konkrétní
spotřeba, zobrazuje se zbývající spotřeba do jejího dosažení. Jakmile je
zadaný čas dosažen, zazní akustický signál. U této fuknce dochází k uložení
naposledy dosažených hodnot. (Maximální hodnota tohoto ukazatele je
999,0 kalorií.)
5. „PULS“ – ukazatel pulzu:
Zobrazuje aktuální pulz v tepech za minutu. Nastavení určitých konkrétních
hodnot pomocí tlačítka „E“ je možné.
U této fuknce nedochází k uložení naposledy dosažených hodnot. (Maximální
hodnota u obou těchto ukazatelů je 40-240 tepů za minutu.)
Pozor:
K měření pulzu je nutné, abyste se drželi oběma rukama za obě konktaktní
plochy jednotky měřící puls. Přitom by se měly kontaktní plochy nacházet
ve středu dlaní.
6. Funkce „SCAN“:
Pokud pomocí tlačítka „F“ zvolíte tuto funkci, budou se zobrazovat v sekvenci
asi 6 sekund všechny aktuální hodnoty jedna za druhou.
7. Modus „STOP“:
Ukazatel modu přerušení tréninku. Je možné přenastavit požadované
hodnoty.
Tlačítka:
1. Tlačítko „F“ (Funkce):
Krátkým jednorázovým stisknutím tohoto tlačítka lze přecházet od jedné
funkce ke druhé; tzn. může být vybrána konkrétní funkce, ve které lze pomocí
tlačítka „E“ nastavovat požadované hodnoty.
Funkce, která je právě vybrána, je zobrazena na displeji.
2. Tlačítko „E“ (Zadání požadovaných hodnot):
Jednorázovým stisknutím tohoto tlačítka je možné zadávat požadované
hodnoty do jednotlivých funkcí. K tomu musí být nejprve vybrána požadovaná
funkce pomocí tlačítka „F“.
Delší stisknutí aktivuje rychlou sekvenci. Od začátku tréninku se potom daná
funkce odpočítává od nastavené hodnoty sestupně směrem k nule.
3. Tlačítko „L“ (smazat):
Krátkým stisknutím tohoto tlačítka lze vynulovat hodnoty vybrané pomocí
tlačítka „F“.
Delším stisknutím (asi 3 sekundy) dojde k vynulování všech dosud
dosažených hodnot.
Zdířka na baterie
Baterie AAA
Výměna baterií
1. Otevřete kryt zdířky pro baterie a vyjměte vybité baterie. (Pokud baterie
vytekla, odstraňte ji se zvýšenou opatrností tak, aby kyselina z baterií nepřišla
do kontaktu s pokožkou, a zdířku na baterie důkladně vyčistěte.)
2. Vložte nové baterie (typ AAA) Mignon 1,5V ve správném pořadí a ve
správné polaritě do zdířky na baterie a zavřete kryt zdířky na baterie tak,
že zaklapne.
3. Pokud počítač okamžitě nezačne fungovat, vyjměte
baterie na dobu 10 sekund a znovu je vložte do zdířky.
4. Vybité baterie zlikvidujte podle předpisů a neházejte je do směsného
odpadu.
Ceskar
62
Čistění, kontrola a skladování domaciho treningoveho
přistroje:
1. Čistění
K čistění používejte pouze lehce namočený hadřík.
Pozor: Nikdy nepoužívejte benzen, ředidlo nebo jiné agresivní čisticí
prostředky na čištění povrchu, jelikož způsobují poškození.
Zařízení je pouze k soukromému domácímu použití je je vhodné pro
použití v interiéru. Udržujte jednotku čistou a vlhkost mimo zařízení.
2. Skladování
Při nepoužívání přístroje po dobu delší než 4 týdny odpojte napájení.
Posuňte ližiny sedla ve směru k řídítkům a sedlovou trubici zasuňte
co možná nejhlouběji do rámu. Ke skladování zvolte suché místo
v interiéru a aplikujte nějaký sprejový olej na zadní a přední stra-
nu připojení nožní páky a nápravy ruční páky. Olej aplikujte i na
montážní šroub řídítek, včetně rychloupínáku.
Přístroj zakryjte, abyste jej ochránili před změnou zabarvení
způsobenou např. slunečním světlem a prachem.
3. Kontroly
Každých 50 hodin doporučujeme zkontrolovat šroubová spojení kvůli
utažení, která byla připravena při montáži. Po každých 100 hodinách
provozu byste měli nastříkat trochu oleje na zadní a přední spojení
pedálů a na osu madel.
Oblast cvičení v mm
(pro domácího trenéra a
uživatele)
Volná oblast v mm
(Oblast cvičení a bezpečnostní oblast
(60cm otáčení))
Řešení potíží
Pokud nedokážete problém vyřešit pomocí následujících informací,
obraťte se prosím na autorizované servisní středisko.
ProblémMožná příčinaŘešení
Počítač se sti-
sknutím klávesy
nezapne.
Nejsou vloženy
baterie nebo jsou
baterie vybité.
Zkontrolujte, zda jsou baterie
ve zdířce vloženy správně nebo
baterie vyměňte.
Počítač neu-
kazuje žádné
hodnoty a se
začátkem trénin-
ku se nezapíná.
Chybějící impulz
senzoru z důvodu
nesprávného
nebo uvolněného
zapojení.
Zkontrolujte správnost zapojení
na počítači a v opěrné tyči.
Počítač neu-
kazuje žádné
hodnoty a se
začátkem trénin-
ku se nezapíná.
Chybějící impulz
senzoru z důvodu
nesprávné pozice
senzoru.
Odšroubujte levý kryt a zkontro-
lujte, zda se přenašeč senzoru
otáčí zároveň se setrvačníkem a
zda je kabel senzoru neporušen.
Nezobrazuje se
pulz.
Není zapojen
snímač pulzu
Zapojte samostatnou zástrčku
kabelu na snímání pulzu do
odpovídající zdířky na počítači.
Nezobrazuje se
pulz.
Senzor pulzu
není správně
zapojen.
Odšroubujte senzory na snímání
pulzu a zkontrolujte správné
zapojení kabelů a případná
poškození kabelů.
Brzdný odpor se
při přenastavení
nijak citelně
nemění.
Tažné lanko není
správně zapo-
jeno.
Zkontrolujte správnost zapo-
jení tažného lanka v opěrné
tyči. Zapojení musí odpovídat
montážnímu návodu.
63
Zahřívací cvičení (zahřátí)
Zahajte zahřátí chůzí na místě po dobu alespoň 3 minut a poté provádějte následující gymnastická cvičení kvůli řádné přípravě na fázi tréninku. Cvičení
nepřetahujte a provádějte je pouze, dokud nepocítíte jemný tah. V této poloze chvíli zůstaňte.
Sáhněte si levou rukou za
hlavou na pravé rameno a
táhněte pravou rukou jemně
za levý loket. Po 20 sekun-
dách paže vyměňte.
Co nejvíce se předkloňte
a nechejte nohy
téměř natažené. Prsty na
rukou směřujte směrem k
prstům na nohou. 2 x 20
sekund.
Sedněte si s jednou nohou
nataženou na podlaze a
předkloňte se a rukama si
sáhněte na chodidlo. 2 x 20
sekund.
Klekněte si do širokého
výpadu vpřed a opřete se
rukama
o podlahu. Pánev tiskněte
dolů. Po 20 sekundách
vyměňte nohu.
Po zahřívacích cvičeních paže a nohy uvolněte volným třesením.
Fázi cvičení nekončete náhle, ale jeďte chvíli volně bez odporu, abyste se vrátili do zóny normálního tepu. (Vychladnutí) Doporučujeme provádění zahřívacích
cvičení na konci tréninku a ukončení cvičení třesením končetinami.
Návod k tréninku
Abyste dosáhli znatelného tělesného a zdravotního zlepšení, musíte při
určování potřebného tréninku dbát následujících faktorů:
1. Intenzita
Stupeň tělesného zatížení při tréninku musí překračovat bod normálního
zatížení, aniž byste dosáhli stavu, kdy nemůžete dýchat nebo kdy jste
zcela vyčerpaní. Vhodnou směrnou hodnotu pro efektivní trénink může
představovat puls. Ten by se měl během tréninku nacházet v oblasti mezi
70% a 85% maximálního pulsu (stanovení a výpočet viz tabulka a vzorce).
Během prvních týdnů by se měl puls při tréninku nacházet ve spodní oblasti
70% maximálního pulsu. V průběhu následujících týdnů a měsíců by měla
frekvence pulsu pomalu stoupat k horní hranici 85% maximálního pulsu. Čím
větší bude kondice trénující osoby, tím více je nutné tréninkové požadavky
stupňovat, aby bylo dosaženo oblasti mezi 70% a 85% maximálního pulsu.
Toho lze dosáhnout prodloužením doby tréninku nebo zvýšením stupně
obtížnosti.
Pokud se puls na displeji počítače nezobrazuje nebo pokud chcete pro jistotu
kontrolovat Vaši frekvenci pulsu, která by se mohla v důsledku případných
chyb v užívání apod. nesprávně zobrazovat, můžete sáhnout po následu-
jících pomůckách:
a) kontrolní měření pulsu běžným způsobem (měření tepu např. na zápěstí
a počítání tepů za minutu).
b) kontrolní měření pulsu pomocí odpovídajících vhodných a kalibrovaných
měřicích přístrojů (k dostání v obchodech se zdravotní technikou).
2. Četnost
Většina expertů doporučuje kombinaci zdravé výživy, kterou je nutné
přizpůsobit s ohledem na cíl tréninku, a tělesného posilování třikrát až
pětkrát týdně.
Normální dospělý člověk musí trénovat dvakrát týdně, aby si udržel svou
současnou kondici. Aby ji bylo možné vylepšit nebo aby bylo možné snížit
tělesnou hmotnost, jsou nutné minimálně tři tréninkové jednotky za týden.
Ideální je samozřejmě pět tréninkových jednotek za týden.
3. Uspořádání tréninku
Každá tréninková jednotka by se měla skládat ze tří tréninkových fází:
„zahřátí“ – „trénink“ – „zchladnutí“.
Během „zahřátí“ by se měla pomalu stupňovat tělesná teplota a přísun kyslí-
ku. Toho lze pomocí gymnastických cvičení dosáhnout za pět až deset minut.
Následně by měl začít samotný „trénink“. Tréninkové zatížení by mělo být
nejprve několik minut nízké a pak by se mělo po dobu 15 – 30 minut stupňovat
tak, aby se puls nacházel v oblasti mezi 70% a 85% maximálního pulsu.
Za účelem podpory oběhu po „tréninkové fázi“ a pro vyloučení namožení
nebo natržení svalů je nutné po „tréninku“ provést ještě „ochlazovací fázi“.
Během této fáze bychom měli pět až deset minut provádět protahovací nebo
lehká gymnastická cvičení.
4. Motivace
Klíčem k úspěšnému programu je pravidelný trénink. Na každý tréninkový den
byste si měli stanovit přesný čas a místo a připravovat se na něj i duševně.
Trénujte pouze tehdy, když máte dobrou náladu a mějte Vás cíl neustále
před očima. Při kontinuálním tréninku budete den za dnem zjišt‘ovat, jak
se vyvíjíte a jak se postupně blížíte k Vašemu osobnímu tréninkovému cíli.
Rovnice pro výpočet: maximální puls = 220 - věk
90% maximálního pulsu = (220 - věk) x 0.9
85% maximálního pulsu = (220 - věk) x 0.85
70% maximálního pulsu = (220 - věk) x 0.7
Ceskar
Maximální tep (220-věk)
90% maximálního tepu
85% maximálního tepu
70% maximálního tepu
64
08/19 (Wecom) - Druckfehler vorbehalten
Service / Hersteller
Bei Reklamationen, notwendigen Ersatzteilbestellungen oder
Reparaturen wenden Sie sich bitte an unsere Service Abteilung.
Gebruikershandleiding.com neemt misbruik van zijn services uitermate serieus. U kunt hieronder aangeven waarom deze vraag ongepast is. Wij controleren de vraag en zonodig wordt deze verwijderd.
Product:
Spelregels forum
Om tot zinvolle vragen te komen hanteren wij de volgende spelregels:
lees eerst de handleiding door;
controleer of uw vraag al eerder door iemand anders is gesteld;
probeer uw vraag zo duidelijk mogelijk te stellen;
heeft u een probleem en al geprobeerd om dit op te lossen, vermeld dit erbij aub;
heeft u een oplossing gekregen van een bezoeker dan horen wij dat graag in dit forum;
wilt u een reactie geven op een vraag of antwoord, gebruik dan niet dit formulier maar klik op de knop 'reageer op deze vraag';
uw vraag wordt direct op de website gezet; vermijd daarom persoonlijke gegevens in te vullen;
Belangrijk! Als er een antwoord wordt gegeven op uw vraag, dan is het voor de gever van het antwoord nuttig om te weten als u er wel (of niet) mee geholpen bent! Wij vragen u dus ook te reageren op een antwoord.
Belangrijk! Antwoorden worden ook per e-mail naar abonnees gestuurd. Laat uw emailadres achter op deze site, zodat u op de hoogte blijft. U krijgt dan ook andere vragen en antwoorden te zien.
Abonneren
Abonneer u voor het ontvangen van emails voor uw Christopeit CT3 bij:
nieuwe vragen en antwoorden
nieuwe handleidingen
U ontvangt een email met instructies om u voor één of beide opties in te schrijven.
Ontvang uw handleiding per email
Vul uw emailadres in en ontvang de handleiding van Christopeit CT3 in de taal/talen: Nederlands, Duits, Engels, Frans als bijlage per email.
De handleiding is 2.07 mb groot.
U ontvangt de handleiding per email binnen enkele minuten. Als u geen email heeft ontvangen, dan heeft u waarschijnlijk een verkeerd emailadres ingevuld of is uw mailbox te vol. Daarnaast kan het zijn dat uw internetprovider een maximum heeft aan de grootte per email. Omdat hier een handleiding wordt meegestuurd, kan het voorkomen dat de email groter is dan toegestaan bij uw provider.
Stel vragen via chat aan uw handleiding
Stel uw vraag over deze PDF
Uw handleiding is per email verstuurd. Controleer uw email
Als u niet binnen een kwartier uw email met handleiding ontvangen heeft, kan het zijn dat u een verkeerd emailadres heeft ingevuld of dat uw emailprovider een maximum grootte per email heeft ingesteld die kleiner is dan de grootte van de handleiding.
Er is een email naar u verstuurd om uw inschrijving definitief te maken.
Controleer uw email en volg de aanwijzingen op om uw inschrijving definitief te maken
U heeft geen emailadres opgegeven
Als u de handleiding per email wilt ontvangen, vul dan een geldig emailadres in.
Uw vraag is op deze pagina toegevoegd
Wilt u een email ontvangen bij een antwoord en/of nieuwe vragen? Vul dan hier uw emailadres in.