You can set the daylight saving time when you are on Daylight
Saving Time.
Select ON or OFF.
SettingDescription
ONDisplays 1 hour faster than regular clock.
OFFDisplays in regular clock.
MODE
ON
↔
OFF
MODE
Register the setting
(press & hold)
* Change ON/OFF according to the period of daylight saving
time.
5
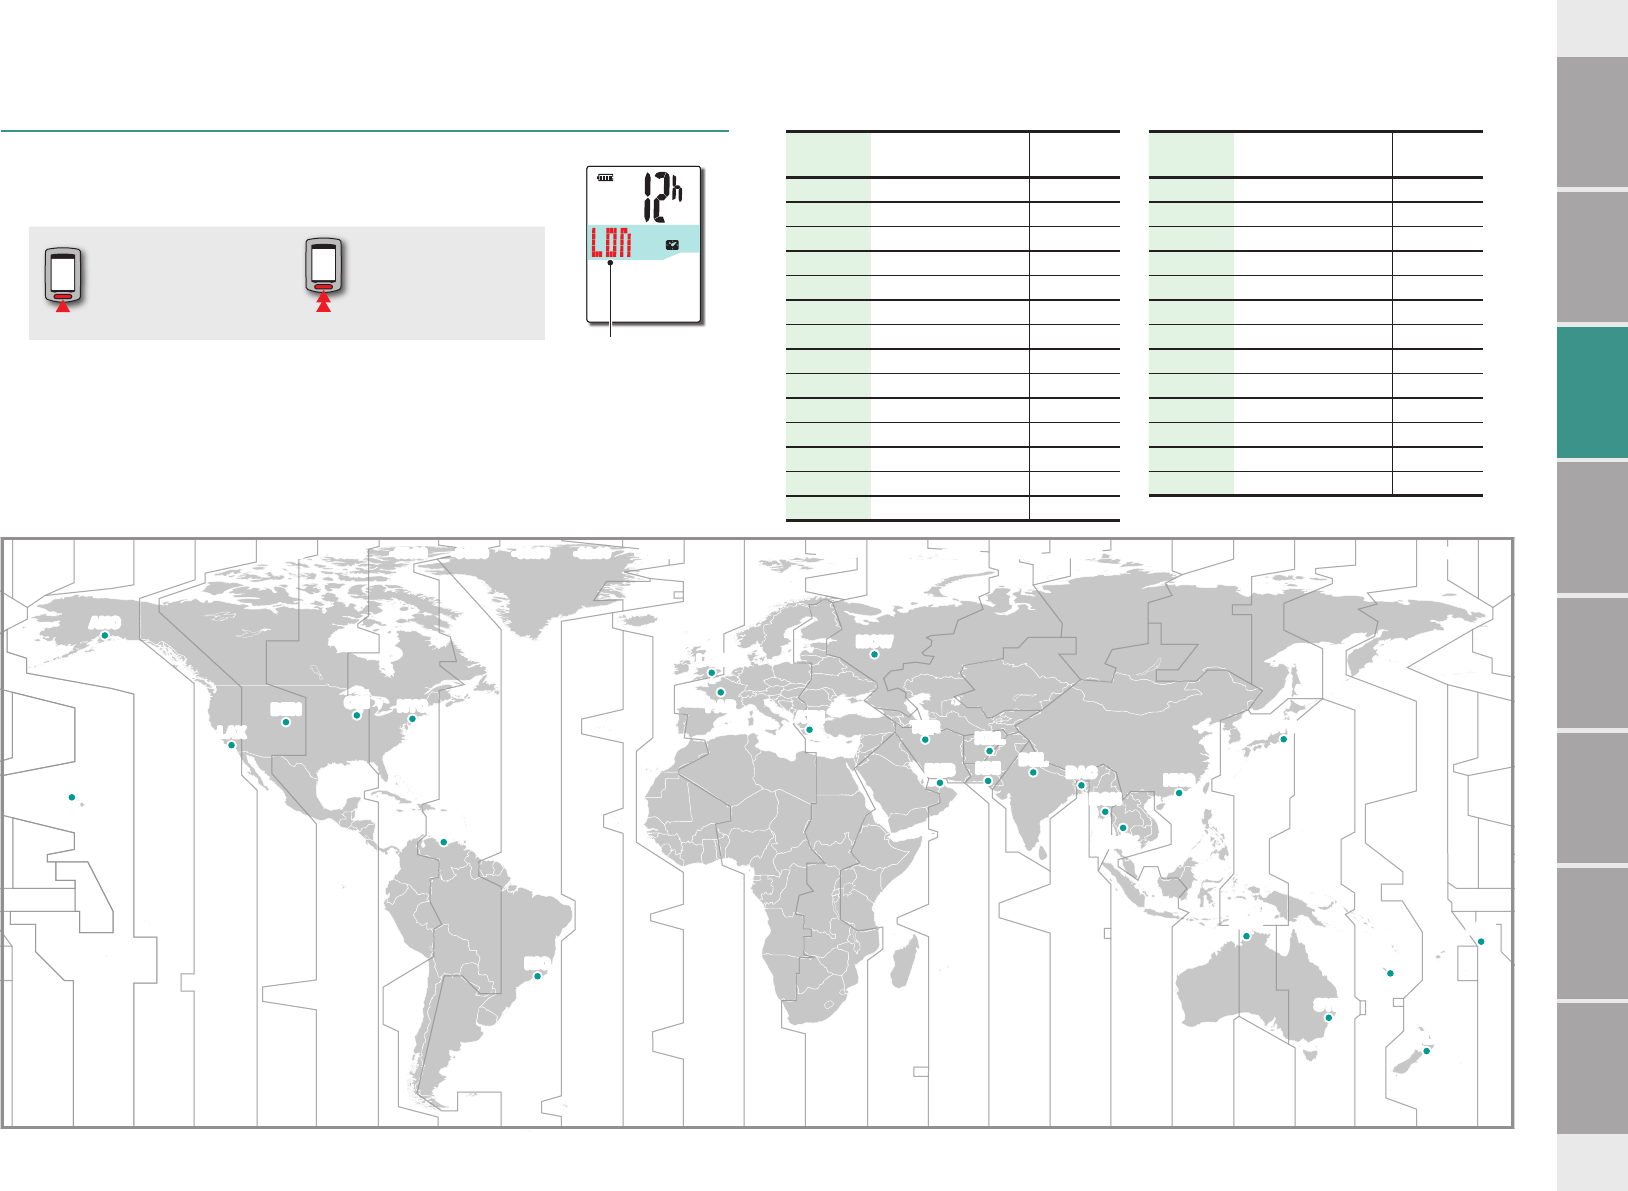
Select the clock display format
Select the display format of “12h” (12 hours display) or “24h”
(24 hours display).
MODE
12h
↔
24h
* Date and clock are acquired from GPS signal; therefore, it is not
necessary to enter them.
6
Press the MENU button to complete setting
Setting up is completed, and the computer changes to the GPS
search screen.
MENU
Complete setting up
(Back)
Now, setting up the computer is completed.
For information on how to use the computer, see “How to use the computer” (page 8).
Display format
Daylight saving
time icon
8
Introduction
How to install the
unit on your bicycle
Setting up the
computer
Others
Changing the
computer con-
figuration
Uploading the mea-
surement data
Setup of your
PC
How to use the
computer
How to use the computer
This unit is a sensor-less cyclocomputer using GPS. An environment where a GPS signal can be received is required for measurement.
Three screens of GPS search screen, measurement screen, and standby screen are available in this unit, which are displayed alternatively according to the GPS receiving status and the bicycle
operating status. This section describes the flow of the screen after the power is turned on until measurement is started.
GPS search screen (when the power is turned on)
When the power is turned on, the GPS search screen will appear, and the GPS signal non-
receiving icon (
) will flash. Once GPS signal is received, the GPS signal receiving icon ()
will light up, and the display will change to the measurement screen.
* In an environment, including indoor, where GPS signal cannot be received, press the
MODE button to change to the measurement screen while the GPS signal non-receiving
icon () is still flashing.
* This unit starts searching GPS after the power is turned on. It may take several minutes to
acquire GPS signal depending on the receiving status.
Measurement screen
This is the basic screen of this unit. This screen is used during measurement.
Your can start/stop measurement and view the data under measurement.
According to the GPS signal receiving status, the computer operates in a different way as follows.
* For the functions available on the measurement screen, see “Functions available on the
measurement screen” (page 9).
When the GPS signal receiving icon ()
lights up
When the GPS signal non-receiving icon
() flashes
Measurement is enabled, and the unit
starts/stops measurement in sync with the
bicycle motion.
The speed unit flashes during measure-
ment.
* If GPS signal cannot be received while
riding, the GPS signal non-receiving
icon
(
) will flash, and the unit will
stop
measurement.
In such status, measurement is disabled
even while riding; however, only viewing the
measurement data and the resetting opera-
tion are enabled.
* Once GPS signal is received, the GPS
signal receiving icon (
) will light up,
and measurement will be enabled.
* The unit turns off the power automatically
in 10 minutes without pressing any button
in such status. (Auto power off)
GPS signal may not be received, thus the unit may stop measurement or may not display
appropriate measurements in the following locations or environments.
•In a tunnel, underground and building, between high-rise buildings, under an elevated
structure and arcade, etc.
•In bad weather (snow, rain, etc.)
•Near a high-voltage line or a mobile telephone relay station.
•When the computer display does not face to the sky.
Standby screen
The unit changes to the standby screen automatically in 10 minutes without any bicycle motion or
button operation, while the GPS signal receiving icon (
) flashes on the measurement screen.
Riding again returns to the measurement screen.
* The unit turns off the power automatically in 50 minutes with the standby screen dis-
played. (Auto power off)
* When the GPS signal cannot be received with the standby screen displayed, the GPS sig-
nal non-receiving icon (
) flashes. In such a case, the computer does not return to the
measurement screen even if you ride the bicycle.
POWER
MODE
MODE
GPS search screen
Measurement screen
Power OFF
When GPS
signal is
received
When GPS
signal cannot
be received
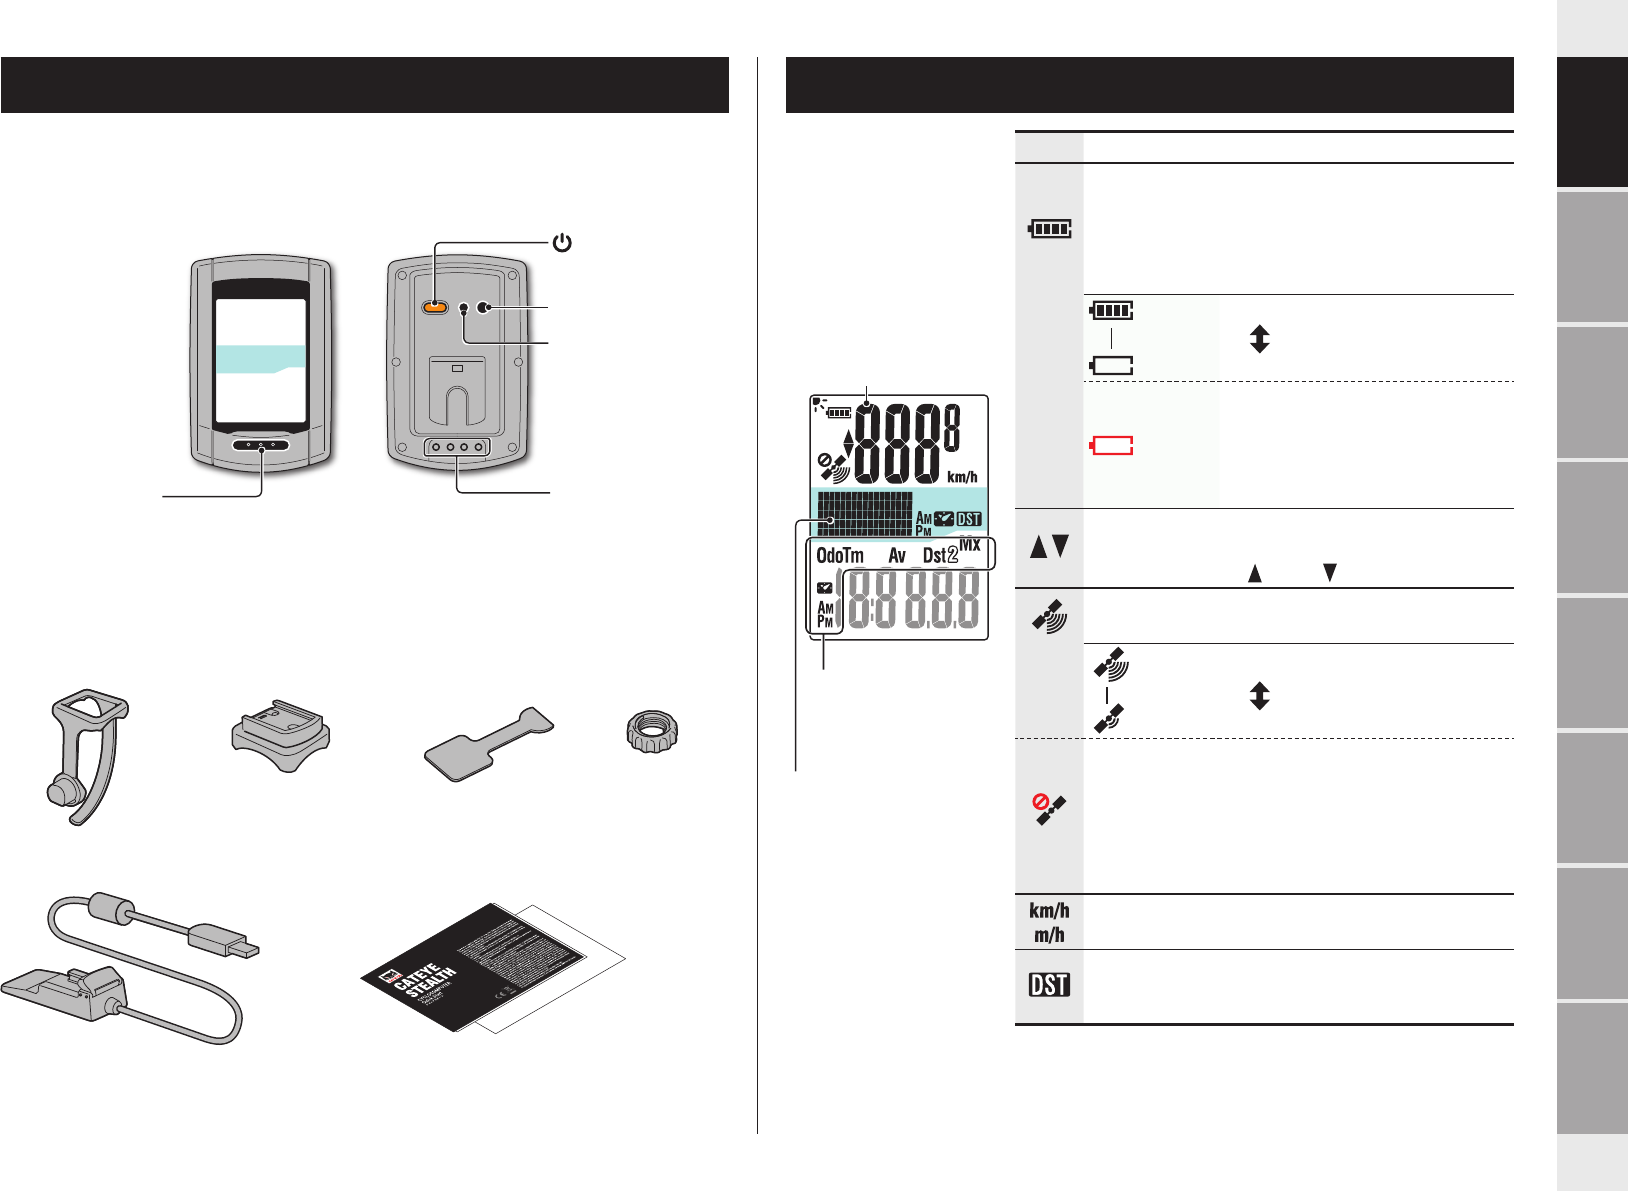
Current speed
0.0 (3.0) - 105.9 km/h
[0.0 (2.0) - 65.9 m/h]
To be changed accord-
ing to the GPS signal
receiving status.
Speed unit
Clock
0:00 - 23:59
[AM1:00 - PM12:59]
Date
(press & hold)
Power ON/OFF
Standby screen
No operation
for 10 minutes
No operation
for 10 minutes
Changed
automatically
Changed by
operating
buttons
or
No opera-
tion for 50
minutes
9
Introduction
How to install the
unit on your bicycle
Setting up the
computer
Others
Changing the
computer con-
figuration
Uploading the mea-
surement data
Setup of your
PC
How to use the
computer
Functions available on the measurement screen
Starting/Stopping measurement
Caution: Press and hold the MODE button to reset the computer before and after
measurement.
Measuring starts by resetting the computer. The unit keeps recording the
trip until it is reset. Turn off the unit when not in use.
When the GPS signal receiving icon () lights up,
the unit starts/stops measurement in sync with the
bicycle motion.
Switching computer function
Pressing the MODE button switches the measurement data in the lower display, in the order
shown in the figure.
*1: When Tm exceeds about 27 hours, or Dst exceeds 999.99 km, Average Speed cannot
be measured, while displaying “.E”. Reset the data.
Backlight
When using it during night-time, the backlight always lights up.
Example: Setting of the night-time: 7:00 PM to 6:00 AM
* The night-time can be set to your needs.
For information on how to set the night-time, see “Changing the computer configuration” (page 20).
* As default, it is set to 7:00 PM to 6:00 AM.
MODEMODE
MODEMODE
MODEMODE
Tm
: Elapsed Time
0:00’ 00” - 9:59’ 59”
Dst
: Trip Distance
0.00 - 999.99 km [mile]
Dst 2
: Trip Distance-2
0.00 - 999.99 /
1000.0 - 9999.9 km [mile]
Av
: Average Speed (*1)
0.0 - 105.9 km/h
[0.0 - 65.9 m/h]
Mx
: Maximum Speed
0.0 (3.0) - 105.9 km/h
[0.0 (2.0) - 65.9 m/h]
Odo
: Total Distance
0.0 - 9999.9 /
10000 - 99999 km[mile]
Starts measurementStops measurement
Current speed
0.0 (3.0) - 105.9 km/h
[0.0 (2.0) - 65.9 m/h]
Selected data
GPS signal
receiving icon
Clock
0:00 - 23:59
[AM1:00 - PM12:59]
PM 6:59AM 6:00PM 7:00 – AM 5:59
A backlight is turned on automatically
10
Introduction
How to install the
unit on your bicycle
Setting up the
computer
Others
Changing the
computer con-
figuration
Uploading the mea-
surement data
Setup of your
PC
How to use the
computer
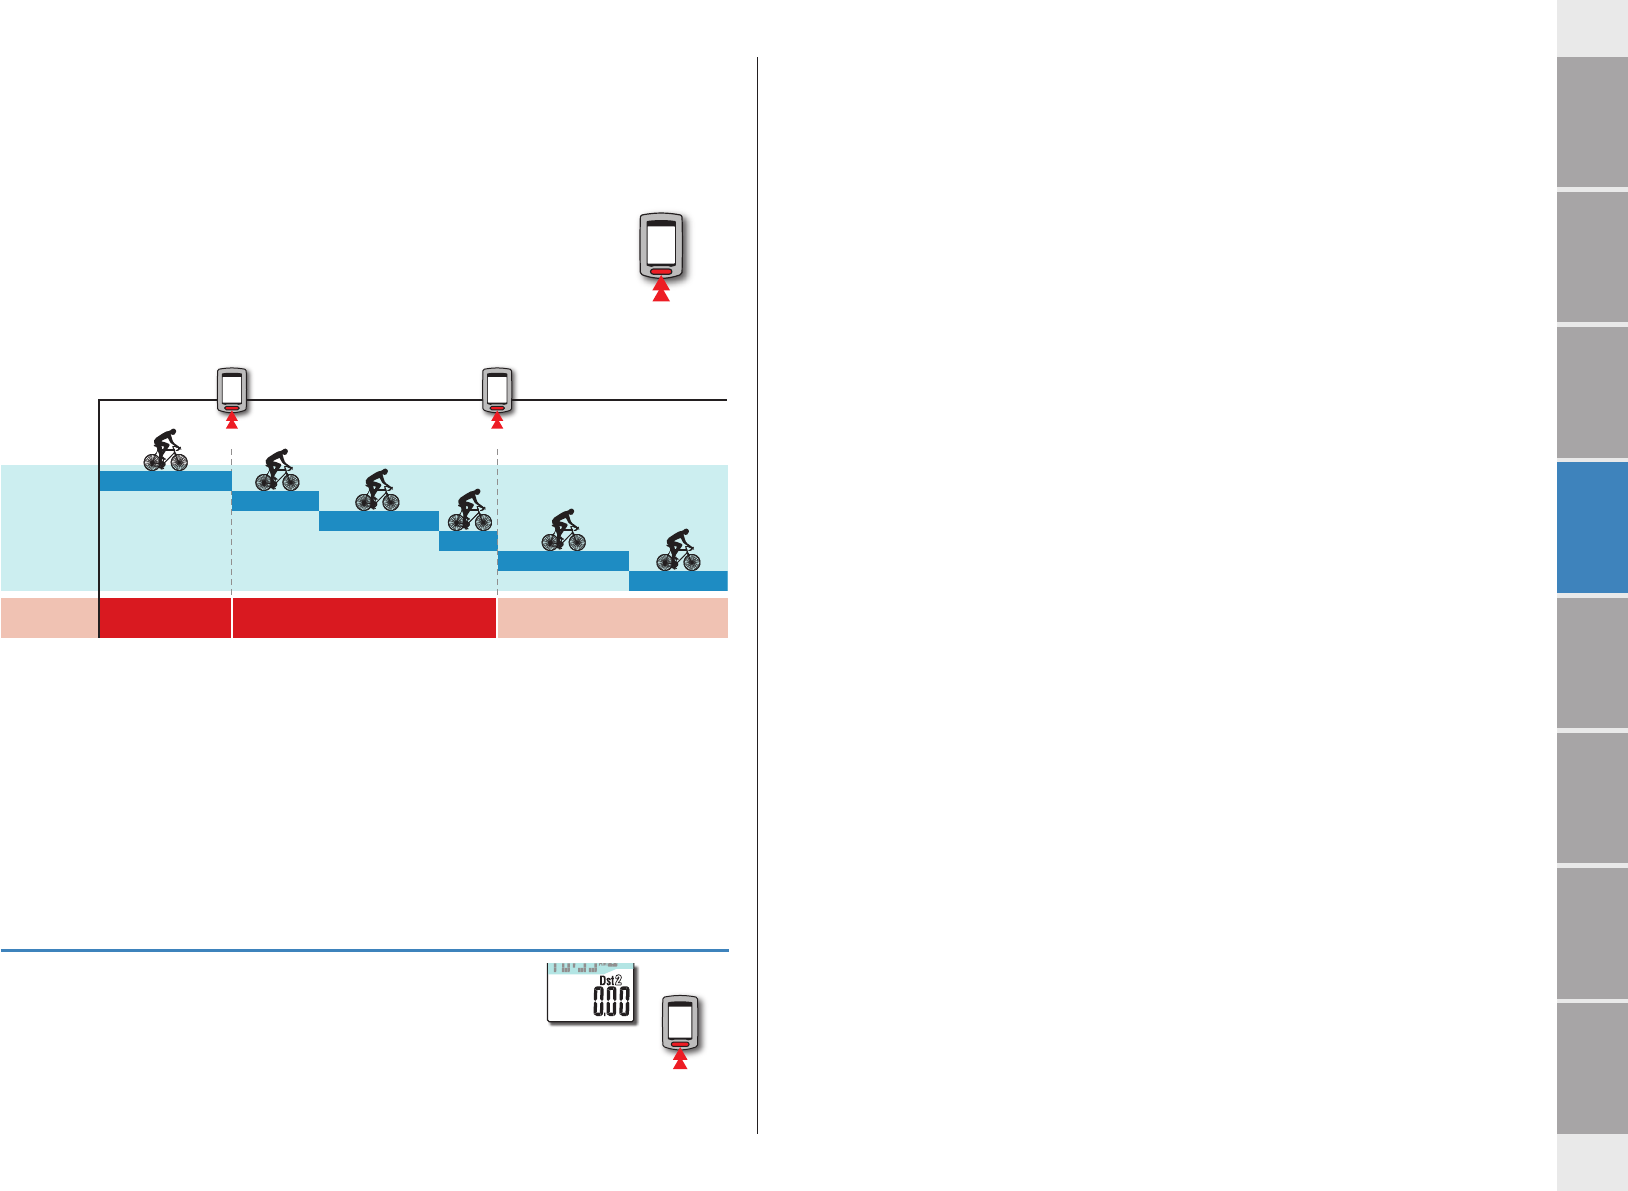
Resetting the measurement data and generating
the trip data
Holding down the MODE button with the measurement screen
displayed resets the measurement data to 0 (resetting operation).
All the measurement data up to that time are generated as trip data.
You can view measurement results and store trip records, by up-
loading the trip data to the special website “CATEYE Atlas™” via the
dedicated software application “CATEYE Sync™”.
1 day
2 day
3 day
4 day
5 day
6 day
Trip data for the 1st
day are generated.
Trip data to
be generated
Resetting
operation
Trip days
Trip data for the 2nd day to the
4th day are generated.
Trip data is not yet generated.
MODE
Resetting
operation
MODE
Resetting
operation
* A trip is continued unless the resetting operation is performed, even if the power is turned
off during measurement.
* The trip distance-2 (Dst2) is not reset to 0, since it is to be reset separately.
For details, see “Resetting the trip distance-2” below.
* The total distance (Odo) cannot be reset.
* For information on how to upload to the CATEYE Atlas™, see “Uploading the measurement
data (trip data)” (page 13).
* The unit has a limited memory capacity. When the data volume exceeds the memory capaci-
ty, any new data can no longer be stored. For details, see “Record interval and capacity limit”
(page 16).
Resetting the trip distance-2
Pressing and holding the MODE button with the trip distance-2
(Dst2) displayed resets only the trip distance-2 data to 0.
* The trip distance-2 (
Dst2
) value cannot be saved as trip data.
MODE
MODE
(press & hold)
(press & hold)
11
Introduction
How to install the
unit on your bicycle
Setting up the
computer
How to use the
computer
Others
Changing the
computer con-
figuration
Uploading the mea-
surement data
Setup of your
PC
Setup of your
PC
Installing CATEYE Sync™
Operating environment for CATEYE Sync™
OS
Windows XP (32 bit), and Vista / 7 / 8(32 bit / 64 bit)
*.NET Framework 3.5 is required.
Mac OS 10.6 or later
MemoryRecommend environment for respective OS
HDDAvailable capacity required: 64 MB or more
Browser
Internet Explorer 7 or later, Safari 4.0 or later,
Firefox, and Google Chrome 5.0 or later
How to Install CATEYE Sync™
1
Click on [Download CATEYE Sync™ now].
Download the file according to the instructions displayed on the screen.
2
Double click on the execution file downloaded.
OSExecution file
For Windows[setup.exe]
For Mac
[CATEYESyncSetUp.pkg]
* Administrator authority is required to run the program on Windows Vista / 7 / 8.
3
Perform an installation according to the instructions displayed on the screen.
Once installation is completed, CATEYE Sync™ will start.
* Go to “Setting CATEYE Sync™”(page 12).
Setup of your PC
At first, access the special website CATEYE Atlas™ to register as a member. Then, install CATEYE Sync™ to your PC (Windows/Mac). You can upload the trip data measured with this unit to CATEYE
Atlas™, STRAVA™, TrainingPeaks™ and others, or change the computer configuration using your PC.
Caution: Use the PC with an Internet access environment to access CATEYE Atlas™ or download CATEYE Sync™.
Membership registration to CATEYE Atlas™
•You can use the same account when using CATEYE INOU and having registered membership.
•When uploading the trip data acquired with this unit only to STRAVA™ or TrainingPeaks™,
membership registration of CATEYE Atlas™ is not required. Install CATEYE Sync™, and see
“Uploading trip data” (page 13).
1
Access CATEYE Atlas™.
Access the website “CATEYE Atlas™” from your browser (http://www.cateyeatlas.com).
2
Click on [Create account].
Register your temporary membership according to the in-
structions displayed on the screen.
Once you are registered, an e-mail is sent from CATEYE Atlas™.
Access to the specified URL to register your formal membership.
* Membership registration is free of charge.
* Make a note of your e-mail address, password and birth
date registered, and be sure to keep it.
3
Click on [Login here].
4
Enter your e-mail address and password, and then click on [Login].
Enter correctly your e-mail address and password registered to login.
* Go to “Installing CATEYE Sync™” (on the right of this page).
2
3
12
Introduction
How to install the
unit on your bicycle
Setting up the
computer
How to use the
computer
Others
Changing the
computer con-
figuration
Uploading the mea-
surement data
Setup of your
PC
Setup of your
PC
Setting CATEYE Sync™
After installing CATEYE Sync™, configure the login setting for CATEYE Atlas™.
* When uploading the trip data only to STRAVA™ or TrainingPeaks™, the following setting is
not required.
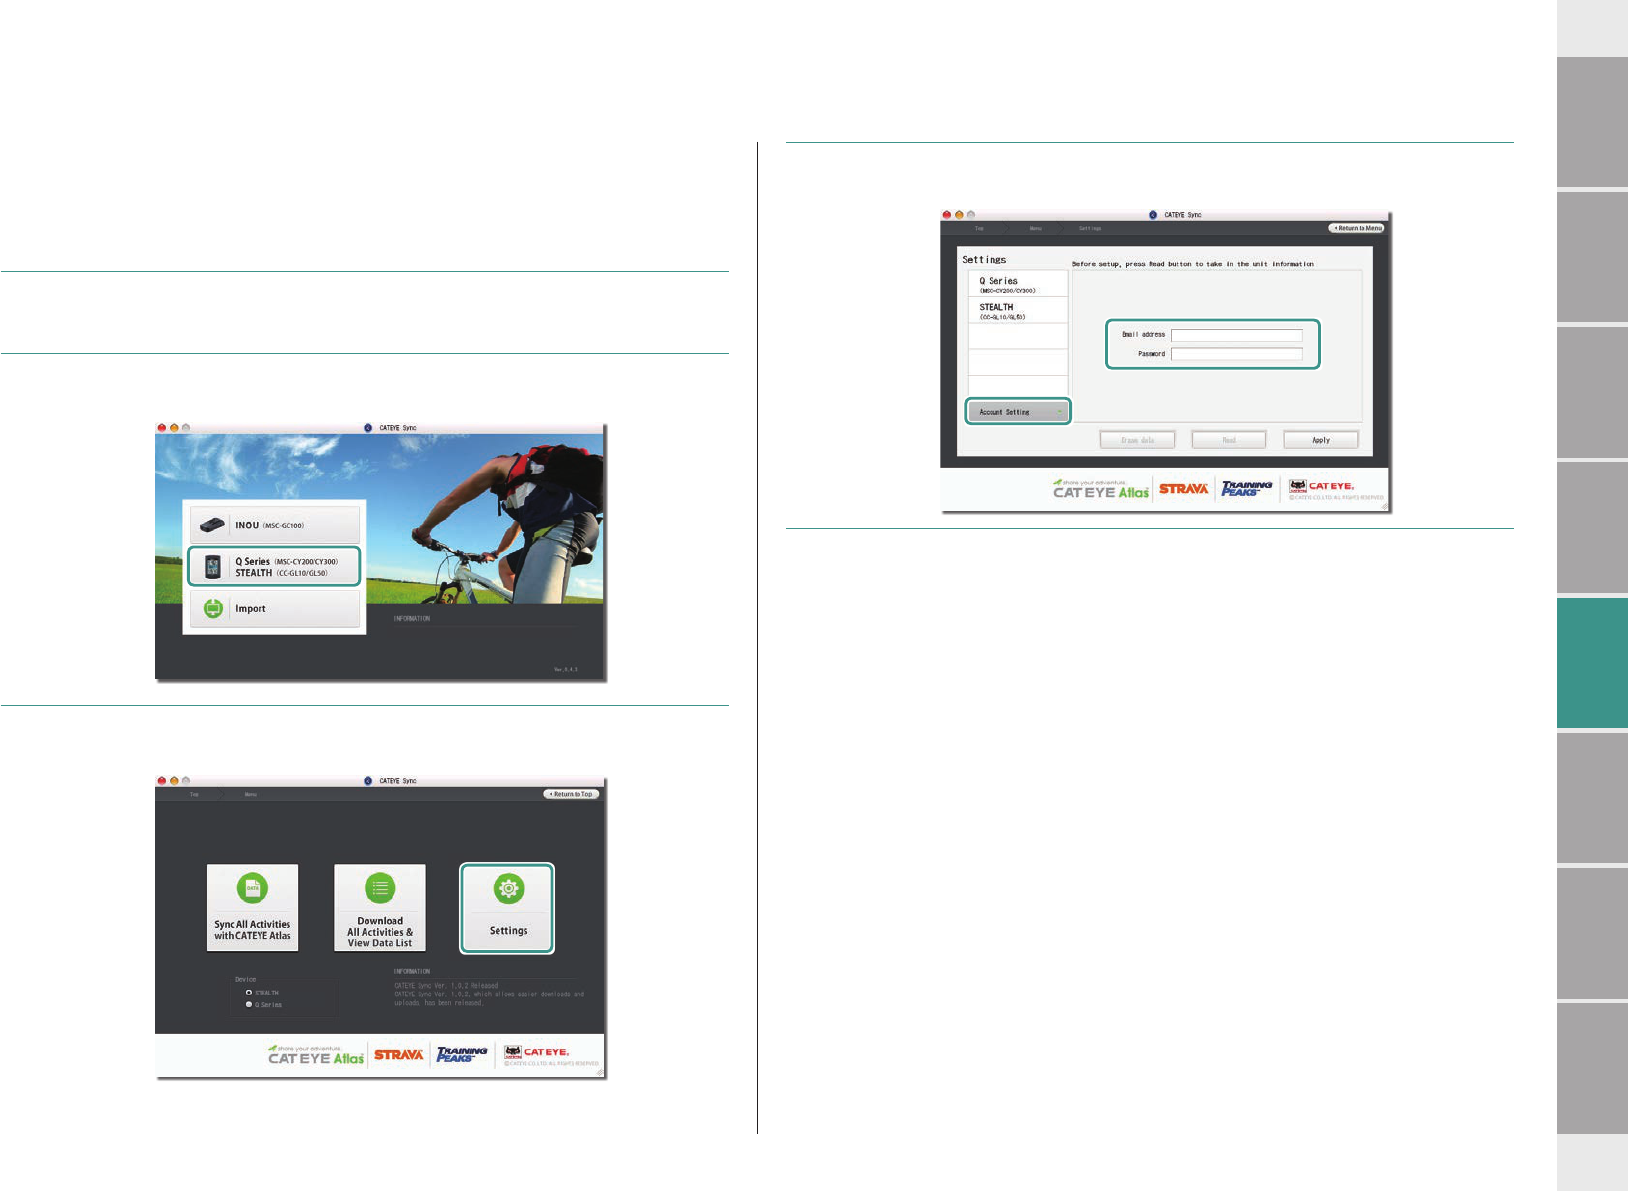
1
Start CATEYE Sync™.
Double-click on the shortcut [CATEYE Sync™] to start CATEYE Sync™.
2
Click on [Q Series / STEALTH].
The menu screen appears.
3
Click on [Settings].
The setting screen appears.
4
Click on [Account setting] and enter your e-mail address and password.
Enter correctly the e-mail address and password you registered at CATEYE Atlas™.
5
Click on [Apply].
Login setting for CATEYE Sync™ is completed.
Now, setup of your PC is completed.
* For information on how to upload the trip data, see “Uploading the measurement data (trip
data)” (page 13).
* With CATEYE Sync™, you can synchronize the settings configured in “Setting up the
computer” (page 5) with the computer. For details, see “Changing the computer con-
figuration” (page 20).
* When using CATEYE INOU, click on [INOU] to start INOU Sync. When you use CATEYE
INOU for the first time, download CATEYE Sync™ INOU from CATEYE Atlas™ to install it.
13
Introduction
How to install the
unit on your bicycle
Setting up the
computer
How to use the
computer
Others
Changing the
computer con-
figuration
Uploading the mea-
surement data
Setup of your
PC
Uploading the mea-
surement data
The trip data generated by the resetting operation can be uploaded to the special website
CATEYE Atlas™ or other services (STRAVA™ and others) in the following procedure.
Uploading trip data
Save the trip data in the computer to your PC, and upload desired trip data to CATEYE Atlas™,
STRAVA™, or TrainingPeaks™.
* The trip data without the resetting operation cannot be recognized with CATEYE Sync™.
Perform the resetting operation of the computer before setting to the cradle.
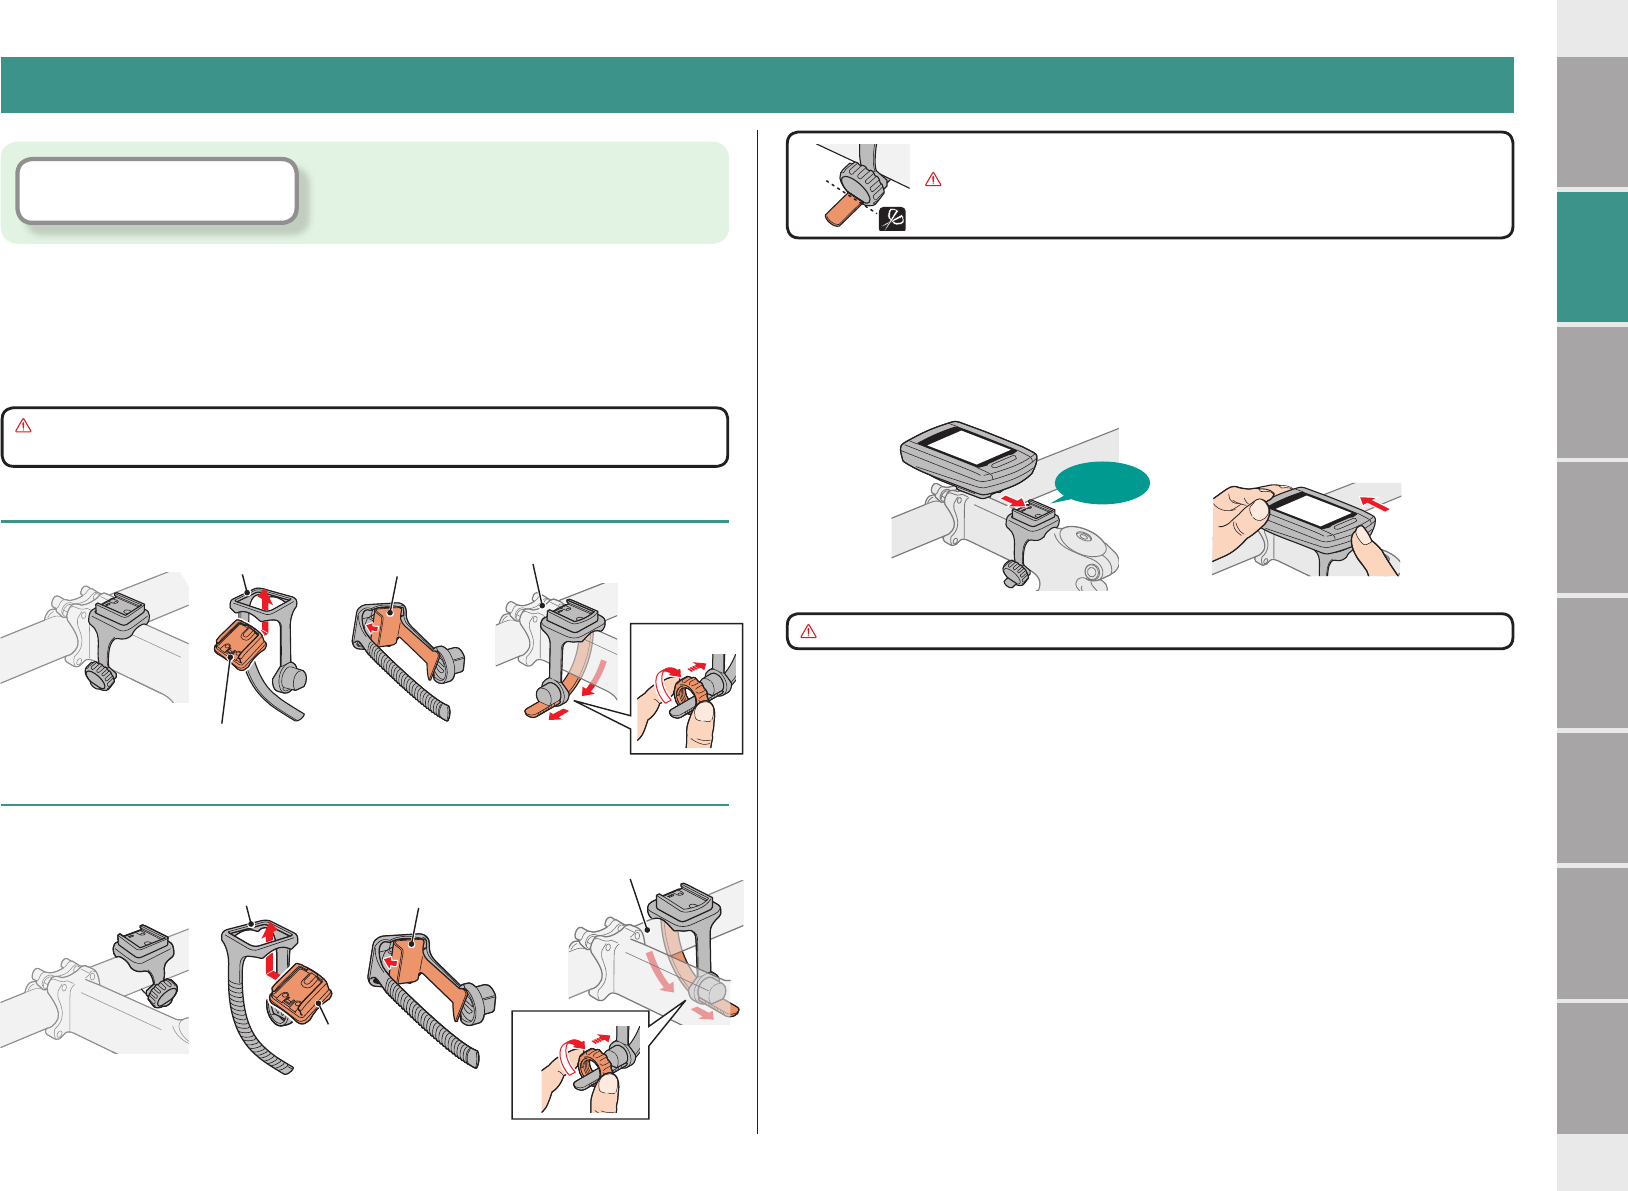
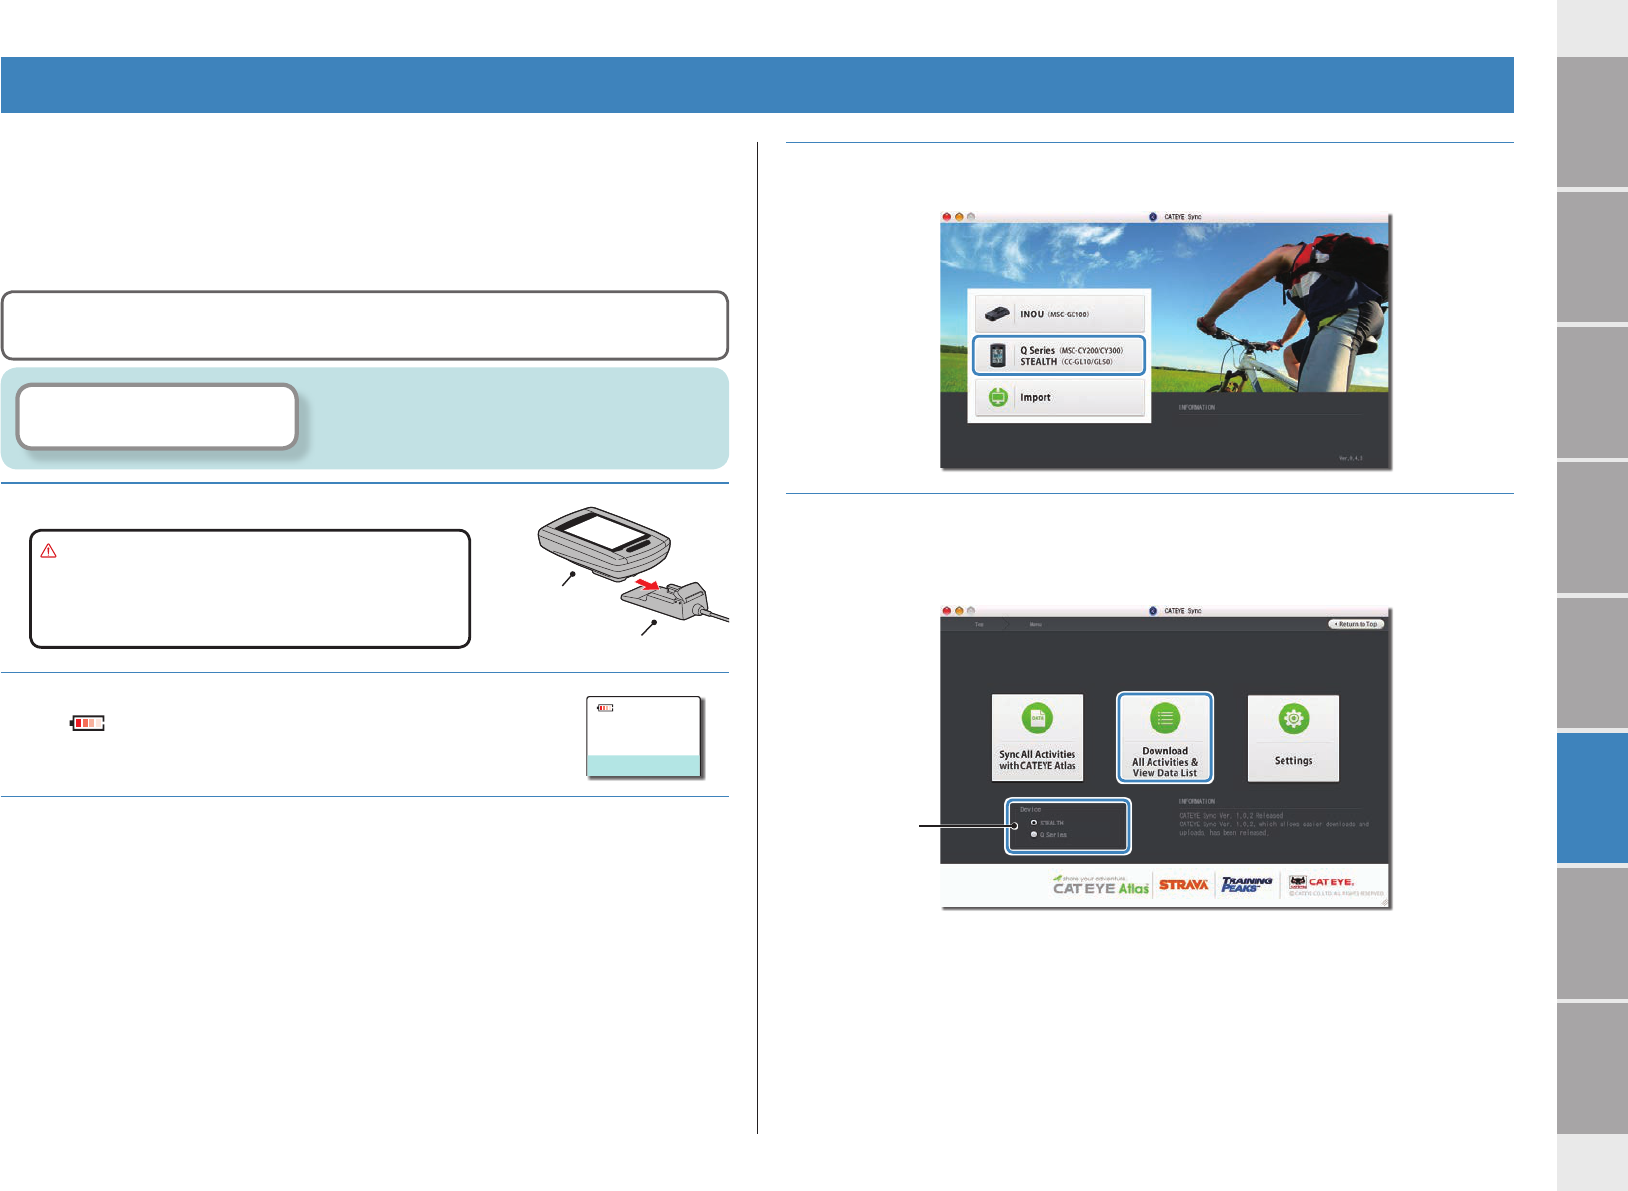
1
Set the computer to the cradle.
Caution: Do not set wet computer to the cradle,
for example after ride in the rain. It
may cause short circuit and damage
the computer or the data.
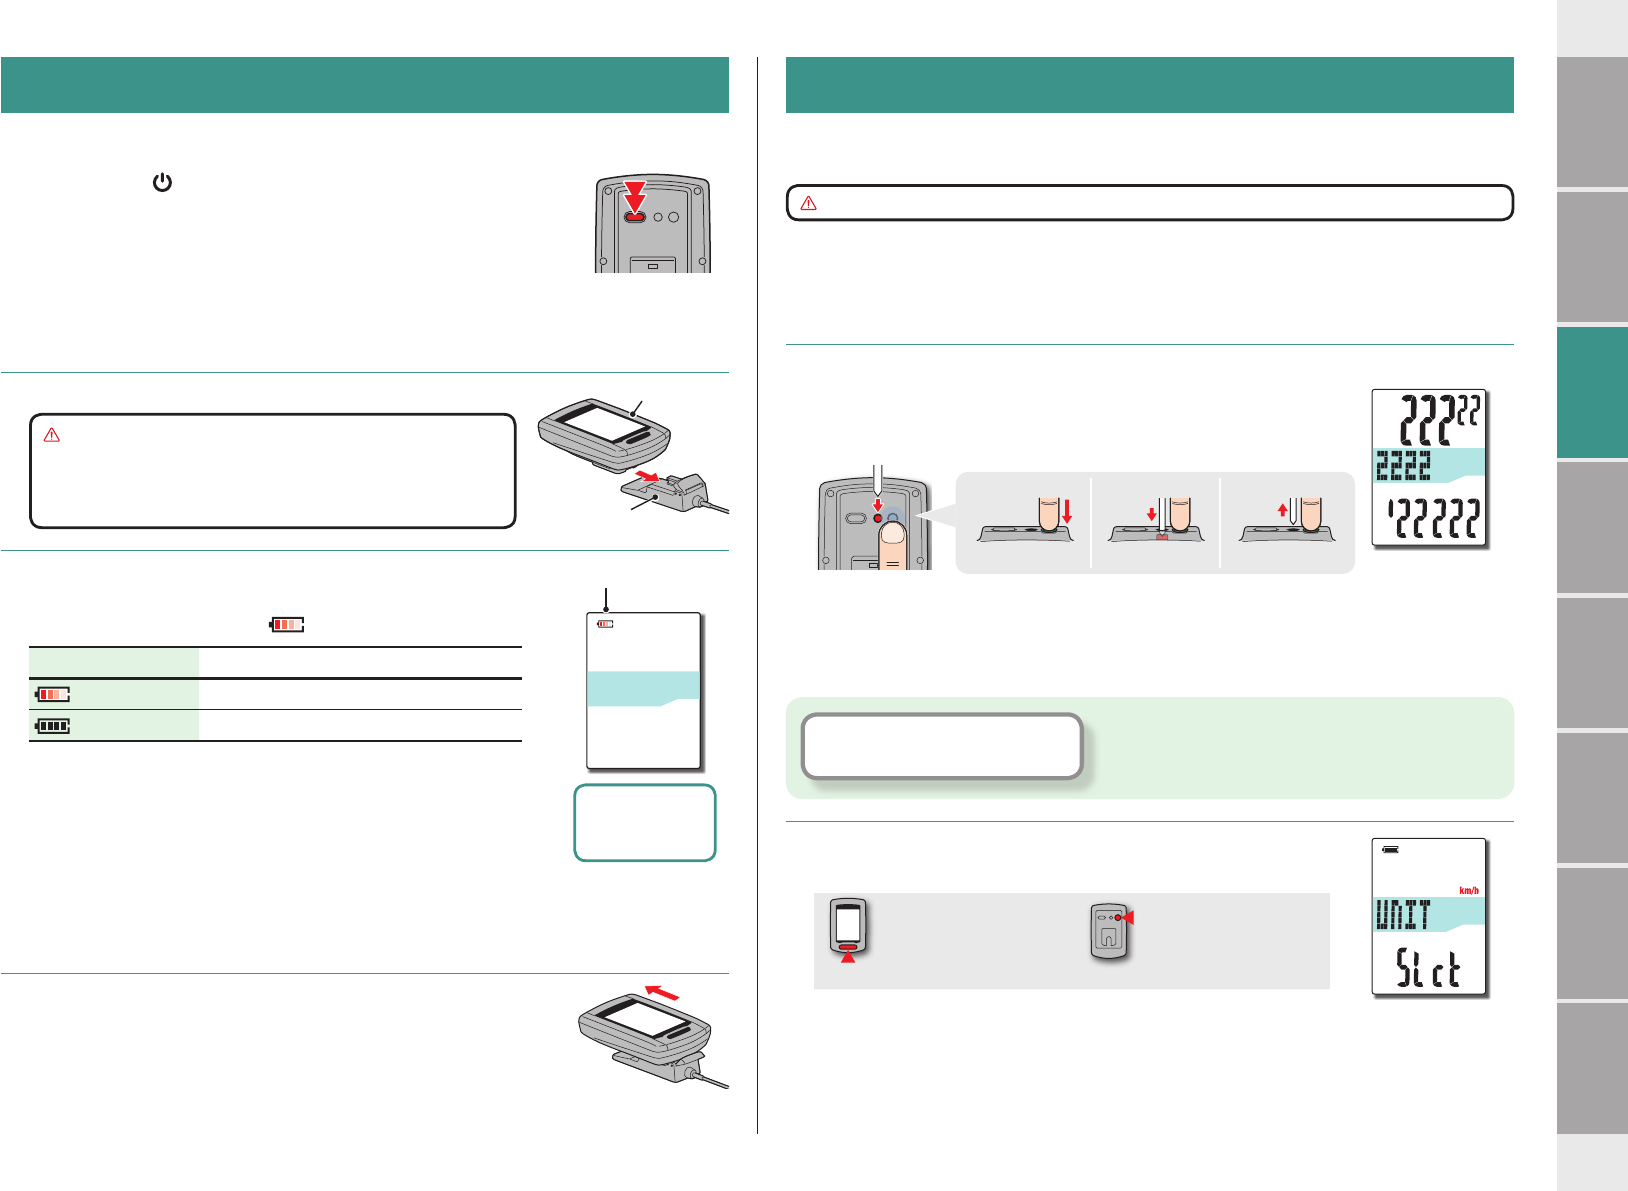
2
Insert the USB plug into your PC.
Only (battery icon) is displayed on the screen.
3
Start CATEYE Sync™.
Double-click on the shortcut [CATEYE Sync™] to start CATEYE Sync™.
Watch video
(YouTube)
Uploading the measurement data (trip data)
Cradle
Computer
4
Click on [Q Series / STEALTH].
The menu screen appears.
5
Check that “STEALTH” is selected under Device, and click [Download
All Activities & View Data List].
The trip data is downloaded from the computer to your PC, and the data list screen
appears.
* Trip data successfully downloaded to your PC is deleted from the computer.
* Data under measurement that has not been reset cannot be read.
Click the button, then a browser will open and a
video will be played back.
Device
24
Introduction
How to install the
unit on your bicycle
Setting up the
computer
How to use the
computer
Others
Changing the
computer con-
figuration
Uploading the mea-
surement data
Setup of your
PC
Changing the
computer con-
figuration
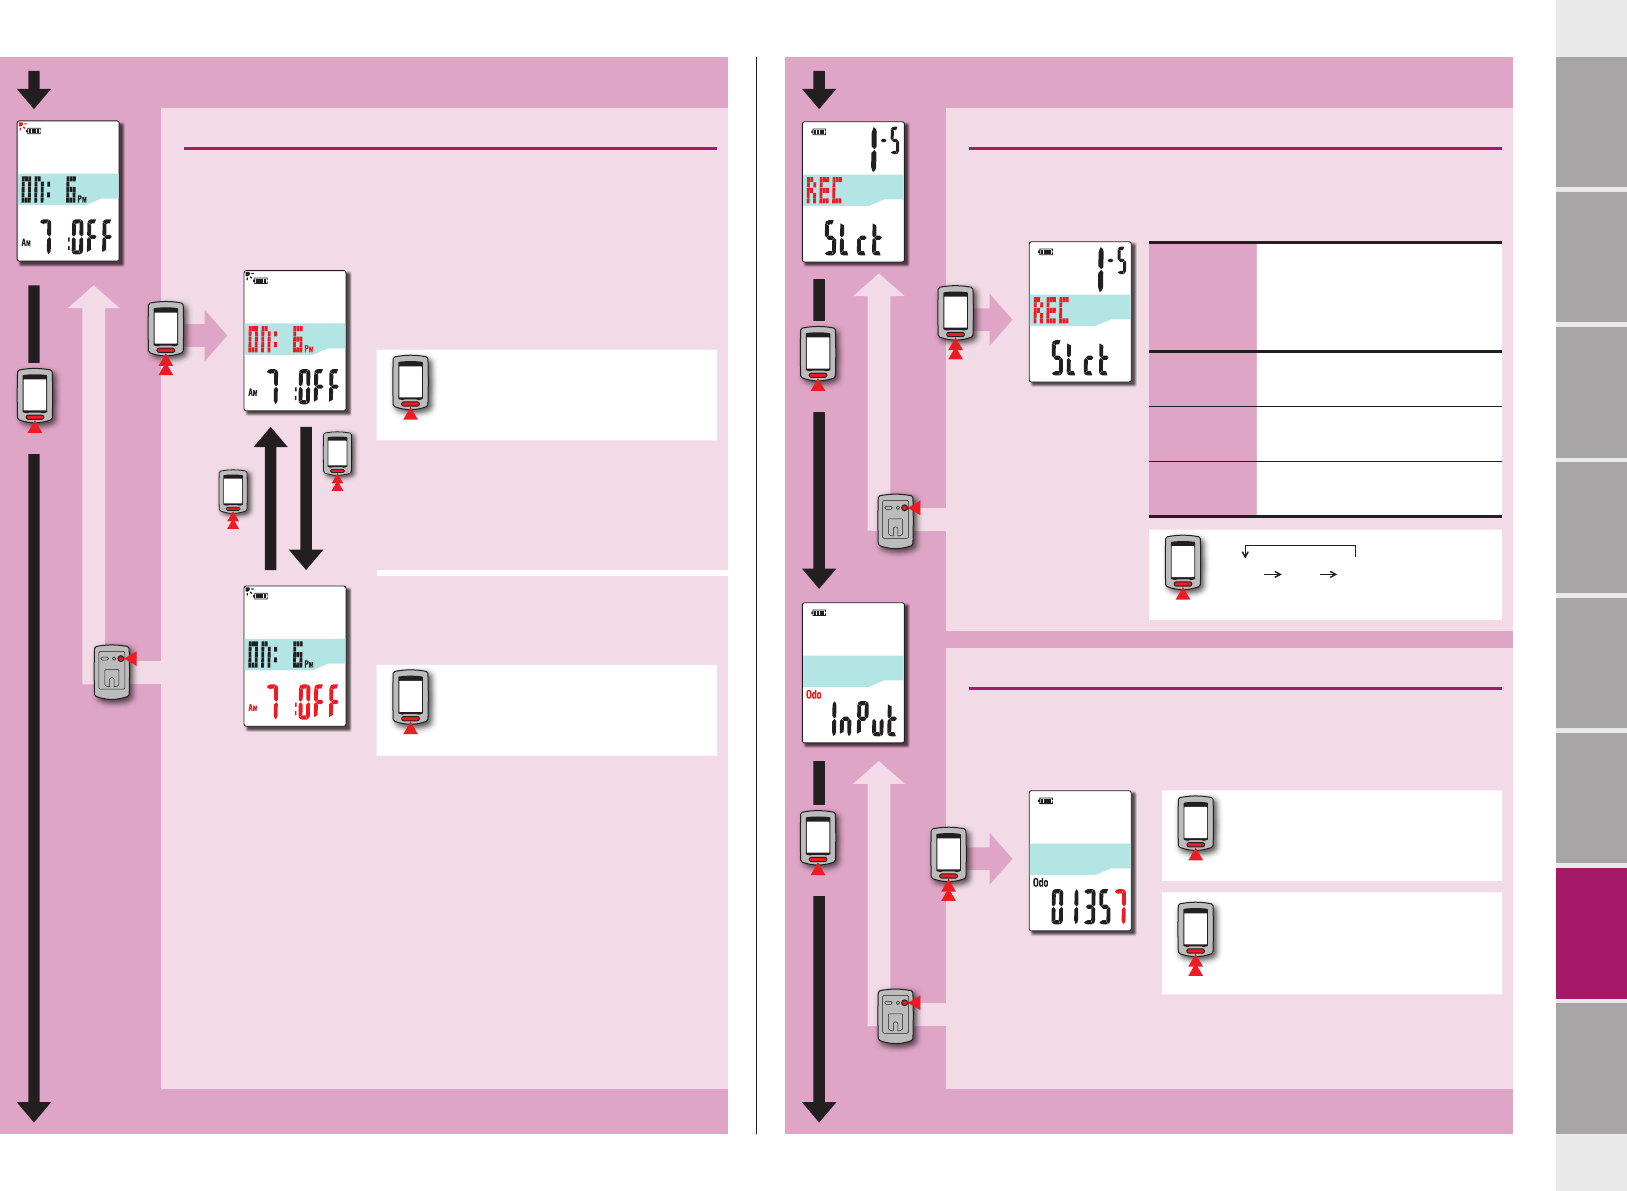
Night-time setting
Set the time when the backlight lights up.
* When you do not want to turn on the backlight throughout the
day, set the start time and end time to the same hour.
Start time
Enter the start time when the backlight
lights up.
MODE
Increase the value
End time
Enter the end time when the backlight
lights off.
MODE
Increase the value
MODE
MODE
MENU
(press & hold)
(press & hold)
Changing
the settings
From “Night-time setting”
Setting the record interval
Set the second-scale interval to record the measurement data.
* The maximum recording time / maximum time for one trip that
can be recorded in the computer depends on the selected interval.
Record
interval
Maximum
recording time
(total time of
all trip data)
Maximum
time for one
trip
1-S
(1 second)
35 hours12 hours
2-S
(2 seconds)
70 hours24 hours
5-S
(5 seconds)
175 hours60 hours
MODE
1-S 2-S 5-S
MODE
(press & hold)
Changing the
settings
Entering the total distance
You can enter the start value of the total distance, and add the trip
distance to it. Use this function when you renew and/or reset your unit.
* Enter the total distance in integer number only.
Gebruikershandleiding.com neemt misbruik van zijn services uitermate serieus. U kunt hieronder aangeven waarom deze vraag ongepast is. Wij controleren de vraag en zonodig wordt deze verwijderd.
Product:
Spelregels forum
Om tot zinvolle vragen te komen hanteren wij de volgende spelregels:
lees eerst de handleiding door;
controleer of uw vraag al eerder door iemand anders is gesteld;
probeer uw vraag zo duidelijk mogelijk te stellen;
heeft u een probleem en al geprobeerd om dit op te lossen, vermeld dit erbij aub;
heeft u een oplossing gekregen van een bezoeker dan horen wij dat graag in dit forum;
wilt u een reactie geven op een vraag of antwoord, gebruik dan niet dit formulier maar klik op de knop 'reageer op deze vraag';
uw vraag wordt direct op de website gezet; vermijd daarom persoonlijke gegevens in te vullen;
Belangrijk! Als er een antwoord wordt gegeven op uw vraag, dan is het voor de gever van het antwoord nuttig om te weten als u er wel (of niet) mee geholpen bent! Wij vragen u dus ook te reageren op een antwoord.
Belangrijk! Antwoorden worden ook per e-mail naar abonnees gestuurd. Laat uw emailadres achter op deze site, zodat u op de hoogte blijft. U krijgt dan ook andere vragen en antwoorden te zien.
Abonneren
Abonneer u voor het ontvangen van emails voor uw Cateye CC-GL10 bij:
nieuwe vragen en antwoorden
nieuwe handleidingen
U ontvangt een email met instructies om u voor één of beide opties in te schrijven.
Ontvang uw handleiding per email
Vul uw emailadres in en ontvang de handleiding van Cateye CC-GL10 in de taal/talen: Engels als bijlage per email.
De handleiding is 3,02 mb groot.
U ontvangt de handleiding per email binnen enkele minuten. Als u geen email heeft ontvangen, dan heeft u waarschijnlijk een verkeerd emailadres ingevuld of is uw mailbox te vol. Daarnaast kan het zijn dat uw internetprovider een maximum heeft aan de grootte per email. Omdat hier een handleiding wordt meegestuurd, kan het voorkomen dat de email groter is dan toegestaan bij uw provider.
Uw handleiding is per email verstuurd. Controleer uw email
Als u niet binnen een kwartier uw email met handleiding ontvangen heeft, kan het zijn dat u een verkeerd emailadres heeft ingevuld of dat uw emailprovider een maximum grootte per email heeft ingesteld die kleiner is dan de grootte van de handleiding.
Er is een email naar u verstuurd om uw inschrijving definitief te maken.
Controleer uw email en volg de aanwijzingen op om uw inschrijving definitief te maken
U heeft geen emailadres opgegeven
Als u de handleiding per email wilt ontvangen, vul dan een geldig emailadres in.
Uw vraag is op deze pagina toegevoegd
Wilt u een email ontvangen bij een antwoord en/of nieuwe vragen? Vul dan hier uw emailadres in.