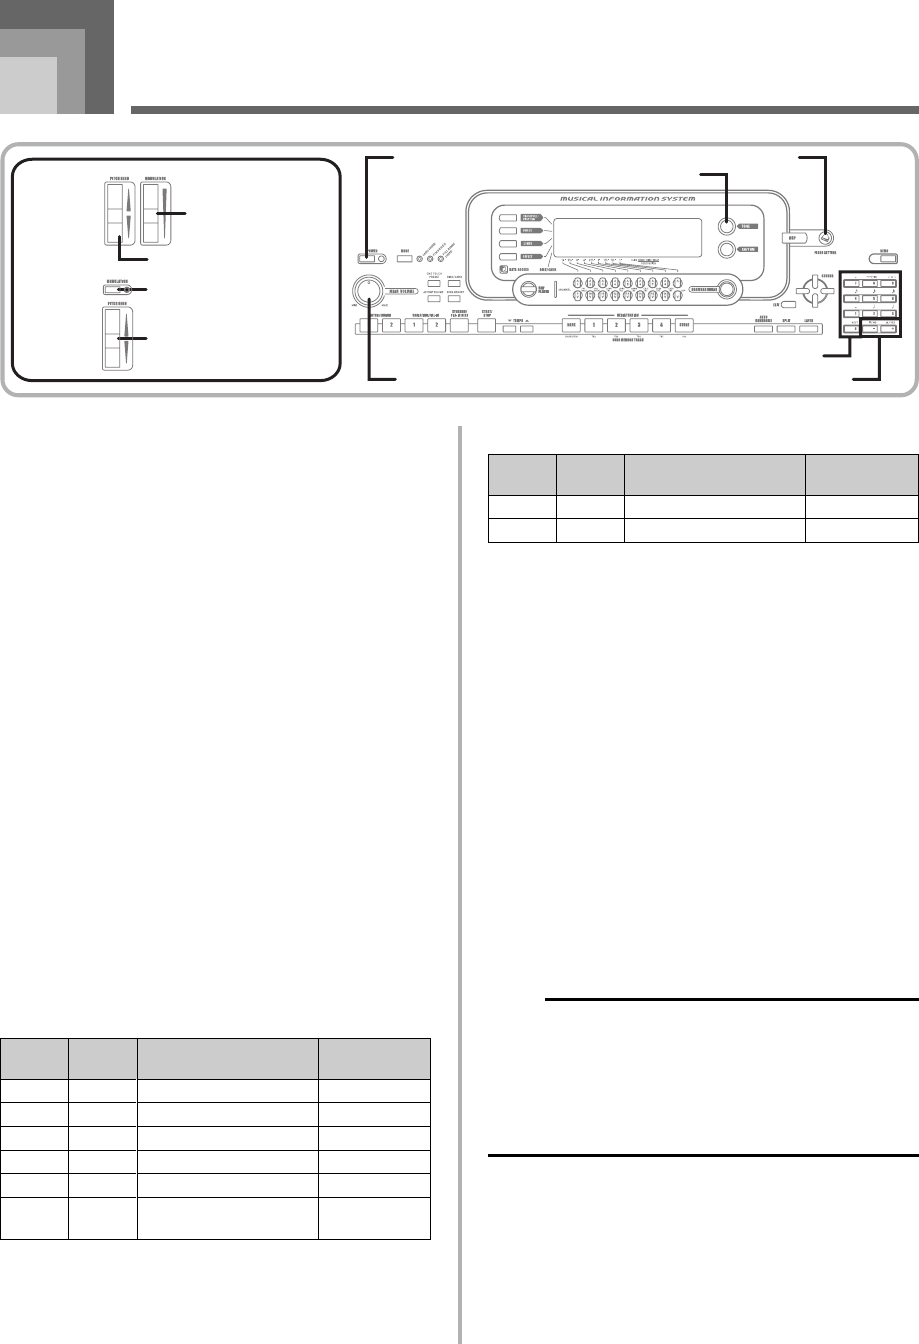
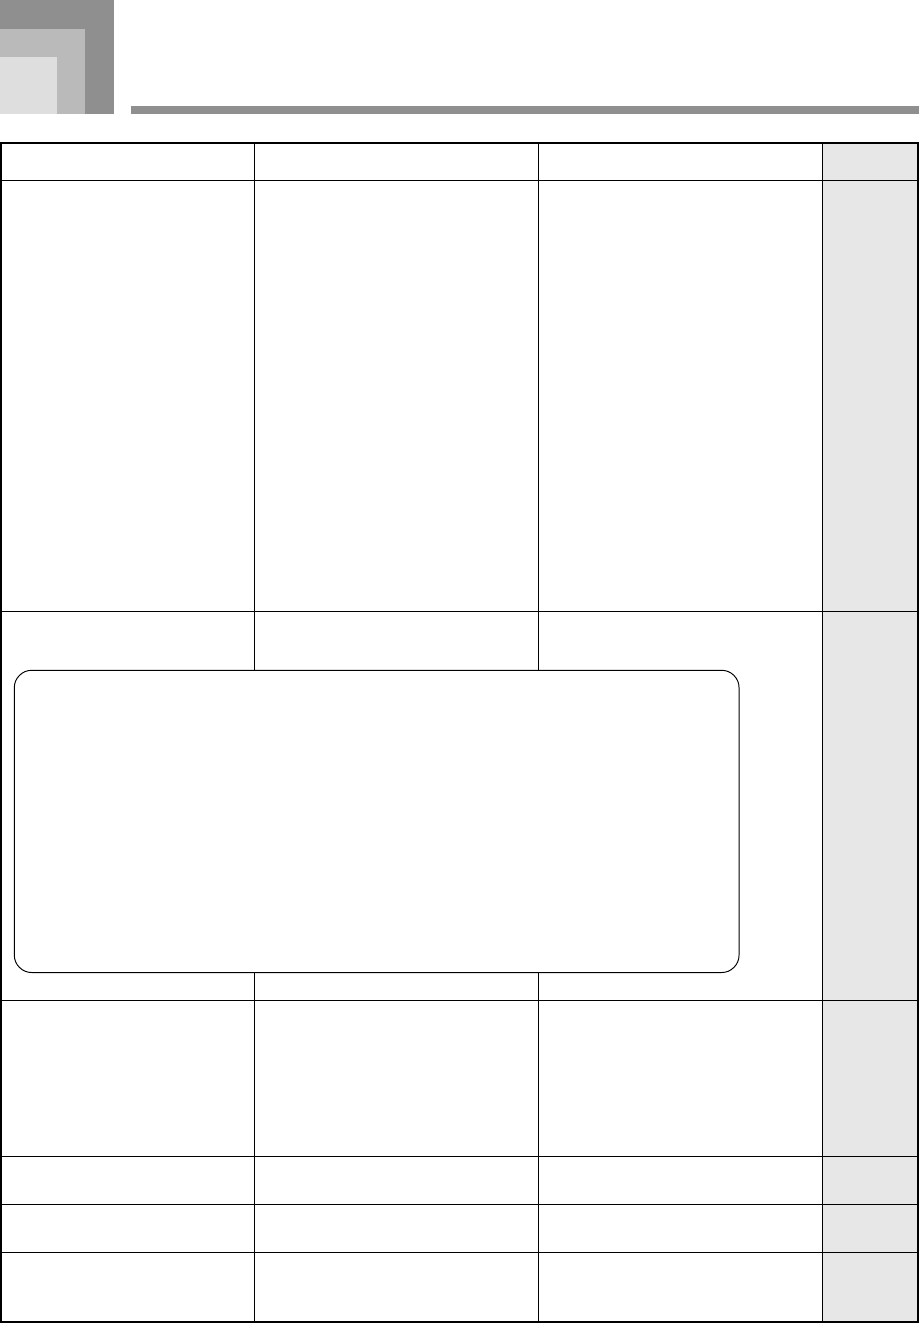
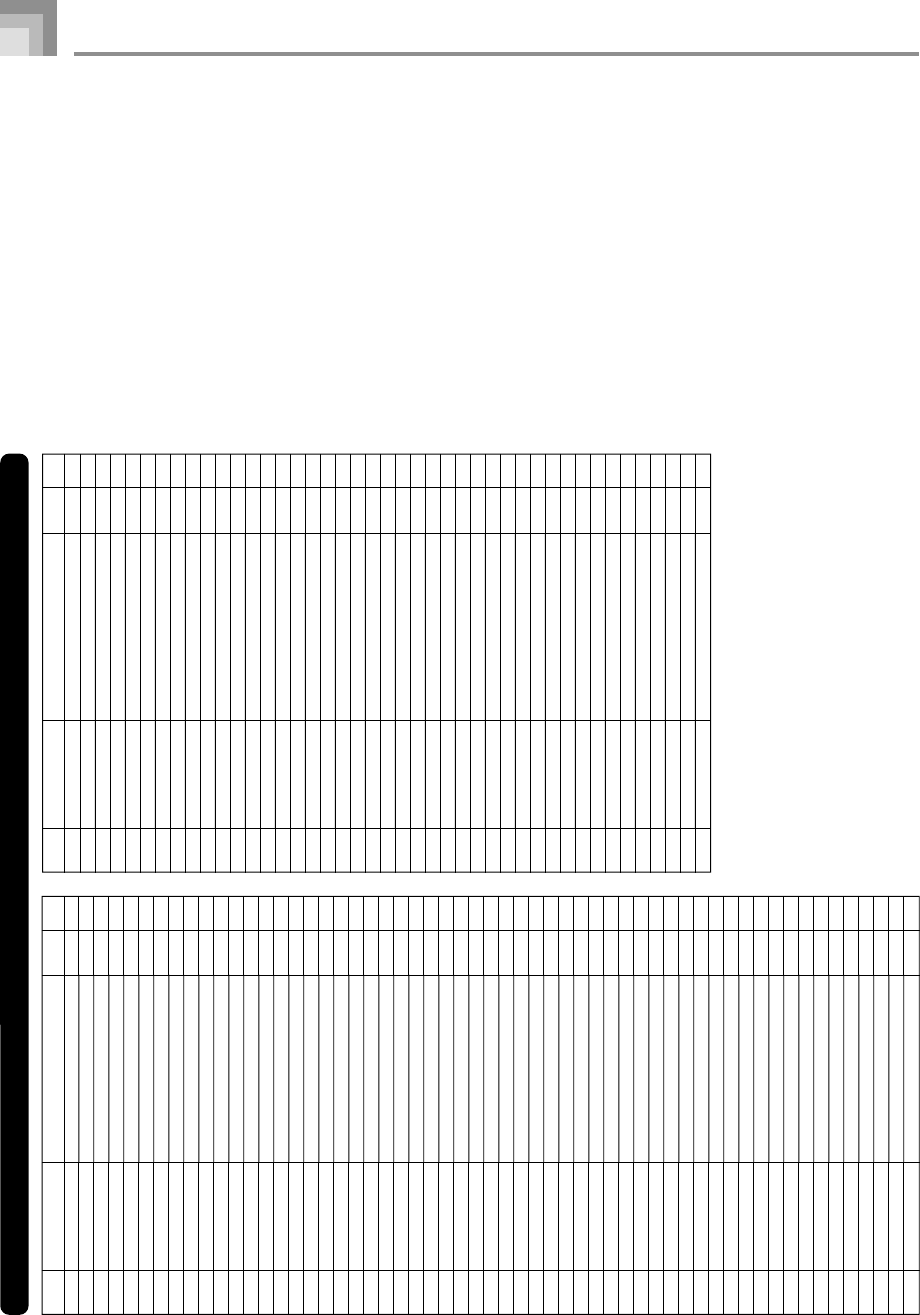
Further storage of waveform, accompaniment, and SMF data becomes
impossible after the total of such data reaches approximately 3.5MB.
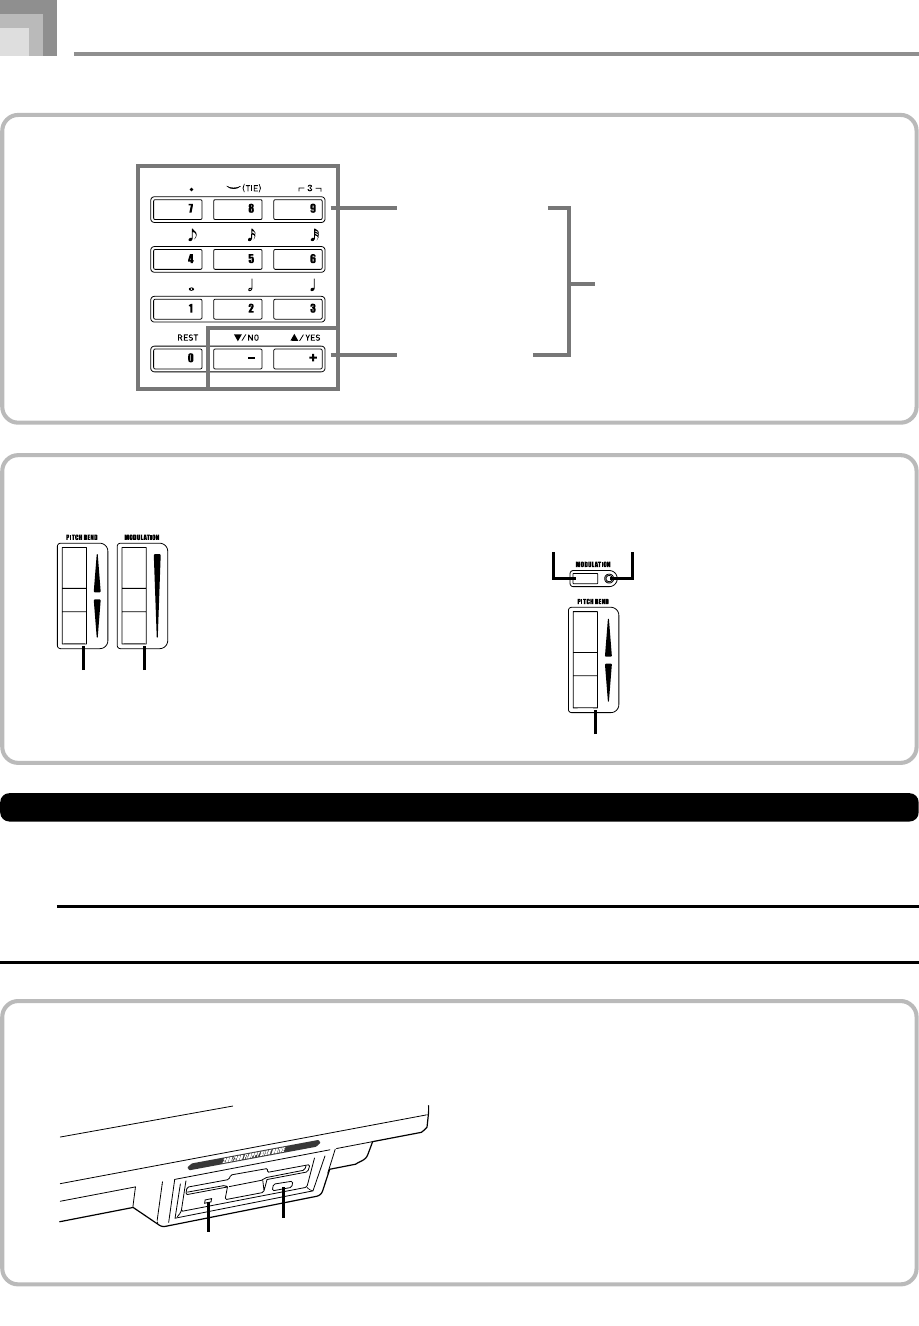
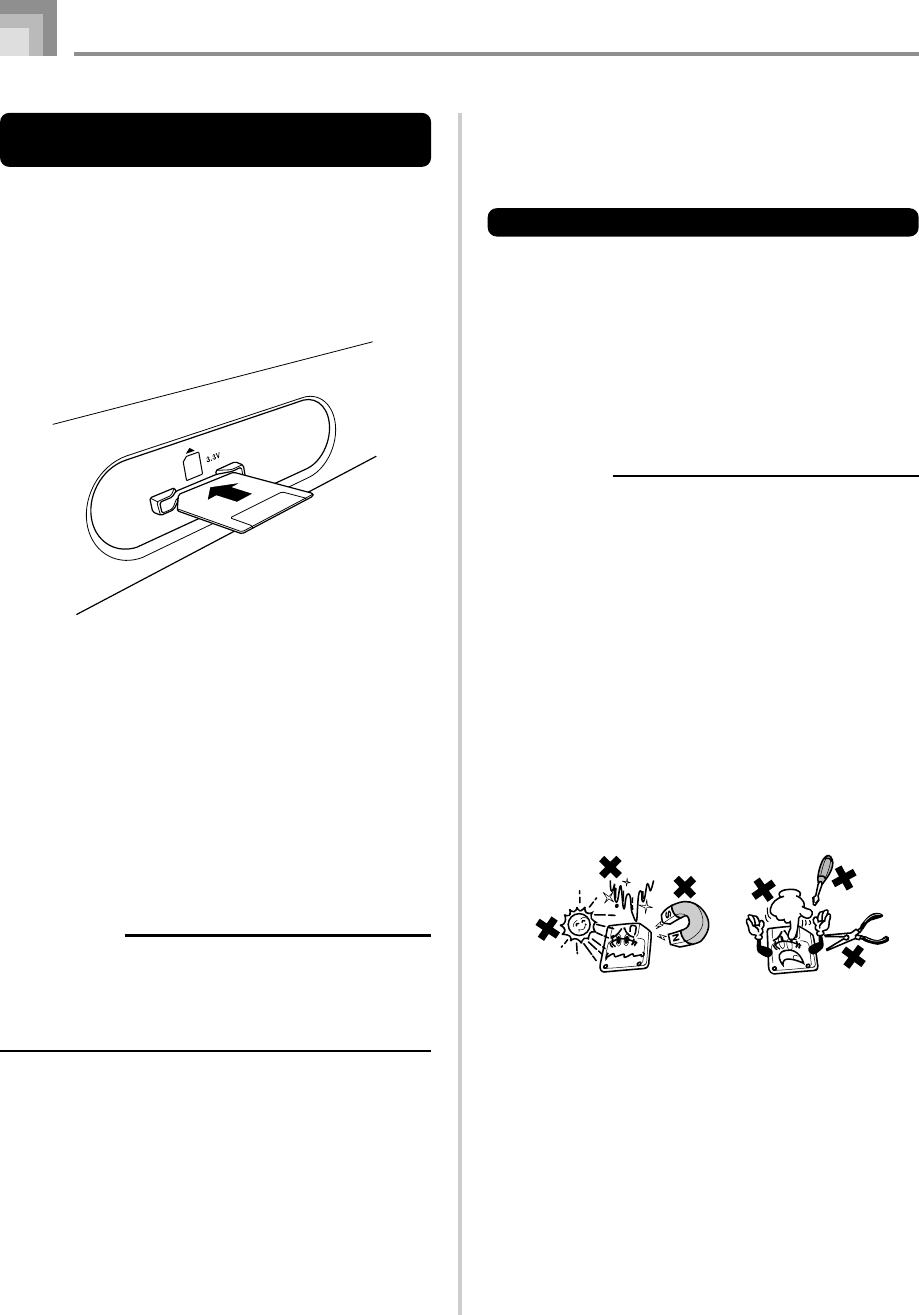
Card Slot3.3V SmartMedia
TM
(8MB, 16MB, 32MB, 64MB, 128MB)
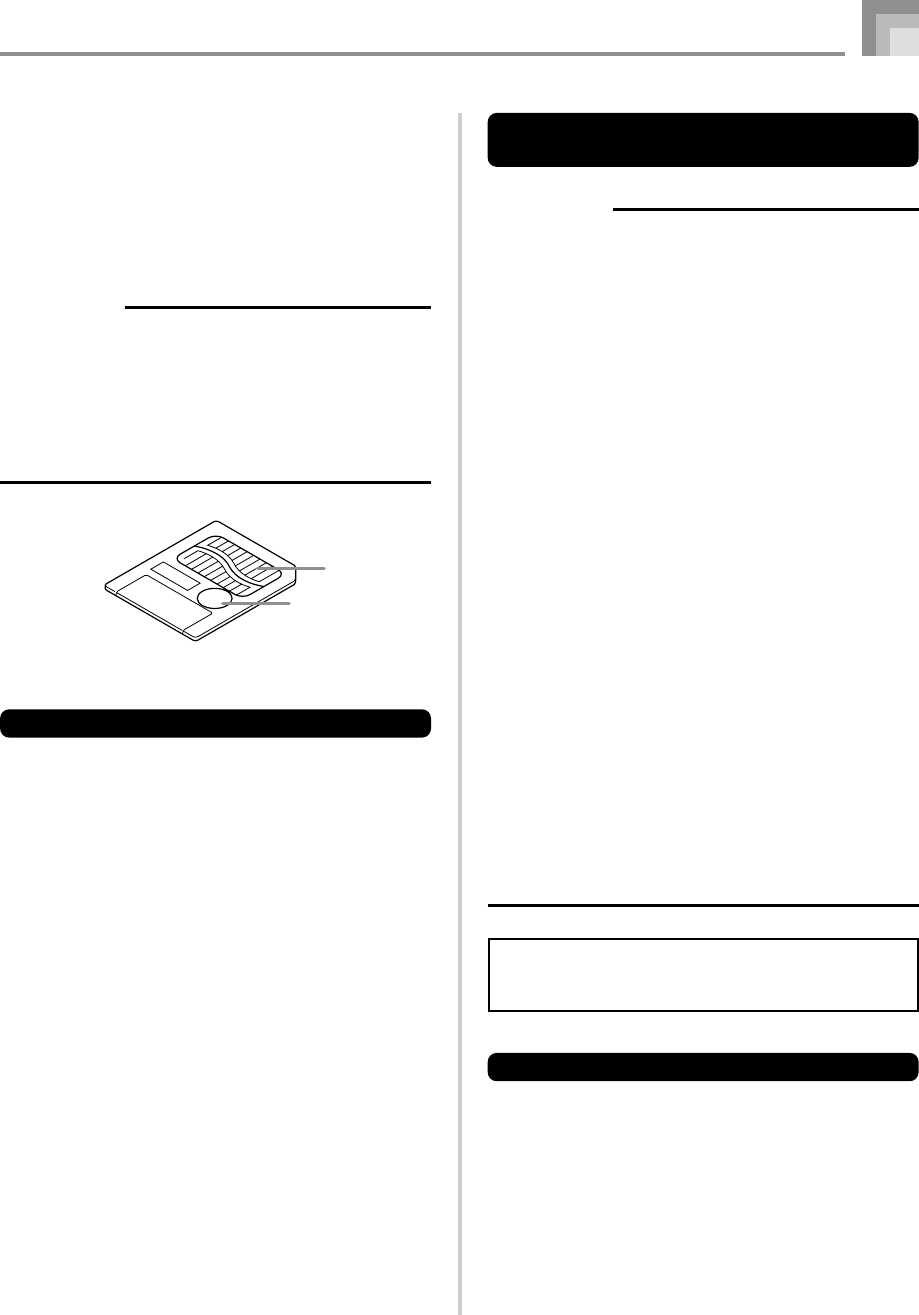
Functions:Save and load of user tones, user songs, and registration data; playback of SMF;
card formatting; file delete; file rename
Floppy Disk Drive (WK-3700 only)
Type:3.5" FDD
Formats:2DD (720KB MS-DOS format)
2HD (1.44MB MS-DOS format)
Functions:Save and load of user tones, user songs, and registration data; playback of SMF;
disk formatting; file delete; file rename
Specifications
738A-E-101A
WK3200_e_95-101.p6505.3.15, 6:17 PM99
E-100
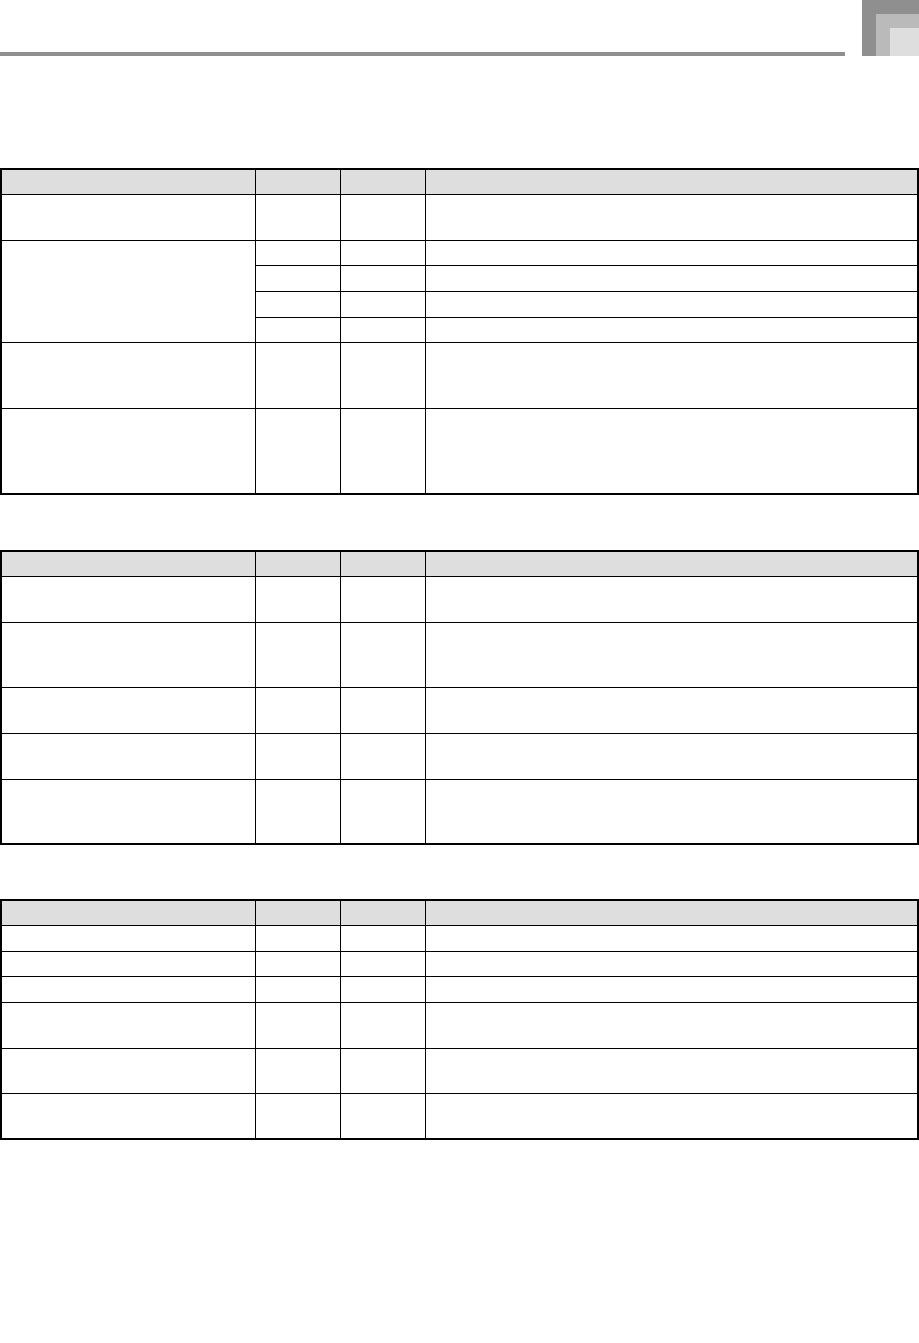
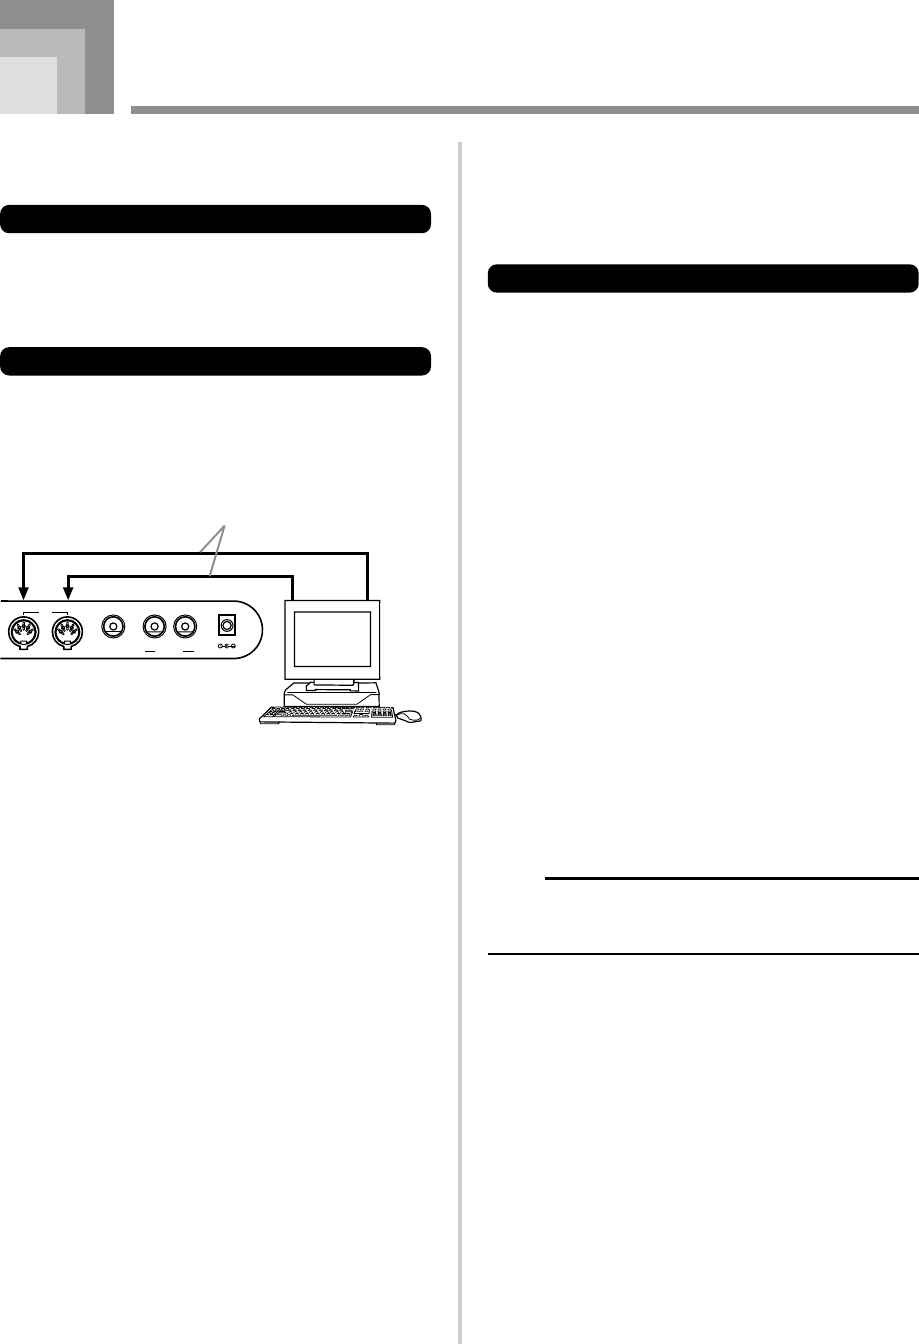
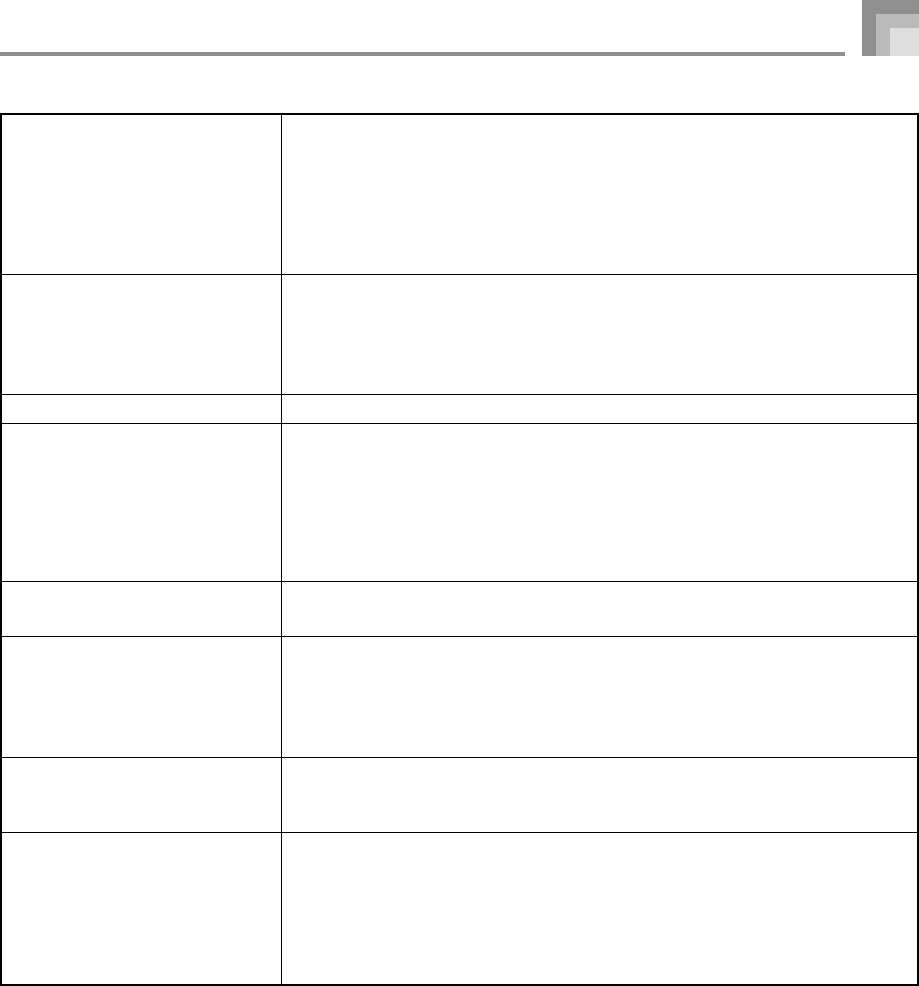
Terminals
MIDI Terminals:IN, OUT
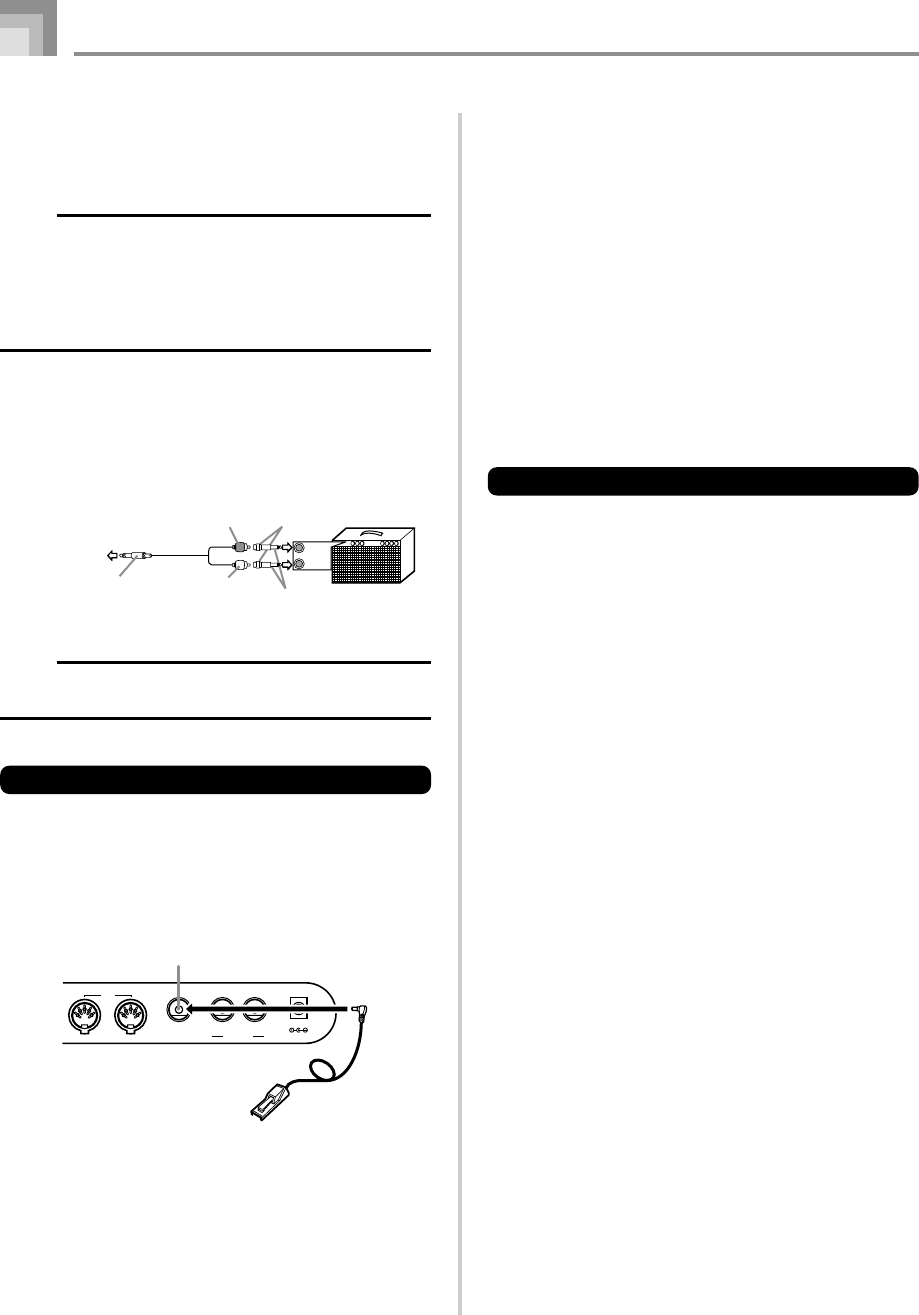
Sustain/Assignable Terminal:Standard jack (sustain, sostenuto, soft, rhythm start/stop)
•
WK-3700
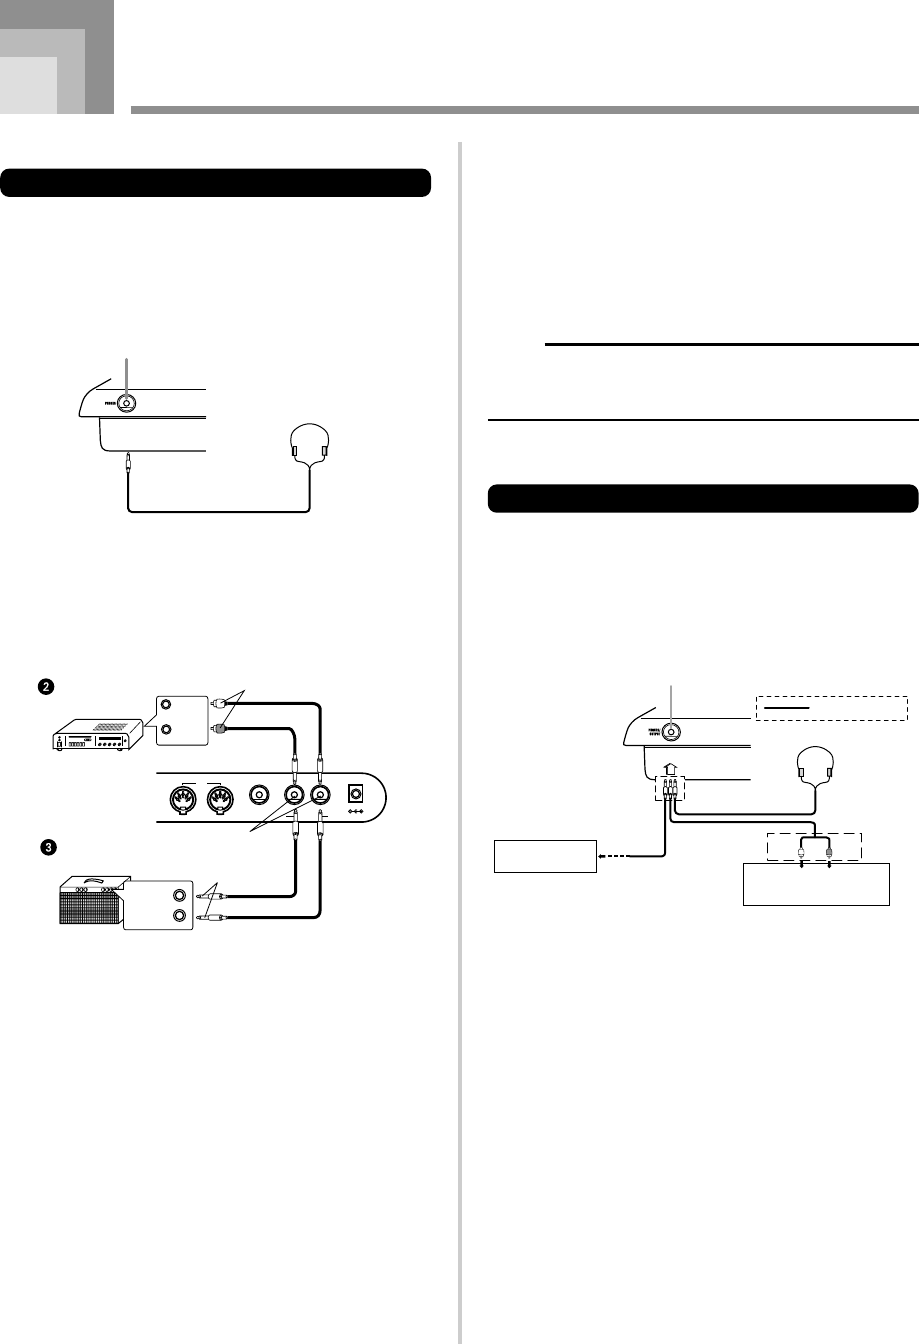
Headphones:Stereo standard jack
Output Impedance : 200Ω
Output Voltage : 250mV (RMS) MAX
Line Out (R, L/MONO):Standard jack x 2
Output Impedance : 3kΩ
Output Voltage : 1.5V (RMS) MAX
•
WK-3200
Headphone/Output Terminal:Stereo standard jack
Output Impedance: 200Ω
Output Voltage: 5.5V (RMS) MAX
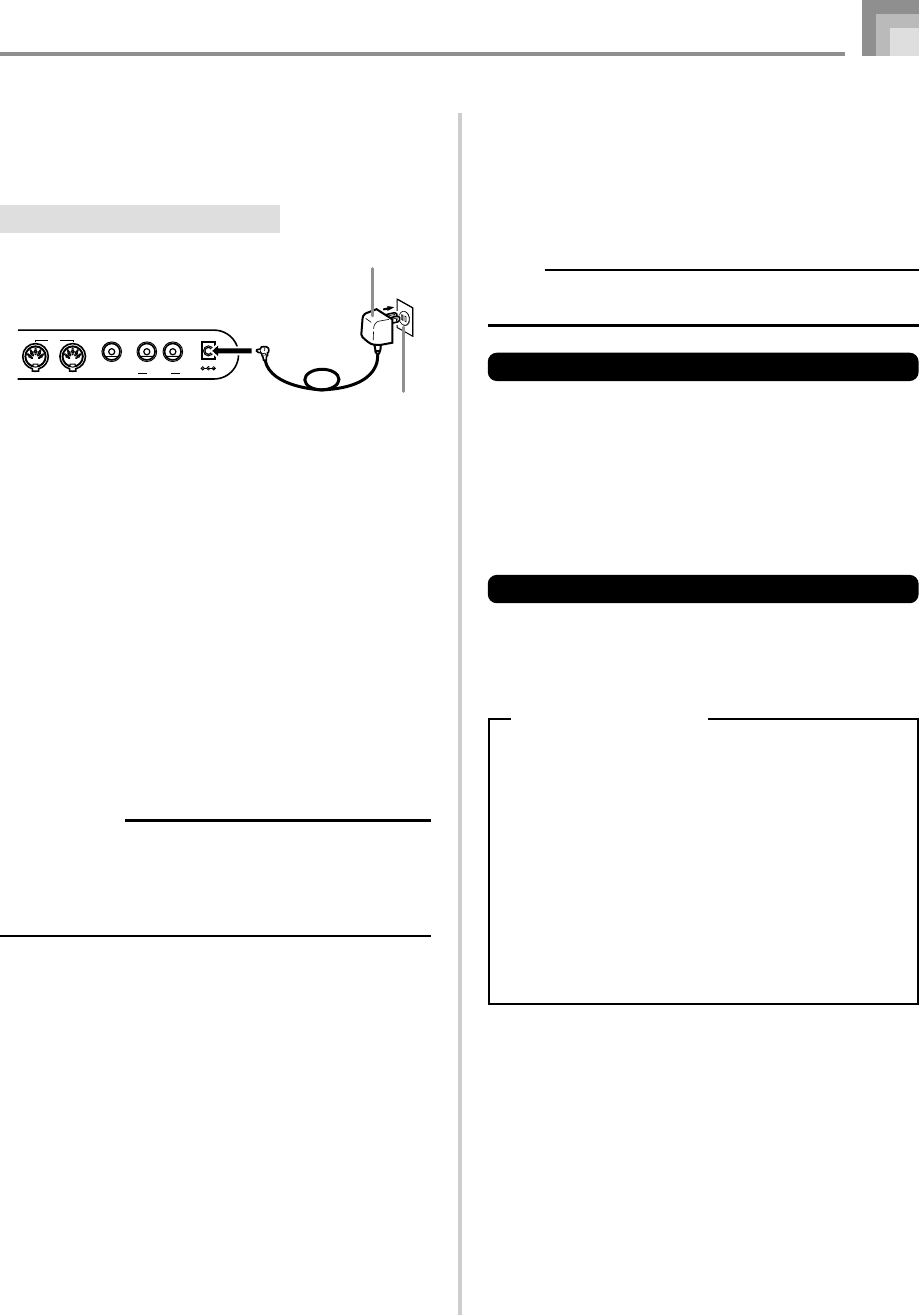
Power Supply Terminal:12V DC
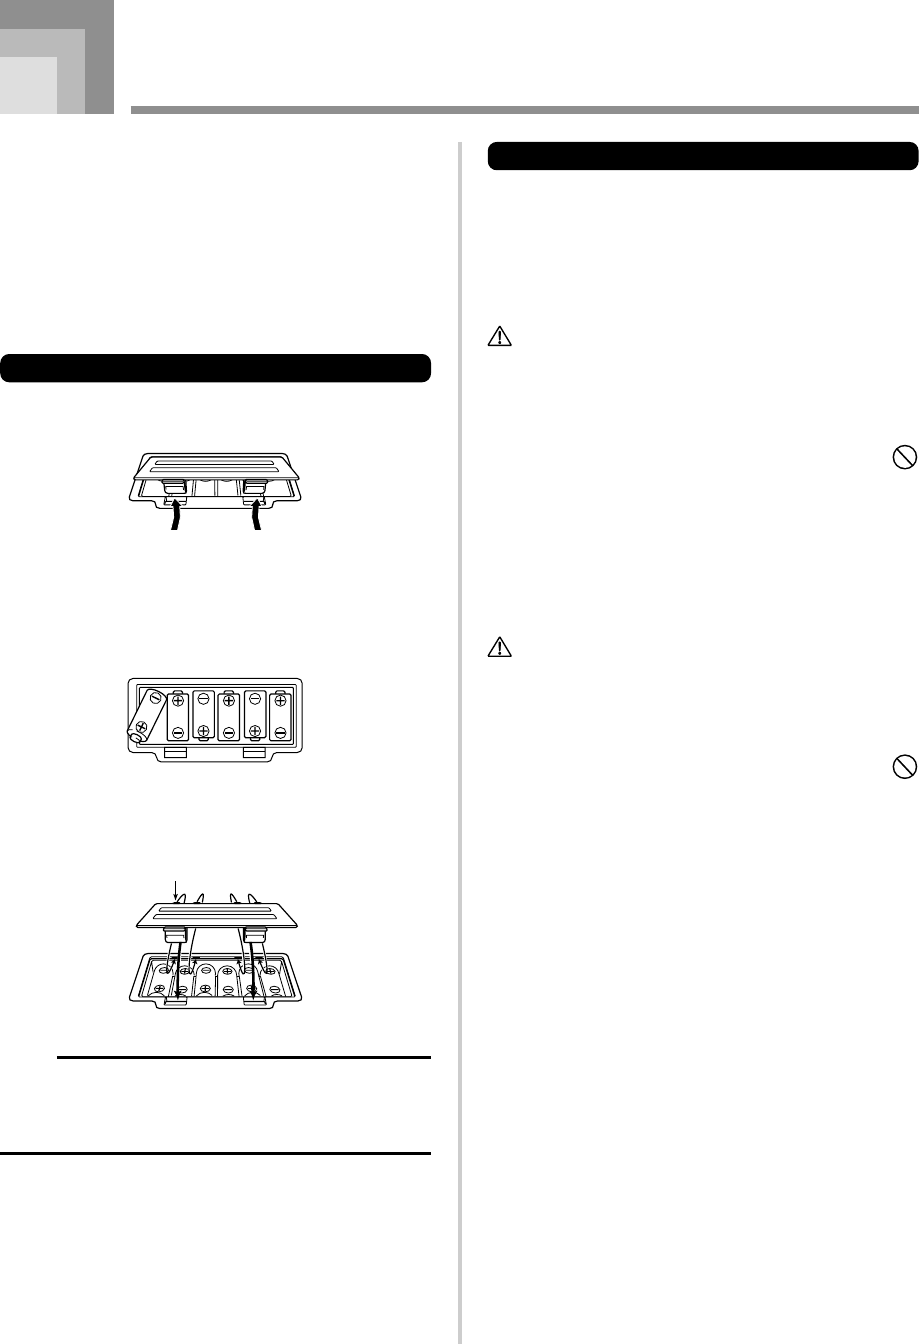
Power Supply:Dual power supply system
Batteries:6 D-size batteries
Battery Life:Approximately 4 hours continuous operation on alkaline batteries
AC Adaptor:AD-12
Auto Power Off:Turns power off approximately six minutes after last key operation. Enabled
under battery power only, can be disabled manually.
Speaker Output:6.1W + 6.1W
Power consumption:12V 18W
Dimensions:122.3 x 42.3 x 16.0 cm (48
3
/
16
x 16
11
/
16
x 6
5
/
16
inch)
Weight:WK-3700: Approximately 10.0 kg (22.0 lbs) (without batteries)
WK-3200: Approximately 9.5 kg (20.9 lbs) (without batteries)
Specifications
738A-E-102A
*The same memory area is used to store waveform data, accompaniment data, and SMF data.
WK3200_e_95-101.p6505.3.15, 6:17 PM100
E-101
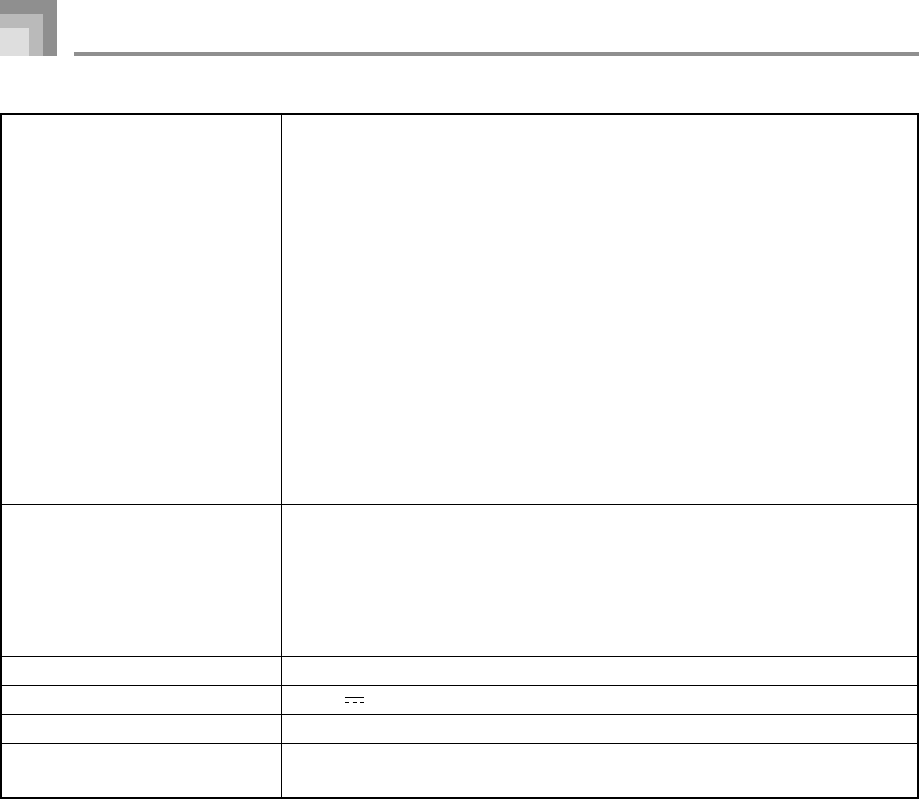
Avoid heat, humidity or direct sunlight.
Do not overexpose the instrument to direct sunlight, or place it near an air conditioner, or in any extremely hot place.
Do not use near a TV or radio.
This instrument can cause video or audio interference with TV and radio reception. If this happens, move the instrument away
from the TV or radio.
Do not use lacquer, thinner or similar chemicals for cleaning.
Clean the instrument with a soft cloth dampened in a weak solution of water and a neutral detergent. Soak the cloth in the
solution and squeeze until it is almost dry.
Avoid use in areas subjected to temperature extremes.
Extremely high or low temperature can cause figures on the LCD screen to become dim and difficult to read. This condition
should correct itself when the instrument is brought back to normal temperature.
NOTE
•You may notice lines in the finish of the case of this instrument. These lines are a result of the molding process used to shape
the plastic of the case. They are not cracks or breaks in the plastic, and are no cause for concern.
Care of your Instrument
738A-E-103A
WK3200_e_95-101.p6505.3.15, 6:17 PM101
738A-E-104A
WK3200_e_95-101.p6505.3.15, 6:17 PM102
A-1
Appendix
738A-E-105A
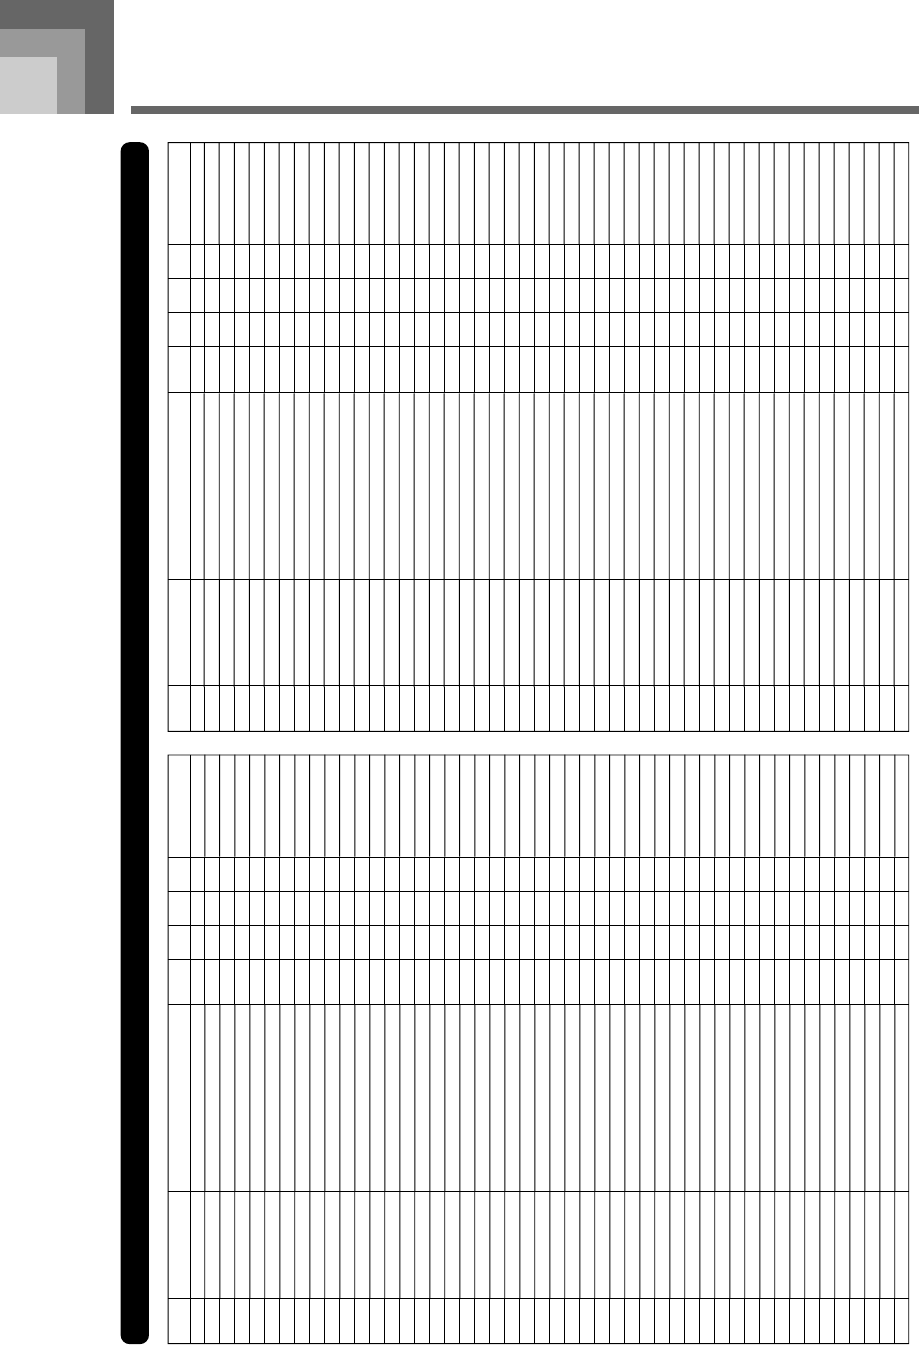
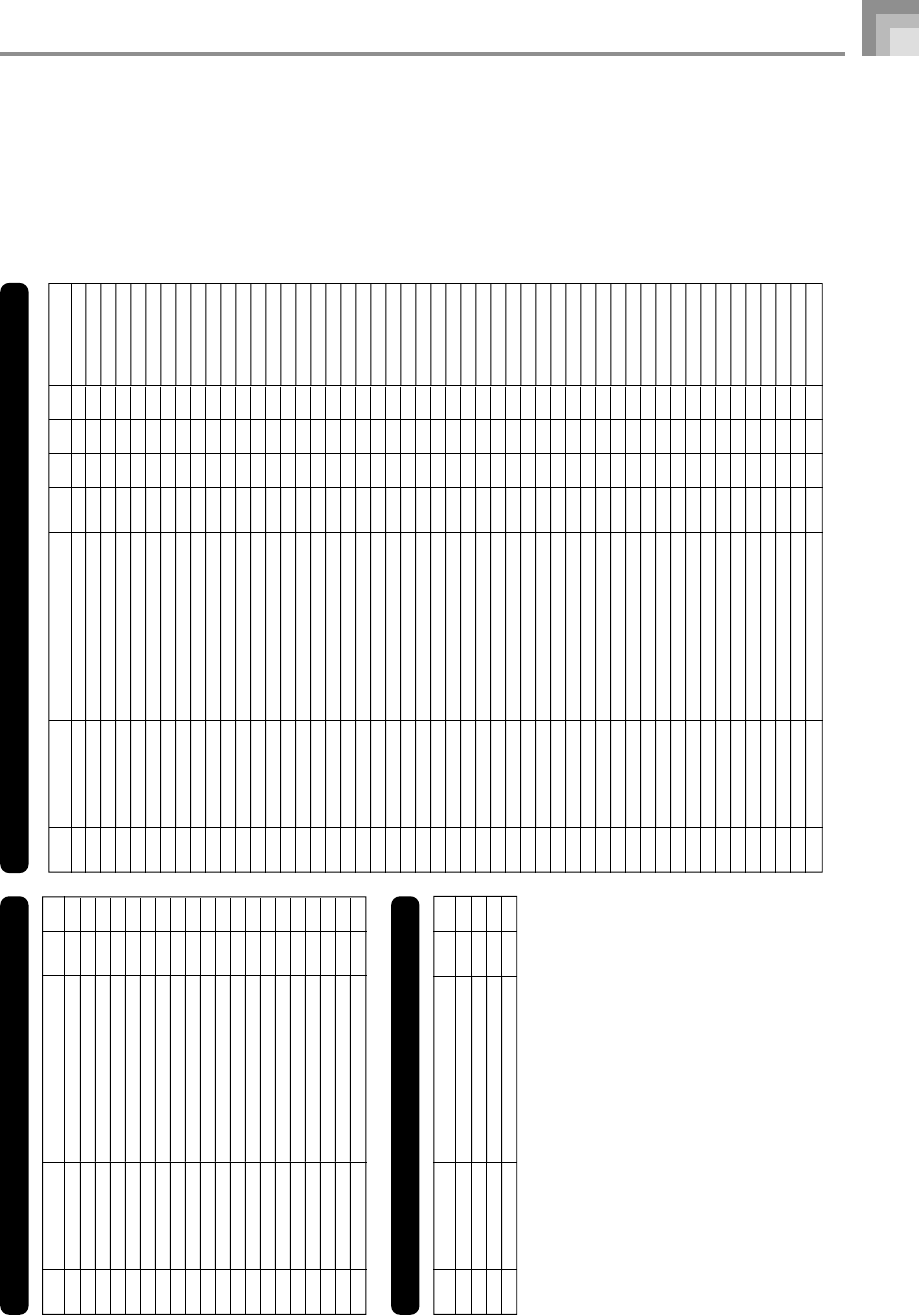
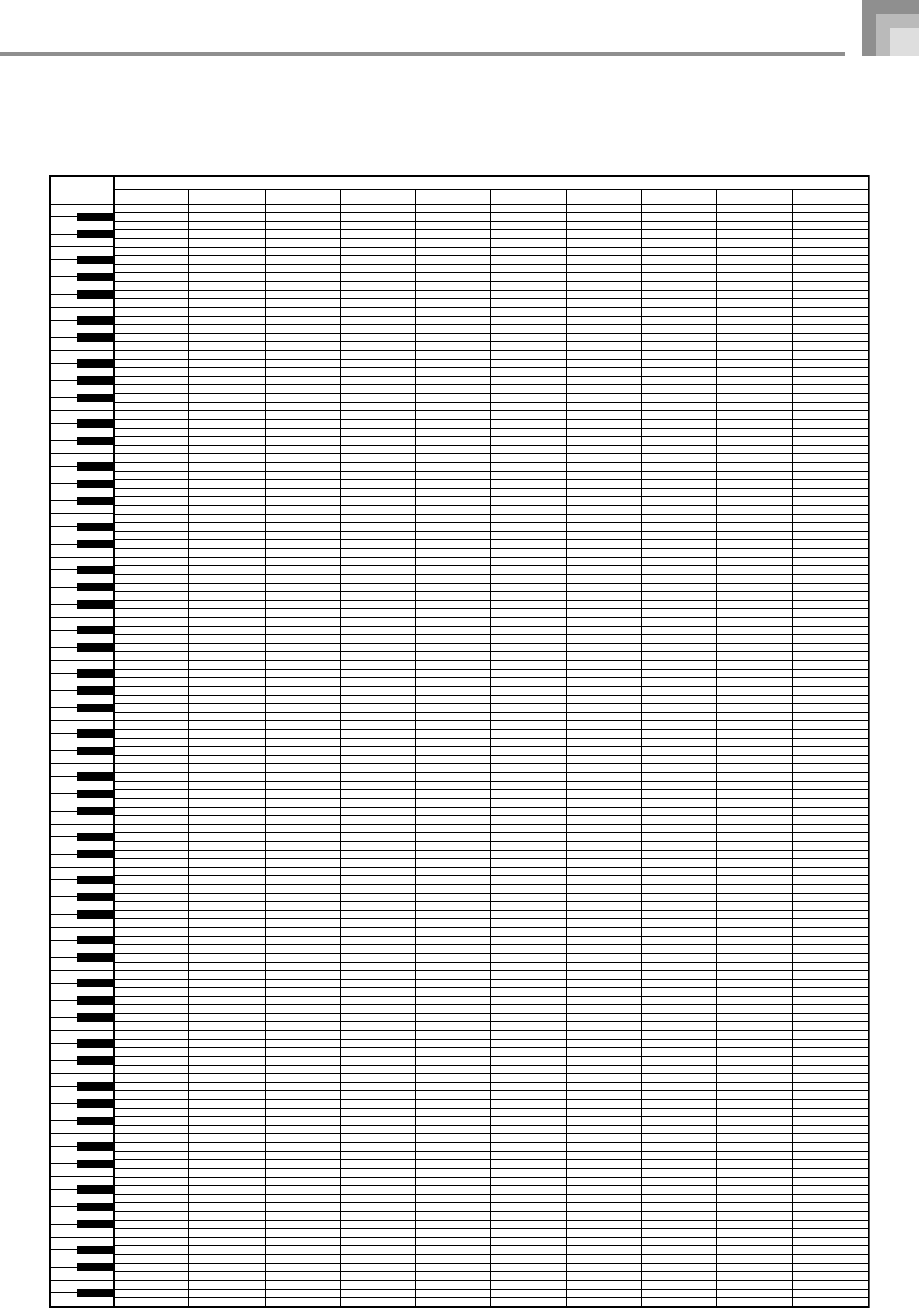
Tone List
1: No.
6: Maximum Polyphony
2: Tone Group
7: Range Type
3: Tone Name
8: DSP Type
4
:
Program Change
5: Bank Select MSB
48
49
50
51
52
53
54
55
56
57
58
59
60
61
62
63
64
65
66
67
68
69
70
71
72
73
74
75
76
77
78
79
80
81
82
83
84
85
86
87
88
89
90
91
92
93
94
95
CHROM.PERC
CHROM.PERC
CHROM.PERC
CHROM.PERC
CHROM.PERC
ORGAN
ORGAN
ORGAN
ORGAN
ORGAN
ORGAN
ORGAN
ORGAN
ORGAN
ORGAN
ORGAN
ORGAN
ORGAN
ORGAN
ORGAN
ORGAN
ORGAN
ORGAN
ORGAN
ORGAN
ORGAN
ORGAN
ORGAN
ORGAN
ORGAN
ORGAN
ORGAN
GUITAR
GUITAR
GUITAR
GUITAR
GUITAR
GUITAR
GUITAR
GUITAR
GUITAR
GUITAR
GUITAR
GUITAR
GUITAR
GUITAR
GUITAR
GUITAR
CELESTA
VIBRAPHONE
PHASER MARIMBA
DELAY GLOCKENSPIEL
ROTARY CELESTA
ROTARY DRAWBAR
ROTARY PERC.ORGAN 1
ROTARY PERC.ORGAN 2
70'S ORGAN
TREMOLO ORGAN
JAZZ DRAWBAR
ROCK ORGAN
OVD ROTARY ORGAN
ROTARY ELEC.ORGAN
CHURCH ORGAN 1
CHAPEL ORGAN
ACCORDION
BANDONEON
HARMONICA
DRAWBAR ORGAN 1
DRAWBAR ORGAN 2
ELEC.ORGAN
PERC.ORGAN 1
PERC.ORGAN 2
JAZZ ORGAN
OVD ROCK ORGAN
TAPE ORGAN
CHURCH ORGAN 2
OCTAVE ACCORDION
NEO BANDONEON
SLOW HARMONICA
WAH HARMONICA
PURE ACOUSTIC GUITAR
NYLON STR.GUITAR
STEEL STR.GUITAR
JAZZ GUITAR
CHORUS CLEAN GUITAR
ROTARY GUITAR
CRUNCH ELEC.GUITAR
OVD FRONT GUITAR
FEEDBACK DIST.GT
MUTE DIST.GUITAR
MELLOW NYLON GUITAR
12 STRING GUITAR
BRIGHT ACOUSTIC GUITAR
CHORUS STEEL GUITAR
UKULELE
BANJO
8
11
12
9
8
16
17
17
17
16
17
18
16
16
19
19
21
23
22
16
16
16
17
17
17
18
20
19
21
23
22
22
25
24
25
26
27
27
27
29
30
28
24
25
25
25
24
105
48
50
50
49
49
52
52
54
49
49
53
48
54
53
48
51
48
48
48
48
50
51
48
51
50
49
50
49
49
49
49
50
49
48
48
48
53
54
52
49
52
49
51
50
52
51
49
48
N
N
N
+1
N
N
N
N
N
N
N
N
N
N
N
N
N
N
N
N
N
N
N
N
N
N
N
N
N
N
N
N
–1
–1
–1
–1
–1
–1
–1
–1
–1
–1
–1
–1
–1
–1
N
N
32
32
32
32
32
16
16
16
32
32
16
16
32
32
16
32
16
16
32
32
32
32
16
16
16
16
16
16
16
16
32
32
32
32
32
32
32
32
32
32
16
32
16
16
32
16
32
32
Reflect
Reflect
PhaDly 2
ChoDly 2
RotRef 2
Rotary 2
Rotary 2
RotRef 1
Rotary 1
Cho Trem
RotRef 1
Rotary 2
Od Rot 2
Rotary 2
RvbHall2
GateRvb2
Reflect
Reflect
Reflect
Reflect
Rotary 1
Reflect
Reflect
Rotary 2
Reflect
OdRtRef1
Cho Dly4
GateRvb2
CmpChoRf
ChoDly 4
RvbRoom2
LWhDsDly
Equalize
Equalize
Equalize
CmpChoRf
CmpEnDly
RotRef 1
CrnDelay
CmpOdDly
DistDly1
MetalDly
ChoDly 3
Equalize
Enha Dly
ChoDly 4
CmpChoRf
Equalize
0
1
2
3
4
5
6
7
8
9
10
11
12
13
14
15
16
17
18
19
20
21
22
23
24
25
26
27
28
29
30
31
32
33
34
35
36
37
38
39
40
41
42
43
44
45
46
47
PIANO
PIANO
PIANO
PIANO
PIANO
PIANO
PIANO
PIANO
PIANO
PIANO
PIANO
PIANO
PIANO
PIANO
PIANO
PIANO
PIANO
PIANO
PIANO
PIANO
PIANO
PIANO
PIANO
E.PIANO
E.PIANO
E.PIANO
E.PIANO
E.PIANO
E.PIANO
E.PIANO
E.PIANO
E.PIANO
E.PIANO
E.PIANO
E.PIANO
E.PIANO
E.PIANO
E.PIANO
E.PIANO
E.PIANO
E.PIANO
E.PIANO
E.PIANO
E.PIANO
E.PIANO
CHROM.PERC
CHROM.PERC
CHROM.PERC
STEREO GRAND PIANO
STEREO MELLOW PIANO
STEREO BRIGHT PIANO
GRAND PIANO
ROCK PIANO
MODERN PIANO
DANCE PIANO
MELLOW PIANO
BRIGHT PIANO
SYNTH-STR PIANO
STRINGS PIANO
VOICE PIANO
ELEC.GRAND PIANO
HARPSICHORD
GRAND PIANO WIDE
AMBIENT PIANO
1 OCTAVE PIANO
2 OCTAVE PIANO
MODERN E.G.PIANO
COMP.PIANO
HONKY-TONK 1
BRIGHT HARPSICHORD
COUPLED HARPSICHORD
ELEC.PIANO 1
ELEC.PIANO 2
FM ELEC.PIANO
DYNO ELEC.PIANO
60'S ELEC.PIANO
MELLOW E.PIANO
POP ELEC.PIANO
TREMOLO E.PIANO
SOFT E.PIANO
GLASS E.PIANO
SYNTH-STR E.PIANO 1
CLAVI
AUTO WAH E.PIANO
PHASER E.PIANO
MODERN E.PIANO
WARM ELEC.PIANO
ELEC.PIANO PAD
SYNTH-STR E.PIANO 2
STRINGS E.PIANO
RESONANCE CLAVI
PULSE CLAVI
LA CLAVI
TREMOLO VIBRAPHONE
MARIMBA
GLOCKENSPIEL
0
0
1
0
1
1
1
0
1
0
1
0
2
6
0
0
3
3
2
0
3
6
6
4
5
5
4
4
4
4
4
5
4
4
7
4
4
5
4
4
5
5
7
7
7
11
12
9
51
52
50
48
49
51
53
50
48
54
52
53
48
51
49
55
51
50
50
56
48
52
49
48
49
48
49
52
53
50
56
51
51
55
48
57
58
50
59
54
53
54
50
49
51
48
48
48
16
16
16
32
32
16
16
32
32
16
16
16
32
32
32
16
16
16
16
32
16
32
16
32
16
16
32
32
16
16
32
16
16
16
32
32
32
16
32
16
16
16
32
32
32
32
32
32
N
N
N
N
N
N
N
N
N
N
N
N
N
N
N
N
N
N
N
N
N
N
N
N
N
N
N
N
N
N
N
N
N
N
N
N
N
N
N
N
N
N
N
N
N
N
N
+1
RvbHall1
GateRvb2
Equalize
RvbHall1
Equalize
Equalize
Enha Dly
Equalize
Enhancer
Cho Flan
RvbHall1
Reflect
Equalize
CmpChoRf
Reflect
St.Delay
Equalize
RvbRoom2
ChoDly 1
CmpEnDly
Enhancer
CmpChoRf
CmpChoRf
Chorus 3
Chorus 3
Chorus 3
Chorus 3
Auto Pan
CmpChoRf
Equalize
Cho Trem
Equalize
Equalize
Equalize
Dist 1
Auto Wah
PhaAPan1
Enha Dly
Cho Trem
StPhaser
Equalize
ChoDly 1
Auto Wah
CmpEnDly
Cho Dly4
Cho Trem
Reflect
Reflect
1
2
3
456
8
7
1
2
3
456
8
7
Advanced Tones
WK3200_e_A-01-13.p6505.4.15, 10:18 AM1
A-2
Appendix
738A-E-106A
1
2
3
456
8
7
1
2
3
456
8
7
96
97
98
99
100
101
102
103
104
105
106
107
108
109
110
111
112
113
114
115
116
117
118
119
120
121
122
123
124
125
126
127
128
129
130
131
132
133
134
135
136
137
138
139
140
141
142
143
144
145
146
147
148
149
150
151
152
153
154
GUITAR
GUITAR
GUITAR
GUITAR
GUITAR
GUITAR
GUITAR
GUITAR
GUITAR
GUITAR
GUITAR
GUITAR
GUITAR
GUITAR
GUITAR
BASS
BASS
BASS
BASS
BASS
BASS
BASS
BASS
BASS
BASS
BASS
BASS
BASS
BASS
BASS
BASS
BASS
BASS
BASS
BASS
BASS
BASS
BASS
BASS
BASS
BASS
BASS
ORCHESTRA
ORCHESTRA
ORCHESTRA
ORCHESTRA
ORCHESTRA
ORCHESTRA
ORCHESTRA
ORCHESTRA
ORCHESTRA
ENSEMBLE
ENSEMBLE
ENSEMBLE
ENSEMBLE
ENSEMBLE
ENSEMBLE
ENSEMBLE
ENSEMBLE
OCTAVE JAZZ GUITAR
CHORUS JAZZ GUITAR
CLEAN GUITAR
ELEC.GUITAR FRONT
ELEC.GUITAR REAR
TREMOLO GUITAR
MUTE GUITAR
OVERDRIVE GUITAR
OVD REAR GUITAR
DISTORTION FRONT GT
MORE DISTORTION GT
TOUCH WAH OVD GT
DISTORTION GUITAR
FEEDBACK GUITAR
DISTORTION CLEAN GT
ACOUSTIC BASS 1
ACOUSTIC BASS 2
RIDE BASS
FINGERED BASS 1
FINGERED BASS 2
PICKED BASS
FRETLESS BASS
SLAP BASS
SAW SYNTH-BASS 1
ANALOG SYNTH-BASS
CHORUS FINGERED BASS
ROCK PICKED BASS
FLAN.FRETLESS BASS
FUNKY SLAP BASS
SQR SYNTH-BASS 1
RESO.SQR BASS
RESO.SAW BASS 1
RESO.SAW BASS 2
DISTORTION SQR BASS
DIGITAL BASS 1
DIGITAL BASS 2
ACID BASS
SAW SYNTH-BASS 2
TRI SYNTH-BASS
SINE BASS
FAT SYNTH-BASS
ORGAN BASS 1
VIOLIN
CELLO
VIOLA
PIZZICATO ENSEMBLE
HARP
SLOW VIOLIN
SLOW CELLO
PIZZICATO
HARPS
STEREO STRINGS
STRING ENSEMBLE
SLOW STRINGS
CHAMBER
PURE SYNTH-STRINGS
SYNTH-STRINGS 1
70'S SYNTH-STR
80'S SYNTH-STR
26
26
27
27
27
29
28
29
29
30
30
30
30
30
30
32
32
32
33
33
34
35
37
38
38
33
34
35
37
39
39
38
38
39
39
39
38
38
39
39
39
38
40
42
41
45
46
40
42
45
46
48
48
49
49
50
50
50
50
50
51
48
51
50
55
48
48
50
50
51
54
48
49
53
48
49
50
48
49
48
48
48
48
52
50
49
49
49
48
50
53
49
51
52
55
50
54
53
54
56
55
48
48
48
49
48
49
49
48
49
51
48
48
49
50
48
51
52
16
32
32
32
32
32
32
16
32
32
16
16
16
16
32
32
32
16
32
32
32
32
32
16
32
16
32
16
32
32
32
32
16
16
32
16
32
32
32
32
16
32
32
32
32
16
32
32
32
32
16
16
32
32
16
16
32
16
16
–1
–1
–1
–1
–1
–1
–1
–1
–1
–1
–1
–1
–1
–1
–1
–1
–1
–1
–1
–1
–1
–1
–1
–1
–1
–1
–1
–1
–1
–1
–1
–1
–1
–1
–1
–1
–1
–1
–1
–1
N
–1
N
–1
N
N
N
N
–1
N
N
N
N
N
N
N
N
N
N
RvbRoom3
OdChorus
Equalize
Equalize
Equalize
Cho Trem
Equalize
CmpDelay
Ovrdrive
DistDly2
DistDly2
AWhCrDly
CmpDelay
CmpCrDly
CmpCrDly
Limiter
Reflect
RvbRoom1
Limiter
Limiter
CmpEnDly
ChoDly 1
Comp 2
Chorus 1
PhaCho 1
Crn Cho
OdChorus
Cho Flan
AWhCrDly
Od Rot 1
Enha Cho
AWhChDly
PhaDly 2
DistDly1
Comp 2
Chorus 2
Enhancer
Equalize
Equalize
Comp 1
CmpEnDly
Comp 1
GateRvb2
GateRvb2
GateRvb2
RvbHall1
Reflect
RvbHall2
RvbHall2
Reflect
Reflect
RvbPlate
RvbRoom3
ChoDly 3
Reflect
ChoDly 3
ChoDly 3
RevHall1
ChoDly 4
155
156
157
158
159
160
161
162
163
164
165
166
167
168
169
170
171
172
173
174
175
176
177
178
179
180
181
182
183
184
185
186
187
188
189
190
191
192
193
194
195
196
197
198
199
200
201
202
203
204
205
206
207
208
209
210
211
212
213
ENSEMBLE
ENSEMBLE
ENSEMBLE
ENSEMBLE
ENSEMBLE
ENSEMBLE
ENSEMBLE
ENSEMBLE
ENSEMBLE
ENSEMBLE
ENSEMBLE
ENSEMBLE
ENSEMBLE
ENSEMBLE
ENSEMBLE
ENSEMBLE
ENSEMBLE
ENSEMBLE
ENSEMBLE
ENSEMBLE
ENSEMBLE
ENSEMBLE
ENSEMBLE
ENSEMBLE
ENSEMBLE
ENSEMBLE
ENSEMBLE
ENSEMBLE
ENSEMBLE
ENSEMBLE
ENSEMBLE
BRASS
BRASS
BRASS
BRASS
BRASS
BRASS
BRASS
BRASS
BRASS
BRASS
BRASS
BRASS
BRASS
BRASS
BRASS
BRASS
BRASS
BRASS
BRASS
BRASS
BRASS
BRASS
BRASS
BRASS
BRASS
BRASS
BRASS
BRASS
STEREO CHOIR
VOICE UUH
VOICE DOO
SYNTH-VOICE 1
SYNTH-VOICE 2
SCAT VOICE 1
SCAT VOICE 2
SCAT VOICE 3
BRIGHT STRINGS
WIDE STRINGS
MELLOW STRINGS
ORCHESTRA STRINGS 1
ORCHESTRA STRINGS 2
RESO.SYNTH-STRINGS
PHASER SYNTH-STRINGS
OLD STRINGS ENSEMBLE
CHOIR STRINGS
SYNTH-CHOIR
SYNTH-DOO
MAGIC VOICE DOO
WAH SYNTH-VOICE
VOICE PAD
BLOW VOICE
NOISY SYNTH-VOICE
POP HIT 1
POP HIT 2
BASS HIT
PIANO HIT
ORGAN HIT
ORCHESTRA HIT 1
TECHNO HIT
PURE TRUMPET
TROMBONE
MUTE TRUMPET
STEREO BRASS
BRASS ENSEMBLE
DEEP SYNTH-BRASS 1
SOFT SYNTH-BRASS
VINTAGE SYNTH-BRASS
TRUMPET 1
MELLOW TRUMPET
MELLOW TROMBONE
BRIGHT TROMBONE
TUBA
FRENCH HORN
TRUMPET 2
TROMBONE SECTION
OCTAVE FRENCH HORN
BRASS
BRASS SFZ
BRASS+FRENCH HORN
OCTAVE BRASS
GATE BRASS
DEEP SYNTH-BRASS 2
ANALOG BRASS 1
ANALOG BRASS 2
WARM SYNTH-BRASS
SLOW SYNTH-BRASS
SQR SYNTH-BRASS
52
53
53
54
54
53
53
53
48
48
49
49
49
51
51
49
48
52
53
53
54
54
54
54
55
55
55
55
55
55
55
56
57
59
61
61
62
63
63
56
56
57
57
58
60
56
57
60
61
61
61
61
61
62
62
62
63
63
62
50
49
48
48
49
52
53
54
49
52
50
51
52
48
49
53
53
51
50
51
55
53
51
54
52
53
49
54
55
48
56
52
50
48
50
51
51
51
48
51
50
48
49
48
48
53
51
50
48
53
55
54
56
53
48
54
52
49
52
16
16
32
32
32
32
32
32
32
16
32
16
16
32
16
32
16
16
16
32
32
16
16
16
16
16
16
16
16
16
16
32
16
32
16
16
16
16
16
16
16
16
32
32
16
32
16
16
32
16
16
16
16
16
32
32
16
16
16
N
N
N
N
N
N
N
–1
N
N
N
N
N
N
N
N
N
N
N
N
N
N
N
N
N
N
N
N
N
N
N
N
–1
N
N
N
N
N
N
N
N
–1
–1
–1
–1
N
–1
–1
N
N
N
N
N
N
N
N
N
N
N
RvbHall1
RvbRoom1
RvbRoom1
Chorus 4
ChoDly 3
ChoDly 4
ChoDly 2
ChoDly 4
RvbHall1
RvbHall1
RvbHall1
RvbRoom3
RvbHall1
ChoDly 3
PhaAPan2
OdChorus
RvbHall1
StXDelay
DistDly1
PhaDly 2
AWhChDly
FlanDly3
DistDly1
FlanDly2
Equalize
FlanDly1
DistDly1
GateRvb2
Rotary 2
RvbHall1
MetalDly
GateRvb1
GateRvb2
Enhancer
RvbPlate
Enha Dly
Enha Dly
Enha Dly
RvbHall2
GateRvb2
RvbHall1
RvbHall1
RvbHall1
RvbHall1
RvbHall1
GateRvb1
GateRvb2
RvbHall1
RvbHall2
Comp 2
RvbHall2
RvbHall2
GateRvb1
Enha Dly
Comp 2
Equalize
Delay
ChoDly 4
Delay
WK3200_e_A-01-13.p6505.4.15, 10:18 AM2
A-3
Appendix
738A-E-107A
1
2
3
456
8
7
1
2
3
456
8
7
214
215
216
217
218
219
220
221
222
223
224
225
226
227
228
229
230
231
232
233
234
235
236
237
238
239
240
241
242
243
244
245
246
247
248
249
250
251
252
253
254
255
256
257
258
259
260
261
262
263
264
265
266
267
268
269
270
271
272
273
274
275
276
277
278
279
280
281
282
283
284
285
286
287
288
289
290
291
292
293
294
295
296
297
298
299
300
301
302
303
304
305
306
307
308
309
310
311
312
313
314
315
316
317
318
319
320
321
322
323
324
325
326
327
328
329
330
331
BRASS
BRASS
REED
REED
REED
REED
REED
REED
REED
REED
REED
REED
REED
REED
REED
REED
REED
REED
REED
REED
REED
REED
PIPE
PIPE
PIPE
PIPE
PIPE
PIPE
PIPE
PIPE
PIPE
PIPE
PIPE
PIPE
PIPE
PIPE
PIPE
SYNTH-LEAD
SYNTH-LEAD
SYNTH-LEAD
SYNTH-LEAD
SYNTH-LEAD
SYNTH-LEAD
SYNTH-LEAD
SYNTH-LEAD
SYNTH-LEAD
SYNTH-LEAD
SYNTH-LEAD
SYNTH-LEAD
SYNTH-LEAD
SYNTH-LEAD
SYNTH-LEAD
SYNTH-LEAD
SYNTH-LEAD
SYNTH-LEAD
SYNTH-LEAD
SYNTH-LEAD
SYNTH-LEAD
SYNTH-LEAD
SYNTH-LEAD
SYNTH-LEAD
SYNTH-LEAD
SYNTH-LEAD
SYNTH-LEAD
SYNTH-LEAD
SYNTH-LEAD
SYNTH-LEAD
SYNTH-LEAD
SYNTH-LEAD
SYNTH-LEAD
SYNTH-LEAD
SYNTH-LEAD
SYNTH-LEAD
SYNTH-LEAD
SYNTH-LEAD
SYNTH-LEAD
SYNTH-LEAD
SYNTH-LEAD
SYNTH-LEAD
SYNTH-LEAD
SYNTH-LEAD
SYNTH-PAD
SYNTH-PAD
SYNTH-PAD
SYNTH-PAD
SYNTH-PAD
SYNTH-PAD
SYNTH-PAD
SYNTH-PAD
SYNTH-PAD
SYNTH-PAD
SYNTH-PAD
SYNTH-PAD
SYNTH-PAD
SYNTH-PAD
SYNTH-PAD
SYNTH-PAD
SYNTH-PAD
SYNTH-PAD
SYNTH-PAD
SYNTH-PAD
SYNTH-PAD
SYNTH-PAD
SYNTH-PAD
SYNTH-PAD
SYNTH-PAD
SYNTH-PAD
SYNTH-PAD
SYNTH-PAD
SYNTH-PAD
SYNTH-PAD
SYNTH-PAD
SYNTH-PAD
SYNTH-PAD
SYNTH-PAD
SYNTH-PAD
SYNTH-PAD
SYNTH-PAD
SAW SYNTH-BRASS
LA SYNTH-BRASS
BREATHY ALTO SAX
BREATHY TENOR SAX
MELLOW SOPRANO SAX
PURE ALTO SAX
PURE TENOR SAX
CLARINET
OBOE
SOPRANO SAX
ALTO SAX
BRIGHT ALTO SAX
TENOR SAX
BARITONE SAX
TREMOLO ALTO SAX
TREMOLO TENOR SAX
ALTO SAXYS
TENOR SAXYS
STACK BARITONE SAX
WAH BARITONE SAX
MELLOW CLARINET
SYNTH-OBOE
PURE FLUTE
FLUTE
MELLOW FLUTE
PICCOLO
PAN FLUTE
BOTTLE BLOW
RECORDER
WHISTLE
PICCOLO ENSEMBLE
BREATHY FLUTE
OCTAVE FLUTE
FLUTE+REED
SYNTH-PAN FLUTE
SYNTH-RECORDER
WHISTLES
SAWTOOTH LEAD
MELLOW SAW LEAD
GR LEAD 1
SQUARE LEAD 1
SQUARE LEAD 2
VOX SQR LEAD
CALLIOPE LEAD
CHIFF LEAD 1
CHARANG LEAD
GT SYNTH-LEAD 1
SOLO VOX
FIFTH LEAD
HUSKY SAW
BASS LEAD 1
BASS LEAD 2
VOX SAW LEAD
SQUARE LEAD 3
MELLOW SQR LEAD
ADVANCED CALLIOPE
SEQ SAW 1
REED SAW
PIPE LEAD
ATTACK SQR 1
ATTACK SQR 2
PLUCK LEAD 1
PLUCK LEAD 2
FIFTH MELLOW
FOURTH LEAD
DETUNE SAW
RESO.SAW LEAD
GR LEAD 2
GR LEAD X
VOX LEAD 1
REED LEAD
SQUARE WAVE 1
SQUARE WAVE 2
PERC.CHIFF 1
CHIFF LEAD 2
TECH POLYSYNTH 1
TECH POLYSYNTH 2
RESONANCE LEAD
FRET LEAD
SEVENTH SEQ
WAH SEQ
FANTASY PAD
WARM PAD
POLYSYNTH PAD
SPACE VOICE 1
COSMIC VOICE
BOWED PAD
METAL PAD 1
HALO PAD
SWEEP PAD
MOVIE SOUND
NOISY SAW
SINE PAD
VIBE PAD
RAIN PAD
CRYSTAL 1
CRYSTAL 2
ATMOSPHERE PAD
BRIGHTER
STAR THEME
NEW FANTASY
WARM VOX
FLUTE PAD
ATTACK POLYSYNTH
CHIFF CHOIR
STAR VOICE 1
STAR VOICE 2
SPACE VOICE 2
SPACE CHOIR
BOTTLE PAD
DEEP BLUE
GOBLIN PAD
POLY SAW
BOUNCE PAD
SLOW SWEEP
STEEL PAD
WONDER BELL
SAVANNA
63
63
65
66
64
65
66
71
68
64
65
65
66
67
65
66
65
66
67
67
71
68
73
73
73
72
75
76
74
78
72
73
73
73
75
74
78
81
81
81
80
80
80
82
83
84
84
85
86
86
87
87
81
80
80
82
81
81
82
80
80
84
84
86
86
81
81
81
81
85
87
80
80
83
83
86
86
86
87
86
86
88
89
90
91
91
92
93
94
95
97
90
89
96
96
98
98
99
100
103
88
89
89
90
91
91
91
91
91
92
97
101
90
94
95
99
98
98
53
50
50
50
49
51
51
49
48
48
48
54
48
48
49
49
52
52
49
50
48
49
49
48
50
48
48
48
48
48
49
53
51
52
49
49
49
48
53
54
48
51
52
48
48
48
49
48
48
49
48
50
57
53
54
49
55
56
50
55
56
50
51
50
51
51
58
59
60
50
51
49
57
49
50
52
54
53
52
55
56
48
48
48
48
50
48
48
48
48
48
49
49
49
48
48
50
48
49
48
49
50
51
50
51
52
53
49
54
49
49
48
51
49
49
49
51
52
16
16
16
16
16
32
16
16
32
32
32
32
32
32
16
16
16
16
16
16
32
16
16
32
16
32
32
32
32
32
16
16
16
16
16
16
16
16
16
16
16
16
16
16
16
16
16
16
16
16
16
16
16
16
16
16
16
16
16
16
16
16
16
16
16
16
16
32
32
16
16
32
32
16
16
16
32
16
16
16
16
16
32
16
16
16
16
16
16
32
16
16
16
16
16
16
16
16
16
16
16
16
16
16
16
16
32
16
32
16
32
16
16
16
16
16
16
32
N
N
–1
–1
N
–1
–1
N
N
N
–1
–1
–1
–1
–1
–1
–1
–1
–1
–1
N
N
N
N
N
+1
N
N
N
N
+1
N
N
N
N
N
N
N
N
N
N
N
N
N
N
N
N
N
N
N
N
N
N
N
N
N
N
N
N
N
N
N
N
N
N
N
N
N
N
N
N
N
N
N
N
N
N
N
N
N
N
N
N
N
N
N
N
N
N
N
N
N
N
N
N
N
N
N
N
N
N
N
N
N
N
N
N
N
N
N
N
N
N
N
N
N
N
N
Enha Cho
PhaDly 1
RvbHall1
RvbHall1
CmpEnDly
GateRvb2
GateRvb2
Reflect
GateRvb2
Equalize
Equalize
Equalize
Equalize
Equalize
Tremolo
Tremolo
Equalize
Equalize
Comp 2
Auto Wah
GateRvb2
ChoDly 4
GateRvb2
Reflect
Reflect
Equalize
GateRvb2
Equalize
GateRvb2
Tremolo
Equalize
Tremolo
Equalize
StXDelay
AWhChDly
ChoDly 4
ChoDly 4
Enha Dly
Enha Dly
PhaDly 2
ChoDly 2
ChoDly 2
ChoDly 4
Equalize
Comp 1
Equalize
PhaAPan1
PhaDly 1
Auto Wah
PhaDly 1
Chorus 2
LFO Wah
RgChoDly
FlanDly1
Tremolo
RvbPlate
Equalize
Enha Cho
Reflect
Comp 2
3Tap Dly
FlanDly2
FlanDly2
StXDelay
Auto Pan
Chorus 2
Phaser
CmpCrDly
ChoDly 2
FlanDly2
Equalize
Auto Pan
AWhChDly
Comp 1
Comp 1
Ring Mod
LoFi Ref
Enha Dly
Enha Dly
Phaser
AWhChDly
PhaDly 2
Equalize
Cho Trem
RotRef 1
Rotary 2
3Tap Dly
St Delay
StPhaser
Equalize
FlanDly1
Lo-Fi
Phaser
CmpDelay
Comp 1
PhaDly 2
St Delay
GateRvb1
Delay
PhaAPan2
ChoDly 3
Equalize
Equalize
Equalize
Cho Flan
DsChoDly
AWhChDly
RgChoDly
ChoDly 4
LFO Wah
RevHall2
Flanger
ChoDly 3
Dist Cho
RgChoDly
ChoDly 3
GateRvb4
RgChoDly
WK3200_e_A-01-13.p6505.4.15, 10:18 AM3
A-4
Appendix
738A-E-108A
400
401
402
403
404
405
406
407
408
409
410
411
412
413
414
415
416
417
418
419
420
421
422
423
424
425
426
427
428
429
430
431
432
433
434
435
436
437
438
439
440
441
442
443
444
445
446
447
448
449
450
451
452
453
454
455
456
GM
GM
GM
GM
GM
GM
GM
GM
GM
GM
GM
GM
GM
GM
GM
GM
GM
GM
GM
GM
GM
GM
GM
GM
GM
GM
GM
GM
GM
GM
GM
GM
GM
GM
GM
GM
GM
GM
GM
GM
GM
GM
GM
GM
GM
GM
GM
GM
GM
GM
GM
GM
GM
GM
GM
GM
GM
GM PIANO 1
GM PIANO 2
GM PIANO 3
GM HONKY-TONK
GM E.PIANO 1
GM E.PIANO 2
GM HARPSICHORD
GM CLAVI
GM CELESTA
GM GLOCKENSPIEL
GM MUSIC BOX
GM VIBRAPHONE
GM MARIMBA
GM XYLOPHONE
GM TUBULAR BELL
GM DULCIMER
GM ORGAN 1
GM ORGAN 2
GM ORGAN 3
GM PIPE ORGAN
GM REED ORGAN
GM ACCORDION
GM HARMONICA
GM BANDONEON
GM NYLON STR.GUITAR
GM STEEL STR.GUITAR
GM JAZZ GUITAR
GM CLEAN GUITAR
GM MUTE GUITAR
GM OVERDRIVE GT
GM DISTORTION GT
GM GT HARMONICS
GM ACOUSTIC BASS
GM FINGERED BASS
GM PICKED BASS
GM FRETLESS BASS
GM SLAP BASS 1
GM SLAP BASS 2
GM SYNTH-BASS 1
GM SYNTH-BASS 2
GM VIOLIN
GM VIOLA
GM CELLO
GM CONTRABASS
GM TREMOLO STRINGS
GM PIZZICATO
GM HARP
GM TIMPANI
GM STRINGS 1
GM STRINGS 2
GM SYNTH-STRINGS 1
GM SYNTH-STRINGS 2
GM CHOIR AAHS
GM VOICE DOO
GM SYNTH-VOICE
GM ORCHESTRA HIT
GM TRUMPET
0
1
2
3
4
5
6
7
8
9
10
11
12
13
14
15
16
17
18
19
20
21
22
23
24
25
26
27
28
29
30
31
32
33
34
35
36
37
38
39
40
41
42
43
44
45
46
47
48
49
50
51
52
53
54
55
56
64
64
64
64
64
64
64
64
64
64
64
64
64
64
64
64
64
64
64
64
64
64
64
64
64
64
64
64
64
64
64
64
64
64
64
64
64
64
64
64
64
64
64
64
64
64
64
64
64
64
64
64
64
64
64
64
64
32
32
32
16
32
16
32
32
32
32
16
32
32
32
32
16
32
16
16
16
32
16
32
16
32
32
32
32
32
16
16
32
32
32
32
32
32
32
16
32
32
32
32
32
32
32
32
32
32
32
32
32
32
32
32
16
32
N
N
N
N
N
N
N
N
N
N
N
N
N
N
N
N
N
N
N
N
N
N
N
N
N
N
N
N
N
N
N
N
N
N
N
N
N
N
N
N
N
N
N
N
N
N
N
N
N
N
N
N
N
N
N
N
N
-
-
-
-
-
-
-
-
-
-
-
-
-
-
-
-
-
-
-
-
-
-
-
-
-
-
-
-
-
-
-
-
-
-
-
-
-
-
-
-
-
-
-
-
-
-
-
-
-
-
-
-
-
-
-
-
-
457
458
459
460
461
462
463
464
465
466
467
468
469
470
471
472
473
474
475
476
477
478
479
480
481
482
483
484
485
486
487
488
489
490
491
492
493
494
495
496
497
498
499
500
501
502
503
504
505
506
507
508
509
510
511
512
513
514
515
GM
GM
GM
GM
GM
GM
GM
GM
GM
GM
GM
GM
GM
GM
GM
GM
GM
GM
GM
GM
GM
GM
GM
GM
GM
GM
GM
GM
GM
GM
GM
GM
GM
GM
GM
GM
GM
GM
GM
GM
GM
GM
GM
GM
GM
GM
GM
GM
GM
GM
GM
GM
GM
GM
GM
GM
GM
GM
GM
GM TROMBONE
GM TUBA
GM MUTE TRUMPET
GM FRENCH HORN
GM BRASS
GM SYNTH-BRASS 1
GM SYNTH-BRASS 2
GM SOPRANO SAX
GM ALTO SAX
GM TENOR SAX
GM BARITONE SAX
GM OBOE
GM ENGLISH HORN
GM BASSOON
GM CLARINET
GM PICCOLO
GM FLUTE
GM RECORDER
GM PAN FLUTE
GM BOTTLE BLOW
GM SHAKUHACHI
GM WHISTLE
GM OCARINA
GM SQUARE LEAD
GM SAWTOOTH LEAD
GM CALLIOPE
GM CHIFF LEAD
GM CHARANG
GM VOICE LEAD
GM FIFTH LEAD
GM BASS+LEAD
GM FANTASY
GM WARM PAD
GM POLYSYNTH
GM SPACE CHOIR
GM BOWED GLASS
GM METAL PAD
GM HALO PAD
GM SWEEP PAD
GM RAIN DROP
GM SOUND TRACK
GM CRYSTAL
GM ATMOSPHERE
GM BRIGHTNESS
GM GOBLINS
GM ECHOES
GM SF
GM SITAR
GM BANJO
GM SHAMISEN
GM KOTO
GM THUMB PIANO
GM BAGPIPE
GM FIDDLE
GM SHANAI
GM TINKLE BELL
GM AGOGO
GM STEEL DRUMS
GM WOOD BLOCK
57
58
59
60
61
62
63
64
65
66
67
68
69
70
71
72
73
74
75
76
77
78
79
80
81
82
83
84
85
86
87
88
89
90
91
92
93
94
95
96
97
98
99
100
101
102
103
104
105
106
107
108
109
110
111
112
113
114
115
64
64
64
64
64
64
64
64
64
64
64
64
64
64
64
64
64
64
64
64
64
64
64
64
64
64
64
64
64
64
64
64
64
64
64
64
64
64
64
64
64
64
64
64
64
64
64
64
64
64
64
64
64
64
64
64
64
64
64
32
32
32
16
32
32
16
32
32
32
32
32
32
32
32
32
32
32
32
32
16
32
32
16
16
16
16
16
16
16
16
16
32
16
16
16
16
16
32
16
16
16
16
16
16
32
16
16
32
32
32
32
16
32
32
32
32
16
32
N
N
N
N
N
N
N
N
N
N
N
N
N
N
N
N
N
N
N
N
N
N
N
N
N
N
N
N
N
N
N
N
N
N
N
N
N
N
N
N
N
N
N
N
N
N
N
N
N
N
N
N
N
N
N
N
N
N
N
-
-
-
-
-
-
-
-
-
-
-
-
-
-
-
-
-
-
-
-
-
-
-
-
-
-
-
-
-
-
-
-
-
-
-
-
-
-
-
-
-
-
-
-
-
-
-
-
-
-
-
-
-
-
-
-
-
-
-
Preset Tones
1
2
3
4568
7
1
23
4568
7
WK3200_e_A-01-13.p6505.3.15, 6:17 PM4
A-5
Appendix
738A-E-109A
575
576
577
578
579
580
581
582
583
584
585
586
587
588
589
590
591
592
593
594
595
596
597
598
599
VARIOUS
VARIOUS
VARIOUS
VARIOUS
VARIOUS
VARIOUS
VARIOUS
VARIOUS
VARIOUS
VARIOUS
VARIOUS
VARIOUS
VARIOUS
VARIOUS
VARIOUS
VARIOUS
VARIOUS
VARIOUS
VARIOUS
VARIOUS
VARIOUS
VARIOUS
VARIOUS
VARIOUS
VARIOUS
BRASS+TRUMPET
BRASS+TROMBONE
SYNTH-BRASS VAR.
OCTAVE SYNTH-BRASS
SYNTH-BRASS SFZ
BREATHY ALTO SAX VAR.
BREATHY TENOR SAX VAR.
MELLOW ALTO SAX
MELLOW TENOR SAX
TRIANGLE WAVE
SQUARE WAVE 3
SAW WAVE
SAW+SQR
SEQ SAW 2
PERC.CHIFF 2
GT SYNTH-LEAD 2
VOX LEAD 2
BASS LEAD 3
SINE SYNTH
SOPRANO PAD
GLASS PAD
METAL PAD 2
FAST SWEEP
WOOD PAD
SYNTH-MALLET
61
61
62
62
63
65
66
65
66
80
80
81
81
81
83
84
85
87
89
89
92
93
95
96
98
16
16
32
16
16
16
16
16
16
32
32
32
16
16
16
16
16
16
16
16
16
16
16
16
16
N
N
N
N
N
N
N
N
N
N
N
N
N
N
N
N
N
N
N
N
N
N
N
N
N
-
-
-
-
-
-
-
-
-
-
-
-
-
-
-
-
-
-
-
-
-
-
-
-
-
68
65
65
66
65
69
69
65
65
66
74
65
66
68
67
68
65
65
65
68
66
65
66
66
65
1
2
3
456
8
7
516
517
518
519
520
521
522
523
524
525
526
527
528
529
530
531
532
533
534
535
536
537
538
539
540
541
542
543
544
545
546
547
548
549
550
551
552
553
554
555
556
557
558
559
560
561
562
563
564
565
566
567
568
569
570
571
572
573
574
GM
GM
GM
GM
GM
GM
GM
GM
GM
GM
GM
GM
VARIOUS
VARIOUS
VARIOUS
VARIOUS
VARIOUS
VARIOUS
VARIOUS
VARIOUS
VARIOUS
VARIOUS
VARIOUS
VARIOUS
VARIOUS
VARIOUS
VARIOUS
VARIOUS
VARIOUS
VARIOUS
VARIOUS
VARIOUS
VARIOUS
VARIOUS
VARIOUS
VARIOUS
VARIOUS
VARIOUS
VARIOUS
VARIOUS
VARIOUS
VARIOUS
VARIOUS
VARIOUS
VARIOUS
VARIOUS
VARIOUS
VARIOUS
VARIOUS
VARIOUS
VARIOUS
VARIOUS
VARIOUS
VARIOUS
VARIOUS
VARIOUS
VARIOUS
VARIOUS
VARIOUS
GM TAIKO
GM MELODIC TOM
GM SYNTH-DRUM
GM REVERSE CYMBAL
GM GT FRET NOISE
GM BREATH NOISE
GM SEASHORE
GM BIRD
GM TELEPHONE
GM HELICOPTER
GM APPLAUSE
GM GUNSHOT
TECHNO PIANO
MODERN E.G.PIANO WIDE
HONKY-TONK 2
DYNO ELEC.PIANO VAR.
60'S ELEC.PIANO VAR.
ELEC.PIANO 3
MODERN EP+E.G.PIANO
MODERN EP VAR.
HARPSICHORD VAR.
PULSE CLAVI VAR.
VIBRAPHONE VAR.
MARIMBA VAR.
TREMOLO ORGAN VAR.
70'S ORGAN VAR.
CHURCH ORGAN 3
PUFF ORGAN
NYLON GUITAR RELEASE
ACOUSTIC GUITAR VAR.
PEDAL STEEL
DETUNE CLEAN GT
PLAIN ELEC.GUITAR REAR
PLAIN ELEC.GUITAR FRONT
FEEDBACK GUITAR VAR.
GUITAR FEEDBACK
ACOUSTIC BASS 1 VAR.
FINGERED BASS 1 VAR.
SAW SYNTH-BASS 3
SAW SYNTH-BASS 4
RESO.SAW BASS 3
ORGAN BASS 2
SQR SYNTH-BASS 2
SQR SYNTH-BASS 3
ATTACK SQR BASS
OCTAVE STRINGS
SYNTH-STRINGS 2
CHOIR+UUH
SCAT VOICE 4
SCAT VOICE 5
SYNTH-VOICE 3
SEQ VOX
BASS HIT VAR.
POP HIT 3
ORCHESTRA HIT 2
TIMPANI HIT
TRUMPET 3
MUTE TRUMPET VAR.
MELLOW FRENCH HORN
64
64
64
64
64
64
64
64
64
64
64
64
70
65
65
65
68
66
66
68
66
65
65
65
65
65
66
65
66
69
65
65
66
67
65
65
67
67
67
73
72
74
65
73
74
66
65
65
71
72
68
66
65
66
67
73
65
65
65
116
117
118
119
120
121
122
123
124
125
126
127
1
2
3
4
4
4
5
5
6
7
11
12
16
17
19
20
24
25
26
27
27
27
30
31
32
33
38
38
38
38
39
39
39
48
50
52
53
53
54
54
55
55
55
55
56
59
60
32
32
32
32
32
32
16
16
32
32
16
32
32
32
16
32
32
16
16
16
32
32
32
32
32
32
16
16
16
32
16
16
32
32
16
32
32
32
16
16
16
16
16
16
16
16
16
16
16
16
16
32
16
16
16
16
32
32
16
N
N
N
N
N
N
N
N
N
N
N
N
N
N
N
N
N
N
N
N
N
N
N
N
N
N
N
N
N
N
N
N
N
N
N
N
N
N
N
N
N
N
N
N
N
N
N
N
N
N
N
N
N
N
N
N
N
N
N
-
-
-
-
-
-
-
-
-
-
-
-
-
-
-
-
-
-
-
-
-
-
-
-
-
-
-
-
-
-
-
-
-
-
-
-
-
-
-
-
-
-
-
-
-
-
-
-
-
-
-
-
-
-
-
-
-
-
-
1
2
3
456
8
7
DRUM SET
DRUM SET
DRUM SET
DRUM SET
DRUM SET
DRUM SET
DRUM SET
DRUM SET
DRUM SET
DRUM SET
DRUM SET
DRUM SET
DRUM SET
DRUM SET
DRUM SET
DRUM SET
DRUM SET
DRUM SET
STANDARD SET 1
STANDARD SET 2
STANDARD SET 3
STANDARD SET 4
ROOM SET
POWER SET
ELECTRONIC SET
SYNTH SET 1
SYNTH SET 2
JAZZ SET
BRUSH SET
ORCHESTRA SET
HIP-HOP SET 1
HIP-HOP SET 2
TECHNO SET 1
TECHNO SET 2
DANCE SET 1
DANCE SET 2
0
1
2
3
8
16
24
25
30
32
40
48
64
65
66
67
68
69
120
120
120
120
120
120
120
120
120
120
120
120
120
120
120
120
120
120
600
601
602
603
604
605
606
607
608
609
610
611
612
613
614
615
616
617
1
23
45
Drum Sets
WK3200_e_A-01-13.p6505.3.15, 6:17 PM5
A-6
738A-E-110A
Appendix
0
1
2
3
4
5
6
7
8
9
10
11
12
13
14
15
16
17
18
19
20
21
22
23
24
25
26
27
28
29
30
31
32
33
34
35
36
37
38
39
40
41
42
43
44
45
46
47
48
49
50
51
52
53
54
55
56
94
94
94
94
94
94
94
94
94
94
94
94
94
94
94
94
94
94
94
94
94
94
94
94
94
94
94
94
94
94
94
94
94
94
94
94
94
94
94
94
94
94
94
94
94
94
94
94
94
94
94
94
94
94
94
94
94
USER TONE
USER TONE
USER TONE
USER TONE
USER TONE
USER TONE
USER TONE
USER TONE
USER TONE
USER TONE
USER TONE
USER TONE
USER TONE
USER TONE
USER TONE
USER TONE
USER TONE
USER TONE
USER TONE
USER TONE
USER TONE
USER TONE
USER TONE
USER TONE
USER TONE
USER TONE
USER TONE
USER TONE
USER TONE
USER TONE
USER TONE
USER TONE
USER TONE
USER TONE
USER TONE
USER TONE
USER TONE
USER TONE
USER TONE
USER TONE
USER TONE
USER TONE
USER TONE
USER TONE
USER TONE
USER TONE
USER TONE
USER TONE
USER TONE
USER TONE
USER TONE
USER TONE
USER TONE
USER TONE
USER TONE
USER TONE
USER TONE
STEREO GRAND PIANO
STEREO MELLOW PIANO
STEREO BRIGHT PIANO
GRAND PIANO
ROCK PIANO
MODERN PIANO
DANCE PIANO
MELLOW PIANO
BRIGHT PIANO
SYNTH-STR PIANO
STRINGS PIANO
VOICE PIANO
ELEC.GRAND PIANO
HARPSICHORD
GRAND PIANO WIDE
AMBIENT PIANO
1 OCTAVE PIANO
2 OCTAVE PIANO
MODERN E.G.PIANO
COMP.PIANO
HONKY-TONK 1
BRIGHT HARPSICHORD
COUPLED HARPSICHORD
ELEC.PIANO 1
ELEC.PIANO 2
FM ELEC.PIANO
DYNO ELEC.PIANO
60'S ELEC.PIANO
MELLOW E.PIANO
POP ELEC.PIANO
TREMOLO E.PIANO
SOFT E.PIANO
GLASS E.PIANO
SYNTH-STR E.PIANO 1
CLAVI
AUTO WAH E.PIANO
PHASER E.PIANO
MODERN E.PIANO
WARM ELEC.PIANO
ELEC.PIANO PAD
SYNTH-STR E.PIANO 2
STRINGS E.PIANO
RESONANCE CLAVI
PULSE CLAVI
LA CLAVI
TREMOLO VIBRAPHONE
MARIMBA
GLOCKENSPIEL
CELESTA
VIBRAPHONE
PHASER MARIMBA
DELAY GLOCKENSPIEL
ROTARY CELESTA
ROTARY DRAWBAR
ROTARY PERC.ORGAN 1
ROTARY PERC.ORGAN 2
70'S ORGAN
700
701
702
703
704
705
706
707
708
709
710
711
712
713
714
715
716
717
718
719
720
721
722
723
724
725
726
727
728
729
730
731
732
733
734
735
736
737
738
739
740
741
742
743
744
745
746
747
748
749
750
751
752
753
754
755
756
1
23
45
1
2
3
45
757
758
759
760
761
762
763
764
765
766
767
768
769
770
771
772
773
774
775
776
777
778
779
780
781
782
783
784
785
786
787
788
789
790
791
792
793
794
795
796
797
798
799
USER TONE
USER TONE
USER TONE
USER TONE
USER TONE
USER TONE
USER TONE
USER TONE
USER TONE
USER TONE
USER TONE
USER TONE
USER TONE
USER TONE
USER TONE
USER TONE
USER TONE
USER TONE
USER TONE
USER TONE
USER TONE
USER TONE
USER TONE
USER TONE
USER TONE
USER TONE
USER TONE
USER TONE
USER TONE
USER TONE
USER TONE
USER TONE
USER TONE
USER TONE
USER TONE
USER TONE
USER TONE
USER TONE
USER TONE
USER TONE
USER TONE
USER TONE
USER TONE
TREMOLO ORGAN
JAZZ DRAWBAR
ROCK ORGAN
OVD ROTARY ORGAN
ROTARY ELEC.ORGAN
CHURCH ORGAN 1
CHAPEL ORGAN
ACCORDION
BANDONEON
HARMONICA
DRAWBAR ORGAN 1
DRAWBAR ORGAN 2
ELEC.ORGAN
PERC.ORGAN 1
PERC.ORGAN 2
JAZZ ORGAN
OVD ROCK ORGAN
TAPE ORGAN
CHURCH ORGAN 2
OCTAVE ACCORDION
NEO BANDONEON
SLOW HARMONICA
WAH HARMONICA
PURE ACOUSTIC GUITAR
NYLON STR.GUITAR
STEEL STR.GUITAR
JAZZ GUITAR
CHORUS CLEAN GUITAR
ROTARY GUITAR
CRUNCH ELEC.GUITAR
OVD FRONT GUITAR
FEEDBACK DIST.GT
MUTE DIST.GUITAR
MELLOW NYLON GUITAR
12 STRING GUITAR
BRIGHT ACOUSTIC GUITAR
CHORUS STEEL GUITAR
UKULELE
BANJO
OCTAVE JAZZ GUITAR
CHORUS JAZZ GUITAR
CLEAN GUITAR
ELEC.GUITAR FRONT
57
58
59
60
61
62
63
64
65
66
67
68
69
70
71
72
73
74
75
76
77
78
79
80
81
82
83
84
85
86
87
88
89
90
91
92
93
94
95
96
97
98
99
94
94
94
94
94
94
94
94
94
94
94
94
94
94
94
94
94
94
94
94
94
94
94
94
94
94
94
94
94
94
94
94
94
94
94
94
94
94
94
94
94
94
94
User Tones
WK3200_e_A-01-13.p6505.3.15, 6:17 PM6
A-7
Appendix
738A-E-111A
1
2
3
456
8
7
0
1
2
3
4
5
6
7
8
9
10
11
12
13
14
15
16
17
18
19
20
21
22
23
24
25
26
27
28
29
30
31
32
33
34
35
36
37
38
39
40
41
42
43
44
45
46
47
48
49
DRAWBAR
DRAWBAR
DRAWBAR
DRAWBAR
DRAWBAR
DRAWBAR
DRAWBAR
DRAWBAR
DRAWBAR
DRAWBAR
DRAWBAR
DRAWBAR
DRAWBAR
DRAWBAR
DRAWBAR
DRAWBAR
DRAWBAR
DRAWBAR
DRAWBAR
DRAWBAR
DRAWBAR
DRAWBAR
DRAWBAR
DRAWBAR
DRAWBAR
DRAWBAR
DRAWBAR
DRAWBAR
DRAWBAR
DRAWBAR
DRAWBAR
DRAWBAR
DRAWBAR
DRAWBAR
DRAWBAR
DRAWBAR
DRAWBAR
DRAWBAR
DRAWBAR
DRAWBAR
DRAWBAR
DRAWBAR
DRAWBAR
DRAWBAR
DRAWBAR
DRAWBAR
DRAWBAR
DRAWBAR
DRAWBAR
DRAWBAR
DRAWBAR ORGAN 1
JAZZ ORGAN 1
FULL DRAWBAR
PERC. ORGAN 1
16'+1' ORGAN
SOUL ORGAN 1
OVERDRIVE ORGAN 1
DRAWBAR ORGAN 2
BLOCK ORGAN 1
THEATER ORGAN 1
JAZZ ORGAN 2
SOUL ORGAN 2
GOSPEL ORGAN 1
CHORUS ORGAN 1
OVERDRIVE ORGAN 2
BLOCK ORGAN 2
DRAWBAR ORGAN 3
PERC. ORGAN 2
THEATER ORGAN 2
GOSPEL ORGAN 2
EVEN ORGAN
FLUTE ORGAN 1
CHORUS ORGAN 2
OVERDRIVE ORGAN 3
16' ORGAN
SOUL ORGAN 3
PERC. ORGAN 3
DRAWBAR ORGAN 4
PERC. ORGAN 4
ODD ORGAN
REED ORGAN 1
BLOCK ORGAN 3
OVERDRIVE ORGAN 4
DRAWBAR ORGAN 5
GOSPEL ORGAN 3
8' + 4' ORGAN
BLOCK ORGAN 4
REED ORGAN 2
PURE ORGAN 1
DRAWBAR ORGAN 6
DELAY ORGAN 1
DEEP CHORUS ORGAN
TREMOLO ORGAN
DELAY ORGAN 2
LFO WAH ORGAN
DIST. ORGAN LEAD
RING ORGAN
MAD ROTARY ORGAN
OLD ORGAN
DIST. RING ORGAN
0
1
2
3
4
5
6
7
8
9
10
11
12
13
14
15
16
17
18
19
20
21
22
23
24
25
26
27
28
29
30
31
32
33
34
35
36
37
38
39
40
41
42
43
44
45
46
47
48
49
96
96
96
96
96
96
96
96
96
96
96
96
96
96
96
96
96
96
96
96
96
96
96
96
96
96
96
96
96
96
96
96
96
96
96
96
96
96
96
96
96
96
96
96
96
96
96
96
96
96
10
10
16
16
16
10
16
16
16
16
10
16
16
16
10
16
16
16
16
16
16
16
16
16
16
16
16
16
10
16
16
10
10
10
16
32
32
16
32
10
10
32
16
16
16
16
16
10
16
10
N
N
N
N
N
N
N
N
N
N
N
N
N
N
N
N
N
N
N
N
N
N
N
N
N
N
N
N
N
N
N
N
N
N
N
N
N
N
N
N
N
N
N
N
N
N
N
N
N
N
Rotary
Rotary
Rotary
Rotary
Rotary
Rotary
OvdRotry
Rotary
OvdRotry
Rotary
Rotary
Rotary
Rotary
Rotary
OvdRotry
Rotary
Rotary
Rotary
Rotary
Rotary
Rotary
Rotary
Rotary
Rotary
Rotary
Rotary
Rotary
Rotary
Rotary
Rotary
Rotary
Rotary
OvdRotry
Rotary
Rotary
Rotary
Rotary
Rotary
Rotary
Rotary
StXDly 2
Cho.Dly4
Cho.Trem
Cho.Dly6
LWhChDl2
MetalDly
RingMod2
RgChDly2
LoFiRef2
DistRing
1
2
3
45
800
801
802
803
804
805
806
807
808
809
810
811
812
813
814
815
816
817
818
819
USER TONE with WAVE
USER TONE with WAVE
USER TONE with WAVE
USER TONE with WAVE
USER TONE with WAVE
USER TONE with WAVE
USER TONE with WAVE
USER TONE with WAVE
USER TONE with WAVE
USER TONE with WAVE
USER TONE with WAVE
USER TONE with WAVE
USER TONE with WAVE
USER TONE with WAVE
USER TONE with WAVE
USER TONE with WAVE
USER TONE with WAVE
USER TONE with WAVE
USER TONE with WAVE
USER TONE with WAVE
PIANO EX.
CZ SWEEP BASS
CZ LEAD 1
CZ SYNTH 1
VOICE BASS
NO DATA
NO DATA
NO DATA
NO DATA
NO DATA
NO DATA
NO DATA
NO DATA
NO DATA
NO DATA
NO DATA
NO DATA
NO DATA
NO DATA
NO DATA
0
1
2
3
4
5
6
7
8
9
10
11
12
13
14
15
16
17
18
19
88
88
88
88
88
88
88
88
88
88
88
88
88
88
88
88
88
88
88
88
1
23
45
900
901
902
903
USER DRUM SET with WAVE
USER DRUM SET with WAVE
USER DRUM SET with WAVE
USER DRUM SET with WAVE
POWER ROOM SET
NO DATA
NO DATA
NO DATA
0
1
2
3
125
125
125
125
User Drum Sets with Waves
Tone with Waves
Drawbar Organ Preset Tones
WK3200_e_A-01-13.p6505.3.15, 6:17 PM7
A-8
Appendix
738A-E-112A
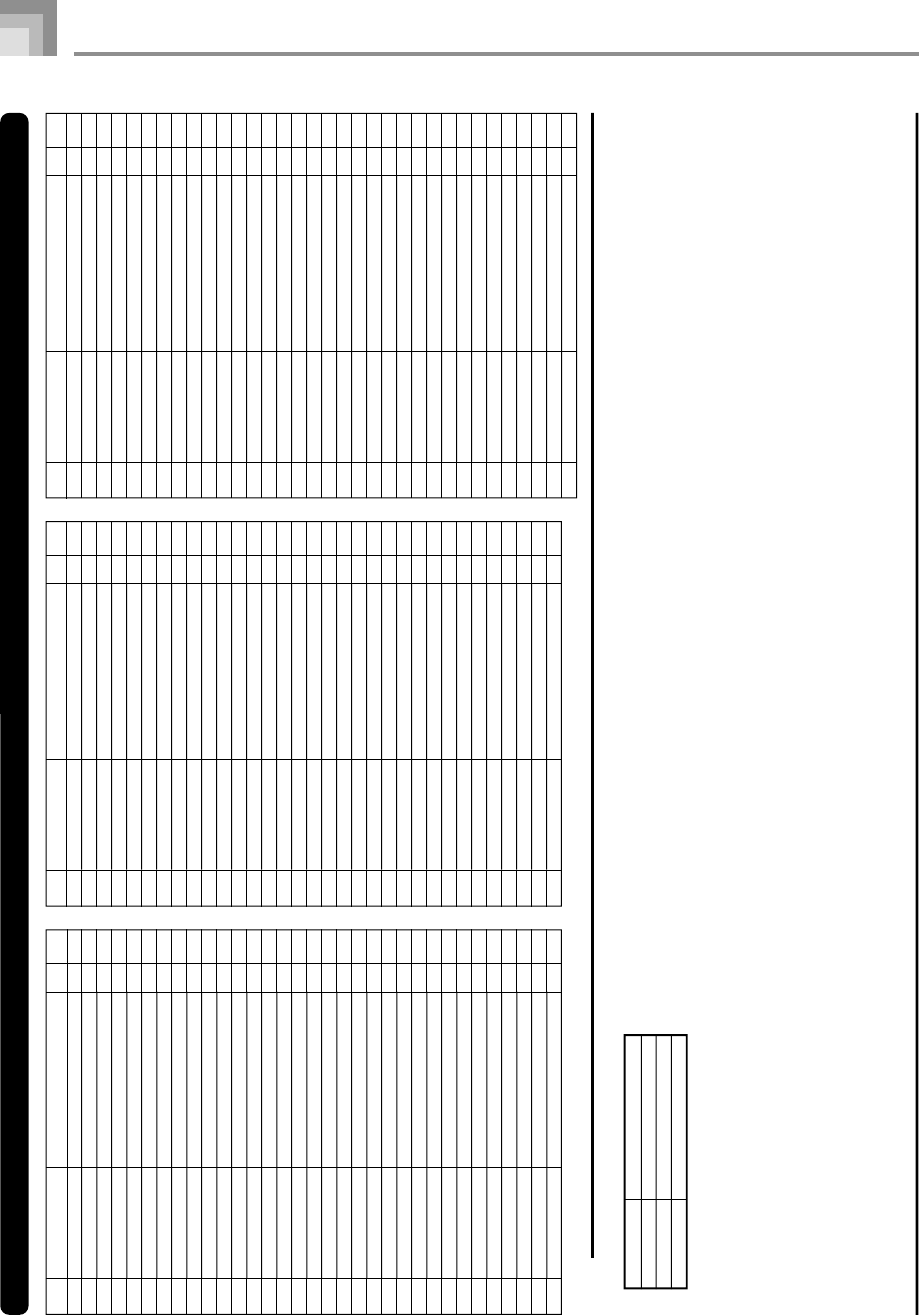
NOTE
Range
•The above list shows the initial factory default configuration. The tone group tone numbers indicated below will change from those shown in this list if you save
original tones to keyboard memory (page E-46).
•User Tones (Tone Numbers 700 through 799)*
1
•User Tones with Waves (Tone Numbers 800 through 819)*
2
•User Drum Sets with Waves (Tone Numbers 900 through 903)*
3
•Drawbar Organ User Tones (Tone Numbers 100 through 199)*
4
*1The initial factory default is Advanced Tones 000 through 099. System reset (page E-73) returns to factory defaults.
*2The initial factory default is preset Tone with Wave data for tone numbers 800 through 804. System reset clears all stored data.
*3The initial factory default is preset Drum Set with Wave data for tone number 900. System reset clears all stored data.
*4The initial factory default is two sets of the same tones assigned to drawbar organ tone numbers 000 through 049. System reset
returns to factory defaults.
•The CD-ROM that comes bundled with the keyboard can be used to return all tones to the initial factory defaults shown in this
list. See “Returning the keyboard to
its initial factory defaults” on page E-80 for details.
SymbolMeaning
NNormal
–11 Octave Down
+11 Octave Up
Drawbar Organ User Tones
12
3
45
100
101
102
103
104
105
106
107
108
109
110
111
112
113
114
115
116
117
118
119
120
121
122
123
124
125
126
127
128
129
130
131
132
USER DRAWBAR
USER DRAWBAR
USER DRAWBAR
USER DRAWBAR
USER DRAWBAR
USER DRAWBAR
USER DRAWBAR
USER DRAWBAR
USER DRAWBAR
USER DRAWBAR
USER DRAWBAR
USER DRAWBAR
USER DRAWBAR
USER DRAWBAR
USER DRAWBAR
USER DRAWBAR
USER DRAWBAR
USER DRAWBAR
USER DRAWBAR
USER DRAWBAR
USER DRAWBAR
USER DRAWBAR
USER DRAWBAR
USER DRAWBAR
USER DRAWBAR
USER DRAWBAR
USER DRAWBAR
USER DRAWBAR
USER DRAWBAR
USER DRAWBAR
USER DRAWBAR
USER DRAWBAR
USER DRAWBAR
DRAWBAR ORGAN 1
JAZZ ORGAN 1
FULL DRAWBAR
PERC. ORGAN 1
16'+1' ORGAN
SOUL ORGAN 1
OVERDRIVE ORGAN 1
DRAWBAR ORGAN 2
BLOCK ORGAN 1
THEATER ORGAN 1
JAZZ ORGAN 2
SOUL ORGAN 2
GOSPEL ORGAN 1
CHORUS ORGAN 1
OVERDRIVE ORGAN 2
BLOCK ORGAN 2
DRAWBAR ORGAN 3
PERC. ORGAN 2
THEATER ORGAN 2
GOSPEL ORGAN 2
EVEN ORGAN
FLUTE ORGAN 1
CHORUS ORGAN 2
OVERDRIVE ORGAN 3
16' ORGAN
SOUL ORGAN 3
PERC. ORGAN 3
DRAWBAR ORGAN 4
PERC. ORGAN 4
ODD ORGAN
REED ORGAN 1
BLOCK ORGAN 3
OVERDRIVE ORGAN 4
0
1
2
3
4
5
6
7
8
9
10
11
12
13
14
15
16
17
18
19
20
21
22
23
24
25
26
27
28
29
30
31
32
104
104
104
104
104
104
104
104
104
104
104
104
104
104
104
104
104
104
104
104
104
104
104
104
104
104
104
104
104
104
104
104
104
12
3
45
12
3
45
133
134
135
136
137
138
139
140
141
142
143
144
145
146
147
148
149
150
151
152
153
154
155
156
157
158
159
160
161
162
163
164
165
USER DRAWBAR
USER DRAWBAR
USER DRAWBAR
USER DRAWBAR
USER DRAWBAR
USER DRAWBAR
USER DRAWBAR
USER DRAWBAR
USER DRAWBAR
USER DRAWBAR
USER DRAWBAR
USER DRAWBAR
USER DRAWBAR
USER DRAWBAR
USER DRAWBAR
USER DRAWBAR
USER DRAWBAR
USER DRAWBAR
USER DRAWBAR
USER DRAWBAR
USER DRAWBAR
USER DRAWBAR
USER DRAWBAR
USER DRAWBAR
USER DRAWBAR
USER DRAWBAR
USER DRAWBAR
USER DRAWBAR
USER DRAWBAR
USER DRAWBAR
USER DRAWBAR
USER DRAWBAR
USER DRAWBAR
DRAWBAR ORGAN 5
GOSPEL ORGAN 3
8' + 4' ORGAN
BLOCK ORGAN 4
REED ORGAN 2
PURE ORGAN 1
DRAWBAR ORGAN 6
DELAY ORGAN 1
DEEP CHORUS ORGAN
TREMOLO ORGAN
DELAY ORGAN 2
LFO WAH ORGAN
DIST. ORGAN LEAD
RING ORGAN
MAD ROTARY ORGAN
OLD ORGAN
DIST. RING ORGAN
DRAWBAR ORGAN 1
JAZZ ORGAN 1
FULL DRAWBAR
PERC. ORGAN 1
16'+1' ORGAN
SOUL ORGAN 1
OVERDRIVE ORGAN 1
DRAWBAR ORGAN 2
BLOCK ORGAN 1
THEATER ORGAN 1
JAZZ ORGAN 2
SOUL ORGAN 2
GOSPEL ORGAN 1
CHORUS ORGAN 1
OVERDRIVE ORGAN 2
BLOCK ORGAN 2
33
34
35
36
37
38
39
40
41
42
43
44
45
46
47
48
49
50
51
52
53
54
55
56
57
58
59
60
61
62
63
64
65
104
104
104
104
104
104
104
104
104
104
104
104
104
104
104
104
104
104
104
104
104
104
104
104
104
104
104
104
104
104
104
104
104
166
167
168
169
170
171
172
173
174
175
176
177
178
179
180
181
182
183
184
185
186
187
188
189
190
191
192
193
194
195
196
197
198
199
USER DRAWBAR
USER DRAWBAR
USER DRAWBAR
USER DRAWBAR
USER DRAWBAR
USER DRAWBAR
USER DRAWBAR
USER DRAWBAR
USER DRAWBAR
USER DRAWBAR
USER DRAWBAR
USER DRAWBAR
USER DRAWBAR
USER DRAWBAR
USER DRAWBAR
USER DRAWBAR
USER DRAWBAR
USER DRAWBAR
USER DRAWBAR
USER DRAWBAR
USER DRAWBAR
USER DRAWBAR
USER DRAWBAR
USER DRAWBAR
USER DRAWBAR
USER DRAWBAR
USER DRAWBAR
USER DRAWBAR
USER DRAWBAR
USER DRAWBAR
USER DRAWBAR
USER DRAWBAR
USER DRAWBAR
USER DRAWBAR
DRAWBAR ORGAN 3
PERC. ORGAN 2
THEATER ORGAN 2
GOSPEL ORGAN 2
EVEN ORGAN
FLUTE ORGAN 1
CHORUS ORGAN 2
OVERDRIVE ORGAN 3
16' ORGAN
SOUL ORGAN 3
PERC. ORGAN 3
DRAWBAR ORGAN 4
PERC. ORGAN 4
ODD ORGAN
REED ORGAN 1
BLOCK ORGAN 3
OVERDRIVE ORGAN 4
DRAWBAR ORGAN 5
GOSPEL ORGAN 3
8' + 4' ORGAN
BLOCK ORGAN 4
REED ORGAN 2
PURE ORGAN 1
DRAWBAR ORGAN 6
DELAY ORGAN 1
DEEP CHORUS ORGAN
TREMOLO ORGAN
DELAY ORGAN 2
LFO WAH ORGAN
DIST. ORGAN LEAD
RING ORGAN
MAD ROTARY ORGAN
OLD ORGAN
DIST. RING ORGAN
104
104
104
104
104
104
104
104
104
104
104
104
104
104
104
104
104
104
104
104
104
104
104
104
104
104
104
104
104
104
104
104
104
104
66
67
68
69
70
71
72
73
74
75
76
77
78
79
80
81
82
83
84
85
86
87
88
89
90
91
92
93
94
95
96
97
98
99
WK3200_e_A-01-13.p6505.3.24, 10:59 AM8
A-9
Appendix
738A-E-113A
Drum Assignment List
“” indicates the same sound as STANDARD SET 1.
➝
Key/
Note number
PC0: STANDARD SET 1
LOW TOM 2a
LOW TOM 2b
LOW TOM 1a
LOW TOM 1b
MID TOM 2a
MID TOM 2b
MID TOM 1a
MID TOM 1b
HIGH TOM 2a
HIGH TOM 2b
HIGH TOM 1a
HIGH TOM 1b
CRASH CYMBAL 1a
CRASH CYMBAL 1b
CRASH CYMBAL 1c
CRASH CYMBAL 2a
CRASH CYMBAL 2b
CRASH CYMBAL 2c
RIDE CYMBAL 1a
RIDE CYMBAL 1b
RIDE CYMBAL 1c
RIDE CYMBAL 2a
RIDE CYMBAL 2b
RIDE CYMBAL 2c
—
—
—
HIGH Q
SLAP
SCRATCH PUSH
SCRATCH PULL
STICKS
SQUARE CLICK
METRONOME CLICK
METRONOME BELL
STANDARD1 KICK 2
STANDARD1 KICK 1
SIDE STICK
STANDARD1 SNARE 1
HAND CLAP 1
STANDARD1 SNARE 2
LOW TOM 2
CLOSED HI-HAT
LOW TOM 1
PEDAL HI-HAT
MID TOM 2
OPEN HI-HAT
MID TOM 1
HIGH TOM 2
CRASH CYMBAL 1
HIGH TOM 1
RIDE CYMBAL 1
CHINESE CYMBAL
RIDE BELL
TAMBOURINE
SPLASH CYMBAL
COWBELL
CRASH CYMBAL 2
VIBRA-SLAP
RIDE CYMBAL 2
HIGH BONGO
LOW BONGO
MUTE HIGH CONGA
OPEN HIGH CONGA
LOW CONGA
HIGH TIMBALE
LOW TIMBALE
HIGH AGOGO
LOW AGOGO
CABASA
MARACAS
SHORT HI WHISTLE
LONG LOW WHISTLE
SHORT GUIRO
LONG GUIRO
CLAVES
HIGH WOOD BLOCK
LOW WOOD BLOCK
MUTE CUICA
OPEN CUICA
MUTE TRIANGLE
OPEN TRIANGLE
SHAKER
JINGLE BELL
BELL TREE
CASTANETS
MUTE SURDO
OPEN SURDO
APPLAUSE
APPLAUSE 2
—
—
—
—
—
—
—
—
—
—
—
—
—
—
—
—
—
—
STANDARD KICK 1a
STANDARD KICK 1b
STANDARD KICK 1c
STANDARD KICK 1d
STANDARD KICK 2a
STANDARD KICK 2b
STANDARD KICK 2c
STANDARD KICK 2d
STANDARD 1 SNARE a
STANDARD 1 SNARE b
STANDARD 1 SNARE c
STANDARD 1 SNARE d
CLOSED HI-HAT a
CLOSED HI-HAT b
CLOSED HI-HAT c
CLOSED HI-HAT d
PEDAL HI-HAT a
PEDAL HI-HAT b
OPEN HI-HAT a
OPEN HI-HAT b
씯
씯
씯
씯
씯
씯
씯
씯
씯
씯
씯
씯
씯
씯
씯
씯
씯
씯
씯
씯
씯
씯
씯
씯
—
—
—
씯
씯
씯
씯
씯
씯
씯
씯
STANDARD2 KICK 2
STANDARD2 KICK 1
씯
STANDARD2 SNARE 1
씯
STANDARD2 SNARE 2
씯
씯
씯
씯
씯
씯
씯
씯
씯
씯
씯
씯
씯
씯
씯
씯
씯
씯
씯
씯
씯
씯
씯
씯
씯
씯
씯
씯
씯
씯
씯
씯
씯
씯
씯
씯
씯
씯
씯
씯
씯
씯
씯
씯
씯
씯
씯
씯
씯
—
—
—
—
—
—
—
—
—
—
—
—
—
—
—
—
—
—
씯
씯
씯
씯
씯
씯
씯
씯
STANDARD 2 SNARE a
STANDARD 2 SNARE b
STANDARD 2 SNARE c
STANDARD 2 SNARE d
씯
씯
씯
씯
씯
씯
씯
씯
씯
씯
씯
씯
씯
씯
씯
씯
씯
씯
씯
씯
씯
씯
씯
씯
씯
씯
씯
씯
씯
씯
씯
씯
—
—
—
씯
씯
씯
씯
씯
씯
씯
씯
STANDARD3 KICK 2
STANDARD3 KICK 1
씯
STANDARD3 SNARE 1
씯
STANDARD3 SNARE 2
씯
씯
씯
씯
씯
씯
씯
씯
씯
씯
씯
씯
씯
씯
씯
씯
씯
씯
씯
씯
씯
씯
씯
씯
씯
씯
씯
씯
씯
씯
씯
씯
씯
씯
씯
씯
씯
씯
씯
씯
씯
씯
씯
씯
씯
씯
씯
씯
씯
—
—
—
—
—
—
—
—
—
—
—
—
—
—
—
—
—
—
씯
씯
씯
씯
씯
씯
씯
씯
STANDARD 3 SNARE a
STANDARD 3 SNARE b
STANDARD 3 SNARE c
STANDARD 3 SNARE d
씯
씯
씯
씯
씯
씯
씯
씯
PC1: STANDARD SET 2
PC8: ROOM SET
PC4: STANDARD SET 5PC3: STANDARD SET 4
씯
씯
씯
씯
씯
씯
씯
씯
씯
씯
씯
씯
씯
씯
씯
씯
씯
씯
씯
씯
씯
씯
씯
씯
—
—
—
씯
씯
씯
씯
씯
씯
씯
씯
ROOM KICK 2
ROOM KICK 1
씯
ROOM SNARE 1
씯
ROOM SNARE 2
ROOM LOW TOM 2
씯
ROOM LOW TOM 1
씯
ROOM MID TOM 2
씯
ROOM MID TOM 1
ROOM HI TOM 2
씯
ROOM HI TOM 1
씯
씯
씯
씯
씯
씯
씯
씯
씯
씯
씯
씯
씯
씯
씯
씯
씯
씯
씯
씯
씯
씯
씯
씯
씯
씯
씯
씯
씯
씯
씯
씯
씯
씯
씯
씯
씯
씯
씯
—
—
—
—
—
—
—
—
—
—
—
—
—
—
—
—
—
—
—
—
—
—
—
—
—
—
—
—
—
—
씯
씯
씯
씯
씯
씯
씯
씯
PC2: STANDARD SET 3
C-1
D-1
E-1
F-1
G-1
A-1
B-1
C0
D0
E0
F0
G0
A0
B0
C1
D1
E1
F1
G1
A1
B1
C2
D2
E2
F2
G2
A2
B2
C3
D3
E3
F3
G3
A3
B3
C4
D4
E4
F4
G4
A4
B4
C5
D5
E5
F5
G5
A5
B5
C6
D6
E6
F6
G6
A6
B6
C7
D7
E7
F7
G7
A7
B7
C8
D8
E8
F8
G8
A8
B8
C9
D9
E9
F9
G9
0
2
4
5
7
9
11
12
14
16
17
19
21
23
24
26
28
29
31
33
35
36
38
40
41
43
45
47
48
50
52
53
55
57
59
60
62
64
65
67
69
71
72
74
76
77
79
81
83
84
86
88
89
91
93
95
96
98
100
101
103
105
107
108
110
112
113
115
117
119
120
122
124
125
127
C#-1
E
-1
F#-1
A
-1
B
-1
C#0
E 0
F#0
A 0
B 0
C#1
E 1
F#1
A 1
B 1
C#2
E 2
F#2
A 2
B 2
C#3
E 3
F#3
A 3
B 3
C#4
E 4
F#4
A 4
B 4
C#5
E 5
F#5
A 5
B 5
C#6
E 6
F#6
A 6
B 6
C#7
E 7
F#7
A 7
B 7
C#8
E 8
F#8
A 8
B 8
C#9
E 9
F#9
1
3
6
8
10
13
15
18
20
22
25
27
30
32
34
37
39
42
44
46
49
51
54
56
58
61
63
66
68
70
73
75
78
80
82
85
87
90
92
94
97
99
102
104
106
109
111
114
116
118
121
123
126
PC24: ELECTRONIC SET
PC25: SYNTH SET 1
PC30: SYNTH SET 2
PC16: POWER SET
씯
씯
씯
씯
씯
씯
씯
씯
씯
씯
씯
씯
씯
씯
씯
씯
씯
씯
씯
씯
씯
씯
씯
씯
—
—
—
씯
씯
씯
씯
씯
씯
씯
씯
STANDARD4 KICK 2
STANDARD4 KICK 1
씯
STANDARD4 SNARE 1
씯
STANDARD4 SNARE 2
씯
씯
씯
씯
씯
씯
씯
씯
씯
씯
씯
씯
씯
씯
씯
씯
씯
씯
씯
씯
씯
씯
씯
씯
씯
씯
씯
씯
씯
씯
씯
씯
씯
씯
씯
씯
씯
씯
씯
씯
씯
씯
씯
씯
씯
씯
씯
씯
씯
—
—
—
—
—
—
—
—
—
—
—
—
—
—
—
—
—
—
—
—
—
—
—
—
—
—
—
—
—
—
씯
씯
씯
씯
씯
씯
씯
씯
씯
씯
씯
씯
씯
씯
씯
씯
씯
씯
씯
씯
씯
씯
씯
씯
씯
씯
씯
씯
씯
씯
씯
씯
—
—
—
씯
씯
씯
씯
씯
씯
씯
씯
POWER KICK 2
POWER KICK 1
씯
POWER SNARE 1
씯
POWER SNARE 2
POWER LOW TOM 2
씯
POWER LOW TOM 1
씯
POWER MID TOM 2
씯
POWER MID TOM 1
POWER HI TOM 2
씯
POWER HI TOM 1
씯
씯
씯
씯
씯
씯
씯
씯
씯
씯
씯
씯
씯
씯
씯
씯
씯
씯
씯
씯
씯
씯
씯
씯
씯
씯
씯
씯
씯
씯
씯
씯
씯
씯
씯
씯
씯
씯
씯
—
—
—
—
—
—
—
—
—
—
—
—
—
—
—
—
—
—
—
—
—
—
—
—
—
—
—
—
—
—
씯
씯
씯
씯
씯
씯
씯
씯
씯
씯
씯
씯
씯
씯
씯
씯
씯
씯
씯
씯
씯
씯
씯
씯
씯
씯
씯
씯
씯
씯
씯
씯
—
—
—
씯
씯
씯
씯
씯
씯
씯
씯
SYNTH 1 KICK 2
SYNTH 1 KICK 1
SYNTH 1 RIM SHOT
SYNTH 1 SNARE 1
SYNTH HAND CLAP
SYNTH 1 SNARE 2
SYNTH 1 LOW TOM 2
SYNTH 1 CHH
SYNTH 1 LOW TOM 1
SYNTH 1 PHH
SYNTH 1 MID TOM 2
SYNTH 1 OHH
SYNTH 1 MID TOM 1
SYNTH 1 HI TOM 2
SYNTH 1 CYMBAL
SYNTH 1 HI TOM 1
SYNTH 1 RIDE
씯
씯
SYNTH 1
TOMBOURINE
씯
SYNTH 1 COWBELL
씯
씯
씯
씯
씯
SYNTH 1 HIGH CONGA
SYNTH 1 MID CONGA
SYNTH 1 LOW CONGA
씯
씯
씯
씯
씯
SYNTH 1 MARACAS
씯
씯
씯
씯
SYNTH 1 CLAVES
씯
씯
씯
씯
씯
씯
씯
씯
씯
씯
씯
씯
씯
씯
—
—
—
—
—
—
—
—
—
—
—
—
—
—
—
—
—
—
—
—
—
—
—
—
—
—
—
—
—
—
씯
씯
씯
씯
씯
씯
씯
씯
씯
씯
씯
씯
씯
씯
씯
씯
씯
씯
씯
씯
씯
씯
씯
씯
씯
씯
씯
씯
씯
씯
씯
씯
—
—
—
씯
씯
씯
씯
씯
씯
씯
씯
SYNTH 2 KICK 2
SYNTH 2 KICK 1
씯
SYNTH 2 SNARE 1
씯
SYNTH 2 SNARE 2
SYNTH 2 LOW TOM 2
SYNTH 2 CHH
SYNTH 2 LOW TOM 1
SYNTH 2 PHH
SYNTH 2 MID TOM 2
SYNTH 2 OHH
SYNTH 2 MID TOM 1
SYNTH 2 HI TOM 2
SYNTH 2 CYMBAL 1
SYNTH 2 HI TOM 1
SYNTH 2 RIDE 1
씯
씯
씯
씯
씯
SYNTH 2 CYMBAL 2
씯
SYNTH 2 RIDE 2
씯
씯
씯
씯
씯
씯
씯
씯
씯
씯
씯
씯
씯
씯
씯
씯
씯
씯
씯
씯
씯
씯
씯
씯
씯
씯
씯
씯
씯
씯
—
—
—
—
—
—
—
—
—
—
—
—
—
—
—
—
—
—
—
—
—
—
—
—
—
—
—
—
—
—
씯
씯
씯
씯
씯
씯
씯
씯
씯
씯
씯
씯
씯
씯
씯
씯
씯
씯
씯
씯
씯
씯
씯
씯
씯
씯
씯
씯
씯
씯
씯
씯
—
—
—
씯
씯
씯
씯
씯
씯
씯
씯
STANDARD5 KICK 2
STANDARD5 KICK 1
씯
STANDARD5 SNARE 1
SYNTH HAND CLAP
STANDARD5 SNARE 2
씯
씯
씯
씯
씯
씯
씯
씯
씯
씯
씯
씯
씯
씯
씯
씯
씯
씯
씯
씯
씯
씯
씯
씯
씯
씯
씯
씯
씯
씯
씯
씯
씯
씯
씯
씯
씯
씯
씯
씯
씯
씯
씯
씯
씯
씯
씯
씯
씯
—
—
—
—
—
—
—
—
—
—
—
—
—
—
—
—
—
—
—
—
—
—
—
—
—
—
—
—
—
—
씯
씯
씯
씯
씯
씯
씯
씯
씯
씯
씯
씯
씯
씯
씯
씯
씯
씯
씯
씯
씯
씯
씯
씯
씯
씯
씯
씯
씯
씯
씯
씯
—
—
—
씯
씯
씯
씯
씯
씯
씯
씯
ELEC KICK 2
ELEC KICK 1
씯
ELEC SNARE 1
씯
ELEC SNARE 2
ELEC LOW TOM 2
씯
ELEC LOW TOM 1
씯
ELEC MID TOM 2
씯
ELEC MID TOM 1
ELEC HI TOM 2
씯
ELEC HI TOM 1
씯
REVERSE CYMBAL
씯
씯
씯
씯
씯
씯
씯
씯
씯
씯
씯
씯
씯
씯
씯
씯
씯
씯
씯
씯
씯
씯
씯
씯
씯
씯
씯
씯
씯
씯
씯
씯
씯
씯
씯
씯
씯
—
—
—
—
—
—
—
—
—
—
—
—
—
—
—
—
—
—
—
—
—
—
—
—
—
—
—
—
—
—
씯
씯
씯
씯
씯
씯
씯
씯
DRUMS SET LIST
WK3200_e_A-01-13.p6505.3.15, 6:17 PM9
A-10
PC40: BRUSH SET
씯
씯
씯
씯
씯
씯
씯
씯
씯
씯
씯
씯
씯
씯
씯
씯
씯
씯
씯
씯
씯
씯
씯
씯
—
—
—
씯
씯
씯
씯
씯
씯
씯
씯
BRUSH KICK 2
BRUSH KICK 1
씯
BRUSH TAP
BRUSH SLAP
BRUSH SWIRL
씯
씯
씯
씯
씯
씯
씯
씯
씯
씯
씯
씯
씯
씯
씯
씯
씯
씯
씯
씯
씯
씯
씯
씯
씯
씯
씯
씯
씯
씯
씯
씯
씯
씯
씯
씯
씯
씯
씯
씯
씯
씯
씯
씯
씯
씯
씯
씯
씯
—
—
—
—
—
—
—
—
—
—
—
—
—
—
—
—
—
—
—
—
—
—
—
—
—
—
—
—
—
—
씯
씯
씯
씯
씯
씯
씯
씯
씯
씯
씯
씯
씯
씯
씯
씯
씯
씯
씯
씯
씯
씯
씯
씯
씯
씯
씯
씯
씯
씯
씯
씯
—
—
—
CLOSED HI-HAT
PEDAL HI-HAT
OPEN HI-HAT
RIDE CYMBAL 1
씯
씯
씯
씯
JAZZ KICK 1
CONCERT BASS DRUM
씯
CONCERT SNARE
CASTANETS
CONCERT SNARE
TIMPANI F
TIMPANI F
TIMPANI G
TIMPANI A
TIMPANI A
TIMPANI B
TIMPANI B
TIMPANI c
TIMPANI c
TIMPANI d
TIMPANI e
TIMPANI e
TIMPANI f
씯
씯
씯
CONCERT CYMBAL 2
씯
CONCERT CYMBAL 1
씯
씯
씯
씯
씯
씯
씯
씯
씯
씯
씯
씯
씯
씯
씯
씯
씯
씯
씯
씯
씯
씯
씯
씯
씯
씯
씯
씯
씯
씯
—
—
—
—
—
—
—
—
—
—
—
—
—
—
—
—
—
—
—
—
—
—
—
—
—
—
—
—
—
—
씯
씯
씯
씯
씯
씯
씯
씯
씯
씯
씯
씯
씯
씯
씯
씯
씯
씯
씯
씯
CRASH CYMBAL 2a
CRASH CYMBAL 2b
CRASH CYMBAL 2c
RIDE CYMBAL 2a
RIDE CYMBAL 2b
RIDE CYMBAL 2c
씯
씯
씯
WHITE NOISE
LOOPED BD
BEEP 1
BEEP 2
HIT 1
HIT 2
씯
씯
HIP-HOP SCRATCH 1
HIP-HOP SCRATCH 2
씯
씯
씯
씯
HIP-HOP KICK 2
HIP-HOP KICK 1
씯
HIP-HOP SNARE 1
HAND CLAP 2
HIP-HOP SNARE 2
씯
HIP-HOP CHH
씯
HIP-HOP PHH
씯
HIP-HOP OHH
씯
씯
HIP-HOP CLASH
씯
HIP-HOP RIDE
씯
씯
씯
씯
씯
SYNTH 2 CYMBAL 2
씯
SYNTH 2 RIDE 2
씯
씯
씯
씯
씯
씯
씯
씯
씯
씯
씯
씯
씯
씯
씯
씯
씯
씯
씯
씯
씯
씯
씯
씯
씯
씯
씯
씯
씯
ELEC KICK 1
SYNTH 1 KICK 1
SYNTH 1 KICK 2
DANCE KICK 3
TECHNO KICK 1
HIP-HOP BD 5
HIP-HOP BD 6
TECHNO KICK 4
DANCE KICK 2
DANCE KICK 1
DANCE KICK 5
DANCE KICK 6
POWER SNARE 2
SYNTH 1 SNARE 1
SYNTH 1 SNARE 2
SYNTH 2 SNARE 1
SYNTH 2 SNARE 2
HIP-HOP SNARE 5
HIP-HOP SNARE 6
TECHNO SNARE 3
TECHNO SNARE 5
TECHNO SNARE 6
DANCE SNARE 4
DANCE SNARE 5
—
—
—
—
—
—
—
씯
씯
씯
씯
씯
씯
씯
씯
PC48: ORCHESTRA SET
PC64: HIP-HOP SET 1
PC66: TECHNO SET 1PC67: TECHNO SET 2
PC68: DANCE SET 1
PC69: DANCE SET 2
PC65: HIP-HOP SET 2
씯
씯
씯
씯
씯
씯
씯
씯
씯
씯
씯
씯
CRASH CYMBAL 2a
CRASH CYMBAL 2b
CRASH CYMBAL 2c
RIDE CYMBAL 2a
RIDE CYMBAL 2b
RIDE CYMBAL 2c
씯
씯
씯
WHITE NOISE
LOOPED BD
BEEP 1
BEEP 2
HIT 1
HIT 2
씯
씯
HIP-HOP SCRATCH 1
HIP-HOP SCRATCH 2
씯
씯
씯
씯
HIP-HOP KICK 4
HIP-HOP KICK 3
씯
HIP-HOP SNARE 3
HAND CLAP 2
HIP-HOP SNARE 4
SYNTH 2 LOW TOM 2
HIP-HOP CHH
SYNTH 2 LOW TOM 1
HIP-HOP PHH
SYNTH 2 MID TOM 2
HIP-HOP OHH
SYNTH 2 MID TOM 1
SYNTH 2 HI TOM 2
SYNTH 2 CYMBAL
SYNTH 2 HI TOM 1
SYNTH 2 RIDE
씯
씯
씯
씯
씯
SYNTH 2 CYMBAL 2
씯
SYNTH 2 RIDE 2
씯
씯
씯
씯
씯
씯
씯
씯
씯
씯
씯
씯
씯
씯
씯
씯
씯
씯
씯
씯
씯
씯
씯
씯
씯
씯
씯
씯
씯
ELEC KICK 1
SYNTH 1 KICK 1
SYNTH 1 KICK 2
DANCE KICK 3
TECHNO KICK 1
HIP-HOP BD 5
HIP-HOP BD 6
TECHNO KICK 4
DANCE KICK 2
DANCE KICK 1
DANCE KICK 5
DANCE KICK 6
POWER SNARE 2
SYNTH 1 SNARE 1
SYNTH 1 SNARE 2
SYNTH 2 SNARE 1
SYNTH 2 SNARE 2
HIP-HOP SNARE 5
HIP-HOP SNARE 6
TECHNO SNARE 3
TECHNO SNARE 5
TECHNO SNARE 6
DANCE SNARE 4
DANCE SNARE 5
—
—
—
—
—
—
—
씯
씯
씯
씯
씯
씯
씯
씯
씯
씯
씯
씯
씯
씯
씯
씯
씯
씯
씯
씯
CRASH CYMBAL 2a
CRASH CYMBAL 2b
CRASH CYMBAL 2c
RIDE CYMBAL 2a
RIDE CYMBAL 2b
RIDE CYMBAL 2c
씯
씯
씯
WHITE NOISE
LOOPED BD
BEEP 1
BEEP 2
HIT 1
HIT 2
씯
씯
HIP-HOP SCRATCH 1
HIP-HOP SCRATCH 2
씯
씯
씯
씯
TECHNO KICK 4
TECHNO KICK 3
SYNTH 1 RIM SHOT
TECHNO SNARE 3
HAND CLAP 3
TECHNO SNARE 4
SYNTH 1 LOW TOM 2
TECHNO 2 CHH 1
SYNTH 1 LOW TOM 1
TECHNO 2 PHH
SYNTH 1 MID TOM 2
TECHNO 2 OHH
SYNTH 1 MID TOM 1
SYNTH 1 HI TOM 2
TECHNO CYMBAL
SYNTH 1 HI TOM 1
TECHNO CYMBAL
씯
씯
SYNTH 1
TAMBOURINE
씯
SYNTH 1 COWBELL
씯
씯
씯
씯
씯
SYNTH 1
HIGH CONGA
SYNTH 1 MID CONGA
SYNTH 1 LOW CONGA
씯
씯
씯
씯
씯
SYNTH 1 MARACAS
씯
씯
씯
씯
SYNTH 1 CLAVES
씯
씯
씯
씯
씯
씯
씯
씯
씯
씯
씯
씯
씯
ELEC KICK 1
SYNTH 1 KICK 1
SYNTH 1 KICK 2
DANCE KICK 3
TECHNO KICK 1
HIP-HOP BD 5
HIP-HOP BD 6
TECHNO KICK 4
DANCE KICK 2
DANCE KICK 1
DANCE KICK 5
DANCE KICK 6
POWER SNARE 2
SYNTH 1 SNARE 1
SYNTH 1 SNARE 2
SYNTH 2 SNARE 1
SYNTH 2 SNARE 2
HIP-HOP SNARE 5
HIP-HOP SNARE 6
TECHNO SNARE 3
TECHNO SNARE 5
TECHNO SNARE 6
DANCE SNARE 4
DANCE SNARE 5
—
—
—
—
—
—
—
씯
씯
씯
씯
씯
씯
씯
씯
씯
씯
씯
씯
씯
씯
씯
씯
씯
씯
씯
씯
CRASH CYMBAL 2a
CRASH CYMBAL 2b
CRASH CYMBAL 2c
RIDE CYMBAL 2a
RIDE CYMBAL 2b
RIDE CYMBAL 2c
씯
씯
씯
WHITE NOISE
LOOPED BD
BEEP 1
BEEP 2
HIT 1
HIT 2
씯
씯
HIP-HOP SCRATCH 1
HIP-HOP SCRATCH 2
씯
씯
씯
씯
DANCE KICK 2
DANCE KICK 1
SYNTH 1 RIM SHOT
DANCE SNARE 1
HAND CLAP 3
DANCE SNARE 2
씯
SYNTH 2 CHH
씯
SYNTH 2 PHH
씯
SYNTH 2 OHH
씯
씯
HIP-HOP CLASH
씯
HIP-HOP RIDE
씯
씯
SYNTH 1
TAMBOURINE
씯
SYNTH 1 COWBELL
씯
씯
씯
씯
씯
SYNTH 1
HIGH CONGA
SYNTH 1 MID CONGA
SYNTH 1 LOW CONGA
씯
씯
씯
씯
씯
SYNTH 1 MARACAS
씯
씯
씯
씯
SYNTH 1 CLAVES
씯
씯
씯
씯
씯
씯
씯
씯
씯
씯
씯
씯
씯
ELEC KICK 1
SYNTH 1 KICK 1
SYNTH 1 KICK 2
DANCE KICK 3
TECHNO KICK 1
HIP-HOP BD 5
HIP-HOP BD 6
TECHNO KICK 4
DANCE KICK 2
DANCE KICK 1
DANCE KICK 5
DANCE KICK 6
POWER SNARE 2
SYNTH 1 SNARE 1
SYNTH 1 SNARE 2
SYNTH 2 SNARE 1
SYNTH 2 SNARE 2
HIP-HOP SNARE 5
HIP-HOP SNARE 6
TECHNO SNARE 3
TECHNO SNARE 5
TECHNO SNARE 6
DANCE SNARE 4
DANCE SNARE 5
—
—
—
—
—
—
—
씯
씯
씯
씯
씯
씯
씯
씯
씯
씯
씯
씯
씯
씯
씯
씯
씯
씯
씯
씯
CRASH CYMBAL 2a
CRASH CYMBAL 2b
CRASH CYMBAL 2c
RIDE CYMBAL 2a
RIDE CYMBAL 2b
RIDE CYMBAL 2c
씯
씯
씯
WHITE NOISE
LOOPED BD
BEEP 1
BEEP 2
HIT 1
HIT 2
씯
씯
HIP-HOP SCRATCH 1
HIP-HOP SCRATCH 2
씯
씯
씯
씯
TECHNO KICK 2
TECHNO KICK 1
SYNTH 1 RIM SHOT
TECHNO SNARE 1
HAND CLAP 3
TECHNO SNARE 2
SYNTH 1 LOW TOM 2
TECHNO 1 CHH
SYNTH 1 LOW TOM 1
TECHNO 1 PHH
SYNTH 1 MID TOM 2
TECHNO 1 OHH
SYNTH 1 MID TOM 1
SYNTH 1 HI TOM 2
SYNTH 1 CYMBAL
SYNTH 1 HI TOM 1
SYNTH 1 RIDE
씯
씯
SYNTH 1
TAMBOURINE
씯
SYNTH 1 COWBELL
씯
씯
씯
씯
씯
SYNTH 1
HIGH CONGA
SYNTH 1 MID CONGA
SYNTH 1 LOW CONGA
씯
씯
씯
씯
씯
SYNTH 1 MARACAS
씯
씯
씯
씯
SYNTH 1 CLAVES
씯
씯
씯
씯
씯
씯
씯
씯
씯
씯
씯
씯
씯
ELEC KICK 1
SYNTH 1 KICK 1
SYNTH 1 KICK 2
DANCE KICK 3
TECHNO KICK 1
HIP-HOP BD 5
HIP-HOP BD 6
TECHNO KICK 4
DANCE KICK 2
DANCE KICK 1
DANCE KICK 5
DANCE KICK 6
POWER SNARE 2
SYNTH 1 SNARE 1
SYNTH 1 SNARE 2
SYNTH 2 SNARE 1
SYNTH 2 SNARE 2
HIP-HOP SNARE 5
HIP-HOP SNARE 6
TECHNO SNARE 3
TECHNO SNARE 5
TECHNO SNARE 6
DANCE SNARE 4
DANCE SNARE 5
—
—
—
—
—
—
—
씯
씯
씯
씯
씯
씯
씯
씯
씯
씯
씯
씯
씯
씯
씯
씯
씯
씯
씯
씯
CRASH CYMBAL 2a
CRASH CYMBAL 2b
CRASH CYMBAL 2c
RIDE CYMBAL 2a
RIDE CYMBAL 2b
RIDE CYMBAL 2c
씯
씯
씯
WHITE NOISE
LOOPED BD
BEEP 1
BEEP 2
HIT 1
HIT 2
씯
씯
HIP-HOP SCRATCH 1
HIP-HOP SCRATCH 2
씯
씯
씯
씯
DANCE KICK 4
DANCE KICK 3
SYNTH 1 RIM SHOT
DANCE SNARE 3
HAND CLAP 3
DANCE SNARE 4
SYNTH 2 LOW TOM 2
HIP-HOP CHH
SYNTH 2 LOW TOM 1
HIP-HOP PHH
SYNTH 2 MID TOM 2
HIP-HOP OHH
SYNTH 2 MID TOM 1
SYNTH 2 HI TOM 2
TECHNO CYMBAL
SYNTH 2 HI TOM 1
TECHNO CYMBAL
씯
씯
SYNTH 1
TAMBOURINE
씯
SYNTH 1 COWBELL
씯
씯
씯
씯
씯
SYNTH 1
HIGH CONGA
SYNTH 1 MID CONGA
SYNTH 1 LOW CONGA
씯
씯
씯
씯
씯
SYNTH 1 MARACAS
씯
씯
씯
씯
SYNTH 1 CLAVES
씯
씯
씯
씯
씯
씯
씯
씯
씯
씯
씯
씯
씯
ELEC KICK 1
SYNTH 1 KICK 1
SYNTH 1 KICK 2
DANCE KICK 3
TECHNO KICK 1
HIP-HOP BD 5
HIP-HOP BD 6
TECHNO KICK 4
DANCE KICK 2
DANCE KICK 1
DANCE KICK 5
DANCE KICK 6
POWER SNARE 2
SYNTH 1 SNARE 1
SYNTH 1 SNARE 2
SYNTH 2 SNARE 1
SYNTH 2 SNARE 2
HIP-HOP SNARE 5
HIP-HOP SNARE 6
TECHNO SNARE 3
TECHNO SNARE 5
TECHNO SNARE 6
DANCE SNARE 4
DANCE SNARE 5
—
—
—
—
—
—
—
씯
씯
씯
씯
씯
씯
씯
씯
Key/
Note number
C-1
D-1
E-1
F-1
G-1
A-1
B-1
C0
D0
E0
F0
G0
A0
B0
C1
D1
E1
F1
G1
A1
B1
C2
D2
E2
F2
G2
A2
B2
C3
D3
E3
F3
G3
A3
B3
C4
D4
E4
F4
G4
A4
B4
C5
D5
E5
F5
G5
A5
B5
C6
D6
E6
F6
G6
A6
B6
C7
D7
E7
F7
G7
A7
B7
C8
D8
E8
F8
G8
A8
B8
C9
D9
E9
F9
G9
0
2
4
5
7
9
11
12
14
16
17
19
21
23
24
26
28
29
31
33
35
36
38
40
41
43
45
47
48
50
52
53
55
57
59
60
62
64
65
67
69
71
72
74
76
77
79
81
83
84
86
88
89
91
93
95
96
98
100
101
103
105
107
108
110
112
113
115
117
119
120
122
124
125
127
C#-1
E
-1
F#-1
A
-1
B
-1
C#0
E 0
F#0
A 0
B 0
C#1
E 1
F#1
A 1
B 1
C#2
E 2
F#2
A 2
B 2
C#3
E 3
F#3
A 3
B 3
C#4
E 4
F#4
A 4
B 4
C#5
E 5
F#5
A 5
B 5
C#6
E 6
F#6
A 6
B 6
C#7
E 7
F#7
A 7
B 7
C#8
E 8
F#8
A 8
B 8
C#9
E 9
F#9
1
3
6
8
10
13
15
18
20
22
25
27
30
32
34
37
39
42
44
46
49
51
54
56
58
61
63
66
68
70
73
75
78
80
82
85
87
90
92
94
97
99
102
104
106
109
111
114
116
118
121
123
126
DRUMS SET LIST
PC32: JAZZ SET
씯
씯
씯
씯
씯
씯
씯
씯
씯
씯
씯
씯
씯
씯
씯
씯
씯
씯
씯
씯
씯
씯
씯
씯
—
—
—
씯
씯
씯
씯
씯
씯
씯
씯
JAZZ KICK 2
JAZZ KICK 1
씯
JAZZ SNARE 1
HAND CLAP 2
JAZZ SNARE 2
씯
씯
씯
씯
씯
씯
씯
씯
씯
씯
씯
씯
씯
씯
씯
씯
씯
씯
씯
씯
씯
씯
씯
씯
씯
씯
씯
씯
씯
씯
씯
씯
씯
씯
씯
씯
씯
씯
씯
씯
씯
씯
씯
씯
씯
씯
씯
씯
씯
—
—
—
—
—
—
—
—
—
—
—
—
—
—
—
—
—
—
—
—
—
—
—
—
—
—
—
—
—
—
씯
씯
씯
씯
씯
씯
씯
씯
Appendix
738A-E-114A
WK3200_e_A-01-13.p6505.3.15, 6:17 PM10
A-11
738A-E-115A
No.Rhythm Name
8 BEAT
0008 BEAT 1
0018 BEAT 2
0028 BEAT 3
0038 BEAT 4
0048 BEAT 5
0058 BEAT POP 1
0068 BEAT POP 2
0078 BEAT POP 3
0088 BEAT POP 4
00960’S SOUL
0108 BEAT DANCE
011POP ROCK 1
012POP ROCK 2
16 BEAT
01316 BEAT 1
01416 BEAT 2
01516 BEAT 3
01616 BEAT 4
017SLOW 16 BEAT
01816 BEAT SHUFFLE 1
01916 BEAT SHUFFLE 2
02016 BEAT SHUFFLE 3
02116 BEAT SHUFFLE 4
022FUNK 1
023FUNK 2
024FUSION
025LATIN FUSION
POPS
026POP 1
027POP 2
028GUITAR POP
029POP WALTZ
030POP SHUFFLE 1
031POP SHUFFLE 2
032SOUL POP
033WORLD POP
034MELLOW R&B
03560’S POP
03680’S POP
037OLDIES POP
038POP WALTZ
BALLAD
0398 BEAT BALLAD 1
0408 BEAT BALLAD 2
0418 BEAT BALLAD 3
04216 BEAT BALLAD 1
04316 BEAT BALLAD 2
04416 BEAT BALLAD 3
0456/8 BALLAD 1
0466/8 BALLAD 2
047ROCK BALLAD
048POP BALLAD
049OLDIES BALLAD
050SERENADE
ROCK
051ROCK 1
052ROCK 2
053ROCK 3
054R&B
055SHUFFLE ROCK
056HEAVY METAL
05760’S ROCK
058SHUFFLE BOOGIE
059BLUES
060TWIST
DANCE
061TRANCE 1
062TRANCE 2
063AMBIENT 1
064AMBIENT 2
065AMBIENT 3
066RAVE
067TECHNO
068DIGITAL ROCK
069HOUSE
070LATIN HOUSE
071DANCE 1
072DANCE 2
073MODERN R&B
074HIP-HOP
075TRIP-HOP
076ELECTRIC POP
077DANCE POP 1
078DANCE POP 2
079DANCE POP 3
080DISCO SOUL
JAZZ
081FAST BIG BAND
082MIDDLE BIG BAND
083SLOW BIG BAND
084JAZZ COMBO 1
085JAZZ COMBO 2
086SWING 1
087SWING 2
088SLOW SWING
089MODERAN JAZZ
090FOX TROT
091QUICKSTEP
092JAZZ WALTZ
EUROPEAN
093POLKA
094POLKA FOX
095POP POLKA
096MARCH 1
097MARCH 2
098GERMAN MARCH
099WALTZ 1
100WALTZ 2
101WALTZ 3
102VINNESE WALTZ
103FRENCH WALTZ 1
104FRENCH WALTZ 2
Rhythm List
Appendix
LATIN/VARIOUS
105BOSSA NOVA 1
106BOSSA NOVA 2
107BOSSA NOVA 3
108SAMBA 1
109SAMBA 2
110MERENGUE
111CUMBIA
112CHA-CHA-CHA
113SALSA
114BEGUINE 1
115BEGUINE 2
116BOLERO
117MAMBO
118RHUMBA
119TANGO 1
120TANGO 2
121REGGAE 1
122REGGAE 2
123SKA
124LATIN DISCO
125BLUEGRASS
126COUNTRY
127COUNTRY SHUFFLE
128COUNTRY WALTZ
129FAST GOSPEL
130SLOW GOSPEL
131BROADWAY
132JIVE
133DIXIE
134PASODOBLE
135SIRTAKI
136HAWAIAN
137ADANI
138BALADI
139SYMPHONY
FOR PIANO
140PIANO BALLAD 1
No.Rhythm Name
160
METRONOME 4 BEAT
161
METRONOME 3 BEAT
162
METRONOME 2 BEAT
163POP BEAT
164URBAN 16 BEAT
165SHUFFLE BALLAD
166U.K EOCK
167UNPLUGGED
168CYBER TRANCE
1692 STEP
170BALLROOM FOX
171PUNTA
172BACHATA
173RAI
174ZOUK
175CONCERTO
User Rhythms
NOTE
•This list shows the initial factory default configuration, in which the user area (160 through 175) contains default rhythm dat
a.
•System reset page E-73 clears all data stored in the user area.
•The CD-ROM that comes bundled with the keyboard can be used to return all rhythms to the initial factory defaults shown in this
list. See “Returning the keyboard
to its initial factory defaults
” on page E-80 for details.
141PIANO BALLAD 2
142PIANO BALLAD 3
143EP BALLAD 1
144EP BALLAD 2
145BLUES BALLAD
146MELLOW JAZZ
147JAZZ COMBO 3
148RAGTIME
149BOOGIE-WOOGIE
150ARPEGGIO 1
151ARPEGGIO 2
152ARPEGGIO 3
153PIANO BALLAD 4
1546/8 MARCH
155MARCH 3
1562 BEAT
157WALTZ 4
158WALTZ 5
159WALTZ 6
WK3200_e_A-01-13.p6505.3.15, 6:17 PM11
A-12
Fingered Chord Chart
dimm7
-5
M7
M
m
7
m7
dim7
Chord
Type
Root
C
D
E
F
G
A
B
C /(D )
(D )/E
F /(G )
(G )/A
(A )/B
*
You can use the above fingerings to finger chords within the accompaniment keyboard range.
Appendix
738A-E-116A
WK3200_e_A-01-13.p6505.3.15, 6:18 PM12
A-13
augsus4
C
D
E
F
G
A
B
C /(D )
(D )/E
F /(G )
(G )/A
(A )/B
m add9
7sus4
mM7
7
-5
add9
Chord
Type
Root
Appendix
738A-E-117A
WK3200_e_A-01-13.p6505.3.15, 6:18 PM13
A-14
Appendix
738A-E-118A
REVERB Effect List
Effect List
CHORUS Effect List
DSP Effect List
Settable parameters depend on the DSP type. Also,
the parameters for each DSP type depend on the
algorithm* associated with the DSP type. See the DSP
Algorithm List on page A-16 for more information.
*Effector structure and operation type
No.Display NameType Name
00Chorus 1Chorus 1
01Chorus 2Chorus 2
02Chorus 3Chorus 3
03Chorus 4Chorus 4
04FBChorus
Feedback Chorus
05Flanger1Flanger 1
06SDelay 1Short Delay 1
07SDelay 2Short Delay 2
08SFChorusSoft Chorus
09BRChorusBright Chorus
10DPChorusDeep Chorus
11Flanger 2Flanger 2
12Flanger 3Flanger 3
13Flanger 4Flanger 4
14SDelay 3Short Delay 3
15SDelay 4Short Delay 4
No.Display NameType Name
00Room 1Room 1
01Room 2Room 2
02Room 3Room 3
03Hall 1Hall 1
04Hall 2Hall 2
05Plate 1Plate 1
06DelayDelay
07PanDelayPan Delay
08Plate 2Plate 2
09Plate 3Plate 3
10LrgRoom 1Large Room 1
11LrgRoom 2Large Room 2
12Stadium 1Stadium 1
13Stadium 2Stadium 2
14LongDly 1Long Delay 1
15LongDly 2Long Delay 2
DSP
Algorithm
DisplayDSP Name
No.IDName
Dynamics Fx
[00]03EqualizeEqualizer
[01]06Comp 1Compressor 1
[02]06Comp 2Compressor 2
[03]07LimiterLimiter
[04]13EnhancerEnhancer Phaser
Phaser
[05]10PhaserPhaser
[06]09StPhaserStereo Phaser
Chorus
[07]16Chorus 1Chorus 1
[08]17Chorus 2Chorus 2
[09]19Chorus 3Chorus 3
[10]18Chorus 4Chorus 4
[11]M05Enha ChoEnhancer - Chorus
Flanger
[12]26FlangerFlanger
[13]M07EnhaFlanEnhancer - Flanger
Equalizer List
No.Display NameType Name
0StandardStandard
1Bass +Bass +
2Treble +Treble +
3LoundnessLoundness
4MellowMellow
5BrightBright
6RockRock
7DanceDance
8JazzJazz
9ClassicClassic
WK3200_e_A-14-15.p6505.3.15, 6:18 PM14
A-15
Appendix
738A-E-119A
DSP
Algorithm
DisplayDSP Name
No.IDName
DSP
Algorithm
DisplayDSP Name
No.IDName
DSP
Algorithm
DisplayDSP Name
No.IDName
Delay
[14]28DelayDelay
[15]223Tap Dly3-Tap Delay
[16]20St DelayStereo Delay
[17]21StXDelayStereo Cross Delay
[18]M06Enha DlyEnhancer - Delay
[19]25ReflectReflection
Cho/Flanger/Delay Combination
[20]M02PhaCho 1Phaser - Chorus 1
[21]M02PhaCho 2Phaser - Chorus 2
[22]M04PhaDly 1Phaser - Delay 1
[23]M04PhaDly 2Phaser - Delay 2
[24]M00ChoDly 1Chorus - Delay 1
[25]M00ChoDly 2Chorus - Delay 2
[26]M01ChoDly 3Chorus - Delay 3
[27]M01ChoDly 4Chorus - Delay 4
[28]M19CmpDelayCompressor - Delay
[29]M18
CmpEnDly
Compressor - Enhancer -Delay
[30]M23
CmpChoRf
Compressor - Chorus -Reflection
[31]M08Cho FlanChorus - Flanger
[32]M03FlanDly 1Flanger - Delay 1
[33]M03FlanDly 2Flanger - Delay 2
Reverb
[34]27
RvbRoom1
Reverb Room 1
[35]27
RvbRoom2
Reverb Room 2
[36]27
RvbRoom3
Reverb Room 3
[37]27RvbHall 1Reverb Hall 1
[38]27RvbHall 2Reverb Hall 2
[39]27RvbPlateReverb Plate
[40]23
GateRvb 1
Gate Reverb 1
[41]23
GateRvb 2
Gate Reverb 2
[42]24
GateRvb 3
Gate Reverb 3
[43]24
GateRvb 4
Gate Reverb 4
[72]M30Crn ChoCrunch - Chorus
[73]M30OdChorusOverdrive - Chorus
[74]M30Dist ChoDistortion - Chorus
[75]M30MetalChoMetal - Chorus
[76]M31DistFlanDistortion - Flanger
[77]M31Met FlanMetal - Flanger
[78]M28CrnDelayCrunch - Delay
[79]M28Od DelayOverdrive - Delay
[80]M28DistDly 1Distortion - Delay 1
[81]M28DistDly 2Distortion - Delay 2
[82]M28MetalDlyMetal - Delay
[83]M28Fuzz DlyFuzz - Delay
[84]M24CrChoDly
Crunch - Chorus - Delay
[85]M24
DsChoDly
Distortion - Chorus - Delay
[86]M25
CmpCrDly
Compressor - Crunch - Delay
[87]M26
AWhCrDly
Auto Wah - Crunch - Delay
[88]M26
AWhOdDly
Auto Wah - Overdrive - Delay
[89]M26
AWhDsDly
Auto Wah - Distortion - Delay
[90]M27
LWhOdDly
LFO Wah - Overdrive - Delay
[91]M27
LWhDsDly
LFO Wah - Distortion - Delay
SFX
[92]14Ring ModRing Modulator
[93]M12
RgChoDly
Ring Modulator - Chorus - Delay
[94]M13RingDist
Ring Modulator - Distortion
[95]15Lo-FiLo-Fi
[96]M11
CompLoFi
Compressor - Lo-Fi
[97]M14LoFi RefLo-Fi - Reflection
[98]M15Crn LoFiCrunch - Lo-Fi
[99]M15DistLoFiDistortion - Lo-Fi
Pan/Tremolo Fx
[44]01TremoloTremolo
[45]M09Cho TremChorus - Tremolo
[46]00Auto PanAuto Pan
[47]M10
PhaAPan 1
Phaser - Auto Pan 1
[48]M10
PhaAPan 2
Phaser - Auto Pan 2
[49]M20
PhaChoAP
Phaser - Chorus - Auto Pan
Rotary Fx
[50]11Rotary 1Rotary 1
[51]11Rotary 2Rotary 2
[52]12Od Rot 1Overdrive - Rotary 1
[53]12Od Rot 2Overdrive - Rotary 2
[54]M17RotRef 1Rotary - Reflection 1
[55]M17RotRef 2Rotary - Reflection 2
[56]M17RotRef 3Rotary - Reflection 3
[57]M16
OdRtRef 1
Overdrive - Rotary - Reflection 1
[58]M16
OdRtRef 2
Overdrive - Rotary - Reflection 2
[59]M16
OdRtRef 3
Overdrive - Rotary - Reflection 3
Wah Fx
[60]04LFO WahLFO Wah
[61]05Auto WahAuto Wah
[62]M21
AWhChDly
Auto Wah - Chorus - Delay
[63]M22
LWhChDly
LFO Wah - Chorus - Delay
Guitar Fx
[64]08CrunchCrunch
[65]08OvrdriveOverdrive
[66]08Dist 1Distortion 1
[67]08Dist 2Distortion 2
[68]08MetalMetal
[69]08FuzzFuzz
[70]M29CrnPhaseCrunch - Phaser
[71]M29Od PhaseOverdrive - Phaser
WK3200_e_A-14-15.p6505.3.15, 6:18 PM15
A-16
738A-E-120A
Appendix
DSP Algorithm List
00 :Auto Pan
■
Function
Continually performs left-right panning of the
input signal in accordance with an LFO.
■
Parameters
0 : Rate (Range: 0 to 127)
Adjusts the panning rate.
1 :Depth (Range: 0 to 127)
Adjusts the panning depth.
01 :Tremolo
■
Function
Adjusts volume of input signal in accordance
with an LFO.
■
Parameters
0 :Rate (Range: 0 to 127)
Adjusts the tremolo rate.
1 :Depth (Range: 0 to 127)
Adjusts the tremolo depth.
02 :2BandEQ
■
Function
This is a two-band equalizer.
■
Parameters
0 :Low Frequency (Range: 0 (200Hz), 1 (400Hz),
2 (800Hz))
Adjusts the cutoff frequency of the low-band
equalizer.
1 :
Low Gain (Range: -12, -11, -10 to 0 to +10, +11, +12)
Adjusts the gain of the low-band equalizer.
2 :High Frequency (Range: 0 (6.0KHz), 1
(8.0KHz), 2 (10KHz))
Adjusts the cutoff frequency of the high-band
equalizer.
3 :
High Gain (Range: -12, -11, -10 to 0 to +10, +11, +12)
Adjusts the gain of the high-band equalizer.
03 :3BandEQ
■
Function
This is a three-band equalizer.
■
Parameters
0 :Low Frequency (Range: 0 (200Hz), 1 (400Hz),
2 (800Hz))
Adjusts the cutoff frequency of the low-band
equalizer.
1 :Low Gain (Range: -12, -11, -10 to 0 to +10, +11,
+12)
Adjusts the gain of the low-band equalizer.
2 :Mid Frequency (Range: 0 (1.0KHz), 1 (1.3KHz),
2 (1.6KHz), 3 (2.0KHz), 4 (3.0KHz), 5 (4.0KHz),
6 (6.0KHz), 7 (8.0KHz))
Adjusts the center frequency of the mid-band
equalizer.
3 :Mid Gain (Range: -12, -11, -10 to 0 to +10, +11,
+12)
Adjusts the gain of the mid-band equalizer.
4 :High Frequency (Range: 0 (6.0KHz), 1
(8.0KHz), 2 (10KHz))
Adjusts the cutoff frequency of the high-band
equalizer.
5 :High Gain (Range: -12, -11, -10 to 0 to +10, +11,
+12)
Adjusts the gain of the high-band equalizer.
04 :LFO Wah
■
Function
This is a “wah” ef
fect that can automatically
affect the frequency in accordance with an LFO.
■
Parameters
0 : Input Level (Range: 0 to 127)
Adjusts the input level. The input signal can
become distorted when the level of the sound
being input, the number of chords, or the Reso-
nance value is large. Adjust this parameter to
eliminate such distortion.
1 :Resonance (Range: 0 to 127)
Adjusts the resonance of the sound.
2 :Manual (Range: 0 to 127)
Adjusts the frequency used as the basis for the
wah filter.
3 :LFO Rate (Range: 0 to 127)
Adjusts the rate of the LFO.
4 :LFO Depth (Range: 0 to 127)
Adjusts the depth of the LFO.
05 :Auto Wah
■
Function
This is a “wah” ef
fect that can automatically
affect the frequency in accordance with the
level of the input signal.
■
Parameters
0 :Input Level (Range: 0 to 127)
Adjusts the input level. The input signal can
become distorted when the level of the sound
being input, the number of chords, or the Reso-
nance value is large. Adjust this parameter to
eliminate such distortion.
1 :Resonance (Range: 0 to 127)
Adjusts the resonance of the sound.
2 :Manual (Range: 0 to 127)
Adjusts the frequency used as the basis for the
wah filter.
WK3200_e_A-16-25.p6505.3.15, 6:18 PM16
A-17
Appendix
738A-E-121A
3 :Depth(Range: -64 to 0 to +63)
Adjusts the depth of the wah in accordance
with the level of the input signal.
Setting a positive value causes the wah filter
to open in direct proportion with the size of
the input signal, producing a bright sound.
Setting a negative value causes the Wah filter
to close in accordance with the size of the in-
put signal, which produces a dark tone qual-
ity. However, large input re-opens the Wah fil-
ter, even if it is closed.
06 :Compressor
■
Function
Compresses the input signal, which can have
the effect of suppressing level variation and
making it possible to sustain dampened
sounds longer.
■
Parameters
0 :Depth (Range: 0 to 127)
Adjusts compression of the audio signal.
1 :Attack (Range: 0 to 127)
Adjusts the attack amount of the input signal.
A smaller value causes prompt compressor op-
eration, which suppresses the attack of the in-
put signal.
A larger values delays compressor operation,
which causes attack to be output as-is.
2 :Release (Range: 0 to 127)
Adjusts the time from the point when the in-
put signal drops below a certain level until the
compression operation is stopped.
When an attack feeling is desired (no compres-
sion at the onset of the sound), set this param-
eter to as low a value as possible.
To have compression applied at all times, set a
high value.
3 :Level (Range: 0 to 127)
Adjusts the output level.
The output volume changes in accordance with
the Depth setting and the characteristics of the
input tone. Use this parameter to correct for
such changes.
07 :Limiter
■
Function
This is an effector that you can use to set an
upper limit value on the level of the input sig-
nal.
■
Parameters
0 :Limit (Range: 0 to 127)
Adjusts the volume level from which the limit
is applied.
1 :Attack (Range: 0 to 127)
Adjusts the attack amount of the input signal.
2 :Release (Range: 0 to 127)
Adjusts the time from when the input signal
drops below a certain level until the limit op-
eration stops.
3 :Level (Range: 0 to 127)
Adjusts the level being output.
The output volume changes in accordance with
the Limit setting and the characteristics of the
input tone. Use this parameter to correct for
such changes.
08 :Distortion
■
Function
This effect provides Distortion +
AmpSimulator.
■
Parameters
0 :Gain (Range: 0 to 127)
Adjusts the input gain.
1 :Low (Range: 0 to 127)
Adjusts the low-band gain.
The cutoff frequency differs according to the
preset DSP.
2 :High (Range: 0 to 127)
Adjusts the high-band gain.
The cutoff frequency differs according to the
preset DSP.
3 :Level (Range: 0 to 127)
Adjusts the output level.
09 :Stereo Phaser
■
Function
This is a stereo phaser that modulates the phase
in accordance with a sine wave LFO.
■
Parameters
0 :Resonance (Range: 0 to 127)
Adjusts the resonance of the sound.
1 :Manual (Range: -64 to 0 to +63)
Adjusts the phaser shift volume, which is used
for reference.
2 :Rate (Range: 0 to 127)
Adjusts the rate of the LFO.
3 :Depth (Range: 0 to 127)
Adjusts the depth of the LFO.
4 :Wet Level (Range: 0 to 127)
Adjusts the volume level of the effect.
10 :Phaser
■
Function
This is a monaural phaser that modulates the
phase in accordance with a sine wave LFO.
■
Parameters
0 :Resonance (Range: 0 to 127)
Adjusts the resonance of the sound.
1 :Manual (Range: -64 to 0 to +63)
Adjusts the phaser shift volume, which is used
for reference.
WK3200_e_A-16-25.p6505.3.15, 6:18 PM17
A-18
2 :Rate (Range: 0 to 127)
Adjusts the rate of the LFO.
3 :Depth (Range: 0 to 127)
Adjusts the depth of the LFO.
4 :Wet Level (Range: 0 to 127)
Adjusts the level of the effect sound.
11 :Rotary
■
Function
This is a rotary speaker simulator.
■
Parameters
0 :Speed (Range: Slow, Fast)
Switches the speed mode between fast and
slow.
1 :Break (Range: Rotate, Stop)
Stops speaker rotation.
2 :Fall Accel (Range: 0 to 127)
Adjusts acceleration when the speed mode is
switched from fast to slow.
3 :Rise Accel (Range: 0 to 127)
Adjusts acceleration when the speed mode is
switched from slow to fast.
4 :Slow Rate (Range: 0 to 127)
Adjusts speaker rotation speed of the slow
speed mode.
5 :Fast Rate (Range: 0 to 127)
Adjusts speaker rotation speed of the fast speed
mode.
12 :Drive Rotary
■
Function
This is an overdrive - rotary speaker simula-
tor.
■
Parameters
0 :Overdrive Gain (Range: 0 to 127)
Adjusts overdrive gain.
1 :Overdrive Level (Range: 0 to 127)
Adjusts the output level of the overdrive.
2 :Speed(Range: Slow, Fast)
Switches the speed mode between fast and
slow.
3 :Break (Range: Rotate, Stop)
Stops speaker rotation.
4 :Fall Accel (Range: 0 to 127)
Adjusts acceleration when the speed mode is
switched from fast to slow.
5 :Rise Accel (Range: 0 to 127)
Adjusts acceleration when the speed mode is
switched from slow to fast.
6 :Slow Rate (Range: 0 to 127)
Adjusts speaker rotation speed of the slow
speed mode.
7 :Fast Rate (Range: 0 to 127)
Adjusts speaker rotation speed of the fast speed
mode.
13 :Enhancer
■
Function
Enhances the outlines of the low range and
high range of the input signal.
■
Parameters
0 :Low Frequency (Range: 0 to 127)
Adjusts the low range enhancer frequency.
1 :Low Gain (Range: 0 to 127)
Adjusts the low range enhancer gain.
2 :High Frequency (Range: 0 to 127)
Adjusts the high range enhancer frequency.
3 :High Gain (Range: 0 to 127)
Adjusts the high range enhancer gain.
14 :Ring Modulator
■
Function
This is a ring modulator (AM modulator) that
makes it possible to modulate the frequency
of internal oscillator (OSC) in accordance with
an internal LFO.
■
Parameters
0 :OSC Frequency (Range: 0 to 127)
Sets the reference frequency of the internal
OSC.
1 :LFO Rate (Range: 0 to 127)
Adjusts the rate of the LFO.
2 :LFO Depth (Range: 0 to 127)
Adjusts the depth of the LFO.
3 :Wet Level (Range: 0 to 127)
Adjusts the level of the effect sound.
4 :Dry Level (Range: 0 to 127)
Adjusts the level of the original sound.
15 :Lo-Fi
■
Function
This is an effector that reproduces a retro-type
Lo-Fi sound using Noise Generator 1 (phono-
graph record player type scratch noise genera-
tor) and Noise Generator 2 (FM radio type
white noise and pink noise continuous noise
generator), and by noise modulation (ampli-
tude modulation = AM) and distortion of fre-
quency characteristics.
■
Parameters
0 :Noise Level 1 (Range: 0 to 127)
Adjusts the level of Noise Generator 1.
1 :Noise Density 1 (Range: 0 to 127)
Adjusts the noise density of Noise Generator
1.
2 :Noise Level 2 (Range: 0 to 127)
Adjusts the level of Noise Generator 2.
3 :Noise Density 2 (Range: 0 to 127)
Adjusts the noise density of Noise Generator
2.
4 :Tone (Range: 0 to 127)
Adjusts the tone.
5 :Resonance (Range: 0 to 127)
Adjusts the resonance of the sound.
Appendix
738A-E-122A
WK3200_e_A-16-25.p6505.3.15, 6:18 PM18
A-19
■
Parameters
0 :Rate1 (Fast LFO Rate) (Range: 0 to 127)
Adjusts the rate of LFO1.
1 :Depth1 (Fast LFO Depth) (Range: 0 to 127)
Adjusts the depth of LFO1.
2 :Rate2 (Slow LFO Rate) (Range: 0 to 127)
Adjusts the rate of LFO2.
3 :Depth2 (Slow LFO Depth) (Range: 0 to 127)
Adjusts the depth of LFO2.
4 :Wet Level (Range: 0 to 127)
Adjusts the level of the effect sound.
19 :Tri 2-Phase Chorus
■
Function
This is stereo chorus in accordance with trian-
gular wave LFO.
■
Parameters
0 :LFO Rate (Range: 0 to 127)
Adjusts the rate of the LFO.
1 :LFO Depth (Range: 0 to 127)
Adjusts the depth of the LFO.
2 :Feedback(Range: -64 to 0 to +63)
Adjusts the feedback of the sound.
3 :Wet Level (Range: 0 to 127)
Adjusts the level of the effect sound.
20 :Stereo Delay 1
■
Function
This is delay of stereo input and output.
■
Parameters
0 :Delay Time (Range: 0 to 127)
Adjusts the delay time.
1 :Wet Level (Range: 0 to 127)
Adjusts the level of the effect sound.
2 :Feedback (Range: 0 to 127)
Adjusts the repeat of the delay.
3 :High Damp (Range: 0 to 127)
Adjusts damping of the high-range delay
sound.
The smaller the value, the greater the damp-
ing of high-range delay sound.
4 :Ratio L (Range: 0 to 127)
Adjusts the delay time of the left channel.
Proportional to the value set for Delay Time.
5 :Ratio R (Range: 0 to 127)
Adjusts the delay time of the right channel.
Proportional to the value set for Delay Time.
21 :Stereo Delay 2
■
Function
This is cross feedback delay of stereo input and
output.
■
Parameters
0 :Delay Time (Range: 0 to 127)
Adjusts the delay time.
1 :Wet Level (Range: 0 to 127)
Adjusts the level of the effect sound.
2 :Feedback (Range: 0 to 127)
Adjusts the repeat of the delay.
3 :High Damp (Range: 0 to 127)
Adjusts damping of the high-range delay
sound.
The smaller the value, the greater the damp-
ing of high-range delay sound.
4 :Ratio L (Range: 0 to 127)
Adjusts the delay time of the left channel.
Proportional to the value set for Delay Time.
5 :Ratio R (Range: 0 to 127)
Adjusts the delay time of the right channel.
Proportional to the value set for Delay Time.
22 :3-Tap Delay
■
Function
This is left/center/right 3-tap delay.
6 :Bass(Range: -64 to 0 to +63)
Adjusts the volume of low sounds.
7 :Level (Range: 0 to 127)
Adjusts the output level.
16 :1-Phase Chorus
■
Function
This is monaural chorus in accordance with a
sine wave LFO.
■
Parameters
0 :LFO Rate (Range: 0 to 127)
Adjusts the rate of the LFO.
1 :LFO Depth (Range: 0 to 127)
Adjusts the depth of the LFO.
2 :Feedback (Range: -64 to 0 to +63)
Adjusts the feedback of the sound.
3 :Wet Level (Range: 0 to 127)
Adjusts the level of the effect sound.
17 :Sin 2-Phase Chorus
■
Function
This is stereo chorus in accordance with a sine
wave LFO.
■
Parameters
0 :LFO Rate (Range: 0 to 127)
Adjusts the rate of the LFO.
1 :LFO Depth (Range: 0 to 127)
Adjusts the depth of the LFO.
2 :Feedback (Range: -64 to 0 to +63)
Adjusts the feedback of the sound.
3 :Wet Level (Range: 0 to 127)
Adjusts the level of the effect sound.
18 :3-Phase Chorus
■
Function
This is 3-phase chorus in accordance with two
LFOs of with different sine wave rates.
Appendix
738A-E-123A
WK3200_e_A-16-25.p6505.3.15, 6:18 PM19
A-20
■
Parameters
0 :Delay Time (Range: 0 to 127)
Adjusts the delay time.
1 :Wet Level (Range: 0 to 127)
Adjusts the level of the effect sound.
2 :Feedback (Range: 0 to 127)
Adjusts the repeat of the delay.
3 :High Damp (Range: 0 to 127)
Adjusts damping of the high-range delay
sound.
The smaller the value, the greater the damp-
ing of high-range delay sound.
4 :Ratio L (Range: 0 to 127)
Adjusts the delay time of the left channel.
Proportional to the value set for Delay Time.
5 :Ratio C (Range: 0 to 127)
Adjusts the delay time of the center channel.
Proportional to the value set for Delay Time.
6 :Ratio R (Range: 0 to 127)
Adjusts the delay time of the right channel.
Proportional to the value set for Delay Time.
23 :Gate Reverb
■
Function
This is a fader that creates artificial reverb that
sounds like it is being cut with a gate.
■
Parameters
0 :LPF (Range: 0 to 127)
Adjusts the cutoff frequency of the low-pass
filter.
A smaller value cuts the high range.
1 :HPF (Range: 0 to 127)
Adjusts the cutoff frequency of the high-pass
filter.
A larger value cuts the low range.
2 :Feedback (Range: 0 to 127)
Adjusts the repeat of the reverb.
3 :High Damp (Range: 0 to 127)
Adjusts damping of the high-range delay
sound.
The smaller the value, the greater the damp-
ing of high-range delay sound.
4 :Diffusion (Range: 0 to 127)
Provides fine adjustment of the reverb.
5 :Wet Level (Range: 0 to 127)
Adjusts the level of the effect sound.
6 :Dry Level (Range: 0 to 127)
Adjusts the level of the original sound.
24 :Reverse Gate Reverb
■
Function
This is gate reverb with a reverse rotation ef-
fect.
■
Parameters
0 :LPF (Range: 0 to 127)
Adjusts the cutoff frequency of the low-pass
filter.
A smaller value cuts the high range.
1 :HPF (Range: 0 to 127)
Adjusts the cutoff frequency of the high-pass
filter.
A larger value cuts the low range.
2 :Feedback (Range: 0 to 127)
Adjusts the repeat of the reverb.
3 :High Damp (Range: 0 to 127)
Adjusts damping of the high-range reverb
sound.
The smaller the value, the greater the damp-
ing of high-range reverb sound.
4 :Diffusion (Range: 0 to 127)
Provides fine adjustment of the reverb.
5 :Wet Level (Range: 0 to 127)
Adjusts the level of the effect sound.
6 :Dry Level (Range: 0 to 127)
Adjusts the level of the original sound.
25 :Reflection
■
Function
This is an effector that extracts the first reflected
sound from a reverb sound.
■
Parameters
0 :Type (Range: 0 to 7)
Selects from among the eight available reflec-
tion patterns.
1 :Wet Level (Range: 0 to 127)
Adjusts the level of the effect sound.
2 :Feedback (Range: 0 to 127)
Adjusts the repeat of the reflected sound.
3 :Tone (Range: 0 to 127)
Adjusts the tone of the reflected sound.
26 :Flanger
■
Function
This is a flanger in accordance with a sine wave
LFO.
■
Parameters
0 :LFO Rate (Range: 0 to 127)
Adjusts the rate of the LFO.
1 :LFO Depth (Range: 0 to 127)
Adjusts the depth of the LFO.
2 :Feedback (Range: -64 to 0 to +63)
Adjusts the feedback of the sound.
3 :Wet Level (Range: 0 to 127)
Adjusts the level of the effect sound.
27 :Reverb
■
Function
This is an effector that preserves the breadth
of a sound by adding a reverb sound.
■
Parameters
0 :Tone (Range: 0 to 127)
Adjusts the tone of the reverb sound.
Appendix
738A-E-124A
WK3200_e_A-16-25.p6505.3.15, 6:18 PM20
A-21
1 :Time (Range: 0 to 127)
Adjusts the reverb time.
2 :High Damp (Range: 0 to 127)
Adjusts damping of the high-range reverb
sound.
The smaller the value, the greater the damp-
ing of high-range reverb sound.
3 :ER Level (Range: 0 to 127)
Adjusts the level of the initial reflection.
4 :Wet Level (Range: 0 to 127)
Adjusts the level of the effect sound.
28 :2-Tap Delay
■
Function
This is left/right 2-tap delay.
■
Parameters
0 :Delay Time (Range: 0 to 127)
Adjusts the delay time.
1 :Wet Level (Range: 0 to 127)
Adjusts the level of the effect sound.
2 :Feedback (Range: 0 to 127)
Adjusts the repeat of the delay.
3 :High Damp (Range: 0 to 127)
Adjusts damping of the high-range delay
sound.
The smaller the value, the greater the damp-
ing of high-range delay sound.
4 :Ratio L (Range: 0 to 127)
Adjusts the delay time of the left channel.
Proportional to the value set for Delay Time.
5 :Ratio R (Range: 0 to 127)
Adjusts the delay time of the right channel.
Proportional to the value set for Delay Time.
★The following “Multi” algorithms ar
e used in com-
bination with the algorithms described above. Pa-
rameters are shared by both types of algorithms.
M00 :Multi00 (Sin 2-Phase Chorus
– 2-T
ap
Delay)
■
Function
This is a multi effector that is related to Sin 2-
Phase Chorus - 2-Tap Delay.
■
Parameters
0 :Chorus LFO Rate
1 :Chorus LFO Depth
2 :Chorus Feedback
3 :Chorus Wet Level
4 :Delay Time
5 :Delay Wet Level
6 :Delay Feedback
7 :Delay High Damp
M01 :Multi01 (3-Phase Chorus
– 3-T
ap De-
lay)
■
Function
This is a multi effector that is related to 3-Phase
Chorus - 3-Tap Delay.
■
Parameters
0 :Chorus Rate 1
1 :Chorus Depth 1
2 :Chorus Rate 2
3 :Chorus Depth 2
4 :Chorus Wet Level
5 :Delay Time
6 :Delay Wet Level
7 :Delay Feedback
M02 : Multi02 (Phaser
– 3-Phase Chorus)
■
Function
This is a multi effector that is related to Phaser
- 3-Phase Chorus.
■
Parameters
0 :Phaser Resonance
1 :Phaser Manual
2 :Phaser Rate
3 :Phaser Depth
4 :Chorus Rate 1
5 :Chorus Depth 1
6 :Chorus Rate 2
7 :Chorus Depth 2
M03 : Multi03 (Flanger
– 2-T
ap Delay)
■
Function
This is a multi effector that is related to Flanger
- 2-Tap Delay.
■
Parameters
0 :Flanger LFO Rate
1 :Flanger LFO Depth
2 :Flanger Feedback
3 :Flanger Wet Level
4 :Delay Time
5 :Delay Wet Level
6 :Delay Feedback
7 :Delay High Damp
M04 : Multi04 (Stereo Phaser
– Stereo Delay
1)
■
Function
This is a multi effector that is related to Stereo
Phaser - Stereo Delay 1.
■
Parameters
0 :Phaser Resonance
1 :Phaser Manual
2 :Phaser Rate
3 :Phaser Depth
4 :Phaser Wet Level
5 :Delay Time
Appendix
738A-E-125A
WK3200_e_A-16-25.p6505.3.15, 6:18 PM21
A-22
6 :Delay Wet Level
7 :Delay Feedback
M05 : Multi05 (Enhancer
– 1-Phase Chorus)
■
Function
This is a multi effector related to Enhancer - 1-
Phase Chorus.
■
Parameters
0 :Enhancer Low Frequency
1 :Enhancer Low Gain
2 :Enhancer High Frequency
3 :Enhancer High Gain
4 :Chorus LFO Rate
5 :Chorus LFO Depth
6 :Chorus Feedback
7 :Chorus Wet Level
M06 : Multi06 (Enhancer
– 2-T
ap Delay)
■
Function
This is a multi effector that is related to En-
hancer - 2-Tap Delay.
■
Parameters
0 :Enhancer Low Frequency
1 :Enhancer Low Gain
2 :Enhancer High Frequency
3 :Enhancer High Gain
4 :Delay Time
5 :Delay Wet Level
6 :Delay Feedback
7 :Delay High Damp
M07 : Multi07 (Enhancer
– Flanger)
■
Function
This is a multi effector related to Enhancer -
Flanger.
■
Parameters
0 :Enhancer Low Frequency
1 :Enhancer Low Gain
2 :Enhancer High Frequency
3 :Enhancer High Gain
4 :Flanger LFO Rate
5 :Flanger LFO Depth
6 :Flanger Feedback
7 :Flanger Wet Level
M08: Multi08 (Sin 2-Phase Chorus
– Flanger)
■
Function
This is a multi effector that is related to Sin 2-
Phase Chorus - Flanger.
■
Parameters
0 :Chorus LFO Rate
1 :Chorus LFO Depth
2 :Chorus Feedback
3 :Chorus Wet Level
4 :Flanger LFO Rate
5 :Flanger LFO Depth
6 :Flanger Feedback
7 :Flanger Wet Level
M09 :Multi09
(Sin 2-Phase Chorus
– T
remolo)
■
Function
This is a multi effector that is related to Sin 2-
Phase Chorus - Tremolo.
■
Parameters
0 :Chorus LFO Rate
1 :Chorus LFO Depth
2 :Chorus Feedback
3 :Chorus Wet Level
4 :Tremolo Rate
5 :Tremolo Depth
M10 : Multi10 (Stereo Phaser
–
Auto Pan)
■
Function
This is a multi effector that is related to Stereo
Phaser - Auto Pan.
■
Parameters
0 :Phaser Resonance
1 :Phaser Manual
2 :Phaser Rate
3 :Phaser Depth
4 :Phaser Wet Level
5 :Auto Pan Rate
6 :Auto Pan Depth
M11 : Multi11 (Compressor
– Lo-Fi)
■
Function
This is a multi effector related to Compressor -
Lo-Fi.
■
Parameters
0 :Compressor Depth
1 :Compressor Attack
2 :Compressor Level
3 :Lo-Fi Noise 1
4 :Lo-Fi Noise 2
5 :Lo-Fi Tone
6 :Lo-Fi Resonance
7 :Lo-Fi Bass
M12 :Multi12 (Ring Modulator
– Sin 2-Phase
Chorus - 2-Tap Delay)
■
Function
This is a multi effector that is related to Ring
Modulator - Sin 2-Phase Chorus.
■
Parameters
0 :Ring OSC Frequency
1 :Ring LFO Rate
2 :Ring LFO Depth
Appendix
738A-E-126A
WK3200_e_A-16-25.p6505.3.15, 6:18 PM22
A-23
3 :Ring Wet Level
4 :Ring Dry Level
5 :Chorus LFO Depth
6 :Delay Time
7 :Delay Wet Level
M13 : Multi13 (Ring Modulator
– Distortion)
■
Function
This is a multi effector related to Ring Modu-
lator - Distortion.
■
Parameters
0 :Ring OSC Frequency
1 :Ring LFO Rate
2 :Ring LFO Depth
3 :Ring Wet Level
4 :Ring Dry Level
5 :Distortion Gain
6 :Distortion Tone
7 :Distortion Level
M14 :Multi14 (Lo-Fi
– Reflection)
■
Function
This is a multi effector related to Lo-Fi - Re-
flection.
■
Parameters
0 :Lo-Fi Noise1
1 :Lo-Fi Noise2
2 :Lo-Fi Tone
3 :Lo-Fi Resonance
4 :Reflection Type
5 :Reflection Wet Level
6 :Reflection Feedback
7 :Reflection Tone
M15 : Multi15 (Distortion
– Lo-Fi)
■
Function
This is a multi effector related to Distortion -
Lo-Fi.
■
Parameters
0 :Distortion Gain
1 :Distortion Low
2 :Distortion High
3 :Distortion Level
4 :Lo-Fi Noise1
5 :Lo-Fi Noise2
6 :Lo-Fi Tone
7 :Lo-Fi Resonance
M16 : Multi16 (Drive Rotary
– Reflection)
■
Function
This is a multi effector related to Drive Rotary
- Reflection.
■
Parameters
0 :Drive Rotary Gain
1 :Drive Rotary Level
2 :Drive Rotary Speed
3 :Drive Rotary Slow Rate
4 :Drive Rotary Fast Rate
5 :Reflection Wet Level
6 :Reflection Feedback
7 :Reflection Tone
M17 : Multi17 (Rotary
– Reflection)
■
Function
This is a multi effector related to Rotary - Re-
flection.
■
Parameters
0 :Rotary Speed
1 :Rotary Break
2 :Rotary Slow Rate
3 :Rotary Fast Rate
4 :Reflection Wet Level
5 :Reflection Feedback
6 :Reflection Tone
M18 :Multi18 (Compressor
– Enhancer - 2-
Tap Delay)
■
Function
This is a multi effector that is related to Com-
pressor - Enhancer - 2-Tap Delay.
■
Parameters
0 :Compressor Depth
1 :Compressor Attack
2 :Compressor Level
3 :Enhancer Low Gain
4 :Enhancer High Gain
5 :Delay Time
6 :Delay Wet Level
7 :Delay Feedback
M19 : Multi19 (Compressor
– Stereo Delay
1)
■
Function
This is a multi effector related to Compressor -
Stereo Delay 1.
■
Parameters
0 :Compressor Depth
1 :Compressor Attack
2 :Compressor Release
3 :Compressor Level
4 :Delay Time
5 :Delay Wet Level
6 :Delay Feedback
7 :Delay High Damp
Appendix
738A-E-127A
WK3200_e_A-16-25.p6505.3.15, 6:18 PM23
A-24
M20 :Multi20 (Phaser
– 1-Phase Chorus
–
Auto Pan)
■
Function
This is a multi effector that is related to Phaser
- 1-Phase Chorus - Auto Pan.
■
Parameters
0 :Phaser Resonance
1 :Phaser Manual
2 :Phaser Rate
3 :Phaser Depth
4 :Chorus LFO Rate
5 :Chorus LFO Depth
6 :Auto Pan Rate
7 :Auto Pan Depth
M21 : Multi21 (Auto Wah – Tri 2-Phase Cho-
rus – 2-Tap Delay)
■
Function
This is a multi effector that is related to Auto
Wah - Tri 2-Phase Chorus - 2-Tap Delay.
■
Parameters
0 :Wah Resonance
1 :Wah Manual
2 :Wah Depth
3 :Chorus LFO Rate
4 :Chorus LFO Depth
5 :Delay Time
6 :Delay Wet Level
7 :Delay Feedback
M22 :Multi22 (LFO Wah – Tri 2-Phase Cho-
rus – 2-Tap Delay)
■
Function
This is a multi effector that is related to LFO
Wah - Tri 2-Phase Chorus - 2-Tap Delay.
■
Parameters
0 :Wah Resonance
1 :Wah Manual
2 :Wah LFO Rate
3 :Wah LFO Depth
4 :Chorus LFO Depth
5 :Delay Time
6 :Delay Wet Level
7 :Delay Feedback
M23 :Multi23 (Compressor
– Sin 2-Phase
Chorus – Reflection)
■
Function
This is a multi effector that is related to Com-
pressor - Sin 2-Phase Chorus - Reflection.
■
Parameters
0 :Compressor Depth
1 :Compressor Attack
2 :Compressor Level
3 :Chorus LFO Rate
4 :Chorus LFO Depth
5 :Reflection Wet Level
6 :Reflection Feedback
7 :Reflection Tone
M24 :Multi24 (Distortion
– 1-Phase Chorus
– 2-Tap Delay)
■
Function
This is a multi effector that is related to Distor-
tion - 1-Phase Chorus - 2-Tap Delay.
■
Parameters
0 :Distortion Gain
1 :Distortion Low
2 :Distortion High
3 :Distortion Level
4 :Chorus LFO Depth
5 :Delay Time
Appendix
738A-E-128A
6 :Delay Wet Level
7 :Delay Feedback
M25 :Multi25 (Compressor
– Distortion – 2-
Tap Delay)
■
Function
This is a multi effector that is related to Com-
pressor - Distortion - 2-Tap Delay.
■
Parameters
0 :Compressor Depth
1 :Distortion Gain
2 :Distortion Low
3 :Distortion High
4 :Distortion Level
5 :Delay Time
6 :Delay Wet Level
7 :Delay Feedback
M26 :Multi26 (Auto Wah – Distortion – 2-T
ap
Delay)
■
Function
This is a multi effector that is related to Auto
Wah - Distortion - 2-Tap Delay.
■
Parameters
0 :Wah Manual
1 :Wah Depth
2 :Distortion Gain
3 :Distortion Tone
4 :Distortion Level
5 :Delay Time
6 :Delay Wet Level
7 :Delay Feedback
WK3200_e_A-16-25.p6505.3.15, 6:18 PM24
A-25
738A-E-129A
M27 :Multi27 (LFO Wah – Distortion – 2-T
ap
Delay)
■
Function
This is a multi effector that is related to LFO
Wah - Distortion - 2-Tap Delay.
■
Parameters
0 :Wah Manual
1 :Wah LFO Rate
2 :Wah LFO Depth
3 :Distortion Gain
4 :Distortion Level
5 :Delay Time
6 :Delay Wet Level
7 :Delay Feedback
M28 : Multi28 (Distortion
– 3-T
ap Delay)
■
Function
This is a multi effector that is related to Distor-
tion - 3-Tap Delay.
■
Parameters
0 :Distortion Gain
1 :Distortion Low
2 :Distortion High
3 :Distortion Level
4 :Delay Time
5 :Delay Wet Level
6 :Delay Feedback
7 :Delay High Damp
M29 : Multi29 (Distortion
– Phaser)
■
Function
This is a multi effector related to Distortion -
Phaser.
■
Parameters
0 :Distortion Gain
1 :Distortion Low
2 :Distortion High
3 :Distortion Level
4 :Phaser Resonance
5 :Phaser Manual
6 :Phaser Rate
7 :Phaser Depth
M30 :Multi30 (Distortion
– Sin 2-Phase Cho-
rus)
■
Function
This is a multi effector that is related to Distor-
tion - Sin 2-Phase Chorus.
■
Parameters
0 :Distortion Gain
1 :Distortion Low
2 :Distortion High
3 :Distortion Level
4 :Chorus LFO Rate
5 :Chorus LFO Depth
6 :Chorus Feedback
7 :Chorus Wet Level
M31 : Multi31 (Distortion
– Flanger)
■
Function
This is a multi effector related to Distortion -
Flanger.
■
Parameters
0 :Distortion Gain
1 :Distortion Low
2 :Distortion High
3 :Distortion Level
4 :Flanger LFO Rate
5 :Flanger LFO Depth
6 :Flanger Feedback
7 :Flanger Wet Level
Appendix
WK3200_e_A-16-25.p6505.3.15, 6:18 PM25
738A-E-130A
BasicDefault
ChannelChanged
Default
ModeMessages
Altered
Note
NumberTrue voice
VelocityNote ON
Note OFF
AfterKey’s
TouchCh’s
Pitch Bender
Control
Change
1-16
1-16
Mode 3
X
❊❊❊❊❊❊❊❊❊❊❊❊❊❊
0-127
❊❊❊❊❊❊❊❊❊❊❊❊❊❊
O
9nH V = 1-127
X
9nH V = 0
X
X
O
*1: Depends on tone
1-16
1-16
Mode 3
X
❊❊❊❊❊❊❊❊❊❊❊❊❊❊
0-127
0-127
*1
O
9nH V = 1-127
X
X
O
O
MIDI Implementation Chart
Version: 1.0
Function ...
Transmitted
Recognized
Remarks
0,32
1
6.38
7
10
11
16
17
18
19
64
66
67
71
72
73
74
76
O
O
O
O
O
X
*2
O
O
O
O
O
*3
O
*3
O
*3
O
O
O
O
O
O
O
O
O
O
O
O
O
O
O
O
O
O
O
O
O
O
O
Bank select
Modulation
Data entry
Volume
Pan
Expression
DSP Parameter0
DSP Parameter1
DSP Parameter2
DSP Parameter3
Hold1
Sostenuto
Soft pedal
Resonance
Release Time
Attack Time
Brightness
Vibrato rate
Models WK-3700/WK-3200
WK3200_e_MIDI Chart.p6505.3.15, 6:18 PM2
738A-E-131A
Program
Change:True #
System Exclusive
System: Song Pos
Common: Song Sel
: Tune
System: Clock
Real Time: Commands
Aux: Local ON/OFF
: All notes OFF
Messages: Active Sense
: Reset
Remarks
O
0-127
❊❊❊❊❊❊❊❊❊❊❊❊❊❊
O
X
X
X
O
O
X
X
X
X
O
0-127
❊❊❊❊❊❊❊❊❊❊❊❊❊❊
O
X
X
X
X
X
X
O
O
X
*
2
Cannot be sent by keyboard play or control panel operations on this instrument, but
sent by Auto Accompaniment or Song Memory functions.
*
3
Selected in accordance with sustain pedal setting.
Mode 1 : OMNI ON, POLYMode 2 : OMNI ON, MONO
O
: Yes
Mode 3 : OMNI OFF, POLYMode 4 : OMNI OFF, MONO
X
: No
74
76
77
78
80
81
82
83
91
93
98,99
100,101
120
121
O
O
O
O
O
O
O
O
O
O
O
O
X
O
O
O
O
O
O
O
O
O
O
O
O
O
X
O
Brightness
Vibrato rate
Vibrato depth
Vibrato delay
DSP Parameter4
DSP Parameter5
DSP Parameter6
DSP Parameter7
Reverb send
Chorus send
NRPN LSB, MSB
RPN LSB, MSB
All sound off
Reset all controller
WK3200/3700-E-1
This recycle mark indicates that the packaging conforms to
the environmental protection legislation in Germany.
Gebruikershandleiding.com neemt misbruik van zijn services uitermate serieus. U kunt hieronder aangeven waarom deze vraag ongepast is. Wij controleren de vraag en zonodig wordt deze verwijderd.
Product:
Spelregels forum
Om tot zinvolle vragen te komen hanteren wij de volgende spelregels:
lees eerst de handleiding door;
controleer of uw vraag al eerder door iemand anders is gesteld;
probeer uw vraag zo duidelijk mogelijk te stellen;
heeft u een probleem en al geprobeerd om dit op te lossen, vermeld dit erbij aub;
heeft u een oplossing gekregen van een bezoeker dan horen wij dat graag in dit forum;
wilt u een reactie geven op een vraag of antwoord, gebruik dan niet dit formulier maar klik op de knop 'reageer op deze vraag';
uw vraag wordt direct op de website gezet; vermijd daarom persoonlijke gegevens in te vullen;
Belangrijk! Als er een antwoord wordt gegeven op uw vraag, dan is het voor de gever van het antwoord nuttig om te weten als u er wel (of niet) mee geholpen bent! Wij vragen u dus ook te reageren op een antwoord.
Belangrijk! Antwoorden worden ook per e-mail naar abonnees gestuurd. Laat uw emailadres achter op deze site, zodat u op de hoogte blijft. U krijgt dan ook andere vragen en antwoorden te zien.
Abonneren
Abonneer u voor het ontvangen van emails voor uw Casio WK-3700 bij:
nieuwe vragen en antwoorden
nieuwe handleidingen
U ontvangt een email met instructies om u voor één of beide opties in te schrijven.
Ontvang uw handleiding per email
Vul uw emailadres in en ontvang de handleiding van Casio WK-3700 in de taal/talen: Engels als bijlage per email.
De handleiding is 5,31 mb groot.
U ontvangt de handleiding per email binnen enkele minuten. Als u geen email heeft ontvangen, dan heeft u waarschijnlijk een verkeerd emailadres ingevuld of is uw mailbox te vol. Daarnaast kan het zijn dat uw internetprovider een maximum heeft aan de grootte per email. Omdat hier een handleiding wordt meegestuurd, kan het voorkomen dat de email groter is dan toegestaan bij uw provider.
Uw handleiding is per email verstuurd. Controleer uw email
Als u niet binnen een kwartier uw email met handleiding ontvangen heeft, kan het zijn dat u een verkeerd emailadres heeft ingevuld of dat uw emailprovider een maximum grootte per email heeft ingesteld die kleiner is dan de grootte van de handleiding.
Er is een email naar u verstuurd om uw inschrijving definitief te maken.
Controleer uw email en volg de aanwijzingen op om uw inschrijving definitief te maken
U heeft geen emailadres opgegeven
Als u de handleiding per email wilt ontvangen, vul dan een geldig emailadres in.
Uw vraag is op deze pagina toegevoegd
Wilt u een email ontvangen bij een antwoord en/of nieuwe vragen? Vul dan hier uw emailadres in.