481309
3
Verklein
Vergroot
Pagina terug
1/74
Pagina verder
Remote controller
Owner’s manual
1
I
1
B
C
A
A
AM
PM
A
B
1
2
F
A
B
1
2
F
A
AM
PM
A
B
1
2
F
8
5
E
C
G
L
N
Y
Q
S RT
3
A1 A2 A3 A4 A5
11
10
1412
9
7
6
4
B
D
F
M
P
2
13
15
11
Display
A
Operating mode
A1
Ventilation (fan only)
A2
Heating (heat pump models only)
A3
Automatic (heat pump models only)
A4
Cooling and dehumidification
A5
Dehumidification only
B
Signal transmission symbol
C
Temperature selected
D
A
B
A
B
Address selector
E
F
F
Temperature unit of measurement (°C or °F)
F
1
2
1
2
Unit configuration
G
Batteries exhausted indicator
L
Air flow direction (Flap)
L1
Automatic
L2
Fixed
L3
Continuous
L4
Horizontal sweep (size 100)
M
Fan speed
M1
Low speed (for night operation)
M2
Medium speed
M3
High speed (at start-up, to reach temperature)
M4
Automatic (fan speed will automatically switch to the value
required for optimum comfort)
N
Personalisation active
P
ON timer active
Q
Night timer active
R
Daily timer active (Everyday)
S
Current time and timer
T
OFF timer active
Y
Ionizer active
Buttons
1
On/Off button
2
Increase temperature (UP)
3
Decrease temperature (DOWN)
4
Mode selection
5
Fan speed selection
6
Personalised mode
7
Air flow direction (Flap)
8
Blank (50, 70)
Horizontal sweep (size 100)
9
ON timer
10
Current time setting / Cancel
11
Daily timer (Everyday)
12
OFF timer
13
Ioniser
14
Sleep timer (Night)
15
Reset
English
3
2
This manual contains information on how to use the air conditioner with
the infrared remote controller.
Please refer to the Installation Operation and maintenance manual of
the indoor unit for routine maintenance and for additional operating info.
The maximum operating range for the remote control is approx. 5 m.
No obstructions such as curtains or plants should be between control
and unit.
Direct sun on the unit receiver may interfere with good signal reception.
The control must be directed toward the unit receiver when pressing the
buttons of the desired functions. An acoustical acknowledgement sound
(beep) will indicate that signal has been received.
The symbol [G] in the display, indicates that the batteries are exhausted
and need to be replaced.
How to change batteries
The remote control operates with two 1.5 V non re-chargeable alkaline
batteries (1.5 V, LR03x2).
Do not use used batteries or batteries of different types, as this may
cause the unit to malfunction.
The average battery life during normal use is approximately one year.
1 ) Open the cover of the battery compartment at the back of the
remote control by pushing the tab in the direction of the arrow (see
picture C).
2 ) Remove the used batteries and insert new batteries.
3 ) Place the battery cover and push it to close.
4 ) Reset the remote control by pressing the reset button [15] with a
sharp object (see picture B).
Note: If the air conditioner does not respond to the remote control,
repeat the battery change operation and press the reset button [15]
again after 5 seconds.
General info
Start / Stop
1
When the air conditioner is not in operation, the remote control
readout will display the time of day only (in case other symbols are lit,
turn control off by pressing button [1]).
1
Press button [1] to start the air conditioner.
All selected and memorized functions will light up and
appear; the unit will operate according to the functions
selected.
2
Press button [1] to stop the air conditioner.
All indicators on the unit will go out, and the control will
display only the current time.
Note
The unit will only emit a “beep”, when the signals are
received correctly.
If the unit does not stop, turn the control on (by pressing
button [1]) and repeat the operation.
If button [1] (air conditioner starting) is pressed too soon after
a stop, the compressor will not start for 3/5 minutes due to
the inherent protection against frequent compressor cycling.
English
3
Setting current time
10 2 3 S
1
With the remote control ON or OFF, press button [10] for at
least 5 seconds.
The displayed current hour [S] figure flashes.
2
Press either button [2] or [3] to set the desired value.
3
Press button [10] to confirm. The minutes figure flashes.
4
Press either button [2] or [3] to set the desired value.
5
Once the current time is set, press button [10] to confirm.
Operating mode selection
4 A1 A2 A3 A4 A5
By repeatedly pressing button [4] the available modes will be selected
in sequence.
The choosen mode is shown on the display as follows, while the unit
will acknowledge signal receipt with a confirming beep.
1a
[A1] Ventilation (fan only)
1b
[A3] Automatic (set the right mode for the desired
temperature)
1c
[A4] Cooling with dehumidification
1d
[A5] Dehumidification only
1e
[A2] Heating (if available)
Temperature setting
2 3 C E
F
F
Press the UP [2] and DOWN [3] buttons to increase or decrease the
temperature from the previously set value.
Note
The unit will confirm signal receipt with a beep, and the value
of the set temperature on the display will change accordingly.
The temperature can be set between 17°C (63°F) and 32°C
(90°F) at 1 degree intervals.
In cooling mode, if the temperature selected is higher than the
room temperature the unit will not start; the same applies for
the heating mode, if the selected temperature is lower than
the room temperature.
English
5
4
Horizontal sweep
8 L4
1
Press button to start the continuous left and right horizontal
swing .
2
Press button to stop the horizontal swing. The vertical flap will
stop at the current position.
Note
Horizontal sweep can be combined with air flow direction [7].
Personalisation (myComfort)
6 2 3 4 5 7 13 N
Memorise the desired operating parameters of the unit, with the
possibility to recall them any time.
The unit can be either off or in operation.
After 10 seconds without pressing any button, the procedure will stop
and the remote control disply resume its original state.
Air flow direction
7 L1 L2 L3
The air flow direction can be adjusted to optimize air distribution in the
room.
1
Press button [7] repeatedly to choose one of the following
louvre positions.
1a
Automatic [L1 flashing] - Air direction will be set automatically.
Louvre will be set to the preset position according to the
operation mode.
1b
Fixed [L2 fixed]- 6 positions can be chosen.
The louvre can be set to one of 6 different air flow directions.
1c
Continuous [L3 swinging] - Will continuously swing up and
down.
“Swing” always assures optimal even air distribution in the
room.
Fan speed selection
5 M1 M2 M3 M4
The air flow intensity can be adjusted to optimize air distribution in the
room.
1a
[M1] Low speed (for night operation)
1b
[M2] Medium speed
1c
[M3] High speed (at start-up, to reach temperature)
1d
[M4] Automatic (fan speed will automatically switch to the
value required for optimum comfort)
English
5
ON timer procedure
9 2 3 4 5 7 10 P
Program the start-up time and the desired operating parameters of the
unit.
The unit can be either off or in operation. If the unit is ON, the only
possible selection is the start-up time. The unit will operate with the
selections shown on the display.
After 10 seconds without pressing any button, the procedure will stop
and the remote control disply resume its original state.
1
Press button [9].
On the display the icon [N] and the hour value start flashing.
2
Time selection.
Set the hours with buttons [2] and [3]. Confirm by pressing [9],
the minutes value start flashing.
Set the minutes with [2] and [3]. Confirm the desired time by
pressing [9]. Mode icon [A] start flashing.
3
Operating mode selection.
Choose the unit operating mode with button [4] (refer to
Operating mode section).
Confirm the desired mode by pressing [9]. Temperature
displayed [C] start flashing.
1
Press button [6] and hold it pressed for 5 seconds.
On the display the icon [N] start flashing.
2
Operating mode selection.
Choose the unit operating mode with button [4] (refer to
Operating mode section).
Confirm the desired mode by pressing [6]. Temperature
displayed [C] start flashing.
3
Temperature selection.
Set the desired temperature with the UP [2] and DOWN [3]
buttons.
Confirm the temperature by pressing [6]. Fan speed [M] start
flashing.
4
Fan speed selection.
Choose the fan speed with button [5] (refer to Fan speed
section).
Confirm by pressing [6]. Air flow direction [L] start flashing.
5
Air flow selection.
Choose the air flow direction with button [7] (refer to Air flow
section).
Confirm by pressing [6]. Personalisation icon [N] will stop
flashing.
6
Press button [6] to activate the personalisation function.
Icon [E] displayed signal the daily timer activation.
Note
To change the parameter repat the procedure from step 1.
To deactivate the personalisation press one of the following
buttons: [2],[3],[4],[5],[13].
English
7
6
OFF timer procedure
12 2 3 10 T
Program the switch-off time of the unit.
The unit can be either off or in operation.
After 10 seconds without pressing any button, the procedure will stop
and the remote control disply resume its original state.
1
Press button [12].
On the display the icon [T] and the hour value start flashing.
2
Time selection.
Set the hours with buttons [2] and [3]. Confirm by pressing
[9], the minutes value start flashing.
Set the minutes with [2] and [3]. Confirm the desired time by
pressing [10].
Off timer icon [T] will stop flashing.
Note
To cancel timer setting push button [12] followed by button
[10].
Daily timer
11 R
The ON and OFF timer memorization will be repeated everyday.
The unit can be either off or in operation.
1
Press button [11] to activate or activate the daily timer
function.
Icon [R] displayed signal the daily timer activation.
4
Temperature selection.
Set the desired temperature with the UP [2] and DOWN [3]
buttons.
Confirm the temperature by pressing [9]. Fan speed [M] start
flashing.
5
Fan speed selection.
Choose the fan speed with button [5]
(refer to Fan speed section).
Confirm by pressing [9]. Air flow direction [L] start flashing.
6
Air flow selection.
Choose the air flow direction with button [7]
(refer to Air flow section).
Confirm by pressing [9]. On timer icon [P] will stop flashing.
Note
During the procedure press [10] to step back and cancel the
parameters inserted.
To cancel timer setting push button [9] followed by button [10].
When the ON Timer function is operating, the unit senses the
room air temperature 1 hour before the start-up time.
The unit start might be delayed by 0 to 40 minutes, depending
on the temperature difference between the room and the
selected temperature.
English
7
Ionizer function
13 Y
1a
With the remote control ON, press button [13] to activate the
ionizer function.
The icon [Y] appear
1b
Press button [13] to deactivate the ionizer function.
The icon [Y] disappear.
Sleep timer procedure
14 2 3 Q
Program the elapsing time before automatic switch off.
The unit must be in operation.
After 10 seconds without pressing any button, the procedure will stop
and the remote control disply resume its original state.
1
Press button [14]. On the display icon [Q] start flashing.
Time indication will change into “1 hr”.
2
Set the elapsing time with buttons [2] and [3].
The time displayed will increase or decrease accordingly by 1
hour with a maximum of 9 hours.
Confirm the desired time by pressing [14]. Sleep timer icon [Q]
will stop flashing.
Note
When the SLEEP timer is set, the unit will control the set
temperature to avoid overcooling or overheating during
operation.
The set temperature will change as follows:
Cooling and dehumidification
Heating
SET
TEMP.
SET TIME
TIME (MIN.)
+0.5°C
+0.5°C
+0.5°C
+0.5°C
°C
30 70 110 150
-1°C
°C
30 90 150
-1°C
-1°C
SET
TEMP.
SET TIME
TIME (MIN.)
+0.5°C
+0.5°C
+0.5°C
+0.5°C
°C
30 70 110 150
-1°C
°C
30 90 150
-1°C
-1°C
English
9
8
Display
A
Modalità di funzionamento
A1
Solo ventilazione
A2
Riscaldamento (solo modelli pompa di calore)
A3
Automatico (solo modelli pompa di calore)
A4
Raffrescamento e deumidificazione
A5
Sola deumidificazione
B
Simbolo di invio segnale all’unità
C
Temperatura selezionata
D
A
B
A
B
Selettore di indirizzo
E
F
F
Unità di misura temperatura (°C o °F)
F
1
2
1
2
Configurazione unità
G
Indicatore batterie esaurite
L
Direzione del flusso d’aria (Aletta)
L1
Automatico
L2
Fisso
L3
Continuo
L4
Oscillazione orizzontale (dimensione 100)
M
Velocità di ventilazione
M1
Bassa velocità (per il funzionamento notturno)
M2
Media velocità
M3
Alta velocità (per la messa a regime)
M4
Automatico (La velocità viene regolata automaticamente per
un migliore confort).
N
Personalizzazione attiva
P
Timer ON attivo
Q
Timer notturno attivo
R
Timer giornaliero attivo
S
Ora corrente e timer
T
Timer OFF attivo
Y
Ionizzatore attivo
Tasti
1
Tasto accensione/spegnimento
2
Aumento della temperatura desiderata
3
Diminuzione della temperatura desiderata
4
Modalità di selezione
5
Scelta velocità di ventilazione
6
Modalità personalizzata
7
Direzione del flusso d’aria (Aletta)
8
Libero (50,70)
Oscillazione orizzontale (dimensione 100)
9
Timer ON
10
Impostazioni ora corrente / Cancella
11
Timer “Daily” (giornaliero)
12
Timer OFF
13
Ionizzatore
14
Timer “Sleep” (notturno)
15
Reset
Italiano
9
Il presente manuale contiene tutte le informazioni necessarie per l’uso
del condizionatore attraverso il telecomando a raggi infrarossi.
Per la manutenzione ordinaria ed ulteriori informazioni sul funziona-
mento, consultare il manuale di Installazione, Funzionamento e Manu-
tenzione dell’unità interna.
La massima distanza operativa del telecomando è di circa 5 m. Non
devono esserci ostacoli tra il telecomando e l’unità (es. tende, piante).
L’irraggiamento solare diretto del ricevitore può rendere difcoltosa la
ricezione del segnale infrarosso. Per inviare i comandi all’unità è neces-
sario dirigere il telecomando verso il ricevitore di segnali posto sull’unità
interna e premere il tasto relativo alla funzione desiderata.
A conferma della ricezione del messaggio inviato, il sistema di controllo
elettronico emette un segnale acustico (beep).
Il simbolo [G] visualizzato sul display indica che le batterie sono scariche
e che devono essere sostituite.
Sostituzione delle batterie
Il telecomando funziona grazie a due batterie alcaline non ricaricabili
da 1,5 V (1.5 V, LR03x2). Non utilizzare batterie usate o batterie di tipo
diverso perchè potrebbero causare anomalie di funzionamento.
La durata media di una batteria in condizioni di uso normale è
approssimativamente di un anno.
1 ) Aprire il coperchio del vano batteria che si trova nella parte
posteriore del telecomando spingendo la linguetta nella direzione
indicata dalla freccia (figura C).
2 ) Togliere le batterie usate ed inserire quelle nuove.
3 ) Rimettere il coperchio del vano batteria al suo posto e spingere fino
a che non è chiuso.
4 ) esettare il telecomando premendo il pulsante di reset [15] con
l’ausilio di un oggetto appuntito (figura B).
Nota: Se il condizionatore non risponde ai comandi inviati dal
telecomando, ripetere le operazioni di sostituzione della batteria e
premere nuovamente il pulsante di reset [15] dopo 5 secondi.
Informazioni generali
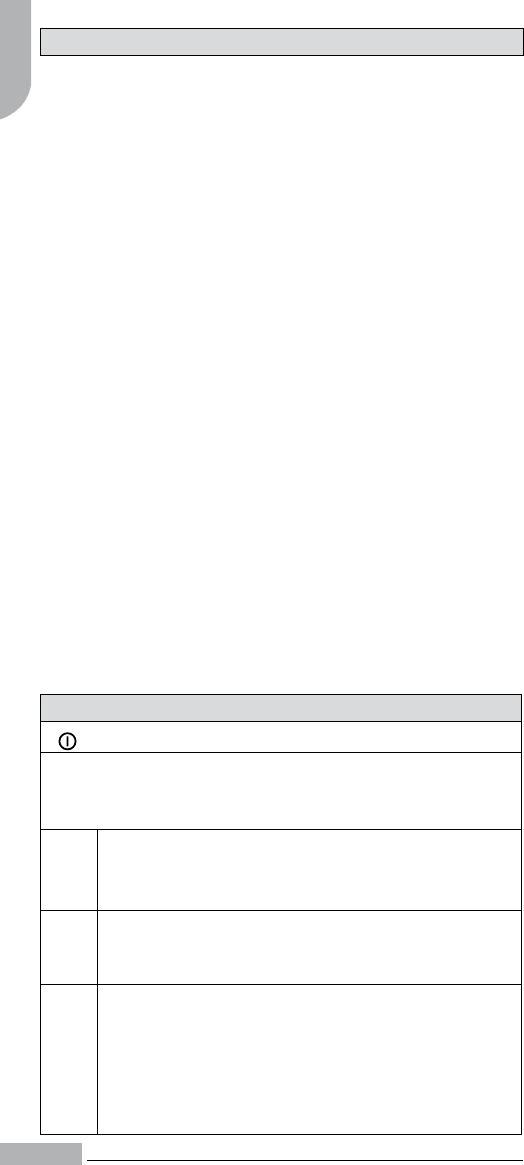
Accensione / spegnimento
1
Quando il climatizzatore è spento, il display del telecomando mostra
solo l’ora attuale (se fossero presenti altri simboli,
provvedere a spegnere il telecomando premendo il tasto).
1
Premendo il tasto [1] il climatizzatore si accende.
Tutte le funzioni selezionate e memorizzate si accendono e
vengono visualizzate; il sistema funzionerà secondo quanto
mostrato sul display.
2
Per lo spegnimento premere nuovamente il tasto [1]: gli
indicatori luminosi dell’unità si spengono, il display del
telecomando mostra solo l’ora attuale.
Nota
L’unità emette il segnale acustico “beep” solo se i comandi
vengono ricevuti correttamente. Se l’unità non si è spenta,
riaccendere il telecomando premendo il tasto [1] e ripetere
l’operazione di spegnimento.
Se il tasto [1] viene premuto immediatamente dopo uno
spegnimento, il compressore si accenderà con un ritardo
di circa 3/5 minuti a causa dell’intervento della protezione
“Ritardo di avviamento compressore”.
Italiano
3

Hulp nodig? Stel uw vraag in het forum

Spelregels
1

Forum

Carrier-Remote-controller

Misbruik melden

Gebruikershandleiding.com neemt misbruik van zijn services uitermate serieus. U kunt hieronder aangeven waarom deze vraag ongepast is. Wij controleren de vraag en zonodig wordt deze verwijderd.

Product:

Bijvoorbeeld antisemitische inhoud, racistische inhoud, of materiaal dat gewelddadige fysieke handelingen tot gevolg kan hebben.

Bijvoorbeeld een creditcardnummer, een persoonlijk identificatienummer, of een geheim adres. E-mailadressen en volledige namen worden niet als privégegevens beschouwd.

Spelregels forum

Om tot zinvolle vragen te komen hanteren wij de volgende spelregels:

Belangrijk! Als er een antwoord wordt gegeven op uw vraag, dan is het voor de gever van het antwoord nuttig om te weten als u er wel (of niet) mee geholpen bent! Wij vragen u dus ook te reageren op een antwoord.

Belangrijk! Antwoorden worden ook per e-mail naar abonnees gestuurd. Laat uw emailadres achter op deze site, zodat u op de hoogte blijft. U krijgt dan ook andere vragen en antwoorden te zien.

Abonneren

Abonneer u voor het ontvangen van emails voor uw Carrier Remote controller bij:


U ontvangt een email met instructies om u voor één of beide opties in te schrijven.


Ontvang uw handleiding per email

Vul uw emailadres in en ontvang de handleiding van Carrier Remote controller in de taal/talen: Nederlands, Duits, Engels, Frans, Italiaans, Portugees, Spaans, Pools, Zweeds, Fins als bijlage per email.

De handleiding is 0,78 mb groot.


U ontvangt de handleiding per email binnen enkele minuten. Als u geen email heeft ontvangen, dan heeft u waarschijnlijk een verkeerd emailadres ingevuld of is uw mailbox te vol. Daarnaast kan het zijn dat uw internetprovider een maximum heeft aan de grootte per email. Omdat hier een handleiding wordt meegestuurd, kan het voorkomen dat de email groter is dan toegestaan bij uw provider.

Stel vragen via chat aan uw handleiding

Stel uw vraag over deze PDF

Uw handleiding is per email verstuurd. Controleer uw email

Als u niet binnen een kwartier uw email met handleiding ontvangen heeft, kan het zijn dat u een verkeerd emailadres heeft ingevuld of dat uw emailprovider een maximum grootte per email heeft ingesteld die kleiner is dan de grootte van de handleiding.

Er is een email naar u verstuurd om uw inschrijving definitief te maken.

Controleer uw email en volg de aanwijzingen op om uw inschrijving definitief te maken

U heeft geen emailadres opgegeven

Als u de handleiding per email wilt ontvangen, vul dan een geldig emailadres in.

Uw vraag is op deze pagina toegevoegd

Wilt u een email ontvangen bij een antwoord en/of nieuwe vragen? Vul dan hier uw emailadres in.


Info