* Nur ein Modell enthalten · Contains only one model · contient un seul modèle · Contiene sólo un modelo · Contiene un solo modellino · Bevat slechts één model Contém só uma miniatura · Endast en modell ·
Sisältää vain yhden radio-ohjattavan · Zawiera tylko jeden model · Csak egy modellt tartalmaz · Vključen samo en model Obsahuje pouze jeden model. · Inneholder kun samme modell · Indeholder kun én
model · Περιέχεται μόνο ένα μοντέλο · 含一个模型 · モデルは1体のみ入っています· 모델 한 개만 들어있음 · · Sadece tek modeli dahildir · В объем
поставки входит только одна модель
> 15cm
ALKAL
I
NE
3
8
10
11
1213
Sicherheitsbestimmungen · Safety instructions · Consignes de sécurité
Disposiciones de seguridad · Norme di sicurezza · Veiligheidsbepalingen
Prescrições de segurança · Säkerhetsbestämmelser · Turvallisuusohjeet
Zasady bezpieczeństwa · Biztonsági rendelkezések · Varnostna določila
Bezpečnostní předpisy · Sikkerhetsbestemmelser · Sikkerhedsbestemmelser
Διατάξεις ασφαλείας · 安全准则 · 安全規定 · 안전수칙 ·
Emniyet kaideleri · Правила техники безопасности
A
E
K
B
F
L
C
GH
M
D
I
O
9
3,7 V
600 mAH
2,22Wh!
R
L
N
RED = ChargingLight Off = Ready
5
DEUTSCH
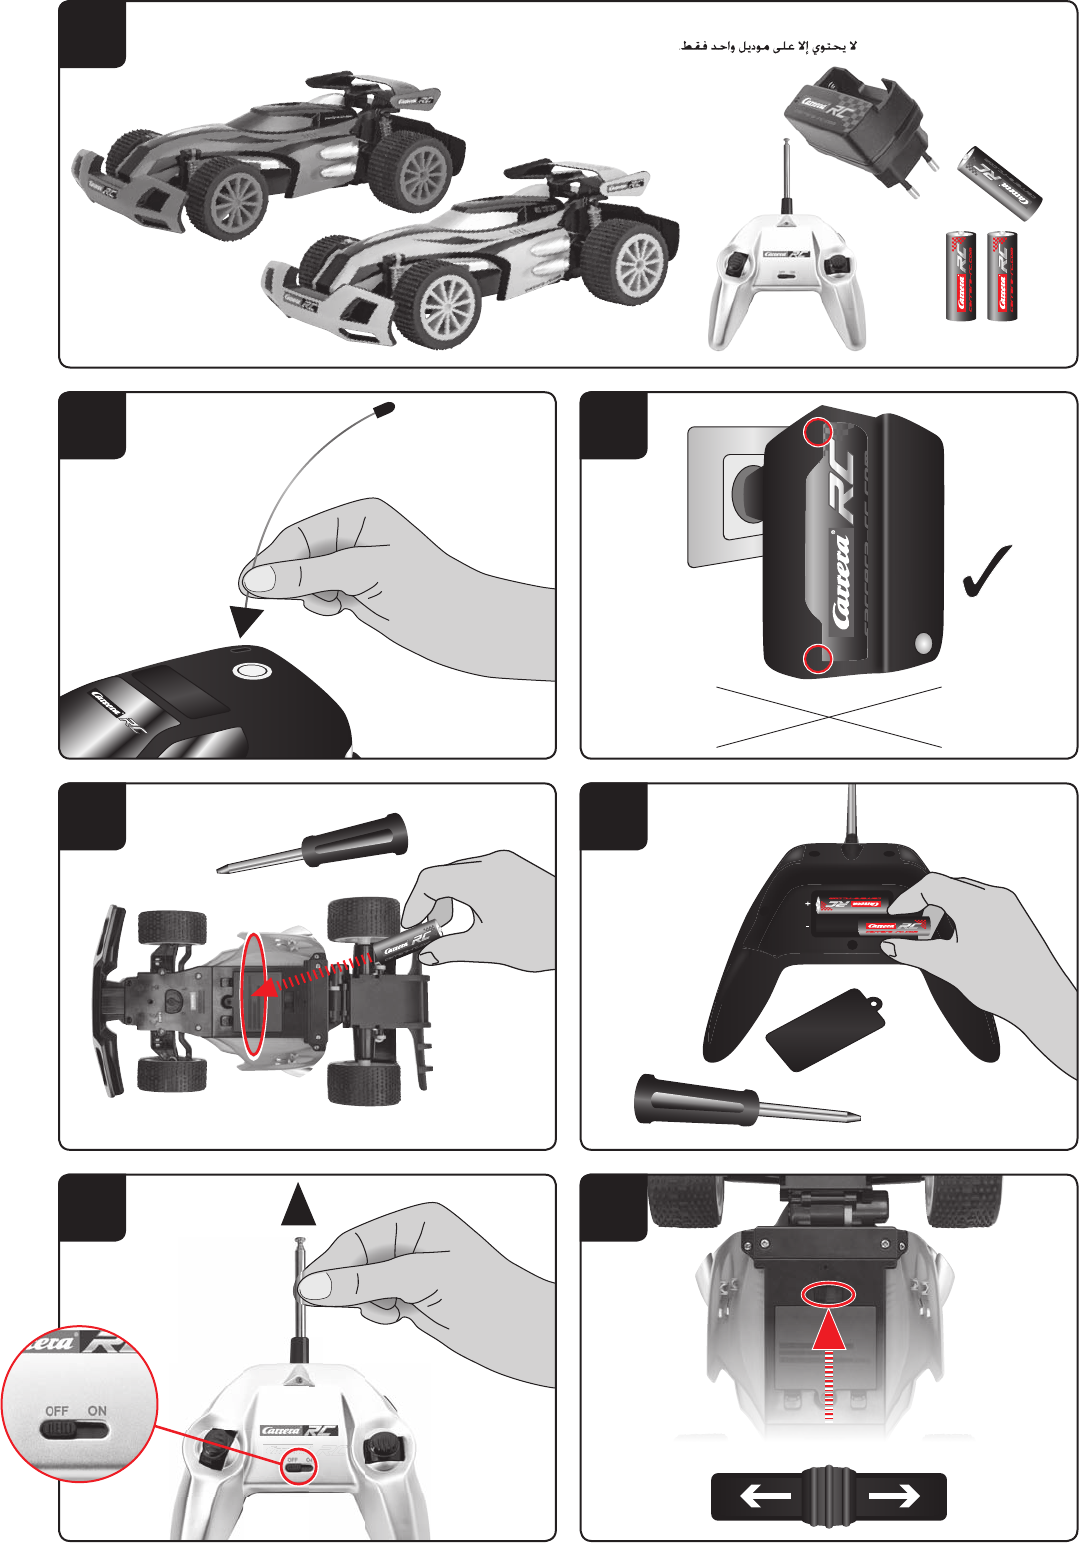
Lieferumfang
1
1x Carrera RC Fahrzeug
1 x Controller
1 x Ladegerät
1 x Akku
1 x Antenne
2 x 1,5 V Micro AAA Batterien
(nicht wiederaufladbar)
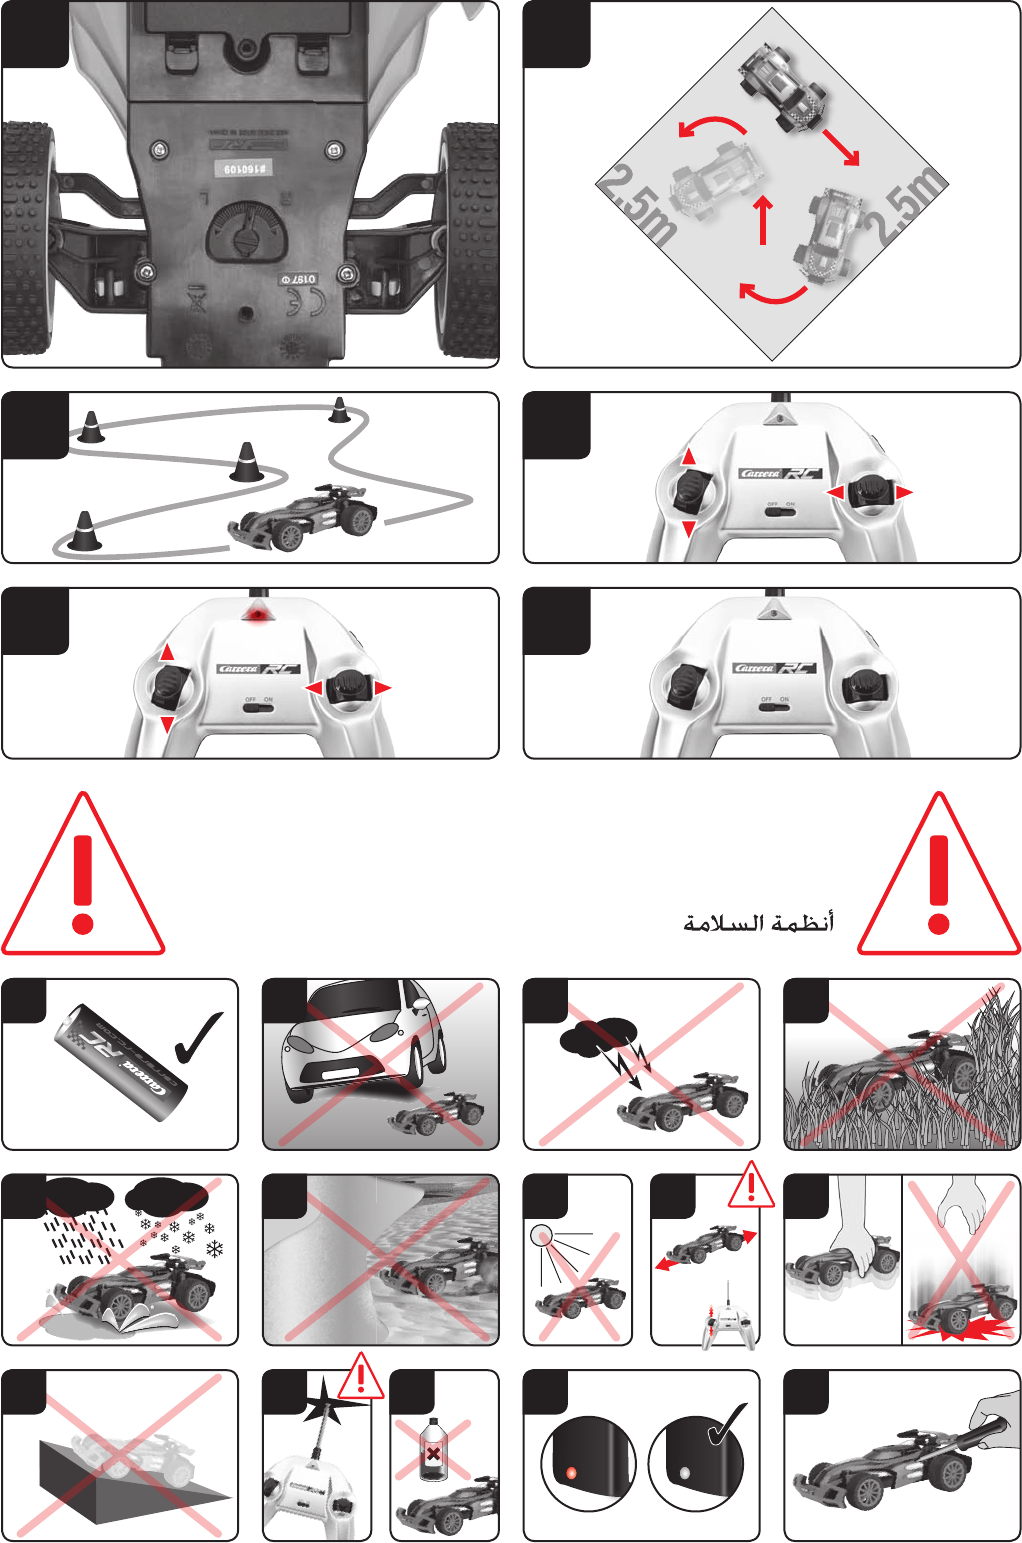
Anbringen der Antenne
2
Das Antennenkabel durch das Antennenröhrchen
führen und dieses am Carrera RC-Fahrzeug be-
festigen.
Das Ende des Antennenkabels mit einem der
Carrera RC-Logo-Aufkleber sichern.
Aufladen des Akkus
3
Setzen sie den Carrera RC Akku in das beiliegen-
de Carrera RC Ladegerät.
Achten Sie auf die richtige Polarität. Achten Sie
darauf, dass Sie mit dem mitgelieferten Carrera
RC Ladegerät nur den mitgelieferten 3,7 V Li-
Ionen Akku laden.
ACHTUNG! Wenn Sie ver suchen einen anderen
Akku oder sonstige wiederaufladbare Batte-
rien, sowie Primär zellen wie z. B. AA (LR6,R6P)
bzw. AAA (LR3/R3P) mit dem Carrera RC Lade-
gerät zu laden kann dies zu schweren Schäden
führen.
Schließen Sie das Ladegerät an eine Energie-
quelle an.
Wenn der Akku richtig eingelegt wurde und der
Aufladungsprozess normal erfolgt, leuchtet das
rote LED-Lämpchen konstant. Wenn der Akku
voll aufgeladen ist, leuchtet die LED nicht mehr
auf. Der Akku kann entfernt und in Ihrem Carrera
RC-Fahrzeug installiert werden und ist nun bereit
zum Fahren.
Laden Sie den Akku unbedingt nach Gebrauch
wieder auf um eine sog. Tiefenentladung des
Akkus zu vermeiden. Der Akku muss nach Ge-
brauch mind. 20 Minuten abkühlen, bevor er
wieder vollständig geladen werden darf. Eine
Nichtbeachtung dieser Pause kann zu einem
defekten Akku führen. Laden Sie den Akku
von Zeit zu Zeit (ca. alle 2-3 Monate) auf.
Eine Nichtbeachtung der o.g. Handhabung
des Akkus kann zu einem Defekt führen.
Einsetzen des Akkus
4
Entfernen Sie mit einem Schraubenzieher den
Deckel des Akkufachs beim Carrera RC-Fahrzeug.
Setzen Sie den Carrera RC Akku in das Fahrzeug
ein. Achten Sie auf die richtige Polarität.
Schrauben Sie den Deckel mit einem Schrauben-
zieher wieder zu.
Einsetzen der Batterien
5
Öffnen Sie das Batteriefach mit einem Schrau-
bendreher und setzen Sie die Batterien in den
Controller ein. Achten Sie auf die richtige Polarität.
Schrauben Sie den Deckel mit einem Schrauben-
zieher wieder zu.
Jetzt kann die Fahrt losgehen
6
Stellen Sie sicher, dass in Ihrem Fahrbereich
niemand die gleiche Frequenz verwendet.
Controllerantenne ganz ausziehen.
7
Carrera RC-Fahrzeug am ON/OFF-Schalter
einschalten.
8
Justieren der Lenkung
Stellt sich beim Betrieb des Carrera RC-Fahr-
zeugs heraus, dass das Fahrzeug nach rechts
oder links zieht, kann durch den auf der Zeich-
nung ersichtlichen Justierungsschalter die Fahr-
spur korrigiert werden.
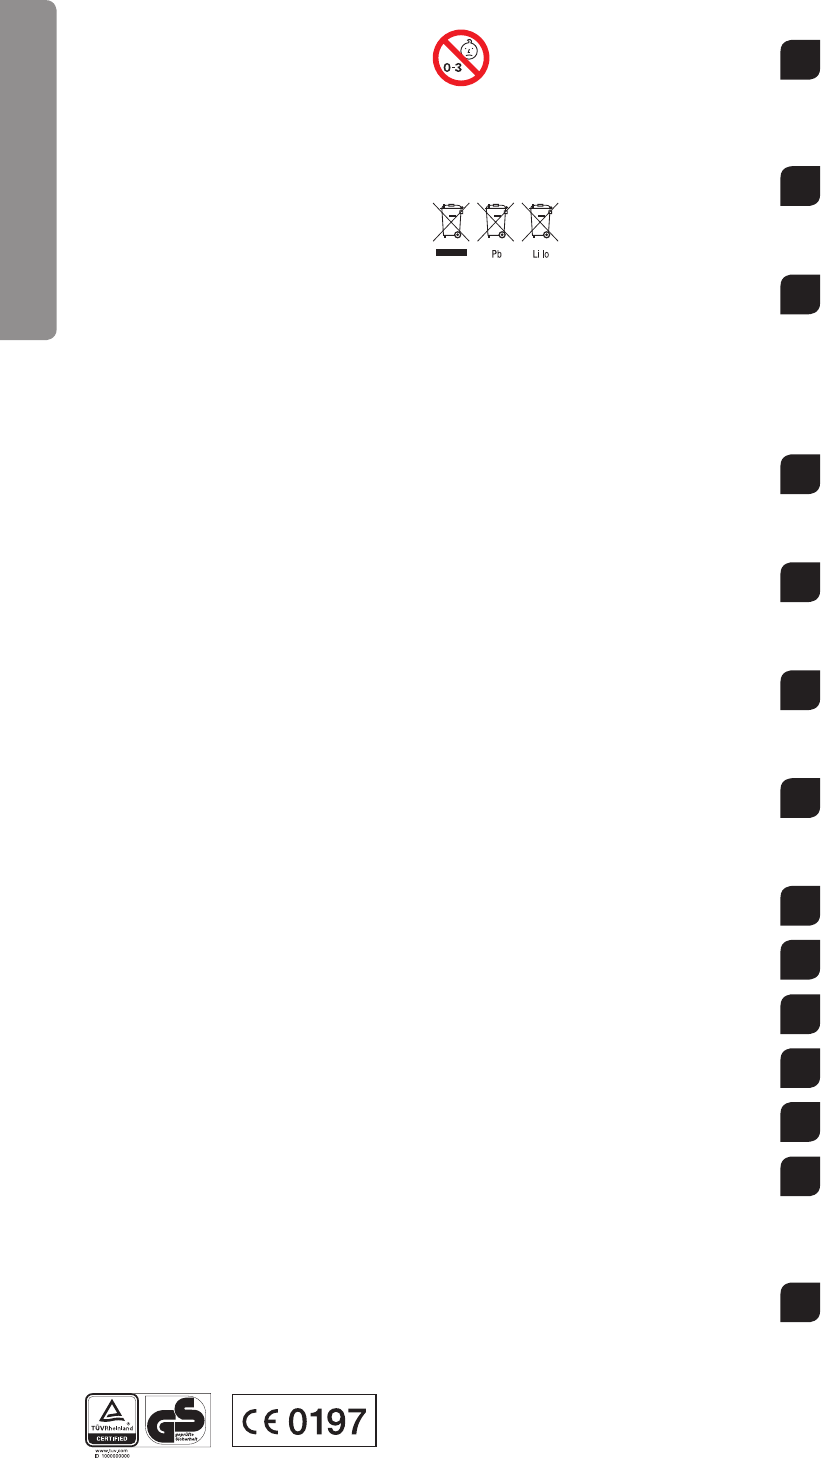
Lass uns üben!
9
Achtung dieses Fahrzeug erreicht hohe Ge-
schwindigkeiten. Bitte üben Sie auf einer leeren
Fläche mit mind. 2,5 x 2,5 Metern Größe.
Bedienen Sie beim ersten Mal sehr vorsichtig
den Gashebel.
10
Bauen Sie mit Eckbegrenzungen oder leeren
Büchsen usw. eine Carrera RC-Fahrzeug Renn-
strecke auf einer großen, freien Fläche. Die
grundlegende Steuertechnik beim Fahren mit
einem Carrera RC-Fahrzeugs ist: auf Geraden
schnell fahren und in den Kurven abbremsen.
• Beim Wechsel vom ersten zum zweiten Akku
muss eine Fahrpause von mindestens 10
Minuten eingehalten werden. Beim darauf
folgenden Wechsel muss unbedingt eine
Ruhepause von mindestens 20 Minuten ein-
gehalten werden.
• Permanenten Motoreinsatz vermeiden.
• Schaltet sich das Fahrzeug mehrmals kurz
hintereinander von selbst ab, ist der Akku
leer. Bitte laden Sie den Akku.
• Zum Ausschalten nach der Fahrt umgekehr-
te Reihenfolge einhalten.
• Nach der Fahrt den Akku herausnehmen
bzw. abklemmen. Laden Sie den Akku un-
bedingt nach Gebrauch wieder auf, um eine
sog. Tiefenentladung des Akkus zu vermei-
den. Der Akku muss nach Gebrauch mind.
20 Minuten abkühlen, bevor er wieder voll-
ständig geladen werden darf.
• Lagern Sie den Akku immer außerhalb des
Fahrzeuges.
• Das Carrera RC-Fahrzeug nach der Fahrt
säubern.
Controller-Funktionen
11
Full Function
Mit den Joysticks können Sie das Fahrzeug in alle
Richtungen lenken:
Joystick links: vorwärts, rückwärts
Joystick rechts: links, rechts
12
Die LED am Controller leuchtet sobald Sie einen
der beiden Joysticks nach oben oder nach unten
bzw. nach rechts oder nach links bewegen.
13
Wenn Sie keinen Joystick betätigen ist die LED
aus, unabhängig davon ob der ON/OFF-Schalter
auf ON- oder OFF steht.
Problemlösungen
Problem
Modell fährt nicht.
Ursache: Schalter am Controller oder/und Modell steht/
stehen auf „OFF“.
Lösung: Einschalten.
Ursache: Schwacher oder gar kein Akku im Modell.
Lösung: Geladenen Akku einlegen.
Ursache:
Das Auto ist an einem Hindernis stehen geblieben.
Lösung: Der Überspannungsschutz hat das Auto abge-
schaltet. ON/OFF Schalter am Fahrzeug einmal auf OFF,
dann wieder auf ON schalten und auf einer freien Fläche
platzieren.
Ursache:
Schwacher Akku/Batterie im Controller oder Modell.
Lösung: Geladenen Akku oder Batterie einlegen.
Ursache: Das Modell wurde beim letzen Gebrauch nicht
ausgeschaltet und der Akku ist leer.
Lösung: Bitte laden Sie den Akku auf.
Ursache: Das Fahrzeug ist sehr warm.
Lösung: Fahrzeug und Controller ausschalten und das
Fahrzeug etwa 30 Minuten abkühlen lassen.
Problem
Keine Kontrolle.
Ursache: Fahrzeug setzt sich ungewollt in Bewegung.
Lösung: Zuerst Controller einschalten, dann erst das
Fahrzeug.
Ursache: Controllerantenne fehlerhaft.
Lösung: Antenne ganz ausziehen.
Die aktuellste Version dieser Bedienungsanleitung und
Informationen zu erhältlichen Ersatzteilen finden Sie auf
Gebruikershandleiding.com neemt misbruik van zijn services uitermate serieus. U kunt hieronder aangeven waarom deze vraag ongepast is. Wij controleren de vraag en zonodig wordt deze verwijderd.
Product:
Spelregels forum
Om tot zinvolle vragen te komen hanteren wij de volgende spelregels:
lees eerst de handleiding door;
controleer of uw vraag al eerder door iemand anders is gesteld;
probeer uw vraag zo duidelijk mogelijk te stellen;
heeft u een probleem en al geprobeerd om dit op te lossen, vermeld dit erbij aub;
heeft u een oplossing gekregen van een bezoeker dan horen wij dat graag in dit forum;
wilt u een reactie geven op een vraag of antwoord, gebruik dan niet dit formulier maar klik op de knop 'reageer op deze vraag';
uw vraag wordt direct op de website gezet; vermijd daarom persoonlijke gegevens in te vullen;
Belangrijk! Als er een antwoord wordt gegeven op uw vraag, dan is het voor de gever van het antwoord nuttig om te weten als u er wel (of niet) mee geholpen bent! Wij vragen u dus ook te reageren op een antwoord.
Belangrijk! Antwoorden worden ook per e-mail naar abonnees gestuurd. Laat uw emailadres achter op deze site, zodat u op de hoogte blijft. U krijgt dan ook andere vragen en antwoorden te zien.
Abonneren
Abonneer u voor het ontvangen van emails voor uw Carrera 160108 bij:
nieuwe vragen en antwoorden
nieuwe handleidingen
U ontvangt een email met instructies om u voor één of beide opties in te schrijven.
Ontvang uw handleiding per email
Vul uw emailadres in en ontvang de handleiding van Carrera 160108 in de taal/talen: Alle talen als bijlage per email.
De handleiding is 6,63 mb groot.
U ontvangt de handleiding per email binnen enkele minuten. Als u geen email heeft ontvangen, dan heeft u waarschijnlijk een verkeerd emailadres ingevuld of is uw mailbox te vol. Daarnaast kan het zijn dat uw internetprovider een maximum heeft aan de grootte per email. Omdat hier een handleiding wordt meegestuurd, kan het voorkomen dat de email groter is dan toegestaan bij uw provider.
Stel vragen via chat aan uw handleiding
Stel uw vraag over deze PDF
Uw handleiding is per email verstuurd. Controleer uw email
Als u niet binnen een kwartier uw email met handleiding ontvangen heeft, kan het zijn dat u een verkeerd emailadres heeft ingevuld of dat uw emailprovider een maximum grootte per email heeft ingesteld die kleiner is dan de grootte van de handleiding.
Er is een email naar u verstuurd om uw inschrijving definitief te maken.
Controleer uw email en volg de aanwijzingen op om uw inschrijving definitief te maken
U heeft geen emailadres opgegeven
Als u de handleiding per email wilt ontvangen, vul dan een geldig emailadres in.
Uw vraag is op deze pagina toegevoegd
Wilt u een email ontvangen bij een antwoord en/of nieuwe vragen? Vul dan hier uw emailadres in.