214371
33
Verklein
Vergroot
Pagina terug
1/44
Pagina verder
33
VIDEO INPUT
Press the POINT LEFT/RIGHT but-
tons to adjust value.
Move the red frame to the
item to be selected and then
press the SET button.
IMAGE ADJUST MENU
IMAGE LEVEL ADJUSTMENT
Press the SET button at this icon to
display other items.
IMAGE ADJUST
Menu icon
Press POINT LEFT/RIGHT buttons
to adjust the value.
NOTE : Tint cannot be adjusted when the video
system is PAL, SECAM, PAL-M or PAL-N.
Press the SET button at this icon to
store the value.
Press the SET button at this icon to
display previous items.
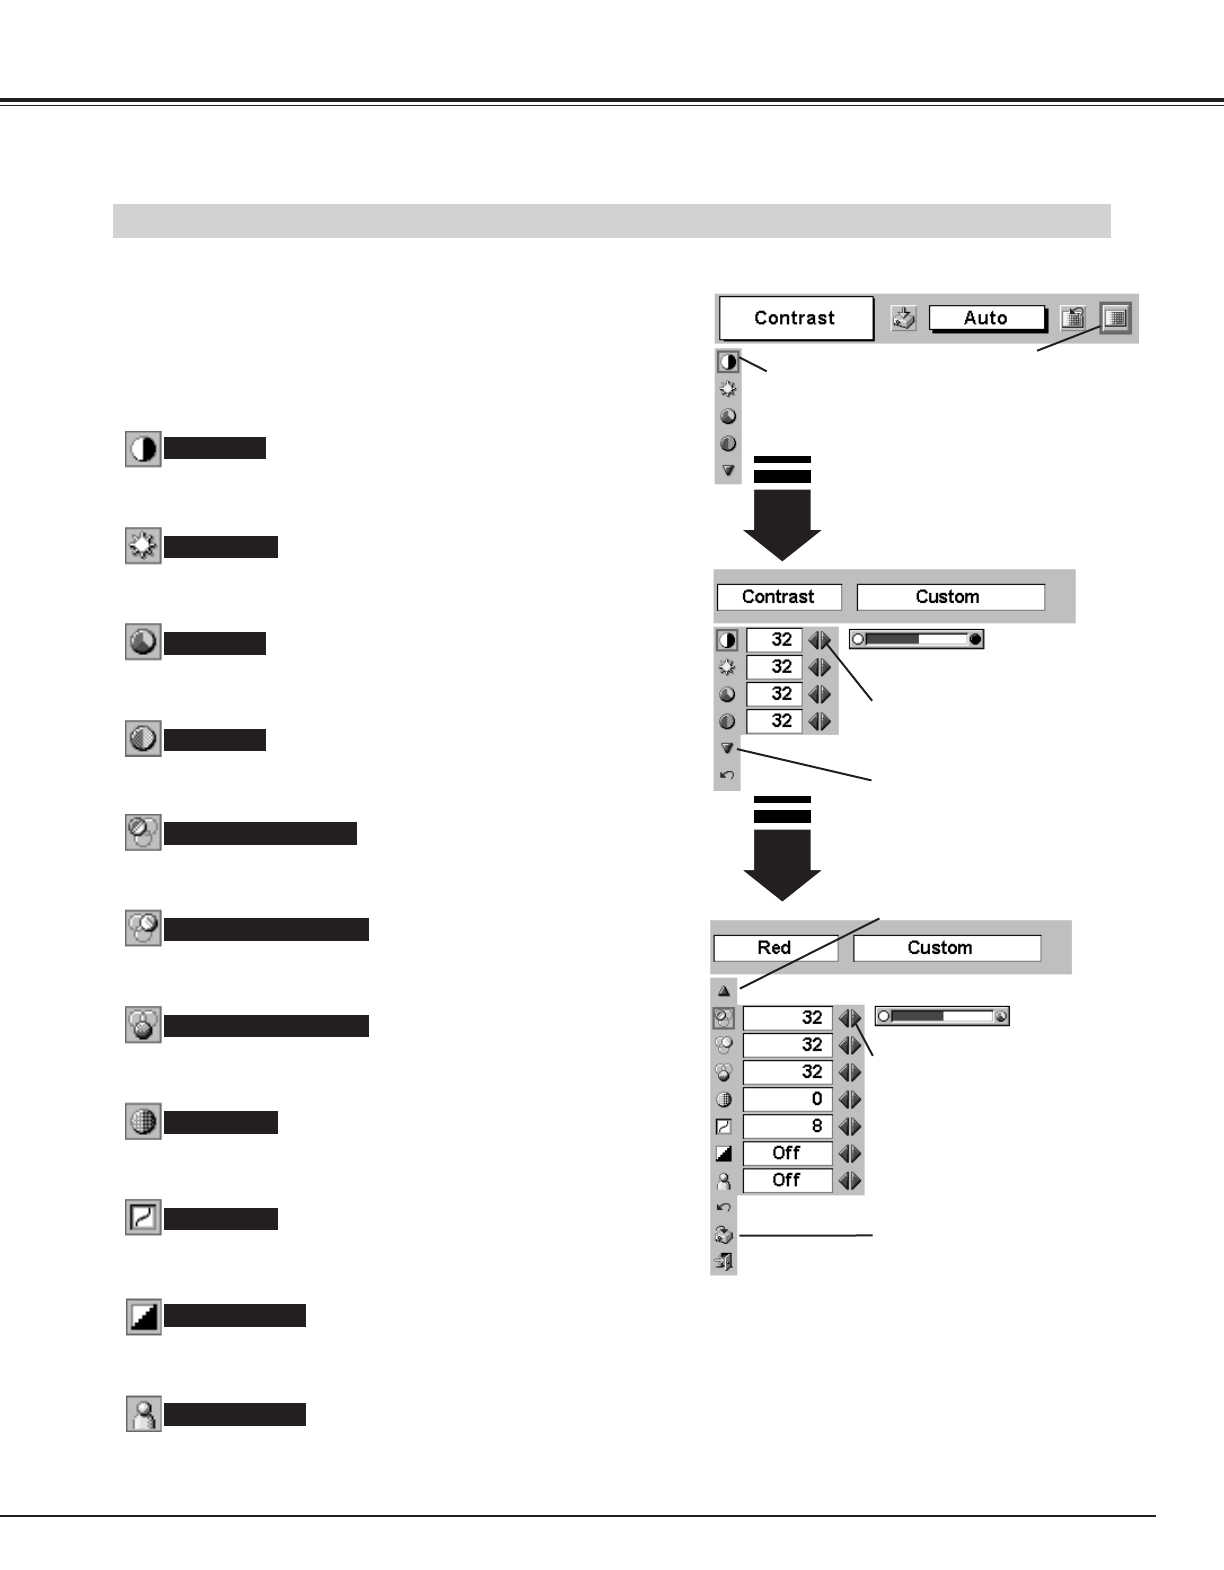
Press the MENU button and the ON-SCREEN MENU will
appear. Press the POINT LEFT/RIGHT button(s) to move the
red frame to the IMAGE ADJUST Menu icon.
1
2
Press the POINT DOWN button to move the red frame to the
item that you want to adjust and then press the SET button. The
level of each item is displayed. Adjust each level by pressing the
POINT LEFT/RIGHT button(s).
Press the POINT LEFT button to decrease contrast, and the POINT
RIGHT button to increase contrast. (From 0 to 63.)
Press the POINT LEFT button to adjust image darker, and the
POINT RIGHT button to adjust brighter. (From 0 to 63.)
Contrast
Brightness
Press either the POINT LEFT button or the POINT RIGHT button to
obtain a better balance of contrast. (From 0 to 15.)
Gamma
Press the POINT LEFT button to lighten color, and the POINT
RIGHT button to darker color. (From 0 to 63.)
Press the POINT LEFT button or the POINT RIGHT button to obtain
the proper color. (From 0 to 63.)
Color
Tint
Press the POINT LEFT button to soften the image, and the POINT
RIGHT button to sharpen the image. (From 0 to 15.)
Sharpness
Press the POINT LEFT button to lighten the red tone and the POINT
RIGHT button to darker tone. (From 0 to 63.)
White balance (Red)
Press the POINT LEFT button to lighten the green tone and the
POINT RIGHT button to darker tone. (From 0 to 63.)
White balance (Green)
Press the POINT LEFT button to lighten the blue tone and the
POINT RIGHT button to darker tone. (From 0 to 63.)
White balance (Blue)
When this function is "ON", it automatically enhances the contrast of
the bright and dark part of image.
When this function is "ON", it produces a more vivid image according
to the image condition.
Auto grayscale
Auto fleshtone
33

Hulp nodig? Stel uw vraag in het forum

Spelregels

Misbruik melden

Gebruikershandleiding.com neemt misbruik van zijn services uitermate serieus. U kunt hieronder aangeven waarom deze vraag ongepast is. Wij controleren de vraag en zonodig wordt deze verwijderd.

Product:

Bijvoorbeeld antisemitische inhoud, racistische inhoud, of materiaal dat gewelddadige fysieke handelingen tot gevolg kan hebben.

Bijvoorbeeld een creditcardnummer, een persoonlijk identificatienummer, of een geheim adres. E-mailadressen en volledige namen worden niet als privégegevens beschouwd.

Spelregels forum

Om tot zinvolle vragen te komen hanteren wij de volgende spelregels:

Belangrijk! Als er een antwoord wordt gegeven op uw vraag, dan is het voor de gever van het antwoord nuttig om te weten als u er wel (of niet) mee geholpen bent! Wij vragen u dus ook te reageren op een antwoord.

Belangrijk! Antwoorden worden ook per e-mail naar abonnees gestuurd. Laat uw emailadres achter op deze site, zodat u op de hoogte blijft. U krijgt dan ook andere vragen en antwoorden te zien.

Abonneren

Abonneer u voor het ontvangen van emails voor uw Canon lv x2 bij:


U ontvangt een email met instructies om u voor één of beide opties in te schrijven.


Ontvang uw handleiding per email

Vul uw emailadres in en ontvang de handleiding van Canon lv x2 in de taal/talen: Engels als bijlage per email.

De handleiding is 1,49 mb groot.


U ontvangt de handleiding per email binnen enkele minuten. Als u geen email heeft ontvangen, dan heeft u waarschijnlijk een verkeerd emailadres ingevuld of is uw mailbox te vol. Daarnaast kan het zijn dat uw internetprovider een maximum heeft aan de grootte per email. Omdat hier een handleiding wordt meegestuurd, kan het voorkomen dat de email groter is dan toegestaan bij uw provider.

Uw handleiding is per email verstuurd. Controleer uw email

Als u niet binnen een kwartier uw email met handleiding ontvangen heeft, kan het zijn dat u een verkeerd emailadres heeft ingevuld of dat uw emailprovider een maximum grootte per email heeft ingesteld die kleiner is dan de grootte van de handleiding.

Er is een email naar u verstuurd om uw inschrijving definitief te maken.

Controleer uw email en volg de aanwijzingen op om uw inschrijving definitief te maken

U heeft geen emailadres opgegeven

Als u de handleiding per email wilt ontvangen, vul dan een geldig emailadres in.

Uw vraag is op deze pagina toegevoegd

Wilt u een email ontvangen bij een antwoord en/of nieuwe vragen? Vul dan hier uw emailadres in.


Info