65101
29
Verklein
Vergroot
Pagina terug
1/127
Pagina verder
Camera User Guide
Make sure you read this guide before using the camera.
Store this guide safely so that you can use it in the future.
ENGLISH
2
Check if the following items are included in your camera package. If anything
is missing, contact the retailer from which you purchased the camera.
You can use the included memory card to try out your new camera and
take some test shots.
Adobe Reader must be installed to view the PDF manuals. Microsoft
Word Viewer 2003 can be installed to view Word manuals (Middle East
only). If this software is not installed on your computer, access the
following web site to download the software:
http://www.adobe.com (in the case of PDF)
http://www.microsoft.com/downloads/ (in the case of Word format).
Checking the Package Contents
Camera
AA-size Alkaline
Batteries (x2)
Interface Cable
IFC-400PCU
AV Cable
AVC-DC300
Wrist Strap
WS-800
Getting Started
Memory Card
DIGITAL CAMERA
Solution Disk
Warranty System
Booklet
Also refer to the manuals on the DIGITAL CAMERA
Manuals Disk.
Camera User Guide (This Guide)
Once you have mastered the basics, use the camera’s
many features to shoot more challenging photos.
Personal Printing Guide
Read when you want to connect the camera to a printer
and print.
Software Starter Guide
Read when you want to connect the camera to a computer.
Explains how to install and use the software on the
DIGITAL CAMERA Solution Disk.
DIGITAL CAMERA
Manuals Disk
3
Test Shots
Take some initial test shots and play them back to make sure the images
were recorded correctly. Please note that Canon Inc., its subsidiaries and
affiliates, and its distributors are not liable for any consequential damages
arising from any malfunction of a camera or accessory, including memory
cards, that results in the failure of an image to be recorded or to be recorded
in a way that is machine readable.
Warning Against Copyright Infringement
The images recorded with this camera are intended for personal use. Do not
record images that infringe upon copyright laws without the prior permission
of the copyright holder. Please be advised that in certain cases the copying
of images from performances, exhibitions, or commercial properties by
means of a camera or other device may contravene copyright or other legal
rights even if the image was shot for personal use.
Warranty Limitations
For information on your camera’s warranty, please refer to the Canon
Warranty System Booklet supplied with your camera.
For Canon Customer Support contacts, please see the Warranty System
Booklet.
LCD Monitor
The LCD monitor is produced with extremely high-precision manufacturing
techniques. More than 99.99% of the pixels operate to specification, but
occasionally non-performing pixels may appear as bright or dark dots. This
is not a malfunction and has no effect on the recorded image.
Camera Body Temperature
Please take care when operating the camera for an extended period as the
camera body may become warm. This is not a malfunction.
Memory Cards
The various types of memory cards that can be used in this camera are
collectively referred to as memory cards in this guide.
Read This First
4
What Do You Want to Do?
4
Shoot, leaving it to the camera to make settings . . . . . . . . . . . . 20
Shoot to match special conditions. . . . . . . . . . . . . . . . . . . . 5052
Focus on faces . . . . . . . . . . . . . . . . . . . . . . . . . . . . . . . . . . . 20, 74
Shoot in places where I cannot use the flash
(turn off the flash) . . . . . . . . . . . . . . . . . . . . . . . . . . . . . . . . . . . . 53
Shoot pictures with me in them too (self-timer). . . . . . . . . . . . . . 57
Insert the date and time into my shots . . . . . . . . . . . . . . . . . . . . 56
Take close-up pictures of subjects (macro shooting) . . . . . . . . . 61
Shooting Close-ups (super macro shooting) . . . . . . . . . . . . . . . 62
Take sepia toned or black and white pictures. . . . . . . . . . . . . . . 69
Change the size of picture I want to take (recording pixels) . . . . 64
Take pictures continuously . . . . . . . . . . . . . . . . . . . . . . . . . . . . . 66
Shoot without the effects of camera shake even in low light
conditions (High ISO Auto) . . . . . . . . . . . . . . . . . . . . . . . . . . . . . 67
IF wP
With nightscapes
(p. 50)
At the beach
(p. 51)
With snowscapes
(p. 52)
V
Kids and pets
(p. 50)
Portraits
(p. 50)
Take good people shots
Take good landscapes
Shoot various other scenes
OU
Foliage
(p. 52)
Sunsets
(p. 51)
y
Aquarium
(p. 51)
t
Indoors
(p. 51)
Fireworks
(p. 51)
Shoot
What Do You Want to Do?
5
1
Look at my pictures. . . . . . . . . . . . . . . . . . . . . . . . . . . . . . . . . . . 23
Automatically play back pictures (slideshow) . . . . . . . . . . . . . . . 88
Look at my pictures on a TV . . . . . . . . . . . . . . . . . . . . . . . . . . . . 91
Quickly search pictures. . . . . . . . . . . . . . . . . . . . . . . . . . . . . 86, 87
Erase pictures . . . . . . . . . . . . . . . . . . . . . . . . . . . . . . . . . . . . 24, 93
Protect pictures from accidental erasure. . . . . . . . . . . . . . . . . . . 92
View
E
Shoot movies . . . . . . . . . . . . . . . . . . . . . . . . . . . . . . . . . . . . . . . 27
View movies . . . . . . . . . . . . . . . . . . . . . . . . . . . . . . . . . . . . . . . . 29
Shoot/View Movies
Print
2
Easily print pictures. . . . . . . . . . . . . . . . . . . . . . . . . . . . . . . . . . . 25
Save images to a computer . . . . . . . . . . . . . . . . . . . . . . . . . . . . 30
Save
3
Turn off sounds . . . . . . . . . . . . . . . . . . . . . . . . . . . . . . . . . . . . . . 45
Use the camera abroad. . . . . . . . . . . . . . . . . . . . . . . . . . . . . . . . 36
Other
6
Chapters 1 – 3 explain the basic operations and frequently used functions of
this camera. Chapters 4 onward explain the advanced functions, letting you
learn more as you read each chapter.
Checking the Package Contents .......2
Read This First ..................................3
What Do You Want to Do? ................4
Safety Precautions.............................8
Inserting the Batteries and Memory
Card .................................................12
Setting the Date and Time ...............16
Setting the Display Language..........18
Pressing the Shutter Button.............19
» Taking Pictures...........................20
1 Viewing Images ..........................23
Erasing Images................................24
Printing Images................................25
X Shooting Movies .........................27
Viewing Movies................................29
Transferring Images to a
Computer .........................................30
Accessories .....................................34
Separately Sold Accessories ...........36
Components Guide..........................38
Power Saving Function
(Auto Power Down)..........................39
Indicator ...........................................39
Information Displayed on the
Screen .............................................40
m FUNC. Menu – Basic
Operations .......................................43
n Menu – Basic Operations ....44
Changing the Sound Settings..........45
Returning the Camera to Default
Settings ........................................... 46
Formatting Memory Cards .............. 47
Changing the Image Display Time .. 48
K Shooting in Special
Conditions ....................................... 50
! Turning the Flash Off.................. 53
Zooming in More Closely on
Subjects (Digital Zoom)................... 54
Inserting the Date and Time....... 56
Ò Using the Self-Timer................... 57
G Shooting in Program AE ............. 60
h Turning the Flash On................... 61
e Shooting Close-ups (Macro)....... 61
œ Shooting Close-ups
(Super Macro Shooting) .................. 62
u Shooting Far Away Subjects
(Infinity) ........................................... 63
Changing the Recording Pixels
(Image Size).................................... 64
Changing the Image Quality
(Compression Ratio) ....................... 64
Adjusting the Brightness
(Exposure Compensation) .............. 66
W Continuous Shooting ................. 66
- Changing the ISO Speed ......... 67
Adjusting the White Balance ........... 68
Table of Contents
1 Getting Started ....................11
2 Learning More......................37
3 Shooting in Special
Conditions and Commonly
Used Functions................... 49
4 Selecting Settings
Yourself ............................... 59
Table of Contents
7
Changing the Tone of an Image
(My Colors) ..................................... 69
Shooting Using a TV Monitor.......... 70
Î Shooting Using the Two
Second Self-Timer .......................... 70
$ Customizing the Self-Timer ........ 71
Changing the Composition with
the Focus Lock................................ 72
Changing the AF Frame Mode........ 74
% Shooting with the AF Lock ........ 75
Magnifying the Focal Point.............. 76
Changing the Metering Mode.......... 77
& Shooting with the AE Lock ........ 77
( Shooting with the FE Lock ........ 78
Shooting with Slow Synchro ...... 78
Œ Red-Eye Correction ................... 79
Shooting Long Exposures .......... 80
Changing the Image Quality ........... 82
AE Lock/Exposure Shift .................. 83
Other Shooting Functions ............... 83
Playback Functions......................... 84
g Searching Images by Sets of 9
(Index Display)................................ 86
d Searching for Images Using
the Jump Display ............................ 87
. Viewing Slideshows .................... 88
Checking the Focus ........................ 89
k Magnifying Images ..................... 90
+ Changing Image Transitions.......90
Viewing Images on a TV .................91
: Protecting Images..................... 92
/ Erasing All Images......................93
\ Rotating Images.......................... 93
= Resizing Images ......................... 94
] Correcting the Red-Eye Effect .... 95
Selecting Images for Printing
(DPOF) ............................................ 96
Changing Functions ...................... 100
Changing Shooting Functions ....... 103
Changing Playback Functions....... 105
Replacing the Date/Time
Battery ........................................... 108
Using Household Power................ 109
Handling Precautions .................... 110
Troubleshooting............................. 111
List of Messages that Appear
on the Screen ................................114
Functions Available in Each
Shooting Mode ..............................116
Menus............................................ 118
Specifications ................................ 122
Index.............................................. 124
5 Getting More Out of Your
Camera ................................ 73
6 Using Various
Functions for Shooting
Movies ................................. 81
7 Using Playback and Other
Functions ............................ 85
8 Customizing the Camera.... 99
9 Useful Information ............ 107
8
Before using the camera, please ensure that you read the safety precautions
described below. Always ensure that the camera is operated correctly.
The safety precautions noted on the following pages are intended to prevent injuries
to yourself and other persons, or damage to the equipment.
Be sure to also check the guides included with any separately sold accessories you
use.
Camera
Warning
Denotes the possibility of serious injury or death.
Caution
Denotes the possibility of injury.
Caution
Denotes the possibility of damage to the equipment.
Warning
Do not trigger the flash in close proximity to human eyes.
Exposure to the intense light produced by the flash could damage eyesight. In
particular, remain at least one meter (39 inches) away from infants when using the
flash.
Store this equipment out of the reach of children and infants.
Strap: Putting the strap around a child’s neck could result in asphyxiation.
Memory card, day/date battery: Dangerous if accidentally swallowed. If this occurs,
contact a doctor immediately.
Do not attempt to disassemble or alter any part of the equipment that is not
expressly described in this guide.
To avoid the risk of injury, do not touch the interior of the camera if it has been
dropped or otherwise damaged.
Stop operating the camera immediately if it emits smoke, a strange smell, or
otherwise behaves abnormally.
Do not use organic solvents such as alcohol, benzine, or thinner to clean the
equipment.
Do not allow liquids or foreign objects to enter the camera.
This could result in fire or electrical shock.
If liquid or foreign objects come into contact with the camera interior, immediately turn
the camera power off and remove the batteries.
Use only recommended power sources.
Using other power sources could result in fire or electrical shock.
Safety Precautions
Safety Precautions
9
Battery
Other Warnings
Use only recommended batteries.
Do not place the batteries near or in direct flame.
Do not let the batteries come into contact with water (e.g. sea water) or other liquids.
Do not attempt to disassemble, alter or apply heat to the batteries.
Avoid dropping or subjecting the batteries to severe impacts.
This may cause explosions or leaks, resulting in fire, injury and damage to the
surroundings. In the event that a battery leaks and the eyes, mouth, skin or clothing
contacts these substances, immediately flush with water and seek medical
assistance.
Do not play the supplied CD-ROM(s) in any CD player that does not support
data CD-ROMs.
Playing the CD-ROM(s) in an audio CD player (music player) could damage the
speakers. It is also possible to suffer hearing loss from listening with headphones to
the loud sounds of a CD-ROM played on a music CD player.
Caution
Be careful not to bang the camera or subject it to strong impacts or shocks
when hanging it by the strap.
Be careful not to bump or push strongly on the lens.
This could damage the camera or lead to injury.
Avoid using, placing or storing the camera in the following places.
- Places subject to strong sunlight.
- Places subject to temperatures above 40 °C (104 °F).
- Humid or dusty areas.
These could cause leakage, overheating or an explosion of the batteries, resulting in
electrical shock, fire, burns or other injuries. High temperatures may also cause
deformation of the casing.
Caution
Do not aim the camera at bright light sources (the sun, etc.).
Doing so may cause malfunctions or damage the image sensor.
When using the camera on a beach or at a windy location, be careful not to
allow dust or sand to enter the camera.
Safety Precautions
10
Do not use the flash with dirt, dust or other items stuck to the surface, or if it is
covered by your fingers or clothing.
This may cause the camera to malfunction.
Remove and store the batteries when you are not using the camera.
If the batteries are left inside the camera, damage caused by leakage may occur.
Before you discard batteries, cover the terminals with tape or other insulators.
Contacting other metal materials in waste containers may lead to fire or explosions.
Do not sit in a chair with the camera in your pocket.
Doing so may cause malfunctions or damage the LCD monitor.
When putting the camera in your bag, ensure that hard objects do not come into
contact with the LCD monitor.
Do not attach accessories to the strap.
Doing so may cause malfunctions or damage the LCD monitor.
11
Getting Started
This chapter explains preparations before shooting, how to shoot in
» mode, and then how to view, erase and print the images you take.
The latter part of this chapter explains how to shoot and view movies
and how to transfer images to a computer.
Attaching the Strap/Holding the Camera
Attach the included strap and place it around your wrist to avoid dropping
the camera during use.
Keep your arms tight against your body while holding the camera firmly by
the sides. Be sure that your fingers do not block the flash.
1
Strap
12
Insert the included batteries and memory card into the camera.
Check the card’s write-protect tab.
If the memory card has a write-protect tab,
you will not be able to record images if the
tab is in the locked position. Slide the tab
up until you hear a click.
Open the cover.
Slide the cover lock , then slide and
open the cover as shown.
Insert the batteries.
Insert the batteries with (+) and (-) ends
oriented correctly.
Insert the memory card.
Insert the memory card as shown until it
locks into place with a click.
Be sure the memory card is oriented
correctly. Inserting the memory card in the
wrong direction could damage the
camera.
Inserting the Batteries and Memory Card
Label
Inserting the Batteries and Memory Card
13
Close the cover.
Close the cover and press downward
as you slide it until it clicks into place .
Removing the Memory Card
Push the memory card in until you hear a
click, then slowly release it.
X The memory card will pop up.
Inserting the Batteries and Memory Card
14
Approximate Number of Shots That Can Be Taken
* The number of shots that can be taken is based on the Camera & Imaging Products
Association (CIPA) measurement standard.
Under some shooting conditions, fewer shots can be taken.
Depending on the brand of alkaline batteries used, the number of shots that can be
taken may vary widely.
The values for NiMH batteries are based on fully charged batteries.
Compatible Batteries
AA-size alkaline batteries and Canon AA-size NiMH batteries (sold
separately) (pp. 34, 36).
We cannot recommend the use of any other batteries than those listed above
because performance varies widely.
NiMH batteries last much longer than alkaline batteries, especially in cold
weather.
Battery Charge Indicator
When battery charge is low, an icon and message will appear. If the
batteries are charged, the icon and message will not display.
Power Source
Alkaline Batteries
(Supplied)
NiMH Batteries
(Sold Separately)
Number of Shots* 200 470
Playback Time (Hours)
810
Can any other batteries be used?
Why use NiMH batteries?
Display Summary
Battery charge is low. Prepare new batteries to
continue using the camera.
“Change the batteries” The batteries are depleted. Insert new batteries.
Inserting the Batteries and Memory Card
15
Approximate Number of Shots per Memory Card
Values are based on the default settings.
The number of shots that can be taken will vary depending on camera settings, the
subject and the memory card used.
You can check the number of shots that can be taken when the camera is in a
Shooting Mode (p. 20).
Compatible Memory Cards
SD memory cards
SDHC memory cards
MultiMediaCards
MMCplus memory cards
HC MMCplus memory cards
SD and SDHC memory cards have a write-protect tab. If this tab is in the locked
position, [Card Locked!] will appear and you will not be able to take or erase
images.
Memory Card
128 MB 2 GB 8 GB
Number of Shots
47 749 2994
Can you check the number of shots that can be taken?
What is the write-protect tab?
Number of shots that can be taken
16
The Date/Time settings screen will appear the first time the camera is turned
on. Since the dates and times recorded into your images are based on these
settings, be sure to set them.
Turn on the camera.
Press the power button.
X The Date/Time screen will appear.
Set the date and time.
Press the qr buttons to select an option.
Press the op buttons to set a value.
Make the setting.
Press the m button.
X Once the date and time have been set,
the Date/Time screen will close.
Pressing the power button will turn off the
camera.
Set the correct date and time. If you have not set the date and time, the Date/
Time screen will appear each time you turn on the camera.
Setting the Date and Time
Reappearing Date/Time screen
Setting the Date and Time
17
Changing the Date and Time
You can change the current date and time settings.
Display the menus.
Press the n button.
Select [Date/Time] in the 3 tab.
Press the qr buttons to select the 3 tab.
Press the op buttons to select [Date/
Time], then press the m button.
Change the date and time.
Follow Steps 2 and 3 on p. 16 to adjust
the setting.
To close the menus, press the n
button.
If [Date/Time] appear even when the date/time have been correctly set, insert a
new date/time battery (p. 108).
Date/Time battery
18
You can change the language displayed in the LCD monitor menus and
messages.
Set the playback mode.
Press the 1 button.
Display the settings screen.
Press and hold the m button , then
press the n button .
Set the display language.
Press the opqr buttons to select a
language, then press the m button.
X Once the display language has been set,
the language menu will close.
Setting the Display Language
You can also change the display language by pressing the n button,
selecting the 3 tab, and selecting the [Language] menu item.
19
The shutter button has two stops. To take images that are in focus, be sure
to first press the shutter button lightly (halfway) to focus, then take the shot.
Press halfway (lightly to the first
stop).
X The camera automatically makes the
necessary settings for shooting, such as
focusing and setting the brightness.
X When the camera focuses, it will beep
twice.
Press fully (to the second stop).
X The camera plays the shutter sound and
takes the shot.
Pressing the Shutter Button
If you just press the shutter button fully without pausing halfway, the
image may not be in focus.
20
The camera can automatically select all settings so that you can take images
just by pressing the shutter button.
The camera can also detect and focus on faces, setting the color and
brightness to optimal levels.
Turn on the camera.
Press the power button.
X The start-up sound will play, and the start-
up screen will appear.
Pressing the power button again will turn
the camera off.
Select the » mode.
Press the æ button, then press the
qr buttons to select ».
Press the m button.
X When faces are detected, a white frame
appears on the face the camera judges to
be the main subject, while gray frames
appear on other detected faces.
Compose the shot.
Pressing the zoom button toward i will
zoom in on your subject, making it appear
larger. Pressing the zoom button toward
j will zoom out from your subject,
making it appear smaller.
» Taking Pictures
» Taking Pictures
21
Focus.
Press the shutter button halfway to focus.
X When the camera focuses, it will beep
twice.
X Green AF frames appear where the
subject is in focus.
X Several AF frames will appear when the
camera focuses on more than one point.
Shoot.
Press the shutter button fully.
X The camera will play the shutter sound
and shoot. The flash will automatically fire
in low light conditions.
X The indicator will blink green while the
image is recorded to the memory card.
X The image will appear for about two
seconds.
You can take a second picture even while
an image is displayed by pressing the
shutter button.
AF Frames
» Taking Pictures
22
The camera does not play any sounds?
Pressing the n button while turning on the camera power will turn off all
sounds except for warning sounds. To turn the sounds on, press the n
button, select the 3 tab, and then select [Mute]. Use the qr buttons to select
[Off].
The image comes out dark even if the flash fired when shooting?
Your subject is too far away. When the camera is at maximum wide angle, move
about 30 cm – 3.0 m (12 in. – 9.8 ft.) away from your subject and shoot. Move
about 30 cm – 2.0 m (12 in. – 6.6 ft.) or more away when the camera is at
maximum telephoto.
The camera beeps once when the shutter button is pressed halfway?
Your subject is too close. When the camera is at maximum wide angle, move
about 4 cm (1.6 in.) or more away from your subject and shoot. Move about
25 cm (9.8 in.) or more away when the camera is at maximum telephoto.
The lamp lights when the shutter button is pressed halfway.
To reduce red-eye and to assist in focusing, the lamp may light when shooting in
dark areas.
What if...
23
You can view your images on the screen.
Select the playback mode.
Press the 1 button.
X The last image you took will appear.
Select an image.
Pressing the
q
button will cycle through the
images in reverse order.
Pressing the r button will cycle through
the images in the order they were taken.
The images change more quickly if you
keep the qr buttons pressed, but they
will appear coarse.
Pressing the 1 button while the lens is
extended will cause the shooting screen
to reappear.
The lens will retract after approximately 1
minute elapses. If you press the 1 button
with the lens retracted, the power will turn
off.
Pressing the 1 button while the camera is off turns the camera on in playback
mode. Pressing it again turns the camera off. Pressing the shutter button halfway
while in playback mode, or pressing the æ button will switch the camera to
shooting mode.
1 Viewing Images
Switching to and from playback mode
24
You can select and erase images one at a time. Please note that erased
images cannot be recovered. Exercise adequate caution before erasing an
image.
Select the playback mode.
Press the 1 button.
X The last image you took will appear.
Select an image to erase.
Press the qr buttons to select an image.
Erase the image.
Press the p button.
X [Erase?] appears.
Press the qr buttons to select [Erase],
then press the m button.
X The displayed image will be erased.
To exit instead of erasing, press the qr
buttons to select [Cancel], then press the
m button.
Erasing Images
25
You can easily print the images you have taken if you connect the camera to
a PictBridge compliant printer (sold separately).
Items to Prepare
Camera and PictBridge compliant printer (sold separately)
Interface cable supplied with the camera (p. 2)
Turn off the camera and printer.
Connect the camera to the printer.
Open the cover, and insert the small end
of the plug firmly into the camera terminal
in the direction shown.
Insert the cable’s larger plug into the
printer. For connection details, refer to the
user guide provided with the printer.
Turn on the printer.
Turn on the camera.
Press the 1 button to turn on the camera.
X will appear.
Printing Images
Printing Images
26
Select an image to print.
Press the qr buttons to select an image.
Print images.
Press the m button.
Press the op buttons to select [Print],
then press the m button.
X Printing will start.
If you want to print additional images,
repeat Steps 5 and 6 after printing has
completed.
After printing has completed, turn off the
camera and printer, and unplug the
interface cable.
Canon-Brand PictBridge Compliant Printers (Sold Separately)
By connecting your camera to one of the Canon-brand PictBridge compliant
printers below, you can print your images without having to use a computer.
For more information, visit your nearest Canon retailer.
Refer to the Personal Printing Guide for details on the best ways to print.
Compact Photo Printers
(SELPHY series)
Inkjet Printers
27
The camera can automatically select all settings so that you can shoot
movies just by pressing the shutter button.
Select the X mode.
Press the æ button and press the qr
buttons to select X.
Press the m button.
Compose the shot.
Pressing the zoom button toward i will
zoom in on your subject, making it appear
larger. Pressing the zoom button toward
j will zoom out from your subject,
making it appear smaller.
Focus.
Press the shutter button halfway to focus.
X When the camera focuses, it will beep
twice.
X Shooting Movies
Shooting Time
X Shooting Movies
28
Shoot.
Press the shutter button fully.
X The camera will start shooting the movie,
and [ Rec] and the elapsed time will
appear.
Once shooting begins, take your finger off
the shutter button.
If you change the composition of your shot
during shooting, the focus will stay the
same, but the brightness and tone will
automatically adjust.
Do not touch the microphone while
shooting.
Do not press any buttons other than the
shutter button. Otherwise, the sound the
buttons make will be recorded in the
movie.
Stop shooting.
Press the shutter button fully again.
X The camera will beep once and stop
shooting the movie.
X The indicator will blink green, and the
movie will record to the memory card.
X Shooting will automatically stop when the
memory card fills.
Estimated Shooting Times
Shooting times are based on default settings. Shooting time can be checked on
the screen in Step 1.
Recording will automatically stop when either the clip file size reaches 4 GB or
the recording time reaches approximately 1 hour.
Elapsed Time
Microphone
Memory Card 128 MB 2 GB 8 GB
Shooting Time
1min. 4sec. 16min. 47sec. 1hr. 7min. 6sec.
29
You can view your movies on the screen.
Select the playback mode.
Press the 1 button.
X The last image you shot will appear.
X appears on movies.
Select a movie.
Press the qr buttons to select a movie to
play, then press the m button.
X The movie control panel will appear.
Play the movie.
Press the qr buttons to select , then
press the m button.
X The movie will play.
You can pause/resume the movie by
pressing the m button again.
Press the op buttons to adjust the
volume.
After the movie finishes, appears.
Viewing Movies
29

Hulp nodig? Stel uw vraag in het forum

Spelregels
1

Forum

Canon-PowerShot-A480
  • welke kabel heb ik nodig verbinding Canon - Labtob Gesteld op 19-1-2022 om 20:29

    Reageer op deze vraag Misbruik melden
  • Mijn lens gaat niet meer naar binnen en de camera geeft lens fout aan opnieuw opstarten maar de camera reageerd nergens op Gesteld op 29-3-2014 om 14:42

    Reageer op deze vraag Misbruik melden
  • Hoe foto's van mijn Canon G7 op laptop zetten Gesteld op 14-1-2014 om 11:37

    Reageer op deze vraag Misbruik melden
    • Als je een Apple hebt gaat dit bijna vanzelf:
      1. Click op je laptop iPhoto aan.
      2. Sluit je camera met het meegeleverde kabeltje aan op je laptop.
      Links in het programma iPhoto zie je je camera vermeld worden.
      Je laptop start vanzelf met het laden van de foto's van je camera.

      3. Je kan de foto's selecteren, die je in 1 keer wilt overzetten.
      4. iPhoto vraagt daarna ook nog of je de overgezette foto's wel/niet op je camera wilt laten staan. Geantwoord op 14-4-2014 om 22:14

      Waardeer dit antwoord Misbruik melden
  • Hallo Meneer ,mevrouw

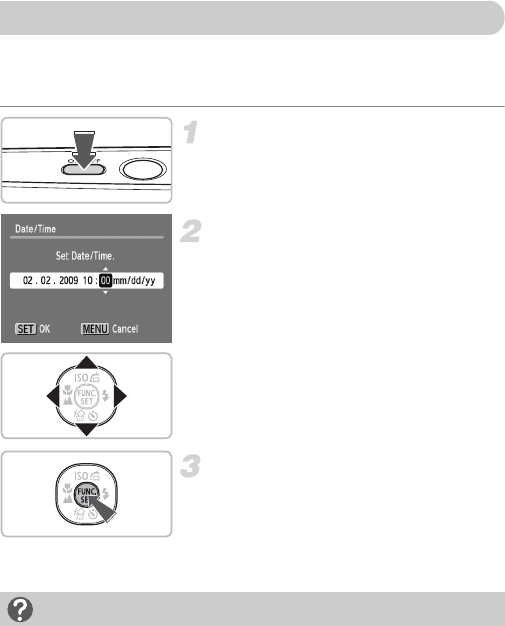
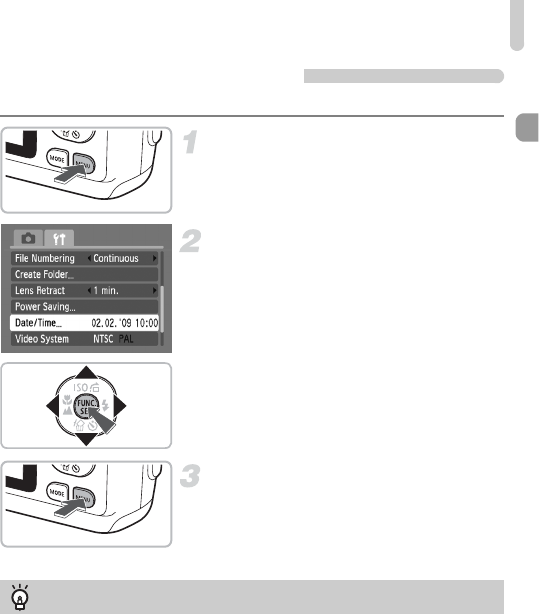
    Ik heb een vraagje hoe krijg ik de datuminfo uit het beeldscherm bij het terug kijken van de foto,s ik heb een Canon Powershot A 480.

    Groetjes James Gesteld op 14-8-2013 om 10:31

    Reageer op deze vraag Misbruik melden
    • Geachte lezer,
      een antwoord op Uw vraag kan ik niet geven daar ik met hetzelfde probleem kamp.
      Misschien hebt U inmiddels een oplossing . Van de hanleiding word ik geen
      cent wijzer, ik heb vanalles geprobeerd, krijg netjes het scherm om alles in te stellen maar kan nergens vinden de hinderlijke datum op het scherm weg te krijgen.
      U kunt mij eventueel ook bereiken op wittelingsgerthe@home.nl, of telefonisch 043-3624241
      Alvast hartelijke dank.

      Wittelings Ger. Geantwoord op 31-10-2013 om 14:42

      Waardeer dit antwoord Misbruik melden
  • wat is kaart lockt Gesteld op 22-4-2013 om 11:20

    Reageer op deze vraag Misbruik melden
  • lens fout hij wil niet meer er uit Gesteld op 6-12-2012 om 01:23

    Reageer op deze vraag Misbruik melden
6
  • De lens gaat niet meer in, en krijg in beeld: lens fout herstart camera, maar hoe doe je dat Gesteld op 30-6-2011 om 17:06

    Reageer op deze vraag Misbruik melden
  • Batterijen verwisselen. Geantwoord op 14-4-2014 om 22:07

    Waardeer dit antwoord (2) Misbruik melden
  • mijn kaart zit op slot hoe maak ik dit ongedaan Gesteld op 12-9-2010 om 12:49

    Reageer op deze vraag Misbruik melden
  • Bij aandrukken geeft de camera "lens fout, herstart camera", vervolgens gaat de camera uit. Bij opnieuw aanzetten verschijnt zelfde foutmelding. Gesteld op 14-7-2010 om 16:48

    Reageer op deze vraag Misbruik melden
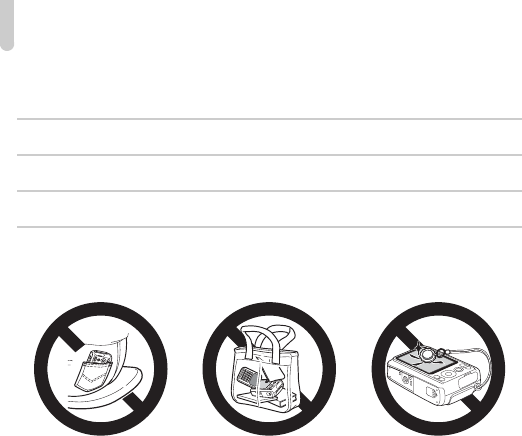
  • Een van mijn vrienden had dit probleem met een powershot SX100 IS. Ik heb het opgelost met een stofzuiger. Waarschijnlijk was er vuil bij de lens gekomen en dat wordt met de stofzuiger weggehaald.
    Actie: batterijen eruit om een luchtstroom mogelijk te maken door het toestel. Een stofzuiger met grote ronde opening voorzichtig de lens laten zuigen. Zorg dat de stofzuiger zich niet vastzuigt aan het toestel, want dan kunnen de lamellen die de lens afsluiten beschadigd worden! Graag een reactie aan:
    thijs.notenboom@hetnet.nl Geantwoord op 20-11-2010 om 21:24

    Waardeer dit antwoord (14) Misbruik melden

Misbruik melden

Gebruikershandleiding.com neemt misbruik van zijn services uitermate serieus. U kunt hieronder aangeven waarom deze vraag ongepast is. Wij controleren de vraag en zonodig wordt deze verwijderd.

Product:

Bijvoorbeeld antisemitische inhoud, racistische inhoud, of materiaal dat gewelddadige fysieke handelingen tot gevolg kan hebben.

Bijvoorbeeld een creditcardnummer, een persoonlijk identificatienummer, of een geheim adres. E-mailadressen en volledige namen worden niet als privégegevens beschouwd.

Spelregels forum

Om tot zinvolle vragen te komen hanteren wij de volgende spelregels:

Belangrijk! Als er een antwoord wordt gegeven op uw vraag, dan is het voor de gever van het antwoord nuttig om te weten als u er wel (of niet) mee geholpen bent! Wij vragen u dus ook te reageren op een antwoord.

Belangrijk! Antwoorden worden ook per e-mail naar abonnees gestuurd. Laat uw emailadres achter op deze site, zodat u op de hoogte blijft. U krijgt dan ook andere vragen en antwoorden te zien.

Abonneren

Abonneer u voor het ontvangen van emails voor uw Canon PowerShot A480 bij:


U ontvangt een email met instructies om u voor één of beide opties in te schrijven.


Ontvang uw handleiding per email

Vul uw emailadres in en ontvang de handleiding van Canon PowerShot A480 in de taal/talen: Engels als bijlage per email.

De handleiding is 9,57 mb groot.


U ontvangt de handleiding per email binnen enkele minuten. Als u geen email heeft ontvangen, dan heeft u waarschijnlijk een verkeerd emailadres ingevuld of is uw mailbox te vol. Daarnaast kan het zijn dat uw internetprovider een maximum heeft aan de grootte per email. Omdat hier een handleiding wordt meegestuurd, kan het voorkomen dat de email groter is dan toegestaan bij uw provider.

Stel vragen via chat aan uw handleiding

Stel uw vraag over deze PDF

Andere handleiding(en) van Canon PowerShot A480

Canon PowerShot A480 Gebruiksaanwijzing - Nederlands - 127 pagina's

Canon PowerShot A480 Gebruiksaanwijzing - Deutsch - 127 pagina's


Uw handleiding is per email verstuurd. Controleer uw email

Als u niet binnen een kwartier uw email met handleiding ontvangen heeft, kan het zijn dat u een verkeerd emailadres heeft ingevuld of dat uw emailprovider een maximum grootte per email heeft ingesteld die kleiner is dan de grootte van de handleiding.

Er is een email naar u verstuurd om uw inschrijving definitief te maken.

Controleer uw email en volg de aanwijzingen op om uw inschrijving definitief te maken

U heeft geen emailadres opgegeven

Als u de handleiding per email wilt ontvangen, vul dan een geldig emailadres in.

Uw vraag is op deze pagina toegevoegd

Wilt u een email ontvangen bij een antwoord en/of nieuwe vragen? Vul dan hier uw emailadres in.


Info