COVER SERIAL NUMBER: ______________________________
In most cities and counties, permits will be required for the installation of electrical circuits or the construction of exterior surfaces (decks and
gazebos). In addition, some communities have adopted residential barrier codes which may require fencing and/or self-closing gates on the property
to prevent unsupervised access to a pool (or spa) by children under 5 years of age. Your CALDERA spa is equipped with a locking cover that meets
the ASTM F1346-91 Standard for Safety Covers, and as a result, is usually exempt from most barrier requirements. As a general practice, your local
Building Department will inform you of any applicable barrier requirements at the time a permit is obtained for the installation of an electrical circuit.
Your CALDERA dealer can provide information on which permits may be required.
WELCOME
WATKINS WELLNESS congratulates you on your decision to enjoy the finest spa available. Welcome to
the growing family of Caldera® spa owners.
NOTE: This is an example. Your spa’s
label will contain different information.
Peel off top sticker and place here.
MODEL: TAHITIAN
SERIES: UTOPIA
SERIAL: TABE1WXXXX
RATINGS: 240V, 50Hz
1280 Park Center Dr., Vista, CA 92081
Watkins Manufacturing Corp.
TABE1WXXXX
TABE1WXXXX
TABE1WXXXXX
TABE1WXXXX
TABLE OF CONTENTS
SAFETY INFORMATION
IMPORTANT SAFETY INSTRUCTIONS ..........................1
3. Keep all cleaners out of the reach of children and use care when
applying.
AVANTE
™
SPA CABINET
All Utopia spas use the exclusive all-climate AVANTE Cabinet designed
for years of performance. The unique, ribbed pattern design is enhanced
by the rich cabinet colors that give the appearance of high-end furniture,
without looking like real wood and, because of the durability of the spa
cabinet material, it comes with a five year warranty against cracking, or
rotting.
CARE OF THE SPA COVER
WARNING: The cover is a manual safety cover that meets or
exceeds all prevailing requirements of ASTM Standards for spa safety
covers when installed and used correctly as of the date of manufacture.
Non-secured or improperly secured covers are a hazard. Open the cover
to its fully open position before use.
VINYL COVER
The vinyl spa cover is an attractive, durable foam insulation product.
Monthly cleaning and conditioning are recommended to maintain its
beauty.
TO CLEAN AND CONDITION THE VINYL
COVER:
SERVICE NOTE: To remove tree sap, use cigarette lighter fluid (not
charcoal lighter fluid). Use sparingly, and rinse with a saddle soap solution
immediately afterwards, then wipe dry.
IMPORTANT REMINDERS:
• DO remove snow buildup to avoid breakage of the foam core from
the additional weight of the snow.
• DO lock cover lock straps to secure the cover when the spa is not
in use.
• DO NOT drag or lift the spa cover using either the flaps or the cover
lock straps.
• DO NOT walk, stand, or sit on the cover.
• DO NOT place any metal or heat transferring object on the cover
or place any type of plastic tarp or drop cloth over the cover as
this may result in a melted foam core, which would not be covered
under the warranty.
• DO NOT use any lifting mechanisms, chemicals or cleaners except
those recommended by WATKINS WELLNESS or its Authorized
Sales and Service Dealer.
• It’s important to have clean water. Water maintenance is one of
the least understood, yet most important areas of spa ownership.
Your dealer can guide you through the process of achieving and
maintaining perfect water in your spa, given your local conditions.
Your program will depend on your water’s mineral content, how
often you use your spa, and how many people use it.
Spa Care and Maintenance
Tahatian
Page 29
Electrical Requirements
IMPORTANT
: Fill the spa with water before turning on the power.
Your CALDERA spa has been carefully designed to give you
maximum safety against electrical shock. Connecting the spa to an
improperly wired circuit will negate many of the spa’s safety features.
Improper wiring may also cause electrocution, risk of fire, and other
risks of injuries. Please read and follow the electrical installation
requirements and instructions for your specific spa model completely!
All CALDERA spa models, are equipped with a power indicator
(CALDERA Logo orange light) which, in addition to showing the spa
has power to it, has a diagnostic function as well. It will begin blinking
if the heater high-limit thermostat has tripped. If the power indicator
light is blinking, follow the instructions in the Troubleshooting section
to identify and correct the cause. The power indicator will stop blinking
once the problem has been corrected. The Power and Ready indicator
lights on the control panel also provide the same diagnostic function.
220 - 240 VOLT PERMANENTLY
CONNECTED
CALDERAspas must be wired in accordance with all applicable
National and Local Electrical Codes. All electrical work should be done
by an experienced, licensed electrician. We recommend the use of
appropriate electrical conduit, fittings, and wire for all circuits.
All UTOPIA spas require a dual electrical service using a 16 & 25
amp breaker and wired per the illustration found on the next page.
Additionally, one main disconnect switch with at least 3 mm separation
between contacts must be used for all electrical circuits to the spa.
NOTE: The CANTABRIA will require an additional 16 amp breaker in
order to operate the heater and the Lounge seat (jet pump 3) at the
same time. Without the additional 16 amp breaker, the heater will NOT
operate while the jets in the lounge (jet pump 3) are on.
• Mount the subpanel according to local codes, but not closer than
1.5 meters (5 feet) away. Your spa must be supplied by a ground
fault circuit interrupter - residual current device (RCD) - with a
tripping rating not exceeding 30 mA in an electrical subpanel.
• Open spa using Door Panel Removal instructions.
• Insert power wires into spa from either side towards the bottom front,
you will find a plastic cap attached to spa.
• Once your spa has been filled with water, turn it on and test all of
the circuit breakers.
IMPORTANT: If both breakers immediately trip, verify that the wires are
correctly connected. Each breaker should be tested prior to each use.
Here’s how:
1. Push the “TEST” button on each GFCI breaker, and observe it
click OFF.
2. Wait 30 seconds, then push the breaker switch to the OFF (down)
position (to ensure that it has completely disengaged), then push
the breaker switch to the ON (up) position. If you don't wait 30
seconds, the spa’s power indicator may continue to blink – try
again.
If any of the GFCI breakers fails to operate in this manner, your spa
may have an electrical malfunction, and you may be at risk of electrical
shock. Turn off all circuits and do not use the spa until the problem has
been corrected by an authorized service agent.
WARNING: Removing, or bypassing any GFCI breaker will result
in an unsafe spa and will void the spa’s warranty.
7
2
3
4
5
6
8
1
EQUIPMENT COMPARTMENT
The illustration below is to be used as a reference only (your spa may look different). The equipment compartment is located behind the front panel of the
spa below the Main Control Panel.
1. Jet pump*
2. EnergyPro
™
heater
3. ENERGY PRO Circulation Pump
4. Advent
™
Control Box
5. MONARCH Ozone Generator
6. Bonding terminal
7. Bluetooth Music (optional)
8. Subwoofer (optional)
1
* There are 3 jet pumps located in the Cantabria equipment compartment, only 2 are shown in illustration above.
Electrical Requirements
Page 30
IMPORTANT: If you ever need to move or relocate your CALDERA spa, it is essential that you understand and apply these installation requirements.
Your CALDERA spa has been carefully engineered to provide maximum safety against electric shock. Remember, connecting the spa to an
improperly wired circuit will negate many of its safety features.
NOTE: Long wiring runs may require larger-gauge wire than stated.
GENEVA,
NIAGARA, TAHITIAN, FLORENCE & PROVENCE
MAIN CONTROL PANEL
220-240 VAC
WIRING ACCESS
DOOR
See page 40 for Door Panel Removal Instructions
220-240 VAC
WIRING ACCESS
DRAIN
CANTABRIA
Electrical Requirements
Page 31
Installation Instructions
OUTDOOR AND PATIO
INSTALLATION
No matter where you put your new spa, it’s important that it has a
solid foundation to support it. In fact, structural damage to the spa,
resulting from incorrect installation, or placement on an inadequate
foundation, is not covered under the spa’s limited warranty.
If you install the spa outdoors, we recommend a reinforced concrete
pad at least ten centimeters (four inches) thick. The reinforcing rod
or mesh in the pad should be attached to a 6 mm² bonding wire
per national electrical codes (contact your local electrical code
compliance inspector for more information; inspection for proper
grounding may be required before pouring concrete to form the
slab).
If you place the spa on the ground, even temporarily, place stepping
stones under the leveling areas (see Spa Leveling Instructions). The
stones should be at least 5 cm thick and 30 cm square. Even with
stones in place, the spa will inevitably settle and become unlevel.
Plus, a spa surrounded by dirt or grass will soon be filled with dirt or
grass from users’ feet. So get it onto a solid foundation as soon as
possible.
DECK INSTALLATION
To be certain your deck can support your spa, you must know the
deck’s maximum load capacity. Consult a qualified building contractor
or structural engineer. To find the weight of your spa, its contents
and occupants, refer to the Spa Specification chart. This weight per
square meter must not exceed the structure’s rated capacity, or serious
structural damage could result.
CAUTION:WATKINS WELLNESS suggests a structural engineer or
contractor be consulted before the spa is placed on an elevated deck.
INDOOR/BASEMENT INSTALLATION
Be aware of some special requirements if you place your spa indoors.
Water will accumulate around the spa, so flooring materials must
provide a good grip when wet. Proper drainage is essential to prevent
a build-up of water around the spa. When building a new room for the
spa it is recommended that a floor drain be installed. The humidity
will naturally increase with the spa installed. Water may get into
woodwork and produce dry rot, mildew, or other problems. Check for
airborne moisture’s effects on exposed wood, paper, etc. in the room.
To minimize these effects, it is best to provide plenty of ventilation to
the spa area. An architect can help to determine if more ventilation
must be installed.
CALDERAspas are equipped with a vent to remove excessive
heat from the equipment compartment. Find this vent (its under the
bottom front left or right corner) and be sure the vent is not blocked by
anything, including carpeting.
Your CALDERA dealer can help you with local information such as
zoning regulations and building codes. They can also give you a copy
of our planning guide.
CAUTION: Do not install the spa on a heated floor.
WARNING: Please keep the area around your spa well
ventilated when it is installed indoors or in a confined area.
Inadequate ventilation around the spa could cause a build-up of a
higher-than-normal concentration of spa chemicals and/or bacterial
fragments. These dispersed spa chemicals and/or bacterial
fragments can be inhaled, and may result in breathing difficulties or
lung damage in certain people suffering from a compromised
immune system or respiratory infection. If you or other bathers are
affected by this condition, please seek medical attention as soon as
possible.
DELIVERY ACCESS
NOTE: It may be necessary to allow for additional over-head clearance if the
spa will be rolled up or down an incline or moved up or down a short flight of
stairs.
Use the information in the chart below to determine the requirements for
access to your desired location. It may be necessary to remove a gate, part of
a fence, or other movable obstructions in order to roll the spa to its installation
site. About ten percent of the time, a crane is the only way to install the spa by
lifting it to its final destination.
If the spa has to be taken off of the cart to go over a wall (either because the
entry area is too narrow, the eaves are too low, the corner is too tight, or the
stairway is too steep), a crane will be required. Don’t be alarmed!
The crane has a truck-mounted boom which can fit right in your driveway. It is
run by a licensed and insured operator.
For a charge, the crane operator will lift
your spa over walls, buildings, or any
other obstruction and place it as close
to the installation site as possible. The
CALDERA spa delivery personnel
will supervise the crane delivery and
complete the spa installation. Crane
delivery typically takes an average of 30
minutes to complete.
NOTE: If your spa delivery requires the
use of a crane, you may be required to
pay for its services at the co mpletion of
the delivery.
SPA DIMENSIONS ON CART
ModelHeigth (H)Length (L)Width (W)
CANTABRIA97 cm274 cm231 cm
GENEVA97 cm226 cm226 cm
NIAGARA97 cm226 cm226 cm
TAHITIAN 91 cm 213 cm213 cm
FLORENCE91 cm213 cm213 cm
PROVENCE89 cm213 cm198 cm
How is your width and height clearance?
Protruding electric meters
A/C units
Do you have sufficient
overhead clearance?
Check low roof eaves,
overhanging branches,
rain gutters
Is the path clear?
Move away branches, dog
houses, firewood, etc.
If there is a 90 turn, can we
clear it? (The spa will not bend.)
No more than 6 consecutive
stairs without a landing
to accommodate the spa
Gas meters
Check all gates
HOUSE
BACK YARD
STREET
Installation Instructions
Page 32Installation Instructions
SPA LEVELING PREPARATION
Concrete sloped at 1.5 cm per 3 m is preferred so that rain water and
water spillover will run off and not puddle underneath the spa (water
under the spa for long
periods of time may
cause the wood to
deteriorate). Other
options are brick,
stepping stone, or
blocks.
It is important to note that soft surfaces, even when stepping stones are
used to evenly distribute the
weight of the spa, will have
a tendency to settle, thus
resulting in an unleveled
spa.
NOTE: Placing the spa on
grass or dirt may increase
the amount of debris which is inadvertently brought into the spa water
and may cause harm to your equipment as well as the spa surface,
which is not covered under warranty.
GROUND PREPARATION
Your CALDERA spa has been engineered to perform on several kinds
of surfaces. While a concrete slab is best for long-term use*, other
foundations are acceptable so long as a level base is prepared prior to
delivery.
*NOTE: A reinforced concrete pad at least 10 cm (4 inches) thick or a
deck that is able to withstand more than 515 kg/m² is recommended for
the PROVENCE, 610 kg/m² is recommended for TAHITIAN spa, and
600 kg/m² is recommended for the GENEVA &NIAGARAand 635 kg/
m² for the CANTABRIA spa.
INSTALLATION NOTES:
If you are purchasing a deck package or a gazebo with your spa, a solid
foundation becomes mandatory. Placing them on any surface other than
a single level pad could create problems with their installation.
As a homeowner, it is your responsibility to provide a suitable, level
foundation for your spa. Keep in mind that most delivery crews are not
equipped to level and prepare spa sites.
If you are interested in having a concrete slab, brick surface, or wood
deck installed, your CALDERA dealer should be able to suggest a
qualified, licensed contractor.
NOTE: In order for the spa to operate properly and the internal plumbing
to drain completely, you must ensure that the spa is level after it has
been installed. Your UTOPIA spa delivery crew can help you perform the
procedure.
Slope 1.5 cm per 3 m for proper drainage.
1.5 cm
3 m
Stepping stones or brick may settle
causing the spa to be unlevel.
Page 33
NOTE:WATKINS WELLNESS recommends that the CANTABRIA be installed on a minimum 10 cm thick reinforced concrete pad or structurally sound deck able to support
the “dead weight” found in the spa specification chart.
WARNING: The CANTABRIA must not be shimmed in any manner.
CANTABRIA
Dimensions
NOTE: All dimensions are approximate; measure your spa before making
critical design or pathway decisions.
108.0” (274 cm)
32.5”
(83 cm)
38”
(97 cm)
102.0” (259 cm)
85.125”
(216 cm)
Cantabria
93.375” (237 cm)
13”
(33 cm)
61.5” (156 cm)
91”
(231 cm)
Cabinet
(Front View)
Door Opening
Front Panel
Drain
(Center of Spa)
Electrical Cut-Out
(both sides)
4" (10 cm) up from
bottom of spa
(Bottom View)
Air Vent
Do Not Block
Air Vent
Do Not Block
Air Vent
Do Not Block
Base Pan
Side Walls
Base Pan Side Walls
DOOR SIDEElectrical Cut-Out
(both sides)
Installation Instructions
Page 34Installation Instructions
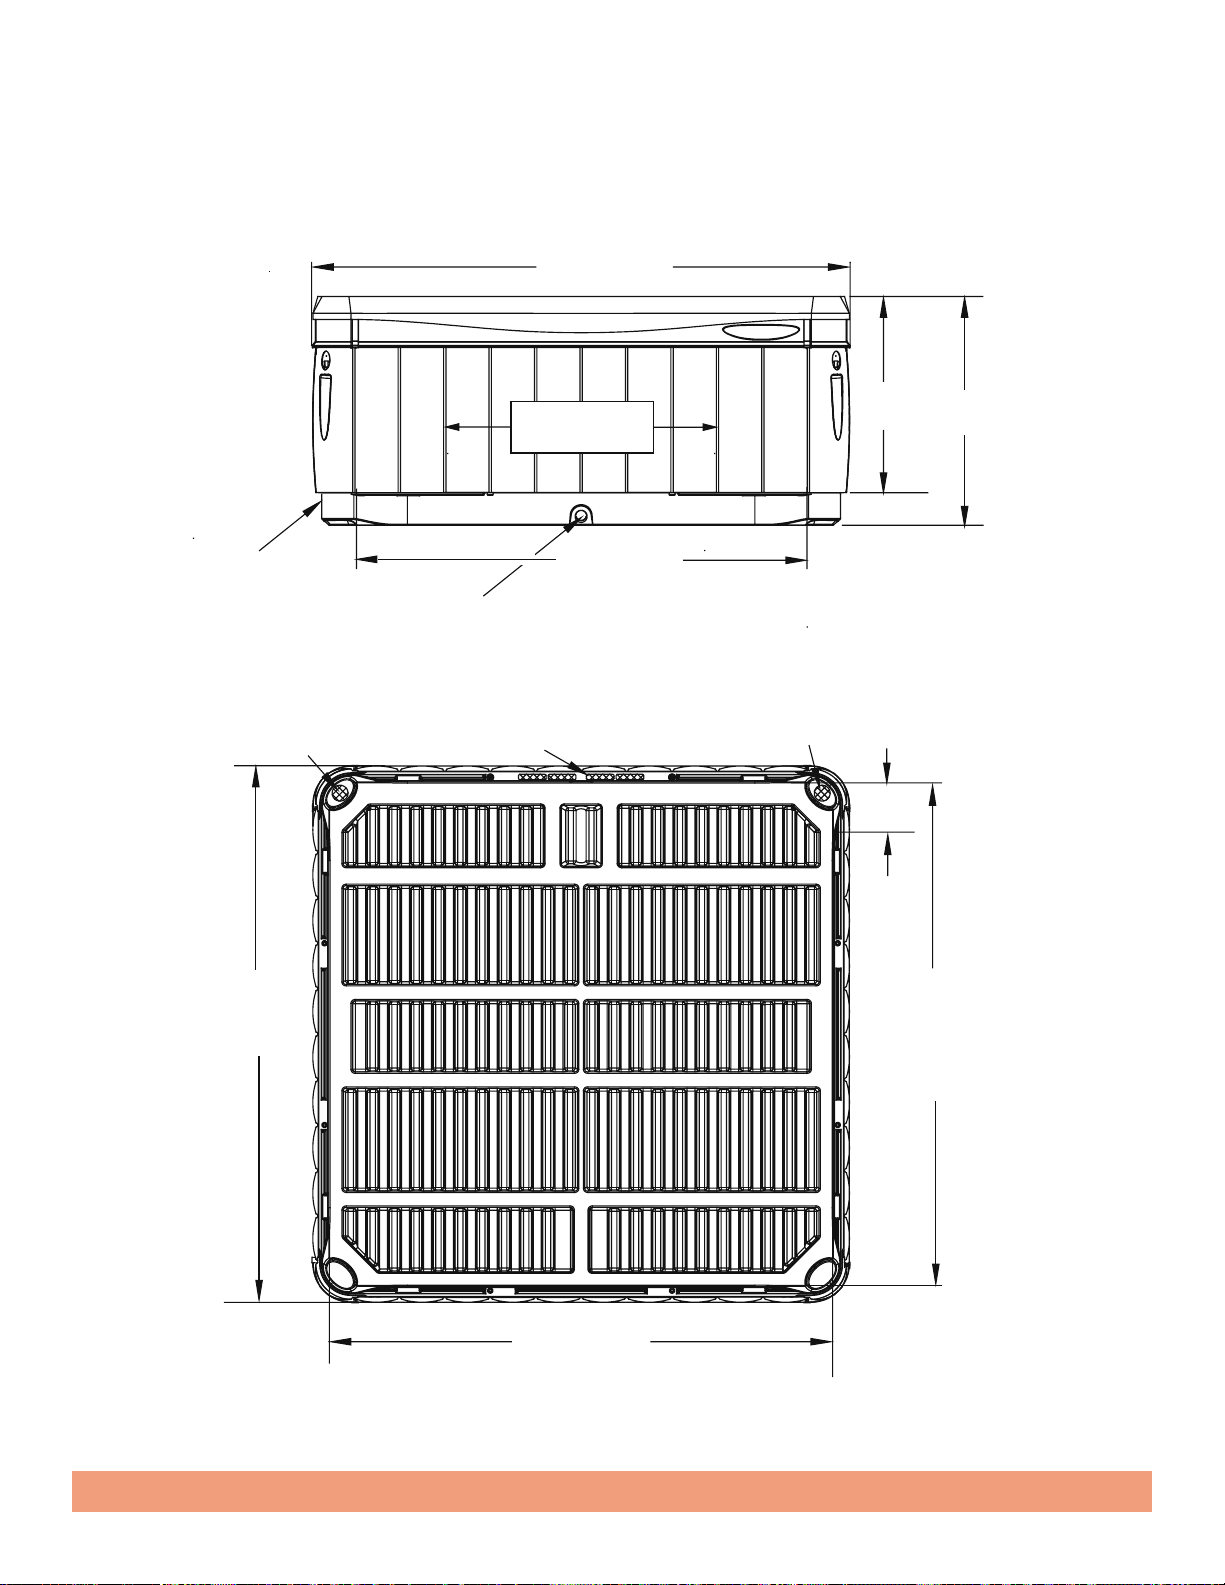
GENEVA & NIAGARA
Dimensions
NOTE: All dimensions are approximate; measure your spa before making
critical design or pathway decisions.
NOTE:WATKINS WELLNESS recommends that the GENEVA & NIAGARA be installed on a minimum 10 cm thick reinforced concrete pad or structurally sound deck able to
support the “dead weight” found in the spa specification chart.
WARNING: The GENEVA &NIAGARA must not be shimmed in any manner.
Niagara & Geneva
89” (226 cm)
32.5”
(83 cm)38”
(97 cm)
83.5” (212 cm)
83.5”
(212 cm)
75” (190 cm)
44.25” (112 cm)
13”
(33 cm)
89”
(226 cm)
Cabinet
(Front View)Door Opening
Front Panel
Drain
(Center of Spa)
(Bottom View)
Air Vent
Do Not Block
Air Vent
Do Not Block
Air Vent
Do Not Block
Base Pan
Side Walls
Base Pan Side Walls
DOOR SIDEElectrical Cut-Out
(both sides)
Electrical Cut-Out
(both sides)
4" (10 cm) up from
bottom of spa
Page 35
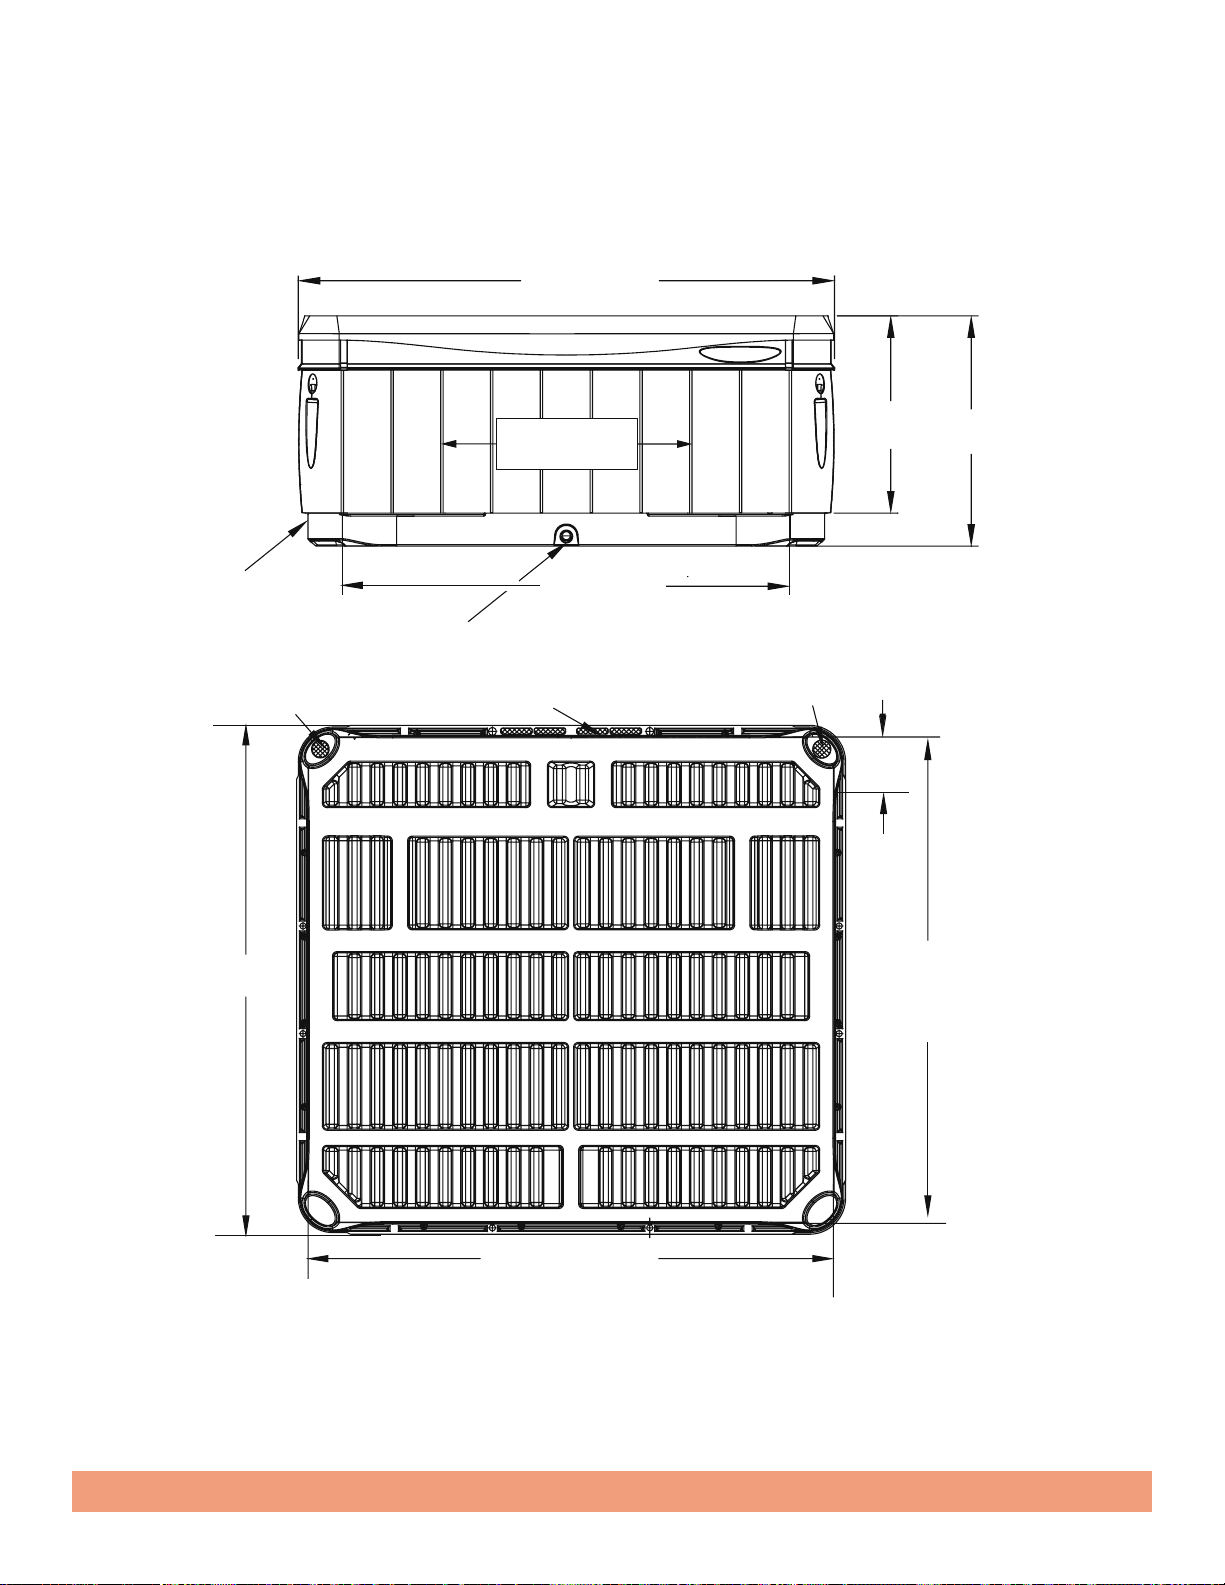
NOTE:WATKINS WELLNESS recommends that the TAHITIAN be installed on a minimum 10 cm thick reinforced concrete pad or structurally sound deck able to support the
“dead weight” found in the spa specification chart.
WARNING: The TAHITIAN must not be shimmed in any manner.
TAHITIAN& FLORENCE
Dimensions
NOTE: All dimensions are approximate; measure your spa before making
critical design or pathway decisions.
84.0” (213 cm)
31”
(79 cm)36”
(91 cm)
78.25” (199 cm)
78.25”
(199 cm)
TAHITIAN
69.5” (177 cm)
37.875” (96 cm)
13”
(33 cm)
84”
(213 cm)
Cabinet
(Front View)
Door Opening
Front Panel
Drain
(Center of Spa)
(Bottom View)
Air Vent
Do Not BlockAir Vent
Do Not Block
Air Vent
Do Not Block
Base Pan
Side Walls
DOOR SIDEElectrical Cut-Out
(both sides)
Electrical Cut-Out
(both sides)
4" (10 cm) up from
bottom of spa
Base Pan Side Walls
Installation Instructions
Page 36Installation Instructions
PROVENCE
Dimensions
NOTE: All dimensions are approximate; measure your spa before making
critical design or pathway decisions.
NOTE:WATKINS WELLNESS recommends that the PROVENCE be installed on a minimum 10 cm thick reinforced concrete pad or structurally sound deck able to support
the “dead weight” found in the spa specification chart.
WARNING: The PROVENCE must not be shimmed in any manner.
84.0” (213 cm)
31”
(79 cm)35”
(89 cm)
78.5” (199 cm)
71.85”
(182.5 cm)
PROVENCE
69.5” (177 cm)
37.875” (96 cm)
13”
(33 cm)
78”
(198 cm)
Door Opening
Drain
(Center of Spa)
Electrical Cut-Out
(both sides)
4" (10 cm) up from
bottom of spa
Base Pan
Side Walls
Base Pan Side Walls
Air Vent
Do Not Block
Air Vent
Do Not Block
Air Vent
Do Not Block
DOOR SIDEElectrical Cut-Out
(both sides)
(Front View)
(Bottom View)
Cabinet
Page 37
Service Information
GENERAL INFORMATION
Your CALDERA spa has been designed to provide years of trouble-
free use. As with any appliance, problems may occasionally occur
that require the expertise of a qualified service person. Though such
simple repairs as resetting a GFCI switch or breaker, or resetting a
high limit thermostat may not require a service call, they may indicate
that a more serious condition exists. These conditions may require an
experienced service person. Before calling for service, please refer to
the Troubleshooting Guide. Always retain your original sales receipt for
future reference.
GFCI AND HIGH LIMIT
THERMOSTAT
If your spa fails to operate at any time, first check the power supply to
the spa.
Check each of the GFCI breakers in the subpanel. If a GFCI has tripped,
reset it. If it will not reset, this may be an indication of a ground fault
(short circuit) within the electrical components. Contact an Authorized
Service Technician for a complete diagnosis.
If upon checking the GFCI’s you find that they have not tripped, check
the house breaker panel and ensure the main breaker for the electrical
circuit supplying the spa has not tripped. If it has, this is an indication
that the circuit was either overloaded or a ground fault exists between
the breaker panel and the spa receptacle or subpanel. Contact a
qualified electrician.
If upon checking the main house breaker and spa GFCI’s you find no
failures, check the high limit thermostat. To check it, simply turn off
power to the spa for 30 seconds. This will automatically reset the high
limit thermostat if it has tripped. If the spa energizes once you turn the
power back on, this indicates reduced water flow through the heating
system. Tripping of the high limit thermostat is normally a result of
one or a combination of these problems. 1) clogged filter cartridge(s),
2) blockage within the system plumbing, 3) a non-functioning heater
circulation pump, 4) power was not disconnected from the spa before it
was drained, 5) an air lock in the plumbing lines. (The Power Indicator
on the front of the spa’s control panel will also be blinking if the high limit
thermostat circuit has tripped.)
If the spa does not function after tripping and resetting the GFCI’s or
resetting the high limit thermostat, then the problem should be referred
to an Authorized Service Technician. Refer to the Troubleshooting Guide
for additional service information.
HEATER AND INTEGRATED
PRESSURE SWITCH
WATKINS WELLNESS unconditionally warrants the heater against any
failure that would require replacement. This warranty’s duration is equal
to the time period identified in the Component Warranty. This warranty
defines unconditional as warranty coverage without exception provided
that the component has failed to operate properly within the spa’s
system. This means that conditions that would normally invalidate the
limited warranty, such as water chemistry damage, do not apply to the
heater.
It is important to note that the heater is protected by both the heater high
limit thermostat circuit and the integrated pressure switch. The causes of
heater high limit tripping are discussed in the previous section.
If the spa is not heating, the red and green lights are blinking, but
the pump and light are operating, then the pressure switch may be
open. Opening of the pressure switch is normally a result of one or a
combination of these problems:
1. A clogged filter cartridge
2. Blockage within the system plumbing
3. Power was not disconnected to the spa before it was drained
4. An air lock in the plumbing lines
5. Circulation pump not properly working
Once the problem has been identified and corrected the pressure switch
will close which will energize the heater.
CIRCULATION PUMP AND
CIRCULATION PUMP THERMAL
CUT-OFF
The circulation pump is a dedicated, water cooled, energy efficient, quiet
pump that provides continuous filtration for the spa. Since the pump is
water cooled, it is equipped with a thermal cut-off to prevent the pump
from being damaged by running hot when water is not present.
Reset the circulation pump’s thermal cut-off by disconnecting power to
the spa and allowing the pump to cool.
Tripping of the thermal cut-off is normally the result of one or a
combination of these problems: 1) clogged filter cartridge(s), 2) blockage
within the system plumbing, 3) power was not disconnected to the spa
before it was drained, or 4) an air lock in the plumbing lines. Once the
problem has been identified and corrected the pump thermal cut-off will
be able to be reset which will allow it to operate normally.
MISCELLANEOUS SERVICE
INFORMATION
The control and high-limit thermostats are equipped with electronic
sensors that are connected to the spa’s plumbing. Never cut or kink the
wires that connect the sensors to the thermostats within the control box.
The jet pump is equipped with a thermal overload cutoff switch that is
designed to protect the pump from overheating. If the pump shuts itself
off in an older spa, it could indicate failure of the pump motor bearings. If
the pump shuts itself off in a new spa, it is usually the result of one or a
combination of the following factors:
• Thermal overload: Although mass-produced, not all thermal overload
cutoffs are exactly the same. Some are more sensitive than others and
will shut the pump off at lower temperatures.
• High temperature: All CALDERA spa models are equipped with a jet
pump shroud that vents the heat generated by the pump motor to the
outside of the equipment compartment, and back into the spa water. If
the vent is blocked by masonry, grass or debris, overheating of the jet
pump may occur. Once the pump motor has cooled sufficiently and any
blockage has been removed from the vent opening, the jet pump can
be restarted.
• Friction: Sometimes the moving parts of a new pump are tight enough
to cause heat build-up due to friction. After a normal break-in period,
the pump will run cooler.
• Improper wiring: If the spa is connected with an extension cord, and/
or the house wiring is undersized, the pump may starve for voltage and
therefore may draw more amperage and generate excessive heat.
Service Information
Page 38
• If the pump is shutting down due to excessive heat, make sure the
equipment compartment has adequate ventilation. The air gap at the
bottom must not be blocked. Should your jet pump continue to shut off
after short periods of use, contact a qualified service technician.
ACTS INVALIDATING WARRANTY
The limited warranty is void if the CALDERA spa has been improperly
installed, subjected to alteration, misuse, or abuse, or if any repairs
on the spa are attempted by anyone other than an authorized
representative of WATKINS WELLNESS. Alteration shall include any
component or plumbing change, electrical conversion, or the addition
of any non-approved sanitation or water purification device or heating
system which contributes to component or unit failure or unsafe
operating system. Misuse and abuse shall include any operation of
the spa other than in accordance with WATKINS WELLNESS printed
instructions, or use of the spa in an application for which it is not
designed; specifically: use of the spa in a non-residential application;
damage caused by operation* of the spa at water temperatures outside
the range of 1.5°C (35°F) and 49°C (120°F); damage caused by a
dirty, clogged or calcified filter cartridge; damage to the spa surface
caused by the use of tri-chloro chlorine, misuse of chemical tablets in a
floater, acid, or any other spa chemicals or spa surface cleaners which
are not recommended by WATKINS WELLNESS; damage caused by
allowing undissolved spa sanitizing chemicals to lie on the spa surface
(no spa surface material can withstand this kind of abuse); damage
to components or spa surface caused by improper water chemistry
maintenance; and damage to the spa surface caused by leaving the spa
uncovered while empty of water and in direct exposure to sunlight (this
may cause solar heating distress in warm weather regions). These are
considered abuses and may invalidate this warranty.
*Operation of the spa does not mean “use” of the spa! WATKINS
WELLNESS does not recommend using the spa if the water
temperature is above or below the spa’s control panel temperature
range.
DISCLAIMERS
WATKINS WELLNESS shall not be liable for loss of use of the
CALDERA spa, or other incidental, consequential, special, indirect, or
punitive costs, expenses or damages, which may include but are not
limited to the removal of a permanent deck or other custom fixture, or the
necessity for crane removal. Any implied warranty shall have a duration
equal to the duration of the applicable limited warranty stated above.
Some states do not allow limitations on how long an implied warranty
lasts. Under no circumstances shall WATKINS WELLNESS or any of its
representatives be held liable for injury to any person or damage to any
property, however arising.
Some states do not allow the exclusion or limitation of incidental or
consequential damages, so the above limitations may not apply to you.
CUSTOMER SERVICE
If you have any questions about any aspect of your CALDERA spa
set-up, operation,or maintenance that have not been answered by this
manual, consult your CALDERA dealer.
TROUBLESHOOTING
Should you experience any problem whatsoever, do not hesitate to
contact your authorized CALDERA dealer. Located below and on the
next page are some tips to help you to diagnose and rectify some more
common sources of trouble yourself, if you choose to do so.
SPA WATER MAINTENANCE TROUBLESHOOTING GUIDE
ProblemProbable causesSolutions
Cloudy Water• Dirty filters
• Excessive oils / organic matter
• Improper sanitization
• Suspended particles / organic matter
• Overused or old water
• Clean filters
• Shock spa with sanitizer
• Add sanitizer
• Adjust pH and/or alkalinity to recommended range
• Run jet pump(s) and clean filters
• Drain and refill the spa
Water Odor• Excessive organics in water
• Improper sanitization
• Low pH
• Shock spa with sanitizer
• Add sanitizer
• Adjust pH to recommended range
Chlorine Odor• Chloramine level too high
• Low pH
• Shock spa with sanitizer
• Adjust pH to recommended range
Musty Odor• Bacteria or algae growth• Shock spa with sanitizer–if problem is visible or persistent, drain, clean and refill
the spa
Organic buildup / scum ring around spa• Build-up of oils and dirt• Wipe off scum with clean rag – if severe, drain the spa, use a spa surface and
tile cleaner to remove the scum, and refill the spa
Algae Growth• High pH
• Low sanitizer level
• Shock spa with sanitizer and adjust pH
• Shock spa with sanitizer and maintain sanitizer level
Eye Irritation• Low pH
• Low sanitizer level
• Adjust pH
• Shock spa with sanitizer and maintain sanitizer level
Skin Irritation / Rash• Unsanitary water
• Free chlorine level above 5 ppm
• Shock spa with sanitizer and maintain sanitizer level
• Allow free chlorine level to drop below 5 ppm before spa use
Stains• Total alkalinity and/or pH too low
• High iron or copper in source water
• Adjust total alkalinity and/or pH
• Use a metal deposit inhibitor
Scale• High calcium content in water – total alkalinity and pH
too high
• Adjust total alkalinity and pH – if scale requires removal, drain the spa, scrub off
the scale, refill the spa and balance the water
Service Information
Page 39
GENERAL OPERATION TROUBLESHOOTING GUIDE
ProblemProbable causesSolutions
Entire spa is inoperative• Power failure
• GFCI tripped
• Heater high-limit thermostat tripped
• Spa lock activated
• Check power source
• Reset GFCI; call for service if it will not reset
• Disconnect power for at least thirty seconds to reset heater high limit. If it will not
reset, check for clogged filters. If tripping continues, call for service.
• Deactivate spa lock
Spa does not heat; jets and light
operate (Orange logo "Ready", and
Gray logo "Power" indicators are
blinking)
• Integrated pressure switch open
• Circulation pump thermal cut-off tripped
• Check for clogged filters. Integrated pressure switch will reset when the flow of water
through the heater has been restored. Call for service if the heater trips frequently.
• Check for clogged filters or air locks in plumbing. Disconnect power to the spa, allow
circulation pump to cool. Circulation pump thermal cut-off will reset when pump has
cooled and power is reapplied. Call for service if circulation pump thermal cut-off
trips frequently.
Jets weak or surging• Spa water level too low
• Filters clogged
• Air valves are closed
• Add water
• Clean filters
• Open air valves
Lights inoperative
• Spa lock activated
• Light wiring or assembly is faulty
• Deactivate spa lock
• Call for service, replace light assembly
Spa not heating properly• Temperature set too low
• Spa cover improperly positioned
• Dirty Filter
• Summer Timer On
• Set control panel to a higher temperature.
• Align spa cover
• Clean filter
• Turn summer timer mode to off position
Gray Logo "Power" indicator blinking• Heater high-limit thermostat tripped• Disconnect power for at least thirty seconds to reset heater high limit. If it will not
reset, check for clogged filters. If tripping continues, call for service.
Orange Logo "Ready" indicator
blinking
• Temperature sensor problem• Disconnect power for at least thirty seconds. If blinking continues, call for service.
Pump motor will not function• Motor overload condition
• Control switch failure if jet symbol does not
come on
• Let cool for one hour. Motor overload will reset automatically. If problem persists,
contact your CALDERA dealer
• Disconnect spa and contact your CALDERA dealer
Noisy pump or motor• Low water level• Add water to normal level (2.5 cm above highest jet)
Pump motor runs, but low or no water/
jet pressure
• Air control valve closed or blocked
• Low water level
• Dirty filter cartridge
• Jet blocked
• Clogged suction or skimmer basket
• Open or clean air valve
• Add water to normal level (2.5 cm above highest jet)
• Clean filter cartridge
• Remove jet face eyeball and clean orifice
• Clean suction cover or skimmer basket
Diverter valves are difficult to turn
• Sand or grit inside valves
• Clean and lubricate valve per diverter valve maintenance instructions.
After filling or refilling the spa: a jet
pump is operating, but water is not
flowing from any of its jets
• Pump is not properly primed
• Turn off power to the spa at the breaker and remove the equipment compartment
door.
• Loosen the union on the top of the pump(s) to allow the air to escape, and then
hand-tighten the union(s).
• Turn power back on, activate the pump, and check to make sure the union is tight
enough to keep it from leaking. Replace the equipment doors.
OR: Remove and reinstall the FROG cap.
Service Information
Page 40Service Information
DOOR PANEL REMOVAL
* 1
Locate the two buttons
below the front panel
on the same side as the
Main Control Panel
* 2
* 3
Pull bottom away from spa, lower
slightly and remove from spa. Place
door panel in cool shaded place.
Button Button
Push up and hold one of
the buttons using an Allen
wrench less than ¼" (6 mm)
in width or small screwdriver
into the center of the safety
lock then pull the door panel
away from the spa next to
that button location. Repeat
procedure on second button.
Main Control Panel
Safety Lock
DOOR PANEL REPLACEMENT
* 1
Raise door panel placing top
under Stainless border with bottom
slightly away from spa.
Push door panel against spa allowing it
to rest above the wood frame. Repeat on
other side of door panel
* 2
* 3
Push bottom of door panel all the
way in making it even with existing
panels.
If necessary, slide door panel from
side to side making the spacing
even on both sides of the door.
Safety Lock
The illustrations are to be used as a reference
only (your spa may look different).
Vista, California
USA
This manual contains installation, operating, maintenance, and service information for the following CALDERA spas
304136.18 B (12/17)
UTOPIA SPECIFICATIONS
CAUTION: WATKINS WELLNESS suggests a structural engineer or contractor be consulted before the spa is placed on an elevated deck.
* NOTE: The “Filled weight” and “Dead weight” of the spa includes the weight of the occupants (assuming an average occupant weight of 80.0 kg).
The GFCI may also be referred to as an ELCB (Earth Leakage Circuit Breaker) or as an RCD (Residual Current Device).
Gebruikershandleiding.com neemt misbruik van zijn services uitermate serieus. U kunt hieronder aangeven waarom deze vraag ongepast is. Wij controleren de vraag en zonodig wordt deze verwijderd.
Product:
Spelregels forum
Om tot zinvolle vragen te komen hanteren wij de volgende spelregels:
lees eerst de handleiding door;
controleer of uw vraag al eerder door iemand anders is gesteld;
probeer uw vraag zo duidelijk mogelijk te stellen;
heeft u een probleem en al geprobeerd om dit op te lossen, vermeld dit erbij aub;
heeft u een oplossing gekregen van een bezoeker dan horen wij dat graag in dit forum;
wilt u een reactie geven op een vraag of antwoord, gebruik dan niet dit formulier maar klik op de knop 'reageer op deze vraag';
uw vraag wordt direct op de website gezet; vermijd daarom persoonlijke gegevens in te vullen;
Belangrijk! Als er een antwoord wordt gegeven op uw vraag, dan is het voor de gever van het antwoord nuttig om te weten als u er wel (of niet) mee geholpen bent! Wij vragen u dus ook te reageren op een antwoord.
Belangrijk! Antwoorden worden ook per e-mail naar abonnees gestuurd. Laat uw emailadres achter op deze site, zodat u op de hoogte blijft. U krijgt dan ook andere vragen en antwoorden te zien.
Abonneren
Abonneer u voor het ontvangen van emails voor uw Caldera Utopia - serie 2018 bij:
nieuwe vragen en antwoorden
nieuwe handleidingen
U ontvangt een email met instructies om u voor één of beide opties in te schrijven.
Ontvang uw handleiding per email
Vul uw emailadres in en ontvang de handleiding van Caldera Utopia - serie 2018 in de taal/talen: Engels als bijlage per email.
De handleiding is 8.75 mb groot.
U ontvangt de handleiding per email binnen enkele minuten. Als u geen email heeft ontvangen, dan heeft u waarschijnlijk een verkeerd emailadres ingevuld of is uw mailbox te vol. Daarnaast kan het zijn dat uw internetprovider een maximum heeft aan de grootte per email. Omdat hier een handleiding wordt meegestuurd, kan het voorkomen dat de email groter is dan toegestaan bij uw provider.
Stel vragen via chat aan uw handleiding
Stel uw vraag over deze PDF
Andere handleiding(en) van Caldera Utopia - serie 2018
Uw handleiding is per email verstuurd. Controleer uw email
Als u niet binnen een kwartier uw email met handleiding ontvangen heeft, kan het zijn dat u een verkeerd emailadres heeft ingevuld of dat uw emailprovider een maximum grootte per email heeft ingesteld die kleiner is dan de grootte van de handleiding.
Er is een email naar u verstuurd om uw inschrijving definitief te maken.
Controleer uw email en volg de aanwijzingen op om uw inschrijving definitief te maken
U heeft geen emailadres opgegeven
Als u de handleiding per email wilt ontvangen, vul dan een geldig emailadres in.
Uw vraag is op deze pagina toegevoegd
Wilt u een email ontvangen bij een antwoord en/of nieuwe vragen? Vul dan hier uw emailadres in.