Please visit us at http://solutions.brother.com where you can get product support
and answers to frequently asked questions (FAQs).
KNOWING YOUR
SEWING MACHINE
SEWING BASICS
VARIOUS STITCHES
APPENDIX
INTRODUCTION
Thank you for purchasing this sewing machine. Before using this machine, carefully read the "IMPORTANT
SAFETY INSTRUCTIONS", and then study this manual for the correct operation of the various functions. In
addition, after you have finished reading this manual, store it where it can quickly be accessed for future
reference.
Please read these safety instructions before attempting to use the machine.
DANGER - To reduce the risk of electric shock:
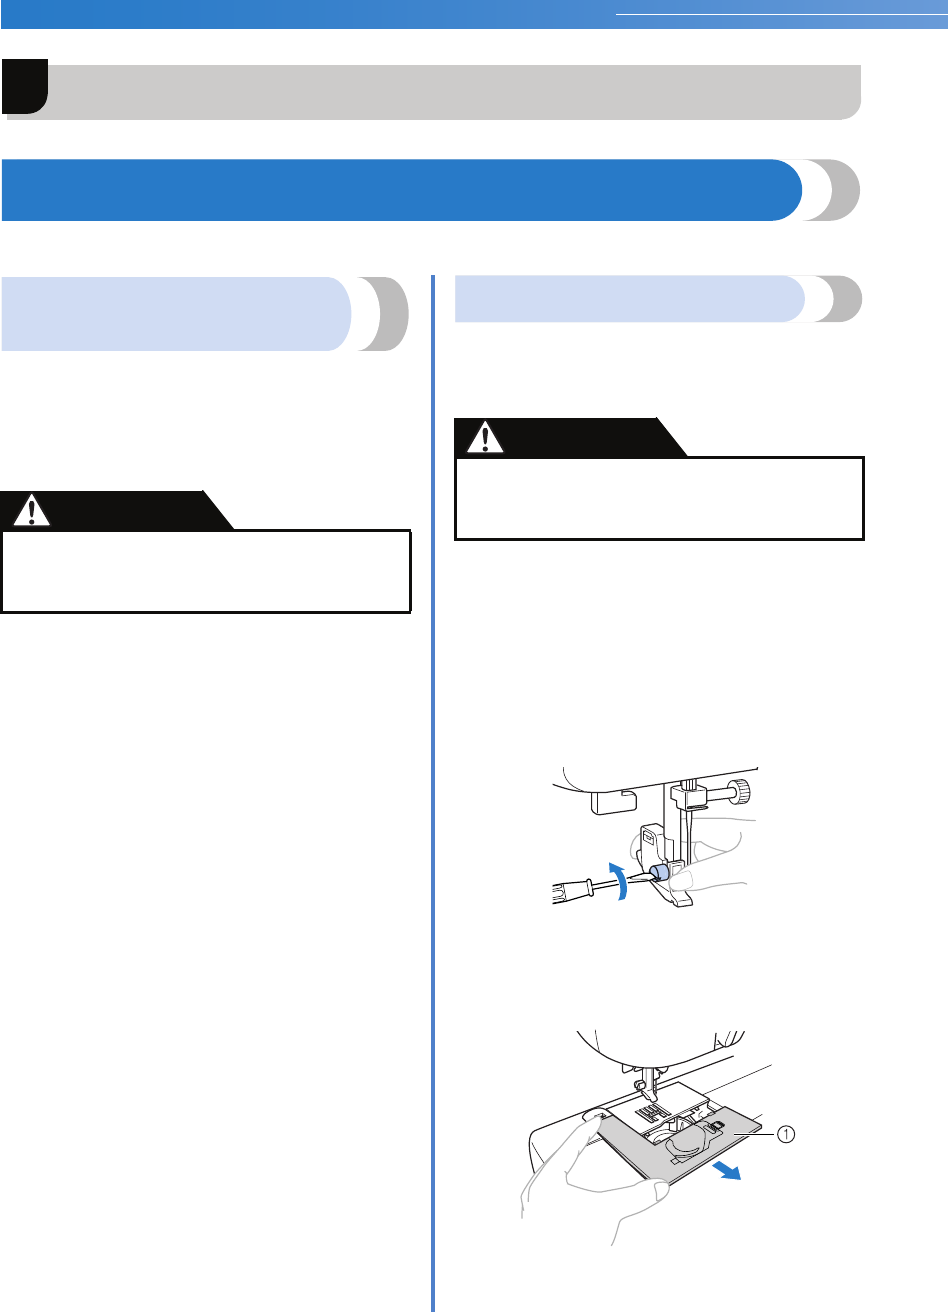
1Always unplug the machine from the electrical outlet immediately after using, when cleaning,
when making any user servicing adjustments mentioned in this manual, or if you are leaving the
machine unattended.
WARNING - To reduce the risk of burns, fire, electric shock, or injury to persons.
2Always unplug the machine from the electrical outlet when making any adjustments mentioned
in the instruction manual:
•
•
•
To unplug the machine, switch the machine to the symbol “O” position to turn it off, then grasp
the plug and pull it out of the electrical outlet. Do not pull on the cord.
Plug the machine directly into the electrical outlet. Do not use an extension cord.
Always unplug your machine if the power is cut.
3 Never operate this machine if it has a damaged cord or plug, if it is not working properly, if it has
been dropped or damaged, or water is spilled on the unit. Return the machine to the nearest
authorized dealer or service center for examination, repair, electrical or mechanical adjustment.
While the machine is stored or in use if you notice anything unusual, such as an odor, heat,
discoloration or deformation, stop using the machine immediately and unplug the power cord.
When transporting the sewing machine, be sure to carry it by its handle. Lifting the sewing
machine by any other part may damage the machine or result in the machine falling, which could
cause injuries.
When lifting the sewing machine, be careful not to make any sudden or careless movements,
otherwise you may injure your back or knees.
IMPORTANT SAFETY
INSTRUCTIONS
1
4 Always keep your work area clear:
•Never operate the machine with any air openings blocked. Keep ventilation openings of the
sewing machine and foot control free from the build up of lint, dust, and loose cloth.
•Do not store objects on the foot controller.
•Do not use extension cords. Plug the machine directly into the electrical outlet.
•Never drop or insert any object into any opening.
•Do not operate where aerosol (spray) products are being used or where oxygen is being
administered.
•Do not use the machine near a heat source, such as a stove or iron; otherwise, the machine,
power cord or garment being sewn may ignite, resulting in fire or an electric shock.
•Do not place this sewing machine on an unstable surface, such as an unsteady or slanted table,
otherwise the sewing machine may fall, resulting in injuries.
5 Special care is required when sewing:
•Always pay close attention to the needle. Do not use bent or damaged needles.
•Keep fingers away from all moving parts. Special care is required around the machine needle.
•Switch the sewing machine to the symbol “O” position to turn it off when making any adjustments
in the needle area.
•Do not use a damaged or incorrect needle plate, as it could cause the needle to break.
•Do not push or pull the fabric when sewing, and follow careful instruction when freehand stitching
so that you do not deflect the needle and cause it to break.
6This machine is not a toy:
•Your close attention is necessary when the machine is used by or near children.
•The plastic bag that this sewing machine was supplied in should be kept out of the reach of
children or disposed of. Never allow children to play with the bag due to the danger of
suffocation.
•Do not use outdoors.
7 For a longer service life:
•When storing this machine, avoid direct sunlight and high humidity locations. Do not use or store
the machine near a space heater, iron, halogen lamp, or other hot objects.
•Use only neutral soaps or detergents to clean the case. Benzene, thinner, and scouring powders
can damage the case and machine, and should never be used.
•Always consult the operation manual when replacing or installing any assemblies, the presser feet,
needle, or other parts to assure correct installation.
2
8 For repair or adjustment:
•If the Light unit (light-emitting diode) is damaged, it must be replaced by authorized dealer.
•In the event a malfunction occurs or adjustment is required, first follow the troubleshooting table
in the back of the operation manual to inspect and adjust the machine yourself. If the problem
persists, please consult your local authorized Brother dealer.
Use this machine only for its intended use as described in this manual.
Use accessories recommended by the manufacturer as contained in this manual.
The contents of this manual and specifications of this product are subject to change without notice.
For additional product information, visit our web site at www.brother.com
SAVE THESE INSTRUCTIONS
This machine is intended for household use.
This appliance is not intended for use by persons (including children) with reduced physical, sensory
or mental capabilities, or lack of experience and knowledge, unless they have been given supervision
or instruction concerning use of the appliance by a person responsible for their safety. Children should
be supervised to ensure that they do not play with the appliance.
FOR USERS IN THE UK, EIRE,
MALTA AND CYPRUS ONLY
IMPORTANT
•In the event of replacing the plug fuse, use a fuse approved by ASTA to BS 1362, i.e. carrying the
mark, rating as marked on plug.
•Always replace the fuse cover. Never use plugs with the fuse cover omitted.
•If the available electrical outlet is not suitable for the plug supplied with this equipment, you
should contact your authorized dealer to obtain the correct lead.
3
CONTENTS
1. KNOWING YOUR SEWING MACHINE ..........................................................5
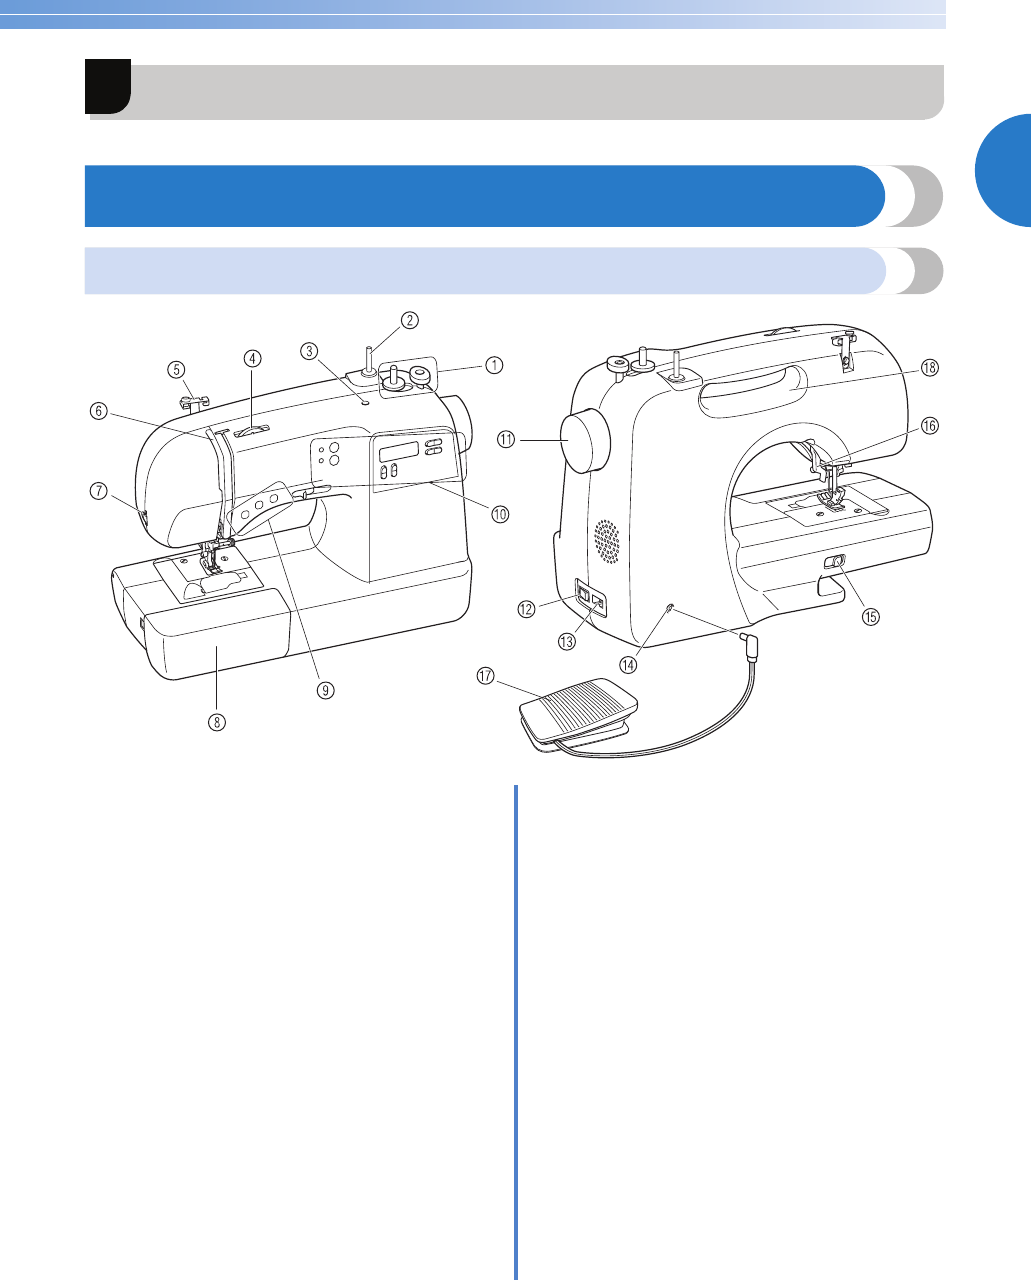
NAMES OF MACHINE PARTS AND THEIR FUNCTIONS ....................................................5
The main parts .................................................................................................................................................5
Needle and presser foot section ......................................................................................................................6
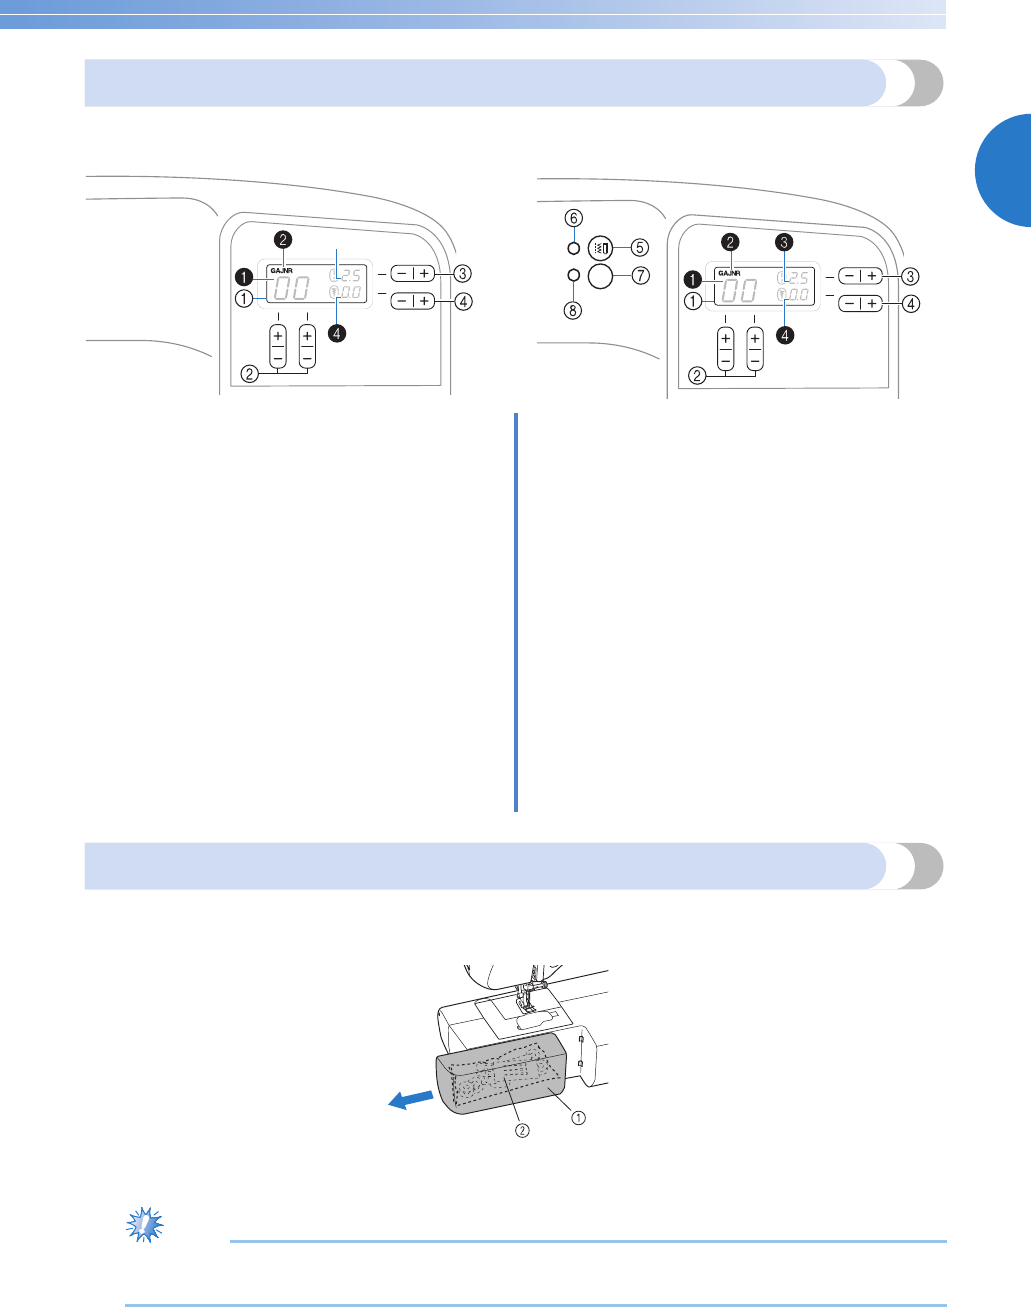
Flat bed attachment .........................................................................................................................................7
USING YOUR SEWING MACHINE .....................................................................................9
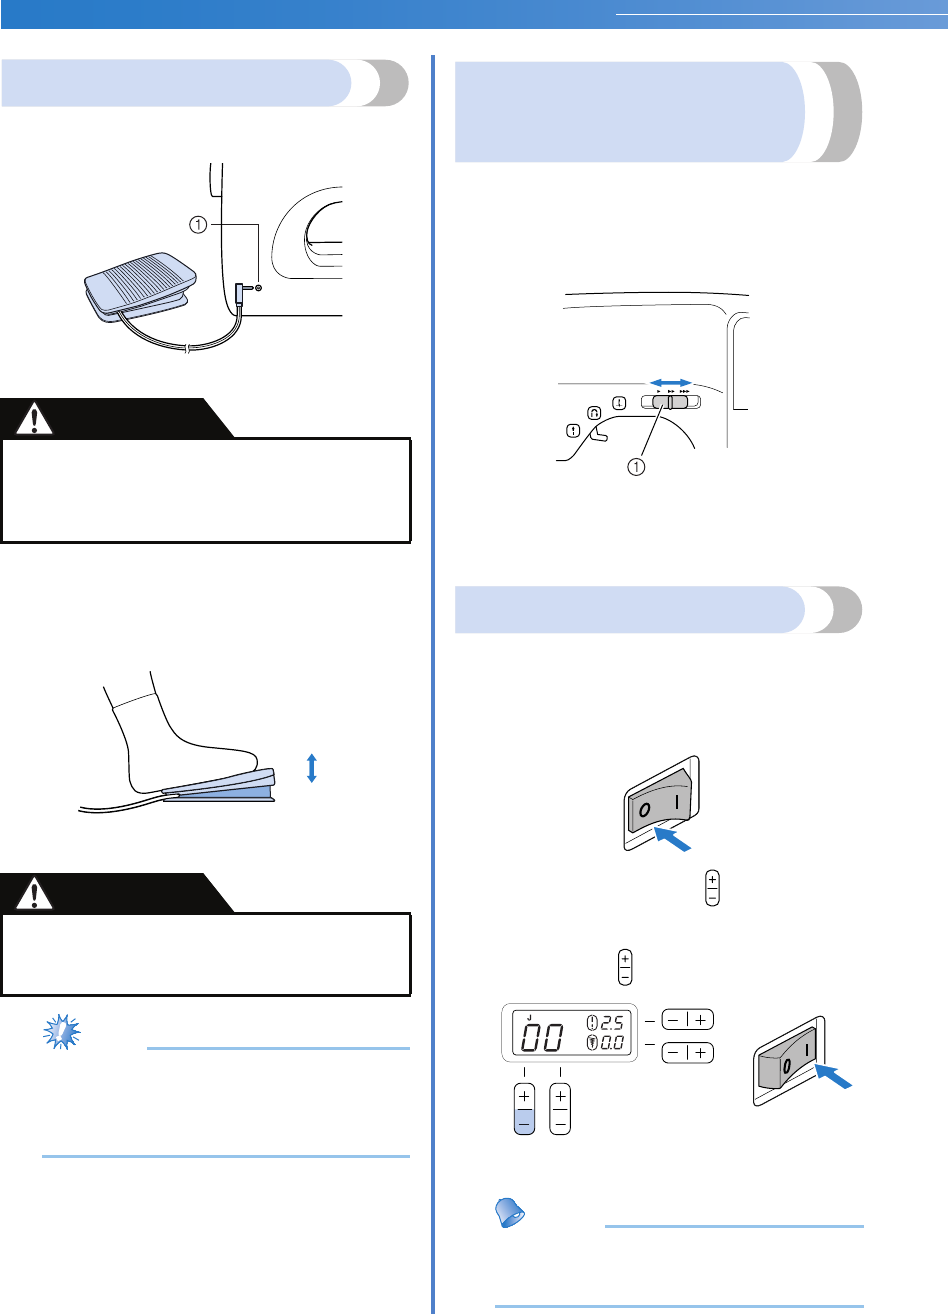
Power supply precautions ................................................................................................................................9
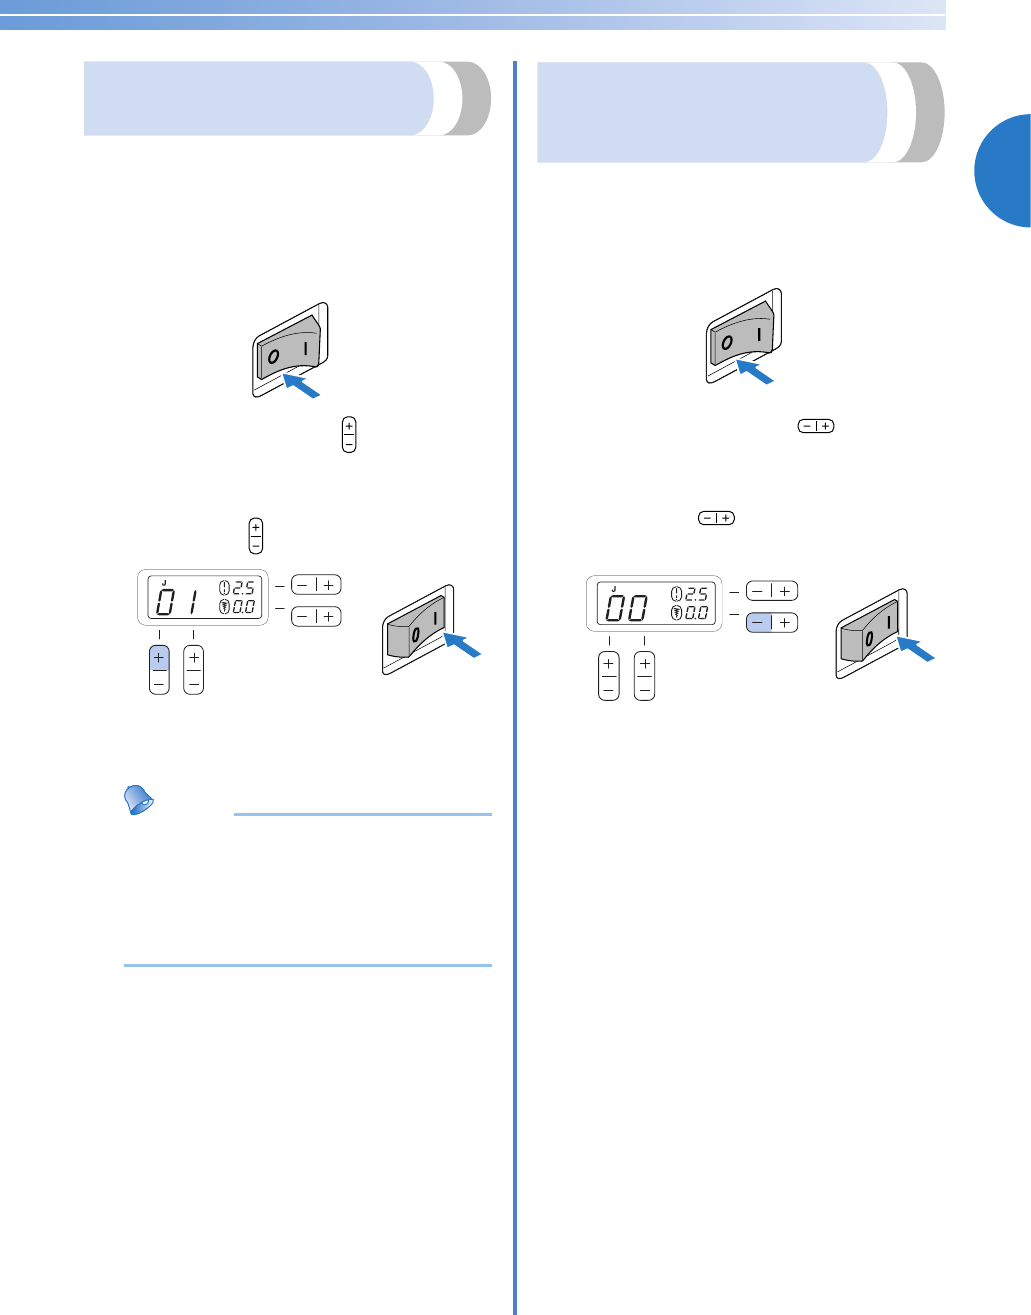
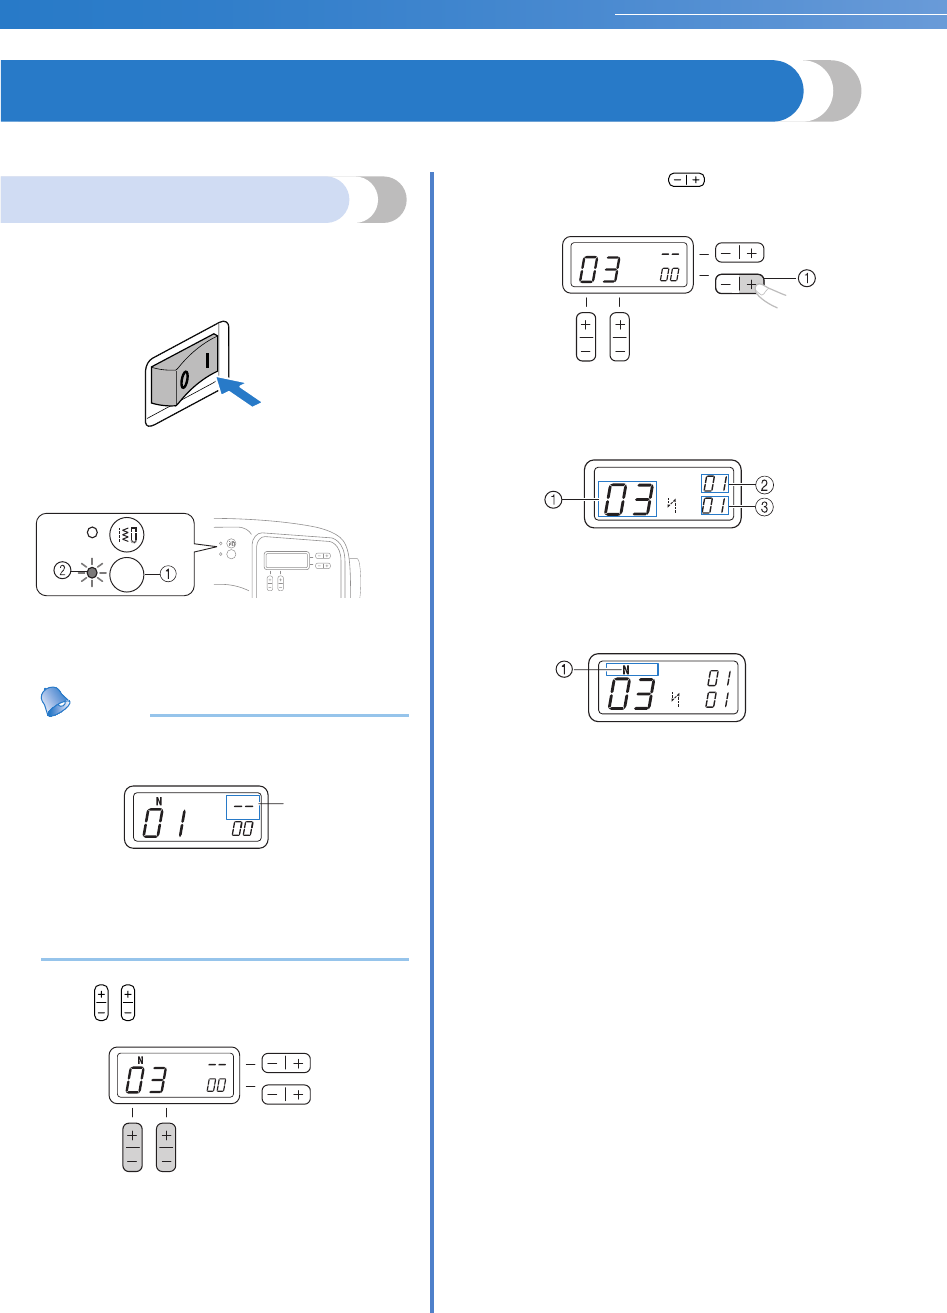
Turning on the machine ...................................................................................................................................9
Sewing speed controller (for models equipped with the sewing speed controller) .........................................10
Changing the needle stop position .................................................................................................................10
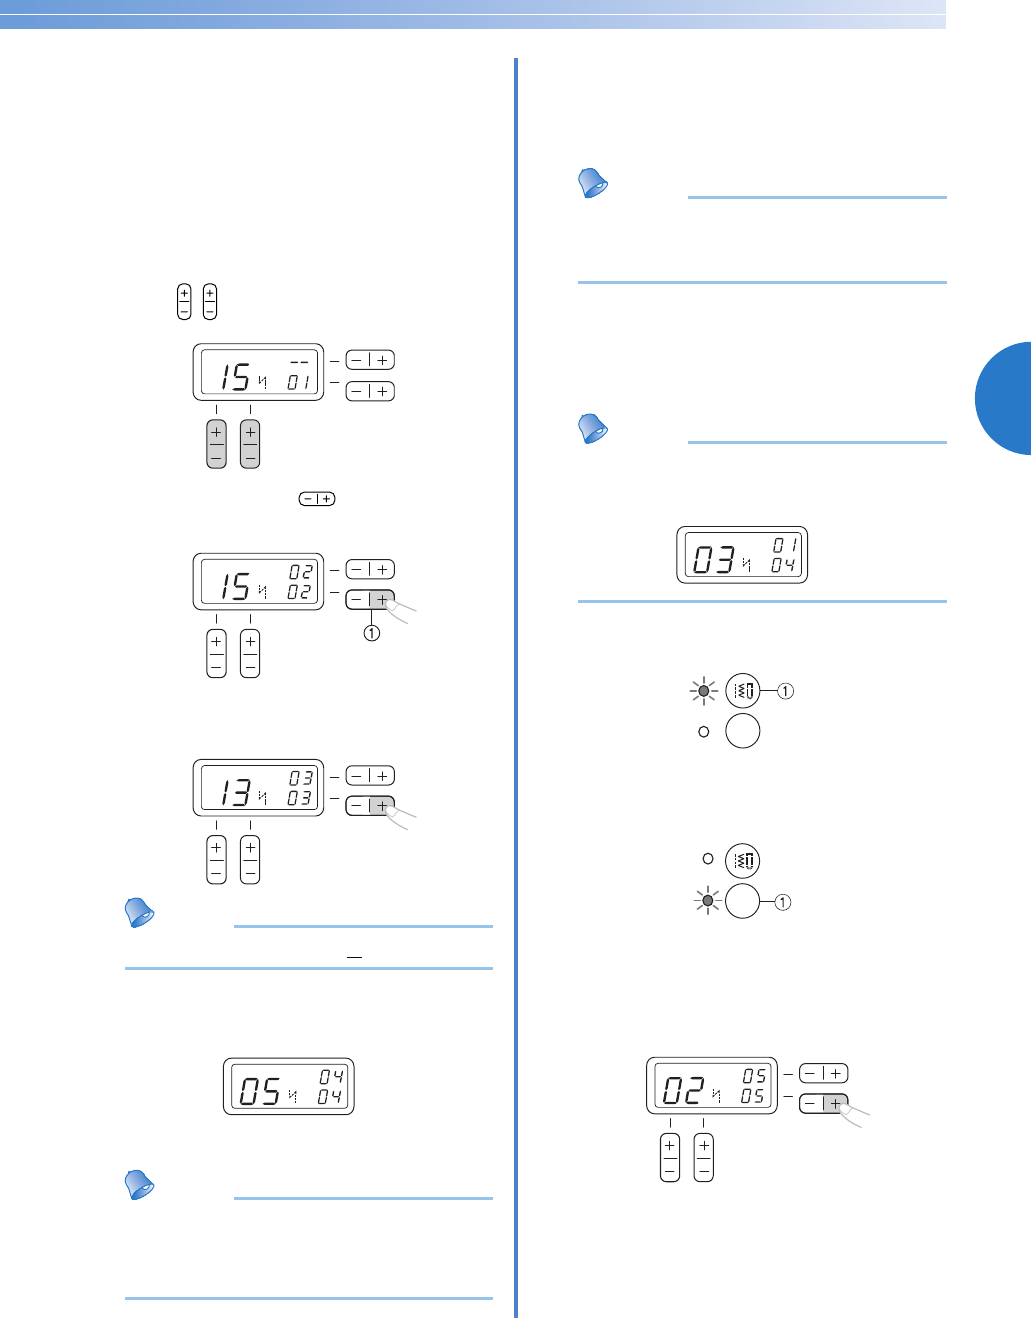
Changing the initial needle position ...............................................................................................................11
Cancelling the operation beep (for models equipped with the operation beep) .............................................11
THREADING THE MACHINE ............................................................................................12
Winding the bobbin ........................................................................................................................................12
Drawing up the lower thread ..........................................................................................................................20
REPLACING THE NEEDLE .................................................................................................21
Needle types and their uses ...........................................................................................................................21
Checking the needle ......................................................................................................................................22
Replacing the needle .....................................................................................................................................22
Sewing with a twin needle ..............................................................................................................................24
REPLACING THE PRESSER FOOT ......................................................................................25
Replacing the presser foot .............................................................................................................................25
Removing the presser foot holder ..................................................................................................................26
General sewing procedure .............................................................................................................................27
Selecting a stitch ............................................................................................................................................28
Starting to sew ...............................................................................................................................................29
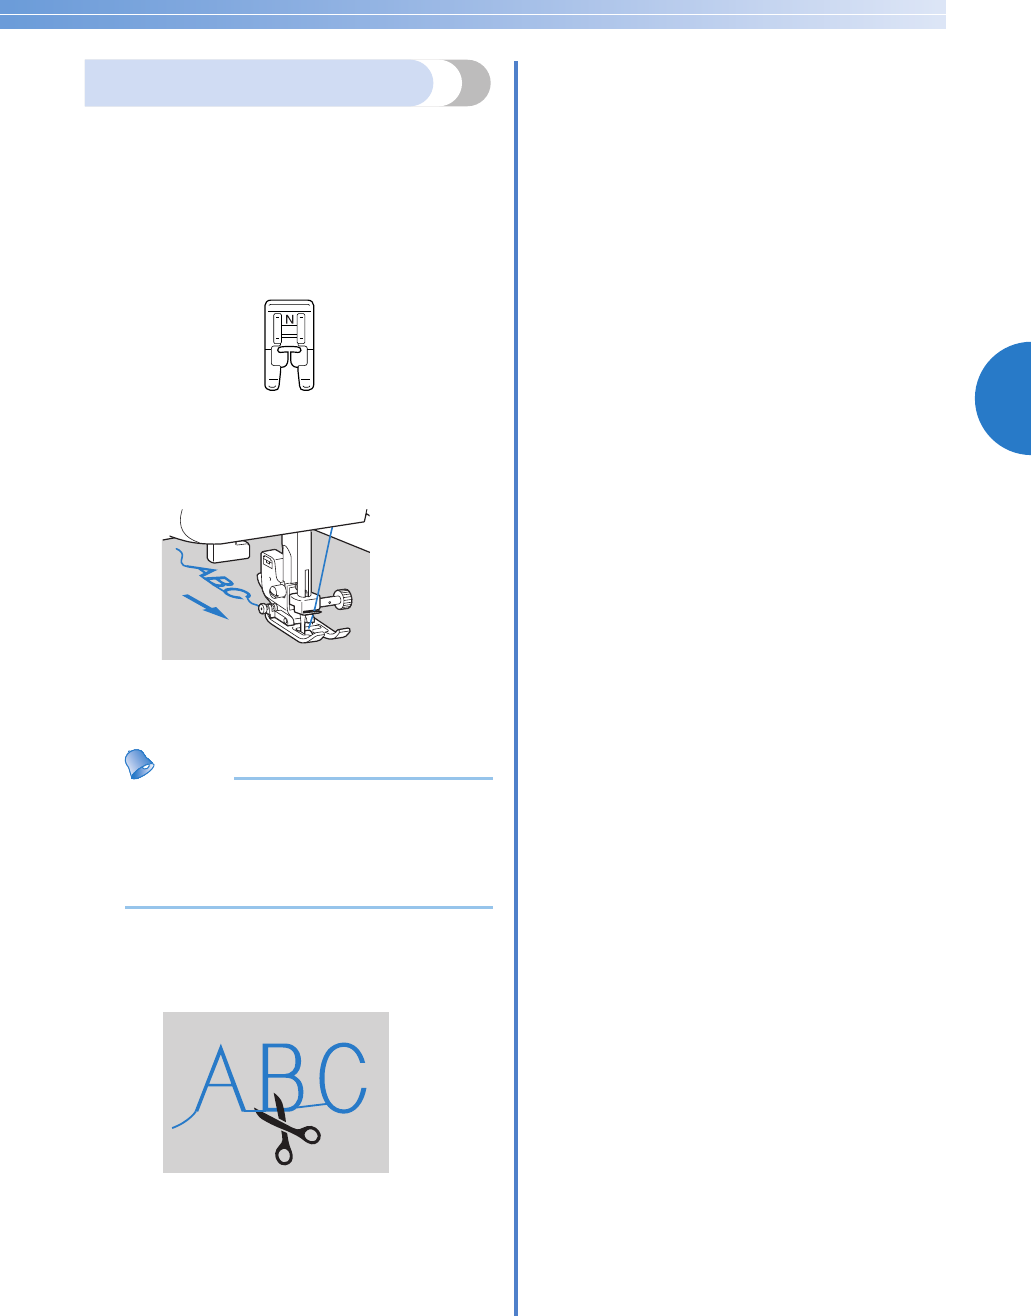
Changing the sewing direction .......................................................................................................................32
Using a free-arm style ....................................................................................................................................34
Bar tack stitching ............................................................................................................................................57
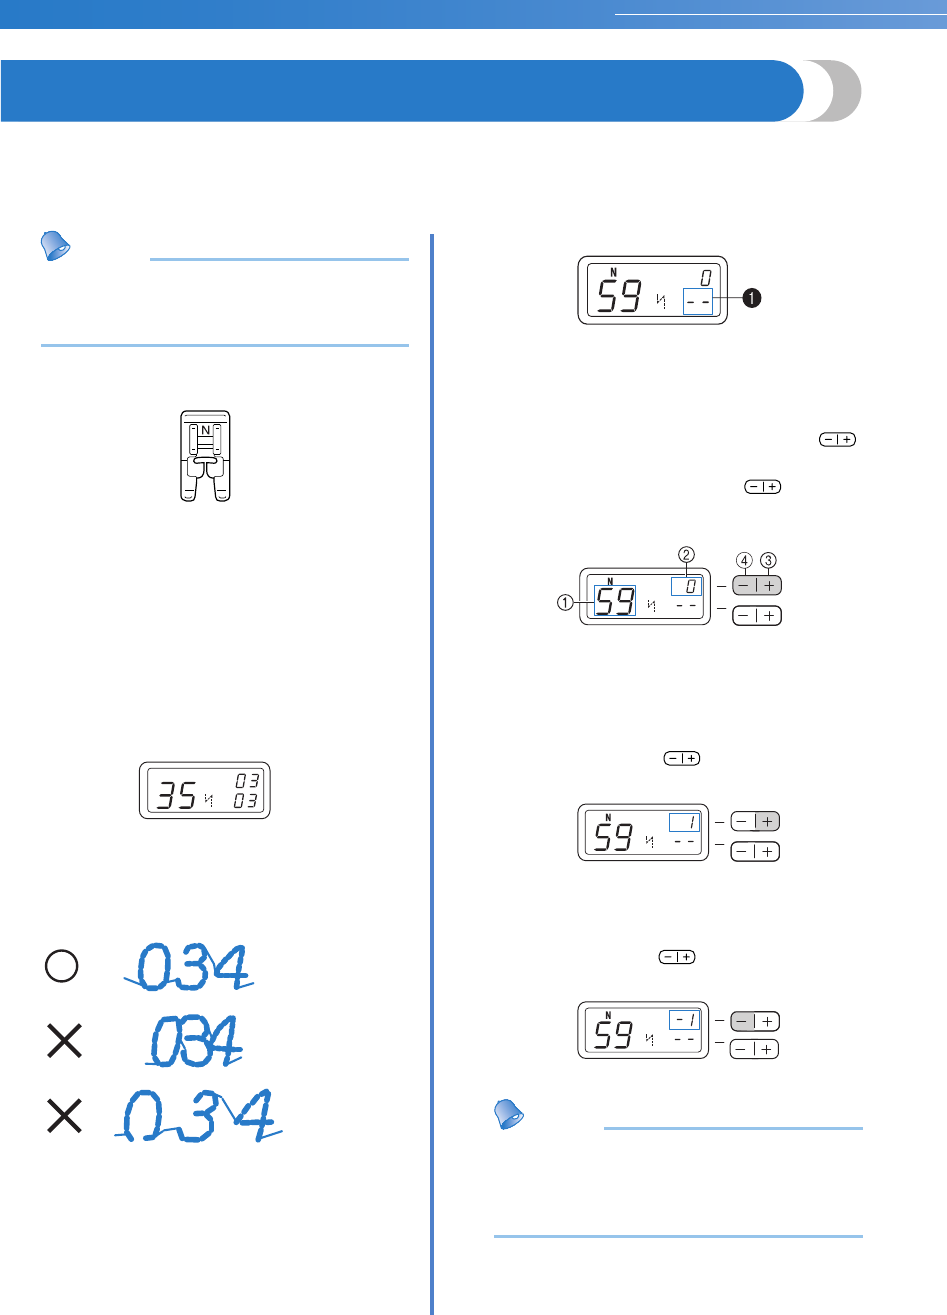
Sewing the character stitches ........................................................................................................................67
ADJUSTING STITCHES (for models equipped with character stitches) .............................68
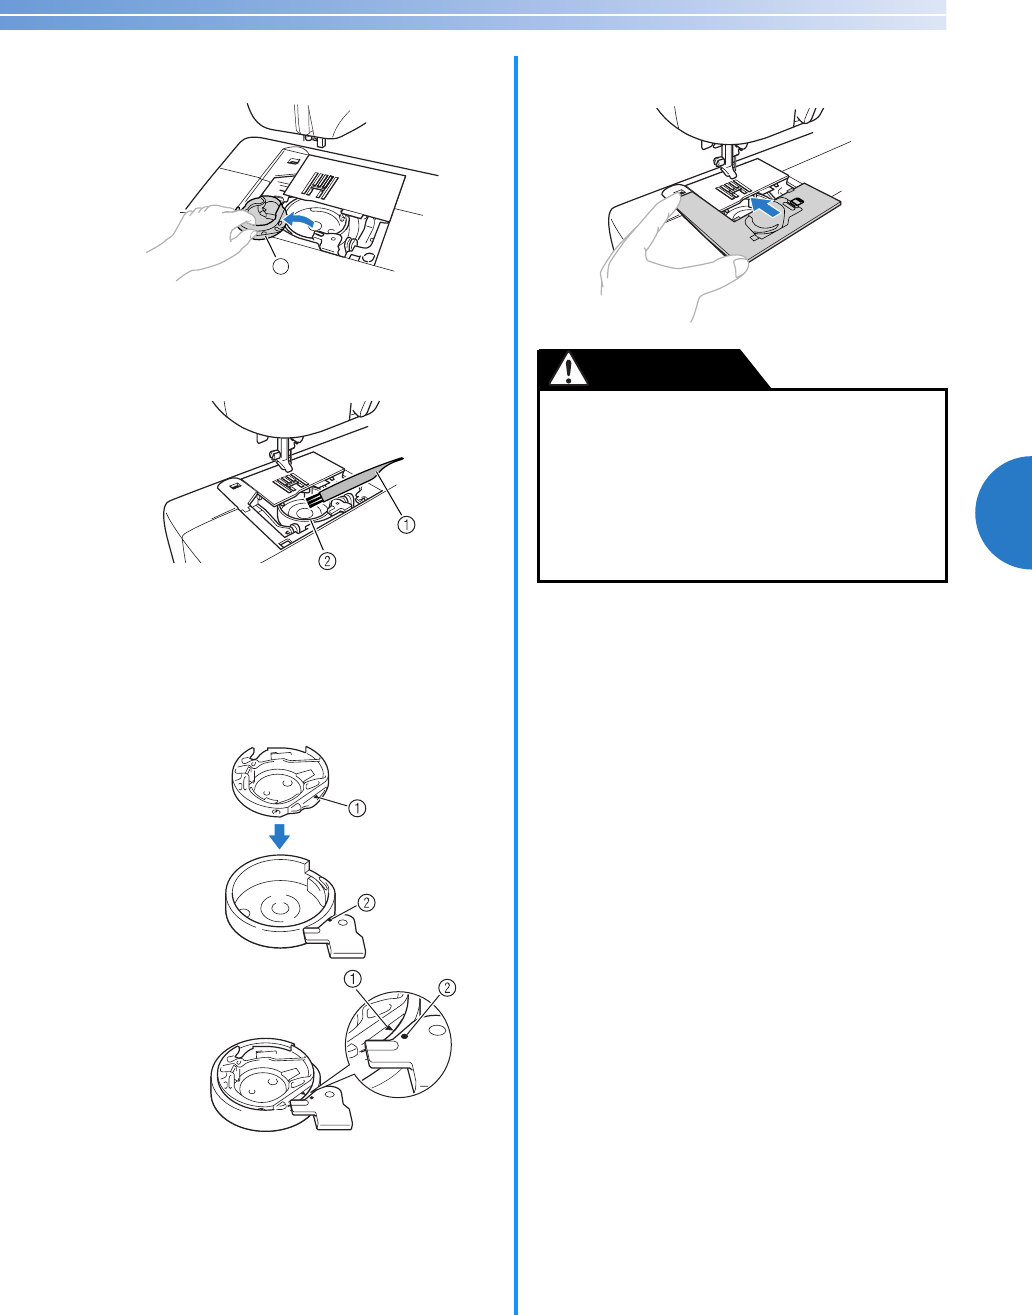
Cleaning the machine surface ........................................................................................................................70
Cleaning the bobbin case ...............................................................................................................................70
Gebruikershandleiding.com neemt misbruik van zijn services uitermate serieus. U kunt hieronder aangeven waarom deze vraag ongepast is. Wij controleren de vraag en zonodig wordt deze verwijderd.
Product:
Spelregels forum
Om tot zinvolle vragen te komen hanteren wij de volgende spelregels:
lees eerst de handleiding door;
controleer of uw vraag al eerder door iemand anders is gesteld;
probeer uw vraag zo duidelijk mogelijk te stellen;
heeft u een probleem en al geprobeerd om dit op te lossen, vermeld dit erbij aub;
heeft u een oplossing gekregen van een bezoeker dan horen wij dat graag in dit forum;
wilt u een reactie geven op een vraag of antwoord, gebruik dan niet dit formulier maar klik op de knop 'reageer op deze vraag';
uw vraag wordt direct op de website gezet; vermijd daarom persoonlijke gegevens in te vullen;
Belangrijk! Als er een antwoord wordt gegeven op uw vraag, dan is het voor de gever van het antwoord nuttig om te weten als u er wel (of niet) mee geholpen bent! Wij vragen u dus ook te reageren op een antwoord.
Belangrijk! Antwoorden worden ook per e-mail naar abonnees gestuurd. Laat uw emailadres achter op deze site, zodat u op de hoogte blijft. U krijgt dan ook andere vragen en antwoorden te zien.
Abonneren
Abonneer u voor het ontvangen van emails voor uw Brother XR9500PRW bij:
nieuwe vragen en antwoorden
nieuwe handleidingen
U ontvangt een email met instructies om u voor één of beide opties in te schrijven.
Ontvang uw handleiding per email
Vul uw emailadres in en ontvang de handleiding van Brother XR9500PRW in de taal/talen: Engels als bijlage per email.
De handleiding is 1,76 mb groot.
U ontvangt de handleiding per email binnen enkele minuten. Als u geen email heeft ontvangen, dan heeft u waarschijnlijk een verkeerd emailadres ingevuld of is uw mailbox te vol. Daarnaast kan het zijn dat uw internetprovider een maximum heeft aan de grootte per email. Omdat hier een handleiding wordt meegestuurd, kan het voorkomen dat de email groter is dan toegestaan bij uw provider.
Uw handleiding is per email verstuurd. Controleer uw email
Als u niet binnen een kwartier uw email met handleiding ontvangen heeft, kan het zijn dat u een verkeerd emailadres heeft ingevuld of dat uw emailprovider een maximum grootte per email heeft ingesteld die kleiner is dan de grootte van de handleiding.
Er is een email naar u verstuurd om uw inschrijving definitief te maken.
Controleer uw email en volg de aanwijzingen op om uw inschrijving definitief te maken
U heeft geen emailadres opgegeven
Als u de handleiding per email wilt ontvangen, vul dan een geldig emailadres in.
Uw vraag is op deze pagina toegevoegd
Wilt u een email ontvangen bij een antwoord en/of nieuwe vragen? Vul dan hier uw emailadres in.