Inserting the Needle ..........................................................................................................................................7
Checking the Needle .........................................................................................................................................8
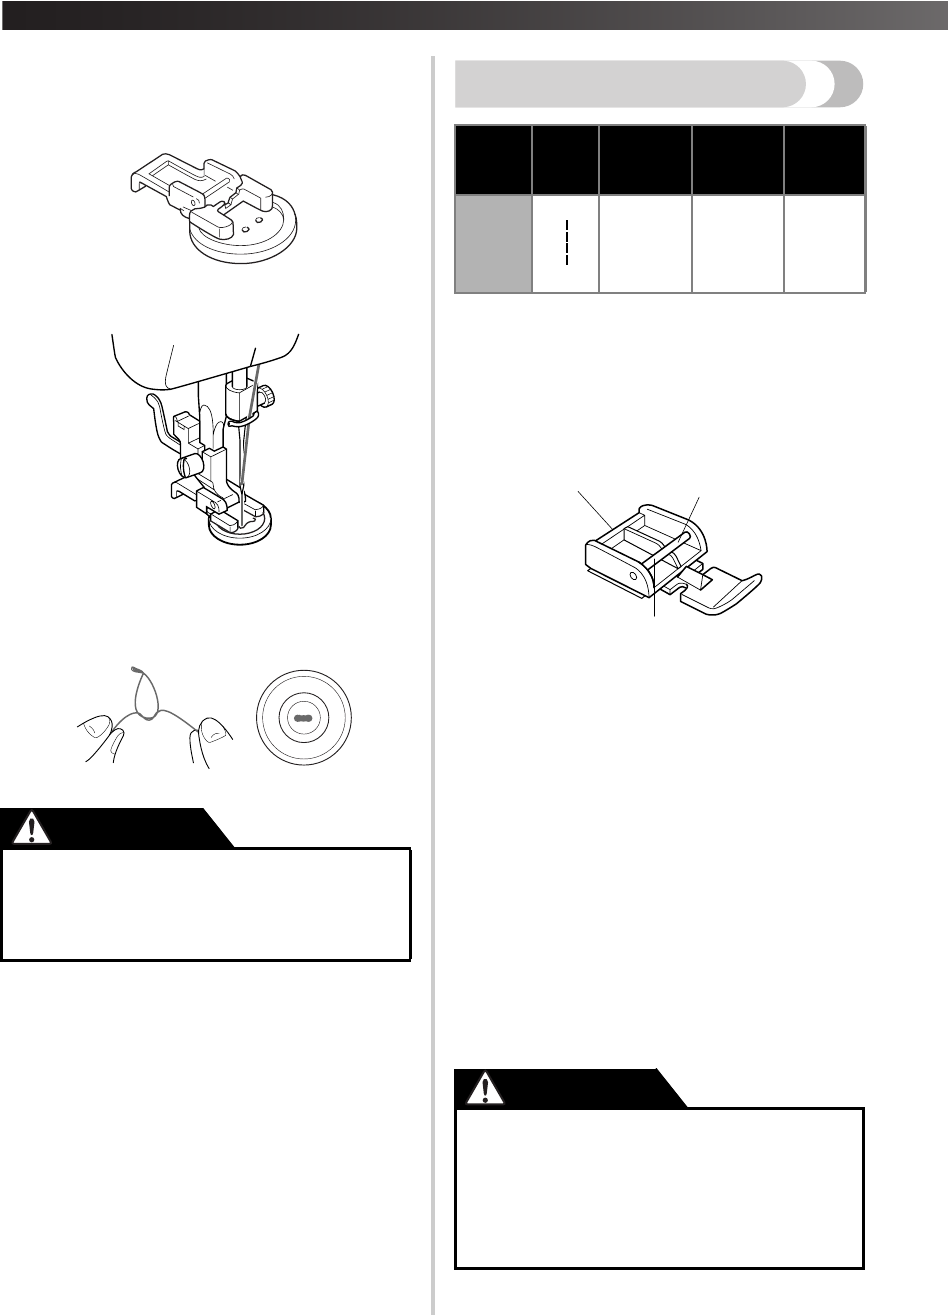
Changing the Presser Foot .................................................................................................................................8
Converting to Free-arm Style .............................................................................................................................9
Steadying the Machine ......................................................................................................................................9
THE CONTROLS ...............................................................................................................10
Reverse Sewing Lever ......................................................................................................................................14
Drop Feed Lever (if the machine is equipped with a drop feed lever) ..............................................................14
THREADING THE MACHINE ............................................................................................15
Winding the Bobbin ........................................................................................................................................15
Using the Needle Threader (models equipped with a needle threader) ............................................................19
Quick Thread-Setting System FAST START BOBBIN (models equipped with a quick thread-setting system) ....20
Drawing up the lower thread ..........................................................................................................................21
Sewing with a Twin Needle ............................................................................................................................21
Tension of the Thread .....................................................................................................................................22
CHART OF SEWING FABRICS, NEEDLES AND THREAD COMBINATIONS .....................24
Please Read Before Sewing .............................................................................................................................25
Blind Hem Stitching ........................................................................................................................................27
Changing the Light Bulb ..................................................................................................................................38
Repacking the Machine ...................................................................................................................................42
INDEX ...............................................................................................................................43
XL5000us.book Page 3 Tuesday, October 28, 2003 11:01 AM
KNOWING YOUR SEWING MACHINE —————————————————————————————————————————————
—
4
PRINCIPAL PARTS
1Bobbin-winding assembly (page 15)
This winds the thread onto the bobbin, which you use
for the lower thread.
2Spool pin (page 15 and 18)
Holds the spool of thread.
3Bobbin-winding tension disc and thread guide
(page 15)
4Thread take-up lever (page 18)
5Thread cutter (page 26)
6Upper tension-control dial (page 22)
This controls the tension of the upper thread.
7Stitch width dial (page 14)
This controls the stitch width.
8Pattern selection dial (page 10)
You can turn this in either direction to choose the stitch
you want.
9Stitch length dial (page13)
This controls the length of the stitches.
0Reverse-sewing lever (page 14)
You can push this to stitch in the reverse direction.
AButtonhole fine adjustment screw (page 33)
BButtonhole lever (1-Step automatic buttonhole)
(page 30)
CNeedle threader (page 19)
This is only available on certain models.
DHandle
EBalance wheel
Turn toward you (counterclockwise) to raise and lower
the needle.
FMain power/sewing light switch (page 7)
You can turn the main power and sewing light on and
off.
GFoot controller receptacle (page 6)
Plug in the foot controller plug and connect the
machine to the power supply.
HPresser foot lever (page 8)
This raises and lowers the presser foot.
IFoot controller (page 7)
You can use this to control the sewing speed, and to
start and stop sewing.
JZigzag presser foot
XL5000us.book Page 4 Tuesday, October 28, 2003 11:01 AM
5
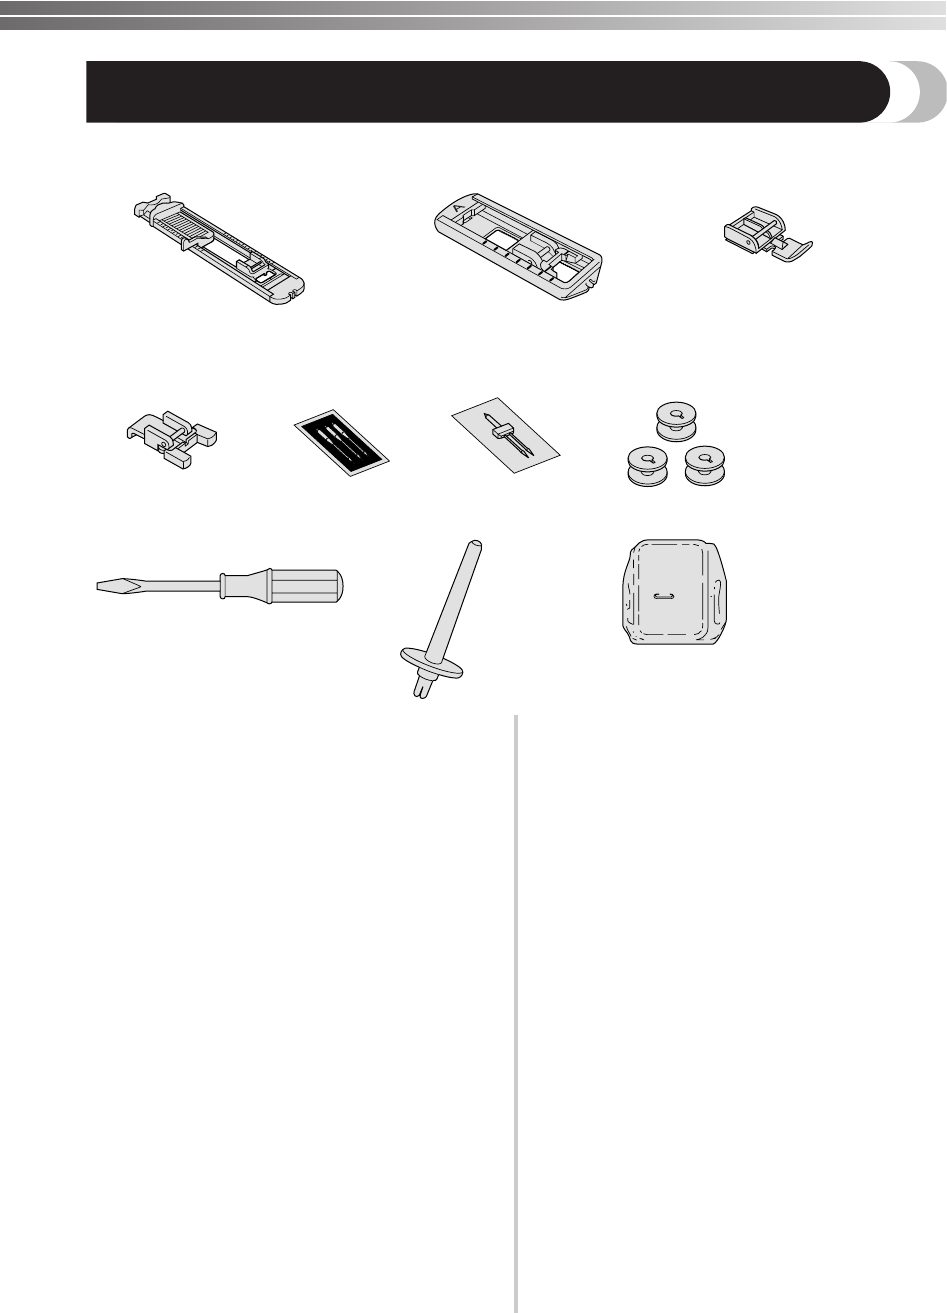
ACCESSORIES
1Buttonhole foot (1 pc.)
2Zipper foot (1 pc.)
3Button sewing foot (1 pc.)
4Needle pack (regular single needle HAX130) (3 pcs.)
5Twin needle (1 pc.)
6Bobbins (3 pcs.)
7Screwdriver (1 pc.)
8Extra spool pin (1 pc.)
9Darning plate (1pc.) (When the machine is not
equipped with a Drop Feed.)
Parts code for zigzag presser foot: 138135-122
Foot controller:
XC7359-021 (110/120V areas)
XC7438-021 (220/240V areas)
XC7456-021 (U.K.)
XC7455-021 (Australia, New Zealand)
The above accessories are stored in the accessory
bag inside the extension table. These accessories
have been designed to help you carry out most
sewing tasks.
2 X59370-021
8 130920-021
3 X59375-121
4 129583-001
5 X57521-001
6 SA156(For U.S.A.)
SFB(XA5539-151)(For other countries)
7 X55467-021
9 XA3442-121
1
XA4911-151X59369-321
(For 1 Step Automatic Buttonhole)
(For 4 Step Buttonhole)
XL5000us.book Page 5 Tuesday, October 28, 2003 11:01 AM
KNOWING YOUR SEWING MACHINE —————————————————————————————————————————————
—
6
USING YOUR SEWING MACHINE
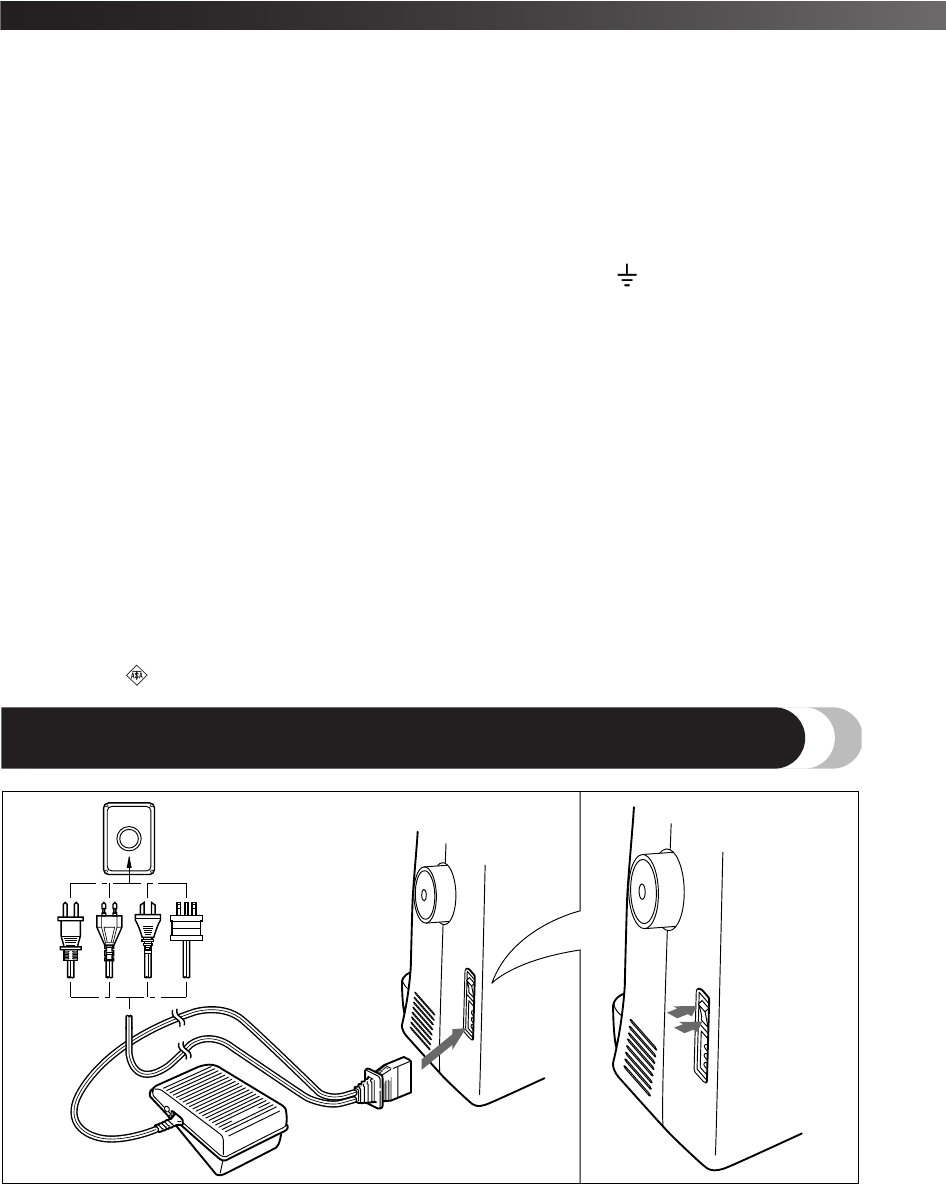
Connecting Plugs
1
Connect the power cord plug to the machine.
2
Connect the power supply plug to a wall
outlet.
●
Use only regular household electricity for the power source. Using other power sources may
result in fire, electric shock, or damage to the machine.
●Turn off the main power and remove the plug in the following circumstances:
•When you are away from the machine
•After using the machine
•When the power fails during use
•When the machine does not operate correctly due to a bad connection or a disconnection
•During electrical storms
●Do not use extension cords or multi-plug adapters with many other appliances plugged in to
them. Fire or electric shock may result.
●Do not touch the plug with wet hands. Electric shock may result.
●When unplugging the machine, always turn off the main power first. Always grasp the plug to
remove it from the outlet. Pulling on the cord may damage the cord, or lead to fire or electric
shock.
●Do not allow the power cord to be cut, damaged, modified, forcefully bent, pulled, twisted, or
bundled. Do not place heavy objects on the cord. Do not subject the cord to heat. These
things may damage the cord and cause fire or electric shock. If the cord or plug is damaged,
take the machine to your authorized dealer for repairs before continuing use.
●Unplug the power cord if the machine is not to be used for a long period of time, otherwise a
fire may result.
WARNING
CAUTION
XL5000us.book Page 6 Tuesday, October 28, 2003 11:01 AM
7
Note
●When leaving the machine unattended, the
main switch of the machine should be
switched off or the plug must be removed
from the socket outlet.
●When servicing the machine, removing
covers or changing bulbs, the machine must
be unplugged.
(For U.S.A. only)
●This appliance has a polarized plug (one
blade wider than the other). To reduce the
risk of electric shock, this plug is intended
to fit in a polarized outlet only one way. If
the plug does not fit fully in the outlet,
reverse the plug.
If it still does not fit, contact a qualified
electrician to install the proper outlet. Do
not modify the plug in any way.
Main Power/Sewing
Light Switch
This switch turns the main power and sewing light
on or off.
1Turn on (toward the “I” mark)
2Turn off (toward the “O” mark)
Foot Controller
When you press the foot controller down lightly, the
machine will run at a low speed. When you press
harder, the machine’s speed will increase. When you
take your foot off the foot controller, the machine
will stop. You should make sure that nothing is
placed on the foot controller when the machine is
not in use.
Note
(For U.S.A. only)
●Foot Controller: Model KD-1902
This foot controller can be used with
Models XL-5500/XL-5600/XL-5700/
XL-5510/XL-5610/XL-5710/PS-21.
.
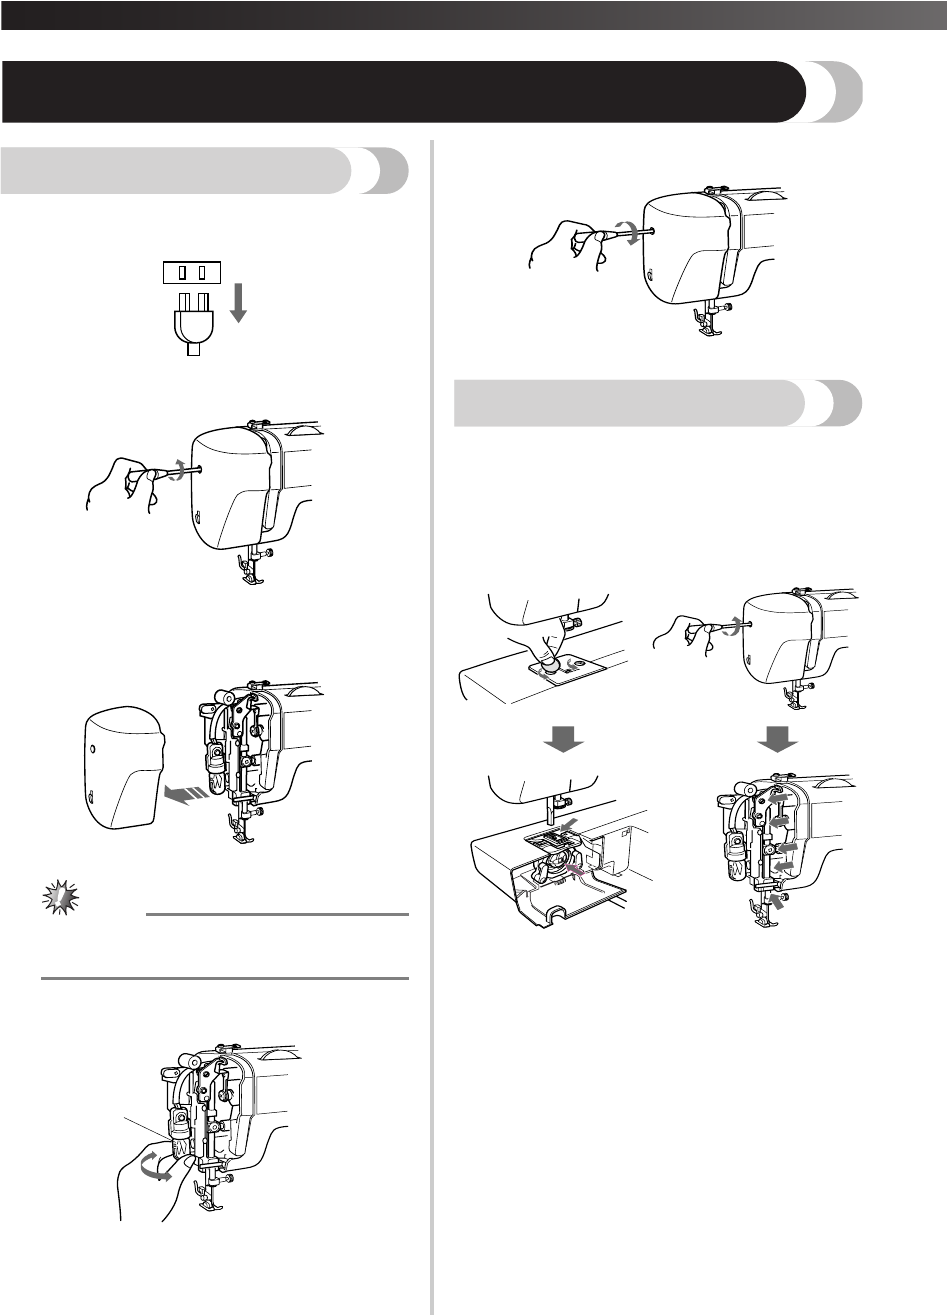
Inserting the Needle
1
Remove the power supply plug from the
electrical outlet.
1
2
●Do not allow pieces of cloth and dust to
build up on the foot controller, otherwise
a fire or an electric shock could occur.
●Turn the main power switch off before
you change the needle. If you leave the
main power on and step on the foot
controller, the machine will start and you
may be injured.
●Only use sewing-machine needles for
home use. Other needles may bend or
break and cause injury.
●Never sew with a bent needle. A bent
needle will easily break and cause injury.
CAUTION
CAUTION
XL5000us.book Page 7 Tuesday, October 28, 2003 11:01 AM
KNOWING YOUR SEWING MACHINE —————————————————————————————————————————————
—
8
2
Raise the needle bar to its highest position.
3
Lower the presser foot.
4
If a needle is already installed, remove it by
loosening the needle clamp with a
screwdriver and pulling the needle down.
1Screwdriver
•Do not use extreme force when
loosening or tightening the needle
clamp screw, otherwise certain parts of
the sewing machine may be damaged.
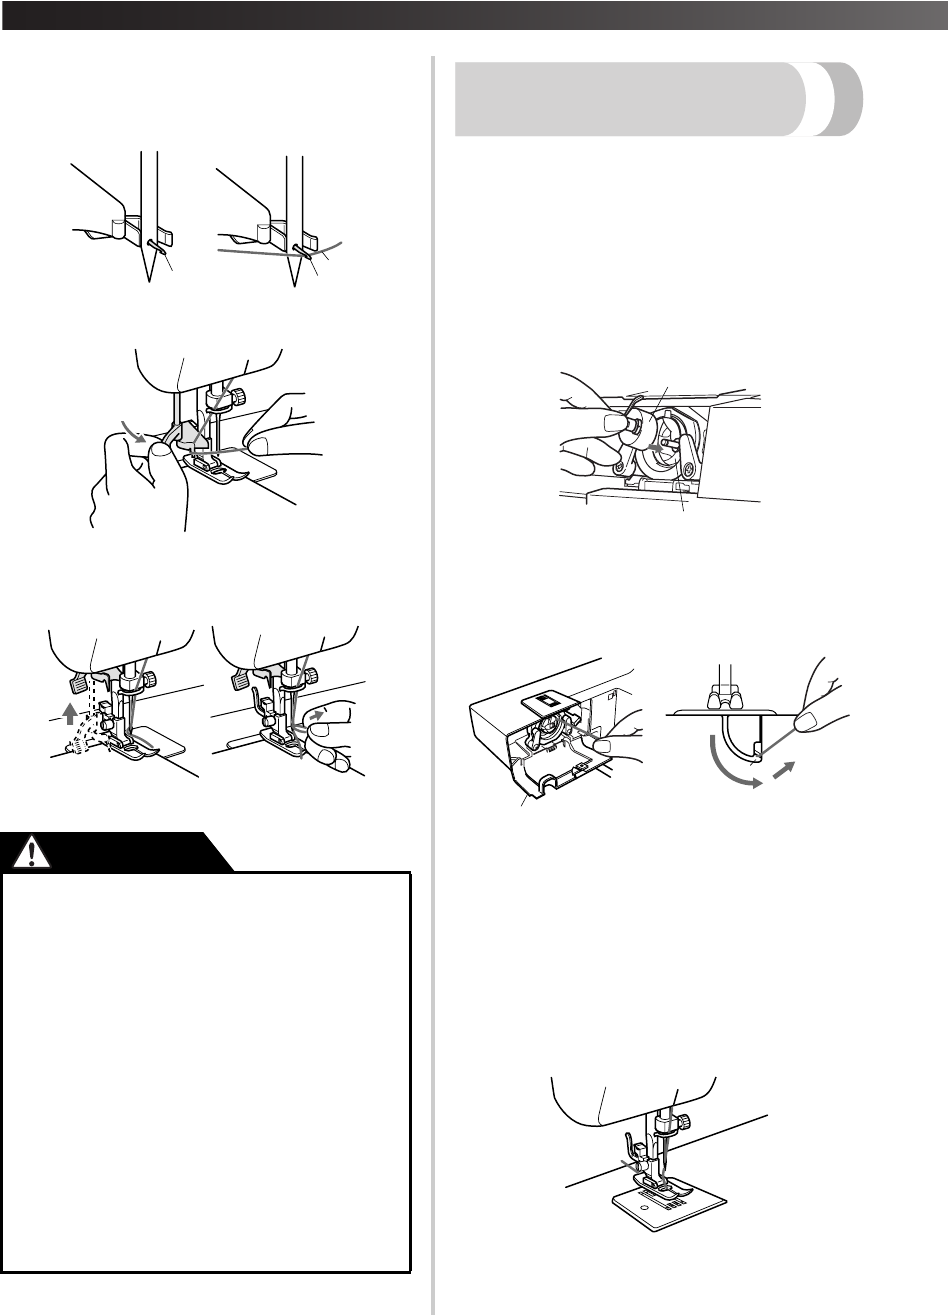
5
With the flat side of the needle toward the
back of the machine, insert the needle until it
touches the needle stopper.
Tighten the needle clamp.
1Screwdriver
2Needle stopper
3Needle
Checking the Needle
1
The sewing needle must always be straight
and sharp for smooth sewing.
2
To check if the needle is bent, place the flat
side of the needle on a flat surface as shown.
3
Replace the needle if it is bent or dull.
Changing the Presser Foot
You will have to change the presser foot depending
on what you want to sew and how.
■Snap-On Type
1
Raise the needle to its highest position by turning
the balance wheel toward you (counterclockwise)
and raise the presser foot lever.
2
Release the foot by raising the lever at the
back of the holder assembly.
●
Make sure to push in the needle until it
touches the stopper, and securely tighten
the needle clamp screw with a
screwdriver. If the needle is not in fully,
or if the needle clamp screw is loose, the
needle may break or the machine may be
damaged.
1
1
3
2
CAUTION
●
Always turn off the power before you
change the presser foot. If you leave the
power on and step on the controller, the
machine will start and you may be injured.
●Always use the correct presser foot for
the stitch pattern you have chosen. If you
use the wrong presser foot, the needle
may strike the presser foot and bend or
break, and may cause injury.
●Only use presser feet that have been
designed to be used with this machine.
Using other any presser feet may cause
an accident or injury.
CAUTION
XL5000us.book Page 8 Tuesday, October 28, 2003 11:01 AM
9
3
Put a different presser foot on the needle plate
so that the bar on the presser foot is in line
with the slot on the shank.
4
Lower the presser foot lever and fix the
presser foot onto the shank. If the presser foot
is in the correct place, the bar should snap in.
Converting to Free-arm Style
Free-arm sewing is convenient for sewing tubular and
hard-to-reach areas. To change your machine to the
free-arm style, lift out the extension table attachment.
1Lift the bottom of the extension table up
toward you.
2Pull the extension table out to remove it.
1Extension table
Steadying the Machine
When the machine is placed on an uneven surface,
turn the rubber cushion on the front right-hand side of
the base plate to adjust it until the machine is stable.
●If the presser foot is not installed with the
correct orientation, the needle may strike
the presser foot, which may bend or
break the needle and cause injury.
CAUTION
1
XL5000us.book Page 9 Tuesday, October 28, 2003 11:01 AM
KNOWING YOUR SEWING MACHINE —————————————————————————————————————————————
—
10
THE CONTROLS
Pattern Selection Dial
To choose a stitch, simply turn the pattern selection
dial in either direction. Stitch widths and lengths are
shown on the following page.
1Pattern selection dial
Note
●Since the pattern selection dial is not
continuous, it cannot be turned directly
from the last stitch to the first one or from
the first stitch to the last one. To select the
first stitch when the last one is displayed or
to select the last stitch when the first one is
displayed, turn the pattern selection dial in
the opposite direction until the desired
stitch is displayed.
■21 Stitches
■17 Stitches
■15 Stitches
1
1
23456789101112131415161718192021
1
234567891011121314151617
123456789101112131415
XL5000us.book Page 10 Tuesday, October 28, 2003 11:01 AM
11
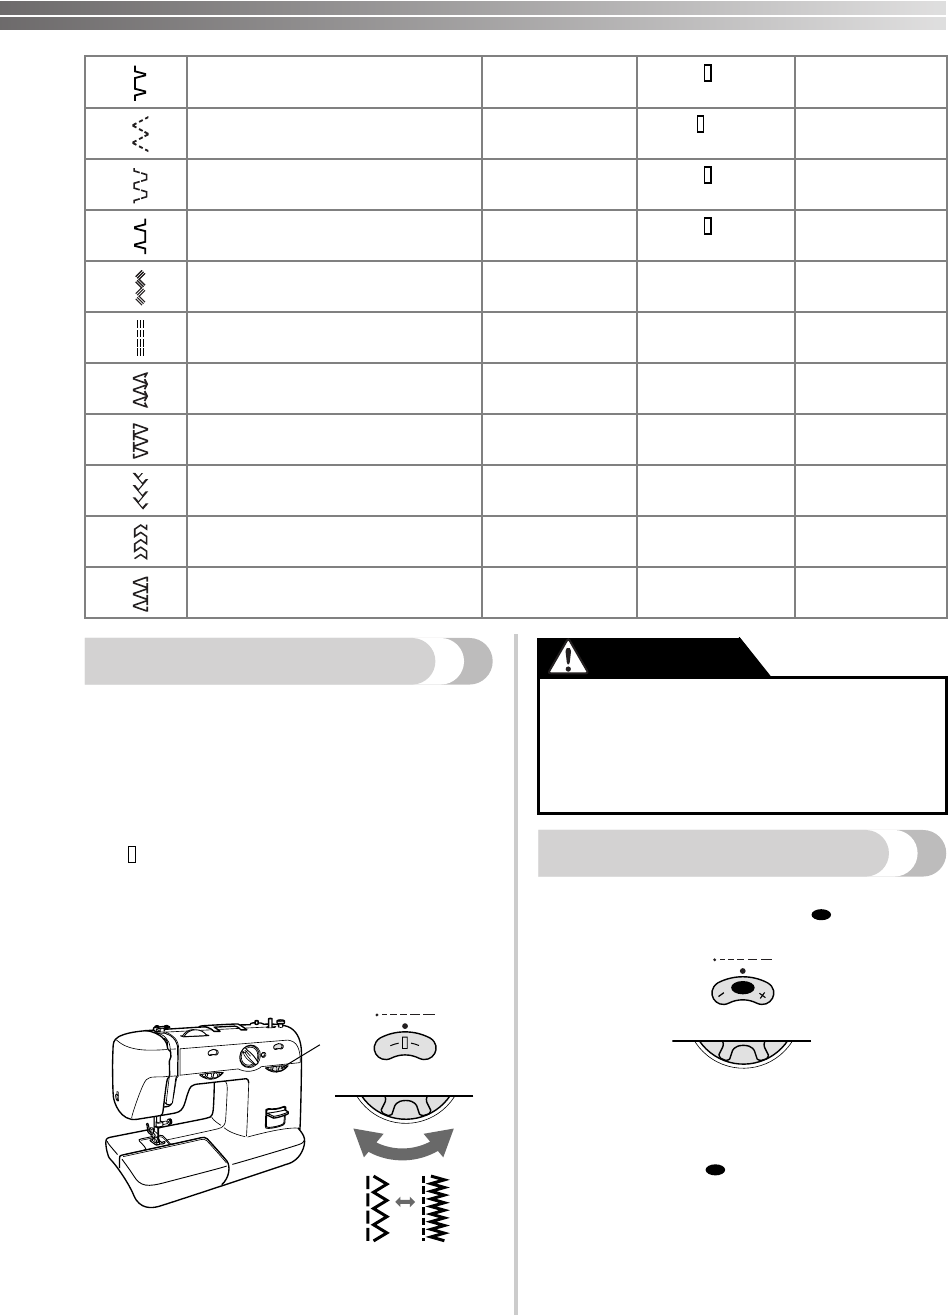
Recommended Widths and Lengths for Stitches
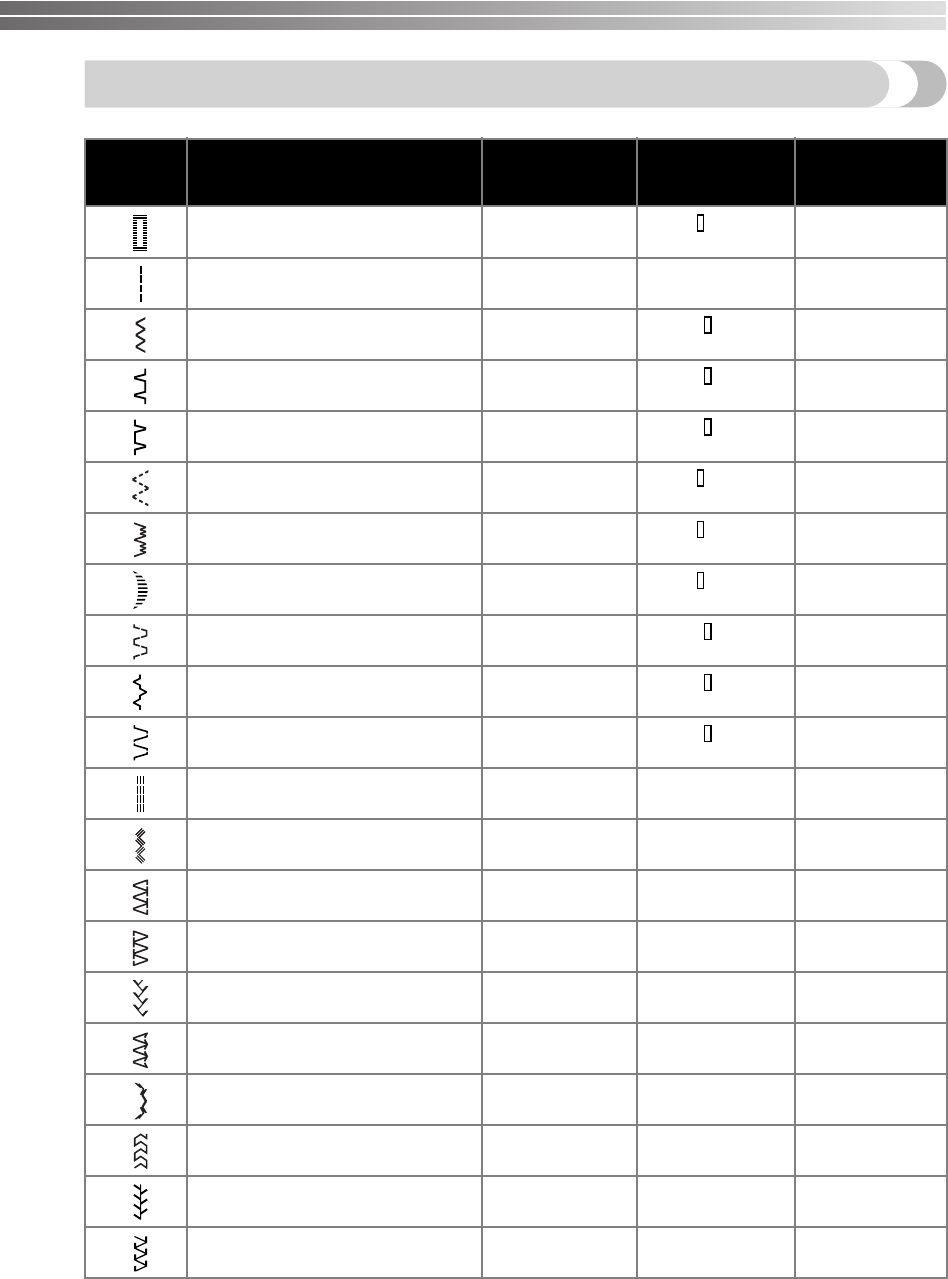
■21 Stitches
PatternStitch Name
Recommended
Width
[mm (inch)]
Recommended
Length
[mm (inch)]
Page in
Instructions
1
1-STEP AUTOMATIC
BUTTONHOLE
3-5
(1/8-3/16)
-1.5
(1/64-1/16)
30
2
STRAIGHT STITCH
0-5 (0-3/16)
(Changes needle position)
1-4
(1/16-3/16)
25, 34, 35
3
ZIGZAG STITCH
0-5
(0-3/16)
-4
(1/64-3/16)
26, 33, 36
4
BLIND HEM STITCH
3-5
(1/8-3/16)
-2
(1/64-1/16)
27
5
SHELL TUCK STITCH
3-5
(1/8-3/16)
-3
(1/64-1/8)
27
6
ELASTIC STITCH
3-5
(1/8-3/16)
-2.5
(1/64-3/32)
28
7
STRETCH BLIND HEM STITCH
3-5
(1/8-3/16)
-1.5
(1/64-1/16)
27
8
SCALLOP STITCH
3-5
(1/8-3/16)
-1.5
(1/64-1/16)
28
9
DOUBLE ACTION STITCH
3-5
(1/8-3/16)
-3
(1/64-1/8)
29
10
BRIDGING STITCH
3-5
(1/8-3/16)
-3
(1/64-1/8)
—
11
RAMPART STITCH
3-5
(1/8-3/16)
-3
(1/64-1/8)
—
12
TRIPLE STRETCH STITCH
0-5 (0-3/16)
(Changes needle position)
Fixed
2.5 (3/32)
25
13
TRIPLE ZIGZAG STRETCH STITCH
3-5
(1/8-3/16)
Fixed
2.5 (3/32)
30
14
STRETCH OVERLOCK STITCH
3-5
(1/8-3/16)
Fixed
2.5 (3/32)
29
15
ELASTIC OVERLOCK STITCH
3-5
(1/8-3/16)
Fixed
2.5 (3/32)
29
16
FEATHER STITCH
3-5
(1/8-3/16)
Fixed
2.5 (3/32)
29
17
ARROWHEAD STITCH
3-5
(1/8-3/16)
Fixed
2.5 (3/32)
29
18
DECORATIVE STITCH
3-5
(1/8-3/16)
Fixed
2.5 (3/32)
30
19
LEAF STITCH
3-5
(1/8-3/16)
Fixed
2.5 (3/32)
—
20
TREE STITCH
3-5
(1/8-3/16)
Fixed
2.5 (3/32)
—
21
LEGS STITCH
3-5
(1/8-3/16)
Fixed
2.5 (3/32)
—
XL5000us.book Page 11 Tuesday, October 28, 2003 11:01 AM
KNOWING YOUR SEWING MACHINE —————————————————————————————————————————————
—
12
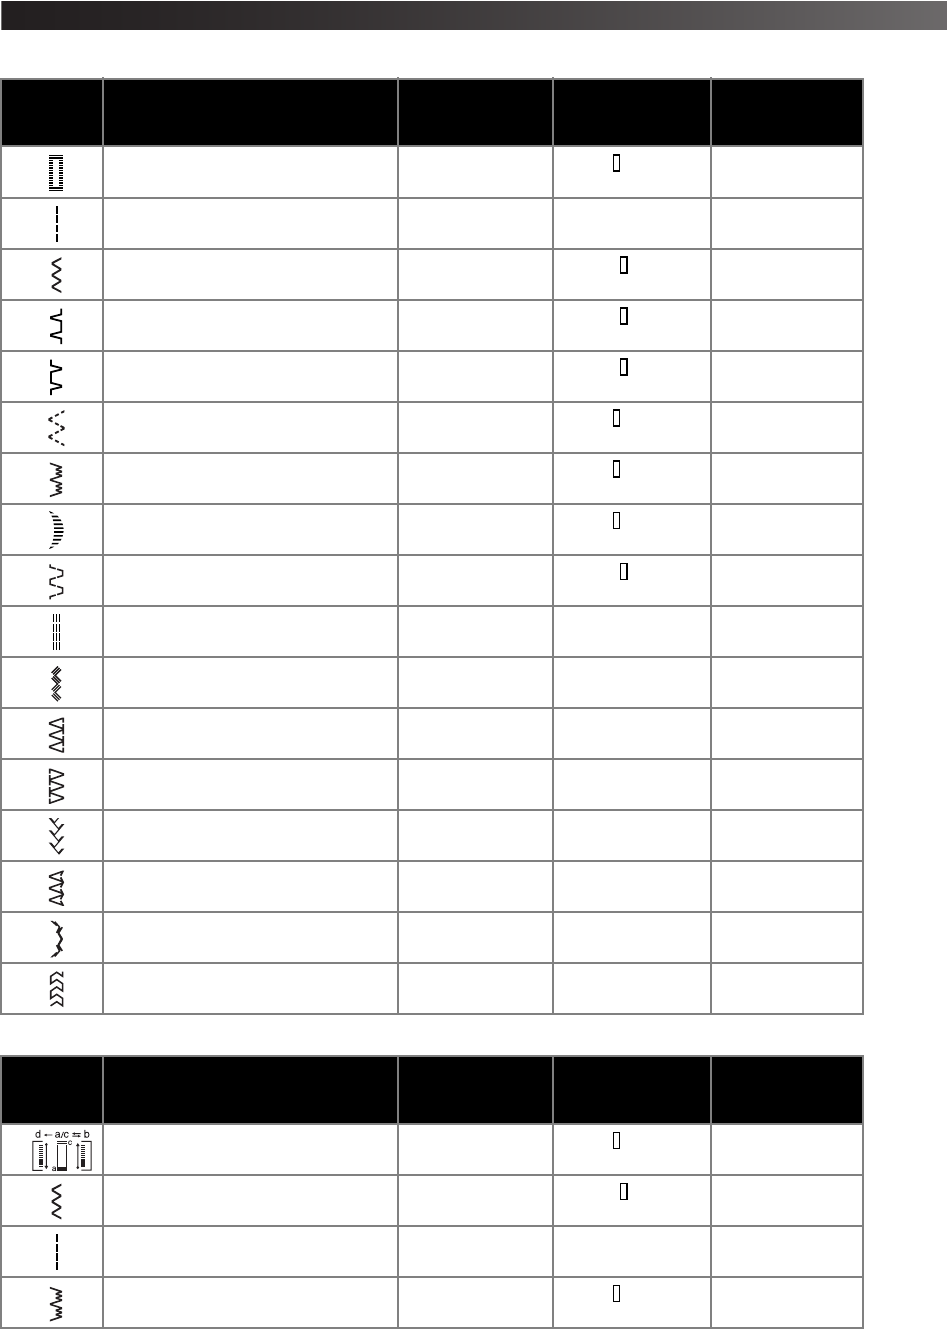
■17 Stitches
■15 Stitches
PatternStitch Name
Recommended
Width
[mm (inch)]
Recommended
Length
[mm (inch)]
Page in
Instructions
1-STEP AUTOMATIC
BUTTONHOLE
3-5
(1/8-3/16)
-1.5
(1/64-1/16)
30
2
STRAIGHT STITCH
0-5 (0-3/16)
(Changes needle position)
1-4
(1/16-3/16)
25, 34, 35
3
ZIGZAG STITCH
0-5
(0-3/16)
-4
(1/64-3/16)
26, 33, 36
4
BLIND HEM STITCH
3-5
(1/8-3/16)
-2
(1/64-1/16)
27
5
SHELL TUCK STITCH
3-5
(1/8-3/16)
-3
(1/64-1/8)
27
6
ELASTIC STITCH
3-5
(1/8-3/16)
-2.5
(1/64-3/32)
28
7
STRETCH BLIND HEM STITCH
3-5
(1/8-3/16)
-1.5
(1/64-1/16)
27
8
SCALLOP STITCH
3-5
(1/8-3/16)
-1.5
(1/64-1/16)
28
9
DOUBLE ACTION STITCH
3-5
(1/8-3/16)
-3
(1/64-1/8)
29
10
TRIPLE STRETCH STITCH
0-5 (0-3/16)
(Changes needle position)
Fixed
2.5 (3/32)
25
11
TRIPLE ZIGZAG STRETCH STITCH
3-5
(1/8-3/16)
Fixed
2.5 (3/32)
30
12
STRETCH OVERLOCK STITCH
3-5
(1/8-3/16)
Fixed
2.5 (3/32)
29
13
ELASTIC OVERLOCK STITCH
3-5
(1/8-3/16)
Fixed
2.5 (3/32)
29
14
FEATHER STITCH
3-5
(1/8-3/16)
Fixed
2.5 (3/32)
29
15
ARROWHEAD STITCH
3-5
(1/8-3/16)
Fixed
2.5 (3/32)
29
16
DECORATIVE STITCH
3-5
(1/8-3/16)
Fixed
2.5 (3/32)
30
17
LEAF STITCH
3-5
(1/8-3/16)
Fixed
2.5 (3/32)
—
PatternStitch Name
Recommended
Width
[mm (inch)]
Recommended
Length
[mm (inch)]
Page in
Instructions
1
4-STEP BUTTONHOLE
3-5
(1/8-3/16)
-1.5
(1/64-1/16)
31
2
ZIGZAG STITCH
0-5
(0-3/16)
-4
(1/64-3/16)
26, 33, 36
3
STRAIGHT STITCH
0-5 (0-3/16)
(Changes needle position)
1-4
(1/16-3/16)
25, 34, 35
4
STRETCH BLIND HEM STITCH
3-5
(1/8-3/16)
-1.5
(1/64-1/16)
27
1
XL5000us.book Page 12 Tuesday, October 28, 2003 11:01 AM
13
Stitch Length Dial
Depending on the selected stitch, you may need to
adjust the stitch length for best results. The numbers
marked on the stitch length dial represent the stitch
length in millimeters (mm) (1/25").
THE HIGHER THE NUMBER, THE LONGER THE
STITCH. With the “0” setting material is not fed. This
is used when sewing on a button.
The “” range is for making a satin stitch (close zigzag
stitch), which is used for making buttonholes and
decorative stitches. The position needed for making the
satin stitch varies according to the material and thread
being used. To determine the exact dial position, first
test the stitch and length settings on a scrap piece of
fabric to observe the feeding of the material.
1Stitch length dial
2Longer
3Shorter
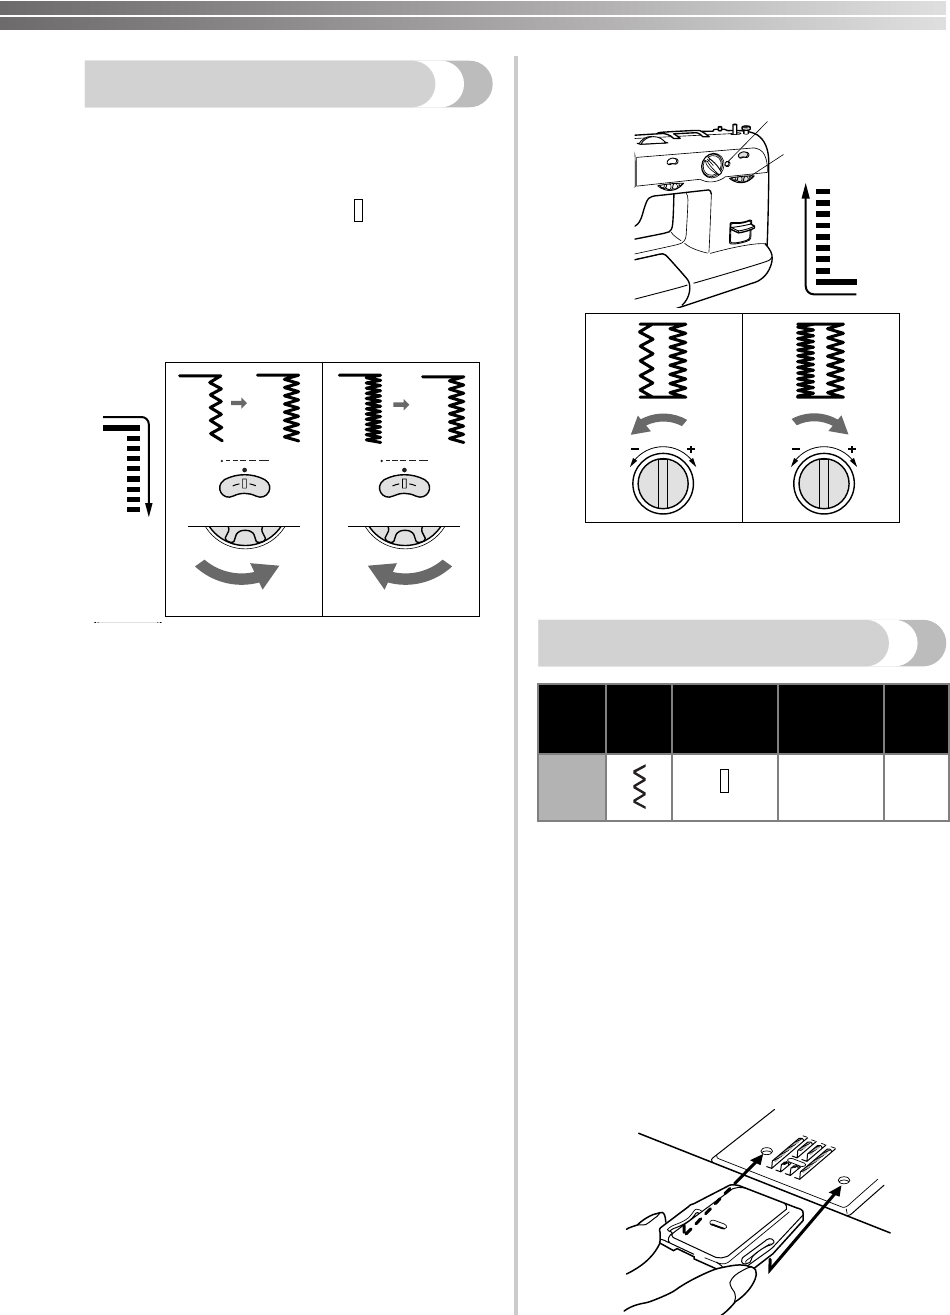
Stretch Stitching
■Selecting a stretch stitch
Setting the stitch length dial to “” changes the
selected pattern to a stretch stitch.
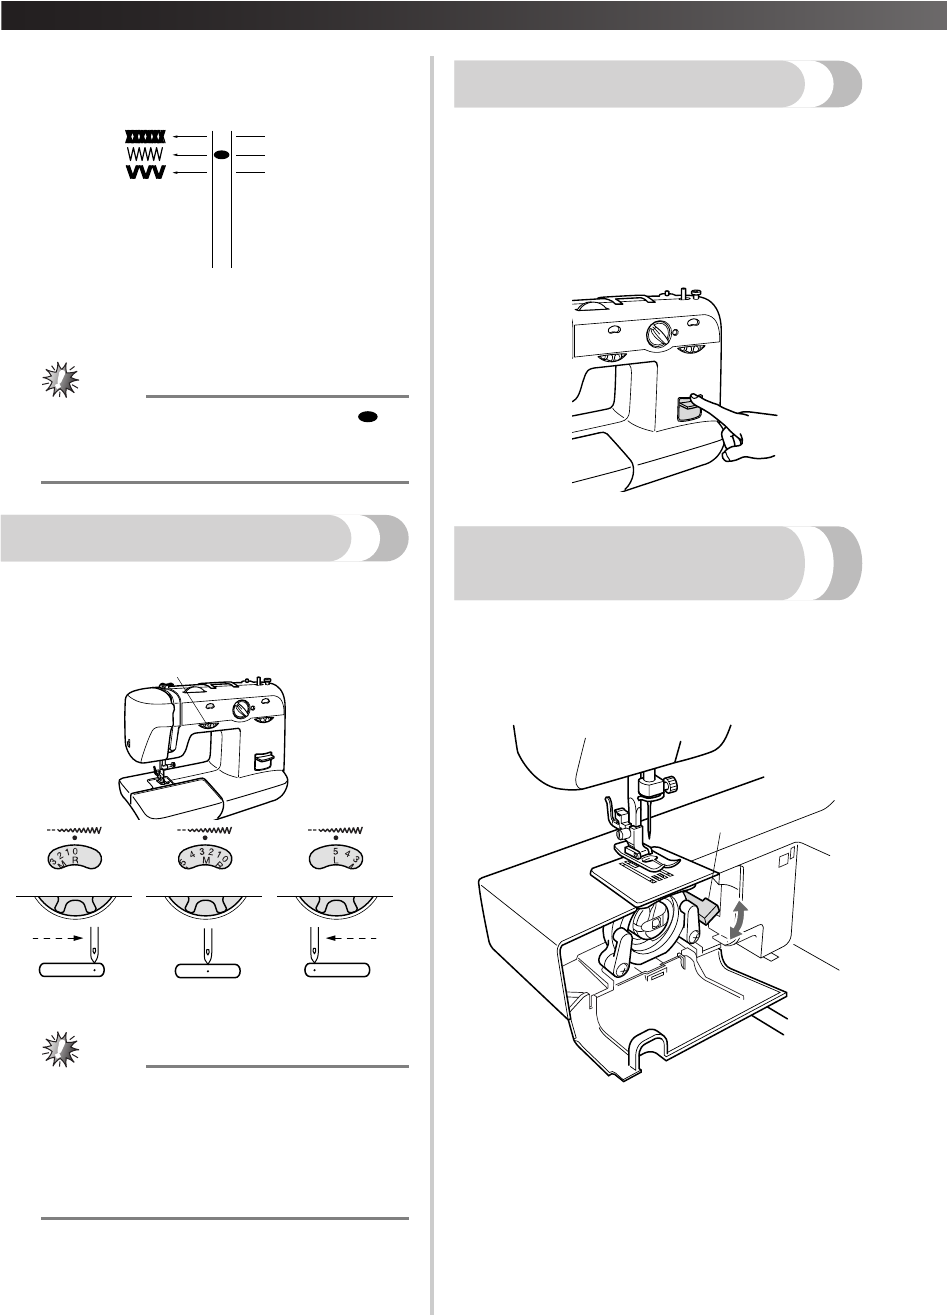
■Adjusting the stretch stitching
The machine is adjusted at the factory so that the
stretch stitching can be sewn with the stitch
length dial set to “” (standard position).
5
SHELL TUCK STITCH
3-5
(1/8-3/16)
-3
(1/64-1/8)
27
6
ELASTIC STITCH
3-5
(1/8-3/16)
-2.5
(1/64-3/32)
28
7
DOUBLE ACTION STITCH
3-5
(1/8-3/16)
-3
(1/64-1/8)
29
8
BLIND HEM STITCH
3-5
(1/8-3/16)
-2
(1/64-1/16)
27
9
TRIPLE ZIGZAG STRETCH STITCH
3-5
(1/8-3/16)
Fixed
2.5 (3/32)
30
10
TRIPLE STRETCH STITCH
0-5 (0-3/16)
(Changes needle position)
Fixed
2.5 (3/32)
25
11
ARROWHEAD STITCH
3-5
(1/8-3/16)
Fixed
2.5 (3/32)
29
12
ELASTIC OVERLOCK STITCH
3-5
(1/8-3/16)
Fixed
2.5 (3/32)
29
13
FEATHER STITCH
3-5
(1/8-3/16)
Fixed
2.5 (3/32)
29
14
LEAF STITCH
3-5
(1/8-3/16)
Fixed
2.5 (3/32)
—
15
STRETCH OVERLOCK STITCH
3-5
(1/8-3/16)
Fixed
2.5 (3/32)
29
1
1
23
2
0
1
●If the stitches are bunched together,
lengthen the stitch length and continue
sewing. Do not continue sewing without
lengthening the stitch length, otherwise
the needle may break and cause injury.
CAUTION
SS
SS
SS
XL5000us.book Page 13 Tuesday, October 28, 2003 11:01 AM
KNOWING YOUR SEWING MACHINE —————————————————————————————————————————————
—
14
If different types of fabric or thread are used or the
pattern does not have the correct shape, turn the
dial toward either “+” or “-” to adjust the stitch.
1Makes fine stitches
2Standard position
3Makes rough stitches
Note
●
The dial cannot be turned past “· · · · + -”.
Do not forcefully turn the stitch length dial
out of the allowable range.
.
Stitch Width Dial
Depending on the stitch selected, you may need to
adjust the stitch width. The numbers marked on the
dial represent the stitch width. THE HIGHER THE
NUMBER, THE WIDER THE STITCH.
1Stitch width dial
Note
●When the Straight or Triple Stretch Stitches
are selected, the needle position can be
changed from left to right.
●When the Straight or Triple Stretch Stitches
are selected, the needle position can be
changed by adjusting the stitch width dial.
.
Reverse Sewing Lever
You can use reverse sewing for backtacking and
reinforcing seams.
To sew in reverse, push the reverse sewing lever in
as far as possible and hold it in that position while
you lightly push the foot controller. To sew forward,
release the reverse sewing lever. The machine will
then sew forward.
Drop Feed Lever (if the machine is
equipped with a drop feed lever)
Use the drop feed lever to raise or lower the feed
dogs according to the job that is being done. When
monogramming, embroidering, darning or sewing on
buttons, the feed dogs should be lowered so that the
garment will not be fed.
1Drop feed lever
2Up position: Feed dogs are down.
3Down position: Feed dogs are up.
–
+
•
•
•
•
4
3
2
3
1
SS
SS
1
1
2
3
XL5000us.book Page 14 Tuesday, October 28, 2003 11:01 AM
15
THREADING THE MACHINE
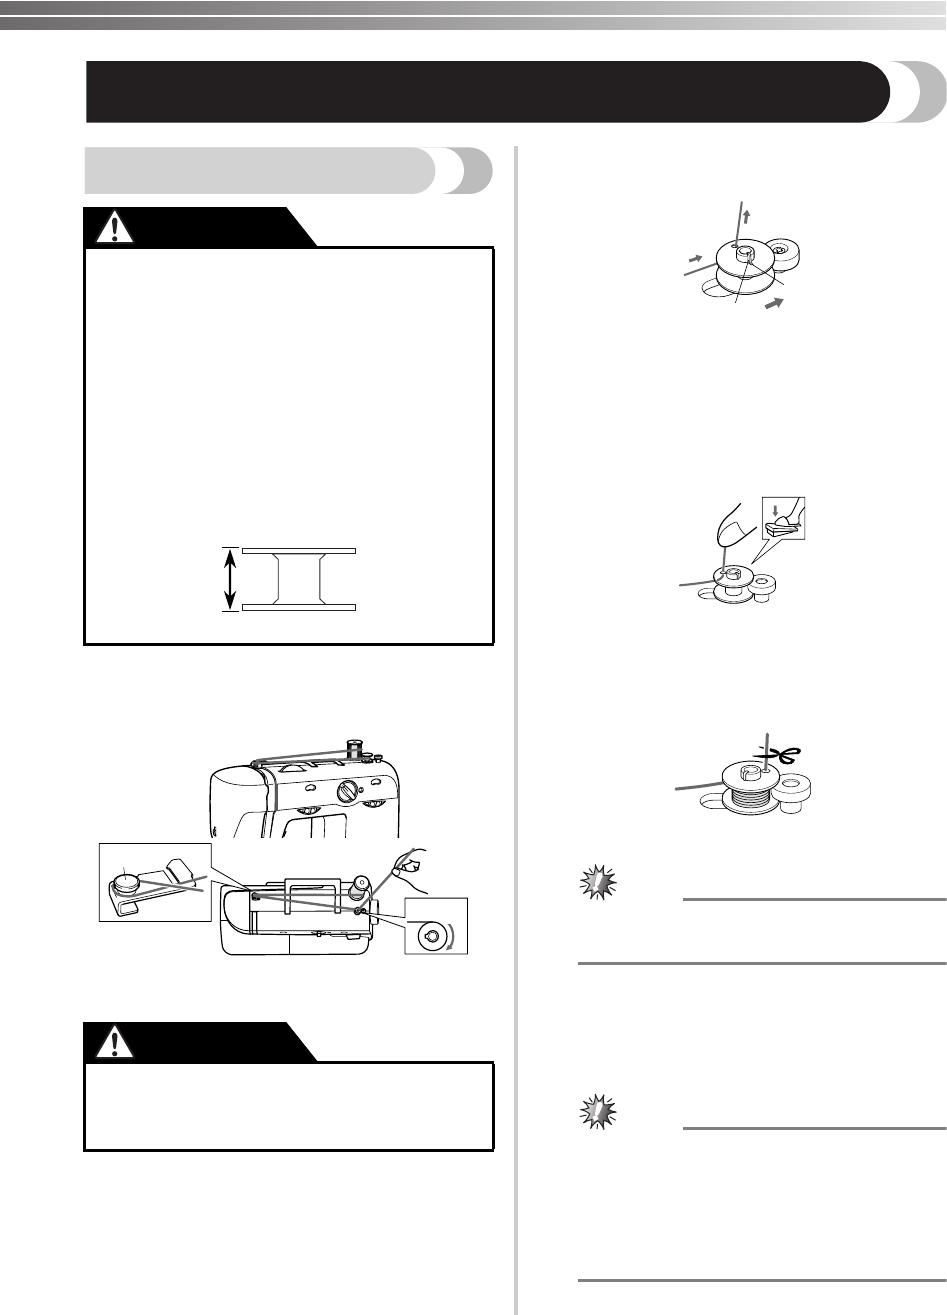
Winding the Bobbin
1
Put the spool of thread on the spool pin and
pass the thread around the bobbin-winding
tension disc.
1Bobbin-winding tension disc
2Bobbin-winding shaft
2
Pass the end of the thread through the hole on
the bobbin from the inside of the bobbin.
3
Put the bobbin onto the bobbin-winding shaft
and slide the bobbin-winding shaft to the
right. Turn the bobbin clockwise, by hand,
until the spring slides into the slit.
1Spring
2Slit
4
While holding the end of the thread, gently
press the foot controller to wind the thread
around the bobbin a few times. Then, stop the
machine.
5
Trim the excess thread above the bobbin and
continue winding the thread onto the bobbin
by pressing the foot controller.
Note
●The machine stops automatically when the
bobbin is full.
6
After the machine stops, cut the thread, slide
the shaft to the left, and then remove the
bobbin.
Note
●The needle bar does not move after the
bobbin-winding shaft is slid to the right.
●Immediately after winding the bobbin, it is
normal to hear the sound of the clutch
engaging when beginning to sew or turning
the balance wheel.
●Only use the bobbin (part code: SA156,
SFB (XA5539-151)) that has been
designed for this sewing machine. Using
of any other bobbin may cause damage to
the machine.
●The bobbin was designed specifically for
this sewing machine. If bobbins from older
models are used, the machine will not
operate correctly. Use only the enclosed
bobbin or bobbins of the same type (part
code: SA156, SFB (XA5539-151)).
●If the spool of thread is not in the right
place, the thread may tangle on the spool
pin.
CAUTION
Actual size
11.5 mm
(7/16")
2
1
CAUTION
1
2
XL5000us.book Page 15 Tuesday, October 28, 2003 11:01 AM
KNOWING YOUR SEWING MACHINE —————————————————————————————————————————————
—
16
Lower Threading
1
Raise the needle to its highest position by turning
the balance wheel toward you (counterclockwise)
and raise the presser foot lever.
2
Open the shuttle cover behind the extension
table on the front of the machine and pull the
bobbin case out of the shuttle race by pulling
the latch toward you.
1Bobbin case latch
2Bobbin case finger
●Make sure you follow the instructions
carefully. If you do not cut the thread
completely, and the bobbin is wound,
when the thread runs low it may tangle
around the bobbin and cause the needle
to break.
●Setting the bobbin improperly may cause
the thread tension to loosen, and may
break the needle.
1Wound evenly
2Wound poorly
CAUTION
CAUTION
1
2
●Setting the bobbin improperly may cause
the thread tension to loosen, breaking the
needle and resulting in injury.
1Wound evenly
2Wound poorly
●The bobbin was designed specifically for
this sewing machine. If bobbins from older
models are used, the machine will not
operate correctly. Use only the enclosed
bobbin or bobbins of the same type
(part code: SA156, SFB (XA5539-151)).
●Make sure you turn the power off while
threading the machine. If you
accidentally step on the foot controller
and the machine starts to work, you
could be injured.
CAUTION
1
2
Actual size
11.5 mm
(7/16")
CAUTION
1
2
XL5000us.book Page 16 Tuesday, October 28, 2003 11:01 AM
17
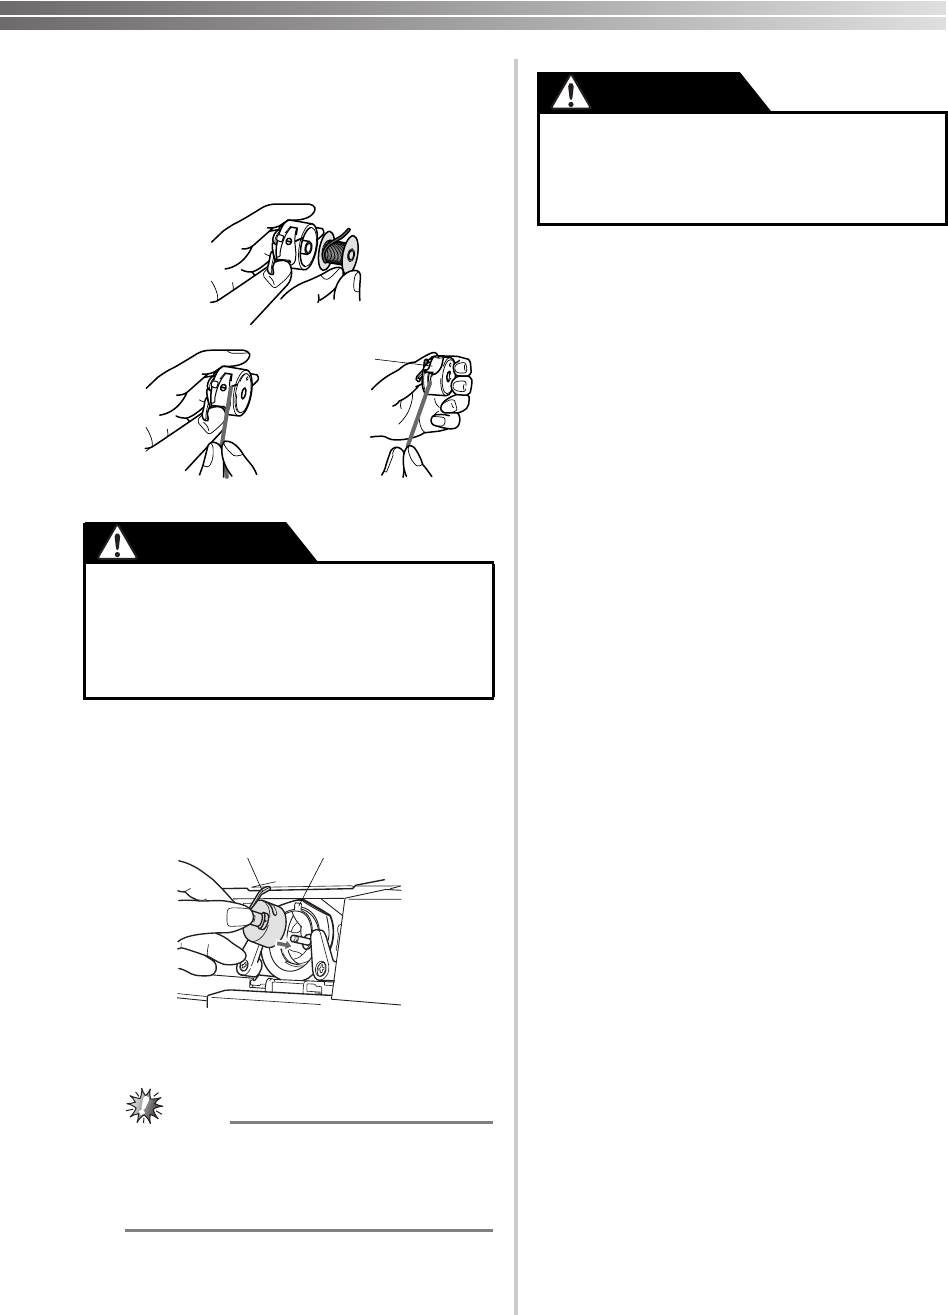
3
Unwind about 10 cm (4") of thread from a full
bobbin and insert the bobbin into the bobbin
case. (See fig. A-1.) Pull the trailing thread
into the slot, then down and to the left, as
shown in fig. A-2, until it enters the delivery
eye under the tension spring (fig. A-3).
1Tension spring
4
Holding the bobbin case by the latch, fully
insert the bobbin case into the shuttle race
and release the latch. Make sure the bobbin
case finger fits into the notch at the top of the
race.
1Bobbin case finger
2Notch
Note
●If the bobbin case is not properly placed
back into the machine, it will fall out from
the shuttle immediately after you start
sewing.
●Make sure you set the bobbin so the
thread unrolls in the correct direction. If
the thread unrolls in the wrong direction,
it may cause the thread tension to be
incorrect or break the needle.
A-1
A-2A-3
1
CAUTION
12
●To reduce the risk of injury from moving
parts, be sure to turn off the machine
before servicing it. In addition, be sure to
close the shuttle cover.
CAUTION
XL5000us.book Page 17 Tuesday, October 28, 2003 11:01 AM
KNOWING YOUR SEWING MACHINE —————————————————————————————————————————————
—
18
Upper Threading
1Spool pin
2Thread guide
3Tension discs
4Thread take-up lever
Set the main power switch to “O”.
1
Raise the presser foot lever and turn the balance
wheel toward you (counterclockwise) to raise
the thread take-up lever to its highest position.
2
Pull up the spool pin and put a spool of thread
on this pin.
3
Pass the thread through guides.
1Spool pin
2Thread guide
3Tension discs
4Thread take-up lever
4
While holding the thread, pull it between the
tension discs.
5
Guide the thread to the back of the thread
take-up lever and around to the left. Bring the
thread through the slit by pulling it toward
you and into the eyelet.
1Thread take-up lever
2
4
1
3
●Make sure you thread the machine
properly, otherwise the thread could
tangle and break the needle.
●
If the spool of thread is in the wrong place, or
is set incorrectly, the thread may tangle on
the spool pin and cause the needle to break.
CAUTION
CAUTION
2
4
3
1
1
1
XL5000us.book Page 18 Tuesday, October 28, 2003 11:01 AM
19
6
Bring the thread down and pass it behind the
thread guide.
1Thread guide
7
Thread the needle from front to back and pull
out about 5 cm (2") of thread.
15cm (2inch)
Note
●If the thread take-up lever is lowered, the
upper thread cannot be wrapped around the
thread take-up lever. Make sure you raise
the presser foot lever and the thread take-up
before you feed the upper thread.
●If you incorrectly feed the thread you may
cause sewing problems.
Using the Needle Threader (models
equipped with a needle threader)
Set the main power switch to “O”.
1
Lower the presser foot lever.
2
Turn the balance wheel toward you
(counterclockwise) until the bottom of the
needle holder aligns with the bottom of the
needle-threading-hook holder.
1Needle holder
2Needle threader lever
3Hook holder
4Align
Note
●When you use the needle threader, make
sure to align the bottom of the needle
holder with the bottom of the holder for the
needle-threading hook before lowering the
needle threader lever, otherwise the hook
may be damaged.
3
While lowering the needle threader lever,
hook the thread onto the guide.
1Needle holder
2Needle threader lever
3Guide
4
Pull down the needle threader lever as much
as possible, and then turn the lever toward the
back of the machine (away from you). Make
sure that the hook passes through the eye of
the needle and grabs the thread.
• Hold the thread in front of the needle to
make sure that the hook grabs it.
1
1
4
3
2
1
2
3
1
XL5000us.book Page 19 Tuesday, October 28, 2003 11:01 AM
KNOWING YOUR SEWING MACHINE —————————————————————————————————————————————
—
20
5
While lightly holding the thread, turn the
needle threader lever toward the front of the
machine (toward you). The hook will pull the
thread through the needle.
1Hook
2Thread
6
Raise the needle threader lever and pull out
about 5 cm (2") of thread through the needle
toward the back of the sewing machine.
Quick Thread-Setting System FAST START BOBBIN
(models equipped with a quick thread-setting system)
This new system allows you to start sewing
immediately after inserting the bobbin without pulling
up the lower thread. You can, however, draw up the
lower thread as explained in “Drawing up the lower
thread” if you wish.
Set the main power switch to “O”.
1
Hold the end of the bobbin thread and insert
the bobbin case into the shuttle.
1Bobbin case
2Shuttle
2
Close the shuttle cover while pulling the
thread through the slit in the cover.
1Shuttle cover
2Slit
3
Slide the thread down to the bottom of the
slit, pull it up, and then cut it on the cutter to
complete the lower threading.
4
Pull out about 15 cm (6") of the upper thread
as usual, and then pull it between the toes of
the presser foot and straight toward the back
of the machine.
5
Start sewing as usual. (It is not necessary to
draw up the bobbin thread.) (Refer to page 21.)
●The needle threader can only be used
with home sewing machine needles size
75/11-100/16. Check the table on
page 24 for the appropriate needle and
thread combinations. If you are using
transparent nylon mono-filament thread,
you can only use needles in the range of
90/14-100/16.
●You cannot use the needle threader if you
are using decorative threads or speciality
needles, such as the twin needle and
wing needle.
If you are using these types of threads or
needles, thread the needle by hand. Make
sure the main power switch is off when
threading the needle by hand.
1
1
2
CAUTION
1
2
1
2
XL5000us.book Page 20 Tuesday, October 28, 2003 11:01 AM
21
Drawing up the lower thread
1
Raise the presser foot and the needle to their
highest positions.
2
While lightly holding the end of the upper
thread, slowly turn the balance wheel to the
front (counterclockwise) once by hand to
lower, then raise the needle.
3
The upper thread should have caught the
lower thread in a loop. Pull on the upper
thread to draw up the lower thread.
1Upper thread
2Lower thread loop
4
Pull out about 15 cm (6") of both threads and
put them toward the back of the machine
under the presser foot. The upper thread
should pass between the toes of the presser
foot.
1Upper thread
2Lower thread
Sewing with a Twin Needle
We have designed your machine so you can sew
with this needle and two top threads. You can use
the same color or two different colors of thread for
making decorative stitches.
■Attaching the Twin Needle
Attach the twin needle in the same way as a
single needle (see page 7). The flat side of the
needle should face toward the back and the
rounded side should face toward you.
■Attaching the Extra Spool Pin
Put the extra vertical spool pin in the hole on the
top right-hand side of the machine. Put the
second spool of thread onto the extra spool pin.
1Extra spool pin
1
2
2
1
●Use only twin needles that have been
made for this machine (part code:
X57521-001). Other needles could break,
and damage the machine.
●When using the twin needle, make sure
the stitch width dial is not set above “3”
since this may cause the needle to hit the
needle plate and break.
●Do not sew with bent needles. The
needle could break and cause injuries.
●When using the twin needle, make sure
you use the zigzag presser foot only.
CAUTION
1
XL_01.fm Page 21 Wednesday, October 29, 2003 2:01 PM
KNOWING YOUR SEWING MACHINE —————————————————————————————————————————————
—
22
■Twin Needle Threading
You should thread each needle separately.
1
Threading the Right Needle
Follow the same instructions for threading a
single needle. See page 18 for more details.
2
Threading the Left Needle
Thread the left needle in the same way that
you threaded the right needle using the
thread from the spool on the extra spool pin,
but do not pass the thread through the thread
guide above the needle before you pass it
through the eye of the left needle.
1Right needle thread passes through thread guide
2Left needle thread passes in front of thread guide
3Thread guide
Note
Models that are equipped with a Needle
Threader
●You cannot use the needle threader to
thread the twin needle. Instead, thread the
twin needle by hand, from front to back.
Using the needle threader may damage the
machine.
Tension of the Thread
The tension of the thread will affect the quality of
your stitches. You may need to adjust it when you
change fabric or thread.
Memo
●We recommend that you sew a scrap piece
of fabric to check the thread tension before
sewing on your project.
●The basic thread tension setting is “5”.
■Possible Problems If the Tension Is Wrong
Upper tension is too tight.
Locks will appear on the surface of the fabric.
Upper tension control dial
Decrease the tension by turning the dial to a
lower number.
1Reverse
2Surface
Upper tension is too loose.
Locks appear on the reverse side of the fabric.
Upper tension control dial
Increase the tension by turning the dial to a higher
number.
1Reverse
2Surface
Note
●The lower thread tension has been adjusted
at the factory for general use. For most
sewing applications, no adjustment is
needed. When sewing with thin thread on
thin fabrics, the thread tension cannot be
adjusted adequately with the upper tension
control dial. Instead, the thread tension
must be adjusted according to the
procedure described below.
Lower tension is too loose.
Locks appear on the surface of the fabric.
Decrease the thread tension by turning the dial to
a lower number. If the result is still not
satisfactory, then adjust the bobbin thread tension
as explained below.
Bobbin
Increase the tension in the bobbin by turning the
screw with a small screwdriver in a clockwise
direction. However, do not turn the screw more
than one full turn.
Remember to return the screw to its original
position before starting your next project.
2
1
3
2
1
2
1
6
4
5
2
1
2
1
6
4
5
XL5000us.book Page 22 Tuesday, October 28, 2003 11:01 AM
23
Correct tension
Correct tension is important as too much or too
little tension will weaken your seams or cause
puckers on your fabric.
1Reverse
2Surface
2
1
2
1
XL5000us.book Page 23 Tuesday, October 28, 2003 11:01 AM
KNOWING YOUR SEWING MACHINE —————————————————————————————————————————————
—
24
CHART OF SEWING FABRICS, NEEDLES AND THREAD COMBINATIONS
Note
●Select the correct needle and thread size from the above chart.
●Use the same size thread for the upper (spool) and lower (bobbin) threads.
●For clear nylon thread, always use needle 90/14 - 100/16.
Fabric Type
Thread
Size of Needle
TypeSize
Medium-
weight
fabrics
BroadclothCotton
60
–80
75/11–90/14
Taffeta
Synthetic
mercerized
Flannel,
Gabardine
Silk or
silk finished
50
–80
Lightweight
fabrics
Lawn, BatisteCotton
60
–80
75/11
Georgette
Synthetic
mercerized
Challis, SatinSilk
50–80
Heavy-
weight
fabrics
DenimCotton
30–50
90/14
–100/16
Corduroy
Synthetic
mercerized
50
TweedSilk
Stretch
fabrics
Jersey
Thread for knits
50
–60
Ball-point needle
(golden colored)
75/11–90/14
Tricot
For top-stitching
Synthetic
mercerized
30
90/14–100/16
Silk
●
Make sure you follow the needle, thread, and fabric combinations listed in the table. Using
the wrong combination, for example, using heavyweight fabric such as denim with a small
needle (for example, 75/11) may bend or break the needle. Also, the seam may be uneven, the
fabric may pucker, or the machine may skip stitches.
CAUTION
XL5000us.book Page 24 Tuesday, October 28, 2003 11:01 AM
25
Please Read Before Sewing
Straight Stitching
*Turn the stitch width dial to adjust the needle
position. Setting the dial to “5” selects the left needle
position; setting the dial to “0” selects the right
needle position.
■Starting Sewing
1
Turn the pattern selection dial to choose the
Straight Stitch or Triple Stretch Stitch.
2
Raise the needle to its highest position and lift
the presser foot lever.
3
Pull up the lower thread by turning the
balance wheel toward you
(counterclockwise), and place both the upper
and lower threads behind the presser foot.
4
Put the fabric under the presser foot and
position the needle 1 cm (3/8") from the edge
of the fabric.
5
Lower the presser foot.
■Backtacking
6
Press the reverse sewing lever down as far as
possible, and then lightly step on the foot
controller. Sew 5 to 10 stitches in the reverse
direction.
7
Release the reverse sewing lever and start
sewing in the forward direction by pressing
the foot controller.
•You can use reverse sewing for locking the
end of seams and where you need to
strengthen a stitch.
■Changing Sewing Direction
1
With the needle still in the fabric, stop the
machine at the point where you want to
change the sewing direction.
●To avoid being injured, watch the needle carefully while you are using the machine. Keep your
hands away from moving parts.
●Do not stretch or pull the fabric during sewing, otherwise the needle may be damaged and
you may be injured.
●Do not use bent or broken needles, otherwise you may be injured.
●Take care that the needle does not hit basting pins or other objects during sewing, otherwise
the needle may break and you may be injured.
●Always use the correct presser foot. If you use the wrong presser, the needle may hit the
presser foot and bend or break and you may also be injured.
●When you turn the balance wheel by hand, always turn it toward the front of the machine
(counterclockwise). Turning it the other way may cause the thread to tangle and damage the
needle or fabric. You may also be injured.
CAUTION
Stitch NamePattern
Stitch Length
[mm (inch)]
Stitch Width
[mm (inch)]
Straight Stitch
1-4
(1/16-3/16)
5-0*
(3/16-0)
Triple Stretch
Stitch
Fixed 2.5
(3/32)
●Make sure the needle does not hit a pin
or any other object during sewing. The
thread could tangle or the needle could
break. You could also be injured.
CAUTION
XL5000us.book Page 25 Tuesday, October 28, 2003 11:01 AM
KNOWING YOUR SEWING MACHINE —————————————————————————————————————————————
—
26
2
Raise the presser foot and turn the fabric to its
new direction using the needle as a turning
point for the fabric.
3
Lower the presser foot and continue sewing in
the new direction.
■Finishing Sewing
1
Stitch to the end of the seam and stop.
2
Push the reverse sewing lever and stitch
backwards for 1 cm (3/8") from the end of the
fabric.
■Removing the Material from the Machine
1
Stop the machine.
Raise the needle to its highest position and
make sure that the thread take-up lever is also
at its highest position.
2
Lift the presser foot and pull the fabric out
gently to the left-hand side.
3
Cut both threads with the thread cutter on the
left-hand side of the machine.
1Thread cutter
4
To prepare the machine for the next seam,
pull about 10 cm (4") of thread through the
toes of the presser foot toward the back of the
machine.
■Top-Stitching and Stretch Materials
You can use the Straight Stitch for top-stitching
and sewing lightweight fabrics.
You can use Triple Stretch Stitch for sewing
stretch fabrics.
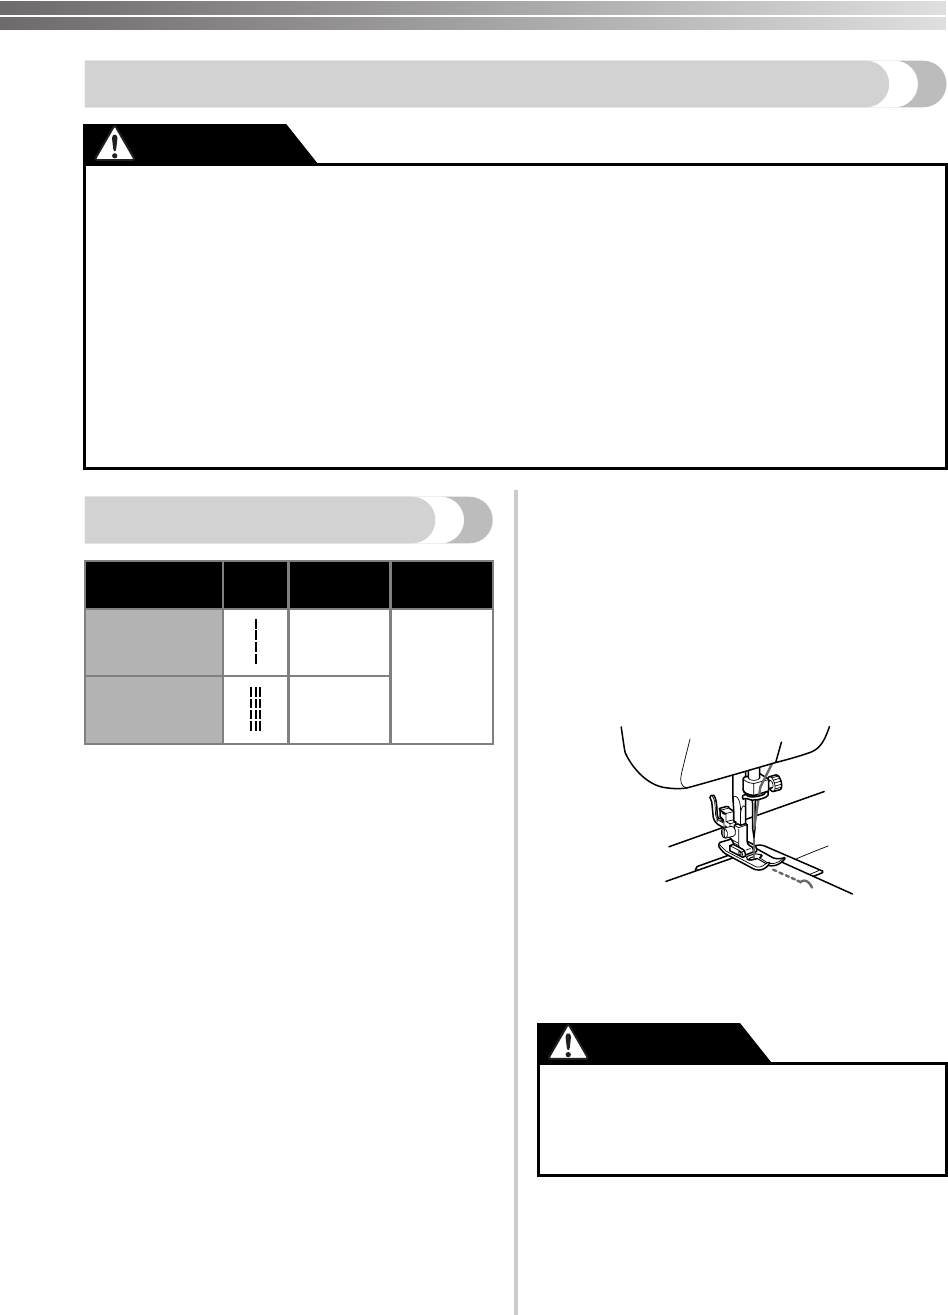
Zigzag Stitching
■Zigzag Stitch
Turn the pattern selection dial to the Zigzag
Stitch, and then select the stitch length and the
stitch width.
We recommend that you sew using the Straight
Stitch at the beginning and end of the zigzag
stitches.
■SATIN STITCH
Setting the Zigzag Stitch length in the “” range
produces a satin stitch (close zigzag stitch). The
satin stitch can be used for making buttonholes
and decorative stitches. Set the pattern selection
dial to the Zigzag Stitch, set the stitch length in
the “” range, and set the stitch width dial
between “0” and “5”.
1
Stitch NamePattern
Stitch
Length
[mm (inch)]
Stitch
Width
[mm (inch)]
Zigzag Stitch
-4
(1/64-3/16)
0-5
(0-3/16)
XL5000us.book Page 26 Tuesday, October 28, 2003 11:01 AM
27
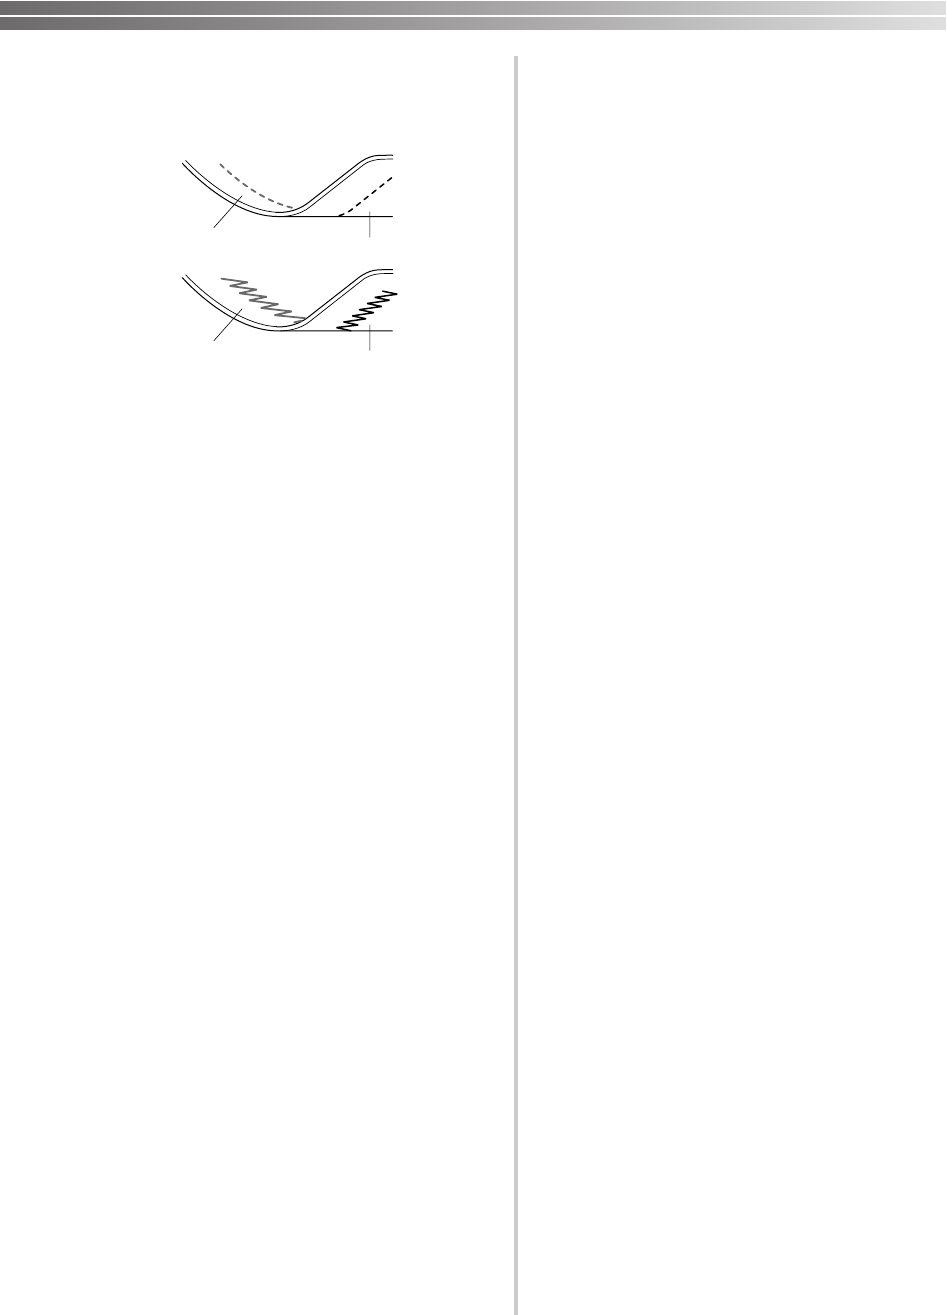
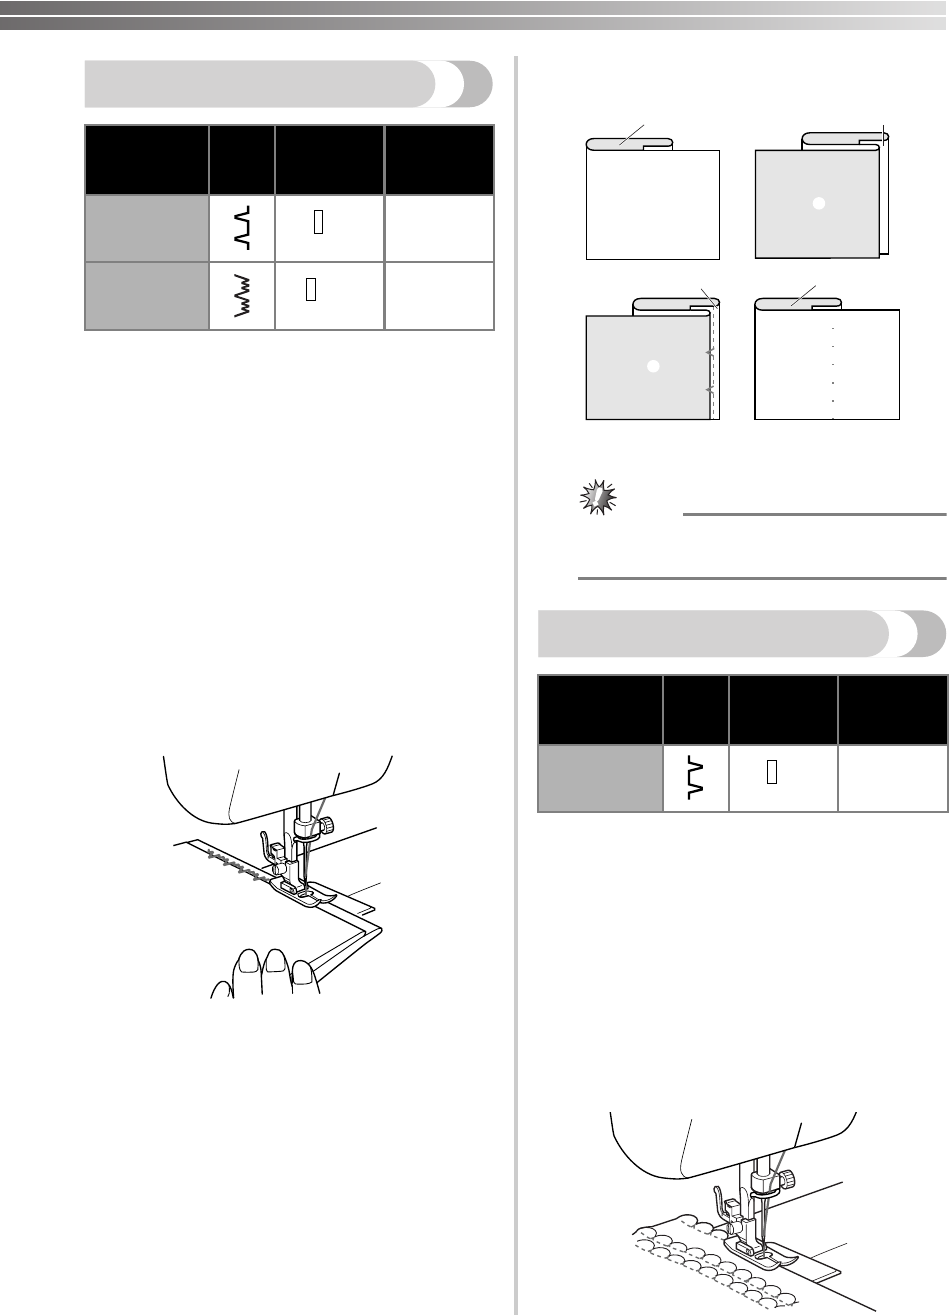
Blind Hem Stitching
You can use the Blind Hem Stitch to finish the edge
of a project, like the hem of a pair of trousers,
without the stitch showing. Use the Blind Hem Stitch
when sewing on non-stretch fabrics, and the Stretch
Blind Hem Stitch for stretch fabrics.
1
Both threads should be the same color as the
fabric.
2
Fold back the hem, as shown in fig. A. Then
fold the edge of the fabric as in fig. B. Leave a
6 mm (15/64") overlap at the edge.
3
Set the pattern selection dial to the Blind Hem
Stitch or Stretch Blind Hem Stitch, and then
set the stitch length.
4
Sew on the fold as in fig. C.
5
When the fabric is unfolded you will have a
blind hem stitch as shown in fig. D.
1Right side of fabric
2Wrong side of fabric
Note
●The Stretch Blind Hem Stitch is useful for
stretch fabrics.
Shell Tuck Stitching
The Shell Tuck Stitch can be used to sew a picot
(lace-like) edge on lightweight fabric.
1
Set the pattern selection dial to the Shell Tuck Stitch.
2
Adjust the thread tension so that it is tighter
than normal.
3
Place the fabric under the presser foot so that
it will be sewn along the bias with the straight
stitches sewn on the seamline and the zigzag
stitches sewn slightly over the folded edge.
4
Sew at a slow speed.
Stitch NamePattern
Stitch
Length
[mm (inch)]
Stitch
Width
[mm (inch)]
Blind Hem
Stitch
-2
(1/64-1/16)
3-5
(1/8-3/16)
Stretch Blind
Hem Stitch
-1.5
(1/64-1/16)
3-5
(1/8-3/16)
Stitch NamePattern
Stitch
Length
[mm (inch)]
Stitch
Width
[mm (inch)]
Shell Tuck
Stitch
-3
(1/64-1/8)
3-5
(1/8-3/16)
A
B
C
D
1
1
2
2
1
1
2
2
XL5000us.book Page 27 Tuesday, October 28, 2003 11:01 AM
KNOWING YOUR SEWING MACHINE —————————————————————————————————————————————
—
28
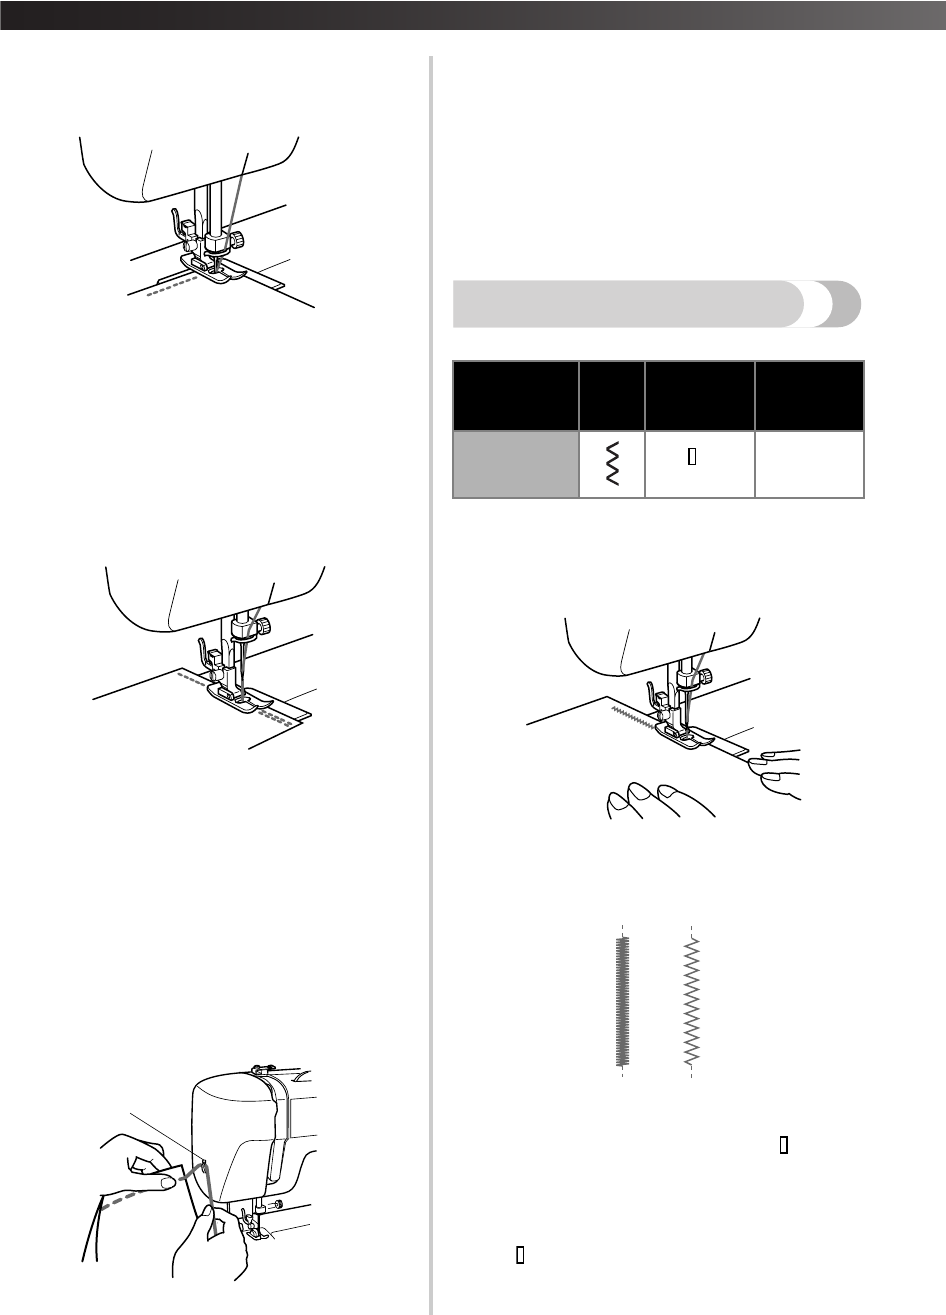
Elastic Stitching
You can use the Elastic Stitch for mending, sewing
elastic or joining fabric. Each is explained below.
Set the pattern selection dial to the Elastic Stitch.
■Mending
1
Set the stitch length dial between "" and
“2.5”.
2
Place the reinforcement fabric under the area
you want to mend.
3
Following the line of the tear, sew using the
Elastic Stitch as illustrated.
■Sewing Elastic
1
Place the elastic on the fabric.
2
As you sew, stretch the elastic in front of and
behind the presser foot.
■Joining Fabric
You can use the Elastic Stitch to join two pieces of
fabric together. In addition, it is very effective
when sewing knitted fabrics. If you are using
nylon thread, the stitch will not be visible.
1
Put the edge of the two pieces of fabric
together and center them under the presser
foot.
2
Sew them together using the Elastic Stitch.
Make sure you keep the two fabric edges close
together.
Scallop Stitching
This machine automatically produces a Scallop
Stitch for decorative edging.
1
Set the pattern selection dial to the Scallop
Stitch.
2
Sew the Scallop Stitch along the edge of the
material.
3
If desired, trim around the scallop with
scissors to create a scalloped edge. Be careful
not to cut the thread.
Stitch NamePattern
Stitch
Length
[mm (inch)]
Stitch
Width
[mm (inch)]
Elastic Stitch
-2.5
(1/64-3/32)
3-5
(1/8-3/16)
Stitch NamePattern
Stitch
Length
[mm (inch)]
Stitch
Width
[mm (inch)]
Scallop Stitch
-1.5
(1/64-1/16)
3-5
(1/8-3/16)
XL5000us.book Page 28 Tuesday, October 28, 2003 11:01 AM
29
Double Action Stitching
This stitch is used for joining two pieces of fabric, for
example, when making patchwork. Set the pattern
selection dial to the Double Action Stitch.
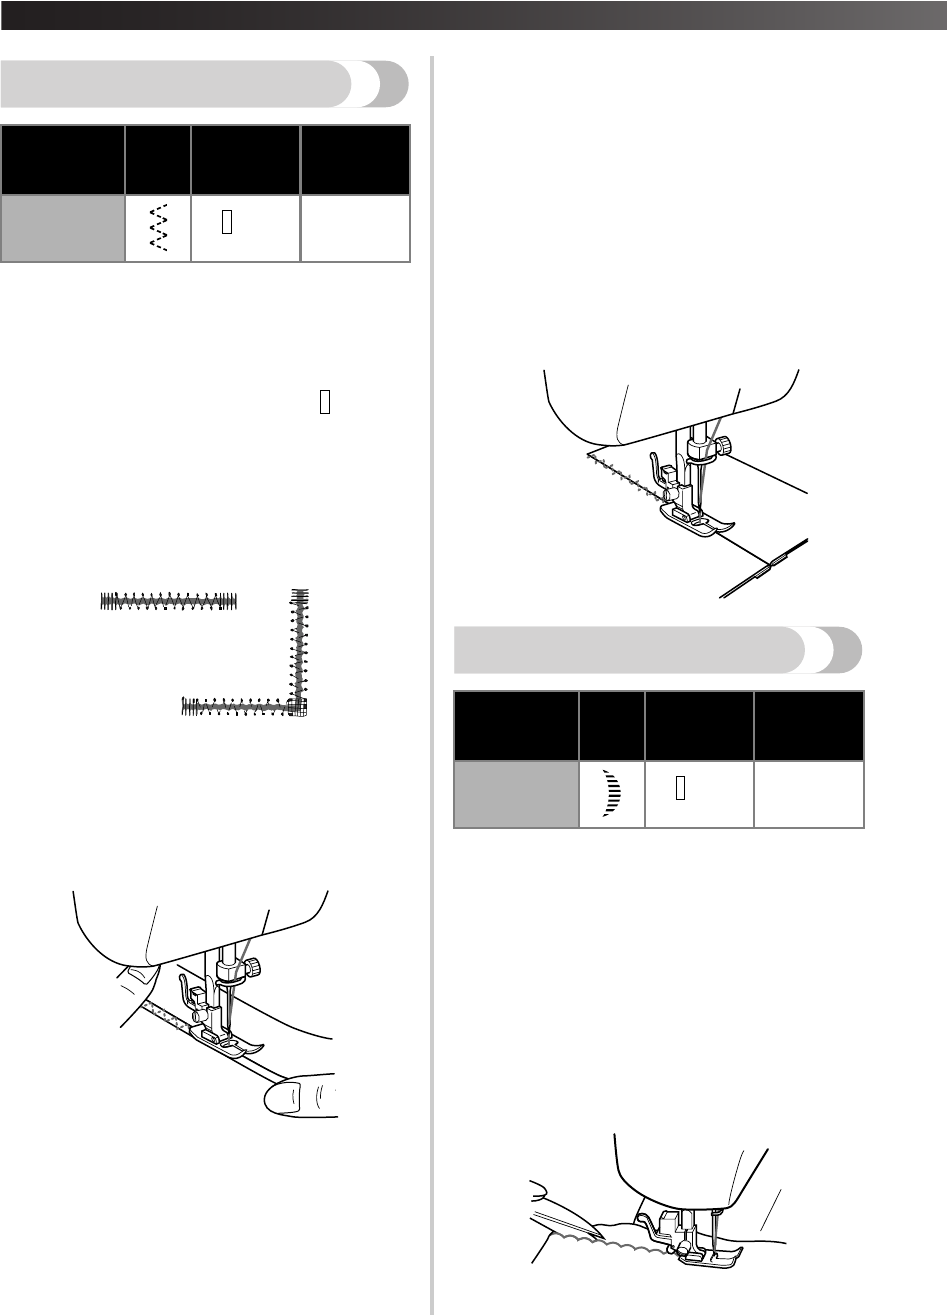
Overedge Stitching
You can use these stitches to join together seams and
finish them in one operation. The Overlock Stitches
are also useful for sewing stretch materials while the
Arrowhead Stitch is ideal for sewing the edge of a
blanket.
1
Set the pattern selection dial to the Elastic
Overlock, Stretch Overlock or Arrowhead.
2
Put the fabric under the presser foot so that
the seamline (or arrowhead point) is
approximately 3 mm (1/8") to the left of the
center of the presser foot. This stitch works
best with a seam allowance of approximately
6 mm (1/4") as this allows the right (zigzag)
side of the stitch to overlock the cut edge of
the fabric.
3
If the seam allowance is wider than the stitch
pattern, trim away any excess fabric after
stitching.
A finished Elastic Overlock Stitch is shown in the
diagram below.
Feather Stitching
Use the Feather Stitch as a decorative top-stitch
when hemming blankets, tablecloths or draperies, or
when embroidering.
1
Set the pattern selection dial to the Feather
Stitch.
2
Place the fabric right side up and sew 1 cm
(3/8") from the edge of the fabric.
3
Trim close to the stitching.
Stitch NamePattern
Stitch
Length
[mm (inch)]
Stitch
Width
[mm (inch)]
Double Action
Stitch
-3
(1/64-1/8)
3-5
(1/8-3/16)
Stitch NamePattern
Stitch
Length
[mm (inch)]
Stitch
Width
[mm (inch)]
Stretch
Overlock
Stitch
Fixed 2.5
(3/32)
3-5
(1/8-3/16)
Elastic
Overlock
Stitch
3-5
(1/8-3/16)
Arrowhead
Stitch
Stitch NamePattern
Stitch
Length
[mm (inch)]
Stitch
Width
[mm (inch)]
Feather Stitch
Fixed 2.5
(3/32)
3-5
(1/8-3/16)
XL5000us.book Page 29 Tuesday, October 28, 2003 11:01 AM
KNOWING YOUR SEWING MACHINE —————————————————————————————————————————————
—
30
The stitch will prevent the fabric from unravelling.
Triple Zigzag Stretch Stitching
This stitch can be used wherever a Zigzag Stitch
would be used to sew heavyweight stretch fabrics.
The Triple Zigzag Stretch Stitch can also be used as a
decorative top-stitch. Set the pattern selection dial to
the Triple Zigzag Stretch Stitch.
Decorative Stitching
This stitch can be used for decorative stitching.
Making a Buttonhole
(1-Step Automatic Buttonhole)
Memo
●We recommend that you practice making a
buttonhole on a scrap piece of fabric before
you try it on the actual garment.
●When making buttonholes on soft fabrics,
place stabilizer material on the underside of
the fabric.
Making a buttonhole is a simple process that
provides reliable results.
■Making a Buttonhole
1
Using tailor’s chalk, mark the position and
length of the buttonhole on the fabric.
2
Attach the buttonhole foot and set the pattern
selection dial to "".
3
You need to sew the front bar tack first. Lower
the presser foot to align the marks on the foot
with the mark on the fabric.
4
Open the button plate and insert the button.
1Starting mark on the fabric
2Marks on the foot
3Button plate
Stitch NamePattern
Stitch
Length
[mm (inch)]
Stitch
Width
[mm (inch)]
Triple Zigzag
Stretch Stitch
Fixed 2.5
(3/32)
3-5
(1/8-3/16)
Stitch NamePattern
Stitch
Length
[mm (inch)]
Stitch
Width
[mm (inch)]
Decorative
Stitch
Fixed 2.5
(3/32)
3-5
(1/8-3/16)
Pattern
Stitch
Length
[mm (inch)]
Stitch
Width
[mm (inch)]
Foot
(1-Step
Automatic
Buttonhole)
-1.5
(1/64-1/16)
3-5
(1/8-3/16)
Buttonhole
Foot
–
2
1
3
XL5000us.book Page 30 Tuesday, October 28, 2003 11:01 AM
31
5
Lower the buttonhole lever and push it back
slightly.
6
While gently holding the upper thread, start
the machine.
7
The bar tacks of the buttonhole are sewn in
the order shown.
8
Stop the machine when buttonhole stitching is
finished.
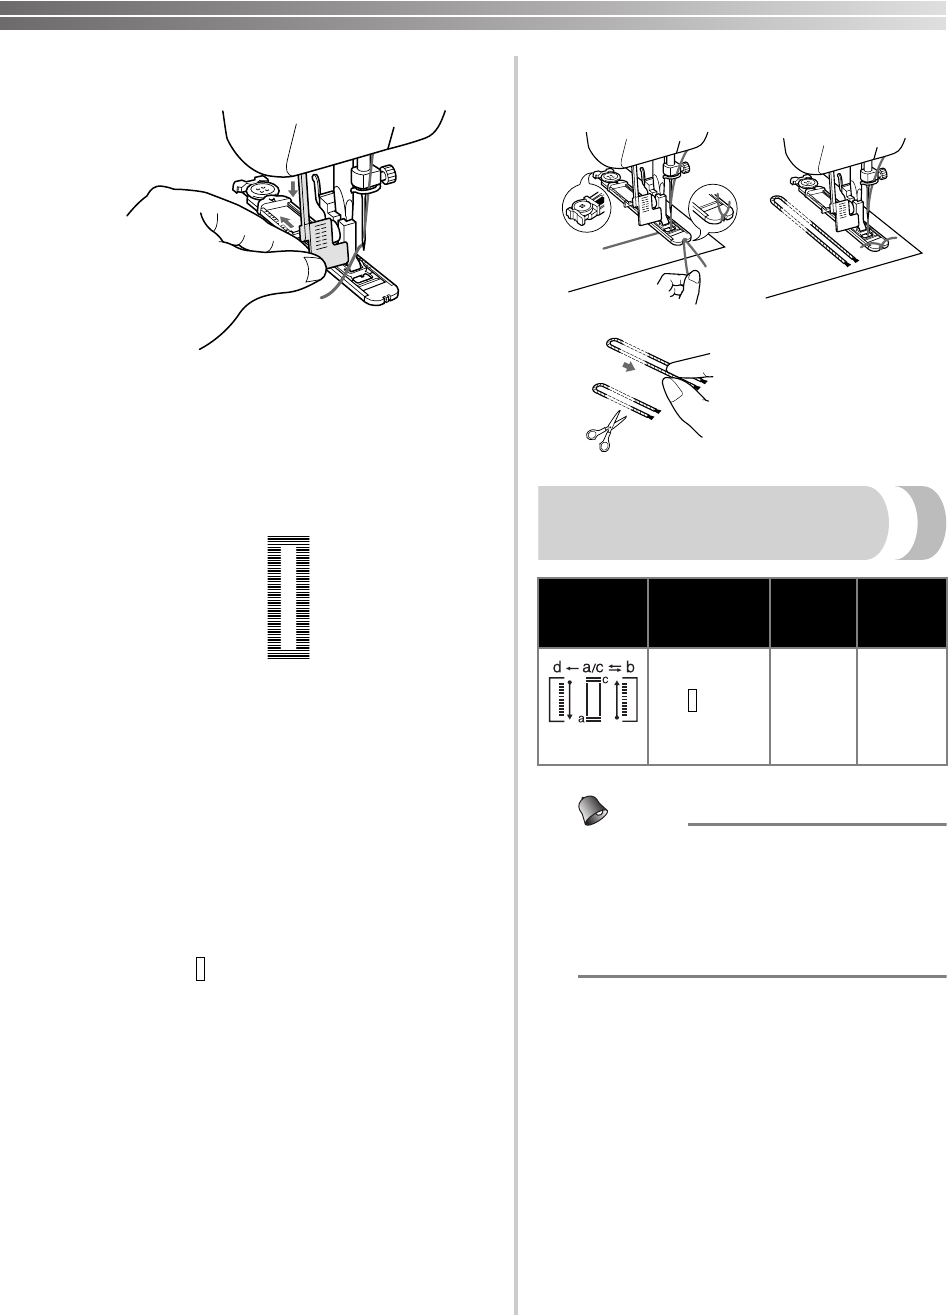
■Making a Buttonhole on Stretch Fabrics
When sewing buttonholes on stretch fabric, the
buttonhole stitching is sewn over a gimp thread.
1
Using tailor’s chalk, mark the position of the
buttonhole on the fabric, and then attach the
buttonhole foot and set the pattern selection
dial to “”.
2
Hook the gimp thread onto the back end of
the buttonhole foot, bring the two gimp
thread ends to the front of the foot, insert
them into the grooves, and then temporarily
tie them there.
3
Lower the presser foot and start sewing.
*Set the stitch width to match the diameter of
the gimp thread.
4
Once sewing is completed, gently pull the
gimp thread to remove any slack, and then
trim off the excess.
Making a Buttonhole
(4-Step Buttonhole)
Memo
●We recommend that you practice making a
buttonhole on a scrap piece of fabric before
you try it on the actual garment.
●When making buttonholes on soft fabrics,
place stabilizer material on the underside of
the fabric.
Making a buttonhole is a simple process that
provides reliable results.
■Making a Buttonhole
1
Using tailor’s chalk, mark the position and
length of the buttonhole on the fabric.
2
Attach the buttonhole foot, and then slide the
outside frame of the buttonhole foot as far
back as possible.
PUSH
1
3
24
Pattern
Stitch Length
[mm (inch)]
Stitch
Width
[mm (inch)]
Foot
(4-Step
Buttonhole)
-1.5
(1/64-1/16)
3-5
(1/8-3/16)
Buttonhole
Foot
PUSH
PUSH
XL5000us.book Page 31 Tuesday, October 28, 2003 11:01 AM
KNOWING YOUR SEWING MACHINE —————————————————————————————————————————————
—
32
3
You need to sew the front bar tack first. Line
the bar tack mark under the center of the
presser foot and align it with the two lines on
the presser foot.
1Front of chalk mark
2Red lines
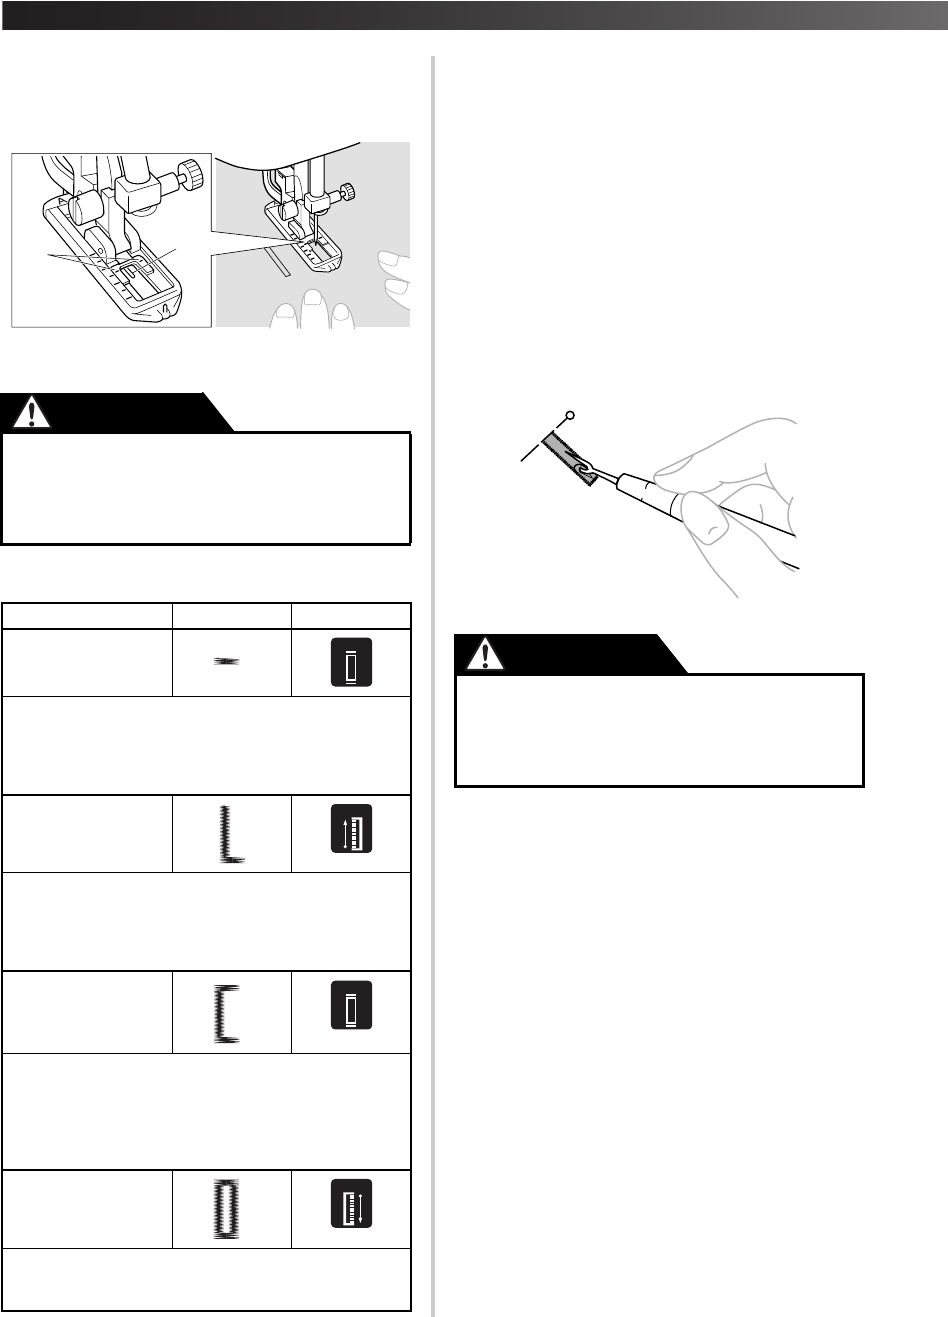
■Making A Buttonhole
■Securing the Stitching and Cutting the
Buttonhole
1
To secure the stitching, turn the material 90
degrees counterclockwise and sew straight
stitches to the end of the front bar tack of the
buttonhole.
2
Remove the material from the machine. We
recommend that you put pins across both
ends of the buttonhole to prevent the stitches
from being cut.
3
Cut an opening in the middle of the
buttonhole with a seam ripper. Be careful not
to cut through any stitches.
●If the presser foot is not installed with the
correct orientation, the needle may strike
the presser foot, bending or breaking the
needle and causing injuries.
StepSewn sectionPattern
Step 1
(Front bar tack)
1.Set the pattern selection dial to “a”.
2.Lower the presser foot and sew 5 to 6 stitches.
3.Stop the machine when the needle is at the left
side of the stitches, and then raise the needle
from the material.
Step 2
(Left side)
1.Turn the pattern selection dial to “b”.
2.Sew the predetermined length of the tailor's
chalk line.
3.Stop the machine when the needle is at the left
side of the stitch, and then raise the needle.
Step 3
(Back bar tack)
1.Turn the pattern selection dial to “c” (same
position as in step 1).
2.Sew 5 to 6 stitches.
3.Stop the machine when the needle is at the right
side of the stitch, and then raise the needle from
the material.
Step 4
(Right side)
1.Set the pattern selection dial to “d”.
2.Sew the right side until the needle reaches the
stitches sewn in step 1.
1
2
CAUTION
a
a/c
a
c
b
b
c
a/c
a
c
d
d
●When using the seam ripper to open the
buttonhole, do not put your hand or
fingers in the path of the ripper. The seam
ripper may slip and cause injuries.
CAUTION
XL5000us.book Page 32 Tuesday, October 28, 2003 11:01 AM
33
Adjusting Buttonholes
If the stitching on the two sides of the buttonhole is
not the same, you can make the following
adjustments.
1
Set the stitch length dial to "" and sew the
buttonhole on a scrap piece of fabric to
observe how the material is fed.
2
If the right side of the buttonhole is too coarse
or fine, adjust the feeding of the material with
the Stitch Length Dial.
1Right side
2Shorter
3Longer
3
After obtaining a satisfactory feeding on the
right side, stitch the buttonhole and observe
the feeding.
4
If the left side is too coarse or fine compared
with the right side, adjust the buttonhole fine
adjustment screw as described below.
If the left side is too coarse, turn the buttonhole
fine adjustment screw with a large screwdriver
in the - direction.
If the left side is too fine, turn the buttonhole
fine adjustment screw with a large screwdriver
in the + direction.
•This adjustment ensures both sides of the
buttonhole are the same.
1Stitch length dial
2Buttonhole fine adjustment screw
3Left side
4In this case
Sewing Buttons
1
Measure the distance between the holes and
set the appropriate stitch width using the
stitch width dial. For example, if the distance
between the holes is 1.5 mm (1/16"), set the
stitch width to “1.5”.
2
Attach the button sewing foot.
3
Place the darning plate on the needle plate.
(On a machine equipped with a drop feed
lever, lower the feed dogs by setting the drop
feed lever to the up position.)
1
23
0
2
1
2
3
2
2
0
1
0
1
Stitch
Name
Pattern
Stitch
Length
[mm (inch)]
Stitch
Width
[mm (inch)]
Foot
Zigzag
Stitch
(1/64)
Any
Button
Sewing
Foot
3
4
4
1
2
XL5000us.book Page 33 Tuesday, October 28, 2003 11:01 AM
KNOWING YOUR SEWING MACHINE —————————————————————————————————————————————
—
34
4
Put a button between the foot and the fabric
and make sure that the needle enters the holes
without hitting the button. If it hits, see step
1.
5
At a slow speed, sew about 10 stitches.
6
Remove the material from the machine. Cut
the upper and lower threads and tie both
threads at the back of the material.
Zipper Insertion
You can use the zipper foot to sew different types of
zippers, and can easily position the zipper to the
right or left side of the needle.
When sewing the right side of the zipper, attach the
presser foot holder to the left pin of the zipper foot.
When sewing the left side of the zipper, attach the
presser foot holder to the right pin of the zipper foot.
1Zipper foot
2Right pin for sewing the left side of the zipper
3Left pin for sewing the right side of the zipper
1
Set the pattern selection dial to the Straight
Stitch (center needle position (2.5 mm
(3/32")).
2
Lower the presser foot lever and fix either the
left or right pin of the zipper foot onto the
shank.
3
Fold the edge of the material 2 cm (3/4") and
place the zipper under the folded section.
4
Use the stitch width dial to adjust the needle
position.
Lower the needle into the notch on either the
left or right side of the zipper foot.
●
Make sure the needle does not hit the
button during sewing, otherwise the
needle may break and you may be
injured.
CAUTION
Stitch
Name
Pattern
Stitch
Length
[mm (inch)]
Stitch
Width
[mm (inch)]
Foot
Straight
Stitch
2-3
(1/16-1/8)
2.5
(center
needle
position)
(3/32)
Zipper
Foot
●
Turn the balance wheel by hand to make
sure the needle does not hit the presser
foot before you start sewing. If you
choose a different stitch, the needle will
hit the presser foot and break the needle.
You may also be injured.
1
2
3
CAUTION
XL_01.fm Page 34 Wednesday, October 29, 2003 1:06 PM
35
5
Sew from the bottom of the zipper toward the
top on both sides. The needle should be
positioned on the zipper side of the foot for
best results.
6
To sew the opposite side of the zipper, release
the foot by raising the lever located at the
back of the presser foot, position the zipper
foot on the other side of the zipper and
continue sewing using the notch on the other
side.
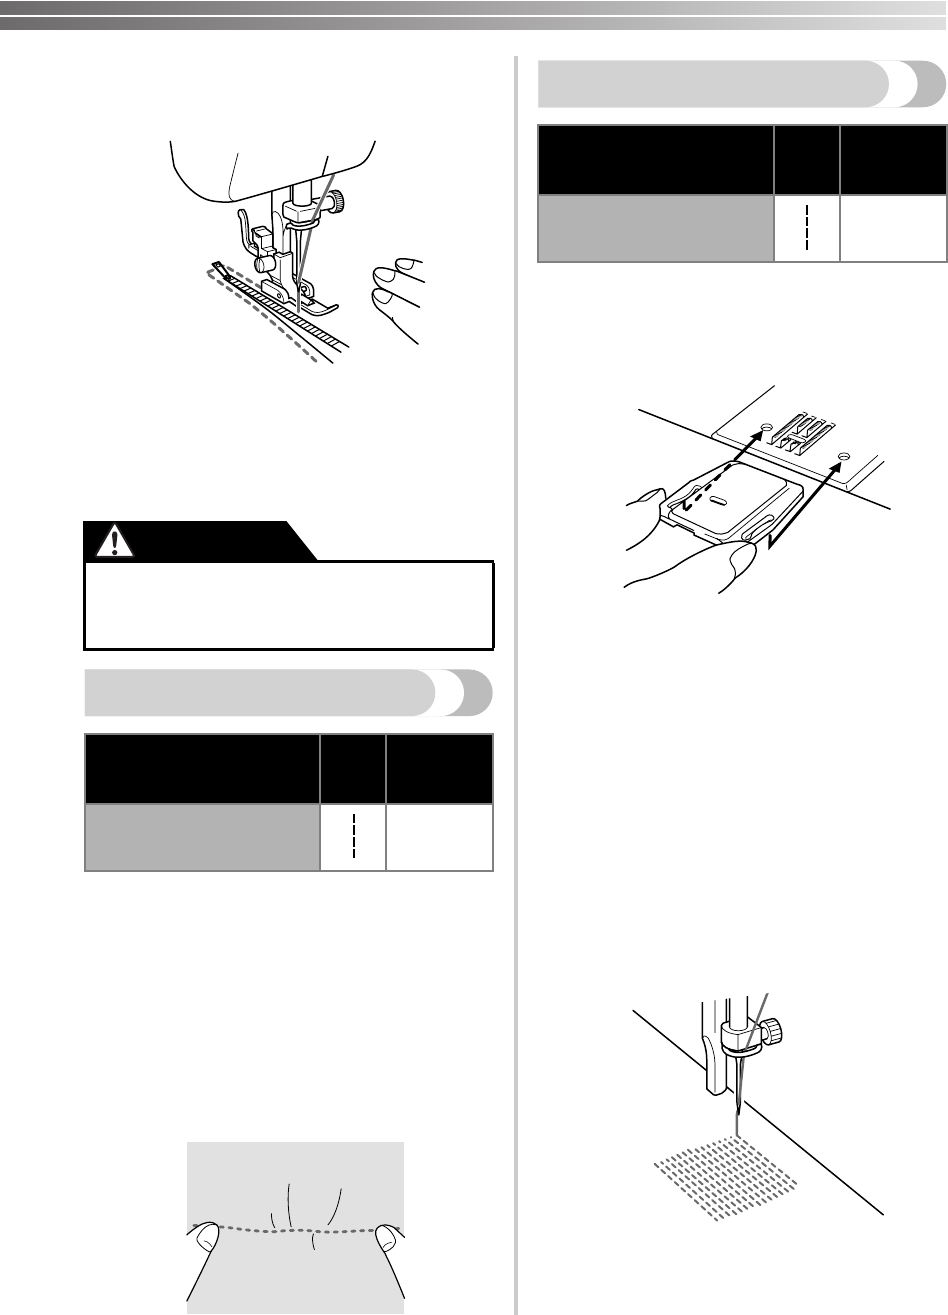
Gathering
1
Set the pattern selection dial to the Straight
Stitch.
2
Loosen the tension of the upper thread so that
the lower thread lies on the underside of the
material.
3
Sew a single row (or many rows) of straight
stitches.
4
Pull the lower threads to gather the material.
Darning
1
Place the darning plate on the needle plate.
(On a machine equipped with a drop feed
lever, lower the feed dogs by setting the drop
feed lever to the up position.)
2
Set the pattern selection dial to the Straight
Stitch.
3
Put the section you want to darn under the
presser foot, together with a piece of fabric
for reinforcement.
4
Remove the presser foot and presser foot
holder, and then lower the presser foot lifter.
5
Begin sewing by alternating between gently
drawing the work away from you and pulling
it toward you.
6
Repeat this motion until the darning section is
filled with parallel lines of stitching.
●
Make sure the needle does not hit the zipper
during sewing. If the needle hits the zipper,
the needle may break and you may be injured.
Stitch NamePattern
Stitch
Length
[mm (inch)]
Straight Stitch
4
(3/16)
CAUTION
Stitch NamePattern
Stitch
Length
[mm (inch)]
Straight StitchAny
XL5000us.book Page 35 Tuesday, October 28, 2003 11:01 AM
KNOWING YOUR SEWING MACHINE —————————————————————————————————————————————
—
36
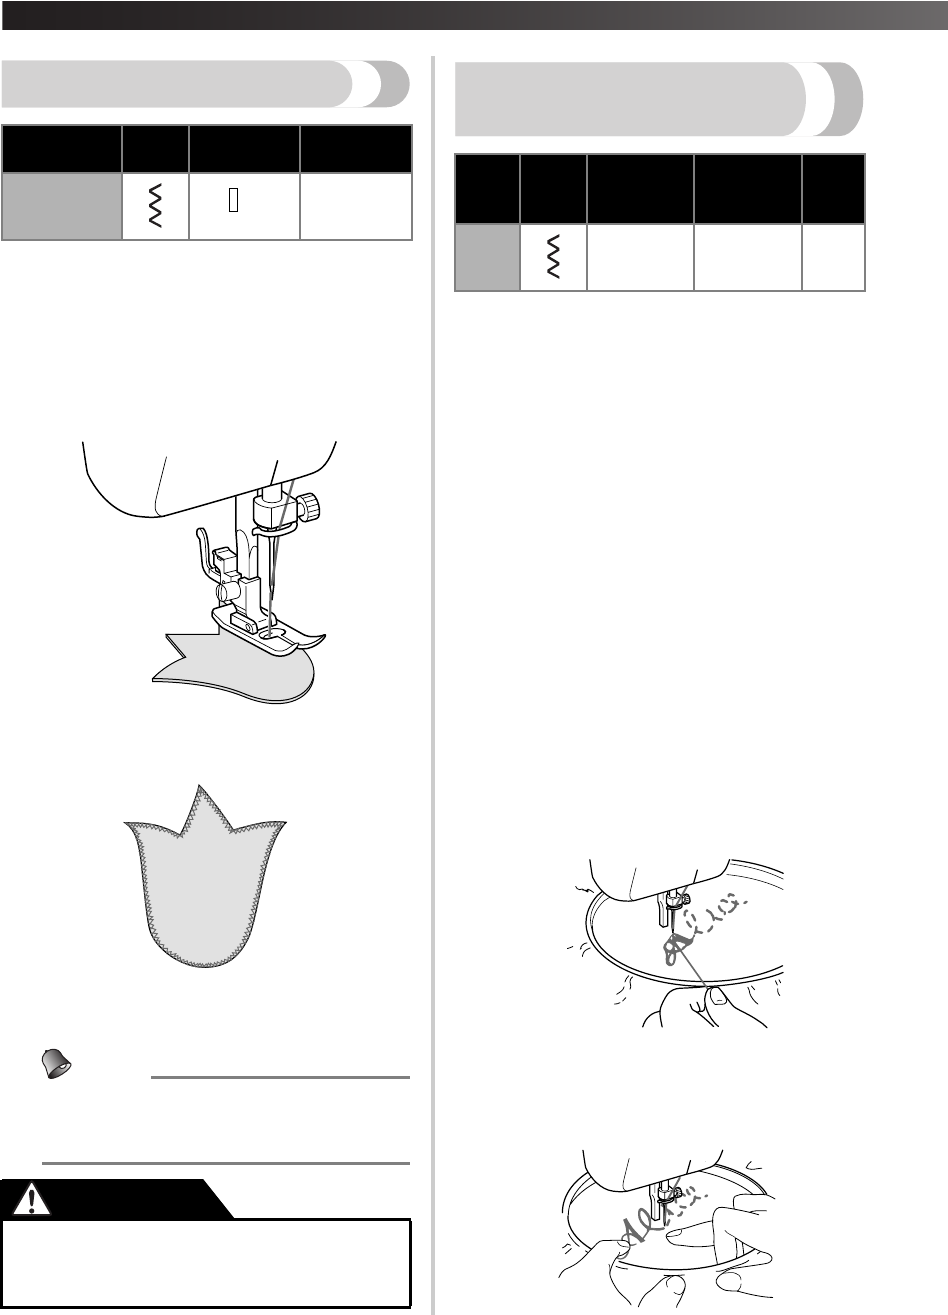
Appliqués
You can create an applique by cutting a different piece
of fabric into a shape and using it as a decoration.
1
Baste the cutout to the fabric at the desired
location.
2
Carefully sew around the edge of the cutout
using a Zigzag Stitch with a fine stitch length.
3
Cut away any fabric that is left outside the
stitching.
4
Remove the basting, if necessary.
Memo
●
Make reinforcing straight stitches at the
beginning and the end of the stitching to secure
it.
Monogramming and
Embroidering
■Preparing for sewing a Monogram and
Embroidering
1
Place the darning plate on the needle plate.
(On a machine equipped with a drop feed
lever, lower the feed dogs by setting the drop
feed lever to the up position.)
2
Set the pattern selection dial to the Zigzag
Stitch.
3
Draw the lettering (for monogramming) or
design (for embroidering) on the surface of
the fabric.
4
Stretch the fabric between embroidery hoops
as firmly as possible, with the underside of the
fabric on the bottom of the inside hoop.
5
Put the work under the needle with the
presser foot holder assembly removed.
6
Pull the lower thread up through the work at
the starting position by turning the balance
wheel, and then make a few holding stitches.
7
Grip the hoop with your thumbs and
forefingers while pressing the fabric with your
middle and third fingers and supporting the
outside of the hoop with your little fingers.
Stitch NamePattern
Stitch Length
[mm (inch)]
Stitch Width
[mm (inch)]
Zigzag Stitch
-2
(1/64-1/16)
Any
●Be careful that the needle does not hit a
pin during sewing, as the needle can
break. You may also be injured.
CAUTION
Stitch
Name
Pattern
Stitch
Length
[mm (inch)]
Stitch
Width
[mm (inch)]
Foot
Zigzag
Stitch
AnyAnyNone
XL5000us.book Page 36 Tuesday, October 28, 2003 11:01 AM
37
Note
●After sewing without feeding, prepare for
the next seam by returning the drop feed
lever to the down position so that the feed
dogs are raised.
■Monogram
1
Sew by moving the hoop slowly along the
lettering at a constant speed.
2
Secure with a few straight stitches at the end
of the last letter.
■Embroidering
1
Stitch the outline of the design by moving the
embroidery hoop.
2
Fill in the design alternating from the outline
of the design to the inside and from the inside
to the edge of the outline until the design is
completely filled in. Keep the stitching close
together.
Memo
●You can make long stitches by moving the
embroidery hoop rapidly and short stitches
by moving it slowly.
3
Secure with a few straight stitches at the end
of the design.
●
Keep fingers away from moving parts,
especially needles.
CAUTION
●Keep fingers away from moving parts,
especially needles.
CAUTION
XL5000us.book Page 37 Tuesday, October 28, 2003 11:01 AM
KNOWING YOUR SEWING MACHINE —————————————————————————————————————————————
—
38
MAINTENANCE
Changing the Light Bulb
1
Remove the power supply plug from the
outlet.
2
Loosen the face plate screw.
3
Remove the face plate from the machine as
shown below.
Note
●Use only a bulb of the same type and rated
15 W.
4
Replace the sewing light bulb.
1Bulb
2Loosen
3Tighten
5
Reattach the face plate and fasten the screw.
Oiling
1
Remove the power supply plug from the
outlet.
2
Remove the needle plate and the face plate,
and then put 2 to 3 drops of oil at each point
indicated by the arrows.
3
Operate the machine at a fast speed for a
short time without thread installed.
4
Be sure to wipe any excess oil off the
machine.
1
3
2
XL5000us.book Page 38 Tuesday, October 28, 2003 11:01 AM
39
Cleaning
■Removing the Shuttle Hook
1
Raise the needle to its highest position and
unplug the machine.
2
Remove the extension table and open the
shuttle cover on the front of the free arm.
3
Take the bobbin case out of the shuttle race
by opening and pulling the latch.
4
Slide the latch levers away from the retaining
ring to remove it.
1Retaining ring
2Latch lever
5
Remove the hook by grasping its center post
and pulling it out.
1Retaining ring
2Latch lever
3Hook
4Driver
5Race body
Note
●
When the needle is lowered, the shuttle hook
cannot be removed.
■Cleaning the Shuttle Race
1
Remove any accumulated lint and thread from
the retaining ring, hook, driver and race body
with a brush.
2
Wipe lint from the shuttle race using a cloth
dampened with machine oil.
3
Clean the shuttle hook as described in step 2.
4
When reinstalling the removed parts, hold the
retaining ring in place with the notch at the
top while pushing the latch levers back to
their original positions.
■Cleaning the Feed Dogs
1
Remove the needle plate by removing the
screws with a coin.
2
Clean the upper part of the feed dogs and
shuttle race body with a brush.
1
2
5
1
2
4
3
1
XL5000us.book Page 39 Tuesday, October 28, 2003 11:01 AM
KNOWING YOUR SEWING MACHINE —————————————————————————————————————————————
—
40
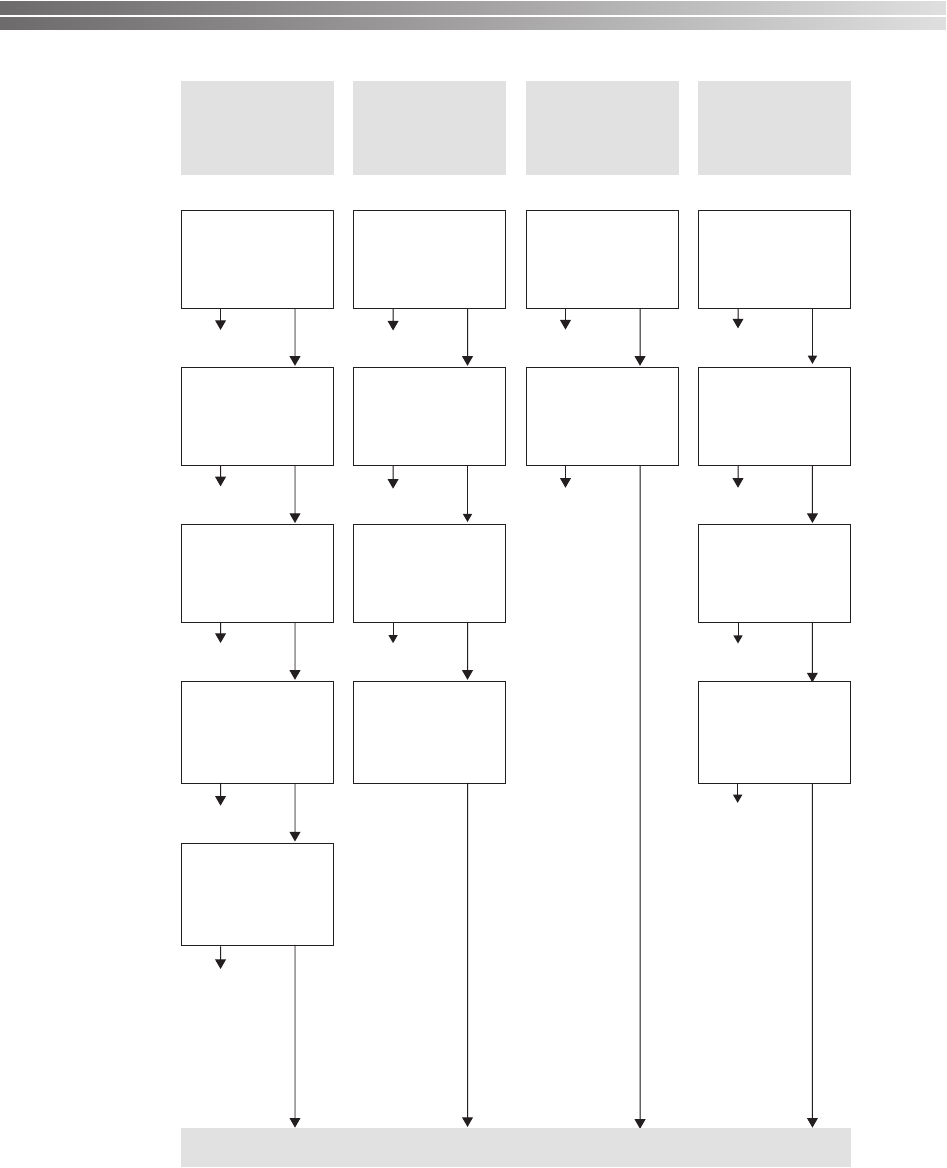
Performance Checklist
Whenever sewing difficulties are encountered, first review the manual section about the operation that you are
performing, to make sure you are using the machine correctly. If the problem persists, the following checklist
may help improve the operation.
If you still have difficulties, contact your nearest service center.
The combination
of needle size/
thread size/fabric
is incorrect.
NoNoNoNoNo
No
No
No
No
No
No
No
No
No
No
No
No
No
No
No
FABRIC
PUCKERS
SKIPPED
STITCHES
LOOP IN SEAM
LOWER THREAD
BREAKS
UPPER THREAD
BREAKS
Lower thread is
tangled.
Needle is incor-
rectly inserted.
Thread tension is
incorrect.
Thread tension is
too tight.
Bobbin is not
threaded properly
in the shuttle
hook.
Upper thread is
tangled.
Inferior needle is
used.
Threading is not
correct.
The combination
of needle size/
thread size/fabric
is incorrect.
Lower thread
tension is too
tight.
Upper thread
tension is too
tight.
Wrong needle is
used.
Spool of thread is
not correctly
installed.
Lint is clinging to
the bottom of the
needle plate.
Lower threading is
not correct.
Needle is bent or
not sharp.
Threading is not
correct.
The combination
of needle size/
thread size/fabric
is incorrect.
CONTACT YOUR LOCAL SERVICE CENTER
Upper threading
is not correct.
Page 18Page 16Page 8Page 22Page 22
Page 18Page 16Page 8Page 16-18
Page 22Page 22Page 24Page 8
Page 18Page 16Page 39Page 24
Page 8Page 16-18
Page 24
XL5000us.book Page 40 Tuesday, October 28, 2003 11:01 AM
41
NoNoNoNo
No
No
No
NoNo
NoNo
No
No
FABRIC DOES
NOT FEED
PROPERLY
MACHINE IS
NOISY OR SLOW
No
NEEDLE
BREAKS
MACHINE DOES
NOT START
Power supply
plug is removed
from outlet.
Lint is clinging to
the bottom of the
needle plate.
Stitch length
dial is set at no
feeding.
Needle is not
correctly inserted.
The combination
of needle size/
thread size/fabric
is incorrect.
Inferior needle is
used.
Main power
switch is turned
off.
Insufficient oiling.
The combination
of needle size/
thread size/fabric
is incorrect.
Foot controller is
not used correctly.
Inferior needle is
used.
Fabric is pulled
excessively. Let the
feed dogs move the
fabric. Do not pull
the fabric.
Thread is tangled.
CONTACT YOUR LOCAL SERVICE CENTER
No
Feed dogs are
lowered.
The bobbin
winding shaft is
slid toward the
bobbin presser.
Page 13Page 8Page 39Page 6
Page 24Page 8Page 38Page 7
Page 8Page 24Page 7
Page 18Page 15
Page 14
XL5000us.book Page 41 Tuesday, October 28, 2003 11:01 AM
KNOWING YOUR SEWING MACHINE —————————————————————————————————————————————
—
42
Repacking the Machine
Keep the carton and packing materials for future use. You may have to take or send the machine to be repaired
or wish to move the machine. If you do not pack it properly, or do not use the right packing material, the
machine could be damaged.
Please follow the diagram below for repacking.
●This packing material is designed to prevent damage. Save this packing material if you need to
move the machine or take or send this machine to be repaired.
IMPORTANT
XL5000us.book Page 42 Tuesday, October 28, 2003 11:01 AM
Gebruikershandleiding.com neemt misbruik van zijn services uitermate serieus. U kunt hieronder aangeven waarom deze vraag ongepast is. Wij controleren de vraag en zonodig wordt deze verwijderd.
Product:
Spelregels forum
Om tot zinvolle vragen te komen hanteren wij de volgende spelregels:
lees eerst de handleiding door;
controleer of uw vraag al eerder door iemand anders is gesteld;
probeer uw vraag zo duidelijk mogelijk te stellen;
heeft u een probleem en al geprobeerd om dit op te lossen, vermeld dit erbij aub;
heeft u een oplossing gekregen van een bezoeker dan horen wij dat graag in dit forum;
wilt u een reactie geven op een vraag of antwoord, gebruik dan niet dit formulier maar klik op de knop 'reageer op deze vraag';
uw vraag wordt direct op de website gezet; vermijd daarom persoonlijke gegevens in te vullen;
Belangrijk! Als er een antwoord wordt gegeven op uw vraag, dan is het voor de gever van het antwoord nuttig om te weten als u er wel (of niet) mee geholpen bent! Wij vragen u dus ook te reageren op een antwoord.
Belangrijk! Antwoorden worden ook per e-mail naar abonnees gestuurd. Laat uw emailadres achter op deze site, zodat u op de hoogte blijft. U krijgt dan ook andere vragen en antwoorden te zien.
Abonneren
Abonneer u voor het ontvangen van emails voor uw Brother RS-35 bij:
nieuwe vragen en antwoorden
nieuwe handleidingen
U ontvangt een email met instructies om u voor één of beide opties in te schrijven.
Ontvang uw handleiding per email
Vul uw emailadres in en ontvang de handleiding van Brother RS-35 in de taal/talen: Engels als bijlage per email.
De handleiding is 2,03 mb groot.
U ontvangt de handleiding per email binnen enkele minuten. Als u geen email heeft ontvangen, dan heeft u waarschijnlijk een verkeerd emailadres ingevuld of is uw mailbox te vol. Daarnaast kan het zijn dat uw internetprovider een maximum heeft aan de grootte per email. Omdat hier een handleiding wordt meegestuurd, kan het voorkomen dat de email groter is dan toegestaan bij uw provider.
Uw handleiding is per email verstuurd. Controleer uw email
Als u niet binnen een kwartier uw email met handleiding ontvangen heeft, kan het zijn dat u een verkeerd emailadres heeft ingevuld of dat uw emailprovider een maximum grootte per email heeft ingesteld die kleiner is dan de grootte van de handleiding.
Er is een email naar u verstuurd om uw inschrijving definitief te maken.
Controleer uw email en volg de aanwijzingen op om uw inschrijving definitief te maken
U heeft geen emailadres opgegeven
Als u de handleiding per email wilt ontvangen, vul dan een geldig emailadres in.
Uw vraag is op deze pagina toegevoegd
Wilt u een email ontvangen bij een antwoord en/of nieuwe vragen? Vul dan hier uw emailadres in.