NOTE species the operating environment, conditions for installation,
or special conditions of use.
WARNING
WARNING indicates a potentially hazardous situation which, if not
avoided, could result in death or serious injuries.
Unpack the machine and check the components
1. Remove the protective tape and film covering the machine.
2. Make sure you have all components.
• The components included in the box may differ depending on your country.
WARNING
Plastic bags are used in the packing of your machine. To avoid the danger of
suffocation, keep these plastic bags away from babies and children. Plastic bags
are not toys.
NOTE
• Most of the illustrations in this Quick Setup Guide show the MFC-J880DW.
• Save all packing materials and the box in case for any reason you must ship your
machine.
• You must purchase the correct interface cable for the interface you want to
use (for either a USB or network connection).
USB cable
We recommend using a USB 2.0 cable (Type A/B) that is no more than 2 metres
long.
Ethernet (Network) cable
Use a straight-through Category5 (or greater) twisted-pair cable for 10BASE-T or
100BASE-TX Fast Ethernet Network.
1
Load plain A4 paper
Pull the paper tray completely
out of the machine.
Open the output paper tray
cover a.
Connect the telephone line cord.
Use the socket marked LINE.
Fan the paper well and load it in the tray,
and then adjust the paper guides.
Connect the power cord. The machine
will power on automatically.
NOTE
If your machine is sharing one telephone line with an
external telephone, connect it as shown below.
a. Extension telephone
b. External telephone
Quick Setup Guide
MFC-J680DW / MFC-J880DW
Read the Product Safety Guide first, then read this Quick Setup Guide for the
correct installation procedure.
3
Connect the telephone line cord
If you are not using your machine as a fax, go to
4
.
LEW535004-00
UK
Version 0
Close the output paper tray cover, and
then slowly push the tray completely
into the machine.
NOTE
Pull out the paper support a, and unfold
the paper support ap b so that the
printed pages do not fall.
Follow the Touchscreen instructions
to install the ink cartridges.
The machine will prepare the ink
tube system for printing.
When the machine has finished the initial cleaning process, follow the
Touchscreen instructions to configure the machine settings.
• Check print quality
• Set date and time
• View operation tips
• Set New Function Notice
• Print the installation sheet
Open the ink cartridge cover, and
then remove the orange protective
part from the machine.
4
Install introductory ink cartridges
5
Machine settings
2
Connect the power cord
NOTE
You can adjust the control panel angle
to read the Touchscreen more easily.
Introductory Ink Cartridges [x4]
• Black
• Yellow
• Cyan
• Magenta
(Approx. 80% yield of the
replacement cartridge (Standard)
uu
Basic User’s Guide: Supply
Specications)
Quick Setup Guide
Basic User’s Guide
Product Safety Guide
Power Cord
(for UK)(for others)
CD-ROMTelephone Line Cord
1
(Example for UK)
(Example for UK)
1
2
Watch our FAQ Videos for help
with setting up your Brother
machine.
solutions.brother.com/videos
Visit the Brother support website
http://support.brother.com
1
2
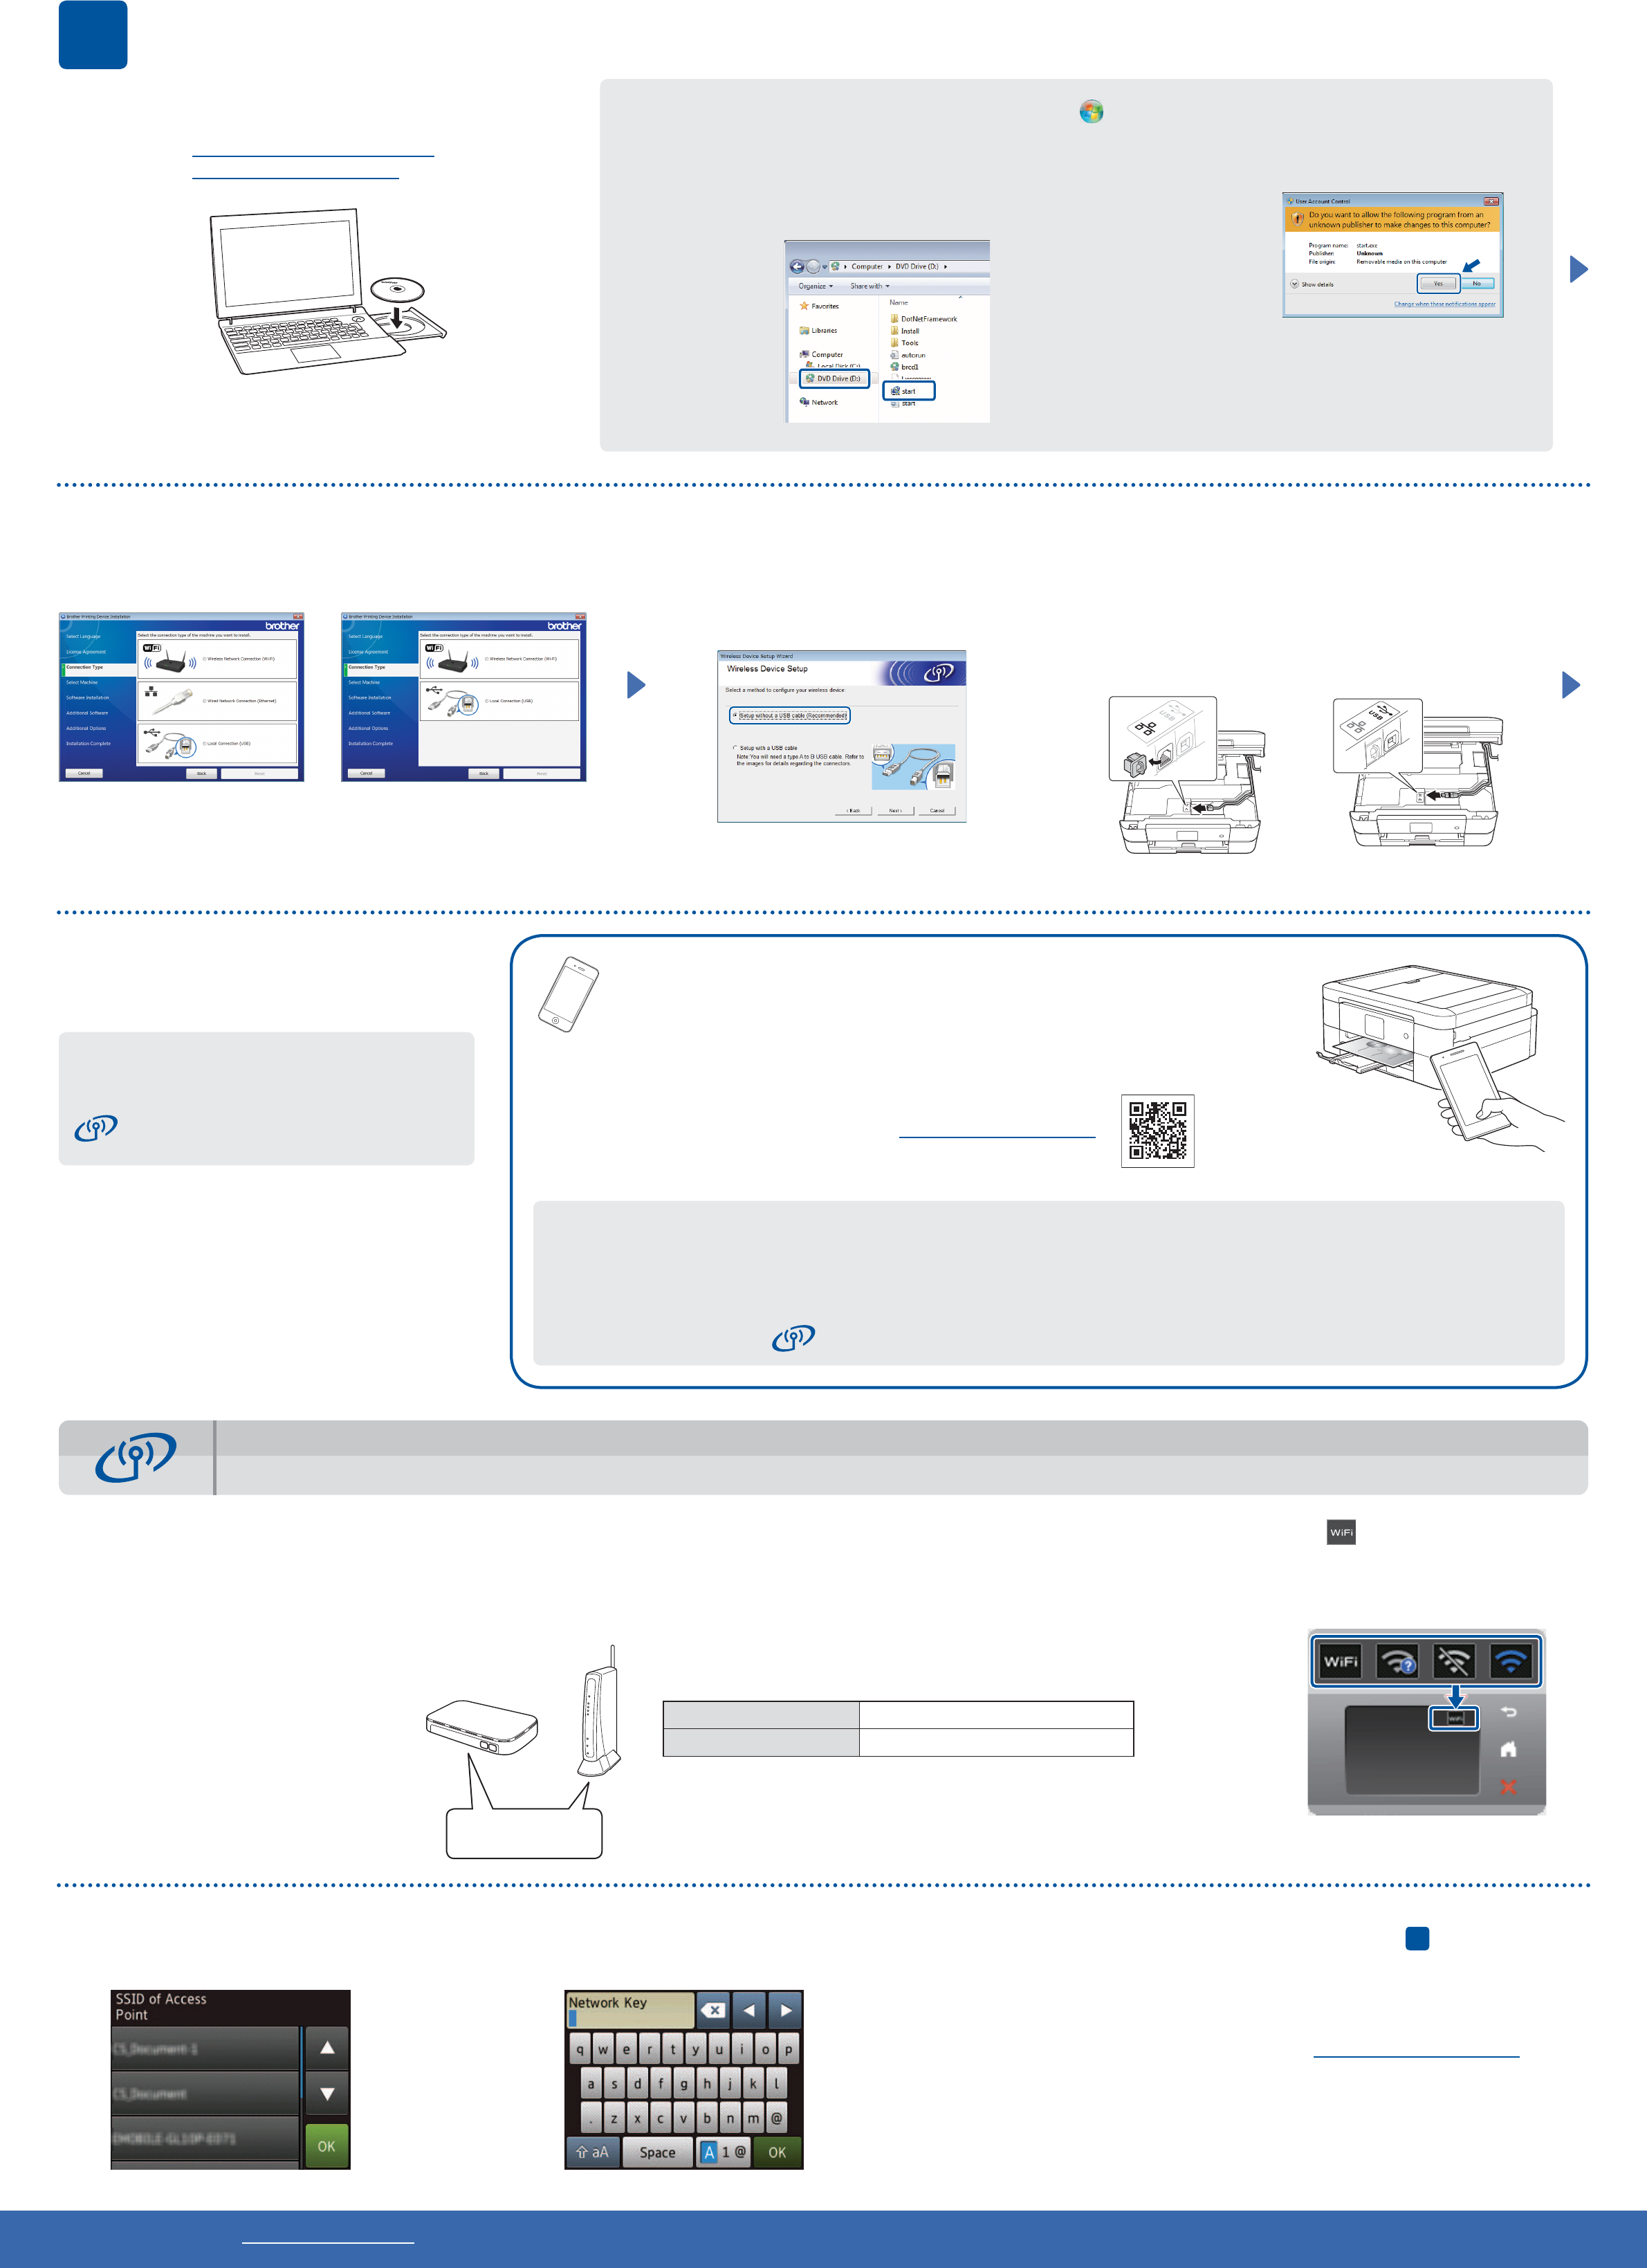
Using the Wireless Setup Wizard
Use Brother’s Wireless Setup Wizard to manually connect your Brother machine to your wireless network. Your computer, smartphone, or mobile device must be connected to the same wireless network if you
Waarschijnlijk iets misgegaan met driver installatie andere computer. Printer is niets meer mee te beginnen, home lampje blijft constant branden. Spanning eraf 30 sec. wachten met aan/uit knop geen resultaat. Iemand een werkende oplossing?
Gesteld op 7-5-2021 om 16:07
Gebruikershandleiding.com neemt misbruik van zijn services uitermate serieus. U kunt hieronder aangeven waarom deze vraag ongepast is. Wij controleren de vraag en zonodig wordt deze verwijderd.
Product:
Spelregels forum
Om tot zinvolle vragen te komen hanteren wij de volgende spelregels:
lees eerst de handleiding door;
controleer of uw vraag al eerder door iemand anders is gesteld;
probeer uw vraag zo duidelijk mogelijk te stellen;
heeft u een probleem en al geprobeerd om dit op te lossen, vermeld dit erbij aub;
heeft u een oplossing gekregen van een bezoeker dan horen wij dat graag in dit forum;
wilt u een reactie geven op een vraag of antwoord, gebruik dan niet dit formulier maar klik op de knop 'reageer op deze vraag';
uw vraag wordt direct op de website gezet; vermijd daarom persoonlijke gegevens in te vullen;
Belangrijk! Als er een antwoord wordt gegeven op uw vraag, dan is het voor de gever van het antwoord nuttig om te weten als u er wel (of niet) mee geholpen bent! Wij vragen u dus ook te reageren op een antwoord.
Belangrijk! Antwoorden worden ook per e-mail naar abonnees gestuurd. Laat uw emailadres achter op deze site, zodat u op de hoogte blijft. U krijgt dan ook andere vragen en antwoorden te zien.
Abonneren
Abonneer u voor het ontvangen van emails voor uw Brother MFC-J880DW bij:
nieuwe vragen en antwoorden
nieuwe handleidingen
U ontvangt een email met instructies om u voor één of beide opties in te schrijven.
Ontvang uw handleiding per email
Vul uw emailadres in en ontvang de handleiding van Brother MFC-J880DW in de taal/talen: Engels als bijlage per email.
De handleiding is 2,08 mb groot.
U ontvangt de handleiding per email binnen enkele minuten. Als u geen email heeft ontvangen, dan heeft u waarschijnlijk een verkeerd emailadres ingevuld of is uw mailbox te vol. Daarnaast kan het zijn dat uw internetprovider een maximum heeft aan de grootte per email. Omdat hier een handleiding wordt meegestuurd, kan het voorkomen dat de email groter is dan toegestaan bij uw provider.
Uw handleiding is per email verstuurd. Controleer uw email
Als u niet binnen een kwartier uw email met handleiding ontvangen heeft, kan het zijn dat u een verkeerd emailadres heeft ingevuld of dat uw emailprovider een maximum grootte per email heeft ingesteld die kleiner is dan de grootte van de handleiding.
Er is een email naar u verstuurd om uw inschrijving definitief te maken.
Controleer uw email en volg de aanwijzingen op om uw inschrijving definitief te maken
U heeft geen emailadres opgegeven
Als u de handleiding per email wilt ontvangen, vul dan een geldig emailadres in.
Uw vraag is op deze pagina toegevoegd
Wilt u een email ontvangen bij een antwoord en/of nieuwe vragen? Vul dan hier uw emailadres in.