558968
6
Verklein
Vergroot
Pagina terug
1/203
Pagina verder
Basic User’s Guide
MFC-J4510DW
MFC-J4710DW
Version A
UK/IRE/GEN
If you need to call Customer Service
Please complete the following information for future
reference:
Model Number: MFC-J4510DW and MFC-J4710DW
(Circle your model number)
Serial Number:
1
Date of Purchase:
Place of Purchase:
1
The serial number is on the back of the unit. Retain
this User's Guide with your sales receipt as a
permanent record of your purchase, in the event of
theft, fire or warranty service.
Register your product on-line at
http://www.brother.com/registration/
© 2012 Brother Industries, Ltd. All rights reserved.
i
User's Guides and where do I find them?
1
This may differ depending on your country.
2
Visit us at http://solutions.brother.com/.
Which Guide? What's in it? Where is it?
Product Safety Guide Read this Guide first. Please read the Safety
Instructions before you set up your machine. See
this Guide for trademarks and legal limitations.
Printed / In the box
Quick Setup Guide Follow the instructions for setting up your machine
and installing the drivers and software for the
operating system and connection type you are
using.
Printed / In the box
Basic User’s Guide Learn the basic Fax, Copy, Scan and PhotoCapture
Center™ operations and how to replace
consumables. See troubleshooting tips.
Printed / In the box
1
Advanced User’s Guide Learn more advanced operations: Fax, Copy,
security features, printing reports and performing
routine maintenance.
PDF file / CD-ROM
Software User’s Guide Follow these instructions for Printing, Scanning,
Network Scanning, PhotoCapture Center™,
Remote Setup, PC-Fax, Web Services (Scan), and
using the Brother ControlCenter utility.
PDF file / CD-ROM
NetworkUsersGuide This Guide provides useful information about wired
and wireless network settings and security settings
using the Brother machine. You can also find
supported protocol information for your machine and
detailed troubleshooting tips.
PDF file / CD-ROM
Web Connect Guide This Guide provides useful information about
accessing Internet services from the Brother
machine, as well as downloading images, printing
data and uploading files directly to Internet services.
PDF file / Brother
Solutions Center
2
AirPrint Guide This Guide provides information for using AirPrint to
print from Mac OS X v10.7.x and your iPhone, iPod
touch, iPad, or other iOS device to your Brother
machine without installing a printer driver.
PDF file / Brother
Solutions Center
2
Google Cloud Print Guide
This Guide provides details on how to use Google
Cloud Print™ services for printing over the Internet.
PDF file / Brother
Solutions Center
2
Wi-Fi Direct™ Guide This Guide provides details on how to configure and
use your Brother machine for wireless printing
directly from a mobile device supporting the Wi-Fi
Direct™ standard.
PDF file / Brother
Solutions Center
2
Mobile Print/Scan Guide
for Brother iPrint&Scan
This Guide provides useful information about
printing from your mobile device and scanning from
your Brother machine to your mobile device when
connected to a Wi-Fi network.
PDF file / Brother
Solutions Center
2
ii
Table of Contents
(Basic User’s Guide)
1 General information 1
Using the documentation .......................................................................................1
Symbols and conventions used in the documentation .................................... 1
Accessing the Advanced User’s Guide, Software User’s Guide and
Network User’s Guide......................................................................................... 1
Viewing User’s Guides ....................................................................................1
Accessing Brother Support (Windows
®
)................................................................ 3
Accessing Brother Support (Macintosh) ................................................................ 3
Control panel overview ..........................................................................................4
3.7" (93.4 mm) Touchscreen LCD ...................................................................6
Setting the Ready screen ..............................................................................10
Basic Operations ...........................................................................................10
Shortcut Settings .................................................................................................11
Adding Copy Shortcuts ..................................................................................11
Adding Fax Shortcuts ....................................................................................12
Adding Scan Shortcuts ..................................................................................13
Adding Web Connect Shortcuts ....................................................................14
Changing Shortcuts .......................................................................................15
Editing Shortcut Names.................................................................................16
Deleting Shortcuts .........................................................................................16
Recalling Shortcuts........................................................................................ 16
Volume Settings...................................................................................................16
Ring Volume ..................................................................................................16
Beeper Volume..............................................................................................17
Speaker Volume ............................................................................................17
Touchscreen LCD ................................................................................................18
Setting the backlight brightness..................................................................... 18
2 Loading paper 19
Loading paper and other print media...................................................................19
Loading paper in paper tray #1......................................................................19
Loading smaller paper (Photo, Photo L and envelopes) ...............................22
Loading paper in paper tray #2 (MFC-J4710DW) .........................................26
Loading paper in the manual feed slot ..........................................................33
Unprintable area ............................................................................................37
Paper settings......................................................................................................38
Paper Size and Type (MFC-J4510DW).........................................................38
Paper Size and Type (MFC-J4710DW).........................................................39
Tray use in Copy mode (MFC-J4710DW) .....................................................39
Tray use in Fax mode (MFC-J4710DW)........................................................40
Acceptable paper and other print media..............................................................40
Recommended print media ...........................................................................41
Handling and using print media .....................................................................41
Choosing the right print media.......................................................................42
iii
3 Loading documents 45
How to load documents .......................................................................................45
Using the ADF ...............................................................................................45
Using the scanner glass ................................................................................ 46
Unscannable area .........................................................................................47
4 Sending a fax 48
How to send a fax ................................................................................................ 48
Stop faxing..................................................................................................... 50
Setting scanner glass size for faxing .............................................................50
Colour fax transmission .................................................................................50
Cancelling a fax in progress ..........................................................................50
How to preview an outgoing fax .................................................................... 51
Transmission Verification Report...................................................................52
5 Receiving a fax 53
Receive Modes....................................................................................................53
Choose the Receive Mode .................................................................................. 53
Using Receive Modes..........................................................................................55
Fax Only ........................................................................................................55
Fax/Tel...........................................................................................................55
Manual...........................................................................................................55
External TAD .................................................................................................55
Receive Mode settings ........................................................................................56
Ring Delay ..................................................................................................... 56
F/T Ring Time (Fax/Tel mode only)...............................................................56
Fax Detect ..................................................................................................... 57
Fax Preview (Monochrome only)......................................................................... 58
How to preview a received fax....................................................................... 58
Turning off Fax Preview................................................................................. 60
6 Telephone and external devices 61
Voice operations..................................................................................................61
Fax/Tel mode.................................................................................................61
Caller ID (U.K. and Ireland only).................................................................... 61
Telephone services..............................................................................................62
Setting the Telephone Line Type...................................................................62
Connecting an external TAD (telephone answering device)................................63
Connections settings ..................................................................................... 64
Recording an outgoing message (OGM) on an external TAD.......................64
Multi-line connections (PBX) ......................................................................... 64
External and extension telephones......................................................................65
Connecting an external or extension telephone ............................................65
Operation from external and extension telephones.......................................65
Using extension telephones (U.K. only) ........................................................66
Using remote codes....................................................................................... 67
iv
7 Dialling and storing numbers 68
How to dial ...........................................................................................................68
Manual dialling...............................................................................................68
Dialling from the Address Book ..................................................................... 68
Fax Redial ..................................................................................................... 69
Additional Dialling Operations..............................................................................69
Outgoing Call history .....................................................................................69
Caller ID history .............................................................................................70
Storing numbers ..................................................................................................70
Storing a pause .............................................................................................70
Storing Address Book numbers.....................................................................70
Changing Address Book names or numbers.................................................71
8 Making copies 73
How to copy .........................................................................................................73
Stop copying..................................................................................................73
Copy preset settings ............................................................................................74
Copy options........................................................................................................75
Paper Type ....................................................................................................75
Paper Size .....................................................................................................76
Tray Select (MFC-J4710DW) ........................................................................76
9 Printing photos from a memory card or
USB Flash memory drive 77
PhotoCapture Center™ operations (PHOTO mode) ...........................................77
Using a memory card or USB Flash memory drive .......................................77
Getting started .....................................................................................................78
Print Images.........................................................................................................80
View Photos...................................................................................................80
PhotoCapture Center™ print settings..................................................................81
How to scan to a memory card or USB Flash memory drive...............................81
10 How to print from a computer 85
Printing a document.............................................................................................85
11 How to scan to a computer 86
Before scanning...................................................................................................86
Scanning a document as a PDF file using ControlCenter4 (Windows
®
) .............87
How to change the machine’s SCAN mode settings for PDF scanning ..............90
How to scan a document as a PDF file using the Touchscreen ....................91
v
A Routine maintenance 93
Replacing the ink cartridges ................................................................................93
Cleaning and checking the machine....................................................................96
Cleaning the scanner glass ...........................................................................96
Cleaning the print head .................................................................................97
Checking the print quality .............................................................................. 98
Checking the print alignment ......................................................................... 99
B Troubleshooting 101
Identifying your problem ....................................................................................101
Error and maintenance messages.....................................................................103
Error animations display .............................................................................. 112
Transferring your faxes or Fax Journal report .............................................112
Document jam ............................................................................................ 113
Printer jam or paper jam .............................................................................. 115
If you are having difficulty with your machine .................................................... 122
Dial Tone detection......................................................................................132
Telephone line interference / VoIP ..............................................................132
Machine Information .......................................................................................... 133
Checking the serial number......................................................................... 133
Reset functions............................................................................................ 133
How to reset the machine............................................................................ 133
C Settings and features tables 134
Using the Settings Tables.................................................................................. 134
Settings tables ................................................................................................... 135
Features tables ..................................................................................................151
Entering Text ..................................................................................................... 175
Inserting spaces ......................................................................................... 175
Making corrections ......................................................................................175
D Specifications 176
General..............................................................................................................176
Print media......................................................................................................... 179
Fax..................................................................................................................... 181
Copy ..................................................................................................................182
PhotoCapture Center™ ..................................................................................... 183
PictBridge .......................................................................................................... 184
Scanner .............................................................................................................185
Printer ................................................................................................................186
Interfaces ...........................................................................................................187
Network.............................................................................................................. 188
Computer requirements .....................................................................................189
Consumable items .............................................................................................190
EIndex 191
vi
Table of Contents
(Advanced User’s Guide)
The Advanced User’s Guide explains the following features and operations.
You can view the Advanced User’s Guide on the CD-ROM.
1 General setup
IMPORTANT NOTE
Memory Storage
Automatic Daylight Saving Time
Sleep Mode
Touchscreen LCD
2 Security features
Secure Function Lock 2.0
Restricting dialling
3 Sending a fax
Additional sending options
Additional sending operations
Polling overview
4 Receiving a fax
Memory Receive (Monochrome only)
Remote Retrieval
Additional receiving operations
Polling overview
5 Dialling and storing numbers
Voice operations
Additional dialling operations
Additional ways to store numbers
6 Printing reports
Fax reports
Reports
7 Making copies
Copy options
A3 Copy Shortcuts
8 Printing photos from a
memory card or USB Flash
memory drive
PhotoCapture Center™ operations
Print Images
PhotoCapture Center™ print settings
Scan to a memory card or USB Flash
memory drive
9 Printing photos from a
camera
Printing photos directly from a
PictBridge camera
Printing photos directly from a digital
camera (without PictBridge)
A Routine maintenance
Cleaning and checking the machine
Packing and shipping the machine
B Glossary
CIndex
1
1
1
Using the
documentation
1
Thank you for buying a Brother machine!
Reading the documentation will help you
make the most of your machine.
Symbols and conventions
used in the documentation 1
The following symbols and conventions are
used throughout the documentation.
Accessing the
Advanced User’s
Guide, Software User’s
Guide and Network
User’s Guide
1
This Basic User’s Guide does not contain all
the information about the machine, such as
how to use the advanced Fax, Copy,
PhotoCapture Center, Printer, Scanner,
PC-Fax, and Network features. When you are
ready to learn detailed information about
these operations, you can read the
Advanced User’s Guide,
Software User’s Guide and
Network User’s Guide that are on the
CD-ROM.
Viewing User’s Guides 1
(Windows
®
) 1
To view the documentation, from ,
All Programs, select Brother, MFC-XXXX
(where XXXX is your model name) from the
programs list, and then choose
User’s Guides.
If you have not installed the software, you can
find the documentation on the CD-ROM by
following the instructions below:
a Turn on your PC. Insert the Brother
CD-ROM into your CD-ROM drive.
General information 1
Bold Bold typeface identifies the
dial pad numbers of the
Touchpanel and buttons on
your computer screen.
Italics Italicized typeface
emphasizes an important
point or refers you to a related
topic.
Courier
New
Text in the Courier New font
identifies messages on the
Touchscreen of the machine.
WARNING
WARNING indicates a potentially
hazardous situation which, if not avoided,
could result in death or serious injuries.
CAUTION
CAUTION indicates a potentially hazardous
situation which, if not avoided, may result in
minor or moderate injuries.
IMPORTANT
IMPORTANT indicates a potentially
hazardous situation which, if not avoided,
may result in damage to property or loss of
product functionality.
NOTE
Notes tell you how you should respond to a
situation that may arise or give tips about
how the operation works with other
features.
Electrical Hazard icons alert you to
possible electrical shocks.
Chapter 1
2
NOTE
If the Brother screen does not appear
automatically, go to Computer or
My Computer then double-click the
CD-ROM icon and double-click start.exe.
b If the model name screen appears, click
your model name.
c If the language screen appears, click
your language. The CD-ROM
Top Menu will appear.
d Click User’s Guides.
e Click PDF documents. If the country
screen appears, choose your country.
After the list of User’s Guides appears,
choose the guide you want to read.
(Macintosh) 1
a Turn on your Macintosh. Insert the
Brother CD-ROM into your CD-ROM
drive. The following window will appear.
b Double-click the User’s Guides icon.
c Choose your language.
d Click User’s Guides. If the country
screen appears, choose your country.
e After the list of User’s Guides appears,
choose the Guide you want to read.
How to find Scanning instructions 1
There are several ways you can scan
documents. You can find the instructions as
follows:
Software User’s Guide
Scanning
ControlCenter
Network Scanning
Nuance™ PaperPort™ 12SE
How-to-Guides
(Windows
®
)
The complete Nuance™ PaperPort
12SE How-to-Guides can be viewed from
the Help section in the PaperPort™ 12SE
application.
Presto! PageManager User’s Guide
(Macintosh)
NOTE
Presto! PageManager must be
downloaded and installed before use. For
more information, see Accessing Brother
Support (Macintosh) on page 3.
The complete Presto! PageManager User’s
Guide can be viewed from the Help section
in the Presto! PageManager application.
How to find Network setup instructions
1
Your machine can be connected to a wireless
or wired network.
Basic setup instructions
(See Quick Setup Guide.)
The wireless access point or router
supports Wi-Fi Protected Setup™ or
AOSS™
(See Quick Setup Guide.)
More information about network setup
(See Network User’s Guide.)
General information
3
1
Accessing Brother
Support (Windows
®
) 1
You can find all the contacts you will need,
such as Web support (Brother Solutions
Center) on the CD-ROM.
Click Brother Support on the Top Menu.
The following screen will appear:
To access our website
(http://www.brother.com/
), click
Brother Home Page.
For the latest news and product support
information
(http://solutions.brother.com/
), click
Brother Solutions Center.
To visit our website for original Brother
Supplies
(http://www.brother.com/original/
),
click Supplies Information.
To access the Brother CreativeCenter
(http://www.brother.com/creativecenter/
)
for FREE photo projects and printable
downloads, click
Brother CreativeCenter.
To return to the top menu, click Back or if
you have finished, click Exit.
Accessing Brother
Support (Macintosh)
1
You can find all the contacts you will need,
such as Web support (Brother Solutions
Center) on the CD-ROM.
Double-click the Brother Support icon.
The following screen will appear:
To download and install Presto!
PageManager, click
Presto! PageManager.
To access the Brother Web Connect
page, click Brother Web Connect.
To register your machine from the Brother
Product Registration Page
(http://www.brother.com/registration/
),
click On-Line Registration.
For the latest news and product support
information
(http://solutions.brother.com/
), click
Brother Solutions Center.
To visit our website for original Brother
Supplies
(http://www.brother.com/original/
), click
Supplies Information.
Chapter 1
4
Control panel overview 1
The MFC-J4510DW and MFC-J4710DW have the same 3.7" (93.4 mm) Touchscreen LCD
and Touchpanel.
NOTE
Most of the illustrations in this User’s Guide show the MFC-J4510DW.
1 3.7" (93.4 mm) Touchscreen LCD (Liquid
Crystal Display)
This is a Touchscreen LCD. You can access
the menus and options by pressing them as
they are displayed on this screen.
You can adjust the angle of the Touchscreen
LCD and Touchpanel by lifting it. To lower this
control panel, push the release button that is
located behind the mark, as shown in the
illustration.
1
General information
5
1
2 Touchpanel:
The LEDs on the Touchpanel only light up
when they are available for use.
Back
Press to go back to the previous menu
level.
Home
Lets you return to the Home screen. The
default shows the date and time, but you
can change the default setting.
Cancel
Press to cancel an operation when lit.
Dial Pad
Press the numbers on the Touchpanel to
dial telephone or fax numbers and to enter
the number of copies.
3
The WiFi light is on when the network interface
is WLAN.
4 Power On/Off
Press to turn the machine on.
Press and hold down to turn the machine
off. The Touchscreen LCD will show
Shutting Down and will stay on for a few
seconds before turning off.
If you have connected an external telephone or
TAD, it is always available.
If you turn the machine off using , it will still
periodically clean the print head to maintain
print quality. To prolong the life of the print
head, provide better ink efficiency and
maintain print quality, you should keep your
machine connected to the power at all times.
3
4
2
Chapter 1
6
3.7" (93.4 mm) Touchscreen LCD 1
You can select three types of screens for the Home screen. When the Home screen is displayed,
you can change the displayed screen by swiping left or right, or pressing d or c.
The following screens show the machine status when the machine is idle.
Home screen 1
The Home screen shows the date and time, as well as
provide access to Fax, Copy and Scan, WiFi setup, Ink
levels and Setup screen.
When the Home screen is displayed the machine is in
Ready mode. If Secure Function Lock
1
has been
turned on an icon is prominently displayed.
1
See Advanced User’s Guide: Secure Function Lock 2.0.
More screen 1
The More screen provides access to additional
features, such as Photo, Web and A3 Copy Shortcuts.
Shortcut screens 1
You can save certain settings as a Shortcut so you can
quickly send a fax, copy, scan and use web connect
services. (For details, see Shortcut Settings
on page 11.)
21
5
3 4
21
6 7 8
3
4
21
9
3
4
General information
7
1
NOTE
Swiping is a type of user operation on the
Touchscreen LCD that is performed by
brushing your finger across the screen to
display the next page or item.
1 Modes:
Fax
Lets you access Fax mode.
Copy
Lets you access Copy mode.
Scan
Lets you access Scan mode.
2 Wireless Status
A four-level indicator on the Ready mode
screen shows the current wireless signal
strength if you are using a wireless
connection.
If you see at the top of the screen,
you can easily configure the wireless
settings by pressing it. For more
information, see Quick Setup Guide.
3
Lets you see the available ink volume.
Also, lets you access the Ink menu.
4
Lets you access the main settings.
For details, see Settings screen
on page 9.
5 Date and Time
Displays the date and time that has been
set in the machine.
6 Photo
Lets you access Photo mode.
7 Web
Lets you connect the Brother machine to
an Internet service.
For details, see Web Connect Guide.
8 A3 Copy Shortcuts
You can quickly copy to A3 or Ledger size
paper using this preset menu. For details,
see Advanced User’s Guide: A3 Copy
Shortcuts.
9 Shortcuts
Lets you set up Shortcuts.
You can save certain settings as a
Shortcut so you can quickly send a fax,
copy, scan and use web connect services.
NOTE
Three Shortcut screens are available. You
can set up to six Shortcuts in each
Shortcut screen. A total of 18 Shortcuts
are available.
To display the other Shortcut screens,
swipe left or right, or press d or c.
0Max
Chapter 1
8
10 New Fax
When Fax Preview is set to On, you can
see how many new faxes you have
received and stored in the memory.
NOTE
(MFC-J4710DW)
If you receive a fax containing multiple
paper sizes (for example, a page of A4
data and a page of A3 data), the machine
may create and store a file for each paper
size. The Touchscreen may show that
more than one fax job has been received.
11 Warning icon
The warning icon appears when there
is an error or maintenance message;
press Detail to view it, and then press
to return to Ready mode.
For details, see Error and maintenance
messages on page 103.
NOTE
This product adopts the font of ARPHIC
TECHNOLOGY CO.,LTD.
MascotCapsule UI Framework and
MascotCapsule Tangiblet developed by
HI CORPORATION are used.
MascotCapsule is a registered trademark
of HI CORPORATION in Japan.
10
11
General information
9
1
Settings screen 1
The Touchscreen LCD shows the machine
status when you press .
You can check and access all the machine's
settings from the following screen.
(MFC-J4510DW)
(MFC-J4710DW)
1 Ink
Lets you see the available ink volume.
Also, lets you access the Ink menu.
2 Receive Mode
Lets you see the current Receive Mode.
Fax (Fax Only)
Fax/Tel (Fax/Tel)
External TAD (External TAD)
Manual (Manual)
3 Wi-Fi
Lets you setup a Wi-Fi network
connection.
A four level indicator on the screen shows
the current wireless signal strength if you
are using a wireless connection.
4 Date & Time
Lets you see the date and time.
Also, lets you access the Date & Time
menu.
5 Fax Preview
Lets you check the Fax Preview status.
Also lets you access the Fax Preview
setting.
6 All Settings
Lets you access the full Settings menu.
7 Paper Size (MFC-J4510DW)
Lets you check the current paper size.
Also, lets you access the Paper Size
setting.
8 Paper Type (MFC-J4510DW)
Lets you check the current paper type.
Also, lets you access the Paper Type
setting.
9 Tray #1 (MFC-J4710DW)
Lets you check the current paper size of
Tray #1. Also, lets you access the
Tray #1 setting. You can change the
paper size and paper type.
10 Tray #2 (MFC-J4710DW)
Lets you check the current paper size of
Tray #2. Also, lets you access the
Tray #2 setting. You can change the
paper size.
12 43
8 7 6
5
12 43
9 10 6
5
Chapter 1
10
Setting the Ready screen 1
You can set the Ready screen to either Home,
More, Shortcuts 1, Shortcuts 2 or
Shortcuts 3.
When the machine is idle or you press ,
the machine will go back to the screen that
you have set.
a Press .
b Press All Settings.
c Swipe up or down, or press a or b to
display General Setup.
d Press General Setup.
e Swipe up or down, or press a or b to
display Button Settings.
f Press Button Settings.
g Press Home Button Settings.
h Swipe up or down, or press a or b to
display Home, More, Shortcuts 1,
Shortcuts 2 or Shortcuts 3, and
then press the option you want.
i Press .
The machine will go to the Home screen
that you have set.
Basic Operations 1
To operate the Touchscreen LCD, use your
finger to press directly on the Touchscreen.
To display and access all the screen menus
or options, swipe left, right, up, down, or press
d c or a b to scroll through them.
The following steps show how to change a
setting in the machine. In this example, the
Receive Mode setting is changed from
Fax Only to Fax/Tel.
a Press .
b Press All Settings.
c Swipe up or down, or press a or b to
display Initial Setup.
d Press Initial Setup.
e Swipe up or down, or press a or b to
display Receive Mode.
f Press Receive Mode.
General information
11
1
g Press Fax/Tel.
NOTE
Press if you want to go back to the
previous level.
h Press .
Shortcut Settings 1
You can add the fax, copy, scan and Web
Connect settings you use most frequently by
setting them as your Shortcuts. Later you can
recall and apply these settings quickly and
easily. You can add 18 Shortcuts.
Adding Copy Shortcuts 1
The following settings can be included in a
copy Shortcut:
Quality
Paper Type
Paper Size
Tray Select (MFC-J4710DW)
Enlarge/Reduce
Density
Stack/Sort
Page Layout
2-sided Copy
Advanced Settings
a If the displayed screen is either Home or
More, swipe left or right, or press d or c
to display a Shortcut screen.
b Press where you haven’t added a
Shortcut.
c Press Copy.
d Read the information on the
Touchscreen, and then confirm it by
pressing OK.
e Press a copy preset you want to include
in the copy Shortcut.
f Swipe up or down, or press a or b to
display the available settings, and then
press the setting you want to change.
Chapter 1
12
g Swipe up or down, or press a or b to
display the available options for the
setting, and then press the option you
want to set.
Repeat steps f and g until you have
chosen all the settings for this Shortcut.
h When you have finished changing
settings, press Save as Shortcut.
i Read and confirm the displayed list of
settings you have chosen, and then
press OK.
j Enter a name for the Shortcut using the
keyboard on the Touchscreen. (To help
you enter letters, see Entering Text
on page 175.)
Press OK.
k Press OK to save your Shortcut.
Adding Fax Shortcuts 1
The following settings can be included in a fax
Shortcut:
Address
Fax Resolution
2-sided Fax (MFC-J4710DW)
Contrast
Broadcasting
Preview
Colour Setting
Real Time TX
Overseas Mode
Glass Scan Size
a If the displayed screen is either Home or
More, swipe left or right, or press d or c
to display a Shortcut screen.
b Press where you haven’t added a
Shortcut.
c Press Fax.
d Read the information on the
Touchscreen, and then confirm it by
pressing OK.
e Enter the fax number using the dial pad
on the Touchpanel, or the Address Book
or Call history on the Touchscreen.
When you have finished, go to step f.
NOTE
You can enter up to 20 digits for a fax
number.
If the Shortcut is to be used for
broadcasting, press Options and choose
Broadcasting in step g before entering
the fax number in step e.
You can enter up to 20 fax numbers if the
Shortcut is for broadcasting. The fax
numbers can be entered in any
combination of Group numbers from the
Address Book and individual fax numbers
from the Address Book or entered
manually. (See Advanced Users Guide:
Broadcasting (Monochrome only).)
When you enter a fax number in a
Shortcut, it will be added automatically to
the Address Book. The name in the
Address Book will be the Shortcut name
plus a sequential number.
f Press Options.
g Swipe up or down, or press a or b to
display the available settings, and then
press the setting you want to change.
h Press the new option you want to set.
Repeat steps g and h until you have
chosen all the settings for this Shortcut.
Press OK.
i When you have finished choosing new
options, press Save as Shortcut.
j Read and confirm the displayed list of
options you have chosen, and then
press OK.
General information
13
1
k Enter a name for the Shortcut using the
keyboard on the Touchscreen. (To help
you enter letters, see Entering Text
on page 175.)
Press OK.
l Press OK to save your Shortcut.
Adding Scan Shortcuts 1
The following settings can be included in a
scan Shortcut:
to Media
2-sided Scan (MFC-J4710DW)
Scan Type
Resolution
File Type
File Name
Auto Crop
Skip Blank Page (MFC-J4710DW)
Remove Background Colour
to E-mail Server (Available after IFAX
has been downloaded)
Address
2-sided Scan (MFC-J4710DW)
Scan Type
Resolution
File Type
to OCR/to File/to Image/to E-mail
PC Select
to FTP/to Network
Profile Name
a If the displayed screen is either Home or
More, swipe left or right, or press d or c
to display a Shortcut screen.
b Press where you haven’t added a
Shortcut.
c Press Scan.
d Swipe up or down, or press a or b to
display the type of scan you want to do,
and then press it.
e Do one of the following:
If you pressed to Media, read the
information on the Touchscreen, and
then press OK to confirm it. Go to
step h.
If you pressed
to E-mail Server, read the
information on the Touchscreen, and
then press OK to confirm it. Go to
step f.
If you pressed to File, to OCR,
to Image or to E-mail, read the
information on the Touchscreen, and
then press OK to confirm it. Go to
step g.
If you pressed to Network or
to FTP, read the information on the
Touchscreen, and then press OK to
confirm it.
Swipe up or down, or press a or b to
display the Profile Name, and then
press it.
Press OK to confirm the Profile Name
you have chosen. Go to step m.
NOTE
To add a Shortcut for to Network and
to FTP, you must have added the Profile
Name beforehand.
Chapter 1
14
f Do one of the following:
To enter an E-mail address
manually, press Manual. Enter the
E-mail address using the keyboard
on the Touchscreen. (See Entering
Text on page 175.)
Press OK.
To enter an E-mail address from the
Address Book, press
Address Book. Swipe up or down,
or press a or b to display the E-mail
address you want, and then press it.
Press OK.
After you confirm the E-mail address
you entered, press OK. Go to step h.
NOTE
Press Detail to view the list of
addresses you have entered.
g Do one of the following:
When the machine is connected to a
PC using a USB connection:
Press OK to confirm <USB> is chosen
as the PC Name. Go to step m.
When the machine is connected to a
network:
Swipe up or down, or press a or b to
display the PC Name, and then press
it. Press OK to confirm the PC Name
you have chosen. Go to step m.
h Press Options.
i Swipe up or down, or press a or b to
display the available settings, and then
press the setting you want to change or
store.
j Swipe up or down, or press a or b to
display the available options for the
setting, and then press the new option
you want to set.
Repeat steps i and j until you have
chosen all the settings for this Shortcut.
When you have finished changing
settings, press OK.
k Review the settings you have chosen:
If you need to make more changes,
return to step h .
If you are satisfied with your
changes, press
Save as Shortcut.
l Review your settings on the
Touchscreen, and then press OK.
m Enter a name for the Shortcut using the
keyboard on the Touchscreen. (To help
you enter letters, see Entering Text
on page 175.)
Press OK.
n Read the information on the
Touchscreen, and then press OK to save
your Shortcut.
Adding Web Connect
Shortcuts 1
The settings for the following services can be
included in a Web Connect Shortcut:
PICASA Web Albums™
Google Drive™
FLICKR
®
Facebook™
EVERNOTE
Dropbox
General information
15
1
NOTE
Web services may have been added
and/or service names may have been
changed by the provider since this
document was published.
To add a Web Connect Shortcut, you
need to have an account with the desired
service. (For details,
see Web Connect Guide.)
a If the displayed screen is either Home or
More, swipe left or right, or press d or c
to display a Shortcut screen.
b Press where you haven't added a
Shortcut.
c Press Web.
d If Information regarding the Internet
connection is displayed, read the
information and confirm it by pressing
OK.
e Swipe left or right, or press d or c to
display the available services, and then
press the desired service.
f Press your account.
If the account needs a PIN code, enter
the PIN for the account using the
keyboard on the Touchscreen.
Press OK.
g Choose the function you want to use.
NOTE
The functions that can be set vary
depending on the chosen service.
h Read and confirm the displayed list of
functions you have chosen, and then
press OK.
i Press OK to save your Shortcut.
NOTE
The Shortcut name will be assigned
automatically. If you want to change the
Shortcut names, see Editing Shortcut
Names on page 16.
Changing Shortcuts 1
You can change the settings in a Shortcut.
NOTE
You cannot change a Web Connect
Shortcut.
If you want to change the Shortcut, delete
it, and then add a new Shortcut.
(For details, see Deleting Shortcuts
on page 16 and Adding Web Connect
Shortcuts on page 14.)
a Press the Shortcut you want to change.
The settings for the Shortcut that you
chose are displayed.
b Change the settings for the Shortcut you
chose in step a. (For example, see
Adding Copy Shortcuts on page 11.)
c Press Save as Shortcut when you
have finished changing settings.
d Press OK to confirm.
e Do one of the following:
If you want to overwrite the Shortcut,
press Yes. Go to step g.
If you do not want to overwrite the
Shortcut, press No to enter a new
Shortcut name. Go to step f.
f To edit the name, hold down to
delete the current name, and then enter
a new name using the keyboard on the
Touchscreen. (To help you enter letters,
see Entering Text on page 175.)
Press OK.
g Press OK to confirm.
Chapter 1
16
Editing Shortcut Names 1
You can edit a Shortcut name.
a Press and hold the Shortcut until the
dialog box appears.
NOTE
You can also press , All Settings
and Shortcut Settings.
b Press Edit Shortcut Name.
c To edit the name, hold down to
delete the current name, and then enter
a new name using the keyboard on the
Touchscreen. (To help you enter letters,
see Entering Text on page 175.)
Press OK.
Deleting Shortcuts 1
You can delete a Shortcut.
a Press and hold the Shortcut until the
dialog box appears.
NOTE
You can also press , All Settings
and Shortcut Settings.
b Press Delete to delete the Shortcut
that you chose in step a.
Press Yes to confirm.
Recalling Shortcuts 1
The Shortcut settings are displayed on the
Shortcut screen. To recall a Shortcut, simply
press the Shortcut name.
Volume Settings 1
Ring Volume 1
You can choose a range of ring volume
levels, from High to Off. The machine will
keep your new setting until you change it.
Setting the Ring Volume 1
a Press .
b Press All Settings.
c Swipe up or down, or press a or b to
display General Setup.
d Press General Setup.
e Swipe up or down, or press a or b to
display Volume.
f Press Volume.
g Press Ring.
h Press Low, Med, High or Off.
i Press .
General information
17
1
Beeper Volume 1
When the beeper is on, the machine will
make a sound when you press the
Touchscreen or Touchpanel, make a
mistake, or after you send or receive a fax.
You can choose a range of sound volume
levels, from High to Off.
a Press .
b Press All Settings.
c Swipe up or down, or press a or b to
display General Setup.
d Press General Setup.
e Swipe up or down, or press a or b to
display Volume.
f Press Volume.
g Press Beep.
h Press Low, Med, High or Off.
i Press .
Speaker Volume 1
You can choose a range of speaker volume
levels, from High to Off.
a Press .
b Press All Settings.
c Swipe up or down, or press a or b to
display General Setup.
d Press General Setup.
e Swipe up or down, or press a or b to
display Volume.
f Press Volume.
g Press Speaker.
h Press Low, Med, High or Off.
i Press .
Chapter 1
18
Touchscreen LCD 1
Setting the backlight
brightness 1
If you are having difficulty reading the
Touchscreen LCD, try changing the
brightness setting.
a Press .
b Press All Settings.
c Swipe up or down, or press a or b to
display General Setup.
d Press General Setup.
e Swipe up or down, or press a or b to
display LCD Settings.
f Press LCD Settings.
g Press Backlight.
h Press Light, Med or Dark.
i Press .
19
2
2
Loading paper and
other print media
2
CAUTION
DO NOT carry the machine by holding the
scanner cover, the Jam Clear Cover, the
manual feed slot cover, or the control panel.
Doing this may cause the machine to slip
out of your hands. Carry the machine by
sliding your hands into the handhold
indentations located on each side of the
machine.
For detailed information, see Product
Safety Guide.
NOTE
(For MFC-J4710DW)
For tray #2 (lower tray), see Loading
paper in paper tray #2 (MFC-J4710DW)
on page 26.
Loading paper in paper
tray #1 2
Load only one size of paper and one type of
paper in the paper tray at any time.
a Pull the paper tray completely out of the
machine.
NOTE
If the paper support flap (1) is open, close
it, and then close the paper support (2).
When you load a different paper size in
the tray, you will need to change the paper
size setting in the menu of the machine at
the same time.
(MFC-J4510DW: See Paper Size
on page 38.)
(MFC-J4710DW: See Paper Size and
Type (MFC-J4710DW) on page 39.)
b Open the output paper tray cover (1).
Loading paper 2
1
2
1
Chapter 2
20
c Gently press and slide the paper
guides (1) to fit the paper size.
Make sure that the triangular mark (2)
on the paper guide (1) lines up with the
mark for the paper size you are using.
d Fan the stack of paper well to avoid
paper jams and misfeeds.
NOTE
Always make sure that the paper is not
curled or wrinkled.
e Gently put the paper into the paper tray
print side down.
Check that the paper is flat in the tray.
Using A4, Letter or Executive
Landscape orientation
2
IMPORTANT
Be careful not to push the paper in too far;
it may lift at the back of the tray and cause
paper feed problems.
NOTE
A5 or smaller size paper should be loaded
into the tray in portrait orientation.
For details, see Loading smaller paper
(Photo, Photo L and envelopes)
on page 22.
If you want to add paper before the tray is
empty, remove the paper from the tray
and combine it with the paper you are
adding. Always fan the stack of paper well
before loading it in the tray. If you add
paper without fanning the stack, the
machine may feed multiple pages.
For details of the paper orientation, see
Paper orientation and capacity of the
paper trays on page 43.
Loading paper
21
2
f Gently adjust the paper guides (1) to fit
the paper.
Make sure the paper guides touch the
sides of the paper.
g Check that the paper is flat in the tray
and below the maximum paper
mark (1).
Overfilling the paper tray may cause
paper jams.
h Close the output paper tray cover.
i Slowly push the paper tray completely
into the machine.
j While holding the paper tray in place,
pull out the paper support (1) until it
clicks and unfold the paper support
flap (2).
1
1
2
1
Chapter 2
22
NOTE
If you are using paper that is longer than
A4, Letter size paper or envelopes with
the flap on the short edge, close the paper
support flap.
Loading smaller paper
(Photo, Photo L and
envelopes) 2
Portrait orientation
(A5 or smaller size paper)
IMPORTANT
Be careful not to push the paper in too far;
it may lift at the back of the tray and cause
paper feed problems.
About envelopes 2
Use envelopes that weigh between 80 to
95 g/m
2
.
Some envelopes need margin settings to
be set in the application. Make sure you
do a test print first before printing many
envelopes.
IMPORTANT
DO NOT use the following types of
envelopes, as they will not feed correctly:
That are of a baggy construction.
That have windows.
That are embossed (have raised
writing on them).
That have clasps or staples.
That are pre-printed on the inside.
Occasionally you may experience paper
feed problems caused by the thickness,
size and flap shape of the envelopes you
are using.
Glue Double flaps
Loading paper
23
2
Loading envelopes 2
a Before loading, press the corners and
sides of the envelopes to make them as
flat as possible.
IMPORTANT
If envelopes are “double-feeding”, put one
envelope in the paper tray at a time.
b Put envelopes in the paper tray with the
address side down. If the envelope flaps
are on the long edge, load the
envelopes with the flap on the left, as
shown in the illustration. Gently press
and slide the paper guides (1) to fit the
size of the envelopes.
Chapter 2
24
NOTE
If you are using envelopes with the flap on
the short edge, insert envelopes in the
paper tray as shown in the illustration.
If you are using envelopes with the flap on
the short edge, close the paper support
flap.
If you have problems printing on
envelopes with the flap on the short edge,
try the following:
2
a Open the envelope flap.
b Put the envelope into the paper tray with
the address side down and the flap
positioned as shown in the illustration.
c Select Reverse Print (Windows
®
) or
Reverse page orientation (Macintosh)
in the printer driver’s dialog box, and
then adjust the size and margin in your
application.
(See Software User’s Guide: Printing
(Windows
®
).)
(See Software User’s Guide: Printing
and Faxing (Macintosh).)
Loading paper
25
2
Loading Photo and Photo L paper 2
a Before loading, press the corners and
sides of the Photo and Photo L paper to
make them as flat as possible.
IMPORTANT
If Photo (10 15 cm) or Photo L
(89 127 mm) paper is “double-feeding,”
put one piece of the Photo paper in the
tray at a time.
b Do one of the following:
If you put Photo L (89 127 mm) in
the paper tray, lift up the Photo L
stopper (1).
If you put Photo (10 15 cm) in the
paper tray, lift up the Photo
stopper (2).
Gently press and slide the paper
guides (3) to fit the paper size.
c Close the output paper tray cover.
d Put Photo or Photo L paper in the paper
tray print side down.
e Open the output paper tray cover (1).
f Gently adjust the paper guides (1) to fit
the paper.
Make sure the paper guides touch the
sides of the paper.
g Close the output paper tray cover.
1
2
3
3
1
1
Chapter 2
26
Loading paper in paper
tray #2 (MFC-J4710DW) 2
NOTE
You can use only A4, A3, Ledger, Letter or
Legal size plain paper in Tray #2.
For details of the paper orientation, see
Paper orientation and capacity of the
paper trays on page 43.
When using A4 or Letter size paper 2
a Pull the paper tray completely out of the
machine.
b Lift up the paper tray cover (1).
c Gently press and slide the paper
guides (1) to fit the paper size.
Make sure that the triangular mark (2)
on the paper guide (1) lines up with the
mark for the paper size you are using.
d Fan the stack of paper well to avoid
paper jams and misfeeds.
NOTE
Always make sure that the paper is not
curled.
1
1
2
Loading paper
27
2
e Gently put the paper into the paper tray
print side down.
Check that the paper is flat in the tray.
Landscape orientation
2
IMPORTANT
Be careful not to push the paper in too far;
it may lift at the back of the tray and cause
paper feed problems.
NOTE
If you want to add paper before the tray is
empty, remove the paper from the tray
and combine it with the paper you are
adding. Always fan the stack of paper well
before loading it in the tray. If you add
paper without fanning the stack, the
machine may feed multiple pages.
If you want to use A3, Ledger or Legal size
paper, see When using A3, Ledger or
Legal size paper on page 28.
f Gently adjust the paper guides (1) to fit
the paper.
Make sure the paper guides touch the
sides of the paper.
g Check that the paper is flat in the tray
and below the maximum paper
mark (1).
Overfilling the paper tray may cause
paper jams.
1
1
Chapter 2
28
h Lower the paper tray cover.
i Slowly push the paper tray completely
into the machine.
j Pull out the paper support (1) until it
clicks and unfold the paper support
flap (2).
When using A3, Ledger or Legal size
paper
2
a Pull the paper tray completely out of the
machine.
b Lift up the paper tray cover (1).
2
1
1
Loading paper
29
2
c Move the slider to the right to unlock the
paper tray.
d Extend the paper tray. Make sure that
the triangular mark (1) lines up with the
mark (2) for the paper size.
e Move the slider to the left to lock the
paper tray.
NOTE
If you are using Legal size paper, lift up
the stopper.
1
2
Chapter 2
30
f Gently press and slide the paper
guides (1) to fit the paper size.
Make sure that the triangular mark (2)
on the paper guide (1) lines up with the
mark for the paper size you are using.
g Fan the stack of paper well to avoid
paper jams and misfeeds.
NOTE
Always make sure that the paper is not
curled or wrinkled.
h Gently put the paper into the paper tray
print side down.
Check that the paper is flat in the tray.
Portrait orientation
2
IMPORTANT
Be careful not to push the paper in too far;
it may lift at the back of the tray and cause
paper feed problems.
NOTE
If you want to add paper before the tray is
empty, remove the paper from the tray
and combine it with the paper you are
adding. Always fan the stack of paper well
before loading it in the tray. If you add
paper without fanning the stack, the
machine may feed multiple pages.
1
2
Loading paper
31
2
i Gently adjust the paper guides (1) to fit
the paper.
Make sure the paper guides touch the
sides of the paper.
j Check that the paper is flat in the tray
and below the maximum paper
mark (1).
Overfilling the paper tray may cause
paper jams.
k Lower the paper tray cover.
l Slowly push the paper tray completely
into the machine.
m Lift up the paper tray cover.
1
1
Chapter 2
32
n Unfold the paper support flap of tray #2.
o Pull out the paper support of tray #1.
CAUTION
When carrying the machine, remove the
lower tray if it has been expanded to hold
large paper, such as A3 size. The weight of
the paper could cause the lower tray to fall
and injure you.
CAUTION
Position the machine so that the tray does
not protrude past the edge of the table or
desk. If someone hits the tray, the machine
could fall and cause injury.
Loading paper
33
2
NOTE
If you are using A3, Ledger or Legal size
paper, close the paper support flap of
tray #1.
If you are finished using A3, Ledger or
Legal size paper and want to use A4 or
Letter size paper, take the paper out of the
tray. (If you lifted up the stopper to use
Legal size paper, lower the stopper.)
Move the slider to the right to unlock the
paper tray, and then shorten the tray.
Move the slider to the left to lock the paper
tray, and then put A4 or Letter size paper
into the tray.
CAUTION
When changing the tray size from A3,
Ledger or Legal size back to the original
size, be careful not to pinch your fingers
between gaps at the back of the tray.
Loading paper in the manual
feed slot 2
You can load special print media into this slot
one sheet at a time. Use the manual feed slot
to print or copy on A3, Ledger, Legal, A4,
Letter, Executive, A5, A6, envelopes,
Photo (10 15 cm), Photo L (89 127 mm),
Photo2L(13 18 cm) and
Index Card (127 203 mm).
NOTE
The machine automatically turns on
Manual Feed mode when you put paper in
the manual feed slot.
If you are using paper that is longer than
A4, Letter size paper or envelopes with
the flap on the short edge, close the paper
support flap.
Chapter 2
34
a Open the manual feed slot cover located
at the back of the machine.
b Slide the manual feed slot paper guides
to fit the paper width that you are going
to use.
NOTE
The paper mark (1) in portrait orientation
is on the right side of the manual feed slot,
and the mark (2) in landscape orientation
is on the left side of it.
When you slide the paper guides, confirm
that they are in these positions.
2
1
Loading paper
35
2
c Put only one sheet of paper in the
manual feed slot with the side to be
printed on face up.
Using A3, Ledger, Legal, A5, A6,
envelopes, Photo, Photo L, Photo 2L
or Index Card
Portrait orientation
2
Using A4, Letter or Executive
Landscape orientation 2
IMPORTANT
DO NOT put more than one sheet of paper
in the manual feed slot at any one time.
Doing this may cause a paper jam. Even if
you are printing multiple pages, do not
feed the next sheet of paper until the
Touchscreen shows a message
instructing you to feed the next sheet.
DO NOT put paper in the manual feed slot
when you are printing from the paper tray.
Doing this may cause a paper jam.
For details on the paper orientation, see
Paper orientation and capacity of the
paper trays on page 43.
d Using both hands, gently adjust the
manual feed slot paper guides to fit the
paper.
Chapter 2
36
NOTE
DO NOT press the paper guides too tightly
against the paper. Doing this may cause
the paper to fold.
Place the paper in the centre of the
manual feed slot between the paper
guides. If the paper is not centred, pull it
out and insert it again at the centre
position.
e Using both hands, put one sheet of
paper in the manual feed slot until the
front edge touches the paper feed roller.
Let go of the paper when you hear the
machine pull it in a short distance. The
Touchscreen will show
Manual Feed Slot ready.
NOTE
When loading an envelope or a sheet of
thick paper, push the envelope into the
manual feed slot until you feel it grab the
envelope.
When you are feeding A3, Legal or Ledger
size paper in the manual feed slot, the
machine holds the printed page after
printing so that the page does not fall.
Once printing is complete, pull out the
printed page and press OK.
f If the data does not fit on one sheet, the
Touchscreen will prompt you to load
another sheet of paper. Place another
sheet of paper in the manual feed slot,
and then press OK on the Touchscreen.
NOTE
Make sure printing has finished before you
close the manual feed slot cover.
When paper is placed in the manual feed
slot, the machine will always print from the
manual feed slot.
Paper inserted in the manual feed slot
while a test page, fax or report is being
printed will be ejected.
During the machine's cleaning process,
paper you place in the manual feed slot
will be ejected. Wait until the machine
finishes its cleaning, and then place the
paper in the manual feed slot again.
Loading paper
37
2
Unprintable area 2
The printable area depends on the settings in the application you are using. The figures below
show the unprintable areas on cut-sheet paper and envelopes. The machine can print in the
shaded areas of cut-sheet paper when the Borderless print feature is available and turned on.
(See Software User’s Guide: Printing (Windows
®
).)
(See Software User’s Guide: Printing and Faxing (Macintosh).)
NOTE
The Borderless print feature is not available for envelopes and 2-sided printing.
Cut-Sheet Paper Envelopes
Top (1) Left (2) Bottom (3) Right (4)
Cut-Sheet 3 mm 3 mm 3 mm 3 mm
Envelopes 22 mm 3 mm 22 mm 3 mm
1
3
24
1
3
42
Chapter 2
38
Paper settings 2
Paper Size and Type
(MFC-J4510DW) 2
Paper Type 2
To get the best print quality, set the machine
for the type of paper you are using.
a Press .
b Press .
c Swipe up or down, or press a or b to
display Plain Paper,
Inkjet Paper, Brother BP71,
Other Glossy or Transparency,
and then press the option you want to
set.
d Press .
NOTE
The machine ejects paper with the printed
surfaces face up onto the paper tray at the
front of the machine. When you use
transparencies or glossy paper, remove
each sheet at once to prevent smudging
or paper jams.
Paper Size 2
You can use the following sizes of paper for
printing copies: A4, A5, A3, 10 15 cm,
Letter, Legal and Ledger and two sizes for
printing faxes: A4 or Letter. When you
change the size of paper you load in the
machine, you will need to change the paper
size setting at the same time so your machine
can fit an incoming fax on the page.
a Press .
b Press .
c Press A4, A5, 10x15cm or Letter.
d Press .
NOTE
When you copy using A3, Legal or
Ledger size paper, set the paper size
option in Copy mode.
Loading paper
39
2
Paper Size and Type
(MFC-J4710DW) 2
To get the best print quality, set the machine
for the type of paper you are using.
You can use the following sizes of paper for
printing copies: A4, A5, A3, 10 15 cm,
Letter, Legal and Ledger and five sizes for
printing faxes: A4, A3, Ledger, Letter and
Legal. When you load a different size of paper
in the machine, you will need to change the
paper size setting at the same time so your
machine can fit an incoming fax on the page.
a Press .
b Press the displayed paper size for
Tray #1 or Tray #2.
c Do one of the following:
If you press the displayed paper size
for Tray #1, press Paper Type.
Swipe up or down, or press a or b to
display Plain Paper,
Inkjet Paper, Brother BP71,
Other Glossy or Transparency,
and press the option you want.
Press Paper Size.
Press A4, A5, 10x15cm or Letter.
If you press the displayed paper size
for Tray #2, press Paper Size.
Swipe up or down, or press a or b to
display A4, A3, Letter, Legal or
Ledger, and press the option you
want.
d Press .
NOTE
You can use only plain paper in Tray #2.
The machine ejects paper with printed
surfaces face up onto the paper tray in
front of the machine. When you use
transparencies or glossy paper, remove
each sheet at once to prevent smudging
or paper jams.
Tray use in Copy mode
(MFC-J4710DW) 2
You can change the default tray the machine
will use for copies.
Auto Tray Select will allow your machine
to feed paper from either Tray #1 or Tray #2,
using the paper type and size settings from
the Copy menu.
To change the default setting follow the
instructions below:
a Press .
b Press All Settings.
c Swipe up or down, or press a or b to
display General Setup.
d Press General Setup.
e Swipe up or down, or press a or b to
display Tray Setting.
f Press Tray Setting.
g Press Tray Use: Copy.
h Press Tray #1, Tray #2 or
Auto Tray Select.
i Press .
Chapter 2
40
NOTE
You can change the paper size and tray
selection temporarily for the next copy.
(See Paper Size on page 76 and Tray
Select (MFC-J4710DW) on page 76.)
Tray use in Fax mode
(MFC-J4710DW) 2
You can change the default tray the machine
will use for printing received faxes.
Auto Tray Select will allow your machine
to take paper from Tray #1 first, or from
Tray #2 if:
Tray #2 is set to a different paper size that
is more suitable for the received faxes.
Both trays are using the same size paper
and Tray #1 is not set to use plain paper.
a Press .
b Press All Settings.
c Swipe up or down, or press a or b to
display General Setup.
d Press General Setup.
e Swipe up or down, or press a or b to
display Tray Setting.
f Press Tray Setting.
g Press Tray Use: Fax.
h Press Tray #1, Tray #2 or
Auto Tray Select.
i Press .
Acceptable paper and
other print media
2
The print quality can be affected by the type
of paper you use in the machine.
To get the best print quality for the settings
you have chosen, always set the Paper Type
to match the type of paper that is loaded in
the tray.
You can use plain paper, inkjet paper (coated
paper), glossy paper, transparencies and
envelopes.
We recommend testing various paper types
before buying large quantities.
For best results, use Brother paper.
When you print on inkjet paper (coated
paper), transparencies and glossy paper,
be sure to choose the correct print media
in the Basic tab of the printer driver or in
the Paper Type setting of the machine’s
menu.
(MFC-J4510DW: See Paper Type
on page 38.)
(MFC-J4710DW: See Paper Size and
Type (MFC-J4710DW) on page 39.)
When you print on Brother Photo paper,
load one extra sheet of the same photo
paper in the paper tray. An extra sheet has
been included in the paper package for
this purpose.
When using transparencies or photo
paper, remove each sheet at once to
prevent smudging or paper jams.
Avoid touching the printed surface of the
paper immediately after printing; the
surface may not be completely dry and
may stain your fingers.
Loading paper
41
2
Recommended print media 2
To get the best print quality, we suggest using
Brother paper. (See the table below.)
If Brother paper is not available in your
country, we recommend testing various
papers before purchasing large quantities.
We recommend using “3M Transparency
Film” when you print on transparencies.
Handling and using print
media 2
Store paper in its original packaging and
keep it sealed. Keep the paper flat and
away from moisture, direct sunlight and
heat.
Avoid touching the shiny (coated) side of
the photo paper.
Avoid touching either side of the
transparency paper because they absorb
water and perspiration easily, and this
may cause decreased output quality.
Transparencies designed for laser
printers/copiers may stain your next
document. Use only transparencies
recommended for inkjet printing.
IMPORTANT
DO NOT use the following kinds of paper:
Damaged, curled, wrinkled, or
irregularly shaped paper
1 2 mm or greater curl may cause jams
to occur.
Extremely shiny or highly textured
paper
Paper that cannot be arranged
uniformly when stacked
Short grain paper
Paper capacity of the output paper
tray cover
2
Up to 50 sheets of 80 g/m
2
A4 paper.
Transparencies and photo paper must be
picked up from the output paper tray cover
one page at a time to avoid smudging.
Brother paper
Paper Type Item
A3 Plain BP60PA3
A3 Glossy Photo BP71GA3
A3 Inkjet (Matte) BP60MA3
A4 Plain BP60PA
A4 Glossy Photo BP71GA4
A4 Inkjet (Matte) BP60MA
10 15 cm Glossy
Photo
BP71GP
1
1
Chapter 2
42
Choosing the right print media 2
Paper type and size for each operation 2
1
Manual Feed Slot only (MFC-J4510DW)
Manual Feed Slot or Tray #2 (MFC-J4710DW)
2
Tray #2 only (MFC-J4710DW)
3
Manual Feed Slot only
Paper Type Paper Size Usage
Fax Copy
Photo
Capture
Printer
Cut-Sheet A3
297 420 mm (11.7 16.5 in.)
Yes
2
Yes
1
Yes
3
Yes
1
A4
210
297 mm (8.3 11.7 in.)
Yes Yes Yes Yes
Ledger
279.4
431.8 mm (11 17 in.)
Yes
2
Yes
1
Yes
3
Yes
1
Letter
215.9
279.4 mm (8 1/2 11 in.)
Yes Yes Yes Yes
Legal
215.9
355.6 mm (8 1/2 14 in.)
Yes
2
Yes
1
–Yes
1
Executive
184
267 mm (7 1/4 10 1/2 in.)
––– Yes
JIS B4
257
364 mm (10.1 14.3 in.)
––– User
Defined
JIS B5
182
257 mm (7.2 10.1 in.)
––– User
Defined
A5
148
210 mm (5.8 8.3 in.)
Yes Yes
A6
105
148 mm (4.1 5.8 in.)
––– Yes
Cards Photo
10
15 cm (4 6 in.)
Yes Yes Yes
Photo L
89
127 mm (3 1/2 5 in.)
––– Yes
Photo 2L
13
18 cm (5 7 in.)
––YesYes
Index Card
127
203 mm (5 8 in.)
––– Yes
Postcard 1
100
148 mm (3.9 5.8 in.)
––– User
Defined
Postcard 2
(Double)
148
200 mm (5.8 7.9 in.)
––– User
Defined
Envelopes C5 Envelope
162
229 mm (6.4 9 in.)
––– Yes
3
DL Envelope
110
220 mm (4.3 8.7 in.)
––– Yes
Com-10
105
241 mm (4 1/8 9 1/2 in.)
––– Yes
Monarch
98
191 mm (3 7/8 7 1/2 in.)
––– Yes
Transparencies
A4
210
297 mm (8.3 11.7 in.)
Yes Yes
Letter
215.9
279.4 mm (8 1/2 11 in.)
Yes Yes
Legal
215.9
355.6 mm (8 1/2 14 in.)
Yes Yes
A5
148
210 mm (5.8 8.3 in.)
Yes Yes
Loading paper
43
2
Paper orientation and capacity of the paper trays 2
1
When using 80 g/m
2
plain paper.
NOTE
When you choose User Defined in the Paper Size drop-down list of the printer driver, the paper
orientation will differ depending on the size and thickness of the paper.
(For details, see Paper orientation using User Defined as the Paper Size in the printer driver
on page 44.)
Paper size Paper types No. of
sheets
Paper Tray #1 <Landscape>
A4, Letter, Executive
<Portrait>
A5, A6, Photo, Photo L, Photo 2L,
Index card, Envelopes (Com-10,
DL, Monarch)
Plain Paper
150
1
Inkjet Paper 20
Glossy Paper, Photo 20
Index Card, Postcard 30
Envelopes, Transparencies 10
Paper Tray #2
(MFC-J4710DW)
<Landscape>
A4, Letter
<Portrait>
A3, Legal, Ledger
Plain Paper
250
1
Manual Feed Slot <Landscape>
A4, Letter, Executive
<Portrait>
A3, Ledger, Legal, A5, A6, Photo,
Photo L, Photo 2L, Index card,
Envelopes (C5, Com-10, DL,
Monarch)
Plain Paper, Inkjet Paper,
Glossy Paper, Photo,
Envelopes and
Transparencies
1
Chapter 2
44
Paper orientation using User Defined as the Paper Size in the printer driver 2
NOTE
When choosing Envelope in the Paper Thickness drop-down list, you must load the envelopes
in Portrait orientation.
Paper weight and thickness 2
1
BP71 (260 g/m
2
) paper is especially designed for Brother inkjet machines.
User Defined Size Paper Orientation
When both of the following conditions are satisfied:
Width: 127.0 mm – 215.9 mm
Height: 216.0 mm – 297.0 mm
Landscape
When any one of the following conditions is satisfied:
Width: less than 127.0 mm
Width: greater than 215.9 mm
Height: less than 216.0 mm
Height: greater than 297.0 mm
Portrait
Paper Type Weight Thickness
Cut-Sheet Plain Paper
64 to 120 g/m
2
0.08 to 0.15 mm
(Tray #2)
Plain Paper
64 to 105 g/m
2
0.08 to 0.15 mm
Inkjet Paper
64 to 200 g/m
2
0.08 to 0.25 mm
Glossy Paper
1
Up to 220 g/m
2
Up to 0.25 mm
Cards
Photo Card
1
Up to 220 g/m
2
Up to 0.25 mm
Index Card
Up to 120 g/m
2
Up to 0.15 mm
Postcard 1
Postcard 2
Up to 200 g/m
2
Up to 0.25 mm
Envelopes
80 to 95 g/m
2
Up to 0.52 mm
Transparencies
45
3
3
How to load
documents
3
You can send a fax, make copies or scan
from the ADF (automatic document feeder)
and from the scanner glass.
NOTE
(MFC-J4710DW)
2-sided documents can be faxed, copied,
or scanned up to Legal size using the
ADF.
Using the ADF 3
The ADF can hold up to 20 pages and feeds
each sheet individually. Use paper that is
within the sizes and weights shown in the
table below. Always fan the edges of the
pages before placing them in the ADF.
Document Sizes and Weights 3
How to load documents 3
IMPORTANT
DO NOT pull on the document while it is
feeding.
DO NOT use paper that is curled,
wrinkled, folded, ripped, stapled, paper
clipped, glued or taped.
DO NOT use cardboard, newspaper or
fabric.
Make sure documents written with ink or
modified with correction fluid are completely
dry.
a Lift up and unfold the ADF document
support (1).
b Fan the pages well.
Loading documents 3
Length: 148 to 355.6 mm
Width: 148 to 215.9 mm
Weight:
64 to 90 g/m
2
1
Chapter 3
46
c Adjust the paper guides (1) to fit the
width of your documents.
d Place your documents face down, top
edge first in the ADF underneath the
guides until you feel them touch the feed
rollers.
The Touchscreen will display
ADF Ready.
IMPORTANT
DO NOT leave thick documents on the
scanner glass. If you do this, the ADF may
jam.
Using the scanner glass 3
You can use the scanner glass to fax, copy or
scan single pages or pages of a book.
Document Sizes Supported 3
How to load documents 3
NOTE
To use the scanner glass, the ADF must
be empty.
a Lift the document cover.
b Using the document guidelines on the
left and top, place the document
face down in the upper left corner of the
scanner glass.
1 document cover
c Close the document cover.
IMPORTANT
If you are scanning a book or thick
document, DO NOT slam the cover down
or press on it.
Length: Up to 297 mm
Width: Up to 215.9 mm
Weight: Up to 2 kg
1
1
Loading documents
47
3
Unscannable area 3
The scannable area depends on the settings
in the application you are using. The figures
below show the unscannable areas.
1
The unscannable area is 1 mm when you use the
ADF.
Usage Document
Size
Top (1)
Bottom (3)
Left (2)
Right (4)
Fax A4 3 mm
3mm
1
Letter 4 mm
Legal
Copy All paper
sizes
3mm
Scan 1 mm 1 mm
1
3
24
48
4
How to send a fax 4
The following steps show how to send a fax.
a Do one of the following to load your
document:
Place the document face down in the
ADF. (See Using the ADF
on page 45.)
Load your document face down on
the scanner glass. (See Using the
scanner glass on page 46.)
NOTE
To send colour faxes with multiple pages,
use the ADF.
If you send a mono fax from the ADF when
the memory is full, it will be sent in real
time.
You can use the scanner glass to fax
pages of a book one at a time. The
documents can be up to A4 or Letter size.
Since you can only scan one page at a
time, it is easier to use the ADF if you are
sending a multiple-page document.
b Do one of the following:
When Fax Preview is set to off, press
Fax.
When Fax Preview is set to on, press
Fax and then Sending Faxes.
The Touchscreen shows:
Sending a fax 4
Sending a fax
49
4
c You can change the following
fax-sending settings. Press Options.
Swipe up or down, or press a or b to
scroll through the fax settings. When the
setting you want is displayed, press it
and choose your new option. When you
have finished changing options, press
OK.
(Basic User’s Guide)
For details about changing the following
fax-sending settings, see pages 50 to
52.
Glass Scan Size
Colour Fax Transmission
Preview Outgoing Fax
Transmission Verification Report
(Setup)
(Advanced User’s Guide)
For more advanced fax-sending
operations and settings
(See Advanced User’s Guide: Sending
a fax.)
Contrast
Fax Resolution
Set New Defaults
Factory Reset
2-sided Fax (MFC-J4710DW)
Faxing at the end of a call
Broadcasting
Real Time Transmission
Overseas Mode
Delayed Fax
Batch Transmission
Cancelling Waiting Jobs
Polled Transmit
d Enter the fax number.
Using the dial pad
Using the Address Book
Address Book
Using the call history
Outgoing Call
Caller ID history
NOTE
You can preview a fax message before
sending it by setting Preview to On. (See
How to preview an outgoing fax
on page 51.)
If your network supports the LDAP
protocol you can search for fax numbers
and E-mail addresses on your server.
(See Network User’s Guide: LDAP
operation.)
e Press Fax Start.
Faxing from the ADF 4
The machine starts scanning the
document to be sent.
Faxing from the scanner glass 4
If you choose Mono in the
Colour Setting (default setting),
the machine starts scanning the first
page. Go to step f.
If you choose Colour in the
Colour Setting, the
Touchscreen asks if you want to
send a colour fax. Press
Yes (Colour fax) to confirm.
The machine starts dialling and
sending the document.
Chapter 4
50
f When the Touchscreen asks you
Next page?, do one of the following:
To send a single page, press No.
The machine starts sending the
document.
To send more than one page, press
Yes and go to step g.
g Place the next page on the scanner
glass.
Press OK.
The machine starts scanning the page.
(Repeat steps f and g for each
additional page.)
Stop faxing 4
To stop faxing, press .
Setting scanner glass size for
faxing 4
When documents are Letter size, you need to
set the Scan Size to Letter. If you do not, the
side portion of the faxes will be missing.
a Load your document.
b Do one of the following:
When Fax Preview is set to off, press
Fax.
When Fax Preview is set to on, press
Fax and then Sending Faxes.
c Press Options.
d Swipe up or down, or press a or b to
display Glass Scan Size.
e Press Glass Scan Size.
f Press Letter (or A4).
g Press OK.
h Enter the fax number.
i Press Fax Start.
NOTE
You can save the setting you use most
often by setting it as the default setting.
(See Advanced User’s Guide: Setting
your changes as a new default.)
This setting is only available for sending
documents from the scanner glass.
Colour fax transmission 4
Your machine can send a colour fax to
machines that support this feature.
Colour faxes cannot be stored in the
machine’s memory. When you send a colour
fax, the machine will send it in real time (even
if Real Time TX is set to Off).
a Load your document.
b Do one of the following:
When Fax Preview is set to off, press
Fax.
When Fax Preview is set to on, press
Fax and then Sending Faxes.
c Press Options.
d Swipe up or down, or press a or b to
display Colour Setting.
e Press Colour Setting.
f Press Colour.
g Press OK.
h Enter the fax number.
i Press Fax Start.
Cancelling a fax in progress 4
If you want to cancel a fax while the machine
is scanning, dialling or sending, press .
Sending a fax
51
4
How to preview an outgoing
fax 4
You can preview a fax message before you
send it. You must set Real Time
Transmission and Polling RX to Off before
you use this feature.
a Load your document.
b Do one of the following:
When Fax Preview is set to off, press
Fax.
When Fax Preview is set to on, press
Fax and then Sending Faxes.
c Press Options.
d Swipe up or down, or press a or b to
display Preview.
e Press Preview.
f Press On.
g Press OK.
h Enter the fax number using the dial pad
or Address Book.
i Press Fax Start.
The machine starts scanning the
document and the outgoing fax appears
on the Touchscreen.
When the fax is displayed, press the
Touchscreen to perform the following
operations.
j Press Start.
NOTE
To send a colour fax, do not use Fax
Preview.
The fax message in the memory will be
sent and then erased when you press
Start.
Description
Enlarge the fax.
Reduce the fax.
or
Scroll vertically.
or
Scroll horizontally.
Rotate the fax clockwise.
Go back to the previous page.
Go to the next page.
Chapter 4
52
Transmission Verification
Report 4
You can use the Transmission Verification
Report as proof that you sent a fax. This
report lists the sender’s name or fax number,
the time and date of the transmission,
duration of the transmission, number of
pages sent, and whether or not the
transmission was successful.
There are several settings available for the
Transmission Verification Report:
On: Prints a report after every fax you
send.
On+Image: Prints a report after every fax
you send. A portion of the faxs first page
appears on the report.
Off: Prints a report if your fax is
unsuccessful due to a transmission error.
Off is the default setting.
Off+Image: Prints a report if your fax is
unsuccessful due to a transmission error.
A portion of the fax’s first page appears on
the report.
a Press .
b Press All Settings.
c Swipe up or down, or press a or b to
display Fax.
d Press Fax.
e Swipe up or down, or press a or b to
display Report Setting.
f Press Report Setting.
g Press XMIT Report.
h Press On, On+Image, Off or
Off+Image.
i Press .
NOTE
If you choose On+Image or Off+Image
the image will only appear on the
Transmission Verification Report if Real
Time Transmission is set to Off. The
image will not appear on the report when
you send a colour fax.
(See Advanced User’s Guide: Real Time
Transmission.)
If your transmission is successful, “OK” will
appear next to “RESULT” on the
Transmission Verification Report. If the
transmission is not successful, “ERROR
will appear next to “RESULT”.
53
5
5
Receive Modes 5
You must choose a Receive Mode depending on the external devices and telephone services you
have on your line.
Choose the Receive Mode 5
By default, your machine will automatically receive any faxes that are sent to it. The diagram below
will help you choose the correct receive mode.
For more detailed information on the Receive Modes, see Using Receive Modes on page 55.
To set the Receive Mode follow the instructions below:
a Press .
b Press All Settings.
c Swipe up or down, or press a or b to display Initial Setup.
d Press Initial Setup.
e Swipe up or down, or press a or b to display Receive Mode.
Receiving a fax 5
Do you want to use the telephone features of your machine (if available), an external
telephone or external telephone answering device connected on the same line as the
machine?
Yes
Fax Only
No
No
No
Manual
Yes
External TAD
Fax/Tel
Are you using the voice message function of
an external telephone answering device?
Do you want the machine to answer fax and
telephone calls automatically?
Yes
Chapter 5
54
f Press Receive Mode.
NOTE
If the option to change the receive mode is unavailable, make sure the BT Call Sign feature is
set to Off. (See Advanced User’s Guide: To enable the machine to work with BT Call Sign
(with your external telephone only).)
g Press Fax Only, Fax/Tel, External TAD or Manual.
h Press .
Receiving a fax
55
5
Using Receive Modes 5
Some Receive Modes answer automatically
(Fax Only and Fax/Tel). You may want to
change the Ring Delay before using these
modes. (See Ring Delay on page 56.)
Fax Only 5
Fax Only mode will automatically answer
every call as a fax call.
Fax/Tel 5
Fax/Tel mode helps you automatically
manage incoming calls by recognising
whether they are fax or voice calls and
dealing with them in one of the following
ways:
Faxes will be automatically received.
Voice calls will start the F/T Ring to tell you
to pick up the line. The F/T Ring is a fast
double-ring made by your machine.
(Also see F/T Ring Time (Fax/Tel mode only)
on page 56 and Ring Delay on page 56.)
Manual 5
Manual mode turns off all automatic
answering functions unless you are using the
BT Call Sign feature.
To receive a fax in Manual mode, lift the
handset of an external telephone. When you
hear fax tones (short repeating beeps), press
Fax Start and choose Receive. You can
also use the Fax Detect feature to receive
faxes by lifting a handset on the same line as
the machine.
(Also see Fax Detect on page 57.)
External TAD 5
External TAD mode lets an external
answering device manage your incoming
calls. Incoming calls will be dealt with in one
of the following ways:
Faxes will be automatically received.
Voice callers can record a message on the
external TAD.
(For more information, see Connecting an
external TAD (telephone answering device)
on page 63.)
Chapter 5
56
Receive Mode settings 5
Ring Delay 5
The Ring Delay sets the number of times the
machine rings before it answers in Fax Only
or Fax/Tel mode. If you have external or
extension telephones on the same line as the
machine, choose the maximum number of
rings.
(See Operation from external and extension
telephones on page 65 and Fax Detect
on page 57.)
a Press .
b Press All Settings.
c Swipe up or down, or press a or b to
display Fax.
d Press Fax.
e Swipe up or down, or press a or b to
display Setup Receive.
f Press Setup Receive.
g Swipe up or down, or press a or b to
display Ring Delay.
h Press Ring Delay.
i Swipe up or down, or press a or b to
display the options, and then press the
number of times the machine will ring
before it answers.
If you choose 0, the machine will answer
immediately and the line will not ring at
all.
j Press .
F/T Ring Time
(Fax/Tel mode only) 5
When somebody calls your machine, you and
your caller will hear the normal telephone
ring. The number of rings is set by the ring
delay setting.
If the call is a fax, then your machine will
receive it. However, if it is a voice call then the
machine will sound the F/T Ring (a fast
double-ring) for the time you have set in the
F/T Ring Time setting. If you hear the F/T
Ring, it means that you have a voice caller on
the line.
Because the F/T Ring is made by the
machine, extension and external telephones
will not ring. However, you can still answer
the call on any telephone by using a remote
code. (For more information, see Using
remote codes on page 67.)
a Press .
b Press All Settings.
c Swipe up or down, or press a or b to
display Fax.
d Press Fax.
e Swipe up or down, or press a or b to
display Setup Receive.
f Press Setup Receive.
g Swipe up or down, or press a or b to
display F/T Ring Time.
h Press F/T Ring Time.
i Press how long the machine will ring to
alert you that you have a voice call (20,
30, 40 or 70 seconds).
j Press .
Receiving a fax
57
5
NOTE
Even if the caller hangs up during the fast
double-ring, the machine will continue to
ring for the set time.
Fax Detect 5
If Fax Detect is On: 5
The machine receives a fax call
automatically, even if you answer the call.
When you see Receiving on the
Touchscreen or when you hear “chirps
through the handset you are using, just
replace the handset. Your machine will do the
rest.
If Fax Detect is Off: 5
If you are at the machine and answer a fax
call by lifting the handset, press Fax Start,
then press Receive to receive the fax.
If you answered at an extension or external
telephone, press l 51. (See Operation from
external and extension telephones
on page 65.)
NOTE
If this feature is set to On, but your
machine does not connect a fax call when
you lift an extension or external telephone
handset, press the remote activation code
l 51.
If you send faxes from a computer on the
same telephone line and the machine
intercepts them, set Fax Detect to Off.
a Press .
b Press All Settings.
c Swipe up or down, or press a or b to
display Fax.
d Press Fax.
e Swipe up or down, or press a or b to
display Setup Receive.
f Press Setup Receive.
g Swipe up or down, or press a or b to
display Fax Detect.
h Press Fax Detect.
i Press On (or Off).
j Press .
Chapter 5
58
Fax Preview
(Monochrome only)
5
How to preview a received fax5
You can view received faxes on the
Touchscreen by pressing Fax and then
Received Faxes . When the
machine is in Ready mode, a popup message
will appear on the Touchscreen to alert you of
new faxes.
Setting Fax Preview 5
a Press .
b Press Fax Preview.
c Press On (or Off).
d Press Yes.
e The Touchscreen will tell you that any
future faxes will not be printed as you
receive them.
Press Yes.
f Press .
NOTE
When Fax Preview is turned on, a backup
copy of received faxes will not be printed
for Fax Forwarding and PC-Fax Receiving
operations, even if you have set Backup
Print to On.
Using Fax Preview 5
When you receive a fax, you will see a pop-up
message on the Touchscreen. (For example:
New Fax:01 [View])
a Press View.
The Touchscreen will display the fax list.
NOTE
The fax list includes the old faxes and the
new fax. The new fax is indicated by a
blue mark next to the fax.
If you want to see a fax that has already
been previewed, press Fax and
Received Faxes.
b Swipe up or down, or press a or b to
display the fax number of the fax you
want to see.
c Press the fax you want to see.
NOTE
If your fax is large there may be a delay
before it is displayed.
The Touchscreen will show the current
page number and total pages of the fax
message. When your fax message is over
99 pages the total number of pages will be
shown as “XX”.
Receiving a fax
59
5
Press the Touchscreen or Touchpanel
to perform the following operations.
d Press .
How to print a fax 5
a Press Fax.
b Press Received Faxes.
c Press the fax you want to view.
d Press Start.
If the fax is multiple pages, go to
step e.
If the fax is a single page, it will start
printing. Go to step f.
e Do one of the following:
Press Print All Pages to print
all pages of the fax. Go to step f.
Press Print Displayed Only to
print the displayed page.
Go to step g.
Press Print From Displayed to
print from the displayed page to the
last page. Go to step g.
f Do one of the following:
To delete the fax, press Yes.
To keep the fax in the memory,
press No.
g Press .
Description
Enlarge the fax.
Reduce the fax.
or
Scroll vertically.
or
Scroll horizontally.
Rotate the fax clockwise.
Delete the fax.
Press Yes to confirm.
Go back to the previous page.
Go to the next page.
Go back to the fax list.
Start Print the fax.
Do one of the following:
Press Print All Pages
to print the whole fax
message.
Press
Print Displayed Only
to only print the displayed
page.
Press
Print From Displayed
to print from the displayed
page to the last page.
Chapter 5
60
How to print all faxes in the list 5
a Press Fax.
b Press Received Faxes.
c Press Print/Delete.
d Do one of the following:
To print all new faxes, press
Print All(New Faxes).
To print all old faxes, press
Print All(Old Faxes).
e Press .
How to delete all faxes in the list 5
a Press Fax.
b Press Received Faxes.
c Press Print/Delete.
d
Do one of the following:
To delete all new faxes, press
Delete All(New Faxes).
To delete all old faxes, press
Delete All(Old Faxes).
e Press Yes to confirm.
f Press .
Turning off Fax Preview 5
a Press .
b Press Fax Preview.
c Press Off.
d Press Yes to confirm.
e If there are faxes stored in the memory,
do one of the following:
If you do not want to print the stored
faxes, press Continue.
The machine asks you to confirm the
deletion of the stored faxes.
Press Yes to confirm. Your faxes will
be deleted.
If you want to print all the stored
faxes, press
Print All Faxes Before Delete
.
If you do not wish to turn off Fax
Preview, press Cancel.
Press .
61
6
6
Voice operations 6
Fax/Tel mode 6
When the machine is in Fax/Tel mode, it will
use the F/T Ring (fast double-ring) to alert
you to pick up a voice call.
If you are at an external telephone, lift the
handset of the external telephone, and then
press Pickup to answer.
If you are at an extension telephone, you'll
need to lift the handset during the F/T Ring
Time and then press #51 between the fast
double-rings. If no one is on the line, or if
someone wants to send you a fax, send the
call back to the machine by pressing l 51.
Caller ID
(U.K. and Ireland only) 6
The Caller ID feature lets you use the Caller
ID subscriber service offered by many local
telephone companies. Call your telephone
company for details. This service shows the
telephone number, or name if it is available,
of your caller as the line rings.
After a few rings, the Touchscreen shows the
telephone number of your caller (and name, if
available). Once you answer a call, the Caller
ID information disappears from the
Touchscreen, but the call information stays
stored in the Caller ID memory.
You can view the list or choose one of these
numbers to fax to, add to Address Book, or
delete from the history. (See Caller ID history
on page 70.)
The ID Unknown message means the
call originated outside your Caller ID
service area.
The ID Withheld message means the
caller has intentionally blocked the
transmission of their information.
You can print a list of the Caller ID information
received by your machine. (See Advanced
User’s Guide: How to print a report.)
NOTE
The Caller ID service varies with different
carriers. Call your local telephone
company to find out about the kind of
service available in your area.
Setting the Caller ID to On 6
If you have Caller ID on your line, then this
function should be set to On to display the
caller's telephone number on the
Touchscreen as the telephone rings.
a Press .
b Press All Settings.
c Swipe up or down, or press a or b to
display Fax.
d Press Fax.
e Swipe up or down, or press a or b to
display Miscellaneous.
f Press Miscellaneous.
g Press Caller ID.
h Press On (or Off).
i Press .
Telephone and external devices 6
Chapter 6
62
Telephone services 6
Your machine supports the Caller ID
subscriber telephone service that some
telephone companies offer.
Features like Voice Mail, Call Waiting, Call
Waiting/Caller ID, answering services, alarm
systems or other custom features on one
telephone line may create problems with the
operation of your machine.
NOTE
Caller ID is available for U.K. and Ireland
only.
Setting the Telephone Line
Type 6
If you are connecting the machine to a line
that features PBX or ISDN to send and
receive faxes, it is also necessary to change
the Telephone Line Type accordingly by
completing the following steps.
a Press .
b Press All Settings.
c Swipe up or down, or press a or b to
display Initial Setup.
d Press Initial Setup.
e Swipe up or down, or press a or b to
display Phone Line Set.
f Press Phone Line Set.
g Press Normal, PBX or ISDN.
h Do one of the following:
If you choose PBX, go to step i.
If you choose ISDN or Normal, go to
step l.
i Press On or Always.
NOTE
If you choose On, the machine dials a
prefix number before the fax number you
dial only when R is pressed.
If you choose Always, the machine
always automatically dials a prefix number
before the fax number.
j Press Dial Prefix.
k Enter the prefix number using the
keyboard on the Touchscreen.
Press OK.
NOTE
You can use the numbers 0 to 9, #, l and !.
You cannot use ! with any other numbers
or characters.
l Press .
Telephone and external devices
63
6
PBX and TRANSFER 6
The machine is initially set to Normal, which
lets the machine connect to a standard PSTN
(Public Switched Telephone Network) line.
However, many offices use a central
telephone system or Private Branch
Exchange (PBX). Your machine can be
connected to most types of PBX. The
machine's recall feature supports timed break
recall only (TBR). TBR will work with most
PBX systems allowing you to gain access to
an outside line, or transfer calls to another
extension. The feature works when the R on
the Touchscreen is pressed.
NOTE
You can program a press of the R button
as part of a number stored in Address
Book. When programming the Address
Book number, press R first (the
Touchscreen shows ‘!’), then enter the
telephone number. If you do this, you do
not need to press R each time before you
dial using an Address Book. (See Storing
numbers on page 70.) However, if your
Telephone Line Type is not set to PBX on
the machine, you cannot use the Address
Book number that the R is programmed
into.
Connecting an external
TAD (telephone
answering device)
6
You may choose to connect an external
answering device. However, when you have
an external TAD on the same telephone line
as the machine, the TAD answers all calls
and the machine “listensfor fax calling
(CNG) tones. If it hears them, the machine
takes over the call and receives the fax. If it
does not hear CNG tones, the machine lets
the TAD continue playing your outgoing
message so your caller can leave a voice
message.
The TAD must answer within four rings (the
recommended setting is two rings). The
machine cannot hear CNG tones until the
TAD has answered the call, and with four
rings, there are only 8 to 10 seconds of CNG
tones left for the fax “handshake”. Make sure
you carefully follow the instructions in this
guide for recording your outgoing message.
We do not recommend using the toll saver
feature on your external answering machine if
it exceeds five rings.
NOTE
If you do not receive all your faxes,
shorten the Ring Delay setting on your
external TAD.
1TAD
When the TAD answers a call, the
Touchscreen shows Telephone.
1
1
Chapter 6
64
IMPORTANT
DO NOT connect a TAD elsewhere on the
same telephone line.
Connections settings 6
The external TAD must be connected as
shown in the previous illustration.
a Using both hands, use the finger holds
on each side of the machine to lift the
scanner cover into the open position.
b Carefully guide the telephone line cord
into the cable channel and out the back
of the machine.
c Lift the scanner cover to release the
lock. Gently push the scanner cover
support down and close the scanner
cover using both hands.
d Set your external TAD to one or two
rings. (The machine's Ring Delay setting
does not apply.)
e Record the outgoing message on your
external TAD.
f Set the TAD to answer calls.
g Set the Receive Mode to
External TAD. (See Choose the
Receive Mode on page 53.)
Recording an outgoing
message (OGM) on an
external TAD 6
Timing is important in recording this
message.
a Record 5 seconds of silence at the
beginning of your message. (This allows
your machine time to listen for the fax
CNG tones of automatic transmissions
before they stop.)
b Limit your speaking to 20 seconds.
NOTE
We recommend beginning your OGM with
an initial 5 second silence because the
machine may not hear the fax tones over
a voice. You may try omitting this pause,
but if your machine has trouble receiving,
then you must re-record the OGM to
include it.
Multi-line connections (PBX) 6
We suggest you ask the company who
installed your PBX to connect your machine.
If you have a multi-line system, we suggest
you ask the installer to connect the unit to the
last line on the system. This prevents the
machine being activated each time the
system receives telephone calls. If all
incoming calls will be answered by a
switchboard operator, we recommend that
you set the Receive Mode to Manual.
We cannot guarantee that your machine will
operate correctly under all circumstances
when connected to a PBX. Any difficulties
with sending or receiving faxes should be
reported first to the company who handles
your PBX.
NOTE
Make sure the Telephone Line Type is set
to PBX. (See Setting the Telephone Line
Type on page 62.)
Telephone and external devices
65
6
External and extension
telephones
6
Connecting an external or
extension telephone 6
You can connect a separate telephone to
your machine as shown in the diagram below.
1 Extension telephone
2 External telephone
NOTE
Please make sure you use an external
telephone with a cable no more than
3 metres long.
Operation from external and
extension telephones 6
If you answer a fax call on an extension or an
external telephone, you can make your
machine take the call by using the Remote
Activation Code. When you press the Remote
Activation Code l 51, the machine starts to
receive the fax.
If the machine answers a voice call and fast
double-rings for you to take over, use the
Remote Deactivation Code #51 to take the
call at an extension telephone. (See F/T Ring
Time (Fax/Tel mode only) on page 56.)
If you answer a call and no one is on
the line:
6
You should assume that you're receiving a
manual fax.
Press l 51 and wait for the chirp or until the
Touchscreen shows Receiving, and then
hang up.
NOTE
You can also use the Fax Detect feature to
make your machine automatically take the
call. (See Fax Detect on page 57.)
1
2
Chapter 6
66
Using extension telephones
(U.K. only) 6
Your premises may already be wired with
parallel extension telephones, or you may
plan to add extension telephones to your line,
as well as your machine. While the simplest
arrangement is a straightforward parallel
connection, there are some problems with
this. The most obvious is inadvertent
interruption of a facsimile transmission
caused by someone picking up an extension
telephone to make an outgoing call. Also, the
remote activation code feature may not
operate reliably in such a simple
configuration.
This machine may also be set to make a
delayed transmission (i.e. a transmission at a
pre-set time). This pre-set job may coincide
with someone picking up an extension
handset.
These problems can easily be eliminated, if
you arrange modification of your extension
wiring circuit, such that extension devices are
connected “downstream” of your machine in
a master/slave configuration (see fig. 2). In
this configuration the machine can always
detect whether a telephone is in use. Thus it
will not attempt to seize the line during that
time. This is known as “telephone off-hook
detection.”
The inadvisable configuration is shown in
figure 1, and the recommended master/slave
configuration is shown in figure 2.
This new connection configuration can be
arranged by contacting BT, Kingston upon
Hull Telecommunications, your PBX
maintainer or a qualified telephone
installation company as appropriate. Simply
explained, the extension telephone circuit
should be terminated on a normal modular
plug (BT 431A style), which in turn should be
put into the modular socket of the white
“T”-shaped connector provided as part of the
line cord assembly.
Inadvisable connection of extension
sockets (Fig. 1.)
6
1 Extension socket
2 Master socket
3 Incoming line
Recommended connection of extension
sockets (Fig. 2.)
6
1 Extension socket
2 Master socket
3 Incoming line
The fax machine must be plugged into the
master socket.
NOTE
These telephones are now connected as
external devices (See Connecting an
external or extension telephone
on page 65.), because they are
connected to the fax machine via the
T-connector.
FAX
11
2
3
FAX
11
2
3
Telephone and external devices
67
6
Using remote codes 6
Remote Activation Code 6
If you answer a fax call on an extension or
external telephone, you can tell your machine
to receive it by dialling the Remote Activation
Code l 51. Wait for the chirping sounds and
then replace the handset. (See Fax Detect
on page 57.)
If you answer a fax call at the external
telephone, you can make the machine
receive the fax by pressing Fax Start and
choose Receive.
Remote Deactivation Code 6
If you receive a voice call and the machine is
in Fax/Tel mode, it will start to sound the F/T
Ring (fast double-ring) after the initial ring
delay. If you pick up the call on an extension
telephone, you can turn the F/T Ring off by
pressing #51 (make sure you press this
between the rings).
If the machine answers a voice call and fast
double-rings for you to take over, you can
take the call at the external telephone by
pressing Pickup.
Changing the remote codes 6
If you want to use Remote Activation, you
have to turn on the remote codes. The preset
Remote Activation Code is l 51. The preset
Remote Deactivation Code is #51. If you
want to, you can replace them with your own
codes.
a Press .
b Press All Settings.
c Swipe up or down, or press a or b to
display Fax.
d Press Fax.
e Swipe up or down, or press a or b to
display Setup Receive.
f Press Setup Receive.
g Swipe up or down, or press a or b to
display Remote Codes.
h Press Remote Codes.
i Do one of the following:
If you want to change the Remote
Activation Code, press Act.Code.
Enter the new code, and then press
OK.
If you want to change the Remote
Deactivation Code, press
Deact.Code.
Enter the new code, and then press
OK.
If you do not want to change the
Codes, go to step j.
If you want to turn the Remote Codes
Off (or On), press Remote Codes.
Press Off (or On).
j Press .
NOTE
If you are always disconnected when
accessing your external TAD remotely, try
changing the Remote Activation Code and
Remote Deactivation Code to another
three-digit code using the numbers 0-9, l,
#.
Remote Codes might not work with some
telephone systems.
68
7
How to dial 7
Manual dialling 7
a Load your document.
b Do one of the following:
When Fax Preview is set to off, press
Fax.
When Fax Preview is set to on, press
Fax and then Sending Faxes.
c Press all of the digits of the fax number.
d Press Fax Start.
Dialling from the Address
Book 7
a Load your document.
b Press Fax.
c Press Address Book.
d Do one of the following:
Swipe up or down, or press a or b to
display the number you want to dial.
Press , and then enter the first
letter of the name and press OK.
Press the name you want to dial.
If the name has two numbers, go to
step e.
If the name has one number, go to
step f.
NOTE
If the LDAP search is available, the result
will be shown on the Touchscreen with
. (For details, see Network User’s
Guide: LDAP operation using the control
panel.)
e Press the number you want to dial.
f To send a fax, press Apply.
g Press Fax Start.
The machine scans and sends the fax.
Dialling and storing numbers 7
Dialling and storing numbers
69
7
Fax Redial 7
If you are sending a fax automatically and the
line is busy, the machine will automatically
redial up to three times at five minute
intervals.
Redial only works if you dialled from the
machine.
a Load your document.
b Do one of the following:
When Fax Preview is set to off, press
Fax.
When Fax Preview is set to on, press
Fax and then Sending Faxes.
c Press Redial.
d Press Fax Start.
NOTE
In Real Time Transmission the automatic
redial feature does not work when you are
using the scanner glass.
Redial will change to Pause when you
enter a fax number.
Additional Dialling
Operations
7
Outgoing Call history 7
The last 30 numbers you sent a fax to will be
stored in the outgoing call history. You can
choose one of these numbers to fax to, add to
the Address Book, or delete from the history.
a Press Fax.
b Press Call History.
c Press Outgoing Call.
d Press the number you want.
e Do one of the following:
To send a fax, press Apply.
Press Fax Start.
If you want to store the number,
press Edit and then press
Add to Address Book.
(See Advanced User’s Guide:
Storing Address Book numbers from
Outgoing Calls.)
If you want to delete the number from
the Outgoing Call history list, press
Edit and then press Delete.
Press Yes to confirm.
Press .
Chapter 7
70
Caller ID history 7
This feature requires the Caller ID subscriber
service offered by many local telephone
companies. (See Caller ID (U.K. and Ireland
only) on page 61.)
The numbers, or names if available, from the
last 30 faxes and telephone calls you
received will be stored in the Caller ID history.
You can view the list or choose one of these
numbers to fax to, add to Address Book, or
delete from the history. When the thirty-first
call comes into the machine, it replaces
information about the first call.
NOTE
If you are not a Caller ID subscriber, you
can still view call dates from the Caller ID
history and delete entries from the list.
a Press Fax.
b Press Call History.
c Press Caller ID history.
d Press the number or the name you want.
e Do one of the following:
To send a fax, press Apply.
Press Fax Start.
If you want to store the number,
press Edit and then press
Add to Address Book.
(See Advanced User’s Guide:
Storing Address Book numbers from
the Caller ID history.)
If you want to delete the number from
the Caller ID history list, press Edit
and then press Delete.
Press Yes to confirm.
Press .
NOTE
You can print the Caller ID list.
(See Advanced User’s Guide: How to
print a report.)
Storing numbers 7
You can set up your machine to do the
following types of easy dialling: Address Book
and Groups for broadcasting faxes. When
you dial an Address Book number, the
Touchscreen shows the number.
NOTE
If you lose electrical power, the Address
Book numbers that are in the memory will
not be lost.
Storing a pause 7
When you are storing Address Book
numbers, you can insert one or more 3.5
second pauses by pressing Pause on the
Touchscreen.
Storing Address Book
numbers 7
You can store up to 100 Addresses with a
name, and each name can have two
numbers.
a Press Fax.
b Press Address Book.
c Press Edit.
d Press Add New Address.
e Press Name.
f Enter the name using the keyboard on
the Touchscreen (up to 16 characters).
Press OK.
(To help you enter letters, see Entering
Text on page 175.)
g Press Address 1.
h Enter the first fax or telephone number
using the keyboard on the Touchscreen
(up to 20 digits).
Press OK.
Dialling and storing numbers
71
7
NOTE
Be sure to include the area code when
entering a fax or telephone number.
Depending on the country, the Caller ID
names and history may not be displayed
correctly if the area code is not registered
with the fax or telephone number.
If you downloaded Internet Fax:
If you want to store an E-mail address to
use with Internet Fax or Scan to E-mail
server, press and enter the E-mail
address then press OK. (See Entering
Text on page 175.)
i If you want to store the second fax or
telephone number, press Address 2.
Enter the second fax or telephone
number using the keyboard on the
Touchscreen (up to 20 digits).
Press OK.
j Press OK to confirm.
k Do one of the following:
To store another Address Book
number, repeat steps c to j.
To finish storing numbers, press .
Changing Address Book
names or numbers 7
You can change or delete an Address Book
name or number that has already been
stored.
a Press Fax.
b Press Address Book.
c Press Edit.
d Do one of the following:
Press Change to edit the names or
numbers. Go to step e.
Press Delete to display Delete.
Delete the numbers you want to
delete by pressing them to display a
red check mark.
Press OK.
Press Yes to confirm. Go to step i.
e Swipe up or down, or press a or b to
display the number you want to change.
f Press the number you want to change.
Chapter 7
72
g Do one of the following:
If you want to change the name,
press Name.
Enter the new name (up to 16
characters) using the keyboard on
the Touchscreen. (To help you enter
letters, see Entering Text
on page 175.)
Press OK.
If you want to change the first fax or
telephone number, press
Address 1.
Enter the new fax or telephone
number (up to 20 digits) using the
keyboard on the Touchscreen.
Press OK.
If you want to change the second fax
or telephone number, press
Address 2.
Enter the new fax or telephone
number (up to 20 digits) using the
keyboard on the Touchscreen.
Press OK.
NOTE
How to change the stored name or
number:
If you want to change a character or a
stored number, press d or c to position the
cursor to highlight the character or the
number you want to change, and then
press . Enter the new character or
number.
h Do one of the following:
Press OK to finish.
To change another Address Book
number, repeat steps c to h.
To change more details, go to g.
i Press .
73
8
8
How to copy 8
The following steps show the basic copy
operation.
a Do one of the following to load your
document:
Place the document face down in the
ADF.
(See Using the ADF on page 45.)
Place the document face down on
the scanner glass.
(See Using the scanner glass
on page 46.)
b Press Copy.
The Touchscreen shows:
1 No. of Copies
You can enter the number of copies by
using the dial pad.
c If you want more than one copy, enter
the number (up to 99).
d Press Mono Start or Colour Start.
Stop copying 8
To stop copying, press .
Making copies 8
1
Chapter 8
74
Copy preset settings 8
You can copy with a variety of settings that
are already set up for you in the machine
simply by pressing them.
The following preset settings are available.
Best Quality
Normal
2-sided(1i2)
2-sided(2i2) (MFC-J4710DW)
A4 i A3
2in1(ID)
2in1
Poster
Ink Save
Book
NOTE
If you change the main option for the
selected copy preset setting, the name
above the setting icon on the Touchscreen
will be changed to Normal.
For example, if you select
Best Quality and change the quality
option from Best, Normal will appear
above the preset icon.
a Load your document.
b Press Copy.
c Swipe left or right to display
Best Quality, Normal,
2-sided(1i2), 2-sided(2i2)
1
,
A4 i A3, 2in1(ID), 2in1, Poster,
Ink Save or Book, and then press the
option you want.
1
(For MFC-J4710DW)
d Enter the number of copies you want.
e Do one of the following:
If you want to change more settings,
go to step f.
If you do not want to change further
settings, go to step i.
f Press Options.
g Swipe up or down, or press a or b to
display the available settings, and then
press the setting you want to change.
h Swipe up or down, or press a or b to
display the available options, and then
press your new option.
Repeat steps g and h for each setting
you want to change.
If you have finished changing settings,
press OK.
NOTE
If you want to save the settings as a
Shortcut, press Save as Shortcut.
i Press Mono Start or Colour Start.
Making copies
75
8
Copy options 8
You can change the following copy settings.
Press Copy and then press Options. Swipe
up or down, or press a or b to scroll through
the copy settings. When the setting you want
is displayed, press it and choose your option.
When you have finished changing options,
press OK.
(Basic User’s Guide)
For details about changing the following copy
settings, see pages 75 to 76.
Paper Type
Paper Size
Tray Select (MFC-J4710DW)
(Advanced User’s Guide)
For details about changing the following copy
settings, see Advanced User’s Guide: Copy
options.
Quality
Enlarge/Reduce
Page Layout
2in1(ID)
Stack/Sort
Density
2-sided Copy
Ink Save Mode
Thin Paper Copy
Watermark Copy
Remove Background Colour
Book Copy
NOTE
If you want to sort copies, use the ADF.
Paper Type 8
If you are copying on a special type of paper,
set the machine for the type of paper you are
using to get the best print quality.
a Load your document.
b Press Copy.
c Enter the number of copies you want.
d Press Options.
e Swipe up or down, or press a or b to
display Paper Type.
f Press Paper Type.
g Swipe up or down, or press a or b to
display Plain Paper,
Inkjet Paper, Brother BP71,
Other Glossy or Transparency,
and then press the option you want to
set.
h If you do not want to change additional
settings, press OK.
i Press Mono Start or Colour Start.
Chapter 8
76
Paper Size 8
If you are copying on paper other than A4
size, you will need to change the Paper Size
setting. You can copy only on A4, A5, A3,
Photo (10 15 cm), Letter, Legal or Ledger
paper.
a Load your document.
b Press Copy.
c Enter the number of copies you want.
d Press Options.
e Swipe up or down, or press a or b to
display Paper Size.
f Press Paper Size.
g Swipe up or down, or press a or b to
display A4, A5, A3, 10x15cm, Letter,
Legal or Ledger, and then press the
option you want to set.
NOTE
(MFC-J4510DW)
If you choose A3, Legal or Ledger, the
precautions for loading paper will be
displayed. Read the information on the
Touchscreen and then confirm by
pressing OK.
If you are using the manual feed slot insert
only one sheet of paper at a time. (See
Loading paper in the manual feed slot
on page 33.)
h If you do not want to change further
settings, press OK.
i Press Mono Start or Colour Start.
Tray Select (MFC-J4710DW) 8
You can change the tray temporarily for the
next copy. To change the default tray setting,
see Tray use in Copy mode (MFC-J4710DW)
on page 39.
a Load your document.
b Press Copy.
c Enter the number of copies you want.
d Press Options.
e Swipe up or down, or press a or b to
display Tray Select.
f Press Tray Select.
g Press Tray #1, Tray #2 or
Auto Tray Select.
h If you do not want to change additional
settings, press OK.
i Press Mono Start or Colour Start.
77
9
9
PhotoCapture Center™
operations
(PHOTO mode)
9
Even if your machine is not connected to your
computer, you can print photos directly from
digital camera media or a USB Flash memory
drive. (See Print Images on page 80.)
You can scan documents and save them
directly to a memory card or USB Flash
memory drive. (See How to scan to a memory
card or USB Flash memory drive
on page 81.)
If your machine is connected to a computer,
you can use your computer to access a
memory card or USB Flash memory drive that
is inserted in the front of the machine.
(See Software User’s Guide: PhotoCapture
Center™ (Windows
®
).)
(See Software User’s Guide: Remote Setup
& PhotoCapture Center™ (Macintosh).)
Using a memory card or USB
Flash memory drive 9
Your Brother machine has media drives
(slots) for use with the following popular
digital camera media: Memory Stick Duo™,
Memory Stick PRO Duo™, SD Memory Card,
SDHC Memory Card, SDXC Memory Card,
MultiMedia Card, MultiMedia Card plus and
USB Flash memory drives.
The PhotoCapture Center™ feature lets you
print digital photos from your digital camera at
high resolution to get photo quality printing.
Printing photos from a memory
card or USB Flash memory drive
9
Chapter 9
78
Getting started 9
a Open the media slot cover.
b Firmly put a memory card or USB Flash memory drive into the correct slot.
1 USB Flash memory drive
IMPORTANT
The USB direct interface supports only a USB Flash
memory drive, a PictBridge-compatible camera, or a
digital camera that uses the USB mass storage as
standard. Any other USB devices are not supported.
2 Memory card slot
Slot Compatible memory cards
Upper slot
Memory Stick Duo
Memory Stick PRO Duo™
Memory Stick Micro™
(Adapter required)
Lower slot
SD Memory Card
SDHC Memory Card
SDXC Memory Card
MultiMedia Card
MultiMedia Card plus
miniSD (Adapter required)
miniSDHC (Adapter required)
microSD (Adapter required)
microSDHC (Adapter required)
MultiMedia Card mobile
(Adapter required)
1
2
Printing photos from a memory card or USB Flash memory drive
79
9
IMPORTANT
DO NOT insert a Memory Stick Duo™ into the lower SD slot, this may cause damage to the
machine.
DO NOT insert more than one media card in the machine at the same time. Doing this may
cause damage to the machine.
DO NOT unplug the power cord or remove the memory card or USB Flash memory drive from
the media drive (slot) or USB direct interface while the machine is reading or writing to the
memory card or USB Flash memory drive. You will lose your data or damage the card.
The machine can only read one device at a time.
Chapter 9
80
Print Images 9
View Photos 9
You can preview your photos on the
Touchscreen before you print them. If your
photos are large files there may be a delay
before each photo is displayed.
a Open the media slot cover.
b Put the memory card or USB Flash
memory drive in the correct slot.
c Press Photo.
d Swipe left or right to display
View Photos.
e Press View Photos.
Press OK.
f Do one of the following:
If you want to choose photos to print
or print more than one for an image,
go to step g.
If you want to print all photos, press
Print All. Press Yes to confirm.
Go to step j.
g Swipe left or right, or press d or c to
display the photo you want to print, and
then press it.
h Press + or - to select the number of
copies you want to print.
Press OK.
i Repeat steps g and h until you have
chosen all the photos you want to print.
j Press OK.
k Read and confirm the displayed list of
options and do one of the following:
If you want to change the print
settings, press Print Settings.
(See Advanced Users Guide:
PhotoCapture Center print
settings.)
If you do not want to change any
settings, go to step l.
l Press Start to print.
Printing photos from a memory card or USB Flash memory drive
81
9
PhotoCapture Center™
print settings
9
You can change the print settings temporarily
for the next print.
The machine returns to its default settings
after 1 minute.
NOTE
You can save the print settings you use
most often by setting them as the default.
(See Advanced User’s Guide: Setting
your changes as a new default.)
How to scan to a
memory card or USB
Flash memory drive
9
You can scan monochrome and colour
documents onto a memory card or USB Flash
memory drive. Monochrome documents will
be stored in PDF (*.PDF) or TIFF (*.TIF) file
formats. Colour documents may be stored in
PDF (*.PDF) or JPEG (*.JPG) file formats.
The factory setting is Colour, 200 dpi and
the default format is PDF. The machine
automatically creates file names based on
the current date. (See Quick Setup Guide.)
For example, the fifth image scanned on July
1, 2012 would be named 01071205.PDF.
You can change the colour and resolution.
For MFC-J4510DW
a Load your document.
b Open the media slot cover.
c Put the memory card or USB Flash
memory drive in the correct slot.
d Press Scan to Media.
IMPORTANT
DO NOT take out the memory card or
USB Flash memory drive while the
machine is reading or writing to it to avoid
damaging the card, USB Flash memory
drive, or the data stored on them.
Chapter 9
82
e Press Options.
Do one of the following:
To change the scan type, swipe up or
down, or press a or b to display
Scan Type.
Press Scan Type and choose
Colour or Black and White.
To change the resolution, swipe up
or down, or press a or b to display
Resolution.
Press Resolution and choose
100 dpi, 200 dpi, 300 dpi,
600 dpi or Auto.
To change the file type, swipe up or
down, or press a or b to display
File Type.
Press File Type and choose PDF,
JPEG or TIFF.
If you want to change the file name,
swipe up or down, or press a or b to
display File Name. Press
File Name and enter the file name.
You can only change the first
6 characters.
Press OK.
To scan multiple documents on the
scanner glass, swipe up and down, or
press a or b to display Auto Crop.
Press Auto Crop and choose On
(or Off).
(For details, see Advanced User’s
Guide: Auto Crop.)
To remove background colour, swipe
up or down, or press
a or b to display
Remove Background Colour.
Press
Remove Background Colour and
choose Low, Medium, High or Off.
NOTE
Remove Background Colour removes
the base colour of documents to make the
scanned data more recognizable.
To start scanning without changing
additional settings, go to step f.
NOTE
If you chose colour in the scan type
setting, you cannot choose the file type
TIFF.
If you chose monochrome in the scan type
setting, you cannot choose the file type
JPEG.
f When you have finished changing
settings, press OK.
NOTE
If you want to save the settings as a
Shortcut, press Save as Shortcut.
g Press Start.
For MFC-J4710DW
a Load your document.
If you want to scan a 2-sided document,
load your document in the ADF.
NOTE
You can scan a 2-sided document up to
Legal size from the ADF.
b Open the media slot cover.
c Put the memory card or USB Flash
memory drive in the correct slot.
d Press Scan to Media.
IMPORTANT
DO NOT take out the memory card or
USB Flash memory drive while the
machine is reading or writing to the
memory card or USB Flash memory drive
to avoid damaging the card, USB Flash
memory drive, or the data stored on them.
e Press Options.
Printing photos from a memory card or USB Flash memory drive
83
9
f Do one of the following:
If you loaded your document in the
ADF to scan a 2-sided document,
swipe up or down, or press a or b to
display 2-sided Scan.
Press 2-sided Scan. Go to
step g.
If you want to scan a single-sided
document, go to step h.
g Do one of the following:
If your document is flipped on the
long edge, press
2-sided Scan: Long Edge.
If your document is flipped on the
short edge, press
2-sided Scan: Short Edge.
h Do one of the following:
To change the scan type, swipe up or
down, or press a or b to display
Scan Type.
Press Scan Type and choose
Colour or Black and White.
To change the resolution, swipe up
or down, or press a or b to display
Resolution.
Press Resolution and choose
100 dpi, 200 dpi, 300 dpi,
600 dpi or Auto.
To change the file type, swipe up or
down, or press a or b to display
File Type.
Press File Type and choose PDF,
JPEG or TIFF.
If you want to change the file name,
swipe up or down, or press a or b to
display File Name. Press
File Name and enter the file name.
You can only change the first
6 characters.
Press OK.
To scan multiple documents on the
scanner glass, swipe up and down,
or press a or b to display
Auto Crop.
Press Auto Crop and choose On
(or Off).
(For details, see Advanced User’s
Guide: Auto Crop.)
To skip blank pages, swipe up or
down, or press a or b
to display
Skip Blank Page. Press
Skip Blank Page and then press
On (or Off).
NOTE
Skip Blank Page is available only
when using the ADF.
Long edge
Portrait Landscape
Short edge
Portrait Landscape
Chapter 9
84
To remove background colour, swipe
up or down, or press a or b to display
Remove Background Colour.
Press
Remove Background Colour
and choose Low, Medium, High or
Off.
NOTE
Remove Background Colour
removes the base colour of documents to
make the scanned data more
recognizable.
To start scanning without changing
additional settings, go to step i.
NOTE
If you chose colour in the scan type
setting, you cannot choose TIFF.
If you chose black & white in the scan type
setting, you cannot choose JPEG.
i When you have finished changing
settings, press OK.
NOTE
If you want to save the settings as a
Shortcut, press Save as Shortcut.
j Press Start.
85
10
10
Printing a document 10
The machine can receive and print data from
your computer. To print from a computer, you
must install the printer driver.
(See Software User’s Guide: Printing
(Windows
®
).)
(See Software User’s Guide: Printing and
Faxing (Macintosh).)
a Install the Brother printer driver from the
CD-ROM. (See Quick Setup Guide.)
b From your application, choose the Print
command.
c Choose the name of your machine in the
Print dialog box and click Properties or
Preferences, depending on the
application you are using.
d Choose the settings you want to change
in the Properties dialog box.
Commonly used settings include:
Media Type
Print Quality
Paper Size
Orientation
Colour / Greyscale
Ink Save Mode
Scaling
2-sided / Booklet
e Click OK.
f Click Print (or OK depending on the
application you are using) to begin
printing.
How to print from a computer 10
86
11
Before scanning 11
To use the machine as a scanner, install a scanner driver. If the machine is on a network,
configure it with a TCP/IP address.
Install the scanner drivers from the CD-ROM. (See Quick Setup Guide: Install MFL-Pro Suite.)
Configure the machine with a TCP/IP address if network scanning does not work.
(See Software User’s Guide: Configuring Network Scanning for Windows
®
.)
How to scan to a computer 11
How to scan to a computer
87
11
Scanning a document as a PDF file using
ControlCenter4 (Windows
®
) 11
(For detailed information, see Software User’s Guide: Scanning.)
NOTE
The screens on your PC may vary depending on your model.
This section is based on using the Advanced Mode of ControlCenter4.
ControlCenter4 is a software utility that lets you quickly and easily access the applications you use
most often. Using ControlCenter4 eliminates the need to manually launch specific applications.
a Load your document. (See How to load documents on page 45.)
b Open ControlCenter4 by clicking /All Programs/Brother/MFC-XXXX (where XXXX is
your model name)/ControlCenter4. The ControlCenter4 application will open.
c If the ControlCenter4 Mode screen appears, choose the Advanced Mode and then click OK.
d Make sure the machine you want to use is selected from the Model pull-down list.
Chapter 11
88
e Set the scanning configuration.
Click Configuration, and then select Button settings, Scan and File.
The configuration dialog box appears. You can change the default settings.
1 Choose PDF (*.pdf) from the File Type pull-down list.
2 You can enter the file name you want to use for the document.
3 You can save the file to the default folder, or choose your preferred folder by clicking the
(Browse) button.
4 You can choose a scanning resolution from the Resolution pull-down list.
5 You can choose the document size from the Document Size pull-down list.
f Click OK.
1
2
4
5
3
How to scan to a computer
89
11
g Click File.
h Press Scan.
The machine starts the scanning process. The folder where the scanned data is saved will
open automatically.
Chapter 11
90
How to change the machine’s SCAN mode
settings for PDF scanning
11
You can change your machine’s Scan mode settings using ControlCenter4. (Windows
®
)
a Open ControlCenter4 by clicking /All Programs/Brother/MFC-XXXX (where XXXX is
your model name)/ControlCenter4. The ControlCenter4 application will open.
b Make sure the machine you want to use is selected from the Model pull-down list.
c Click the Device Settings tab.
d Click Device Scan Settings.
How to scan to a computer
91
11
e Choose the File tab. You can change the default settings.
1 Choose PDF (*.pdf) from the File Type pull-down list.
2 You can enter the file name you want to use for the document.
3 You can save the file to the default folder, or choose your preferred folder by clicking the
(Browse) button.
4 You can choose a scanning resolution from the Resolution pull-down list.
5 You can choose the document size from the Document Size pull-down list.
f Click OK.
How to scan a document as a PDF file using the Touchscreen 11
a Load your document. (See How to load documents on page 45.)
b Press Scan.
c Swipe left or right to display to File.
1
2
4
5
3
Chapter 11
92
d Press to File.
will be displayed in the centre of the Touchscreen highlighted in blue.
e Press OK.
When the machine is connected to a network, press the PC Name.
Do one of the following:
If you want to use the default settings, go to step j.
If you want to change the default settings, go to step f.
f Press Options.
g Press Set with Touch Panel.
Press On.
h Choose the settings for 2-sided Scan
1
, Scan Type, Resolution, File Type,
Skip Blank Page
1
and Remove Background Colour as required.
1
(For MFC-J4710DW)
i Press OK.
j Press Start.
The machine starts the scanning process.
NOTE
The following scan modes are available.
to OCR
to File
to Image
to Media
to E-mail
to E-mail Server
to FTP
to Network
WS Scan
1
1
Windows
®
users only. (Windows Vista
®
SP2 or later and Windows
®
7)
(See Software User’s Guide: Using Web Services for scanning on your network (Windows Vista
®
SP2 or later and
Windows
®
7).)
93
A
A
Replacing the ink
cartridges
A
Your machine is equipped with an ink dot
counter. The ink dot counter automatically
monitors the level of ink in each of the
four cartridges. When the machine detects an
ink cartridge is running out of ink, the machine
will display a message.
The Touchscreen will show which ink
cartridge is low or needs replacing. Be sure to
follow the Touchscreen prompts to replace
the ink cartridges in the correct order.
Even though the machine tells you to replace
an ink cartridge, there will be a small amount
of ink left in the ink cartridge. It is necessary
to keep some ink in the ink cartridge to
prevent air from drying out and damaging the
print head assembly.
CAUTION
If ink gets in your eyes, wash it out with
water at once and call a doctor if you are
concerned.
IMPORTANT
Brother multifunction machines are
designed to work with ink of a particular
specification and will work to a level of
optimum performance and reliability when
used with Brother Original ink cartridges.
Brother cannot guarantee this optimum
performance and reliability if ink or ink
cartridges of other specifications are
used. Brother does not therefore
recommend the use of cartridges other
than Brother Original cartridges or the
refilling of used cartridges with ink from
other sources. Damage to the product
caused by the use of consumables
manufactured by third parties may not be
covered by the product warranty. Please
refer to the terms of the product warranty.
a Open the ink cartridge cover.
If one or more of the ink cartridges have
reached the end of their life, the
Touchscreen shows
B&W 1-sided Print Only or
Cannot Print.
Routine maintenance A
94
b Press the lock release lever as shown to
release the cartridge indicated on the
Touchscreen. Remove the cartridge
from the machine.
c Open the new ink cartridge bag for the
colour indicated on the Touchscreen,
and then take out the ink cartridge.
d Turn the green release lever on the
orange protective packing (1)
counterclockwise until it clicks to release
the vacuum seal. Then remove the
orange protective packing as shown.
IMPORTANT
DO NOT touch the cartridge in the area
indicated (2); this can prevent the
machine from detecting the cartridge.
1
2
1
2
Routine maintenance
95
A
e Each colour has its own correct position.
Insert the ink cartridge in the direction of
the arrow on the label.
f Gently push the back of the ink cartridge
marked “PUSH” until the cartridge lever
lifts, and then close the ink cartridge
cover.
g The machine will automatically reset the
ink dot counter.
NOTE
If you replaced an ink cartridge, for
example Black, the Touchscreen may ask
you to verify that it was a brand new one
(for example, Did you change
Black). For each new cartridge you
installed, press Yes to reset the ink dot
counter for that colour. If the ink cartridge
you installed is not a brand new one, be
sure to press No.
If the Touchscreen shows
No Ink Cartridge or
Cannot Detect after you install the ink
cartridge check that the ink cartridge is a
brand new Brother Original cartridge and
that it is installed correctly. Remove the
ink cartridge and reinstall it slowly until the
cartridge lever lifts.
IMPORTANT
DO NOT take out ink cartridges if you do
not need to replace them. If you do so, it
may reduce the ink quantity and the
machine will not know the quantity of ink
left in the cartridge.
DO NOT touch the cartridge insertion slots.
If you do so, the ink may stain your skin.
If ink gets on your skin or clothing,
immediately wash it off with soap or
detergent.
If you mix the colours by installing an ink
cartridge in the wrong position, the
Touchscreen shows
Wrong Ink Colour. Check which ink
cartridges are not matched by colour to
their ink cartridge positions and move
them to their correct positions.
Once you open an ink cartridge, install it in
the machine and use it up within six
months of installation. Use unopened ink
cartridges by the expiration date written on
the cartridge package.
DO NOT dismantle or tamper with the ink
cartridge; this can cause the ink to leak out
of the cartridge.
96
Cleaning and checking
the machine
A
Cleaning the scanner glass A
a Unplug the machine from the electrical
socket.
b Lift the document cover (1). Clean the
scanner glass (2) and the white
plastic (3) with a soft lint-free cloth
moistened with a non-flammable glass
cleaner.
c In the ADF unit, clean the white bar (1)
and the glass strip (2) with a lint-free
cloth moistened with a non-flammable
glass cleaner.
(MFC-J4510DW)
(MFC-J4710DW)
2
1
3
2
1
2
1
Routine maintenance
97
A
NOTE
In addition to cleaning the glass strip with
a non-flammable glass cleaner, run your
finger tip over the glass strip to see if you
can feel anything on it. If you feel dirt or
debris, clean the glass strip again
concentrating on that area. You may need
to repeat the cleaning process three or
four times. To test, make a copy after each
cleaning attempt.
Cleaning the print head A
To maintain good print quality, the machine
will automatically clean the print head when
needed. You can start the cleaning process
manually if there is a print quality problem.
Clean the print head if you get a horizontal
line in the text or graphics, or blank text on
your printed pages. You can clean Black only,
three colours at a time
(Yellow/Cyan/Magenta), or all four colours at
once.
Cleaning the print head consumes ink.
Cleaning too often uses ink unnecessarily.
IMPORTANT
DO NOT touch the print head. Touching
the print head may cause permanent
damage and may void the print head's
warranty.
a Press .
NOTE
You can also press and Ink.
b Press Cleaning.
c Press Black, Colour or All.
The machine cleans the print head.
When cleaning is finished, the machine
will go back to the Ready mode
automatically.
i
When there is a
spot of dirt or
correction fluid
on the glass strip,
the printed
sample shows a
vertical line.
After the glass
strip is cleaned,
the vertical line is
gone.
98
NOTE
If you clean the print head at least five
times and the print has not improved, try
installing a new Brother Original
Innobella™ ink cartridge for each problem
colour. Try cleaning the print head again
up to five more times. If the print has not
improved call your Brother customer
service or local Brother dealer.
You can also clean the print head from
your PC.
(See Software User’s Guide:
Maintenance tab (Windows
®
).)
Checking the print quality A
If faded or streaked colours and text appear
on your printouts, some of the print head
nozzles may be clogged. You can check this
by printing the Print Quality Check Sheet and
looking at the nozzle check pattern.
a Press .
NOTE
You can also press and Ink.
b Press Test Print.
c Press Print Quality.
d Press OK.
The machine begins printing the Print
Quality Check Sheet.
e Check the quality of the four colour
blocks on the sheet.
f The Touchscreen asks you if the print
quality is OK.
Do one of the following:
If all lines are clear and visible, press
Yes to finish the Print Quality check
and go to step j.
If you can see missing short lines as
shown below, press No.
g The Touchscreen asks you if the print
quality is OK for black and then the three
colours.
Press Yes or No.
h The Touchscreen asks you if you want
to start cleaning.
Press OK.
The machine starts cleaning the print
head.
i After the cleaning procedure is finished,
press OK.
The machine prints the Print Quality
Check Sheet again. Return to step e.
j Press .
If you repeat this procedure at least five
times and the print quality is still poor,
replace the ink cartridge for the clogged
colour.
After replacing the ink cartridge, check
the print quality. If the problem still
exists, repeat the cleaning and test print
procedures at least five times for the
new ink cartridge. If ink is still missing,
call Brother customer service or your
local Brother dealer.
OK Poor
Routine maintenance
99
A
IMPORTANT
DO NOT touch the print head. Touching
the print head may cause permanent
damage and may void the print head's
warranty.
NOTE
When a print head nozzle is clogged, the
printed sample looks like this.
A4, Letter and Executive
A3, Ledger, Legal, A5, A6, envelopes,
Photo (10 15 cm), Photo L
(89 127 mm), Photo 2L (13 18 cm)
and Index Card (127 203 mm)
After the print head nozzle is cleaned, the
horizontal lines are gone.
Checking the print alignment A
If your printed text becomes blurred or
images become faded, you may need to
adjust the print alignment after transporting
the machine.
a Press .
NOTE
You can also press and Ink.
b Press Test Print.
c Press Alignment.
d Press OK.
The machine starts printing the
Alignment Check Sheet.
e For the “A” pattern, swipe up or down, or
press a or b to display the number of the
test print that has the least visible
vertical stripes (1-9), and then press it.
Press OK.
f For the “B” pattern, swipe up or down, or
press a or b to display the number of the
test print that has the least visible
vertical stripes (1-9), and then press it.
Press OK.
g For the “C” pattern, swipe up or down, or
press a or b to display the number of the
test print that has the least visible
vertical stripes (1-9), and then press it.
Press OK.
100
h For the “D” pattern, swipe up or down, or
press a or b to display the number of the
test print that has the least visible
vertical stripes (1-9), and then press it.
Press OK.
i Press .
101
B
B
Identifying your problem B
First, check the following.
The machine's power cord is connected correctly and the machine's power switch is turned on.
All of the protective parts have been removed.
Paper is inserted correctly in the paper tray.
The interface cables are securely connected to the machine and the computer, or the wireless
connection is set up on both the machine and your computer.
Touchscreen Messages
(See Error and maintenance messages on page 103.)
If you did not solve your problem with the above checks, identify your problem and then go to the
page suggested below.
Paper handling and Printing problems:
Printing Difficulties on page 123
Print Quality Difficulties on page 124
Paper Handling Difficulties on page 126
Printing Received Faxes on page 127
Telephone and Fax problems:
Telephone Line or Connections on page 128
Handling Incoming Calls on page 129
Receiving Faxes on page 128
Sending Faxes on page 128
Copying problems:
Copying Difficulties on page 129
Troubleshooting B
If you think there is a problem with your machine, check each of the items below first and follow
the troubleshooting tips.
You can correct most problems by yourself. If you need additional help, the Brother Solutions
Center offers the latest FAQs and troubleshooting tips.
Visit us at http://solutions.brother.com/
.
102
Scanning problems:
Scanning Difficulties on page 130
PhotoCapture Center Difficulties on page 130
Software and Network problems:
Software Difficulties on page 130
Network Difficulties on page 131
Difficulties when entering data on page 131
Troubleshooting
103
B
Error and maintenance messages B
As with any sophisticated office product, errors may occur and consumable items may need to be
replaced. If this happens, your machine identifies the error or required routine maintenance and
shows the appropriate message. The most common error and maintenance messages are shown
below.
You can clear most errors and perform routine maintenance by yourself. If you need more help,
the Brother Solutions Center offers the latest FAQs and troubleshooting tips:
Visit us at http://solutions.brother.com/
.
Error Message Cause Action
B&W 1-sided Print
Only
Replace ink.
One or more of the colour ink
cartridges have reached the end of
their life.
You can use the machine in
monochrome mode for approximately
four weeks depending on the number
of pages you print.
While this message appears on the
Touchscreen, each operation works
in the following way:
Printing
If you choose Greyscale in the
Advanced tab of the printer
driver, you can use the machine
as a monochrome printer.
2-sided print is not available when
this message appears.
Copying
If the paper type is set to
Plain Paper you can make
copies in monochrome.
2-sided copy is not available
when this message appears.
Faxing
If the paper type is set to
Plain Paper or
Inkjet Paper, the machine will
receive and print the faxes in
monochrome.
If a sending machine has a colour
fax, the machine’s “handshake”
will ask that the fax be sent as
monochrome.
Replace the ink cartridges. (See
Replacing the ink cartridges
on page 93.)
NOTE
The machine will stop all print
operations, you cannot use the
machine until a new ink cartridge is
installed in the following cases:
If you unplug the machine or take
out the ink cartridge.
If the paper type is set to anything
except Plain Paper or
Inkjet Paper.
(Windows
®
) If you check
Slow Drying Paper in the Basic
tab of the printer driver.
(Macintosh) If you check
Slow Drying Paper in the
Print Settings of the printer
driver.
104
BT Call Sign On
(U.K. only)
BT Call Sign is set to ON. You cannot
change the Receive Mode from
Manual to another mode.
Set BT Call Sign to OFF.
(See Advanced User’s Guide: BT Call
Sign (U.K. only).)
Cannot Detect You installed a new ink cartridge too
quickly and the machine did not
detect it.
Take out the new ink cartridge and
re-install it slowly until the cartridge
lever lifts. (See Replacing the ink
cartridges on page 93.)
An ink cartridge is not installed
correctly.
If you are using non Brother Original
ink, the machine may not detect the
ink cartridge.
Replace the cartridge with a Brother
Original ink cartridge. If the error
message remains, contact Brother
customer service or your local
Brother dealer.
Cannot Detect Ink
Volume
If you are using non Brother Original
ink, the machine may not detect the
ink volume.
Replace the cartridge with a Brother
Original ink cartridge. If the error
message remains, contact Brother
customer service or your local
Brother dealer.
Cannot Print
Replace ink.
One or more of the ink cartridges
have reached the end of their life. The
machine will stop all print operations.
While memory is available,
monochrome faxes will be stored in
the memory. If a sending machine
has a colour fax, the machine's
“handshake” will ask that the fax be
sent as monochrome.
Replace the ink cartridges. (See
Replacing the ink cartridges
on page 93.)
Comm.Error Poor telephone line quality caused a
communication error.
If the problem continues, call the
telephone company and ask them to
check your telephone line.
Connection Fail You tried to poll a fax machine that is
not in Polled Waiting mode.
Check the other fax machine's polling
setup.
Cover is Open. The scanner cover is not completely
closed.
Lift the scanner cover and then close
it again.
Make sure the telephone line cord
and USB cable (if used) have been
guided correctly through the cable
channel and out the back of the
machine.
The ink cartridge cover is not
completely closed.
Firmly close the ink cartridge cover
until it clicks.
Data Remaining in
Memory
Print data is left in the machine's
memory.
Press . The machine will cancel
the job and clear it from the memory.
Try to print again.
Error Message Cause Action
Troubleshooting
105
B
Disconnected The other person or other person's
fax machine stopped the call.
Try to send or receive again.
If calls are stopped repeatedly and
you are using a VoIP (Voice over IP)
system, try changing the
Compatibility to Basic (for VoIP). (See
Telephone line interference / VoIP
on page 132.)
Document Cover Open
(MFC-J4710DW)
The document cover was open while
scanning a 2-sided document using
the ADF.
Close the document cover.
Document Jam/too Long
The document was not inserted or fed
correctly, or the document scanned
from the ADF was too long.
(See Using the ADF on page 45.)
(See Document jam on page 113.)
High Temperature The print head is too warm. Allow the machine to cool down.
Hub is Unusable. A hub or USB Flash memory drive
with hub has been connected to the
USB direct interface.
Hubs, including USB Flash memory
drives that have a hub built in, are not
supported. Unplug the device from
the USB direct interface.
Image Too Long The proportions of your photo are
irregular so effects could not be
added.
Choose a regularly proportioned
image.
Image Too Small The size of your photo is too small to
trim.
Choose a larger image.
Error Message Cause Action
106
Ink Absorber Full The ink absorber box or flushing box
is full. These components are
periodic maintenance items that may
require replacement after a period of
time to ensure optimum performance
from your Brother machine. Because
these components are periodic
maintenance items, the replacement
is not covered under the warranty.
The need to replace these items and
the time period before replacement is
dependent on the number of purges
and flushes required to clean the ink
system. These boxes acquire
amounts of ink during the different
purging and flushing operations. The
number of times a machine purges
and flushes for cleaning varies
depending on different situations. For
example, frequently powering the
machine on and off will cause
numerous cleaning cycles since the
machine automatically cleans upon
power up. The use of non-Brother ink
may cause frequent cleanings
because non-Brother ink could cause
poor print quality which is resolved by
cleaning. The more cleaning the
machine requires, the faster these
boxes will fill up.
NOTE
Repairs resulting from the use of
non-Brother supplies may not be
covered under the stated product
warranty.
The ink absorber box or flushing box
will need to be replaced. Contact
Brother Customer Service or your
local Brother Authorised Service
Centre to have your machine
serviced.
Other reasons for cleaning are:
1 After a paper jam has been
cleared, the machine
automatically cleans itself before
the next received fax is printed.
2 The machine automatically cleans
itself after sitting idle for more than
30 days (infrequent use).
3 The machine automatically cleans
itself after ink cartridges of the
same colour have been replaced
12 times.
Ink Absorber NearFull
The ink absorber box or flushing box
is nearly full.
Call Brother customer service or your
local Brother dealer.
Ink Low One or more of the ink cartridges are
near the end of their life. If one of the
colour ink cartridges is near the end
of its life and someone is sending you
a colour fax, your machine’s
“handshake” will ask that the fax be
sent as monochrome. If the sending
machine has the ability to convert it,
the colour fax will be printed at your
machine as a monochrome fax.
Order a new ink cartridge. You can
continue printing until the
Touchscreen shows
Cannot Print. (See Replacing the
ink cartridges on page 93.)
Low Temperature The print head is too cold. Allow the machine to warm up.
Error Message Cause Action
Troubleshooting
107
B
Media Error The memory card is either corrupted,
incorrectly formatted, or there is a
problem with the memory card.
Remove the memory card from the
media drive (slot) of the machine and
format it correctly.
Put the card firmly into the slot again
to make sure it is in the correct
position. If the error remains, check
the media drive (slot) of the machine
by putting in another memory card
that you know is working.
Media is Full. The memory card or USB Flash
memory drive you are using has no
available space or already contains
999 files.
Your machine can only save to your
memory card or USB Flash memory
drive if it contains less than 999 files.
Delete unused files to free some
space and try again.
No Caller ID There is no incoming call history. You
did not receive calls or you have not
subscribed to the Caller ID service
from your telephone company.
If you want to use the Caller ID
feature, call your telephone company.
(See Caller ID (U.K. and Ireland only)
on page 61.)
No File The memory card or USB Flash
memory drive in the media drive does
not contain a .JPG file.
Put the correct memory card or USB
Flash memory drive into the slot
again.
No Ink Cartridge An ink cartridge is not installed
correctly.
Take out the new ink cartridge and
re-install it slowly until the cartridge
lever lifts. (See Replacing the ink
cartridges on page 93.)
Error Message Cause Action
108
(MFC-J4510DW)
No Paper Fed
(MFC-J4710DW)
No Paper Fed
No Paper Fed #1
No Paper Fed #2
The machine is out of paper or paper
is not correctly loaded in the paper
tray.
Do one of the following:
Refill the paper in the paper tray,
and then press OK on the
Touchscreen.
Remove and reload the paper,
then press OK on the
Touchscreen. (See Loading
paper and other print media
on page 19.)
The paper is jammed in the machine. Remove the jammed paper by
following the steps in Printer jam or
paper jam on page 115.
If this error occurs often during
2-sided copying or 2-sided printing,
the paper feed rollers may be stained
with ink. Clean the paper feed rollers.
(See Advanced User’s Guide:
Cleaning the paper feed rollers.)
Paper dust has accumulated on the
surface of the paper pick-up rollers.
Clean the paper pick-up rollers.
(See Advanced User’s Guide:
Cleaning the paper pick-up rollers.)
The Jam Clear Cover is not closed
correctly.
Make sure the Jam Clear Cover is
closed evenly at both ends. (See
Printer jam or paper jam
on page 115.)
The paper was not inserted in the
centre position of the manual feed
slot.
Remove the paper and re-insert it in
the centre of the manual feed slot,
and then press OK on the
Touchscreen. (See Loading paper in
the manual feed slot on page 33.)
No Response/Busy The number you dialled has not
answered or is busy.
Verify the number and try again.
Out of Fax Memory The fax memory is full. Do one of the following:
Clear the data in the memory. To
gain extra memory, you can turn
off Memory Receive.
(See Advanced User’s Guide:
Turning off Memory Receive
operations.)
Print the faxes that are in the
memory. (See Advanced User’s
Guide: Printing a fax from the
memory.)
Error Message Cause Action
Troubleshooting
109
B
Out of Memory The machine's memory is full. If a copy operation is in process:
Press and wait until the other
operations that are in progress finish,
and then try again.
The memory card or USB Flash
memory drive you are using does not
have enough free space to scan the
documents.
Press .
Delete unused files from your
memory card or USB Flash memory
drive to make some free space and
then try again.
Paper Jam [Front] The paper is jammed in the machine. Remove the jammed paper by
following the steps in Paper is
jammed in the front of the machine
on page 115.
Make sure the paper guides are set to
the correct paper size.
Paper Jam [Front,Rear]
The paper is jammed in the machine. Remove the jammed paper by
following the steps in Paper is
jammed in the front and back of the
machine on page 117.
Make sure the paper guides are set to
the correct paper size.
More than one sheet of paper was
placed in the manual feed slot.
OR
Another sheet of paper was placed in
the manual feed slot before the
Touchscreen showed
Put paper in Manual Feed Slot,
and then Press [OK]
.
D
o not put more than one sheet of
paper in the manual feed slot at any
one time. Wait until the Touchscreen
shows
Put paper in Manual Feed Slot,
and then Press [OK].
before you
feed the next sheet of paper in the
manual feed slot.
Remove the jammed paper by
following the steps in Paper is
jammed in the front and back of the
machine on page 117.
Paper Jam [Rear] The paper is jammed in the machine. Remove the jammed paper by
following the steps in Paper is
jammed in the back of the machine
on page 116.
Make sure the paper guides are set to
the correct paper size.
Paper dust has accumulated on the
surface of the paper pick-up rollers.
Clean the paper pick-up rollers.
(See Advanced User’s Guide:
Cleaning the paper pick-up rollers.)
Error Message Cause Action
110
Paper tray not
detected
The paper tray is not completely
inserted.
Slowly push the paper tray
completely into the machine.
Paper or a foreign object has
prevented the paper tray from being
inserted correctly.
Pull the paper tray out of the machine,
and remove the jammed paper or
foreign object. Slowly push the paper
tray completely into the machine.
Touchscreen
Initialisation
Failed
The Touchscreen was pressed
before the power on initialization was
completed.
Make sure that nothing is touching or
resting on the Touchscreen.
Debris may be stuck between the
lower part of the Touchscreen and its
frame.
Insert a piece of stiff paper between
the lower part of the Touchscreen and
its frame and slide it back and forth to
push out the debris.
Unable to Clean XX
Unable to Initialize XX
Unable to Print XX
Unable to Scan XX
The machine has a mechanical
problem.
OR
A foreign object such as a paper clip
or a piece of ripped paper is in the
machine.
Open the scanner cover and remove
any foreign objects and paper scraps
from inside the machine. If the error
message continues, disconnect the
machine from the power for several
minutes and reconnect it.
(The machine can be turned off for
approximately 24 hours without losing
faxes stored in the memory. See
Transferring your faxes or Fax
Journal report on page 112.)
Unusable Device
Disconnect device
from front connector
& turn machine off &
then on
A broken device has been connected
to the USB direct interface.
Unplug the device from the USB
direct interface, then press to
turn the machine off and then on
again.
Unusable Device
Please disconnect
USB device.
A USB device or USB Flash memory
drive that is not supported has been
connected to the USB direct
interface.
For more information, visit us at
http://solutions.brother.com/
.
Unplug the device from the USB
direct interface. Turn the machine off
and then on again.
Wrong Ink Colour An ink cartridge has been installed in
the wrong position.
Check which ink cartridges are not
matched by colour to their ink
cartridge positions and move them to
their correct positions.
Error Message Cause Action
Troubleshooting
111
B
(MFC-J4510DW)
Wrong Paper
(MFC-J4710DW)
Wrong Paper
Wrong Paper #1
Wrong Paper #2
The paper size setting does not
match the size of paper in the tray.
1 Check that the paper size you
choose matches the size of paper
in the tray.
(MFC-J4510DW: See Paper Size
on page 38.)
(MFC-J4710DW: See Paper Size
and Type (MFC-J4710DW)
on page 39.)
2 Make sure you loaded the paper
in the correct orientation, by
setting the paper guides at the
indicators for your paper size.
(See Loading paper and other
print media on page 19.)
3 After you have checked the paper
size and the paper orientation,
press OK on the Touchscreen.
The paper orientation is not correct
for the paper size.
You did not set the paper guides in
the tray to the indicators for the paper
size you are using.
Wrong Tray Setting
(MFC-J4710DW)
The machine’s Paper Size and Tray
Use settings do not match the size of
paper in the tray you are using.
Configure the paper size setting for
the tray according to the on-screen
instructions.
Error Message Cause Action
112
Error animations display B
Error animations display step-by-step
instructions when paper gets jammed. You
can read the steps at your own pace by
pressing c to see the next step and d to go
back a step.
Transferring your faxes or Fax
Journal report B
If the Touchscreen shows:
Unable to Clean XX
Unable to Initialize XX
Unable to Print XX
Unable to Scan XX
we recommend transferring your faxes to
another fax machine or to your PC. (See
Transferring faxes to another fax machine
on page 112 or Transferring faxes to your PC
on page 112.)
You can also transfer the Fax Journal report
to see if there are any faxes you need to
transfer. (See Transferring the Fax Journal
report to another fax machine on page 113.)
Transferring faxes to another fax
machine
B
If you have not set up your Station ID, you
cannot enter fax transfer mode. (See Quick
Setup Guide: Enter personal information
(Station ID).)
a Press to interrupt the error
temporarily.
b Press .
c Press All Settings.
d Swipe up or down, or press a or b to
display Service.
e Press Service.
f Press Data Transfer.
g Press Fax Transfer.
h Do one of the following:
If the Touchscreen shows No Data,
there are no faxes left in the
machine's memory.
Press Close, and then press .
Enter the fax number to which faxes
will be forwarded.
i Press Fax Start.
Transferring faxes to your PC B
You can transfer the faxes from your
machine's memory to your PC.
a Press to interrupt the error
temporarily.
b Make sure you have installed
MFL-Pro Suite on your PC, and then
turn on PC-FAX Receiving on the PC.
(See Software User’s Guide: PC-FAX
receiving.)
c Make sure you have set PC-Fax
Receive on the machine.
(See Advanced User’s Guide: PC-Fax
Receive (Windows
®
only).)
If faxes are in the machine’s memory
when you set up PC-Fax Receive, the
Touchscreen will ask if you want to
transfer the faxes to your PC.
d Do one of the following:
To transfer all faxes to your PC,
press Yes. If Fax Preview is set to
Off, you will be asked if you want to
also turn on the backup print option.
To exit and leave the faxes in the
memory, press No.
e Press .
Troubleshooting
113
B
Transferring the Fax Journal report to
another fax machine
B
If you have not set up your Station ID, you
cannot enter fax transfer mode. (See Quick
Setup Guide: Enter personal information
(Station ID).)
a Press to interrupt the error
temporarily.
b Press .
c Press All Settings.
d Swipe up or down, or press a or b to
display Service.
e Press Service.
f Press Data Transfer.
g Press Report Transfer.
h Enter the fax number to which the Fax
Journal report will be forwarded.
i Press Fax Start.
Document jam B
Documents can jam in the ADF unit if they are
not inserted or fed correctly, or if they are too
long. Follow the steps below to clear a
document jam.
Document is jammed in the top of the
ADF unit
B
a Take out any paper from the ADF that is
not jammed.
b Open the ADF cover.
c Remove the jammed document by
pulling it upward.
1 ADF cover
d Close the ADF cover.
e Press .
IMPORTANT
To avoid document jams, close the ADF
cover correctly by pushing it gently in the
centre.
1
114
Document is jammed inside the ADF
unit
B
a Take any paper that is not jammed out
of the ADF.
b Lift the document cover.
c Pull the jammed document out to the
left.
1 document cover
d Close the document cover.
e Press .
Removing small documents jammed
in the ADF
B
a Lift the document cover.
b Insert a piece of stiff paper, such as
cardstock, into the ADF to push any
small paper scraps through.
1 document cover
c Close the document cover.
d Press .
1
1
Troubleshooting
115
B
Printer jam or paper jam B
Take out the jammed paper depending on
where it is jammed in the machine.
Paper is jammed in the front of the
machine
B
If the Touchscreen shows
Paper Jam [Front], follow these steps:
a Unplug the machine from the electrical
socket.
b Pull the paper tray (1) completely out of
the machine.
c Pull out the jammed paper (1).
d Lift the Jam Clear Flap and remove the
jammed paper.
e Make sure you look carefully inside the
machine above and below the Jam
Clear Flap for any pieces of paper.
f Put the paper tray firmly back in the
machine.
1
1
116
NOTE
Make sure you pull out the paper support
until it clicks.
g Re-connect the power cord.
NOTE
If there is a repeat paper jam, a small
piece of paper may be stuck in the
machine. (See Additional paper jam clear
operations on page 120.)
Paper is jammed in the back of the
machine
B
If the Touchscreen shows
Paper Jam [Rear], follow these steps:
a Unplug the machine from the electrical
socket.
b Open the Jam Clear Cover (1) at the
back of the machine.
c Open the inside cover (1).
d Pull the jammed paper out of the
machine.
e Close the inside cover and Jam Clear
Cover. Make sure the covers are closed
correctly.
f Re-connect the power cord.
1
1
Troubleshooting
117
B
Paper is jammed in the front and back
of the machine
B
If the Touchscreen shows
Paper Jam [Front,Rear], follow these
steps:
a Unplug the machine from the electrical
socket.
b (MFC-J4510DW)
Pull the paper tray (1) completely out of
the machine.
(MFC-J4710DW)
Pull the paper tray #1 and then tray #2
completely out of the machine.
c (MFC-J4510DW)
Pull out the jammed paper (1).
(MFC-J4710DW)
d Lift the Flap, and remove the jammed
paper.
1
1
1
118
e Make sure you look carefully inside the
machine above and below the Jam
Clear Flap for any pieces of paper.
f Using both hands, use the finger holds
on each side of the machine to lift the
scanner cover (1) into the open position.
g Slowly pull the jammed paper (1) out of
the machine.
h Move the print head (if necessary) to
take out any paper remaining in this
area. Make sure that jammed paper is
not left in the corners of the machine (1)
and (2).
IMPORTANT
If the paper is jammed under the print
head, unplug the machine from the power
source, and then move the print head to
take out the paper.
If the print head is in the right corner as
shown in the illustration, you cannot move
the print head. Re-connect the power
cord. Hold down until the print head
moves to the centre. Then unplug the
machine from the power source and take
out the paper.
If ink gets onto your skin, immediately
wash with soap and plenty of water.
1
1
1
2
Troubleshooting
119
B
i Open the Jam Clear Cover (1) at the
back of the machine.
j Open the inside cover (1).
k Make sure you look carefully inside for
any jammed paper. If there is any
jammed paper, slowly pull it out of the
machine.
l Close the inside cover and Jam Clear
Cover. Make sure the covers are closed
correctly.
m Lift the scanner cover (1) to release the
lock. Gently push the scanner cover
support down (2) and close the scanner
cover (3) using both hands.
1
1
2
1
3
120
n (MFC-J4510DW)
Put the paper tray firmly back in the
machine.
(MFC-J4710DW)
Put paper tray #1 and then tray #2 firmly
back in the machine.
NOTE
Make sure you pull out the paper support
until it clicks.
o Re-connect the power cord.
NOTE
If there is a repeat paper jam, a small
piece of paper may be stuck in the
machine. (See Additional paper jam clear
operations on page 120.)
Additional paper jam clear operationsB
a Using both hands, use the finger holds
on each side of the machine to lift the
scanner cover into the open position.
NOTE
If the print head is at the right corner as
shown in the illustration, hold down
until the print head moves to the middle.
b Unplug the machine from the electrical
socket.
c Lift the scanner cover (1) to release the
lock. Gently push the scanner cover
support down (2) and close the scanner
cover (3) using both hands.
33
1
2
Troubleshooting
121
B
d Open the manual feed slot cover.
e Put only one sheet of A4 or Letter size
thick paper such as glossy paper in a
Landscape position in the manual feed
slot.
Push it into the manual feed slot.
NOTE
We recommend you use glossy paper.
If you don't push the paper deep enough
into the manual feed slot, the machine will
not feed it when you re-connect the power
cord.
f Re-connect the power cord.
The paper you placed in the manual
feed slot will be fed through the machine
and ejected.
g Using both hands, use the finger holds
on each side of the machine to lift the
scanner cover into the open position.
Make sure that a piece of paper is not
still jammed inside the machine.
Lift the scanner cover to release the
lock. Gently push the scanner cover
support down and close the scanner
cover using both hands.
122
If you are having difficulty with your machine B
IMPORTANT
For technical help, you must call Brother customer support. Calls must be made from within
the country where you purchased the machine.
If you think there is a problem with your machine, check the following chart and follow the
troubleshooting tips. You can correct most problems by yourself.
If you need additional help, the Brother Solutions Center offers the latest FAQs and
troubleshooting tips.
Visit us at http://solutions.brother.com/
.
Troubleshooting
123
B
Printing Difficulties
Difficulty Suggestions
No printout. Check that the correct printer driver has been installed and chosen.
Check to see if the Touchscreen is showing an error message.
(See Error and maintenance messages on page 103.)
Make sure that the machine is online.
(Windows
®
7)
Click /Devices and Printers. Right-click Brother MFC-XXXXX (where
XXXXX is your model name) and choose Seewhatsprinting. Click Printer and
make sure that Use Printer Offline is unchecked.
(Windows Vista
®
)
Click /Control Panel/Hardware and Sound/Printers. Right-click
Brother MFC-XXXXX (where XXXXX is your model name). If the printer is offline,
it will show Use Printer Online. Select this option to enable the printer.
(Windows
®
XP)
Click Start/Control Panel/Printers and Other Hardware/Printers and Faxes.
Right-click Brother MFC-XXXXX (where XXXXX is your model name). If the
printer is offline, it will show Use Printer Online. Select this option to enable the
printer.
One or more ink cartridges have reached the end of their life.
(See Replacing the ink cartridges on page 93.)
The document will not print if the old, unprinted data remains in the printer driver
spooler. Open the printer icon, and then delete all the data. Your printer icon can
be found in the following way:
(Windows
®
7)
Click /Devices and Printers/Printers and Faxes.
(Windows Vista
®
)
Click /Control Panel/Hardware and Sound/Printers.
(Windows
®
XP)
Click Start/Control Panel/Printers and Other Hardware/Printers and Faxes.
(Mac OS X v10.7.x)
Click System Preferences/Print & Scan.
(Mac OS X v10.5.8, 10.6.x)
Click System Preferences/Print & Fax.
The headers or footers appear
when the document displays on the
screen but they do not show up
when it is printed.
There is an unprintable area on the top and bottom of the page. Adjust the top and
bottom margins in your document to allow for this.
(See Unprintable area on page 37.)
Cannot perform “Page Layout”
printing.
Check that the paper size setting in the application and in the printer driver are the
same.
124
Print speed is too slow. Try changing the printer driver setting. The highest resolution needs longer data
processing, sending and printing time. Try the other quality settings in the printer
driver Advanced tab (Windows
®
) or Color Settings (Macintosh). Click
Colour Settings (Windows
®
) or Advanced Color Settings (Macintosh) and
make sure you uncheck Color Enhancement.
Turn the Borderless feature off. Borderless printing is slower than normal printing.
(See Software User’s Guide: Printing (Windows
®
).)
(See Software User’s Guide: Printing and Faxing (Macintosh).)
Colour Enhancement is not
working correctly.
If the image data is not full colour in your application (such as 256 colour), Colour
Enhancement will not work. Use at least 24 bit colour data with the Colour
Enhancement feature.
Machine does not print from
Adobe
®
Illustrator
®
.
Try to reduce the print resolution.
(See Software User’s Guide: Printing (Windows
®
).)
(See Software User’s Guide: Printing and Faxing (Macintosh).)
Print Quality Difficulties
Difficulty Suggestions
Poor print quality. Check the print quality. (See Checking the print quality on page 98.)
Make sure that the Media Type setting in the printer driver or the Paper Type
setting in the machine’s menu matches the type of paper you are using.
(See Paper Type on page 38.)
(See Software User’s Guide: Printing (Windows
®
).)
(See Software User’s Guide: Printing and Faxing (Macintosh).)
Make sure that your ink cartridges are fresh. The following may cause ink to clog:
The expiration date written on the cartridge package has passed. (Brother
Original cartridges stay usable for up to two years if kept in their original
packaging.)
The ink cartridge has been in your machine for over six months.
The ink cartridge may not have been stored correctly before use.
Make sure you are using Brother Original Innobella™ ink. Brother does not
recommend the use of cartridges other than Brother Original cartridges or the
refilling of used cartridges with ink from other sources.
Make sure you are using one of the recommended types of paper.
(See Acceptable paper and other print media on page 40.)
The recommended environment for your machine is between 20 C to 33 C.
Printing Difficulties (continued)
Difficulty Suggestions
Troubleshooting
125
B
White horizontal lines appear in text
or graphics.
A4, Letter and Executive
A3, Ledger, Legal, A5, A6,
envelopes, Photo (10 15 cm),
Photo L (89 127 mm), Photo 2L
(13 18 cm) and Index Card
(127 203 mm)
Clean the print head. (See Cleaning the print head on page 97.)
Make sure you are using Brother Original Innobella™ ink.
Try using the recommended types of paper.
(See Acceptable paper and other print media on page 40.)
To prolong print head life, provide the best ink cartridge economy and maintain
print quality, we do not recommend frequently unplugging the machine and/or
leaving the machine unplugged for extended periods of time. We recommend
using to power down the machine. Using allows minimal power to the
machine ensuring periodic cleanings of the print head occur.
The machine prints blank pages. Clean the print head. (See Cleaning the print head on page 97.)
Make sure you are using Brother Original Innobella™ ink.
To prolong print head life, provide the best ink cartridge economy and maintain
print quality, we do not recommend frequently unplugging the machine and/or
leaving the machine unplugged for extended periods of time. We recommend
using to power down the machine. Using allows minimal power to the
machine ensuring periodic cleanings of the print head occur.
Characters and lines are blurred. Check the printing alignment. (See Checking the print alignment on page 99.)
Printed text or images are skewed. Make sure the paper is loaded correctly in the paper tray and the paper guides are
adjusted correctly. (See Loading paper and other print media on page 19.)
Make sure the Jam Clear Cover is closed correctly.
Smudge or stain at the top centre of
the printed page.
Make sure the paper is not too thick or curled.
(See Acceptable paper and other print media on page 40.)
Printing appears dirty or ink seems
to run.
Make sure you are using the recommended types of paper. (See Acceptable
paper and other print media on page 40.) Don't handle the paper until the ink is
dry.
Make sure you are using Brother Original Innobella™ ink.
If you are using photo paper, make sure that you have set the correct paper type.
If you are printing a photo from your PC, set the Media Type in the printer driver.
Print Quality Difficulties (continued)
Difficulty Suggestions
126
Ink is smudged or running when
using glossy photo paper.
Be sure to check the front and back of the paper. Place the glossy surface (printing
surface) face down. (See Paper Type on page 38.)
If you use glossy photo paper, make sure that the paper type setting is correct.
Prints appears dirty or the paper
jams when using A3 paper.
(PC print for Windows
®
)
Check Slow Drying Paper in the Basic tab of the printer driver.
(PC print for Macintosh)
Select Print Settings from drop-down list and then check Slow Drying Paper in
the printer driver.
(Copy)
Adjust the copy density to make copies lighter. (See Advanced User’s Guide:
Adjusting Density.)
Stains appear on the reverse side
or at the bottom of the page.
Make sure the printer platen is not dirty with ink. (See Advanced User’s Guide:
Cleaning the machine’s printer platen.)
Make sure you are using Brother Original Innobella™ ink.
Make sure you are using the paper support flap.
(See Loading paper and other print media on page 19.)
Make sure the paper feed rollers are not dirty with ink.
(See Advanced User’s Guide: Cleaning the paper feed rollers.)
The machine prints dense lines on
the page.
(Windows
®
only)
Check Reverse Order in the Basic tab of the printer driver.
The printouts are wrinkled.
(Windows
®
)
In the printer driver Advanced tab, click Colour Settings and uncheck
Bi-Directional Printing.
(Macintosh)
In the printer driver, choose Print Settings, click Advanced, choose
Other Print Options and uncheck Bi-Directional Printing.
Make sure you are using Brother Original Innobella™ ink.
Paper Handling Difficulties
Difficulties Suggestions
The machine does not feed paper. Make sure the Jam Clear Cover at the back of the machine is closed.
If the Touchscreen shows the Paper Jam message and you still have a problem,
see Error and maintenance messages on page 103.
If there is no paper, load a new stack of paper into the paper tray.
If there is paper in the paper tray, make sure it is straight. If the paper is curled,
you should straighten it. Sometimes it is helpful to remove the paper, turn the stack
over and put it back into the paper tray.
Reduce the amount of paper in the paper tray, and then try again.
Clean the paper pick-up rollers.
(See Advanced User’s Guide: Cleaning the paper pick-up rollers.)
Photo paper does not feed
correctly.
When you print on Brother Photo paper, load one extra sheet of the same photo
paper in the paper tray. An extra sheet has been included in the paper package
for this purpose.
Print Quality Difficulties (continued)
Difficulty Suggestions
Troubleshooting
127
B
Machine feeds multiple pages. Do the following:
(See Loading paper and other print media on page 19.)
Make sure the paper is loaded correctly in the paper tray.
Remove all the paper from the tray and fan the stack of paper well, then put it
back in the tray.
Make sure you do not push the paper in too far.
Make sure the Jam Clear Cover is closed correctly. (See Paper is jammed in the
back of the machine on page 116.)
Make sure the Base Pad in the paper tray is not dirty. (See Advanced User’s
Guide: Cleaning the paper pick-up rollers.)
There is a paper jam. See Printer jam or paper jam on page 115. Make sure the paper guides are set to
the correct paper size.
Paper jam reoccurs. If there is a repeat paper jam, a small piece of paper may be stuck in the machine.
Make sure paper is not still jammed in the machine. (See Additional paper jam
clear operations on page 120.)
The paper jams when you use
2-sided copy or 2-sided print.
Use one of the jam prevention settings, 2-sided 1 or 2-sided 2.
For copying
(See Advanced User’s Guide: 2-sided copying.)
For printing
(See Software User’s Guide: 2-sided / Booklet (Windows
®
).)
(See Software User’s Guide: 2-sided Printing (Macintosh).)
If paper jams occur often during 2-sided copying or 2-sided printing, the paper
feed rollers may be stained with ink. Clean the paper feed rollers. (See Advanced
User’s Guide: Cleaning the paper feed rollers.)
Printing Received Faxes
Difficulty Suggestions
Condensed print
Horizontal streaks
Top and bottom sentences are
cut off
Missing lines
Usually this is caused by a poor telephone connection. Make a copy; if your copy
looks good, you probably had a bad connection, with static or interference on the
telephone line. Ask the other party to send the fax again.
Vertical black lines when receiving. The sender's scanner may be dirty. Ask the sender to make a copy to see if the
problem is with the sending machine. Try receiving from another fax machine.
Left and right margins are cut off or
a single page is printed on two
pages.
If the received faxes are divided and printed on two pages or if you get an extra
blank page, your paper size setting may not be correct for the paper you are using.
(MFC-J4510DW: See Paper Size on page 38.)
(MFC-J4710DW: See Paper Size and Type (MFC-J4710DW) on page 39.)
Turn on Auto Reduction. (See Advanced User’s Guide: Printing a reduced
incoming fax.)
Received colour fax prints only in
monochrome.
Replace the colour ink cartridges that have reached the end of their life, and then
ask the other person to send the colour fax again.
(See Replacing the ink cartridges on page 93.)
Paper Handling Difficulties (continued)
Difficulties Suggestions
128
Telephone Line or Connections
Difficulty Suggestions
Dialling does not work.
(No dial tone)
Check the line cord connections.
Change the Tone/Pulse setting. (See Quick Setup Guide.)
If there is no dial tone, connect a known working telephone and telephone line cord
to the socket. Then lift the external telephone's handset and listen for a dial tone.
If there is still no dial tone, ask your telephone company to check the line and/or
wall socket.
The machine does not answer
when called.
Make sure the machine is in the correct Receive Mode for your setup.
(See Choose the Receive Mode on page 53.) Check for a dial tone. If possible, call
your machine to hear it answer. If there is still no answer, check the telephone line
cord connection. If there is no ringing when you call your machine, ask your
telephone company to check the line.
Receiving Faxes
Difficulty Suggestions
Cannot receive a fax. If you connect your machine to PBX or ISDN, set the menu setting of Telephone
Line Type to your telephone line type. (See Setting the Telephone Line Type
on page 62.)
Sending Faxes
Difficulty Suggestions
Cannot send a fax. Check all line cord connections. Make sure the telephone line cord is plugged into
the telephone wall socket and the LINE socket inside the machine.
Print the Transmission Verification Report and check for an error. (See Advanced
User’s Guide: Reports.)
Contact your administrator to check your Secure Function Lock Settings.
Ask the other party to check that the receiving machine has paper.
Poor fax send quality. Try changing your resolution to Fine or S.Fine. Make a copy to check your
machine's scanner operation. If the copy quality is poor, clean the scanner. (See
Cleaning the scanner glass on page 96.)
Transmission Verification Report
says “RESULT:ERROR”.
There is probably temporary noise or static on the line. Try sending the fax again.
If you send a PC FAX message and getRESULT:ERROR” on the Transmission
Verification Report, your machine may be out of memory. To gain extra memory,
you can turn off Memory Receive (See Advanced User’s Guide: Turning off
Memory Receive operations.), print fax messages from the machine’s memory
(See Advanced User’s Guide: Printing a fax from the memory.), or cancel a
Delayed Fax or Polling Job. (See Cancelling a fax in progress on page 50.)
(See Advanced User’s Guide: Checking and cancelling waiting jobs.) If the
problem continues, ask the telephone company to check your telephone line.
If you often get transmission errors due to possible interference on the telephone
line, try changing the machine's Compatibility setting to Basic(for VoIP).
(See Telephone line interference / VoIP on page 132.)
If you connect your machine to PBX or ISDN, set the menu setting of Telephone
Line Type to your telephone line type. (See Setting the Telephone Line Type
on page 62.)
Vertical black lines when sending. Black vertical lines on faxes you send are typically caused by dirt or correction fluid
on the glass strip. Clean the glass strip. (See Cleaning the scanner glass
on page 96.)
Troubleshooting
129
B
Handling Incoming Calls
Difficulty Suggestions
The machine “hears” a voice as a
CNG Tone.
If Fax Detect is set to On, your machine is more sensitive to sounds. It may
mistakenly interpret certain voices or music on the line as a fax machine calling
and respond with fax receiving tones. Deactivate the machine by pressing .
Try avoiding this problem by turning Fax Detect to Off.
(See Fax Detect on page 57.)
Sending a fax call to the machine. If you answered on an extension or external telephone, press your Remote
Activation Code (the factory default is l 51). If you answered on an external
telephone, press Fax Start, and then press Receive to receive the fax. When
your machine answers, hang up.
Custom features on a single line. If you have Call Waiting, Call Waiting/Caller ID, Caller ID, Voice Mail, an
answering machine, an alarm system or other custom feature on a single
telephone line with your machine, it may create a problem sending or receiving
faxes.
For example: If you subscribe to Call Waiting or some other custom service and
its signal comes through the line while your machine is sending or receiving a fax,
the signal can temporarily interrupt the faxes. Brother's ECM (Error Correction
Mode) feature should help overcome this problem. This condition is related to the
telephone system industry and is common to all devices that send and receive
information on a single, shared line with custom features. If avoiding a slight
interruption is crucial to your business, a separate telephone line with no custom
features is recommended.
Copying Difficulties
Difficulty Suggestions
Cannot make a copy. Contact your administrator to check your Secure Function Lock Settings.
Vertical black lines or streaks
appear in copies.
Black vertical lines on copies are typically caused by dirt or correction fluid on the
glass strip. Clean the glass strip, scanner glass, white bar and white plastic above
them. (See Cleaning the scanner glass on page 96.)
Poor copy results when using the
ADF.
Try using the scanner glass. (See Using the scanner glass on page 46.)
Fit to Page does not work correctly. Make sure your source document is not skewed.
Reposition the document and try again.
130
Scanning Difficulties
Difficulty Suggestions
TWAIN or WIA errors appear when
starting to scan. (Windows
®
)
Make sure the Brother TWAIN or WIA driver is chosen as the primary source in
your scanning application. For example, in Nuance™ PaperPort™ 12SE, click
Scan Settings, Select to choose the Brother TWAIN/WIA driver.
TWAIN or ICA errors appear when
starting to scan. (Macintosh)
Make sure the Brother TWAIN driver is chosen as the primary source.
In PageManager, click File, Select Source and choose the Brother TWAIN driver.
Mac OS X v10.6.x and 10.7.x users can also scan documents using the ICA
Scanner Driver. (See Software User’s Guide: Scanning a document using the ICA
driver (Mac OS X v10.6.x, 10.7.x).)
OCR does not work. Try increasing the scanner resolution.
(Macintosh)
Presto! PageManager must be downloaded and installed before use.
For more information, see Accessing Brother Support (Macintosh) on page 3.
Poor scanning results when using
the ADF.
Try using the scanner glass. (See Using the scanner glass on page 46.)
PhotoCapture Center™ Difficulties
Difficulty Suggestions
Removable Disk does not work
correctly.
1 Take out the memory card or USB Flash memory drive and put it back in
again.
2 If you have tried “Eject” from within Windows
®
, take out the memory card or
USB Flash memory drive before you continue.
3 If an error message appears when you try to eject the memory card or USB
Flash memory drive, it means the card is being accessed. Wait a while and
then try again.
4 If all of the above do not work, turn off your PC and machine, and then turn
them on again.
Cannot access Removable Disk
from the computer.
Make sure that you have correctly inserted the memory card or USB Flash
memory drive.
Part of my photo is missing when
printed.
Make sure that Borderless printing and Cropping are turned off. (See Advanced
User’s Guide: Borderless printing and Cropping.)
Software Difficulties
Difficulty Suggestions
Cannot install software or print.
(Windows
®
only)
Run the Repair MFL-Pro Suite program on the CD-ROM. This program will repair
and reinstall the software.
“Device Busy Make sure the machine is not showing an error message on the Touchscreen.
Cannot print images from
FaceFilter Studio.
(Windows
®
)
To use FaceFilter Studio, you must install the FaceFilter Studio application from
the CD-ROM supplied with your machine. (See Quick Setup Guide.)
Also, before you start FaceFilter Studio for the first time, you must make sure your
Brother machine is turned on and connected to your computer. This will allow you
to access all the functions of FaceFilter Studio.
Troubleshooting
131
B
Network Difficulties
Difficulty Suggestions
Cannot print over the network. Make sure that your machine is powered on and is online and in the Ready mode.
Print a Network Configuration Report (See Advanced User’s Guide: Reports.) and
check the current Network settings printed in this list. Reconnect the LAN cable to
the hub to verify that the cabling and network connections are good. If possible,
try connecting the machine to a different port on your hub using a different cable.
If the connections are good, the machine shows LAN Active for 2 seconds.
If you are using a wireless connection or are having Network problems,
see Network User’s Guide: Troubleshooting.
The network scanning feature does
not work.
It is necessary to configure the third-party Security/Firewall Software to allow
Network scanning. To add port 54925 for Network scanning, enter the information
below:
In Name: Enter any description, for example Brother NetScan.
In Port number: Enter 54925.
In Protocol: UDP is selected.
Please refer to the instruction manual that came with your third-party
Security/Firewall Software or contact the software manufacturer.
(Macintosh)
Re-select your network machine in the Device Selector window from the Model
pop-up menu in the main screen of ControlCenter2.
The network PC-Fax Receive
feature does not work.
(Windows
®
only)
It is necessary to set the third-party Security/Firewall Software to allow PC-FAX
Rx. To add port 54926 for Network PC-FAX Rx, enter the information below:
In Name: Enter any description, for example Brother PC-FAX Rx.
In Port number: Enter 54926.
In Protocol: UDP is selected.
Please refer to the instruction manual that came with your third-party
Security/Firewall Software or contact the software manufacturer.
The Brother software cannot be
installed.
(Windows
®
)
Allow network access to the following programs if your security software displays
an alert message during MFL-Pro Suite installation.
(Macintosh)
If you are using a firewall function of anti-spyware or antivirus security software,
temporarily disable it and then install the Brother software.
Cannot connect to wireless
network.
Investigate the problem using the WLAN Report.
Press , All Settings, and then swipe up or down, or press a or b to
display Print Reports. Press Print Reports. Swipe up or down, or press a
or b to display WLAN Report, and then press WLAN Report.
(See Network User’s Guide.)
Difficulties when entering data
Difficulty Suggestions
The dial pad does not work when
entering numbers or characters.
Use the keyboard on the Touchscreen to enter information.
132
Dial Tone detection B
When you send a fax automatically, by
default your machine will wait for a fixed
amount of time before it starts to dial the
number. By changing the Dial Tone setting to
Detection, you can make your machine
dial as soon as it detects a dial tone. This
setting can save a small amount of time when
sending a fax to many different numbers. If
you change the setting and start having
problems when dialling, you should change it
back to the No Detection setting.
a Press .
b Press All Settings.
c Swipe up or down, or press a or b to
display Initial Setup.
d Press Initial Setup.
e Swipe up or down, or press a or b to
display Dial Tone.
f Press Dial Tone.
g Press Detection or No Detection.
h Press .
Telephone line
interference / VoIP B
If you are having problems sending or
receiving a fax due to possible interference
on the telephone line, you can change the
compatibility setting which reduces the
modem speed to minimise errors.
a Press .
b Press All Settings.
c Swipe up or down, or press a or b to
display Initial Setup.
d Press Initial Setup.
e Swipe up or down, or press a or b to
display Compatibility.
f Press Compatibility.
g Press High, Normal or
Basic(for VoIP).
Basic(for VoIP) cuts the
modem speed to 9,600 bps and
turns off colour fax receiving and
ECM, except for colour fax-sending.
Unless interference is a recurring
problem on your telephone line, you
may prefer to use it only when
needed.
To improve compatibility with most
VoIP services, Brother recommends
changing the compatibility setting to
Basic(for VoIP).
Normal sets the modem speed at
14,400 bps.
High increases the modem speed to
33,600 bps. (factory default)
h Press .
NOTE
VoIP (Voice over IP) is a type of phone
system that uses an internet connection,
rather than a traditional phone line.
Troubleshooting
133
B
Machine Information B
Checking the serial number B
You can see the machine’s serial number on
the Touchscreen.
a Press .
b Press All Settings.
c Swipe up or down, or press a or b to
display Machine Info.
d Press Machine Info.
e Press Serial No.
Your machine’s serial number will
appear on the Touchscreen.
f Press .
Reset functions B
The following reset functions are available:
1 Network
You can reset the print server back to its
default factory settings, such as the
password and IP address information.
2 Address Book & Fax
Address Book & Fax resets the following
settings:
Address Book
(Address Book and Setup Groups)
Programmed fax jobs in the memory
(Polled Transmit, Delayed Fax and
Delayed Batch Transmission)
Station ID
(Name and Number)
Remote Fax Options
(Fax Forwarding)
Report settings
(Transmission Verification Report,
Address Book and Fax Journal)
History
(Caller ID history and Outgoing Call)
Faxes in memory
3 All Settings
You can restore all settings to the factory
default.
Brother strongly recommends performing
this procedure before handing over or
disposing of the machine.
NOTE
Unplug the interface cable before you
choose Network or All Settings.
How to reset the machine B
a Press .
b Press All Settings.
c Swipe up or down, or press a or b to
display Initial Setup.
d Press Initial Setup.
e Swipe up or down, or press a or b to
display Reset.
f Press Reset.
g Press the option you want to reset.
h Press Yes to confirm.
i Press Yes for 2 seconds to reboot the
machine.
134
C
Using the Settings
Tables
C
Your machine’s Touchscreen LCD is easy to
set up and operate. All you have to do is
press the settings and options you want to set
as they are displayed on the screen.
We have created step-by-step Settings
Tables so you can see at-a-glance all the
available choices for each setting and
feature. You can use these tables to quickly
choose your preferred settings in the
machine.
Settings and features tables C
Settings and features tables
135
C
Settings tables C
The Settings tables will help you understand the settings selections that are found in the
machine's programs. The factory settings are shown in Bold with an asterisk.
(Settings) C
Level1 Level2 Level3 Options Descriptions Page
(Date & Time)
Date Sets the date and time on
the screen and in the
headings of the faxes you
send.
See .
Time ——
Auto Daylight On*
Off
Automatically changes for
Daylight Savings Time.
See .
Time Zone Sets the time zone for
your country.
See .
Ink (See (Ink) on page 173.)
Wi-Fi (See (Wi-Fi Setup) on page 173.)
Fax Preview ——On
Off*
You can view faxes you
receive on the
Touchscreen.
58
(Paper Type)
(MFC-J4510DW)
——Plain Paper*
Inkjet Paper
Brother BP71
Other Glossy
Transparency
Sets the type of paper in
the paper tray.
38
(Paper Size)
(MFC-J4510DW)
——A4*
A5
10x15cm
Letter
Sets the size of paper in
the paper tray.
38
(Tray #1)
(MFC-J4710DW)
Paper Type Plain Paper*
Inkjet Paper
Brother BP71
Other Glossy
Transparency
Sets the type of paper in
the paper tray #1.
39
Paper Size A4*
A5
10x15cm
Letter
Sets the size of paper in
the paper tray #1.
See Quick Setup Guide.
See Advanced User’s Guide.
The default settings are shown in Bold with an asterisk.
136
All Settings C
(Tray #2)
(MFC-J4710DW)
Paper Size A4*
A3
Letter
Legal
Ledger
Sets the size of paper in
the paper tray #2.
39
All Settings For details, see
All Settings in the
following table.
Configures the detailed
settings.
Level1 Level2 Level3 Options Descriptions Page
General Setup Ink Test Print Print Quality
Alignment
Lets you check the print
quality or alignment.
98
99
Cleaning Black
Colour
All
Lets you clean the print
head.
97
Ink Volume Lets you check the
available ink volume.
See .
Paper Type
(MFC-J4510DW)
Plain Paper*
Inkjet Paper
Brother BP71
Other Glossy
Transparency
Sets the type of paper in
the paper tray.
38
Paper Size
(MFC-J4510DW)
A4*
A5
10x15cm
Letter
Sets the size of paper in
the paper tray.
38
See Advanced User’s Guide.
The default settings are shown in Bold with an asterisk.
Level1 Level2 Level3 Options Descriptions Page
See Quick Setup Guide.
See Advanced User’s Guide.
The default settings are shown in Bold with an asterisk.
Settings and features tables
137
C
General Setup
(Continued)
Tray Setting
(MFC-J4710DW)
Tray #1 Paper Type
(Options)
Plain Paper*
Inkjet Paper
Brother BP71
Other Glossy
Transparency
Sets the type of paper in
the paper tray #1.
39
Paper Size
(Options)
A4*
A5
10x15cm
Letter
Sets the size of paper in
the paper tray #1.
Tray #2 Paper Size
(Options)
A4*
A3
Letter
Legal
Ledger
Sets the size of paper in
the paper tray #2.
39
Tray Use: Copy
Tray #1
Tray #2
Auto Tray
Select*
Choose the tray that will
be used for Copy.
39
Tray Use: Fax Tray #1
Tray #2
Auto Tray
Select*
Choose the tray that will
be used for Fax.
40
Level1 Level2 Level3 Options Descriptions Page
See Advanced User’s Guide.
The default settings are shown in Bold with an asterisk.
138
General Setup
(Continued)
Volume Ring Off
Low
Med*
High
Adjusts the ring volume. 16
Beep Off
Low*
Med
High
Adjusts the volume of the
sounds when you press
the Touchscreen or
Touchpanel.
17
Speaker Off
Low
Med*
High
Adjusts the speaker
volume.
17
LCD Settings Backlight Light*
Med
Dark
You can adjust the
brightness of the
Touchscreen backlight.
18
Dim Timer Off
10Secs
20Secs
30Secs*
You can set how long the
Touchscreen backlight
stays on after the last
finger press.
See .
Button Settings
Home Button
Settings
Home*
More
Shortcuts 1
Shortcuts 2
Shortcuts 3
Chooses the screen that
is displayed when you
press Home ( ) on the
Touchpanel.
10
Sleep Mode 1Min
2Mins
3Mins
5Mins*
10Mins
30Mins
60Mins
You can choose how long
the machine will remain
idle before it goes into
Sleep mode.
See .
Function Lock Set Password You can restrict selected
machine operation for up
to 10 restricted users and
for all other
non-authorized Public
users.
Lock OffiOn
Shortcut
Settings
Shortcut Name
Edit Shortcut
Name
You can change the
shortcut name.
16
Delete Deletes the shortcut. 16
Level1 Level2 Level3 Options Descriptions Page
See Advanced User’s Guide.
The default settings are shown in Bold with an asterisk.
Settings and features tables
139
C
Fax Setup Receive Ring Delay 0
1
2*
3
4
5
6
7
8
(Example for the
U.K.)
Sets the number of rings
before the machine
answers in Fax Only or
Fax/Tel mode.
56
F/T Ring Time 20Secs
30Secs*
40Secs
70Secs
Sets the length of the fast
double-ring time in
Fax/Tel mode.
56
Fax Preview On
Off*
You can view faxes you
receive on the
Touchscreen.
58
Fax Detect On*
Off
Receives fax messages
automatically when you
answer a call and hear fax
tones.
57
Remote Codes Remote Codes
(Options)
On*
Off
Act.Code (l51)
Deact.Code
(#51)
Allows you to answer all
calls at an extension or
external telephone and
use codes to turn the
machine on or off. You
can personalize these
codes.
67
Auto Reduction
On*
Off
Cuts the size of incoming
faxes to fit the paper size.
See .
Memory Receive
Off*
Fax Forward
Fax Storage
PC Fax Receive
You can set the machine
to either forward fax
messages, store incoming
faxes in the memory (so
you can retrieve them
while you are away from
your machine) or send
faxes to your PC.
If you choose Fax Forward
or PC-Fax Receive, you
can turn on the safety
feature Backup Print.
Level1 Level2 Level3 Options Descriptions Page
See Advanced User’s Guide.
The default settings are shown in Bold with an asterisk.
140
Fax
(Continued)
Report Setting
XMIT Report On
On+Image
Off*
Off+Image
Choose the initial setup
for the Transmission
Verification Report.
52
Journal Period Journal Period
Sets the interval for the
automatic printing of the
Fax Journal.
If you have chosen any
other option than Off and
Every 50 Faxes, you
can set the time for the
chosen option.
If you have chosen
Every 7 Days, you can
set the day of the week.
See .
Time
Day
Print Document
Prints incoming faxes
stored in the memory.
Remote Access --- Set your own code for
Remote Retrieval.
Dial Restriction
Dial Pad Enter # Twice
On
Off*
You can set whether to
restrict fax transmissions,
or require that the user
enters the number twice
in order to prevent
transmissions to an
incorrect address.
Address Book Enter # Twice
On
Off*
Shortcuts Enter # Twice
On
Off*
LDAP Server Enter # Twice
On
Off*
Remaining Jobs
Check which jobs are in
the memory and cancel
chosen jobs.
Miscellaneous BT Call Sign
(U.K. Only)
On
Off*
Use with BT Call Sign.
Caller ID
(U.K. and Ireland
only)
On*
Off
View or print a list of the
last 30 Caller IDs stored in
the memory.
61
Level1 Level2 Level3 Options Descriptions Page
See Advanced User’s Guide.
The default settings are shown in Bold with an asterisk.
Settings and features tables
141
C
Level1 Level2 Level3 Level4 Options Descriptions Page
Network Wired LAN TCP/IP BOOT Method Auto*
Static
RARP
BOOTP
DHCP
Choose the
BOOT method
that best suits
your needs.
See .
IP Address [000-255].
[000-255].
[000-255].
[000-255]
Enter the IP
address.
Subnet Mask [000-255].
[000-255].
[000-255].
[000-255]
Enter the Subnet
mask.
Gateway [000-255].
[000-255].
[000-255].
[000-255]
Enter the
Gateway
address.
Node Name
BRNXXXXXXXXXXXX
Enter the Node
name.
WINS
Configuration
Auto*
Static
Chooses the
WINS
configuration
mode.
WINS Server (Primary)
000.000.000.000
(Secondary)
000.000.000.000
Specifies the IP
address of the
primary or
secondary WINS
server.
DNS Server (Primary)
000.000.000.000
(Secondary)
000.000.000.000
Specifies the IP
address of the
primary or
secondary DNS
server.
APIPA On*
Off
Automatically
allocates the IP
address from the
link-local address
range.
See Network User’s Guide.
Please go to the Brother Solutions Center to download the Wi-Fi Direct™ Guide at http://solutions.brother.com/
.
Please go to the Brother Solutions Center to download the Web Connect Guide at http://solutions.brother.com/
.
The default settings are shown in Bold with an asterisk.
142
Network
(Continued)
Wired LAN
(Continued)
TCP/IP
(Continued)
IPv6 On
Off*
Enable or disable
the IPv6 protocol.
If you want to use
the IPv6 protocol,
visit
http://solutions.
brother.com/ for
more information.
See .
Ethernet Auto*
100B-FD
100B-HD
10B-FD
10B-HD
Chooses the
Ethernet link
mode.
MAC Address You can see your
machine’s MAC
address.
WLAN TCP/IP BOOT Method Auto*
Static
RARP
BOOTP
DHCP
Chooses the
BOOT method
that best suits
your needs.
IP Address [000-255].
[000-255].
[000-255].
[000-255]
Enter the IP
address.
Subnet Mask [000-255].
[000-255].
[000-255].
[000-255]
Enter the Subnet
mask.
Gateway [000-255].
[000-255].
[000-255].
[000-255]
Enter the
Gateway
address.
Node Name
BRWXXXXXXXXXXXX
Enter the Node
name.
WINS
Configuration
Auto*
Static
Chooses the
WINS
configuration
mode.
Level1 Level2 Level3 Level4 Options Descriptions Page
See Network User’s Guide.
Please go to the Brother Solutions Center to download the Wi-Fi Direct™ Guide at http://solutions.brother.com/
.
Please go to the Brother Solutions Center to download the Web Connect Guide at http://solutions.brother.com/
.
The default settings are shown in Bold with an asterisk.
Settings and features tables
143
C
Network
(Continued)
WLAN
(Continued)
TCP/IP
(Continued)
WINS Server (Primary)
000.000.000.000
(Secondary)
000.000.000.000
Specifies the IP
address of the
primary or
secondary WINS
server.
See .
DNS Server (Primary)
000.000.000.000
(Secondary)
000.000.000.000
Specifies the IP
address of the
primary or
secondary DNS
server.
APIPA On*
Off
Automatically
allocates the IP
address from the
link-local address
range.
IPv6 On
Off*
Enable or disable
IPv6 protocol for
a wireless LAN.
If you want to use
the IPv6 protocol,
visit
http://solutions.
brother.com/ for
more information.
Setup Wizard
You can
manually
configure your
print server for a
wireless network.
WPS/AOSS You can easily
configure your
wireless network
settings using the
one-button push
method.
WPS w/ PIN
Code
You can easily
configure your
wireless network
settings using
WPS with a PIN
code.
Level1 Level2 Level3 Level4 Options Descriptions Page
See Network User’s Guide.
Please go to the Brother Solutions Center to download the Wi-Fi Direct™ Guide at http://solutions.brother.com/
.
Please go to the Brother Solutions Center to download the Web Connect Guide at http://solutions.brother.com/
.
The default settings are shown in Bold with an asterisk.
144
Network
(Continued)
WLAN
(Continued)
WLAN Status Status You can see the
current wireless
network status.
See .
Signal You can see the
current wireless
network signal
strength.
SSID You can see the
current SSID.
Comm. Mode You can see the
current
Communication
Mode.
MAC Address You can see your
machine’s MAC
address.
Wi-Fi Direct
Push Button You can easily
configure your
Wi-Fi Direct™
network settings
using the
one-button push
method.
See .
PIN Code You can easily
configure your
Wi-Fi Direct™
network settings
using WPS with a
PIN code.
Manual You can
manually
configure your
Wi-Fi Direct™
network settings.
Group Owner On
Off*
Sets your
machine as the
Group Owner.
Level1 Level2 Level3 Level4 Options Descriptions Page
See Network User’s Guide.
Please go to the Brother Solutions Center to download the Wi-Fi Direct™ Guide at http://solutions.brother.com/
.
Please go to the Brother Solutions Center to download the Web Connect Guide at http://solutions.brother.com/
.
The default settings are shown in Bold with an asterisk.
Settings and features tables
145
C
Network
(Continued)
Wi-Fi Direct
(Continued)
Device
Information
Device Name You can see the
device name of
your machine.
See .
SSID Shows SSID of
Group Owner.
When the
machine is not
connected,
Touchscreen
shows
Not Connected
.
IP Address You can see the
current IP
address of your
machine.
Status
Information
Status G/O Active
(**)
Client Active
Not Connected
Off
Wired LAN
Active
** = the number
of devices
You can see the
current Wi-Fi
Direct™ network
status.
Signal Strong
Medium
Weak
None
You can see the
current Wi-Fi
Direct™ network
signal strength.
When your
machine acts as
Group Owner,
the Touchscreen
always shows
Strong.
I/F Enable On
Off*
Enable or
Disable the Wi-Fi
Direct™
connection.
Level1 Level2 Level3 Level4 Options Descriptions Page
See Network User’s Guide.
Please go to the Brother Solutions Center to download the Wi-Fi Direct™ Guide at http://solutions.brother.com/
.
Please go to the Brother Solutions Center to download the Web Connect Guide at http://solutions.brother.com/
.
The default settings are shown in Bold with an asterisk.
146
Network
(Continued)
E-mail/IFAX
(Available after
IFAX is
downloaded)
Mail Address
Enter the mail
address. (Up to
60 characters)
See .
Setup Server
SMTP Server Name
(Up to 30
characters)
IP Address
[000-255].
[000-255].
[000-255].
[000-255]
Enter the SMTP
server address.
SMTP Port [00001-65535] Enter the SMTP
port number.
Auth. for
SMTP
None*
SMTP-AUTH
POP bef.SMTP
Selects the
Security method
for E-mail
notification.
POP3 Server Name
(Up to 30
characters)
IP Address
[000-255].
[000-255].
[000-255].
[000-255]
Enter the POP3
server address.
POP3 Port [00001-65535] Enter the POP3
port number.
Mailbox Name
Enter the mail
box name. (Up to
60 characters)
Mailbox
Password
Enter the
password to login
to the POP3
server. (Up to
32 characters)
APOP On
Off*
Enables or
disables APOP.
Level1 Level2 Level3 Level4 Options Descriptions Page
See Network User’s Guide.
Please go to the Brother Solutions Center to download the Wi-Fi Direct™ Guide at http://solutions.brother.com/
.
Please go to the Brother Solutions Center to download the Web Connect Guide at http://solutions.brother.com/
.
The default settings are shown in Bold with an asterisk.
Settings and features tables
147
C
Network
(Continued)
E-mail/IFAX
(Available after
IFAX is
downloaded)
(Continued)
Setup Mail
RX
Auto Polling
Auto Polling
(Options)
On*
Off
Automatically
checks the POP3
server for new
messages.
See .
(When On
chosen)
Poll Frequency
(Options)
1Min
3Mins
5Mins
10Mins*
30Mins
60Mins
Sets the interval
for checking for
new messages
on the POP3
server.
Header All
Subject+From+To
None*
Selects the
contents of the
mail header to be
printed.
Delete Error
Mail
On*
Off
Deletes error
mails
automatically.
Notification
On
MDN
Off*
Receives
notification
messages.
Setup Mail
TX
Sender
Subject
Displays the
subject that is
attached to the
Internet Fax data.
Size Limit On
Off*
Limits the size of
E-mail
documents.
Notification
On
Off*
Sends
notification
messages.
Level1 Level2 Level3 Level4 Options Descriptions Page
See Network User’s Guide.
Please go to the Brother Solutions Center to download the Wi-Fi Direct™ Guide at http://solutions.brother.com/
.
Please go to the Brother Solutions Center to download the Web Connect Guide at http://solutions.brother.com/
.
The default settings are shown in Bold with an asterisk.
148
Network
(Continued)
E-mail/IFAX
(Available after
IFAX is
downloaded)
(Continued)
Setup Relay Relay
Broadcast
On
Off*
Relays a
document to
another fax
machine over the
Internet.
See .
Relay Domain
Registers the
Domain name.
Relay Report
On
Off*
Prints the Relay
Broadcast
Report.
Manual POP3
Receive
Accesses the
POP3 server and
confirms whether
an e-mail has
been received.
Web Connect
Settings
Proxy
Settings
Proxy
Connection
On
Off*
You can change
the Web
connection
settings.
See .
Address
Port
User Name
Password
Network I/F Wired LAN*
WLAN
You can choose
the network
connection type.
See .
Network Reset
——Yes
No
Restore all
network settings
back to the
factory default.
Level1 Level2 Level3 Level4 Options Descriptions Page
See Network User’s Guide.
Please go to the Brother Solutions Center to download the Wi-Fi Direct™ Guide at http://solutions.brother.com/
.
Please go to the Brother Solutions Center to download the Web Connect Guide at http://solutions.brother.com/
.
The default settings are shown in Bold with an asterisk.
Settings and features tables
149
C
All Settings (continued) C
Level1 Level2 Level3 Options Descriptions Page
Print Reports XMIT Verify Prints these lists and
reports.
See .
Address Book ——
Fax Journal ——
User Settings ——
Network
Configuration
——
WLAN Report ——
Caller ID
history
——
Machine Info. Serial No. Lets you check the serial
number of your machine.
133
Initial Setup Receive Mode Fax Only*
Fax/Tel
External TAD
Manual
Choose the Receive
Mode that best suits your
needs.
53
Date & Time Date Sets the date and time on
the screen and in the
headings of the faxes you
send.
See .
Time
Auto Daylight On*
Off
Automatically changes for
Daylight Savings Time.
See .
Time Zone Sets the time zone for
your country.
See .
Station ID Fax
Name
Enter your name and fax
number to appear on
each page you fax.
Tone/Pulse Tone*
Pulse
Choose the dialling mode.
Dial Tone Detection
No Detection*
Turns Dial Tone Detection
on or off.
132
Phone Line Set
Normal*
PBX
ISDN
Choose the telephone
line type.
62
Compatibility High*
Normal
Basic(for VoIP)
Adjusts the modem speed
to help resolve
transmission problems.
132
See Advanced User’s Guide.
See Quick Setup Guide.
The default settings are shown in Bold with an asterisk.
150
Initial Setup
(Continued)
Reset Network Yes
No
Resets the print server
back to its factory default
settings, such as the
password and IP address
information.
133
Address Book
&Fax
Yes
No
Deletes all stored
Address Book numbers
and faxes, restores the
Station ID, Address Book
List, Transmission
Verification Report and
Fax Journal back to the
factory default settings.
All Settings Yes
No
Resets all the machine’s
settings back to the
factory default.
Miscellaneous
Temporary Fax
Backup
Backup
(Options)
On
Off*
Prints or deletes fax data
that is stored in the
memory.
See .
Reprint
Delete
Level1 Level2 Level3 Options Descriptions Page
See Advanced User’s Guide.
See Quick Setup Guide.
The default settings are shown in Bold with an asterisk.
Settings and features tables
151
C
Features tables C
Fax (When Fax Preview is Off.) C
Level1 Level2 Level3 Options Descriptions Page
Redial (Pause) Redials the last number
called. When you are
entering a fax or
telephone number on the
Touchpanel, Redial
changes to Pause on the
Touchscreen. Press
Pause when you need a
delay while dialling
numbers, such as access
codes and credit card
numbers. You can also
store a pause when you
set up addresses.
69
Tel(R) ———Tel changes to R when
PBX is selected as the
telephone line type. You
can use R to gain access
to an outside line or to
transfer a call to another
extension when
connected to a PBX.
63
See Network User’s Guide.
See Advanced User’s Guide.
The default settings are shown in Bold with an asterisk.
152
Address Book
(Search:)
When LDAP is off, the
search will be within the
local Address Book.
When LDAP is on, the
search will be within the
local Address Book and
the LDAP Server.
68
Detail
(This will appear
only when LDAP
is on.)
Displays detailed
information about the
selected address.
See .
Edit
Add New Address
Stores Address Book
numbers so you can dial
by pressing
Address Book on the
Touchscreen (and Apply,
then Fax Start).
70
Setup Groups You can set up Group
numbers for
Broadcasting.
See .
Change You can change Address
Book numbers.
71
Delete You can delete Address
Book numbers.
Apply You can send a fax using
the Address Book.
68
Call History Outgoing Call Apply You can choose a number
from the Outgoing Call
history and then send a
fax to it, add it to the
Address Book, or delete it.
69
Edit
Add to Address
Book
Delete
Caller ID
history
Apply You can choose a number
from the Caller ID history
and then send a fax to it,
add it to the Address
Book, or delete it.
70
Edit
Add to Address
Book
Delete
Fax Start Lets you send a fax. 48
Options
Fax Resolution
Standard*
Fine
S.Fine
Photo
Sets the resolution for
outgoing faxes.
See .
2-sided Fax
(MFC-J4710DW)
Off*
2-sided Scan:
Long Edge
2-sided Scan:
Short Edge
You can choose the
2-sided fax scan mode.
Level1 Level2 Level3 Options Descriptions Page
See Network User’s Guide.
See Advanced User’s Guide.
The default settings are shown in Bold with an asterisk.
Settings and features tables
153
C
Options
(Continued)
Contrast Auto*
Light
Dark
Changes the brightness
of faxes you send.
See .
Broadcasting Add Number Add Number You can send the same
fax message to more than
one fax number.
Add from
Address book
Search in
Address book
Preview On
Off*
You can preview a fax
message before you send
it.
51
Colour Setting
Mono*
Colour
Sets whether faxes are
sent in monochrome or
colour.
50
Delayed Fax Delayed Fax On
Off*
Sets the time of day in
24-hour format that the
delayed faxes will be sent.
See .
Set Time
Batch TX On
Off*
Combines delayed faxes
to the same fax number at
the same time of day into
one transmission.
Real Time TX On
Off*
You can send a fax
without using the memory.
Polled TX Standard
Secure
Off*
Sets up the document on
your machine to be
retrieved by another fax
machine.
Polling RX Standard
Secure
Timer
Off*
Sets up your machine to
poll another fax machine.
Overseas Mode On
Off*
If you are having difficulty
sending faxes overseas,
set this to On.
Glass Scan Size
Letter
A4*
Sets the glass scan size
for faxes.
50
Set New Default
Yes
No
You can save your fax
settings.
See .
Factory Reset Yes
No
You can restore all settings
back to the factory default.
Save as
Shortcut
Saves the current settings
as a shortcut.
Level1 Level2 Level3 Options Descriptions Page
See Network User’s Guide.
See Advanced User’s Guide.
The default settings are shown in Bold with an asterisk.
154
Fax (When Fax Preview is On.) C
Copy C
Level1 Level2 Level3 Options Descriptions Page
Sending Faxes (See Fax (When Fax Preview is Off.) on page 151.)
Received Faxes
Print/Delete
Print All(New
Faxes)
Prints the new received
faxes.
60
Print All(Old
Faxes)
Prints the old received
faxes.
Delete All(New
Faxes)
Deletes the new received
faxes.
60
Delete All(Old
Faxes)
Deletes the old received
faxes.
Address Book (See Address Book in Fax (When Fax Preview is Off.) on page 151.)
Call History (See Call History in Fax (When Fax Preview is Off.) on page 151.)
The default settings are shown in Bold with an asterisk.
Level1 Level2 Level3 Options Descriptions Page
Mono Start ———Lets you make a
monochrome copy.
73
Colour Start Lets you make a colour
copy.
Best Quality
Normal*
2-sided(1i2)
2-sided(2i2)
(MFC-J4710DW)
A4 i A3
2in1(ID)
2in1
Poster
Ink Save
Book
———You can choose the
desired settings from the
preset items.
74
See Advanced User’s Guide.
The default settings are shown in Bold with an asterisk.
Settings and features tables
155
C
Options Quality Normal*
Best
Choose the Copy
resolution for the next
copy.
See .
Paper Type Plain Paper*
Inkjet Paper
Brother BP71
Other Glossy
Transparency
(For
MFC-J4710DW,
when Tray #2 is
selected in
Tray Select.)
Plain Paper
Choose the paper type
that matches the paper in
the tray.
75
Paper Size A4*
A5
A3
10x15cm
Letter
Legal
Ledger
(For
MFC-J4710DW,
when Tray #2 is
selected in
Tray Select.)
A4*
A3
Letter
Legal
Ledger
Choose the paper size
that matches the paper in
the tray.
76
Tray Select
(MFC-J4710DW)
Tray #1
Tray #2
Auto Tray
Select*
Choose the tray that will
be used for Copy mode.
76
Level1 Level2 Level3 Options Descriptions Page
See Advanced User’s Guide.
The default settings are shown in Bold with an asterisk.
156
Options
(Continued)
Enlarge/Reduce
100%* ——
See .
Enlarge
198% 10x15cm
i
A4
186% 10x15cm
i
Letter
141% A4
i
A3, A5
i
A4
You can choose the
enlargement ratio for the
next copy.
Reduce 97% Letter i
A4
93% A4
i
Letter
83% Legal
i
A4
69% A4 i A5
47% A4 i
10x15cm
You can choose the
reduction ratio for the next
copy.
Fit to Page Your machine will adjust
the size automatically to
the paper size you set.
Custom(25-400%)
You can choose the
enlargement or reduction
ratio for your type of
document.
Density
Adjusts the density of
copies.
Stack/Sort Stack*
Sort
You can choose to stack
or sort multiple copies.
Page Layout Off(1in1)*
2in1(Portrait)
2in1(Landscape)
2in1(ID)
4in1(Portrait)
4in1(Landscape)
Poster(2x1)
Poster(2x2)
Poster(3x3)
You can make N in 1, 2 in
1 ID, or Poster copies.
Level1 Level2 Level3 Options Descriptions Page
See Advanced User’s Guide.
The default settings are shown in Bold with an asterisk.
+2
+1
-1
-2
0
Settings and features tables
157
C
Options
(Continued)
2-sided Copy
(MFC-J4510DW)
Off* You can choose the
2-sided print settings.
See .
Portrait Long
Edge Flip
Landscape Long
Edge Flip
Portrait Short
Edge Flip
Landscape Short
Edge Flip
Advanced Normal*
2-sided 1
2-sided 2
2-sided Copy
(MFC-J4710DW)
Off* You can choose the
2-sided print settings.
2-sided
i
2-sided
1-sided
i
2-sided
Long Edge Flip
2-sided
i
1-sided
Long Edge Flip
1-sided
i
2-sided
Short Edge Flip
2-sided
i
1-sided
Short Edge Flip
Advanced Normal*
2-sided 1
2-sided 2
Advanced
Settings
Off*
Ink Save Mode
Thin Paper Copy
Book Copy
Watermark Copy
Remove
Background
Colour
You can choose various
copy settings.
Save as
Shortcut
Saves the current settings
as a shortcut.
Level1 Level2 Level3 Options Descriptions Page
See Advanced User’s Guide.
The default settings are shown in Bold with an asterisk.
158
Scan C
Level1 Level2 Level3 Options1 Descriptions Page
to OCR
(Available after
Presto!
PageManager is
downloaded for
Macintosh users.
See Accessing
Brother Support
(Macintosh)
on page 3.)
PC Select Options (For details, see
the Options
on page 160.)
Configure the detailed
settings.
See .
Save as
Shortcut
Saves the current settings
as a shortcut.
Start Start scanning.
to File* PC Select Options (For details, see
the Options
on page 161.)
Configure the detailed
settings.
Save as
Shortcut
Saves the current settings
as a shortcut.
Start Start scanning.
to Image PC Select Options (For details, see
the Options
on page 161.)
Configure the detailed
settings.
Save as
Shortcut
Saves the current settings
as a shortcut.
Start Start scanning.
to Media
(when a memory
card or USB
Flash memory
drive is inserted)
Options (For details, see
the Options
on page 162.)
Configure the detailed
settings.
81
Save as
Shortcut
Saves the current settings
as a shortcut.
See .
Start Start scanning. 81
See Software User’s Guide.
See Advanced User’s Guide.
The default settings are shown in Bold with an asterisk.
Settings and features tables
159
C
to E-mail PC Select Options (For details, see
the Options
on page 161.)
Configure the detailed
settings.
See .
Save as
Shortcut
Saves the current settings
as a shortcut.
Start Start scanning.
to E-mail
Server
(Available after
IFAX is
downloaded)
Address Book Choose the address of
the recipient from the
address book.
Manual Manually enter the
address of the recipient.
OK Options (For details, see
the Options
on page 163.)
Configure the detailed
settings.
Save as
Shortcut
Saves the current settings
as a shortcut.
Start Start scanning.
Detail You can view the list of
addresses you have
entered.
to FTP Profile Name Options (For details, see
the Options
on page 164.)
Configure the detailed
settings.
Save as
Shortcut
Saves the current settings
as a shortcut.
Start Start scanning.
to Network Profile Name Options (For details, see
the Options
on page 164.)
Configure the detailed
settings.
Save as
Shortcut
Saves the current settings
as a shortcut.
Start Start scanning.
WS Scan
(Appears when
you install a Web
Services
Scanner, which is
displayed in your
computer’s
Windows
®
Explorer.)
Scan PC Select You can scan data by
using the Web Services
protocol.
Scan for E-mail
Scan for Fax
Scan for Print
Level1 Level2 Level3 Options1 Descriptions Page
See Software User’s Guide.
See Advanced User’s Guide.
The default settings are shown in Bold with an asterisk.
160
Options C
(for to OCR)
Level1 Level2 Options1 Descriptions Page
Options 2-sided Scan
(MFC-J4710DW)
Off*
2-sided Scan:
Long Edge
2-sided Scan:
Short Edge
You can choose the 2-sided
scan mode.
See .
Set with Touch
Panel
Off(Set with
Computer)*
On
If you want to use the
Touchscreen to change the
machine’s settings, choose On.
The settings below will appear when On is selected in
Set with Touch Panel.
Scan Type Colour
Black and White*
You can choose the scan type
for your document.
Resolution 100 dpi
200 dpi*
300 dpi
600 dpi
You can choose the scan
resolution for your document.
File Type Text*
HTML
RTF
You can choose the file format
for your document.
Skip Blank Page
(MFC-J4710DW)
On
Off*
When On is selected, blank
pages are skipped.
See Software User’s Guide.
The default settings are shown in Bold with an asterisk.
Settings and features tables
161
C
Options C
(for to File, to Image or to E-mail)
Level1 Level2 Options1 Descriptions Page
Options 2-sided Scan
(MFC-J4710DW)
Off*
2-sided Scan:
Long Edge
2-sided Scan:
Short Edge
You can choose the 2-sided
scan mode.
See .
Set with Touch
Panel
Off(Set with
Computer)*
On
If you want to use the
Touchscreen to change the
machine’s settings, choose On.
The settings below will appear when On is selected in
Set with Touch Panel.
Scan Type Colour*
Black and White
You can choose the scan type
for your document.
Resolution 100 dpi
200 dpi*
300 dpi
600 dpi
You can choose the scan
resolution for your document.
File Type (If you choose the
Colour option in the
Scan Type setting)
PDF*
JPEG
(If you choose the
Mono option in the
Scan Type setting)
PDF*
TIFF
You can choose the file format
for your document.
Skip Blank Page
(MFC-J4710DW)
On
Off*
When On is selected, blank
pages are skipped.
Remove
Background
Colour
Off*
Low
Medium
High
Change the amount of
background colour that is
removed.
See Software User’s Guide.
The default settings are shown in Bold with an asterisk.
162
Options C
(for to Media)
Level1 Level2 Options1 Descriptions Page
Options 2-sided Scan
(MFC-J4710DW)
Off*
2-sided Scan:
Long Edge
2-sided Scan:
Short Edge
You can choose the 2-sided
scan mode.
81
Scan Type Colour*
Black and White
You can choose the scan type
for your document.
Resolution 100 dpi
200 dpi*
300 dpi
600 dpi
Auto
You can choose the scan
resolution for your document.
File Type (If you choose the
Colour option in the
Scan Type setting)
PDF*
JPEG
(If you choose the
Mono option in the
Scan Type setting)
PDF*
TIFF
You can choose the file format
for your document.
File Name You can rename the file.
Auto Crop On
Off*
Scan multiple documents
placed on the scanner glass to
a memory card or USB Flash
memory drive one at a time.
81
See .
Skip Blank Page
(MFC-J4710DW)
On
Off*
When On is selected, blank
pages are skipped.
81
Remove
Background
Colour
Off*
Low
Medium
High
Change the amount of
background colour that is
removed.
81
Set New Default Yes
No
You can save your scan
settings as the default settings.
See .
Factory Reset Yes
No
You can restore all settings to
the original factory default
settings.
See Advanced User’s Guide.
The default settings are shown in Bold with an asterisk.
Settings and features tables
163
C
Options C
(for to E-mail Server)
NOTE
It is available after IFAX is downloaded.
Level1 Level2 Options1 Descriptions Page
Options 2-sided Scan
(MFC-J4710DW)
Off*
2-sided Scan:
Long Edge
2-sided Scan:
Short Edge
You can choose the 2-sided
scan mode.
See .
Scan Type Colour*
Black and White
You can choose the scan type
for your document.
Resolution 100 dpi
200 dpi*
300 dpi
600 dpi
Auto
You can choose the scan
resolution for your document.
File Type (If you choose the
Colour option in the
Scan Type setting)
PDF*
JPEG
(If you choose the
Mono option in the
Scan Type setting)
PDF*
TIFF
You can choose the file format
for your document.
Set New Default Yes
No
You can save your scan
settings as the default settings.
Factory Reset Yes
No
You can restore all settings to
the original factory default
settings.
See Software User’s Guide.
The default settings are shown in Bold with an asterisk.
164
Options C
(for to FTP or to Network)
Level1 Level2 Options1 Descriptions Page
Options 2-sided Scan
(MFC-J4710DW)
Off*
2-sided Scan:
Long Edge
2-sided Scan:
Short Edge
You can choose the 2-sided
scan mode.
See .
Scan Type Colour*
Black and White
You can choose the scan type
for your document.
Resolution 100 dpi
200 dpi*
300 dpi
600 dpi
Auto
You can choose the scan
resolution for your document.
File Type (If you choose the
Colour option in the
Scan Type setting)
PDF*
JPEG
(If you choose the
Mono option in the
Scan Type setting)
PDF*
TIFF
You can choose the file format
for your document.
Skip Blank Page
(MFC-J4710DW)
On
Off*
When On is selected, blank
pages are skipped.
Remove
Background
Colour
Off*
Low
Medium
High
Change the amount of
background colour that is
removed.
User Name Enter the user name.
See Software User’s Guide.
The default settings are shown in Bold with an asterisk.
Settings and features tables
165
C
Photo (More screen) C
Level1 Level2 Level3 Options Descriptions Page
Index Print Print Index
Sheet
Print Settings
For details, see
the Print Settings
on page 169.
You can print a thumbnail
page.
See .
Print Photos
Using Index
No.
Print Settings
For details, see
the Print Settings
on page 166.
You can print photos by
choosing the index
numbers.
View Photos* OK
Print Settings
For details, see
the Print Settings
on page 166.
You can adjust your
photos with the options.
80
Print All You can print all photos in
your memory card or
USB Flash memory drive.
Enhance Photos
Enhance Auto Correct
Print Settings
(For details, see
the Print Settings
on page 166.)
You can adjust your
photos with these
settings.
See .
Enhance Skin
Enhance Scenery
Remove Red-Eye
Night Scene
Fill Light
Whiteboard
Monochrome
Sepia
Auto Correct &
Remove Red-Eye
Crop
Print Settings
For details, see
the Print Settings
on page 166.
You can crop your photo
and print a part of the
image.
Enhance and
Crop
Auto Correct
Print Settings
(For details, see
the Print Settings
on page 166.)
You can adjust your
photos with these
settings and crop your
photo.
Enhance Skin
Enhance Scenery
Remove Red-Eye
Night Scene
Fill Light
Whiteboard
Monochrome
Sepia
Auto Correct &
Remove Red-Eye
See Advanced User’s Guide.
The default settings are shown in Bold with an asterisk.
166
Print Settings C
(for View Photos, Print Photos Using Index No., Enhance Photos or Slide Show)
Slide Show Show Each
Photo for
3Secs*
10Secs
30Secs
1Min
5Mins
Sets the time each photo
in the Slide Show is
shown before the
machine switches to the
next photo.
See .
Effect Off*
Slide In
Fade In
Zoom In
Sets the effect that is
used when the machine
switches to the next
photo in the Slide Show.
Start The machine starts a
Slide Show of your
photos.
You can choose a photo
during the Slide Show
and change the print
settings. (For details, see
the Print Settings
on page 166.)
Option1 Option2 Option3 Option4 Descriptions Page
Print Quality
(Not available for
DPOF printing.)
Normal
Photo*
Choose the print quality.
See .
Paper Type Plain Paper
Inkjet Paper
Brother BP71
Other Glossy*
Choose the paper type.
See Advanced User’s Guide.
The default settings are shown in Bold with an asterisk.
Level1 Level2 Level3 Options Descriptions Page
See Advanced User’s Guide.
The default settings are shown in Bold with an asterisk.
Settings and features tables
167
C
Paper Size 10x15cm*
13x18cm
A4
A3
Letter
Ledger
Choose the paper size.
See .
(When A4 or
Letter is chosen)
Print Size
8x10cm
9x13cm
10x15cm
13x18cm
15x20cm
Max. Size*
Choose the print size if
you are using A4 or Letter
size paper.
Auto Correct
(Does not appear
when DPOF Print
is chosen.)
(View Photos
and
Slide Show
only)
On
Off*
The machine decides the
appropriate effect for your
photo.
Brightness
(Does not appear
when Enhance
or
Enhance and Crop
is chosen.)
Adjusts the brightness.
Contrast
(Does not appear
when Enhance
or
Enhance and Crop
is chosen.)
Adjusts the contrast.
Option1 Option2 Option3 Option4 Descriptions Page
See Advanced User’s Guide.
The default settings are shown in Bold with an asterisk.
+2
+1
-1
-2
0
-2
-1
0
+1
+2
168
Colour Enhance
(Does not appear
when Enhance
or
Enhance and Crop
is chosen.)
On
Off*
White Balance
Adjusts the hue of the
white areas.
See .
Sharpness
Enhances the detail of the
image.
Colour Density
Adjusts the total amount
of colour in the image.
Cropping On*
Off
Crops the image around
the margin to fit the paper
size or print size. Turn this
feature off if you want to
print whole images or
prevent unwanted
cropping.
Borderless On*
Off
Expands the printable
area to fit the edges of the
paper.
Date Print
(Not available for
DPOF printing.)
On
Off*
Prints the date on your
photo.
Set New Default
Yes
No
You can save your print
settings as the default
settings.
Factory Reset Yes
No
You can restore all the
settings back to the
factory default.
Option1 Option2 Option3 Option4 Descriptions Page
See Advanced User’s Guide.
The default settings are shown in Bold with an asterisk.
+2
+1
-1
-2
0
+2
+1
-1
-2
0
+2
+1
-1
-2
0
Settings and features tables
169
C
Print Settings C
(for Print Index Sheet)
Web (More screen) C
Level1 Level2 Level3 Options Descriptions Page
Paper Type Plain Paper*
Inkjet Paper
Brother BP71
Other Glossy
Choose the paper type.
See .
Paper Size Letter
A4*
Choose the paper size.
See Advanced User’s Guide.
The default settings are shown in Bold with an asterisk.
Level1 Level2 Level3 Options Descriptions Page
Web PICASA Web
Albums™
Lets you connect the
Brother machine to an
Internet service.
Web services may have
been added and/or service
names may have been
changed by the provider
since this document was
published.
See .
Google Drive™
FLICKR
®
——
Facebook™
EVERNOTE
Dropbox
Please go to the Brother Solutions Center to download Web Connect Guide at http://solutions.brother.com/
.
The default settings are shown in Bold with an asterisk.
170
A3 Copy Shortcuts (More screen) C
(Shortcuts) C
Level1 Level2 Option1 Option2 Descriptions Page
A3 2in1
A4 i A3*
A4 + Note(L)
A4 + Note(P)
A4 + Grid
A4 + Blank
A4 Centre
Options Quality Normal*
Best
Choose the Copy
resolution for the next
copy.
See .
Paper Type Plain Paper Displays the available
paper type.
Paper Size A3*
Ledger
Sets the size of paper in
the paper tray.
Tray Select
(MFC-J4710DW)
Auto Tray
Select
Automatically chooses
the tray that contains the
most suitable paper.
Density
Adjusts the density of
copies.
See Advanced User’s Guide.
The default settings are shown in Bold with an asterisk.
Level1 Level2 Level3 Options Descriptions Page
Add Shortcut Copy Normal Move to Copy
Options Screen.
You can choose the
desired settings from the
preset items.
11
Best Quality
2-sided(1i2)
2-sided(2i2)
(MFC-J4710DW)
A4 i A3
2in1(ID)
2in1
Poster
Ink Save
Book
The default settings are shown in Bold with an asterisk.
+2
+1
-1
-2
0
Settings and features tables
171
C
Add Shortcut
(Continued)
Fax
(Options)
Fax Resolution
Standard*
Fine
S.Fine
Photo
Sets the resolution for
outgoing faxes.
12
2-sided Fax
(MFC-J4710DW)
Off*
2-sided Scan:
Long Edge
2-sided Scan:
Short Edge
You can choose the
2-sided fax scan mode.
Contrast Auto*
Light
Dark
Changes the brightness
of faxes you send.
Broadcasting Add Number
(Options)
Add Number
Add from
Address book
Search in
Address book
You can send the same
fax message to more than
one fax number.
Preview On
Off*
You can preview a fax
message before you send
it.
Colour Setting
Mono*
Colour
Sets whether faxes are
sent in monochrome or
colour.
Real Time TX On
Off*
You can send a fax
without using the
memory.
Overseas Mode On
Off*
If you are having difficulty
sending faxes overseas,
set this to On.
Glass Scan Size
Letter
A4*
Adjust the scan area of
the scanner glass to the
size of the document.
Level1 Level2 Level3 Options Descriptions Page
The default settings are shown in Bold with an asterisk.
172
Add Shortcut
(Continued)
Scan to File PC Select You can scan a
monochrome or a colour
document into your
computer.
13
to OCR PC Select You can have your text
document converted to an
editable text file.
to Image PC Select You can scan a colour
picture into your graphics
application.
to Media
(Options)
2-sided Scan
(MFC-J4710DW)
Scan Type
Resolution
File Type
File Name
Auto Crop
Skip Blank Page
(MFC-J4710DW)
Remove
Background
Colour
You can scan documents
into a memory card or
USB Flash memory drive.
to E-mail PC Select You can scan a
monochrome or a colour
document into your E-mail
application.
to E-mail
Server
(Options)
2-sided Scan
(MFC-J4710DW)
Scan Type
Resolution
File Type
You can scan a
monochrome or a colour
document into your E-mail
Server.
to Network Profile Name You can send scanned
data to a CIFS server on
your local network or on
the Internet.
to FTP Profile Name You can send scanned
data via FTP.
Web PICASA Web
Albums™
Lets you connect the
Brother machine to an
Internet service.
Web services may have
been added and/or
service names may have
been changed by the
provider since this
document was published.
14
Google Drive
FLICKR
®
Facebook
EVERNOTE
Dropbox
Level1 Level2 Level3 Options Descriptions Page
The default settings are shown in Bold with an asterisk.
Settings and features tables
173
C
(Ink) C
(Wi-Fi Setup) C
NOTE
After the Wi-Fi
®
is set up, you cannot change the settings from your Home screen.
Change any settings for the Wi-Fi connection in the Settings screen.
This list appears
when each
Shortcut name is
pressed for 2
seconds.
Edit Shortcut
Name
You can change the
shortcut name.
16
Delete Deletes the shortcut. 16
Level1 Level2 Level3 Options Descriptions Page
(Ink)
Test Print Print Quality
Alignment
Lets you check the print
quality or alignment.
98
99
Cleaning Black
Colour
All
Lets you clean the print
head.
97
Ink Volume Lets you check the
available ink volume.
See .
See Advanced User’s Guide.
The default settings are shown in Bold with an asterisk.
Level1 Level2 Level3 Options Descriptions Page
(Wi-Fi Setup)
Setup Wizard You can manually
configure your print server
for a wireless network.
See .
Setup with PC You can configure the
Wi-Fi settings using a PC.
WPS/AOSS You can easily configure
your wireless network
settings using the
one-button push method.
WPS w/ PIN Code
You can easily configure
your wireless network
settings using WPS with a
PIN code.
See .
See Quick Setup Guide.
See Network User’s Guide.
The default settings are shown in Bold with an asterisk.
Level1 Level2 Level3 Options Descriptions Page
The default settings are shown in Bold with an asterisk.
174
When using memory cards or USB Flash memory drives in the correct slot C
Level1 Level2 Level3 Options Descriptions Page
Photo (See Photo (More screen) on page 165.)
Scan to Media (See to Media on page 158.)
Web (See Web (More screen) on page 169.)
DPOF Displays the DPOF
setting screen.
See .
See Advanced User’s Guide.
The default settings are shown in Bold with an asterisk.
Settings and features tables
175
C
Entering Text C
When you need to enter text into the machine the keyboard will appear on the Touchscreen.
Press to cycle between letters, numbers and special characters.
NOTE
To change between lowercase or uppercase, press .
Inserting spaces C
To enter a space, press Space. Or, you can press c to move the cursor.
NOTE
The characters that are available may differ depending on your country.
Making corrections C
If you entered an incorrect character and want to change it, press d to move the cursor to highlight
the incorrect character, and then press . Enter the correct character. You can also use the
cursor to go back and insert letters.
To erase all the characters, press repeatedly.
176
D
General D
NOTE
This chapter provides a summary of the machines’ specifications. For additional specifications
visit http://www.brother.com/
for details.
1
Measured when the machine is connected to the USB interface. Power consumption varies slightly depending on the
usage environment or part wear.
2
When using ADF, single-sided printing, resolution: standard / document: ISO/IEC 24712 printed pattern.
3
Measured according to IEC 62301 Edition 2.0.
4
When using ADF, single-sided printing and scanning, resolution: standard / document: ISO/IEC 24712 printed pattern.
5
Even when the machine is turned off, it will automatically turn itself on periodically for print head maintenance, and
then turn itself off.
Specifications D
Printer Type Inkjet
Print Head Mono:
Colour:
Piezo with 420 nozzles 1
Piezo with 420 nozzles 3
Memory Capacity 128 MB (MFC-J4510DW)
256 MB (MFC-J4710DW)
LCD (Liquid Crystal
Display)
3.7 in. (93.4 mm) TFT Colour Touchscreen LCD and Touchpanel
Power Source AC 220 to 240V 50/60Hz
Power Consumption
1
(MFC-J4510DW)
Copying Mode:
Approx. 21 W
2
Ready Mode:
Approx. 5.5 W
3
Sleep Mode:
Approx. 1.5 W
3
Off:
Approx. 0.04 W
35
(MFC-J4710DW)
Copying Mode:
Approx. 21 W
4
Ready Mode:
Approx. 5.5 W
3
Sleep Mode:
Approx. 1.5 W
3
Off:
Approx. 0.04 W
35
Specifications
177
D
Dimensions (MFC-J4510DW) (MFC-J4710DW)
Weight (MFC-J4510DW) 9.3 kg
(MFC-J4710DW) 11.3 kg
186 mm
480 mm
490 mm
274 mm
290 mm
483 mm
254 mm
480 mm
490 mm
342 mm
290 mm
483 mm
178
1
Noise depends on printing conditions.
2
Office equipment with LWAd>6.30 B(A) is not suitable for use in room where people require high levels of
concentration. Such equipment should be placed in separate rooms because of the noise emission.
Noise Operating:
LPAm = 50 dB(A) (Average)
1
Noise per ISO9296 Copying: (MFC-J4510DW)
L
WAd = 6.20 B(A)
2
(Mono)
L
WAd = 6.15 B(A) (Colour)
(MFC-J4710DW)
LWAd = 6.29 B(A)
2
(Mono)
L
WAd = 6.16 B(A) (Colour)
Ready: (MFC-J4510DW)
L
WAd = 3.29 B(A) (Mono/Colour)
(MFC-J4710DW)
L
WAd = 3.28 B(A) (Mono/Colour)
Temperature Operating:
Best Print Quality:
10 to 35 C
20 to 33 C
Humidity Operating:
Best Print Quality:
20 to 80% (without condensation)
ADF (automatic
document feeder)
Up to 20 pages
Paper: 80 g/m
2
A4 or Letter size
Document Size ADF Width: 148 mm to 215.9 mm
ADF Length: 148 mm to 355.6 mm
Scanner Glass Width: Max. 215.9 mm
Scanner Glass Length: Max. 297 mm
Specifications
179
D
Print media D
1
For glossy paper or transparencies, remove printed pages from the output paper tray immediately after they exit the
machine to avoid smudging.
2
Use only transparencies recommended for inkjet printing.
3
See Paper type and size for each operation on page 42.
Paper Input
Paper Tray #1 D
Paper type:
Plain paper, inkjet paper (coated paper),
glossy paper
1
and transparency
12
Paper size
3
:
(Landscape)
A4, Letter, Executive
(Portrait)
A5, A6, Envelopes (Com-10, DL, Monarch), Photo (10 15 cm),
Photo L (89 127 mm), Photo 2L (13 18 cm) and Index card
(127 203 mm)
Width: 89 mm - 215.9 mm
Length: 127 mm - 297 mm
For more details, see Paper weight and thickness on page 44.
Maximum paper tray capacity:
Approx. 150 sheets of 80 g/m
2
plain paper
Paper Tray #2 (MFC-J4710DW) D
Paper Type:
Plain Paper
Paper Size:
(Landscape)
A4, Letter
(Portrait)
A3, Ledger, Legal
Width: 210 mm - 297 mm
Length: 279.4 mm - 431.8 mm
For more details, see Paper weight and thickness on page 44.
Maximum paper tray capacity:
Approx. 250 sheets of 80 g/m
2
plain paper
180
1
For glossy paper or transparencies, remove printed pages from the output paper tray immediately after they exit the
machine to avoid smudging.
2
Use only transparencies recommended for inkjet printing.
3
See Paper type and size for each operation on page 42.
Paper Input
(Continued)
Manual Feed Slot D
Paper type:
Plain paper, inkjet paper (coated paper),
glossy paper
1
and transparency
12
Paper size
3
:
(Landscape)
A4, Letter, Executive
(Portrait)
A3, Ledger, Legal, A5, A6, Envelopes (Com-10, DL, Monarch, C5),
Photo (10 15 cm), Photo L (89 127 mm), Photo 2L (13 18 cm)
and Index card (127 203 mm)
Width: 89 mm - 297 mm
Length: 127 mm - 431.8 mm
For more details, see Paper weight and thickness on page 44.
Maximum paper tray capacity:
1 sheet of special print media
Paper Output
Up to 50 sheets of 80 g/m
2
plain paper (face up print delivery to the output
paper tray)
1
Specifications
181
D
Fax D
1
E-mail addresses are available after IFAX is downloaded.
2
“Pages” refers to the “ITU-T Test Chart #1” (a typical business letter, Standard resolution, MMR code). Specifications
and printed materials are subject to change without prior notice.
Compatibility ITU-T Super Group 3
Modem Speed Automatic Fallback
33,600 bps
Scanning Width
(Single-sided document)
ADF: 208 mm (A4)
Scanner Glass: 204 mm (A4)
Scanning Width and Length
(MFC-J4710DW)
(2-sided document)
Width: 208 mm (A4/Letter/Legal) (ADF)
Length: 349.6 mm (ADF)
Printing Width MFC-J4510DW, MFC-J4710DW (Paper Tray #1)
204 mm (A4)
MFC-J4710DW (Paper Tray #2)
291 mm (A3)
Greyscale Monochrome: 8 bit (256 levels)
Colour: 24 bit (8 bit per colour/ 256 levels)
Resolution Standard
203 98 dpi (Mono)
203 196 dpi (Colour)
Fine
203 196 dpi (Mono/Colour)
Superfine
203 392 dpi (Mono)
Photo
203 196 dpi (Mono)
Address Book
100 names 2 numbers or E-mail addresses
1
Groups Up to 6
Broadcasting 250 (200 Address Book/50 Manual Dial)
Automatic Redial 3 times at 5 minute intervals
Memory Transmission
Up to 200
2
pages
Out of Paper Reception
Up to 200
2
pages
182
Copy D
1
When copying on A4 size paper.
Colour/Monochrome Yes/Yes
Copy Width
204 mm
1
Multiple Copies Stacks/Sorts up to 99 pages
Enlarge/Reduce 25% to 400% (in increments of 1%)
Resolution Prints up to 1200 1200 dpi
2-sided Yes
Paper type:
Plain paper
Paper size:
A4, Letter, A5
Specifications
183
D
PhotoCapture Center™ D
1
Memory cards, adapters and USB Flash memory drive are not included.
2
USB 2.0 Standard
USB Mass Storage standard up to 32 GB
Support format: FAT12/FAT16/FAT32/exFAT
3
Progressive JPEG format is not supported.
4
Motion JPEG only
5
See Paper type and size for each operation on page 42.
Compatible Media
1
Memory Stick Duo™ (16 MB - 128 MB)
Memory Stick PRO Duo™ (256 MB - 32 GB)
Memory Stick Micro™ (M2™) with Adapter (256 MB - 32 GB)
MultiMedia Card (32 MB - 2 GB)
MultiMedia Card plus (128 MB - 4 GB)
MultiMedia Card mobile with Adapter (64 MB - 1 GB)
SD Memory Card (16 MB - 2 GB)
miniSD with Adapter (16 MB - 2 GB)
microSD with Adapter (16 MB - 2 GB)
SDHC Memory Card (4 GB - 32 GB)
miniSDHC with Adapter (4 GB - 32 GB)
microSDHC with Adapter (4 GB - 32 GB)
SDXC Memory Card (48 GB - 128 GB)
USB Flash memory drive
2
Resolution Up to 1200 4800 dpi
File Extension
(Media Format) DPOF (ver. 1.0, ver. 1.1), Exif DCF (up to ver. 2.1)
(Image Format)
Photo Print: JPEG
3
, AVI
4
, MOV
4
Scan to Media: JPEG, PDF (Colour)
TIFF, PDF (Monochrome)
Number of Files Up to 999 files
(The folder inside memory cards or USB Flash memory drive is
also counted.)
Folder File must be stored in the 4th folder level of the memory card or
USB Flash memory drive.
Borderless A4, Letter, A3, Ledger, Photo 10 15 cm,
Photo2L13 18 cm
5
184
PictBridge D
Compatibility Supports the Camera & Imaging Products Association
PictBridge standard CIPA DC-001.
Visit http://www.cipa.jp/pictbridge/
for more information.
Interface USB direct interface
Specifications
185
D
Scanner D
1
Windows
®
XP in this User’s Guide includes Windows
®
XP Home Edition, Windows
®
XP Professional, and Windows
®
XP Professional x64 Edition.
2
For the latest driver updates for the Mac OS X you are using, visit us at http://solutions.brother.com/.
3
Maximum 1200 1200 dpi scanning when using the WIA Driver for Windows
®
XP, Windows Vista
®
and Windows
®
7
(resolution up to 19200 19200 dpi can be selected by using the Brother scanner utility).
Colour/Monochrome Yes/Yes
TWAIN Compliant
Yes (Windows
®
XP
1
/Windows Vista
®
/Windows
®
7)
(Mac OS X v10.5.8, 10.6.x, 10.7.x
2
)
WIA Compliant
Yes (Windows
®
XP
1
/Windows Vista
®
/Windows
®
7)
ICA Compliant Yes (Mac OS X v10.6.x, 10.7.x)
Colour Depth 48 bit colour Processing (Input)
24 bit colour Processing (Output) / 256 levels per colour
Greyscale 16 bit colour Processing (Input)
8 bit colour Processing (Output) / 256 levels
Resolution
Up to 19200 19200 dpi (interpolated)
3
Up to 2400 2400 dpi (optical) (Scanner Glass)
Up to 2400 1200 dpi (optical) (ADF)
Scanning Width and Length
(Single-sided document)
(Scanner Glass)
Width: Up to 213.9 mm
Length: Up to 295 mm
(ADF)
Width: Up to 213.9 mm
Length: Up to 353.6 mm
Scanning Width and Length
(MFC-J4710DW)
(2-sided document)
Width: 213.9 mm (ADF)
Length: 353.6 mm (ADF)
186
Printer D
1
When the Borderless feature is set to On.
2
See Paper type and size for each operation on page 42.
3
When printing on A3 size paper.
4
For detailed specifications visit http://www.brother.com/.
Resolution Up to 1200 6000 dpi
Printing Width
3
291 mm [297 mm (borderless)
1
]
Borderless
2
A4, Letter, A3, Ledger, A6, Photo 10 15 cm,
Photo L 89 127 mm, Photo 2L 13 18 cm
2-sided Paper type:
Plain paper
Paper size:
A4, Letter, A5, Executive
Print Speed
4
Specifications
187
D
Interfaces D
1
Your machine has a Hi-Speed USB 2.0 interface. The machine can also be connected to a computer that has a USB
1.1 interface.
2
Third party USB ports are not supported.
3
See Network on page 188.
See Network User’s Guide: Supported protocols and security features.
USB
12
A USB 2.0 interface cable that is no longer than 2 m.
LAN cable
3
Ethernet UTP cable category 5 or greater.
Wireless LAN IEEE 802.11b/g/n (Infrastructure/Ad-hoc Mode)
IEEE 802.11g/n (Wi-Fi Direct™)
188
Network D
NOTE
For more information about the Network specifications, see Network User’s Guide.
You can connect your machine to a network for Network Printing, Network Scanning, PC Fax
Send, PC Fax Receive (Windows
®
only), Remote Setup, and access photos from PhotoCapture
Center™
1
. Also included is Brother BRAdmin Light
2
Network Management software.
1
See Computer requirements on page 189.
2
(Windows
®
) If you require more advanced printer management, use the latest Brother BRAdmin Professional utility
version that is available as a download from http://solutions.brother.com/
.
Wireless Network
Security
SSID (32 characters), WEP 64/128 bit, WPA-PSK (TKIP/AES),
WPA2-PSK (AES)
Wireless Setup
Support Utility
AOSS™ Yes
WPS Yes
Specifications
189
D
Computer requirements D
SUPPORTED OPERATING SYSTEMS AND SOFTWARE FUNCTIONS
Computer Platform &
Operating System Version
PC Interface
Processor
Hard Disk Space
to install
USB
2
10/100
Base-TX
(Ethernet)
Wireless
802.11b/g/n
For
Drivers
For
Applications
Windows
®
Operating
System
Windows
®
XP
Home
14
Windows
®
XP
Professional
14
Printing
PC Fax
3
Scanning
Removable Disk
5
32bit (x86)
or 64bit
(x64)
processor
150 MB 1 GB
Windows
Vista
®14
500 MB 1.3 GB
Windows
®
7
14
650 MB
Windows Server
®
2003
Windows Server
®
2003 R2
Windows Server
®
2008
N/A Printing 50 MB N/A
Windows Server
®
2008 R2
64bit (x64)
processor
Macintosh
Operating
System
Mac OS X v10.5.8 Printing
PC Fax (Send)
3
Scanning
Removable Disk
5
PowerPC
G4/G5 or
Intel
®
Processor
80 MB 550 MB
Mac OS X v10.6.x
Mac OS X v10.7.x
Intel
®
Processor
Conditions:
1
For WIA, 1200 1200 resolution. Brother Scanner Utility
enables to enhance up to 19200 19200 dpi.
2
Third party USB ports are not supported.
3
PC Fax supports black and white only.
4
PaperPort™ 12SE supports Windows
®
XP Home (SP3 or
greater), XP Professional (SP3 or greater), XP
Professional x64 Edition (SP2 or greater), Windows
Vista
®
(SP2 or greater) and Windows
®
7.
5
Removable disk is a function of PhotoCapture Center™.
For the latest driver updates, visit us at
http://solutions.brother.com/
.
All trademarks, brand and product names are the
property of their respective companies.
190
Consumable items D
Ink The machine uses individual Black, Yellow, Cyan and Magenta ink
cartridges that are separate from the print head assembly.
Service Life of Ink
Cartridge
The first time you install a set of ink cartridges the machine will use
an amount of ink to fill the ink delivery tubes for high quality
printouts. This process will only happen once. After this process is
complete the cartridges provided with your machine will have a
lower yield than standard cartridges (65 %). With all following ink
cartridges you can print the specified number of pages.
Replacement
Consumables
<Super High Yield Black> LC127XLBK
<Super High Yield Yellow> LC125XLY
<Super High Yield Cyan> LC125XLC
<Super High Yield Magenta> LC125XLM
Black, Yellow, Cyan and Magenta - Approximately 1,200 pages
1
<High Yield Black> LC123BK
<High Yield Yellow> LC123Y
<High Yield Cyan> LC123C
<High Yield Magenta> LC123M
Black, Yellow, Cyan and Magenta - Approximately 600 pages
1
1
Approx. cartridge yield is declared in accordance with ISO/IEC 24711.
For more information about the replacement consumables, visit us
at http://www.brother.com/pageyield/
.
What is Innobella™?
Innobella™ is a range of genuine consumables offered by Brother.
The name "Innobella™" derives from the words "Innovation" and
"Bella" (meaning "Beautiful" in Italian) and is a representation of the
"innovative" technology providing you with "beautiful" and "long
lasting" print results.
When you print photo images, Brother recommends Innobella™
glossy photo paper (BP71 series) for high quality. Brilliant prints are
made easier with Innobella™ Ink and paper.
Index
191
E
E
A
Address Book
changing
...............................................71
deleting
.................................................71
Group dial
changing
............................................71
setting up
..............................................70
using
.....................................................68
ADF (automatic document feeder)
...........45
Answering machine (TAD)
.......................63
connecting
............................................64
Apple Macintosh
See Software User's Guide.
Automatic
fax receive
............................................53
Fax Detect
.........................................57
B
Brother
CreativeCenter
........................................3
C
Caller ID ...................................................61
Caller ID history
....................................70
Add to Address Book
.........................70
Delete
................................................70
Send a fax
..........................................70
Cleaning
print head
..............................................97
scanner
.................................................96
Connecting
external TAD
(answering machine)
..................... 63, 64
external telephone
................................65
Consumable items
.................................190
Control panel overview
..............................4
ControlCenter
See Software User's Guide.
Copy
paper size
............................................. 76
paper type
............................................ 75
preset settings
...................................... 74
Shortcuts
.............................................. 11
tray use
................................................ 39
using scanner glass
............................. 46
Custom telephone features on a single
line
......................................................... 129
D
Dialling
a pause
................................................ 70
Address Book
....................................... 68
Caller ID history
.................................... 70
manual
................................................. 68
Outgoing Call
....................................... 69
Document
loading
............................................ 45, 46
E
Envelopes .......................22, 23, 33, 42, 44
Error messages on Touchscreen
.......... 103
B&W 1-sided Print Only
..................... 103
Cannot Detect
.................................... 104
Cannot Print
....................................... 104
Comm. Error
....................................... 104
Cover is Open
.................................... 104
Data Remaining in Memory
................ 104
Document Jam/too Long
.................... 105
Ink Absorber Full
................................ 106
Ink Absorber NearFull
........................ 106
Ink Low
............................................... 106
No Ink Cartridge
................................. 107
No Paper Fed
..................................... 108
Out of Fax Memory
............................ 108
Out of Memory
................................... 109
Paper Jam
.......................................... 109
Unable to Clean
................................. 110
Unable to Initialize
.............................. 110
Unable to Print
................................... 110
Unable to Scan
................................... 110
Wrong Paper
...................................... 111
Wrong Tray Setting
............................ 111
Extension telephone, using
............... 66, 67
External telephone, connecting
............... 65
192
F
Fax codes
changing
...............................................67
Remote Activation Code
.......... 57, 65, 67
Remote Deactivation Code
............ 65, 67
using
.....................................................67
Fax Detect
................................................57
Fax, from PC
See Software User's Guide.
Fax, stand-alone
receiving
................................................53
difficulties
................................ 127, 128
F/T Ring Time, setting
........................56
Fax Detect
..........................................57
Fax Preview
.......................................58
from extension telephone
............ 65, 67
Ring Delay, setting
.............................56
telephone line interference / VoIP
....132
tray use
..............................................40
sending
.................................................48
change scanner glass size
.................50
colour fax
...........................................50
difficulties
.........................................128
Fax Preview
.......................................51
Shortcuts
..................................... 11, 12
telephone line interference / VoIP
....132
Transmission Verification Report
.......52
Fax/Tel mode
answering at extension
telephones
..................................... 65, 67
Remote Activation Code
................ 65, 67
Remote Deactivation Code
............ 65, 67
Ring Delay
............................................56
G
Greyscale ...................................... 181, 185
H
Help
Features tables
...................................151
Settings tables
....................................135
Touchscreen messages
......................134
I
Ink cartridges
ink dot counter
...................................... 93
replacing
............................................... 93
Innobella™
............................................ 190
J
Jams
document
............................................ 113
paper
.................................................. 115
L
LCD (Liquid Crystal Display) ............. 4, 134
Brightness
............................................ 18
M
Macintosh
See Software User's Guide.
Maintenance, routine
replacing ink cartridges
........................ 93
Manual
dialling
.................................................. 68
receive
.................................................. 53
Manual feed slot
...................................... 33
Multi-line connections (PBX)
................... 64
N
Network
Printing
See Network User's Guide.
Scanning
See Software User's Guide.
Nuance™ PaperPort™ 12SE
See Software User's Guide. Also see Help
in the PaperPort™ 12SE application.
O
Outgoing Call
Add to Address Book
............................ 69
Delete
................................................... 69
Send a fax
............................................ 69
193
E
P
Paper ...................................... 40, 179, 180
capacity
.................................................43
loading
..................................... 19, 22, 26
loading A3 or Legal paper
.....................28
loading envelopes and postcard
...........22
loading Photo and Photo L paper
.........25
printable area
........................................37
size
.......................................................38
size of document
...................................45
type
.......................................... 38, 39, 42
Photo and Photo L paper
......22, 25, 42, 43
PhotoCapture Center™
from PC
See Software User's Guide.
MultiMedia Card
....................................77
Preview photos
.....................................80
Print settings
Quality
................................................81
Scan to Media
change file name
...............................81
SD Memory Card
..................................77
SDHC Memory Card
.............................77
SDXC Memory Card
.............................77
specifications
......................................183
Presets for copying
..................................74
Presto! PageManager
See Software User's Guide. Also see Help
in the Presto! PageManager application.
Print
difficulties
............................................123
paper jams
..........................................115
printable area
........................................37
resolution
............................................186
specifications
......................................186
Printing
See Software User's Guide.
R
Ready screen .......................................... 10
Receive Mode
External TAD
........................................ 53
Fax Only
............................................... 53
Fax/Tel
................................................. 53
Manual
................................................. 53
Redial/Pause
........................................... 69
Remote Setup
See Software User's Guide.
Resolution
copy
.................................................... 182
fax
...................................................... 181
print
.................................................... 186
scan
.................................................... 185
Ring Delay, setting
.................................. 56
S
Scan Shortcuts .................................. 11, 13
Scanning
See Software User's Guide.
Serial Number
how to find ...............See inside front cover
Shortcuts
................................................. 11
adding
............................... 11, 12, 13, 14
changing
............................................... 15
Shortcut name
................................... 16
Copy
..................................................... 11
deleting
................................................. 16
Fax
....................................................... 12
recalling
................................................ 16
Scan
..................................................... 13
Web
...................................................... 14
Sockets
EXT
External telephone
............................ 65
Step-by-step Settings Tables
................ 134
Swiping
...................................................... 7
194
T
TAD (telephone answering device),
external
............................................. 53, 63
connecting
...................................... 63, 64
Receive Mode
.......................................53
recording OGM
.....................................64
Telephone line
connections
...........................................64
difficulties
............................................128
interference / VoIP
..............................132
multi-line (PBX)
.....................................64
type
.......................................................62
Text, entering
.........................................175
Transferring your faxes or
Fax Journal report
..................................112
Transparencies
....40, 41, 43, 44, 179, 180
Tray Select
...............................................76
Troubleshooting
document jam
.....................................113
error messages on Touchscreen
........103
if you are having difficulty
copying
.............................................129
document jam
..................................113
entering data
....................................131
incoming calls
..................................129
Network
............................................131
paper handling
.................................126
PhotoCapture Center
...................130
print quality
.......................................124
printing
.............................................123
printing received faxes
.....................127
receiving faxes
.................................128
scanning
...........................................130
software
...........................................130
telephone line or connections
..........128
maintenance messages on
Touchscreen
.......................................103
paper jam
............................................115
U
Unscannable area ....................................47
V
Volume, setting
beeper
.................................................. 17
ring
....................................................... 16
speaker
................................................. 17
W
Web Shortcuts ................................... 11, 14
Windows
®
See Software User's Guide.
Wireless Network
See Quick Setup Guide and Network
User's Guide.
www.brotherearth.com
Visit us on the World Wide Web
http://www.brother.com/
These machines are approved for use in the country of purchase only. Local Brother companies
or their dealers will only support machines purchased in their own countries.
6

Hulp nodig? Stel uw vraag in het forum

Spelregels
1

Forum

Brother-MFC-J4510DW
  • Mijn Mfc-j6530 de doet helemaal niets meer. Hoe kan ik de voeding demonteren en controleren?
    Gesteld op 12-10-2024 om 18:17

    Reageer op deze vraag Misbruik melden
  • Mijn brother printer DCP-4120DW doet niets alle adviezen geprobeerd stekker 30 minuten er uit aan uit knop ingedrukt gehouden bij de stekker in stopcontact 5 keer geprobeerd doet helemaal niets Gesteld op 1-9-2023 om 12:58

    Reageer op deze vraag Misbruik melden
  • inktjets zitten vol printer geeft tocht aan dat de inkt op is. als gereset , printjes schoongeveegd van de inkt patronen. maar blijft rood kruis / storing aangeven. Gesteld op 22-5-2023 om 18:45

    Reageer op deze vraag Misbruik melden
  • mijn printer (mfc-j4510dw) geeft aan inktabsorbeerder vol Gesteld op 27-12-2022 om 11:06

    Reageer op deze vraag Misbruik melden
  • Wedertom een opstart[robleem met mijn Brother dcp-j562dw printer.
    De printer heeft een half jaar stilgestaan maar wel aangeloten op het lichtnet.
    Alle voorgaande oplossingen geprobeerd maar gebeurd echt niets.
    Wie heeft er nog een oplossing Gesteld op 13-10-2021 om 17:24

    Reageer op deze vraag Misbruik melden
  • Printer gaat niet meer aan. Wat te doen?
    Brother DCP-J562DW Gesteld op 11-4-2021 om 16:22

    Reageer op deze vraag Misbruik melden
6
  • Kan ik zelf inktabsorbeerder leegmaken?
    Winkels zijn gesloten.
    BVD
    Theo Gesteld op 21-12-2020 om 16:47

    Reageer op deze vraag Misbruik melden
  • Ik heb vorige jaar een gebruikte Brother MFC J4510 DW gehad van iemand.Hij wil niet kopiëren.
    Bij elke poging blanco papier terug.Besturings programma recent gedownload op mijn computer. Pas en nieuwe
    zwarte inktpatroon er in gezet. Gesteld op 24-5-2020 om 08:53

    Reageer op deze vraag Misbruik melden
    • Heb alle instrukties onderaan de forun lijst gevolg, met stekker d'rin stekker d'ruit. Helaas niets heeft geholpen. Jammer
      Geantwoord op 24-5-2020 om 09:56

      Waardeer dit antwoord Misbruik melden
  • brother J4510DW. onderstaande een paar keer gedaan. ( stekker eruit, knop aanhouden) maar de printer gaat telkens spontaan uit. af en toe lijkte eenlichtje geven , maar als ik dan opdracht voor printen wil geen , weer geen sjoege.
    Wat is er aan de hand?. Brother verwijst naar " hardwareprobleem" maar niet " welke dan precies?
    Gesteld op 11-5-2020 om 08:58

    Reageer op deze vraag Misbruik melden
    • Ik moet deze bewerking iedere keer uitvoeren om het toestel te kunnen starten. Volgens de service dienst van Brother zit de fout in het main board De prijs van de herstelling is 170 euro exl.btw. Veel geld voor een scanner/printer van 2016 die maar sporadisch werd gebruikt. Volgens het forum is dit een fout die veelvuldig voorkomt. Spijtig geen technische uitleg van het service center. Geantwoord op 22-1-2021 om 17:38

      Waardeer dit antwoord Misbruik melden
  • goedendag,

    Na heel lang mijn printer in de schuur te hebben bewaard, wilde ik hem vandaag weer gebruiken.
    Hij is aangeweest, maar nadat ik het bedienningspaneel heb uitgeschoven, ging het schermpje aan hen uit.
    het scherm geeft nog wel licht en het huisje ook.
    Weet iemand wat dit is en hoe ik het kan oplossen? Gesteld op 26-3-2020 om 19:05

    Reageer op deze vraag Misbruik melden
  • Goedendag, mijn display geeft alleen licht en verder niet.
    Aan/uit reageert wel want ik krijg signaaltjes, kort verschijnt het icoontje van 'home' (huisje).
    Weet iemand wat de oorzaak is?
    Vriendelijke groet, Hans Gesteld op 22-3-2019 om 08:45

    Reageer op deze vraag Misbruik melden
  • de inkt absorbeerder vol waar zit deze kan het gereinicht worden en hoe Gesteld op 5-1-2019 om 02:50

    Reageer op deze vraag Misbruik melden
12
  • Klik op deze LINK

    Geantwoord op 29-8-2024 om 16:50

    Waardeer dit antwoord Misbruik melden
  • Ik heb tijdens gebruik van scherm de uit-knop langdurig ingedrukt om het toestel uit te zetten. Nu wil ik opnieuw aanzetten en het gaat niet meer. Gesteld op 15-10-2018 om 13:30

    Reageer op deze vraag Misbruik melden
    • heb juist hetzelfde probleem net opgelost. Printer maanden spanningsloos gestaan.
      Stekker uitgetrokken. 2minuten gewacht.
      aan/uit knop ingedrukt houden, stekker insteken, aan/uit knop enkele minuten blijven indrukken.
      terug opgestart. :)
      Geantwoord op 3-12-2018 om 08:38

      Waardeer dit antwoord (11) Misbruik melden
  • Heb ik ook regelmatig. Een vreemde remedie helpt: stekker uit het stopcontact, halve minuut wachten, papierlade eruithalen, dan de stekker er weer in en de aanknop indrukken. Omdat hij de papierlade mist geeft hij een melding. Als je dan de la er weer in doet, werkt hij weer gewoon. Geantwoord op 15-3-2019 om 15:41

    Waardeer dit antwoord (8) Misbruik melden
  • Dit geld ook voor de DCP 9020CDW. inderdaad heel vreemd maar hij doet het weer
    Bedankt Geantwoord op 16-9-2019 om 23:13

    Waardeer dit antwoord (2) Misbruik melden
  • Heeft iemand een idee, hoe het komt dat de printer steeds offline geeft terwijl hij gewoon is aan gesloten?
    Vind langzaam aan dat dit apparaat grote miskoop is. Gesteld op 25-4-2018 om 19:20

    Reageer op deze vraag Misbruik melden
    • Dat gevoel heb ik helaas ook! Met name door de zeer slechte vage kleurafdruk. De constante problemen. Functies die niet goed werken. Geantwoord op 5-6-2018 om 09:51

      Waardeer dit antwoord Misbruik melden
  • Hier hetzelfde probleem.
    Printer gaat niet meer aan of gaat vanzelf weer Uit!
    Echt waardeloos! Gesteld op 21-3-2018 om 09:46

    Reageer op deze vraag Misbruik melden
    • Ik heb op internet een manier gevonden die bij mijn printer hielp: de stekker eruit halen, 30 seconden wachten, de papierlade eruithalen, dan de stekker er weer in (evt. nog op de aan/uit knop drukken tot er beeld komt) en dan geeft hij een melding dat de papierlade er niet in zit. Papierlade terugschuiven en hij doet het weer! Een beetje omslachtig, maar beter dan een nieuwe kopen. Geantwoord op 16-6-2018 om 14:55

      Waardeer dit antwoord (59) Misbruik melden
  • Stroom eraf dan de aan/uit indrukken en de stroom er weer op, de aan/uit knop vast houden tot je het normale scherm te voorschijn komt Geantwoord op 18-6-2018 om 20:23

    Waardeer dit antwoord (38) Misbruik melden
  • Klopt! Precies zoals Brother het zelf ook aangeeft! Geantwoord op 31-7-2018 om 18:07

    Waardeer dit antwoord (7) Misbruik melden
  • na mijn laatste print uitgevallen en krijg het apparaat niet meer aan de praat Geantwoord op 7-12-2020 om 19:56

    Waardeer dit antwoord (27) Misbruik melden
  • Op mijn scherm komt zwarte streep na stroom uitval Geantwoord op 26-12-2020 om 16:42

    Waardeer dit antwoord (5) Misbruik melden
  • Er moet toch een betere oplossing zijn dan het uittrekken van de stekker iedere keer dat je het apparaat wilt aanzetten??
    Geantwoord op 27-12-2020 om 15:08

    Waardeer dit antwoord (19) Misbruik melden
  • Na vele jaren schik nu 1 keer niet op willen starten.
    Stekker eruit, Papierlade(s) eruit en na 30 sec stekker erin...hopla...en doet t weer!
    Dank voor de werkende tip
    Geantwoord op 28-6-2022 om 20:48

    Waardeer dit antwoord (2) Misbruik melden
  • Bizarre oplossing, maar werkt vooralsnog....
    Ik dacht dat voeding kapot was. Geantwoord op 13-7-2022 om 14:36

    Waardeer dit antwoord (2) Misbruik melden
  • Ook hier hetzelfde probleem (in 2023!) Printer DCP-3550CDW helemaal dood. Stekker eruit, papierlade eruit en na 30 sec stekker erin, knop aan/uit ingedrukt houden...en doet t weer.
    Geantwoord op 11-9-2023 om 09:35

    Waardeer dit antwoord Misbruik melden
  • Hier zelfde verhaal na stekker in stopcontact doen viel printer J6520dw van alles geprobeerd tot ik Deze post vond, papier la er uit, stekker er in en hij doet het weer…. ?? bedankt voor de tip Geantwoord op 5-12-2023 om 19:18

    Waardeer dit antwoord (1) Misbruik melden
  • Stekker eruit aan uit knop vasthouden en stekker erin. Geweldig en zo eenvoudig maar je moet het maar weten. Erg bedankt. ???? Geantwoord op 8-3-2024 om 17:38

    Waardeer dit antwoord Misbruik melden
  • ik heb de aan en uitknop uitgezet. nu werk hij niet meer Gesteld op 26-1-2018 om 13:34

    Reageer op deze vraag Misbruik melden
    • zelfde probleem gehad, stekker eruit halen, minuutje wachten, aan/uit knop ingedrukt houden terwijl je de stekker er weer in doet, even ingedrukt houden en hij deed het weer. Geantwoord op 21-2-2018 om 11:52

      Waardeer dit antwoord (15) Misbruik melden
  • Stroom storing gehad. werkt niet meer Stekker meermaals in en uit gedaan.niets werkt...
    Lees eerder advies !
    Stekker eruit halen, even wachten, aan/uit knop ingedrukt houden terwijl je de stekker er weer in doet. werkt weer! TOP thanks Geantwoord op 12-6-2018 om 13:23

    Waardeer dit antwoord Misbruik melden
  • de printer start niet meer op. Als ik de voedingskabel er opnieuw in doe, doet hij het even en sluit zich daarna weer af. Gesteld op 4-12-2017 om 18:56

    Reageer op deze vraag Misbruik melden
  • Ook bij mij thuis hetzelfde probleem. Is er een oplossing? Geantwoord op 19-12-2017 om 19:41

    Waardeer dit antwoord (5) Misbruik melden
  • effe uitgeprobeerd. Stroomstekker eruit gehaald. Een minuut wachten. Aan/uit knop ingedrukt houden terwijl je de stroomstekker in het stopcontact doet. Nog even ingedrukt houden en voila hij doet het weer. Echt waar. Geantwoord op 19-12-2017 om 19:48

    Waardeer dit antwoord (12) Misbruik melden
  • IDD na het eruit halen van de stroomstekker en weer aansluiten. Na 30 keer - ja hoor hij doet het weer. Helaas na een tijdje valt hij weer uit en weer hetzelfde ritueel. DIT IS GEEN WERKBARE SITUATIE WANT HET KOMT ALTIJD ONGELEGEN. Geantwoord op 8-1-2018 om 12:34

    Waardeer dit antwoord (3) Misbruik melden
  • Als het probleem zich blijft herhalen (zoals bij mij) moet je de volledige software van de printer vernieuwen.
    Zie hiervoor:
    Klik op deze LINK
    Installeer het complete pakket van drivers & software.
    Dit heeft bij mij het probleem permanent laten verdwijnen.
    Veel succes. Geantwoord op 1-2-2018 om 12:59

    Waardeer dit antwoord Misbruik melden
  • Ik heb alle tips hieronder gelezen en ook toegepast maar mijn printer MFC J6520DW gaat niet meer aan nadat hij is uit geweest. Een keer ging hij even aan maar sloot ook meteen daarna weer af, zonder dat ik iets kon doen om dit tegen te houden. Aan/uitknop ingedrukt houden terwijl ik stekker terugplaats werkt niet, heb 3 minuten volgehouden (lijkt me dat als ie het dan niet doet, dat het geen zin heeft langer te blijven wachten). Wat kan ik nog meer doen om hem aan te krijgen? (en waarom kan dit niet simpeler??) Gesteld op 21-11-2017 om 10:44

    Reageer op deze vraag Misbruik melden
    • Ik had het zelfde probleem, belangrijke toevoeging bij deze tip haal de stroom eraf en wacht een paar minuten dan pa de truc met geleijk aan/uit knop in combinatie met stroom erop Geantwoord op 20-12-2017 om 20:54

      Waardeer dit antwoord Misbruik melden
18
  • Printer uitgezet maar krijg hem nooit meer aan op aan/uit knop.
    Gesteld op 13-10-2017 om 15:17

    Reageer op deze vraag Misbruik melden
  • Ik heb dat ook gehad uit gezet en steeds geprobeerd en eindelijk wel 20 min ingedrukt gehouden en toen deed hij het weer succes gr Theo. Geantwoord op 16-10-2017 om 17:20

    Waardeer dit antwoord Misbruik melden
  • mijn printer sluit af nadat ik de stekker nadat ik de stekker in de wandcontactdoos stop. Dus hij start op en sluit onmiddelijk af en ik krijg m niet meer aan.
    Gesteld op 23-9-2017 om 15:01

    Reageer op deze vraag Misbruik melden
    • Voor mij werkte het volgende: stekker uittrekken - 5 minuten wachten (zonder het wachten lukte het niet) - aanuitknop induwen, ingedrukt houden, terwijl stekker in stopcontact steken, blijven ingedrukt houden tot helemaal opgestart dan loslaten. Werkt nu weer prima. Geantwoord op 11-1-2018 om 12:56

      Waardeer dit antwoord Misbruik melden
  • Ik heb een Brother Printer die ik niet aan de gang kan krijgen. startknop houd ik ingedrukt maar hij gaat niet aan. ook stekker eruit en dan weer erin, geen resultaat. en hij is maar 2 jaar oud Gesteld op 9-7-2017 om 21:58

    Reageer op deze vraag Misbruik melden
    • Ik had ook een probleem met opstarten ik heb het ca 10 keer probeert de start knop wel 10 tot15 minuten ingedrukt gehouden en eindelijk heb ik hem aan de gang gekregen hij werkt nu al weer twee dagen goed succes Theo . Geantwoord op 9-7-2017 om 22:25

      Waardeer dit antwoord Misbruik melden
  • Dit probleem heb ik ook gehad,maar na een telefoontje met de helpdesk was ik eruit,je moet
    namelijk de stekker eruit halen daarna de startknop ingedrukt houden terwijl je de stekker weer
    in het stopcontact steekt,startknop ingedrukt houden tot hij weer aangaat. Geantwoord op 10-7-2017 om 17:07

    Waardeer dit antwoord (19) Misbruik melden
  • Ik heb een Brother Printer die ik niet aan de gang kan krijgen ik moet hem opstarten met de startknop ingedrukt en de net kabel uit het apparaat de gaat hij even aan en gaat meteen weer uit schakelen Gesteld op 1-7-2017 om 16:40

    Reageer op deze vraag Misbruik melden
  • Ik heb mijn printer afgezet maar krijg hem niet meer aan. Gesteld op 29-3-2017 om 17:38

    Reageer op deze vraag Misbruik melden
    • De stekker eruit halen,dan op de aan/uit knop blijven drukken,terwijl dat je dit doet,de stekker weer in het apparaat stoppen Geantwoord op 29-3-2017 om 17:51

      Waardeer dit antwoord (1) Misbruik melden
  • Werkt, bedankt! Maar nu heb ik het volgende probleem, hij wil niet meer printen... i Geantwoord op 29-3-2017 om 19:55

    Waardeer dit antwoord Misbruik melden
  • Dan maar in de kliko! Geantwoord op 30-3-2017 om 09:49

    Waardeer dit antwoord Misbruik melden
  • wat moet je doen bij een stand by afsluiting? als ik hem opstart zegt hij schakel alles uit stand by afsluiting
    Gesteld op 26-2-2017 om 15:03

    Reageer op deze vraag Misbruik melden
    • Stroom eraf. Aan/uit knop indrukken en ingedrukt houden. Hierna stroom weer aan met de nog steeds ingedrukte aan/uit knop. Hierna reset de printer zich zodat alles weer werkt.. Geantwoord op 2-3-2017 om 12:42

      Waardeer dit antwoord (33) Misbruik melden
24
  • De printer gaat uit en wil niet meer aan, wat kan ik doen?? Gesteld op 10-12-2016 om 10:38

    Reageer op deze vraag Misbruik melden
  • Als dat niet helpt: Stekker er paar minuten uit. Aan/uit knopje ingedrukt houden terwijl je de stekker weer in steekt. Pas loslaten als de printer weer is opgestart. Geantwoord op 14-12-2016 om 21:10

    Waardeer dit antwoord (11) Misbruik melden
  • Nieuwe zwarte originele cartridge erin maar zwart wil niet printen ook na reinigen en test afdrukken geen zwart afdrukken. Iemand tips? Gesteld op 1-11-2016 om 19:34

    Reageer op deze vraag Misbruik melden
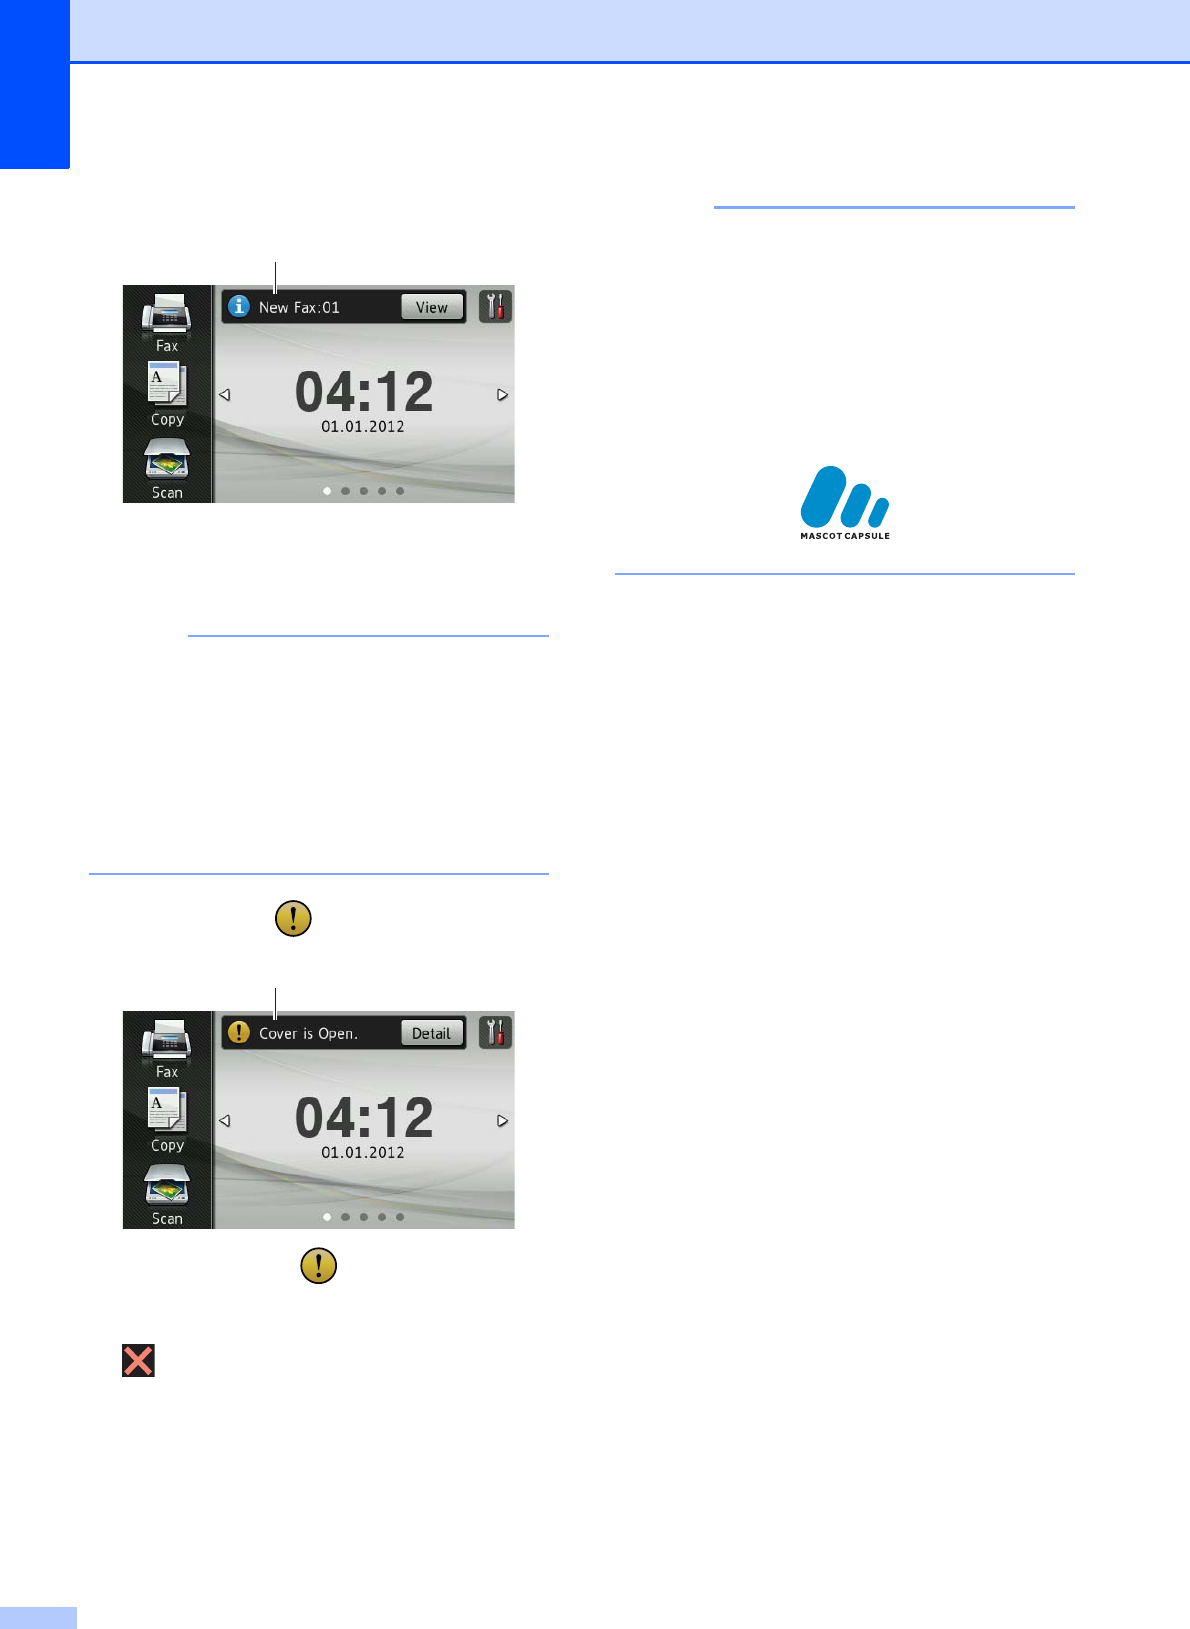
  • Printer wil niet aan. (alle drivers gecontroleerd) Als er netspanning op komt komt de melding "alle functies worden uitgeschakeld" daarna "in stand-by aan/uit om verder te gaan"
    Dan schakelt de printer uit om verder niet meer te reageren. Gesteld op 25-9-2016 om 21:59

    Reageer op deze vraag Misbruik melden
    • Beste,
      Dat probleem ken ik. Weet ook niet hoe dat komt, maar bij was de oplossing stroomkabel uitrekken en 2 tot 3 min wachten. Daarna stroomkabel terug insteken en voilà probleem opgelost
      Veel succes
      Geantwoord op 5-10-2016 om 19:45

      Waardeer dit antwoord (6) Misbruik melden
  • Heb hetzelfde probleem,
    Nu voor de 2e keer. 1e keer heb ik de stekker een paar keer uitgetrokken en weer in gedaan in een andere stopcontact en de printer werkte weer.
    Nu heb ik weer dit probleem. Heb al de stekker een paar keer uitgetrokken en verschilldende stopcontacten geprobeerd maar de printer werkt nog steeds niet.:(((( Help!! Geantwoord op 24-10-2016 om 17:48

    Waardeer dit antwoord (25) Misbruik melden
  • stekker uit stopcontact. papiertray er uit. minuutje wachten. powerknop ingedrukt houden en stekker er weer in.
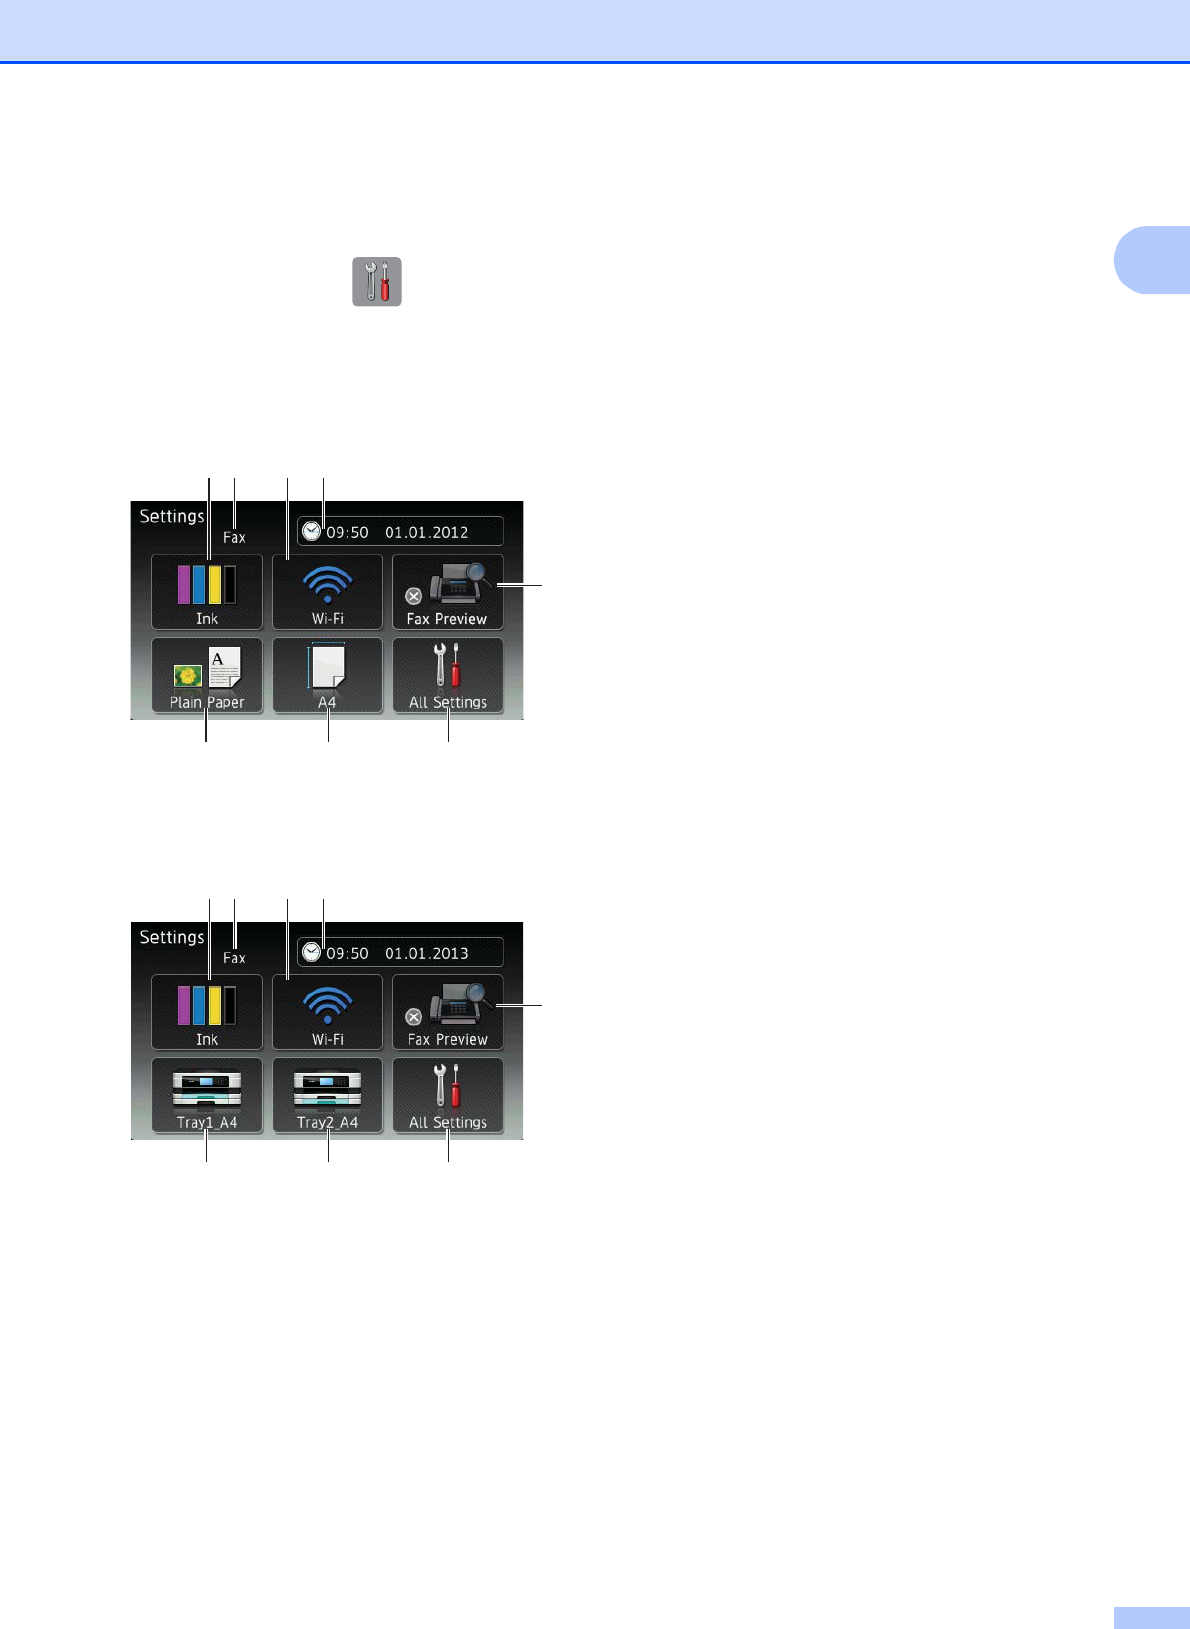
    datum en tijdinstellingen en mogelijk meer instellingen zijn dan wel verdwenen en moeten opnieuw aangemaakt worden Geantwoord op 4-3-2017 om 11:45

    Waardeer dit antwoord (4) Misbruik melden
  • deze laatste optie werkt inderdaad Geantwoord op 31-7-2020 om 14:17

    Waardeer dit antwoord Misbruik melden
  • ook mijn Brother printer MFC-J45100W heeft hetzelfde probleem.
    Ik heb het met de door Brother aangegeven tip geprobeerd, maar
    krijg de printer niet meer aan. Iemand misschien een andere oplossing? Gesteld op 9-8-2016 om 21:14

    Reageer op deze vraag Misbruik melden
  • De aan uit knop van mijn printer werkt niet meer. Stekker eruit, stekker erin gedaan. VErvolgens heel kort, "afsluiten druk aan/uit om verder te gaan" bericht.
    Printer gaat uit, en niet meer aan met aan/uit knop.
    Iemand dit al eens eerder meegemaakt? En... wat nu??
    Gesteld op 27-7-2016 om 10:33

    Reageer op deze vraag Misbruik melden
  • Net brother service gebeld. De truuk is: Stekker eruit. Dan aan/uit knop vasthouden en tegelijkertijd stekker erin. AAN/UIT vast blijven houden totdat scherm zegt: "sluiten". Dan op sluiten klikken. En klaar. Doet 't weer! Succes allemaal! Geantwoord op 27-7-2016 om 10:41

    Waardeer dit antwoord (210) Misbruik melden
  • Oplossing hierboven heeft voor mij gewerkt nadat ik het volgende doorhad: de stekker moet er meer dan 10 sec. uit zijn, en de AAN/UIT knop niet los te laten voordat het scherm "sluiten" aangeeft. Geantwoord op 18-8-2016 om 13:39

    Waardeer dit antwoord (80) Misbruik melden
  • Ik heb dit vandaag ook gehad. Laatste advies werkte inderdaad nadat ik meer dan 10 sec de stekker eruit liet. Alleen mijn scherm gaf niet "sluiten" aan, maar direct het begin scherm. En toen deed ie het weer! Geantwoord op 20-11-2017 om 14:12

    Waardeer dit antwoord (39) Misbruik melden
  • Bij mij werkte de "reset methode" ook, echter na een keer of 3 aanzetten van de printer (DCP-J4120DW) was weer het afgelopen. Moest weer resetten om het ding aan de praat te krijgen. Dit fenomeen bleef zich regelmatig herhalen.......
    De uiteindelijke oplossing was het gehele softwarepakket vervangen, zie hiervoor de link
    Klik op deze LINK
    Installeer het complete pakket van drivers & software.
    Bij mij werkt nu alles alweer een aantal dagen prima (zo'n 20 tot 30 keer uit en aangezet zonder problemen).
    Succes! Geantwoord op 31-1-2018 om 16:48

    Waardeer dit antwoord (34) Misbruik melden
  • Brother en Hp zijn de printermerken en ze kunnen niet eens een knappe printer ontwerpen. Zijn stuk voor stuk rotdingen Geantwoord op 12-3-2019 om 16:37

    Waardeer dit antwoord (13) Misbruik melden
  • Fantastische printer, al jaren in gebruik. Storing wellicht door oude drivers. Bedankt voor de oplossing! Geantwoord op 11-9-2019 om 20:16

    Waardeer dit antwoord (5) Misbruik melden
  • mijn printer doet het helemaal niet . heb alle stekkers er al uit gehaald . wie weet raad Geantwoord op 21-9-2019 om 20:46

    Waardeer dit antwoord (144) Misbruik melden
  • Enorm bedankt voor deze uitleg!
    en man was alle ***** slecht van brother zelf dat dit ff 'zomaar' gebeurt Geantwoord op 28-1-2020 om 21:30

    Waardeer dit antwoord (3) Misbruik melden
  • Ik heb het probleem ook maar na het opstarten zoals boven beschreven gaat de printer vanzelf weer uit Geantwoord op 4-1-2021 om 11:26

    Waardeer dit antwoord (25) Misbruik melden
  • bizar.... en bedankt voor deze tips....niks lukte.... dacht, toch even zoeken ergens op internet... en na 20 seconden vond ik deze meldingen... daar kom je normaal toch niet achter.... Geantwoord op 26-6-2021 om 20:39

    Waardeer dit antwoord (29) Misbruik melden
  • Ik heb zwart witte strepen op display Geantwoord op 5-8-2021 om 18:20

    Waardeer dit antwoord (4) Misbruik melden
  • ik ook! sinds vandaag! Geantwoord op 23-8-2021 om 11:20

    Waardeer dit antwoord (1) Misbruik melden
  • Model MFC-J491DW.
    De trucs met de stekker er enige tijd uit, powerbutton ingedrukt houden en stekker er weer in en powerbutton nog een tijdje ingedrukt houden, leverde helaas slechts alleen maar een wit schermpje op de printer op. Geen enkele toets deed iets, en de computer blijft beweren dat de printer offline is.
    N.B.: dit euvel deed zich voor nadat vorige week de stroom even was uitgevallen.
    Alle combi's van trucs geprobeerd, geen resultaat. (Behalve dan een wit displaytje op de printer.)
    Iemand? Geantwoord op 21-10-2021 om 01:02

    Waardeer dit antwoord (22) Misbruik melden
  • Het is mij ook gelukt door de stekker en minstens tien seconden uit te halen, vervolgens op de powerknop drukken, stekker er in en blijven vasthouden. Er verscheen eerst een wit schermpje, daarna lichtte het thuisknopje op en pas daarna het startscherm. Het is dus nodig om de startknop lang ingedrukt te houden. Geantwoord op 13-6-2022 om 15:22

    Waardeer dit antwoord Misbruik melden
  • Wij hebben hetzelfde probleem. Maar de bovenstaande oplossingen helpen niet. Ook al andere stopcontacten geprobeerd maar hij gaat niet aan Geantwoord op 10-7-2022 om 13:58

    Waardeer dit antwoord (9) Misbruik melden
  • Ook het probleem gehad.
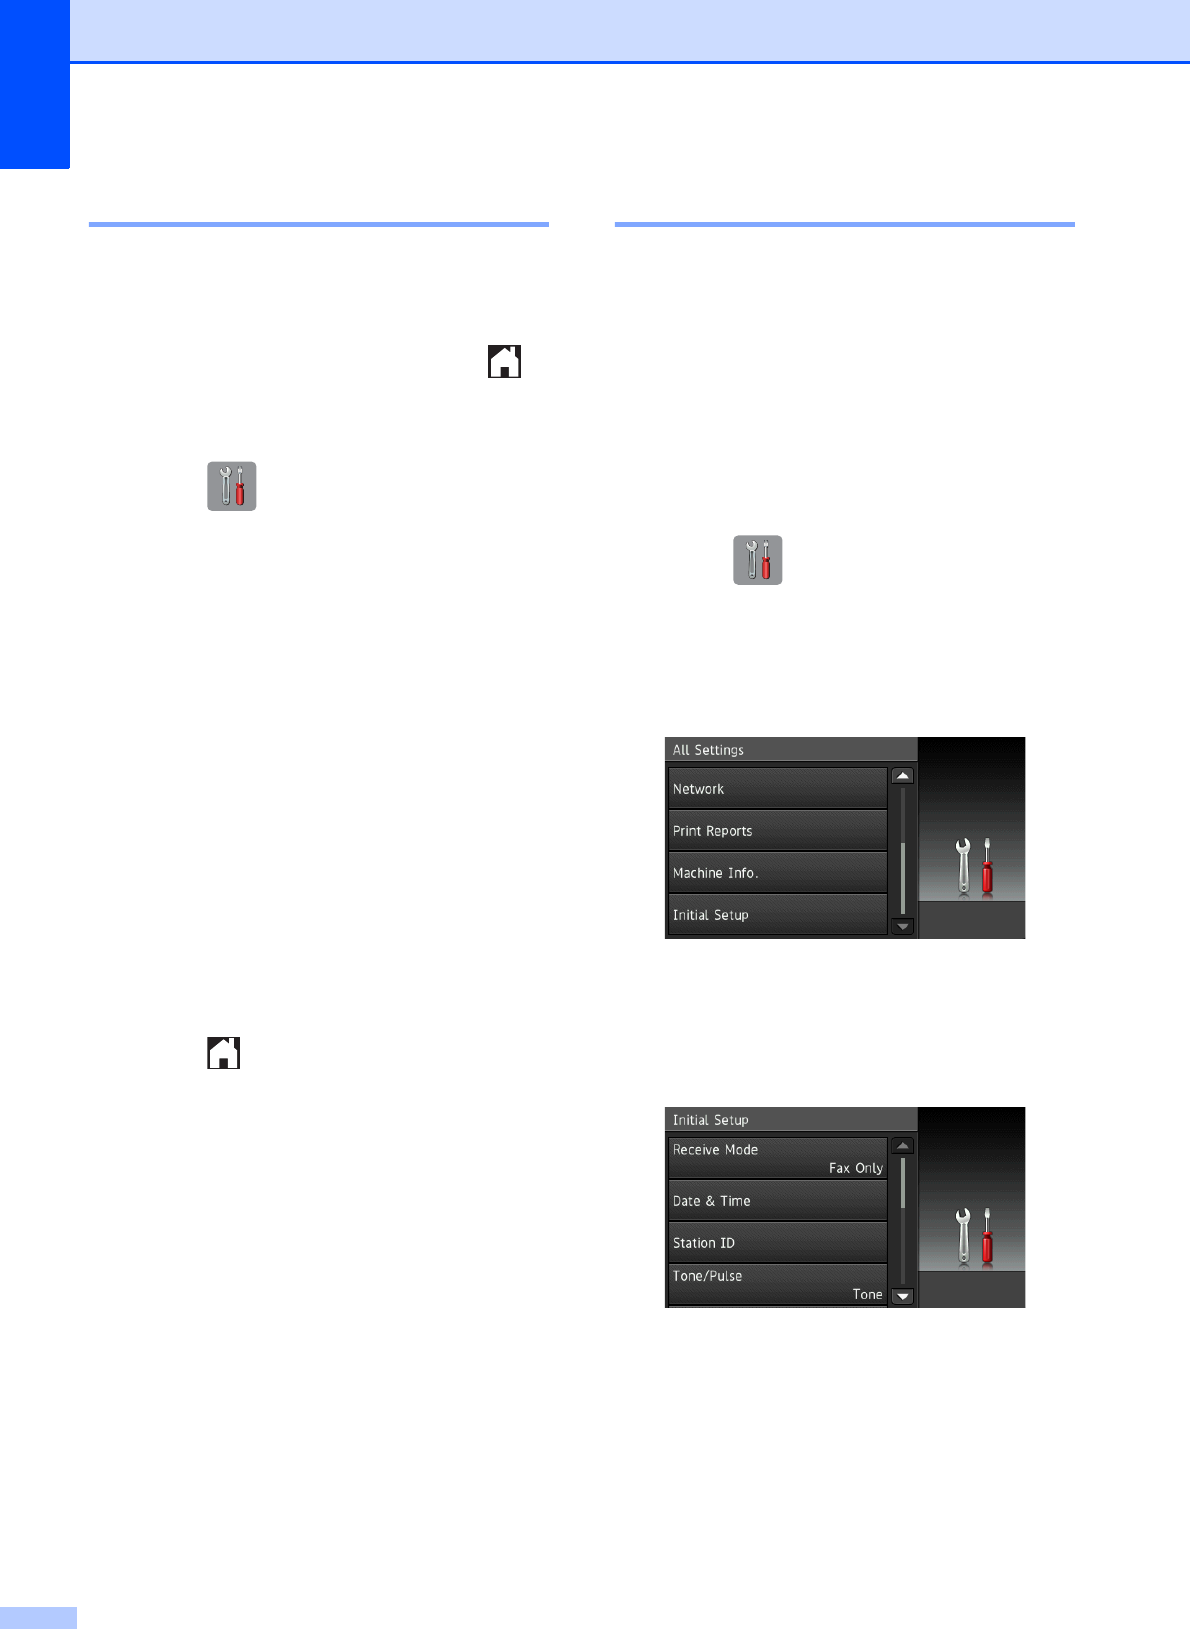
    Stekker eruit. AAN/UIT knop ingedrukt, 10 seconden wachten. Daarna Stekker er weer in, maar knop in gedrukt houden tot dat "SLUITEN" knop verschijnt met boven in de Station ID.
    Dan AAN/UIT los laten en "SLUITEN" aan tikken. Printer hersteld. Geantwoord op 28-7-2022 om 08:58

    Waardeer dit antwoord (2) Misbruik melden
  • Dank voor de uitleg! het is gelukt, heel fijn!
    Geantwoord op 12-10-2022 om 18:16

    Waardeer dit antwoord (2) Misbruik melden
  • ook hier dit probleem en gelukkig opgelost, alleen bij uitzetten moet het proces herhaald worden, de laatste drivers zijn blijkbaar uit 2014 ?
    Ook wordt hij niet zichtbaar in het thuiswerk alleen aan USB ? Geantwoord op 30-11-2022 om 20:40

    Waardeer dit antwoord (1) Misbruik melden
  • Heb hier ook dat probleem. Na reset werkt hij terug. 24 uur later niet meer. Heeft alle firmware updates gehad, volgens Brother. Staat hier als test en is niet eens aan een computer gelinkt. Dus drivers? Kan je ook een Factory reset doen? Geantwoord op 1-1-2023 om 09:36

    Waardeer dit antwoord (1) Misbruik melden
  • Ik heb hetzelfde probleem maar de printer geeft geen signaal
    Geantwoord op 26-1-2023 om 15:34

    Waardeer dit antwoord (3) Misbruik melden
  • Tja, top, werkt gewoon deze truc!
    Bedankt, spaart weer een nieuwe printer. Geantwoord op 12-2-2023 om 11:57

    Waardeer dit antwoord Misbruik melden
  • Brother printer gaat niet meer aan ,ook niet na stroom eraf en knop ingedrukt houden, groot apparaat maar als ie niet werkt heb je er niks aan. Geantwoord op 9-3-2023 om 11:32

    Waardeer dit antwoord (9) Misbruik melden
  • stekker eruit, aan uit knop ingedrukt houden en stekker er weer in.
    werkt weer :)
    en bedankt Geantwoord op 20-3-2023 om 19:04

    Waardeer dit antwoord Misbruik melden
  • Zucht, eindelijk hier een antwoord gevonden op het probleem. Had wel niet door dat je de aan/uit knop echt wel lang moest indrukken voor de reset. Werkt weer naar behoren. Bedankt! Geantwoord op 28-7-2023 om 09:51

    Waardeer dit antwoord Misbruik melden
  • Inderdaad zucht! Eerst inktabsorbeerkussen vol, via youtube de oplossing met 46 minuten durende video gevonden van een Australiër, werkte weer maar voor eventjes. Toen helemaal dood!!! Stekker eruit, aan/uitknop indrukken en vastgehouden voor minstens 20 seconden terwijl ik de stekker weer in het stopcontact duwde. HIJ DOET HET WEER!!!! Groeten, Cor Geantwoord op 31-7-2023 om 21:33

    Waardeer dit antwoord (1) Misbruik melden
  • Bij mij werkte het ook nadat je inderdaad langer dan 10 seconden de stekker eruit had gehaald.
    Blij! Geantwoord op 8-8-2023 om 10:43

    Waardeer dit antwoord (1) Misbruik melden
  • Dit was het inderdaad. Bij mij ook meteen naar het beginscherm (sluiten verscheen niet). Type DCP-L2560DW. Geantwoord op 9-6-2024 om 11:19

    Waardeer dit antwoord Misbruik melden
  • Printer MFC-J4620DW
    Werkte zoals boven reeds aangegeven:
    - Stekker eruit
    - min. 10 sec. wachten (om de elektronica 'leeg' te laten lopen)
    - Startknop inhouden
    - Stekker terug stoppen (startknop in blijven houden)
    - Met startknop in, wachten tot de printer geheel herstart is
    MvG, Erick Geantwoord op 13-6-2024 om 07:03

    Waardeer dit antwoord (2) Misbruik melden
  • waardeloze printer , ga voor ander merk! Geantwoord op 28-7-2024 om 20:49

    Waardeer dit antwoord Misbruik melden
  • Ook mijn printer gaat nooit meer normaal aan.
    Ik doe tegenwoordig standaard de stekker eruit als ik de printer niet meer nodig heb. Hij moet er toch uit als ik 'm weer aan wil zetten :).
    Aanzetten gaat dan als volgt:
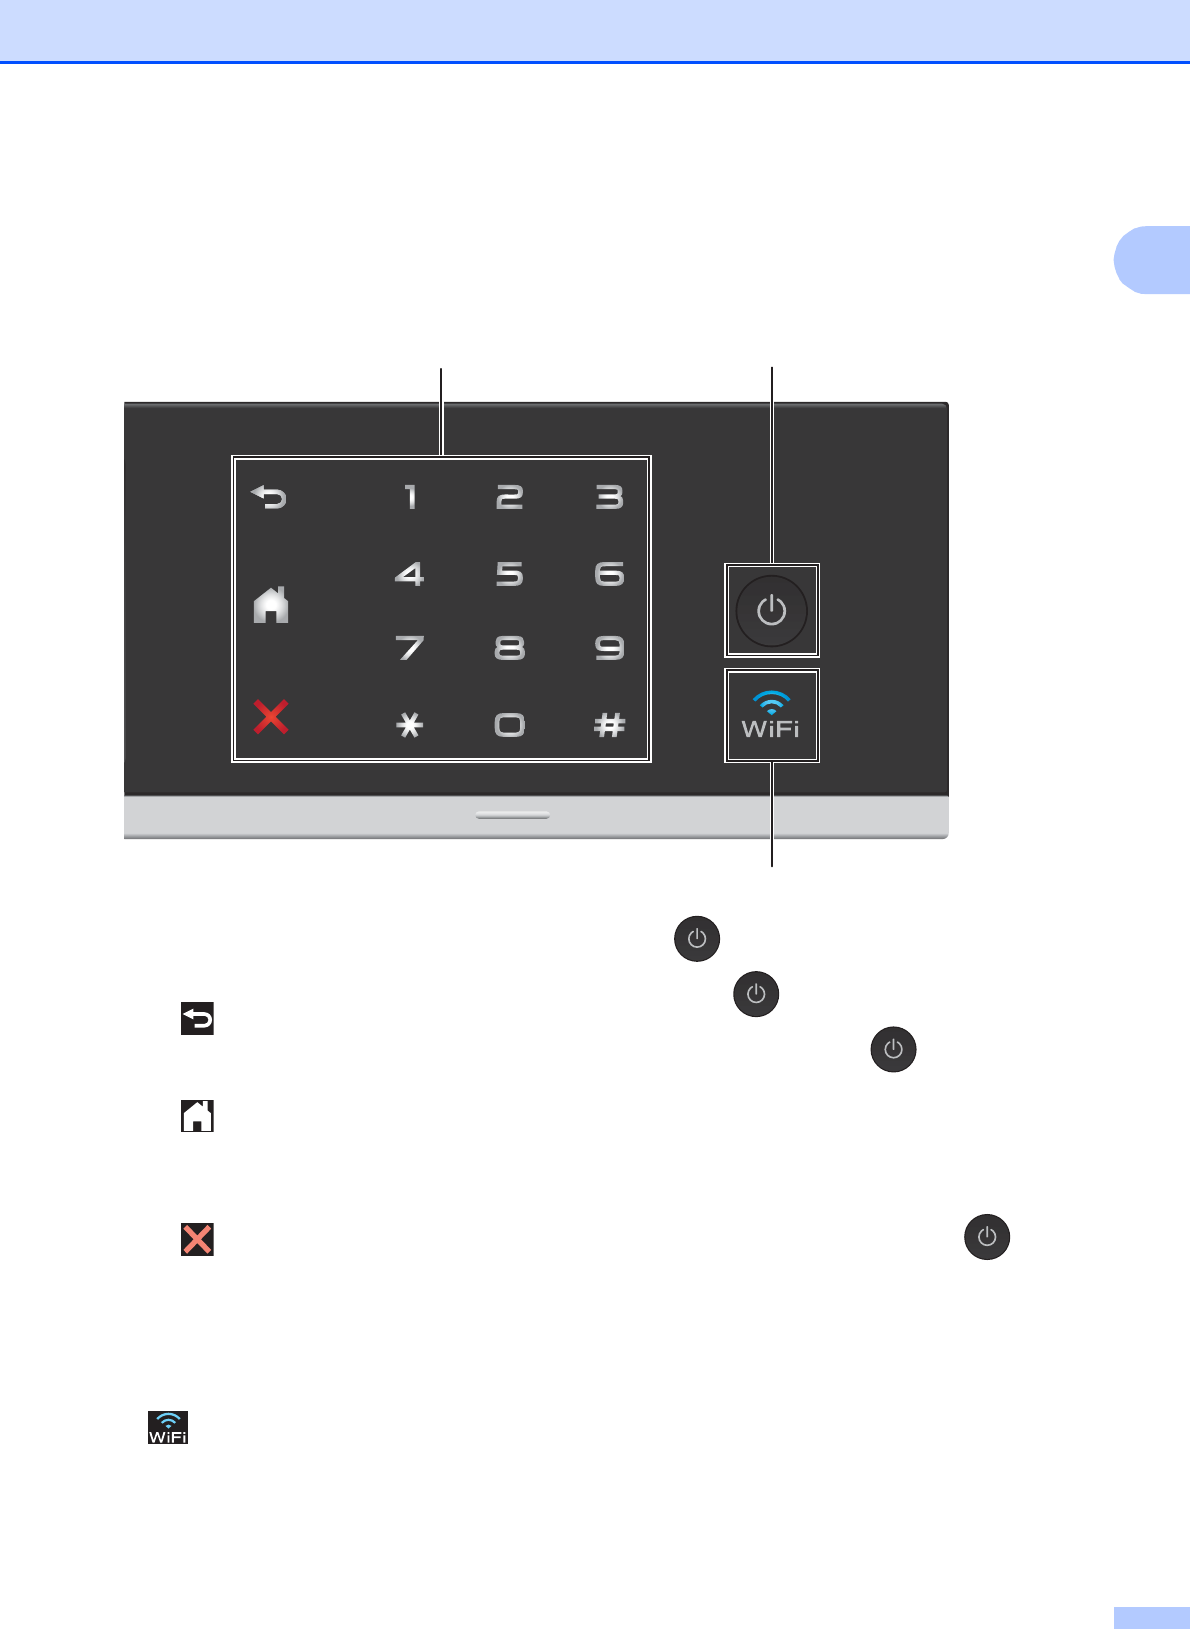
    - stekker erin en tegelijkertijd de aan/uitknop ingedrukt houden totdat het huisje wit gaat branden.
    - dan kun je de knop loslaten.
    - zodra de melding "alle functies worden uitgeschakeld" in beeld komt snel de aan/uitknop indrukken totdat
    het huisje weer wit gaat branden.
    - De printer is nu klaar voor gebruik.
    Het werkt, maar is heel omslachtig. Voor mij nooit meer een brother in ieder geval. Geantwoord op 8-10-2024 om 08:50

    Waardeer dit antwoord Misbruik melden
  • Zelfde issue bij een MFC-L3710CW; lijkt helemaal dood te zijn en en verschillende keren (!) de truuk toegepast te hebben start de printer weer in begin scherm.... Geantwoord op 8-10-2024 om 10:45

    Waardeer dit antwoord Misbruik melden
  • Mijn printer DCP J4120DW START NIET OP NA STEKKER ERUIT TE HALEN EN KNOP INGEDRUKT TE HOUDEN Geantwoord op 20-11-2024 om 21:43

    Waardeer dit antwoord Misbruik melden
  • als ik de stekker erin steek gat de printer aan en komt er in het display te staan: alle functies worden afgesloten en daarna: stand-by aan uit
    dan springt het display op zwart en doet die niks meer wat ik ook doe stekker nog een keer erin en eruit gebeurt er niks meer Gesteld op 3-7-2016 om 17:30

    Reageer op deze vraag Misbruik melden
    • Had hetzelfde probleem. Net brother service gebeld. De truuk is: Stekker eruit. Dan aan/uit knop vasthouden en tegelijkertijd stekker erin. AAN/UIT vast blijven houden totdat scherm zegt: "sluiten". Dan op sluiten klikken. En klaar. Doet 't weer! Succes allemaal! Geantwoord op 27-7-2016 om 10:42

      Waardeer dit antwoord (6) Misbruik melden
30
  • de printer start op en geeft meteen melding dat hij alles uitschakelt
    Gesteld op 13-5-2016 om 19:42

    Reageer op deze vraag Misbruik melden
    • Ik heb niet het antwoord, maar heb dit ook! Erg vervelend, de printer is niet meer bruikbaar terwijl hij hard nodig is. Geantwoord op 18-6-2016 om 18:46

      Waardeer dit antwoord Misbruik melden
  • Zojuist heb ik mijn Brother MFC-J6520DW uitgezet, echter krijg ik de printer met geen 10 paarden meer aan. Wat kan dit zijn? Gesteld op 25-3-2016 om 10:58

    Reageer op deze vraag Misbruik melden
    • Stroom afkoppelen (stekker uit stopcontact) daarna starknop indrukken en ingedrukt houden, waarna de stekker weer in het stopcontact word gedaan, terwijl je nog steeds de startknop ingedrukt houdt.
      De printer reset zichzelf en start weer normaal op.
      Kopie van een eerder antwoord en deze oplossing werkt. Geantwoord op 18-5-2016 om 09:47

      Waardeer dit antwoord (29) Misbruik melden
  • printerschakelt automatsch uit en kan niet meer worden aangezet Gesteld op 17-12-2015 om 11:08

    Reageer op deze vraag Misbruik melden
    • heb het zelfde gehad, na contact met brother het volgend, stroom afkoppelen daarna starknop indrukken en ingedrukt houden waarna de stekker weer in het stopcontact word gedaan terwijl nog steeds de startknop ingedrukt word gehouden.
      de printer reset zichzelf en start weer normaal op.

      heb inmiddels weer 2 printers aan de praat gekregen en werken weer normaal

      vr gr aldert Geantwoord op 31-12-2015 om 17:07

      Waardeer dit antwoord (22) Misbruik melden
  • Bedankt voor de duidelijke TIP Geantwoord op 18-2-2016 om 21:25

    Waardeer dit antwoord (1) Misbruik melden
  • Erg veel dank, ook namens mij. Ik heb al lange tijd een brother staan die ik met geen mogelijkheid meer aan de gang kreeg, maar die het inderdaad weer deed na deze tip!

    vrgr. Levien Geantwoord op 24-2-2016 om 13:15

    Waardeer dit antwoord Misbruik melden
  • de brother 4510, opeens lukt scannen vanaf de plaat niet meer. hij lijkt te zoeken om snelkoppeling te maken maar bedoeling is opslaan als bestand op computer.
    ( doet niet meer sinds de computer yosemite heeft ipv lion)
    Gesteld op 9-9-2015 om 10:26

    Reageer op deze vraag Misbruik melden
    • Mijn Brother MFC-J4510DW kan sedert een upgrade van Windows 8.0 naar 8.1 ook niet meer scannen (opslaan als bestand op PC). Ik krijg de boodschap "controleer kabel" ondanks ik eerder via WiFi scans kon opslaan. Printen via WiFi lukt probleemloos.
      Wie weet een oplossing hiervoor ?
      Gr., Charles Geantwoord op 17-9-2015 om 20:47

      Waardeer dit antwoord (20) Misbruik melden
  • mfc j4510dw wil op eens niks meer zelfs niet aan ?? Gesteld op 13-8-2015 om 14:30

    Reageer op deze vraag Misbruik melden
  • De touchscreen van mijn brother printer MFC J4510DW is zwart en wil niet aan .... help Gesteld op 10-6-2015 om 16:28

    Reageer op deze vraag Misbruik melden
36

Misbruik melden

Gebruikershandleiding.com neemt misbruik van zijn services uitermate serieus. U kunt hieronder aangeven waarom deze vraag ongepast is. Wij controleren de vraag en zonodig wordt deze verwijderd.

Product:

Bijvoorbeeld antisemitische inhoud, racistische inhoud, of materiaal dat gewelddadige fysieke handelingen tot gevolg kan hebben.

Bijvoorbeeld een creditcardnummer, een persoonlijk identificatienummer, of een geheim adres. E-mailadressen en volledige namen worden niet als privégegevens beschouwd.

Spelregels forum

Om tot zinvolle vragen te komen hanteren wij de volgende spelregels:

Belangrijk! Als er een antwoord wordt gegeven op uw vraag, dan is het voor de gever van het antwoord nuttig om te weten als u er wel (of niet) mee geholpen bent! Wij vragen u dus ook te reageren op een antwoord.

Belangrijk! Antwoorden worden ook per e-mail naar abonnees gestuurd. Laat uw emailadres achter op deze site, zodat u op de hoogte blijft. U krijgt dan ook andere vragen en antwoorden te zien.

Abonneren

Abonneer u voor het ontvangen van emails voor uw Brother MFC-J4510DW bij:


U ontvangt een email met instructies om u voor één of beide opties in te schrijven.


Ontvang uw handleiding per email

Vul uw emailadres in en ontvang de handleiding van Brother MFC-J4510DW in de taal/talen: Engels als bijlage per email.

De handleiding is 26,08 mb groot.


U ontvangt de handleiding per email binnen enkele minuten. Als u geen email heeft ontvangen, dan heeft u waarschijnlijk een verkeerd emailadres ingevuld of is uw mailbox te vol. Daarnaast kan het zijn dat uw internetprovider een maximum heeft aan de grootte per email. Omdat hier een handleiding wordt meegestuurd, kan het voorkomen dat de email groter is dan toegestaan bij uw provider.

Stel vragen via chat aan uw handleiding

Stel uw vraag over deze PDF

Andere handleiding(en) van Brother MFC-J4510DW

Brother MFC-J4510DW Installatiehandleiding - Nederlands - 44 pagina's

Brother MFC-J4510DW Gebruiksaanwijzing - Nederlands - 101 pagina's

Brother MFC-J4510DW Gebruiksaanwijzing - Nederlands - 213 pagina's

Brother MFC-J4510DW Installatiehandleiding - Deutsch - 44 pagina's

Brother MFC-J4510DW Gebruiksaanwijzing - Deutsch - 105 pagina's

Brother MFC-J4510DW Gebruiksaanwijzing - Deutsch - 213 pagina's

Brother MFC-J4510DW Installatiehandleiding - English - 44 pagina's

Brother MFC-J4510DW Gebruiksaanwijzing - English - 91 pagina's

Brother MFC-J4510DW Installatiehandleiding - Français - 44 pagina's

Brother MFC-J4510DW Gebruiksaanwijzing - Français - 103 pagina's

Brother MFC-J4510DW Gebruiksaanwijzing - Français - 213 pagina's


Uw handleiding is per email verstuurd. Controleer uw email

Als u niet binnen een kwartier uw email met handleiding ontvangen heeft, kan het zijn dat u een verkeerd emailadres heeft ingevuld of dat uw emailprovider een maximum grootte per email heeft ingesteld die kleiner is dan de grootte van de handleiding.

Er is een email naar u verstuurd om uw inschrijving definitief te maken.

Controleer uw email en volg de aanwijzingen op om uw inschrijving definitief te maken

U heeft geen emailadres opgegeven

Als u de handleiding per email wilt ontvangen, vul dan een geldig emailadres in.

Uw vraag is op deze pagina toegevoegd

Wilt u een email ontvangen bij een antwoord en/of nieuwe vragen? Vul dan hier uw emailadres in.


Info