502678
3
Verklein
Vergroot
Pagina terug
1/44
Pagina verder
1
Start Here
MFC-J4410DW
MFC-J4610DW
Quick Setup Guide
UK/IRE/GEN Version 0
Please read the Product Safety Guide first before you set up your machine. Then, please read this Quick Setup
Guide for the correct setup and installation.
1
Unpack the machine and check the components
Most of the illustrations in this Quick Setup Guide show the MFC-J4410DW.
The components included in the box may differ depending on your country.
WARNING
Plastic bags are used in the packing of your machine. To avoid the danger of suffocation, keep these
plastic bags away from babies and children. Plastic bags are not toys.
a Remove the protective tape and film covering the machine, and also from the Touchscreen.
b Make sure you have all the components.
WARNING
WARNING indicates a potentially hazardous situation which, if not avoided, could result in death
or serious injuries.
CAUTION
CAUTION indicates a potentially hazardous situation which, if not avoided, may result in minor
or moderate injuries.
IMPORTANT
IMPORTANT indicates a potentially hazardous situation which, if not avoided, may result in
damage to property or loss of product functionality.
NOTE
Notes tell you how you should respond to a situation that may arise or give tips about how the
operation works with other features.
Introductory Ink
Cartridges
Black
Yellow
Cyan
Magenta
(Approx. 65% yield of
the replacement
cartridge) uuBasic
User’s Guide:
Consumable items
Quick Setup Guide
Basic User’s Guide Product Safety
Guide
CD-ROM Power Cord Telephone Line Cord
NOTE
Save all packing materials and the box in case for any reason you must ship your machine.
You need to purchase the correct interface cable for the interface you want to use (for USB or network
connection).
USB cable
It is recommended to use a USB 2.0 cable (Type A/B) that is no more than 2 metres long.
Network cable
Use a straight-through Category5 (or greater) twisted-pair cable for 10BASE-T or 100BASE-TX Fast
Ethernet Network.
(for UK) (for others)
2
2
Load plain A4 paper
CAUTION
DO NOT carry the machine by holding the scanner
cover or the Jam Clear Cover. Doing this may
cause the machine to slip out of your hands. Only
carry the machine by placing your hands under the
entire machine.
For detailed information, see the Product Safety
Guide.
a Pull the paper tray (for MFC-J4610DW, paper
tray #1) a, completely out of the machine.
b Open the output paper tray cover a.
c Gently press and slide the paper guides a to fit
the paper size. Make sure that the triangular
mark b on the paper guide a lines up with the
mark for the paper size you are using.
d Fan the stack of paper well to avoid paper jams
and misfeeds.
e Gently put the paper into the paper tray (for
MFC-J4610DW, tray #1) print side down and
top edge first.
1
1
1
2
NOTE
Always make sure that the paper is not curled or
wrinkled.
IMPORTANT
Be careful that you do not push the paper in too
far; it may lift at the back of the tray and cause
paper feed problems.
3
f Gently adjust the paper guides to fit the paper.
Make sure that the paper guides touch the
edges of the paper.
g Check that the paper is flat in the tray and
below the maximum paper mark a. Close the
output paper tray cover.
h Slowly push the paper tray completely into the
machine.
i While holding the paper tray in place, pull out
the paper support a until it clicks, and then
unfold the paper support flap b .
1
NOTE
For printing and copying on special media,
open the manual feed slot a on the back of the
machine. Feed only one sheet at a time of A3,
Ledger, Legal, envelopes, or thicker paper
when using the manual feed slot.
For details, see Loading paper in the manual
feed slot in chapter 2 of the Basic User’s
Guide.
(MFC-J4610DW)
For information about tray #2, see Loading
paper in paper tray #2 in chapter 2 of the Basic
User’s Guide.
2
1
1
4
3
Connect the power cord
and telephone line
WARNING
The machine must be fitted with an earthed
plug.
Since the machine is grounded through the
power outlet, you can protect yourself from
potentially hazardous electrical conditions on
the telephone network by keeping the power
cord connected to your machine when you
connect it to a telephone line. Similarly, you
can protect yourself when you want to move
your machine by disconnecting the telephone
line first and then the power cord.
a Connect the power cord.
b Lift the scanner cover until it locks securely into
the open position.
c Connect the telephone line cord.
Connect one end of the telephone line cord to
the socket of the machine marked LINE.
Carefully guide the telephone line cord into the
cable channel and out the back of the machine.
Connect the other end to a modular wall
socket.
IMPORTANT
DO NOT connect the USB cable yet (if you are
using a USB cable).
NOTE
If you do not plan to use the fax feature on this
machine, go to step 4 on page 5.
To prolong print head life, provide the best ink
cartridge economy and maintain print quality,
we do not recommend frequently unplugging
the machine and/or leaving the machine
unplugged for extended periods of time. We
recommend using to power down the
machine. Using allows minimal power to
the machine, which ensures periodic cleaning
of the print head.
(Example for UK)
IMPORTANT
The telephone line cord MUST be connected to
the socket of the machine marked LINE.
(Example for UK)
5
d Lift the scanner cover to release the lock a.
Gently push the scanner cover support
down b and close the scanner cover c using
both hands.
4
Install the ink cartridges
CAUTION
If ink gets in your eyes, wash it out with water at
once and call a doctor if you are concerned.
a Make sure that the power is turned on.
The Touchscreen will show
No Ink Cartridge.
b Open the ink cartridge cover a.
NOTE
If you are sharing one telephone line with an
external telephone, connect it as shown below.
a Extension telephone
b External telephone
Please make sure you use an external telephone
with a cable no more than 3 metres long.
NOTE
If you are sharing one telephone line with an
external telephone answering machine, connect it
as shown below.
Set the receive mode to External TAD if you
have an external answering machine. See
Choose a Receive Mode on page 8. Detailed
information uuBasic User’s Guide: Connecting
an external TAD (telephone answering device)
1
2
3
1
2
NOTE
Make sure you install the Introductory Ink
Cartridges included with your machine first.
NOTE
You can adjust the angle of the control panel by
lifting it. When lowering the control panel, make
sure you push the release button a that is
located behind the mark.
1
1
6
c Remove the orange protective part a.
d Unpack the ink cartridge.
Turn the green release lever on the orange
protective packing a counterclockwise until it
clicks to release the vacuum seal. Then
remove the orange protective packing a as
shown.
e Take care to match the sticker colour a with
the cartridge colour b as shown in the diagram
below.
Install each ink cartridge in the direction of the
arrow on the label.
f Gently push the back of the ink cartridge
marked “PUSH” until the cartridge lever lifts.
After all the ink cartridges are installed close
the ink cartridge cover.
NOTE
Do not throw away the orange protective part.
You will need it if you transport the machine.
IMPORTANT
DO NOT shake the ink cartridges. If ink stains
your skin or clothing, wash with soap or
detergent at once.
DO NOT touch the cartridge in the area
indicated b, as this can cause the machine not
to function with the cartridge.
1
2
1
2
NOTE
The machine will prepare the ink tube system for
printing. This process will take approximately four
minutes. Do not turn off the machine.
1
2
7
5
Check the print quality
a When the preparation process has finished, the
Touchscreen shows Set Paper and Press
Start.
Press Start.
b Check the quality of the four colour blocks on
the sheet. (black/yellow/cyan/magenta)
c If all lines are clear and visible, press Yes to
finish the quality check and go to the next step.
If you can see missing short lines, press No and
follow the steps on the Touchscreen.
6
Set the paper settings
(MFC-J4610DW)
For your machine to produce the best print quality and
to feed the correct paper size, the paper type and size
must be set to match the paper in the tray.
For details on the types and sizes of paper supported,
see Paper Size and Type in chapter 2 of the Basic
User’s Guide.
a When Tray Setting appears on the
Touchscreen, press Tray Setting to set the
paper size and paper type.
b Press Tray #1 to set paper size and paper
type for tray #1, or press Tray #2 to set paper
size for tray #2.
c Press the size and type of paper you are using.
d Press OK.
NOTE
Make sure you put paper in the paper tray (for
MFC-J4610DW, tray #1) for the initial setup.
OK
Poor
NOTE
You can change the default tray that the machine
will use for printing copies or received faxes. (See
Tray use in Copy mode or Tray use in Fax mode
in chapter 2 of the Basic User’s Guide.)
8
7
Choose a Receive Mode
There are four possible receive modes: Fax Only,
Fax/Tel, Manual and External TAD.
uuBasic User’s Guide: Using Receive Modes
a Press Settings.
b Press s or t to display Initial Setup.
Press Initial Setup.
c Press Receive Mode.
d Press s or t to display Fax Only, Fax/Tel,
External TAD or Manual.
Press the desired receive mode.
e Press .
8
Set the date and time
The machine displays the date and time, and if you
set up the station ID, it will add it to each fax you send.
a Press Settings.
b Press s or t to display Initial Setup.
Press Initial Setup.
c Press Date & Time.
d Press Date & Time.
Enter the last two digits of the year on the
Touchscreen, and then press OK.
To move the cursor to the left, press and
re-enter the number.
e Repeat for month/day/time in 24-hour format.
f Press .
Do you want to use the telephone features of your
machine (if available) or an external telephone or
external telephone answering device connected on the
same line as the machine?
Your machine
automatically answers
every call as a fax.
Your machine controls
the line and
automatically answers
every call. If the call is
not a fax, the telephone
will ring for you to pick
up the call.
Your external telephone
answering device (TAD)
automatically answers
every call. Voice
messages are stored
on the external TAD.
Fax messages are
printed.
You control the
telephone line and must
answer every call
yourself.
Do you want the machine to
answer fax and telephone calls
automatically?
Manual
Fax Only
Fax/Tel
External TAD
No
Yes
Yes
No
No
Yes
Are you using the voice message
function of an external telephone
answering device?
(e.g. Enter 1 2 for 2012.)
9
9
Enter personal
information (Station ID)
You should store your name and fax number to be
printed on all fax pages that you send.
Information on how to enter text uuBasic User’s
Guide: Entering Text
a Press Settings.
b Press s or t to display Initial Setup.
Press Initial Setup.
c Press s or t to display Station ID.
Press Station ID.
d Enter your fax number (up to 20 digits) on the
Touchscreen, and then press OK.
e Enter your name (up to 20 characters) using
the Touchscreen, and then press OK.
f Press .
10
Fax Transmission Report
Your Brother machine is equipped with a
Transmission Verification Report that can be used as
confirmation that you sent a fax. This report lists the
name or fax number of the receiving party, the date,
time, and duration of the transmission, the number of
pages transmitted, and whether or not the
transmission was successful.
Instructions on using this feature uuBasic User’s
Guide: Transmission Verification Report
11
Set Tone or Pulse dialling
mode
Your machine comes set for Tone dialling service. If
you have a Pulse dialling service (rotary), you need to
change the dialling mode.
a Press Settings.
b Press s or t to display Initial Setup.
Press Initial Setup.
c Press s or t to display Tone/Pulse.
Press Tone/Pulse.
d Press Pulse (or Tone).
e Press .
NOTE
Press to cycle between letters, numbers
and special characters. (The characters
available may differ depending on your
country.)
If you need to enter a character that is on the
same button as the character before, press c to
move the cursor to the right.
If you entered a character incorrectly and want
to change it, press to delete it and re-enter
the correct character.
NOTE
If you make a mistake and want to start again,
press and go back to a.
10
12
Set the telephone line
type
If you are connecting the machine to a line that
features PBX or ISDN to send and receive faxes, it is
necessary to change the telephone line type
accordingly by completing the following steps.
a Press Settings.
b Press s or t to display Initial Setup.
Press Initial Setup.
c Press s or t to display Phone Line Set.
Press Phone Line Set.
d Press s or t to display Normal, PBX or ISDN.
Press the desired telephone line type.
e Press .
13
Set the telephone line
compatibility (VoIP)
If you are connecting the machine to a VoIP service
(over the Internet) you need to change the
compatibility setting.
a Press Settings.
b Press s or t to display Initial Setup.
Press Initial Setup.
c Press s or t to display Compatibility.
Press Compatibility.
d Press s or t to display Basic(for VoIP).
Press Basic(for VoIP).
e Press .
14
Automatic Daylight
Savings Time
You can set the machine to change automatically for
daylight savings time. It will set the time forward one
hour in the spring and backward one hour in the fall.
a Press Settings.
b Press s or t to display Initial Setup.
Press Initial Setup.
c Press Date & Time.
d Press s or t to display Auto Daylight.
Press Auto Daylight.
e Press On (or Off).
f Press .
15
Set the Time Zone
You can set the time zone on the machine for your
location.
a Press Settings.
b Press s or t to display Initial Setup.
Press Initial Setup.
c Press Date & Time.
d Press s or t to display Time Zone.
Press Time Zone.
e Enter your time zone.
Press OK.
f Press .
NOTE
If you choose PBX the machine will then ask you
to set the Dial Prefix. uuBasic User’s Guide:
Setting the Telephone Line Type
NOTE
PBX and TRANSFER
The machine is initially set to Normal, which lets
the machine connect to a standard PSTN (Public
Switched Telephone Network) line. However,
many offices use a central telephone system or
Private Branch Exchange (PBX). Your machine
can be connected to most types of PBX. The
machine’s recall feature supports timed break
recall only (TBR). TBR will work with most PBX
systems allowing you to gain access to an outside
line, or transfer calls to another extension. The
feature works when the R on the Touchscreen is
pressed.
NOTE
If you are using an analogue telephone line you
can skip this step.
11
Windows
®
Macintosh
Windows
®
Macintosh
USB Wired Network
Wireless Network
16
Choose your connection type
These installation instructions are for Windows
®
XP Home, XP Professional, XP Professional x64 Edition,
Windows Vista
®
, Windows
®
7, and Mac OS X v10.5.8, 10.6.x, 10.7.x.
NOTE
For Windows Server
®
2003/2008/2008 R2, the drivers can be found from your model’s download page at
http://solutions.brother.com/
.
If your computer does not have a CD-ROM drive you can download the latest drivers, manuals and utilities
for your model from the Brother Solutions Center at http://solutions.brother.com/
. Some software
applications included on the CD-ROM may not be available as a download.
For USB interface cable
Windows
®
, go to page 12
Macintosh, go to page 15
For Wired Network
Windows
®
, go to page 18
Macintosh, go to page 22
For Wireless Network
Windows
®
and Macintosh,
go to page 26
12
Windows
®
USB
For USB interface users
(Windows
®
XP Home/XP Professional/Windows Vista
®
/Windows
®
7)
17
Before you install
Make sure that your computer is ON and you are
logged on with Administrator rights.
18
Install MFL-Pro Suite
a Put the supplied installation CD-ROM into your
CD-ROM drive. If the model name screen
appears, choose your machine. If the language
screen appears, choose your language.
b The CD-ROM Top menu will appear.
Click Install MFL-Pro Suite and click Yes if
you accept the license agreements. Follow the
on-screen instructions.
c Choose Local Connection (USB), and then
click Next. The installation continues.
d When this screen appears, go to the next step.
IMPORTANT
DO NOT connect the USB cable yet.
If there are any programs running, close them.
NOTE
The screens may differ depending on your
operating system.
The CD-ROM includes Nuance™ PaperPort
12SE. This software supports Windows
®
XP
Home (SP3 or greater), XP Professional (SP3
or greater), XP Professional x64 Edition (SP2
or greater), Windows Vista
®
(SP2 or greater)
and Windows
®
7. Update to the latest
Windows
®
Service Pack before installing
MFL-Pro Suite.
NOTE
For Windows Vista
®
and Windows
®
7, when
the User Account Control screen appears click
Continue or Yes.
If the Brother screen does not appear
automatically, go to My Computer or
Computer then double-click the CD-ROM icon
and double-click start.exe.
13
Windows
®
USB
Windows
®
Macintosh
USB
19
Connect the USB cable
a Lift the scanner cover until it locks securely into
the open position.
b Connect the USB cable to the USB port
marked with a symbol a. You will find the
USB port inside the machine on the right, as
shown in the callout below.
c Carefully guide the USB cable into the cable
channel and out the back of the machine.
Connect the cable to your computer.
d Lift the scanner cover to release the lock a.
Gently push the scanner cover support
down b and close the scanner cover c using
both hands.
e The installation will continue automatically.
The installation screens appear one after
another.
1
IMPORTANT
Make sure that the cable does not restrict the
cover from closing, or an error may occur.
IMPORTANT
DO NOT cancel any of the screens during the
installation. It may take a few seconds for all
screens to appear.
NOTE
For Windows Vista
®
and Windows
®
7, when the
Windows
®
Security screen appears, click the
check box and click Install to complete the
installation correctly.
1
2
3
14
Windows
®
USB
f If Environmental Advice for Imaging
Equipment screen appears, click Next.
g When the On-Line Registration screen is
displayed, follow the on-screen instructions.
Click Next.
h If you do not want to set your machine as the
default printer, uncheck Set as Default Printer
and click Next.
20
Finish and restart
a Click Finish to restart your computer.
After restarting the computer, you must log on
with Administrator rights.
b The following screens will appear.
When the Software Update Setting screen
appears, choose the software update setting
you want and click OK.
When the Brother Product Research and
Support Program screen appears, select
your preference and follow the on-screen
instructions.
To install optional applications:
Now go to
Page 42
NOTE
If an error message appears during the
software installation, run the Installation
Diagnostics located in Start/
All Programs/Brother/MFC-JXXX (where
MFC-JXXX is your model name).
Depending on your security settings, a
Windows
®
Security or antivirus software
window may appear when using the machine
or its software. Please allow or permit the
window to continue.
NOTE
Internet access is required for the software
update and the Brother Product Research &
Support Program.
Finish
The installation is now
complete.
NOTE
XML Paper Specification Printer Driver
The XML Paper Specification Printer Driver is the
most suitable driver for Windows Vista
®
and
Windows
®
7 when printing from applications that
use the XML Paper Specification documents.
Please download the latest driver by accessing
the Brother Solutions Center at
http://solutions.brother.com/
.
15
Macintosh
USB
Windows
®
Macintosh
USB
For USB interface users
(Mac OS X v10.5.8, 10.6.x, 10.7.x)
17
Before you install
Make sure your machine is connected to the power
and your Macintosh is ON. You must be logged on
with Administrator rights.
18
Connect the USB cable
a Lift the scanner cover until it locks securely into
the open position.
b Connect the USB cable to the USB port
marked with a symbol a. You will find the
USB port inside the machine on the right, as
shown in the callout below.
c Carefully guide the USB cable into the cable
channel and out the back of the machine.
Connect the cable to your Macintosh.
NOTE
For Mac OS X v10.5.0 to 10.5.7 users, upgrade to
Mac OS X v10.5.8 - 10.7.x.
IMPORTANT
DO NOT connect the machine to a USB port on
a keyboard or a non-powered USB hub.
Connect the machine directly to your
Macintosh.
IMPORTANT
Make sure that the cable does not restrict the
cover from closing, or an error may occur.
1
16
Macintosh
USB
d Lift the scanner cover to release the lock a.
Gently push the scanner cover support
down b and close the scanner cover c using
both hands.
19
Install MFL-Pro Suite
a Put the supplied installation CD-ROM into your
CD-ROM drive.
b Double-click the Start Here OSX icon to install.
If the model name screen appears, choose
your machine.
c Choose Local Connection (USB), and then
click Next. Follow the on-screen instructions.
d Please wait for the software to install. After the
installation, the Brother software will search for
the Brother device. This will take a few
moments to complete.
e Choose your machine from the list, and then
click OK.
f When this screen appears, click Add Printer.
Choose your machine from the list. Click Add
and then click Next.
g When this screen appears, click Next.
The installation of MFL-Pro Suite is now
complete.
Go to step 20.
1
2
3
17
Macintosh
USB
Windows
®
Macintosh
USB
20
Download and install
Presto! PageManager
When Presto! PageManager is installed, OCR
capability is added to Brother ControlCenter2. You
can easily scan, share and organize photos and
documents using Presto! PageManager.
a On the Brother Support screen, click the
Presto! PageManager to go to the
Presto! PageManager download site, and
follow the on-screen instructions.
Finish
The installation is now
complete.
18
Windows
®
Wired Network
For wired network interface users
(Windows
®
XP Home/XP Professional/Windows Vista
®
/Windows
®
7)
17
Before you install
Make sure that your computer is ON and you are
logged on with Administrator rights.
18
Connect the network
cable
a Lift the scanner cover until it locks securely into
the open position.
b Connect the network cable to the Ethernet port
marked with a symbol a. You will find the
Ethernet port inside the machine on the left, as
shown in the callout below. Remove the orange
protective cap before connecting the cable.
IMPORTANT
If there are any programs running, close them.
NOTE
The screens may differ depending on your
operating system.
The CD-ROM includes Nuance™ PaperPort
12SE. This software supports Windows
®
XP
Home (SP3 or greater), XP Professional (SP3
or greater), XP Professional x64 Edition (SP2
or greater), Windows Vista
®
(SP2 or greater)
and Windows
®
7. Update to the latest
Windows
®
Service Pack before installing
MFL-Pro Suite.
If you have previously set up your machine for
a wireless network and then want to set it up on
a wired network, you should check that the
machine’s Network I/F is set to
Wired LAN. The wireless network interface
will become inactive with this setting.
On your machine, press Settings.
Press s or t to display Network.
Press Network.
Press s or t to display Network I/F.
Press Network I/F.
Press Wired LAN.
Press .
1
19
Windows
®
Wired Network
Windows
®
Macintosh
Wired Network
c Carefully guide the network cable into the cable
channel and out the back of the machine.
Connect the cable to your network.
d Lift the scanner cover to release the lock a.
Gently push the scanner cover support
down b and close the scanner cover c using
both hands.
19
Install MFL-Pro Suite
a Put the supplied installation CD-ROM into your
CD-ROM drive. If the model name screen
appears, choose your machine. If the language
screen appears, choose your language.
b The CD-ROM Top menu will appear.
Click Install MFL-Pro Suite and click Yes if
you accept the license agreements. Follow the
on-screen instructions.
IMPORTANT
Make sure that the cable does not restrict the
cover from closing, or an error may occur.
NOTE
If both the USB and the network cables are being
used, guide both cables through the cable
channel with one on top of the other.
1
2
3
NOTE
For Windows Vista
®
and Windows
®
7, when
the User Account Control screen appears click
Continue or Yes.
If the Brother screen does not appear
automatically, go to My Computer or
Computer then double-click the CD-ROM icon
and double-click start.exe.
20
Windows
®
Wired Network
c Choose Wired Network Connection
(Ethernet), and then click Next.
d When this screen appears, choose Change
the Firewall port settings to enable network
connection and continue with the
installation. (Recommended) and click Next.
If you are using a firewall other than the
Windows
®
Firewall or the Windows
®
Firewall is
off, this screen may appear.
See the instructions provided with your firewall
software for information on how to add the
following network ports.
For network scanning, add UDP port 54925.
For network PC-Fax receiving, add UDP port
54926.
If you still have trouble with your network
connection, add UDP ports 137 and 161.
e The installation of the Brother drivers will
automatically start. The installation screens
appear one after another.
f If Environmental Advice for Imaging
Equipment screen appears, click Next.
g When the On-Line Registration screen is
displayed, follow the on-screen instructions.
Click Next.
h If you do not want to set your machine as the
default printer, uncheck Set as Default Printer
and click Next.
NOTE
If there is more than one machine connected to
the network, choose your machine from the list,
and then click Next.
This window will not appear if there is only one
machine connected to the network, the
machine will be chosen automatically.
If your machine is not found over the network,
the following screen will appear.
Confirm your settings by following the
on-screen instructions.
IMPORTANT
DO NOT cancel any of the screens during the
installation. It may take a few seconds for all
screens to appear.
NOTE
For Windows Vista
®
and Windows
®
7, when the
Windows
®
Security screen appears, click the
check box and click Install to complete the
installation correctly.
21
Windows
®
Wired Network
Windows
®
Macintosh
Wired Network
20
Finish and restart
a Click Finish to restart your computer. After
restarting the computer, you must log on with
Administrator rights.
b The following screens will appear.
When the Software Update Setting screen
appears, choose the software update setting
you want and click OK.
When the Brother Product Research and
Support Program screen appears, select
your preference and follow the on-screen
instructions.
21
Install MFL-Pro Suite on
additional computers
(if needed)
If you want to use your machine with multiple
computers on the network, install MFL-Pro Suite on
each computer. Go to step 19 on page 19. Also see
step 17 on page 18 before you install.
To install optional applications:
Now go to
Page 42
NOTE
If an error message appears during the
software installation, run the Installation
Diagnostics located in Start/
All Programs/Brother/MFC-JXXX (where
MFC-JXXX is your model name).
Depending on your security settings, a
Windows
®
Security or antivirus software
window may appear when using the machine
or its software. Please allow or permit the
window to continue.
NOTE
Internet access is required for the software
update and the Brother Product Research &
Support Program.
NOTE
Network license (Windows
®
)
This product includes a PC license for up to 2
users. This license supports the installation of the
MFL-Pro Suite including Nuance™ PaperPort
12SE on up to 2 PCs on the network. If you want
to use more than 2 PCs with Nuance™
PaperPort™ 12SE installed, please purchase the
Brother NL-5 pack which is a multiple PC license
agreement pack for up to 5 additional users. To
purchase the NL-5 pack, contact Brother
customer service or your local Brother dealer.
Finish
The installation is now
complete.
NOTE
XML Paper Specification Printer Driver
The XML Paper Specification Printer Driver is the
most suitable driver for Windows Vista
®
and
Windows
®
7 when printing from applications that
use the XML Paper Specification documents.
Please download the latest driver by accessing
the Brother Solutions Center at
http://solutions.brother.com/
.
22
Macintosh
Wired Network
For wired network interface users
(Mac OS X v10.5.8, 10.6.x, 10.7.x)
17
Before you install
Make sure your machine is connected to the power
and your Macintosh is ON. You must be logged on
with Administrator rights.
18
Connect the network
cable
a Lift the scanner cover until it locks securely into
the open position.
b Connect the network cable to the Ethernet port
marked with a symbol a. You will find the
Ethernet port inside the machine on the left, as
shown in the callout below. Remove the orange
protective cap before connecting the cable.
NOTE
For Mac OS X v10.5.0 to 10.5.7 users, upgrade
to Mac OS X v10.5.8 - 10.7.x.
If you have previously set up your machine for
a wireless network and then want to set it up on
a wired network, you should check that the
machine’s Network I/F is set to
Wired LAN. The wireless network interface
will become inactive with this setting.
On your machine, press Settings.
Press s or t to display Network.
Press Network.
Press s or t to display Network I/F.
Press Network I/F.
Press Wired LAN.
Press .
1
23
Macintosh
Wired Network
Windows
®
Macintosh
Wired Network
c Carefully guide the network cable into the cable
channel and out the back of the machine.
Connect the cable to your network.
d Lift the scanner cover to release the lock a.
Gently push the scanner cover support
down b and close the scanner cover c using
both hands.
19
Install MFL-Pro Suite
a Put the supplied installation CD-ROM into your
CD-ROM drive.
b Double-click the Start Here OSX icon to install.
If the model name screen appears, choose
your machine.
c Choose Wired Network Connection
(Ethernet), and then click Next. Follow the
on-screen instructions.
d Please wait for the software to install. After the
installation, the Brother software will search for
the Brother device. This will take a few
moments to complete.
e If the machine is configured for your network,
choose your machine from the list, and then
click OK.
IMPORTANT
Make sure that the cable does not restrict the
cover from closing, or an error may occur.
NOTE
If both the USB and the network cables are being
used, guide both cables through the cable
channel with one on top of the other.
1
2
3
24
Macintosh
Wired Network
f When this screen appears, click Add Printer.
Choose your machine from the list. Click Add
and then click Next.
g When this screen appears, click Next.
The installation of MFL-Pro Suite is now
complete.
Go to step 20.
NOTE
If your machine is not found over the network,
confirm your network settings.
You can find your machine’s MAC Address
(Ethernet Address) and IP Address by printing
out the Network Configuration Report.
uuNetwork User’s Guide: Printing the Network
Configuration Report
If this screen appears, click OK.
Enter a name for your Macintosh up to
15 characters long.
If you want to use the scan feature directly from
your machine to scan over the network, you
must check the Register your computer with
the “Scan To” function on the machine box.
Click OK. Go to f.
The name you enter will appear on the
machine’s Touchscreen when you press Scan
and choose a scan option. (uuSoftware User’s
Guide: Network Scanning)
25
Macintosh
Wired Network
Windows
®
Macintosh
Wired Network
20
Download and install
Presto! PageManager
When Presto! PageManager is installed, OCR
capability is added to Brother ControlCenter2. You
can easily scan, share and organize photos and
documents using Presto! PageManager.
a On the Brother Support screen, click the
Presto! PageManager to go to the
Presto! PageManager download site, and
follow the on-screen instructions.
21
Install MFL-Pro Suite on
additional computers
(if needed)
If you want to use your machine with multiple
computers on the network, install MFL-Pro Suite on
each computer. Go to step 19 on page 23. Also see
step 17 on page 22 before you install.
Finish
The installation is now
complete.
26
For Wireless Network Users
For wireless network interface users
17
Before you begin
First you must configure the wireless network settings of your machine to communicate with your access
point/router. After the machine is configured to communicate with your access point/router, computers on your
network will have access to the machine. To use the machine from these computers, you will need to install the
drivers and software. The following steps will guide you through the configuration and installation process.
To achieve optimum results with normal everyday document printing, place the Brother machine as close to the
network access point/router as possible with minimal obstructions. Large objects and walls between the two
devices as well as interference from other electronic devices can affect the data transfer speed of your documents.
Due to these factors, wireless may not be the best method of connection for all types of documents and
applications. If you are printing large files, such as multi-page documents with mixed text and large graphics, you
may want to consider choosing wired Ethernet for a faster data transfer or USB for the fastest throughput speed.
Although your Brother machine can be used in both a wired and wireless network, only one of the connection
methods can be used at a time.
The following instructions are for infrastructure mode (connected to a computer through an access point/router).
Infrastructure Mode
a Access point/router
b Wireless network machine (your machine) connected to the access point/router
c Wireless-capable computer connected to the access point/router
d Wired computer connected to the access point/router
e Mobile device connected to the access point/router
Please make sure the wireless network settings of the machine match the access point/router.
NOTE
If you have previously configured the wireless settings of the machine you must reset the network settings
before you can configure the wireless settings again.
On your machine, press Settings.
Press s or t to display Network. Press Network.
Press s or t to display Network Reset. Press Network Reset.
Press Yes to accept. Hold down Yes for 2 seconds to confirm.
NOTE
To set up your machine in Ad-hoc mode (connected to a wireless-capable computer without an access
point/router) you can find instructions in the Network User’s Guide on the CD-ROM.
You can view the Network User’s Guide by following the instructions below.
1 Turn on your computer. Insert the CD-ROM into your CD-ROM drive.
For Windows
®
:
2 Choose your model and the language. The CD-ROM top menu will appear.
3 Click User’s Guides, and then click PDF documents.
4 Click Network User’s Guide.
For Macintosh:
2 Double-click User’s Guides. Choose your model and the language.
3 Click User’s Guides, and then click Network User’s Guide.
1
2
3
4
5
27
For Wireless Network Users
Wireless Network
18
Choose your wireless setup method
The following instructions offer three methods for setting up your Brother machine on a wireless network. Choose
the method you prefer for your environment.
a Setup using the installation CD-ROM and a USB cable (Windows
®
and Macintosh)
You need to temporarily use a USB cable during configuration (cable not included).
It is recommended that you use a computer wirelessly connected to your network for this method.
If you are using Windows
®
XP, or currently using a computer connected to an access
point/router by network cable, you need to know your wireless settings. Please write down
your wireless network settings in the area below.
Please do not contact Brother Customer Service for assistance without the wireless security
information. We cannot assist you in locating your network security settings.
Item Record the current wireless network settings
SSID (Network Name)
Network Key
* The Network Key may also be described as the Password, Security Key or Encryption Key.
NOTE
If you do not know this information (SSID and Network Key), you cannot continue the wireless
setup.
How can I find this information?
1) You should see the documentation provided with your wireless access point/router.
2) The initial network name could be the manufacturer’s name or the model name.
3) If you do not know the security information, please consult the router manufacturer, your system
administrator or internet provider.
Now go to
page 29
28
For Wireless Network Users
For methods b and c, start your wireless setup by pressing the Wi-Fi button on the Touchscreen.
b Manual setup from the control panel using the Setup Wizard (Windows
®
, Macintosh and
mobile devices)
If your wireless access point/router does not support WPS (Wi-Fi Protected Setup™) or AOSS™,
write down the wireless network settings of your wireless access point/router in the area below.
Please do not contact Brother Customer Service for assistance without the wireless security
information. We cannot assist you in locating your network security settings.
Item Record the current wireless network settings
SSID (Network Name)
Network Key
* The Network Key may also be described as the Password, Security Key or Encryption Key.
NOTE
If you do not know this information (SSID and Network Key), you cannot continue the wireless
setup.
How can I find this information?
1) You should see the documentation provided with your wireless access point/router.
2) The initial SSID could be the manufacturer’s name or the model name.
3) If you do not know the security information, please consult the router manufacturer, your system
administrator or internet provider.
Now go to
page 32
c
One-push setup using WPS or AOSS™ (Windows
®
, Macintosh and mobile devices)
If your wireless access point/router supports automatic wireless (one-push) setup (WPS or AOSS™)
Now go to
page 33
29
For Wireless Network Users
Wireless Network
19
Setup using the
installation CD-ROM and
a USB cable (Windows
®
and Macintosh)
a Put the supplied installation CD-ROM into your
CD-ROM drive. If the model name screen
appears, choose your machine. If the language
screen appears, choose your language.
b The CD-ROM Top menu will appear.
Click Install MFL-Pro Suite and click Yes if
you accept the license agreements. Follow the
on-screen instructions.
c Choose Wireless Network Connection, and
then click Next.
d When this screen appears, choose Change
the Firewall port settings to enable network
connection and continue with the
installation. (Recommended) and click Next.
If you are using a firewall other than the
Windows
®
Firewall or the Windows
®
Firewall is
off, this screen may appear.
See the instructions provided with your firewall
software for information on how to add the
following network ports.
For network scanning, add UDP port 54925.
For network PC-Fax receiving, add UDP port
54926.
If you still have trouble with your network
connection, add UDP ports 137 and 161.
You need to temporarily use a USB cable
during configuration (cable not included).
These steps are for a Windows
®
installation.
For Macintosh installation, insert the
installation CD-ROM into your CD-ROM
drive and double-click Start Here OSX to
install. Select Wireless installation and
follow the Wireless Device Setup
instructions on your computer screen.
NOTE
For Windows Vista
®
and Windows
®
7, when
the User Account Control screen appears click
Continue or Yes.
If the Brother screen does not appear
automatically, go to My Computer or
Computer then double-click the CD-ROM icon
and double-click start.exe.
30
For Wireless Network Users
e Choose Yes, I have a USB cable to use for
installation. and then click Next.
f Temporarily connect the USB cable (not
included) directly to the computer and the
machine.
If the confirmation screen appears, check the
box and click Next, go to g.
Otherwise, go to h.
g When the following screen appears, check Yes
if you want to connect to the listed SSID. Click
Next and go to j.
h When the following screen appears, the wizard
will search for wireless networks available to
your machine. Choose the SSID that you wrote
down for your network in step 18-a on
page 27, and then click Next.
NOTE
For instructions on connecting the USB cable
to the USB port of your machine, see Connect
the USB cable on page 13.
If this screen appears, read the Important
Notice. Check the box after you confirm the
SSID and Network Key, and then click Next.
NOTE
If a list of SSIDs is not displayed, make sure
your access point is on and set to broadcast the
SSID. Make sure the machine and the access
point are within communication range, then
click Refresh.
If your access point is set to not broadcast the
SSID you can manually add it by clicking the
Advanced button. Follow the on-screen
instructions for entering the Name (SSID), and
then click Next.
31
For Wireless Network Users
Wireless Network
i Enter the Network Key you wrote down in
step 18-a on page 27, and then click Next.
j Click Next. The settings will be sent to your
machine.
k Disconnect the USB cable between the
computer and the machine.
l Click Next to continue to install MFL-Pro Suite.
Wireless setup is now complete. The
Wi-Fi button at the upper right of the
Touchscreen changes to a four-level
indicator that displays the wireless signal
strength of your access point/router.
The Wi-Fi LED on the control panel
lights up, indicating that the machine’s
Network I/F is set to WLAN.
To install MFL-Pro Suite
For Windows
®
users:
Now go to
Step 21-e on page 37
For Macintosh users:
Now go to
Step 21-d on page 39
NOTE
If your network is not configured for
Authentication and Encryption, the following
screen will appear. To continue configuration,
click OK and go to j.
NOTE
The settings will remain unchanged if you click
Cancel.
If you want to manually enter the IP address
settings of your machine, click Change IP
Address and enter the necessary IP address
settings for your network.
If the wireless setup failure screen appears,
click Retry.
32
For Wireless Network Users
19
Manual setup from the
control panel using the
Setup Wizard
(Windows
®
, Macintosh
and mobile devices)
a Press .
Press Setup Wizard.
When Network I/F switched to
Wireless. is displayed, press Yes to accept.
This will start the wireless setup wizard.
To cancel, press No.
b The machine will search for available SSIDs. It
will take several seconds to display a list of
available SSIDs.
If a list of SSIDs is displayed, press s or t to
choose the SSID you wrote down in step 18-b
on page 28. Select the SSID you want to
connect with.
If the wireless access point/router of the
selected SSID supports WPS and the machine
asks to use WPS, go to c.
If the machine asks you to enter a Network
Key, go to d.
Otherwise, go to e.
c Press Yes to connect your machine using
WPS. (If you choose No to continue manual
configuration, go to d to enter a Network Key.)
When the Touchscreen indicates you should
start WPS, press the WPS button on your
wireless access point/router, and then press
Next to proceed.
Go to e.
d Enter the Network Key you wrote down in
step 18-b on page 28 using the Touchscreen.
The letters appear in this order: lower case and
then upper case. Press to cycle between
letters, numbers and special characters. (The
characters available may differ depending on
your country.) To move the cursor to the right,
press c.
(For more information, see Entering Text for
Wireless Settings on page 43.)
Press OK when you have entered all the
characters, then press Yes to apply your
settings.
e Your machine will now try to connect to your
wireless network. It may take a few minutes.
f A connection result message appears for
60 seconds on the Touchscreen and a WLAN
report will automatically be printed.
If the connection failed, check the error code on
the printed report and refer to Troubleshooting
on page 34.
Wireless setup is now complete. The
Wi-Fi button at the upper right of the
Touchscreen changes to a four-level
indicator that displays the wireless signal
strength of your access point/router.
The Wi-Fi LED on the control panel
lights up, indicating that the machine’s
Network I/F is set to WLAN.
To install MFL-Pro Suite, continue to
step 20.
For Windows
®
users:
Now go to
Page 36
For Macintosh users:
Now go to
Page 39
NOTE
If a list of SSIDs is not displayed, make sure
your access point is on. Move your machine
closer to the access point and try starting
from a again.
If your access point is set to not broadcast the
SSID, you will have to manually add the SSID
name. For details, see the Network User’s
Guide.
NOTE
For Mobile Device users, please go to the User’s
Guide for the application you are using (Ex.
AirPrint, Brother iPrint&Scan or other
applications) for additional details on how to use
your machine with the application. To download
the User’s Guide for the application you are using,
please go to the manuals download selection on
your model’s home page of the Brother Solutions
Center at http://solutions.brother.com/
.
33
For Wireless Network Users
Wireless Network
19
One-push setup using
WPS or AOSS™
(Windows
®
, Macintosh
and mobile devices)
a Confirm your wireless access point/router has
the WPS or AOSS™ symbol as shown below.
b Place the Brother machine within range of your
WPS or AOSS™ access point/router. The
range may differ depending on your
environment. Refer to the instructions provided
with your access point/router.
c Press .
Press s or t to display WPS/AOSS.
Press WPS/AOSS.
When Network I/F switched to
Wireless. is displayed, press Yes to accept.
This will start the wireless setup wizard.
To cancel, press No.
d When the Touchscreen indicates you should
start WPS or AOSS™, press the WPS or
AOSS™ button on your wireless access
point/router. See the user’s guide of your
wireless access point/router for instructions.
Then press OK and your machine will now
automatically detect which mode (WPS or
AOSS™) your wireless access point/router
uses and try to connect to your wireless
network.
e A connection result message appears for
60 seconds on the Touchscreen and a WLAN
report will automatically be printed.
If the connection failed, check the error code on
the printed report and refer to Troubleshooting
on page 34.
Wireless setup is now complete. The
Wi-Fi button at the upper right of the
Touchscreen changes to a four-level
indicator that displays the wireless signal
strength of your access point/router.
The Wi-Fi LED on the control panel
lights up, indicating that the machine’s
Network I/F is set to WLAN.
To install MFL-Pro Suite, continue to
step 20.
For Windows
®
users:
Now go to
Page 36
For Macintosh users:
Now go to
Page 39
NOTE
If your wireless access point/router supports WPS
(PIN Method), you can also configure your
machine using the PIN (Personal Identification
Number) Method. uuNetwork User’s Guide:
Configuration using the PIN Method of WPS
(Wi-Fi Protected Setup)
NOTE
For Mobile Device users, please go to the User’s
Guide for the application you are using (Ex.
AirPrint, Brother iPrint&Scan or other
applications) for additional details on how to use
your machine with the application. To download
the User’s Guide for the application you are using,
please go to the manuals download selection on
your model’s home page of the Brother Solutions
Center at http://solutions.brother.com/
.
34
For Wireless Network Users
Troubleshooting
How can I find the wireless security information (SSID and Network Key)
* The Network Key may also be described as the Password, Security Key or Encryption Key.
Wireless LAN report
If the wireless LAN report that printed shows that the connection failed, check the error code on the printed report
and refer to the following instructions.
Please do not contact Brother Customer Service for assistance without the wireless security
information. We cannot assist you in locating your network security settings.
1) You should see the documentation provided with your wireless access point/router.
2) The initial SSID could be the manufacturer’s name or the model name.
3) If you do not know the security information, please consult the router manufacturer, your system
administrator or internet provider.
Error code Recommended Solutions
TS-01
The wireless setting is not activated, turn the wireless setting to ON.
- If a network cable is connected to your machine, disconnect it and turn the wireless setting
of your machine to ON.
On your machine, press Settings.
Press s or t to display Network, and then press Network.
Press s or t to display Network I/F, and then press Network I/F.
Press WLAN.
Press .
TS-02
The wireless access point/router cannot be detected.
1. Check the following 4 points.
- Make sure that the wireless access point/router is powered on.
- Move your machine to an obstruction-free area, or closer to the wireless access
point/router.
- Temporarily place your machine within about one metre from the wireless access point
when you are configuring the wireless settings.
- If your wireless access point/router is using MAC address filtering, confirm the MAC
address of the Brother machine is allowed in the filter.
2. If you manually entered the SSID and security information (SSID/authentication
method/encryption method/Network Key), the information may be incorrect.
Reconfirm the SSID and security information and re-enter the correct information as
necessary.
See How can I find the wireless security information (SSID and Network Key) on page 34 to
confirm.
35
For Wireless Network Users
Wireless Network
TS-04
The Authentication/Encryption methods used by the selected wireless access point/router are
not supported by your machine.
For infrastructure mode, change the authentication and encryption methods of the wireless
access point/router.
Your machine supports the following authentication methods:
authentication method encryption method
WPA-Personal
TKIP
AES
WPA2-Personal AES
Open
WEP
None (without encryption)
Shared key WEP
If your problem is not solved, the SSID or network settings you entered may be incorrect.
Reconfirm the wireless network settings.
See How can I find the wireless security information (SSID and Network Key) on page 34 to
confirm.
For ad-hoc mode, change the authentication and encryption methods of your computer for
the wireless setting.
Your machine supports Open authentication method only, with optional WEP encryption.
TS-05
The security information (SSID/Network Key) is incorrect.
Reconfirm the SSID and security information (Network Key).
If your router uses WEP encryption, enter the key used as the first WEP key. Your Brother
machine supports the use of the first WEP key only.
See How can I find the wireless security information (SSID and Network Key) on page 34 to
confirm.
TS-06
The wireless security information (Authentication method/Encryption method/Network Key) is
incorrect.
Reconfirm the wireless security information (Authentication method/Encryption method/
Network Key) in the table of TS-04.
If your router uses WEP encryption, enter the key used as the first WEP key. Your Brother
machine supports the use of the first WEP key only.
See How can I find the wireless security information (SSID and Network Key) on page 34 to
confirm.
TS-07
The machine cannot detect a wireless access point/router that has WPS or AOSS™ enabled.
If you would like to configure your wireless settings using WPS or AOSS™, you must operate
both your machine and the wireless access point/router.
Confirm your wireless access point/router supports WPS or AOSS™ and try starting again.
If you do not know how to operate your wireless access point/router
using WPS or AOSS™ see the documentation provided with your
wireless access point/router, ask the manufacturer of your wireless
access point/router or ask your network administrator.
TS-08
Two or more wireless access points that have WPS or AOSS™ enabled are detected.
- Confirm that only one wireless access point/router within range has the WPS or AOSS™
method active and try again.
- Try starting again after a few minutes in order to avoid interference from other access
points.
36
Windows
®
Wireless Network
Install the drivers & software
(Windows
®
XP Home/XP Professional/Windows Vista
®
/Windows
®
7)
20
Before you install
Make sure that your computer is ON and you are
logged on with Administrator rights.
21
Install MFL-Pro Suite
a Put the supplied installation CD-ROM into your
CD-ROM drive. If the model name screen
appears, choose your machine. If the language
screen appears, choose your language.
b The CD-ROM Top menu will appear.
Click Install MFL-Pro Suite and click Yes if
you accept the license agreements. Follow the
on-screen instructions.
c Choose Wireless Network Connection, and
then click Next.
IMPORTANT
If there are any programs running, close them.
NOTE
The screens may differ depending on your
operating system.
The CD-ROM includes Nuance™ PaperPort
12SE. This software supports Windows
®
XP
Home (SP3 or greater), XP Professional (SP3
or greater), XP Professional x64 Edition (SP2
or greater), Windows Vista
®
(SP2 or greater)
and Windows
®
7. Update to the latest
Windows
®
Service Pack before installing
MFL-Pro Suite.
NOTE
For Windows Vista
®
and Windows
®
7, when
the User Account Control screen appears click
Continue or Yes.
If the Brother screen does not appear
automatically, go to My Computer or
Computer then double-click the CD-ROM icon
and double-click start.exe.
37
Windows
®
Wireless Network
Windows
®
Macintosh
Wireless Network
d When this screen appears, choose Change
the Firewall port settings to enable network
connection and continue with the
installation. (Recommended) and click Next.
If you are using a firewall other than the
Windows
®
Firewall or the Windows
®
Firewall is
off, this screen may appear.
See the instructions provided with your firewall
software for information on how to add the
following network ports.
For network scanning, add UDP port 54925.
For network PC-Fax receiving, add UDP port
54926.
If you still have trouble with your network
connection, add UDP ports 137 and 161.
e Choose your machine from the list, and then
click Next.
f The installation of the Brother drivers will
automatically start. The installation screens
appear one after another.
g If Environmental Advice for Imaging
Equipment screen appears, click Next.
h When the On-Line Registration screen is
displayed, follow the on-screen instructions.
Click Next.
i If you do not want to set your machine as the
default printer, uncheck Set as Default Printer
and click Next.
NOTE
If your machine is not found over the network,
confirm your settings by following the
on-screen instructions. If you encounter this
failure, go to step 18-b on page 28 and setup
the wireless connection again.
If you are using WEP and the Touchscreen
displayed Connected but your machine is not
found on the network, make sure you entered
the WEP key correctly. The WEP key is case
sensitive.
IMPORTANT
DO NOT cancel any of the screens during the
installation. It may take a few seconds for all
screens to appear.
NOTE
For Windows Vista
®
and Windows
®
7, when the
Windows
®
Security screen appears, click the
check box and click Install to complete the
installation correctly.
38
Windows
®
Wireless Network
22
Finish and restart
a Click Finish to restart your computer. After
restarting the computer, you must log on with
Administrator rights.
b The following screens will appear.
When the Software Update Setting screen
appears, choose the software update setting
you want and click OK.
When the Brother Product Research and
Support Program screen appears, select
your preference and follow the on-screen
instructions.
23
Install MFL-Pro Suite on
additional computers
(if needed)
If you want to use your machine with multiple
computers on the network, install MFL-Pro Suite on
each computer. Go to step 20 on page 36.
To install optional applications:
Now go to
Page 42
NOTE
If an error message appears during the
software installation, run the Installation
Diagnostics located in Start/
All Programs/Brother/MFC-JXXX (where
MFC-JXXX is your model name).
Depending on your security settings, a
Windows
®
Security or antivirus software
window may appear when using the machine
or its software. Please allow or permit the
window to continue.
NOTE
Internet access is required for the software
update and the Brother Product Research &
Support Program.
NOTE
Network license (Windows
®
)
This product includes a PC license for up to 2
users. This license supports the installation of the
MFL-Pro Suite including Nuance™ PaperPort™
12SE on up to 2 PCs on the network. If you want
to use more than 2 PCs with Nuance™
PaperPort™ 12SE installed, please purchase the
Brother NL-5 pack which is a multiple PC license
agreement pack for up to 5 additional users. To
purchase the NL-5 pack, contact Brother
customer service or your local Brother dealer.
Finish
The installation is now
complete.
NOTE
XML Paper Specification Printer Driver
The XML Paper Specification Printer Driver is the
most suitable driver for Windows Vista
®
and
Windows
®
7 when printing from applications that
use the XML Paper Specification documents.
Please download the latest driver by accessing
the Brother Solutions Center at
http://solutions.brother.com/
.
39
Macintosh
Wireless Network
Windows
®
Macintosh
Wireless Network
Install the drivers & software
(Mac OS X v10.5.8, 10.6.x, 10.7.x)
20
Before you install
Make sure your machine is connected to the power
and your Macintosh is ON. You must be logged on
with Administrator rights.
21
Install MFL-Pro Suite
a Put the supplied installation CD-ROM into your
CD-ROM drive.
b Double-click the Start Here OSX icon to install.
If the model name screen appears, choose
your machine.
c Choose Wireless Network Connection, and
then click Next.
d Choose your machine from the list, and then
click Next.
e Choose your machine from the list, and then
click OK.
NOTE
For Mac OS X v10.5.0 to 10.5.7 users, upgrade to
Mac OS X v10.5.8 - 10.7.x.
NOTE
If your wireless settings fail, the Wireless Device
Setup Wizard screen appears. Follow the
on-screen instructions to complete the wireless
configuration.
40
Macintosh
Wireless Network
f The installation of the Brother drivers will
automatically start. Please wait for the software
to install.
g When this screen appears, click Add Printer.
Choose your machine from the list. Click Add
and then click Next.
h When this screen appears, click Next.
The installation of MFL-Pro Suite is now
complete.
Go to step 22.
NOTE
You can find your machine’s MAC Address
(Ethernet Address) and IP Address by printing
out the Network Configuration Report.
uuNetwork User’s Guide: Printing the Network
Configuration Report
If this screen appears, click OK.
Enter a name for your Macintosh up to
15 characters long.
If you want to use the scan feature directly from
your machine to scan over the network, you
must check the Register your computer with
the “Scan To” function on the machine box.
Click OK. Go to g.
The name you enter will appear on the
machine’s Touchscreen when you press Scan
and choose a scan option. (uuSoftware User’s
Guide: Network Scanning)
41
Macintosh
Wireless Network
Windows
®
Macintosh
Wireless Network
22
Download and install
Presto! PageManager
When Presto! PageManager is installed, OCR
capability is added to Brother ControlCenter2. You
can easily scan, share and organize photos and
documents using Presto! PageManager.
a On the Brother Support screen, click the
Presto! PageManager to go to the
Presto! PageManager download site, and
follow the on-screen instructions.
23
Install MFL-Pro Suite on
additional computers
(if needed)
If you want to use your machine with multiple
computers on the network, install MFL-Pro Suite on
each computer. Go to step 20 on page 39.
Finish
The installation is now
complete.
42
Windows
®
Install Optional Applications
1
Install optional
applications
FaceFilter Studio and BookScan &
Whiteboard Suite supported by
Reallusion, Inc
FaceFilter Studio is an easy-to-use borderless photo
printing application.
The BookScan Enhancer software can correct your
scanned book images automatically.
The Whiteboard Enhancer software cleans up and
enhances text and images from photos taken of your
whiteboard.
a Open the top menu again by ejecting and then
reinserting the CD-ROM or by double-clicking
the start.exe program from the root folder.
b The CD-ROM Top menu will appear. Choose
your language and then click Additional
Applications.
c Click the button for the application you want to
install.
d Go back to the Additional Applications
screen to install more applications.
2
Install FaceFilter Studio
Help
To get instructions on how to use FaceFilter Studio,
download and install FaceFilter Studio Help.
a To run FaceFilter Studio, go to
Start/All Programs/Reallusion/
FaceFilter Studio on your computer.
b Click Check for Updates on the screen.
c Click the Download button and choose a folder
to save the file in.
d Close FaceFilter Studio before you start the
installer for FaceFilter Studio Help.
Double-click the downloaded file from the
folder you specified and follow the on-screen
instructions for installation.
NOTE
The machine must be ON and connected to the
computer.
Some applications require Internet access.
Make sure you are logged on with
Administrator rights.
This application is not available for Windows
Server
®
2003/2008 series.
NOTE
You can also go to the Reallusion update web
page by clicking the button in the upper right
corner of this screen.
NOTE
To view the complete FaceFilter Studio Help, go
to Start/All Programs/Reallusion/
FaceFilter Studio/FaceFilter Studio Help on
your computer.
43
For Network Users
Reset the network settings to factory default
To restore all network settings of the internal Print/Scan server to the factory default, please follow the steps below.
a Make sure the machine is idle, then disconnect all the cables from the machine (except the power cord).
b Press Settings.
c Press s or t to display Network, and then press Network.
d Press s or t to display Network Reset, and then press Network Reset.
e Press Yes.
f Hold down Yes for 2 seconds to confirm.
g The machine will restart, re-connect the cables once this is complete.
Entering Text for Wireless Settings
Up to four letters are assigned to each letter button on the Touchscreen. By pressing the correct button repeatedly,
you can access the character you want.
Press to cycle between letters, numbers and special characters. (The characters available may differ
depending on your country.)
Inserting spaces
To enter a space, press then press the space button or .
Repeating characters
If you need to enter a character that is on the same button as the character before, press c to move the cursor to
the right.
Making corrections
If you entered a character incorrectly and want to change it, press to delete it and re-enter the correct
character.
Consumables
www.brotherearth.com
Replacement consumables
When the time comes to replace ink cartridges, an error message will be indicated on the Touchscreen. For more
information about the ink cartridges for your machine, visit http://www.brother.com/original/
or contact your local
Brother re-seller.
Ink cartridge
Trademarks
The Brother logo is a registered trademark of Brother Industries, Ltd.
Brother is a trademark of Brother Industries, Ltd.
Windows, Windows Vista and Windows Server are either registered trademarks or trademarks of Microsoft Corporation in the United States
and/or other countries.
Macintosh and Mac OS are trademarks of Apple Inc., registered in the United States and other countries.
Nuance, the Nuance logo, PaperPort and ScanSoft are trademarks or registered trademarks of Nuance Communications, Inc. or its affiliates
in the United States and/or other countries.
FaceFilter Studio is a trademark of Reallusion, Inc.
AOSS is a trademark of Buffalo Inc.
Wi-Fi and Wi-Fi Protected Access (WPA) are registered trademarks of the Wi-Fi Alliance.
Wi-Fi Protected Setup and Wi-Fi Protected Access 2 (WPA2) are trademarks of the Wi-Fi Alliance.
Each company whose software title is mentioned in this manual has a Software License Agreement specific to its proprietary programs.
Any trade names and product names of companies appearing on Brother products, related documents and any other
materials are all trademarks or registered trademarks of those respective companies.
Compilation and Publication
Under the supervision of Brother Industries, Ltd., this manual has been compiled and published, covering the latest product descriptions and
specifications.
The contents of this manual and the specifications of this product are subject to change without notice.
Brother reserves the right to make changes without notice in the specifications and materials contained herein and shall not be responsible for
any damages (including consequential) caused by reliance on the materials presented, including but not limited to typographical and other
errors relating to the publication.
Copyright and License
©2012 Brother Industries, Ltd. All rights reserved.
This product includes software developed by the following vendors:
©1983-1998 PACIFIC SOFTWORKS, INC. ALL RIGHTS RESERVED.
©2008 Devicescape Software, Inc. All rights reserved.
This product includes the “KASAGO TCP/IP” software developed by ZUKEN ELMIC,Inc.
Magenta Cyan Yellow Black
LC123M (High Yield)
LC125XLM
(Super High Yield)
LC123C (High Yield)
LC125XLC
(Super High Yield)
LC123Y (High Yield)
LC125XLY
(Super High Yield)
LC123BK (High Yield)
LC127XLBK
(Super High Yield)
What is Innobella™?
Innobella™ is a range of genuine consumables offered by Brother.
The name “Innobella™” derives from the words “Innovation” and “Bella” (meaning
“Beautiful” in Italian) and is a representation of the “innovative” technology providing you
with “beautiful” and “long lasting” print results.
Get inspired. If you’re using Windows
®
, double-click the Brother CreativeCenter icon on your desktop to
access our FREE website with many ideas and resources for personal and professional use.
Mac users can access Brother CreativeCenter at this web address: http://www.brother.com/creativecenter/
3

Hulp nodig? Stel uw vraag in het forum

Spelregels
1

Forum

Brother-MFC-J4410DW
  • Mijn absorber bak is vol ( volgens de printer) maar die heb ik leeg gemaakt, de melding blijft. Kan het niet uitzetten of resetten. Nu kan ik niet meer printen, wat nu kan ook nergens vinden waar ik een nieuwe moet kopen. Gesteld op 26-2-2022 om 18:44

    Reageer op deze vraag Misbruik melden
  • ik heb een printer type MFC-j4410DW en sinds kort geeft hij een storing ,absorber bijna vol
    wat betekent dit en wat moet ik dan doen om dit te verhelpen
    Kan iemand mij dit vertellen .
    dank u Gesteld op 2-9-2021 om 12:01

    Reageer op deze vraag Misbruik melden
  • Deze printer nieuw aangekocht en maar een maand op 2 gebruikt daarna verhuisd en heb hem dus nu gedurende een jaar of 3 niet meer gebruikt . Nieuwe inkt geplaatst maar als ik scan of kopiër komt er alleen een wit blad uit.
    Is er misschien nog iets dat vervangen mirt worden? Dank Gesteld op 9-1-2020 om 13:13

    Reageer op deze vraag Misbruik melden
  • Hoe kan ik mijn wifi wachtwoord wijzigen op de printer? (Brother MFC-J4410DW) Gesteld op 31-10-2015 om 08:07

    Reageer op deze vraag Misbruik melden
  • Beste gene die hier naar kijkt,
    zou u misschien even de tijd kunnen nemen om dit bericht te beantwoorden?
    ik ben namelijk niet de enigste met dit probleem en misschien bent u slim genoeg / weet u het antwoord hierop en helpt u vele, vele mensen

    ik heb het zelfde probleem als: Ineens wil onze brother MFC-j4410dw niet printen in de printer instellingen staat ie niet op off line printen hier hebben we het vinkje niet aanstaan.
    Toch geeft hij aan niet offline te staan hoe kunnen we dit op lossen.
    -------------------------------------------------------------------------------------

    de oplossingen via internet helpen niet

    please help
    Gesteld op 3-7-2015 om 12:36

    Reageer op deze vraag Misbruik melden
    • ik volg hier even want wij hebben dit probleem. Iedere keer opnieuw printer installeren en volgende computergebruik staat hij weer offline, licht uitgedrukt hoogst irritant... Geantwoord op 28-7-2015 om 17:25

      Waardeer dit antwoord (5) Misbruik melden
  • Ik had dit probleem ook en zelfs op de klanten dienst hadden ze geen gepaste oplossing.
    dan heb ik de printer draadloos geinstalleert als ook met usb kabel en nu werkt hij prima.
    oh ja voor de zekerheid ook de software up to date gezet. Geantwoord op 8-9-2015 om 13:51

    Waardeer dit antwoord (2) Misbruik melden
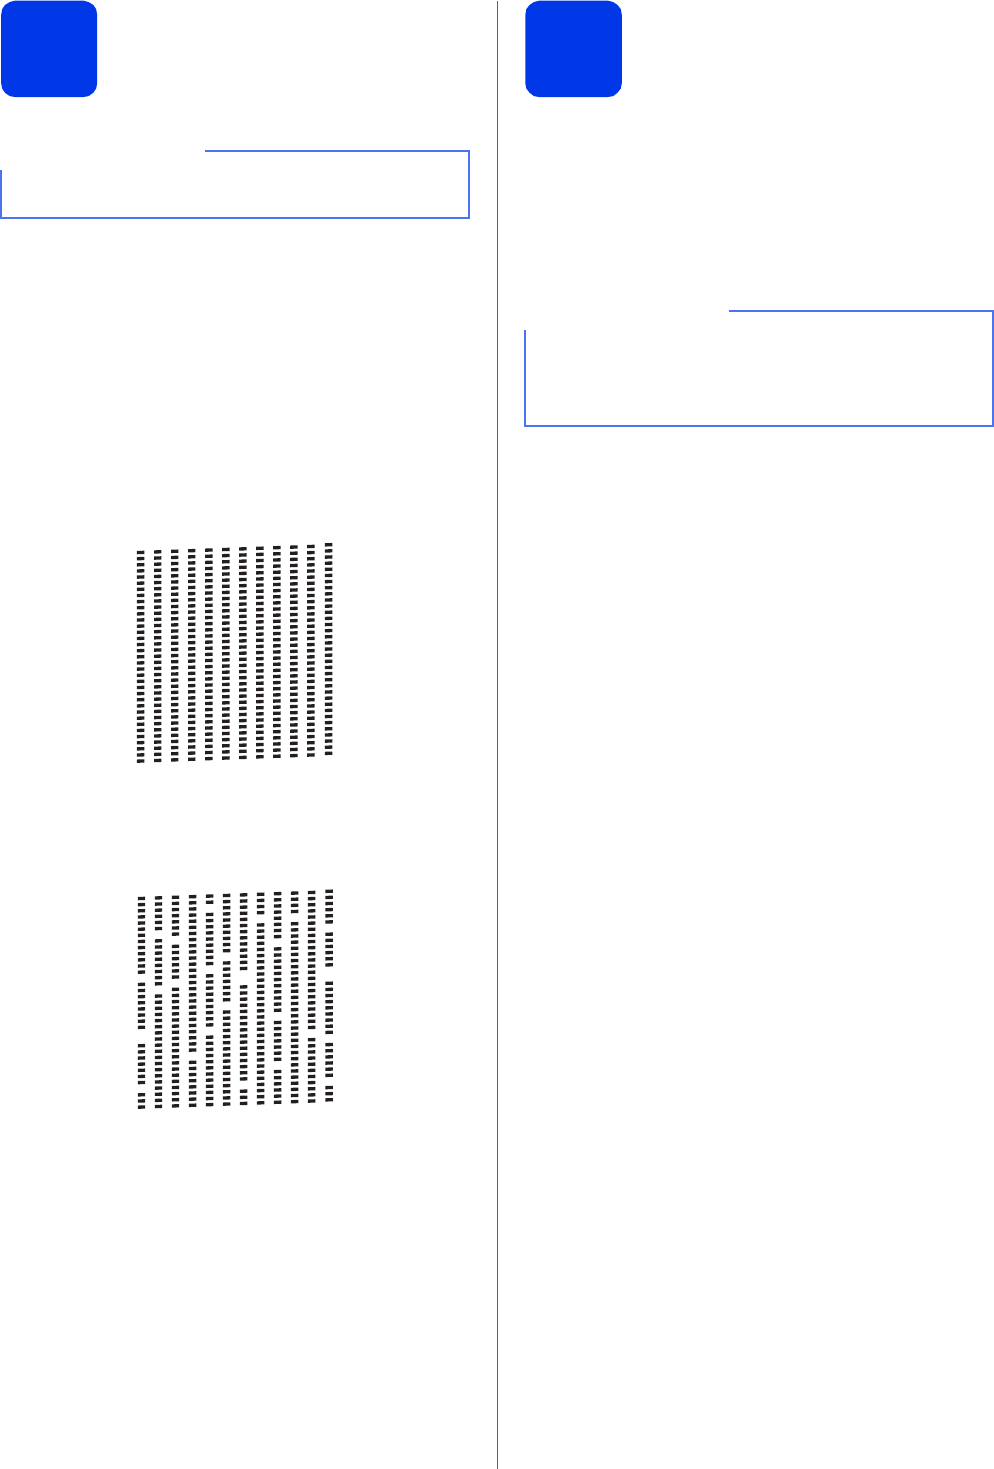
  • hoe kan ik mijn kleuren afstellen. is mij geadviseerd deze printer te kopen mfcj4410dw voor mooie kleuren maar het ziet er niet uit Gesteld op 1-5-2014 om 21:38

    Reageer op deze vraag Misbruik melden
6
  • Ik heb de printer MFC-J4710DW en krijg voortdurend de melding 'papier vast (voor/achter)'. Ondanks het feit dat er echt geen resten papier in zitten, blijft de error en de melding. Graag hulp Gesteld op 24-3-2014 om 20:20

    Reageer op deze vraag Misbruik melden

Misbruik melden

Gebruikershandleiding.com neemt misbruik van zijn services uitermate serieus. U kunt hieronder aangeven waarom deze vraag ongepast is. Wij controleren de vraag en zonodig wordt deze verwijderd.

Product:

Bijvoorbeeld antisemitische inhoud, racistische inhoud, of materiaal dat gewelddadige fysieke handelingen tot gevolg kan hebben.

Bijvoorbeeld een creditcardnummer, een persoonlijk identificatienummer, of een geheim adres. E-mailadressen en volledige namen worden niet als privégegevens beschouwd.

Spelregels forum

Om tot zinvolle vragen te komen hanteren wij de volgende spelregels:

Belangrijk! Als er een antwoord wordt gegeven op uw vraag, dan is het voor de gever van het antwoord nuttig om te weten als u er wel (of niet) mee geholpen bent! Wij vragen u dus ook te reageren op een antwoord.

Belangrijk! Antwoorden worden ook per e-mail naar abonnees gestuurd. Laat uw emailadres achter op deze site, zodat u op de hoogte blijft. U krijgt dan ook andere vragen en antwoorden te zien.

Abonneren

Abonneer u voor het ontvangen van emails voor uw Brother MFC-J4410DW bij:


U ontvangt een email met instructies om u voor één of beide opties in te schrijven.


Ontvang uw handleiding per email

Vul uw emailadres in en ontvang de handleiding van Brother MFC-J4410DW in de taal/talen: Engels als bijlage per email.

De handleiding is 10,19 mb groot.


U ontvangt de handleiding per email binnen enkele minuten. Als u geen email heeft ontvangen, dan heeft u waarschijnlijk een verkeerd emailadres ingevuld of is uw mailbox te vol. Daarnaast kan het zijn dat uw internetprovider een maximum heeft aan de grootte per email. Omdat hier een handleiding wordt meegestuurd, kan het voorkomen dat de email groter is dan toegestaan bij uw provider.

Stel vragen via chat aan uw handleiding

Stel uw vraag over deze PDF

Andere handleiding(en) van Brother MFC-J4410DW

Brother MFC-J4410DW Installatiehandleiding - Nederlands - 46 pagina's

Brother MFC-J4410DW Gebruiksaanwijzing - Nederlands - 177 pagina's

Brother MFC-J4410DW Gebruiksaanwijzing - Nederlands - 86 pagina's

Brother MFC-J4410DW Gebruiksaanwijzing - Deutsch - 90 pagina's

Brother MFC-J4410DW Gebruiksaanwijzing - Deutsch - 179 pagina's

Brother MFC-J4410DW Installatiehandleiding - Deutsch - 44 pagina's

Brother MFC-J4410DW Gebruiksaanwijzing - English - 175 pagina's

Brother MFC-J4410DW Gebruiksaanwijzing - English - 81 pagina's

Brother MFC-J4410DW Installatiehandleiding - Français - 44 pagina's

Brother MFC-J4410DW Gebruiksaanwijzing - Français - 179 pagina's

Brother MFC-J4410DW Gebruiksaanwijzing - Français - 91 pagina's


Uw handleiding is per email verstuurd. Controleer uw email

Als u niet binnen een kwartier uw email met handleiding ontvangen heeft, kan het zijn dat u een verkeerd emailadres heeft ingevuld of dat uw emailprovider een maximum grootte per email heeft ingesteld die kleiner is dan de grootte van de handleiding.

Er is een email naar u verstuurd om uw inschrijving definitief te maken.

Controleer uw email en volg de aanwijzingen op om uw inschrijving definitief te maken

U heeft geen emailadres opgegeven

Als u de handleiding per email wilt ontvangen, vul dan een geldig emailadres in.

Uw vraag is op deze pagina toegevoegd

Wilt u een email ontvangen bij een antwoord en/of nieuwe vragen? Vul dan hier uw emailadres in.


Info