INDEX ..........................................................45
KNOWING YOUR SEWING MACHINE ————————————————————————————————————————————————————————————————————————————————————————————————————————————————————————————————
—
————————————————————————————————————————————————
—————
5
1KNOWING YOUR SEWING MACHINE
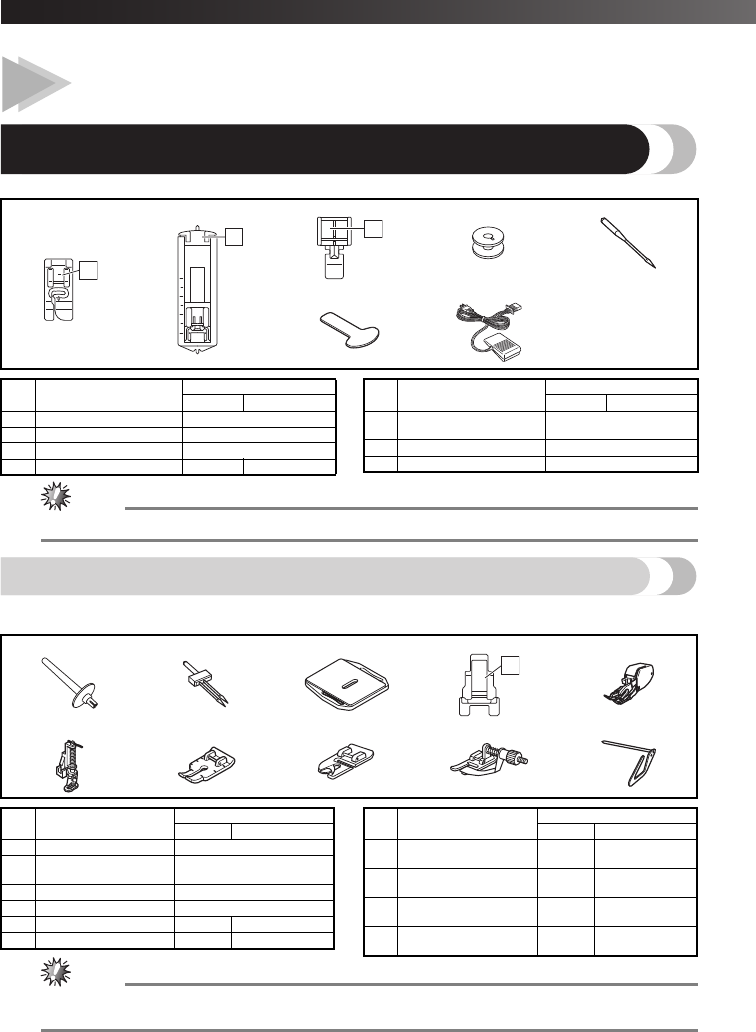
ACCESSORIES
We have designed these accessories to help you easily perform most sewing tasks.
Note
●The included accessories vary depending on the machine model.
Optional accessories
The following are available as optional accessories to be purchased separately. Depending on the model you
purchased, the following accessory may be included with your machine.
Note
●The quilting guide can be inserted into the holes at the back of the walking foot or the black plastic hole
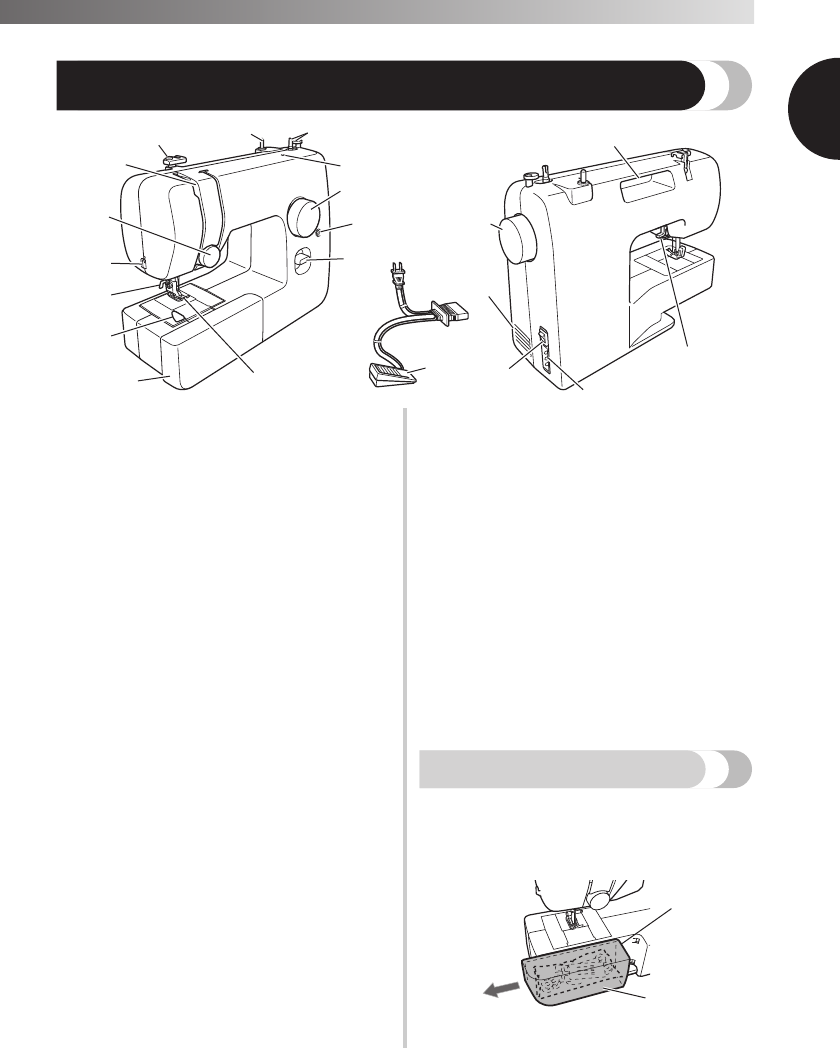
This winds the thread onto the bobbin for use as the
lower thread.
2Spool pin (Page 13, 17)
This holds the spool of thread.
3Thread guide (Page 13, 17)
This is used when winding the thread onto the
bobbin and then threading the machine.
4Thread take-up lever (Page18)
5Hole for extra spool pin (Page 26)
This holds a second spool of thread for sewing with
the twin needle.
6Upper tension-control dial (Page 27)
This controls the tension of the upper thread.
7Thread cutter (Page 24)
Pass the threads through the thread cutter to cut them.
8Needle threader (Page 19)
(This is only available on certain models.)
9Quick-set bobbin (Page 16, 21)
(This is only available on certain models.)
0Flat bed attachment with accessory compartment
(Page 6)
APresser foot (Page 10)
BReverse sewing lever (Page 12)
Push this lever to stitch in the reverse direction.
CButtonhole fine-adjustment screw (Page 34)
DPattern selection dial (Page 11)
Rotate the dial in either direction to choose the
stitch you want.
EHandwheel
Used to manually raise and lower the needle.
FAir vent
The air vent allows the air surrounding the motor to
circulate.
Do not cover the air vent while the machine is
being used.
GMain power and sewing light switch (Page 8)
You can turn the main power and sewing light
switch on and off.
HFoot controller jack / socket (Page 7)
Plug in the foot controller plug and connect the
machine to the power supply.
IPresser foot lever (Page 17)
Used to raise and lower the presser foot.
JHandle
Carry the machine by its handle when transporting.
KFoot controller (Page 8)
You can use this to control the sewing speed, and to
start and stop sewing.
Foot Controller:
Model KD-1902 for 110-120V area
KD-1902 for 110-127V area (Brazil only)
Model KD-2902 for 220-240V area
The foot controller part code differs depending on the
country or region. Contact your Brother dealer or the
nearest authorized Brother Service Center.
Flat bed attachment
The accessories can be stored in a compartment inside
the flat bed attachment.
1
Slide the flat bed attachment to the left to
open it.
1Flat bed attachment
2Storage compartment
1
2
3
4
7
8
9
0
A
6
C
B
H
G
K
D
5
I
E
F
J
1
2
KNOWING YOUR SEWING MACHINE ————————————————————————————————————————————————————————————————————————————————————————————————————————————————————————————————
—
————————————————————————————————————————————————
—————
7
USING YOUR SEWING MACHINE
WARNING
CAUTION
Connecting plugs
1
Connect the foot controller plug to the
machine.
2
Connect the power supply plug to a wall
outlet.
Note
●If a power outage occurs while the sewing
machine is being operated, turn off the main
power and unplug the power supply cord.
When restarting the sewing machine, follow
the necessary procedure to correctly operate
the machine.
●Use only regular household electricity for the power source. Using other power sources may
result in fire, electric shock, or damage to the machine.
●Make sure that the plugs on the power cord are firmly inserted into the electrical outlet and
the power supply jack on the machine. Otherwise, a fire or electric shock may result.
●Do not insert the plug on the power cord into an electrical outlet that is in poor condition.
●Turn off the main power and remove the plug in the following circumstances:
•When you are away from the machine
•After using the machine
•When the power fails during use
•When the machine does not operate correctly due to a bad connection or a disconnection
•During electrical storms
●Use only the power cord included with this machine.
●Do not use extension cords or multi-plug adapters with many other appliances plugged in to
them. Fire or electric shock may result.
●Do not touch the plug with wet hands. Electric shock may result.
●
When unplugging the machine, always turn off the main power first. Always grasp the plug to
remove it from the outlet. Pulling on the cord may damage the cord, or lead to fire or electric shock.
●
Do not allow the power cord to be cut, damaged, modified, forcefully bent, pulled, twisted, or
bundled. Do not place heavy objects on the cord. Do not subject the cord to heat. These
things may damage the cord and cause fire or electric shock. If the cord or plug is damaged,
take the machine to your authorized Brother Service Center for repairs before continuing use.
●Unplug the power cord if the machine is not to be used for a long period of time. Otherwise
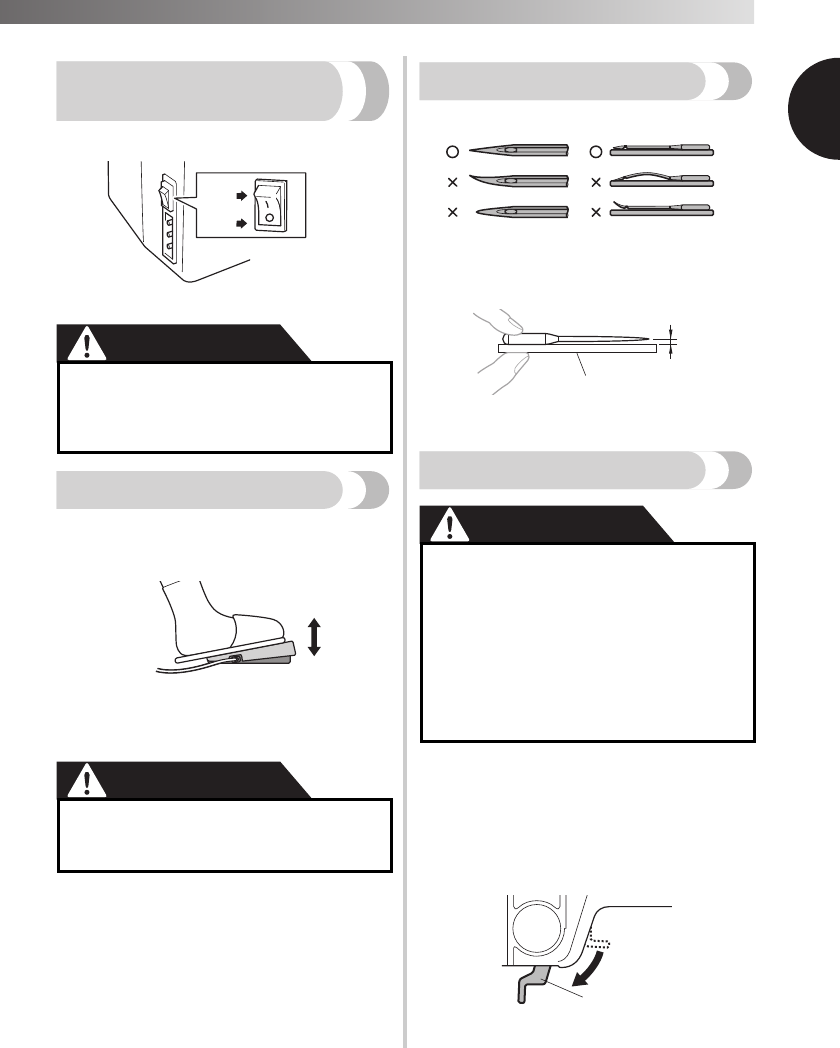
This switch turns the main power and sewing light on or
off.
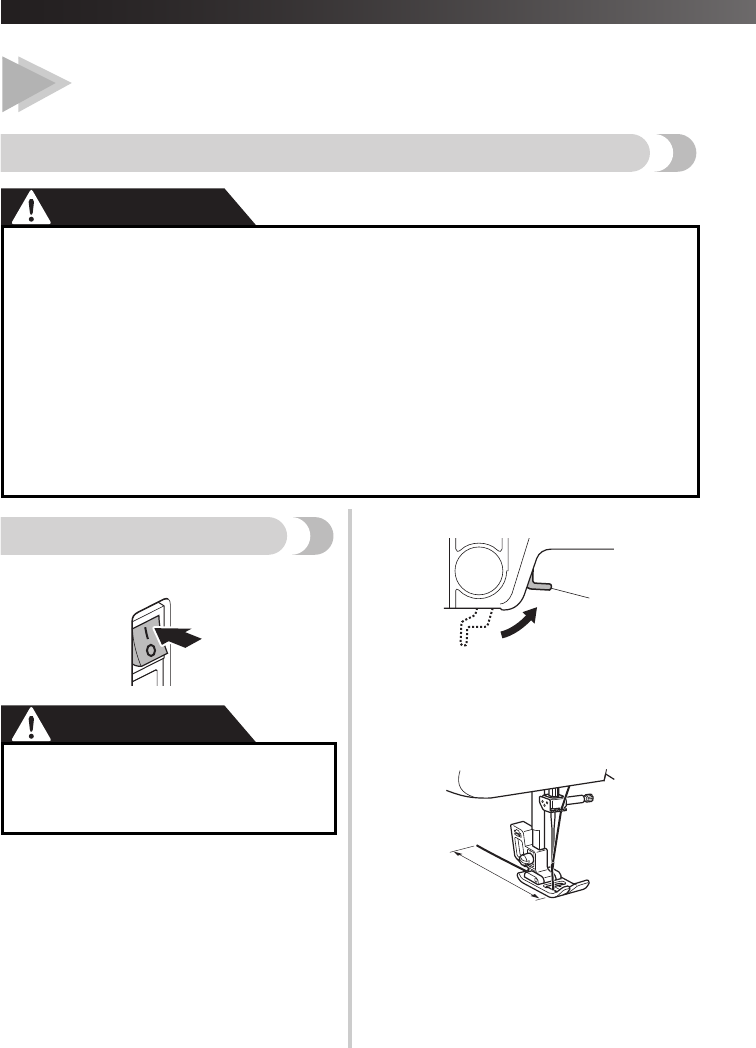
1Turn on (toward the ‘I’ mark)
2Turn off (toward the ‘O’ mark)
CAUTION
Foot controller
When you press the foot controller down lightly, the
machine will run at a low speed. When you press harder,
the machine’s speed will increase. When you take your
foot off the foot controller, the machine will stop.
1Slower
2Faster
You should make sure that nothing is placed on the foot
controller when the machine is not in use.
CAUTION
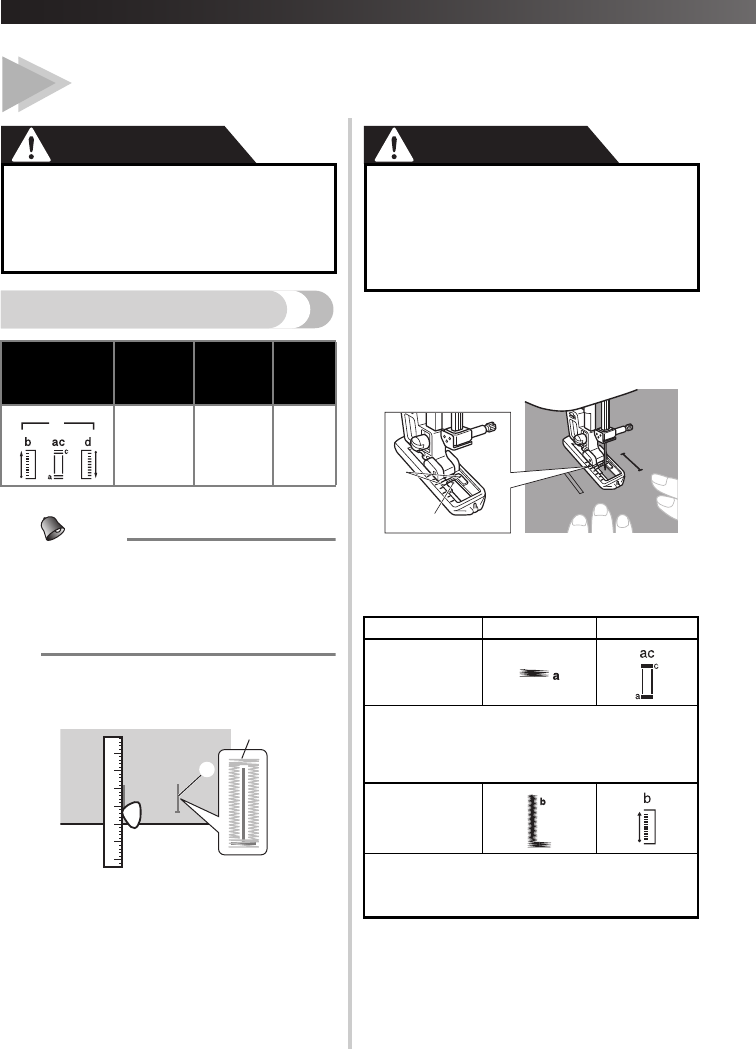
Checking the needle
The sewing needle must always be straight and sharp
for smooth sewing.
■Checking the needle correctly
Put the flat side of the needle on a flat surface.
Check the needle from the top and the sides.
Dispose of any bent needles safely.
1Parallel space
2Level surface (bobbin cover, glass, etc.)
Replacing the needle
CAUTION
1
Turn off the machine.
2
Raise the needle by turning the
handwheel toward you
(counterclockwise) so that the mark on
the wheel points up.
3
Lower the presser foot lever.
1Presser foot lever
●
Do not turn on the machine while pressing
down the foot controller. The machine
may start unexpectedly and cause
personal injury or damage to the machine.
●Do not allow pieces of cloth and dust to
build up on the foot controller. Doing so
could cause a fire or an electric shock.
2
1
1
2
●Always turn off the machine before you
change the needle. Otherwise, injuries
may occur if the foot controller is
accidentally pressed and the machine
starts sewing.
●Only use sewing machine needles for
home use. Other needles may bend or
break and cause injury.
●Never sew with a bent needle. A bent
needle will easily break and cause injury.
1
2
1
KNOWING YOUR SEWING MACHINE ————————————————————————————————————————————————————————————————————————————————————————————————————————————————————————————————
You will have to change the presser foot depending on
what you want to sew and how.
1
Turn off the machine.
Raise the presser foot lever.
2
Raise the needle by turning the
handwheel toward you
(counterclockwise) so that the mark on
the wheel points up.
3
Note
●Depending on the type of presser foot
holder, the method of releasing the presser
foot will vary.
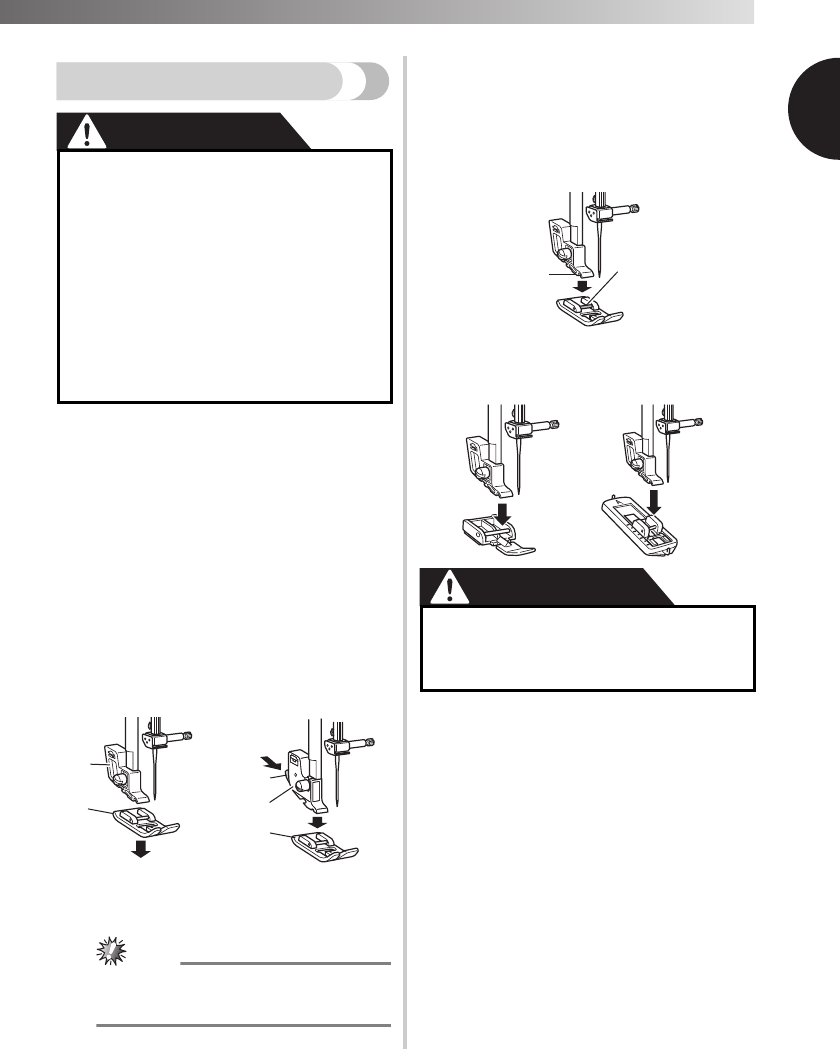
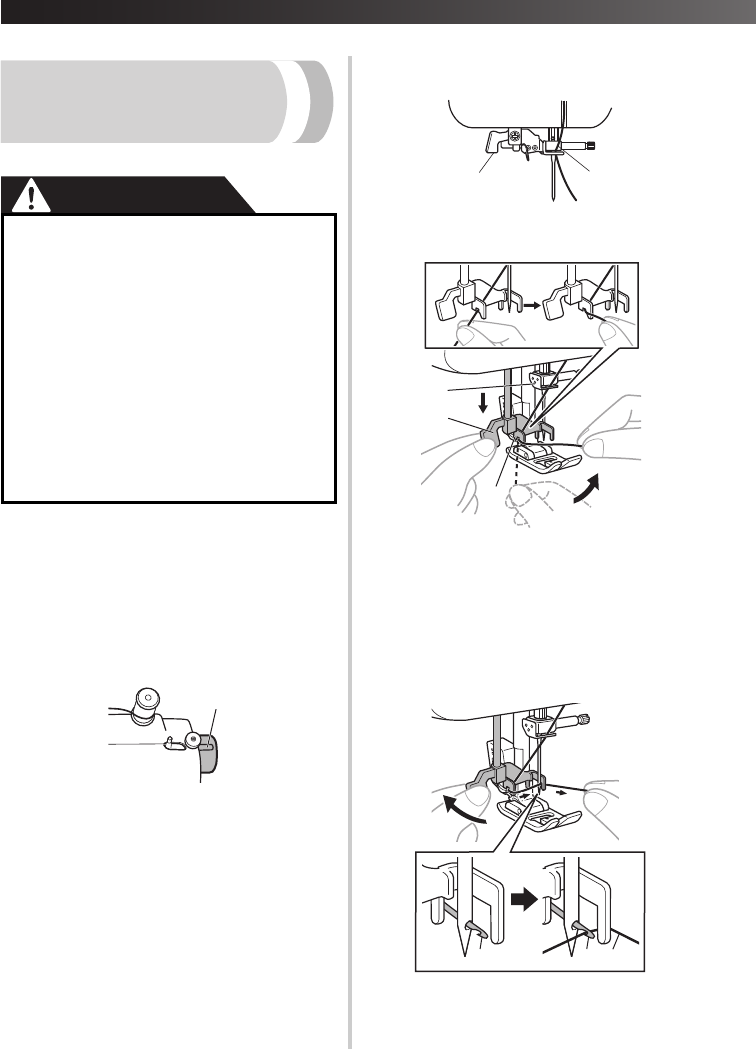
4
Put a different presser foot on the needle
plate so that the bar on the presser foot is
in line with the slot on the shank.
5
Lower the presser foot lever and fix the
presser foot onto the shank. If the presser
foot is in the correct place, the bar should
snap in.
1Shank
2Bar
■Presser foot installation orientation
CAUTION
●
Always turn off the machine before you
change the presser foot. If you leave the
power on and step on the controller, the
machine will start and you may be injured.
●Always use the correct presser foot for
the stitch pattern you have chosen. If
you use the wrong presser foot, the
needle may strike the presser foot and
bend or break, and may cause injury.
●Only use presser feet that have been
designed to be used with this machine.
Using any other presser foot may cause
accident or injury.
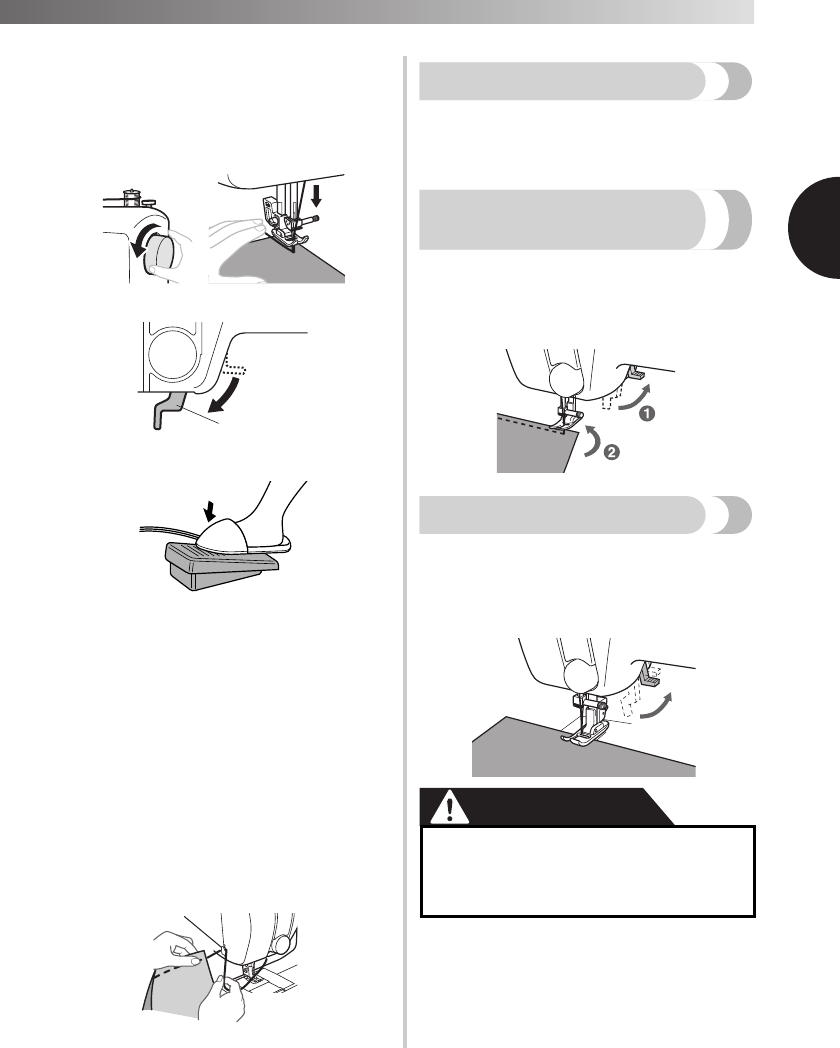
Remove the presser
foot by pulling it
vertically downward.
|
|
|
|
|
|
|
|
or
|
|
|
|
|
|
|
|
Press the black
button at the back of
the presser foot
holder to release the
presser foot.
1Presser foot holder
2Presser foot
1Black button
2Presser foot holder
3Presser foot
1
2
1
2
3
●If the presser foot is not installed with
the correct orientation, the needle may
strike the presser foot, which may bend
or break the needle and cause injury.
1
2
KNOWING YOUR SEWING MACHINE ————————————————————————————————————————————————————————————————————————————————————————————————————————————————————————————————
—
————————————————————————————————————————————————
—————
11
THE CONTROLS
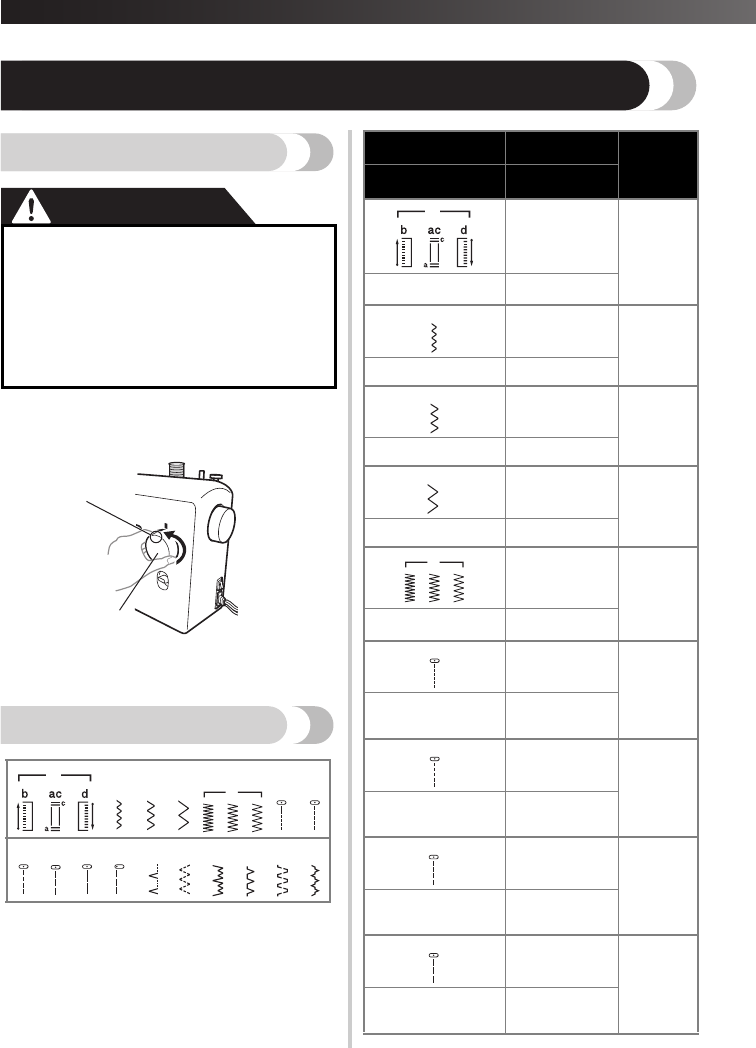
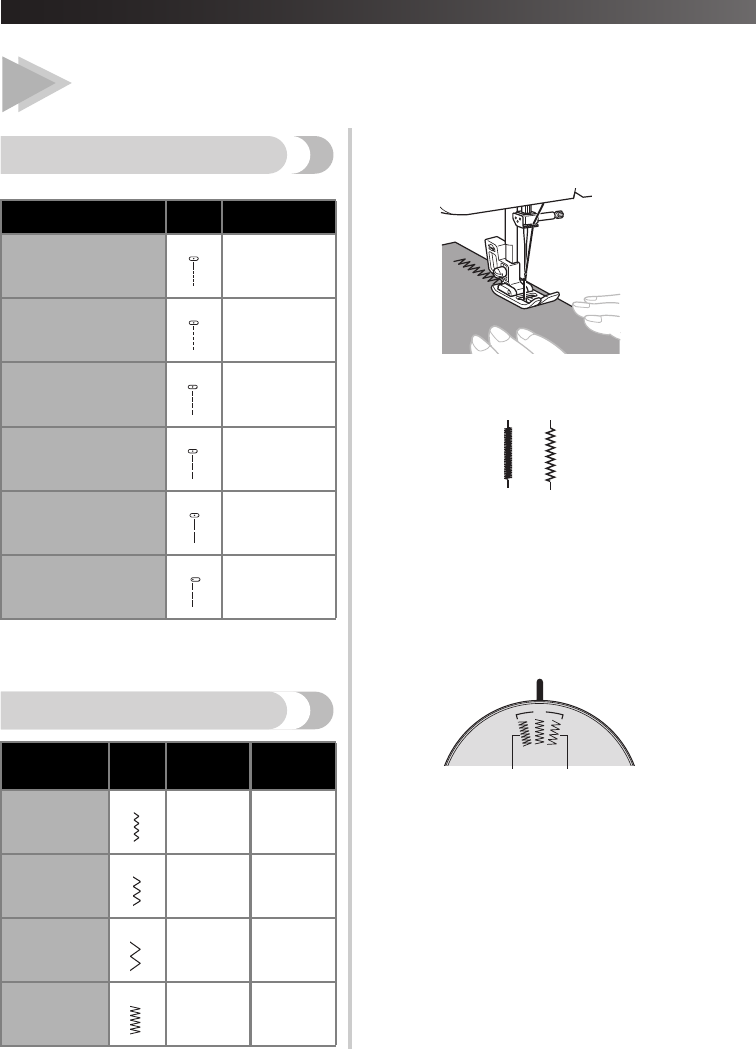
Pattern selection dial
CAUTION
To choose a stitch, simply turn the pattern selection dial
in either direction.
1Pattern selection dial
2Chosen pattern number
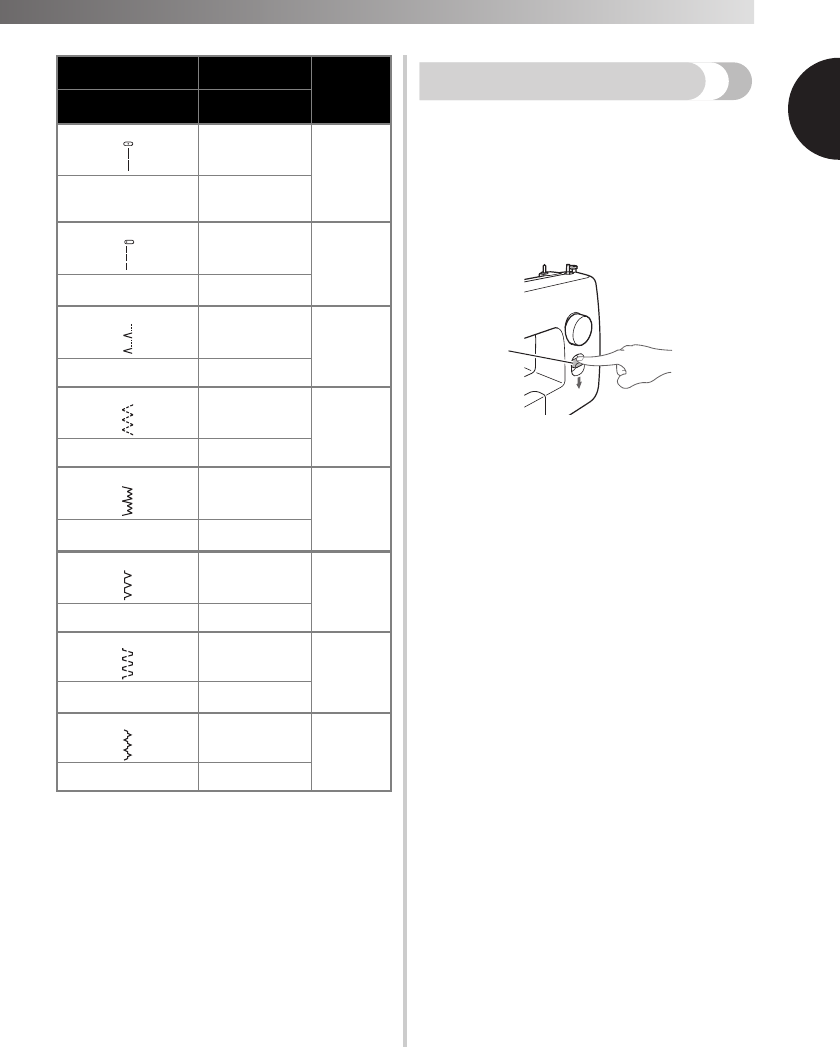
Patterns and stitch names
*1: Stitch nos. 15-17 are only available on certain
To sew in reverse, push the reverse sewing lever in as
far as possible and hold it in that position while you
lightly push the foot controller. To sew forward, release
the reverse sewing lever. The machine will then sew
forward.
The length of reverse stitches is fixed at 2 mm (1/16
inch).
1Reverse sewing lever
4 (3/16)
29, 38
STRAIGHT STITCH
(Center Needle
Position)
—
2.5 (3/32)
29, 36, 38
STRAIGHT STITCH
(Left Needle Position)
—
2 (1/16)
30, 39
BLIND HEM STITCH5 (3/16)
1 (1/16)
31
ELASTIC STITCH5 (3/16)
2 (1/16)
30, 39
STRETCH BLIND
HEM STITCH
5 (3/16)
2 (1/16)
31
OVEREDGE STITCH5 (3/16)
1.2 (1/16)
32
DOUBLE ACTION
STITCH
5 (3/16)
1.2 (1/16)
32
BRIDGING STITCH5 (3/16)
Pattern
Preset Length
(mm (inch))
Reference
Page
Stitch Name
Preset Width
(mm (inch))
10
11
12
13
14
15
16
17
1
KNOWING YOUR SEWING MACHINE ————————————————————————————————————————————————————————————————————————————————————————————————————————————————————————————————
—
————————————————————————————————————————————————
—————
13
THREADING THE MACHINE
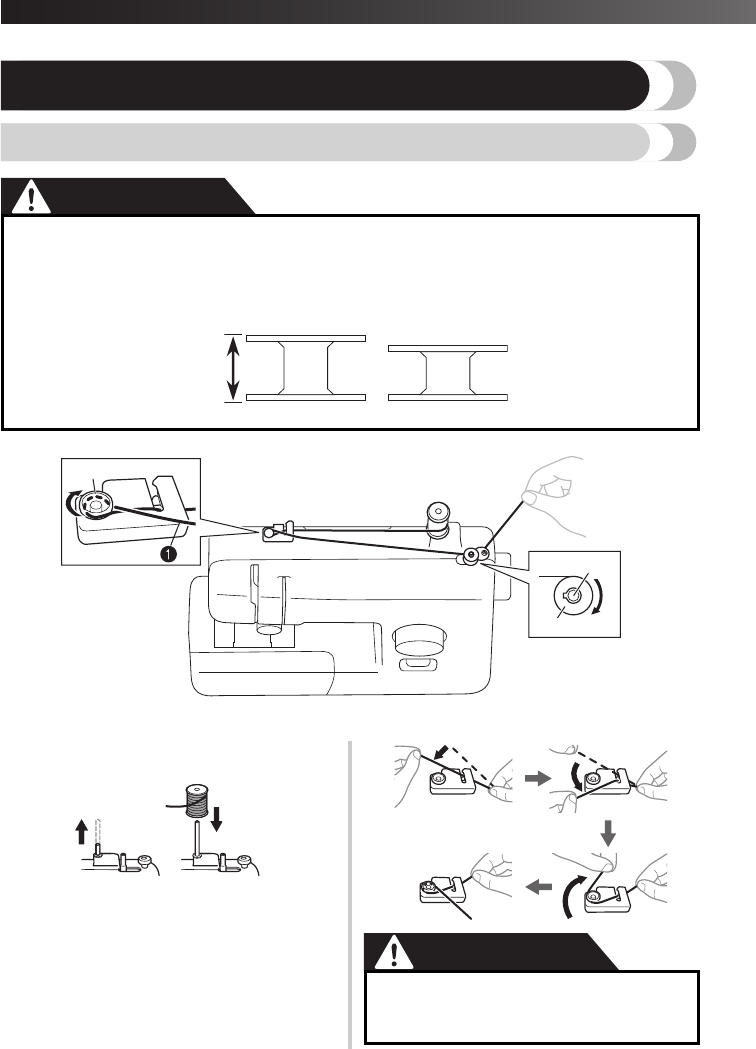
Winding the bobbin
CAUTION
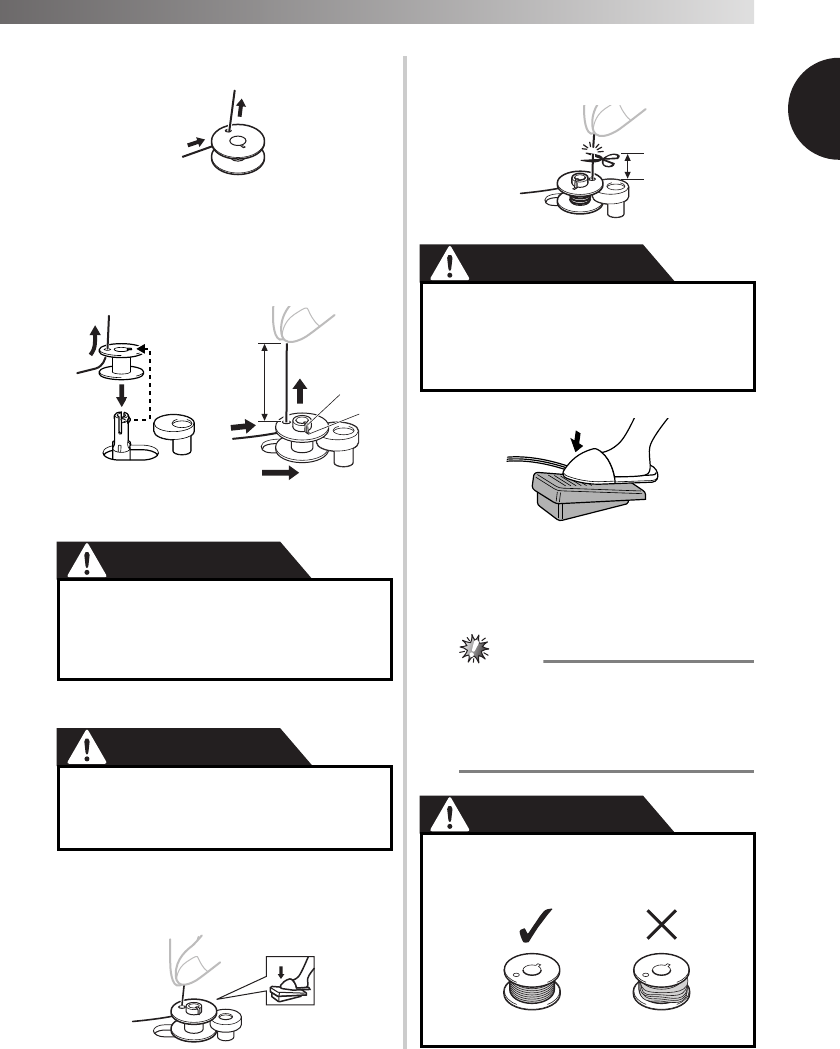
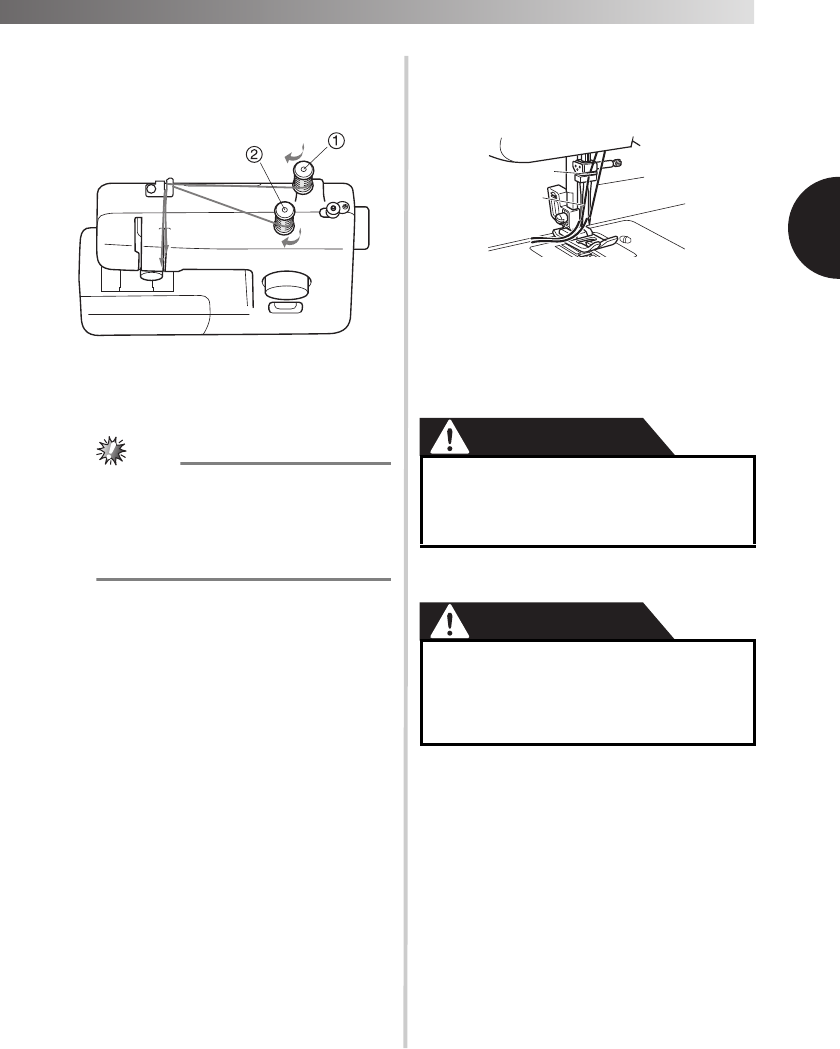
1
Pull up the spool pin and put a spool of
thread on this pin.
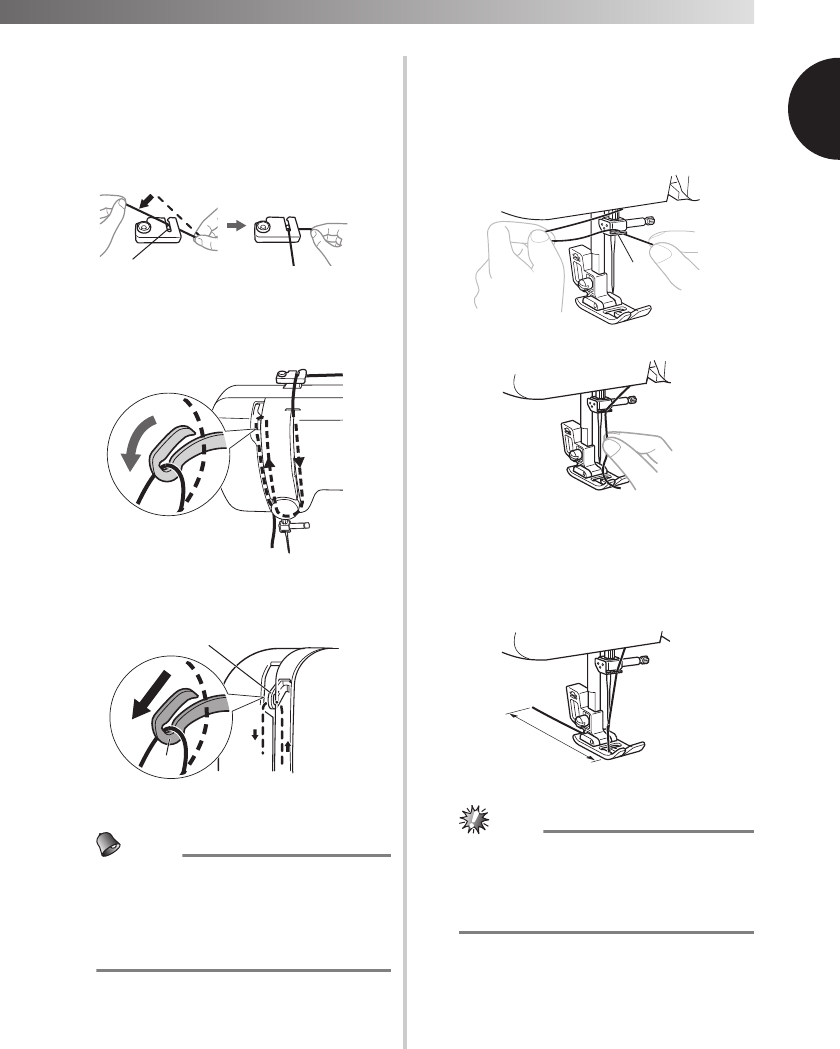
2
While holding the thread from the spool
with your right hand, pass the thread
toward you, in the groove on the thread
guide. Then, pass the thread around the
pre-tension disk and pull the thread in
completely.
CAUTION
●We designed the bobbin that comes with this machine. If you use bobbins from other models,
the machine will not work properly. Only use the bobbin that comes with this machine or
bobbins of the same type (part code: SA156, SFB: XA5539-151). Using other bobbins may
cause damage to the machine. SA156 is Class 15 type bobbin.
KNOWING YOUR SEWING MACHINE ————————————————————————————————————————————————————————————————————————————————————————————————————————————————————————————————
KNOWING YOUR SEWING MACHINE ————————————————————————————————————————————————————————————————————————————————————————————————————————————————————————————————
—
————————————————————————————————————————————————
—————
17
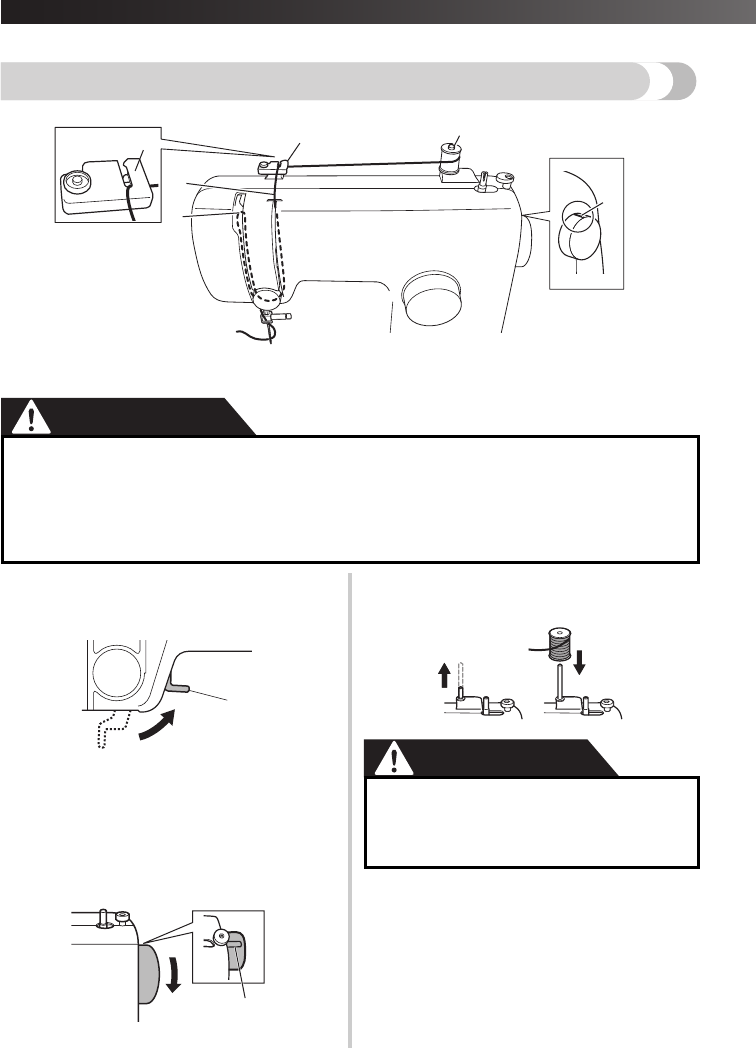
Upper threading
1Spool pin
2Thread guide (back)
3Thread guide (front)
4Thread take-up lever
5Mark on the handwheel
CAUTION
1
Turn off the machine.
2
Raise the presser foot lever.
1Presser foot lever
3
Raise the needle by turning the
handwheel toward you
(counterclockwise) so that the mark on
the wheel points up.
•If the needle is not correctly raised, the
sewing machine can not be threaded.
1Mark on the wheel
4
Pull up the spool pin and put a spool of
thread on this pin.
CAUTION
4
3
2
2
1
5
●When threading the upper thread, carefully follow the instructions. If the upper threading is
not correct, the thread may become tangled or the needle may bend or break.
●Never use a thread weight of 20 or lower.
●Use the needle and the thread in the correct combination. For details on the correct
combination of needles and threads, refer to “FABRIC, THREAD, AND NEEDLE
KNOWING YOUR SEWING MACHINE ————————————————————————————————————————————————————————————————————————————————————————————————————————————————————————————————
KNOWING YOUR SEWING MACHINE ————————————————————————————————————————————————————————————————————————————————————————————————————————————————————————————————
—
————————————————————————————————————————————————
—————
21
Drawing up the lower
thread
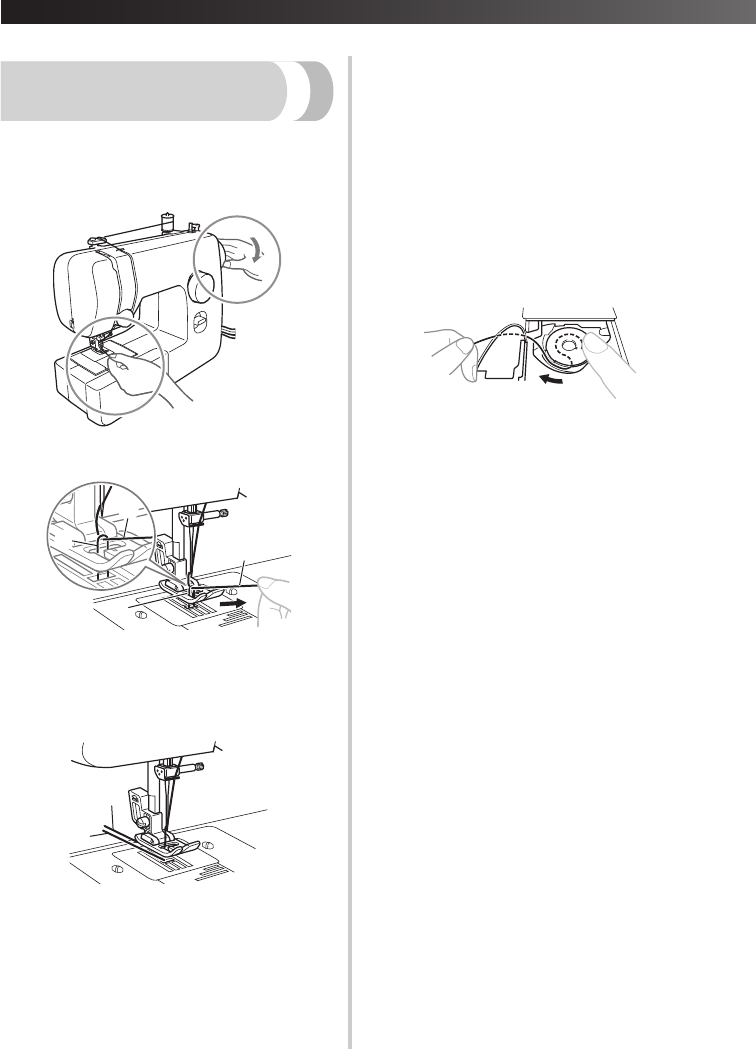
1
While lightly holding the end of the upper
thread, slowly turn the handwheel toward
you (counterclockwise) by hand to lower
and then raise the needle.
2
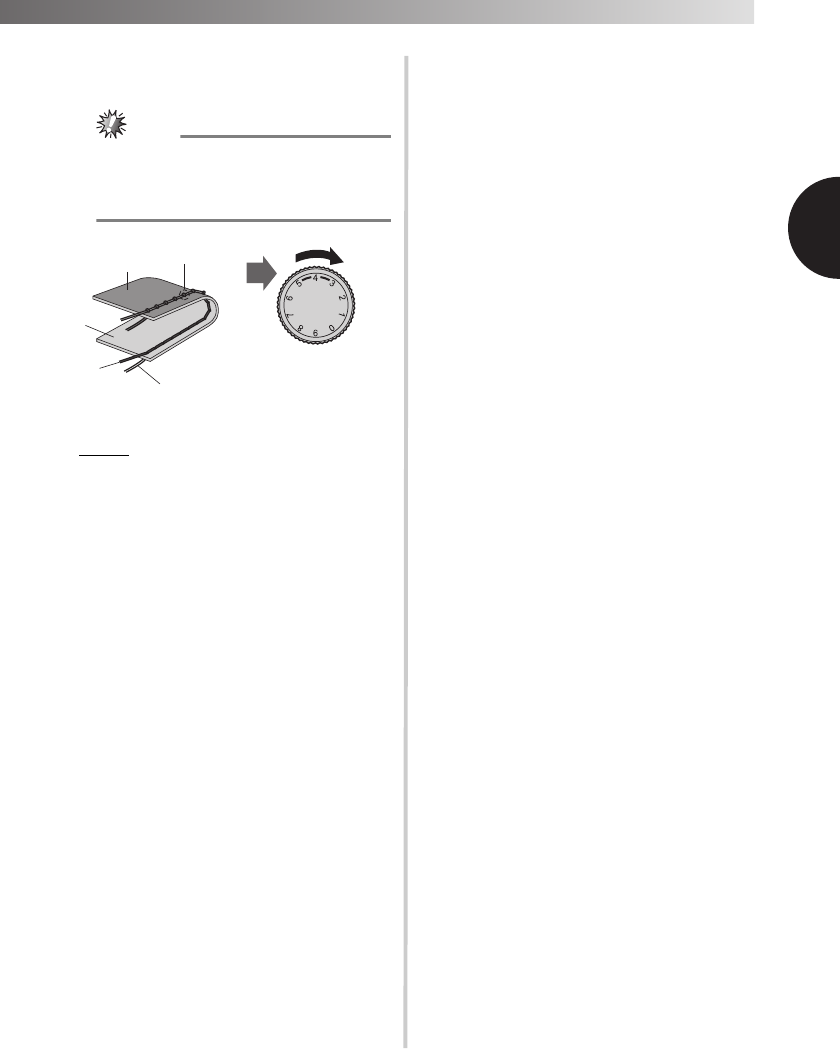
Pull on the upper thread to draw up the
lower thread.
1Upper thread
2Lower thread
3
Pull out about 10 cm (4 inches) of both
threads and put them toward the back of
the machine under the presser foot.
1Upper thread
2Lower thread
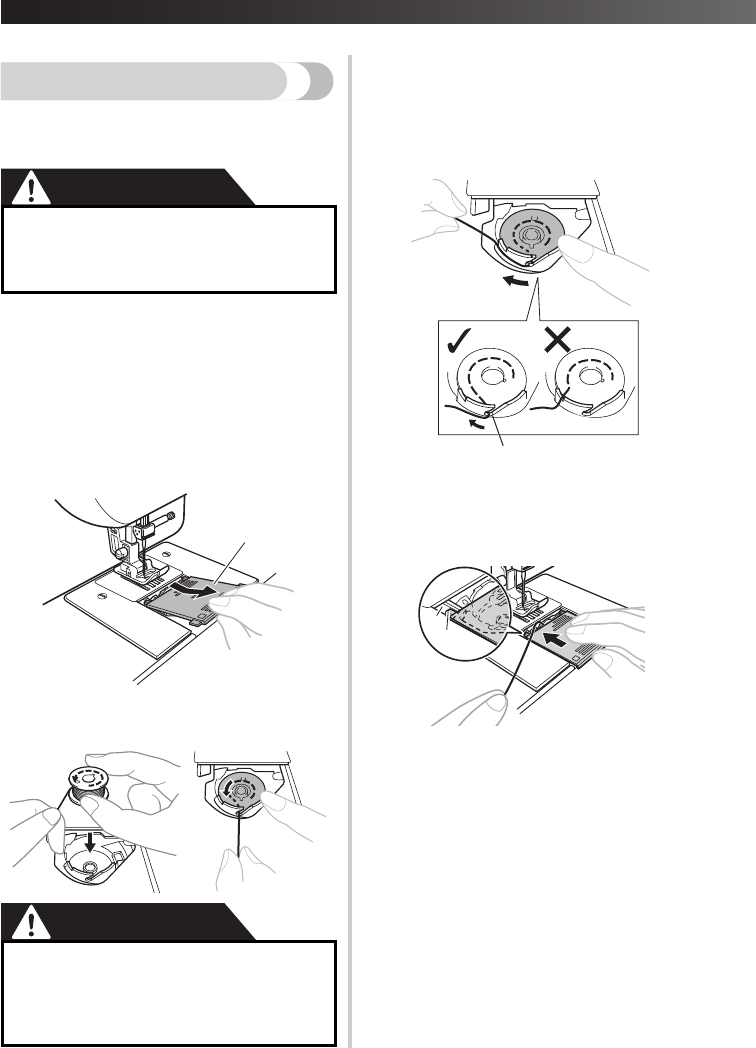
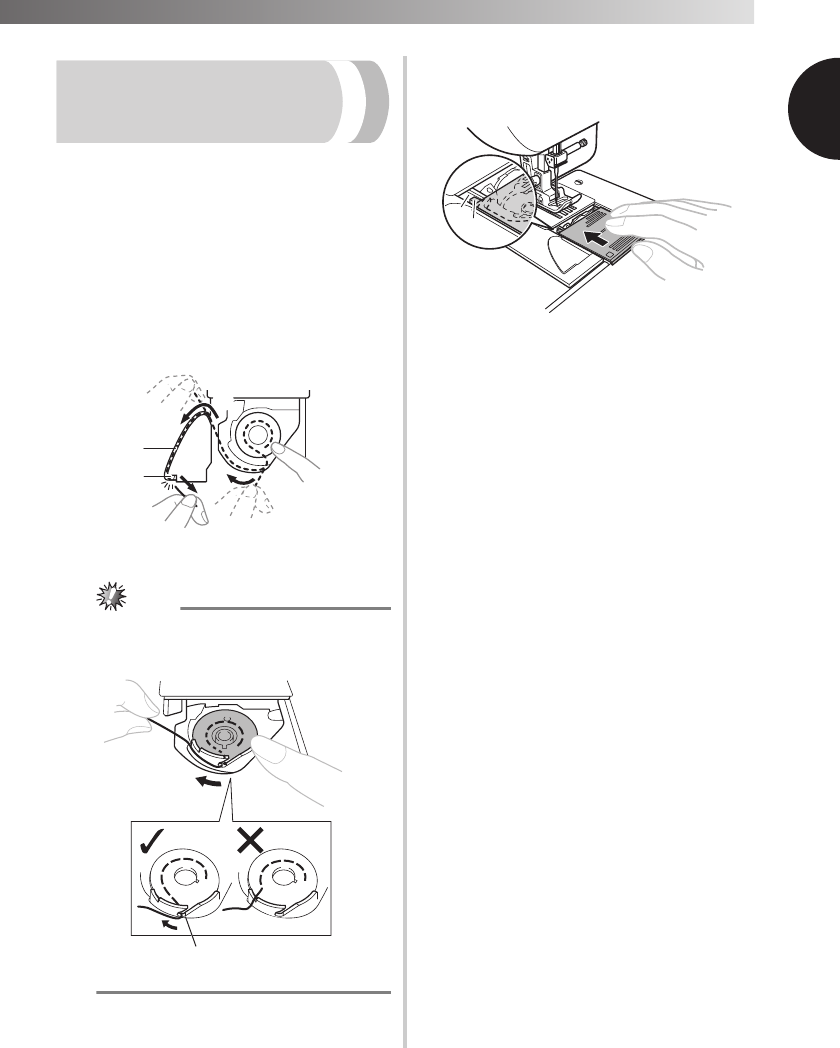
■For models equipped with a quick-set
bobbin
You can begin sewing immediately without drawing
up the bobbin thread.
When sewing gathers or darts, you can draw up the
lower thread by hand so that some thread will be
left over. Before you draw up the lower thread, put
If the stitching on the two sides of the buttonhole is not
the same, you can make the following adjustments.
1
After sewing the left side of the
buttonhole, stitch the right side and
observe the feeding.
1Right row
2
If the left side is too open or tight
compared with the right side, adjust the
buttonhole fine-adjustment screw as
described in the following paragraphs.
1Buttonhole fine-adjustment screw
2Left side
3Buttonhole appearance
If the left side is too open, turn the buttonhole
fine-adjustment screw with a large
screwdriver in the “–” direction.
If the left side is too tight, turn the buttonhole
fine-adjustment screw with a large
screwdriver in the “+” direction.
•This adjustment ensures both sides of the
buttonhole are the same.
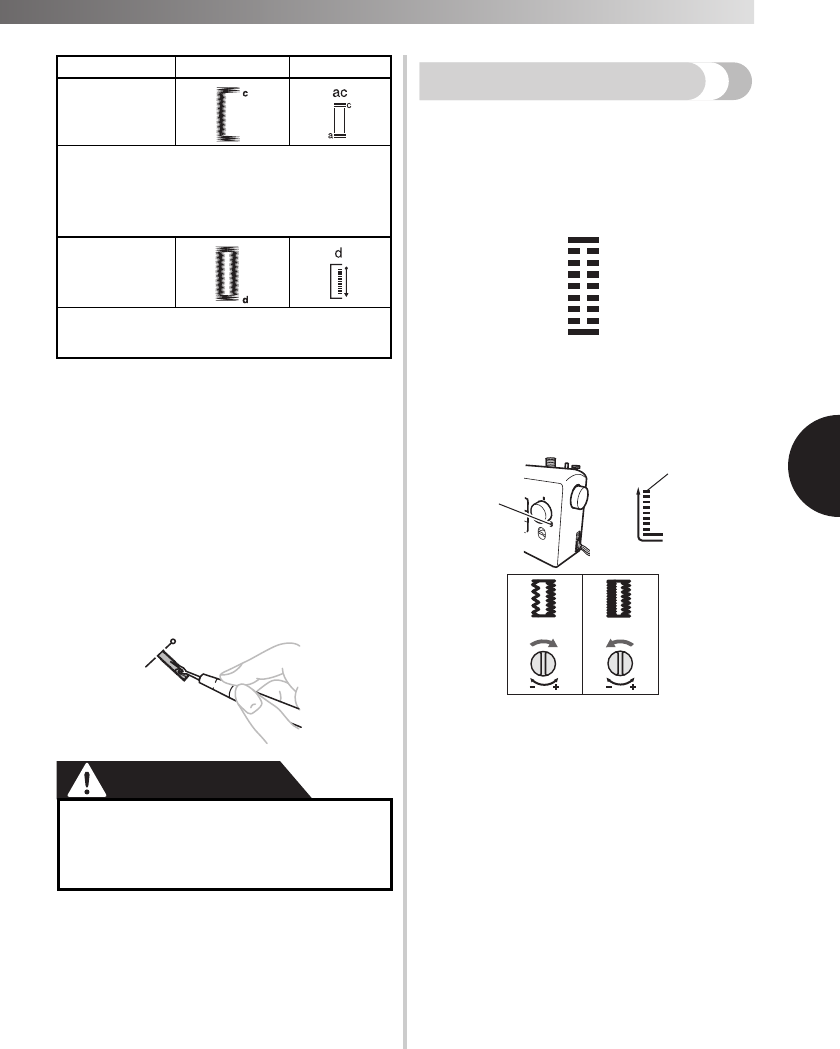
Step 3
(Back bar tack)
1.Turn the pattern selection dial to “c” (same
position as in step 1).
2.Sew 5 to 6 stitches.
3.Stop the machine when the needle is at the right
side of the stitch and then raise the needle from the
material.
Step 4
(Right side)
1.Set the pattern selection dial to “d”.
2.Sew the right side until the needle reaches the
stitches sewn in step 1.
●
When using the seam ripper to open the
buttonhole, do not put your hand or
finger in the path of the ripper. The seam
ripper may slip and you may be injured.
StepSewn sectionPattern
1
1
2
3
3
USING ATTACHMENTS AND APPLICATIONS ————————————————————————————————————————————————————————————————————————————————————————————————————————————————————————————————
—
————————————————————————————————
—————
35
5USING ATTACHMENTS AND
APPLICATIONS
CAUTION
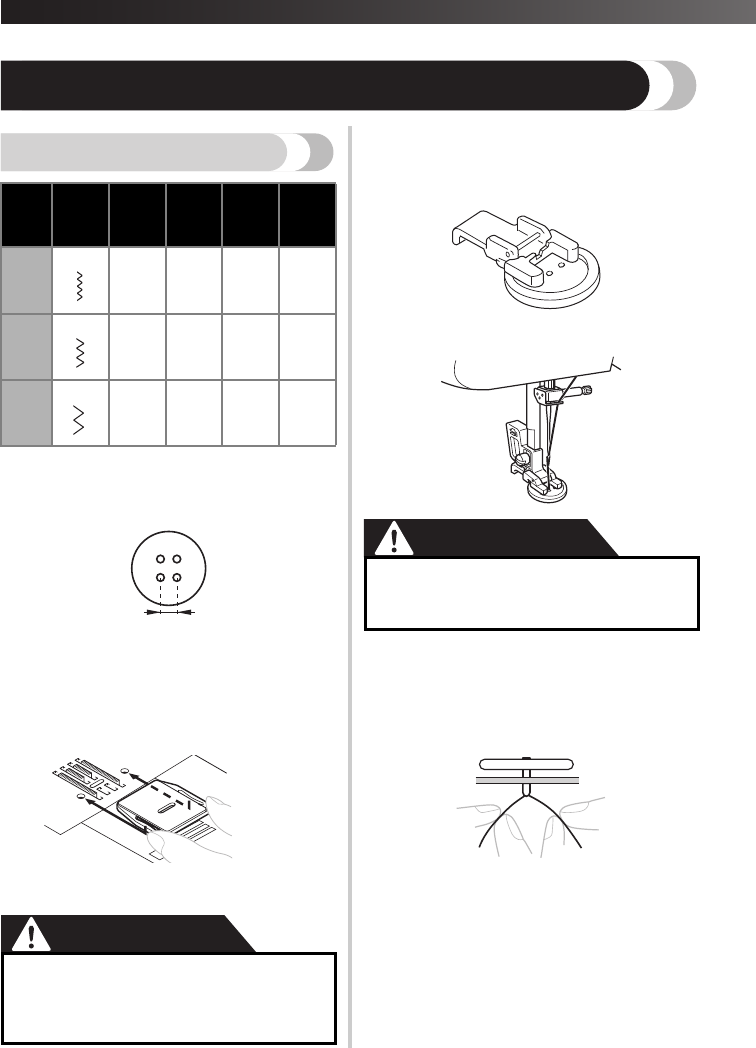
Zipper insertion
You can use the zipper foot “I” to sew different types of
zippers, and can easily position it to the right or left side
of the needle.
When sewing with the zipper on the right side, attach
the shank to the left pin of the zipper foot. When sewing
with the zipper on the left side, attach the shank to the
right pin of the zipper foot.
1Right pin for sewing with the zipper on the left
side
2Left pin for sewing with the zipper on the right
side
3Needle drop point for sewing with the zipper
on the left side
4Needle drop point for sewing with the zipper
on the right side
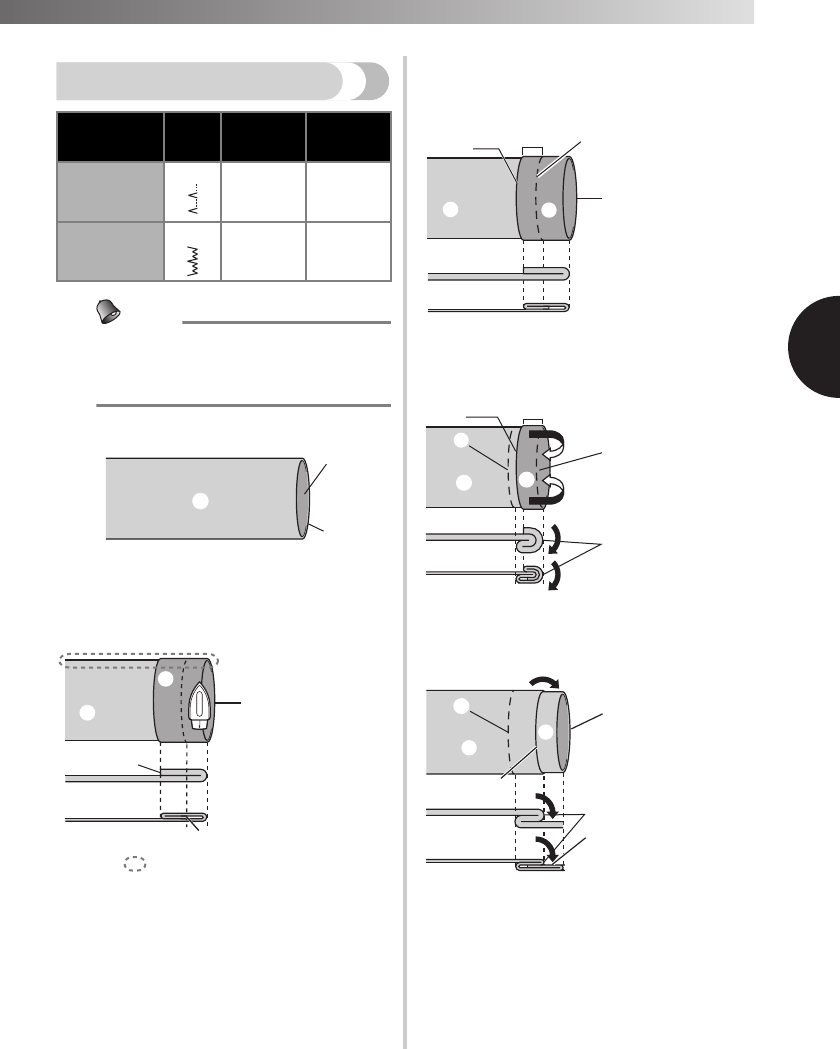
1
Prepare the fabric with the zipper basted
on the wrong side.
1Basting stitching
2Reverse stitches
3Wrong side of fabric
4End of zipper opening
5Zipper
2
Turn off the machine.
Attach the zipper foot “I”.
CAUTION
3
Turn on the machine.
CAUTION
4
With the right side of the fabric facing up,
continue sewing with the zipper on the
right side of the presser foot.
1End of zipper opening
2Basting stitching
3Zipper
•Sew the stitching in order, from 1 to 3.
●
Always turn off the machine before replacing the presser foot. Otherwise, injuries may occur
if the foot controller is accidentally pressed and the machine starts sewing.
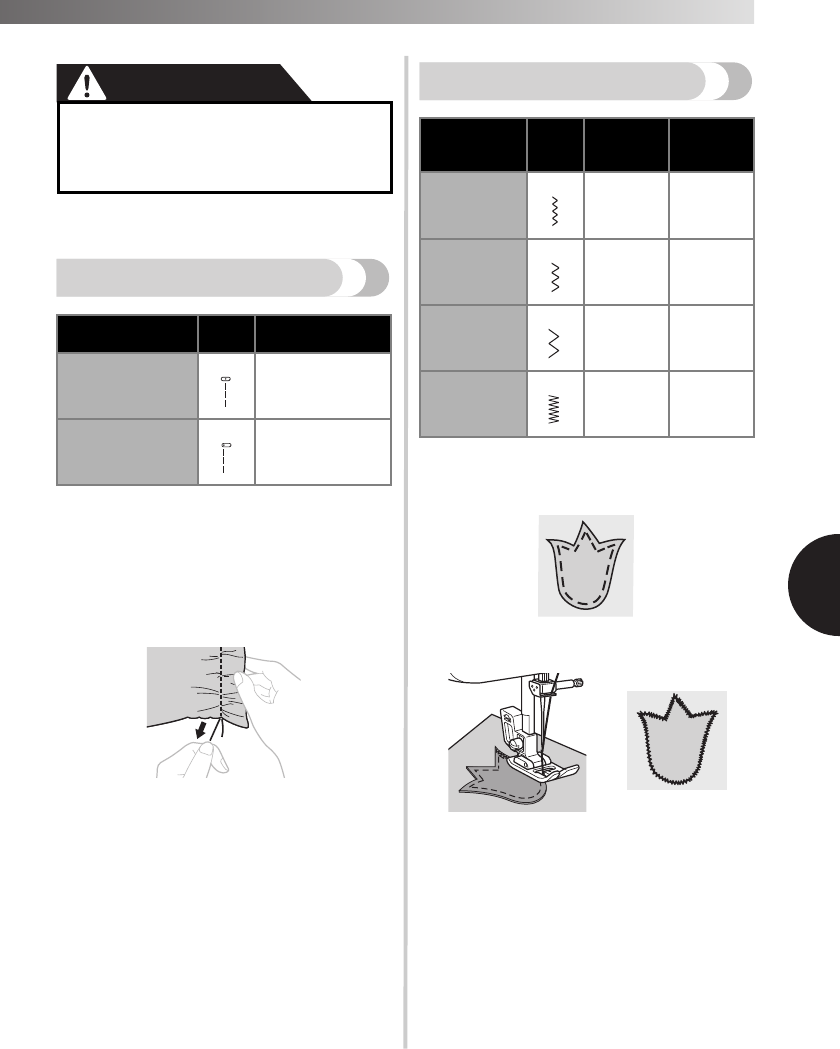
You can create an appliqué by cutting a different piece
of fabric into a shape and applying it as a decoration.
1
Baste the cut design to the fabric.
2
Carefully sew around the edge of the
design with a zigzag stitch.
●Make sure the needle does not hit the
zipper during sewing. If the needle hits
the zipper, the needle may break and
you may be injured.
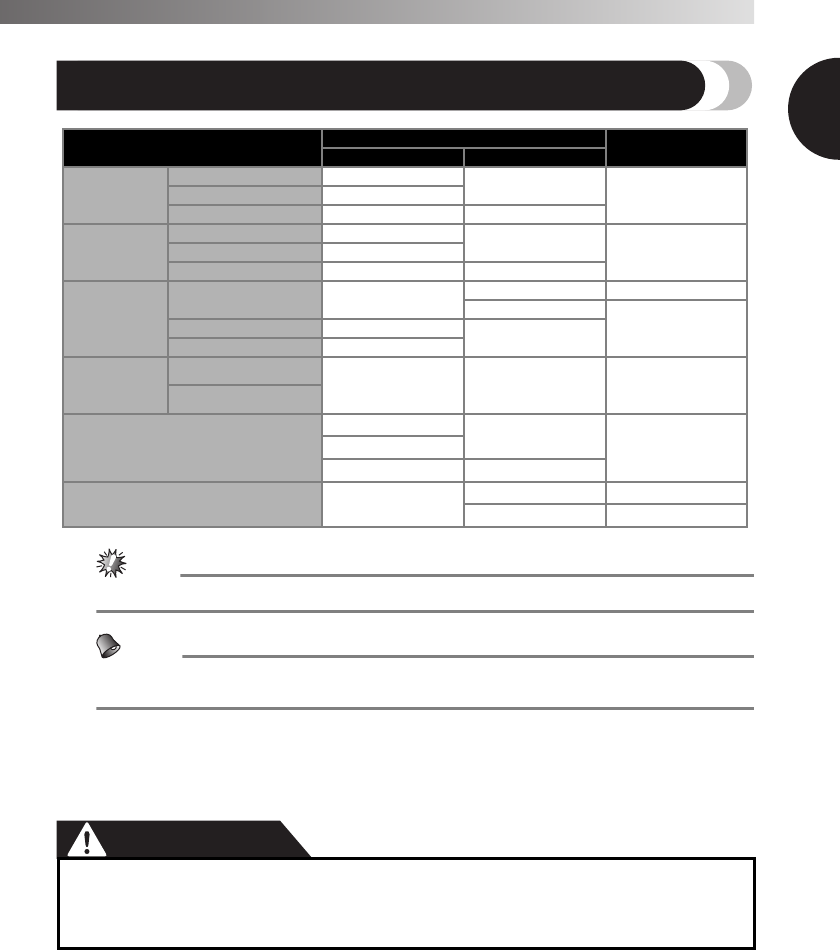
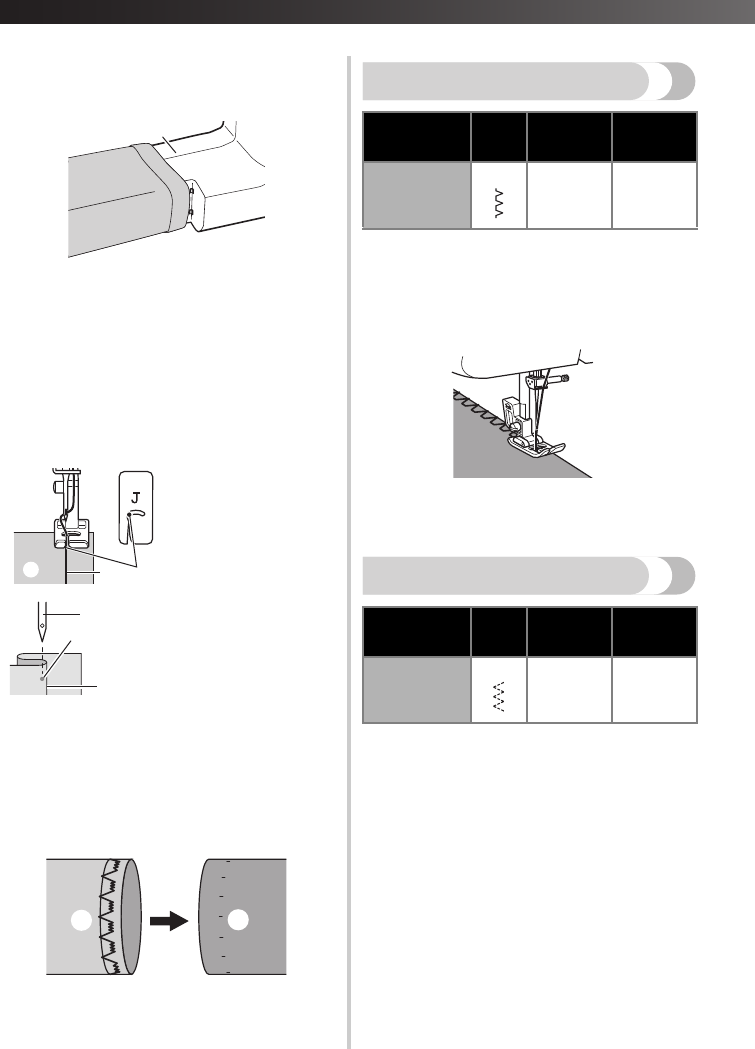
Stitch NamePattern
Stitch Length
[mm (inch)]
Straight Stitch
(Center Needle
Position)
3 (1/8)
Straight Stitch
(Left Needle Position)
2.5 (3/32)
9
11
Stitch NamePattern
Stitch
Length
[mm (inch)]
Stitch Width
[mm (inch)]
Zigzag Stitch0.7 (1/32)1.8 (1/8)
Zigzag Stitch1.5 (1/16)3.3 (3/16)
Zigzag Stitch2 (1/16)5 (3/16)
Zigzag (Satin)
Stitch
0.5 (1/32)5 (3/16)
2
3
4
5
USING ATTACHMENTS AND APPLICATIONS ————————————————————————————————————————————————————————————————————————————————————————————————————————————————————————————————
USING ATTACHMENTS AND APPLICATIONS ————————————————————————————————————————————————————————————————————————————————————————————————————————————————————————————————
—
————————————————————————————————
—————
39
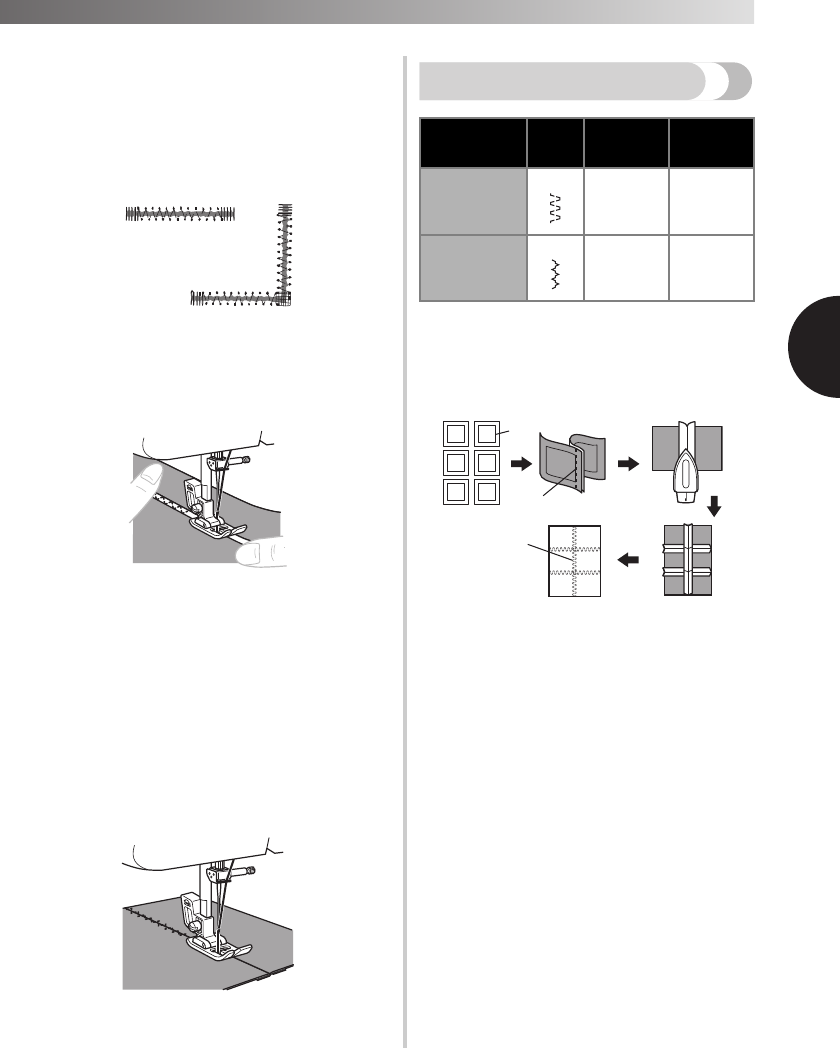
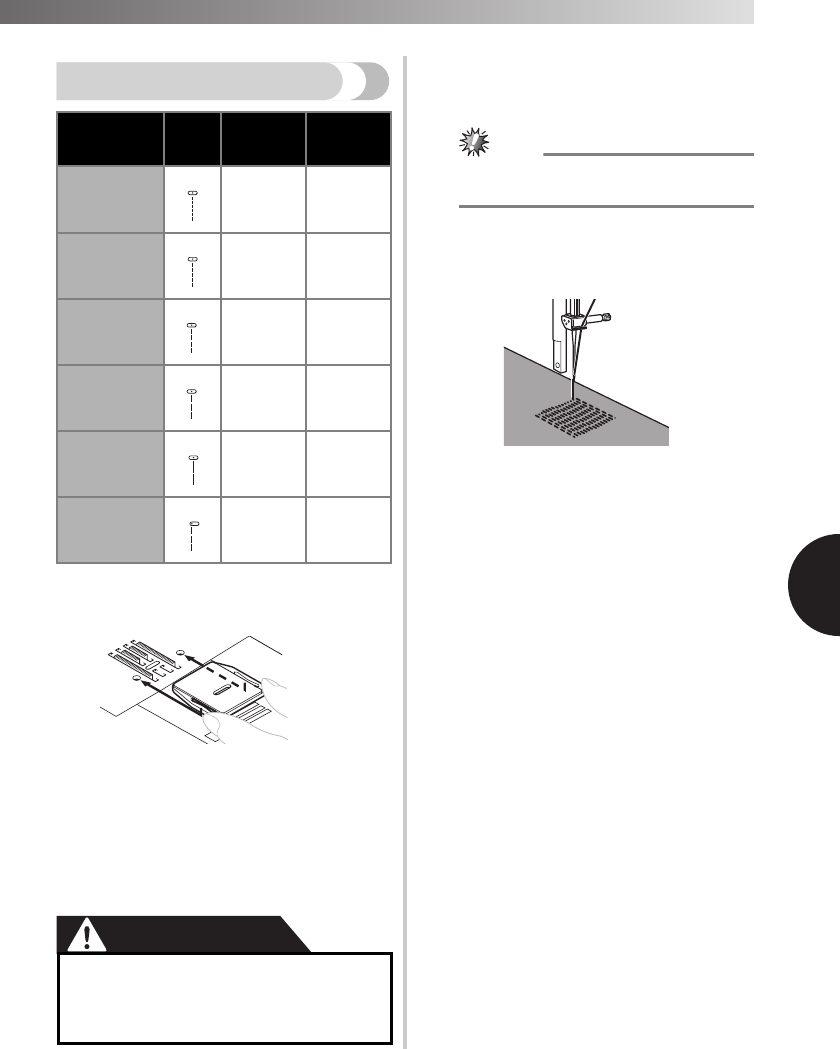
Using the blind stitch foot
This foot comes in handy not only for stretch blind hem
stitching, but also for sewing fabric edges and seams.
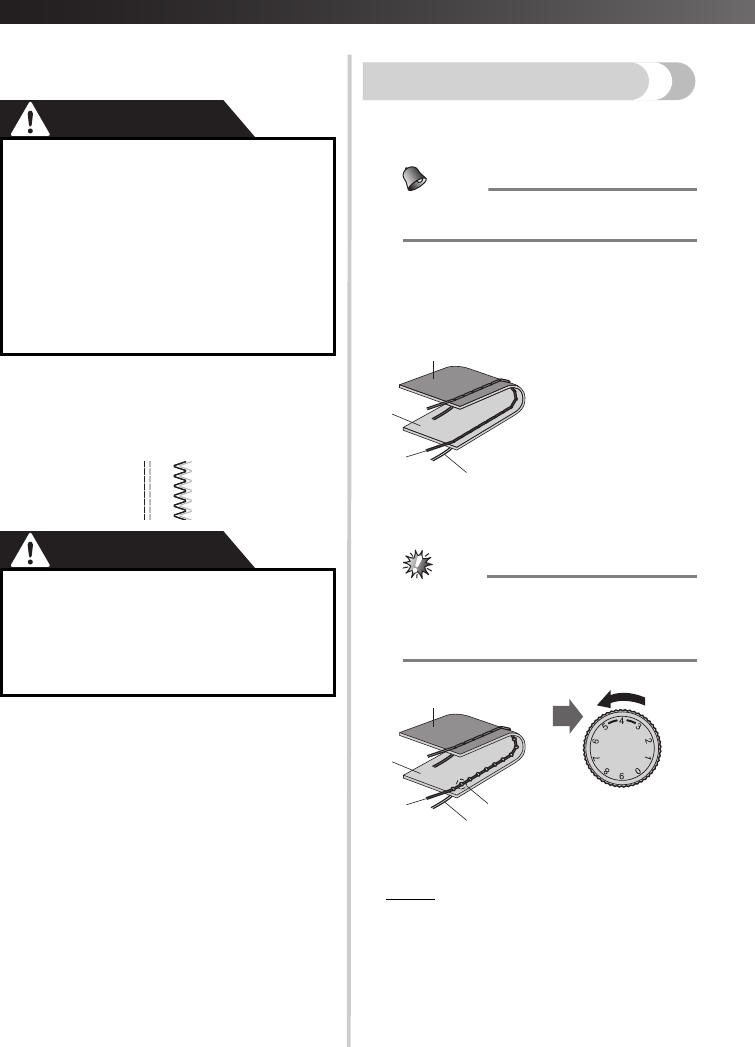
■When edge stitching
1
Turn off the machine.
2
Attach the blind stitch foot.
Turn on the machine.
CAUTION
3
Position the needle the distance you want
the stitch to be from the edge of the fabric,
and then lower the needle in that position.
4
Turn the foot guide screw and carefully
adjust to guide the fabric.
1Screw
2Guide
■When sewing seams
1
Turn off the machine.
2
Attach the blind stitch foot.
Turn on the machine.
CAUTION
3
Set the pattern selection dial to the
Straight Stitch (Center Needle Position).
Align the foot guide with the needle
position.
4
Set the pattern selection dial to the Zigzag
Stitch with the desired width.
5
Place the fabric under the foot so the foot
guide is aligned between both edges of the
fabric.
6
Lower the presser foot and start sewing.
■When stretch blind hem stitching
When stretch blind hem stitching using the blind
stitch foot, turn the screw to adjust the guide to the
Gebruikershandleiding.com neemt misbruik van zijn services uitermate serieus. U kunt hieronder aangeven waarom deze vraag ongepast is. Wij controleren de vraag en zonodig wordt deze verwijderd.
Product:
Spelregels forum
Om tot zinvolle vragen te komen hanteren wij de volgende spelregels:
lees eerst de handleiding door;
controleer of uw vraag al eerder door iemand anders is gesteld;
probeer uw vraag zo duidelijk mogelijk te stellen;
heeft u een probleem en al geprobeerd om dit op te lossen, vermeld dit erbij aub;
heeft u een oplossing gekregen van een bezoeker dan horen wij dat graag in dit forum;
wilt u een reactie geven op een vraag of antwoord, gebruik dan niet dit formulier maar klik op de knop 'reageer op deze vraag';
uw vraag wordt direct op de website gezet; vermijd daarom persoonlijke gegevens in te vullen;
Belangrijk! Als er een antwoord wordt gegeven op uw vraag, dan is het voor de gever van het antwoord nuttig om te weten als u er wel (of niet) mee geholpen bent! Wij vragen u dus ook te reageren op een antwoord.
Belangrijk! Antwoorden worden ook per e-mail naar abonnees gestuurd. Laat uw emailadres achter op deze site, zodat u op de hoogte blijft. U krijgt dan ook andere vragen en antwoorden te zien.
Abonneren
Abonneer u voor het ontvangen van emails voor uw Brother J17S bij:
nieuwe vragen en antwoorden
nieuwe handleidingen
U ontvangt een email met instructies om u voor één of beide opties in te schrijven.
Ontvang uw handleiding per email
Vul uw emailadres in en ontvang de handleiding van Brother J17S in de taal/talen: Engels als bijlage per email.
De handleiding is 12,26 mb groot.
U ontvangt de handleiding per email binnen enkele minuten. Als u geen email heeft ontvangen, dan heeft u waarschijnlijk een verkeerd emailadres ingevuld of is uw mailbox te vol. Daarnaast kan het zijn dat uw internetprovider een maximum heeft aan de grootte per email. Omdat hier een handleiding wordt meegestuurd, kan het voorkomen dat de email groter is dan toegestaan bij uw provider.
Uw handleiding is per email verstuurd. Controleer uw email
Als u niet binnen een kwartier uw email met handleiding ontvangen heeft, kan het zijn dat u een verkeerd emailadres heeft ingevuld of dat uw emailprovider een maximum grootte per email heeft ingesteld die kleiner is dan de grootte van de handleiding.
Er is een email naar u verstuurd om uw inschrijving definitief te maken.
Controleer uw email en volg de aanwijzingen op om uw inschrijving definitief te maken
U heeft geen emailadres opgegeven
Als u de handleiding per email wilt ontvangen, vul dan een geldig emailadres in.
Uw vraag is op deze pagina toegevoegd
Wilt u een email ontvangen bij een antwoord en/of nieuwe vragen? Vul dan hier uw emailadres in.