451191
16
Verklein
Vergroot
Pagina terug
1/91
Pagina verder
BASIC USER’S GUIDE
DCP-J515W
DCP-J715W
Version 0
UK/IRE/GEN
If you need to call Customer Service
Please complete the following information for future
reference:
Model Number: DCP-J515W, DCP-J715W
(Circle your model number)
Serial Number:
1
Date of Purchase:
Place of Purchase:
1
The serial number is on the back of the unit. Retain
this User's Guide with your sales receipt as a
permanent record of your purchase, in the event of
theft, fire or warranty service.
Register your product on-line at
http://www.brother.com/registration/
By registering your product with Brother, you will be recorded as the
original owner of the product. Your registration with Brother:
may serve as confirmation of the purchase date of your product
should you lose your receipt; and
may support an insurance claim by you in the event of product loss
covered by insurance.
© 2010 Brother Industries, Ltd.
i
User's Guides and where do I find it?
Which manual? What's in it? Where is it?
Safety and Legal Please read the Safety Instructions before you
set up your machine.
Printed / In the box
Quick Setup Guide Read this Guide first. Follow the instructions for
setting up your machine and installing the
drivers and software for the operating system
and connection type you are using.
Printed / In the box
Basic User's Guide Learn the basic Copy, Scan and PhotoCapture
Center™ operations and how to replace
consumables. See troubleshooting tips.
Printed / In the box
Advanced User's Guide Learn more advanced operations: Copy,
printing reports and performing routine
maintenance.
PDF file /
Documentation
CD-ROM
Software User's Guide Follow these instructions for Printing, Scanning,
Network Scanning, PhotoCapture Center™,
and using the Brother ControlCenter utility.
PDF file /
Documentation
CD-ROM
Network User's Guide This Guide provides more advanced
information for configuring the Ethernet and
Wireless network connections. In addition, find
information about network utilities, network
printing, troubleshooting tips and supported
network specifications.
PDF file /
Documentation
CD-ROM
ii
Table of Contents
(BASIC USER’S GUIDE)
1 General information 1
Using the documentation .......................................................................................1
Symbols and conventions used in the documentation .................................... 1
Accessing the Advanced User’s Guide, Software User’s Guide and
Network User’s Guide.........................................................................................1
Viewing Documentation................................................................................... 1
Accessing Brother Support (Windows
®
)................................................................3
Accessing Brother Support (Macintosh) ................................................................3
Control panel overview ..........................................................................................4
LCD display indications ................................................................................... 5
Basic Operations .............................................................................................6
Warning LED indications .................................................................................6
LCD display ...........................................................................................................7
Setting the backlight brightness.......................................................................7
2 Loading paper 8
Loading paper and other print media.....................................................................8
Loading envelopes and postcards.................................................................10
Loading photo paper......................................................................................12
Removing small printouts from the machine .................................................14
Printable area ................................................................................................15
Paper settings......................................................................................................16
Paper Type ....................................................................................................16
Paper Size .....................................................................................................16
Acceptable paper and other print media..............................................................17
Recommended print media ...........................................................................17
Handling and using print media .....................................................................18
Choosing the right print media.......................................................................19
3 Loading documents 21
How to load documents .......................................................................................21
Using the ADF (DCP-J715W only) ................................................................21
Using the scanner glass ................................................................................21
Scannable area .............................................................................................22
4 Making copies 23
How to copy .........................................................................................................23
Stop copying..................................................................................................23
Copy settings.................................................................................................23
Paper options ................................................................................................24
iii
5 Printing photos from a memory card or
USB Flash memory drive 25
PhotoCapture Center™ Operations..................................................................... 25
Using a memory card or USB Flash memory drive .......................................25
Getting started ..................................................................................................... 26
Print Images......................................................................................................... 28
View Photos................................................................................................... 28
PhotoCapture Center™ print settings.................................................................. 28
How to scan to a memory card or USB Flash memory drive............................... 29
6 How to print from a computer 31
Printing a document.............................................................................................31
7 How to scan to a computer 32
Scanning a document ..........................................................................................32
Scanning using the scan key ...............................................................................32
Scanning using a scanner driver ......................................................................... 32
A Routine maintenance 33
Replacing the ink cartridges ................................................................................33
Cleaning and checking the machine....................................................................35
Cleaning the scanner glass ........................................................................... 35
Cleaning the paper pick-up rollers .................................................................36
Cleaning the print head .................................................................................37
Checking the print quality .............................................................................. 37
Checking the print alignment ......................................................................... 38
B Troubleshooting 39
Error and Maintenance messages....................................................................... 39
Error animation .............................................................................................. 43
Document jam (DCP-J715W only) ................................................................43
Printer jam or paper jam ................................................................................ 44
Troubleshooting................................................................................................... 46
If you are having difficulty with your machine ................................................ 46
Machine Information ............................................................................................ 51
Checking the serial number........................................................................... 51
Reset functions.............................................................................................. 51
How to reset the machine.............................................................................. 51
C Menu and features 52
On-screen programming......................................................................................52
Menu table...........................................................................................................53
Entering Text ....................................................................................................... 68
Inserting special characters........................................................................... 68
Making corrections ........................................................................................68
iv
D Specifications 69
General ................................................................................................................69
Print media...........................................................................................................71
Copy ....................................................................................................................72
PhotoCapture Center ....................................................................................... 73
PictBridge (DCP-J715W only) .............................................................................74
Scanner ...............................................................................................................75
Printer ..................................................................................................................76
Interfaces ............................................................................................................. 77
Computer requirements .......................................................................................78
Consumable items ...............................................................................................79
Network (LAN) .....................................................................................................80
E Index 81
v
Table of Contents
(ADVANCED USER’S GUIDE)
The Advanced User's Guide explains the following features and operations.
You can view the Advanced User's Guide on the Documentation CD-ROM.
1 General setup
Memory storage
Sleep Mode
LCD display
2 Printing reports
Reports
3 Making copies
Copy settings
4
Printing photos from a memory
card or USB Flash memory drive
PhotoCapture Center™ operations
Print Images
PhotoCapture Center™ print settings
Scan to a memory card or USB Flash
memory drive
5 Printing photos from a camera
(DCP-J715W only)
Printing photos directly from a PictBridge
camera
Printing photos directly from a digital
camera (without PictBridge)
A Routine maintenance
Cleaning and checking the machine
Packing and shipping the machine
B Glossary
C Index
vi
1
1
1
Using the
documentation
1
Thank you for buying a Brother machine!
Reading the documentation will help you
make the most of your machine.
Symbols and conventions
used in the documentation 1
The following symbols and conventions are
used throughout the documentation.
Accessing the
Advanced User’s
Guide, Software User’s
Guide and Network
User’s Guide
1
This Basic User’s Guide does not contain all
the information about the machine such as
how to use the advanced features for Copy,
PhotoCapture Center™, Printer, Scanner
and Network. When you are ready to learn
detailed information about these operations,
read the Advanced User’s Guide,
Software User’s Guide and
Network User’s Guide that are on the
Documentation CD-ROM.
Viewing Documentation 1
a Turn on your computer. Insert the
Documentation CD-ROM into your
CD-ROM drive.
Note
(Windows
®
users)
If the screen does not appear
automatically, go to
My Computer (Computer), double-click
the CD-ROM icon, and then double-click
index.html.
b (Macintosh users)
Double-click the CD-ROM icon, and
then double-click index.html.
General information 1
Bold Bold typeface identifies specific
buttons on the machine’s
control panel, or on the
computer screen.
Italics Italicized typeface emphasizes
an important point or refers you
to a related topic.
Courier
New
Text in the Courier New font
identifies messages on the
LCD of the machine.
WARNING
WARNING indicates a potentially
hazardous situation which, if not avoided,
could result in death or serious injuries.
CAUTION
CAUTION indicates a potentially hazardous
situation which, if not avoided, may result in
minor or moderate injuries.
IMPORTANT
IMPORTANT indicates a potentially
hazardous situation which may result in
property-damage-only accidents or loss of
product functionality.
Notes tell you how you should
respond to a situation that may arise
or give tips about how the operation
works with other features.
Electrical Hazard icons alert you to
possible electrical shock.
Chapter 1
2
c Click your country.
d
Point to your language, point to
View Guide
,
and then click the guide you want to read.
Note
(Windows
®
users only)
Your web browser may display a yellow bar
at the top of the page that contains a security
warning about Active X controls. For the
page to display correctly you must click on
the bar, click
Allow Blocked Content
, then
click
Yes
in the Security Warning dialog box.
(Windows
®
users only)
1
For faster access, you can copy all user
documentation in PDF format to a local
folder on your computer. Point to your
language, then click Copy to local disk.
1
Microsoft
®
Internet Explorer
®
6.0 or greater.
How to find Scanning instructions 1
There are several ways you can scan
documents. You can find the instructions as
follows:
Software User’s Guide
Scanning
ControlCenter
Network Scanning
ScanSoft™ PaperPort™11SE with OCR
How-to-Guides (DCP-J715W only)
The complete ScanSoft™
PaperPort™11SE with OCR
How-to-Guides can be viewed from the
Help selection in the ScanSoft™
PaperPort™11SE application.
Presto! PageManager User’s Guide
(DCP-J715W only)
Note
Presto! PageManager must be
downloaded and installed before use. See
Accessing Brother Support (Macintosh)
on page 3 for further instructions.
The complete Presto! PageManager
User's Guide can be viewed from the Help
selection in the Presto! PageManager
application.
How to find Network setup
instructions
1
Your machine can be connected to a wireless
or wired network. (Wired network is not
available for DCP-J515W model.) You can
find basic setup instructions in the Quick
Setup Guide. If your wireless access point or
router supports Wi-Fi Protected Setup or
AOSS™, follow the steps in the Quick Setup
Guide. For more information about network
setup please see the Network User’s Guide
on the Documentation CD-ROM.
General information
3
1
Accessing Brother
Support
(Windows
®
) 1
You can find all the contacts you will need,
such as Web support (Brother Solutions
Center) on the Installation CD-ROM.
Click Brother Support on the Top Menu.
The following screen will appear:
To access our website
(http://www.brother.com
), click
Brother Home Page.
For the latest news and product support
information
(http://solutions.brother.com/
), click
Brother Solutions Center.
To visit our website for original Brother
Supplies
(http://www.brother.com/original/
), click
Supplies Information.
To access the Brother CreativeCenter
(http://www.brother.com/creativecenter/
)
for FREE photo projects and printable
downloads, click
Brother CreativeCenter.
To return to the Top Menu, click Back or
if you have finished, click Exit.
Accessing Brother
Support
(Macintosh)
1
You can find all the contacts you will need,
such as Web support (Brother Solutions
Center) on the Installation CD-ROM.
Double-click the Brother Support icon.
The following screen will appear:
(DCP-J715W only)
To download and install Presto!
PageManager, click
Presto! PageManager.
To register your machine from the Brother
Product Register Page
(http://www.brother.com/registration/
),
click On-Line Registration.
For the latest news and product support
information
(http://solutions.brother.com/
), click
Brother Solutions Center.
To visit our website for original Brother
Supplies
(http://www.brother.com/original/
), click
Supplies Information.
Chapter 1
4
Control panel overview 1
The DCP-J515W and DCP-J715W have the same control panel keys.
1 LCD (Liquid Crystal Display)
Displays messages on the screen to help you
set up and use your machine.
Also, you can adjust the angle of the LCD
screen by lifting it.
2 Number of Copies
Use this key to make multiple copies.
3 Menu keys:
d or c
Press to scroll backward or forward to a
menu selection.
Also, press to choose options.
a or b
Press to scroll through the menus and
options.
Clear
Press to go back to the previous menu
level.
Menu
Lets you access the main menu to program
the machine.
OK
Lets you confirm a selection.
4 Start keys:
Mono Start
Lets you start making copies in
monochrome. Also lets you start a
scanning operation (in colour or mono,
depending on the scanning setting in the
ControlCenter software).
Colour Start
Lets you start making copies in full colour.
Also lets you start a scanning operation (in
colour or mono, depending on the scanning
setting in the ControlCenter software).
5 Stop/Exit
Stops an operation or exits from a menu.
6On/Off
You can turn the machine on and off.
If you turn the machine off, it will still
periodically clean the print head to maintain
print quality. To prolong print head life, provide
the best ink cartridge economy, and maintain
print quality, you should keep your machine
connected to the power at all times.
0101
COPY
COPY
Mem.
Quality Normal
Ratio:
Enlarge/Reduce 100%
134
56
2
87
General information
5
1
7 Mode keys:
SCAN
Lets you access Scan mode.
PHOTO CAPTURE
Lets you access PhotoCapture Center™
mode.
8 Warning LED
Turns orange and blinks when the LCD
displays an error or an important status
message.
Note
Most of the illustrations in this User’s Guide
show the DCP-J515W.
LCD display indications 1
The LCD display shows the mode the
machine is in, the current settings, and the
available ink volume.
1 Ink indicator
Lets you see the available ink volume.
2 Memory Status
Lets you see the available memory in the
machine.
3 Wireless Status
A four level indicator shows the current
wireless signal strength if you are using a
wireless connection.
The warning icon appears when there is
an error or a maintenance message. For
details, see Error and Maintenance
messages on page 39.
0Max
0101
COPY
COPY
Mem.
Quality Normal
Ratio:
Enlarge/Reduce 100%
321
Chapter 1
6
Basic Operations 1
The following steps show how to change a
setting in the machine. In this example the
Paper Type setting is changed from
Plain Paper to Inkjet Paper.
a Press Menu.
b Press a or b to choose
General Setup.
Press OK.
c Press a or b to choose Paper Type .
d Press d or c to choose Inkjet Paper.
Press OK.
You can see the current setting on the
LCD:
e Press Stop/Exit.
Warning LED indications 1
The Warning LED (light emitting diode) is a
light that shows the status of the machine, as
shown in the table.
MENU
MENU
Ink Management
OK
OK
General Setup
Network
Print Reports
Select & Press
General Setup
General Setup
Paper Type Inkjet Paper
Paper Size A4
Select & Press
LCD Settings
5MinsSleep Mode
OK
LED DCP status Description
Off
Ready The DCP is ready for
use.
Orange
Cover open The cover is open. Close
the cover. (See Error
and Maintenance
messages on page 39.)
Cannot Print Replace the ink cartridge
with a new one. (See
Replacing the ink
cartridges on page 33.)
Paper error Put paper in the tray or
clear the paper jam.
Check the LCD
message. (See Error
and Maintenance
messages on page 39.)
Other
messages
Check the LCD
message. (See Error
and Maintenance
messages on page 39.)
General information
7
1
LCD display 1
Setting the backlight
brightness 1
If you are having difficulty reading the LCD,
try changing the brightness setting.
a Press Menu.
b Press a or b to choose
General Setup .
Press OK.
c Press a or b to choose LCD Settings.
Press OK.
d Press a or b to choose Backlight.
e Press d or c to choose Light, Med or
Dark.
Press OK.
f Press Stop/Exit.
8
2
Loading paper and
other print media
2
Note
To print on Photo (10 15 cm) or Photo L
(89 127 mm) paper, you must use the
photo paper tray. (See Loading photo
paper on page 12.)
a If the paper support flap is open, close it,
and then close the paper support. Pull
the paper tray completely out of the
machine.
b Lift the output paper tray cover (1).
c With both hands, gently press and slide
the paper side guides (1) and then the
paper length guide (2) to fit the paper
size.
Make sure that the triangular marks (3)
on the paper side guides (1) and paper
length guide (2) line up with the marks
for the paper size you are using.
Loading paper 2
1
2
3
3
1
Loading paper
9
2
Note
When you use Legal size paper, press
and hold the universal guide release
button (1) as you slide out the front of the
paper tray.
d Fan the stack of paper well to avoid
paper jams and misfeeds.
IMPORTANT
Always make sure that the paper is not
curled.
e Gently put the paper into the paper tray
print side down and top edge in first.
Check that the paper is flat in the tray.
IMPORTANT
Be careful that you do not push the paper
in too far; it may lift at the back of the tray
and cause feed problems.
f Gently adjust the paper side guides (1)
to fit the paper with both hands.
Make sure the paper side guides touch
the sides of the paper.
1
1
Chapter 2
10
g Close the output paper tray cover.
h Slowly push the paper tray completely
into the machine.
i While holding the paper tray in place,
pull out the paper support ( ) until it
clicks, and then unfold the paper
support flap ( ).
IMPORTANT
DO NOT use the paper support flap for
Legal size paper.
Loading envelopes and
postcards 2
About envelopes 2
Use envelopes that weigh between 80 to
95 g/m
2
.
Some envelopes need margin settings to
be set in the application. Make sure you
do a test print first before printing many
envelopes.
IMPORTANT
DO NOT use any of the following types of
envelopes, as they will cause paper feed
problems:
That are of a baggy construction.
That are embossed (have raised
writing on them).
That have clasps or staples.
That are pre-printed on the inside.
Occasionally you may experience paper
feed problems caused by the thickness,
size and flap shape of the envelopes you
are using.
1
2
Glue 2
Double flap 2
Loading paper
11
2
How to load envelopes and postcards2
a Before loading, press the corners and
sides of envelopes or postcards to make
them as flat as possible.
IMPORTANT
If envelopes or postcards are
“double-feeding”, put one envelope or
postcard in the paper tray at a time.
b Put envelopes or postcards in the paper
tray with the address side down and the
leading edge (top of the envelopes) in
first. With both hands, gently press and
slide the paper side guides (1) and
paper length guide (2) to fit the size of
the envelopes or postcards.
2
1
Chapter 2
12
If you have problems printing on
envelopes with the flap on the short
edge, try the following suggestions:
2
a Open the envelope flap.
b Put the envelope into the paper tray with
the address side down and the flap
positioned as shown in the illustration.
c Adjust the size and margin in your
application.
Loading photo paper 2
Use the photo paper tray which has been
assembled on the top of the output paper tray
cover to print on Photo (10 15 cm) and
Photo L (89 127 mm) size paper. When you
use the photo paper tray, you do not have to
take out the paper that is in the tray beneath it.
a Squeeze the blue photo paper tray
release button (1) using your right index
finger and thumb and push the photo
paper tray forward until it clicks into the
photo printing position (2).
Photo Paper Tray
2
1
Loading paper
13
2
b Press and slide the paper side
guides (1) and paper length guide (2) to
fit the paper size.
c Put the photo paper into the photo paper
tray and gently adjust the paper side
guides to the paper.
Make sure the paper side guides touch
the sides of the paper. Check that the
paper is flat in the tray.
Note
Be careful that you do not push the paper
in too far; it may lift at the back of the tray
and cause feed problems.
Always make sure that the paper is not
curled or wrinkled.
d When you have finished printing photos
return the photo paper tray to the
Normal printing position.
Squeeze the blue photo paper tray
release button (1) using your right index
finger and thumb and pull the photo
paper tray back until it clicks (2).
2
1
1
2
Chapter 2
14
IMPORTANT
If you do not return the photo paper tray to
the Normal printing position after printing
photos, you will get a No Paper Fed
error when you use standard paper.
Photo paper tray in the normal printing
position
Photo paper tray in the photo printing
position
Removing small printouts
from the machine 2
When the machine ejects small paper onto
the output paper tray cover you may not be
able to reach it. Make sure printing has
finished, and then pull the tray completely out
of the machine.
Loading paper
15
2
Printable area 2
The printable area depends on the settings in the application you are using. The figures below
show the unprintable areas on cut sheet paper and envelopes. The machine can print in the
shaded areas of cut sheet paper when the Borderless print feature is available and turned on.
(See Printing for Windows
®
or Printing and Faxing for Macintosh in the Software User's Guide.)
Note
The Borderless feature is not available for envelopes.
Cut Sheet Paper Envelopes
Top (1) Bottom (2) Left (3) Right (4)
Cut Sheet 3mm 3mm 3mm 3mm
Envelopes 12 mm 24 mm 3 mm 3 mm
3
4
1
2
Chapter 2
16
Paper settings 2
Paper Type 2
To get the best print quality, set the machine
for the type of paper you are using.
a Press Menu.
b Press a or b to choose
General Setup.
Press OK.
c Press a or b to choose Paper Type .
d Press d or c to choose Plain Paper ,
Inkjet Paper, Brother BP71,
Brother BP61, Other Glossy or
Transparency.
Press OK.
e Press Stop/Exit.
Note
The machine ejects paper with printed
surfaces face up onto the paper tray in
front of the machine. When you use
transparencies or glossy paper, remove
each sheet at once to prevent smudging
or paper jams.
Paper Size 2
You can use five sizes of paper for printing
copies: A4, A5, Letter, Legal and 10 15 cm.
When you load a different size of paper in the
machine, you will need to change the paper
size setting at the same time.
a Press Menu.
b Press a or b to choose
General Setup .
Press OK.
c Press a or b to choose Paper Size.
d Press d or c to choose A4, A5,
10x15cm, Letter or Legal.
Press OK.
e Press Stop/Exit.
Loading paper
17
2
Acceptable paper and
other print media
2
The print quality can be affected by the type
of paper you use in the machine.
To get the best print quality for the settings
you have chosen, always set the Paper Type
to match the type of paper you load.
You can use plain paper, inkjet paper (coated
paper), glossy paper, transparencies and
envelopes.
We recommend testing various paper types
before buying large quantities.
For best results, use Brother paper.
When you print on inkjet paper (coated
paper), transparencies and glossy paper,
be sure to choose the correct print media
in the “Basic” tab of the printer driver or in
the Paper Type setting of the menu. (See
Paper Type on page 24.)
When you print on Brother photo paper,
load one extra sheet of the same photo
paper in the paper tray. An extra sheet has
been included in the paper package for
this purpose.
When you use transparencies or photo
paper, remove each sheet at once to
prevent smudging or paper jams.
Avoid touching the printed surface of the
paper immediately after printing; the
surface may not be completely dry and
may stain your fingers.
Recommended print media 2
To get the best print quality, we suggest using
Brother paper. (See the table below.)
If Brother paper is not available in your
country, we recommend testing various
papers before purchasing large quantities.
We recommend using “3M Transparency
Film” when you print on transparencies.
Brother paper
Paper Type Item
A4 Plain BP60PA
A4 Glossy Photo BP71GA4
A4 Inkjet (Matte) BP60MA
10 15 cm Glossy BP71GP
Chapter 2
18
Handling and using print
media 2
Store paper in its original packaging, and
keep it sealed. Keep the paper flat and
away from moisture, direct sunlight and
heat.
Avoid touching the shiny (coated) side of
photo paper. Load photo paper with the
shiny side facing down.
Avoid touching either side of
transparencies because they absorb
water and perspiration easily, and this
may cause decreased output quality.
Transparencies designed for laser
printers/copiers may stain your next
document. Use only transparencies
recommended for inkjet printing.
IMPORTANT
DO NOT use the following kinds of paper:
Damaged, curled, wrinkled, or
irregularly shaped paper
1 2 mm or greater curl may cause jams
to occur.
Extremely shiny or highly textured
paper
Paper that cannot be arranged
uniformly when stacked
Paper made with a short grain
Paper capacity of the output paper
tray cover
2
Up to 50 sheets of 80 g/m
2
A4 paper.
Transparencies and photo paper must be
picked up from the output paper tray cover
one page at a time to avoid smudging.
1
1
Loading paper
19
2
Choosing the right print media 2
Paper type and size for each operation 2
Paper Type Paper Size Usage
Copy Photo
Capture
Printer
Cut Sheet A4 210 297 mm (8.3 11.7 in.) Yes Yes Yes
Letter 215.9 279.4 mm (8 1/2 11 in.) Yes Yes Yes
Legal 215.9 355.6 mm (8 1/2 14 in.) Yes Yes
Executive 184 267 mm (7 1/4 10 1/2 in.) Yes
JIS B5 182 257 mm (7.2 10.1 in.) Yes
A5 148 210 mm (5.8 8.3 in.) Yes Yes
A6 105 148 mm (4.1 5.8 in.) Yes
Cards Photo 10 15 cm (4 6 in.) Yes Yes Yes
Photo L 89 127 mm (3 1/2 5 in.) Yes
Photo 2L 13 18 cm (5 7 in.) Yes Yes
Index Card 127 203 mm (5 8 in.) Yes
Postcard 1 100 148 mm (3.9 5.8 in.) Yes
Postcard 2
(Double)
148 200 mm (5.8 7.9 in.) Yes
Envelopes C5
Envelope
162 229 mm (6.4 9 in.) Yes
DL
Envelope
110 220 mm (4.3 8.7 in.) Yes
COM-10 105 241 mm (4 1/8 9 1/2 in.) Yes
Monarch 98 191 mm (3 7/8 7 1/2 in.) Yes
JE4
Envelope
105 235 mm (4.1 9.3 in.) Yes
Transparencies A4 210 297 mm (8.3 11
.7 in.) Yes Yes
Letter 215.9 279.4 mm (8 1/2 11 in.) Yes Yes
Legal 215.9 355.6 mm (8 1/2 14 in.) Yes Yes
A5 148 210 mm (5.8 8.3 in.) Yes Yes
Chapter 2
20
Paper weight, thickness and capacity 2
1
Up to 100 sheets of 80 g/m
2
paper.
2
For Photo 10 15 cm paper and Photo L 89 127 mm paper, use the photo paper tray. (See Loading photo paper
on page 12.)
3
BP71 260 g/m
2
paper is especially designed for Brother inkjet machines.
Paper Type Weight Thickness No. of
sheets
Cut
Sheet
Plain Paper
64 to 120 g/m
2
0.08 to 0.15 mm
100
1
Inkjet Paper
64 to 200 g/m
2
0.08 to 0.25 mm 20
Glossy Paper
Up to 220 g/m
2
Up to 0.25 mm
20
23
Cards Photo Card
Up to 220 g/m
2
Up to 0.25 mm
20
23
Index Card
Up to 120 g/m
2
Up to 0.15 mm 30
Postcard
Up to 200 g/m
2
Up to 0.25 mm 30
Envelopes
75 to 95 g/m
2
Up to 0.52 mm 10
Transparencies 10
21
3
3
How to load
documents
3
You can make copies and scan from the ADF
(automatic document feeder) and from the
scanner glass.
Using the ADF
(DCP-J715W only) 3
The ADF can hold up to 15 pages and feeds
each sheet individually. Use standard
80 g/m
2
paper and always fan the pages
before putting them in the ADF.
Document Sizes Supported 3
How to load documents 3
IMPORTANT
DO NOT pull on the document while it is
feeding.
DO NOT use paper that is curled,
wrinkled, folded, ripped, stapled, paper
clipped, pasted or taped.
DO NOT use cardboard, newspaper or
fabric.
Make sure documents written with ink are
completely dry.
a Unfold the ADF Document Output
Support Flap (1).
b Fan the pages well.
c Adjust the paper guides (2) to fit the
width of your document.
d Make sure you place your documents,
face down, top edge first in the ADF
underneath the guides until you feel
them touch the feed roller and the LCD
shows ADF Ready.
IMPORTANT
DO NOT leave thick documents on the
scanner glass. If you do this, the ADF may
jam.
Using the scanner glass 3
You can use the scanner glass to copy or
scan pages of a book or one page at a time.
Document Sizes Supported 3
Loading documents 3
Paper:
80 g/m
2
A4
Length: 148 to 355.6 mm
Width: 148 to 215.9 mm
Weight:
64 to 90 g/m
2
Length: Up to 297 mm
Width: Up to 215.9 mm
Weight: Up to 2 kg
2
1
Chapter 3
22
How to load documents 3
Note
To use the scanner glass, the ADF must
be empty. (DCP-J715W only)
a Lift the document cover.
b Using the document guidelines on the
left and top, place the document face
down in the upper left corner of the
scanner glass.
c Close the document cover.
IMPORTANT
If you are scanning a book or thick
document, DO NOT slam the cover down
or press on it.
Scannable area 3
The scannable area depends on the settings
in the application you are using. The figures
below show unscannable areas.
Usage Document
Size
Top (1)
Bottom (2)
Left (3)
Right (4)
Copy A4 3 mm 3 mm
Letter 3 mm 3 mm
Scan A4 3 mm 3 mm
Letter 3 mm 3 mm
23
4
4
How to copy 4
The following steps show the basic copy
operation. For details about each option, see
the Advanced User’s Guide.
a Do one of the following to load your
document:
Place the document face down in the
ADF. (DCP-J715W only)
(See Using the ADF (DCP-J715W
only) on page 21.)
Load your document face down on
the scanner glass.
(See Using the scanner glass
on page 21.)
b Press + or - repeatedly until the number
of copies you want appears (up to 99).
1 No. of Copies
c Press Mono Start or Colour Start.
Note
If you want to sort copies, use the ADF.
(DCP-J715W only)
Stop copying 4
To stop copying, press Stop/Exit.
Copy settings 4
You can change the following copy settings.
Press a or b to scroll through the copy
settings. When the setting you want is
highlighted, press OK.
(Basic User’s Guide)
For details about changing the following copy
settings, see page 24.
Paper Type
Paper Size
(Advanced User’s Guide)
For details about changing the following copy
settings, see chapter 3:
Quality
Enlarge/Reduce
Density
Ink Save Mode
Stack/Sort (DCP-J715W only)
Page Layout
Book Copy
Watermark Copy
Set New Default
Factory Reset
Making copies 4
1
0101
COPY
COPY
Quality Normal
Ratio:
Copy Press Start
Enlarge/Reduce 100%
Chapter 4
24
Paper options 4
Paper Type 4
If you are copying on special paper, set the
machine for the type of paper you are using to
get the best print quality.
a Load your document.
b Enter the number of copies you want.
c Press a or b to choose Paper Type .
d Press d or c to choose Plain Paper ,
Inkjet Paper, Brother BP71,
Brother BP61, Other Glossy or
Transparency.
Press OK.
e If you do not want to change additional
settings, press Mono Start or
Colour Start.
Paper Size 4
If you are copying on paper other than A4
size, you will need to change the paper size
setting.
You can copy only on A4, Legal, Letter, A5 or
Photo 10 15 cm paper.
a Load your document.
b Enter the number of copies you want.
c Press a or b to choose Paper Size .
d Press d or c to choose A4, A5,
10x15cm, Letter or Legal.
Press OK.
e If you do not want to change additional
settings, press Mono Start or
Colour Start.
25
5
5
PhotoCapture Center™
Operations
5
Note
USB Flash memory is not available for
DCP-J515W model.
Even if your machine is not connected to your
computer, you can print photos directly from
digital camera media or a USB Flash memory
drive. (See Print Images on page 28.)
You can scan documents and save them
directly to a memory card or USB Flash
memory drive. (See How to scan to a memory
card or USB Flash memory drive
on page 29.)
You can access a memory card or USB Flash
memory drive that is inserted in the front of
the machine from your computer.
(See PhotoCapture Center™ for Windows
®
or Remote Setup & PhotoCapture Center
for Macintosh in the Software User's Guide.)
Using a memory card or USB
Flash memory drive 5
Your Brother machine has media drives
(slots) for use with the following popular
digital camera media: Memory Stick™,
Memory Stick PRO™, Memory Stick Duo™,
Memory Stick PRO Duo™, SD, SDHC and
USB Flash memory drives.
The PhotoCapture Center™ feature lets you
print digital photos from your digital camera at
high resolution to get photo quality printing.
Printing photos from a memory
card or USB Flash memory drive
5
Chapter 5
26
Getting started 5
Firmly put a memory card or USB Flash memory drive into the correct slot.
IMPORTANT
DO NOT insert a Memory Stick Duo™ into the lower SD slot, this may cause damage to the
machine.
1 USB Flash memory drive (DCP-J715W only)
IMPORTANT
The USB direct interface supports only a USB Flash
memory drive, a PictBridge compatible camera, or a
digital camera that uses the USB mass storage standard.
Any other USB devices are not supported.
2 Memory card slot
Slot Compatible memory cards
Upper slot
Memory Stick™
Memory Stick PRO™
Memory Stick Duo™
Memory Stick PRO Duo™
Memory Stick Micro™
(Adapter required)
Lower slot
SD
SDHC
mini SD (Adapter required)
micro SD (Adapter required)
1
2
Printing photos from a memory card or USB Flash memory drive
27
5
PHOTO CAPTURE key indications:
PHOTO CAPTURE light is on, the memory card or USB Flash memory drive is correctly
inserted.
PHOTO CAPTURE light is off, the memory card or USB Flash memory drive is not correctly
inserted.
PHOTO CAPTURE light is blinking, the memory card or USB Flash memory drive is being read
or written to.
IMPORTANT
DO NOT unplug the power cord or remove the memory card or USB Flash memory drive from
the media drive (slot) or USB direct interface while the machine is reading or writing to the
memory card or USB Flash memory drive (the PHOTO CAPTURE key is blinking). You will
lose your data or damage the card.
The machine can only read one device at a time.
Chapter 5
28
Print Images 5
View Photos 5
You can preview your photos on the LCD
before you print them. If your photos are large
files there may be a delay before each photo
is displayed on the LCD.
a Make sure you have put the memory
card or USB Flash memory drive in the
correct slot.
Press (PHOTO CAPTURE).
b Press a or b to choose
View Photo(s).
Press OK.
c Press d or c to choose your photo.
d Press + or - repeatedly to enter the
number of copies you want.
e Repeat steps c and d until you have
chosen all the photos.
Note
Press Clear to go back to the previous
level.
f After you have chosen all the photos, do
one of the following:
Press OK and change the print
settings. (See PhotoCapture
Center™ print settings on page 28.)
If you do not want to change any
settings, press Colour Start to print.
PhotoCapture Center™
print settings
5
You can change the print settings temporarily
for the next print.
The machine returns to its default settings
after 3 minutes.
Note
You can save the print settings you use
most often by setting them as the default.
(See Setting your changes as a new
default in chapter 4 in the Advanced
User’s Guide.)
1 No. of prints
(For View Photo(s), Search by Date, Slide
Show)
You can see the total number of photos that will
be printed.
(For Print All Photos, Print Photos, Enhance
Photos, Trimming)
You can see the number of copies of each
photo that will be printed.
(For DPOF printing)
This does not appear.
0001
Print Press Start
Print Quality Photo
Paper Type Other Glossy
10x15cmPaper Size
Print Setting
Print Setting
1
Printing photos from a memory card or USB Flash memory drive
29
5
How to scan to a
memory card or USB
Flash memory drive
5
You can scan monochrome and colour
documents into a memory card or USB Flash
memory drive. Monochrome documents will
be stored in PDF (*.PDF) or TIFF (*.TIF) file
formats. Colour documents may be stored in
PDF (*.PDF) or JPEG (*.JPG) file formats.
The factory setting is Color 150 and the
default file format is PDF. The machine
automatically creates file names based on
the current date. (For details, see the Quick
Setup Guide.) For example, the fifth image
scanned on July 1, 2010 would be named
01071005.PDF. You can change the colour
and quality.
a Make sure you have put the memory
card or USB Flash memory drive in the
correct slot.
IMPORTANT
DO NOT take out the memory card or
USB Flash memory drive while
PHOTO CAPTURE is blinking to avoid
damaging the card, USB Flash memory
drive or data stored on it.
b Load your document.
c When you want to scan to a memory
card or USB Flash memory drive, press
(SCAN).
d Press a or b to choose
Scan to Media.
Press OK.
e Do one of the following:
To change the quality, press a or b to
choose Quality. Go to step f.
Press Mono Start or Colour Start to
start scanning without changing
additional settings.
f Press d or c to choose
Color 150, Color 300, Color 600,
B/W 200x100 or B/W 200.
Press OK.
g Do one of the following:
To change the file type, go to step h.
Press Mono Start or Colour Start to
start scanning without changing
additional settings.
h Press a or b to choose File Type.
Press d or c to choose JPEG, PDF or
TIFF.
Press OK.
Note
If you chose a Color resolution in step f,
you cannot choose TIFF.
If you chose a B/W resolution in step f,
you cannot choose JPEG.
i Do one of the following:
To change the file name, go to
step j.
Press Mono Start or Colour Start to
start scanning without changing
additional settings.
Quality Selectable File
Format
Color 150 JPEG / PDF
Color 300 JPEG / PDF
Color 600 JPEG / PDF
B/W 200x100 TIFF / PDF
B/W 200 TIFF / PDF
SCAN
SCAN
Select & Press
Scan to File
Scan to Media
Scan to E-mail
Scan to OCR
OK
OK
Scan a document
directly to a media
card or
USB flash
memory.
Chapter 5
30
j The file name is set automatically;
however, you can set a name of your
choice using the a, b, d or c keys.
Press a or b to choose File Name.
Press OK.
Enter the new name. (See Entering Text
on page 68.)
You can only change the first
6 characters.
Press a, b, d or c to select , and
press OK.
k Press Mono Start or Colour Start.
Note
You can place multiple documents on the
scanner glass and scan them as separate
files. (See Auto Crop in chapter 4 in the
Advanced User’s Guide.)
OK
OK
31
6
6
Printing a document 6
The machine can receive data from your
computer and print it. To print from a
computer, install the printer driver.
(See Printing for Windows
®
or Printing and
Faxing for Macintosh in the Software User’s
Guide for the details about the print settings.)
a Install the Brother printer driver on the
Installation CD-ROM. (See the Quick
Setup Guide.)
b From your application, choose the Print
command.
c Choose the name of your machine in the
Print dialog box and click Properties.
d Choose the settings you want in the
Properties dialog box.
Media Type/Quality
Paper Size
Page Layout
Colour Settings
Scaling
Use Watermark
Print Date & Time
e Click OK.
f Click OK to begin printing.
How to print from a computer 6
32
7
Scanning a document 7
There are several ways to scan documents.
You can use the SCAN key on the machine or
the scanner drivers on your computer.
a To use the machine as a scanner, install
a scanner driver. If the machine is on a
Network, configure it with a TCP/IP
address.
Install the scanner drivers on the
Installation CD-ROM. (See the Quick
Setup Guide and Scanning in the
Software User’s Guide.)
Configure the machine with a TCP/IP
address if network scanning does not
work. (See Configuring Network
Scanning in the Software User’s
Guide.)
b Load your document. (See Loading
documents on page 21.)
Use the ADF to scan multiple pages
of documents. It feeds each sheet
automatically. (DCP-J715W only)
Use the scanner glass to scan a
page of a book or one sheet at a
time.
c Do one of the following:
To scan using the SCAN key, go to
Scanning using the scan key.
To scan using a scanner driver at
your computer, go to Scanning using
a scanner driver.
Scanning using the
scan key
7
For more information, see Using the Scan
key in the Software User’s Guide.
a Press the SCAN key.
b Choose the scan mode you want.
Scan to File
Scan to Media
Scan to E-mail
Scan to OCR
1
Scan to Image
1
DCP-J715W only
(Macintosh users)
Presto! PageManager must be downloaded
and installed before use. See Accessing
Brother Support (Macintosh) on page 3 for
further instructions.
c (For network users)
Choose the computer you want to send
the data to.
d Press Start to begin scanning.
Scanning using a
scanner driver
7
For more information, see Scanning a
document using the TWAIN driver or
Scanning a document using the WIA driver in
the Software User’s Guide.
a Start a scanning application and click
the Scan button.
b Adjust the settings such as Resolution,
Brightness and Scan Type in the
Scanner Setup dialog box.
c Click Start or Scan to begin scanning.
How to scan to a computer 7
33
A
A
Replacing the ink
cartridges
A
Your machine is equipped with an ink dot
counter. The ink dot counter automatically
monitors the level of ink in each of the 4
cartridges. When the machine detects an ink
cartridge is running out of ink, the machine
will tell you with a message on the LCD.
The LCD will tell you which ink cartridge is low
or needs replacing. Be sure to follow the LCD
prompts to replace the ink cartridges in the
correct order.
Even though the machine tells you to replace
an ink cartridge, there will be a small amount
of ink left in the ink cartridge. It is necessary
to keep some ink in the ink cartridge to
prevent air from drying out and damaging the
print head assembly.
IMPORTANT
Brother multifunction machines are
designed to work with ink of a particular
specification and will work to a level of
optimum performance and reliability when
used with genuine Brother Original ink
cartridges. Brother cannot guarantee this
optimum performance and reliability if ink
or ink cartridges of other specifications are
used. Brother does not therefore
recommend the use of cartridges other
than genuine Brother Original cartridges
or the refilling of used cartridges with ink
from other sources. If damage is caused
to the print head or other parts of this
machine as a result of using incompatible
products with this machine, any repairs
required as a result may not be covered by
the warranty.
a Open the ink cartridge cover.
If one or more ink cartridges have
reached the end of their life, the LCD
shows B&W Print Only or
Cannot Print.
b Press the lock release lever as shown to
release the cartridge indicated on the
LCD. Remove the cartridge from the
machine.
c Open the new ink cartridge bag for the
colour shown on the LCD, and then take
out the ink cartridge.
Routine maintenance A
34
d Turn the green knob on the protective
yellow cap clockwise until it clicks to
release the vacuum seal, then remove
the cap (1).
e Each colour has its own correct position.
Insert the ink cartridge in the direction of
the arrow on the label.
f Gently push the ink cartridge in until it
clicks, and then close the ink cartridge
cover.
g The machine will automatically reset the
ink dot counter.
Note
If you replaced an ink cartridge, for
example Black, the LCD may ask you to
verify that it was a brand new one (for
example, Did You Change Black).
For each new cartridge you installed,
press + (Yes) to automatically reset the
ink dot counter for that colour. If the ink
cartridge you installed is not a brand new
one, be sure to press - (No).
If the LCD shows No Ink Cartridge or
Cannot Detect after you install the ink
cartridges, check that the ink cartridges
are installed correctly.
CAUTION
If ink gets in your eyes, wash it out with
water at once and call a doctor if you are
concerned.
1
Routine maintenance
35
A
IMPORTANT
DO NOT take out ink cartridges if you do
not need to replace them. If you do so, it
may reduce the ink quantity and the
machine will not know the quantity of ink
left in the cartridge.
DO NOT touch the cartridge insertion
slots. If you do so, the ink may stain your
skin.
If ink gets on your skin or clothing
immediately wash it off with soap or
detergent.
If you mix the colours by installing an ink
cartridge in the wrong position, clean the
print head several times after correcting
the cartridge installation.
Once you open an ink cartridge, install it in
the machine and use it up within six
months of installation. Use unopened ink
cartridges by the expiration date written on
the cartridge package.
DO NOT dismantle or tamper with the ink
cartridge, this can cause the ink to leak out
of the cartridge.
Cleaning and checking
the machine
A
Cleaning the scanner glass A
a Lift the document cover (1). Clean the
scanner glass (2) and the white
plastic (3) with a soft lint-free cloth
moistened with a non-flammable glass
cleaner.
2
1
3
36
b (DCP-J715W only)
In the ADF unit, clean the white bar (1)
and the glass strip (2) with a lint-free
cloth moistened with a non-flammable
glass cleaner.
Note
In addition to cleaning the glass strip with
a non-flammable glass cleaner, run your
finger tip over the glass strip to see if you
can feel anything on it. If you feel dirt or
debris, clean the glass strip again
concentrating on that area. You may need
to repeat the cleaning process three or
four times. To test, make a copy after each
cleaning attempt.
Cleaning the paper pick-up
rollers A
a Pull the paper tray completely out of the
machine.
b Unplug the machine from the electrical
socket and open the Jam Clear
Cover (1) at the back of the machine.
c Clean the Paper Pick-up Rollers (1) with
isopropyl alcohol on a cotton swab.
d Close the Jam Clear Cover.
Make sure the cover is closed correctly.
e Re-connect the power cord.
f Slowly push the paper tray completely
back into the machine.
1
2
1
1
Routine maintenance
37
A
Cleaning the print head A
To maintain good print quality, the machine
will automatically clean the print head when
needed. You can start the cleaning process
manually if there is a print quality problem.
Clean the print head and ink cartridges if you
get a horizontal line in the text or graphics, or
blank text on your printed pages. You can
clean Black only, three colours at a time
(Cyan/Magenta/Yellow), or all four colours at
once.
Cleaning the print head consumes ink.
Cleaning too often uses ink unnecessarily.
IMPORTANT
DO NOT touch the print head. Touching
the print head may cause permanent
damage and may void the print head's
warranty.
a Press Menu.
b Press a or b to choose
Ink Management.
Press OK.
c Press a or b to choose Cleaning.
Press OK.
d Press a or b to choose Black, Color or
All.
Press OK.
The machine cleans the print head.
When cleaning is finished, the machine
will go back to standby mode
automatically.
Note
If you clean the print head at least five
times and the print has not improved, try
installing a new Brother Original
Innobella™ ink cartridge for each problem
colour. Try cleaning the print head again
up to five more times. If the print has not
improved call your Brother dealer.
Checking the print quality A
If faded or streaked colours and text appear
on your output, some of the nozzles may be
clogged. You can check this by printing the
Print Quality Check Sheet and looking at the
nozzle check pattern.
a Press Menu.
b Press a or b to choose
Ink Management.
Press OK.
c Press a or b to choose Test Print.
Press OK.
d Press a or b to choose
Print Quality.
Press OK.
e Press Colour Start.
The machine begins printing the Print
Quality Check Sheet.
f Check the quality of the four colour
blocks on the sheet.
g Do one of the following:
If all lines are clear and visible, press
+ to choose Yes, and go to step k.
If you can see missing short lines as
shown below, press - to choose No.
h The LCD asks you if the print quality is
OK for black and the three colours.
Press + (Yes) or - (No).
i The LCD asks you if you want to start
cleaning.
Press + (Yes).
The machine starts cleaning the print
head.
OK Poor
38
j After cleaning is finished, press
Colour Start.
The machine starts printing the Print
Quality Check Sheet again. Return to
step f.
k Press Stop/Exit.
If you repeat this procedure at least five
times and the print quality is still poor,
replace the ink cartridge for the clogged
colour.
After replacing the ink cartridge, check
the print quality. If the problem still
exists, repeat the cleaning and test print
procedures at least five times for the
new ink cartridge. If ink is still missing,
call your Brother dealer.
IMPORTANT
DO NOT touch the print head. Touching
the print head may cause permanent
damage and may void the print head's
warranty.
Note
Checking the print alignment A
You may need to adjust the print alignment
after transporting the machine, if your printed
text becomes blurred or images become
faded.
a Press Menu.
b Press a or b to choose
Ink Management.
Press OK.
c Press a or b to choose Test Print.
Press OK.
d Press a or b to choose Alignment.
Press OK.
e Press Mono Start or Colour Start.
The machine starts printing the
Alignment Check Sheet.
f Check the 600 dpi and 1200 dpi test
prints to see if number 5 most closely
matches number 0.
If the number 5 samples of both the
600 dpi and 1200 dpi test prints are
the best matches, press + (Yes) to
finish Alignment Check, and go to
step i.
If another test print number is a
better match for either 600 dpi or
1200 dpi, press - (No) to choose it.
g For 600 dpi, press d or c to choose the
number of the test print that most closely
matches the number 0 sample (1-8).
Press OK.
h For 1200 dpi, press d or c to choose the
number of the test print that most closely
matches the number 0 sample (1-8).
Press OK.
i Press Stop/Exit.
i
When a print head
nozzle is clogged
the printed
sample looks like
this.
After the print
head nozzle is
cleaned, the
horizontal lines
are gone.
39
B
B
Error and Maintenance messages B
As with any sophisticated office product, errors may occur and consumable items may need to be
replaced. If this happens, your machine identifies the error and shows an error message. The
most common error and maintenance messages are shown below.
You can correct most errors and routine maintenance by yourself. If you need more help, the
Brother Solutions Center offers the latest FAQs and troubleshooting tips.
Visit us at http://solutions.brother.com/
Troubleshooting B
Error Message Cause Action
B&W Print On ly
Replace Ink
One or more of the colour ink
cartridges have reached the end
of their life.
You can use the machine in
black & white mode for
approximately four weeks
depending on the number of
pages you print.
While this message appears on
the LCD, each operation works in
the following way:
Printing
If you click Greyscale in the
Advanced tab of the printer
driver you can use the
machine as a monochrome
printer.
Copying
If the paper type is set to
Plain Pap er or
Inkjet Pa per you can
make copies in monochrome.
If the paper type is set to
Other Glossy,
Brother BP71 or
Brother BP61 the machine will
stop all print operations. If you
unplug the machine, or take out
the ink cartridge, you cannot use
the machine until you change to
a new ink cartridge.
Replace the ink cartridges. (See Replacing
the ink cartridges on page 33.)
40
Cannot De tect You installed a new ink cartridge
too quickly and the machine did
not detect it.
Take out the new ink cartridge and
re-install it slowly.
If you are using non Brother
Original ink the machine may not
detect the ink cartridge.
Replace the cartridge with a Brother
Original ink cartridge. If the error message
remains, contact your Brother dealer.
An ink cartridge is not installed
correctly.
Take out the new ink cartridge and
re-install it slowly until it clicks. (See
Replacing the ink cartridges on page 33.)
Cannot Pr int
Replace I nk
One or more of the ink cartridges
have reached the end of their life.
The machine will stop all print
operations.
Replace the ink cartridges. (See Replacing
the ink cartridges on page 33.)
Cover is Open The scanner cover is not
completely closed.
Lift the scanner cover and then close it
again.
The ink cartridge cover is not
completely closed.
Firmly close the ink cartridge cover until it
clicks.
Data Rema ining Print data is left in the machine's
memory.
Press Stop/Exit. The machine will cancel
the job and clear it from the memory. Try to
print again.
Document Jam
(DCP-J715W only)
The document was not inserted
or fed correctly, or the document
scanned from the ADF was too
long.
(See Using the ADF (DCP-J715W only)
on page 21.)
(See Document jam (DCP-J715W only)
on page 43.)
High Temp erature The print head is too warm. Allow the machine to cool down.
Hub is Un usable. A Hub or USB Flash memory
drive with Hub has been
connected to the USB direct
interface.
A Hub or USB Flash memory drive with
Hub are not supported. Unplug the device
from the USB direct interface.
Image Too Long. The proportions of your photo
are irregular so effects could not
be added.
Choose a regularly proportioned image.
Image Too Small. The size of your photo is too
small to trim.
Choose a larger image.
Ink Absor ber Full
Internal servicing required.
This problem may be caused by
the use of cartridges other than
genuine Brother Original
cartridges or the refilling of empty
cartridges with ink from other
sources. If damage is caused to
the print head or other parts of this
machine as a result of using other
brands of ink or ink cartridges, any
repairs required as a result may
not be covered by the warranty.
Call Brother Customer Service / your
Brother dealer.
Error Message Cause Action
Troubleshooting
41
B
Ink Absorber NearFull
The ink absorber box or flushing
box is near full.
Call Brother Customer Service / your
Brother dealer.
Ink low One or more of the ink cartridges
are near the end of their life.
Order a new ink cartridge.
Low Temperat ure The print head is too cold. Allow the machine to warm up.
Media Error The memory card is either
corrupted, incorrectly formatted,
or there is a problem with the
memory card.
Put the card firmly into the slot again to
make sure it is in the correct position. If the
error remains, check the media drive (slot)
of the machine by putting in another
memory card that you know is working.
Media is Ful l. The memory card or USB Flash
memory drive you are using
already contains 999 files.
Your machine can only save to your
memory card or USB Flash memory drive
if it contains less than 999 files. Try
deleting unused files to free some space
and try again.
No File The memory card or USB Flash
memory drive in the media drive
does not contain a .JPG file.
Put the correct memory card or USB Flash
memory drive into the slot again.
No Ink Cartr idge
An ink cartridge is not installed
correctly.
Take out the ink cartridge and put it in
again seating it properly. (See Replacing
the ink cartridges on page 33.)
No Paper Fed The Photo Paper Tray is in the
Photo printing position.
Make sure that the Photo Paper Tray is in
the Normal printing position.
(See step d and the Important note in
Loading photo paper on page 12.)
The machine is out of paper or
paper is not correctly loaded in
the paper tray.
Do one of the following:
Refill the paper in the paper tray, and
then press Mono Start or
Colour Start.
Remove the paper and load it again
and then press Mono Start or
Colour Start. (See Loading paper and
other print media on page 8.)
The paper is jammed in the
machine.
Remove the jammed paper by following
the steps in Printer jam or paper jam
on page 44.
The Jam Clear Cover is not
closed correctly.
Check the Jam Clear Cover is closed
evenly at both ends. (See Printer jam or
paper jam on page 44.)
Error Message Cause Action
42
Out of Me mory The machine's memory is full. Copy operation in progress:
Press Stop/Exit and wait until the other
operations in progress finish and then try
again.
The memory card or USB Flash
memory drive you are using does
not have enough free space to
scan the documents.
Delete unused files from your memory card
or USB Flash memory drive to make some
free space and then try again.
Paper Jam Paper is jammed in the machine. Remove the jammed paper by following
the steps in Printer jam or paper jam
on page 44.
Make sure the paper length guide is
adjusted to the correct paper size.
Unable to Clean XX
Unable to Init. XX
Unable to Print XX
Unable to Scan XX
The machine has a mechanical
problem.
–OR–
A foreign object such as a paper
clip or ripped paper is in the
machine.
Open the scanner cover and remove any
foreign objects and paper scraps inside the
machine. If the error message continues,
disconnect the machine from the power for
several minutes, then reconnect it.
Unusable Device
Disconnect device from
front connector & turn
machine off & then on
A broken device has been
connected to the USB direct
interface.
Unplug the device from the USB direct
interface, then press On/Off to turn the
machine off and then on again.
Unusable Device
Please Di sconnect
USB Devic e.
A USB device or USB Flash
memory drive that is not
supported has been connected
to the USB direct interface.
(For more information, visit us at
http://solutions.brother.com/
)
Unplug the device from the USB direct
interface.
Wrong Pap er Size Paper is not the correct size. Check that the Paper Size setting matches
the size of paper in the tray. Load the
correct size of paper, and then press
Mono Start or Colour Start. (See Paper
Size on page 16.)
Error Message Cause Action
Troubleshooting
43
B
Error animation B
Error animations display step-by-step
instructions when paper gets jammed. You
can read the steps at your own pace by
pressing c to see the next step and d to go
backward.
Document jam
(DCP-J715W only) B
Documents can jam in the ADF unit if they are
not inserted or fed correctly, or if they are too
long. Follow the steps below to clear a
document jam.
Document is jammed in the top of the
ADF unit
B
a Take out any paper from the ADF that is
not jammed.
b Open the ADF cover.
c Pull the jammed document up and to the
left.
d Close the ADF cover.
e Press Stop/Exit.
IMPORTANT
To avoid future document jams close the
ADF cover correctly by pushing it gently in
the middle.
Document is jammed inside the ADF
unit
B
a Take out any paper from the ADF that is
not jammed.
b Lift the document cover.
c Pull the jammed document out to the
left.
d Close the document cover.
e Press Stop/Exit.
44
Printer jam or paper jam B
Take out the jammed paper depending on
where it is jammed in the machine.
a Unplug the machine from the electrical
socket.
b Open the Jam Clear Cover (1) at the
back of the machine. Pull the jammed
paper out of the machine.
c Close the Jam Clear Cover.
Make sure the cover is closed correctly.
d If the paper support flap is open, close it,
and then close the paper support. Pull
the paper tray completely out of the
machine.
e Pull out the jammed paper (1).
1
1
Troubleshooting
45
B
f Using both hands, grasp the plastic tabs
on both sides of the machine and lift the
scanner cover (1) until it locks securely
in the open position.
Move the print head (if necessary) to
take out any paper remaining in this
area. Make sure that jammed paper is
not left in the corners of the machine.
Check both ends of the print carriage.
Note
If the print head is at the right corner as
shown in the illustration, you cannot move
it. Re-connect the power cord, then hold
down Stop/Exit until the print head moves
to the middle. Unplug the machine from
the power source, and take out the paper.
IMPORTANT
If ink gets on your skin or clothing
immediately wash it off with soap or
detergent.
g Lift the scanner cover to release the
lock ( ). Gently push the scanner cover
support down ( ) and close the
scanner cover ( ) using both hands.
h Push the paper tray firmly back into the
machine.
i While holding the paper tray in place,
pull out the paper support ( ) until it
clicks, and then unfold the paper
support flap ( ).
Make sure you pull out the paper
support until it clicks.
IMPORTANT
DO NOT use the paper support flap for
Legal size paper.
j Re-connect the power cord.
1
1
2
3
1
2
46
Troubleshooting B
If you think there is a problem with your machine, check the chart below and follow the
troubleshooting tips.
Most problems can be easily resolved by yourself. If you need additional help, the Brother
Solutions Center offers the latest FAQs and troubleshooting tips.
Visit us at http://solutions.brother.com/
If you are having difficulty with your machine B
Printing
Difficulty Suggestions
No printout Check the interface cable on both the machine and your computer. (See the Quick
Setup Guide.)
Make sure the machine is plugged in and not turned off.
Check to see if the LCD is showing an error message.
(See Error and Maintenance messages on page 39.)
One or more ink cartridges have reached the end of their life. (See Replacing the
ink cartridges on page 33.)
If the LCD says Cannot Print and Replace Ink, see Replacing the ink
cartridges on page 33.
Check that the correct printer driver has been installed and chosen.
Make sure that the machine is online. Click Start and then Printers and Faxes.
Choose Brother DCP-XXXX (where XXXX is your model name), and make sure
that Use Printer Offline is unchecked.
When you choose the Print Odd Pages and Print Even Pages settings, you may
see a print error message on your computer, as the machine pauses during the
printing process. The error message will disappear after the machine re-starts
printing.
Poor print quality Use only Genuine Brother Consumables as ink from other manufactures can
cause print quality problems.
Check the print quality. (See Checking the print quality on page 37.)
Make sure that the Media Type setting in the printer driver or the Paper Type
setting in the machine’s menu matches the type of paper you are using.
(See Printing for Windows
®
or Printing and Faxing for Macintosh in the Software
User’s Guide and Paper Type on page 16.)
Make sure that your ink cartridges are fresh. The following may cause ink to clog:
The expiration date written on the cartridge package has passed.
(Brother Original cartridges stay usable for up to two years if kept in their
original packaging.)
The ink cartridge was in your machine over for six months.
The ink cartridge may not have been stored correctly before use.
Try using the recommended types of paper. (See Acceptable paper and other print
media on page 17.)
The recommended environment for your machine is between 20 C to 33 C.
Troubleshooting
47
B
White horizontal lines appear in text
or graphics.
Clean the print head. (See Cleaning the print head on page 37.)
Make sure you are using Brother Original Innobella™ ink.
Try using the correct types of paper. (See Acceptable paper and other print media
on page 17.)
If you want to print on Photo 10 15 cm or Photo L 89 127 mm paper, make
sure you use the photo paper tray. (See Loading photo paper on page 12.)
The machine prints blank pages. Clean the print head. (See Cleaning the print head on page 37.)
Characters and lines are stacked. Check the printing alignment. (See Checking the print alignment on page 38.)
Printed text or images are skewed. Make sure the paper is loaded correctly in the paper tray and the paper side
guides are adjusted correctly. (See Loading paper and other print media
on page 8.)
Make sure the Jam Clear Cover is closed correctly.
Smudged stain at the top centre of
the printed page.
Make sure the paper is not too thick or curled. (See Acceptable paper and other
print media on page 17.)
Smudged stain at the right or left
corner of the printed page.
Make sure the paper is not curled when you print on the back side of the paper
with the Print Odd Pages and Print Even Pages settings.
Printing appears dirty or ink seems
to run.
Make sure you are using the recommended types of paper. (See Acceptable
paper and other print media on page 17.) Don't handle the paper until the ink is
dry.
If you are using photo paper, make sure that you have set the correct paper type.
If you are printing a photo from your PC, set the Media Type in the Basic tab of
the printer driver.
Make sure you are using Brother Original Innobella™ ink.
Stains appear on the reverse side
or at the bottom of the page.
Make sure the printer platen is not dirty with ink. (See Cleaning the machine’s
printer platen in appendix A in the Advanced User’s Guide.)
Make sure you are using the paper support flap. (See Loading paper and other
print media on page 8.)
The machine prints dense lines on
the page.
Check Reverse Order in the Basic tab of the printer driver.
The printouts are wrinkled. In the printer driver Advanced tab, click Colour Settings, and uncheck
Bi-Directional Printing.
Make sure you are using Brother Original Innobella™ ink.
Cannot perform “Page Layout”
printing.
Check that the paper size setting in the application and in the printer driver are the
same.
Print speed is too slow. Try changing the printer driver setting. The highest resolution needs longer data
processing, sending and printing time. Try the other quality settings in the printer
driver Advanced tab. Also, click the Colour Settings, and make sure you
uncheck Colour Enhancement
.
Tu
rn the borderless feature off. Borderless printing is slower than normal printing.
(See Printing for Windows
®
or Printing and Faxing for Macintosh in the Software
User’s Guide.)
Colour Enhancement is not
working correctly.
If the image data is not full colour in your application (such as 256 colour), Colour
Enhancement will not work. Use at least 24 bit colour data with the Colour
Enhancement feature.
Printing (continued)
Difficulty Suggestions
48
Photo paper does not feed
correctly.
When you print on Brother Photo paper, load one extra sheet of the same photo
paper in the paper tray. An extra sheet has been included in the paper package
for this purpose.
Clean the paper pick-up rollers. (See Cleaning the paper pick-up rollers
on page 36.)
Machine feeds multiple pages. Make sure the paper is loaded correctly in the paper tray. (See Loading paper and
other print media on page 8.)
Check that more than two types of paper are not loaded in the paper tray at any
one time.
There is a paper jam. Make sure the paper length guide is set to the correct paper size. Do not extend
the paper tray when you load A5 or smaller size paper. (See Printer jam or paper
jam on page 44.)
Printed pages are not stacked
neatly.
Make sure you are using the paper support flap. (See Loading paper and other
print media on page 8.)
Machine does not print from
Adobe
®
Illustrator
®
.
Try to reduce the print resolution. (See Printing for Windows
®
or Printing and
Faxing for Macintosh in the Software User’s Guide.)
Copying Difficulties
Difficulty Suggestions
Vertical black lines or streaks
appear on copies.
Vertical black lines or streaks on copies are typically caused by dirt or correction
fluid on the scanner. Clean scanner glass and white plastic above it. (See
Cleaning the scanner glass on page 35.)
Poor copy results when using the
ADF. (DCP-J715W only)
Try using the scanner glass. (See Using the scanner glass on page 21.)
Vertical black lines or streaks
appear in copies. (DCP-J715W
only)
Vertical black lines or streaks on copies are typically caused by dirt or correction
fluid on the glass strip. Clean the glass strip. (See Cleaning the scanner glass
on page 35.)
Fit to Page does not work correctly. Make sure the document is not skewed on the scanner glass. Reposition the
document and try again.
Scanning Difficulties
Difficulty Suggestions
TWAIN/WIA errors appear when
starting to scan.
Make sure the Brother TWAIN/WIA driver is chosen as the primary source.
In PaperPort™11SE with OCR, click File, Scan or Get Photo and click Select to
choose the Brother TWAIN/WIA driver. (DCP-J715W only)
Poor scanning results when using
the ADF. (DCP-J715W only)
Try using the scanner glass. (See Using the scanner glass on page 21.)
OCR does not work.
(DCP-J715W only)
Try increasing the scanner resolution.
(Macintosh users)
Presto! PageManager must be downloaded and installed before use.
See Accessing Brother Support (Macintosh) on page 3 for further instructions.
Printing (continued)
Difficulty Suggestions
Troubleshooting
49
B
Software Difficulties
Difficulty Suggestions
Cannot install software or print. (Windows
®
users only)
Run the Repair MFL-Pro Suite program on the Installation CD-ROM. This
program will repair and reinstall the software.
“Device Busy Make sure the machine is not showing an error message on the LCD.
Cannot print images from
FaceFilter Studio.
To use FaceFilter Studio, you must install the FaceFilter Studio application from
the Installation CD-ROM supplied with your machine. To install FaceFilter Studio
see the Quick Setup Guide.
Also, before you start FaceFilter Studio for the first time, you must make sure your
Brother machine is turned on and connected to your computer. This will allow you
to access all the functions of FaceFilter Studio.
PhotoCapture Center™ Difficulties
Difficulty Suggestions
Removable Disk does not work
correctly.
1 Have you installed the Windows
®
2000 update? If not, do the following:
1) Unplug the USB cable.
2) Install the Windows
®
2000 update using one of the following methods.
Install MFL-Pro Suite from the Installation CD-ROM. (See the Quick
Setup Guide.)
Download the latest service pack from the Microsoft Web site.
3) Wait about 1 minute after you restart the PC, and then connect the USB
cable.
2
Take out the memory card or USB Flash memory drive and put it back in again.
3 If you have tried “Eject” from within Windows
®
, take out the memory card or
USB Flash memory drive before you continue.
4 If an error message appears when you try to eject the memory card or USB
Flash memory drive, it means the card is being accessed. Wait a while and
then try again.
5
If all of the above do not work, turn off your PC and machine, and then turn them
on again. (You will have to unplug the power cord of the machine to turn it off.)
Cannot access Removable Disk
from Desktop icon.
Make sure that you have correctly inserted the memory card or USB Flash
memory drive.
Part of my photo is missing when
printed.
Make sure that Borderless Printing and Cropping are turned off. (See Borderless
printing in chapter 4 and Cropping in chapter 4 in the Advanced User’s Guide.)
50
Network Difficulties
Difficulty Suggestions
Cannot print over the Network. Make sure that your machine is powered on and is online and in Ready mode.
Print a Network Configuration list (see Printing Reports in chapter 2 in the
Advanced User’s Guide) and check the current Network settings printed in this list.
(DCP-J715W only)
Reconnect the LAN cable to the hub to verify that the cabling and network
connections are good. If possible, try connecting the machine to a different port on
your hub using a different cable. If the connections are good, the machine shows
LAN Activ e for 2 seconds.
(If you are having Network problems, see the Network User’s Guide for more
information.)
The network scanning feature does
not work.
(Windows
®
users)
It is necessary to configure third-party Security/Firewall Software to allow Network
scanning. To add port 54925 for Network scanning, enter the information below:
In Name: Enter any description, for example Brother NetScan.
In Port number: Enter 54925.
In Protocol: UDP is selected.
Please refer to the instruction manual that came with your third-party
Security/Firewall Software or contact the software manufacturer.
(Macintosh users)
Re-select your machine in the Device Selector application located in
Macintosh HD/Library/Printers/Brother/Utilities/DeviceSelector or from the
model list in ControlCenter2.
The Brother software cannot be
installed.
(Windows
®
users)
Allow network access to the following programs if your security software displays
an alert message during MFL-Pro Suite installation.
BrC3Rgin.exe
BrnIPMon
Brother Status Monitor (Network)
ControlCenter Program
Generic Host Process f...
Setup.exe
Spooler SubSystem App
wdsw MFC Application
(Macintosh users)
Re-select your machine in the Device Selector application located in
Macintosh HD/Library/Printers/Brother/Utilities/DeviceSelector or from the
model list in ControlCenter2.
Cannot connect to wireless
network.
Investigate the problem using the WLAN Report.
Press Menu key, choose Print Reports and then press OK. Choose
WLAN Repo rt.
For details, see the Network User’s Guide.
Reset the network settings. Press Menu key, choose Network and then press OK. Choose
Network R eset.
For details, see the Network User’s Guide.
Troubleshooting
51
B
Machine Information B
Checking the serial number B
You can see the machine’s serial number on
the LCD.
a Press Menu.
b Press a or b to choose
Machine Info.
Press OK.
c Press a or b to choose Serial No.
Press OK.
d Press Stop/Exit.
Reset functions B
The following reset functions are available:
1 Network
You can reset the print server back to its
default factory settings such as the IP
address information.
2 All Settings
You can reset all the machine settings
back to the settings that were set at the
factory.
Brother strongly recommends you use this
operation when you dispose of the
machine.
Note
Unplug the interface cable before you
choose Network or All Settings.
(DCP-J715W only)
How to reset the machine B
a Press Menu.
b Press a or b to choose
Initial Setup.
Press OK.
c Press a or b to choose Reset.
Press OK.
d Press a or b to choose the type of reset
you want to use.
Press OK.
Press + to confirm.
e Press + to reboot the machine.
52
C
On-screen
programming
C
Your machine is designed to be easy to
operate with LCD on-screen programming
using the menu keys. User-friendly
programming helps you take full advantage of
all the menu selections your machine has to
offer.
Since your programming is done on the LCD,
we have created step-by-step on-screen
instructions to help you program your
machine. All you need to do is follow the
instructions as they guide you through the
menu selections and programming options.
Menu and features C
Menu and features
53
C
Menu table C
The menu table will help you understand the menu selections and options that are found in the
machine's programs. The factory settings are shown in Bold with an asterisk.
Menu ( ) C
Level1 Level2 Level3 Options Descriptions Page
Ink Management
Test Print Print Qual ity
Alignment
Lets you check the print
quality or alignment.
37
Cleaning Black
Color
All
Lets you clean the print
head.
37
Ink Volume Lets you check the
available ink volume.
See
1
.
General Se tup Paper Type Plain Paper*
Inkjet Pap er
Brother BP 71
Brother BP 61
Other Glos sy
Transparency
Sets the type of paper in
the paper tray.
16
Paper Size A4*
A5
10x15cm
Letter
Legal
Sets the size of the
paper in the paper tray.
16
LCD Settin gs Backlight Light *
Med
Dark
You can adjust the
brightness of the LCD
backlight.
7
Dim Timer Off
10Secs
20Secs
30Secs*
You can set how long
the LCD backlight stays
on for after you go back
to the Ready screen.
See
1
.
1
See Advanced User’s Guide.
The factory settings are shown in Bold with an asterisk.
54
Network menu (DCP-J515W) C
General S etup
(Continued)
Sleep Mod e 1Min
2Mins
3Mins
5Mins*
10Mins
30Mins
60Mins
You can choose how
long the machine must
be idle before it goes into
sleep mode.
See
1
.
Level1 Level2 Level3 Options Descriptions
Network TCP/ IP BOOT Meth od Auto*
Static
RARP
BOOTP
DHCP
Chooses the BOOT method
that best suits your needs.
IP Addres s [000-255].
[000-255].
[000-255].
[000-255]
Enter the IP address.
Subnet Ma sk [000-255].
[000-255].
[000-255].
[000-255]
Enter the subnet mask.
Gateway [000-255].
[000-255].
[000-255].
[000-255]
Enter the Gateway address.
Node Name BRWXXXXXXX XXXXX You can see the current
Node name.
WINS Conf ig Auto*
Static
You can choose the WINS
configuration mode.
See Network User's Guide.
The factory settings are shown in Bold with an asterisk.
Level1 Level2 Level3 Options Descriptions Page
1
See Advanced User’s Guide.
The factory settings are shown in Bold with an asterisk.
Menu and features
55
C
Network
(Continued)
TCP/IP
(Continued)
WINS Serve r (Primary)
000.000.000.000
(Secondary)
000.000.000.000
Specifies the IP address of
the primary or secondary
server.
DNS Server (Primary)
000.000.000.000
(Secondary)
000.000.000.000
Specifies the IP address of
the primary or secondary
server.
APIPA On*
Off
Automatically allocates the
IP address from the link-local
address range.
Setup Wiza rd You can manually configure
your print server for a
wireless network.
WPS/AOSS You can easily configure
your wireless network
settings using the one-button
push method.
WPS w/PIN Code You can easily configure
your wireless network
settings using WPS with a
PIN code.
WLAN Statu s Status You can see the current
wireless network status.
Signal You can see the current
wireless network signal
strength.
SSID You can see the current
SSID.
Comm. Mode You can see the current
Communication Mode.
MAC Addres s You can see your machine’s
Mac address from the control
panel.
WLAN Enabl e On
Off*
Lets you use the wireless
network connection.
Network Re set Restores all network settings
to factory default.
Level1 Level2 Level3 Options Descriptions
See Network User's Guide.
The factory settings are shown in Bold with an asterisk.
56
Network menu (DCP-J715W) C
Level1 Level2 Level3 Level4 Options Descriptions
Network Wired LAN TCP/IP BOOT Method Auto*
Static
RARP
BOOTP
DHCP
Chooses the
BOOT method
that best suits
your needs.
IP Address [000-255].
[000-255].
[000-255].
[000-255]
Enter the IP
address.
Subnet Mask [000-255].
[000-255].
[000-255].
[000-255]
Enter the Subnet
mask.
Gateway [000-255].
[000-255].
[000-255].
[000-255]
Enter the
Gateway
address.
Node Name BRNXXXXXXXXXXXX Enter the Node
name.
WINS Config Auto*
Static
Chooses the
WINS
configuration
mode.
WINS Server (Primary)
000.000.000.000
(Seconda ry)
000.000.000.000
Specifies the IP
address of the
primary or
secondary
server.
DNS Server (Primary)
000.000.000.000
(Seconda ry)
000.000.000.000
Specifies the IP
address of the
primary or
secondary
server.
APIPA On*
Off
Automatically
allocates the IP
address from the
link-local address
range.
See Network User's Guide.
The factory settings are shown in Bold with an asterisk.
Menu and features
57
C
Network
(Continued)
Wired LAN
(Continued)
Ethernet Auto*
100B-FD
100B-HD
10B-FD
10B-HD
Chooses the
Ethernet link
mode.
MAC Ad dress You can see your
machine’s Mac
address from the
control panel.
WLAN TCP/IP B OOT M ethod Auto*
Static
RARP
BOOTP
DHCP
Chooses the
BOOT method
that best suits
your needs.
IP Add ress [000-255].
[000-255].
[000-255].
[000-255]
Enter the IP
address.
Subnet Mask [000-255].
[000-255].
[000-255].
[000-255]
Enter the Subnet
mask.
Gateway [000-255].
[000-255].
[000-255].
[000-255]
Enter the
Gateway
address.
Node N ame BRWXXXXXXXXXXXX Enter the Node
name.
WINS C onfig Auto*
Static
Chooses the
WINS
configuration
mode.
WINS S erver (Primary )
000.000.000.000
(Secondary)
000.000.000.000
Specifies the IP
address of the
primary or
secondary
server.
DNS Se rver (Pr imary)
000.000.000.000
(Secondary)
000.000.000.000
Specifies the IP
address of the
primary or
secondary
server.
Level1 Level2 Level3 Level4 Options Descriptions
See Network User's Guide.
The factory settings are shown in Bold with an asterisk.
58
Network
(Continued)
WLAN
(Continued)
TCP/IP
(Continued)
APIPA On*
Off
Automatically
allocates the IP
address from the
link-local address
range.
Setup Wiza rd You can manually
configure your
print server for a
wireless network.
WPS/AOSS You can easily
configure your
wireless network
settings using the
one-button push
method.
WPS w/PIN Code
You can easily
configure your
wireless network
settings using
WPS with a PIN
code.
WLAN Statu s Status You can see the
current wireless
network status.
Signal You can see the
current wireless
network signal
strength.
SSID You can see the
current SSID.
Comm. Mode You can see the
current
Communication
Mode.
MAC Addres s You can see your
machines Mac
address from the
control panel.
Network I /F Wired LAN*
WLAN
You can choose
the network
connection type.
Network Reset
Yes
No
Restores all wired
and wireless
network settings
to the factory
default.
Level1 Level2 Level3 Level4 Options Descriptions
See Network User's Guide.
The factory settings are shown in Bold with an asterisk.
Menu and features
59
C
Menu ( ) (continued) C
Level1 Level2 Level3 Options Descriptions Page
Print Repo rts Help List You can print these lists
and reports.
See
1
.
User Setti ngs ——
Network Config
——
WLAN Repor t ——
Machine In fo. Serial No. Lets you check the serial
number of your machine.
51
Initial Se tup Date&Time Puts the date and time in
your machine.
See
2
.
Reset Network Resets the print server
back to its factory default
settings, such as the IP
address information.
51
All Settin gs Resets all the machine’s
settings back to the
settings that were set at
the factory.
51
Local Language
(Choose the
language you
want to use)
Allows you to change the
LCD language for your
country.
See
1
.
1
See Advanced User’s Guide.
2
See Quick Setup Guide.
The factory settings are shown in Bold with an asterisk.
60
Copy (Default display) C
Level1 Level2 Level3 Options Descriptions Page
Quality ——Fast
Normal*
Best
Choose the Copy
resolution for your type of
document.
See
1
.
Enlarge/Reduce
100%* ———
Enlarge 142% A5iA4
186% 10x15cm
i
LTR
198% 10x15cm
i
A4
You can choose the
enlargement ratio for the
next copy.
Reduce
47% A4
i
10x15cm
69% A4iA5
(DCP-J515W)
83%
93% A4iLT R
97% LTRiA4
(DCP-J715W)
83% LGLiA4
93% A4iLT R
97% LTRiA4
You can choose the
reduction ratio for the
next copy.
Fit to Page Your machine will adjust
the size automatically to
the paper size you set.
Custom(25-400%)
You can choose the
enlargement or reduction
ratio for the next copy.
Paper Typ e ——Plain Paper*
Inkjet Pap er
Brother BP 71
Brother BP 61
Other Glos sy
Transparency
Choose the paper type
that matches the paper in
the tray.
24
Paper Siz e ——A4*
A5
10x15cm
Letter
Legal
Choose the paper size
that matches the paper in
the tray.
24
1
See Advanced User’s Guide.
The factory settings are shown in Bold with an asterisk.
Menu and features
61
C
Density ——
Adjusts the density of
copies.
See
1
.
Ink Save Mode ——On
Off*
You can save some ink.
Stack/Sort
(DCP-J715W
only)
——Stack*
Sort
You can choose to stack
or sort multiple copies.
Page Layou t ——O ff(1 in 1)*
2 in 1 (P)
2 in 1 (L)
4 in 1 (P)
4 in 1 (L)
Poster(3 x 3)
You can make N in 1 or
Poster copies.
Book Copy On Corrects dark borders
and skew when copying
from the scanner glass.
On(Preview) (Skew
Adjustment)
(Shadow Revise)
Off* ——
Watermark Copy Watermark Copy
On
Off*
(If you choose On,
see the
watermark copy
settings in the
following table.)
You can place a logo or
text into your document
as a Watermark.
Current Setting
——
Exit ——
Set New Default
You can save your copy
settings.
Factory Re set You can restore all
settings to the factory
settings.
Level1 Level2 Level3 Options Descriptions Page
1
See Advanced User’s Guide.
The factory settings are shown in Bold with an asterisk.
62
Watermark Copy Settings C
Option1 Option2 Option3 Option4 Descriptions Page
Template Text CONFIDENTIAL*
DRAFT
COPY
Places a text into your
document as a
Watermark using a
template.
See
1
.
Position A
B
C
D
E*
F
G
H
I
Pattern
Size Smal l
Medium*
Large
Angle -90
-45°*
0
45
90
Transparency -2
-1
0*
+1
+2
Colour Red
Orange
Yellow
Blue
Green
Purple
Black*
Apply
1
See Advanced User’s Guide.
The factory settings are shown in Bold with an asterisk.
Menu and features
63
C
Media (Select image
from media)
Position A
B
C
D
E*
F
G
H
I
Pattern
Places a logo or text into
your document as a
Watermark using an
image from removable
media.
See
1
.
Size Small
Medium*
Large
Angle -90
-45°*
0
45
90
Transparency -2
-1
0*
+1
+2
Apply
Scan (Set page and
press Start)
Transparency -2
-1
0*
+1
+2
Places a logo or text into
your document as a
Watermark using a
scanned image.
Apply
Option1 Option2 Option3 Option4 Descriptions Page
1
See Advanced User’s Guide.
The factory settings are shown in Bold with an asterisk.
64
PHOTO CAPTURE ( ) C
Level1 Level2 Level3 Options Descriptions Page
View Phot o(s) See the print
settings in the
following table.
You can preview your
photos on the LCD.
28
Print Ind ex Layout Format
6 Images/Line
*
5 Images/L ine
You can print a
thumbnail page.
See
1
.
Paper Type Plain Pape r *
Inkjet Pap er
Brother BP 71
Brother BP 61
Other Glos sy
Paper Size A4*
Letter
Print Pho tos See the print
settings in the
following table.
You can print an
individual image.
Enhance Photos
Auto Correct
Enhance Ski n
Enhance Scenery
Remove Red-Eye
Monochrome
Sepia
You can adjust your
photos with these
settings.
Search by Date
You can search your
photos in date order.
Print All Photos
You can print all photos
in your media card or
USB Flash memory
drive.
Slide Sho w The machine starts a
Slide Show of your
photos.
Trimming You can trim your photo
and print a part of the
image.
1
See Advanced User’s Guide.
The factory settings are shown in Bold with an asterisk.
Menu and features
65
C
Print Settings C
Option1 Option2 Option3 Option4 Descriptions Page
Print Qual ity
(Does not appear
for DPOF
printing.)
Normal
Photo*
Choose the print quality.
See
1
.
Paper Type Plain Paper
Inkjet P aper
Brother BP71
Brother BP61
Other Gl ossy*
Choose the paper type.
Paper Size 10x15cm*
13x18cm
A4
Letter
(When Letter or
A4 is chosen)
8 x 10cm
9 x 13cm
10 x 15cm
13 x 18cm
15 x 20cm
Max. Si ze*
Choose the paper and
print size.
Brightness
(Does not appear
when
Enhance Photos
is chosen.)
Adjusts the brightness.
Contrast
(Does not appear
when
Enhance Photos
is chosen.)
Adjusts the contrast.
1
See Advanced User’s Guide.
The factory settings are shown in Bold with an asterisk.
66
Color Enh ance
(Does not appear
when
Enhance Photos
is chosen.)
On
Off*
White Balance
Adjusts the hue of the
white areas.
See
1
.
Sharpness
Enhances the detail of
the image.
Color Density
Adjusts the total amount
of colour in the image.
Cropping On*
Off
Crops the image around
the margin to fit the paper
size or print size. Turn
this feature off if you want
to print whole images or
prevent unwanted
cropping.
Borderless On*
Off
Expands the printable
area to fit the edges of
the paper.
Date Prin t
(Does not appear
when DPOF Print
is chosen.)
On
Off*
Prints the date on your
photo.
Set New Default
———You can save your print
settings.
Factory R eset ———You can restore all the
settings to factory
settings.
Option1 Option2 Option3 Option4 Descriptions Page
1
See Advanced User’s Guide.
The factory settings are shown in Bold with an asterisk.
+2
+1
-1
-2
+2
+1
-1
-2
+2
+1
-1
-2
Menu and features
67
C
SCAN ( ) C
Level1 Option1 Option2 Option3 Descriptions Page
Scan to File You can scan a monochrome
or a colour document into
your computer.
See
1
.
Scan to Media
(When a memory
card or USB
Flash memory
drive is inserted.)
Quality Color 150*
Color 3 00
Color 6 00
B/W 200 x100
B/W 200
You can choose the scan
resolution and file format for
your document.
29
File Type (If you chose
Colour option in
Quality setting)
PDF*
JPEG
(If you chose
Mono option in
Quality setting)
PDF*
TIFF
File Name ——
Auto Crop On
Off*
Scan multiple documents
placed on the scanner glass
to a memory card or USB
Flash memory drive one at a
time.
See
2
.
Set New Default
You can save your scan
settings.
Factory Re set You can restore all settings to
the factory settings.
Scan to E-mail
You can scan a monochrome
or a colour document into
your E-mail application.
See
1
.
Scan to OCR
3
(DCP-J715W
only)
You can have your text
document converted to an
editable text file.
Scan to Image
You can scan a colour picture
into your graphics
application.
1
See Software User’s Guide.
2
See Advanced User’s Guide.
3
(Macintosh users)
Presto! PageManager must be downloaded and installed before use. See Accessing Brother
Support (Macintosh) on page 3 for further instructions.
The factory settings are shown in Bold with an asterisk.
68
Entering Text C
Press a, b, d or c to select numbers or characters you want to choose, and press OK repeatedly
until the file name is complete.
Press a, b, d or c to select , and press OK.
Inserting special characters C
To enter special characters, press a, b, d or c to select , and press OK.
Making corrections C
If you entered an incorrect letter and want to change it, press a, b, d or c to select or .
Press OK several times to move the cursor under the incorrect character. Then press a, b, d or c
to select , and press OK. Re-enter the correct letter.
OK
OK
0 123456789
ABCDEFGH I J
KLMNOPQRST
UV
W
XYZ
OK
OK
Scan to Media
Scan to Media
File Name 010110
Complete OK
69
D
D
General D
1
When all the modes are connected to USB.
2
When resolution: standard, draft: ISO/IEC24712 printed pattern.
3
When using ADF, resolution: standard, draft: ISO/IEC24712 printed pattern.
Specifications D
Printer Type Inkjet
Print Method Mono:
Colour:
Piezo with 94 1 nozzle
Piezo with 94 3 nozzles
Memory Capacity 40 MB
LCD (Liquid Crystal Display) Wide 3.3 in. (82.79 mm) TFT Colour LCD
Power Source AC 220 to 240V 50/60Hz
Power Consumption
1
(DCP-J515W)
Copying Mode:
Approx. 17 W
2
Standby Mode: Approx. 3.5 W
Sleep Mode: Approx. 2 W
Off: Approx. 0.5 W
(DCP-J715W)
Copying Mode:
Approx. 17 W
3
Standby Mode: Approx. 6 W
Sleep Mode: Approx. 3.5 W
Off: Approx. 0.5 W
70
1
Noise depends on printing conditions.
Dimensions
(DCP-J515W)
(DCP-J715W)
Weight (DCP-J515W)
(DCP-J715W)
6.9 kg
7.5 kg
Noise Operating: L
PAm = 50 dB (A) or less
1
Noise per ISO9296 Operating: LWAd = 62.3 dB (A) (Mono)
L
WAd = 56.7 dB (A) (Colour)
Office equipment with L
WAd > 63.0 dB (A)
is not suitable for use in rooms where
people do primarily intellectual work. Such
equipment should be placed in separate
rooms because of the noise emission.
Temperature Operating:
Best Print Quality:
10 - 35 C
20 - 33 C
Humidity Operating:
Best Print Quality:
20 - 80% (without condensation)
ADF (automatic document
feeder) (DCP-J715W only)
Up to 15 pages
Paper: 80 g/m
2
A4 or Letter size
Document Size ADF Width (DCP-J715W) : 148 mm to 215.9 mm
ADF Length (DCP-J715W) : 148 mm to 355.6 mm
Scanner Glass Width: Max. 215.9 mm
Scanner Glass Length: Max. 297 mm
390 mm
150 mm
360 mm
368 mm
450 mm
180 mm
375 mm
390 mm 370 mm
460 mm405 mm
Specifications
71
D
Print media D
1
For glossy paper or transparencies, we recommend removing printed pages from the output paper tray immediately
after they exit the machine to avoid smudging.
2
Use only transparencies recommended for inkjet printing.
3
See Paper type and size for each operation on page 19.
Paper Input Paper Tray
Paper type:
Plain paper, inkjet paper (coated paper), glossy paper
1
,
transparencies
12
and envelopes
Paper size:
A4, Legal, Executive, Letter, A5, A6, JIS B5,
envelopes (commercial No.10, DL, C5, Monarch, JE4),
Photo 10 15 cm, Photo 2L 13 18 cm, Index card and
Postcard
3
Width: 98 mm - 215.9 mm
Length: 148 mm - 355.6 mm
For more details, see Paper weight, thickness and capacity
on page 20.
Maximum paper tray capacity:
Approx. 100 sheets of 80 g/m
2
plain paper
Photo Paper Tray
Paper type:
Plain paper, inkjet paper (coated paper) and glossy paper
1
Paper size:
Photo 10 15 cm and Photo L 89 127 mm
Width: 89 mm - 102 mm
Length: 127 mm - 152 mm
Maximum paper tray capacity:
Approx. 20 sheets
Paper Output Up to 50 sheets of A4 plain paper (face up print delivery to the
output paper tray)
1
72
Copy D
Colour/Monochrome Yes/Yes
Copy Width Max. 210 mm
Multiple Copies Stacks up to 99 pages
Enlarge/Reduce 25% to 400% (in increments of 1%)
Resolution (Monochrome)
Prints up to 1200 1200 dpi
(Colour)
Prints up to 600 1200 dpi
Specifications
73
D
PhotoCapture Center™ D
1
Memory cards, adapters and USB Flash memory drive are not included.
2
USB 2.0 standard
USB Mass Storage standard from 16 MB to 32 GB
Support format: FAT12/FAT16/FAT32
3
Progressive JPEG format is not supported.
4
Motion JPEG only
5
See Paper type and size for each operation on page 19.
Compatible Media
1
Memory Stick™ (16 MB - 128 MB)
Memory Stick PRO™ (256 MB - 16 GB)
Memory Stick Duo™ (16 MB - 128 MB)
Memory Stick PRO Duo™ (256 MB - 16 GB)
Memory Stick Micro™ (M2™) with adapter
SD (16 MB to 2 GB)
SDHC (4 GB to 16 GB)
microSD with adapter
miniSD with adapter
USB Flash memory drive
2
(DCP-J715W only)
Resolution Up to 1200 2400 dpi
File Extension DPOF (ver.1.0, ver.1.1), Exif DCF (up to ver.2.1)
(Media Format)
Photo Print: JPEG
3
, AVI
4
, MOV
4
(Image Format) Scan to Media: JPEG, PDF (Colour)
TIFF, PDF (Monochrome)
Number of Files Up to 999 files
(The folder inside memory cards or USB Flash memory drive
is also counted.)
Folder File must be stored in the 4th folder level of the memory card
or USB Flash memory drive.
Borderless
A4, Letter, Photo 10 15 cm, Photo 2L 13 18 cm
5
74
PictBridge (DCP-J715W only) D
Compatibility Supports the Camera & Imaging Products Association
PictBridge standard CIPA DC-001.
Visit http://www.cipa.jp/pictbridge
for more information.
Interface USB direct interface
Specifications
75
D
Scanner D
1
For the latest driver updates for the Mac OS X you are using, visit us at http://solutions.brother.com/
2
Windows
®
XP in this User’s Guide includes Windows
®
XP Home Edition, Windows
®
XP Professional, and Windows
®
XP Professional x64 Edition.
3
Maximum 1200 1200 dpi scanning when using the WIA Driver for Windows
®
XP, Windows Vista
®
and Windows
®
7
(resolution up to 19200 19200 dpi can be chosen by using the Brother scanner utility).
Colour/Monochrome Yes/Yes
TWAIN Compliant
Yes (Windows
®
2000 Professional/Windows
®
XP/
Windows
®
XP Professional x64 Edition/Windows Vista
®
/
Windows
®
7)
Mac OS X 10.4.11 - 10.5.x - 10.6.x
1
WIA Compliant
Yes (Windows
®
XP
2
/Windows Vista
®
/Windows
®
7)
ICA Compliant Yes (Mac OS X 10.6.x)
Colour Depth 36 bit colour Processing (Input)
24 bit colour Processing (Output)
(Actual Input: 30 bit colour/Actual Output: 24 bit colour)
Resolution
Up to 19200 19200 dpi (interpolated)
3
Up to 1200 2400 dpi (optical) (Scanner Glass)
Up to 1200 600 dpi (optical) (ADF) (DCP-J715W)
Scanning Speed Monochrome: up to 3.44 sec.
Colour: up to 4.83 sec.
(A4 size at 100 100 dpi)
Scanning Width Up to 210 mm
Scanning Length Up to 291 mm
Greyscale 256 levels
76
Printer D
1
When you set the Borderless feature to On.
2
See Paper type and size for each operation on page 19.
3
When printing on A4 size paper.
Resolution Up to 1200 6000 dpi
Printing Width
204 mm [210 mm (borderless)
1
]
3
Borderless A4, Letter, A6, Photo 10 15 cm,
Index Card 127 203 mm, Photo L 89 127 mm,
Photo 2L 13 18 cm, Postcard 1 100 148 mm
2
Specifications
77
D
Interfaces D
1
Your machine has a Hi-Speed USB 2.0 interface (DCP-J715W only).
The machine can also be connected to a computer that has a USB 1.1 interface.
2
Third party USB ports are not supported.
3
See Network (LAN) on page 80 and the Network User’s Guide for detailed network specifications.
USB
12
Use a USB 2.0 interface cable that is no longer than 2 m.
LAN cable
3
(DCP-J715W only)
Use an Ethernet UTP cable category 5 or greater.
Wireless LAN IEEE 802.11b/g (Infrastructure/Ad-hoc Mode)
78
Computer requirements D
SUPPORTED OPERATING SYSTEMS AND SOFTWARE FUNCTIONS
Computer Platform &
Operating System Version
Supported
PC Software
Functions
PC
Interface
Processor
Minimum
Speed
Minimum
RAM
Recommended
RAM
Hard Disk Space to install
For
Drivers
For
Applications
Windows
®
Operating
System
1
Windows
®
2000
Professional
4
Printing,
Scanning,
Removable
Disk
5
USB,
10/100
Base-TX
(Ethernet)
(DCP-J715W)
Wireless
802.11b/g
Intel
®
Pentium
®
II
or equivalent
64 MB
256 MB 110 MB 340 MB
Windows
®
XP Home
24
Windows
®
XP
Professional
24
128 MB 110 MB 340 MB
Windows
®
XP Professional
x64 Edition
2
64-bit (Intel
®
64 or
AMD64) supported CPU
256 MB 512 MB 110 MB 340 MB
Windows Vista
®2
Intel
®
Pentium
®
4
or equivalent
64-bit (Intel
®
64
or AMD64)
supported CPU
512 MB
1GB
600 MB 530 MB
Windows
®
7
2
1GB
(32 bit)
2GB
(64 bit)
1GB
(32 bit)
2GB
(64 bit)
650 MB 530 MB
Windows Server
®
2003
(print only via network)
Printing
10/100
Base-TX
(Ethernet)
(DCP-J715W)
Wireless
802.11b/g
Intel
®
Pentium
®
III
or equivalent
256 MB 512 MB
50 MB N/A
Windows Server
®
2003 x64 Edition
(print only via network)
64-bit (Intel
®
64
or AMD64)
supported CPU
Windows Server
®
2003
R2 (print only via network)
Intel
®
Pentium
®
III
or equivalent
Windows Server
®
2003 R2 x64 Edition
(print only via network)
64-bit (Intel
®
64
or AMD64)
supported CPU
512 MB
1GB
Windows Server
®
2008 (print only via
network)
Intel
®
Pentium
®
4
or equivalent 64-bit
(Intel
®
64 or AMD64)
supported CPU
2GB
Windows Server
®
2008
R2 (print only via network)
64-bit (Intel
®
64 or
AMD64) supported CPU
Macintosh
Operating
System
Mac OS X
10.4.11 - 10.5.x
Printing,
Scanning,
Removable
Disk
5
USB
3
,
10/100
Base-TX
(Ethernet)
(DCP-J715W)
Wireless
802.11b/g
PowerPC G4/G5
Intel
®
Core™
Processor
512 MB
1GB 80MB
400 MB
Mac OS X 10.6.x
Intel
®
Core™
Processor
1GB 2GB
Conditions:
1
Microsoft
®
Internet Explorer
®
5.5 or greater.
2
For WIA, 1200 1200 resolution. Brother Scanner
Utility enables to enhance up to 19200 19200 dpi.
3
Third party USB ports are not supported.
4
PaperPort
11SE supports Microsoft
®
SP4 or higher for
Windows
®
2000 and SP2 or higher for XP (DCP-J715W only).
5
Removable disk is a function of PhotoCapture Center
.
For the latest driver updates, visit
http://solutions.brother.com/
All trademarks, brand and product names are the
property of their respective companies.
Specifications
79
D
Consumable items D
Ink The machine uses individual Black, Yellow, Cyan and Magenta ink
cartridges that are separate from the print head assembly.
Service Life of Ink
Cartridge
The first time you install a set of ink cartridges the machine will use
an amount of ink to fill the ink delivery tubes for high quality
printouts. This process will only happen once. After this process is
complete the cartridges provided with your machine will have a
lower yield than standard cartridges (65%). With all following ink
cartridges you can print the specified number of pages.
Replacement
Consumables
(DCP-J515W)
<Low Yield Black> LC985BK, <Low Yield Cyan> LC985C,
<Low Yield Magenta> LC985M, <Low Yield Yellow> LC985Y
Black - Approximately 300 pages
1
Cyan, Magenta, Yellow - Approximately 260 pages
1
(DCP-J715W)
<Standard Black> LC1100BK, <Standard Cyan> LC1100C,
<Standard Magenta> LC1100M, <Standard Yellow> LC1100Y
Black - Approximately 450 pages
1
Cyan, Magenta, Yellow - Approximately 325 pages
1
1
Approx. cartridge yield is declared in accordance with ISO/IEC 24711
For more information about the replacement consumables, visit us
at www.brother.com/pageyield
What is Innobella™?
Innobella™ is a range of genuine consumables offered by Brother.
The name "Innobella™" derives from the words "Innovation" and
"Bella" (meaning "Beautiful" in Italian) and is a representation of the
"innovative" technology providing you with "beautiful" and "long
lasting" print results.
When you print photo images, Brother recommends Innobella™
glossy photo paper (BP71 series) for high quality. Brilliant prints are
made easier with Innobella™ Ink and paper.
80
Network (LAN) D
Note
For details about the full Network specifications, see the Network User’s Guide.
1
See the Computer Requirements chart on page 78.
2
If you require more advanced printer management, use the latest Brother BRAdmin Professional utility version that is
available as a download from http://solutions.brother.com/
LAN You can connect your machine to a network for Network Printing,
Network Scanning and access photos from PhotoCapture Center™
1
.
Also included is Brother BRAdmin Light
2
Network Management
software.
Wireless Network
Security
SSID (32 chr), WEP 64/128 bit, WPA-PSK (TKIP/AES),
WPA2-PSK (AES)
Setup Support Utility AOSS Yes
WPS Yes
Index
81
E
E
A
ADF (automatic document feeder) ...........21
Apple Macintosh
See Software User's Guide.
C
Cleaning
paper pick-up roller
...............................36
print head
..............................................37
scanner
.................................................35
Consumable items
...................................79
Control panel overview
..............................4
ControlCenter
See Software User's Guide.
Copy
paper size
.............................................24
paper type
.............................................24
using scanner glass
..............................21
D
Document
loading
........................................... 21, 22
E
Envelopes ...................... 10, 11, 12, 19, 20
Error messages on LCD
..........................39
B&W Print Only
.....................................39
Cannot Print
..........................................40
Cover is Open
.......................................40
Data Remaining
....................................40
Document Jam
......................................40
Ink Low
.................................................41
No Ink Cartridge
....................................41
No Paper Fed
.......................................41
Out of Memory
......................................42
Paper Jam
............................................42
Unable to Clean
....................................42
Unable to Init.
........................................42
Unable to Print
......................................42
Unable to Scan
.....................................42
G
Greyscale ................................................ 75
H
Help
LCD messages
..................................... 52
Menu Table
.......................................... 53
I
Ink cartridges
ink dot Counter
..................................... 33
replacing
............................................... 33
Innobella™
.............................................. 79
J
Jams
document
............................................. 43
paper
.................................................... 44
L
LCD (Liquid Crystal Display) ................... 52
Brightness
.............................................. 7
M
Macintosh
See Software User's Guide.
Maintenance, routine
replacing ink cartridges
........................ 33
Mode, entering
PhotoCapture
......................................... 5
Scan
....................................................... 5
N
Network
Printing
See Network User's Guide.
Scanning
See Software User's Guide.
Number of Copies key
............................... 4
82
O
On/Off key ..................................................4
Out of Memory message
..........................42
P
Paper ................................................ 17, 71
capacity
.................................................20
loading
....................................... 8, 10, 12
loading envelopes and postcards
.........10
loading photo paper
..............................12
printable area
........................................15
size
................................................. 16, 19
size of document
...................................21
type
................................................ 16, 19
PaperPort™11SE with OCR
See Software User's Guide. See also Help
in the PaperPort™11SE application.
Photo Paper Tray
.....................................12
PhotoCapture Center™
from PC
See Software User's Guide.
Memory Stick PRO™
............................25
Memory Stick™
.....................................25
Preview photos
.....................................28
Print settings
Quality
................................................28
SD
.........................................................25
SDHC
....................................................25
specifications
........................................73
Presto! PageManager
See Software User's Guide. See also Help
in the Presto! PageManager application.
Print
area
.......................................................15
difficulties
..............................................46
improving quality
...................................37
on small paper
......................................14
paper jams
............................................44
resolution
..............................................76
specifications
........................................76
Programming your machine
.....................52
R
Resolution
copy
...................................................... 72
print
...................................................... 76
scan
...................................................... 75
S
Scannable area ....................................... 22
Scanner glass
cleaning
................................................ 35
using
..................................................... 21
Scanning
See Software User's Guide.
Serial Number
how to find ...............See inside front cover
T
Transparencies ........ 16, 17, 18, 19, 20, 71
Troubleshooting
....................................... 46
document jam
....................................... 43
error messages on LCD
....................... 39
if you are having difficulty
copying
.............................................. 48
Network
............................................. 50
PhotoCapture Center™
..................... 49
printing
.............................................. 46
scanning
............................................ 48
software
............................................. 49
paper jam
............................................. 44
print alignment
...................................... 38
print quality
........................................... 37
W
Windows
®
See Software User's Guide.
Visit us on the World Wide Web
http://www.brother.com
This machine is approved for use in the country of purchase only. Local Brother companies or their
dealers will only support machines purchased in their own countries.
16

Hulp nodig? Stel uw vraag in het forum

Spelregels
1

Forum

Brother-DCP-J715W
  • zwarte cartridge doet het niet. is reiniging mogelijk? Gesteld op 15-8-2022 om 13:24

    Reageer op deze vraag Misbruik melden
    • Bij 123inkt.nl heb ik lang gelden reiningingscartridge gekocht, type LC-980/1100BK voor mijn trouwe Brother, Simon Geantwoord op 15-8-2022 om 13:45

      Waardeer dit antwoord Misbruik melden
  • Mijn controlcenter3 wordt geblokkeerd door Adobe Flash Player. Lijkt logisch nadat op 12/1 ondersteuning is beëindigd.
    Ook na verwijderen van de Adobe Flash Player blijft de blokkering.
    Nieuwe installatie Controlcenter niet mogelijk; is geblokkeerd in de Brother support website.
    Wie heeft een oplossing voor mijn trouwe DCP-J715W?
    Simon

    Gesteld op 20-1-2021 om 12:29

    Reageer op deze vraag Misbruik melden
  • draadloze printer print niet heeft wel connectie met computer Gesteld op 16-6-2020 om 14:05

    Reageer op deze vraag Misbruik melden
    • Sinds 15/6 heb ik ook problemen met printen, wel connectie maar geen printopdracht, ook niet met de bekabelde optie.
      Zou een Windows 10 update ons parten spelen? Geantwoord op 16-6-2020 om 23:40

      Waardeer dit antwoord (3) Misbruik melden
  • Bij mij ook het probleem 4F maar ik kan het antwoord ook niet vinden. Is de printkop dan stuk? Gesteld op 3-11-2016 om 18:14

    Reageer op deze vraag Misbruik melden
  • printer blijft offline aan, hoe dit te verhelpen
    Gesteld op 13-8-2015 om 22:42

    Reageer op deze vraag Misbruik melden
  • mijn printer geeft de foutmelding print onmogelijk 4f, hoe los ik dit op Gesteld op 17-5-2015 om 20:35

    Reageer op deze vraag Misbruik melden
    • IK heb een MFC-J265W met zelfde foutmelding.
      Heb de stekker eruitgehaald, op <menu> gedrukt en vervolgens stekker erweer in.
      Lampjes gaan knipperen en er komt"maintenance"in t beeld.
      Stekker erweer uit en na 5 sec erweer in.
      Grt R Geantwoord op 1-9-2015 om 19:59

      Waardeer dit antwoord (52) Misbruik melden
6
12
  • Mijn printer print legen pagina s. Hoe komt dat? Gesteld op 20-8-2014 om 17:11

    Reageer op deze vraag Misbruik melden
    • Dit probleem heb ik ook gehad. Bij navraag Brother blijkt dat de printerkop defect was. Reparatiekosten 50 euro. Voor 60 euro nieuwe HP printer gekocht. Voor mij nooit meer Brother! Geantwoord op 21-8-2014 om 06:53

      Waardeer dit antwoord Misbruik melden
  • bij de tweede pagina stopt de printer met printen
    Gesteld op 18-8-2014 om 21:02

    Reageer op deze vraag Misbruik melden
  • Brother printer dcp j715w nooit problemen gehad, maar heeft nu constant papierstoring Gesteld op 12-8-2014 om 17:27

    Reageer op deze vraag Misbruik melden
    • Ik heb hetzelfde probleem, ondanks dat er geen papier meer in zit geeft hij nog steeds papierstoring aan.
      Wie weet de oplossing?

      Geantwoord op 8-12-2014 om 14:41

      Waardeer dit antwoord (2) Misbruik melden
  • Ik dus ook constant problemen met printen, kleuren niet mooi of 1kleur werekt niet.
    Voor mij nooit meer een Brother alleen maar ellende!!! Geantwoord op 6-2-2015 om 12:08

    Waardeer dit antwoord Misbruik melden
  • mijn Brother DCP-J715w doet het van de een op de andere dag niet meer. Hij gaat niet aan, vervanging van de stroomkabel en opnieuw installeren hebben niet geholpen. Het lijkt erop dat de voeding het niet meer doet. Zit er misschien een zekering of zoiets in dat vervangen kan worden?
    Cees Gesteld op 23-6-2014 om 21:33

    Reageer op deze vraag Misbruik melden
  • Inmiddels heb ik bij de leverancier geïnformeerd, zeer waarschijnlijk is de voeding defect. Dat schijnt vaker van het ene op het andere moment te gebeuren. Het advies is een andere te kopen, reparatie is duurder. Geantwoord op 6-7-2014 om 23:51

    Waardeer dit antwoord (2) Misbruik melden
  • De printer geeft aan print onmogelijk 70
    Vraagt steeds om achterklep te openen papier te verwijderen wat er niet in vast zit..
    Geen van de toetsen werkt Gesteld op 11-6-2014 om 15:18

    Reageer op deze vraag Misbruik melden
  • Print geen zwart meer nieuwe unit geplaatst LC1100BK Gesteld op 12-5-2014 om 23:32

    Reageer op deze vraag Misbruik melden
    • Zie mijn antwoord van 26 maart jl. Ik had het zelfde probleem. Moest een nieuwe printerkop in a 50 euro.
      ik heb ondertussen een nieuwe printer gekocht, een HP.
      voor mij geen Brother meer! Geantwoord op 12-5-2014 om 23:41

      Waardeer dit antwoord (2) Misbruik melden
18
  • Onze Brother DCP-J715W is nu zo'n twee jaar oud.
    Na iets meer dan een jaar deed het kleuren display helemaal niets meer en stond met zwart, waardoor we ook niet meer in het menu van de printer kunnen.\

    Sinds een paar dagen scant en print hij nu ineens niet meer.
    Er is voldoende inkt en papier aanwezig en er zit ook geen papier ergens vast.

    Dit is nu de derde brother all in one printer die het binnen 2 jaar opgeeft.
    Geen Brother printer meer voor mij, ik hen het wel gehad... Gesteld op 26-3-2014 om 13:11

    Reageer op deze vraag Misbruik melden
    • Net buiten de garantieperiode stopte bij ons het afdrukken van de kleur zwart (oké zwart is geen kleur).
      Bij navraag Brother service dienst blijkt de printkop defect te zijn. Printer wegbrengen naar Amstelveen met, als kosten vermoedelijk 50 euro. Ik lees net dat je voor 37 euro al een nieuwe Canon printer koopt bij Expert.
      voor mij geen Brother meer. Geantwoord op 26-3-2014 om 13:36

      Waardeer dit antwoord (2) Misbruik melden
  • mijn dcp715w geeft een fout melding kan niet printen 4f.
    staat dat ik in de hanlieding moet kijken maar kan niets over vinden.
    HELP Gesteld op 19-1-2013 om 14:23

    Reageer op deze vraag Misbruik melden
  • Hallo,

    Weet je hier al meer van. ik zit vandaag ook met het probleem en geen idee hoe ik dit moet oplossen?

    Geantwoord op 1-10-2013 om 19:06

    Waardeer dit antwoord (1) Misbruik melden
  • mijn printer print geen zwart meer, de cartridge is half vol, heb ook al een nieuwe gestoken maar dit helpt niet. kan iemand mij zeggen wat te doen en mailen naar info@nivoinstall.be? Gesteld op 26-6-2012 om 22:01

    Reageer op deze vraag Misbruik melden
  • Als je inktjetpapier selecteert doet ie het wel, bij normaal papier doet ie het niet.
    Geantwoord op 8-7-2012 om 14:48

    Waardeer dit antwoord (8) Misbruik melden
  • Sinds een week een vergelijkbaar probleem:

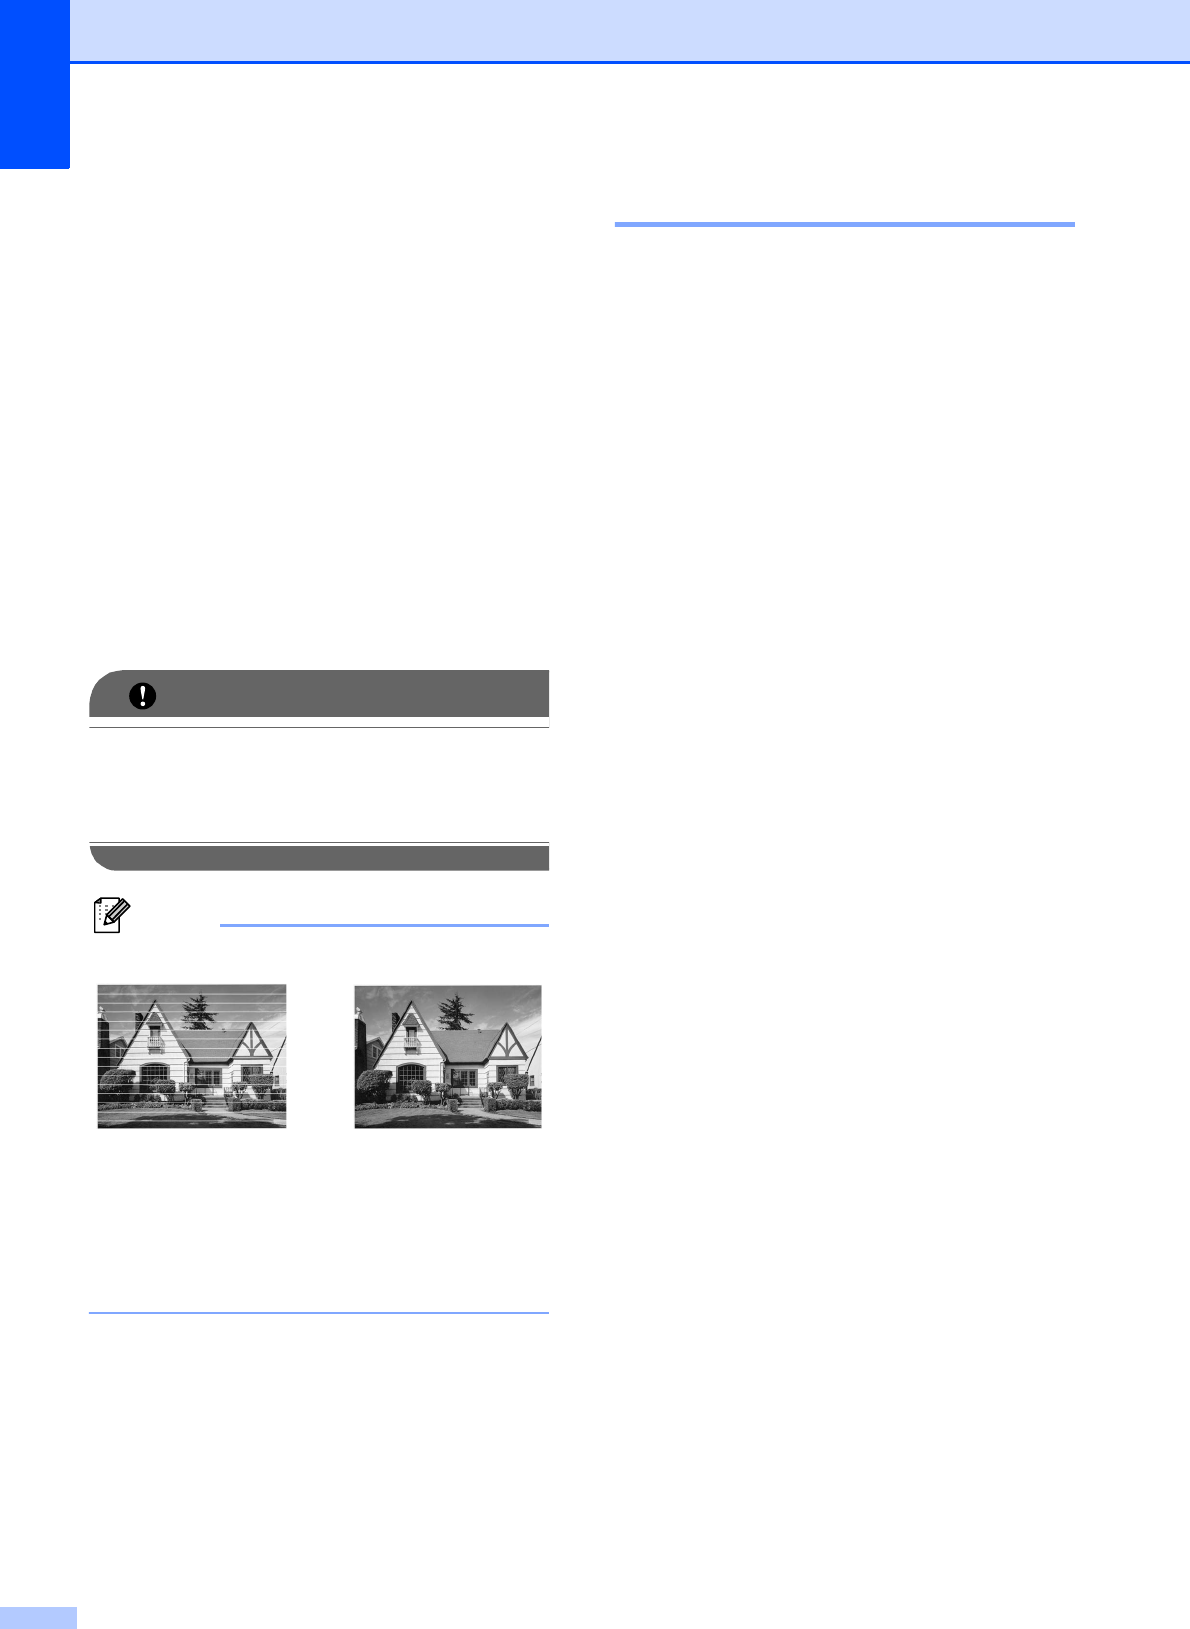
    Ondanks meerdere keren reinigen + vervangen van de cartridge is zwart nu licht grijs.
    Als ik inktjet papier kies: donker grijs, maar nog steeds niet zwart
    Geantwoord op 25-9-2012 om 20:24

    Waardeer dit antwoord (5) Misbruik melden
  • mijn brother printer CP-J715W ontnagt geen printer opdrachten van pc. Kan wel copieren. Gesteld op 16-5-2012 om 13:42

    Reageer op deze vraag Misbruik melden
  • Opnieuw installeren op de pc , met de Cd, en de printer . Komt meer voor Geantwoord op 29-1-2013 om 12:07

    Waardeer dit antwoord (2) Misbruik melden

Misbruik melden

Gebruikershandleiding.com neemt misbruik van zijn services uitermate serieus. U kunt hieronder aangeven waarom deze vraag ongepast is. Wij controleren de vraag en zonodig wordt deze verwijderd.

Product:

Bijvoorbeeld antisemitische inhoud, racistische inhoud, of materiaal dat gewelddadige fysieke handelingen tot gevolg kan hebben.

Bijvoorbeeld een creditcardnummer, een persoonlijk identificatienummer, of een geheim adres. E-mailadressen en volledige namen worden niet als privégegevens beschouwd.

Spelregels forum

Om tot zinvolle vragen te komen hanteren wij de volgende spelregels:

Belangrijk! Als er een antwoord wordt gegeven op uw vraag, dan is het voor de gever van het antwoord nuttig om te weten als u er wel (of niet) mee geholpen bent! Wij vragen u dus ook te reageren op een antwoord.

Belangrijk! Antwoorden worden ook per e-mail naar abonnees gestuurd. Laat uw emailadres achter op deze site, zodat u op de hoogte blijft. U krijgt dan ook andere vragen en antwoorden te zien.

Abonneren

Abonneer u voor het ontvangen van emails voor uw Brother DCP-J715W bij:


U ontvangt een email met instructies om u voor één of beide opties in te schrijven.


Ontvang uw handleiding per email

Vul uw emailadres in en ontvang de handleiding van Brother DCP-J715W in de taal/talen: Engels als bijlage per email.

De handleiding is 3,43 mb groot.


U ontvangt de handleiding per email binnen enkele minuten. Als u geen email heeft ontvangen, dan heeft u waarschijnlijk een verkeerd emailadres ingevuld of is uw mailbox te vol. Daarnaast kan het zijn dat uw internetprovider een maximum heeft aan de grootte per email. Omdat hier een handleiding wordt meegestuurd, kan het voorkomen dat de email groter is dan toegestaan bij uw provider.

Stel vragen via chat aan uw handleiding

Stel uw vraag over deze PDF

Andere handleiding(en) van Brother DCP-J715W

Brother DCP-J715W Snelstart handleiding - Nederlands - 97 pagina's

Brother DCP-J715W Installatiehandleiding - Nederlands - 34 pagina's

Brother DCP-J715W Gebruiksaanwijzing - Nederlands - 41 pagina's

Brother DCP-J715W Snelstart handleiding - Deutsch - 97 pagina's

Brother DCP-J715W Gebruiksaanwijzing - Deutsch - 42 pagina's

Brother DCP-J715W Installatiehandleiding - Deutsch - 34 pagina's

Brother DCP-J715W Gebruiksaanwijzing - English - 40 pagina's

Brother DCP-J715W Installatiehandleiding - English - 34 pagina's


Uw handleiding is per email verstuurd. Controleer uw email

Als u niet binnen een kwartier uw email met handleiding ontvangen heeft, kan het zijn dat u een verkeerd emailadres heeft ingevuld of dat uw emailprovider een maximum grootte per email heeft ingesteld die kleiner is dan de grootte van de handleiding.

Er is een email naar u verstuurd om uw inschrijving definitief te maken.

Controleer uw email en volg de aanwijzingen op om uw inschrijving definitief te maken

U heeft geen emailadres opgegeven

Als u de handleiding per email wilt ontvangen, vul dan een geldig emailadres in.

Uw vraag is op deze pagina toegevoegd

Wilt u een email ontvangen bij een antwoord en/of nieuwe vragen? Vul dan hier uw emailadres in.


Info