345467
2
Verklein
Vergroot
Pagina terug
1/12
Pagina verder
REFRIGERATEUR
REFRIGERATOR
KOELKAST
KÜHLSCHRANK
REFRIGERADOR
FRIGORÍFICO
F
t
N
D
E
P
MODE D’EMPLOI INSTRUCTIONS FOR USE GEBRUIKSAANWIJZING
BEDIENUNGSANLEITUNG LIBRO DE ISTRUCCIONES INSTRUÇÕES DE USO
2222755-12
SB 1600 E
SA 2350 E
Safety Instructions . . . . . . . . . . . . . . . . . . . . . . . . . . . . . . . . . . . . . . . . . . . . . . . . . . . . . . . . . . . . . . . . . . . . . .12
Disposal . . . . . . . . . . . . . . . . . . . . . . . . . . . . . . . . . . . . . . . . . . . . . . . . . . . . . . . . . . . . . . . . . . . . . . . . . . . . . . .13
Use and Control
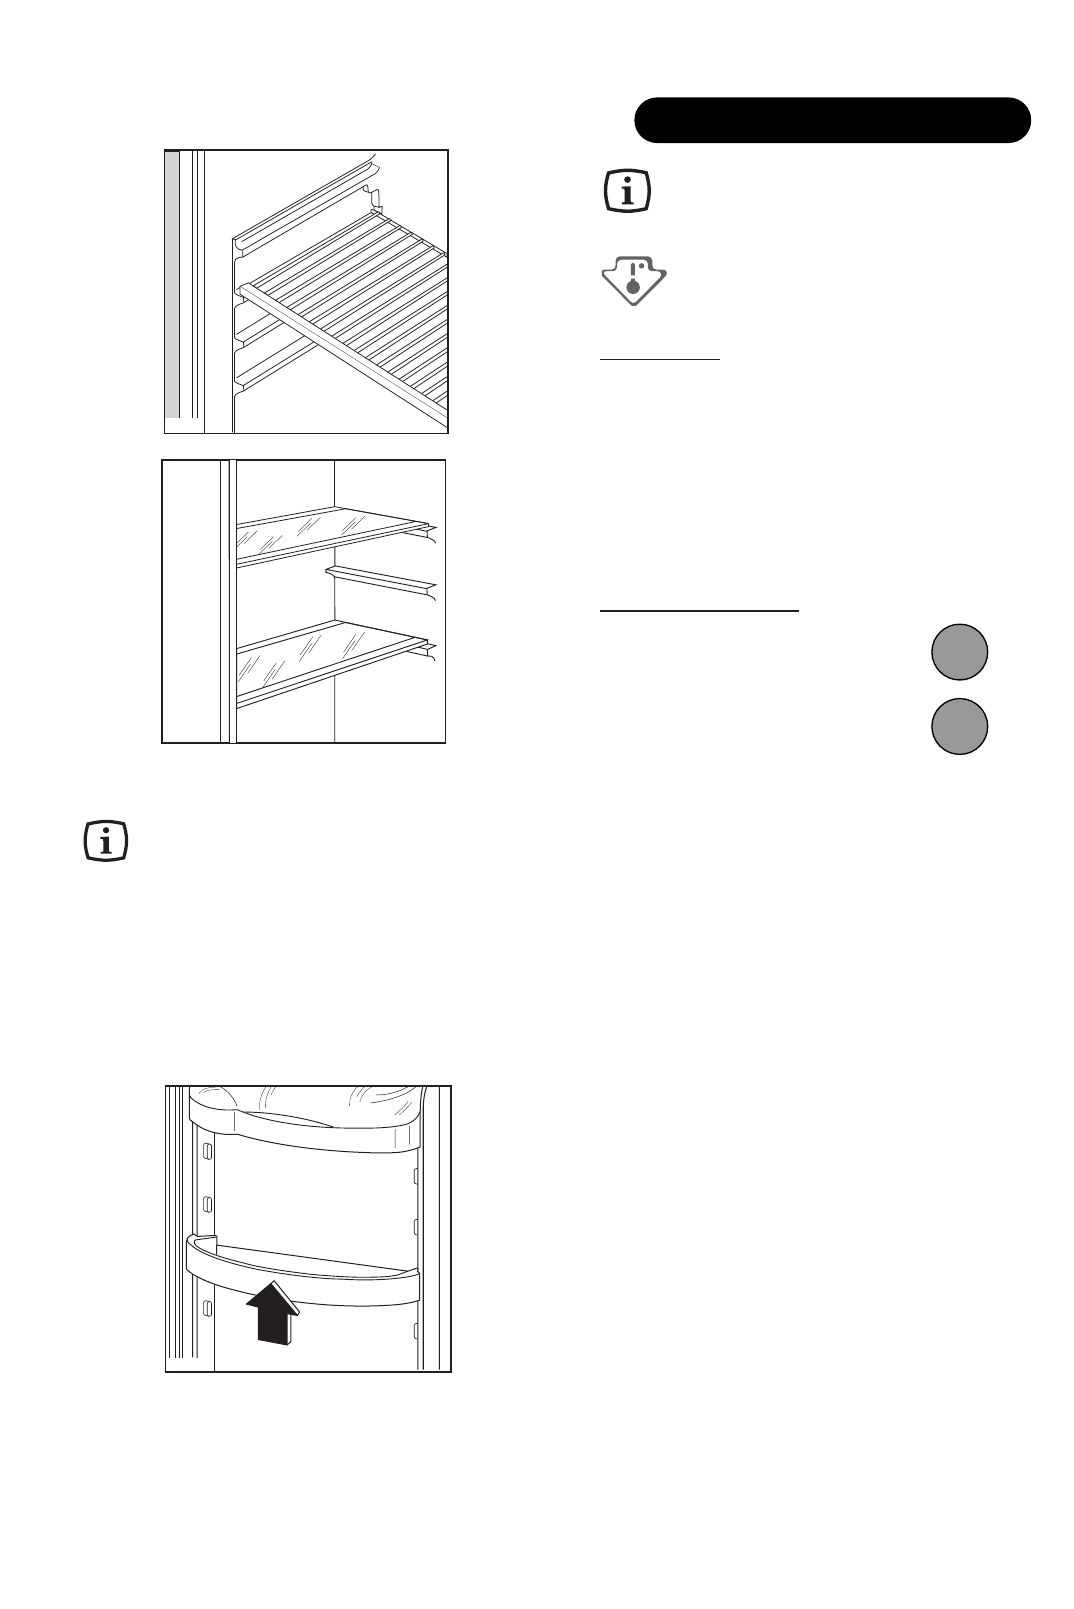
Before Use / Starting the appliance / Temperature control / Internal parts . . . . . . . . . . . . .13
Food Protection . . . . . . . . . . . . . . . . . . . . . . . . . . . . . . . . . . . . . . . . . . . . . . . . . . . . . . . . . . . . . . . . . . . . . . . .14
Hints . . . . . . . . . . . . . . . . . . . . . . . . . . . . . . . . . . . . . . . . . . . . . . . . . . . . . . . . . . . . . . . . . . . . . . . . . . . . . . . . .15
Maintenance Defrosting . . . . . . . . . . . . . . . . . . . . . . . . . . . . . . . . . . . . . . . . . . . . . . . . . . . . . . . . . . . . . . . . .15
Cleaning / Changing the light bulb . . . . . . . . . . . . . . . . . . . . . . . . . . . . . . . . . . . . . . . . . . . . . . . . . . . . . . . . . .16
Something not Working . . . . . . . . . . . . . . . . . . . . . . . . . . . . . . . . . . . . . . . . . . . . . . . . . . . . . . . . . . . . . . . . . .16
Customer Service and Spare Parts . . . . . . . . . . . . . . . . . . . . . . . . . . . . . . . . . . . . . . . . . . . . . . . . . . . . . . . . .17
Technical Specifications . . . . . . . . . . . . . . . . . . . . . . . . . . . . . . . . . . . . . . . . . . . . . . . . . . . . . . . . . . . . . . . . .17
Installation
Positioning . . . . . . . . . . . . . . . . . . . . . . . . . . . . . . . . . . . . . . . . . . . . . . . . . . . . . . . . . . . . . . . . . .17
Electrical connection . . . . . . . . . . . . . . . . . . . . . . . . . . . . . . . . . . . . . . . . . . . . . . . . . . . . . . . . . . . . . . . . . . . .18
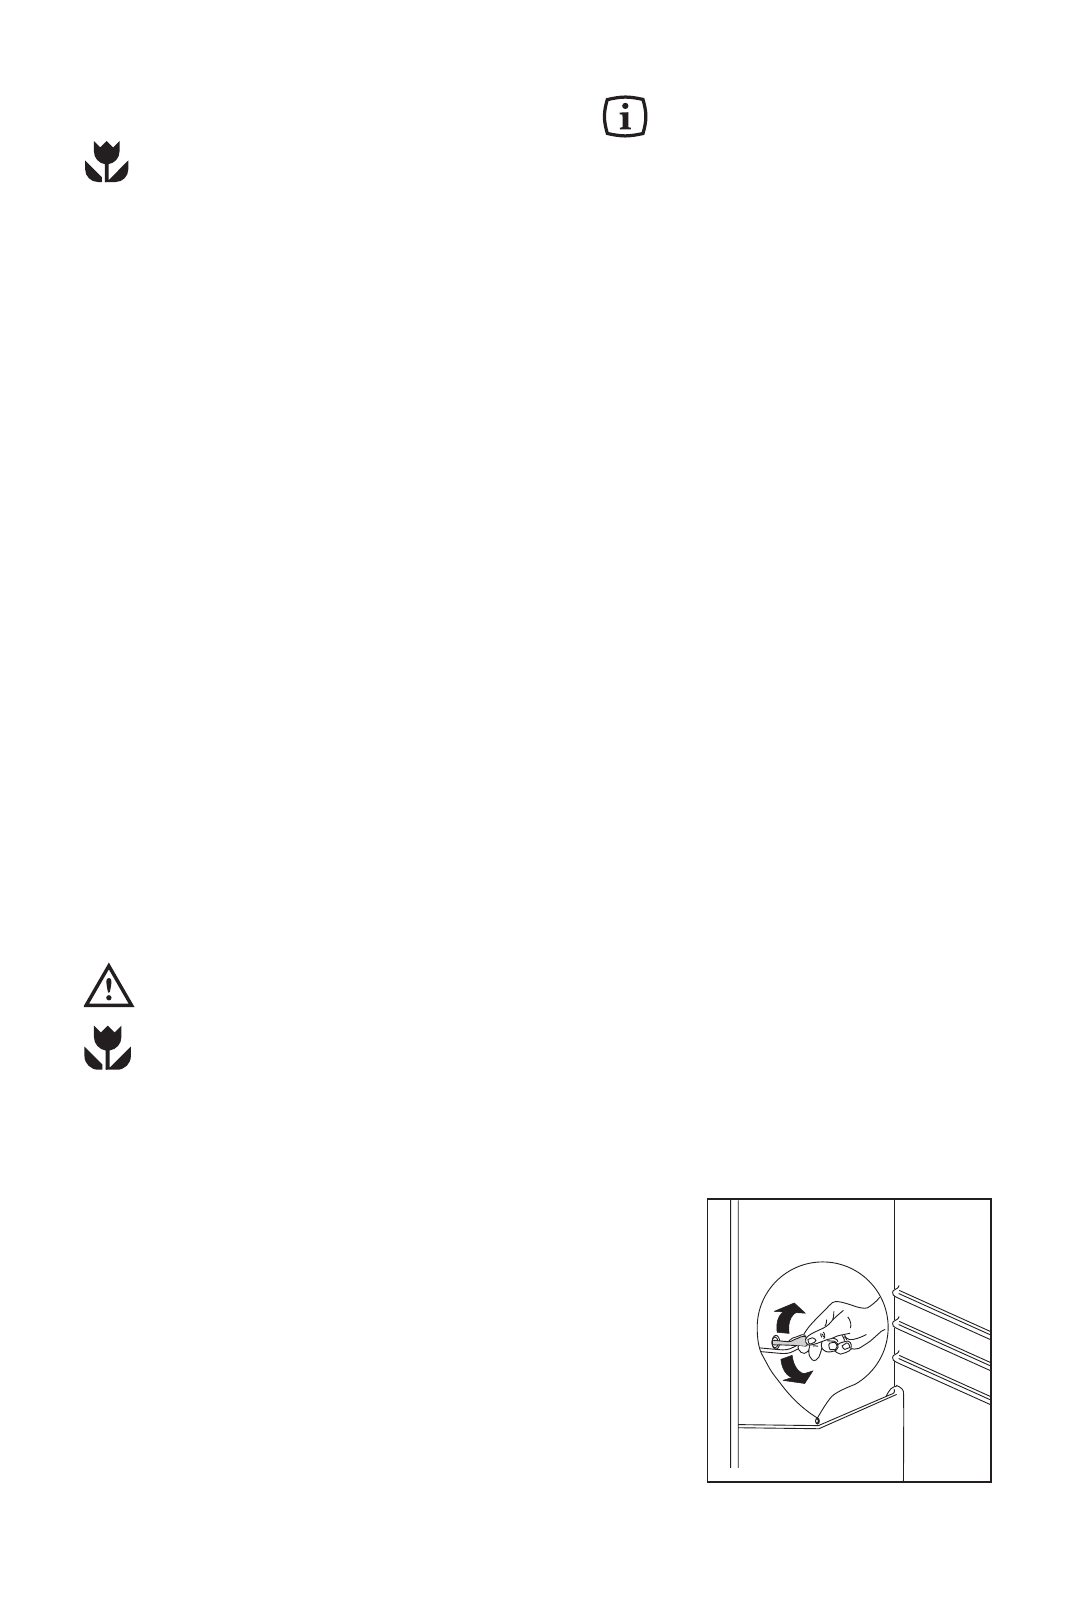
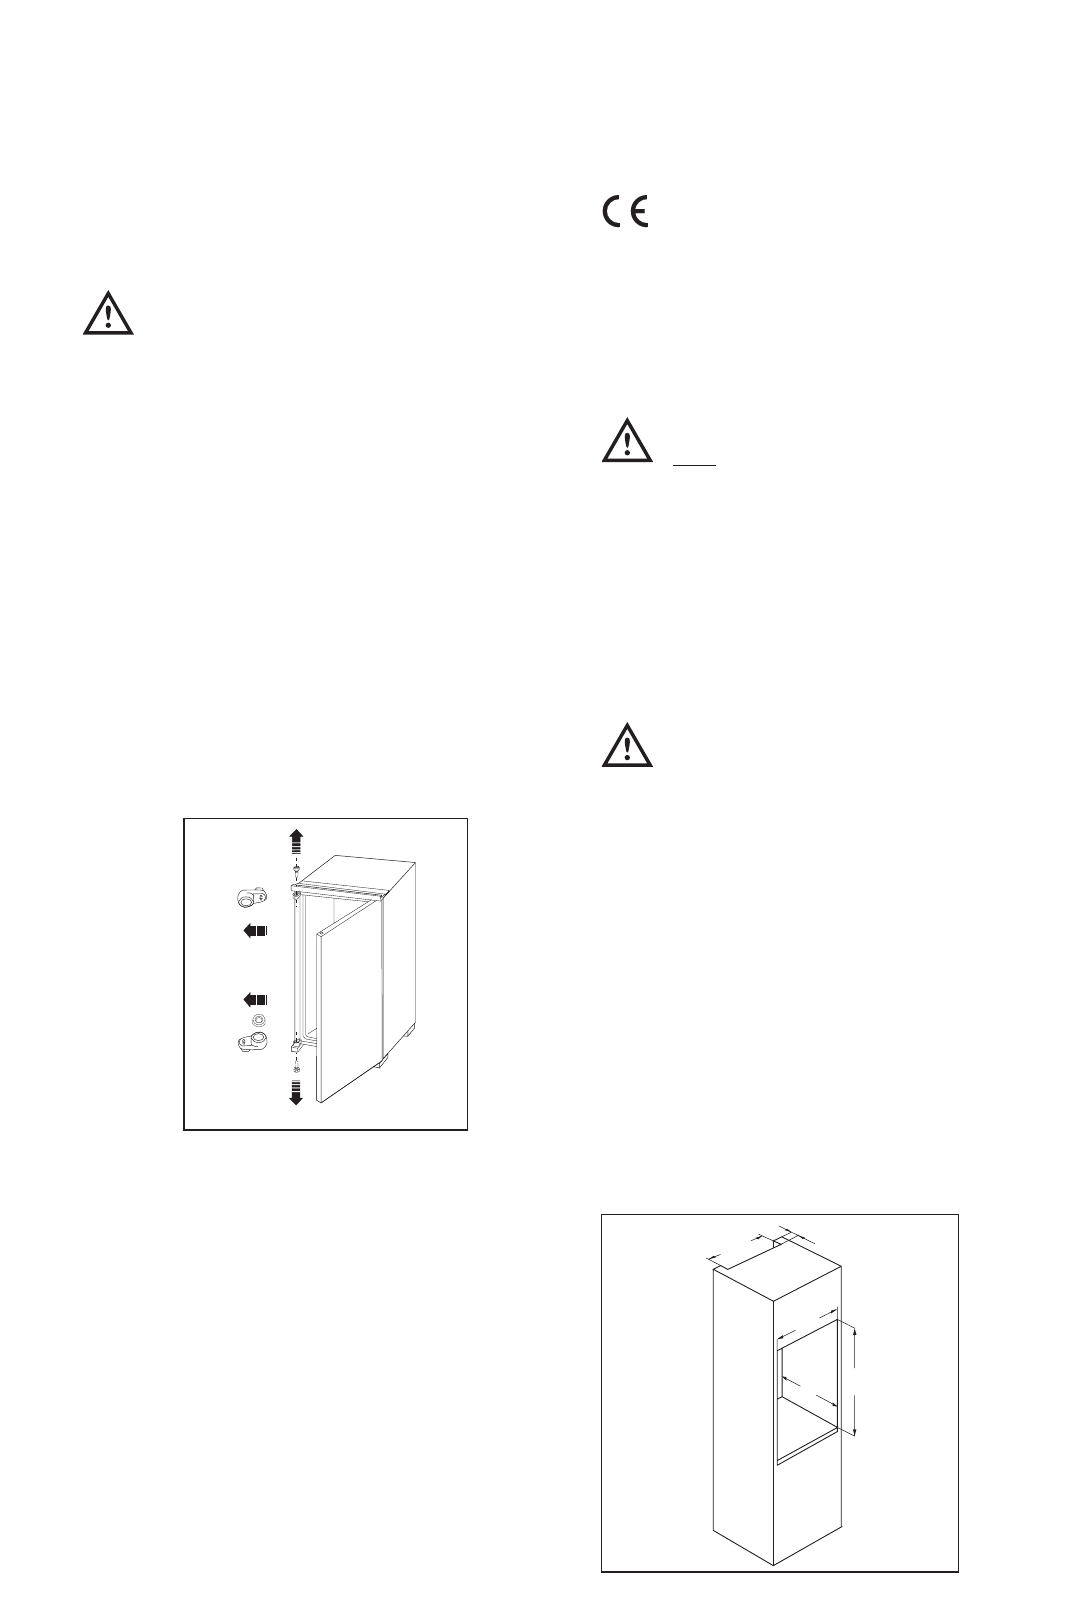
Door reversal . . . . . . . . . . . . . . . . . . . . . . . . . . . . . . . . . . . . . . . . . . . . . . . . . . . . . . . . . . . . . . . . . . . . . . . . . .18
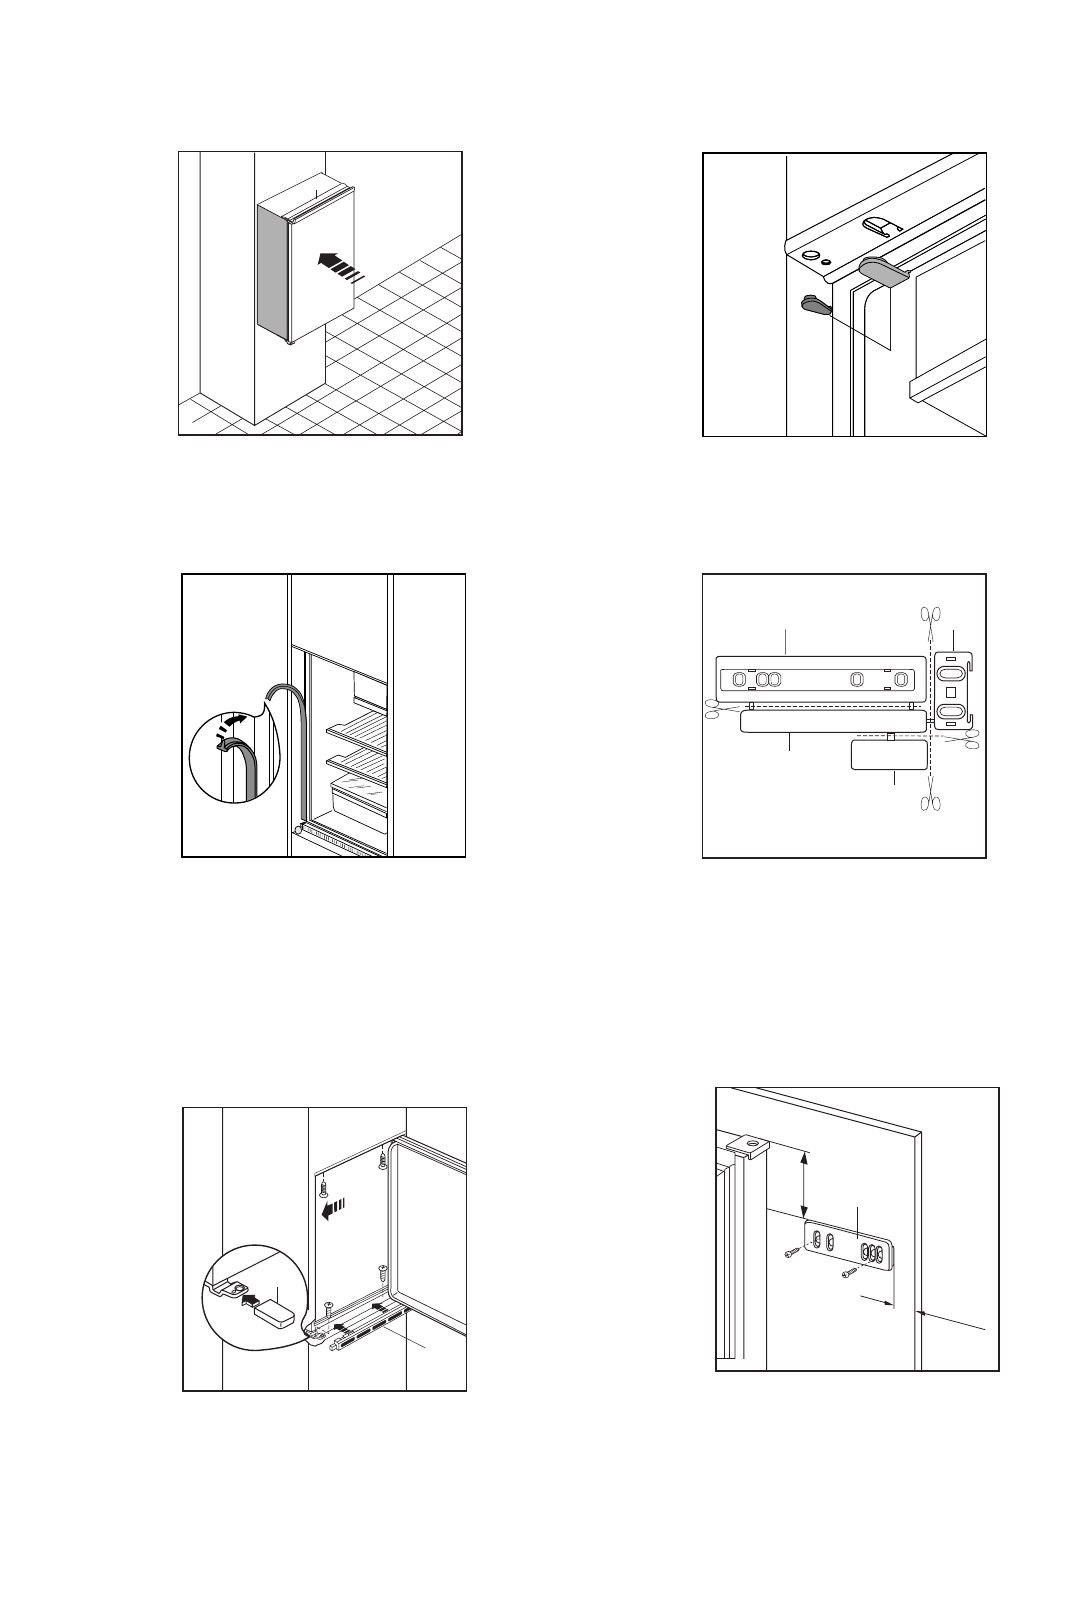
Building-in . . . . . . . . . . . . . . . . . . . . . . . . . . . . . . . . . . . . . . . . . . . . . . . . . . . . . . . . . . . . . . . . . . . . . . . . . . . . .18
12 Printed on paper manufactured with environmentally sound proceses
Safety Instructions
t
Please read these operating instructions
carefully before installing the appliance. These
warnings are provided in the interests of your
safety. Ensure you fully understand them before
installing or using the appliance. If you are
unsure about the meaning of these warnings
contact the Customer Care Department.
Domestic Use
¥ The domestic refrigerators and freezers are
designed to be used specifically for the storage of
edible foodstuffs only.
¥ Check the appliance for transport damage. Under
no circumstances should a damaged appliance be
installed. In the event of damage please contact
your retailer.
¥ This appliance is heavy. The edges and projecting
parts of the cabinet may be sharp. Be careful when
moving the cabinet and always use gloves.
¥ Any electrical work required to install this appliance
should be carried out by a qualified electrician or
competent person.
¥ Ensure that the appliance does not stand on the
electrical supply cable.
¥ Do not use electrical appliances inside the
appliance
¥ Do not keep carbonated drinks or bottles in the freezer
compartment. The glass bottles may break.
¥ Ice lollies can cause Ôfrost/freezer burnsÕ if
consumed straight from the freezer.
¥ It is dangerous to try and alter the specifications or
modify this product in any way.
¥ Under no circumstances should you attempt to
repair the appliance yourself. Refer to your local
Service Centre, and always insist on genuine spare
parts.
Child Safety
¥ This appliance is designed to be operated by
adults only. There is a risk of suffocation! Keep
packaging material away from children!
¥ In case of disposal of the appliance, cut off the
supply cable as close as possible and make
thelock unusable, to prevent children from closing
themselves inside the appliances.
Environment Protection
¥ This appliance does not contain gasses which
could damage the ozone layer, in either its
refrigerant circuit or insulation materials. The
appliance shall not be discarded together with the
urban refuse and rubbish. Avoid damaging the
cooling unit, especially at the rear near the heat
exchanger. Information on your local disposal sites
may be obtained from your municipal authorities.
Index
Instructions for the use of the instructions booklet
Notes which are important for your safety or for the proper functioning of the appliance
Supplementary information regarding operation and practical applications of the appliance.
Tips and notes concerning economical and environmentally sound use of the appliance
Use and Control
Before Use
Wait two hours before connecting the
appliance to allow the oil to flow back in the
compressor.
¥ Before using the appliance for the first time, wash
the interior and all internal accessories with
lukewarm water and some neutral soap so as to
remove the typical smell of a brand-new product,
then dry thoroughly.
Do not use detergents or abrasive
powders, as these will damage the finish.
¥ Remove safety elements used for transportation.
Starting the appliance
¥ Insert the plug into the wall socket and turn the
thermostat knob clockwise beyond position ÇOÈ
(OFF).
¥ Turn the thermostat control to the required setting.
Temperature Control
¥ The thermostat control situated inside the fridge
compartment regulates the temperature of the
appliance.
¥ It allows you to adjust the temperature inside the
refrigerator according to use and external
conditions.
¥
Setting ã1Ò = hightest temperature, warmest
setting
¥ Setting ã6Ò = lowest temperature, coldest
setting.
¥ Setting ã0Ò = Off
A medium setting is generally the most suitable.
Internal Parts
Storage shelves
¥ Depending on the model, your appliance is
equipped with either glass storage shelves or
storage racks.
¥ The shelves can be removed for cleaning.
¥ To permit storage of food packages of various
sizes, the shelves can be placed at different
heights.
Disposal
Appliance Packaging Information
¥ The materials used on this appliance marked with the symbol are recyclable.
>PE<=polyethylene
>PS<=polystyrene
>PP<=polypropylene
All materials are environmentally sound!
Disposal of old Appliances
Information concerning collection schedules or locations can be obtained from your local Council or
Environmental Health Office.
13
¥ To remove the internal shelf pull forward until it can
be tipped up or down and removed.
¥ Please do the same in reverse to insert the shelf at
a different height.
The glass shelf above the vegetable drawers
and the bottle shelf should always remain in
position, to ensure correct air circulation.
¥ To permit storage of food packages of various
sizes, the central door shelf can be adjusted in
height.
¥ Gradually pull the shelf in the direction of the
arrows until it comes free, then reposition as
required.
¥ For more thorough cleaning, the top and bottom
door sheves can be removed by pulling them in the
direction of the arrows, then refitting them in
position.
Explanation of the cold zone signs
The symbol shown here on the left indicates
the coldest point inside your refrigerator.
Coldest area: below or equal to +4¡C
Meat, poultry, fish, cold cuts, ready-to-eat meals,
mixed salads, egg or cream based mixes and cakes,
fresh pasta, cake mixes, pizzas/quiches, fresh foods
and fresh-milk cheeses, vegetables ready to be used
and packed in plastic bags and all other fresh foods
whose expiry date is associated with a preservation
temperature below or equal to +4¡C.
Temperatur indicator
Thermostat must be adjusted
Right Temperature
With the temperature indicator you can keep a check
that your refrigerator is working properly.
The indicator shows the "OK" symbol when the
coldest area reaches a temperature that is below or
equal to 4¡C.
If the temperature is higher than 4¡C the indicator is
black so you must adjust the thermostat to make the
temperature drop.
ATTENTION: Keeping the refrigerator door open for
a long time will cause the internal temperature to
rise. To measure the temperature correctly, it should
be read on the indicator within 30 seconds.
14
D040
D302
PR187
FOOD PROTECTION
OK
15
Hints
Saving Energy
¥ Pay careful attention to where the cabinet is
placed. See the section ÒInstallationÓ. When
installed correctly the cabinet will consume less
energy.
¥ Try to avoid keeping the doors open for long
periods or opening the doors too frequently as
warm air will enter the cabinet and cause the
compressor to switch on unnecessarily often.
¥ If the ambient temperature is high, the thermostat
knob is on the coldest setting (higher numbers) and
the appliance is fully loaded, the compressor may
run continuously, causing frost or ice to form on the
evaporator. If this happens, turn the knob to a
warmer setting (lower numbers) to allow automatic
defrosting and so a saving in electricity
consumption.
¥ Do not place warm foods inside the appliance.
Allow warm foods to cool first.
¥ Keep the heat emitting condenser, the metall grille
on the rear wall of your appliance, always clean.
Hints for refrigeration
¥ Do not store warm food or evaporating liquids in
the refrigerator and do cover or wrap up the food,
particularly if it has a strong smell.
To help you use your refrigerator correctly, here are
some useful hints:
¥
Raw meat (beef, pork, lamb & poultry): wrap in
polythene bags and place on top of the salad
compartment, this being the coldest spot in the
refrigerator.
Meat can only be stored safely in this way for
one or two days at the most.
¥ Cooked food, cold cuts, jelly, etc.: these should
be well covered and can be stored on any of the
glass shelves.
¥
Fruit & vegetables: these should be thoroughly
cleaned and placed in the bottom drawer.
¥ Butter & cheese: these should be placed in
special airtight containers or wrapped in aluminium
foil or polythene bags to keep out as much air as
possible.
¥
Milk bottles: these should have a top and should
be stored in the bottle rack on the door.
Bananas, potatoes, onions and garlic, if not
packed, must not be kept in the refrigerator.
Maintenance
Unplug the appliance before carrying out
any maintenance operation.
Warning
This appliance contains hydrocarbons in its
cooling unit maintenance and recharging must
therefore only be carried out by authorised
technicians.
Defrosting
Refrigerator compartment
¥ Defrosting the refrigerator compartment is
automatic. The defrost water drains out through a
trough into a container at the back of the appliance,
above the motor compressor, where it evaporates.
¥ It is important to periodically clean the defrost
water drain hole.
D037
16
Changing the light bulb
¥ Should the interior light fail to work, first switch off
the appliance and disconnect from the electricity
supply, then replace the bulb as follows:
1. unscrew the light cover securing screws.
2. unhook the moving part by pressing it as shown
in the figure.
3. Replace the bulb by other with another with the
same charcteristics.
D411
Cleaning
Never use metal objects for cleaning your
appliance as it may get damaged.
NEVER use detergents, abrasive powders,
highly perfumed cleaning products or wax
polishes to clean the interior as these will
damage the surface and leave a strong
odour.
Clean the inside with warm water and bicarbonate of
soda. Rinse and dry thoroughly.
To guarantee a safe operation of the fridge, once a
year remove the ventilation grille at the base and
clean the air channels with a vacuum cleaner.
When the appliance is not in use
Disconnect the appliance from the electricity supply.
Empty all foods and clean the appliance, leaving the
doors ajar to prevent unpleasant smells.
Something not Working
Problems may be due to causes which can easily be solved before calling the Technical Service. Please
follow these instructions:
Level properly the appliances if it is not well levelled.
Weight surpasses the storage limit of the door shelf so spread weight more evenly or
take some products out.
Readjust the door if it is not properly aligned.
Set a lower temperature.
Distribute the food products to allow cold air to circulate around them.
Make sure that the door is completely closed and that the insulating strip is complete
and clean.
The temperature where the cabinet is placed is above normal room temperature.
Set a warmer temperature.
Turn the thermostat knob to a lower number.
The temperature where the cabinet is placed is above normal room temperature.
Check that the ventilation is sufficient and that the ventilation openings are
unobstructed.
The cause could be the introduction of large quantities of food and/or frequent
opening/closing of the door.
Sometimes is normal. During automatic defrosting frost thaws on the cooling plate.
Place the drain hose at the back of the cabinet above the drain bowl.
Sometimes this is normal. Temperature control may cause clicking sounds when the
system is connected or disconnected.
The injected cooling gas may produce a gurgling sound while passing through the
tubes.
The motor may cause a humming noise and/or slight bumping.
The insulation material used has a tendency to slighly increase noise levels, how ever it
allows for much better insulation and a lower energy consumption.
Door does not close
It is too warm inside the refrigerator
It is too cold inside the refrigerator.
The compressor works continuously.
There is water inside/outside the refrigerator.
Water comes out on the floor.
Noises
SYMPTOM SOLUTION
Technical specifications
The technical data is indicated in the rating plate on the left side inside the appliance.
This information can be found on the rating plate
inside the cabenit on the left hand wall. We
recommend that you enter this information here, so
that it is handy if needed.
If you cannot find the remedy for a malfunction in
these operating instructions, please contact your
dealer or our customer service department and
consult the Guarantee card.
Selective ordering of replacement parts can save
unnecessary travel and costs.
For this reason always provide the following
appliance information:
¥ Model Name
¥ Model Number (PNC)
¥ Serial Number (S-No.)
Customer service and spare parts
Installation
Take utmost care when handling your
appliance so as not to cause any damages to
the cooling unit with consequent possible fluid
leakages.
¥ During normal operation, the condenser and
compressor at the back of the appliance heat up
considerably. Always ensure that there is adequate
ventilation as a failure to do this will result in
component failure and possible food loss. See
installation instructions.
¥
Important: if the supply cord is damaged, it must
be replaced by a special cord or assembly availa-
ble from the manufacturer or its service agent.
Positioning
¥ Unpack the cabinet and check that it is in good
condition and free of any transport damage.
¥ Place the refrigerator away from direct sunlight and
heat sources.
¥ Maintain recommended ventilation.
17
It is necessary that the niche is provided with a
conduct of venti-lation having the following
dimensions:
Depth 50 mm
Width 540 mm
The climate classification can be found on the rating
plate, which is located inside the cabinet on the left
hand wall.
The following table shows which ambient
temperature is correct for each climate classification:
Climate
classification
SN +10 to +32¡C
+16 to +32¡C
+18 to +38¡C
+18 to +43¡C
N
ST
T
for an ambient temperature of
18
Electrical connection
Before plugging in, ensure that the voltage and
frequency shown on the serial number plate
correspond to your domestic power supply.
Voltage can vary by ±6% of the rated voltage.
For operation with different voltages, a suitably sized
auto-transformer must be used.
Important
The appliance must be earthed.
The power supply cable plug is provided with a
contact for this purpose.
If the domestic power supply socket is not
earthed. connect the appliance to a separate
earth in compliance with current regulations,
consulting a specialist technician.
The Manufacturer declines all
responsibility if the above safety
precautions are not observed.
This appliance complies with the following E.E.C.
Directives:
- 87/308 EEC of 2/6/87 relative to radio
interference suppression.
- 73/23 EEC of 19.2.73 (Low Voltage
Directive)
and subsequent modifications.
- 89/336 EEC of 3.5.89 (Electromagnetic
Compatibility Directive) and subsequent
modifications.
Attention!
It must be possible to disconnect the appliance
from the mains power supply; the plug must
therefore be easily accessible after installation.
Door reversal
The applianceÕs door has been locked in position for
transport by means of pins on both sides. According
to the door opening direction, remove relevant pins
at the top and at the bottom.
Warning!
If the ambient temperature is cold (i.e. in
Winter), the gasket may not fit perfectly to the
cabinet. In that case, wait for the natural fitting
of the gasket or accelerate this process by
heating up the part involved with a normal
hairdrier.
D163
B
A
Dimensions of the recess
SB 1600 E SA 2350 E
Height of housing (1) 880 1225 mm
Depth of housing (2) 550 550 mm
Width of housing (3) 560 560 mm
It is necessary that the niche is provided with a
conduct of ventilation having the following
dimensions:
Depth 50 mm
Width 540 mm
Building-in
PR0
540
50
3
2
1
19
1. Slide the appliance into the recess, pushing it
against the wall on the handle side.
2. Apply joint the sealing strip as shown in figure.
D132
A
D022
3. Open the door and push the appliance against the
side of the kitchen unit opposite to that of ap-
pliance hinges. Fasten the appliance with 4
screws provided in the kit included with the
appliance. Snap vent grille (C) and hinge cover (D)
into position.
D727
C
D
4. Apply covers (B) on joint cover lugs and into hinge
holes.
D013
BB
5. Separate parts A, B, C, D as shown in the figure.
PR266
A
B
C
D
6. Place guide (A) on the inside part of the furniture
door, up and down as shown in the figure and
mark the position of external holes. After having
drilled holes, fix the guide with the screws
supplied.
20mm
A
50mm
PR166
20
7. Fix cover (C) on guide (A) until it clips into place.
8. Open the appliance door and the furniture door at
90¡. Insert the small square (B) into guide (A). Put
together the appliance door and the furniture door
and mark the holes as indicated in the figure.
Remove the squares and drill holes with ¯ 2 mm
at 8 mm from the outer edge of the door. Place the
small square on the guide again and fix it with the
screws supplied.
PR33/2
C
A
8mm
PR167
A
B
9. Should the lining up of the furniture door be
necessary, use the clearance of slots. At the end
of operations, it is necessary to check if the door
of the furniture closes properly.
10. Fix cover (D) on guide (B) until it clips into place.
Brandt UK Ltd
Intec Four, Wade Road, Basingstoke, Hampshire RG24 8NE
Brochures and Stockist information : 08707 505 503
All other departments : 01256 308 000
Service fax : 01256 346 877
Sales Order Processing fax : 01256 843 024
Marketing and Home Economist fax : 01256 325 888
Distributor in Ireland :
Quality Electrical Distributors Ltd
143b Slaney Close, Dublin Industrial Estate , Glasnevin, Dublin 11
Sales telephone : 01 878 1996 ; Sales fax : 01 878 1473
Email : sales@qedltd.ie
ElcoBrandt Suisse SA
Service Apr•s Vente
Route de Soleure 12
2072 St Blaise (NE)
TŽl : 032-756-49-89
Fax : 032-756-49-99
NumŽro vert : 0800 81 12 34
E-mail : serviceCH@elcobrandt.com
Service Consommateurs Brandt
BP 9526
95069 CERGY PONTOISE CEDEX
Tel : +33 (0) 892 02 88 01*
*0,34 Eur TTC / min ˆ partir dÕun poste fixe
Tarif en vigueur au 1 avril 2004
Service fourni par
Brandt Customer Services sociŽtŽ par actions simplifiŽe au capital de 2.500.000 euros
5/7 avenue des BŽthunes, 95310 Saint Ouen l'Aum™ne
RCS Pontoise 440 303 303
Brandt Appliances - S. A. S. au capital de 10 000 000 Euros - RCS Nanterre B 440 302 347
2

Hulp nodig? Stel uw vraag in het forum

Spelregels

Misbruik melden

Gebruikershandleiding.com neemt misbruik van zijn services uitermate serieus. U kunt hieronder aangeven waarom deze vraag ongepast is. Wij controleren de vraag en zonodig wordt deze verwijderd.

Product:

Bijvoorbeeld antisemitische inhoud, racistische inhoud, of materiaal dat gewelddadige fysieke handelingen tot gevolg kan hebben.

Bijvoorbeeld een creditcardnummer, een persoonlijk identificatienummer, of een geheim adres. E-mailadressen en volledige namen worden niet als privégegevens beschouwd.

Spelregels forum

Om tot zinvolle vragen te komen hanteren wij de volgende spelregels:

Belangrijk! Als er een antwoord wordt gegeven op uw vraag, dan is het voor de gever van het antwoord nuttig om te weten als u er wel (of niet) mee geholpen bent! Wij vragen u dus ook te reageren op een antwoord.

Belangrijk! Antwoorden worden ook per e-mail naar abonnees gestuurd. Laat uw emailadres achter op deze site, zodat u op de hoogte blijft. U krijgt dan ook andere vragen en antwoorden te zien.

Abonneren

Abonneer u voor het ontvangen van emails voor uw Brandt sa 2350 e bij:


U ontvangt een email met instructies om u voor één of beide opties in te schrijven.


Ontvang uw handleiding per email

Vul uw emailadres in en ontvang de handleiding van Brandt sa 2350 e in de taal/talen: Engels als bijlage per email.

De handleiding is 0,46 mb groot.


U ontvangt de handleiding per email binnen enkele minuten. Als u geen email heeft ontvangen, dan heeft u waarschijnlijk een verkeerd emailadres ingevuld of is uw mailbox te vol. Daarnaast kan het zijn dat uw internetprovider een maximum heeft aan de grootte per email. Omdat hier een handleiding wordt meegestuurd, kan het voorkomen dat de email groter is dan toegestaan bij uw provider.

Stel vragen via chat aan uw handleiding

Stel uw vraag over deze PDF

Andere handleiding(en) van Brandt sa 2350 e

Brandt sa 2350 e Gebruiksaanwijzing - Nederlands - 13 pagina's

Brandt sa 2350 e Gebruiksaanwijzing - Deutsch - 12 pagina's

Brandt sa 2350 e Gebruiksaanwijzing - Français - 13 pagina's


Uw handleiding is per email verstuurd. Controleer uw email

Als u niet binnen een kwartier uw email met handleiding ontvangen heeft, kan het zijn dat u een verkeerd emailadres heeft ingevuld of dat uw emailprovider een maximum grootte per email heeft ingesteld die kleiner is dan de grootte van de handleiding.

Er is een email naar u verstuurd om uw inschrijving definitief te maken.

Controleer uw email en volg de aanwijzingen op om uw inschrijving definitief te maken

U heeft geen emailadres opgegeven

Als u de handleiding per email wilt ontvangen, vul dan een geldig emailadres in.

Uw vraag is op deze pagina toegevoegd

Wilt u een email ontvangen bij een antwoord en/of nieuwe vragen? Vul dan hier uw emailadres in.


Info