167520
11
Verklein
Vergroot
Pagina terug
1/19
Pagina verder
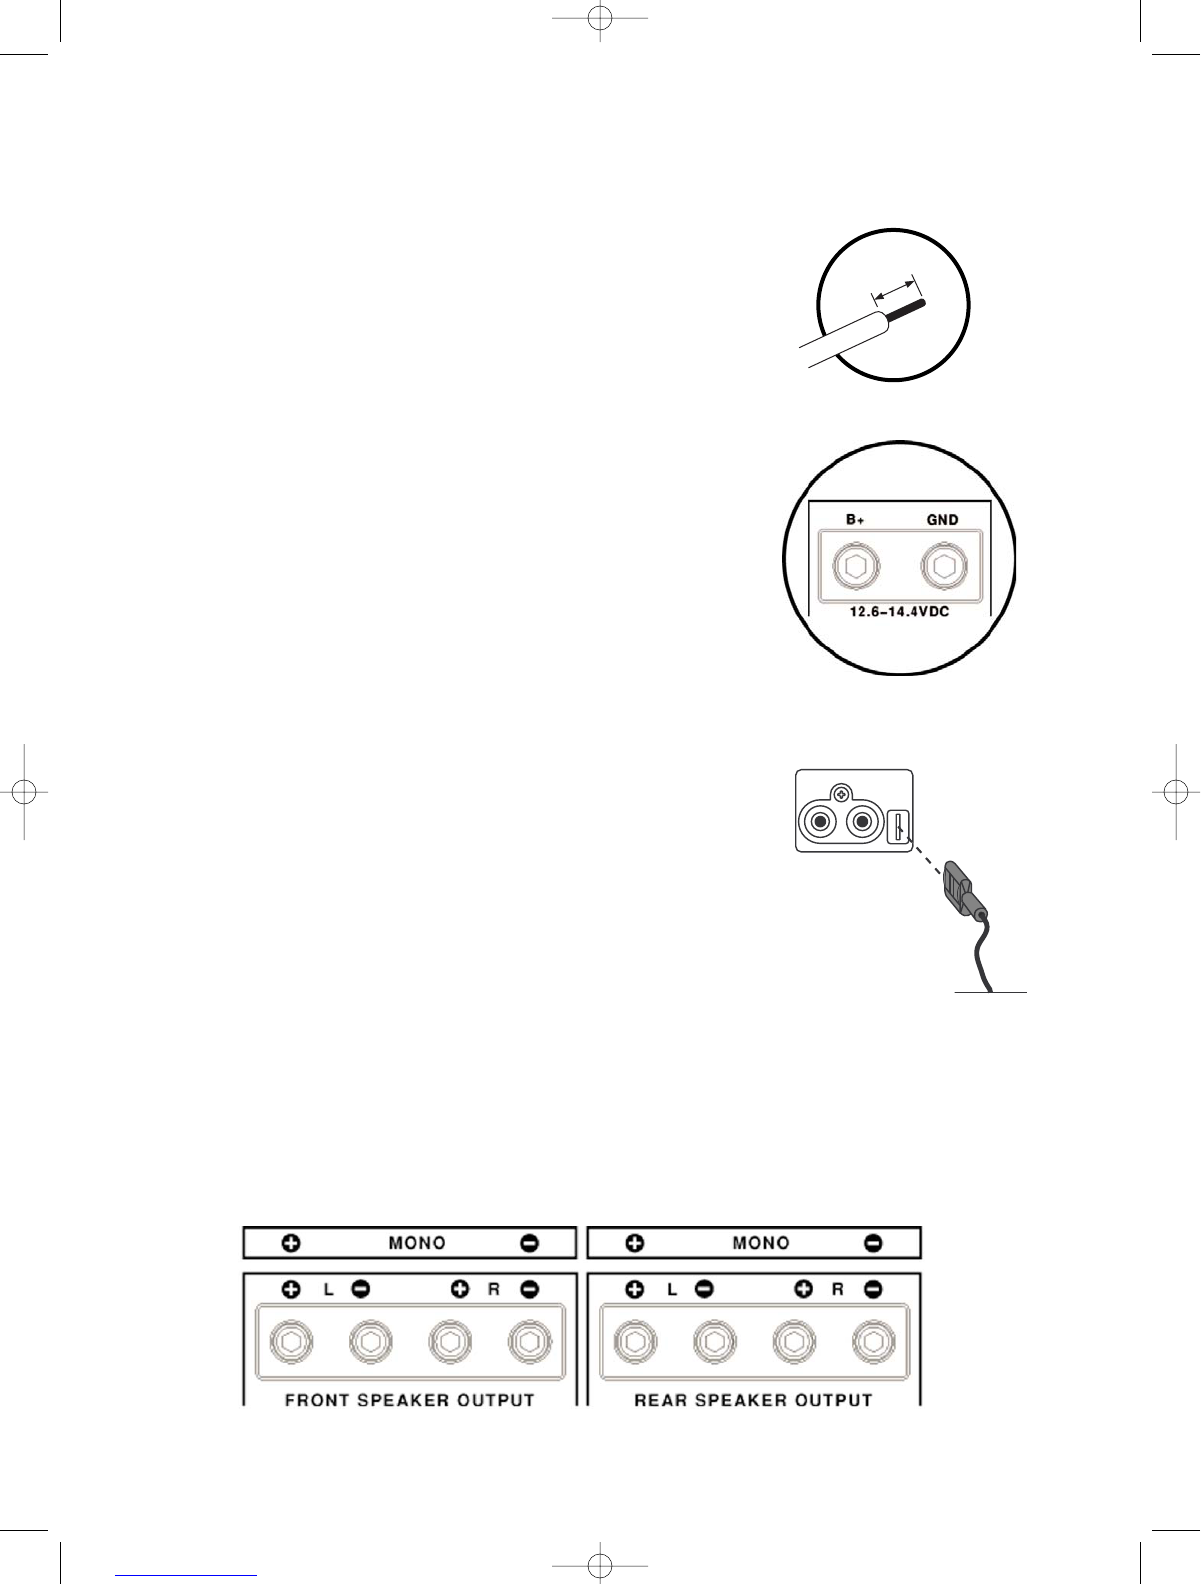
Power/B+ & Power/GND Connection
Strip approximately
5
/8" (16mm) of insulation. The positive (+) power wire
is installed into the amplifier terminal marked “B+.” The negative (–) wire
is installed into the terminal marked “GND.” The ground wire should be
as short as possible and connected directly to the chassis of the vehicle.
Make sure that the chassis connection point is free of rust, grease, dirt,
paint, and other materials that may insulate the ground wire from making
proper connection. Tighten the B+ and GND terminals with the supplied
3mm hex wrench to secure the wire into the terminals. If the power wire
must be routed through a drilled or existing hole, use a nylon panel grom-
met to prevent fraying the wire insulation. Failure to do so could lead to
an electrical short if the wire insulation is worn through and the power wire
is shorted to ground.
Installation—Fuses & Wiring (cont.)
Remote Input Connection
Use the supplied FEMALE slide connector to connect the REMOTE trig-
ger lead from the head unit to the amplifier. Crimp connector to wire from
head unit that controls remote turn-on (refer to head unit owner’s manu-
al). Once the slide connector is crimped into place, carefully push connector
onto recessed male REMOTE terminal adjacent to the RCA Input pair. Only
one (1) remote turn-on terminal should be connected.
Speaker Output Connection
Prepare each wire by stripping approximately
5
/8" (16mm) of insulation. The positive (+) speaker wire is
installed into the amplifier terminal marked “SPEAKER OUTPUT” / “+.” The negative (–) speaker wire is
installed into the amplifier terminal marked “SPEAKER OUTPUT” / “-.” Tighten the “Speaker Output”, “+”,
and “-” terminals with the supplied 2mm hex wrench to secure the wire into the terminals. If the speaker
wires must be routed through a drilled or existing hole, use a nylon panel grommet to prevent fraying the
wire insulation. Failure to do so could lead to an electrical short if the wire insulation is worn through and
the speaker wires are shorted to ground.
1
/
4
"
Strip
5
/8" (16mm)
11
GT-40_manual 4/10/03 4:17 PM Page 11
Downloaded from www.Manualslib.com manuals search engine
11

Hulp nodig? Stel uw vraag in het forum

Spelregels

Misbruik melden

Gebruikershandleiding.com neemt misbruik van zijn services uitermate serieus. U kunt hieronder aangeven waarom deze vraag ongepast is. Wij controleren de vraag en zonodig wordt deze verwijderd.

Product:

Bijvoorbeeld antisemitische inhoud, racistische inhoud, of materiaal dat gewelddadige fysieke handelingen tot gevolg kan hebben.

Bijvoorbeeld een creditcardnummer, een persoonlijk identificatienummer, of een geheim adres. E-mailadressen en volledige namen worden niet als privégegevens beschouwd.

Spelregels forum

Om tot zinvolle vragen te komen hanteren wij de volgende spelregels:

Belangrijk! Als er een antwoord wordt gegeven op uw vraag, dan is het voor de gever van het antwoord nuttig om te weten als u er wel (of niet) mee geholpen bent! Wij vragen u dus ook te reageren op een antwoord.

Belangrijk! Antwoorden worden ook per e-mail naar abonnees gestuurd. Laat uw emailadres achter op deze site, zodat u op de hoogte blijft. U krijgt dan ook andere vragen en antwoorden te zien.

Abonneren

Abonneer u voor het ontvangen van emails voor uw Boston Acoustics gt 40 bij:


U ontvangt een email met instructies om u voor één of beide opties in te schrijven.


Ontvang uw handleiding per email

Vul uw emailadres in en ontvang de handleiding van Boston Acoustics gt 40 in de taal/talen: Engels als bijlage per email.

De handleiding is 0,67 mb groot.


U ontvangt de handleiding per email binnen enkele minuten. Als u geen email heeft ontvangen, dan heeft u waarschijnlijk een verkeerd emailadres ingevuld of is uw mailbox te vol. Daarnaast kan het zijn dat uw internetprovider een maximum heeft aan de grootte per email. Omdat hier een handleiding wordt meegestuurd, kan het voorkomen dat de email groter is dan toegestaan bij uw provider.

Uw handleiding is per email verstuurd. Controleer uw email

Als u niet binnen een kwartier uw email met handleiding ontvangen heeft, kan het zijn dat u een verkeerd emailadres heeft ingevuld of dat uw emailprovider een maximum grootte per email heeft ingesteld die kleiner is dan de grootte van de handleiding.

Er is een email naar u verstuurd om uw inschrijving definitief te maken.

Controleer uw email en volg de aanwijzingen op om uw inschrijving definitief te maken

U heeft geen emailadres opgegeven

Als u de handleiding per email wilt ontvangen, vul dan een geldig emailadres in.

Uw vraag is op deze pagina toegevoegd

Wilt u een email ontvangen bij een antwoord en/of nieuwe vragen? Vul dan hier uw emailadres in.


Info