814790
17
Verklein
Vergroot
Pagina terug
1/170
Pagina verder
Bedienungsanleitung / Garantie
Gebruiksaanwijzing • Mode d’emploi • Manual de instrucciones
Istruzioni per l’uso Instruction Manual Instrukcja obsługi / Gwarancja
Használati utasítás Руководство по эксплуатации
CL6045QCCB_IM 17.12.20
KLIMAGERÄTCL 6045 QC CB/CL 6046 QC CB/CL 6047 QC CB
Airco toestel Climatiseur Unidad de aire acondicianado
Unità aria condizionata Air Conditioning Unit Klimatyzator
Légkondícionáló • Напольный кондиционер •
Bedienungsanleitung ..........................................................................................................................Seite 4
Gebruiksaanwijzing .......................................................................................................................... Pagina 20
Mode d’emploi .....................................................................................................................................Page 37
Manual de instrucciones .................................................................................................................Página 53
Istruzioni per l’uso ............................................................................................................................ Pagina 70
Instruction Manual ...............................................................................................................................Page 87
Instrukcja obsługi .............................................................................................................................Strona 103
Használati utasítás ..............................................................................................................................Oldal 120
Руководство по эксплуатации .........................................................................................................стр. 137
167  .................................................................................................................................................................... 
2
CL6045QCCB_IM 17.12.20
3
Übersicht der Bedienelemente
Overzicht van de bedieningselementen Liste des différents éléments de commande
Indicación de los elementos de manejo Elementi di comando Overview of the Components
Przegląd elementów obsługi A kezelőelemek áttekintése
Обзор деталей прибора
CL6045QCCB_IM 17.12.20
4
CL6045QCCB_IM 17.12.20
Bedienungsanleitung
Vielen Dank, dass Sie sich für unser Produkt entschieden haben. Wir
wünschen Ihnen viel Freude mit dem Gerät.
Symbole in dieser Bedienungsanleitung
Wichtige Hinweise für Ihre Sicherheit sind besonders gekennzeichnet.
Beachten Sie diese Hinweise unbedingt, um Unfälle und Schäden am
Gerät zu vermeiden:
WARNUNG:
Warnt vor Gefahren für Ihre Gesundheit und zeigt mögliche Verlet-
zungsrisiken auf.
ACHTUNG:
Weist auf mögliche Gefährdungen für das Gerät oder andere Gegen-
stände hin.
HINWEIS:
Hebt Tipps und Informationen für Sie hervor.
Allgemeine Hinweise
Lesen Sie vor Inbetriebnahme dieses Gerätes die Bedienungsanleitung
sehr sorgfältig durch und bewahren Sie diese inkl. Garantieschein,
Kassenbon und nach Möglichkeit den Karton mit Innenverpackung gut
auf. Falls Sie das Gerät an Dritte weitergeben, geben Sie auch die Be-
dienungsanleitung mit.
Benutzen Sie das Gerät ausschließlich für den privaten und den dafür
vorgesehenen Zweck. Dieses Gerät ist nicht für den gewerblichen
Gebrauch bestimmt.
Benutzen Sie das Gerät nicht im Freien. Halten Sie es vor Hitze,
direkter Sonneneinstrahlung, Feuchtigkeit (auf keinen Fall in Flüssig-
keiten tauchen) und scharfen Kanten fern. Benutzen Sie das Gerät
nicht mit feuchten Händen.
Das Gerät und das Netzkabel müssen regelmäßig auf Zeichen von
Beschädigungen untersucht werden. Wird eine Beschädigung fest-
gestellt, darf das Gerät nicht mehr benutzt werden.
Verwenden Sie nur Original-Zubehör.
Zur Sicherheit Ihrer Kinder lassen Sie keine Ver-packungsteile (Plas-
tikbeutel, Karton, Styropor, etc.) erreichbar liegen.
WARNUNG:
Lassen Sie kleine Kinder nicht mit Folie spielen. Es besteht Er-
stickungsgefahr!
Spezielle Sicherheitshinweise für dieses Gerät
Auf dem Produkt nden Sie Symbole mit Warn- oder Informationscharakter:
Anweisungen lesen!
WARNUNG: Brandgefahr!
Das Gerät enthält ein brennbares Kältemittel!
Keine Gegenstände, außer den vom Hersteller erlaubten, zur Beschleunigung des Abtauprozesses verwenden.
Das Gerät sollte nur in Räumen ohne dauernde Zündquellen (z. B. offene Flammen, ein eingeschaltetes Gas-
gerät oder einen Elektroheizer) aufbewahrt werden.
Das Gerät nicht anbohren oder anbrennen.
Denken Sie daran, dass Kältemittel geruchslos sind.
Die Service-Anleitung ist unter der folgenden Internetadresse verfügbar: www.sli24.de
Im Bereich „Downloads“ geben Sie bitte die Modell-Bezeichnung CL 6045 QC CB ein.
Jede Person, die an dem Kältemittelkreislauf arbeitet, muss einen Befähigungsnachweis von einer Industrie-
akkreditierten Stelle, die ihre Kompetenz im sicheren Umgang mit Kältemitteln anhand eines in der Industrie
bekannten Verfahrens nachweist, vorweisen können.
Servicearbeiten sollten nur gemäß den Herstellervorgaben durchgeführt werden. Ist für die Wartungs- und
Reparaturarbeiten die Unterstützung von weiteren Personen erforderlich, sollte die im Umgang mit brennbaren
Kältemitteln geschulte Person die Arbeiten ständig überwachen.
ACHTUNG: Überhitzungsgefahr!
Halten Sie die Lüftungsschlitze frei!
Decken Sie das Gerät nicht ab!
5
CL6045QCCB_IM 17.12.20
ACHTUNG:
Unsachgemäße Installation und Inbetriebnahme ohne Nachweis durch einen zertizierten Fachbetriebs führt zum
Erlöschen der Garantie gemäß EU 517 / 2014 Kapitel II Art. 3.
WARNUNG:
Benutzen und lagern Sie das Gerät nicht an folgenden Orten:
- In der Nähe einer Feuerquelle.
- Einem Bereich, in dem Wasser oder Öl spritzen kann.
- Einem Bereich, der direktem Sonnenlicht ausgesetzt ist.
- Im Badezimmer, in der Waschküche oder an einem Swimmingpool.
Berühren Sie das Gerät nicht, wenn Sie barfuß sind oder Körperteile nass oder feucht sind.
Während der Installation des Gerätes durch einen zertizierten Fachbetrieb, sichern Sie den umliegenden Bereich
ab, um Unfälle zu vermeiden. Kinder und andere Unbefugte sollten keinen Zutritt haben.
Stellen Sie sicher, dass der Sockel der Außenanlage ausreichend fest montiert ist.
Stellen Sie sicher, dass keine Luft in das Kältemittelsystem eindringen kann und prüfen Sie, ob Kältemittel austritt,
wenn Sie die Klimaanlage bewegen. Denken Sie daran, dass Kältemittel geruchslos sind.
Führen Sie nach der Installation der Klimaanlage einen Testlauf durch und überprüfen Sie die Betriebsdaten.
Die in der eingebauten Steuereinheit installierten Sicherungen haben einen Nennwert von T 5 A / 250 V. Stellen Sie
sicher, dass das Innengerät stets mit einer Sicherung für den maximalen Eingangsstrom geeigneten Kapazität
oder mit einem anderen Überlastungsschutzgerät geschützt wird.
Das Gerät muss mit einer Installation vom Versorgungsnetz getrennt werden können, welche eine allpolige Kon-
takttrennung aufweist, welche unter den Bedingungen der Überspannungskategorie III eine vollständige Trennung
ermöglicht. Diese muss gemäß den Sicherheitsvorschriften in die Festverkabelung integriert werden. Alle Elektro-
arbeiten dürfen nur durch einen Elektrofachbetrieb durchgeführt werden. Die Klimaanlage darf nur von zertizier-
ten Fachbetrieben installiert werden.
Stellen Sie das Gerät nicht in der Nähe von brennbaren Stoffen (Alkohol usw.) oder Druckbehältern (z. B Sprüh-
dosen, Gasaschen) auf. Der Abstand sollte mindestens 50 cm betragen.
Wenn das Gerät in Bereichen ohne Lüftungsmöglichkeit verwendet wird, müssen Vorkehrungen getroffen werden,
um zu verhindern, dass durch Kältemittelgaslecks eine Brandgefahr entstehen kann.
Beachten Sie die nationalen Anschlussvorschriften. Die Verkabelung muss den geltenden nationalen Vorschriften
entsprechen.
Vor dem Berühren der Verbindungsklemmen müssen alle Stromkreise von der Stromversorgung getrennt werden.
Dieses Gerät kann von Kindern ab 8 Jahren und darüber sowie von Personen mit verringerten physischen, senso-
rischen oder mentalen Fähigkeiten oder Mangel an Erfahrung und / oder Wissen benutzt werden, wenn sie beauf-
sichtigt oder bezüglich des sicheren Gebrauchs des Gerätes unterwiesen wurden und die daraus resultierenden
Gefahren verstanden haben.
Kinder dürfen nicht mit dem Gerät spielen.
Reparieren Sie das Gerät nicht selbst, sondern suchen Sie einen autorisierten Fachmann auf.
Die Reinigung und Wartung muss von Fachpersonal durchgeführt werden. Trennen Sie das Gerät in jedem Fall
von der Stromversorgung bevor Reinigungs- oder Wartungsarbeiten durchgeführt werden.
Dieses Gerät wurde für die Klimatisierung von Wohnräumen entwickelt und darf nicht für andere Zwecke wie z. B
zum Trocknen von Kleidung, Abkühlen von Lebensmitteln usw. verwendet werden.
Verwenden Sie das Gerät nur mit montiertem Luftlter. Die Verwendung des Klimageräts ohne Luftlter kann zu
einer übermäßigen Ansammlung von Staub oder Verunreinigungen an den Innenteilen des Geräts führen und
Schäden bzw. Fehlfunktionen verursachen.
Der Benutzer ist dafür verantwortlich, dass das Gerät von einem qualizierten Techniker installiert wird. Dieser
hat zu prüfen, ob es gemäß den geltenden Gesetzen und Richtlinien geerdet ist und einen thermomagnetischen
Schutzschalter besitzt.
6
CL6045QCCB_IM 17.12.20
Setzen Sie sich niemals längere Zeit direkt kaltem Luftstrom aus. Der direkte und längere Aufenthalt im kalten
Luftstrom kann gesundheitsschädlich sein. Besondere Vorsicht ist für Kinder, alte oder kranke Menschen geboten.
Wenn das Gerät Rauch absondert oder ein Brandgeruch auftritt, unterbrechen Sie sofort die Stromversorgung
und wenden Sie sich an Ihren Service. Eine Verwendung des Geräts unter solchen Bedingungen bzw. in diesem
Zustand kann zu Bränden oder Stromschlägen führen.
Schalten Sie das Gerät über die Taste aus, wenn Sie es über einen längeren Zeitraum nicht benutzen.
Achten Sie darauf, die Luftstromrichtung richtig einzustellen. Die Klappen müssen im Heizmodus nach unten und
im Kühlmodus nach oben gerichtet sein.
Durch die Vermeidung von extrem schwankenden Temperatureinstellungen können Schäden am Gerät vermie-
den werden.
Das Netzkabel nicht biegen, ziehen oder zusammendrücken, da es dadurch beschädigt werden kann. Ein be-
schädigtes Netzkabel kann Stromschläge oder Feuer verursachen. Nur spezialisiertes technisches Personal darf
ein beschädigtes Netzkabel ersetzen.
Blockieren Sie nicht den Lufteinlass oder -auslass des Innen- oder Außengeräts. Das Verstopfen dieser Öffnun-
gen führt zu einer Verringerung der Kühlleistung und kann zu Ausfällen oder Beschädigungen führen. Führen Sie
keine unbefugten und unsachgemäßen Änderungen am Gerät durch.
Stellen Sie keine schweren oder heißen Gegenstände auf das Gerät.
Lassen Sie Fenster oder Türen nicht dauerhaft geöffnet, wenn die Klimaanlage in Betrieb ist.
Richten Sie den Luftstrom nicht auf Panzen oder Tiere. Ein längerer Aufenthalt im direkten kalten Luftstrom kann
sich negativ auf Panzen und Tiere auswirken.
Klettern Sie nicht auf das Außengerät und stellen Sie keine Gegenstände darauf ab.
Führen Sie niemals einen Stab oder einen ähnlichen Gegenstand in das Gerät ein. Dies kann zu Verletzungen
und Schäden führen.
Achten Sie beim Verlegen und Biegen der Kühlmittelleitungen darauf, dass Sie ein dafür geeignetes Spezial-
werkzeug benutzen. Ein Abknicken der empndlichen Leitungen muss aus Sicherheitsgründen in jedem Fall ver-
mieden werden. Alle Arbeiten müssen von einem zertizierten Betrieb durchgeführt werden und gemäß der dem
Gerät beiliegenden Anlage entsprechend dokumentiert und nachgewiesen werden.
Die Kühlmittelleitungen dürfen nicht ohne Weiteres verlängert oder verkürzt werden, da diese ab Werk bereits mit
dem Kühlmittel vorbefüllt sind.
ACHTUNG:
Alle technischen Änderungen an den Kühlmittelleitungen müssen durch einen zertizierten Fachbetrieb durch-
geführt werden. Unsachgemäße Veränderungen führen zum Erlöschen der Garantie.
Achten Sie darauf, dass alle Leitungen diffusionsdicht isoliert sind, damit sich keine Flüssigkeiten, Wasserdampf,
oder Kondensat bilden und z. B. ins Innere des Mauerwerks gelangen können. So können Feuchtigkeit und
Schimmelbildung vermieden werden.
Umgang mit Batterien
WARNUNG:
Setzen Sie Batterien keiner hohen Wärme, wie z. B. Sonnenschein,
Feuer oder ähnlichem aus. Es besteht Explosionsgefahr!
Halten Sie Batterien von Kindern fern. Sie sind kein Spielzeug.
Öffnen Sie Batterien nicht gewaltsam.
Vermeiden Sie den Kontakt zu metallischen Gegenständen (Ringe,
Nägel, Schrauben usw.). Es besteht Kurzschlussgefahr!
Durch einen Kurzschluss können sich Batterien stark erhitzen oder
evtl. sogar entzünden. Verbrennungen können die Folge sein.
Zu Ihrer Sicherheit sollten die Batteriepole beim Transport mit Kle-
bestreifen überdeckt werden.
Falls eine Batterie ausläuft, die Flüssigkeit nicht in die Augen oder
Schleimhäute reiben. Bei Berührung die Hände waschen, die
Augen mit klarem Wasser spülen. Bei anhaltenden Beschwerden
einen Arzt aufsuchen.
WARNUNG:
Nicht wiederauadbare Batterien dürfen nicht aufgeladen werden.
Beachten Sie die Polarität beim Einlegen der Batterie(n).
ACHTUNG:
Wird die Fernbedienung längere Zeit nicht benutzt, entnehmen Sie
die Batterien, um ein „Auslaufen“ von Batteriesäure zu vermeiden.
Ungleiche Batterietypen oder neue und gebrauchte Batterien dürfen
nicht zusammen verwendet werden.
Batterien gehören nicht in den Hausmüll. Geben Sie verbrauchte
Batterien bei zuständigen Sammelstellen oder beim Händler ab.
7
CL6045QCCB_IM 17.12.20
Auspacken des Gerätes
1. Nehmen Sie das Gerät aus seiner Verpackung.
2. Entfernen Sie sämtliches Verpackungsmaterial, wie Folien, Füllmate-
rial und Kartonverpackung.
3. Überprüfen Sie das Gerät auf eventuelle Transportschäden, um Ge-
fährdungen zu vermeiden.
4. Im Schadensfall nehmen Sie das Gerät nicht in Betrieb. Wenden Sie
sich an Ihren Händler.
Lieferumfang
Inneneinheit
a) 6 × Schrauben
b) 6 × Dübel
c) 1 × Wandhalterung
Außeneinheit
d) 1 × Kondenswasserablaufstutzen
e) 4 × Standfüße für die Außeneinheit
Anschlusszubehör
f) 1 × Anschlusskabel für die Außeneinheit
g) 2 × Kühlmittelleitungen (grau und blau) inkl.
Isolierung
h) 1 × Isoliermaterial (Ersatz)
i) 2 × Kondenswasserleitungen
j) 1 × Vinylband
k) 1 × Lochabdeckung
Zubehör
m) 1 × Fernbedienung
n) 2 × R03 „AAA“ 1,5 V Batterien
o) 2 × Filter
p) 2 × Filtereinsätze
1 × Aktivkohlelter (grau)
1 × Ionisierungslter (grün)
Übersicht der Bedienelemente
Seite 3
Geräteeinheit für den Innenbereich
1 Frontblende
2 Filtereinsatz mit Aktivkohlelter (grau)
3 Filtereinsatz mit Ionisierungslter (grün)
4 WLAN Modul
5 LED Display
6 Typenschild (Position kann abweichen)
7 Schaltplan
8 Elektrische Anschlusseinheit
9 Taste (Ein- / Ausschalten)
10 Luftabweiser
11 Signalempfänger
12 Luftleitklappe
13 Fernbedienung
Geräteeinheit für den Außenbereich
14 Typenschild der Außeneinheit (Position kann abweichen)
15 Anschlussabdeckung
16 Kühlmittelventil
a grau
b blau
17 Luftauslass
Fernbedienung
HINWEIS:
Sollte Ihr Modell über eine der Funktionen nicht verfügen, hören Sie
trotzdem einen Piepton, wenn Sie die Taste drücken.
Tasten der Fernbedienung
Nr. Taste Bedeutung
1Ein- / Ausschalten
2OPTION Auswahltaste
3Einstell- / Auswahltaste
4Einstell- / Auswahltaste
5ECO Aktivieren / Deaktivieren ECO Funktion
6TURBO Aktivieren / Deaktivieren der Turbo Funktion
7Mode Auswahltaste Betriebsmodi
8Fan Einstellung der Lüftergeschwindigkeit
9Einstellung der Luftleitklappe
10 Einstellung der Luftabweiser (nicht vorhan-
den; nur manuelle Einstellung möglich)
Display der Fernbedienung
Netzwerkanzeige
Kindersicherung
AUTO Automatik-Modus
COOL Kühlmodus
DRY Luftentfeuchtungsmodus
HEAT Heizmodus
FAN Ventilator-Modus
ECO Energiesparmodus
Lüftungsgeschwindigkeitsanzeige
Lüftung aus
8
CL6045QCCB_IM 17.12.20
Höchste Temperatur und Geschwindigkeit
Luftleitklappenanzeige
Luftabweiseranzeige (nicht vorhanden)
Schlummer Modus
Automatisches Ein- und Ausschalten
Automatische Temperaturberechnung
Schimmel- / Selbstreinigung
Health Funnktion (nicht vorhanden)
nicht vorhanden
Informationen zur App „Smart Life - Smart Living“
Die Smart Life - Smart Living App ist für Android und für iOS verfüg-
bar. Scannen Sie den entsprechenden QR Code, um direkt zum Down-
load zu gelangen.
HINWEIS:
Anbieterbedingt können beim Download der App Kosten entstehen.
Google Play App Store
Informationen zur Bedienung mit der App
Dieses Gerät bieten Ihnen die Möglichkeit das Gerät über Ihr Heimnetz-
werk zu bedienen. Voraussetzung dafür ist eine dauerhafte WLAN Ver-
bindung mit Ihrem Router und die kostenlose App „Smart Life - Smart
Living“. Über die App können Sie komfortabel auf alle Funktionen des
Gerätes zugreifen. Um ein unbeabsichtigtes Einschalten von unterwegs
vorzubeugen, empfehlen wir das Gerät vom Stromnetz zu trennen,
wenn Sie nicht zu Hause sind!
Systemanforderung für die Verwendung der App
iOs 10.0 oder höher
Android 5.0 oder höher
Inbetriebnahme mit der App
1. Installieren Sie die App „Smart Life - Smart Living“. Erstellen Sie ein
Benutzerkonto.
2. Aktivieren Sie die WLAN Funktion in den Einstellungen Ihres Gerätes.
3. Stellen Sie sicher, dass sich Ihr W-Lan Netzwerk in der Nähre Ihres
Gerätes bendet.
4. Schalten Sie die Inneneinheit ein.
5. Öffnen Sie die App und wählen Sie „ + “ aus.
6. Wählen Sie das Menü „Klimaanlage“ aus und folgen den Anweisun-
gen auf dem Display.
7. Drücken Sie die Taste ECO auf der Fernbedienung 6-mal bis Ihnen
„CF“ angezeigt wird. Sollte Ihnen „AP“ angezeigt werden, drücken Sie
erneut 6-mal die Taste ECO.
HINWEIS:
„CF“: Kontrollleuchte am Modul (4) blinkt schnell.
„AP“: Kontrollleuchte am Modul (4) blinkt langsam.
Drücken Sie dann „next step“. Geben Sie nun Ihr Passwort ein.
8. Nachdem das Gerät erfolgreich verbunden wurde, leuchtet die
Kontrollleuchte dauerhaft. Jetzt können Sie das Gerät mittels App
bedienen.
HINWEIS:
Das Gerät arbeitet ausschließlich mit 2,4 GHz Routern zusammen.
5 GHz Router werden nicht unterstützt.
WLAN Verbindung trennen
Möchten Sie die bestehende WLAN Verbindung (Kontrollleuchte leuch-
tet) wieder trennen, gehen Sie wie folgt vor:
Drücken Sie 6-mal die Taste ECO auf der Fernbedienung.
HINWEIS:
Möchten Sie die WLAN Verbindung wieder herstellen, gehen Sie vor
wie im Abschnitt „Inbetriebnahme mit der App“ beschrieben.
Installation
Inneneinheit (a)
Montieren Sie die Inneneinheit an einer stabilen Wand, die keinen
Vibrationen ausgesetzt ist.
Alle Geräteöffnungen dürfen nicht blockiert werden, damit die Luft in
den gesamten Raum strömen kann.
Montieren Sie das Gerät nicht in der Nähe von Wärmequellen, Dämp-
fen oder brennbaren Gasen.
Montieren Sie das Gerät nicht an einem Ort, wo es dauerhaft direkter
Sonneneinstrahlung ausgesetzt ist.
Wählen Sie einen Platz wo Kondenswasser leicht abießen kann und
wo es leicht ans Außengerät angeschlossen werden kann.
Überprüfen Sie regelmäßig die korrekte Funktion des Gerätes und
halten Sie die nötigen Mindestabstände stets ein bzw. frei. Wählen
Sie einen Platz an dem der Filter gut erreichbar ist.
Installieren Sie das Gerät nicht in feuchten Räumen wie Badezim-
mern, Waschräumen etc.
Die Installation sollte optimalerweise möglichst hoch oberhalb des
Fußbodens liegen.
Außeneinheit (b)
Installieren Sie das Außengerät nicht in der Nähe von Wärmequellen,
Dampf oder brennbaren Gasen.
Stellen Sie das Gerät nicht an zu staubigen Orten auf.
Installieren Sie das Gerät dort wo Betriebsgeräusche keine Personen
stören und nicht an zu stark von Personen frequentierten Orten.
Sprechen Sie sich ggf. mit Ihren direkten Nachbarn ab. Orientieren
Sie sich hierzu ggf. an der Bundes-Immissionsschutzverordnung-
Lärm.
Installieren Sie das Gerät nicht wo es direkter Sonneneinstrahlung
oder starker Witterung ausgesetzt ist oder nutzen Sie einen Sonnen-
schutz, welcher den Luftstrom nicht beeinträchtigt.
Halten Sie die im u. a. Bild gezeigten Mindestabstände bei Installation
und im laufenden Betrieb stets ein / frei.
Installieren Sie die Außeneinheit an einem stabilen Ort.
Wenn die Außeneinheit Vibrationen ausgesetzt ist, gleichen Sie diese
mittels Gummifüßen am Boden aus.
9
CL6045QCCB_IM 17.12.20
Die Mindestabstände (in mm) sind im Bild eingezeichnet.
ACHTUNG:
Der Käufer muss sicherstellen, dass Personen / Firmen, die diese
Klimaanlage installieren, warten oder reparieren über ausreichende
Qualikationen und Erfahrungen mit Kältemittelprodukten verfügen.
Unsachgemäße Installation und Inbetriebnahme ohne Nachweis
durch einen zertizierten Fachbetrieb führt zum Erlöschen der Ga-
rantie gemäß (EU) 517 / 2014 Kapitel II, Artikel 3.
Installation der Wandhalterung
ACHTUNG:
Bevor Sie die Wandhalterung installieren, stellen Sie in jedem Fall
sicher, wo genau Sie die Bohrung für die Rohre vornehmen wollen!
Siehe Kapitel „Installation der Inneneinheit und Wanddurchführung
nach außen“.
1. Lösen Sie die Wandhalterung an den Verriegelungsclips.
2. Klappen Sie sie die Wandhalterung nach oben.
3. Entfernen Sie die Wandhalterung, indem Sie diese aus der Halterung
lösen.
4. Bohren Sie mindestens 32 mm tiefe Löcher in eine stabile Wand, um
die Platte zu befestigen.
5. Setzen Sie die Kunststoffdübel in das Loch ein
6. Befestigen Sie die Halteplatte mit den mitgelieferten Schrauben an
der Wand.
7. Prüfen Sie den festen Sitz der Halteplatte.
Ausrichtung der Kühlmittelleitungen
ACHTUNG:
Die Klimaanlage muss von einem zertizierten Kälte-Klimafachbetrieb
installiert und angeschlossen werden. Unsachgemäße Installation
führt zum Erlöschen der Garantie.
Die Kühlmittelleitungen können in 3 Richtungen verlegt werden, die in
der Abbildung durch Nummern gekennzeichnet sind. Wenn die Rohrlei-
tungen in Variante 1 oder 3 verlegt werden, schneiden Sie vorsichtig mit
einem Cutter eine Kerbe an der Seite der Inneneinheit entlang der Naht.
Führen Sie die Verbindungsleitungen in die Richtung der Wandöffnung
und binden Sie die Kühlmittelleitungen, die Kondenswasserleitung und
die Stromkabel mit Vinylband zusammen und achten Sie in jedem
Fall auf eine diffusionsdichte Isolierung, damit sich keine Flüssigkeiten,
Wasserdampf, oder Kondensat bilden und z. B. ins Innere des Mauer-
werks gelangen können. So können Feuchtigkeit und Schimmelbildung
vermieden werden. Achten Sie darauf, dass die Kondenswasserleitung
mit einem leichten Gefälle versehen ist, damit das Wasser ungehindert
ießen kann.
ACHTUNG:
Beachten Sie die Diffusionsdichtigkeit der Leitungen, um Nässeschä-
den und Schimmelbildung im Mauerwerk zu vermeiden.
10
CL6045QCCB_IM 17.12.20
Ausrollen der Kühlmittelleitungen
Entfernen Sie die Kappen erst unmittelbar bevor Sie die Kühlmittel-
leitungen anschließen, um es vor Verschmutzungen zu schützen.
Wenn die Leitungen zu oft gebogen oder gezogen werden, werden
sie steif. Biegen Sie die Leitungen nicht mehr als dreimal.
Rollen sie die Leitungen vorsichtig wie in Grak A gezeigt ab. Ver-
meiden Sie ein Knicken.
ACHTUNG:
Ziehen Sie die Leitung nicht auseinander wie in Grak B, sondern
rollen Sie diese vorsichtig ab.
Anschlüsse an die Inneneinheit
ACHTUNG:
Die Klimaanlage muss von einem zertizierten Kälte-Klimafachbetrieb
installiert bzw. angeschlossen werden. Unsachgemäße Installation
führt zum Erlöschen der Garantie.
1. Entfernen Sie die Schutzkappen.
2. Prüfen Sie die Verbindungen auf Verschmutzung oder Beschädigun-
gen.
3. Verbinden Sie die Überwurfmuttern mit dem Anschlussgewinde an
der Inneneinheit. Beachten Sie dabei die Farben der Schutzkappen.
4. Ziehen Sie die Verbindung mit einem entsprechenden Schrauben-
schlüssel in entgegengesetzte Richtung fest.
HINWEIS:
Achten Sie auf das passenden Drehmoment und beachten Sie hierzu
unsere Tabelle „Installationsinformationen“.
Anschluss Kondenswasserableitung an die Inneneinheit
Die korrekte Installation der Kondenswasserableitung des Innengeräts
ist von großer Bedeutung.
1. Den Ablaufschlauch unterhalb der Rohrleitung verlegen und darauf
achten, dass keine Senken entstehen.
2. Der Ablaufschlauch muss nach unten geneigt sein, um den Kondens-
wasserabuss zu erleichtern.
3. Biegen oder verdrehen Sie den Ablaufschlauch nicht. Lassen Sie ihn
nicht überstehen. Tauchen Sie das Ende nicht in Wasser. Wenn eine
Verlängerung an den Schlauch angeschlossen ist, achten Sie beim
Einführen in die Inneneinheit auf die Verbindung.
4. Wenn die Kältemittelleitungen wie im Kapitel „Ausrichtung der Kühl-
mittelleitungen“ gezeigten Nr. 3 verlegt sind, müssen die Rohre, das
Verbindungskabel zur Außeneinheit und der Kondenswasserablauf-
schlauch mit einem Rohrverbinder an der Rückseite des Geräts
gesichert werden.
5. Setzen Sie die Rohrverbindung in die entsprechende Vorrichtung ein.
6. Drücken Sie die Leitung zur Verbindung fest in das Klimagerät und
vergewissern Sie sich, dass die Verbindung dicht ist.
ACHTUNG:
Vermeiden Sie beim Positionieren ein Abknicken und lassen Sie auch
diese Arbeiten nur durch einen zertizierten Fachbetrieb durchführen!
11
CL6045QCCB_IM 17.12.20
Installation der Inneneinheit und Wanddurchführung nach außen
Nachdem Sie die Kühlmittellleitungen- sowie die Kondenswasserleitung
gemäß den Anweisungen angeschlossen haben, gehen Sie wie folgt
vor:
1. Verlegen Sie die Leitungen, das Verbindungskabel zur Außeneinheit
und die Kondenswasserleitung mit großer Sorgfalt in Richtung der
Stelle, wo sie durch die Wand nach außen geführt werden sollen.
2. Binden Sie die Kühlmittelleitungen, Verbindungskabel zur Außenein-
heit und die Kondenswasserleitung mit Vinylband zusammen und
ummanteln anschließend alles stramm mit einem Isolierband (nicht
im Lieferumfang enthalten).
ACHTUNG:
Beachten Sie die Diffusionsdichtigkeit der Leitungen, um Nässe-
schäden und Schimmelbildung im Mauerwerk zu vermeiden.
Achten Sie darauf, dass alle offen liegenden Rohrteile ausreichend
isoliert sind.
3. Bohren Sie ein Loch mit einem Durchmesser von 57 mm und einem
Gefälle von 5 - 7 mm. (Bild 2)
HINWEIS:
Bohren Sie dies mit einem leichten Gefälle nach außen von
5 - 7 mm, um den Abuss des Kondenswassers sicher zu stellen.
Stellen Sie in jedem Fall sicher, dass über die gesamte Länge der
Kondenswasserleitung in Richtung Wandöffnung ein Gefälle be-
steht.
4. Setzen Sie die Lochabdeckung ein.
5. Führen Sie die isolierten Leitungen, das Verbindungskabel zur
Außeneinheit und die Kondenswasserleitung durch die Wandöffnung.
HINWEIS:
Nach Montage der Leitungen verschließen Sie das Loch in der
Wand, durch das die Rohrleitungen geführt werden luft- und was-
serdicht.
6. Befestigen Sie die Inneneinheit sicher am oberen Teil der Wandhal-
teplatte.
7. Drücken Sie den unteren Teil der Inneneinheit fest gegen die Wand-
halteplatte bis dieser fest aufsitzt.
Installation der Außeneinheit
Entscheiden Sie sich vor dem Anschluss der Leitungen für den richti-
gen Platz und berücksichtigen Sie, dass dort genug Raum für spätere
Wartungsarbeiten vorhanden ist. (Beachten Sie die Mindestabstände)
Stecken Sie die mitgelieferten Schutzkappen auf die Standfüße und
befestigen Sie diese an einem dafür geeigneten Platz.
Verwenden Sie besonders stabile Schrauben / Bolzenanker und
berücksichtigen Sie dabei auch das Gewicht des Geräts, um zu ver-
meiden, dass Vibrationen während des Betriebs die Verbindung mit
der Zeit lockern. Die Einheit muss gemäß den geltenden Sicherheits-
vorschriften installiert werden.
Der Kondenswasserablauf der Außeneinheit
Durch die Kondenswasserleitung kann das Kondenswasser und das
Eis, welches sich während der Wärmeproduktion an der Außeneinheit
bildet, abgeleitet werden.
1. Befestigen Sie den Kondenswasserablaufstutzen in der dafür vor-
gesehenen 25 mm Öffnung.
2. Verbinden Sie den Kondenswasserablaufstutzen mit der Kondens-
wasserleitung und achten Sie auf einen geregelten Ablauf, um Näs-
seschäden zu vermeiden.
Elektrischer Anschluss (Außeneinheit)
Entfernen Sie die Anschlussabdeckung (15) an der rechten Seite des
Gerätes. Auf der Rückseite bendet sich der zugehörige Schaltplan.
Siehe Grak.
1. Schließen Sie das Netzanschlusskabel der Inneneinheit an die Klem-
menleiste an.
2. Befestigen Sie das Netzanschlusskabel der Außeneinheit sorgfältig
mit den Kabelverbindungsklemmen.
12
CL6045QCCB_IM 17.12.20
3. Vergewissern Sie sich, dass die Kabel ordnungsgemäß befestigt wur-
den. Achten Sie darauf, dass die Erdung korrekt installiert ist.
4. Setzen sie die Abdeckklappe wieder fest auf das Gerät
ACHTUNG:
Alle Elektroarbeiten müssen von einem zertizierten Elektrofach-
betrieb durchgeführt werden. Unsachgemäße Installation führt zum
Erlöschen der Garantie.
Anleitung Schnellkupplung
Verwenden Sie die Schnellkupplung, um das Innen und Außengerät der
Klimaanlage einfach zu verbinden. Ein schnelles und einfaches Ver-
fahren, bei dem alle Gewährleistungsansprüche bestehen, so lange alle
Arbeiten von einem zertizierten Fachbetrieb durchgeführt werden.
ACHTUNG:
Die im Lieferumfang enthaltenen Kühlmittelleitungen sind ab Werk
mit dem Kühlmittel vorbefüllt.
Die Leitungen dürfen nicht gekürzt und verlängert werden.
Anschluss an die Inneneinheit
1. Rollen Sie die Kühlmittelleitungen vorsichtig und sorgfältig auseinan-
der, wie im Kapitel „Ausrollen der Kühlmittelleitungen“ beschrieben.
Vermeiden Sie in jedem Fall ein Abknicken der Leitungen.
2. Schutzkappen (blau und grau) von den Kupplungen des Innengerä-
tes abnehmen.
3. Stellen Sie sicher, dass alle Schrauben in gutem Zustand sind und
frei von Schmutzpartikeln wie Staub, Sand oder anderen Schweb-
stoffen und Schmutz.
4. Verschrauben Sie die Kühlmittelleitungen mit den Anschlüssen der In-
neneinheit. Beachten Sie hierzu die jeweiligen Farben blau und grau.
Verschrauben Sie danach die Muttern mit Hilfe von zwei Schrauben-
schlüsseln (einen zur Befestigung der Anschlüsse und den anderen
zum Kontern).
HINWEIS:
Achten Sie auf das passenden Drehmoment und beachten Sie
hierzu unsere Tabelle „Installationsinformationen“.
Anschluss an die Außeneinheit
1. Rollen Sie die Kühlmittelleitungen vorsichtig und sorgfältig auseinan-
der, wie in Kapitel „Ausrollen der Kühlmittelleitungen“ beschrieben.
Vermeiden Sie in jedem Fall ein Abknicken der Leitungen.
2. Schutzkappen (blau und grau) von den Kupplungen des Außengerä-
tes abnehmen.
3. Stellen Sie sicher, dass alle Schrauben in gutem Zustand sind und
frei von Schmutzpartikeln wie Staub, Sand oder anderen Schweb-
stoffen und Schmutz.
4. Verschrauben Sie die Kühlmittelleitungen mit den Anschlüssen
der Außeneinheit. Beachten Sie hier-zu die jeweiligen Farben blau
und grau. Verschrauben Sie danach die Muttern mit Hilfe von zwei
Schraubenschlüsseln (einen zur Befestigung der Anschlüsse und den
anderen zum Kontern).
HINWEIS:
Achten Sie auf den passenden Drehmoment und beachten Sie
hierzu unsere Tabelle „Installationsinformationen“.
13
CL6045QCCB_IM 17.12.20
5. Kältemittelkreislauf des Gerätes auf korrekten Verschluss und Luft-
dichtigkeit überprüfen. Verbindungselemente mit Hilfe von Leckage-
spray kontrollieren. Beim Auftreten von Luftblasen, sind Leckagen
vorhanden. In diesem Fall müssen die Sperrventile unbedingt
verschlossen werden. Überprüfen Sie die Leitungen und Anschlüsse
sorgfältig.
HINWEIS:
Die Sperrventile (a) sind ab Werk geschlossen und müssen geöff-
net werden. Das Serviceventil (b) dient ausschließlich für Service-
zwecke.
ACHTUNG:
Die Klimaanlage muss von einem zertizierten Kälte-Klimafachbetrieb
installiert und angeschlossen werden. Unsachgemäße Installation
führt zum Erlöschen der Garantie.
Test der Inneneinheit
Funktioniert der Netzschalter?
Arbeitet der Ventilator?
Funktionieren die Betriebsmodi normal?
Lassen sich Temperatur und Timer richtig einstellen?
Leuchten alle Lampen normal?
Funktionieren die Luftstromklappen normal?
Funktioniert die Kondenswasserableitung normal?
ACHTUNG:
Alle oben genannten Schritte, müssen durch einen zertizierten
Kälte- / Klimabetrieb durchgeführt werden. Unsachgemäße Durchfüh-
rung führt zum Erlöschen der Garantie.
Test der Außeneinheit
Gibt es während des Betriebs ungewöhnliche Geräusche oder Vibra-
tionen?
Gibt es Kühlmittellecks?
HINWEIS:
Die elektronische Steuerung lässt den Kompressor erst drei Minuten
nach dem Einschalten anlaufen.
ACHTUNG:
Alle oben genannten Schritte, müssen durch einen zertizierten
Kälte- / Klimabetrieb durchgeführt werden. Unsachgemäße Durchfüh-
rung führt zum Erlöschen der Garantie.
Installationsinformationen
Installationsanleitung – Installateursinformationen
Ausführung Modell / Kühlleistung (Btu / h) 9k 12k 15 / 18k
Kühlmittelleitungsdurchmesser a) 1 / 4" 6 1 / 4" 6 1 / 4" 6
Kühlmittelleitungsdurchmesser b) 3 / 8" 9,52 1 / 2" 12 1 / 2" 12
Standard Kühlmittelleitungslänge 5 m 5 m 5 m
Maximaler Abstand zw. Innen und Außeneinheit 15 m 15 m 15 m
Zusätzliche Kältemittelfüllung 20 g / m 20 g / m 30 g / m
Maximalabstand zwischen Innen-und Außeneinheit 5 m (15 m) 5 m (15 m) 5 m (15 m)
Kältemittel * R32 R32 R32
*) Weitere Informationen nden Sie auf dem Typenschild am Außengerät
Anzugsdrehmoment für Schutzkappen und Flanschanschlüsse
Kühlmittelleitung Anzugs drehmoment (N × m) Entsprechende Belastung
(Nutzung: 20 cm Schlüssels) Anzugsdrehmoment (N × m)
1 / 4" 6 15 - 20 Fest / Handfest Service-Anschlussmutter 7 - 9
3 / 8" 9,52 31 - 35 Fest Schutzkappen 25 - 30
1 / 2" 12 35 - 45 Fest
5 / 8" 15,88 75 - 80 Fest
14
CL6045QCCB_IM 17.12.20
Kabelspezikationen
Installationsanleitung – Installateursinformationen
Modell Kühlleistung (Btu / h) 9k 12k 15 / 18k
Stromkabel
N1,0 mm²
AWG18
1,0 mm² (1,5 mm²)
AWG18 (AWG16)
1,5 mm²
AWG16
L1,0 mm²
AWG18
1,0 mm² (1,5 mm²)
AWG18 (AWG16)
1,5 mm²
AWG16
E1,0 mm²
AWG18
1,0 mm² (1,5 mm²)
AWG18 (AWG16)
1,5 mm²
AWG16
Anschlusskabel
N1,0 mm² 1,0 mm² (1,5 mm²) 1,5 mm²
L1,0 mm² 1,0 mm² (1,5 mm²) 1,5 mm²
11,0 mm² 1,0 mm² (1,5 mm²) 1,5 mm²
20,75 mm² 0,75 mm² 0,75 mm²
30,75 mm² 0,75 mm² 0,75 mm²
Installationsanleitung – Installateursinformationen
Spannungswandler 9k 12k 18 / 22k
Modell Kühlleistung (Btu / h) Querschnitt
Stromkabel
N1,0 mm² (1,5 mm²)
AWG18 (AWG16)
1,0 mm² (1,5 mm²)
AWG18 (AWG16)
1,5 mm²
AWG16
L1,0 mm² (1,5 mm²)
AWG18 (AWG16)
1,0 mm² (1,5 mm²)
AWG18 (AWG16)
1,5 mm²
AWG16
E1,0 mm² (1,5 mm²)
AWG18 (AWG16)
1,0 mm² (1,5 mm²)
AWG18 (AWG16)
1,5 mm²
AWG16
Anschlusskabel
N1,0 mm² (1,5 mm²) 1,0 mm² (1,5 mm²) 1,5 mm²
L1,0 mm² (1,5 mm²) 1,0 mm² (1,5 mm²) 1,5 mm²
11,0 mm² (1,5 mm²) 1,0 mm² (1,5 mm²) 1,5 mm²
Bei 220 V 7 K, 9 K, 12 K, 15 K, 16 K, 18 K, 22 K, 24 K, 30 K ist der Sicherungswert der Inneneinheit der Klimaanlage 50 T, 3,15 A
Bei 110 V 7 K, 9 K, 12 K ist der Sicherungswert der Inneneinheit der Klimaanlage 50 T, 3,15 A
125 V 7 K, 9 K, 12 K ist der Sicherungswert der Außeneinheit der Klimaanlage 61 T, 15 A
250 V 18 K, 22 K, 24 K ist der Sicherungswert der Außeneinheit der Klimaanlage 65 T, 25 A!
Schaltplan
Für verschiedene Modelle kann der Schaltplan unterschiedlich sein.
Bitte beachten Sie die auf dem Innen- und Außengerät angebrachten
Schaltpläne.
Bei den Innengeräten nden Sie den Schaltplan (7) unter der Front-
blende (1).
Bei den Außengeräten ist der Schaltplan auf die Rückseite der An-
schlussabdeckung (15) geklebt.
HINWEIS:
Bei einigen Modellen sind die Kabel herstellerseits ohne Lüsterklem-
men an die Hauptplatine des Innengeräts angeschlossen.
Bedienung
Nahbedienung
Wenn die Fernbedienung nicht funktioniert oder eine Wartung erforder-
lich ist, gehen Sie wie folgt vor:
1. Öffnen Sie die Frontabdeckung und heben Sie diese an bis Sie die
Taste erreichen.
2. Einmaliges Drücken der Taste führt zum Start der Kühlfunktion.
(Sie hören einen Piepton)
3. Zweimaliges Drücken der Taste innerhalb von 3 Sekunden führt
zum Starten der Heizfunktion. (Sie hören zwei Pieptöne.)
4. Zum Ausschalten drücken Sie die Taste erneut. (Sie hören einen
langen Piepton.)
HINWEIS:
Der externe statische Druck der Wärmepumpe beträgt für alle Modelle
0 Pa.
Fernbedienung
1. Öffnen Sie den Batteriefachdeckel auf der Rückseite der Fernbedie-
nung, indem Sie diese in Pfeilrichtung schieben.
15
CL6045QCCB_IM 17.12.20
2. Legen Sie 2 Batterien des Typs R03 „AAA“ 1,5 V ein. Achten Sie auf
die richtige Polarität. (siehe Batteriefachboden)
HINWEIS:
Kindersicherung: Drücken Sie gleichzeitig die Tasten und um
diese zu aktivieren.
Display Ein- / Ausschalten: ECO Taste lange drücken
3. Richten Sie die Fernbedienung auf die Klimaanlage.
HINWEIS:
Stellen Sie sicher, dass sich keine Gegenstände / Hindernisse
zwischen Fernbedienung und dem Signalempfänger im Innengerät
benden.
HINWEIS:
Setzen Sie die Fernbedienung niemals längere Zeit direkten Son-
nenstrahlen aus.
Benutzen und lagern Sie die Fernbedienung in einem Abstand von
mindestens einem Meter zum Fernseher oder anderen Elektro-
geräten.
Ein- / Ausschalten
Drücken Sie die Taste , um das Gerät einzuschalten.
Drücken Sie die Taste erneut, um das Gerät wieder auszuschalten.
Einstellung des Luftstroms
Der Luftstrom tritt gleichmäßig verteilt in den Raum aus. Sie haben die Mög-
lichkeit, die Strömungsrichtung zu optimieren.
Die Taste aktiviert die Luftleitklappe (1). Der Luftstrom richtet sich von
oben nach unten, um eine gleichmäßige Luftverteilung im Raum zu gewähr-
leisten.
Die Luftabweiser (2) werden manuell positioniert und benden sich unter den
Luftleitklappen. Sie ermöglichen es den Luftstrom nach rechts oder links zu
lenken.
ACHTUNG:
Die Ausrichtung der Luftabweiser muss bei ausgeschalteten Gerätezustand erfolgen.
Niemals die Luftleitklappen manuell positionieren, da dies zu ernsthaften Schäden führen kann.
Stecken Sie niemals Finger, Stöcke oder andere Gegenstände in die Luftein- oder austrittsöffnungen. Dies kann zu Schäden und Verletzungen
führen.
HINWEIS:
Bitte beachten Sie, dass konstruktionsbedingt nicht alle Funktionen in jedem Betriebsmodus auf dem Display der Fernbedienung zu sehen sind.
Durch Drücken der Taste OPTION sehen Sie welche Funktionen im jeweiligen Betriebsmodus zur Verfügung stehen.
Taste MODE Auswahl des jeweiligen Betriebsmodus
Taste OPTION Auswahl der jeweiligen Funktion
Kühlmodus (COOL)
Der Kühlmodus ermöglicht es den Raum zu kühlen und gleichzeitig die
Luftfeuchtigkeit zu reduzieren.
1. Um den Kühlmodus zu aktivieren, drücken Sie die Taste MODE bis
Ihnen „COOL“ im Display der Fernbedienung angezeigt wird. Die
Kühlfunktion startet, wenn die gewählte Temperatur geringer als die
Raumtemperatur ist. (Auswahl mittels der Tasten und .)
2. Um die Funktion der Klimaanlage zu optimieren, stellen Sie die Tem-
peratur, die Geschwindigkeit und die Richtung des Luftstroms durch
Drücken der jeweiligen Tasten ein.
Heizmodus (HEAT)
Der Heizmodus ermöglicht es den Raum zu heizen.
1. Um den Heizmodus zu aktivieren, drücken Sie die Taste MODE bis
Ihnen „HEAT“ im Display der Fernbedienung angezeigt wird. Die
Heizfunktion startet, wenn die gewählte Temperatur höher als die
Raumtemperatur ist. (Auswahl mittels der Tasten und .)
2. Um die Funktion des Heizmodus zu optimieren, stellen Sie die Tem-
peratur, die Geschwindigkeit und die Richtung des Luftstroms durch
Drücken der jeweiligen Tasten ein.
HINWEIS:
Wenn das Gerät mit einer elektrischen Heizung ausgestattet ist,
verzögert dies den Start der Anwendung um wenige Minuten.
HINWEIS:
Im Heizbetrieb kann ein automatischer Abtaufunktionslauf starten,
der für die Reinigung des Geräts unerlässlich ist. Es werden Frost-
rückstände auf dem Kondensator beseitigt, um seine volle Wärme-
austauschkraft wiederzugewinnen. Dieser Vorgang dauert in der
Regel 2 - 10 Minuten. Während des Abtauens stoppt der Lüfter den
Betrieb. Nach dem Auftauen kehrt das Gerät automatisch in den
Heizbetrieb zurück.
Automatisches Einschalten ( )
Um die automatische Einschaltzeit zu programmieren, muss das Gerät
ausgeschaltet sein.
1. Drücken Sie die Taste OPTION.
2. Wählen Sie mit den Pfeiltasten und bis „ “ auf dem Dis-
play der Fernbedienung erscheint.
3. Drücken Sie die Taste OPTION erneut und stellen Sie mit den Pfeil-
tasten und die gewünschte Zeit ein.
4. Bestätigen Sie die Auswahl mit der Taste OPTION.
HINWEIS:
Um die eingestellte Funktion abzubrechen wiederholen Sie die o. a.
Schritte.
Die Timer Funktion kann in 30-minütigen Intervallen eingestellt
werden.
16
CL6045QCCB_IM 17.12.20
Automatisches Ausschalten ( )
Um die automatische Ausschaltzeit zu programmieren, muss das Gerät
eingeschaltet sein.
1. Drücken Sie die Taste OPTION.
2. Wählen Sie mit den Pfeiltasten und bis „ “ auf dem Dis-
play der Fernbedienung erscheint.
3. Drücken Sie die Taste OPTION erneut und stellen Sie mit den Pfeil-
tasten und die gewünschte Zeit ein.
4. Bestätigen Sie die Auswahl mit der Taste OPTION.
HINWEIS:
Um die eingestellte Funktion abzubrechen wiederholen Sie die o. a.
Schritte.
Die Timer Funktion kann in 30-minütigen Intervallen eingestellt
werden.
Ventilator Modus (FAN)
Um den Ventilator Modus einzustellen, drücken Sie die Taste MODE bis
„FAN“ im Display der Fernbedienung erscheint.
Durch Drücken der Taste FAN wird die Geschwindigkeit in der folgen-
den Reihenfolge geändert:
aus ( )
LOW ( )
MEDIUM ( )
HIGH ( )
Turbo ( )
automatisch
Luftentfeuchtungsmodus (DRY)
Mit dieser Funktion wird die Luftfeuchtigkeit im Raum reduziert und die
Luftqualität verbessert.
Um den Luftentfeuchtungsmodus einzuschalten, drücken Sie die Taste
MODE bis „DRY“ im Display der Fernbedienung erscheint. Der Ventila-
tor wird zusammen mit wechselnden Kühlzyklen aktiviert.
Automatik Modus (AUTO)
Um den Automatik Modus zu aktivieren, drücken Sie die MODE Taste
bis „AUTO“ im Display der Fernbedienung erscheint.
Die Ventilatorgeschwindigkeit und die Temperatur werden automatisch
gesteuert, abhängig von der Raumtemperatur.
Umgebungstemperatur Betriebsmodus
< 20 °C Heizen
20 °C ~ 26 °C Entfeuchten
> 26 °C Kühlen
Schlummer Modus ( )
Die Funktion SLEEP stellt die Temperatur automatisch ein, um die
Raumluft in der Nacht besonders angenehm zu machen. Im Kühl- und
Luftentfeuchtungsmodus wird die eingestellte Temperatur automatisch
alle 60 Minuten um 1 °C erhöht bis ein Temperaturanstieg von 2 °C
innerhalb von 2 Stunden erreicht wird.
1. Um den Schlummer Modus zu aktivieren, drücken Sie die Taste
OPTION.
2. Wählen Sie mit den Pfeiltasten und bis „ “ auf dem Dis-
play der Fernbedienung erscheint.
3. Bestätigen Sie die Auswahl mit der Taste OPTION.
4. Durch erneutes Drücken der Taste OPTION können Sie die Funktion
“ ausschalten.
Im Heizmodus wird die Temperatur um 2 °C während der ersten 2 Stun-
den reduziert.
Nach 10 Stunden im Schlummer Modus wird das Gerät automatisch
ausgeschaltet.
Energiesparmodus (ECO)
Durch Drücken der Taste ECO aktivieren oder deaktivieren Sie die
Eco-Funktion. Das Gerät schaltet sich automatisch in den Energiespar-
modus. Die eingestellte Temperatur wird schrittweise und automatisch
erhöht, ohne den Klimakomfort zu beeinträchtigen. Dies führt zu einem
niedrigeren Stromverbauch.
Durch längeres Drücken der Taste ECO, können Sie das Display am
Innengerät ausschalten.
Höchste Temperatur und Geschwindigkeit ( )
Durch Drücken der Taste TURBO aktivieren oder deaktivieren Sie die
Turbo-Funktion. Diese ermöglicht das schnellstmögliche Erreichen der
eingestellten Temperatur.
Schimmel- / Selbstreinigung ( )
1. Um den Selbstreinigungs Modus zu aktivieren, drücken Sie die Taste
OPTION.
2. Wählen Sie mit den Pfeiltasten und bis „ “ auf dem
Display der Fernbedienung erscheint.
3. Bestätigen Sie die Auswahl mit der Taste OPTION.
4. Durch erneutes Drücken der Taste OPTION können Sie die Funktion
“ ausschalten.
Automatische Temperaturberechnung ( )
Automatische Temperaturberechnung mit Hilfe eines Sensors in der
Fernbedienung. Stellen Sie sicher, dass die Fernbedienung keinen
Hitzequellen wie z. B. Lampen ausgesetzt ist.
1. Um den “ Modus zu aktivieren, drücken Sie die Taste OP-
TION.
2. Wählen mit den Pfeiltasten und bis “ auf dem Display der
Fernbedienung erscheint.
3. Bestätigen Sie die Auswahl mit der Taste OPTION.
4. Durch erneutes Drücken der Taste OPTION können Sie die Funktion
“ ausschalten
Reinigung und Wartung
WARNUNG:
Achten Sie darauf, dass bei der Reinigung kein Was-
ser in die Öffnungen des Gerätes eindringt. Es könnte
zu einem elektrischen Schlag oder Brand führen.
ACHTUNG:
Lassen Sie Ihr Gerät regelmäßig warten, damit es sicher und efzi-
ent arbeitet.
Alle Reinigungs- und Wartungsarbeiten, müssen durch einen zerti-
zierten Kälte- / Klimabetrieb durchgeführt werden. Unsachgemäße
Durchführung führt zum Verlust der Garantie.
Filterreinigung (-tausch)
1. Öffnen Sie die Frontblende in Richtung des Pfeils.
17
CL6045QCCB_IM 17.12.20
2. Heben Sie die Frontblende mit einer Hand an, entnehmen Sie mit der
anderen den Staublter.
3. Reinigen Sie den Filter mit Wasser. Bei starker Verschmutzung
verwenden Sie warmes Wasser zur Reinigung (nicht über 45 °C).
Anschließend den Filter trocknen lassen.
4. Setzen Sie den Luftlter wieder ein.
5. Schließen Sie die Abdeckung.
HINWEIS:
Die zusätzlichen Aktivkohlelter (grau) und Ionisierungslter (grün),
können nicht gereinigt werden und sollten abhängig von den Betriebs-
stunden durch neue Filter ersetzt werden. Im nächsten Bild sehen
Sie, wie Sie die Filter entnehmen können.
Reinigung der Inneneinheit
1. Öffnen Sie die Frontplatte des Geräts und hängen Sie diese an den
Scharnieren aus, um sich die Reinigung zu erleichtern.
2. Reinigen Sie das Innengerät mit einem Tuch mit Wasser (nicht wär-
mer als 40 °C).
ACHTUNG:
Besprühen Sie das Gerät nicht mit Reinigungsmitteln.
Benutzen Sie keine Drahtbürste oder andere scheuernde Gegen-
stände.
Benutzen Sie keine scharfen oder scheuernden Reinigungsmittel.
Reinigung der Außeneinheit
Wenn der Lufteinlass der Außeneinheit verstopft ist, entfernen Sie Blät-
ter und anderen Abfall und entfernen Sie danach verbliebenen Staub
mit Druckluft oder etwas Wasser.
Batteriewechsel
HINWEIS:
Verwenden Sie nur neue Batterien. Entfernen Sie die Batterien aus
der Fernbedienung nur, wenn die Klimaanlage nicht in Betrieb ist.
Wann:
Es ist kein Bestätigungston mehr vom Innengerät zu hören.
Das Display funktioniert nicht mehr korrekt.
Wie:
Öffnen sie die rückseitige Abdeckung.
Setzen Sie neue Batterien ein. Achten Sie auf die richtige Polarität.
Störungsbehebung
Störung Mögliche Ursache
Das Gerät arbeitet nicht. Stromausfall / Stecker gezogen
Beschädigter Lüftermotor am Innen- oder Außengerät
Thermomagnetischer Schalter des Kompressors defekt
Defekte Schutzeinrichtung oder Sicherungen
Lose Verbindungen oder herausgezogener Stecker
Betriebsunterbrechung zum Geräteschutz
Spannung zu hoch oder zu niedrig
Funktion „ “ ist aktiviert (Automatisches Einschalten)
Beschädigung an der elektronischen Steuerplatine
Ungewöhnlicher Geruch Luftlter verschmutzt
Geräusch von Wasser Flüssigkeitsrückuss im Kältemittelkreislauf
Feiner Nebelaustritt aus dem Luftauslass Tritt auf, wenn die Luft im Raum sehr kalt wird, zum Beispiel im „COOL“ oder „DRY“ Modi.
Ungewöhnliche Geräusche Geräusche können durch Ausdehnung oder Zusammenziehen bei thermischen Schwankungen an der
Frontplatte entstehen und sind kein Mangel.
18
CL6045QCCB_IM 17.12.20
Störung Mögliche Ursache
Ungewollter Luftstrom (heiß oder kalt) Unpassende Temperatureinstellungen
Der Lufteinlass oder -auslass des Innen- oder Außengeräts wurde blockiert.
Der Luftlter ist blockiert.
Lüftergeschwindigkeit auf Minimum eingestellt
Andere Wärmequellen im Raum
Fehlendes Kältemittel
Das Gerät reagiert nicht auf Signale /
Eingaben.
Die Fernbedienung ist nicht nah genug am Empfänger der Inneneinheit.
Die Batterien der Fernbedienung haben nicht mehr genug Spannung.
Hindernisse zwischen Fernbedienung und Empfänger der Inneneinheit
Das Display ist aus. Aktivierte LED Funktion
Spannungsfehler
Die ECO Funktion ist aktiviert (siehe Kapitel „Energiesparmodus (ECO)“)
Funktionen werden auf der Fernbedie-
nung nicht angezeigt
Nicht alle Funktionen werden in jedem Betriebsmodus angezeigt (siehe Kapitel „Bedienung“)
Schalten Sie die Klimaanlage in diesen Fällen sofort aus und unterbrechen Sie die Stromversorgung:
Ungewöhnliche Geräusche während des Betriebs
Fehler in der Steuerplatine
Defekte Sicherungen oder Schalter
Sprühwasser oder Objekte in der Anlage
Überhitze / Verschmorte Kabel oder Stecker
Starker, aus dem Gerät austretender Geruch
Fehlercodes auf dem Display
Im Falle eines Fehlers zeigt das Display der Inneneinheit folgende Fehlercodes:
Leuchten der Lampe Beschreibung des Fehlers
Blinkt einmal Fehler des Innentemperatursensors
Blinkt zweimal Fehler des Außentemperatursensors
Blinkt sechsmal Funktionsstörung des Innenlüftermotors
HINWEIS:
Weitere Fehlercodes nden Sie in der Serviceanleitung.
19
CL6045QCCB_IM 17.12.20
Technische Daten
Modell: ..............................................................................CL 6045 QC CB
Nettogewicht Inneneinheit: ............................................................ ca. 7 kg
Nettogewicht Außeneinheit: ......................................................... ca. 25 kg
Spannungsversorgung: ................................................220 - 240 V~, 50 Hz
Leistungsaufnahme Kühlen: ............................................................ 800 W
Leistungsaufnahme Heizen: ............................................................ 699 W
Leistungsaufnahme im vernetzten Bereitschaftsbetrieb: ................. 5,0 W
Schutzklasse: ............................................................................................
Kälteleistung: ..........................................................9000 BTU (2600 kW/h)
Wärmeleistung: ......................................................9000 BTU (2610 kW/h)
Kältemittel: .......................................................................................... R 32
Maximal zulässiger Betriebsdruck:
Druckseite: ................................................................................ 3,7 MPa
Saugseite: ................................................................................. 1,2 MPa
Modell: ..............................................................................CL 6046 QC CB
Nettogewicht Inneneinheit: ......................................................... ca. 8,5 kg
Nettogewicht Außeneinheit: ......................................................... ca. 25 kg
Spannungsversorgung: ................................................220 - 240 V~, 50 Hz
Leistungsaufnahme Kühlen: ...........................................................1130 W
Leistungsaufnahme Heizen: ............................................................ 922 W
Leistungsaufnahme im vernetzten Bereitschaftsbetrieb: ................. 5,0 W
Schutzklasse: ............................................................................................
Kälteleistung: ........................................................12000 BTU (3400 kW/h)
Wärmeleistung: ....................................................12000 BTU (3420 kW/h)
Kältemittel: .......................................................................................... R 32
Maximal zulässiger Betriebsdruck:
Druckseite: ................................................................................ 3,7 MPa
Saugseite: ................................................................................. 1,2 MPa
Modell: ..............................................................................CL 6047 QC CB
Nettogewicht Inneneinheit: .......................................................ca. 10,5 kg
Nettogewicht Außeneinheit: ...................................................... ca. 35,5 kg
Spannungsversorgung: ................................................220 - 240 V~, 50 Hz
Leistungsaufnahme Kühlen: .......................................................... 1579 W
Leistungsaufnahme Heizen: .......................................................... 1382 W
Leistungsaufnahme im vernetzten Bereitschaftsbetrieb: ................. 2,5 W
Schutzklasse: ............................................................................................
Kälteleistung: ........................................................18000 BTU (5100 kW/h)
Wärmeleistung: ....................................................18000 BTU (5130 kW/h)
Kältemittel: .......................................................................................... R 32
Maximal zulässiger Betriebsdruck:
Druckseite: ................................................................................ 3,7 MPa
Saugseite: ................................................................................. 1,2 MPa
WLAN
Unterstütztes Netzwerk: ..........................................................802.11 b/g/n
Maximale abgestrahlte Sendeleistung: ...................................... 18,0 dBm
Frequenzbereich: ...........................................................................2,4 GHz
Kanäle: ............................................................................................... 1 - 13
Unterstützte WLAN Schlüssel: .............................................. WPA / WPA2
Technische und gestalterische Änderungen im Zuge stetiger Produkt-
entwicklungen vorbehalten.
Hinweis zur Richtlinienkonformität
Hiermit erklärt die Firma C.Bomann GmbH dass der Funkanlagen-Typ
CL 6045 QC CB der Richtlinie 2014 / 53 / EU entspricht.
Außerdem bendet sich das Gerät in Übereinstimmung mit der RoHS-
Richtlinie 2011 / 65 / EG.
Der vollständige Text der EU-Konformitätserklärung ist unter der folgen-
den Internetadresse verfügbar: www.sli24.de
Im Bereich „Downloads“ geben Sie bitte die Modell-Bezeichnung
CL 6045 QC CB ein.
Geprüft für den Betrieb in Deutschland.
Entsorgung
Batterieentsorgung
Als Verbraucher sind Sie gesetzlich verpichtet, gebrauchte
Batterien / Akkus zurückzugeben.
Entfernen Sie die Batterien aus der Fernbedienung, bevor Sie
das Gerät entsorgen.
Sie können sie bei einer Sammelstelle für Altbatterien bzw. Sondermüll
abgeben. Informieren Sie sich bei Ihrer Gemeinde.
Bedeutung des Symbols „Mülltonne“
Schonen Sie unsere Umwelt, Elektrogeräte gehören nicht in
den Hausmüll.
Nutzen Sie die für die Entsorgung von Elektrogeräten vor-
gesehenen Sammelstellen und geben dort Ihre Elektrogeräte
ab die Sie nicht mehr benutzen werden.
Sie helfen damit die potenziellen Auswirkungen, durch falsche Entsor-
gung, auf die Umwelt und die menschliche Gesundheit zu vermeiden.
Sie leisten damit Ihren Beitrag zur Wiederverwertung, zum Recycling
und zu anderen Formen der Verwertung von Elektro- und Elektronik-Alt-
geräten.
Informationen, wo die Geräte zu entsorgen sind, erhalten Sie über Ihre
Kommunen oder die Gemeindeverwaltungen.
CL6045QCCB_IM 17.12.20
20
Gebruiksaanwijzing
Dank u voor het kiezen van ons product. Wij hopen dat u het gebruik
van het apparaat zult genieten.
Symbolen in deze gebruiksaanwijzing
Belangrijke aanwijzingen voor uw veiligheid zijn speciaal gekenmerkt.
Neem deze aanwijzingen strikt in acht om ongevallen en schade aan
het apparaat te vermijden:
WAARSCHUWING:
Waarschuwt voor gevaren voor uw gezondheid en toont mogelijk
letsel risico’s.
LET OP:
Wijst op mogelijke gevaren voor het apparaat of andere voorwerpen.
OPMERKING:
Kenmerkt tips en informatie voor u.
Algemene opmerkingen
Lees vóór de ingebruikname van dit apparaat de handleiding uiterst
zorgvuldig door en bewaar deze goed, samen met het garantiebewijs,
de kassabon en zo mogelijk de doos met de binnenverpakking. Geef
ook de handleiding mee wanneer u de machine aan derden doorgeeft.
Gebruik het apparaat uitsluitend privé en uitsluitend voor de voorge-
schreven toepassing. Dit apparaat is niet geschikt voor commercieel
gebruik.
Gebruik het apparaat niet buiten. Bescherm het tegen hitte, directe
zonnestralen, vocht (in geen geval in vloeistoffen dompelen) en
scherpe randen. Gebruik het apparaat niet met vochtige handen.
Het apparaat en de netkabel moeten regelmatig op zichtbare schade
worden gecontroleerd. Wanneer u schade vaststelt, mag het appa-
raat niet meer worden gebruikt.
Gebruik alleen originele reserveonderdelen.
Laat om veiligheidsredenen geen verpakkingsdelen (plasticzak, doos,
piepschuim, enz.) binnen het bereik van uw kinderen liggen.
WAARSCHUWING:
Laat kleine kinderen niet met de folie spelen. Er bestaat gevaar
voor verstikking!
Speciale veiligheidsinstructies voor dit apparaat
Het product is voorzien van waarschuwings- en informatiesymbolen:
Aanwijzingen doorlezen!
WAARSCHUWING: Brandgevaar!
Het apparaat bevat een ontvlambaar koelmiddel!
Gebruik geen andere dan de door de fabrikant toegestane voorwerpen om het ontdooiproces te versnellen.
Het toestel mag alleen worden opgeslagen in ruimtes zonder permanente ontstekingsbron (bijv. open vuur, een
geactiveerd gastoestel of elektrische verwarming).
Boor geen gaten in het apparaat en verbrand het ook niet.
Onthoud dat koelmiddelen geurloos zijn.
De servicehandleiding is verkrijgbaar op het volgende webadres: www. sli24.de
Voer in het “Downloads” gedeelte de modelnaam CL 6045 QC CB CB in.
Iedereen die betrokken is bij het werken aan of inbreken in een koelmiddelcircuit, moet in het bezit zijn van een
geldig certicaat van een door de industrie geaccrediteerde beoordelingsautoriteit, die hun bevoegdheid om
koelmiddelen veilig te behandelen overeenkomstig een door de branche erkende beoordelingsspecicatie goed-
keurt.
Onderhoud mag alleen worden uitgevoerd zoals aanbevolen door de fabrikant van de apparatuur. Onderhoud
en reparaties waarvoor de assistentie van ander bekwaam personeel vereist is, moeten worden uitgevoerd on-
der toezicht van de persoon die bevoegd is voor het gebruik van ontvlambare koelmiddelen.
LET OP: Gevaar voor oververhitting!
De ventilatieopeningen niet blokkeren!
Bedek het apparaat niet!
LET OP:
Bij ondeskundige installatie en gebruik zonder vericatie (bijv. certicaat) van een gespecialiseerd bedrijf vervalt de
garantie in overeenstemming met EU 517 / 2014 Hoofdstuk II Art. 3.
CL6045QCCB_IM 17.12.20
21
WAARSCHUWING:
Gebruik en sla het apparaat niet op op de volgende locaties:
- Dichtbij een vuurbron.
- Een ruimte waar water of olie kan spetteren.
- Een ruimte die aan direct zonlicht is blootgesteld.
- In de badkamer, de wasruimte of naast een zwembad.
Raak het apparaat niet aan wanneer u blootsvoets bent of wanneer lichaamsdelen nat of vochtig zijn.
Beveilig de omgeving tijdens de installatie van het apparaat door een erkend vakbedrijf om ongelukken te voorko-
men. Kinderen en onbevoegde personen mogen niet worden toegelaten.
Zorg ervoor dat het stopcontact voor de buitenfaciliteit voldoende veilig is geïnstalleerd.
Zorg ervoor dat er geen lucht in het koelsysteem kan komen en controleer of er koelmiddel lekt wanneer u het
airconditioningsysteem verplaatst. Onthoud dat koelmiddelen geurloos zijn.
Voer na installatie van het airconditioningsysteem een testrun uit en controleer de bedrijfsgegevens.
De in de ingebouwde regeleenheid ingebouwde zekeringen hebben een nominale waarde van T 5 A / 250 V. Zorg
ervoor dat de binneneenheid altijd beveiligd is met een zekering die voldoende capaciteit heeft voor de maximale
ingangsstroom, of met behulp van een andere overbelastingsbeveiliging.
Het apparaat moet tijdens de installatie losgekoppeld blijven van het elektriciteitsnet, met een scheiding van alle
polen, waardoor een volledige scheiding mogelijk is in overeenstemming met de voorwaarden van overspan-
ningscategorie III. Deze moeten conform de veiligheidsvoorschriften in de vaste bekabeling worden geïntegreerd.
Alle elektrische werkzaamheden mogen alleen worden uitgevoerd door een professionele elektricien of een ge-
specialiseerd bedrijf dat zich bezighoudt met elektrische werkzaamheden. De airco-eenheid mag alleen door een
gecerticeerd vakbedrijf worden geïnstalleerd.
Plaats het apparaat niet in de buurt van brandbare stoffen (alcohol enz.) of onder druk staande houders (bijv.
spuitbussen, gasessen enz.). Handhaaf een afstand van minimaal 50 cm aan tussen het apparaat en dergelijke
stoffen.
Als het apparaat wordt gebruikt in ruimtes zonder ventilatie, moeten voorzorgsmaatregelen worden genomen om
het brandgevaar dat gepaard gaat met het lekken van koelgas te voorkomen.
Neem de landelijke aansluitnormen in acht. De bekabeling moet voldoen aan de geldende nationale voorschriften.
Voordat u de aansluitklemmen aanraakt, moeten alle elektrische circuits worden losgekoppeld van de voeding.
Dit apparaat kan worden gebruikt door kinderen ouder dan acht (8) jaar en door personen met verminderde fy-
sieke, zintuiglijke of mentale vermogens of gebrek aan ervaring en kennis, mits ze onder toezicht staan of instruc-
ties krijgen over het veilige gebruik van het apparaat en de gevaren die daarmee gepaard gaan begrijpen.
Laat kinderen niet met het apparaat spelen.
Repareer het apparaat niet zelf, neem altijd contact op met een geautoriseerde reparateur.
Reiniging en onderhoud moeten worden uitgevoerd door gekwaliceerd personeel. Koppel het apparaat in ieder
geval altijd los van het elektriciteitsnet voordat u reinigings- of onderhoudswerkzaamheden uitvoert.
Dit apparaat is niet ontwikkeld om te voorzien in airconditioning in woonruimtes / vertrekken en mag niet worden
gebruikt voor andere doeleinden zoals bijv. kleding drogen, levensmiddelen koelen, enz.
Gebruik het apparaat alleen met geïnstalleerd luchtlter. Gebruik van het airconditioningapparaat zonder het
luchtlter kan leiden tot overmatige ophoping van stof of vervuiling van de interne onderdelen van het apparaat en
schade en / of defecten veroorzaken.
De gebruiker is daarom verantwoordelijk voor de installatie van het apparaat door een gekwaliceerde technicus.
De gekwaliceerde technicus moet controleren of het apparaat is geaard in overeenstemming met de toepasse-
lijke wettelijke bepalingen en richtlijnen, en ervoor zorgen dat het apparaat is uitgerust met een thermomagneti-
sche stroomonderbreker.
Stel uzelf nooit gedurende langere tijd bloot aan een koude luchtstroom. Langdurige directe blootstelling aan
koude lucht kan schadelijk zijn voor uw gezondheid. Bijzondere voorzichtigheid is geboden met betrekking tot
kinderen, ouderen of personen met een ziekte.
CL6045QCCB_IM 17.12.20
22
Als het apparaat rook afgeeft of er een brandlucht wordt gedetecteerd, dient u onmiddellijk de stroomtoevoer af te
sluiten en uw servicetechnicus te raadplegen. Gebruik van het apparaat onder dergelijke omstandigheden en/ of
in deze toestand kan brand of elektrische schokken veroorzaken.
Gebruik de toets om het apparaat uit te schakelen als u het langere tijd niet gebruikt.
Zorg ervoor dat de luchtstroomrichting correct is ingesteld. De kleppen moeten naar beneden wijzen tijdens de
verwarmingsmodus en naar boven tijdens de koelmodus.
Door extreme schommelingen in temperatuurinstellingen te vermijden, kan schade aan het apparaat worden voor-
komen.
Buig het netsnoer niet, trek er niet aan en plet het niet, omdat het hierdoor beschadigd kan raken. Een beschadigd
netsnoer kan een elektrische schok en brand veroorzaken. Alleen gespecialiseerd technisch personeel mag een
beschadigde voedingskabel vervangen.
Blokkeer de luchtinlaat of -uitlaat van de binnen- of de buiteneenheid niet. Het blokkeren of dichtmaken van deze
openingen leidt tot een verminderde koelcapaciteit en kan storingen of schade veroorzaken. Voer geen ongeauto-
riseerde of onjuiste wijzigingen of aanpassingen aan het apparaat uit.
Plaats geen zware of hete voorwerpen op het apparaat.
Laat ramen of deuren niet langdurig openstaan als de airconditioning in gebruik is.
Richt de luchtstroom niet op planten of dieren. Lange perioden van directe blootstelling aan koude luchtstromen
kunnen een negatief effect hebben op planten en dieren.
Klim niet op het externe apparaat en plaats er geen voorwerpen op.
Steek nooit een staaf, stang, paal of iets dergelijks in het apparaat. Dit kan zowel persoonlijk letsel als materiële
schade veroorzaken.
Gebruik voor het leggen en buigen van de koelmiddelleidingen een geschikt, speciaal ontworpen gereedschap.
Om veiligheidsredenen moet het knikken van de kwetsbare buizen koste wat kost worden vermeden. Alle werk-
zaamheden moeten worden uitgevoerd door een gecerticeerd bedrijf en dienovereenkomstig gedocumenteerd
en bepaald in overeenstemming met de apparatuur die met het toestel wordt verbonden.
De koelmiddelleidingen mogen niet zonder verdere maatregelen worden verlengd of ingekort, aangezien deze in
de fabriek tijdens de fabricage al met koelmiddel zijn gevuld.
LET OP:
Alle technische wijzigingen aan de koelmiddelleidingen moeten worden uitgevoerd door een gecerticeerd ge-
specialiseerd bedrijf. Door onjuiste wijzigingen of aanpassingen vervalt de garantie.
Controleer of alle leidingen en kabels ondoordringbaar zijn om de vorming van vloeistoffen, waterdamp of con-
densaat en bijv. het binnendringen daarvan in het apparaat te voorkomen. Dit voorkomt zowel vochtophoping als
schimmelvorming.
Omgaan met batterijen
WAARSCHUWING:
Stel de batterijen niet bloot aan een overmatige hitte, zoals direct
zonlicht, vuur, enz. Er bestaat een risico voor explosie!
Batterijen zijn geen speelgoed. Houd uit de buurt van kinderen.
Forceer de batterijen niet open.
Vermijd contact met metalen voorwerpen (ringen, spijkers, schroe-
ven, enz.). Er bestaat een risico op kortsluiting!
Een kortsluiting kan er toe leiden dat de batterij extreem heet wor-
den of zelfs in brand raken, wat tot letsel zal leiden.
Voor uw eigen veiligheid, dek de batterijklemmen tijdens het ver-
voer met plakband af.
In het geval van lekkende batterijen, zorg ervoor geen vloeistof in
uw ogen of op de slijmvliezen te wrijven. In geval van contact, was
uw handen en spoel uw ogen met helder water. Zoek medische
hulp als irritatie aanhoudt.
Niet-oplaadbare batterijen mogen niet opgeladen worden.
Zorg voor de juiste polariteit bij het plaatsen van de batterij(en).
LET OP:
Wanneer u de afstandsbediening voor een lange tijd niet gebruikt,
verwijder de batterijen om “lekkage” van elektrolyt te voorkomen.
Gebruik geen verschillende soorten batterijen door elkaar of nieuwe
met oude batterijen.
Werp batterijen nooit met het normale huisvuil weg. Breng gebruikte
batterijen naar de relevante inzamelpunten of uw verkoper.
Het apparaat uitpakken
1. Haal het apparaat uit de verpakking.
2. Verwijder alle verpakkingsmaterialen zoals folie, vulmateriaal en
kartonnen verpakkingen.
3. Controleer het apparaat voor mogelijke transportschade om gevaar te
voorkomen.
4. Gebruik het apparaat niet als het beschadigd is. Neem contact op
met uw distributeur.
CL6045QCCB_IM 17.12.20
23
Omvang van de levering
Binneneenheid
a) 6 × schroeven
b) 6 × deuvels
c) 1 × wandmontage
Buiteneenheid
d) 1 × ondersteuning voor het condensaat
afvoersysteem
e) 4 × voeten voor de buiteneenheid
Aansluit accessoires
f) 1 × aansluitkabel voor de buiteneenheid
g) 2 × koelmiddelbuizen (grijs en blauw)
inclusief isolatie
h) 1 × isolatiemateriaal (reserve)
i) 2 × condensaat waterbuizen
j) 1 × vinyltape
k) 1 × afdekkapje
Accessoires
m) 1 × afstandsbediening
n) 2 × R03 “AAA” 1,5 V batterijen
o) 2 × lters
p) 2 × lterpatronen
1 × geactiveerd koolstoflter (grijs)
1 × ionisatielter (groen)
Overzicht van de bedieningselementen
Pagina 3
Apparaateenheid voor binnen
1 Voorpaneel
2 Filterpatroon met geactiveerd koolstoflter (grijs)
3 Filterpatroon met ionisatielter (groen)
4 WLAN module
5 LED scherm
6 Typeplaatje (positie kan verschillen)
7 Schakelschema
8 Elektrische aansluiteenheid
9 toets (aan / uit)
10 Luchtdeector
11 Signaalontvanger
12 Luchtklep
13 Afstandsbediening
Apparaateenheid voor buiten
14 Typeplaatje voor buiten (positie kan verschillen)
15 Aansluitingafdekking
16 Koelmiddelklep
a Grijs
b Blauw
17 Luchtuitlaat
Afstandsbediening
OPMERKING:
Mocht uw model een van deze functies niet hebben, dan hoort u toch
een piep als u op de toets drukt.
Toetsen op de afstandsbediening
Nr. Toets Betekenis
1Aan- en uitschakelen
2OPTION Keuzetoets
3Instellingen / keuzetoets
4Instellingen / keuzetoets
5ECO Activeren / deactiveren ECO functie
6TURBO Activeren / deactiveren van de Turbo functie
7Mode Keuzetoets Bedrijfsmodi
8Fan Ventilatorsnelheid instelling
9Luchtkleppen instelling
10 Luchtdeector instelling (niet beschikbaar;
moet handmatig worden afgesteld)
Scherm afstandsbediening
Netwerkscherm
Kinderslot
AUTO Automatische modus
COOL Koelmodus
DRY Lucht ontvochtigingsmodus
HEAT Verwarmingsmodus
FAN Ventilatormodus
ECO Energiebesparende modus
Ventilatiesnelheidsweergave
Ventilatie uit
Maximale temperatuur en snelheid
Luchtklep weergave
CL6045QCCB_IM 17.12.20
24
Luchtdeector weergave (niet beschik-
baar)
Slaapmodus
Automatisch aan / uit schakelaar
Automatische temperatuurberekening
Meeldauw- / zelfreiniging
Gezondheidsfunctie (niet beschikbaar)
Niet Beschikbaar
Informatie over de App “Smart Life - Smart Living”
De Smart Life - Smart Living app is beschikbaar voor android en
iOS. Scan de overeenkomstige QR-code om direct over te gaan tot het
downloaden.
OPMERKING:
Afhankelijk van de aanbieder, kunnen er kosten aan het downloaden
van de app verbonden zijn.
Google Play App Store
Informatie over het gebruik van de app
Dit apparaat stelt u in staat om het apparaat via uw thuisnetwerk te
bedienen. Voorwaarden zijn: 1) Een permanente Wi-Fi-verbinding met
uw router en 2) de gratis app “Smart Life - Smart Living”. Via de app
heeft u gemakkelijk toegang tot alle functies van het apparaat. Om te
voorkomen dat het apparaat per ongeluk wordt ingeschakeld, raden wij
u aan om het apparaat van het stroomnet los te koppelen wanneer u
niet thuis bent!
Systeemvereisten voor gebruik van de app
iOs 10.0 of hoger
Android 5.0 of hoger
Ingebruikname via de app
1. Installeer de app “Smart Life - Smart Living”. Maak een gebruikersac-
count aan.
2. Activeer de wi-functie in de instellingen van uw apparaat.
3. Zorg ervoor dat uw wi-netwerk zich in de buurt van het apparaat
bevindt.
4. Schakel de binneneenheid in.
5. Start de app en selecteer + .
6. Selecteer het menu “Airconditioner” en volg de instructies op het
display.
7. Druk zes keer op de ECO toets op de afstandsbediening totdat “CF”
in het display verschijnt. Als “AP” in het display verschijnt, drukt u
nogmaals zes keer op de ECO toets.
OPMERKING:
“CF”: Waarschuwingslampje op de module (4) knippert snel.
“AP”: Het waarschuwingslampje op de module (4) knippert lang-
zaam.
Druk in dat geval op “volgende stap”. Voer uw wachtwoord in.
8. Zodra het apparaat succesvol is verbonden, brandt het Wi-Fi-indica-
tielampje continu. Nu kunt u het apparaat met de app bedienen.
OPMERKING:
Het apparaat kan alleen met 2,4 GHz routers werken. 5 GHz routers
worden niet ondersteund.
De Wi-Fi-verbinding verbreken
Als u de bestaande wi-verbinding wilt verbreken (controlelampje
brandt), gaat u als volgt te werk:
Druk zes keer op de ECO toets op de afstandsbediening.
OPMERKING:
Als u de wi-verbinding opnieuw tot stand wilt brengen, gaat u te werk
zoals beschreven in het hoofdstuk “Ingebruikname via de app”.
Installatie
Binneneenheid (a)
Monteer de binneneenheid op een stevige muur die niet aan trillingen
wordt blootgesteld.
Geen van de openingen in het toestel mag worden geblokkeerd zodat
lucht de hele kamer kan instromen.
Monteer het apparaat niet in de buurt van warmtebronnen, dampen of
brandbare gassen.
Monteer het apparaat niet op een locatie waar het gedurende lange
tijd aan direct zonlicht wordt blootgesteld.
Kies een locatie waar condensaat gemakkelijk kan weglopen en van
waaruit hij eenvoudig op de buiteneenheid kan worden aangesloten.
Controleer regelmatig of het toestel goed functioneert en volg altijd
de richtlijnen met betrekking tot minimumafstanden en / of houd deze
ruimtes vrij. Kies een locatie van waaruit het lter gemakkelijk kan
worden bereikt.
Installeer het apparaat niet in vochtige ruimtes zoals badkamers,
wasruimtes enz.
Voor optimale resultaten moet de installatie zo hoog mogelijk boven
de vloer worden uitgevoerd.
Buiteneenheid (b)
Monteer de buiteneenheid niet in de buurt van warmtebronnen, dam-
pen of brandbare gassen.
Plaats het apparaat niet op zeer stofge locaties.
Installeer het apparaat in een ruimte waar niemand wordt gestoord
door het bedrijfsgeluid en waar niet veel mensen komen. Maak even-
tueel een afspraak met de buren. Raadpleeg hiervoor eventueel de
Duitse federale emissiebeschermingsrichtlijn.
Installeer het apparaat niet in een ruimte waar het wordt blootgesteld
aan direct zonlicht of extreme weersomstandigheden of gebruik een
zonwering die de luchtstroom niet nadelig beïnvloedt.
Houd altijd rekening met de minimumafstanden die in de onder-
staande afbeelding worden weergegeven en / of houd de ruimte
binnen deze afstand vrij tijdens installatie en bedrijf.
Installeren de buiteneenheid op een stabiele locatie.
Als de buitenunit aan trillingen wordt blootgesteld, gebruik dan rub-
beren dempers op de vloer om de invloed van de trillingen tegen te
gaan.
CL6045QCCB_IM 17.12.20
25
De minimale afstanden (in mm) zijn aangegeven in de afbeelding.
LET OP:
De koper dient ervoor te zorgen dat personen / bedrijven die deze
airconditioners installeren, onderhouden of repareren, over vol-
doende kwalicaties en ervaring beschikken om met koelmiddelen
te werken.
Bij ondeskundige installatie en gebruik zonder vericatie (bijv.
certicaat) van een gespecialiseerd bedrijf vervalt de garantie in
overeenstemming met (EU) 517 / 2014 Hoofdstuk II Art. 3.
De muurbeugel installeren
LET OP:
Zorg ervoor dat u, voordat u de muurbeugel installeert, de exacte plek
hebt gevonden waar u het gat voor de leidingen gaat boren! Zie het
hoofdstuk “Installatie van de binnenunit en muurdoorvoer naar buiten”.
1. Maak de muurbevestiging los bij de vergrendelingsklemmen.
2. Vouw de muurbevestiging omhoog.
3. Verwijder de muurbevestiging door deze uit de houder te halen.
4. Boor gaten van minimaal 32 mm diep in een massieve muur om de
plaat te bevestigen.
5. Plaats de plastic deuvels in het gat.
6. Bevestig de montageplaat met de meegeleverde schroeven aan de
muur.
7. Zorg ervoor dat de montageplaat stevig is vastgeschroefd.
Uitlijning van de koelmiddelbuizen
LET OP:
De airconditioning moet worden geïnstalleerd en aangesloten door
een gecerticeerd koel- en airconditioningbedrijf. Bij ondeskundige
installatie vervalt de garantie.
De koelmiddelleidingen kunnen in 3 richtingen gelegd worden zoals
afgebeeld volgens de nummers in de afbeelding. Indien het leidingwerk
wordt geplaatst volgens optie 1 of 3, dan dient u met een snijder voor-
zichtig een inkeping in de zijkant van de binnenunit langs de naad te
snijden.
Geleid de aansluitleidingen in de richting van de opening in de muur en
bind de koelmiddelleidingen, de condenswaterleiding en de stroomkabel
met vinyltape aan elkaar en zorg altijd voor ondoordringbare isolatie
zodat er geen vloeistoffen, waterdamp of condensaat kunnen ontstaan
en bijv in de muur binnendringen. Dit voorkomt zowel vochtophoping
als schimmelvorming. Zorg ervoor dat de condenswaterleiding met een
lichte helling wordt geplaatst, zodat de waterstroom niet wordt belem-
merd.
LET OP:
Zorg ervoor dat de leidingen ondoordringbaar zijn afgedicht om vocht-
schade en schimmelvorming in de muur te voorkomen.
CL6045QCCB_IM 17.12.20
26
Uitrollen van de koelmiddelbuizen
Verwijder de afdekkappen pas vlak voordat u de koelmiddelbuizen
aansluit om vervuiling te voorkomen.
Als de buizen te vaak worden gebogen of eraan getrokken, worden
ze stijf. Buig de buizen niet meer dan drie keer.
Rol de buizen voorzichtig uit zoals aangegeven in diagram A. Voor-
kom knikken.
LET OP:
Trek de buis niet uit elkaar zoals weergegeven in afbeelding B. Rol
deze in plaats daarvan voorzichtig uit.
Aansluitingen op de binneneenheid
LET OP:
De airconditioningeenheid moet worden geïnstalleerd en / of aangeslo-
ten door een erkend koel- en airconditioningbedrijf. Bij ondeskundige
installatie vervalt de garantie.
1. Verwijder de beschermkapjes.
2. Controleer de aansluitingen op vervuiling of beschadiging.
3. Verbind de wartelmoer met de aansluitdraad op de binneneenheid.
Let hierbij op de kleur van de beschermkapjes.
4. Draai de verbinding vast in tegengestelde richting met een geschikte
sleutel.
OPMERKING:
Neem altijd het juiste aanhaalmoment in acht en volg de tabel “Instal-
latie informatie” op.
De condenswaterbuis naar de binneneenheid aansluiten
Het is uiterst belangrijk dat de condenswaterbuis van de binneneenheid
op de juiste manier wordt geïnstalleerd.
1. Leg de afvoerslang onder de buis en zorg ervoor dat er geen zakken
of lage delen zijn.
2. De afvoerslang moet naar beneden hellen om de doorstroming van
het condenswater te vergemakkelijken.
3. Buig of draai de afvoerslang niet. Laat het niet uitsteken. Dompel het
uiteinde niet onder in water. Als de buis wordt aangesloten op een
verlengstuk, let dan op de aansluiting bij het plaatsen in de binnen-
eenheid.
4. Als de koelmiddelbuizen worden gelegd zoals afgebeeld bij nr. 3 in
het hoofdstuk “Uitlijning van de koelmiddelbuizen”, dan moeten de
buizen, de aansluitkabel voor de buiteneenheid en de afvoerbuis
voor condenswater met buiskoppelingen aan de achterzijde van het
toestel worden vastgezet.
5. Steek de buiskoppeling in het betreffende toestel.
6. Druk de verbindingsleiding stevig in de airconditioningeenheid en
zorg ervoor dat de verbinding goed vastzit.
LET OP:
Voorkom knikken tijdens het positioneren en laat deze werkzaamhe-
den alleen uitvoeren door gecerticeerde gespecialiseerde bedrijven!
CL6045QCCB_IM 17.12.20
27
Installatie van de binnenunit en muurdoorvoer naar buiten
Nadat u zowel de koelmiddelbuizen als de afvoerbuis voor het condens-
water volgens de instructies hebt aangesloten, gaat u als volgt te werk:
1. Leg de buizen, de aansluitkabel van de buitenunit en de condenswa-
terbuis met uiterste zorg naar de plek waar deze door de muur naar
buiten moeten worden geleid.
2. Bind de koelmiddelbuizen, de aansluitkabel van de buiteneenheid en
de condenswaterbuis met vinyltape aan elkaar vast en dek vervol-
gens alles goed af met isolatietape (niet bij de levering inbegrepen).
LET OP:
Zorg ervoor dat de leidingen ondoordringbaar zijn afgedicht om
vochtschade en schimmelvorming in de muur te voorkomen.
Zorg ervoor dat alle blootliggende buisdelen voldoende zijn geïso-
leerd.
3. Boor een gat met een diameter van 57 mm en een helling / helling van
5 - 7 mm. (Foto 2)
OPMERKING:
Boor deze met een lichte helling van 5 - 7 mm naar buiten toe, zodat
het condenswater kan weglopen. Zorg er in ieder geval voor dat er
over de gehele lengte van de condenswaterbuis een helling is in de
richting van de opening in de muur.
4. Plaats de gatafdekking.
5. Leid de geïsoleerde buizen, de aansluitkabel voor de buiteneenheid
en de condenswaterbuizen door de opening in de muur.
OPMERKING:
Sluit na het plaatsen van de buizen, het gat in de muur waardoor de
buizen zijn gevoerd zowel luchtdicht als waterdicht af.
6. Bevestig de binneneenheid stevig aan het bovenste deel van de
wandmontageplaat.
7. Druk het onderste deel van de binneneenheid stevig tegen de wand-
montageplaat tot deze stevig vastzit.
Installeren van de buiteneenheid
Bepaal voor het aansluiten van de buizen waar u de buiteneenheid
wilt plaatsen en zorg ervoor dat er op de door u gekozen locatie
voldoende ruimte is voor onderhoudswerkzaamheden op een later
tijdstip. (Neem de minimale afstanden in acht)
Plaats de meegeleverde beschermkapjes op de standaard en beves-
tig deze op een geschikte plaats.
Gebruik uitzonderlijk stevige schroeven / boutankers en houd ook
rekening met het gewicht van het toestel, om te voorkomen dat door
trillingen bij gebruik de verbindingen na verloop van tijd losraken.
De eenheid moet worden geïnstalleerd in overeenstemming met de
geldende veiligheidsvoorschriften.
Condenswaterafvoerbuis voor de buiteneenheid
Condenswater en ijs dat zich door warmteontwikkeling in de buiteneen-
heid ophoopt, kan via de condenswaterbuis worden afgevoerd.
1. Bevestig de steunen voor de condenswaterafvoerbuis in de daarvoor
bestemde opening van 25 mm.
2. Monteer de steunen voor de condenswaterafvoerbuis op de condens-
waterbuis en zorg ervoor dat de stroming goed wordt geregeld om
vochtschade te voorkomen.
Elektrische aansluiting (buiteneenheid)
Verwijder de afdekking van de aansluiting (15) aan de rechterkant van
het apparaat. Het bijbehorende diagram bevindt zich op de achterkant.
Zie diagram.
1. Sluit de voedingskabel van de binneneenheid aan op de klemmen-
strook.
2. Bevestig de voedingskabel van de buiteneenheid voorzichtig met
behulp van de kabelaansluitklemmen.
3. Zorg ervoor dat de kabels correct zijn aangesloten. Zorg ervoor dat
de aarding correct is geïnstalleerd.
4. Plaats de beschermkap terug op het apparaat.
CL6045QCCB_IM 17.12.20
28
LET OP:
Alle elektrische werkzaamheden mogen alleen worden uitgevoerd
door een professionele elektricien of een gespecialiseerd elektrobe-
drijf. Bij ondeskundige installatie vervalt de garantie.
Instructies voor snelkoppeling
Gebruik de snelkoppeling om eenvoudig de binnen- en buiteneenheden
van de airconditioningeenheid te verbinden. Een snelle en gemakkelijke
procedure waarbij alle garantieclaims beschikbaar zijn, mits alle werk-
zaamheden worden uitgevoerd door een gespecialiseerd bedrijf.
LET OP:
De bij aevering geleverde koelmiddelbuizen zijn tijdens de fabri-
cage voorgevuld met het koelmiddel.
De buizen mogen niet ingekort of verlengd worden.
Aansluiten op de binneneenheid
1. Wees voorzichtig bij het voorzichtig afrollen van de koelmiddelbuizen
zoals beschreven in het hoofdstuk getiteld “Uitrollen van de koelmid-
delbuizen”. Voorkom altijd het knikken van de buizen.
2. Verwijder de beschermkappen (blauw en grijs) van de koppelingen op
de binneneenheid.
3. Zorg ervoor dat alle schroeven in goede staat verkeren en vrij zijn van
vuildeeltjes, stof, zand en ander aanhangend materiaal of vuil.
4. Schroef de koelmiddelbuizen vast met behulp van de connectoren op
de binneneenheid. Zorg ervoor dat de aansluitingen worden gemaakt
volgens het blauw / grijze kleurenschema. Draai vervolgens de moe-
ren vast met twee sleutels (een om de verbinding vast te draaien en
de andere om tegen te houden).
OPMERKING:
Neem altijd het juiste aanhaalmoment in acht en volg de tabel
“Installatie informatie” op.
Aansluiten op de buiteneenheid
1. Wees voorzichtig bij het voorzichtig uitrollen van de koelmiddelbuizen
zoals beschreven in het hoofdstuk “Uitrollen van de koelmiddelbui-
zen”. Voorkom altijd het knikken van de buizen.
2. Verwijder de beschermkappen (blauw en grijs) van de koppelingen op
de buiteneenheid.
3. Zorg ervoor dat alle schroeven in goede staat verkeren en vrij zijn van
vuildeeltjes, stof, zand en ander aanhangend materiaal of vuil.
4. Schroef de koelmiddelbuizen vast met behulp van de connectoren op
de buiteneenheid. Zorg ervoor dat de aansluitingen worden gemaakt
volgens het blauw / grijze kleurenschema. Draai vervolgens de moe-
ren vast met twee sleutels (een om de verbinding vast te draaien en
de andere om tegen te houden).
OPMERKING:
Neem altijd het juiste aanhaalmoment in acht en volg de tabel
“Installatie informatie” op.
CL6045QCCB_IM 17.12.20
29
5. Zorg ervoor dat het koelcircuit van het apparaat goed is aangesloten
en luchtdicht is. Inspecteer de verbindingselementen met lekspray.
Als er luchtbellen verschijnen, zijn er lekken. Is dit het geval, dan
moeten de afsluiters worden gesloten. Controleer zorgvuldig de bui-
zen en de aansluitingen.
OPMERKING:
De afsluiters (a) zijn tijdens de fabricage gesloten en moeten
worden geopend. Serviceventiel (b) is uitsluitend bedoeld voor
servicedoeleinden.
LET OP:
De airconditioning moet worden geïnstalleerd en aangesloten door
een gecerticeerd koel- en airconditioningbedrijf. Bij ondeskundige
installatie vervalt de garantie.
Testen van de binneneenheid
Functioneert de aan / uit-schakelaar naar behoren?
Werkt de ventilator?
Werken de bedieningsmodi normaal?
Kunnen temperatuur en tijd nauwkeurig worden aangepast?
Branden alle lampen normaal?
Werken de luchtstroomkleppen naar behoren?
Functioneert de condenswaterbuis normaal?
LET OP:
Alle hierboven beschreven stappen moeten worden uitgevoerd door
een gecerticeerd koel- en airconditioningbedrijf. Bij ondeskundige
uitvoering vervalt de garantie.
Testen van de buiteneenheid
Zijn er ongebruikelijke geluiden of trillingen tijdens het gebruik?
Lekt er koelmiddel?
OPMERKING:
Het elektronische regelsysteem start de compressor pas drie minuten
nadat de eenheid is ingeschakeld.
LET OP:
Alle hierboven beschreven stappen moeten worden uitgevoerd door
een gecerticeerd koel- en airconditioningbedrijf. Bij ondeskundige
uitvoering vervalt de garantie.
Installatie informatie
Installatie instructies – Installatie informatie
Ontwerpmodel / Koelcapaciteit (Btu / h) 9k 12k 15 / 18k
Koelmiddelbuis diameter a) 1 / 4" 6 1 / 4" 6 1 / 4" 6
Koelmiddelbuis diameter b) 3 / 8" 9,52 1 / 2" 12 1 / 2" 12
Standaard koelmiddelbuis lengte 5 m 5 m 5 m
Maximale afstand tussen binnen- en buiteneenheid 15 m 15 m 15 m
Extra koelmiddel bijvullen 20 g / m 20 g / m 30 g / m
Maximale afstand tussen binnen- en buiteneenheid 5 m (15 m) 5 m (15 m) 5 m (15 m)
Koelmiddel * R32 R32 R32
*) Meer informatie vindt u op het typeplaatje op de buiteneenheid.
Aanhaalmoment voor beschermkappen en ensverbindingen
Koelmiddelbuis Aanhaalmoment (N × m) Overeenkomstig belastings-
gebruik: 20 cm moersleutel) Aanhaalmoment (N × m)
1 / 4" 6 15 - 20 Vast / handvast Service-aansluitmoer 7 - 9
3 / 8" 9,52 31 - 35 Vast Beschermkapjes 25 - 30
1 / 2" 12 35 - 45 Vast
5 / 8" 15,88 75 - 80 Vast
CL6045QCCB_IM 17.12.20
30
Kabelspecicaties
Installatie-instructies – Informatie voor de installateur
Model Koelcapaciteit
(Btu / h) 9k 12k 15 / 18k
Netsnoer
N1,0 mm²
AWG18
1,0 mm² (1,5 mm²)
AWG18 (AWG16)
1,5 mm²
AWG16
L1,0 mm²
AWG18
1,0 mm² (1,5 mm²)
AWG18 (AWG16)
1,5 mm²
AWG16
E1,0 mm²
AWG18
1,0 mm² (1,5 mm²)
AWG18 (AWG16)
1,5 mm²
AWG16
Aansluitkabel
N1,0 mm² 1,0 mm² (1,5 mm²) 1,5 mm²
L1,0 mm² 1,0 mm² (1,5 mm²) 1,5 mm²
11,0 mm² 1,0 mm² (1,5 mm²) 1,5 mm²
20,75 mm² 0,75 mm² 0,75 mm²
30,75 mm² 0,75 mm² 0,75 mm²
Installatie instructies – Installatie informatie
Spanningstransformator 9k 12k 18 / 22k
Model Koelcapaciteit
(Btu / h) Doorsnede
Netsnoer
N1,0 mm² (1,5 mm²)
AWG18 (AWG16)
1,0 mm² (1,5 mm²)
AWG18 (AWG16)
1,5 mm²
AWG16
L1,0 mm² (1,5 mm²)
AWG18 (AWG16)
1,0 mm² (1,5 mm²)
AWG18 (AWG16)
1,5 mm²
AWG16
E1,0 mm² (1,5 mm²)
AWG18 (AWG16)
1,0 mm² (1,5 mm²)
AWG18 (AWG16)
1,5 mm²
AWG16
Aansluitkabel
N1,0 mm² (1,5 mm²) 1,0 mm² (1,5 mm²) 1,5 mm²
L1,0 mm² (1,5 mm²) 1,0 mm² (1,5 mm²) 1,5 mm²
11,0 mm² (1,5 mm²) 1,0 mm² (1,5 mm²) 1,5 mm²
Bij 220 V 7 K, 9 K, 12 K, 15 K, 16 K, 18 K, 22 K, 24 K, 30 K is de back-upwaarde voor de binneneenheid van de airconditioning: 50 T, 3,15 A
Bij 110V 7 K, 9 K, 12 K, is de back-upwaarde voor de binneneenheid van de airconditioning: 50 T, 3,15 A
125 V 7 K, 9 K, 12 K, is de back-upwaarde voor de buiteneenheid van de airconditioning: 61 T, 15 A
250 V 18 K, 22 K, 24 K, is de back-upwaarde voor de buiteneenheid van de airconditioning: 65 T, 25 A!
Schakelschema
Het schakelschema kan variëren voor verschillende modellen. Let op de
schakelschema’s op de binnen- en buiteneenheden.
Voor de binneneenheid vindt u het schakelschema (7) onder het voorste
paneel (1).
Voor de buiteneenheid vindt u het schakelschema op de achterkant van
de connectorafdekking (15).
OPMERKING:
Bij sommige modellen zijn de kabels door de fabrikant zonder klem-
menstroken op de hoofdprint van de binneneenheid aangesloten.
Bediening
Tafelbediening
Als de afstandsbediening niet werkt of als er onderhoud nodig is, ga dan
als volgt te werk:
1. Open de voorklep en til deze omhoog totdat u bij de toets kunt.
2. Door op de toets te drukken, start de koelfunctie. (U hoort een
piep)
3. Als u binnen 3 seconden op de toets drukt, start de verwarmings-
functie. (U hoort twee piepjes.)
4. Om het uit te schakelen, drukt u nogmaals op de toets. (U hoort
een lange piep)
OPMERKING:
De externe statische druk voor de waterpomp op alle modellen is 0 Pa.
CL6045QCCB_IM 17.12.20
31
Afstandsbediening
1. Open het klepje van het batterijvak aan de achterkant van de af-
standsbediening door het in de richting van de pijl te duwen.
2. Plaats 2 R03 “AAA” 1,5 V batterijen. Zorg dat de polariteit correct is.
(Zie de onderkant van het batterijvak)
OPMERKING:
Kinderslot: Druk de en toetsen tegelijkertijd in om het kinder-
slot te activeren.
Schakel het scherm in / uit: Houd de ECO toets ingedrukt
3. Richt de afstandsbediening op de airconditioning.
OPMERKING:
Zorg ervoor dat er zich geen voorwerpen / obstakels bevinden in de
ruimte tussen de afstandsbediening en de signaalontvanger in de
binneneenheid.
Stel de afstandsbediening nooit voor langere tijd bloot aan direct
zonlicht.
Gebruik en bewaar de afstandsbediening op een afstand van mini-
maal één meter van een televisie of andere elektrische apparaten.
Aan- en uitschakelen
Druk op de toets om het apparaat uit te schakelen.
Druk nogmaals op de toets om het apparaat weer aan te zetten.
De luchtstroom aanpassen
De luchtstroom wordt gelijkmatig verdeeld wanneer deze de kamer in komt.
Er zijn opties beschikbaar voor het optimaliseren van de stroomrichting.
De toets activeert de luchtrichtingsklep (1). De luchtstroom wordt van
boven naar beneden gericht om een gelijkmatige verdeling van de lucht door
de kamer te garanderen.
De luchtdeectoren (2) moeten met de hand worden gepositioneerd en be-
vinden zich onder de luchtrichtingskleppen. Deze maken het mogelijk om de
luchtstroom naar rechts of naar links te richten.
LET OP:
Afstellen van de luchtdeector moet plaatsvinden terwijl het apparaat is uitgeschakeld.
Positioneer de luchtrichtingskleppen nooit handmatig (dus niet met de hand). Dit kan tot ernstige schade leiden.
Steek nooit vingers, stokken of andere voorwerpen in de luchtinlaat- / uitlaatopeningen. Dit kan materiële schade en persoonlijk letsel tot gevolg
hebben.
OPMERKING:
Houd er rekening mee dat om ontwerpredenen niet alle functies in elke bedieningsmodus op het scherm van de afstandsbediening kunnen wor-
den weergegeven. Door op de OPTION toets te drukken, kunt u ontdekken welke functies beschikbaar zijn voor individuele bedrijfsmodi.
MODE toets Selecteer een bedrijfsmodus
OPTION toets Selecteer een eigenschap
Koelmodus (COOL)
De koelmodus maakt gelijktijdige koeling van de kamer en vermindering
van de luchtvochtigheid mogelijk.
1. Om de koelmodus te activeren, drukt u op de MODE toets totdat
“COOL” op het scherm van de afstandsbediening verschijnt. De
koelfunctie wordt geactiveerd als de geselecteerde temperatuur lager
is dan de temperatuur in de kamer. (Selectie met de en toetsen.)
2. Om de airconditioning te optimaliseren, past u de temperatuur, de
snelheid en de luchtstroomrichting aan door op de betreffende toet-
sen te drukken.
Verwarmingsmodus (HEAT)
De verwarmingsmodus maakt het mogelijk om de kamer te verwarmen.
1. Om de verwarmingsmodus te activeren, drukt u op de MODE toets
tot “HEAT” op het scherm van de afstandsbediening verschijnt. De
verwarmingsfunctie wordt geactiveerd als de geselecteerde tempera-
tuur hoger is dan de temperatuur in de kamer. (Selectie met de en
toetsen.)
2. Om de verwarmingsfunctie te optimaliseren past u de temperatuur,
de snelheid en de luchtstroomrichting aan door op de betreffende
toetsen te drukken.
OPMERKING:
Als het apparaat is uitgerust met een elektrische verwarming, zal dit
de activering van de applicatie enkele minuten vertragen.
Tijdens de verwarmingsmodus kan een automatische ontdooifunc-
tie worden geactiveerd. Deze ontdooifunctie is onmisbaar voor het
reinigen van het apparaat. Vorstresten op de condensor worden
verwijderd om het volledige warmtewisselingsvermogen te herstel-
len. Deze procedure duurt normaal gesproken 2 - 10 minuten. De
ventilator stopt met werken tijdens het ontdooien. Na het ontdooien
keert het apparaat automatisch terug naar de verwarmingsmodus.
Het apparaat automatisch inschakelen ( )
Om het apparaat te programmeren om automatisch in te schakelen,
moet het apparaat uitgeschakeld zijn.
1. Druk op de OPTION toets.
2. Gebruik de pijltoetsen om en te selecteren totdat ” op
het scherm van de afstandsbediening verschijnt.
3. Druk nogmaals op de OPTION toetsen gebruik de pijltoetsen en
om de gewenste tijd in te stellen.
4. Bevestig uw selectie met de OPTION toets.
OPMERKING:
Herhaal de hierboven beschreven stappen om de ingestelde functie
te annuleren.
De functie Timer kan worden ingesteld met intervallen van 30 mi-
nuten.
CL6045QCCB_IM 17.12.20
32
Het apparaat automatisch uitschakelen ( )
Om het apparaat te programmeren om automatisch uit te schakelen,
moet het apparaat zijn ingeschakeld.
1. Druk op de OPTION toets.
2. Gebruik de pijltoetsen om en te selecteren totdat ” op
het scherm van de afstandsbediening verschijnt.
3. Druk nogmaals op de OPTION toets en gebruik de pijltjestoetsen
en om de gewenste tijd in te stellen.
4. Bevestig uw keuze met de OPTION toets.
OPMERKING:
Herhaal de hierboven beschreven stappen om de ingestelde functie
te annuleren.
De timerfunctie kan worden ingesteld met intervallen van 30 minuten.
Ventilatormodus (FAN)
Om de ventilatormodus te activeren, drukt u op de MODE toets totdat
“FAN” op het scherm van de afstandsbediening verschijnt.
Door op de FAN toets te drukken, kunt u de ventilatorsnelheid in de
volgende volgorde aanpassen:
Uit ( )
LOW ( )
MEDIUM ( )
HIGH ( )
Turbo ( )
Automatisch
Luchtontvochtigingsmodus (DRY)
Deze functie verlaagt de luchtvochtigheid en verbetert de luchtkwaliteit
in de kamer.
Om de modus luchtontvochtiging in te schakelen, drukt u op de MODE
toets totdat “DRY” verschijnt in het scherm van de afstandsbediening.
De ventilator wordt geactiveerd met een variabele koelcyclus.
Automatische modus (AUTO)
Om de automatische modus te activeren, drukt u op de MODE toets
totdat “AUTO” in het scherm van de afstandsbediening verschijnt.
De ventilatorsnelheid en de temperatuur worden automatisch geregeld,
ongeacht de temperatuur in de kamer.
Omgevingstemperatuur Bedrijfsmodus
< 20 °C Verwarmen
20 °C ~ 26 °C Luchtontvochtiger
> 26 °C Koud
Slaapmodus ( )
De functie SLEEP past de temperatuur automatisch aan om de lucht in
de kamer ’s nachts bijzonder aangenaam te maken. Tijdens bedrijf in
koel- / ontvochtigingsmodus wordt de ingestelde temperatuur automa-
tisch met 1 °C verhoogd totdat binnen 2 uur een temperatuurstijging van
2 °C is bereikt.
1. Druk op de OPTION toets om de slaapmodus te activeren.
2. Gebruik de pijltoetsen om en te selecteren totdat ” op
het scherm van de afstandsbediening verschijnt.
3. Bevestig uw keuze met de OPTION toets.
4. Schakel met de OPTION toets de functie “ ” uit.
Tijdens de verwarmingsmodus wordt de temperatuur gedurende de
eerste 2 uur met 2 °C verlaagd.
Na 10 uur in sluimerstand gaat het apparaat automatisch uit.
Energiebesparingsmodus (ECO)
Door op de ECO toets te drukken, wordt de Eco-functie geactiveerd of
gedeactiveerd. Het apparaat gaat in de energiebesparende modus.
De aangepaste temperatuur wordt automatisch en geleidelijk verhoogd
zonder het klimatologische comfort in gevaar te brengen. Dit resulteert
in een laag energieverbruik.
Door de ECO toets ingedrukt te houden, schakelt u het scherm van de
binneneenheid uit.
Maximale temperatuur en snelheid ( )
Door op de TURBO toets te drukken, wordt de Turbo functie geacti-
veerd of gedeactiveerd. Hierdoor kan de ingestelde temperatuur zo snel
mogelijk worden bereikt.
Zelfreiniging voor meeldauw ( )
1. Om de zelfreinigende modus te activeren, drukt u op de OPTION
toets.
2. Gebruik de pijltoetsen om en te selecteren totdat ” op
het scherm van de afstandsbediening verschijnt.
3. Bevestig uw keuze met de OPTION toets.
4. Schakel met de OPTION toets de functie “ ” uit.
Automatische temperatuurberekening ( )
Automatische temperatuurberekening door middel van een sensor in
de afstandsbediening. Zorg ervoor dat de afstandsbediening niet wordt
blootgesteld aan warmtebronnen zoals bijv. lampen.
1. Om “ ” te activeren, drukt u op de OPTION toets.
2. Gebruik de pijltoetsen om en te selecteren totdat ” op het
scherm van de afstandsbediening verschijnt.
3. Bevestig uw keuze met de OPTION toets.
4. Druk nogmaals op de OPTION toets om de functie “ ” uit te
schakelen.
Reinigen en onderhoud
WAARSCHUWING:
Zorg ervoor dat er tijdens het schoonmaken geen
water in de openingen van het apparaat komt. Gevaar
voor een elektrische schok of brand.
LET OP:
Onderhoud uw apparaat regelmatig om een veilige en efciënte
werking te garanderen.
Alle reinigings- en onderhoudswerkzaamheden moeten worden
uitgevoerd door een gecerticeerd koel- en airconditioningbedrijf.
Bij ondeskundige toepassing vervalt de garantie.
Het lter reinigen en vervangen
1. Open het voorste paneel in de richting van de pijl.
CL6045QCCB_IM 17.12.20
33
2. Til de voorklep met één hand op, gebruik de andere hand om het
stoflter te verwijderen.
3. Maak het lter schoon met water. Gebruik bij sterke vervuiling warm
water om te reinigen (niet boven 45 °C). Laat het lter opdrogen.
4. Plaats het lter terug.
5. Sluit de klep van het compartiment.
OPMERKING:
De extra actieve koollters (grijs) en ionisatielters (groen) kunnen
niet worden schoongemaakt en moeten, afhankelijk van het aantal
bedrijfsuren, worden vervangen door nieuwe lters. De volgende
afbeelding toont het proces voor het verwijderen van de lters.
Reinigen van de binneneenheid
1. Open de frontplaat van het apparaat en verwijder de scharnieren om
het schoonmaken te vergemakkelijken.
2. Reinig de binneneenheid met een doek en water (niet warmer dan
40 °C).
LET OP:
Spuit geen reinigingsmiddelen op het apparaat.
Dompel het apparaat niet onder in water: hierdoor kunnen de elek-
tronische componenten beschadigd worden.
Gebruik geen staalborstel of schurende reinigingsmiddelen.
Reinigen van de buiteneenheid
Als de luchtinlaat van de buitenunit verstopt is, verwijder dan eventueel
aanwezige bladeren of ander afvalmateriaal en verwijder eventueel
achtergebleven stof met perslucht of een beetje water.
Vervangen van de batterijen
OPMERKING:
Gebruik alleen nieuwe batterijen. Verwijder de batterijen alleen uit de
afstandsbediening als de airconditioning is uitgeschakeld.
Als:
U geen bevestigingstoon meer hoort vanuit de binneneenheid.
Het display niet meer correct functioneert.
Hoe:
Open de achterklep.
Plaats nieuwe batterijen. Zorg dat de polariteit correct is.
Probleemoplossing
Storing / defect Mogelijke oorzaak
Het apparaat werkt niet. Stroomstoring / stekker uitgetrokken
Beschadigde ventilatormotor van de binnenunit of van de buitenunit
Thermomagnetische schakelaar op de compressor is kapot
Beschermend apparaat kapot of defect of zekeringen doorgebrand
Losse verbindingen of stekker uitgetrokken
Bedrijfsonderbreking ter bescherming / behoud van het product
Spanning te hoog of te laag
Functie “ ” is geactiveerd (automatisch inschakelen van het apparaat)
Schade aan de elektronische besturing
Vreemde geur Luchtlters vervuild of vies
Geluid van water Vloeistof stroomt terug in het koelmiddelcircuit
Er lekt jne nevel uit de luchtuitlaat Dit gebeurt wanneer de lucht in de kamer erg koud wordt, bijvoorbeeld in de modus “COOL” of “DRY”.
Vreemde geluiden Geluiden kunnen optreden als gevolg van uitzetten of krimpen veroorzaakt door thermische uctuaties
in het voorpaneel. Het optreden van deze geluiden betekent niet dat het apparaat defect is.
CL6045QCCB_IM 17.12.20
34
Storing / defect Mogelijke oorzaak
Ongewenste luchtstroom (warm of koud) Onjuiste of ongeschikte temperatuurinstellingen
De luchtinlaat of -uitlaat is geblokkeerd op de binnen- of buiteneenheid.
Het luchtlter is verstopt.
Ventilatorsnelheid ingesteld op minimumstand
Andere warmtebronnen in de kamer
Ontbrekend(e) koelmiddel(en)
Het apparaat reageert niet op signalen /
invoer.
De afstandsbediening is niet dicht genoeg bij de ontvanger van de binneneenheid.
Er is onvoldoende spanning in de batterijen van de afstandsbediening.
Obstakels tussen de afstandsbediening en de ontvanger
Het scherm is uitgeschakeld. Geactiveerde LED-functie
Spanningsfout
De ECO-functie is geactiveerd (zie hoofdstuk over “Energiebesparingsmodus (ECO)”)
Functies of kenmerken ontbreken op het
display
Niet alle functies of kenmerken worden voor elke bedrijfsmodus weergegeven (zie hoofdstuk over
“Bediening”)
Schakel in deze gevallen het apparaat onmiddellijk uit en trek de stekker uit het stopcontact:
Vreemde geluiden tijdens gebruik
Fout in de besturingskaart
Doorgebrande zekeringen of kapotte schakelaar
Sproeiwater of voorwerpen in het systeem
Oververhitte / verbrande kabel of stekker
Sterke geur afkomstig van het apparaat
Foutcodes op het scherm
Als er een fout optreedt, verschijnen de volgende foutcodes op het scherm van de binneneenheid:
Lamp gaat aan Beschrijving van de fout
Knippert eenmaal Binnentemperatuursensor fout
Knippert tweemaal Buitentemperatuursensor fout
Knippert zesmaal De motor van de binnenventilator werkt niet goed
OPMERKING:
Aanvullende foutcodes zijn te vinden in de servicehandleiding.
CL6045QCCB_IM 17.12.20
35
Technische gegevens
Model:...............................................................................CL 6045 QC CB
Nettogewicht van binneneenheid: ...............................................ong. 7 kg
Nettogewicht van buiteneenheid: ..............................................ong. 25 kg
Voedingsspanning:.......................................................220 - 240 V~, 50 Hz
Opgenomen vermogen tijdens koelen:............................................ 800 W
Opgenomen vermogen tijdens verwarmen: .................................... 699 W
Opgenomen vermogen tijdens stand-by: ......................................... 5,0 W
Beschermingsklasse: ................................................................................
Koelcapaciteit: ........................................................9000 BTU (2600 kW/h)
Thermische uitvoer: ...............................................9000 BTU (2610 kW/h)
Koelmiddel: ......................................................................................... R 32
Maximaal toegestane werkdruk:
Drukkant: .................................................................................. 3,7 MPa
Aanzuigkant: ............................................................................. 1,2 MPa
Model:...............................................................................CL 6046 QC CB
Nettogewicht van binneneenheid: ............................................ong. 8,5 kg
Nettogewicht van buiteneenheid: ..............................................ong. 25 kg
Voedingsspanning:.......................................................220 - 240 V~, 50 Hz
Opgenomen vermogen tijdens koelen:...........................................1130 W
Opgenomen vermogen tijdens verwarmen: .................................... 922 W
Opgenomen vermogen tijdens stand-by: ......................................... 5,0 W
Beschermingsklasse: ................................................................................
Koelcapaciteit: ...................................................... 12000 BTU (3400 kW/h)
Thermische uitvoer: .............................................12000 BTU (3420 kW/h)
Koelmiddel: ......................................................................................... R 32
Maximaal toegestane werkdruk:
Drukkant: .................................................................................. 3,7 MPa
Aanzuigkant: ............................................................................. 1,2 MPa
Model:...............................................................................CL 6047 QC CB
Nettogewicht van binneneenheid: ..........................................ong. 10,5 kg
Nettogewicht van buiteneenheid: ...........................................ong. 35,5 kg
Voedingsspanning:.......................................................220 - 240 V~, 50 Hz
Opgenomen vermogen tijdens koelen:.......................................... 1579 W
Opgenomen vermogen tijdens verwarmen: .................................. 1382 W
Opgenomen vermogen tijdens stand-by: ......................................... 2,5 W
Beschermingsklasse: ................................................................................
Koelcapaciteit: ...................................................... 18000 BTU (5100 kW/h)
Thermische uitvoer: .............................................18000 BTU (5130 kW/h)
Koelmiddel: ......................................................................................... R 32
Maximaal toegestane werkdruk:
Drukkant: .................................................................................. 3,7 MPa
Aanzuigkant: ............................................................................. 1,2 MPa
Wi-Fi
Ondersteund netwerk: ............................................................802.11 b/g/n
Maximaal uitgestraald uitgangsvermogen: ................................. 18,0 dBm
Frequentieband: .............................................................................2,4 GHz
Kanalen: ............................................................................................. 1 - 13
Ondersteunde wi beveiliging: ............................................... WPA / WPA2
Het recht om technische en ontwerpaanpassingen te maken in de loop
van voortdurende productontwikkeling blijft voorbehouden.
Opmerking van de richtlijn conformiteit
Hierbij verklaar ik, Clatronic International GmbH, dat het type radioappa-
ratuur CL 6045 QC CB / CL 6046 QC CB / CL 6047 QC CB conform is
met Richtlijn 2014 / 53 / EU.
Het apparaat is bovendien in overeenkomst met de vereisten van de
RoHS-richtlijn 2011 / 65 / EU & (EU) 2015 / 863.
De volledige tekst van de EU-conformiteitsverklaring kan worden ge-
raadpleegd op het volgende internetadres:
www.sli24.de
Geef op de download-pagina de modelnaam CL 6045 QC CB in.
Getest voor gebruik in Nederland.
Verwijdering
Verwijdering van batterijen
Als consument bent u wettelijk verplicht om oude batte-
rijen / accu’s terug te brengen.
Verwijder de batterijen uit de afstandsbediening vóór het weg-
werpen van het apparaat.
Breng de batterij naar een inzamelpunt voor de inzameling van oude
batterijen of gevaarlijk afval. Neem contact op met de plaatselijke over-
heid voor informatie.
CL6045QCCB_IM 17.12.20
36
Betekenis van het symbool “vuilnisemmer”
Bescherm ons milieu, elektrische apparaten horen niet in het
huisafval.
Maak voor het afvoeren van elektrische apparaten gebruik
van de voorgeschreven verzamelpunten en geef daar de
elektrische apparaten af die u niet meer gebruikt.
Daardoor helpt u de potentiële effecten te voorkomen die een verkeerde
afvoer op het milieu en de menselijke gezondheid kunnen hebben.
Op deze wijze levert u uw bijdrage aan het hergebruik, de recycling
en andere verwerkingsvormen voor oude elektronische en elektrische
apparaten.
Voor informatie over verzamelpunten voor uw apparaten kunt u contact
opnemen met uw gemeente of gemeenteadministratie.
CL6045QCCB_IM 17.12.20
37
Mode d’emploi
Merci d’avoir choisi notre produit. Nous espérons que vous saurez
proter votre appareil.
Symboles de ce mode d’emploi
Les informations importantes pour votre sécurité sont particulièrement
indiquées. Veillez à bien respecter ces indications an d’éviter tout
risque d’accident ou d’endommagement de l’appareil :
AVERTISSEMENT :
Prévient des risques pour votre santé et des risques éventuels de
blessure.
ATTENTION :
Indique les risques pour l’appareil ou tout autre appareil.
NOTE :
Attire votre attention sur des conseils et informations.
Notes générales
Lisez attentivement ce mode d’emploi avant de mettre l’appareil en
marche pour la première fois. Conservez le mode d’emploi ainsi que
le bon de garantie, votre ticket de caisse et si possible, le carton avec
l’emballage se trouvant à l’intérieur. Si vous remettez l’appareil à des
tiers, veuillez-le remettre avec son mode d’emploi.
N’utilisez cet appareil que pour un usage privé et pour les taches aux-
quelles il est destiné. Cet appareil n’est pas prévu pour une utilisation
professionnelle.
Ne l’utilisez pas en plein air. Protégez-le de la chaleur, des rayons di-
rects du soleil, de l’humidité (ne le plongez en aucun cas dans l’eau)
et des objets tranchants. N’utilisez pas cet appareil avec des mains
humides.
Il y a lieu d’inspecter l’appareil et le bloc d’alimentation régulièrement
en vue d’éventuels signes d’endommagements. Lorsqu’un endom-
magement est détecté, l’appareil ne doit plus être utilisé.
N’utilisez que les accessoires d’origine.
Par mesure de sécurité vis-à-vis des enfants, ne laissez pas les em-
ballages (sac en plastique, carton, polystyrène) à leur portée.
AVERTISSEMENT :
Ne pas laisser les jeunes enfants jouer avec le lm plastique. Il y a
risque d’étouffement !
Conseils de sécurité spéciques à cet appareil
Vous trouverez sur le produit des symboles au caractère d’avertissement ou d’information :
Lisez les instructions !
AVERTISSEMENT : Risque d’incendie !
L’appareil contient un réfrigérant inammable !
N’utilisez pas des objets différents de ceux autorisés par le fabricant pour accélérer le processus de dégivrage.
L’appareil ne doit être conservé que dans des pièces sans source permanente d’inammation (p. ex. ammes
nues, appareil à gaz activé ou radiateur électrique).
Ne pas percer ni brûler l’appareil.
N’oubliez pas que les réfrigérants sont inodores.
Le manuel d’entretien est disponible à l’adresse suivante : www.sli24.de
Dans la zone « Downloads » (Téléchargements), veuillez saisir le nom du modèle CL 6045 QC CB.
Toute personne travaillant sur un circuit réfrigérant ou devant en ouvrir un doit posséder un certicat valide dé-
livré par un organisme d’évaluation de compétences certié par l’industrie, prouvant ses capacités à manipuler
les réfrigérants en toute sécurité dans le respect des normes établies par l’industrie.
L’entretien de l’appareil doit être effectué comme recommandé par le fabricant de l’équipement. L’entretien et
les réparations nécessitant l’aide d’une autre personne compétente doit être effectuée sous la supervision de la
personne faisant autorité concernant l’utilisation de réfrigérants inammables.
ATTENTION : Risque de surchauffe !
Dégagez les fentes de ventilation !
Ne couvrez pas l’appareil !
ATTENTION :
Une installation incorrecte et le fonctionnement sans contrôle (par ex. sans certication) par une société spéciali-
sée entraîne l’annulation de la garantie comme établit par la déclaration (UE) 517 / 2014 Chapitre II Art. 3.
CL6045QCCB_IM 17.12.20
38
AVERTISSEMENT :
Ne pas utiliser ni ranger l’appareil dans les lieux suivants :
- À proximité d’une source de amme nue.
- Un lieu susceptible de subir des éclaboussures d’eau ou d’huile.
- Un lieu exposé à la lumière directe du soleil.
- Dans une salle de bain, dans une buanderie ou à proximité d’une piscine.
Ne touchez pas l’appareil si vous êtes pieds nus ou qu’une partie de votre corps est mouillée ou humide.
Pendant l’installation de l’appareil par une compagnie spécialisée, assurez-vous que l’entourage est sûr pour évi-
ter les accidents. Les enfants et les personnes autorisées ne doivent pas être autorisées à s’approcher.
Assurez-vous que la prise électrique en extérieur est installée de manière correcte.
Assurez-vous qu’aucun air ne peut pénétrer dans le système de réfrigération, et contrôlez le niveau des agents
de réfrigération lorsque vous déplacez le système de climatisation. Souvenez-vous que les agents de réfrigération
n’ont pas d’odeur.
À la suite de l’installation du système de climatisation, effectuez un essai de fonctionnement et vériez les don-
nées de fonctionnement.
Les fusibles installés dans l’unité de contrôle intégrée ont une valeur nominale de T 5 A / 250 V. Assurez-vous que
l’intérieur de l’appareil est toujours protégé à l’aide d’un fusible d’une capacité sufsante pour le courant d’entrée
maximal, ou à l’aide d’un autre dispositif de protection.
L’appareil doit être déconnecté de l’alimentation secteur pendant l’installation qui indique la séparation de tous les
contacts. Cela rend la séparation complète possible dans le respect des conditions de sous-tension de catégorie
III. Ces derniers doivent être intégrés avec le câblage permanent dans le respect des réglementations de sécurité.
Tout travail sur le système électrique doit être effectué par un technicien professionnel ou par une compagnie spé-
cialisée en électricité. Le climatiseur doit être installé par une compagnie certiée.
Ne placez pas l’appareil à proximité de substances inammables (alcool, etc.) ou de conteneurs sous pression
(des bombes aérosol, des bouteilles de gaz, etc.) Veuillez vous assurer de ménager un espace d’au moins 50 cm
entre l’appareil et ces substances.
Si l’appareil est utilisé dans un lieu sans aération, prenez ces précautions pour éviter les risques d’incendie asso-
ciés à la fuite de gaz réfrigérant.
Veuillez respecter les normes de connexion nationales. Le câblage doit respecter les réglementations nationales
applicables.
Avant de toucher les bornes de connexion, déconnectez tous les circuits électriques de l’alimentation électrique.
Cet appareil peut être utilisé par des enfants de plus de huit (8) ans et par des personnes dont les capacités
physiques, sensorielles ou mentales sont réduites ou des personnes inexpérimentées ou n’ayant pas les connais-
sances requises, s’ils sont sous surveillance ou disposent d’instructions correctes concernant l’utilisation en toute
sécurité de l’appareil et les risques encourus.
Les enfants ne doivent pas jouer avec l’appareil.
Ne réparez pas l’appareil vous-même, mais contactez toujours un technicien qualié.
Le nettoyage et la maintenance doivent être effectués par le personnel qualié. Dans toutes les situations, -
branchez toujours l’appareil de la source d’alimentation avant d’effectuer une opération de nettoyage ou de main-
tenance.
L’appareil n’a pas été conçu pour fonctionner comme climatiseur dans les lieux / quartiers d’habitation et ne doit
pas être utilisé dans d’autres buts comme le séchage des vêtements, la réfrigération des aliments, etc.
Utilisez l’appareil uniquement avec le ltre à air installé. L’utilisation du climatiseur sans le ltre à air peut entraîner
une accumulation excessive de poussière et la contamination des composants internes de l’appareil ce qui peut
causer des dommages et / ou des défaillances.
L’utilisateur est donc responsable d’assurer l’installation correcte de l’appareil par un technicien qualié. Le techni-
cien qualié doit vérier que l’appareil a été mis à la terre dans le respect des provisions et conseils applicables et
doit s’assurer que l’appareil est équipé d’un disjoncteur thermomagnétique.
CL6045QCCB_IM 17.12.20
39
Ne laissez jamais l’appareil exposé directement à un ux d’air froid pendant une longue durée. L’exposition pro-
longée à un ux d’air froid peut être dangereuse pour la santé humaine. Faites particulièrement attention dans le
cas des enfants, des personnes âgées ou des personnes malades.
Si l’appareil émet de la fumée ou que vous sentez une odeur de brûlé, débranchez immédiatement la source d’ali-
mentation et prenez contact avec votre technicien. L’utilisation de l’appareil sous ces circonstances et / ou dans
ces conditions peut causer un incendie ou une électrocution.
Utilisez le bouton pour éteindre l’appareil si vous ne l’utilisez pas pendant une période prolongée.
Assurez-vous que la direction du ux de l’air est correcte. Les bouches doivent être orientées vers le bas en mode
chauffage et vers le haut en mode refroidissement.
Pour préserver l’appareil, éviter les changements extrêmes des réglages de température.
Ne pliez pas, ne tirez pas sur et n’écrasez pas le câble d’alimentation, car cela pourrait l’endommager. Si le câble
d’alimentation est endommagé, cela augmente les risques d’électrocution et d’incendie. Seul le personnel tech-
nique spécialisé est à même de remplacer le câble d’alimentation s’il est endommagé.
Ne bloquez pas l’entrée ni la sortie d’air de l’unité intérieure ou extérieure. Le blocage ou l’obstruction de ces
ouvertures peut réduire les capacités de refroidissement de l’appareil, ainsi que des pannes ou des dommages.
N’effectuez pas d’altérations ni de changements non autorisés et inadaptés.
Ne placez aucun objet lourd ou dégageant de la chaleur sur l’appareil.
Ne laissez pas les fenêtres ou les portes ouvertes pendant de longues durées si le climatiseur est en fonctionne-
ment.
N’orientez pas le ux d’air vers des plantes ou des animaux. Des durées prolongées d’exposition directe à des
ux d’air froids peuvent impacter négativement le bien-être des plantes et des animaux.
N’escaladez pas l’unité extérieure et ne posez pas d’objets dessus.
N’insérez jamais de baguette, de barre, un poteau ou un objet similaire dans l’appareil. Cela peut entraîner des
blessures et endommager l’appareil.
Veillez à utiliser un outil spéciquement conçu pour le positionnement et le pliage des tuyaux de refroidissement.
Pour votre sécurité, évitez de déformer les câbles délicats, quelle que soit la situation. Tout le travail doit être effec-
tué par une compagnie certiée et le travail doit être effectué à partir de la documentation correcte et en fonction
de l’équipement attaché à l’appareil.
Les tuyaux de réfrigérant ne doivent pas être allongés ou raccourcis sans précautions spéciales, car ils sont pré-
remplis en usine de l’agent de réfrigération.
ATTENTION :
Toute modication technique apportée aux tuyaux de réfrigérant doit être effectuée par une compagnie spéciali-
sée certiée. Des altérations ou modications incorrectes annuleront les droits à la garantie.
Vériez que tous les tuyaux et câbles sont correctement scellés pour éviter la formation de liquides, de vapeur
d’eau ou de condensation et ainsi éviter que de l’eau ne pénètre au sein de l’appareil. Cela évitera l’accumulation
d’humidité ainsi que la formation de moisissure.
Manipulation des piles
AVERTISSEMENT :
N’exposez pas les piles à une source de chaleur excessive comme
les rayons du soleil, le feu ou toute source similaire. Il y a un risque
d’explosion !
Les piles ne sont pas des jouets. Éloignez-les des enfants.
N’ouvrez pas les piles de force.
Évitez le contact avec les objets métalliques (bagues, clous, vis,
etc.). Il y a un risque de court-circuit !
En cas de court-circuit, la pile peut devenir excessivement chaude
ou même prendre feu, ce qui provoque des blessures.
Pour votre propre sécurité, couvrez les bornes de la pile avec du
ruban adhésif pendant le transport.
AVERTISSEMENT :
Si la pile fuit, veillez à ne pas appliquer le liquide sur les yeux ou les
muqueuses. En cas de contact, lavez les mains et rincez les yeux
avec de l’eau claire. Consultez un médecin, si l’irritation persiste.
Ne rechargez pas les piles non-rechargeables.
Assurez-vous que la polarité est correcte lors de l’insertion de la
(des) pile(s).
ATTENTION :
Lorsque vous n’utilisez pas la télécommande pendant une longue
période, retirez les piles pour éviter que l’acide contenu dans la pile
ne fuie.
Ne mélangez pas des piles de types différents ou des nouvelles
piles avec des piles usagées.
Ne jetez pas les piles avec les déchets ménagers. Rapportez les
piles usagées à un point de collecte autorisé ou à votre revendeur.
CL6045QCCB_IM 17.12.20
40
Déballage de l’appareil
1. Retirez l’appareil de la boîte.
2. Retirez la totalité du matériau d’emballage, tel que les lms, le rem-
bourrage, et le carton.
3. Inspectez l’appareil pour repérer d’éventuels dégâts liés au transport
et éviter les risques associés.
4. Si des dommages sont constatés, n’utilisez pas l’appareil. Contactez
votre distributeur.
Contenu de la livraison
Unité d’intérieur
a) 6 × vis
b) 6 × cheville
c) 1 × support mural
Unité d’extérieur
d) 1 × support pour le système de canalisation
de la condensation
e) 4 × pieds pour l’unité d’extérieur
Accessoires de connexion
f) 1 × câble de connexion pour l’unité
d’extérieur
g) 2 × tuyau de réfrigérant (gris e bleu) avec
isolant
h) 1 × matériau d’isolation (en remplacement)
i) 2 × tuyau d’eau de condensation
j) 1 × adhésif vinyle
k) 1 × cache de trou
Accessoires
m) 1 × télécommande
n) 2 × pile « AAA » de 1,5 V R03
o) 2 × ltre
p) 2 × cartouche de ltre
1 × ltre à charbon actif (gris)
1 × ltre ionisant (vert)
Liste des différents éléments de commande
Page 3
Unité d’intérieur pour l’appareil
1 Panneau avant
2 Cartouche de ltre avec ltre à charbon actif (gris)
3 Cartouche de ltre avec ltre ionisant (vert)
4 Module WLAN
5 Afchage LED
6 Plaque de type (positionnement variable)
7 Schéma du circuit
8 Unité de connexion électrique
9 Bouton (allumer / éteindre)
10 Déecteur d’air
11 Récepteur du signal
12 Rabat d’air
13 Télécommande
Unité d’extérieur pour l’appareil
14 plaque de type pour extérieur (positionnement variable)
15 cache de prise
16 valve de liquide de refroidissement
a gris
b bleu
17 sortie d’air
Télécommande
NOTE :
Si votre modèle ne possède pas l’une de ces fonctions, vous en-
tendrez quand même un bip lorsque vous appuyez sur le bouton
correspondant.
Boutons sur la télécommande
N. Bouton Signication
1Allumer / éteindre
2OPTION Bouton de sélection
3Bouton réglages / sélection
4Bouton réglages / sélection
5ECO Pour activer ou désactiver la fonction ÉCO
6TURBO Pour activer ou désactiver la fonction Turbo
7Mode Bouton de sélection des modes
8Fan Réglage de vitesse du ventilateur
9Réglage du rabat d’air
10 Réglage du déecteur d’air (non disponible,
doit être orienté manuellement)
CL6045QCCB_IM 17.12.20
41
Écran de la télécommande
Afchage du réseau
Verrouillage de sécurité enfant
AUTO Mode automatique
COOL Mode refroidissement
DRY Mode de déshumidication
HEAT Mode de chauffage
FAN Mode ventilateur
ECO Mode d’économie d’énergie
Afchage de la vitesse du ventilateur
Ventilation désactivée
Température et vitesse maximale
Afchage du rabat d’air
Afchage du déecteur d’air (non disponible)
Mode sommeil
Allumage / mise hors tension automatique
Mesure automatique de la température
Auto-nettoyage de la moisissure
Fonction bien-être (non disponible)
Non disponible
Informations concernant l’application
« Smart Life - Smart Living »
L’application Smart Life - Smart Living App est disponible pour
Android et iOS. Scannez le code QR correspondant pour accéder direc-
tement au téléchargement.
NOTE :
En fonction du fournisseur, le téléchargement de l’application peut
entraîner des frais.
Google Play App Store
Information sur l’utilisation de l’application
Cet outil vous permet d’utiliser l’appareil via votre réseau domestique.
Nécessaire : 1) une connexion Wi-Fi permanente à votre routeur, et 2)
l’application gratuite « Smart Life - Smart Living ». Vous pouvez contrô-
ler aisément toutes les fonctions de l’appareil via l’application. Pour
éviter que l’appareil ne s’allume de manière accidentelle, nous vous
recommandons de le débrancher de l’alimentation électrique lorsque
vous n’êtes pas chez vous !
Exigences du système pour l’utilisation de l’application
iOS 10.0 ou plus récent
Android 5.0 ou plus récent
Mise en service via l’application
1. Installez l’application « Smart Life - Smart Living ». Créez un compte
utilisateur.
2. Activez la fonction Wi-Fi dans les paramètres de votre appareil.
3. Vériez que le réseau Wi-Fi est bien à portée pour votre appareil.
4. Allumez l’unité d’intérieur.
5. Lancez l’application et sélectionnez « + » aus.
6. Sélectionnez le menu « Climatiseur » et suivez les instructions af-
chées
7. Appuyez sur le bouton ECO de la télécommande six fois jusqu’à
que « CF » apparaisse sur l’écran. Si « AP » apparaît sur l’écran,
appuyez sur le bouton ECO six fois de nouveau.
8. Dans ce cas, appuyez sur « étape suivante ». Saisissez votre mot de
passe.
9. Une fois que l’appareil est correctement connecté, le voyant indica-
teur Wi-Fi s’illumine en continu. Vous pouvez maintenant contrôler
l’appareil avec l’application.
NOTE :
L’appareil peut seulement être utilisé avec un routeur 2,4 GHz. Les
routeurs de 5 GHz ne sont pas pris en charge.
Oublier la connexion WIFI
Si vous souhaitez supprimer la connexion Wi-Fi actuelle (le voyant de
contrôle est illuminé), suivez les étapes suivantes : Appuyez sur le bou-
ton ECO de la télécommande six fois.
NOTE :
Si vous souhaitez établir la connexion Wi-Fi de nouveau, suivez les
étapes décrites dans la section « Mise en service via l’application ».
Installation
Unité d’intérieur (a)
Montez l’unité d’intérieur sur un mur solide non exposé à des vibra-
tions.
Aucune des ouvertures de l’appareil ne doit être bloquée de manière
que l’air puisse circuler dans la pièce entière.
N’installez pas l’unité près de sources de chaleur, de sources de
vapeur ou de gaz inammables.
Ne montez pas l’appareil là où il serait exposé à la lumière directe du
soleil pendant de longues durées.
Sélectionnez un emplacement depuis lequel la condensation peut
être facilement évacuée et depuis lequel le raccord à l’unité d’exté-
rieur peut être aisément effectué.
Vériez régulièrement que l’appareil fonctionne correctement et
respectez toujours les conseils pour les distances minimales et d’es-
pacement libre. Sélectionnez un emplacement permettant un accès
facile au ltre.
N’installez pas l’appareil dans des pièces humides telles que des
salles de bain, des buanderies, etc.
Unité d’extérieur (b)
N’installez pas l’unité près de sources de chaleur, de sources de
vapeur ou de gaz inammables.
N’installez pas l’appareil dans des emplacements excessivement
poussiéreux.
Installez l’appareil dans un lieu où le bruit qu’il génère ne dérangera
pas les personnes et qui n’est pas très fréquenté. Si nécessaire,
prenez contact avec vos voisins pour vous assurer de ne pas les
déranger. Consultez la Directive fédérale allemande de protection
contre les émissions, le cas échéant.
N’installez pas l’appareil dans un lieu qui l’exposerait à la lumière di-
recte du soleil, à des conditions météo extrêmes, et si cela n’est pas
possible, installez un système de protection contre le soleil en veillant
à ne pas impacter le ux de l’air.
Respectez toujours les distances d’installation minimales décrites
dans l’illustration ci-dessous et / ou gardez l’espace dans ces dis-
tances libre d’obstructions pendant l’installation et le fonctionnement.
CL6045QCCB_IM 17.12.20
42
Unité d’intérieur (a)
Pour garantir les meilleurs résultats, l’installation doit être effectuée
aussi loin du sol que possible.
Unité d’extérieur (b)
Installez l’unité d’extérieur sur un emplacement stable.
Si l’unité d’extérieur est exposée à des vibrations, utilisez des tam-
pons amortisseurs au sol pour réduire leur impact.
Les distances minimales (en mm) sont
indiquées dans l’illustration.
ATTENTION :
La personne ayant acheté l’appareil doit s’assurer que le personnel /
la compagnie effectuant l’installation, la maintenance ou la répa-
ration du climatiseur dispose des qualications et de l’expérience
sufsantes pour le travail avec des agents de réfrigération.
Une installation incorrecte et le fonctionnement sans contrôle
(par ex. sans certication) par une société spécialisée entraînent
l’annulation de la garantie comme établit par la déclaration (UE)
517 / 2014 Chapitre II Art. 3.
Installation de la monture murale
ATTENTION :
Avant de commencer l’installation de la monture murale, assurez-vous
d’avoir trouvé le site précis auquel vous allez percer le trou de
passage des tuyaux ! Consultez le chapitre nommé « Installation de
l’unité d’intérieur et traversée de mur vers l’extérieur ».
1. Desserrez les clips de monture de la monture murale.
2. Déployez la monture murale vers le haut.
3. Retirez la monture murale en la libérant de son support.
4. Percez des trous d’une profondeur d’au moins 32 mm dans un mur
solide pour la xation de la plaque.
5. Insérez les chevilles de plastique dans les trous
6. Fixez la plaque de monture au mur à l’aide des vis incluses.
7. Assurez-vous que la plaque de monture est solidement vissée en
place.
Alignement des tuyaux de refroidissement
ATTENTION :
Le climatiseur doit être installé et connecté par une société certiée
pour le travail avec les produits de réfrigération et de climatisation.
Une installation incorrecte annulera les droits à la garantie.
Les tuyaux de réfrigérant peuvent être installés dans 3 directions
comme indiqué par des chiffres dans l’illustration. Si la tuyauterie est
positionnée comme indiqué dans les options 1 et 3, alors utilisez un
cutter pour découper une encoche latérale sur la jointure de l’unité
d’intérieur.
Faites passer les tuyaux de connexion dans la direction de l’ouverture
dans le mur et attachez les tuyaux de réfrigérant, le tuyau de l’eau de
condensation et le câble d’alimentation avec l’adhésif vinyle en veillant
CL6045QCCB_IM 17.12.20
43
à ce que l’isolation soit imperméable pour empêcher que du liquide, de
la vapeur d’eau ou de la condensation ne se forme et par exemple ne
pénètre dans le mur. Cela évitera l’accumulation d’humidité ainsi que la
formation de moisissure. Assurez-vous que le tuyau d’eau de conden-
sation soit en descente douce de manière que l’eau puisse s’écouler
aisément.
ATTENTION :
Assurez-vous que les tuyaux soient scellés de manière imperméable
pour éviter les dégâts causés par l’humidité et la formation de moisis-
sure dans le mur.
Dérouler les tuyaux de réfrigérant
Ne retirez les capuchons de fermeture qu’immédiatement avant la
connexion des tuyaux de refroidissement pour éviter les tâches.
Si les tuyaux sont pliés ou étirés trop fréquemment, ils deviendront
plus rigides. Ne pliez pas les tuyaux plus de trois fois.
Déroulez les tuyaux soigneusement comme décrit dans le schéma A.
Évitez de les déformer.
ATTENTION :
Ne tirez pas sur les tuyaux pour les étendre comme décrit dans le
schéma B. Au lieu de cela, déroulez-les soigneusement.
Connexion de l’unité d’intérieur
ATTENTION :
Le climatiseur doit être installé et / ou connecté par une société cer-
tiée pour le travail avec les produits de réfrigération et de climatisa-
tion. Une installation incorrecte annulera les droits à la garantie.
1. Retirez les capuchons protecteurs.
2. Vériez les connexions à la recherche de tâches ou de dommages.
3. Connectez l’écrou de jumelage au letage de connexion sur l’unité
intérieure. Pendant ce temps, faites attention à respecter les couleurs
des capuchons de protection.
4. Serrez la connexion à l’aide d’une clef à molette adéquate.
NOTE :
Respectez toujours la taille de couple correcte et appliquez les infor-
mations du tableau inclus nommé « Informations d’installation ».
Connecter le tuyau d’eau de condensation pour l’unité d’intérieur
Il est extrêmement important que le tuyau d’eau de condensation soit
installé de la manière correcte.
1. Positionnez le exible d’évacuation sous le tuyau et assurez-vous
qu’il soit à niveau.
2. Le exible d’évacuation doit être incliné vers le bas pour faciliter
l’écoulement de l’eau de condensation.
3. Ne pliez pas et n’enroulez pas le exible d’évacuation. Ne le laissez
pas dépasser. N’immergez pas l’extrémité du exible dans l’eau. Si le
exible est connecté à une extension, assurez-vous que la connexion
est correcte lors de son insertion dans l’unité d’intérieur.
4. Si les tuyaux de refroidissement sont installés comme décrit par le
point N° 3 du chapitre nommé « Alignement des tuyaux de refroidis-
sement », alors les tuyaux, le câble de connexion pour l’unité d’exté-
rieur et le tuyau d’évacuation de l’eau de condensation doivent être
attachés à l’arrière de l’appareil avec des colliers de tuyaux.
5. Insérez le connecteur de tuyau dans l’appareil correspondant.
6. Poussez le tuyau de connexion fermement vers le bas dans le clima-
tiseur et vériez que la connexion est correcte
ATTENTION :
Évitez les déformations pendant le positionnement et faites effectuer
ces tâches par une société spécialisée certiée.
CL6045QCCB_IM 17.12.20
44
Installation de l’unité d’intérieur et traversée de mur vers l’extérieur
Une fois la connexion des tuyaux de réfrigérant et le tuyau d’évacuation
de l’eau de condensation effectuée comme indiqué, effectuez les
étapes suivantes :
1. Avec grand soin, positionnez les tuyaux, le câble de connexion de
l’unité d’extérieur et le tuyau d’eau de condensation vers le point
ils devront traverser le mur vers l’extérieur.
2. Attachez ensemble les tuyaux d’eau de condensation, le câble de
connexion pour l’unité d’extérieur et le tuyau d’eau de condensation
avec l’adhésif vinyle puis couvrez le tout fermement avec de l’adhésif
d’isolation (non inclus avec l’appareil).
ATTENTION :
Assurez-vous que les tuyaux soient scellés de manière imper-
méable pour éviter les dégâts causés par l’humidité et la formation
de moisissure dans le mur.
Assurez-vous que tous les tuyaux ont été sufsamment isolées.
3. Percez un trou d’un diamètre de 57 mm avec une inclinaison / une
descente de 5 - 7 mm. (image 2).
NOTE :
Percez le trou avec une inclinaison légère de 5 - 7 mm vers l’exté-
rieur pour assurer que le tuyau de l’eau condensée puisse évacuer
l’eau.
Dans tous les cas, assurez-vous que l’inclinaison ainsi effectuée
affecte la longueur totale du tuyau d’eau de condensation dans la
direction du trou dans le mur.
4. Insérez le cache de trou.
5. Guidez les tuyaux isolés, le câble de connexion pour l’unité d’exté-
rieur et les tuyaux d’eau de condensation dans l’ouverture dans le
mur.
NOTE :
Après installation des tuyaux, scellez le trou dans le mur par les-
quels les tuyaux sont passés de manière qu’il soit étanche à l’air et
à l’eau.
6. Fixez l’unité d’intérieur solidement à la partie supérieure de la plaque
de monture murale
7. Pressez la partie inférieure de l’unité d’intérieur sur la plaque de mon-
ture murale jusqu’à ce qu’elle soit fermement installée.
Installation de l’unité d’extérieur
Avant de connecter les tuyaux, décidez où vous souhaitez placer
l’unité d’extérieur et assurez-vous que l’emplacement sélectionné dis-
pose de sufsamment d’espace pour effectuer les éventuelles opéra-
tions de maintenance futures. (respectez les distances minimales)
Placez les capuchons de protection (inclus avec l’appareil) sur le pied
et xez-les aux points dédiés.
Utilisez des vis / boulons extrêmement solides et tenez compte égale-
ment du poids de l’appareil, pour éviter que les vibrations ne puissent
défaire les connexions au l du temps. L’unité doit être installée dans
le respect des réglementations de sécurité en vigueur.
Tuyau d’eau de condensation pour l’unité d’extérieur
L’eau de condensation et la glace qui se forment dans l’unité d’extérieur
à cause de la génération de chaleur peuvent être évacuées à l’aide du
tuyau d’eau de condensation.
1. Fixez les supports pour le tuyau d’évacuation de l’eau de condensa-
tion dans l’ouverture de 25 mm prévue à cet effet.
2. Connectez les supports pour le tuyau d’évacuation de l’eau de
condensation au tuyau d’eau de condensation et assurez-vous que
l’écoulement est correctement contrôlé pour éviter les dommages
causés par la moisissure.
CL6045QCCB_IM 17.12.20
45
Branchements électriques (unité d’extérieur)
Retirez le cache du connecteur (15) situé sur le côté droit de l’appareil.
Le schéma relatif est indiqué sur l’arrière. Voyez le schéma
1. Connectez le câble d’alimentation pour l’unité d’intérieur à la borne de
connexion.
2. Attachez soigneusement le câble d’alimentation pour l’unité d’exté-
rieur à l’aide des pinces de connexion du câble.
3. Assurez-vous que les câbles ont été correctement attachés. Assu-
rez-vous que la mise à la terre est correcte.
4. Remettez le cache de protection sur l’appareil.
ATTENTION :
Tous les travaux électriques doivent être effectués par un électricien
professionnel ou une société professionnelle de travail avec les pro-
duits électroniques. Une installation incorrecte annulera les droits à la
garantie.
Instructions de couplage rapide
Utilisez le couplage rapide pour raccorder aisément les unités d’intérieur
et d’extérieur au climatiseur. La procédure rapide et facile permet la
connexion dans le respect des termes de la garantie, tant qu’elle est
effectuée par une société spécialisée.
ATTENTION :
Les tuyaux de réfrigérant inclus avec l’appareil ont été préremplis
d’agent de réfrigération en usine.
Les tuyaux ne doivent pas être raccourcis ou rallongés.
Connexion à l’unité d’intérieur
1. Déroulez les tuyaux de réfrigérant soigneusement comme décrit
dans le chapitre nommé « Dérouler les tuyaux de réfrigérant ». Évitez
toujours de déformer les tuyaux.
2. Retirez les capuchons protecteurs (bleu et gris) des couplages de
l’unité d’intérieur.
3. Vériez que tous les pas de vis sont en bon état et qu’ils ne com-
portent pas de corps étrangers comme des particules de saleté, de la
poussière, du sable, d’autres matières en suspension ou tout type de
corps étranger.
4. Vissez les tuyaux de réfrigérant à l’aide des connecteurs sur l’unité
d’extérieur. Assurez-vous que les connexions sont effectuées dans le
respect des couleurs bleu / gris. Ensuite, serrez les boulons à l’aide
de deux clefs à molette (l’une pour serrer, l’autre pour tenir en place).
NOTE :
Respectez toujours la taille de couple correcte et appliquez les in-
formations du tableau inclus nommé « Informations d’installation ».
Connexion à l’unité d’extérieur
1. Déroulez les tuyaux de réfrigérant soigneusement comme décrit
dans le chapitre nommé « Dérouler les tuyaux de réfrigérant ». Évitez
toujours de déformer les tuyaux.
2. Retirez les capuchons protecteurs (bleu et gris) des couplages de
l’unité d’extérieur.
3. Vériez que tous les pas de vis sont en bon état et qu’ils ne com-
portent pas de corps étrangers comme des particules de saleté, de la
poussière, du sable, d’autres matières en suspension ou tout type de
corps étranger.
4. Vissez les tuyaux de réfrigérant à l’aide des connecteurs sur l’unité
d’extérieur. Assurez-vous que les connexions sont effectuées dans le
respect des couleurs bleu / gris. Ensuite, serrez les boulons à l’aide
de deux clefs à molette (l’une pour serrer, l’autre pour tenir en place).
NOTE :
Respectez toujours la taille de couple correcte et appliquez les in-
formations du tableau inclus nommé « Informations d’installation ».
CL6045QCCB_IM 17.12.20
46
5. Assurez-vous que le circuit de réfrigération pour l’appareil est
correctement connecté et étanche à l’air. Contrôlez les éléments de
connexion avec un vaporisateur de détection des fuites. Si des bulles
apparaissent, alors des fuites sont présentes. Si c’est le cas, il est
alors impératif de fermer les valves de coupure. Inspectez soigneuse-
ment les tuyaux et les connexions.
NOTE :
La valve de coupure (a) a été fermée en usine et doit être ouverte.
La valve de service (b) est utilisée pour la maintenance unique-
ment.
ATTENTION :
Le climatiseur doit être installé et connecté par une société certiée
pour le travail avec les produits de réfrigération et de climatisation.
Une installation incorrecte annulera les droits à la garantie.
Tester l’unité d’intérieur
L’interrupteur d’alimentation fonctionne-t-il correctement ?
Le ventilateur fonctionne-t-il ?
Les modes de fonctionnement sont ils normalement activés ?
La température et le temps de fonctionnement peuvent-ils être préci-
sément ajustés ?
Tous les voyants fonctionnent-ils correctement ?
Les rabats de direction de l’air fonctionnent-ils correctement ?
Le tuyau d’eau de condensation fonctionne-t-il correctement ?
ATTENTION :
Toutes les étapes décrites ci-dessus doivent être effectuées par une
société spécialiste de la réfrigération et de la climatisation. Une implé-
mentation incorrecte annulera les droits à la garantie.
Tester l’unité d’extérieur
Entend-on des bruits ou des vibrations inhabituelles pendant le fonc-
tionnement ?
Y a-t-il une fuite d’agent de refroidissement ?
NOTE :
Le système de contrôle électronique n’activera le compresseur que
dans les trois minutes suivant l’allumage de l’unité.
ATTENTION :
Toutes les étapes décrites ci-dessus doivent être effectuées par une
société spécialiste de la réfrigération et de la climatisation. Une implé-
mentation incorrecte annulera les droits à la garantie.
Informations d’installation
Instructions d’installation - Informations d’installation
Type de design / Capacité de refroidissement (Btu / h) 9k 12k 15 / 18k
Diamètre de tuyau de réfrigérant a) 1 / 4" 6 1 / 4" 6 1 / 4" 6
Diamètre de tuyau de réfrigérant b) 3 / 8" 9,52 1 / 2" 12 1 / 2" 12
Longueur standard de tuyau de réfrigérant 5 m 5 m 5 m
Distance maximale entre l’unité d’intérieur et l’unité d’extérieur 15 m 15 m 15 m
Charge de réfrigérant supplémentaire 20 g / m 20 g / m 30 g / m
Distance maximale entre l’unité d’intérieur et l’unité d’extérieur 5 m (15 m) 5 m (15 m) 5 m (15 m)
Agent de réfrigération * R32 R32 R32
*) Des détails supplémentaires sont indiqués sur la plaque d’information apposée à l’extérieur de l’unitét
Serrage des couples pour les capuchons de protection et connexion des brides
Tuyau de
réfrigérant
Serrage des couples
(N x m)
Utilisation de charge correspondante :
clef à molette de 20 cm
Serrage des couples
(N x m)
1 / 4" 6 15 - 20 Serré / serré à la main Écrou de connexion pour
la maintenance 7 - 9
3 / 8" 9,52 31 - 35 Serré Capuchons de protection 25 - 30
1 / 2" 12 35 - 45 Serré
5 / 8" 15,88 75 - 80 Serré
CL6045QCCB_IM 17.12.20
47
Caractéristiques techniques des câbles
Instructions d’installation - Informations pour l’installateur
Modèle Agent de réfrigération (Btu / h) 9k 12k 15 / 18k
Câble électrique
N1,0 mm²
AWG18
1,0 mm² (1,5 mm²)
AWG18 (AWG16)
1,5 mm²
AWG16
L1,0 mm²
AWG18
1,0 mm² (1,5 mm²)
AWG18 (AWG16)
1,5 mm²
AWG16
E1,0 mm²
AWG18
1,0 mm² (1,5 mm²)
AWG18 (AWG16)
1,5 mm²
AWG16
Câble de branchement
N1,0 mm² 1,0 mm² (1,5 mm²) 1,5 mm²
L1,0 mm² 1,0 mm² (1,5 mm²) 1,5 mm²
11,0 mm² 1,0 mm² (1,5 mm²) 1,5 mm²
20,75 mm² 0,75 mm² 0,75 mm²
30,75 mm² 0,75 mm² 0,75 mm²
Instructions d’installation - Informations d’installationn
Transformateur de tension 9k 12k 18 / 22k
Modèle Agent de réfrigération (Btu / h) Coupe
Câble électrique
N1,0 mm² (1,5 mm²)
AWG18 (AWG16)
1,0 mm² (1,5 mm²)
AWG18 (AWG16)
1,5 mm²
AWG16
L1,0 mm² (1,5 mm²)
AWG18 (AWG16)
1,0 mm² (1,5 mm²)
AWG18 (AWG16)
1,5 mm²
AWG16
E1,0 mm² (1,5 mm²)
AWG18 (AWG16)
1,0 mm² (1,5 mm²)
AWG18 (AWG16)
1,5 mm²
AWG16
Câble de branchement
N1,0 mm² (1,5 mm²) 1,0 mm² (1,5 mm²) 1,5 mm²
L1,0 mm² (1,5 mm²) 1,0 mm² (1,5 mm²) 1,5 mm²
11,0 mm² (1,5 mm²) 1,0 mm² (1,5 mm²) 1,5 mm²
À 220 V 7 K, 9 K, 12 K, 15 K, 16 K, 18 K, 22 K, 24 K, 30 K la valeur de sécurité pour l’unité d’intérieur du climatiseur est 50 T, 3,15 A
À 220 V 110 V 7 K, 9 K, 12 K la valeur de sécurité pour l’unité d’intérieur du climatiseur est 50 T, 3,15 A
125 V 7 K, 9 K, 12 K la valeur de sécurité pour l’unité d’extérieur du climatiseur est 61 T, 15 A
250 V 18 K, 22 K, 24 K la valeur de sécurité pour l’unité d’extérieur du climatiseur 65 T, 25 A !
Schéma du circuit
Le schéma du circuit est différent selon les modèles. Veuillez consulter
les schémas des circuits pour les unités d’intérieur et d’extérieur.
Pour l’unité d’intérieur, le schéma du circuit (7) est présent sur le pan-
neau avant (1).
Pour l’unité d’extérieur, le schéma du circuit est collé au dos du cache
de connecteur (15).
NOTE :
Pour certains modèles, les câbles ont été connectés par le fabricant
à la carte des circuits principale de l’unité d’intérieur sans bornes de
terminaux.
Fonctionnement
Contrôle direct
Si la télécommande ne fonctionne pas ou si vous devez effectuer une
maintenance, suivez les étapes suivantes :
1. Ouvrez le cache avant et levez-le pour atteindre le bouton .
2. Appuyez sur le bouton pour lancer la fonction de refroidissement.
(Vous entendrez un bip)
3. Appuyez sur le bouton pendant 3 secondes pour lancer la fonction
de chauffage. (Vous entendrez deux bips.)
4. Pour éteindre, appuyez sur le bouton de nouveau. (Vous enten-
drez un long bip.)
NOTE :
La pression statique externe pour la pompe à eau sur tous les mo-
dèles est de 0 Pa.
CL6045QCCB_IM 17.12.20
48
Télécommande
1. Ouvrez le cache du compartiment à piles au dos de la télécommande
en le poussant dans le sens de la èche.
2. Insérez 2 piles « AAA » de 1,5 V R03. Veillez à respecter le sens des
polarités. (indiqué au fond du compartiment à piles)
NOTE :
Verrou de sécurité enfant :Appuyez sur le bouton et simulta-
nément pour activer le verrou de sécurité enfant.
Allumer / éteindre l’écran : Maintenez le bouton ECO enfoncé
3. Pointez la télécommande vers le climatiseur.
NOTE :
Assurez-vous qu’il ne se trouve aucun objet ou obstruction dans
l’espace situé entre la télécommande et le récepteur de signal de
l’unité d’intérieur.
Ne laissez jamais la télécommande exposée à la lumière directe du
soleil pour de longues durées.
Utilisez et rangez la télécommande à au moins un mère d’une télé-
vision ou d’autres types d’appareils électriques.
Allumer / éteindre
Appuyez sur le bouton pour éteindre l’appareil.
Appuyez sur le bouton pour allumer l’appareil de nouveau.
Ajuster la direction de l’air
L’air peut être distribué de manière homogène lorsqu’il est expulsé dans la
pièce. Vous disposez d’options pour optimiser la direction de l’air.
Appuyez sur le bouton pour activer le rabat de direction de l’air (1). La ux
d’air peut être dirigé depuis le haut ou le bas pour garantir une distribution
homogène de l’air dans la pièce.
Les déecteurs d’air (2) doivent être positionnés manuellement et sont loca-
lisés sous les rabats de direction de l’air. Ces derniers vous permettent de
diriger l’air vers la gauche ou la droite.
ATTENTION :
L’orientation du déecteur d’air doit être effectuée lorsque l’appareil est éteint.
Ne positionnez pas les rabats de direction de l’air manuellement (c.-à-d. directement à la main). Cela peut causer de graves dommages
N’insérez jamais les doigts, de bâtons ou d’autres objets dans les ouvertures d’entrée / de sortie. Cela peut causer des dommages matériels et
des blessures.
NOTE :
Notez que pour des raisons pratiques, toutes les fonctionnalités ne peuvent être afchées sur l’écran de la télécommande sous tous les modes.
Appuyez sur le bouton OPTION pour afcher quelles fonctionnalités sont disponibles pour chaque modes.
Bouton MODE Sélectionner un mode de fonctionnement
Bouton OPTION Sélectionner une fonctionnalité
Mode Refroidissement (COOL)
Le mode de refroidissement permet à la fois de rafraîchir une pièce
mais également réduire l’humidité ambiante.
1. Pour activer le mode de refroidissement, appuyez sur le bouton
MODE jusqu’à que « COOL » apparaisse sur l’écran de la télécom-
mande. La fonction de refroidissement s’active si la température sé-
lectionnée est inférieure à celle de la pièce. (Effectuez votre sélection
avec les boutons et .)
2. Pour optimiser la fonctionnalité de climatisation, réglez la tempéra-
ture, la vitesse et la direction de l’air à l’aide des boutons appropriés.
Mode chauffage (HEAT)
Le mode de chauffage permet de chauffer une pièce.
1. Pour activer le mode de chauffage, appuyez sur le bouton MODE
jusqu’à que « HEAT » apparaisse sur l’écran de la télécommande.
La fonction de chauffage s’active si la température sélectionnée est
supérieure à celle de la pièce. (Effectuez votre sélection avec les
boutons et .)
2. Pour optimiser la fonctionnalité de chauffage, réglez la température,
la vitesse et la direction de l’air à l’aide des boutons appropriés.
NOTE :
Si l’appareil est équipé d’un chauffage électrique, cela introduira un
délai dans l’activation de l’application pendant quelques minutes.
NOTE :
Une fonction de dégel automatique peut aussi être activée dans le
mode de chauffage. Cette fonction de dégel est indispensable pour
le nettoyage de l’appareil. Les résidus de givre sont éliminés pour
rétablir les capacités d’échange maximales de la chaleur. Cette
procédure dure généralement entre 2 et 10 minutes. Le ventilateur
sera coupé pendant cette durée. Après dégel, l’appareil se réacti-
vera automatiquement en mode de chauffage.
Allumer automatiquement l’apparei ( )
Pour programmer l’appareil de manière qu’il s’allume automatiquement,
commencez par l’éteindre.
1. Appuyez sur le bouton OPTION.
2. Appuyez sur les boutons échés pour sélectionner et jusqu’à
que « » apparaisse sur l’écran de la télécommande.
3. Appuyez sur le bouton OPTION de nouveau et appuyez sur les bou-
tons échés pour sélectionner et pour régler le temps désiré.
4. Conrmez votre sélection à l’aide du bouton OPTION.
NOTE :
Pour annuler la fonction, répétez les étapes décrites ci-dessus.
La fonctionnalité Timer peut être réglée par intervalles de 30 mi-
nutes.
CL6045QCCB_IM 17.12.20
49
Éteindre automatiquement l’appareil ( )
Pour programmer l’appareil de manière qu’il s’éteigne automatique-
ment, commencez par l’allumer.
1. Appuyez sur le bouton OPTION.
2. Appuyez sur les boutons échés pour sélection et jusqu’à que
« » apparaisse sur l’écran de la télécommande.
3. Appuyez sur le bouton OPTION de nouveau et appuyez sur les
boutons échés pour sélectionner et pour régler le temps désiré
conrmez votre sélection à l’aide du bouton OPTION.
NOTE :
Pour annuler la fonction, répétez les étapes décrites ci-dessus
La fonctionnalité Timer peut être réglée par intervalles de 30 minutes.
Mode Ventilateur (FAN)
Pour activer le mode de FAN, appuyez sur le bouton MODE jusqu’à que
« FAN » apparaisse sur l’écran de la télécommande.
Appuyez sur le bouton FAN pour régler la vitesse du ventilateur, dans
avec choix dans l’ordre suivant :
Éteint ( )
LOW ( )
MEDIUM ( )
HIGH ( )
Turbo ( )
automatique
Mode de déshumidication de l’air (DRY)
Cette fonctionnalité réduit l’humidité de l’air et améliore la qualité géné-
rale de l’air dans la pièce.
Pour activer le mode de déshumidication, appuyez sur le bouton
MODE jusqu’à que « DRY » apparaisse sur l’écran de la télécom-
mande. Le ventilateur s’activera avec un cycle de refroidissement
variable.
Mode automatique (AUTO)
Pour activer le mode automatique, appuyez sur le bouton MODE
jusqu’à que « AUTO » apparaisse sur l’écran de la télécommande.
La vitesse du ventilateur et la température seront automatiquement
contrôlées, quelle que soit la température dans la pièce.
Température ambiante Mode de fonctionnement
< 20 °C Chaleur
20 °C ~ 26 °C Déshumidication
> 26 °C Rafraîchissement
Mode sommeil ( )
La fonctionnalité SLEEP ajuste automatiquement la température pour
assurer que l’air dans la pièce soit spécialement agréable pour dormir.
Lors du fonctionnement en mode rafraîchissement / déshumidication,
la température ajustée sera automatiquement ajustée de 1 °C de plus
jusqu’à atteindre 2 °C de plus après une durée de 2 heures.
1. Pour activer le mode sommeil, appuyez sur le bouton OPTION.
2. Appuyez sur les boutons échés pour sélectionner et jusqu’à
que « » apparaisse sur l’écran de la télécommande.
3. Conrmez votre sélection à l’aide du bouton OPTION.
4. Appuyez sur le bouton OPTION pour désactiver la fonction « ».
En mode de chauffage, la température est réduite de 2 °C au cours des
2 premières heures.
Après 10 heures en mode sommeil, l’appareil s’éteint automatiquement.
Mode d’économie d’énergie (ECO)
Appuyez sur le bouton ECO pour activer ou désactiver la fonction Eco.
L’appareil entrera en mode d’économie d’énergie. La température est
automatiquement et graduellement augmentée sans compromettre le
confort ambiant. Cela réduira la consommation énergétique.
Maintenez le bouton ECO appuyé pour éteindre l’écran de l’unité d’in-
térieur.
Température et vitesse maximale ( )
Appuyez sur le bouton TURBO pour activer ou désactiver la fonction
de turbo. Cela permet d’atteindre la température réglée aussi vite que
possible.
Moisissure / nettoyage auto ( )
1. Pour activer le mode de nettoyage auto, appuyez sur le bouton
OPTION.
2. Appuyez sur les boutons échés pour sélectionner et jusqu’à
que « » apparaisse sur l’écran de la télécommande.
3. Conrmez votre sélection à l’aide du bouton OPTION.
4. Appuyez sur le bouton OPTION pour désactiver la fonction
« ».
Mesure automatique de la température ( )
Le calcul de la température automatique est effectué via un capteur in-
tégré à la télécommande. Veillez à ce que la télécommande ne soit pas
exposée à des sources de chaleur, comme des lampes.
1. Pour activer « » appuyez sur le bouton OPTION.
2. Appuyez sur les boutons échés pour sélectionner et jusqu’à
que « » apparaisse sur l’écran de la télécommande.
3. Conrmez votre sélection à l’aide du bouton OPTION.
4. Appuyez sur le bouton OPTION de nouveau pour désactiver la fonc-
tion « ».
Nettoyage et entretien
AVERTISSEMENT :
Veillez à ne pas faire pénétrer d’eau dans les ou-
vertures de l’appareil pendant le nettoyage. Il y a un
risque d’électrocution ou d’incendie.
ATTENTION :
Effectuez l’entretien régulier de votre appareil pour garantir son
fonctionnement optimal et en toute sécurité.
Toutes les étapes de nettoyage et d’entretien doivent être effec-
tuées par une société certiée pour le travail de réfrigération et de
climatisation. Une application incorrecte annulera les droits à la
garantie.
Nettoyage et changement du ltre
1. Ouvrez le panneau avant dans le sens de la èche.
CL6045QCCB_IM 17.12.20
50
2. Soulevez le panneau avant d’une main et retirez le ltre à poussière
de l’autre.
3. Nettoyez le ltre à l’eau. S’il est très sale, lavez-le à l’eau chaude (pas
au-dessus de 45 °C). Laissez le ltre sécher naturellement.
4. Remettez le ltre en place.
5. fermez le cache du compartiment.
NOTE :
Le ltre à charbon actif (gris) et les ltres ionisants (verts) ne peuvent
pas être lavés. Selon le nombre d’heures d’utilisation, ils doivent être
remplacés par des ltres neufs. L’illustration suivante décrit le proces-
sus de retrait des ltres.
Nettoyage de l’unité d’intérieur
1. Ouvrez le panneau avant de l’appareil et retirez les charnières pour
faciliter le nettoyage.
2. Nettoyez l’unité d’intérieur à l’aide d’un chiffon et d’eau (pas plus
chaude que 40 °C).
ATTENTION :
Ne vaporisez pas de produits nettoyants sur l’appareil.
N’immergez pas l’appareil dans l’eau : les composants électro-
niques peuvent être endommagés.
N’utilisez pas de brosses métalliques ou tout autre objet abrasif.
Nettoyage de l’unité d’extérieur
Si la bouche d’aspiration de l’unité d’extérieur est bloquée, retirez toutes
les feuilles et autres corps étrangers présents puis retirez la poussière
restante avec de l’air comprimé ou un peu d’eau.
Changer les piles
NOTE :
Utilisez seulement des piles neuves. Ne retirez les piles de la télé-
commande qu’après avoir éteint le climatiseur.
Si :
Vous n’entendez plus de bip de conrmation de l’unité d’intérieur.
L’écran ne fonctionne plus correctement
Comment :
Ouvrez le cache arrière.
Insérez de nouvelles piles. Veillez à respecter le sens des polarités.
Dépannage
Défaillance / panne Cause possible
L’appareil ne fonctionne
pas.
Coupure de courant / prise débranchée
Moteur du ventilateur endommagé dans l’unité d’extérieur ou d’intérieur
L’interrupteur thermostatique du compresseur est cassé.
Le système de protection est cassé, défectueux ou les fusibles ont brûlé.
Mauvaises connexions ou prise débranchée
Interruption contrôlée pour la protection / la préservation du produit
Tension trop élevée ou trop basse
La fonction « » est activée (allumage automatique de l’appareil)
La carte électronique est endommagée
Odeur inhabituelle Filtres à air sales ou souillés
Clapotement Du liquide s’écoule dans la mauvaise direction dans le circuit de réfrigération
Une brume ne s’échappe
de la bouche de sortie d’air
Ceci se produit lorsque l’air dans la pièce devient très froid, par exemple en mode « COOL » ou « DRY » Modi.
Bruits inhabituelse L’appareil peut émettre des bruits à cause des extensions ou contractions des matériaux causées par les variations
de température. Ces bruits n’indiquent pas que l’appareil est défectueux ou cassé.
CL6045QCCB_IM 17.12.20
51
Défaillance / panne Cause possible
Flux d’air indésirable
(chaud ou froid)
Réglage incorrect ou inadapté de la température
La bouche d’entrée ou de sortie d’air de l’unité d’extérieur ou d’intérieur est obstruée.
Le ltre à air est bloqué.
La vitesse du ventilateur est réglée au minimum
Autres sources de chaleur dans la pièce
Agent(s) de réfrigération manquant(s)
L’appareil ne répond pas
aux signaux / contrôles
La télécommande est trop éloignée du récepteur de l’unité d’intérieur
Les piles de la télécommande sont déchargées.
Un obstacle bloque la transmission entre la télécommande et le récepteur
L’écran est éteint. Fonction LED activée
Tension incorrecte
La fonction ECO est activée (voir le chapitre sur « Mode d’économie d’énergie (ECO) »)
Fonctions ou fonctionnalités
absentes de l’écran
Toutes les fonctions disponibles ne peuvent être afchées pour chaque mode de fonctionnement (voir le chapitre sur
« Fonctionnement »)
Si cela se produit, éteignez l’appareil immédiatement et débranchez l’alimentation
Bruits inhabituels pendant le fonctionnement
Erreurs de la carte de contrôle
Fusibles brûlés ou interrupteur cassé
De l’eau ou des objets ont pénétré dans le système
Surchauffe / câble ou prise brûlée
Odeur forte émise par l’appareil
Codes d’erreur afchés sur l’écran
En cas d’erreur, les codes suivants apparaîtront sur l’écran de l’unité d’intérieur :
Voyants indicateurs Description de l’erreur
Clignote une fois Erreur du capteur de température intérieure
Clignote deux fois Erreur du capteur de température extérieure
Clignote six fois Le moteur du ventilateur interne est défaillant
NOTE :
Des codes d’erreurs supplémentaires sont indiqués dans le manuel
d’entretien.
CL6045QCCB_IM 17.12.20
52
Données techniques
Modèle : ...........................................................................CL 6045 QC CB
Poids net de l’unité d’intérieur : .................................................... env. 7 kg
Poids net de l’unité d’extérieur : ................................................. env. 25 kg
Consommation électrique / tension : ............................220 - 240 V~, 50 Hz
Consommation électrique pendant le refroidissement : .................. 800 W
Consommation électrique pendant le chauffage : ........................... 699 W
Consommation électrique en veille : ................................................. 5,0 W
Classe de protection : ...............................................................................
Capacité de réfrigération :......................................9000 BTU (2600 kW/h)
Puissance thermique : ...........................................9000 BTU (2610 kW/h)
Agent(s) de réfrigération : ................................................................... R 32
Pression de fonctionnement maximale permise :
Côté pression : ......................................................................... 3,7 MPa
Côté aspiration : ....................................................................... 1,2 MPa
Modèle : ...........................................................................CL 6046 QC CB
Poids net de l’unité d’intérieur : ................................................. env. 8,5 kg
Poids net de l’unité d’extérieur : ................................................. env. 25 kg
Consommation électrique / tension : ............................220 - 240 V~, 50 Hz
Consommation électrique pendant le refroidissement : .................1130 W
Consommation électrique pendant le chauffage : ........................... 922 W
Consommation électrique en veille : ................................................. 5,0 W
Classe de protection : ...............................................................................
Capacité de réfrigération :....................................12000 BTU (3400 kW/h)
Puissance thermique : .........................................12000 BTU (3420 kW/h)
Agent(s) de réfrigération : ................................................................... R 32
Pression de fonctionnement maximale permise :
Côté pression : ......................................................................... 3,7 MPa
Côté aspiration : ....................................................................... 1,2 MPa
Modèle : ...........................................................................CL 6047 QC CB
Poids net de l’unité d’intérieur : ................................................ env. 10,5kg
Poids net de l’unité d’extérieur : .............................................. env. 35,5 kg
Consommation électrique / tension : ............................220 - 240 V~, 50 Hz
Consommation électrique pendant le refroidissement : ................ 1579 W
Consommation électrique pendant le chauffage : ......................... 1382 W
Consommation électrique en veille : ................................................. 2,5 W
Classe de protection : ...............................................................................
Capacité de réfrigération :....................................18000 BTU (5100 kW/h)
Puissance thermique : .........................................18000 BTU (5130 kW/h)
Agent(s) de réfrigération : ................................................................... R 32
Pression de fonctionnement maximale permise :
Côté pression : ......................................................................... 3,7 MPa
Côté aspiration : ....................................................................... 1,2 MPa
Wi-Fi
Réseau pris en charge : ..........................................................802.11 b/g/n
Puissance de sortie rayonnée maximale : .................................. 18,0 dBm
Plage de fréquence : ......................................................................2,4 GHz
Canaux : .............................................................................................1 - 13
Types de chiffrement Wi-Fi supportés : ................................. WPA / WPA2
Nous nous réservons le droit d’apporter des modications techniques
ainsi que des modications de conception dans le cadre du développe-
ment continu de nos produits.
Note sur la déclaration de conformité
Le soussigné, Clatronic International GmbH, déclare que l’équipe-
ment radioélectrique du type CL 6045 QC CB/ CL 6046 QC CB/
CL 6047 QC CB est conforme à la directive 2014 / 53 / UE.
De plus, l’appareil est conforme aux exigences de la directive RoHS
2011 / 65 / CE & (EU) 2015 / 863.
Le texte complet de la déclaration UE de conformité est disponible à
l’adresse internet suivante : www.sli24.de
Dans la zone de téléchargements, veuillez saisir le nom du modèle
CL 6045 QC CB.
Fonctionnement testé en France.
Élimination
Élimination des piles
En tant que consommateur, vous êtes tenu de rapporter les
piles / accumulateurs usagés.
Retirez les piles de la télécommande avant de jeter l’appareil.
Rapportez les piles à un point de collecte qui rassemble les
piles usagées ou les déchets dangereux. Contactez votre
autorité locale pour plus d’informations.
Signication du symbole « Poubelle »
Protégez votre environnement, ne jetez pas vos appareils
électriques avec les ordures ménagères.
Utilisez, pour l’élimination de vos appareils électriques, les
bornes de collecte prévues à cet effet où vous pouvez vous
débarrasser des appareils que vous n’utilisez plus.
Vous contribuez ainsi à éviter les impacts potentiels dans l’environne-
ment et sur la santé de chacun, causés par une mauvaise élimination
de ces déchets.
Vous contribuez aussi au recyclage sous toutes ses formes des appa-
reils électriques et électroniques usagés.
Vous trouverez toutes les informations sur les bornes d’élimination des
appareils auprès de votre commune ou de l’administration de votre
communauté.
CL6045QCCB_IM 17.12.20
53
Manual de instrucciones
Le agradecemos la conanza depositada en este producto y espera-
mos que disfrute de su uso.
Símbolos en este manual de instrucciones
Advertencias importantes para su seguridad están señaladas en espe-
cial. Siga estas advertencias incondicionalmente, para evitar accidentes
y daños en el aparato:
AVISO:
Advierte ante los peligros para su salud y demuestra posibles riesgos
de herida.
ATENCIÓN:
Indica los posibles riesgos para el aparato u otros objetos.
NOTA:
Pone en relieve consejos e informaciones para usted.
Notas generales
Antes de la puesta en servicio de este aparato lea detenidamente el
manual de instrucciones y guarde éste bien incluido la garantía, el
recibo de pago y si es posible también el cartón de embalaje con el em-
balaje interior. En caso de dejar el aparato a terceros, también entregue
el manual de instrucciones.
Solamente utilice el aparato para el uso privado y para el n previsto.
Este aparato no está destinado para el uso profesional.
No lo utilice al aire libre. No lo exponga al calor, a la entrada directa
de rayos de sol, a la humedad (en ningún caso sumerja el aparato
en agua) y a los cantos agudos. No utilice el aparato con las manos
húmedas.
El aparato y el cable de alimentación de red se deben controlar regu-
larmente para garantizar que no estén dañados. En caso de que se
comprobara un daño, no se podrá seguir utilizando el aparato.
Solamente utilice accesorios originales.
Para la seguridad de sus niños no deje material de embalaje (bolsas
de plástico, cartón, poliestireno etc.) a su alcance.
AVISO:
No deje jugar a los niños con las láminas de plástico. ¡Existe peli-
gro de asxia!
Consejos de seguridad especiales para este aparato
En el producto encontrará símbolos con el n de advertir o informar:
¡Lea estas instrucciones!
AVISO: ¡Riesgo de fuego!
¡El aparato contiene un refrigerante inamable!
No use objetos distintos a los permitidos por el fabricante para acelerar el proceso de descongelación.
El aparato debe guardarse exclusivamente en salas sin una fuente de ignición permanente (por ejemplo, llama
abierta, aparato de gas activo o calentador eléctrico).
No taladre ni queme el aparato.
Recuerde que el refrigerante es inodoro.
El manual de servicio está disponible en la siguiente dirección web: www. sli24.de
En la zona de “Downloads” (Descargas), introduzca el nombre de modelo CL 6045 QC CB.
Cualquier persona implicada en trabajos en un circuito de refrigerante o desarmado de estos debe poseer un
certicado con validez en vigor de una autoridad de evaluación acreditada por industria, que autorice su com-
petencia para manejar con seguridad refrigerantes según una especicación de evaluación reconocida por la
industria.
La asistencia debe ser realizada únicamente según las recomendaciones del fabricante del equipo. El manteni-
miento y las reparaciones que requieran la ayuda de otro experto deben ser realizados bajo la supervisión de la
persona competente en el uso de refrigerantes inamables.
ATENCIÓN: ¡Peligro de sobrecalentamiento!
¡Mantener libres las ranuras de ventilación!
¡No cubra el aparato!
CL6045QCCB_IM 17.12.20
54
ATENCIÓN:
Una instalación y uso incorrectos sin comprobación (es decir, certicado) de una empresa especialista anulará la
garantía de acuerdo con UE 517 / 2014 Capítulo II Art. 3.
AVISO:
No use ni almacene el aparato en los siguientes lugares:
- Cerca de una fuente de fuego.
- Una zona en la que pueda salpicar agua o aceite.
- Una zona expuesta a la luz solar directa.
- En el cuarto de baño, la habitación de lavandería o cerca de una piscina.
No toque el aparato si está descalzo ni si tiene partes del cuerpo mojadas o húmedas.
Durante la instalación del aparato por una empresa especialista certicada, asegure la zona circundante para
evitar accidentes. Los niños y personas no autorizadas no deben tener pemitido el acceso.
Asegúrese de que la toma de la instalación exterior se haya instalado de forma sucientemente segura.
Asegúrese de que no pueda entrar aire en el sistema refrigerante y compruebe si existen fugas de agentes refri-
gerantes cuando mueva el sistema de aire acondicionado. Recuerde que los agentes refrigerantes son inodoros.
Después de la instalación del sistema de aire acondicionado, realice una activación de prueba y compruebe los
datos operativos.
Los fusibles instalados en la centralita integrada tienen un valor nominal de T 5 A / 250 V. Asegúrese de que el
aparato de interior siempre esté protegido con un fusible con capacidad suciente para la corriente de entrada
máxima, o con ayuda de otro dispositivo de protección contra sobrecarga.
El aparato debe quedar desconectado de la red de alimentación durante la instalación, que muestra una sepa-
ración de todos los contactos de polos, lo que posibilita la total separación de acuerdo con las condiciones de
categoría de sobretensión III. Deben integrarse en el cableado permanente de acuerdo con las normativas de
seguridad. Los trabajos eléctricos solamente deben ser realizados por un electricista profesional o empresa es-
pecialista en tratar con trabajos eléctricos. La unidad de aire acondicionado solamente debe ser instalada por una
empresa especialista certicada.
No coloque el aparato cerca de sustancias inamables (alcohol, etc.) ni recipientes presurizados (como aero-
soles, bombonas de gas, etc.). Mantenga una distancia de como mínimo 50 cm entre el aparato y este tipo de
sustancias.
Si el aparato se usa en zonas sin instalaciones de ventilación, deben tomarse precauciones para evitar los ries-
gos de incendio asociados con la fuga de gas refrigerante.
Obedezca los estándares de conexión nacionales. El cableado debe cumplir con las normativas nacionales apli-
cables.
Antes de tocar las pinzas de conexión deben desconectarse todos los circuitos eléctricos de la alimentación.
Este aparato puede ser usado por niños mayores de ocho (8) años de edad, así como personas con capacidades
físicas, sensoriales o mentales reducidas, o falta de experiencia y conocimientos, si reciben supervisión o instruc-
ciones sobre el uso seguro del aparato y comprenden los peligros que conlleva.
Los niños no deben jugar con el aparato.
No repare el aparato usted mismo, contacte siempre con un técnico autorizado.
La limpieza y el mantenimiento deben ser realizados por personal cualicado. En cualquier caso, desconecte
siempre el aparato de la alimentación antes de realizar tareas de limpieza o mantenimiento.
Este aparato ha sido desarrollado para proporcionar aire acondicionado en espacios residenciales / alojamientos y
no puede usarse para otros nes, como por ejemplo secar prendas, refrigerar alimentos, etc.
Use el aparato exclusivamente con el ltro de aire instalado. El uso del aparato de aire acondicionado sin el ltro
de aire puede provocar una acumulación excesiva de polvo o contaminación de las piezas internas del aparato y
puede causar daños y / o avería.
CL6045QCCB_IM 17.12.20
55
El usuario es por tanto responsable de garantizar la instalación del aparato por un técnico cualicado. El técnico
cualicado debe comprobar si el aparato se ha conectado a tierra de acuerdo con las provisiones estatutarias y
normativas aplicables, así como garantizar que el aparato esté equipado con un interruptor de circuito termomag-
nético.
No se exponga nunca al aire frío durante un tiempo prolongado. La exposición directa prolongada a una corriente
de aire frío puede ser perjudicial para su salud. Se recomienda una especial precaución en lo que respecta a
niños, personas mayores o personas enfermas.
Si el aparato emite humo o se detecta olor a quemado, desconecte de inmediato la alimentación y consulte con
su técnico de servicio. Usar el aparato en estas circunstancias y / o en este estado puede causar incendio o elec-
trocución.
Use el botón para apagar el aparato cuando no lo use durante un tiempo prolongado.
Asegúrese de que la dirección del caudal de aire esté correctamente establecida. Las aletas deben estar orienta-
das hacia abajo en modo calefacción y hacia arriba en modo refrigeración.
Evitando las uctuaciones extremas de posición de temperatura puede evitarse dañar el aparato.
No doble, tire ni aplaste el cable de alimentación, podría dañarse. Un cable de alimentación dañado puede causar
electrocuciones e incendios. Un cable de alimentación dañado solamente puede ser sustituido por personal téc-
nico especializado.
No obstruya la entrada ni la salida de aire del aparato interior o exterior. Obstruir o tapar estas aperturas causará
una capacidad refrigerante reducida y puede causar averías o daños. No realice cambios no autorizados ni inade-
cuados del aparato.
No ponga objetos pesados ni calientes sobre el aparato.
No deje abiertas las ventanas o puertas durante un tiempo prolongado cuando la unidad de aire acondicionado
se use.
No apunte la corriente de aire a plantas ni animales. Los periodos prolongados de exposición a corrientes de aire
frío pueden afectar negativamente a plantas y animales.
No se ponga de pie sobre el aparato externo ni ponga ningún objeto encima.
No introduzca una varilla, barra o palo u objeto similar en el aparato. Podría causar lesiones personales así como
daños materiales.
Asegúrese de usar una herramienta adecuada, diseñada especícamente, para colocar y doblar los conductos
de refrigerante. Por motivos de seguridad, debe evitarse por todos los medios deformar los conductos delicados.
Todos los trabajos deben ser realizados por una empresa certicada y documentada de la forma correspondiente
y determinados de acuerdo con el equipamiento conectado al aparato.
Los conductos de refrigerante no deben alargarse ni acortarse sin tomar medidas ulteriores, dado que se han
llenado previamente con un agente refrigerante en la fábrica durante la fabricación.
ATENCIÓN:
Cualquier modicación técnica de los conductos de refrigerante debe ser realizada por una empresa especialista
certicada. Las alteraciones o modicaciones inadecuadas anularán la garantía
Manipulación de las pilas
AVISO:
No exponga las pilas a excesivo calor como la luz solar, fuego o
similar. ¡Existe el riesgo de explosión!
Las pilas no son juguetes. Manténgalas lejos de los niños.
No abra las pilas ni las fuerce.
Evite el contacto con objetos metálicos (anillos, clavos, tornillos,
etc.) ¡Existe el riesgo de un cortocircuito!
Un cortocircuito podría provocar que la batería se calentase de
manera excesiva o incluso que se prendiera fuego derivando en
lesiones físicas.
Por su propia seguridad, cubra los terminales de la batería con
cinta adhesiva durante el transporte.
AVISO:
En caso de una batería con fuga, asegúrese de no frotarse el
líquido en los ojos ni en las membranas mucosas. En caso de
contacto, lávese las manos y aclárese los ojos con agua limpia.
Busque asistencia médica si las molestias persisten.
Las baterías no recargables no deben recargarse.
Asegúrese de usar la polaridad correcta al introducir la batería /
baterías.
ATENCIÓN:
Cuando no utilice el mando a distancia durante un periodo largo de
tiempo, retire las pilas para evitar la “fuga” del ácido.
No mezcle las pilas de diferentes tipos ni las pilas nuevas con
viejas.
CL6045QCCB_IM 17.12.20
56
ATENCIÓN:
No deseche las pilas junto con la basura doméstica. Lleve las pilas
gastadas al punto de recogida correspondiente o a su minorista.
Desembalaje del aparato
1. Extraiga el aparato de su embalaje.
2. Retire todo el material de embalaje, tales como láminas, relleno y
envases de cartón.
3. Compruebe si existen daños de transporte en el aparato para evitar
riesgos.
4. Si se producen daños, no use el aparato. Póngase en contacto con
su distribuidor.
Contenido en la entrega
Unidad de interior
a) 6 × tornillos
b) 6 × clavijas
c) 1 × soportes de pared
Unidad de exterior
d) 1 × soporte para el sistema de canalización
de condensación
e) 4 × patas para la unidad de exterior
Accesorios de conexión
f) 1 × cable de conexión para la unidad de
exterior
g) 2 × conductos de refrigerante (gris y azul)
incluyendo aislamiento
h) 1 × material aislante (recambio)
i) 2 × conductos de agua de condensación
j) 1 × cinta de vinilo
k) 1 × cubierta de agujero
Accesorios
m) 1 × mando a distancia
n) 2 × baterías R03 “AAA” 1,5V
o) 2 × ltros
p) 2 × cartuchos de ltro
1 × ltro de carbón activado (gris)
1 × ltro ionizante (verde)
Indicación de los elementos de manejo
Página 3
Unidad de aparato para zonas de interior
1 Panel frontal
2 Cartucho de ltro con ltro de carbón activado (gris)
3 Cartucho de ltro con ltro ionizante (verde)
4 Módulo WLAN
5 Pantalla LED
6 Placa de tipo (la posición puede variar)
7 Diagrama de circuito
8 Unidad de conexión eléctrica
9 Botón (encendido / apagado)
10 Deector de aire
11 Receptor de señal
12 Aleta de aire
13 Mando a distancia
Unidad de aparato para zonas de exterior
14 Placa de tipo para zona exterior (la posición puede variar)
15 Cubierta de conector
16 Válvula de refrigerante
a Gris
b Azul
17 Salida de aire
Mando a distancia
NOTA :
Si su modelo carece de una de estas funciones, escuchará igual-
mente un pitido cuando pulse el botón.
Botones en el mando a distancia
Nº. Botón Signicado
1Encendido / apagado
2OPTION Tecla de selección
3Tecla de conguración- / selección
4Tecla de conguración- / selección
5ECO Activar / desactivar la función ECO
6TURBO Activar / desactivar la función Turbo
7Mode Tecla de selección de Modos operativos
8Fan Establecer la velocidad del ventilador
9Establecer la aleta del aire
10 Establecer el deector de aire (no disponible;
debe ajustarse manualmente)
CL6045QCCB_IM 17.12.20
57
Pantalla del mando a distancia
Indicador de red
Bloqueo infantil
AUTO Modo automático
COOL Modo frío
DRY Modo de deshumidicación de aire
HEAT Modo calefacción
FAN Modo ventilador
ECO Modo Ahorro de energía
Indicación de velocidad de ventilación
Ventilación apagada
Temperatura y velocidad máxima
Indicación de aleta de aire
Indicación de deector de aire (no disponible)
Modo reposo
Interruptor de encendido / apagado automático
Cálculo de temperatura automático
Moho / limpieza automática
Función de salud (no disponible)
No disponible
(Información sobre la app “Smart Life – Smart Living”)
La app Smart Life - Smart Living App está disponible para Android e
iOS. Escanee el código QR correspondiente para acceder directamente
a la descarga.
NOTA:
Dependiendo del proveedor, puede surgir costes en la descarga de la
aplicación.
Google Play App Store
Información de uso de la app
Este aparato permite usarlo mediante su red doméstica. Los requisitos
previos son: 1) Una conexión WiFi permanente a su router y 2) la app
gratuita “Smart Life – Smart Living”. Puede acceder cómodamente a
todas las funciones del aparato mediante la app. ¡Para evitar que se
encienda accidentalmente el aparato, recomendamos desconectarlo de
la alimentación cuando no esté en casa!
Requisitos del sistema para el uso de la aplicación
iOS 10.0 o superior
Android 5.0 o superior
Puesta en funcionamiento mediante la app
1. Instale la app “Smart Life – Smart Living”. Cree una cuenta de usua-
rio.
2. Active la función WiFi en la conguración de su aparato.
3. Asegúrese de que su red WiFi se encuentre en las inmediaciones del
aparato.
4. Encienda la unidad de interior.
5. Ejecute la app y seleccione + .
6. Seleccione el menú “Unidad de aire acondicionado” y siga las ins-
trucciones en la pantalla.
7. Pulse el botón ECO en el mando a distancia seis veces hasta que
aparezca “CF” en pantalla. Si aparece “AP” en pantalla, pulse de
nuevo el botón ECO seis veces
8. En este caso, pulse “paso siguiente”. Introduzca su clave.
9. Cuando el aparato se haya conectado correctamente, el testigo Wi-Fi
se iluminará jo. Ahora podrá usar el aparato con la app.
NOTA:
El aparato solamente puede usarse con routers de 2,4 GHz. Los rou-
ters de 5 GHz no están soportados.
Desconectar la WiFi
Si desea desconectar la conexión Wi-Fi existente (testigo de control en-
cendido), proceda del modo siguiente: Pulse el botón ECO en el mando
a distancia seis veces.
NOTA:
Si desea restablecer la conexión Wi-Fi, proceda como se describe en
la sección titulada “Puesta en funcionamiento mediante la app”.
Instalación
Unidad de interior(a)
Monte la unidad de interior en una pared sólida no expuesta a vibra-
ciones.
Ninguna de las aperturas del aparato debe estar obstruida, de forma
que el aire pueda uir en toda la sala.
No monte el aparato cerca de fuentes de calor, vapores o gases
inamables.
No monte el aparato en una ubicación donde esté expuesto a la luz
solar directa durante un tiempo prolongado.
Seleccione una ubicación en la que la condensación pueda drenarse
fácilmente y desde la que pueda conectarse fácilmente a la unidad
de exterior.
Compruebe con regularidad el correcto funcionamiento del aparato
y obedezca siempre las normas sobre distancias mínimas y / o man-
tenga estos espacios despejados. Seleccione una ubicación desde la
que se pueda alcanzar fácilmente el ltro.
No instale el aparato en salas húmedas como baños, lavaderos, etc.
Para obtener resultados óptimos, la instalación debe realizarse tan
por encima del suelo como sea posible.
Unidad de exterior (b)
No monte la unidad de exterior cerca de fuentes de calor, vapores o
gases inamables.
No instale el aparato en ubicaciones demasiado polvorientas.
Instale el aparato en una zona donde nadie pueda molestarse por
el ruido del funcionamiento y que no sea frecuentada por muchas
personas. Si es necesario, póngase de acuerdo con sus vecinos.
Consulte la Directiva de Protección de Emisiones Federal Alemana,
si es necesario, en este aspecto.
No instale el aparato en una zona en la que esté expuesto a la luz
solar directa o a condiciones meteorológicas importantes o use
protección solar de un tipo que no afecte negativamente al caudal de
aire.
Obedezca siempre las distancias mínimas indicadas en la ilustración
siguiente y / o mantenga el espacio de esta distancia despejado du-
rante la instalación y el uso.
Instale la unidad de exterior en una ubicación estable.
Si la unidad de exterior se expone a vibraciones, use amortiguadores
de caucho en el suelo para compensar la inuencia de las vibraciones.
CL6045QCCB_IM 17.12.20
58
Las distancias mínimas (en mm) están marcadas en la ilustración
ATENCIÓN:
El comprador debe garantizar que las personas / empresas que
instalen, realicen mantenimiento o reparen estas unidades de aire
acondicionado posean cualicaciones y experiencia sucientes en
el trabajo con agentes refrigerantes.
Una instalación y uso incorrectos sin comprobación (es decir, certi-
cado) de una empresa especialista anulará la garantía de acuerdo
con (UE) 517 / 2014 Capítulo II Art. 3.
Instalación del soporte de pared
ATENCIÓN:
Antes de instalar el soporte de pared, ¡asegúrese de haber localizado
el punto preciso en el que va a taladrar el agujero para los conductos!
Consulte el capítulo titulado “Instalación de la unidad de interior y
perforación de pared al exterior”.
1. Aoje el soporte de pared en los clips de bloqueo.
2. Pliegue hacia arriba el soporte de pared.
3. Retire el soporte de pared soltándolo del soporte.
4. Taladre agujeros de como mínimo 32 mm de profundidad en una
pared sólida para jar la placa.
5. Ponga las clavijas de plástico en el agujero.
6. Fije la placa de montaje a la pared usando los tornillos incluidos.
7. Asegúrese de que la placa de montaje esté rmemente atornillada en
posición
Alineación de los conductos de refrigerante
ATENCIÓN:
La unidad de aire acondicionado debe ser instalada y conectada por
una empresa de refrigeración y aire acondicionado certicada. Una
instalación inadecuada anulará la garantía.
Los conductos de refrigerante pueden colocarse en 3 direcciones como
se indica, de acuerdo con los números en la ilustración. Si los conduc-
tos se colocan de acuerdo con las opciones 1 o 3, deberá usar un cúter
para cortar cuidadosamente una muesca en el lateral de la unidad de
interior a lo largo de la junta.
Guíe los conductos de conexión en la dirección de la apertura en la
pared y ate los conductos de refrigerante, la conducción de agua de
condensación y el cable de alimentación juntos usando cinta de vinilo,
y asegúrese siempre de que el aislamiento sea impermeable para que
no se formen líquidos, vapor de agua ni condensación y, por ejemplo,
penetren la pared. Esto evitará la acumulación de humedad así como la
formación de moho. Asegurese de que el conducto de agua de conden-
sación esté colocado con una suave inclinación para que el caudal de
agua no se obstruya.
ATENCIÓN:
Asegúrese de que los conductos estén sellados de forma impermea-
ble para evitar daños por humedad y acumulación de moho en la
pared.
CL6045QCCB_IM 17.12.20
59
Desenrollar los conductos de refrigeración
Saque las tapas solo inmediatamente antes de conectar los conduc-
tos de refrigeración para evitar que se ensucie.
Si los conductos se doblan o tiran con demasiada frecuencia, se
pondrán rígidos. No doble los conductos más de tres veces.
Desenrolle cuidadosamente los conductos como se indica en el
diagrama A. Evite abollarlos.
ATENCIÓN:
No desmonte el conducto tirando como se muestra en el diagrama B.
En su lugar, desenróllelo cuidadosamente.
Conexiones a la unidad de interior
ATENCIÓN:
La unidad de aire acondicionado debe ser instalada y / o conectada
por una empresa de refrigeración y aire acondicionado certicada.
Una instalación inadecuada anulará la garantía.
1. Saque las cubiertas protectoras.
2. Compruebe si las conexiones están sucias o dañadas.
3. Conecte la rosca de junta con el estriado de conexión en la unidad
de interior. Al hacerlo, preste atención al color de las cubiertas pro-
tectoras.
4. Apriete la conexión en dirección opuesta, usando una llave ade-
cuada.
NOTA:
Observe siempre el par correcto y obedezca la tabla incluida titulada
“Información de instalación”.
Conexión del conducto de agua de condensación a la unidad de interior
Es extremadamente importante que el conducto de agua de condensa-
ción de la unidad de interior se instale correctamente.
1. Pase el conducto de drenaje bajo el conducto y asegúrese de que no
existan hundimientos ni recesos.
2. El conducto de drenaje debe inclinarse hacia abajo para facilitar el
caudal del agua de condensación.
3. No doble ni retuerza el conducto de drenaje. No deje que sobresalga.
No sumerja el extremo en agua. Si el conducto está conectado a una
extensión, asegúrese de la conexión al introducirlo en la unidad de
interior.
4. Si los conductos de refrigerante se colocan como se muestra en nº 3
en el capítulo titulado “Alineación de los conductos de refrigerante”,
los conductos, el cable de conexión para la unidad de exterior y el
conducto de drenaje del agua de condensación deben asegurarse en
la parte posterior del aparato usando juntas de conducto.
5. Introduzca el conector del conducto en el aparato correspondiente.
6. Presione rmemente el conducto de conexión hacia abajo en la uni-
dad de aire acondicionado y asegúrese de que la conexión sea rme
ATENCIÓN:
Evite las abolladuras durante el posicionamiento y permita solo que
estas tareas sean realizadas por empresas especialistas certicadas
CL6045QCCB_IM 17.12.20
60
Instalación de la unidad de interior y perforación de pared al exterior
Cuando haya conectado los conductos de refrigerante así como el
conducto de drenaje para el agua de condensación de acuerdo con las
instrucciones, proceda del modo siguiente
1. Con extremo cuidado, coloque los conductos, el cable de conexión
para la unidad de exterior y el conducto de agua de condensación
hacia el punto en el que deban pasarse por la pared al exterior.
2. Ate los conductos de refrigeración, el cable de conexión para la
unidad de exterior y el conducto de agua de condensación juntos con
cinta de vinilo y cúbralo todo apretado con cinta aislante (no incluida
en la entrega).
ATENCIÓN:
Asegúrese de que los conductos estén sellados de forma imper-
meable para evitar daños por humedad y acumulación de moho en
la pared.
Asegúrese de que todas las piezas de conducto expuestas estén
sucientemente aisladas.
3. Taladre un agujero con un diámetro de 57 mm y una inclinación /
gradiente de 5 - 7 mm. (Imagen 2)
NOTA:
Taladre con una ligera inclinación de 5 - 7 mm hacia el exterior, para
garantizar que el agua de condensación pueda drenarse.
En todo caso, asegúrese de que exista una inclinación en toda la
longitud del conducto de agua de condensación en la dirección de
la apertura en la pared.
4. Introduzca la cubierta del agujero.
5. Guíe los conductos con aislamiento, el cable de conexión para la
unidad de exterior y los conductos de agua de condensación por la
apertura en la pared.
NOTA:
Después de instalar los conductos, selle el agujero en la pared por
el que se han pasado los conductos de forma que quede estanco
además de impermeable
6. Fije la unidad de interior con seguridad a la parte superior de la placa
de montaje en pared.
7. Presione rmemente la parte inferior de la unidad de interior contra la
placa de montaje hasta que repose rmemente.
Instalación de la unidad de exterior
Antes de conectar los conductos, decida dónde quiere colocar la
unidad de exterior y asegúrese de que haya suciente espacio en
la ubicación elegida para realizar trabajos de mantenimiento en el
futuro. (Obedezca las distancias mínimas)
Ponga las cubiertas protectoras incluidassobre el soporte y fíjelas en
un lugar adecuado.
Use tornillos / anclajes de perno especialmente resistentes y tenga en
cuenta también el peso del aparato, para evitar que las vibraciones
durante el funcionamiento aojen la conexión con el tiempo. La
unidad debe instalarse de acuerdo con las normativas de seguridad
aplicables.
Conducto de drenaje de agua de
condensación para la unidad de exterior
El agua de condensación y hielo que se acumulan en la unidad de
exterior debido a la generación de calor pueden drenarse mediante el
conducto de agua de condensación
1. Fije los soportes para el conducto de agua de condensación en la
apertura de 25 mm diseñada para ello.
2. Conecte los soportes para el conducto de agua de condensación al
conducto de agua de condensación y asegúrese de que el caudal
esté correctamente controlado para evitar daños por humedad.
CL6045QCCB_IM 17.12.20
61
Conexión eléctrica (unidad de exterior)
Saque la cubierta del conector (15) del lado derecho del aparato. Puede
encontrar el diagrama correspondiente en el lado posterior. Consulte el
diagrama
1. Conecte el cable de alimentación para la unidad de interior a la
banda de terminal.
2. Instale cuidadosamente el cable de alimentación para la unidad de
exterior usando las pinzas de conexión del cable.
3. Asegúrese de que los cables se hayan instalado correctamente. Ase-
gúrese de que la toma de tierra se haya instalado correctamente.
4. Vuelva a colocar la cubierta protectora en el aparato.
ATENCIÓN:
Todos los trabajos eléctricos deben ser realizados por un electricista
profesional certicado o empresa de electrónica especialista. Una
instalación inadecuada anulará la garantía.
Instrucciones de conexión rápida
Use la conexión rápida para conectar fácilmente las unidades de inte-
rior y exterior para la unidad de aire acondicionado. Un procedimiento
rápido y sencillo respecto al cual están disponibles todas las reclama-
ciones de garantía siempre que todo el trabajo sea realizado por una
empresa especialista.
ATENCIÓN:
Los conductos de refrigerante incluidos en la entrega se han lle-
nado previamente con el agente refrigerante durante la fabricación.
Los conductos no deben acortarse ni alargarse
Conexión a la unidad de interior
1. Tenga cuidado en desenrollar cuidadosamente los conductos de
refrigerante como se describe en el capítulo titulado “Desenrollar los
conductos de refrigerante”. Evite siempre abollar los conductos.
2. Saque las cubiertas protectoras (azul y gris) de las juntas en la uni-
dad de interior.
3. Asegúrese de que todos los tornillos estén en buen estado y libres de
suciedad, polvo, arena y otros materiales en suspensión o suciedad.
4. Enrosque los conductos de refrigerante usando los conectores en la
unidad de interior. Tenga cuidado para asegurarse de que las cone-
xiones se realicen de acuerdo con el esquema de color azul / gris. A
continuación, je las roscas usando dos llaves (una para apretar la
conexión y la otra para retener).
NOTA:
Observe siempre el par correcto y obedezca la tabla incluida titu-
lada “Información de instalación”.
Conexión a la unidad de exterior
1. Tenga cuidado en desenrollar cuidadosamente los conductos de
refrigerante como se describe en el capítulo titulado “Desenrollar los
conductos de refrigerante”. Evite siempre abollar los conductos.
2. Saque las cubiertas protectoras (azul y gris) de las juntas en la uni-
dad de exterior.
3. Asegúrese de que todos los tornillos estén en buen estado y libres de
suciedad, polvo, arena y otros materiales en suspensión o suciedad.
4. Enrosque los conductos de refrigerante usando los conectores en la
unidad de exterior. Tenga cuidado para asegurarse de que las cone-
xiones se realicen de acuerdo con el esquema de color azul / gris. A
continuación, je las roscas usando dos llaves (una para apretar la
conexión y la otra para retener).
NOTA:
Observe siempre el par correcto y obedezca la tabla incluida titu-
lada “Información de instalación”.
CL6045QCCB_IM 17.12.20
62
5. Asegúrese de que el circuito refrigerante para el aparato esté co-
rrectamente conectado y sea estanco. Inspeccione los elementos
de conexión usando aerosol para fugas. Si aparecen burbujas de
aire, existen fugas. En este caso, las válvulas de detención deben
estar cerradas. Compruebe cuidadosamente los conductos y las
conexiones.
NOTA:
Las válvulas de detención (a) se han cerrado en fábrica y deben
abrirse. La válvula de servicio (b) es exclusivamente para nes de
servicio.
ATENCIÓN:
La unidad de aire acondicionado debe ser instalada y conectada por
una empresa de refrigeración y aire acondicionado certicada. Una
instalación inadecuada resultará en la anulación de la garantía.
Probar la unidad de interior
¿Funciona correctamente el interruptor de encendido?
¿Funciona el ventilador?
¿Funcionan con normalidad los modos de funcionamiento?
¿Puede ajustarse con precisión la temperatura y la hora?
¿Se iluminan con normalidad todos los testigos?
¿Funcionan correctamente las aletas de caudal de aire?
¿Funciona con normalidad del conducto de agua de condensación?
ATENCIÓN:
Todos los pasos descritos anteriormente deben ser realizados por
una empresa de refrigeración y aire acondicionado certicada. Una
implementación inadecuada resultará en la anulación de la garantía
Probar la unidad de exterior
¿Existen ruidos o vibraciones inusuales durante el funcionamiento?
¿Tiene fugas el agente refrigerante?
NOTA:
El sistema de control electrónico solamente activará el compresor tres
minutos después de encender la unidad
ATENCIÓN:
Todos los pasos descritos anteriormente deben ser realizados por
una empresa de refrigeración y aire acondicionado certicada. Una
implementación inadecuada anulará la garantía.
Información de instalación
Instrucciones de instalación - Información de instalación
Modelo de diseño / Capacidad refrigerante (Btu / h) 9k 12k 15 / 18k
Diámetro de conducto de refrigerante a) 1 / 4" 6 1 / 4" 6 1 / 4" 6
Diámetro de conducto de refrigerante b) 3 / 8" 9,52 1 / 2" 12 1 / 2" 12
Longitud de conducto de refrigerante estándar 5 m 5 m 5 m
Distancia máxima entre unidad de interior y exterior 15 m 15 m 15 m
Carga de refrigerante adicional 20 g / m 20 g / m 30 g / m
Distancia máxima entre unidad de interior y exterior 5 m (15 m) 5 m (15 m) 5 m (15 m)
Agente refrigerante * R32 R32 R32
*) Puede encontrar información adicional en la placa de información de la unidad de exterior
Par de jación para cubiertas protectoras y conexiones de brida
Conducto de refrigerante Par de jación (N x m) Uso de carga correspondiente:
llave de 20 cm Par de jación (N x m)
1 / 4" 6 15 - 20 Apretado / apretado a mano Rosca de conexión de servicio 7 - 9
3 / 8" 9,52 31 - 35 Apretado Cubierta protectora 25 - 30
1 / 2" 12 35 - 45 Apretado
5 / 8" 15,88 75 - 80 Apretado
CL6045QCCB_IM 17.12.20
63
Especicaciones de cable
Instrucciones de instalación - Información para el instalador
Modelo Capacidad de refrigerante (Btu / h) 9k 12k 15 / 18k
Cable de alimentación
N1,0 mm²
AWG18
1,0 mm² (1,5 mm²)
AWG18 (AWG16)
1,5 mm²
AWG16
L1,0 mm²
AWG18
1,0 mm² (1,5 mm²)
AWG18 (AWG16)
1,5 mm²
AWG16
E1,0 mm²
AWG18
1,0 mm² (1,5 mm²)
AWG18 (AWG16)
1,5 mm²
AWG16
Conexión de cable
N1,0 mm² 1,0 mm² (1,5 mm²) 1,5 mm²
L1,0 mm² 1,0 mm² (1,5 mm²) 1,5 mm²
11,0 mm² 1,0 mm² (1,5 mm²) 1,5 mm²
20,75 mm² 0,75 mm² 0,75 mm²
30,75 mm² 0,75 mm² 0,75 mm²
Instrucciones de instalación - Información de instalación
Transformador de tensión 9k 12k 18 / 22k
Modelo Agente refrigerante (Btu / h) Sección cruzada
Cable de alimentación
N1,0 mm² (1,5 mm²)
AWG18 (AWG16)
1,0 mm² (1,5 mm²)
AWG18 (AWG16)
1,5 mm²
AWG16
L1,0 mm² (1,5 mm²)
AWG18 (AWG16)
1,0 mm² (1,5 mm²)
AWG18 (AWG16)
1,5 mm²
AWG16
E1,0 mm² (1,5 mm²)
AWG18 (AWG16)
1,0 mm² (1,5 mm²)
AWG18 (AWG16)
1,5 mm²
AWG16
Conexión de cable
N1,0 mm² (1,5 mm²) 1,0 mm² (1,5 mm²) 1,5 mm²
L1,0 mm² (1,5 mm²) 1,0 mm² (1,5 mm²) 1,5 mm²
11,0 mm² (1,5 mm²) 1,0 mm² (1,5 mm²) 1,5 mm²
A 220 V 7 K, 9 K, 12 K, 15 K, 16 K, 18 K, 22 K, 24 K, 30 K el valor de reserva para la unidad de interior de aire acondicionado es 50 T, 3,15 A
A 110 V 7 K, 9 K, 12 K el valor de reserva para la unidad de interior de aire acondicionado es 50 T, 3,15 A
125 V 7 K, 9 K, 12 K el valor de reserva para la unidad de exterior de aire acondicionado es 61 T, 15 A
¡250 V 18 K, 22 K, 24 K iel valor de reserva para la unidad de exterior de aire acondicionado es 65 T, 25 A!
Diagrama de circuito
El diagrama de circuito puede variar para distintos modelos. Siga el
diagrama de circuito en las unidades de interior y exterior.
Para la unidad de interior, encontrará el diagrama de circuito (7) bajo el
panel anterior (1).
Para la unidad de exterior, encontrará el diagrama de circuito adherido
al lado inverso de la cubierta del conector (15).
NOTA:
Para algunos modelos, los cables han sido conectados por el fabri-
cante a la placa de circuito principal de la unidad interior sin bandas
de terminales
Uso
Control de mesa
Si el mando a distancia no funciona o se precisa mantenimiento, pro-
ceda del modo siguiente:
1. Abra la cubierta anterior y levántela hacia arriba hasta alcanzar el
botón .
2. Pulsar el botón hará que se active la función de refrigeración.
(Escuchará un pitido)
3. Pulsar el botón en menos de 3 segundos hará que se active la
función de calefacción. (Escuchará dos pitidos)
4. Para apagarlo, pulse de nuevo el botón . (Escuchará un pitido largo)
NOTA:
La presión estática externa para la bomba de agua en todos los
modelos es 0 Pa.
CL6045QCCB_IM 17.12.20
64
Mando a distancia
1. Abra la cubierta del compartimiento de baterías en el lado posterior
del mando a distancia empujándola en la dirección de la echa.
2. Introduzca 2 baterías R03 “AAA” de 1,5 V. Asegúrese de que la polari-
dad sea correcta. (Consulte el fondo del compartimento de baterías).
NOTA:
Bloqueo de seguridad infantil: Pulse los botones y simultá-
neamente para activar el bloqueo de seguridad infantil.
Encender / apagar la pantalla: Mantenga pulsado el botón ECO.
3. Apunte el mando a distancia a la unidad de aire acondicionado.
NOTA:
Asegúrese de que no haya objetos / obstrucciones en el espacio
entre el mando a distancia y el receptor de señal en la unidad de
interior.
No deje nunca el mando a distancia expuesto a la luz solar directa
durante un tiempo prolongado.
Use y guarde el mando a distancia a una distancia de como mí-
nimo un metro de un televisor u otros electrodomésticos.
Encendido / apagado
Pulse el botón para apagar el aparato.
Pulse de nuevo el botón para volver a encender el aparato.
Ajuste del caudal de aire
El caudal de aire se distribuirá homogéneamente a medida que sale en la
sala. Dispone de opciones para optimizar la dirección del caudal.
El botón activa la aleta de dirección de aire (1). El caudal de aire se
orienta de arriba abajo para garantizar una distribución del aire homogénea
por toda la sala.
Los deectores de aire (2) deben posicionarse manualmente y se encuen-
tran bajo las aletas de dirección de aire. Permiten dirigir el caudal de aire a
derecha o izquierda
ATENCIÓN:
El ajuste del deector de aire debe hacerse con el aparato.
No coloque nunca las aletas de dirección de aire manualmente (es decir, con la mano). Podría causar graves daños.
No introduzca nunca los dedos, palos ni otros objetos en las aperturas de entrada / salida de aire. Podría causar daños materiales y lesiones
personales.
NOTA:
Observe que, por motivos de diseño, no pueden verse todas las funciones en la pantalla del mando a distancia en cada modo operativo.
Pulsando la tecla OPTION puede descubrir las opciones disponibles para modos operativos individuales.
Botón MODE Seleccionar un modo operativo
Botón OPTION Seleccionar una función
Modo refrigeración (COOL)
El modo refrigeración permite refrigerar y reducir la humedad del aire
de la sala simultáneamente.
1. Para activar el modo refrigeración, pulse la tecla MODE hasta que
aparezca “COOL” en la pantalla del mando a distancia. La función de
refrigeración se activará si la temperatura seleccionada es inferior a
la temperatura en la sala. (Selección usando las teclas y .)
2. Para optimizar la función de aire acondicionado, ajuste la tempe-
ratura, velocidad y dirección del caudal de aire pulsando las teclas
correspondientes.
Modo calefacción (HEAT)
El modo calefacción permite calentar la sala.
1. Para activar el modo calefacción, pulse la tecla MODE hasta que
aparezca “HEAT” en la pantalla del mando a distancia. La función de
calefacción se activará si la temperatura seleccionada es superior a
la temperatura en la sala. (Selección usando las teclas y .)
2. Para optimizar la función de calefacción, ajuste la temperatura,
velocidad y dirección del caudal de aire pulsando las teclas corres-
pondientes.
NOTA:
Si el aparato está equipado con un calefactor eléctrico, se retrasará
la activación de la aplicación unos minutos.
NOTA:
Puede activarse una función automática de descongelación
durante el modo calefacción. Esta función de descongelación es
indispensable para la limpieza del aparato. Los restos de escarcha
en el condensador se eliminan para restablecer toda su capacidad
de intercambio de calor. Este procedimiento tarda normalmente
2 - 10 minutos. El ventilador dejará de funcionar durante la des-
congelación. Después de la descongelación, el aparato volverá
automáticamente a modo calefacción.
Encender automáticamente el aparato ( )
Para programar el aparato para encenderse automáticamente, éste
debe estar apagado.
1. Pulse el botón OPTION.
2. Use las teclas de echa para seleccionar y hasta que aparezca
” en la pantalla del mando a distancia.
3. Pulse de nuevo el botón OPTION y use las teclas de echa y
para establecer la hora deseada.
4. Conrme su selección usando el botón OPTION.
NOTA:
Para cancelar la función establecida, repita los pasos descritos
anteriormente.
La función Timer puede ajustarse en intervalos de 30 minutos.
CL6045QCCB_IM 17.12.20
65
Apagar automáticamente el aparato ( )
Para programar el aparato para apagarse automáticamente, éste debe
estar encendido.
1. Pulse el botón OPTION.
2. Use las teclas de echa para seleccionar y hasta que aparezca
” en la pantalla del mando a distancia.
3. Pulse de nuevo el botón OPTION y use las teclas de echa y
para ajustar la hora deseada.
4. Conrme su selección usando el botón OPTION.
NOTA:
Para interrumpir la función ajustada, repita los pasos descritos
anteriormente.
La función de temporizador puede ajustarse en intervalos de 30 mi-
nutos.
Modo ventilador (FAN)
Para activar el modo ventilador, pulse la tecla MODE hasta que apa-
rezca “FAN” en la pantalla del mando a distancia.
Pulsando la tecla FAN puede ajustar la velocidad del ventilador en el
orden siguiente:
Apagado ( )
LOW ( )
MEDIUM ( )
HIGH ( )
Turbo ( )
Automático
Modo de deshumidicación de aire (DRY)
Esta función reduce la humedad del aire y mejora la calidad del aire en
la sala.
Para activar el modo de deshumidicación de aire, pulse el botón
MODE hasta que aparezca “DRY” en la pantalla del mando a distancia.
El ventilador se activará con un ciclo de refrigeración variable.
Modo automático (AUTO)
Para activar el modo automático, pulse el botón MODE
hasta que aparezca “AUTO” en la pantalla del mando a distancia.
La velocidad del ventilador y la temperatura se controlarán automática-
mente, sin importar la temperatura de la sala.
Temperatura ambiente Modo operativo
< 20 °C Calor
20 °C ~ 26 °C Deshumidicar
> 26 °C Frío
Modo reposo ( )
La función SLEEP ajusta automáticamente la temperatura para que el
aire de la sala sea especialmente agradable durante la noche. Cuando
funcione en modo frío / deshumidicación, la temperatura ajustada
aumentará automáticamente en 1 °C hasta lograr un aumento de 2 °C
en un periodo de 2 horas.
1. Para activar el modo reposo, pulse el botón OPTION.
2. Use las teclas de echa para seleccionar y hasta que aparezca
” en la pantalla del mando a distancia.
3. Conrme su selección usando el botón OPTION.
4. Use el botón OPTION para apagar la función .
Durante el modo calefacción, la temperatura se reduce en 2 °C durante
las primeras 2 horas.
Pasadas 10 horas en modo reposo, el aparato se apagará automática-
mente.
Modo de ahorro de energía (ECO)
Pulsar el botón ECO activa o desactiva la función Eco. El aparato
pasará a modo de ahorro de energía. La temperatura ajustada aumenta
gradualmente de forma automática sin poner en peligro la comodidad
climática. Esto resulta en un bajo consumo energético.
Mantener pulsado el botón ECO permite apagar la pantalla dela unidad
de interior.
Temperatura y velocidad máximas ( )
Pulsar el botón TURBO activa o desactiva la Función Turbo. Esto per-
mite lograr la temperatura ajustada lo más rápido posible.
Moho / Auto limpieza ( )
1. Para activar el modo de auto limpieza, pulse el botón OPTION.
2. Use las teclas de echa para seleccionar y hasta que aparezca
” en la pantalla del mando a distancia.
3. Conrme su selección usando el botón OPTION.
4. Use el botón OPTION para apagar la función .
Cálculo de temperatura automático ( )
Cálculo de temperatura automático mediante un sensor en el mando
a distancia. Asegúrese de que elmando a distancia no se exponga a
fuentes de calor, como lámparas.
1. Para activar ” pulse el botón OPTION.
2. Use las teclas de echa para seleccionar y hasta que aparezca
en la pantalla del mando a distancia.
3. Conrme su selección usando el botón OPTION.
4. Pulse de nuevo la tecla OPTION para apagar la función .
Limpieza y mantenimiento
AVISO:
Asegúrese de que no entre agua por las aberturas del
aparato durante la limpieza. Riesgo de electrocución
o incendio.
ATENCIÓN:
Realice con regularidad el servicio de su aparato para garantizar
que su funcionamiento sea seguro y ecaz
Todos los trabajos de limpieza y mantenimiento deben ser realiza-
dos por una empresa de refrigeración y aire acondicionado certi-
cada. Una aplicación inadecuada anulará la garantía.
Limpieza y cambio del ltro
1. Abra el panel delantero en la dirección de la echa.
CL6045QCCB_IM 17.12.20
66
2. Levante la cubierta anterior con una mano, use la otra mano para
retirar el ltro para polvo.
3. Limpie el ltro con agua. Si está muy sucio, use agua caliente para
limpiarlo (no más de 45 °C). Deje secar el ltro a continuación.
4. Vuelva a introducir el ltro de aire.
5. Cierre la cubierta del compartimiento.
NOTA:
Los ltros adicionales de carbón activado (gris) y ltros ionizadores
(verde) no pueden limpiarse y, según el número de horas de fun-
cionamiento, deben ser sustituidos por ltros nuevos. La ilustración
siguiente muestra el proceso de extracción de los ltros.
Limpiar la unidad de interior
1. Abra la placa anterior del aparato y retire las bisagras para facilitar la
limpieza.
2. Limpie la unidad de interior usando una gamuza y agua (no más
caliente de 40 °C).
ATENCIÓN:
No rocíe agentes limpiadores sobre el aparato.
No sumergir el aparato en agua: se pueden dañar los componentes
electrónicos.
No usar cepillos alambre ni objetos abrasivos.
Limpiar la unidad de exterior
Si la entrada de aire de la unidad de exterior está obstruida, quite hojas
u otro material de desecho presente y elimine a continuación el polvo
restante usando aire comprimido o un poco de agua
Cambiar las baterías
NOTA:
Use exclusivamente baterías nuevas. Saque las baterías del mando
a distancia exclusivamente cuando la unidad de aire acondicionado
esté apagada
Si:
Ya no escucha un pitido de conrmación de la unidad de interior.
La pantalla ya no funciona correctamente.
Cómo:
Abra la cubierta posterior.
Introduzca baterías nuevas. Asegúrese de que la polaridad sea
correcta
Solución de problemas
Mal funcionamiento / Avería Causa posible
El aparato no funciona. Fallo de energía / enchufe desconectado
Motor de ventilador dañado en la unidad de interior o de exterior.
Interruptor termomagnético en el compresor averiado
Dispositivo protector averiado o defectuoso, o fusibles quemados
Conexiones sueltas o enchufe desconectado
Interrupción de funcionamiento para proteger / preservar el producto
Tensión demasiado elevada o demasiado baja
Se activa la función “ ” (encendido automático del aparato)
Daños en la placa de control electrónica
Olor inusual Filtros de aire sucios
Sonido de agua Retrocaudal de líquido en el circuito de refrigerante
Sale una neblina de la salida de aire Esto se produce cuando el aire de la sala está muy frío, por ejemplo en los modos “COOL” o “DRY”.
Ruidos inusuales Pueden producirse ruidos por la expansión o contracción del panel anterior causadas por uctuaciones
térmicas. Estos ruidos no implican que el aparato sea defectuoso o esté averiado
CL6045QCCB_IM 17.12.20
67
Mal funcionamiento / Avería Causa posible
Caudal de aire no deseado (caliente
o frío)
Conguración de temperatura inadecuada o incorrecta
La entrada o salida de aire está obstruida en la unidad de interior o de exterior.
Filtro de aire obstruido.
Velocidad de ventilador en posición mínima
Otras fuentes de calor en la sala
Agente(s) refrigerante(s) ausente(s)
El aparato no responde a señales /
introducciones.
El mando a distancia no está lo sucientemente cerca del receptor de la unidad de interior.
Tensión insuciente restante en las baterías para el mando a distancia.
Obstáculos entre el mando a distancia y el receptor.
La pantalla se apaga. Función LED activada
Error de tensión
La función ECO está activada (consulte el capítulo “Modo de ahorro de energía (ECO)”)
Funciones o características
ausentes de la pantalla
No se muestran todas las funciones o características para cada modo operativo (consulte el capítulo de
“Uso”)
En estos casos, apague de inmediato el aparato y desconecte la alimentación:
Ruidos inusuales durante el funcionamiento
Error en la placa de control
Fusibles quemados o interruptor averiado
Agua u objetos en el sistema
Cable o enchufe sobrecalentado / quemado
Sale un olor fuerte del aparato
Códigos de error en pantalla
Si se produce un error aparecerán los siguientes códigos de error en la pantalla de la unidad de interior.
Testigos Descripción del error
Parpadea una vez Error del sensor de temperatura de interior
Parpadea dos veces Error del sensor de temperatura de exterior
Parpadea seis veces El motor del ventilador interior funciona
NOTA:
Puede encontrar códigos de error adicionales en el manual de servicio.
CL6045QCCB_IM 17.12.20
68
Datos técnicos
Modelo: ............................................................................CL 6045 QC CB
Peso neto de la unidad de interior: ........................................... aprox. 7 kg
Peso neto de la unidad de exteriort: ....................................... aprox. 25 kg
Alimentación / potencia: ................................................220 - 240 V~, 50 Hz
Entrada de alimentación durante refrigeración: .............................. 800 W
Entrada de alimentación durante calefacción: ................................ 699 W
Entrada de alimentación durante
funcionamiento en espera integrado: ............................................... 5,0 W
Clase de protección: .................................................................................
Capacidad refrigerante: .........................................9000 BTU (2600 kW/h)
Emisión térmica: ....................................................9000 BTU (2610 kW/h)
Agente(s) de refrigeración: ................................................................. R 32
Presión operativa admisible máxima:
Lado de presión: ....................................................................... 3,7 MPa
Lado de succión: ...................................................................... 1,2 MPa
Modelo: ............................................................................CL 6046 QC CB
Peso neto de la unidad de interior: ........................................ aprox. 8,5 kg
Peso neto de la unidad de exteriort: ....................................... aprox. 25 kg
Alimentación / potencia: ................................................220 - 240 V~, 50 Hz
Entrada de alimentación durante refrigeración: .............................1130 W
Entrada de alimentación durante calefacción: ................................ 922 W
Entrada de alimentación durante
funcionamiento en espera integrado: ............................................... 5,0 W
Clase de protección: .................................................................................
Capacidad refrigerante: .......................................12000 BTU (3400 kW/h)
Emisión térmica: ..................................................12000 BTU (3420 kW/h)
Agente(s) de refrigeración: ................................................................. R 32
Presión operativa admisible máxima:
Lado de presión: ....................................................................... 3,7 MPa
Lado de succión: ...................................................................... 1,2 MPa
Modelo: ............................................................................CL 6047 QC CB
Peso neto de la unidad de interior: ...................................... aprox. 10,5 kg
Peso neto de la unidad de exteriort: .................................... aprox. 35,5 kg
Alimentación / potencia: ................................................220 - 240 V~, 50 Hz
Entrada de alimentación durante refrigeración: ............................ 1579 W
Entrada de alimentación durante calefacción: .............................. 1382 W
Entrada de alimentación durante
funcionamiento en espera integrado: ............................................... 2,5 W
Clase de protección: .................................................................................
Capacidad refrigerante: .......................................18000 BTU (5100 kW/h)
Emisión térmica: ..................................................18000 BTU (5130 kW/h)
Agente(s) de refrigeración: ................................................................. R 32
Presión operativa admisible máxima:
Lado de presión: ....................................................................... 3,7 MPa
Lado de succión: ...................................................................... 1,2 MPa
WiFi
Red soportada: .......................................................................802.11 b/g/n
Potencia de salida radiada máxima:........................................... 18,0 dBm
Gama de frecuencia: .....................................................................2,4 GHz
Canales: ............................................................................................. 1 - 13
Claves WiFi soportadas: ........................................................ WPA / WPA2
El derecho de realizar modicaciones técnicas y de diseño en el curso
del desarrollo continuo del producto esta reservado.
Noticación de cumplimiento de directiva
Por la presente, Clatronic International GmbH, declara que el
tipo de equipo radioeléctrico CL 6045 QC CB / CL 6046 QC CB /
CL 6047 QC CB es conforme con la Directiva 2014 / 53 / UE.
Además, el aparato cumple los requisitos de la directiva RoHS
2011 / 65 / UE & (UE) 2015 / 863.
El texto completo de la declaración UE de conformidad está disponible
en la dirección Internet siguiente: www.sli24.de
En la zona de descargas, introduzca el nombre del modelo
CL 6045 QC CB.
Comprobado para su funcionamiento en España.
Eliminación
Eliminación de la batería
Como consumidor está obligado por la ley a recoger pilas /
acumuladores gastados.
Retire las pilas del mando a distancia antes de desechar el
aparato.
Lleve las pilas a un punto de recogida de pilas gastadas o residuos
peligrosos. Póngase en contacto con la autoridad local para más infor-
mación.
CL6045QCCB_IM 17.12.20
69
Signicado del símbolo “Cubo de basura”
Proteja nuestro medio ambiente, aparatos eléctricos no for-
man parte de la basura doméstica.
Haga uso de los centros de recogida previstos para la elimi-
nación de aparatos eléctricos y entregue allí sus aparatos
eléctricos que no vaya a utilizar más.
Ayudará en evitar las potenciales consecuencias, a causa de una
errónea eliminación de desechos, para el medio ambiente y la salud
humana.
Con ello, contribuirá a la recuperación, al reciclado y a otras formas de
reutilización de los aparatos viejos eléctricos y electrónicos.
La información cómo se debe eliminar los aparatos, se obtiene en su
ayuntamiento o su administración municipal.
CL6045QCCB_IM 17.12.20
70
Istruzioni per l’uso
Grazie per aver scelto il nostro prodotto. Vi auguriamo un buon utilizzo
del dispositivo.
Simboli per questo manuale di istruzioni per l’uso
Le indicazioni importanti per la propria sicurezza sono indicati appro-
priatamente. Osservare assolutamente queste indicazioni, per evitare
incidenti e danni all’apparecchio:
AVVISO:
Previene i rischi della propria salute ed indica possibili rischi di ferite.
ATTENZIONE:
Indica possibili pericoli per l’apparecchio o altri oggetti.
NOTA:
Mette in risalto consigli ed informazioni.
Note generali
Prima di mettere in funzione questo apparecchio, leggere molto atten-
tamente le istruzioni per l’uso e conservarle con cura unitamente al cer-
tificato di garanzia, allo scontrino e, se possibile, alla scatola di cartone
con la confezione interna. Se passate l’apparecchio a terzi, consegnate
anche le istruzioni per l’uso.
Utilizzare l’apparecchio esclusivamente per scopi privati e conforme-
mente al tipo di applicazione previsto. Questo prodotto non è stato
concepito ai fini di un impiego in ambito industriale.
Non utilizzarlo all’aperto. Proteggerlo dal calore, nonché dall’espo-
sizione diretta ai raggi solari e dall’umidità (non immergerlo mai in
sostanze liquide) e tenerlo a distanza da oggetti con spigoli affilati.
Non utilizzare l’apparecchio con le mani umide.
Controllare regolarmente che l’apparecchio e il cavo non presentino
tracce di danneggiamento. In tal caso l’apparecchio non deve più
essere utilizzato.
Utilizzare esclusivamente accessori originali.
Per sicurezza tenere l’imballaggio (sacchetto di plastica, scatola,
polistirolo, ecc.) fuori dalla portata dei bambini.
AVVISO:
Non lasciar giocare i bambini piccoli con la pellicola di plastica.
Pericolo di soffocamento!
Avvertenze speciali di sicurezza per questo apparecchio
Sul prodotto si trovano simboli di carattere informativo e di avvertenza:
Leggere le istruzioni!
AVVISO: Pericolo d’incendio!
L’apparecchio contiene un refrigerante infiammabile!
Non utilizzare elementi differenti da quelli consentiti dal produttore per accelerare il processo di sbrinamento.
Conservare l’apparecchio solo in locali privi di fonti di ignizione fisse (ad es. fiamme libere, apparecchi a gas in
funzione o riscaldatori elettrici).
Non perforare o bruciare l’apparecchio.
Ricordate che i refrigeranti sono inodori.
Il manuale di assistenza è disponibile al seguente indirizzo web: www. sli24. de
Nell’area “Downloads”, inserire il nome del modello CL 6045 QC CB.
Chiunque sia addetto a intervenire su un circuito refrigerante o a interromperlo deve essere in possesso di un
certificato valido rilasciato da un’autorità di controllo accreditata nel settore che autorizza l’idoneità dell’addetto a
maneggiare i refrigeranti in sicurezza conformemente a specifiche di valutazione riconosciute dall’azienda.
La manutenzione deve essere eseguita solo come raccomandato dal produttore dell’apparecchiatura. La manu-
tenzione e le riparazioni che richiedono l’assistenza di altro personale qualificato devono essere effettuate sotto
la supervisione della persona competente per l’utilizzo di refrigeranti infiammabili.
ATTENZIONE: Pericolo di surriscaldamento!
Non ostruire le aperture di ventilazione!
Non coprire l’apparecchio!
ATTENZIONE:
L’installazione e il funzionamento improprio in assenza di una conformità (ad es. certificato) da parte di un’azienda
specializzata fanno decadere la garanzia ai sensi del regolamento UE 517 / 2014 Capitolo II Art. 3.
CL6045QCCB_IM 17.12.20
71
AVVISO:
Non utilizzare e conservare l’apparecchio nei seguenti luoghi:
- Vicino a una sorgente di combustione.
- In aree dove si possono verificare schizzi di acqua o di oli.
- In aree esposte alla luce solare diretta.
- In bagno, in lavanderia o nei pressi di una piscina.
Non toccare l’apparecchio quando si è a piedi nudi o quando parti del corpo sono bagnate o umide.
Durante l’installazione dell’apparecchio da parte di un’azienda specializzata certificata, assicurarsi che l’area circo-
stante sia in sicurezza per evitare incidenti. Ai bambini e alle persone non autorizzate non deve essere consentito
l’ingresso nel locale oggetto dell’installazione.
Assicurarsi che la presa di corrente per l’impianto esterno sia stata installata in modalità completamente sicura.
Assicurarsi che l’aria non possa entrare nel sistema di refrigerazione e controllare che non vi siano perdite di
refrigerante quando si trasferisce l’impianto di condizionamento dell’aria. È importante rammentare che gli agenti
refrigeranti sono inodori.
Dopo l’installazione dell’impianto di condizionamento dell’aria, eseguire un test di prova e controllare i dati di fun-
zionamento.
I fusibili installati nella centralina integrata hanno un valore nominale di T 5 A / 250 V. Assicurarsi che l’apparecchio
interno sia sempre protetto con un fusibile di capacità adeguata alla massima corrente d’ingresso o con l’ausilio di
un altro dispositivo di protezione da sovraccarico.
Durante l’installazione, l’apparecchio deve rimanere scollegato dalla rete di alimentazione di corrente, che evi-
denzia la separazione dei contatti di tutti i poli, rendendo possibile una segregazione totale secondo le condizioni
della categoria di sovratensione III. Tali fusibili devono essere integrati nel cablaggio permanente in conformità alle
norme di sicurezza. Tutte le operazioni relative ai sistemi elettrici devono essere eseguite esclusivamente da un
elettricista professionista o da un’azienda specializzata. L’unità di condizionamento dell’aria deve essere installata
solo da un’azienda specializzata certificata.
Non posizionare l’apparecchio in prossimità di sostanze infiammabili (alcool, ecc.) o vicino a contenitori sotto pres-
sione (ad es. bombolette spray, bombole di gas, ecc.). Mantenere una distanza di almeno 50 cm tra l’apparecchio
e tali sostanze o contenitori.
Se l’apparecchio viene utilizzato in aree prive di impianti di ventilazione, è necessario adottare le necessarie pre-
cauzioni per evitare il pericolo d’incendio associato alla fuoriuscita di gas refrigerante.
Osservare le norme nazionali che regolano tali standard di collegamento. Il cablaggio deve essere conforme alle
normative nazionali vigenti.
Prima di toccare i morsetti di collegamento, tutti i circuiti elettrici devono essere scollegati dalla rete elettrica.
Questo apparecchio può essere utilizzato da bambini di età superiore a otto (8) anni così come da persone con li-
mitate capacità fisiche, sensoriali o mentali o con scarsa esperienza e conoscenza, se sono sorvegliate o se sono
state istruite sull’uso sicuro dell’apparecchio e ne comprendono i pericoli.
I bambini non possono giocare con l’apparecchio.
Non riparare il dispositivo; contattare sempre un tecnico autorizzato.
La pulizia e la manutenzione devono essere effettuate esclusivamente da personale qualificato. In qualsiasi cir-
costanza, scollegare sempre l’apparecchio dall’alimentazione elettrica prima di eseguire operazioni di pulizia o di
manutenzione.
Questo apparecchio non è stato progettato per fornire aria condizionata nell’ambiente abitativo / luogo e non può
essere utilizzato per altri scopi, come ad esempio per asciugare i vestiti, per la refrigerazione di alimenti, ecc.
Utilizzare l’apparecchio solo con il filtro dell’aria installato. L’uso dell’apparecchio di condizionamento senza il filtro
dell’aria può causare un eccessivo accumulo di polvere o la contaminazione delle parti interne dell’apparecchio e
causare danni e / o malfunzionamenti.
L’utente è pertanto responsabile di assicurare che l’installazione dell’apparecchio sia effettuata esclusivamente da
un tecnico qualificato. Il tecnico qualificato deve verificare se l’apparecchio è stato messo a terra in conformità con
CL6045QCCB_IM 17.12.20
72
le disposizioni di legge e le linee guida applicabili, nonché assicurarsi che l’apparecchio sia dotato di un interrut-
tore magnetotermico.
Non esporre mai l’apparecchio direttamente ad una corrente d’aria fredda per un periodo di tempo prolungato.
L’esposizione diretta prolungata a una corrente d’aria fredda può essere dannosa per la salute. Si raccomanda di
prestare particolare attenzione a categorie come bambini, anziani o persone con patologie.
Se l’apparecchio emette fumo o si rileva odore di bruciato, scollegarlo immediatamente dalla presa di corrente e
contattare il tecnico del servizio assistenza. Utilizzare l’apparecchio nelle circostanze e / o nelle condizioni sopra
descritte può determinare l’insorgere di incendi o scosse elettriche.
Se l’apparecchio non viene utilizzato per un periodo di tempo prolungato, spegnerlo con il tasto .
Assicurarsi che la direzione del flusso d’aria sia posizionata correttamente. Le valvole devono essere rivolte verso
il basso in modalità riscaldamento e verso l’alto in modalità raffreddamento.
Evitando variazioni estreme delle impostazioni di temperatura, è possibile evitare danni all’apparecchio.
Non piegare, tirare o schiacciare il cavo di alimentazione, poiché potrebbe danneggiarsi. Un cavo di alimentazione
danneggiato può essere la causa di shock elettrici e di incendi. Solo personale tecnico specializzato deve essere
autorizzato a sostituire un cavo di alimentazione danneggiato.
Non bloccare l’ingresso o l’uscita dell’aria sia dell’apparecchio interno che esterno. Bloccare od ostruire queste
aperture determinerà una riduzione della capacità di raffreddamento e può causare malfunzionamenti o danni.
Non apportare modifiche o sostituzioni non autorizzate o improprie all’apparecchio.
Non collocare oggetti pesanti o caldi sull’apparecchio.
Non lasciare finestre o porte aperte per lunghi periodi di tempo quando l’unità di climatizzazione è in funzione.
Non indirizzare la corrente d’aria verso piante o animali. Periodi prolungati di esposizione diretta alle correnti di
aria fredda possono avere un impatto negativo su piante e animali.
Non salire sull’apparecchio esterno e non appoggiarvi sopra alcun oggetto.
Non inserire un bastone, una barra, un’asta o oggetti similari nell’apparecchio. Ciò può causare lesioni personali e
danni materiali.
Per la posa e la piegatura dei tubi di raffreddamento è necessario utilizzare uno strumento adeguato e apposi-
tamente progettato. Per motivi di sicurezza, è necessario impedire in ogni caso qualsiasi deformazione dei cavi
essendo estremamente delicati. Tutte le operazioni devono essere eseguite da un’azienda certificata, conseguen-
temente documentate e stabilite conformemente alle dotazioni collegate all’apparecchio.
I tubi di raffreddamento non devono essere allungati o accorciati senza adottare ulteriori accorgimenti, poiché que-
sti sono già stati precaricati con un agente refrigerante in fabbrica durante la produzione.
ATTENZIONE:
Tutte le modifiche tecniche ai tubi di raffreddamento devono essere eseguite da un’azienda specializzata certifi-
cata. Modifiche o alterazioni improprie comportano la scadenza della garanzia.
Verificare che tutti i tubi e i cablaggi siano impermeabili per evitare la formazione di liquidi, vapore acqueo o con-
densa e impedire, ad esempio, la loro intrusione nella parete interna dell’apparecchio. Ciò eviterà il formarsi di
umidità e la conseguente comparsa di muffa.
Movimentazione batterie
AVVISO:
Non esporre le batterie a calore eccessivo come la luce diretta del
sole, fiamme o condizioni simili. Pericolo di esplosione!
Le batterie non sono giocattoli. Tenere le batterie lontano dalla
portata dei bambini.
Non aprire la batterie forzandole.
Evitare il contatto con oggetti metallici (anelli, chiodi, cacciaviti
ecc.). Pericolo di cortocircuito!
Un cortocircuito fa sì che la batteria si surriscaldi o addirittura si
incendi, con conseguenti lesioni.
Per la vostra sicurezza, coprire i morsetti della batteria con nastro
adesivo durante il trasporto.
AVVISO:
In caso di perdite dalle batterie, evitare che il liquido entri in contatto
con gli occhi oppure con le mucosa. In caso di contatto, lavare le
mani e risciacquare gli occhi con acqua pulita. Contattare un me-
dico in caso il fastidio persista.
Le batterie non ricaricabili non devono essere ricaricate.
Assicurarsi che la polarità sia corretta quando si inserisce la batte-
ria / le batterie.
ATTENZIONE:
Quando non si utilizza il telecomando per periodi prolungati, rimuo-
vere le batterie per prevenire perdite di acido.
Non mescolare batterie di tipi diversi né batterie nuove e vecchie.
CL6045QCCB_IM 17.12.20
73
ATTENZIONE:
Non gettare le batterie insieme ai rifiuti domestici. Restituire le bat-
terie usate a un punto di raccolta autorizzato oppure al rivenditore
di fiducia.
Disimballaggio dell’apparecchio
1. Togliere l’apparecchio dall’imballaggio.
2. Rimuovere tutti i materiali di imballaggio come pellicole di plastica,
materiali di riempimento e imballaggio di cartone.
3. Verificare l’apparecchio per constatare eventuali danni derivanti dal
trasporto così da evitare incidenti.
4. Se si constatano danneggiamenti non mettere in funzione l’apparec-
chio. Contattare il distributore.
Nella fornitura
Unità interna
a) 6 × viti
b) 6 × tasselli
c) 1 × supporto per montaggio a parete
Unità esterna
d) 1 × supporto per il sistema di
canalizzazione della condensa
e) 4 × sostegno per l’unità esterna
Accessori di collegamento
f) 1 × Cavo di collegamento per l’unità
esterna
g) 2 × tubo di raffreddamento (grigio e blu)
comprensivo di isolamento
h) 1 × materiale isolante (ricambio)
i) 2 × tubo dell’acqua di condensa
j) 1 × nastro vinilico
k) 1 × copri-foro
Accessori
m) 1 × telecomando
n) 2 × batteria R03 “AAA” da 1,5 V
o) 2 × filtri
p) 2 × cartuccia filtro
1 × filtro a carbone attivo (grigio)
1 × filtro ionizzato (verde)
Elementi di comando
Pagina 3
Unità apparecchio per aree interne
1 Pannello frontale
2 Cartuccia filtro con filtro a carboni attivi (grigio)
3 Cartuccia filtro con filtro ionizzato (verde)
4 Modulo WLAN
5 Display LED
6 Targhetta (la posizione può differire)
7 Schema elettrico
8 Unità di collegamento elettrico
9 Tasto (accensione / spegnimento)
10 Deflettore
11 Ricevitore del segnale
12 Aletta di ventilazione
13 Telecomando
Unità apparecchio per aree esterne
14 Targhetta per area esterna (la posizione può differire)
15 Copertura del connettore
16 Valvola refrigerante
a grigio
b blu
17 Uscita aria
Telecomando
NOTA:
Se il modello acquistato non dispone di una di queste funzioni, si udirà
comunque un segnale acustico quando si premerà il tasto.
Tasti sul telecomando
N. Tasto Significato
1Accensione- / spegnimento
2OPTION Tasto selezione
3Impostazioni- / tasto selezione
4Impostazioni- / tasto selezione
5ECO Attiva / disattiva la funzione ECO
6TURBO Attivazione / disattivazione della funzione Turbo
7Mode Modalità operativa tasto selezione
8Fan Regolazione velocità dell’aria
9Regolazione aletta di ventilazione
10 Regolazione deflettore (non disponibile; deve
essere regolato manualmente)
CL6045QCCB_IM 17.12.20
74
Display telecomando
Indicatore rete
Blocco di sicurezza per bambini
AUTO Modalità automatica
COOL Modalità raffreddamento
DRY Modalità deumidificazione dell’aria
HEAT Modalità riscaldamento
FAN Modalità ventilazione
ECO Modalità risparmio energetico
Indicatore della velocità di ventilazione
Ventola / ventilatore spenti
Temperatura e velocità massime
Indicatore aletta di ventilazione
Indicatore deflettore (non disponibile)
Modalità snooze
Inserimento automatico di accensione / spegnimento
Rilevamento automatico della temperatura
Autopulizia antimuffa
Funzionalità purificazione dell’aria (non disponibile)
Non disponibile
Informazioni sull’applicazione
“Smart Life - Smart Living”
L’applicazioneSmart Life - Smart Living è disponibile per i sistemi
operativi Android e iOS. Scansionare il codice QR corrispondente per
accedere direttamente al download.
NOTA:
A seconda del fornitore, i costi possono diventare esigibili quando si
scarica l’applicazione.
Google Play App Store
Informazioni su come utilizzare l’applicazione
Questo apparecchio consente il suo utilizzo tramite la rete domestica.
I prerequisiti sono: 1) una connessione Wi-Fi fissa al router e 2) l’ap-
plicazione gratuita “Smart Life - Smart Living”. È possibile accedere
comodamente a tutte le funzioni dell’apparecchio tramite l’applicazione.
Per impedire che l’apparecchio si accenda inavvertitamente, si consiglia
di scollegarlo dalla rete elettrica quando non si è presenti!
Requisiti di sistema per l’uso dell’applicazione
iOs 10.0 o superiore
Android 5.0 o superiore
Messa in funzione tramite l’applicazione
1. Installare l’applicazione “Smart Life - Smart Living”. Creare un ac-
count utente.
2. Attivare la funzione Wi-Fi nelle impostazioni dell’apparecchio.
3. Assicurarsi che la rete Wi-Fi si trovi in prossimità dell’apparecchio.
4. Accendere l’unità interna.
5. Avviare l’applicazione e selezionare + .
6. Selezionare il menu per “Air conditioning unit” (unità di condiziona-
mento dell’aria) e seguire le istruzioni sul display.
7. Premere il tasto ECO sul telecomando sei volte finché sul display
non appare “CF”. Se sul display appare “AP”, premere nuovamente il
tasto ECO sei volte.
NOTA:
“CF”: la spia luminosa sul modulo (4) lampeggia rapidamente.
“AP”: la spia luminosa sul modulo (4) lampeggia lentamente.
In tal caso, premere “next step” Inserire la password.
8. Una volta che l’apparecchio è stato collegato con successo, la spia
Wi-Fi si illumina in modalità fissa. Adesso è possibile utilizzare l’appa-
recchio tramite l’app.
NOTA:
L’apparecchio può essere utilizzato solo con router a 2,4 GHz. I router
a 5 GHz non sono supportati.
Disconnessione del Wi-Fi
Se si intende disconnettere una connessione Wi-Fi esistente (la spia di
controllo è accesa), procedere come segue: Premere il tasto ECO sul
telecomando sei volte.
NOTA:
Se si intende ristabilire la connessione Wi-Fi, procedere come de-
scritto nella sezione “Messa in funzione tramite l’applicazione”.
Installazione
Unità interna (a)
Installare l’unità interna su una parete salda che non sia esposta ad
alcuna vibrazione.
Nessuna delle aperture dell’apparecchio deve essere ostruita in
modo tale che l’aria possa fluire liberamente in tutto l’ambiente.
Non montare l’apparecchio vicino a fonti di calore, vapori o gas
infiammabili.
Non montare l’apparecchio in una posizione che lo espone alla luce
diretta del sole per lunghi periodi di tempo.
Scegliere una posizione in cui la condensa possa facilmente scari-
carsi e da cui collegare facilmente l’unità interna all’unità esterna.
Controllare regolarmente il corretto funzionamento dell’apparecchio
e rispettare sempre le indicazioni relative alle distanze minime e / o
mantenere sgombri gli spazi previsti. Selezionare una posizione da
cui il filtro sia facilmente raggiungibile.
Non installare l’apparecchio in ambienti umidi come bagni, lavande-
rie, ecc.
Unità esterna (b)
Non montare l’unità esterna vicino a fonti di calore, vapore o gas
infiammabili.
Non installare l’apparecchio in luoghi eccessivamente polverosi.
Installare l’apparecchio in una area in cui nessuno sarà disturbato
dal rumore generato dal funzionamento e che non sia frequentata da
numerose persone. Se necessario, concordate l’area di installazione
con i vicini di casa. Se necessario, consultare la Direttiva Federale
Tedesca sulla Protezione delle Emissioni.
Non installare l’apparecchio in un’area in cui sia esposto alla luce di-
retta del sole o a condizioni climatiche avverse, né utilizzare sistemi di
protezione dai raggi solari che pregiudicano la circolazione dell’aria.
Osservare sempre le distanze minime indicate nella figura riportata
di seguito e / o mantenere lo spazio previsto libero entro tale distanza
durante l’installazione e il funzionamento.
Installare l’unità esterna in una posizione fissa e stabile.
CL6045QCCB_IM 17.12.20
75
Unità interna (a)
Per ottenere prestazioni ottimali, l’installazione deve essere realizzata
il più in alto possibile rispetto al pavimento.
Unità esterna (b)
Se l’unità esterna è esposta a vibrazioni, utilizzare paracolpi in
gomma sul pavimento per contrastarne gli effetti.
Le distanze minime (in mm) sono indicate in figura.
ATTENZIONE:
L’acquirente deve assicurarsi che le persone / ditte / imprese che
installano, manutengono o riparano queste unità di climatizzazione
siano in possesso di qualifiche ed esperienza sufficienti per operare
con gli agenti refrigeranti.
L’installazione e il funzionamento improprio in assenza di una
conformità (ad es. certificato) da parte di un’azienda specializ-
zata fanno decadere la garanzia ai sensi del regolamento (UE)
517 / 2014 Capitolo II Art. 3.
Installazione del supporto per il montaggio a parete
ATTENZIONE:
Prima di installare il supporto per il montaggio a parete, accertarsi di
aver individuato il punto preciso in cui si intende praticare il foro per i
tubi! Vedere il capitolo “Installazione dell’unità interna e della boccola
a parete verso l’esterno”.
1. Allentare il supporto per il montaggio a parete in corrispondenza dei
fermi di bloccaggio.
2. Piegare il supporto per il montaggio a parete verso l’alto.
3. Rimuovere il supporto per il montaggio a parete sganciandolo dal
sostegno.
4. Praticare fori di almeno 32 mm di profondità in una parete di materiale
compatto per fissare la piastra.
5. Collocare i tasselli di plastica nel foro.
6. Fissare la piastra di montaggio alla parete con le viti in dotazione.
7. Accertarsi che la piastra di montaggio sia avvitata saldamente in
posizione.
Allineamento dei tubi di raffreddamento
ATTENZIONE:
L’unità di condizionamento dell’aria deve essere installata e collegata
da un’azienda certificata nel settore della refrigerazione e del condi-
zionamento dell’aria. L’installazione impropria comporta la scadenza
della garanzia.
I tubi di raffreddamento possono essere posati in 3 direzioni come
indicato nei numeri riportati in figura. Se le tubazioni sono posizionate
in base alle opzioni 1 o 3, è necessario utilizzare un cutter per praticare
una scanalatura sul lato dell’unità interna lungo la giunzione.
Orientare i tubi di collegamento in direzione dell’apertura nella parete e
legare insieme i tubi di raffreddamento, la tubazione dell’acqua di con-
densa e il cavo di alimentazione con nastro vinilico e assicurare sempre
un isolamento impermeabile, in modo che non si formino liquidi, vapore
acqueo o condensa cosicché non penetrino ad esempio nella parete.
Ciò eviterà il formarsi di umidità e la conseguente comparsa di muffa.
Assicurarsi che il tubo dell’acqua di condensa sia posizionato in leggera
pendenza in modo che il flusso dell’acqua non venga ostacolato.
ATTENZIONE:
Accertarsi che i tubi siano ermeticamente sigillati per evitare danni
dovuti all’umidità e la formazione di muffa nella muratura.
CL6045QCCB_IM 17.12.20
76
Srotolamento dei tubi di raffreddamento
Togliere i tappi di copertura solo immediatamente prima di collegare i
tubi di raffreddamento per evitare che si sporchino.
Se i tubi vengono piegati o tirati con eccessiva frequenza, diventano
rigidi. Non piegare i tubi più di tre volte.
Srotolare dolcemente i tubi come indicato nel diagramma A. Evitare
deformazioni.
ATTENZIONE:
Non tirare il tubo come indicato nel diagramma B. Piuttosto, srotolarlo
dolcemente.
t
Collegamenti all’unità interna
ATTENZIONE:
L’unità di condizionamento dell’aria deve essere installata e / o
collegata da un’azienda certificata nel settore della refrigerazione e
del condizionamento dell’aria. L’installazione impropria comporta la
scadenza della garanzia
1. Rimuovere i tappi protettivi.
2. Verificare che i raccordi non siano sporchi o danneggiati.
3. Collegare il dado di raccordo con la filettatura di allacciamento
dell’unità interna. Nel fare ciò, prestare attenzione al colore dei tappi
protettivi.
4. Serrare il raccordo utilizzando una chiave adeguata.
NOTA:
Attenersi sempre alla coppia di serraggio corretta e consultare la
tabella allegata relativa “Informazioni per l’installazione”.
Collegamento del tubo dell’acqua di condensa per l’unità interna
È estremamente importante che il tubo dell’acqua di condensa per
l’unità interna sia installato in modo corretto.
1. Posare il tubo di scarico sotto il tubo e assicurarsi che non vi siano
avvallamenti o incavi.
2. Il tubo di scarico deve essere orientato verso il basso per agevolare il
flusso dell’acqua di condensa.
3. Non piegare o torcere il tubo di scarico. Non lasciare il tubo spor-
gente. Non immergere la parte terminale in acqua. Se il tubo è
collegato ad una prolunga, assicurarsi che il collegamento sia corret-
tamente assicurato quando si inserisce il tubo nell’unità interna.
4. Se i tubi di raffreddamento vengono posati come indicato al punto 3
del capitolo “Allineamento dei tubi di raffreddamento”, allora i tubi, il
cavo di collegamento per l’unità esterna e il tubo di scarico dell’acqua
di condensa devono essere fissati sul lato posteriore dell’apparecchio
utilizzando appositi giunti.
5. Inserire il raccordo del tubo nel relativo alloggiamento.
6. Spingere con decisione il tubo verso il basso nell’unità di condiziona-
mento e assicurarsi che il collegamento sia ben saldo.
ATTENZIONE:
Evitare deformazioni durante il posizionamento e affidare questi inter-
venti solo a ditte specializzate certificate.
CL6045QCCB_IM 17.12.20
77
Installazione dell’unità interna e della boccola a parete verso l’esterno.
Dopo aver collegato i tubi di raffreddamento così come il tubo di scarico
dell’acqua di condensa secondo le indicazioni, procedere come segue:
1. Posare con estrema cura i tubi, il cavo di collegamento per l’unità
esterna e il tubo dell’acqua di condensa verso il punto in cui devono
essere convogliati attraverso la parete verso l’esterno.
2. Legare insieme i tubi dell’acqua di condensa, il cavo di collegamento
per l’unità esterna e il tubo dell’acqua di condensa con nastro vinilico
e quindi rivestire il tutto con nastro isolante (non incluso nella forni-
tura).
ATTENZIONE:
Accertarsi che i tubi siano ermeticamente sigillati per evitare danni
dovuti all’umidità e la formazione di muffa nella muratura.
Assicurarsi che tutte le parti del tubo esposte siano state sufficien-
temente isolate.
3. Praticare un foro con un diametro di 57 mm e un’inclinazione / gra-
diente di 5 - 7 mm. (Immagine 2)
NOTA:
Forare con una leggera inclinazione di 5 - 7 mm verso l’esterno, per
garantire che l’acqua condensata sia in grado di defluire.
Assicurarsi, ad ogni modo, che sia presente una pendenza lungo
tutta la lunghezza del tubo dell’acqua di condensa in direzione
dell’apertura nella parete.
4. Inserire il copri-foro.
5. Guidare i tubi isolati, il cavo di collegamento per l’unità esterna e i tubi
dell’acqua di condensa attraverso l’apertura nella parete.
NOTA:
Dopo aver installato i tubi, sigillare il foro nella parete attraverso il
quale sono stati fatti passare i tubi in modo che sia a tenuta d’aria
e stagna.
6. Fissare saldamente l’unità interna alla parte superiore della piastra di
montaggio a parete.
7. Premere saldamente la parte inferiore dell’unità interna contro la
piastra di montaggio a parete fino a quando non si appoggia perfet-
tamente.
Installazione dell’unità esterna
Prima di collegare i tubi, decidere dove si desidera posizionare l’unità
esterna e assicurarsi che ci sia spazio sufficiente nel luogo prescelto
per i lavori di manutenzione da eseguire in un secondo momento.
(Osservare le distanze minime)
Posizionare i tappi protettivi (inclusi nella fornitura) sul sostegno e
fissarli negli appositi punti.
Utilizzare viti / bulloni di ancoraggio particolarmente resistenti e consi-
derare anche il peso dell’apparecchio, in modo tale da evitare che le
vibrazioni causate dal funzionamento allentino irrimediabilmente gli
agganci nel tempo. L’unità deve essere installata in conformità alle
norme di sicurezza vigenti.
Tubo di scarico dell’acqua
di condensa per l’unità esterna
L’acqua di condensa e il ghiaccio che si accumulano nell’unità esterna a
causa della generazione di calore possono essere scaricati attraverso il
tubo dell’acqua di condensa.
8. Fissare i supporti per il tubo di scarico dell’acqua di condensa nell’a-
pertura di 25 mm progettata a tale scopo.
9. Collegare i supporti per il tubo di scarico dell’acqua di condensa al
tubo dell’acqua di condensa e assicurarsi che il flusso sia adeguata-
mente regolato per prevenire danni dovuti all’umidità.
Collegamento elettrico (unità esterna)
Rimuovere la copertura del connettore (15) sul lato destro dell’appa-
recchio. Il diagramma correlato è riportato sul lato posteriore. Vedere il
diagramma.
1. Collegare il cavo di alimentazione dell’unità interna alla morsettiera.
CL6045QCCB_IM 17.12.20
78
2. Fissare delicatamente il cavo di alimentazione per l’unità esterna
utilizzando i morsetti di collegamento.
3. Assicurarsi che i cavi siano stati fissati correttamente. Accertarsi che
la messa a terra sia stata installata correttamente.
4. Riposizionare la copertura protettiva sull’apparecchio.
ATTENZIONE:
Tutti gli interventi elettrici devono essere eseguiti da un elettricista
professionista certificato o da un’azienda specializzata in elettronica.
L’installazione impropria comporta la scadenza della garanzia.
Istruzioni per l’attacco rapido
Utilizzare l’attacco rapido per collegare agevolmente le unità interne ed
esterne dell’unità di condizionamento dell’aria. Una procedura semplice
e veloce, per la quale sono previste tutte le rivendicazioni in garanzia, a
condizione che tutti i lavori siano eseguiti da un’azienda specializzata.
ATTENZIONE:
I tubi di raffreddamento forniti alla consegna sono stati pre-riempiti
con il refrigerante durante la fabbricazione.
I tubi non devono essere né accorciati né allungati.
Collegamento all’unità interna
1. Prestare attenzione a srotolare con delicatezza i tubi di raffredda-
mento Come descritto nel capitolo “Srotolamento dei tubi di raffredda-
mento”. Evitare sempre di deformare i tubi
2. Rimuovere i tappi protettivi (blu e grigio) dai raccordi dell’unità interna.
3. Assicurarsi che tutte le viti siano in buone condizioni e non presentino
particelle di sporco, polvere, sabbia e altre sostanze in sospensione
o sporcizia.
4. Avvitare i tubi di raffreddamento utilizzando i connettori dell’unità
interna. Prestare attenzione ad assicurare che i collegamenti siano
effettuati in conformità con lo schema di colore blu / grigio. Quindi,
serrare i dadi con due chiavi (una per serrare il collegamento e l’altra
per controbilanciare).
NOTA:
Attenersi sempre alla coppia di serraggio corretta e consultare la
tabella allegata relativa “Informazioni per l’installazione”.
Collegamento all’unità esterna
1. Fate attenzione a srotolare con delicatezza i tubi di raffreddamento
come descritto nel capitolo “Srotolamento dei tubi di raffreddamento”.
Evitare sempre di deformare i tubi.
2. Rimuovere i tappi protettivi (blu e grigio) dai raccordi dell’unità
esterna.
3. Assicurarsi che tutte le viti siano in buone condizioni e non presentino
particelle di sporco, polvere, sabbia e altre sostanze in sospensione
o sporcizia.
4. Avvitare i tubi di raffreddamento utilizzando i connettori dell’unità
esterna. Prestare attenzione ad assicurare che i collegamenti siano
effettuati in conformità con lo schema di colore blu / grigio. Quindi,
serrare i dadi con due chiavi (una per serrare il collegamento e l’altra
per controbilanciare).
NOTA:
Attenersi sempre alla coppia di serraggio corretta e consultare la
tabella allegata relativa “Informazioni per l’installazione”.
CL6045QCCB_IM 17.12.20
79
5. Assicurarsi che il circuito del refrigerante dell’apparecchio sia colle-
gato correttamente e che sia a tenuta d’aria. Ispezionare gli elementi
di collegamento con lo spray rileva-perdite. Se si formano delle bolle
d’aria, allora significa che sono presenti delle perdite. In tal caso,
è indispensabile che le valvole di intercettazione vengano sigillate.
Verificare accuratamente i tubi e i collegamenti.
NOTA:
La valvola di intercettazione (a) è stata sigillata durante la fab-
bricazione e non deve essere aperta. La valvola di servizio (b) è
destinata esclusivamente a scopi di servizio.
ATTENZIONE:
L’unità di condizionamento dell’aria deve essere installata e collegata
da un’azienda certificata nel settore della refrigerazione e del condi-
zionamento dell’aria. L’installazione impropria comporta la scadenza
della garanzia.
Test dell’unità interna
L’interruttore di alimentazione funziona correttamente?
L’aeratore funziona?
Le modalità di funzionamento operano normalmente?
La temperatura e la temporizzazione possono essere regolate corret-
tamente?
Tutte le spie si accendono normalmente?
Le alette di ventilazione funzionano correttamente?
Il tubo dell’acqua di condensa funziona correttamente?
ATTENZIONE:
Tutte le fasi descritte in precedenza devono essere eseguite da
un’azienda certificata nel settore della refrigerazione e del condizio-
namento dell’aria. L’esecuzione impropria comporta la scadenza della
garanzia.
Test dell’unità esterna
È possibile rilevare rumori o vibrazioni insolite durante il funziona-
mento?
L’agente di raffreddamento fuoriesce?
NOTA:
Il sistema di comando elettronico avvia il compressore solo tre minuti
dopo l’accensione dell’unità.
ATTENZIONE:
Tutte le fasi descritte in precedenza devono essere eseguite da
un’azienda certificata nel settore della refrigerazione e del condizio-
namento dell’aria. L’esecuzione impropria comporta la scadenza della
garanzia.
Informazioni di installazione
Istruzioni di installazione - Informazioni di installazionen
Modello costruttivo / Capacità di raffreddamento (Btu / h) 9k 12k 15 / 18k
Diametro del tubo di raffreddamento a) 1 / 4" 6 1 / 4" 6 1 / 4" 6
Diametro del tubo di raffreddamento b) 3 / 8" 9,52 1 / 2" 12 1 / 2" 12
Lunghezza standard del tubo di raffreddamento 5 m 5 m 5 m
Distanza massima tra unità interna ed esterna 15 m 15 m 15 m
Carica supplementare di refrigerante 20 g / m 20 g / m 30 g / m
Distanza massima tra unità interna ed esterna 5 m (15 m) 5 m (15 m) 5 m (15 m)
Agente di raffreddamento * R32 R32 R32
*) Ulteriori informazioni sono riportate sulla targhetta informativa posta sull’unità esternat
Coppia di serraggio per tappi protettivi e collegamenti flangiati
Tubo di
raffreddamento
Coppia di serraggio
(N x m)
Impiego di carico di serraggio
adeguato: Chiave da 20 cm
Coppia di serraggio
(N x m)
1 / 4" 6 15 - 20 Serraggio/serraggio manuale Dado di connessione-servizio 7 - 9
3 / 8" 9,52 31 - 35 Serraggio Tappi protettivi 25 - 30
1 / 2" 12 35 - 45 Serraggio
5 / 8" 15,88 75 - 80 Serraggio
CL6045QCCB_IM 17.12.20
80
Specifiche cavi
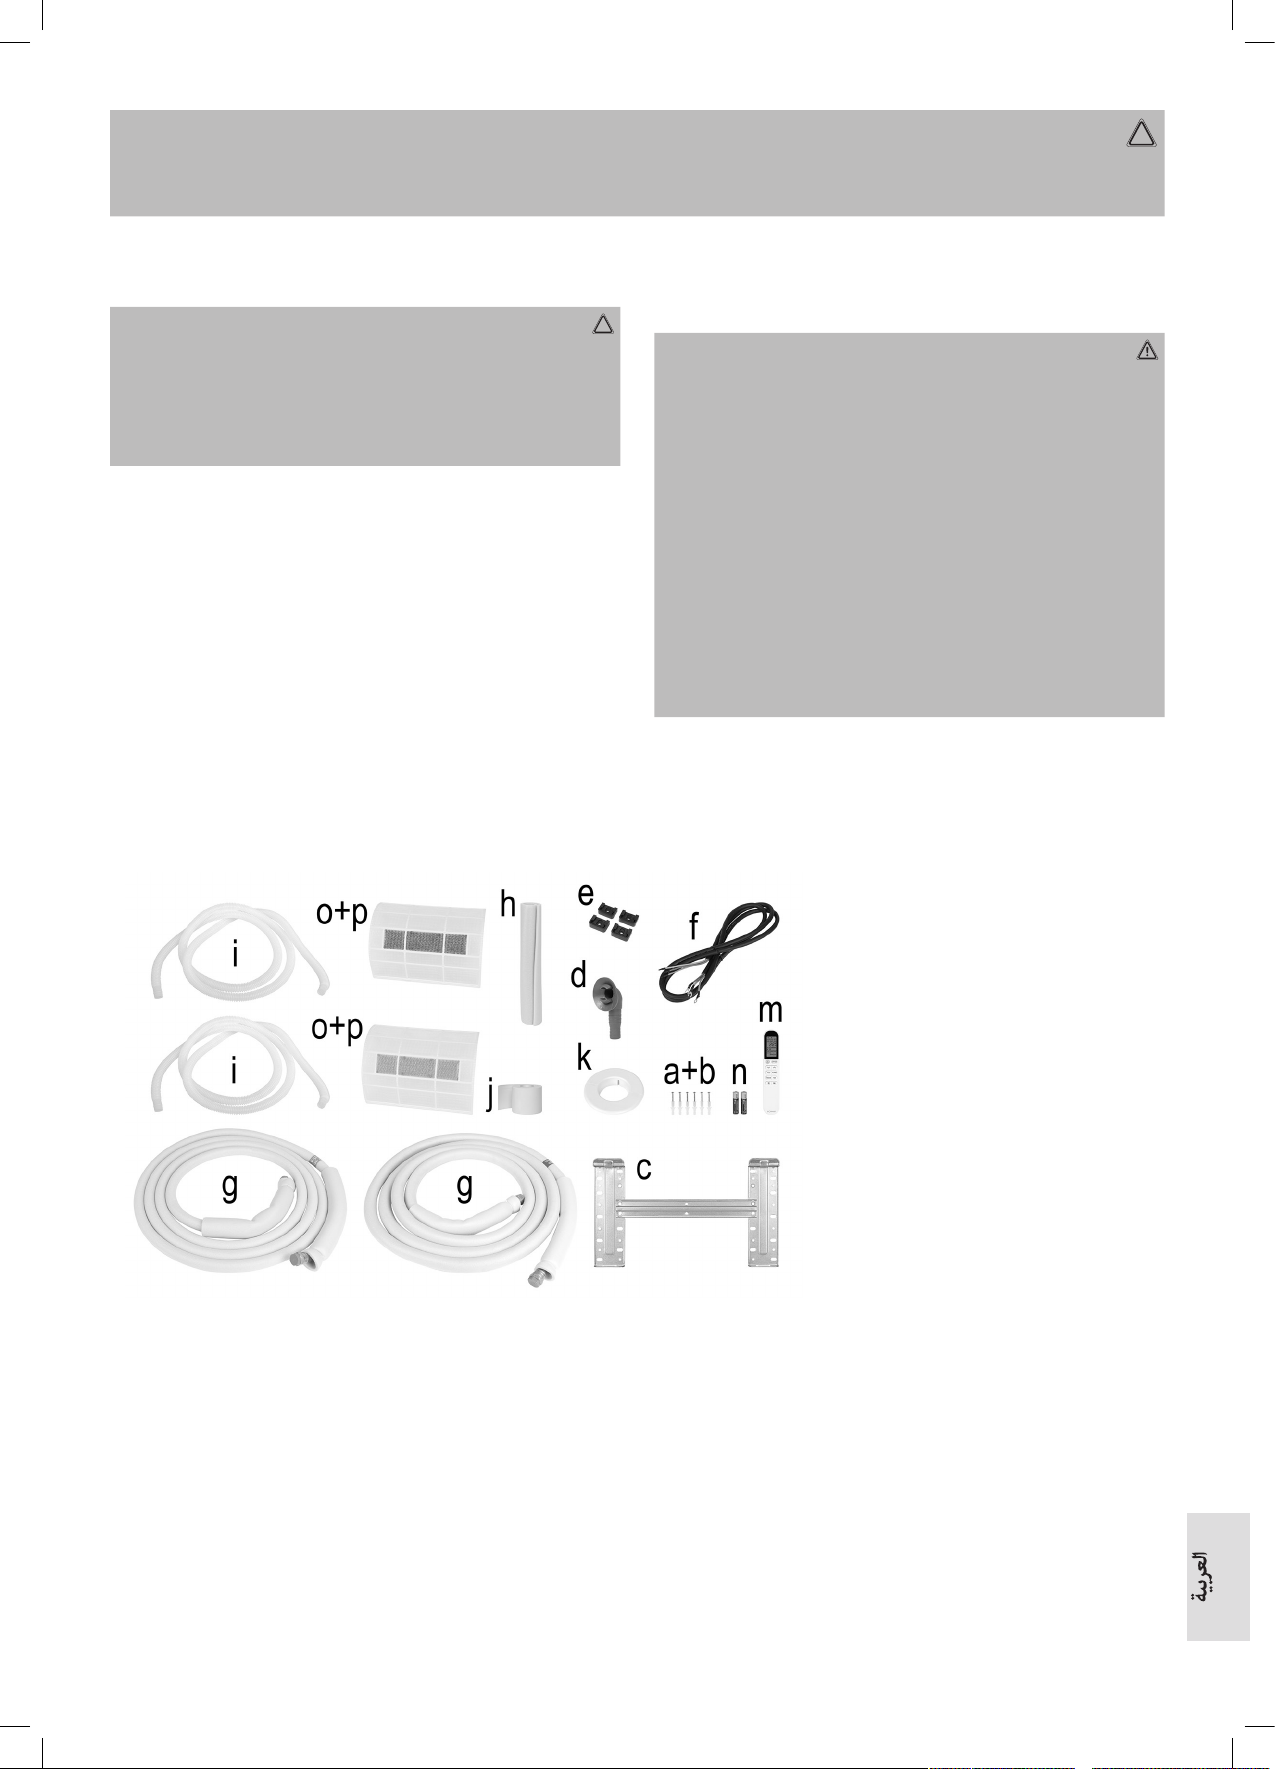
Istruzioni di installazione - Informazioni per l’installatore
Modello Agente di raffreddamento (Btu / h) 9k 12k 15 / 18k
Cavo di alimentazione
N1,0 mm²
AWG18
1,0 mm² (1,5 mm²)
AWG18 (AWG16)
1,5 mm²
AWG16
L1,0 mm²
AWG18
1,0 mm² (1,5 mm²)
AWG18 (AWG16)
1,5 mm²
AWG16
E1,0 mm²
AWG18
1,0 mm² (1,5 mm²)
AWG18 (AWG16)
1,5 mm²
AWG16
Cavo di collegamento
N1,0 mm² 1,0 mm² (1,5 mm²) 1,5 mm²
L1,0 mm² 1,0 mm² (1,5 mm²) 1,5 mm²
11,0 mm² 1,0 mm² (1,5 mm²) 1,5 mm²
20,75 mm² 0,75 mm² 0,75 mm²
30,75 mm² 0,75 mm² 0,75 mm²
Istruzioni di installazione - Informazioni di installazione
Trasformatore di tensione 9k 12k 18 / 22k
Modello Agente di raffreddamento (Btu / h) Sezione trasversale
Cavo di alimentazione
N1,0 mm² (1,5 mm²)
AWG18 (AWG16)
1,0 mm² (1,5 mm²)
AWG18 (AWG16)
1,5 mm²
AWG16
L1,0 mm² (1,5 mm²)
AWG18 (AWG16)
1,0 mm² (1,5 mm²)
AWG18 (AWG16)
1,5 mm²
AWG16
E1,0 mm² (1,5 mm²)
AWG18 (AWG16)
1,0 mm² (1,5 mm²)
AWG18 (AWG16)
1,5 mm²
AWG16
Cavo di collegamento
N1,0 mm² (1,5 mm²) 1,0 mm² (1,5 mm²) 1,5 mm²
L1,0 mm² (1,5 mm²) 1,0 mm² (1,5 mm²) 1,5 mm²
11,0 mm² (1,5 mm²) 1,0 mm² (1,5 mm²) 1,5 mm²
A 220 V 7 K, 9 K, 12 K, 15 K, 16 K, 18 K, 22 K, 24 K, 30 K il valore di backup per l’unità interna dell’aria condizionata è 50 T, 3,15 A
A 110 V 7 K, 9 K, 12 K iil valore di backup per l’unità interna dell’aria condizionata è:50 T, 3,15 A
125 V 7 K, 9 K, 12 K il valore di backup per l’unità esterna dell’aria condizionata 61 T, 15 A
250 V 18 K, 22 K, 24 K il valore di backup per l’unità esterna dell’aria condizionata è 65 T, 25 A!
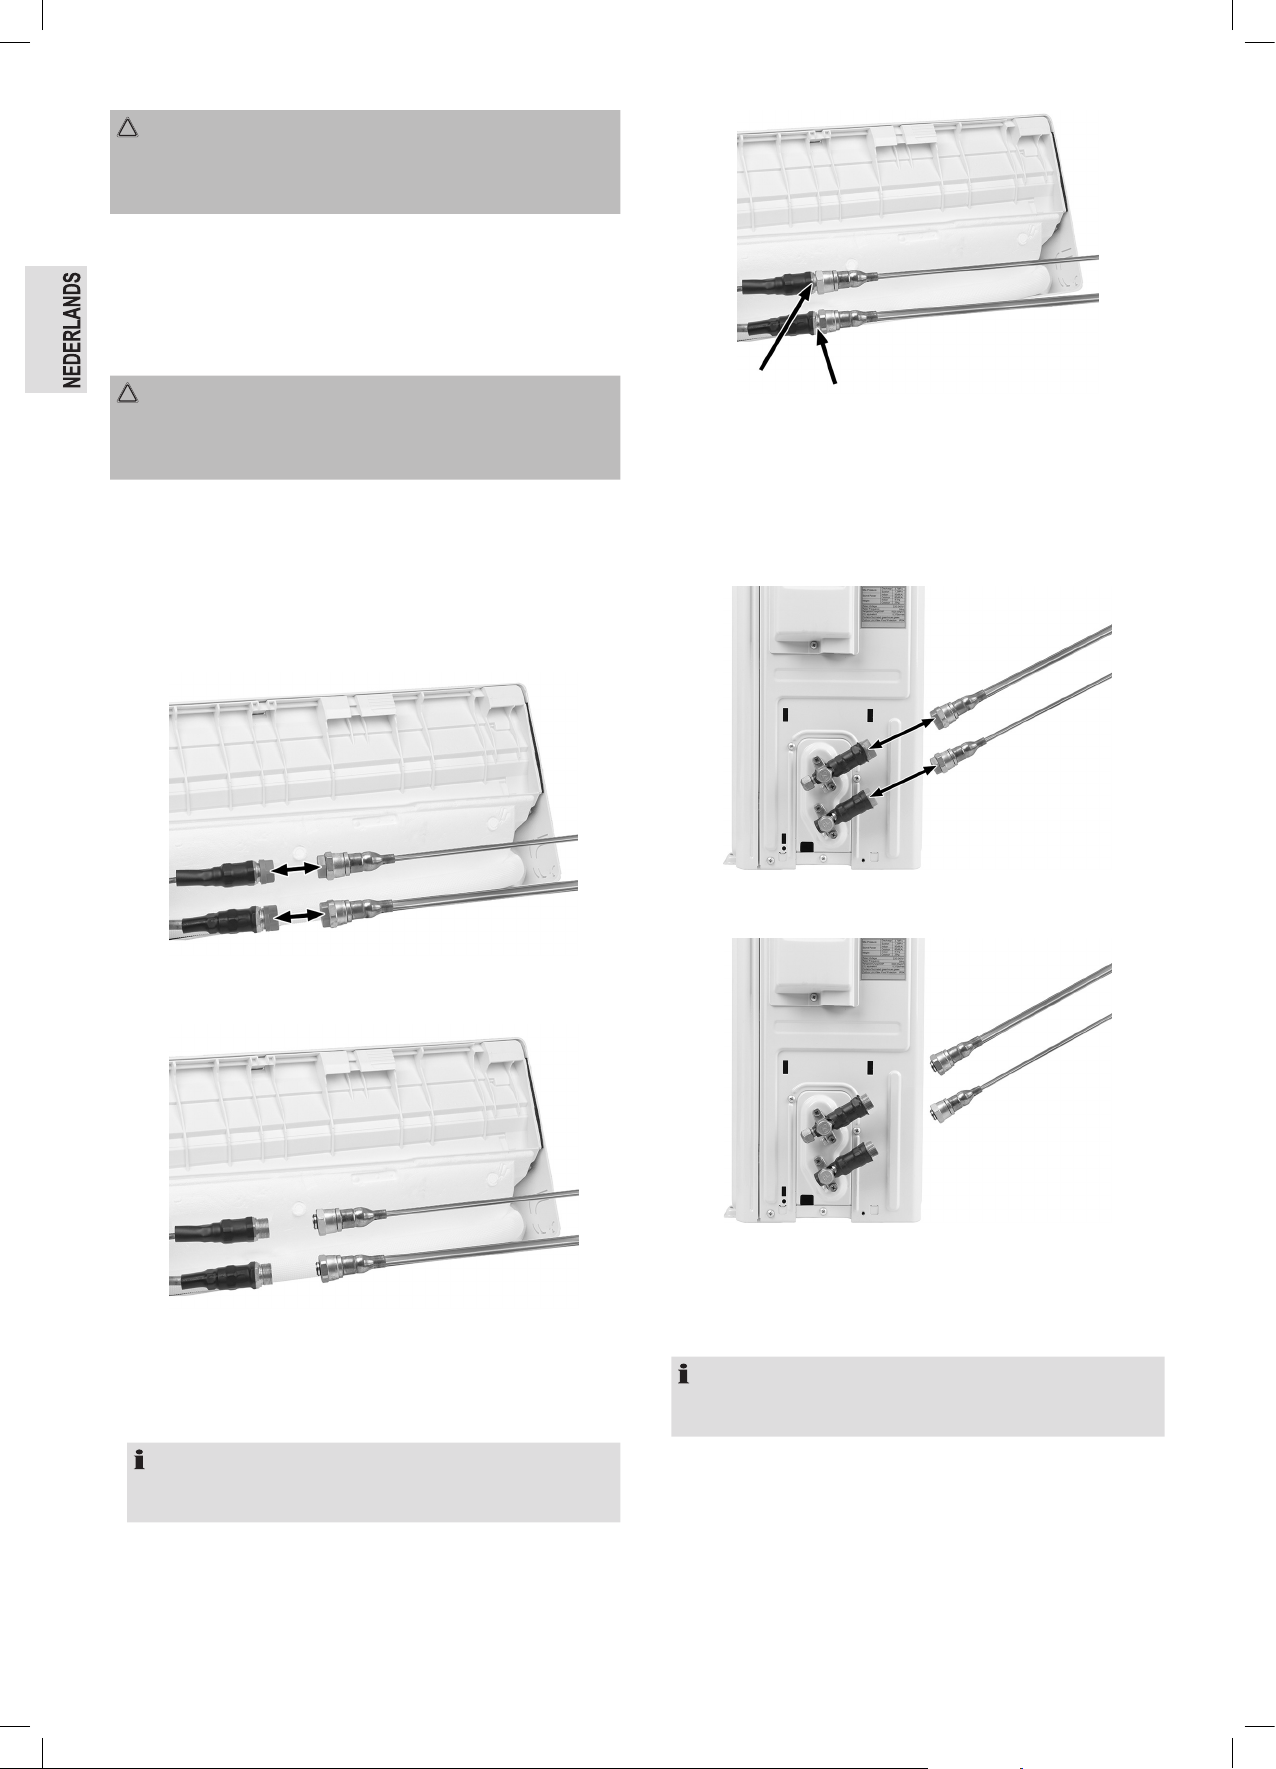
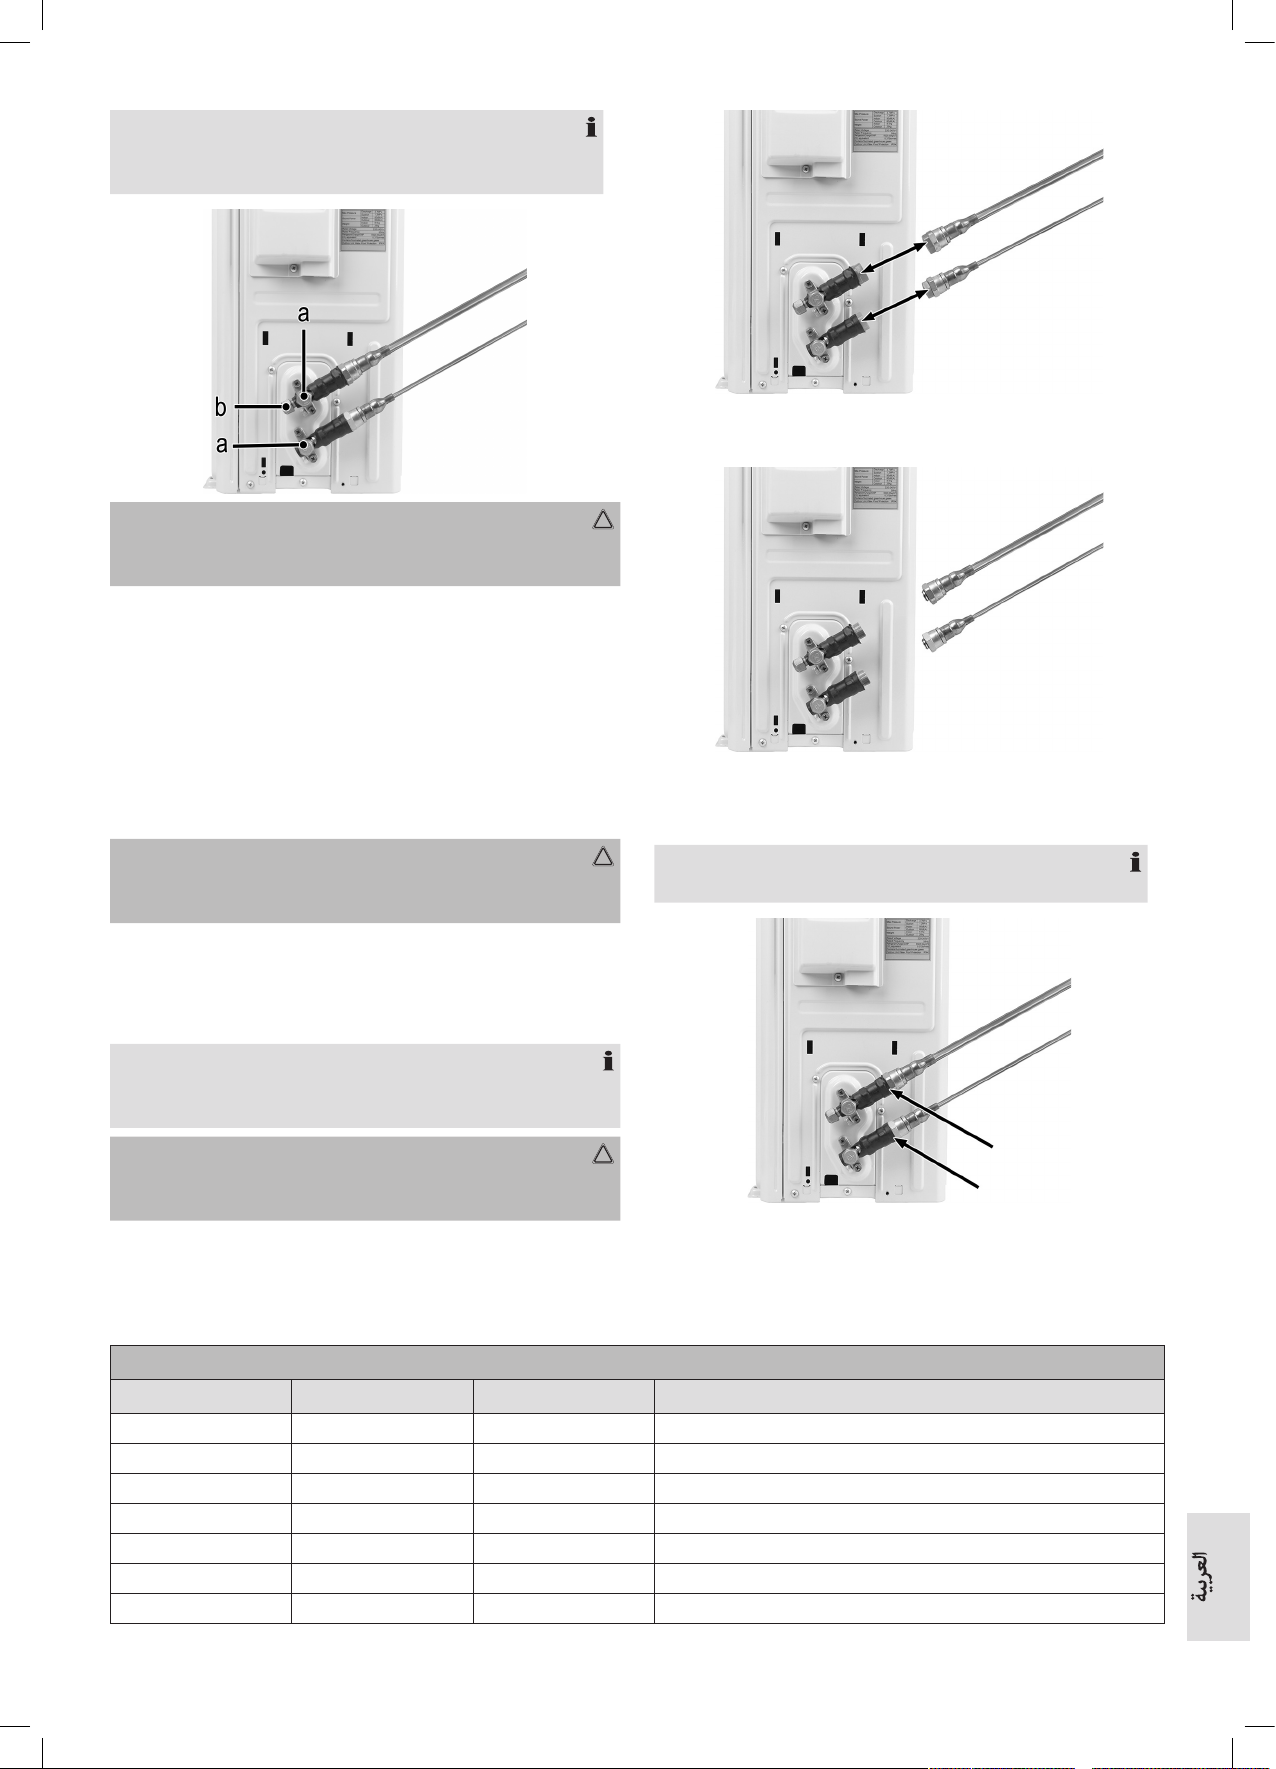
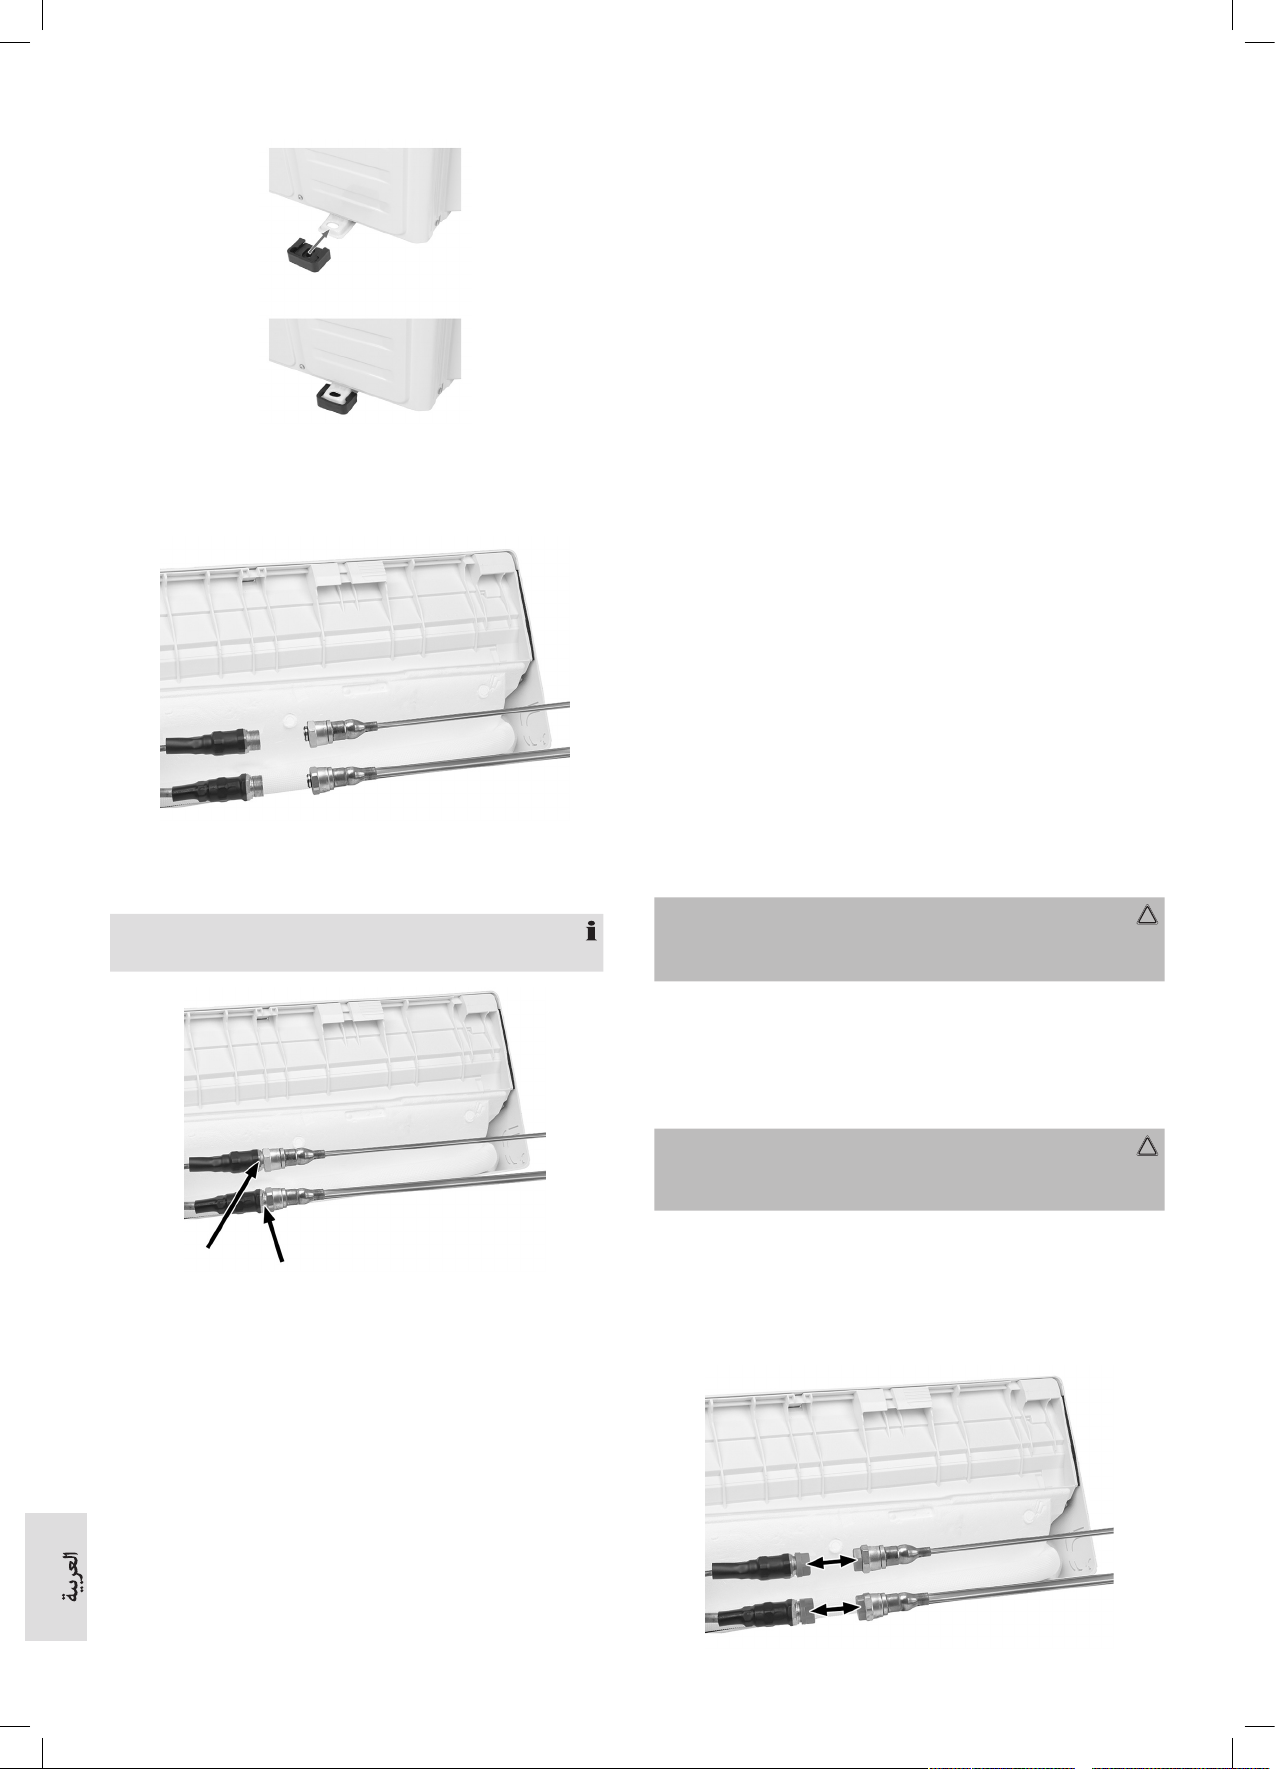
Schema elettrico
Lo schema elettrico può differire a seconda dei modelli. Osservare gli
schemi elettrici delle unità interne ed esterne.
Per l’unità interna, lo schema elettrico (7) si trova al di sotto del pannello
anteriore (1).
Per quanto riguarda l’unità esterna, lo schema elettrico è applicato sul
retro della copertura del connettore (15).
NOTA:
Per alcuni modelli, i cavi sono stati collegati dal produttore al circuito
principale dell’unità interna senza morsettiere.
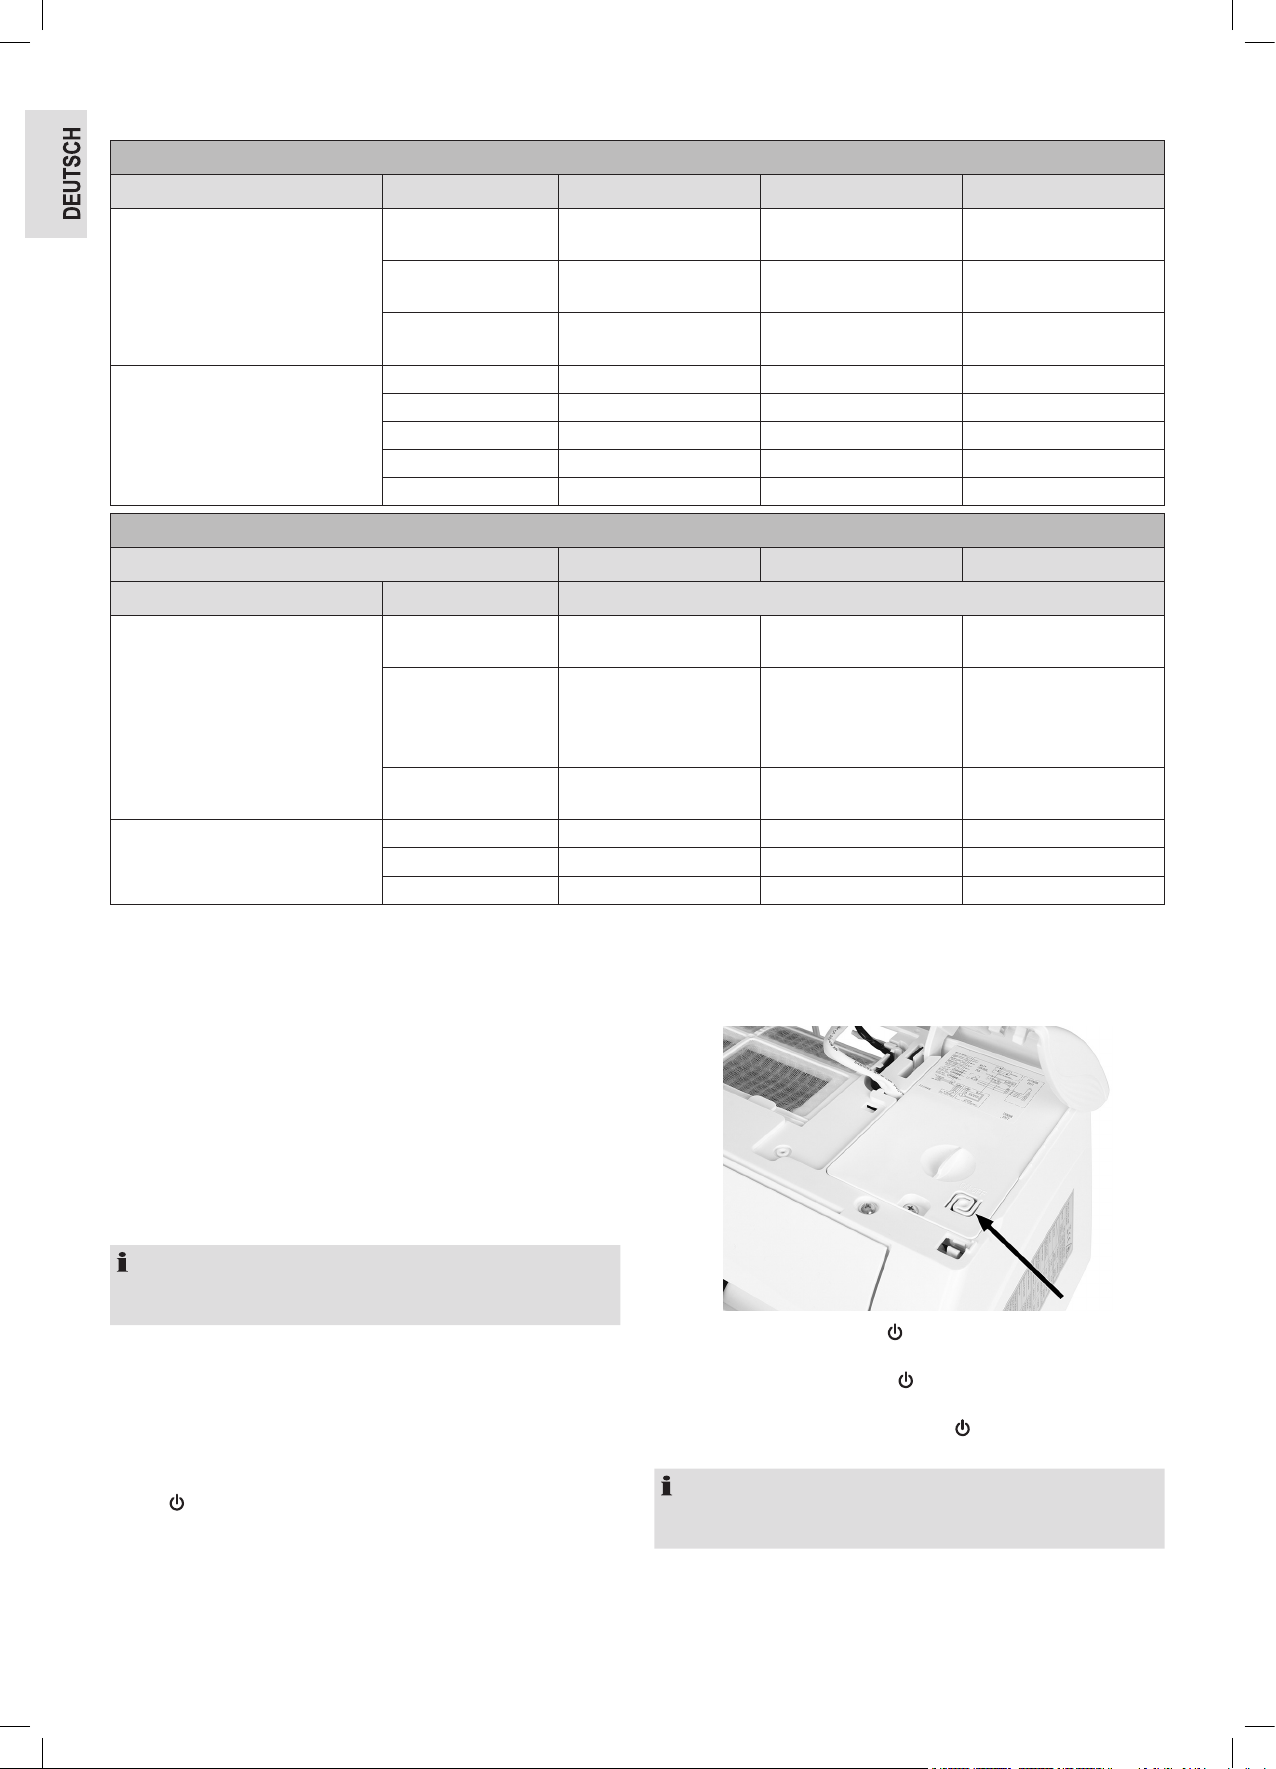
Funzionamento
Impostazione da pannello
Se il telecomando non funziona o se è necessario eseguire la manuten-
zione, procedere come segue:
1. Aprire la copertura anteriore e sollevarla verso l’alto fino a raggiun-
gere il tasto .
2. Premendo il tasto si avvierà la funzione di raffreddamento (Verrà
udito un segnale acustico)
3. Premendo il tasto entro 3 secondi causerà l’avvio della funzione di
riscaldamento. (Verranno uditi due segnali acustici.)
4. Per disattivare, premere di nuovo il tasto (Verrà udito un lungo
segnale acustico.)
NOTA:
La pressione statica esterna per la pompa dell’acqua su tutti i modelli
è pari a 0 Pa.
CL6045QCCB_IM 17.12.20
81
Telecomando
1. Aprire il copribatteria sul retro del telecomando spingendolo nella
direzione della freccia.
2. Inserire 2 × R03 “AAA” batterie da 1,5 V. Assicurarsi che la polarità sia
corretta. (Si veda sul fondo del vano batterie)
NOTA:
Blocco di sicurezza per bambini: Premere contemporaneamente
i tasti e per attivare il blocco di sicurezza per bambini.
Accendere e spegnere il display: Premere e tenere premuto il
tasto ECO.
3. Puntare il telecomando verso l’unità di condizionamento dell’aria.
NOTA:
Assicurarsi che non ci siano oggetti / ostacoli posizionati tra il teleco-
mando e il ricevitore di segnale nell’unità interna.
Non lasciare mai il telecomando esposto alla luce solare diretta per
lunghi periodi di tempo.
Utilizzare e conservare il telecomando a una distanza di almeno un
metro dal televisore o da altri apparecchi elettrici.
Accensione- / spegnimento
Premere il tasto , per spegnere l’apparecchio.
Premere nuovamente il tasto per riaccendere l’apparecchio.
Regolazione del flusso d’aria
Il flusso d’aria sarà distribuito in modo uniforme durante la sua immissione
nella stanza. Sono disponibili opzioni per l’ottimizzazione della direzione del
flusso.
Il tasto attiva l’aletta di convogliamento dell’aria (1). Il flusso d’aria è diretto
dall’alto verso il basso per garantire una distribuzione uniforme in tutto il
locale.
I deflettori (2) devono essere posizionati manualmente e si trovano sotto le
alette di convogliamento dell’aria. Permettono di dirigere il flusso d’aria verso
destra o verso sinistra.
ATTENZIONE:
L’orientamento del deflettore deve essere effettuato ad apparecchio spento.
Non posizionare mai manualmente (cioè a mano) le alette di convogliamento dell’aria. Tale operazione può provocare gravi danni.
Non inserire mai dita, bastoncini o altri oggetti nelle aperture di ingresso / uscita dell’aria. Ciò può causare danni materiali e lesioni personali.
NOTA:
Si noti che, per motivi progettuali, non tutte le funzioni possono essere visualizzate sul display del telecomando in ogni modalità di funziona-
mento. Premendo il tasto OPTION, è possibile scoprire quali caratteristiche sono disponibili per le singole modalità di funzionamento.
Il tasto MODE Seleziona una modalità di funzionamento
Il tasto OPTION Seleziona una caratteristica
Modalità raffreddamento (COOL)
La modalità raffreddamento consente sia il raffreddamento del locale
che la riduzione dell’umidità dell’aria.
1. Per attivare la modalità di raffreddamento premere il tasto MODE
finché sul display del telecomando non appare “COOL”. La funzione
di raffreddamento si attiva se la temperatura selezionata è inferiore a
quella ambientale. (Selezione utilizzando i tasti e .)
2. Per ottimizzare la funzione di condizionamento dell’aria, regolare la
temperatura, la velocità e la direzione del flusso d’aria premendo gli
appositi tasti
Modalità di riscaldamento (HEAT)
La modalità di riscaldamento consente di riscaldare il locale.
1. Per attivare la modalità di riscaldamento premere il tasto MODE
finché sul display del telecomando non appare “HEAT”. La funzione
di riscaldamento si attiva se la temperatura selezionata è superiore a
quella ambientale. (Selezione utilizzando i tasti e .)
2. Per ottimizzare la funzione di riscaldamento, regolare la temperatura,
la velocità e la direzione del flusso d’aria premendo gli appositi tasti.
NOTA:
Se l’apparecchio è dotato di un riscaldatore elettrico, ciò ritarderà
l’attivazione dell’applicazione per alcuni minuti.
NOTA:
Durante la modalità di riscaldamento può attivarsi la funzione di
scongelamento automatico. Tale funzione di scongelamento è in-
dispensabile per la pulizia dell’apparecchio. I residui di ghiaccio sul
condensatore vengono rimossi per ripristinare la piena capacità di
scambio termico. Questa procedura richiede normalmente dai 2 ai
10 minuti. La ventola si arresterà durante lo scongelamento. Dopo
la fase di scongelamento, l’apparecchio torna automaticamente in
modalità riscaldamento.
Accensione automatica dell’apparecchio ( )
Per programmare l’accensione automatica, l’apparecchio deve essere
spento.
1. Premere il tasto OPTION.
2. Utilizzare i tasti freccia per selezionare e fino a quando non
appare “ ” sul display del telecomando.
3. Premere di nuovo il tasto OPTION utilizzare i tasti freccia e per
regolare la temporizzazione desiderata.
4. Confermare la selezione utilizzando il tasto OPTION.
NOTA:
Per interrompere la regolazione della funzione, ripetere i passi
descritti in precedenza.
La funzione Timer può essere regolata a intervalli di 30 minuti.
Spegnimento automatico dell’apparecchio ( )
Per programmare lo spegnimento automatico, l’apparecchio deve
essere acceso.
CL6045QCCB_IM 17.12.20
82
1. Premere il tasto OPTION.
2. Utilizzare i tasti freccia per selezionare e fino a quando non
appare “ ” sul display del telecomando.
3. Premere di nuovo il tasto OPTION utilizzare i tasti freccia e per
regolare la temporizzazione desiderata
4. Confermare la selezione utilizzando il tasto OPTION.
NOTA:
Per interrompere la regolazione della funzione, ripetere i passi
descritti in precedenza.
La funzione Timer può essere regolata a intervalli di 30 minuti.
Modalità ventilazione (FAN)
Per attivare la modalità ventilazione premere il tasto MODE finché sul
display del telecomando non appare “FAN”.
Premendo il tasto FAN, è possibile regolare la velocità di ventilazione,
nella sequenza seguente:
spenta ( )
LOW ( )
MEDIUM ( )
HIGH ( )
Turbo ( )
automatica
Modalità deumidificazione dell’aria (DRY)
Questa funzione permette di abbattere l’umidità ambientale e di miglio-
rare la qualità dell’aria nel locale.
Per attivare la modalità di deumidificazione dell’aria, premere il tasto
MODE finché sul display del telecomando non appare “DRY”. Si attiverà
la ventola con un ciclo di raffreddamento ad andamento variabile.
Modalità automatica (AUTO)
Per attivare la modalità automatica, premere il tasto MODE Finché sul
display del telecomando non appare “AUTO”.
La velocità della ventola e la temperatura saranno controllate automati-
camente, indipendentemente dalla temperatura del locale.
Temperatura ambientale Modalità di funzionamento
< 20 °C Riscaldamento
20 °C ~ 26 °C Deumidificazione
> 26 °C Raffreddamento
Modalità snooze ( )
La funzione SLEEP regola automaticamente la temperatura in modo
tale da rendere l’aria nel locale particolarmente piacevole durante la
notte. Durante il funzionamento in modalità di raffreddamento / deumidi-
ficazione, la temperatura impostata verrà automaticamente aumentata
di 1 °C fino a raggiungere un aumento di temperatura di 2 °C entro un
periodo di 2 ore
1. Per attivare la modalità snooze, premere il tasto OPTION.
2. Utilizzare i tasti freccia per selezionare e fino a quando non
appare “ ” sul display del telecomando.
3. Confermare la selezione utilizzando il tasto OPTION.
4. Utilizzare il tasto OPTION per disattivare la funzione .
Durante la modalità di riscaldamento, la temperatura viene diminuita di
2 °C durante le prime 2 ore.
Dopo 10 ore consecutive in modalità snooze, l’apparecchio viene auto-
maticamente spento.
Modalità risparmio energetico (ECO)
Premendo il tasto ECO si attiva o disattiva la funzione Eco. L’apparec-
chio entrerà in modalità risparmio energetico. La temperatura impostata
viene automaticamente aumentata gradualmente senza compromettere
il comfort climatico. Ciò si tradurrà in un basso consumo energetico.
Premendo e tenendo premuto il tasto ECO è possibile spegnere il
display dell’unità interna.
Temperatura massima e velocità ( )
Premendo il tasto TURBO si attiva o disattiva la funzione turbo. Questa
modalità consente di raggiungere la temperatura impostata il più veloce-
mente possibile.
Funzione antimuffa / auto-pulizia ( )
1. Per attivare la modalità auto-pulizia, premere il tasto OPTION.
2. Utilizzare i tasti freccia per selezionare e fino a quando non
appare “ ” sul display del telecomando.
3. Confermare la selezione utilizzando il tasto OPTION.
4. Utilizzare il tasto OPTION per disattivare la funzione .
Rilevamento Automatico della Temperatura ( )
Il rilevamento automatico della temperatura è possibile grazie ad un
sensore posizionato nel telecomando. Accertarsi che il telecomando
non sia esposto a fonti di calore come ad esempio sorgenti luminose.
1. Per attivare ” premere il tasto OPTION.
2. Utilizzare i tasti freccia per selezionare e fino a quando non
appare “ sul display del telecomando.
3. Confermare la selezione utilizzando il tasto OPTION.
4. Premere il tasto OPTION per disattivare la funzione .
Pulizia e manutenzione
AVVISO:
Assicurarsi che durante la pulizia non penetri acqua
nelle bocchette dell’apparecchio. Pericolo di shock
elettrico o incendio!
ATTENZIONE:
Manutenere regolarmente l’apparecchio per garantirne il funziona-
mento sicuro ed efficiente.
Tutti gli interventi di pulizia e manutenzione devono essere eseguiti
da un’azienda certificata nel settore della refrigerazione e del
condizionamento dell’aria. Un’esecuzione impropria comporta la
scadenza della garanzia.
Pulizia e sostituzione del filtro
1. Aprire il pannello anteriore in direzione della freccia.
CL6045QCCB_IM 17.12.20
83
2. Sollevare la copertura frontale con una mano, e rimuovere il filtro
antipolvere con l’altra mano.
3. Lavare il filtro con acqua. Se particolarmente sporco, utilizzare per la
pulizia acqua calda (non superiore a 45 °C). Lasciare quindi asciu-
gare il filtro.
4. Reinserire in sede il filtro dell’aria.
5. Chiudere la copertura del vano.
NOTA:
I filtri aggiuntivi a carbone attivo (grigio) e i filtri ionizzanti (verde) non
possono essere puliti e, a seconda del numero di ore di funziona-
mento, devono essere sostituiti con filtri nuovi. La seguente illustra-
zione descrive il processo di rimozione dei filtri.
Pulizia dell’unità interna
1. Aprire il pannello anteriore dell’apparecchio e rimuovere le cerniere
per semplificare la pulizia.
2. Pulire l’unità interna utilizzando un panno e acqua (non più calda di
40 °C).
ATTENZIONE:
Non spruzzare detergenti sull’apparecchio.
Non immergere l’apparecchio in acqua: i componenti elettronici
potrebbero danneggiarsi.
Non utilizzare una spazzola a setole metalliche o elementi abrasivi.
Pulizia dell’unità esterna
Se l’ingresso dell’aria sull’unità esterna è ostruito, rimuovere le foglie o
altri materiali di scarto presenti e successivamente rimuovere la polvere
residua utilizzando aria compressa o un po’ d’acqua.
Sostituzione della batteria
NOTA:
Utilizzare esclusivamente batterie nuove. Rimuovere le batterie dal te-
lecomando solo quando l’unità di condizionamento dell’aria è spenta.
Se:
Non si avverte più un segnale acustico di conferma dall’unità interna.
Il display non funziona più correttamente.
Come:
Aprire il coperchio posteriore.
Inserire le nuove batterie. Assicurarsi che la polarità sia corretta.
Risoluzione dei problemi
Malfunzionamento / Guasto Possibili cause
L’apparecchio non funziona. Mancanza di corrente / spina staccatan
Motore della ventola danneggiato nell’unità interna o nell’unità esterna
L’interruttore termomagnetico del compressore è guasto
Dispositivo di protezione guasto o difettoso oppure i fusibili sono bruciati
Connessioni allentate o spina staccata
Interruzione del funzionamento ai fini della protezione / conservazione del prodotto
Tensione troppo alta o troppo bassa
La funzione “ ” è attivata (accensione automatica dell’apparecchio)
Danni alla scheda di controllo elettronico
Odore caratteristico Filtri dell’aria contaminati o sporchi
Rumore di acqua Riflusso di liquido nel circuito del refrigerante
Fuoriuscita di vapore finissimo
dall’uscita dell’aria
Ciò avviene quando l’aria nel locale diventa estremamente fredda, ad esempio nella modalità “COOL” o “DRY”.
Rumori insolitie Possono verificarsi rumori causati dall’estensione o dalla contrazione dovuta alle fluttuazioni termiche del pannello
anteriore. Il manifestarsi di tali rumori non significa che l’apparecchio sia difettoso o guasto
CL6045QCCB_IM 17.12.20
84
Malfunzionamento / Guasto Possibili cause
Flusso d’aria indesiderato
(caldo o freddo)
Impostazioni della temperatura improprie o non idonee.
L’ingresso o l’uscita dell’aria sono ostruiti sia sull’unità interna che sull’unità esterna.
Il filtro dell’aria è intasato.
La velocità della ventola è impostata al minimo
Sono presenti altre fonti di calore nel locale
Agente o agenti di raffreddamento mancanti
L’apparecchio non risponde ai
segnali / comandi.
Il telecomando non è sufficientemente vicino al ricevitore dell’unità interna.
La tensione residua nelle batterie del telecomando è insufficiente.
Presenza di eventuali ostacoli tra il telecomando e il ricevitore
Il display è spento. Funzione LED attivata
Errore tensione
La funzione ECO è attivata (vedere capitolo relativo alla “Modalità risparmio energetico (ECO)”)
Funzioni o caratteristiche
assenti dal display
Non tutte le funzioni o caratteristiche sono indicate in ogni modalità di funzionamento (vedi capitolo relativo alla
“Funzionamento”).
In tale evenienza, spegnere immediatamente l’apparecchio e scollegare l’alimentazione elettrica:
Rumori inusuali durante il funzionamento
Errore nella scheda di controllo
Fusibili bruciati o interruttore guasto
Nebulizzazione di acqua o presenza di corpi estranei nell’impianto
Surriscaldamento / cavo o spina bruciata
Odore intenso emanato dall’apparecchio
Codici di errore visualizzati sul display
Se si verifica un errore, sul display dell’unità interna appariranno i seguenti codici:
Spie luminose Descrizione dell’errore
Lampeggia una volta sola Errore del sensore di temperatura interno
Lampeggia due volte Errore del sensore di temperatura esterno
Lampeggia sei volte Il motore della ventola interna non funziona
NOTA:
Ulteriori codici di errore sono riportati nel manuale di assistenza.
CL6045QCCB_IM 17.12.20
85
Dati tecnici
Modello: ............................................................................CL 6045 QC CB
Peso netto dell’unità interna: ......................................................... ca. 7 kg
Peso netto dell’unità esterna: ...................................................... ca. 25 kg
Alimentazione elettrica / tensione: ................................ 220 - 240 V~, 50 Hz
Ingresso di potenza durante il raffreddamento: ............................... 800 W
Ingresso di potenza durante il riscaldamento: ................................. 699 W
Ingresso di alimentazione durante
il funzionamento integrato in standby: .............................................. 5,0 W
Classe di protezione: ................................................................................
Capacità frigorifera: ................................................9000 BTU (2600 kW/h)
Potenza termica: ....................................................9000 BTU (2610 kW/h)
Agente(i) di raffreddamento: ............................................................... R 32
Pressione di esercizio massima consentita:
Lato pressione: ......................................................................... 3,7 MPa
Lato aspirazione: ...................................................................... 1,2 MPa
Modello: ............................................................................CL 6046 QC CB
Peso netto dell’unità interna: ...................................................... ca. 8,5 kg
Peso netto dell’unità esterna: ...................................................... ca. 25 kg
Alimentazione elettrica / tensione: ................................ 220 - 240 V~, 50 Hz
Ingresso di potenza durante il raffreddamento: ..............................1130 W
Ingresso di potenza durante il riscaldamento: ................................. 922 W
Ingresso di alimentazione durante
il funzionamento integrato in standby: .............................................. 5,0 W
Classe di protezione: ................................................................................
Capacità frigorifera: ..............................................12000 BTU (3400 kW/h)
Potenza termica: ..................................................12000 BTU (3420 kW/h)
Agente(i) di raffreddamento: ............................................................... R 32
Pressione di esercizio massima consentita:
Lato pressione: ......................................................................... 3,7 MPa
Lato aspirazione: ...................................................................... 1,2 MPa
Modello: ............................................................................CL 6047 QC CB
Peso netto dell’unità interna: ....................................................ca. 10,5 kg
Peso netto dell’unità esterna: ...................................................ca. 35,5 kg
Alimentazione elettrica / tensione: ................................ 220 - 240 V~, 50 Hz
Ingresso di potenza durante il raffreddamento: ............................. 1579 W
Ingresso di potenza durante il riscaldamento: ............................... 1382 W
Ingresso di alimentazione durante
il funzionamento integrato in standby: .............................................. 2,5 W
Classe di protezione: ................................................................................
Capacità frigorifera: ..............................................18000 BTU (5100 kW/h)
Potenza termica: ..................................................18000 BTU (5130 kW/h)
Agente(i) di raffreddamento: ............................................................... R 32
Pressione di esercizio massima consentita:
Lato pressione: ......................................................................... 3,7 MPa
Lato aspirazione: ...................................................................... 1,2 MPa
Wi-Fi
Rete supportata: .....................................................................802.11 b/g/n
Massima potenza di uscita irradiata: .......................................... 18,0 dBm
Intervallo di frequenza: ...................................................................2,4 GHz
Canali: ................................................................................................ 1 - 13
Chiavi di frequenza supportate: ............................................. WPA / WPA2
Si riserva il diritto di apportare modifiche tecniche e di design nel corso
dello sviluppo del prodotto.
Avviso sulla conformità alla direttiva
Il fabbricante, Clatronic International GmbH, dichiara che il tipo di appa-
recchiatura radio CL 6045 QC CB / CL 6046 QC CB / CL 6047 QC CB è
conforme alla direttiva 2014 / 53 / UE.
Inoltre, l’apparecchio è conforme ai requisiti della direttiva RoHS
2011 / 65 / UE & (UE) 2015 / 863.
Il testo completo della dichiarazione di conformità UE è disponibile al
seguente indirizzo Internet: www.sli24.de
Nell’area per i download, si prega di inserire il nome del modello
CL 6045 QC CB.
Testato per il funzionamento in Italia.
Smaltimento
Smaltimento batterie
I consumatori sono tenuti per legge a restituire batterie /
accumulatori scarichi.
Rimuovere le batterie dal telecomando prima di gettare l’ap-
parecchio.
Restituire le batterie a un punto di raccolta autorizzato o di rifiuti perico-
losi. Contattare l’autorità locale per maggiori informazioni.
CL6045QCCB_IM 17.12.20
86
Significato del simbolo “Eliminazione”
Salvaguardare l’ambiente, gli elettrodomestici non vanno eli-
minati come rifiuti domestici.
Per l’eliminazione degli elettrodomestici, fare uso dei posti di
raccolta previsti per questo tipo e porre quegli elettrodome-
stici che non sono più in uso.
Si contribuisce così ad evitare un effetto potenziale sull’ambiente e sulla
salute, dovuto magari ad una eliminazione sbagliata.
Questo significa un contributo personale alla riutilizzazione, al riciclaggio
e altre forme di utilizzazione di elettrodomestici ed apparecchi elettronici
usati.
Si possono trovare le corrispondenti informazioni sugli appositi luoghi di
raccolta, nelle amministrazioni dei comuni.
CL6045QCCB_IM 17.12.20
87
Instruction Manual
Thank you for choosing our product. We hope you will enjoy using the
appliance.
Symbols in this Instruction Manual
Important information for your safety is specially marked. It is essential
to comply with these instructions in order to avoid accidents and prevent
damage to the appliance:
WARNING:
This warns you of dangers to your health and indicates possible injury
risks.
CAUTION:
This refers to possible hazards to the appliance or other objects.
NOTE:
This highlights tips and information.
General Notes
Read the operating instructions carefully before putting the appliance
into operation and keep the instructions including the warranty, the
receipt and, if possible, the box with the internal packing. If you give this
appliance to other people, please also pass on the operating instruc-
tions.
The appliance is designed exclusively for private use and for the
envisaged purpose. This appliance is not t for commercial use.
Do not use it outdoors. Keep it away from sources of heat, direct
sunlight, humidity (never dip it into any liquid) and sharp edges. Do
not use the appliance with wet hands.
The appliance and the mains lead have to be checked regularly for
signs of damage. If damage is found the appliance must not be used.
Use only original spare parts.
In order to ensure your children’s safety, please keep all packaging
(plastic bags, boxes, polystyrene etc.) out of their reach.
WARNING:
Do not allow small children to play with the plastic foil. There is a
danger of suffocation!
Special Safety Precautions for this Appliance
On the products you will nd symbols that indicate warnings or provide information:
Read the instructions!
WARNING: Fire hazard!
The appliance contains a ammable refrigerant!
Do not use any objects other than those permitted by the manufacturer to accelerate the defrosting process.
The appliance should only be stored in rooms without a permanent source of ignition (e. g. open ames, an acti-
vated gas appliance or electric heater).
Do not drill or burn the appliance.
Remember that refrigerants are odourless.
The service manual is available at the following web address: www.sli24.de
In the “Downloads” area, please enter the model name CL 6045 QC CB.
Any person who is involved with working on or breaking into a refrigerant circuit should hold a current valid
certicate from an industry-accredited assessment authority, which authorises their competence to handle refrig-
erants safely in accordance with an industry recognised assessment specication.
Servicing shall only be performed as recommended by the equipment manufacturer. Maintenance and repair
requiring the assistance of other skilled personnel shall be carried out under the supervision of the person com-
petent in the use of ammable refrigerants.
CAUTION: Risk of overheating!
Keep the ventilation slots free!
Do not cover the appliance!
CAUTION:
Improper installation and operation without verication (e.g. certicate) from a specialist company shall cause the
warranty to expire in accordance with EU 517 / 2014 Chapter II Art. 3.
CL6045QCCB_IM 17.12.20
88
WARNING:
Do not use and store the appliance at the following locations:
- Near a re source.
- An area, where water or oil can splash.
- An area exposed to direct sunlight.
- In the bathroom, the laundry room or next to a swimming pool.
Do not touch the appliance when you are barefoot or when parts of your body are wet or damp.
During installation of the appliance by a certied specialist company, secure the surrounding area to avoid acci-
dents. Children and unauthorized persons should not be permitted entry.
Make sure that the socket for the outdoor facility has been installed in sufciently secure fashion.
Make sure no air can get into the refrigerant system and check for leaking cooling agents when you move the
air-conditioning system. Remember that cooling agents are odourless.
Following installation of the air-conditioning system, do a test-run and check the operating data.
The fuses installed in the built-in control unit have a rated value of T 5 A / 250 V. Make sure the interior appliance
is always protected using a fuse possessing sufcient capacity for the maximum input current, or with the aid of
another overload protection device.
The appliance must remain disconnected from the mains supply network during installation, which shows all-pole
contact separation, which makes complete separation possible in accordance with the conditions of over voltage
category III. These must be integrated into the permanent cabling in accordance with the safety regulations. All
electrical work must only be performed by a professional electrician or specialist company dealing with electric
work. The air-conditioning unit must only be installed by a certied specialist company.
Do not place the appliance near ammable substances (alcohol, etc.) or pressurized containers (e. g. spray cans,
gas cylinders, etc.). Please maintain a distance of at least 50 cm between the appliance and any such substances.
If the appliance is used in areas without ventilation facilities, then precautions must be undertaken in order to avoid
the re hazard associated with the leakage of refrigerant gas.
Please observe the national connection standards. The cabling must comply with the applicable national regula-
tions.
Before touching the connecting clamps, all electrical circuits must be disconnected from the power supply.
This appliance can be used by children over the age of eight (8) years as well as by persons with reduced phys-
ical, sensory or mental capabilities or lack of experience and knowledge if they are supervised or provided with
instruction concerning the safe use of the appliance and understand the hazards involved therewith.
Children may not play with the appliance.
Do not repair the appliance yourself, but always contact an authorized technician.
Cleaning and maintenance must be performed by qualied personnel. In any event, always disconnect the appli-
ance from the power supply before performing cleaning or maintenance tasks.
This appliance was not developed to provide air conditioning in living space / quarters and may not be used for
other purposes such as e.g. drying clothes, refrigeration of foodstuffs, etc.
Only use the appliance with the air lter installed. Use of the air conditioning appliance without the air lter can
lead to an excessive accumulation of dust or contamination of the internal parts of the appliance and cause dam-
age and / or malfunction.
The user is therefore responsible for ensuring installation of the appliance by a qualied technician. The qualied
technician must verify whether the appliance has been grounded in accordance with applicable statutory provi-
sions and guidelines, as well as ensure that the appliance is equipped with a thermomagnetic circuit breaker.
Never permit the appliance to be directly exposed to a cold air current for a prolonged period of time. Prolonged
direct exposure to a cold air current can be injurious to health. Particular caution is recommended with regard to
children, elderly persons or persons with an illness.
CL6045QCCB_IM 17.12.20
89
If the appliance is giving off smoke or a burning odour is detected, immediately disconnect the power supply and
consult your service technician. Use of the appliance under such circumstances and/or in this condition can cause
re or electrical shock.
Use the button to switch off the appliance if you are not using it for an extended period of time.
Make sure the air ow direction is correctly installed. The valves must point downwards during heating mode and
upwards during cooling mode.
By avoiding extreme uctuations in temperature settings, damage to the appliance can be avoided.
Do not bend, pull or crush the power cable as it can become damaged thereby. A damaged power cable can
cause electric shocks as well as res. Only specialized technical staff must be permitted to replace a damaged
power cable.
Do not block the air inlet or outlet of the interior appliance or of the exterior appliance. Blocking or plugging these
openings will lead to reduced cooling capacity and can cause malfunctions or damage. Do not perform any unau-
thorized or improper changes or alternations on the appliance.
Do not place any heavy or hot objects on the appliance.
Do not leave windows or doors open for long periods of time when the air conditioning unit is in use.
Do not point the air current at plants or animals. Long periods of direct exposure to cold currents of air can have a
negative impact on plants and animals.
Do not climb on the external appliance and do not place any objects on top of it.
Never insert a rod, bar or pole or similar object into the appliance. This can cause personal injury as well as mate-
rial damage.
Be sure to use an appropriate, specically-designed tool for the laying and bending of the cooling pipes. For safety
reasons, any buckling of the delicate cables must be avoided at all costs. All work must be performed by a certied
company and correspondingly documented and determined in accordance with the equipment attached to the
appliance.
The cooling pipes must not be extended or shortened without undertaking further measures, since these have
already been pre-lled with a cooling agent at the factory during manufacture.
CAUTION:
All technical modications to the cooling pipes must carried out by a certied specialist company. Improper alter-
ations or modications shall result in expiry of the warranty.
Check to ensure that all pipes and cables are impermeable to prevent the formation of liquids, water vapour or
condensate and e.g. to prevent their penetration of the interior walling of the appliance. This will prevent the accu-
mulation of moisture as well as the formation of mildew.
Handling Batteries
WARNING:
Do not expose batteries to excessive heat such as sunlight, re or
similar. There is a risk of explosion!
Batteries are not toys. Keep away from children.
Do not open batteries by force.
Avoid contact with metal objects (rings, nails, screws, etc.). There is
a risk of short circuit!
A short circuit could cause the battery to heat up excessively or
even to catch re, resulting in injuries.
For your own safety, cover the battery terminals with adhesive tape
during transport.
In case of battery leakage, make sure not to rub the liquid into your
eyes or mucous membranes. In case of contact, wash your hands
and rinse your eyes with clear water. Seek medical attention if any
discomfort persists.
Non-rechargeable batteries are not to be recharged.
Ensure correct polarity when inserting the battery / batteries.
CAUTION:
When not using the remote control for a long period of time, remove
the batteries in order to prevent “leakage” of battery acid.
Different battery types or new and used batteries must not be used
together.
Do not dispose of batteries along with domestic waste. Return used
batteries to the relevant collection facilities or your retailer.
Unpacking the Appliance
1. Remove the appliance from its packaging.
2. Remove all packaging materials such as foils, lling materials and
cardboard packaging.
3. Check the appliance for possible transport damage to prevent haz-
ards.
4. If damage occurs, do not operate the appliance. Contact your distrib-
utor.
CL6045QCCB_IM 17.12.20
90
Scope of Delivery
Interior Unit
a) 6 × screw
b) 6 × dowel
c) 1 × wall mount
Exterior Unit
d) 1 × support for the condensate channelling
system
e) 4 × stand for the exterior unit
Connection Accessories
f) 1 × Connecting cable for the exterior unit
g) 2 × cooling pipe (grey and blue) including
insulation
h) 1 × insulation material (spare)
i) 2 × condensate water pipe
j) 1 × vinyl tape
k) 1 × hole cover
Accessories
m) 1 × remote control
n) 2 × R03 “AAA” 1.5 V battery
o) 2 × lter
p) 2 × lter cartridge
1 × activated carbon lter (grey)
1 × ionizing lter (green)
Overview of the Components
Page 3
Appliance Unit for Indoor Areas
1 Front panel
2 Filter cartridge with activated carbon lter (grey)
3 Filter cartridge with ionizing lter (green)
4 WLAN module
5 LED display
6 Type plate (position may differ)
7 Circuit diagram
8 Electric connection unit
9 button (on / off)
10 Air deector
11 Signal receiver
12 Air ap
13 Remote control
Appliance Unit for Outdoor Areas
14 Type plate for outdoor area (position may differ)
15 Connector cover
16 Coolant valve
a grey
b blue
17 Air outlet
Remote control
NOTE:
Should your model lack one of these functions, you will nevertheless
hear a beep when you press down on the button.
Buttons on the Remote Control
No. Button Meaning
1Switch on / off
2OPTION Selection button
3Settings / selection button
4Settings / selection button
5ECO Activate / deactivate ECO function
6TURBO Activation / deactivation of the Turbo function
7Mode Selection button operating mode
8Fan Adjust air speed
9Adjust air ap
10 Adjust air deector (not available; must be
adjusted manually)
Remote Control Display
Network display
Child lock
AUTO Automatic mode
COOL Cool mode
DRY Air dehumidication mode
HEAT Heating mode
FAN Fan mode
ECO Energy-saving mode
Ventilation speed display
Fan / ventilator off
Maximum temperature and speed
Air ap display
CL6045QCCB_IM 17.12.20
91
Air deector display (not available)
Snooze mode
Automatic on / off switch
Automatic temperature calculation
Self-cleaning for mildew
Health feature (not available)
Not available
Information on the App
“Smart Life - Smart Living”
The Smart Life - Smart Living app is available for android and iOS.
Scan the corresponding QR code to get directly to the download.
NOTE:
Depending on the provider, there may be costs involved in download-
ing the app.
Google Play App Store
Information on How to Use the App
This appliance allows you to operate the appliance via your home net-
work. Prerequisites are: 1) a permanent Wi-Fi connection to your router
and 2) the free “Smart Life - Smart Living” app. You can comfortably ac-
cess all functions of the appliance via the app. To prevent the appliance
from being inadvertently switched on, we recommend disconnecting the
appliance from the power supply when you are away from home!
System Requirement for Use of the App
iOs 10.0 or higher
Android 5.0 or higher
Commissioning with the App
1. Install the “Smart Life - Smart Living” app. Create a user account.
2. Activate the Wi-Fi function in the settings of your appliance.
3. Ensure that your WiFi network is located in the vicinity of the appli-
ance.
4. Switch on the interior unit.
5. Launch the app and select + .
6. Select the menu for the “Air conditioning unit” and follow the instruc-
tions in the display.
7. Press the ECO button on the remote control six times until “CF”
appears in the display. If “AP” appears in the display, press the ECO
button again six times.
NOTE:
“CF” : Warning light on the module (4) is ashing rapidly.
“AP” : The warning light on the module (4) is ashing slowly.
In this case, press “next step”. Enter your password.
8. Once the appliance has been successfully connected, the Wi-Fi indi-
cator light will glow continuously. Now you can operate the appliance
using the app.
NOTE:
The appliance can only be operated with 2.4 GHz routers. 5 GHz
routers are not supported.
Disconnecting the Wi-Fi
Should you wish to disconnect the existing Wi-Fi connection (control
lamp is lit), proceed as follows:
Press the ECO button on the remote control six times.
NOTE:
Should you wish to re-establish the Wi-Fi connection, proceed as
described in the section entitled “Commissioning with the App”.
Installation
Interior Unit (a)
Mount the interior unit on a solid wall which is not exposed to any
vibrations.
None of the openings on the appliance must be blocked so that the
air can ow into the entire room.
Do not mount the appliance close to heat sources, vapours or am-
mable gases.
Do not mount the appliance in a location where it will be exposed to
direct sunlight for long periods of time.
Select a location in which condensate can easily drain and from
which the interior unit can be easily connected to the exterior unit.
Check regularly to ensure proper functioning of the appliance and
always observe the guidelines regarding minimum distances and/or
keep these spaces clear. Select a location from which the lter can be
easily reached.
Do not install the appliance in humid rooms such as bathrooms,
laundry rooms, etc.
For optimum results, installation should be performed as high above
the oor as possible.
Exterior Unit (b)
Do not mount the exterior unit close to heat sources, vapour or am-
mable gases.
Do not set up the appliance in locations which are overly dusty.
Install the appliance in an area in which nobody will be disturbed by
the operating noise and which is not frequented by many persons.
If necessary, make an arrangement with your next-door neighbours.
Consult the German Federal Emissions Protection Directive in this
regard, if necessary.
Do not install the appliance in an area in which it will be exposed to
direct sunlight or severe weather conditions or use sun protection of a
kind which will not adversely affect air ow.
Always observe the minimum distances depicted in the illustration be-
low and/or keep the space within this distance clear during installation
and operation.
Install the exterior unit in a stable location.
If the exterior unit is exposed to vibrations, use rubber bumpers on
the oor to counteract the inuence of the vibrations.
CL6045QCCB_IM 17.12.20
92
The minimum distances (in mm) are marked in the illustration.
CAUTION:
The purchaser must ensure that persons / rms / companies which
install, maintain or repair these air conditioning units possess
sufcient qualications and experience working with refrigerating
agents.
Improper installation and operation without verication (e. g. certi-
cate) from a specialist company shall cause the warranty to expire
in accordance with (EU) 517 / 2014 Chapter II Art. 3.
Installing the Wall Mount
CAUTION:
Before you install the wall mount, make sure you have found the
precise spot at which you are going to drill the hole for the pipes! See
the chapter entitled “Installation of the Interior Unit and Wall Bushing
to the Outside”.
1. Loosen the wall mount at the locking clips.
2. Fold the wall mount upward.
3. Remove the wall mount by releasing it from the holder.
4. Drill holes at least 32 mm deep in a solid wall in order to fasten the
plate.
5. Place the plastic dowels in the hole.
6. Fasten the mounting plate to the wall using the screws included.
7. Ensure that the mounting plate is screwed rmly in place.
Alignment of the Cooling Pipes
CAUTION:
The air conditioning unit must be installed and connected by a certi-
ed refrigeration and air conditioning company. Improper installation
shall result in expiry of the warranty.
The cooling pipes can be laid in 3 directions as depicted in accordance
with the numbers in the illustration. If the piping is placed in accordance
with options 1 or 3, then you must use a cutter to carefully cut a notch in
the side of the interior unit along the seam.
Guide the connection pipes in the direction of the opening in the wall
and bind the cooling pipes, the condensed water piping and the power
cable together using vinyl tape and always ensure impermeable insu-
lation so that no liquids, water vapour or condensate are permitted to
form and e. g. penetrate the wall. This will prevent the accumulation of
moisture as well as the formation of mildew. Ensure that the condensed
water pipe is placed on a gentle incline so that the water ow is not
obstructed.
CAUTION:
Ensure that the pipes are impermeably sealed to avoid moisture dam-
age and mildew build-up in the walling.
CL6045QCCB_IM 17.12.20
93
Unrolling the Cooling Pipes
Only remove the covering caps immediately before you connect the
cooling pipes in order to prevent soiling.
If the pipes are bent or pulled too frequently, they will become rigid.
Do not bend the pipes more than three times.
Carefully unroll the pipes as shown in diagram A. Avoid buckling.
CAUTION:
Do not pull the pipe apart as shown in diagram B. Instead, unroll it
carefully.
Connections to the Interior Unit
CAUTION:
The air conditioning unit must be installed and / or connected by a cer-
tied refrigeration and air conditioning company. Improper installation
shall result in expiry of the warranty.
1. Remove the protective caps.
2. Check the connections for soiling or damage.
3. Connect the union nut with the connection thread on the interior unit.
In doing so, pay attention to the colour of the protective caps.
4. Tighten the connection using a suitable wrench.
NOTE:
Always observe the correct torque and observe the chart provided
entitled “Installation Information”.
Connecting the Condensed Water Pipe for the Interior Unit
It is extremely important that the condensed water pipe for the interior
unit be installed in correct fashion.
1. Lay the drain hose below the pipe and make sure there are no dips or
recesses.
2. The drain hose must be inclined downwards in order to facilitate the
ow of the condensed water.
3. Do not bend or twist the drain hose. Do not allow it to protrude. Do
not immerse the end in water. If the pipe is connected to an exten-
sion, ensure the connection when inserting it into the interior unit.
4. If the cooling pipes are laid as shown at No. 3 in the chapter entitled
“Alignment of the Cooling Pipes”, then the pipes, the connecting cable
for the exterior unit and the drain pipe for condensed water must be
secured to the rear side of the appliance using pipe couplings.
5. Insert the pipe connector in the corresponding appliance.
6. Press the connecting pipe down rmly into the air conditioning unit
and make sure the connection is tight.
CAUTION:
Avoid buckling during positioning and only permit these tasks to be
performed by a certied specialist companies!
CL6045QCCB_IM 17.12.20
94
Installation of the Interior Unit and Wall Bushing to the Outside
After you have connected the cooling pipes as well as the drain pipe
for the condensed water in accordance with the directions, proceed as
follows:
1. Using extreme care, lay the pipes, the connecting cable for the exte-
rior unit and the condensed water pipe towards the spot where they
are to be led through the wall to the outside.
2. Bind the condensed water pipes, the connecting cable for the exterior
unit and the condensed water pipe together using vinyl tape and
then cover everything tightly using insulating tape (not included in
delivery).
CAUTION:
Ensure that the pipes are impermeably sealed to avoid moisture
damage and mildew build-up in the walling.
Make sure all exposed tubular parts have been sufciently isolated.
3. Drill a hole with a diameter of 57 mm and an incline / gradient of
5 - 7 mm. (Image 2)
NOTE:
Drill this with a slight incline of 5 - 7 mm toward the outside, to en-
sure that the condensed water is able to drain. In any case, make
sure that there is an incline over the entire length of the condensed
water pipe in the direction of the opening in the wall.
4. Insert the hole-cover.
5. Guide the insulated pipes, the connecting cable for the exterior unit
and the condensed water pipes through the opening in the wall.
NOTE:
After installing the pipes, seal the hole in the wall through which the
pipes have been passed so that it is airtight as well as watertight.
6. Fasten the interior unit securely to the upper part of the wall mounting
plate.
7. Press the lower part of the interior unit rmly against the wall mount-
ing plate until it rests rmly.
Installation of the Exterior Unit
Before connecting the pipes, decide where you want to place the
exterior unit and take care to ensure that there is enough room in the
location you have chosen for maintenance work to be performed at a
later time. (Observe the minimum distances)
Put the protective caps (included in delivery) on the stand and fasten
these in the appropriate places.
Use exceptionally sturdy screws / bolt anchors and bear in mind also
the weight of the appliance, in order to prevent vibrations caused by
operation from loosening the connection over time. The unit must be
installed in accordance with the applicable safety regulations.
Condensed Water Drain Pipe for the Exterior Unit
Condensed water and ice which build up in the exterior unit due to heat
generation can be drained by means of the condensed water pipe.
1. Fasten the supports for the condensed water drain pipe in the 25 mm
opening designed therefor.
2. Connect the supports for the condensed water drain pipe to the con-
densed water pipe and ensure the ow is properly controlled in order
to avoid moisture damage.
Electrical Connection (Exterior Unit)
Remove the connector cover (15) on the right side of the appliance. The
associated diagram can be found on the rear side. See diagram.
1. Connect the power supply cable for the interior unit to the terminal
strip.
2. Carefully attach the power supply cable for the exterior unit using the
cable connecting clamps.
3. Make sure that the cables have been properly attached. Be sure that
the grounding has been correctly installed.
4. Place the protective cover back on the appliance.
CL6045QCCB_IM 17.12.20
95
CAUTION:
All electrical works must be performed by a certied professional elec-
trician or specialist electronics company. Improper installation shall
result in expiry of the warranty.
Quick Coupling Instructions
Use quick coupling to easily connect the interior and exterior units for
the air conditioning unit. A fast and easy procedure with respect to which
all warranty claims are available provided all work is performed by a
specialist company.
CAUTION:
The cooling pipes provided upon delivery have been pre-lled with
the cooling agent during manufacture.
The pipes must not be shortened or extended.
Connection to the Interior Unit
1. Use caution to carefully unroll the cooling pipes as described in the
chapter entitled “Unrolling the Cooling Pipes”. Always avoid buckling
the pipes.
2. Remove the protective caps (blue and grey) from the couplings on
the interior unit.
3. Make sure all screws are in good condition and free of dirt particles,
dust, sand and other suspended matter or soiling.
4. Screw in the cooling pipes using the connectors on the interior unit.
Take care to ensure that the connections are made in accordance
with the blue / grey colour scheme. Next, fasten the nuts using two
wrenches (one to tighten the connection and the other to counter).
NOTE:
Always observe the correct torque and observe the chart provided
entitled “Installation Information”.
Connection to the Exterior Unit
1. Use caution to carefully unroll the cooling pipes as described in the
chapter entitled “Unrolling the Cooling Pipes”. Always avoid buckling
the pipes.
2. Remove the protective caps (blue and grey from the couplings on the
exterior unit.
3. Make sure all screws are in good condition and free of dirt particles,
dust, sand and other suspended matter or soiling.
4. Screw in the cooling pipes using the connectors on the exterior unit.
Take care to ensure that the connections are made in accordance
with the blue / grey colour scheme. Next, fasten the nuts using two
wrenches (one to tighten the connection and the other to counter).
NOTE:
Always observe the correct torque and observe the chart provided
entitled “Installation Information”.
CL6045QCCB_IM 17.12.20
96
5. Make sure the refrigerant circuit for the appliance is properly con-
nected and airtight. Inspect the connecting elements using leakage
spray. If air bubbles appear, then there are leaks. If this is the case,
then it is imperative that the stop valves be sealed. Carefully check
the pipes and the connections.
NOTE:
Stop valve (a) has been sealed during manufacture and must not
be opened. Service valve (b) is exclusively for service purposes.
CAUTION:
The air conditioning unit must be installed and connected by a certi-
ed refrigeration and air conditioning company. Improper installation
shall result in expiry of the warranty.
Testing the Interior Unit
Is the power switch functioning properly?
Does the ventilator work?
Do the operating modes function normally?
Can temperature and time be accurately adjusted?
Do all lamps light up in normal fashion?
Are the airow aps functioning properly?
Is the condensed water pipe functioning normally?
CAUTION:
All of the steps described above must be performed by a certied
refrigeration and air conditioning company. Improper implementation
shall result in expiry of the warranty.
Testing the Exterior Unit
Can unusual noises or vibrations be detected during operation?
Is the cooling agent leaking?
NOTE:
The electronic control system will only start the compressor three
minutes after the unit is switched on.
CAUTION:
All of the steps described above must be performed by a certied
refrigeration and air conditioning company. Improper implementation
shall result in expiry of the warranty.
Installation Information
Installation Instructions – Installation Information
Design model / Cooling capacity (Btu / h) 9k 12k 15 / 18k
Cooling pipe diameter a) 1 / 4" 6 1 / 4" 6 1 / 4" 6
Cooling pipe diameter b) 3 / 8" 9,52 1 / 2" 12 1 / 2" 12
Standard cooling pipe length 5 m 5 m 5 m
Maximum distance between interior and exterior unit 15 m 15 m 15 m
Additional refrigerant charge 20 g / m 20 g / m 30 g / m
Maximum distance between interior and exterior unit 5 m (15 m) 5 m (15 m) 5 m (15 m)
Cooling agent * R32 R32 R32
*) Additional information can be found on the information plate on the exterior unit.
Tightening Torque for Protective Caps and Flange Connections
Cooling pipe Tightening torque (N × m) Corresponding load use:
20 cm wrench) Tightening torque (N × m)
1 / 4" 6 15 - 20 Tight / hand-tight Service-connecting nut 7 - 9
3 / 8" 9,52 31 - 35 Tight Protective caps 25 - 30
1 / 2" 12 35 - 45 Tight
5 / 8" 15,88 75 - 80 Tight
CL6045QCCB_IM 17.12.20
97
Cable Specications
Installation Instructions – Information for the Installer
Model Cooling agent (Btu / h) 9k 12k 15 / 18k
Power cable
N1.0 mm²
AWG18
1.0 mm² (1.5 mm²)
AWG18 (AWG16)
1.5 mm²
AWG16
L1.0 mm²
AWG18
1.0 mm² (1.5 mm²)
AWG18 (AWG16)
1.5 mm²
AWG16
E1.0 mm²
AWG18
1.0 mm² (1.5 mm²)
AWG18 (AWG16)
1.5 mm²
AWG16
Connecting cable
N1.0 mm² 1.0 mm² (1.5 mm²) 1.5 mm²
L1.0 mm² 1.0 mm² (1.5 mm²) 1.5 mm²
11.0 mm² 1.0 mm² (1.5 mm²) 1.5 mm²
20.75 mm² 0.75 mm² 0.75 mm²
30.75 mm² 0.75 mm² 0.75 mm²
Installation Instructions – Installation Information
Voltage transformer 9k 12k 18 / 22k
Model Cooling agent (Btu / h) Cross section
Power cable
N1.0 mm² (1.5 mm²)
AWG18 (AWG16)
1.0 mm² (1.5 mm²)
AWG18 (AWG16)
1.5 mm²
AWG16
L1.0 mm² (1.5 mm²)
AWG18 (AWG16)
1.0 mm² (1.5 mm²)
AWG18 (AWG16)
1.5 mm²
AWG16
E1.0 mm² (1.5 mm²)
AWG18 (AWG16)
1.0 mm² (1.5 mm²)
AWG18 (AWG16)
1.5 mm²
AWG16
Connecting cable
N1.0 mm² (1.5 mm²) 1.0 mm² (1.5 mm²) 1.5 mm²
L1.0 mm² (1.5 mm²) 1.0 mm² (1.5 mm²) 1.5 mm²
11.0 mm² (1.5 mm²) 1.0 mm² (1.5 mm²) 1.5 mm²
At 220 V 7 K, 9 K, 12 K, 15 K, 16 K, 18 K, 22 K, 24 K, 30 K, the backup value for the air conditioning interior unit is: 50 T, 3.15 A
At 110 V 7 K, 9 K, 12 K, the backup value for the air conditioning interior unit is: 50 T, 3.15 A
125 V 7 K, 9 K, 12 K the backup value for the air conditioning exterior unit is: 61 T, 15 A
250 V 18 K, 22 K, 24 K the backup value for the air conditioning exterior unit is: 65 T, 25 A!
Circuit Diagram
The circuit diagram may vary for different models. Please observe the
circuit diagrams on the interior and exterior units.
For the interior unit, you will nd the circuit diagram (7) under the front
panel (1).
For the exterior unit, you will nd the circuit diagram stuck to the reverse
side of the connector cover (15).
NOTE:
For some models, the cables have been connected by the manufac-
turer to the main circuit board of the interior unit without terminal strips.
Operation
Tableside Control
If the remote control is not functioning or maintenance is required, pro-
ceed as follows:
1. Open the front cover and lift it upwards until you reach the button.
2. Pressing the button will cause the cooling function to start. (You will
hear a beep)
3. Pressing the button within 3 seconds will cause the heating func-
tion to start. (You will hear two beeps.)
4. To switch it off, press the button again. (You will hear a long beep.)
NOTE:
The external static pressure for the water pump on all models is 0 Pa.
Remote Control
1. Open the battery compartment cover on the rear side of the remote
control by pushing it in the direction of the arrow.
CL6045QCCB_IM 17.12.20
98
2. Insert 2 × R03 “AAA” 1.5 V batteries. Please ensure that the polarity is
correct. (See the bottom of the battery compartment)
NOTE:
Child Safety Lock: Press the and buttons down at the same
time to activate the child safety lock.
Turn the display on / off: Press and hold the ECO button
3. Point the remote control at the air conditioning unit.
NOTE:
Make sure there are no objects / obstructions located in the space
between the remote control and the signal receiver in the interior
unit.
NOTE:
Never leave the remote control exposed to direct sunlight for long
periods of time.
Use and store the remote control at a distance of at least one meter
from the television set or other electrical appliances.
Switch On / Off
Press the button to switch off the appliance.
Press the button again to switch the appliance on again.
Adjusting the Air Flow
The air ow will be evenly distributed as it escapes into the room. Options
are available for optimization of the ow direction.
The button activates the air directing ap (1). The air ow is directed from
above to below to guarantee even distribution of the air throughout the room.
The air deectors (2) must be positioned manually and are located under the
air directing aps. These make it possible to direct the air ow towards the
right or the left.
CAUTION:
Orientation of the air deector must occur while the appliance is switched off.
Never position the air directing aps manually (i. e. by hand). This can result in serious damage.
Never insert ngers, sticks or other objects into the air inlet / outlet openings. This can result in material damage and personal injury.
NOTE:
Please note that for design reasons, not all features can be viewed in the remote control display in each operating mode. By pressing the
OPTION button, you can discover which features are available for individual operating modes.
MODE button Select an operating mode
OPTION button Select a feature
Cooling Mode (COOL)
Cooling mode permits simultaneous cooling of the room and reduction
of air humidity.
1. To activate cooling mode, press the MODE button until “COOL” ap-
pears in the remote control display. The cooling function will activate
if the temperature selected is lower than the temperature in the room.
(Selection using the and buttons.)
2. To optimize the air conditioning feature, adjust the temperature, the
speed and the air ow direction by pressing the appropriate buttons.
Heating Mode (HEAT)
Heating mode makes it possible to heat the room.
1. To activate heating mode, press the MODE button until “HEAT” ap-
pears in the remote control display. The heating function will activate if
the temperature selected is higher than the temperature in the room.
(Selection using the and buttons.)
2. To optimize the heating feature, adjust the temperature, the speed
and the air ow direction by pressing the appropriate buttons.
NOTE:
If the appliance is equipped with an electric heater, then this will
delay activation of the application for a few minutes.
An automatic thawing function may activate during heating mode.
This thawing function is indispensable for the cleaning of the appli-
ance. Frost residue on the condenser is removed in order to restore
its full heat exchange capacity. This procedure normally takes 2 - 10
minutes. The fan will stop operating during defrosting. After defrost-
ing, the appliance will automatically revert to heating mode.
Switching the Appliance on Automatically ( )
To program the appliance to switch on automatically, the appliance must
be turned off.
1. Press the OPTION button.
2. Use the arrow buttons to select and until “ ” appears on
the remote control display.
3. Press the OPTION button again and use the arrow buttons and
to adjust the desired time.
4. Conrm your selection using the OPTION button.
NOTE:
To interrupt the adjusted function, repeat the steps described
above.
The Timer feature can be adjusted for 30-minute intervals
Switching the Appliance Off Automatically ( )
To program the appliance to switch off automatically, the appliance must
be turned on.
1. Press the OPTION button.
2. Use the arrow buttons to select and until “ ” appears on
the remote control display.
3. Press the OPTION button again and use the arrow buttons and
to adjust the desired time.
4. Conrm your selection using the OPTION button.
NOTE:
To interrupt the adjusted function, repeat the steps described
above.
CL6045QCCB_IM 17.12.20
99
NOTE:
The Timer feature can be adjusted for 30-minute intervals.
Fan Mode (FAN)
To activate the fan mode, press the MODE button until “FAN” appears in
the remote control display.
By pressing the FAN button, you can adjust the fan speed, in the follow-
ing order:
off ( )
LOW ( )
MEDIUM ( )
HIGH ( )
Turbo ( )
automatic
Air Dehumidication Mode (DRY)
This feature permits the reduction of air humidity as well as improved air
quality in the room.
To switch on air dehumidication mode, press the MODE button until
“DRY” appears in the remote control display. The fan will activate with a
variable cooling cycle.
Automatic Mode (AUTO)
To activate automatic mode, press the MODE button until “AUTO” ap-
pears in the remote control display.
The fan speed and the temperature will be automatically controlled,
irrespective of the temperature in the room.
Ambient Temperature Operating mode
< 20 °C Heat
20 °C ~ 26 °C Dehumidify
> 26 °C Cool
Snooze Mode ( )
The SLEEP feature automatically adjusts the temperature in order to
render the air in the room especially pleasant during the night. While
operating in cool / dehumidication mode, the adjusted temperature will
be automatically increased by 1 °C until a temperature increase of 2 °C
has been attained within a period of 2 hours.
1. To activate snooze mode, press the OPTION button.
2. Use the arrow buttons to select and until “ ” appears on
the remote control display.
3. Conrm your selection using the OPTION button.
4. Use the OPTION button to switch off the “ ” function.
During heating mode, the temperature is reduced by 2 °C during the rst
2 hours.
After 10 hours in snooze mode, the appliance with automatically switch
off.
Energy Saving Mode (ECO)
Pressing the ECO button activates or deactivates the Eco feature. The
appliance will enter the energy saving mode. The adjusted temperature
is automatically, gradually increased without compromising climatic
comfort. This will result in low energy consumption.
Pressing and holding down the ECO button allows you to switch off the
display for the interior unit.
Maximum Temperature and Speed ( )
Pressing the TURBO button activates or deactivates the Turbo function.
This allows the adjusted temperature to be attained as quickly as pos-
sible.
Mildew / Self-cleaning ( )
1. To activate self-cleaning mode, press the OPTION button.
2. Use the arrow buttons to select and until “ ” appears
on the remote control display.
3. Conrm your selection using the OPTION button.
4. Use the OPTION button to switch off the “ ” function.
Automatic Temperature Calculation ( )
Automatic temperature calculation my means of a sensor in the remote
control. Ensure that the remote control is not exposed to sources of heat
such e. g. lamps.
1. To activate “ ” press the OPTION button.
2. Use the arrow buttons to select and until “ ” appears on
the remote control display.
3. Conrm your selection using the OPTION button.
4. Press the OPTION button again to switch off the “ ” function.
Cleaning and Maintenance
WARNING:
Make sure no water penetrates the openings on the
appliance during cleaning. Danger of electric shock or
re.
CAUTION:
Maintain your appliance regularly to ensure its safe and efcient
operation.
All cleaning and maintenance work must be performed by a certi-
ed refrigeration and air conditioning company. Improper application
shall result in expiry of the warranty.
Cleaning and Exchanging the Filter
1. Open the front panel in the direction of the arrow.
2. Raise the front cover with one hand, use the other hand to remove
the dust lter.
CL6045QCCB_IM 17.12.20
100
3. Clean the lter with water. If heavily soiled, use warm water to clean
(not above 45 °C). Then leave the lter to dry.
4. Reinsert the air lter.
5. Close the compartment cover.
NOTE:
The additional activated carbon lters (grey) and ionizing lters
(green) cannot be cleaned and, depending on the number of hours of
operation, should be replaced with new lters. The following illustra-
tion depicts the process for removal of the lters.
Cleaning the Interior Unit
1. Open the front plate of the appliance and remove the hinges to facili-
tate cleaning.
2. Clean the interior unit using a cloth and water (not warmer than 40 °C).
CAUTION:
Do not spray cleaning agents on the appliance.
Do not immerse the appliance in water: the electronic components
can be damaged.
Do not use a wire brush or any abrasive items.
Cleaning the Exterior Unit
If the air inlet on the exterior unit is blocked, remove any leaves or other
waste material present and then remove any remaining dust using com-
pressed air or a little water.
Changing the Battery
NOTE:
Use only new batteries. Only remove the batteries from the remote
control when the air conditioning unit is switched off.
If:
You no longer hear a conrmation beep from the interior unit.
The display is no longer functioning correctly.
How:
Open the rear cover.
Insert new batteries. Please ensure that the polarity is correct.
Troubleshooting
Malfunction / Breakdown Possible Cause
The appliance is not working. Power failure / plug pulled out
Damaged fan motor on the interior unit or on the exterior unit.
Thermomagnetic switch on the compressor is broken.
Protective device broken or defective or fuses blown
Loose connections or plug pulled out
Operational interruption for protection / preservation of the product
Voltage too high or too low
Function “ ” is activated (automatic switching on of the appliance)
Damage to the electronic control board
Usual odour Air lters soiled or dirty
Sound of water Liquid backow in the refrigerant circuit
Fine mist is leaking from the air outlet This occurs when the air in the room becomes very cold, for example in the “COOL” or “DRY” modes.
Unusual noises Noises can occur due to extension or contraction caused by thermal uctuations in the front panel.
The occurrence of these noises does not mean that the appliance is defective or broken.
Undesired air ow (hot or cold) Improper or unsuitable temperature adjustments
The air inlet or outlet is blocked on either the interior unit or on the exterior unit.
The air lter is blocked.
Fan speed adjusted to minimum setting
Other heat sources in the room
Missing cooling agent(s)
CL6045QCCB_IM 17.12.20
101
Malfunction / Breakdown Possible Cause
The appliance is not responding to signals /
entries.
The remote control is not close enough to the receiver for the interior unit.
There is insufcient voltage remaining in the batteries for the remote control.
Obstacles placed between the remote control and the receiver
The display is switched off. Activated LED function
Voltage error
The ECO function is activated (see chapter on servicing) “Energy saving mode (ECO)”)
Functions or features are absent from the
display
Not all functions or features are shown for each operating mode (see chapter “Operation”)
In this case, switch the appliance off immediately and disconnect the power supply:
Unusual noises during operation
Error in the control board
Blown fuses or broken switch
Spray water or objects in the system
Overheating / burnt cable or plug
Strong odor emanating from the appliance
Error codes in the display
If an error occurs, the following error codes will appear in the display of the interior unit:
Lamp lights Description of error
Blinks once Indoor temperature sensor error
Blinks twice Outdoor temperature sensor error
Blinks six times The motor for the interior fan is malfunctioning
NOTE:
Additional error codes can be found in the service manual.
CL6045QCCB_IM 17.12.20
102
Technical Data
Model:...............................................................................CL 6045 QC CB
Net weight of interior unit: .......................................................approx. 7 kg
Net weight of exterior unit: ....................................................approx. 25 kg
Power / voltage supply: ................................................. 220 - 240 V~, 50 Hz
Power input during cooling: ............................................................. 800 W
Power input during heating: ............................................................. 699 W
Power input during integrated standby operation: ............................ 5.0 W
Protection class: ........................................................................................
Refrigeration capacity: ...........................................9000 BTU (2600 kW/h)
Thermal output: ...................................................... 9000 BTU (2610 kW/h)
Cooling agent(s): ................................................................................. R 32
Maximum permissible operating pressure:
Pressure side: ........................................................................... 3,7 MPa
Suction side: ............................................................................. 1.2 MPa
Model:...............................................................................CL 6046 QC CB
Net weight of interior unit: ....................................................approx. 8,5 kg
Net weight of exterior unit: ....................................................approx. 25 kg
Power / voltage supply: ................................................. 220 - 240 V~, 50 Hz
Power input during cooling: ............................................................1130 W
Power input during heating: ............................................................. 922 W
Power input during integrated standby operation: ............................ 5.0 W
Protection class: ........................................................................................
Refrigeration capacity: .........................................12000 BTU (3400 kW/h)
Thermal output: .................................................... 12000 BTU (3420 kW/h)
Cooling agent(s): ................................................................................. R 32
Maximum permissible operating pressure:
Pressure side: ........................................................................... 3,7 MPa
Suction side: ............................................................................. 1.2 MPa
Model:...............................................................................CL 6047 QC CB
Net weight of interior unit: ..................................................approx. 10,5 kg
Net weight of exterior unit: .................................................approx. 35,5 kg
Power / voltage supply: ................................................. 220 - 240 V~, 50 Hz
Power input during cooling: ........................................................... 1579 W
Power input during heating: ........................................................... 1382 W
Power input during integrated standby operation: ............................ 2,5 W
Protection class: ........................................................................................
Refrigeration capacity: .........................................18000 BTU (5100 kW/h)
Thermal output: .................................................... 18000 BTU (5130 kW/h)
Cooling agent(s): ................................................................................. R 32
Maximum permissible operating pressure:
Pressure side: ........................................................................... 3,7 MPa
Suction side: ............................................................................. 1.2 MPa
Wi-Fi
Network supported: ................................................................. 802.11 b/g/n
Maximum radiated output power: ............................................... 18.0 dBm
Frequency range: ...........................................................................2.4 GHz
Channels: ........................................................................................... 1 - 13
Supported Wi-Fi keys:............................................................ WPA / WPA2
The right to make technical and design modications in the course of
continuous product development remains reserved.
Notice of Directive Conformity
Hereby, Clatronic International GmbH declares that the radio equipment
type CL 6045 QC CB / CL 6046 QC CB / CL 6047 QC CB is in compli-
ance with Directive 2014 / 53 / EU.
Furthermore, the appliance is in compliance with the requirements of
the RoHS directive 2011 / 65 / EC & (EU) 2015 / 863.
The full text of the EU declaration of conformity is available at the follow-
ing internet address: www.sli24.de
In the “Download” area, please enter the model name CL 6045 QC CB.
Tested for operation in Great Britain.
Disposal
Battery Disposal
As a consumer you are obliged by law to return old batter-
ies / accumulators.
Remove the batteries from the remote control before dispos-
ing of the appliance.
Return the batteries to a collection facility for the collection of old
batteries or hazardous waste. Contact your local authority for more
information.
Meaning of the “Dustbin” Symbol
Protect our environment: do not dispose of electrical equip-
ment in the domestic waste.
Please return any electrical equipment that you will no longer
use to the collection points provided for their disposal.
This helps avoid the potential effects of incorrect disposal on
the environment and human health.
This will contribute to the recycling and other forms of re-utilisation of
electrical and electronic equipment.
Information concerning where the equipment can be disposed of can be
obtained from your local authority.
CL6045QCCB_IM 17.12.20
103
Instrukcja obsługi
Dziękujemy za wybór naszego produktu. Mamy nadzieję, że korzystanie
z urządzenia sprawi państwu radość.
Symbole użyte w tej instrukcji obsługi
Ważne informacje dotyczące bezpieczeństwa użytkownika są specjalnie
wyróżnione. Koniecznie stosuj się do tych wskazówek, aby uniknąć
wypadków i uszkodzenia urządzenia:
OSTRZEŻENIE:
Ostrzega przed zagrożeniami dla zdrowia i wskazuje na potencjalne
ryzyka obrażeń.
UWAGA:
Wskazuje na potencjalne zagrożenia dla urządzenia lub innych przed-
miotów.
WSKAZÓWKA:
Wyróżnia porady i informacje ważne dla użytkownika.
Ogólne uwagi
Przed uruchomieniem urządzenia proszę bardzo dokładnie przeczytać
instrukcję obsługi. Proszę zachować ją wraz z kartą gwarancyjną,
paragonem i w miarę możliwości również kartonem z opakowaniem
wewnętrznym. Przekazując urządzenie innej osobie, oddaj jej także
instrukcję obsługi.
Proszę wykorzystywać urządzenie jedynie dla prywatnego celu, jaki
został przewidziany dla urządzenia. Urządzenie to nie zostało przewi-
dziane do użytku w ramach działalności gospodarczej.
Proszę nie korzystać z urządzenia na zewnątrz. Proszę trzymać
urządzenie z daleka od ciepła, bezpośredniego promieniowania sło-
necznego, wilgoci (w żadnym wypadku nie zanurzać w substancjach
płynnych) oraz ostrych krawędzi. Proszę nie obsługiwać urządzenia
wilgotnymi dłońmi.
Należy regularnie sprawdzać, czy urządzenie i kabel sieciowy nie są
uszkodzone. W razie uszkodzenia należy przestać korzystać z urzą-
dzenia.
Proszę stosować tylko oryginalne akcesoria.
Dla bezpieczeństwa dzieci proszę nie zostawiać swobodnie dostęp-
nych części opakowania (torby plastikowe, kartony, styropian itp.).
OSTRZEŻENIE:
Nie pozwalaj dzieciom bawić się folią. Niebezpieczeństwo udu-
szenia!
Specjalne wskazówki bezpieczeństwa dla urządzenia
Na produkcie umieszczone symbole ostrzegawcze i informacyjne:
Przeczytaj instrukcje!
OSTRZEŻENIE: Ryzyko pożaru!
Urządzenie zawiera łatwopalny czynnik chłodniczy!
Do przyspieszenia procesu rozmrażania nie wolno stosować żadnych środków, których producent nie dopusz-
cza do stosowania
Urządzenie należy przechowywać w pomieszczeniach, w których nie ma stałych źródeł zapłonu (np. płomieni,
włączonego grzejnika gazowego lub elektrycznego).
Nie należy wiercić ani podpalać urządzenia.
Należy pamiętać, że czynniki chłodnicze bezwonne.
Instrukcja serwisowa dostępna jest pod następującym adresem internetowym: www.sli24.de
W obszarze „Downloads” (Pliki do pobrania), wpisz nazwę modelu CL 6045 QC CB.
Każda osoba, która jest zaangażowana w pracę lub włącza się do układu obiegu czynnika chłodniczego, po-
winna posiadać aktualny ważny certykat od akredytowanego w branży organu oceniającego, który potwierdza
jej kompetencje i upoważnia ją do bezpiecznej obsługi czynników chłodniczych, zgodnie z uznaną specykacją
przemysłową.
Serwisowanie odbywa się wyłącznie zgodnie z zaleceniami producenta urządzenia. Konserwacja i naprawy
wymagające pomocy innych wykwalikowanych pracowników przeprowadzane pod nadzorem osoby kompe-
tentnej w zakresie stosowania łatwopalnych czynników chłodniczych.
UWAGA: Niebezpieczeństwo przegrzania!
Utrzymywać otwory wentylacyjne niezablokowane!
Nie przykrywać urządzenia!
CL6045QCCB_IM 17.12.20
104
UWAGA:
Niewłaściwa instalacja i obsługa bez werykacji (np. certykatu) ze strony specjalistycznej rmy powoduje wyga-
śnięcie gwarancji zgodnie z UE 517 / 2014 rozdział II art. 3.
OSTRZEŻENIE:
Nie używać i nie przechowywać urządzenia w następujących miejscach:
- w pobliżu źródła ognia.
- w obszarze, w którym może się rozlewać woda lub olej.
- w obszarze, który jest narażony na bezpośrednie działanie promieni słonecznych.
- w łazience, pralni lub przy basenie publicznym.
Nie dotykać urządzenia, gdy jest się na boso lub gdy części ciała są mokre lub wilgotne.
Podczas instalacji urządzenia przez certykowaną specjalistyczną rmę zabezpieczyć otoczenie, aby uniknąć
wypadków. Dzieci i osoby nieupoważnione nie powinny mieć wstępu.
Upewnić się, że gniazdo urządzenia zewnętrznego zostało zainstalowane w wystarczająco bezpieczny sposób.
Upewnić się, że powietrze nie może dostać się do układu chłodniczego i podczas przesuwania układu klimatyzacji
sprawdzić, czy nie wycieka czynnik chłodzący. Należy pamiętać, że środki chłodzące są bezwonne.
Po zainstalowaniu klimatyzacji należy przeprowadzić rozruch próbny i sprawdzić dane eksploatacyjne.
Bezpieczniki zainstalowane we wbudowanej centrali mają wartość znamionową T 5 A / 250 V. Upewnić się, że
urządzenie wewnętrzne jest zawsze zabezpieczone bezpiecznikiem o wystarczającej pojemności dla maksymal-
nego prądu wejściowego lub za pomocą innego urządzenia zabezpieczającego przed przeciążeniem.
Podczas instalacji urządzenie musi pozostać odłączone od sieci zasilającej, co wskazuje na bezwzględną sepa-
rację styków, co umożliwia całkowitą separację zgodnie z warunkami III kategorii przepięciowej. Muszą być one
zintegrowane ze stałym okablowaniem zgodnie z przepisami bezpieczeństwa. Wszelkie prace elektryczne mogą
być wykonywane wyłącznie przez profesjonalnego elektryka lub specjalistyczną rmę zajmującą się pracami elek-
trycznymi. Klimatyzator może być instalowany wyłącznie przez certykowaną specjalistyczną rmę.
Nie umieszczać urządzenia w pobliżu substancji łatwopalnych (alkoholu itp.) lub pojemników pod ciśnieniem (np.
aerozoli, butli z gazem itp.). Zachować odległość co najmniej 50 cm między urządzeniem a takimi substancjami.
Jeśli urządzenie jest używane w miejscach bez wentylacji, należy przedsięwziąć środki ostrożności w celu unik-
nięcia zagrożenia pożarowego związanego z wyciekiem gazu chłodniczego.
Należy przestrzegać krajowych standardów dotyczących połączeń. Okablowanie musi być zgodne z obowiązują-
cymi przepisami krajowymi.
Przed dotknięciem zacisków przyłączeniowych należy odłączyć wszystkie obwody elektryczne od zasilania.
To urządzenie może być używane przez dzieci w wieku powyżej ośmiu (8) lat, a także przez osoby o ograniczo-
nych zdolnościach zycznych, sensorycznych lub umysłowych lub bez doświadczenia i wiedzy, jeśli są one nad-
zorowane lub otrzymały instrukcje dotyczące bezpiecznego użytkowania urządzenia i rozumieją związane z tym
zagrożenia.
Dzieci nie mogą bawić się urządzeniem.
Nie można naprawiać urządzenia samodzielnie, ale trzeba zawsze skontaktować się z autoryzowanym techni-
kiem.
Czyszczenie i konserwacja muszą być wykonywane przez wykwalikowany personel. W każdym przypadku
należy zawsze odłączyć urządzenie od zasilania przed przystąpieniem do czyszczenia lub czynności konserwa-
cyjnych.
To urządzenie nie zostało zaprojektowane do klimatyzacji mieszkań / pomieszczeń mieszkalnych i nie może być
używane do innych celów, takich jak np. suszenie odzieży, chłodzenie artykułów spożywczych itp.
Używać urządzenia wyłącznie z zainstalowanym ltrem powietrza. Używanie klimatyzatora bez ltra powietrza
może prowadzić do nadmiernego nagromadzenia się kurzu lub zanieczyszczenia wewnętrznych części urządze-
nia i spowodować uszkodzenie i / lub nieprawidłowe jego działanie.
CL6045QCCB_IM 17.12.20
105
Dlatego użytkownik jest odpowiedzialny za zapewnienie instalacji urządzenia przez wykwalikowanego technika.
Wykwalikowany technik musi sprawdzić, czy urządzenie zostało uziemione zgodnie z obowiązującymi przepi-
sami i wytycznymi, a także upewnić się, że urządzenie jest wyposażone w wyłącznik termomagnetyczny.
Nigdy nie należy pozwalać, aby urządzenie było bezpośrednio wystawiane na działanie strumienia zimnego
powietrza przez dłuższy okres czasu. Długotrwałe bezpośrednie narażenie na prąd zimnego powietrza może być
szkodliwe dla zdrowia. Szczególną ostrożność zaleca się w przypadku dzieci, osób starszych lub chorych.
Jeśli z urządzenia wydobywa się dym lub wyczuwalny jest zapach spalenizny, należy natychmiast odłączyć zasi-
lanie i skonsultować się z technikiem serwisu. Korzystanie z urządzenia w takich okolicznościach i / lub w takich
warunkach może spowodować pożar lub porażenie prądem.
Za pomocą przycisku wyłączyć urządzenie, jeśli nie będzie używane przez dłuższy czas.
Upewnić się, że kierunek przepływu powietrza jest prawidłowo ustawiony. Zawory muszą być skierowane w dół w
trybie ogrzewania i w górę w trybie chłodzenia.
Unikając ekstremalnych wahań ustawień temperatury, można uniknąć uszkodzenia urządzenia.
Nie zginać, nie ciągnąć ani nie zgniatać przewodu zasilającego, ponieważ może to spowodować jego uszkodze-
nie. Uszkodzony kabel zasilający może spowodować porażenie prądem elektrycznym oraz pożar. Tylko wyspecja-
lizowany personel techniczny może wymieniać uszkodzony kabel zasilający.
Nie blokować wlotu ani wylotu powietrza urządzenia wewnętrznego lub urządzenia zewnętrznego. Zablokowanie
lub zatykanie tych otworów prowadzi do zmniejszenia wydajności chłodzenia i może spowodować nieprawidłowe
działanie lub uszkodzenie. Nie wolno dokonywać żadnych nieautoryzowanych lub niewłaściwych zmian ani zmian
w urządzeniu.
Nie kłaść na urządzeniu żadnych ciężkich ani gorących przedmiotów.
Nie pozostawiać otwartych okien ani drzwi przez dłuższy czas, gdy klimatyzator jest używany.
Nie kierować strumienia powietrza na rośliny ani zwierzęta. Długie okresy bezpośredniego narażenia na zimne
prądy powietrza mogą mieć negatywny wpływ na rośliny i zwierzęta.
Nie wchodzić na urządzenie zewnętrzne i nie stawiać na nim żadnych przedmiotów.
Nigdy nie wkładać żadnego drąga, pręta, drążka lub podobnego przedmiotu do urządzenia. Może to spowodować
obrażenia ciała oraz szkody materialne.
Upewnić się, że używasz odpowiedniego, specjalnie zaprojektowanego narzędzia do układania i gięcia rur chło-
dzących. Ze względów bezpieczeństwa należy za wszelką cenę unikać wyboczenia delikatnych kabli. Wszystkie
prace muszą być wykonane przez certykowaną rmę oraz odpowiednio udokumentowane i określone zgodnie z
wyposażeniem dołączonym do urządzenia.
Rur chłodzących nie wolno przedłużać ani skracać bez podjęcia dalszych środków, ponieważ zostały one już
fabrycznie napełnione czynnikiem chłodzącym podczas produkcji.
UWAGA:
Wszelkie modykacje techniczne rur chłodzących muszą być wykonywane przez certykowaną specjalistyczną
rmę. Niewłaściwe przeróbki lub modykacje spowodują wygaśnięcie gwarancji.
Sprawdzić, czy wszystkie rury i kable nieprzepuszczalne, aby zapobiec tworzeniu się cieczy, pary wodnej lub
kondensatu i np. aby zapobiec ich penetracji przez wewnętrzne ściany urządzenia. Zapobiegnie to gromadzeniu
się wilgoci, a także tworzeniu się pleśni.
Posługiwanie się bateriami
OSTRZEŻENIE:
Nie wystawiać baterii na działanie nadmiernego gorąca typu słońce,
ogień lub tym podobne. Pojawia się ryzyko wybuchu!
Baterie nie są zabawkami. Trzymać je z dala od dzieci.
Nie otwierać baterii z użyciem siły.
Nie dopuszczać do styczności z metalowymi przedmiotami (pier-
ścionki, gwoździe, śruby, itp.). Pojawia się ryzyko zwarcia!
Zwarcie może doprowadzić do nadmiernego nagrzania baterii lub
nawet pożaru i w efekcie do obrażeń ciała.
OSTRZEŻENIE:
Ze względu na własne bezpieczeństwo, podczas transportu zabez-
pieczać terminale baterii taśmą klejącą.
W razie wycieku baterii, uważać, aby nie wetrzeć cieczy do oczu
ani na błony śluzowe. W razie kontaktu, umyć ręce i opłukać oczy
czystą wodą. W razie utrzymywania się jakiegokolwiek dyskom-
fortu, skonsultować się z lekarzem.
Nie doładowywać baterii jednorazowego użytku.
Wkładając baterie do komory należy dopilnować ich właściwej
polaryzacji.
CL6045QCCB_IM 17.12.20
106
UWAGA:
Kiedy przez dłuższy okres czasu nie korzystamy z pilota, wyjąć
baterie, aby zapobiegać „wyciekowi” kwasu z baterii.
Nie mieszać baterii różnego rodzaju ani nowych baterii ze starymi.
Nie wyrzucać baterii wraz z odpadami gospodarstwa domowego.
Zwrócić zużyte baterie do odpowiedniego punktu zbiórki lub do
sprzedawcy.
Rozpakowanie urządzenia
1. Wyjąć urządzenie z opakowania.
2. Usunąć wszystkie materiały opakowaniowe, takie jak folie, materiały
wypełniające i opakowania kartonowe.
3. Sprawdzić urządzenie pod kątem ewentualnych uszkodzeń transpor-
towych, aby uniknąć zagrożeń.
4. W przypadku uszkodzenia nie wolno korzystać z urządzenia. Skon-
taktuować się z dystrybutorem.
Zakres dostawy
Jednostka wewnętrzna
a) 6 × śruba
b) 6 × kołek
c) 1 × uchwyt ścienny
Jednostka zewnętrzna
d) 1 × wspornik dla systemu odprowadzania
kondensatu
e) 4 × stojak na jednostkę zewnętrzną
Akcesoria przyłączeniowe
f) 1 × kabel połączeniowy do jednostki
zewnętrznej
g) 2 × rura chłodząca (szara i niebieska) wraz
z izolacją
h) 1 × materiał izolacyjny (zapasowy)
i) 2 × rura do skroplin
j) 1 × taśma winylowa
k) 1 × zaślepka otworu
Akcesoria
m) 1 × pilot
n) 2 × baterie R03 „AAA” 1,5 V
o) 2 × ltr
p) 2 × wkład ltrujący
1 × ltr z węglem aktywnym (szary)
1 × ltr jonizujący (zielony)
Przegląd elementów obsługi
Strona 3
Jednostka urządzenia do obszarów wewnętrznych
1 Panel przedni
2 Wkład ltrujący z ltrem z węglem aktywnym (szary)
3 Wkład ltrujący z ltrem jonizującym (zielony)
4 Moduł WLAN
5 Wyświetlacz LED
6 Tabliczka znamionowa (pozycja może się różnić)
7 Schemat połączeń
8 Elektryczna jednostka przyłączeniowa
9 przycisk (włączania / wyłączania zasilania)
10 Deektor powietrza
11 Odbiornik sygnału
12 Klap powietrza
13 Pilot zdalnego sterowania
Jednostka urządzenia do obszarów zewnętrznych
14 tabliczka znamionowa do zastosowań zewnętrznych (pozycja może
się różnić)
15 Osłona złącza
16 Zawór płynu chłodzącego
a szary
b niebieski
17 Wylot powietrza
Pilot zdalnego sterowania
WSKAZÓWKA:
Jeśli nawet w Państwa modelu brakuje jednej z tych funkcji, pomimo
to po naciśnięciu przycisku słyszalny będzie sygnał dźwiękowy.
Przyciski na pilocie
Nr. Przycisk Znaczenie
1Włącznik / Wyłącznik
2OPTION Klawisz wyboru
3Klawisz ustawień / wyboru
4Klawisz ustawień / wyboru
5ECO Włączanie / wyłączanie funkcji ECO
6TURBO Włączanie / wyłączanie funkcji Turbo
7Mode Tryb działania klawisza wyboru
8Fan Dostosować prędkość powietrza
9Wyregulować klapę powietrza
10 Wyregulować deektor powietrza (niedostępny;
należy ustawić ręcznie)
CL6045QCCB_IM 17.12.20
107
Wyświetlacz pilota
Wyświetlacz sieciowy
Zabezpieczenie przed dziećmi
AUTO Tryb automatyczny
COOL Tryb chłodzenia
DRY Tryb osuszania powietrza
HEAT Tryb ogrzewania
FAN Tryb wentylacji
ECO Tryb oszczędzania energii
Wyświetlacz prędkości wentylacji
Wentylator wyłączony
Maksymalna temperatura i prędkość
Wyświetlacz klapy powietrza
Wyświetlacz deektora powietrza (niedostępny)
Tryb drzemki
Automatyczny włącznik / wyłącznik zasilania
Automatyczne obliczanie temperatury
Samoczyszczenie pod kątem pleśni
Funkcja zdrowia (niedostępna)
Niedostępna
Informacja dotycząca aplikacji
„Smart Life - Smart Living”
Smart Life - Smart Living aplikacja jest dostępna dla systemu Android
oraz iOS. Zeskanuj odpowiedni kod QR i pobierz ją bezpośrednio.
WSKAZÓWKA:
W zależności od dostawcy, mogą zaistnieć koszty związane z pobie-
raniem aplikacji.
Google Play App Store
Informacje na temat korzystania z aplikacji
To urządzenie umożliwia obsługę urządzenia za pośrednictwem sieci
domowej. Wymagania wstępne to: 1) stałe połączenie Wi-Fi z routerem
i 2) bezpłatna aplikacja „Smart Life - Smart Living”. Aplikacja umożliwia
wygodny dostęp do wszystkich funkcji urządzenia. Aby zapobiec
przypadkowemu włączeniu urządzenia, zalecamy odłączenie go od
zasilania, gdy znajdują się Państwo poza domem!
Wymagania systemowe do użytkowania aplikacji
iOs 10.0 lub wyższy
Android 5.0 lub wyższy
Uruchomienie za pośrednictwem aplikacji
1. Zainstalować aplikację „Smart Life - Smart Living”.
2. Aktywować funkcję Wi-Fi w ustawieniach swojego urządzenia.
3. Upewnić się, że Państwa sieć Wi-Fi znajduje się w pobliżu urządzenia.
4. Włączyć jednostkę wewnętrzną.
5. Uruchomić aplikację i wybrać „ + .
6. Wybrać menu „Klimatyzator” i postępować zgodnie z instrukcjami na
wyświetlaczu.
7. Nacisnąć przycisk ECO na pilocie sześć razy, aż na wyświetlaczu
pojawi się „CF”. Jeśli na wyświetlaczu pojawi się „AP”, nacisnąć
ponownie przycisk ECO sześć razy.
WSKAZÓWKA:
„CF”: Lampka ostrzegawcza na module (4) szybko miga.
„AP”: Lampka ostrzegawcza na module (4) miga powoli.
W takim przypadku nacisnąć „następny krok”. Wprowadzić hasło.
8. Po pomyślnym podłączeniu urządzenia kontrolka Wi-Fi będzie się
świecić w sposób ciągły. Teraz możesz obsługiwać urządzenie za
pomocą aplikacji.
WSKAZÓWKA:
Urządzenie może współpracować tylko z routerami 2,4 GHz. Routery
5 GHz nie są obsługiwane.
Odłączanie Wi-Fi
Jeśli chce się rozłączyć istniejące połączenie WiFi (lampka kontrolna
świeci się), wykonać następujące czynności:
Nacisnąć przycisk ECO na pilocie sześć razy.
WSKAZÓWKA:
Jeśli chce się ponownie nawiązać połączenie WIFI, postępować zgod-
nie z opisem w rozdziale „Uruchomienie za pośrednictwem aplikacji”.
Instalacja
Jednostka wewnętrzna (a)
Zamontować jednostkę wewnętrzną na solidnej ścianie, która nie jest
narażona na wibracje.
Żaden z otworów w urządzeniu nie może być zasłonięty, aby powie-
trze mogło napływać do całego pomieszczenia.
Nie montować urządzenia w pobliżu źródeł ciepła, oparów lub łatwo-
palnych gazów.
Nie montować urządzenia w miejscu, w którym będzie narażone na
bezpośrednie działanie promieni słonecznych przez dłuższy czas.
Wybrać miejsce, w którym kondensat może łatwo odpływać i z
którego można łatwo podłączyć jednostkę wewnętrzną do jednostki
zewnętrznej.
Regularnie sprawdzać, czy urządzenie działa prawidłowo i zawsze
przestrzegać wytycznych dotyczących minimalnych odległości i/lub
utrzymywać te przestrzenie w czystości. Wybrać lokalizację, z której
można łatwo dotrzeć do ltra.
Jednostka zewnętrzna (b)
Nie montować jednostki zewnętrznej w pobliżu źródeł ciepła, oparów
lub łatwopalnych gazów.
Nie ustawiać urządzenia w miejscach nadmiernie zakurzonych.
Zainstalować urządzenie w miejscu, w którym nikt nie będzie prze-
szkadzał hałas podczas pracy i które nie jest uczęszczane przez
wiele osób. Jeśli to konieczne, należy uzgodnić to z sąsiadami. W
razie potrzeby należy zapoznać się z niemiecką federalną dyrektywą
dotyczącą ochrony przed emisjami.
Nie instalować urządzenia w miejscu, w którym będzie narażone na
bezpośrednie działanie promieni słonecznych lub trudnych warunków
pogodowych, ani nie używać ochrony przeciwsłonecznej, która bę-
dzie miała negatywny wpływ na przepływ powietrza.
Zawsze przestrzegać minimalnych odległości przedstawionych na
poniższej ilustracji i/lub utrzymywać wolną przestrzeń w tej odległości
podczas instalacji i obsługi.
Zainstalować jednostkę zewnętrzną w stabilnym miejscu.
CL6045QCCB_IM 17.12.20
108
Jednostka wewnętrzna (a)
Nie instalować urządzenia w wilgotnych pomieszczeniach, takich jak
łazienki, pralnie itp.
Aby uzyskać optymalne wyniki, montaż należy przeprowadzić jak
najwyżej nad podłogą.
Jednostka zewnętrzna (b)
Jeśli jednostka zewnętrzna jest narażona na wibracje, użyć gumo-
wych zderzaków na podłodze, aby przeciwdziałać wpływowi wibracji.
Minimalne odległości (w mm) zaznaczono na ilustracji.
UWAGA:
Nabywca musi zapewnić, że osoby / rmy / przedsiębiorstwa, które
instalują, konserwują lub naprawiają te klimatyzatory, posiadają
wystarczające kwalikacje i doświadczenie w pracy z czynnikami
chłodniczymi.
Niewłaściwa instalacja i obsługa bez werykacji (np. certykatu)
ze strony specjalistycznej rmy powoduje wygaśnięcie gwarancji
zgodnie z (UE) 517 / 2014 rozdział II art. 3.
Instalowanie uchwytu ściennego
UWAGA:
Zanim zainstaluje się uchwyt ścienny, upewnić się, że znalazło się
dokładne miejsce, w którym zamierza się wywiercić otwór na rury!
Patrz rozdział „Montaż jednostki wewnętrznej i przepustu ściennego
na zewnątrz”.
1. Poluzować uchwyt ścienny na zatrzaskach.
2. Złożyć uchwyt ścienny do góry.
3. Zdjąć uchwyt ścienny, zwalniając go z obsadki.
4. Wywierć otwory o głębokości co najmniej 32 mm w litej ścianie w celu
zamocowania płyty.
5. Umieścić plastikowe kołki w otworze.
6. Przymocować płytę montażową do ściany za pomocą dołączonych
śrub.
7. Upewnić się, że płyta montażowa jest mocno przykręcona.
Wyrównanie rur chłodzących
UWAGA:
Klimatyzator musi być zainstalowany i podłączony przez certy-
kowaną rmę chłodniczą i klimatyzacyjną. Niewłaściwa instalacja
spowoduje wygaśnięcie gwarancji.
Rury chłodzenia można układać w 3 kierunkach, jak pokazano zgod-
nie z numerami na rysunku. Jeśli orurowanie zostanie umieszczone
zgodnie z opcją 1 lub 3, należy użyć przecinaka, aby ostrożnie wyciąć
nacięcie z boku jednostki wewnętrznej wzdłuż szwu.
Poprowadzić rury przyłączeniowe w kierunku otworu w ścianie i związać
rury chłodzące, rury do skroplin i kabel zasilający taśmą winylową i
zawsze zapewnić nieprzepuszczalną izolację, aby nie dopuścić do
tworzenia się cieczy, pary wodnej lub kondensatu. na przykład prze-
niknąć przez ścianę. Zapobiegnie to gromadzeniu się wilgoci, a także
tworzeniu się pleśni. Upewnić się, że rura do skroplin jest umieszczona
na łagodnym nachyleniu, aby nie utrudniać przepływu wody.
UWAGA:
Upewnić się, że rury są szczelnie uszczelnione, aby uniknąć uszko-
dzeń spowodowanych wilgocią i gromadzenia się pleśni w ścianie.
CL6045QCCB_IM 17.12.20
109
Rozwijanie rur chłodzących
Zaślepki zdejmować tylko bezpośrednio przed podłączeniem rur
chłodzących, aby zapobiec zabrudzeniu.
Jeśli rury będą zbyt często wyginane lub ciągnięte, staną się sztywne.
Nie zginać rur więcej niż trzy razy.
Ostrożnie rozwinąć rury, jak pokazano na schemacie A. Unikać
wyboczenia.
UWAGA:
Nie rozsuwać rury, jak pokazano na schemacie B. Zamiast tego,
ostrożnie ją rozwinąć.
Połączenia z jednostką wewnętrzną
UWAGA:
Klimatyzator musi być zainstalowany i / lub podłączony przez certy-
kowaną rmę chłodniczą i klimatyzacyjną. Niewłaściwa instalacja
spowoduje wygaśnięcie gwarancji.
1. Zdjąć nasadki ochronne.
2. Sprawdzić połączenia pod kątem zabrudzenia lub uszkodzenia.
3. Połączyć nakrętkę łączącą z gwintem przyłączeniowym jednostki
wewnętrznej. Należy przy tym zwrócić uwagę na kolor nasadek
ochronnych.
4. Dokręcić połączenie odpowiednim kluczem.
WSKAZÓWKA:
Zawsze zwracać uwagę na właściwy moment dokręcania i przestrze-
gać dołączonej tabeli zatytułowanej „Informacje dotyczące instalacji”.
Podłączanie rury do skroplin do jednostki wewnętrznej
Niezwykle ważne jest, aby rura do skroplin została zainstalowana we
właściwy sposób do jednostki wewnętrznej.
1. Ułożyć wąż spustowy pod rurą i upewnić się, że nie ma żadnych
zagłębień ani wgłębień.
2. Wąż spustowy musi być skierowany w dół, aby ułatwić przepływ
skroplonej wody.
3. Nie zginać ani nie skręcać węża spustowego. Nie pozwolić mu wy-
stawać. Nie zanurzać końcówki w wodzie. Jeśli rura jest podłączona
do przedłużki, należy zapewnić połączenie podczas wkładania jej do
jednostki wewnętrznej.
4. Jeśli rury chłodzące są ułożone zgodnie z punktem 3 w rozdziale
zatytułowanym „Wyrównanie rur chłodzących”, wówczas rury, kabel
połączeniowy jednostki zewnętrznej i rura odprowadzająca skroploną
wodę muszą być zamocowane z tyłu urządzenie za pomocą złączek
rurowych.
5. Włożyć łącznik rurowy do odpowiedniego urządzenia.
6. Mocno docisnąć rurę łączącą do jednostki klimatyzacyjnej i upewnić
się, że połączenie jest szczelne.
UWAGA:
Unikać wyboczenia podczas pozycjonowania i zezwalać na wyko-
nywanie tych zadań wyłącznie przez certykowane rmy specjali-
styczne!
CL6045QCCB_IM 17.12.20
110
Montaż jednostki wewnętrznej i przepustu ściennego na zewnątrz
Po podłączeniu rur chłodzących oraz rury spustowej skroplonej wody
zgodnie z instrukcją należy postępować w następujący sposób:
1. Zachowując szczególną ostrożność, ułożyć rury, kabel połączeniowy
jednostki zewnętrznej i rurę do skroplin w miejscu, w którym mają być
poprowadzone przez ścianę na zewnątrz.
2. Owinąć razem rury skroplin, kabel połączeniowy jednostki zewnętrz-
nej i rurę do skroplin taśmą winylową, a następnie szczelnie przykryć
wszystko taśmą izolacyjną (brak w zestawie).
UWAGA:
Upewnić się, że rury są szczelnie uszczelnione, aby uniknąć uszko-
dzeń spowodowanych wilgocią i gromadzenia się pleśni w ścianie.
Upewnić się, że wszystkie odsłonięte części rurowe zostały wystar-
czająco odizolowane.
3. Wywiercić otwór o średnicy 57 mm z nachyleniem / spadkiem
5 - 7 mm. (Ilustracja 2)
WSKAZÓWKA:
Nawiercić ją z lekkim nachyleniem 5 - 7 mm na zewnątrz, aby mieć
pewność, że skroplona woda będzie mogła odpłynąć. W każdym
przypadku upewnić się, że na całej długości rury do skroplin znaj-
duje się nachylenie w kierunku otworu w ścianie.
4. Włożyć osłonę otworu.
5. Przeprowadzić izolowane rury, kabel połączeniowy jednostki ze-
wnętrznej i rury do skroplin przez otwór w ścianie.
WSKAZÓWKA:
Po zamontowaniu rur należy uszczelnić otwór w ścianie, przez
który poprowadzono rury, tak aby był zarówno hermetyczny, jak i
wodoszczelny.
6. Przymocować bezpiecznie jednostkę wewnętrzną do górnej części
płyty do montażu ściennego.
7. Docisnąć mocno dolną część jednostki wewnętrznej do płyty do mon-
tażu ściennego, aż do oporu.
Instalacja jednostki zewnętrznej
Przed podłączeniem rur zdecydować, gdzie chcesz umieścić
jednostkę zewnętrzną i upewnić się, że w wybranym miejscu jest
wystarczająco dużo miejsca na prace konserwacyjne, które będą
przeprowadzane w późniejszym czasie. (Przestrzegać minimalnych
odległości)
Założyć nasadki ochronne (w zestawie) na stojak i przymocować je w
odpowiednich miejscach.
Używać wyjątkowo wytrzymałych śrub / kołków rozporowych i pamię-
tać również o wadze urządzenia, aby w miarę upływu czasu wibracje
spowodowane pracą nie powodowały poluzowania połączenia. Urzą-
dzenie należy zainstalować zgodnie z obowiązującymi przepisami
bezpieczeństwa.
Rura spustowa kondensatu do jednostki zewnętrznej
Skroplona woda i lód, które gromadzą się w jednostce zewnętrznej w
wyniku wytwarzania ciepła, można odprowadzić za pomocą rury do
skroplin.
1. Zamocować wsporniki rury spustowej skroplin w przewidzianym do
tego otworze 25 mm.
2. Podłączyć wsporniki rury odprowadzającej skropliny do rury do skro-
plin i upewnić się, że przepływ jest odpowiednio kontrolowany, aby
uniknąć uszkodzeń spowodowanych wilgocią.
Połączenie elektryczne (jednostka zewnętrzna)
Zdjąć osłonę złącza (15) po prawej stronie urządzenia. Odpowiedni
schemat znajduje się z tyłu. Zob. schemat.
1. Podłączyć kabel zasilający jednostki wewnętrznej do listwy zacisko-
wej.
2. Ostrożnie przymocować kabel zasilający jednostki zewnętrznej za
pomocą zacisków połączeniowych.
3. Upewnić się, że kable zostały prawidłowo podłączone. Upewnić się,
że uziemienie zostało prawidłowo zainstalowane.
4. Ponownie założyć osłonę ochronną na urządzenie.
CL6045QCCB_IM 17.12.20
111
UWAGA:
Wszelkie prace elektryczne musi wykonywać uprawniony elektryk
zawodowy lub specjalistyczna rma elektroniczna. Niewłaściwa insta-
lacja spowoduje wygaśnięcie gwarancji.
Instrukcje użycia szybkozłącza
Użyć szybkozłącza w celu łatwegp połączenia wewnętrznych i
zewnętrznych jednostek klimatyzatora. Szybka i łatwa procedura,
odnośnie do której przysługują wszelkie roszczenia gwarancyjne pod
warunkiem wykonania wszystkich prac przez wyspecjalizowaną rmę.
UWAGA:
Dostarczone rury chłodzące zostały wstępnie napełnione środkiem
chłodzącym podczas produkcji.
Nie wolno skracać ani wydłużać rur.
Podłączenie do jednostki wewnętrznej
1. Zachować ostrożność, aby ostrożnie rozwinąć rury chłodzące jak
opisano w rozdziale zatytułowanym „Rozwijanie rur chłodzących”.
Zawsze unikać wyginania rur.
2. Zdjąć nasadki ochronne (niebieskie i szare) ze złączek na jednostce
wewnętrznej.
3. Upewnić się, że wszystkie śruby są w dobrym stanie i wolne od czą-
stek brudu, kurzu, piasku i innych zawiesin lub zabrudzeń.
4. Przykręcić rury chłodzące za pomocą złączek na jednostce we-
wnętrznej. Zwrócić uwagę, aby połączenia były wykonane zgodnie
z niebiesko-szarą kolorystyką. Następnie dokręcić nakrętki dwoma
kluczami (jeden do dokręcenia połączenia, a drugi do kontrowania).
WSKAZÓWKA:
Zawsze zwracać uwagę na właściwy moment dokręcania i prze-
strzegać dołączonej tabeli zatytułowanej „Informacje dotyczące
instalacji”.
Podłączenie do jednostki zewnętrznej
1. Zachować ostrożność, aby ostrożnie rozwinąć rury chłodzące, jak
opisano w rozdziale zatytułowanym „Rozwijanie rur chłodzących”.
Zawsze unikać wyginania rur.
2. Zdjąć nasadki ochronne (niebieskie i szare) ze złączek na jednostce
zewnętrznej.
3. Upewnić się, że wszystkie śruby są w dobrym stanie i wolne od czą-
stek brudu, kurzu, piasku i innych zawiesin lub zabrudzeń.
4. Przykręcić rury chłodzące za pomocą złączek na jednostce zewnętrz-
nej. Zwrócić uwagę, aby połączenia były wykonane zgodnie z niebie-
sko-szarą kolorystyką. Następnie dokręcić nakrętki dwoma kluczami
(jeden do dokręcenia połączenia, a drugi do kontrowania).
WSKAZÓWKA:
Zawsze zwracać uwagę na właściwy moment dokręcania i prze-
strzegać dołączonej tabeli zatytułowanej „Informacje dotyczące
instalacji”.
CL6045QCCB_IM 17.12.20
112
5. Upewnić się, że obwód chłodniczy urządzenia jest prawidłowo podłą-
czony i szczelny. Skontrolować elementy łączące za pomocą sprayu
do wycieków. Jeśli pojawią się pęcherzyki powietrza, występują
nieszczelności. W takim przypadku konieczne jest uszczelnienie
zaworów odcinających. Dokładnie sprawdzić rury i połączenia.
WSKAZÓWKA:
Zawór odcinający (a) został zaplombowany podczas produkcji i nie
można go otwierać. Zawór serwisowy (b) służy wyłącznie do celów
serwisowych.
UWAGA:
Klimatyzator musi być zainstalowany i podłączony przez certykowaną
rmę chłodniczą i klimatyzacyjną. Niewłaściwa instalacja spowoduje
wygaśnięcie gwarancji.
Testowanie jednostki wewnętrznej
Czy wyłącznik zasilania działa prawidłowo?
Czy wentylator działa?
Czy tryby pracy działają normalnie?
Czy można dokładnie ustawić temperaturę i czas?
Czy wszystkie lampy świecą się normalnie?
Czy klapy powietrza działają prawidłowo?
Czy rura do skroplin działa normalnie?
UWAGA:
Wszystkie opisane powyżej kroki muszą być wykonane przez certy-
kowaną rmę chłodniczą i klimatyzacyjną. Niewłaściwa realizacja
skutkuje wygaśnięciem gwarancji.
Testowanie jednostki zewnętrznej
Czy podczas pracy mają miejsce nietypowe dźwięki lub wibracje?
Czy środek chłodzący wycieka?
WSKAZÓWKA:
Elektroniczny system sterowania uruchomi sprężarkę dopiero po
trzech minutach od włączenia urządzenia.
UWAGA:
Wszystkie opisane powyżej kroki muszą być wykonane przez certy-
kowaną rmę chłodniczą i klimatyzacyjną. Niewłaściwa realizacja
skutkuje wygaśnięciem gwarancji.
Informacje dotyczące instalacji
Instrukcje instalacji – informacje dotyczące instalacji
Model projektowy / Wydajność chłodnicza (Btu / h) 9k 12k 15 / 18k
Średnica rury chłodzącej a) 1 / 4" 6 1 / 4" 6 1 / 4" 6
Średnica rury chłodzącej b) 3 / 8" 9,52 1 / 2" 12 1 / 2" 12
Standardowa długość rury chłodzącej 5 m 5 m 5 m
Maksymalna odległość między jednostką wewnętrzną i zewnętrzną 15 m 15 m 15 m
Dodatkowa ilość czynnika chłodniczego 20 g / m 20 g / m 30 g / m
Maksymalna odległość między jednostką wewnętrzną i zewnętrzną 5 m (15 m) 5 m (15 m) 5 m (15 m)
Środek chłodzący * R32 R32 R32
*) Dodatkowe informacje można znaleźć na tabliczce informacyjnej na jednostce zewnętrznej.
Moment dokręcania kołpaków ochronnych i połączeń kołnierzowyc
Rura chłodząca Moment dokręcania (N × m) Odpowiednie obciążenie:
Klucz 20 cm Moment dokręcania (N × m)
1 / 4" 6 15 - 20 Mocno / mocno ręcznie Nakrętka łącząca serwisowa 7 - 9
3 / 8" 9,52 31 - 35 Mocno Nasadki ochronne 25 - 30
1 / 2" 12 35 - 45 Mocno
5 / 8" 15,88 75 - 80 Mocno
CL6045QCCB_IM 17.12.20
113
Specykacje kabli
Instrukcja instalacji – informacje dla instalatora
Model Czynnik chłodzący (Btu / h) 9k 12k 15 / 18k
Kabel zasilania
N1,0 mm²
AWG18
1,0 mm² (1,5 mm²)
AWG18 (AWG16)
1,5 mm²
AWG16
L1,0 mm²
AWG18
1,0 mm² (1,5 mm²)
AWG18 (AWG16)
1,5 mm²
AWG16
E1,0 mm²
AWG18
1,0 mm² (1,5 mm²)
AWG18 (AWG16)
1,5 mm²
AWG16
Kabel łączący
N1,0 mm² 1,0 mm² (1,5 mm²) 1,5 mm²
L1,0 mm² 1,0 mm² (1,5 mm²) 1,5 mm²
11,0 mm² 1,0 mm² (1,5 mm²) 1,5 mm²
20,75 mm² 0,75 mm² 0,75 mm²
30,75 mm² 0,75 mm² 0,75 mm²
Instrukcje instalacji – informacje dotyczące instalacji
Transformator napięcia 9k 12k 18 / 22k
Model Czynnik chłodzący (Btu / h) Przekrój
Kabel zasilania
N1,0 mm² (1,5 mm²)
AWG18 (AWG16)
1,0 mm² (1,5 mm²)
AWG18 (AWG16)
1,5 mm²
AWG16
L1,0 mm² (1,5 mm²)
AWG18 (AWG16)
1,0 mm² (1,5 mm²)
AWG18 (AWG16)
1,5 mm²
AWG16
E1,0 mm² (1,5 mm²)
AWG18 (AWG16)
1,0 mm² (1,5 mm²)
AWG18 (AWG16)
1,5 mm²
AWG16
Kabel łączący
N1,0 mm² (1,5 mm²) 1,0 mm² (1,5 mm²) 1,5 mm²
L1,0 mm² (1,5 mm²) 1,0 mm² (1,5 mm²) 1,5 mm²
11,0 mm² (1,5 mm²) 1,0 mm² (1,5 mm²) 1,5 mm²
Przy 220 V 7 K, 9 K, 12 K, 15 K, 16 K, 18 K, 22 K, 24 K, 30 K wartość zapasowa dla jednostki wewnętrznej klimatyzacji wynosi: 50 T, 3,15 A
Przy 110 V 7 K, 9 K, 12 K wartość zapasowa dla jednostki wewnętrznej klimatyzacji wynosi: 50 T, 3,15 A
125 V 7 K, 9 K, 12 K wartość zapasowa dla jednostki wewnętrznej klimatyzacji wynosi: 61 T, 15 A
250 V 18 K, 22 K, 24 K wartość zapasowa dla jednostki wewnętrznej klimatyzacji wynosi: 65 T, 25 A!
Schemat obwodu
Schemat obwodu może się różnić w zależności od modelu. Należy prze-
strzegać schematów obwodów na jednostce wewnętrznej i zewnętrznej.
Schemat obwodu (7) jednostki wewnętrznej znajduje się pod panelem
przednim (1).
Schemat obwodu jednostki zewnętrznej znajduje się na odwrotnej stro-
nie osłony złącza (15).
WSKAZÓWKA:
W niektórych modelach kable zostały podłączone przez producenta
do głównej płytki drukowanej jednostki wewnętrznej bez listew zaci-
skowych.
Działanie
Panel kontrolny
Jeśli pilot nie działa lub wymagana jest konserwacja, wykonać następu-
jące czynności:
1. Otworzyć przednią pokrywę i unieśc ją do góry, aż dotrze się do
przycisku .
2. Naciśnięcie przycisku spowoduje uruchomienie funkcji chłodzenia.
(Będzie słyszalny sygnał dźwiękowy)
3. Naciśnięcie przycisku na 3 sekund spowoduje uruchomienie funk-
cji podgrzewania. (Będą słyszalne dwa sygnały dźwiękowe)
4. Aby ją wyłączyć, należy nacisnąć ponownie przycisk . (Będzie
słyszalny długi sygnał dźwiękowy)
WSKAZÓWKA:
Zewnętrzne ciśnienie statyczne pompy wodnej we wszystkich mode-
lach wynosi 0 Pa.
CL6045QCCB_IM 17.12.20
114
Pilot zdalnego sterowania
1. Otworzyć pokrywę komory baterii z tyłu pilota, popychając ją w kie-
runku strzałki.
2. Włożyć 2 baterie R03 „AAA” 1,5 V. Upewnić się, że polaryzacja jest
prawidłowa. (Zob. na spód komory baterii)
WSKAZÓWKA:
Zabezpieczenie przed dziećmi: Nacisnąć jednocześnie przyciski
i aby aktywować blokadę przed dziećmi.
Włączanie / wyłączanie wyświetlacza: Nacisnąć i przytrzymać
przycisk ECO
3. Skierować pilota w stronę klimatyzatora.
WSKAZÓWKA:
Upewnić się, że w przestrzeni między pilotem a odbiornikiem sygnału
w jednostce wewnętrznej nie ma żadnych przedmiotów / przeszkód.
Nigdy nie pozostawiać pilota zdalnego sterowania wystawionego na
bezpośrednie działanie promieni słonecznych przez dłuższy czas.
Używać i przechowywać pilota w odległości co najmniej jednego
metra od telewizora lub innych urządzeń elektrycznych.
Włącznik / Wyłącznik
Nacisnąć przycisk aby wyłączyć urządzenie.
Nacisnąć ponownie przycisk aby ponownie włączyć urządzenie.
Regulacja przepływu powietrza
Strumień powietrza będzie równomiernie rozprowadzany, gdy uchodzi do
pomieszczenia. Dostępne są opcje optymalizacji kierunku przepływu.
Przycisk aktywuje klapę kierującą powietrze (1). Strumień powietrza jest
kierowany od góry do dołu, aby zapewnić równomierne rozprowadzenie
powietrza w całym pomieszczeniu.
Deektory powietrza (2) należy ustawić ręcznie i znajdują się one pod
klapami kierującymi powietrze. Umożliwiają one skierowanie strumienia
powietrza w prawo lub w lewo.
UWAGA:
Ustawienie deektora powietrza musi nastąpić, gdy urządzenie jest wyłączone.
Nigdy nie ustawiać klap kierujących powietrze ręcznie (np. ręką). Może to spowodować poważne uszkodzenia.
Nigdy nie wkładać palców, patyków ani innych przedmiotów do otworów wlotu / wylotu powietrza. Może to spowodować szkody materialne i
obrażenia ciała.
WSKAZÓWKA:
Należy pamiętać, że ze względów konstrukcyjnych nie wszystkie funkcje można wyświetlić na wyświetlaczu pilota w każdym trybie pracy. Naci-
skając klawisz OPTION można sprawdzić, które funkcje są dostępne dla poszczególnych trybów pracy.
Przycisk MODE Wybrać tryb pracy
Przycisk OPTION Wybrać funkcję
Tryb chłodzenia (COOL)
Tryb chłodzenia umożliwia jednoczesne chłodzenie pomieszczenia i
redukcję wilgotności powietrza.
1. Aby włączyć tryb chłodzenia, nacisnąć przycisk MODEna wy-
świetlaczu pilota pojawi się „COOL”. Funkcja chłodzenia zostanie
aktywowana, jeśli wybrana temperatura jest niższa od temperatury w
pomieszczeniu. (Wybór za pomocą klawiszy i .)
2. Aby zoptymalizować działanie klimatyzacji, wyregulować tempera-
turę, prędkość i kierunek przepływu powietrza, naciskając odpowied-
nie przyciski.
Tryb ogrzewania (HEAT)
Tryb ogrzewania umożliwia ogrzanie pomieszczenia.
1. Aby włączyć tryb ogrzewania, nacisnąć przycisk MODEna wy-
świetlaczu pilota pojawi się „HEAT”. Funkcja ogrzewania zostanie
aktywowana, jeśli wybrana temperatura jest wyższa od temperatury
w pomieszczeniu. (Wybór za pomocą klawiszy i .)
2. Aby zoptymalizować działanie ogrzewania, wyregulować tempera-
turę, prędkość i kierunek przepływu powietrza, naciskając odpowied-
nie przyciski.
WSKAZÓWKA:
Jeśli urządzenie jest wyposażone w grzałkę elektryczną, opóźni to
uruchomienie aplikacji o kilka minut.
WSKAZÓWKA:
Funkcja automatycznego rozmrażania może aktywować się w
trybie ogrzewania. Ta funkcja rozmrażania jest niezbędna do
czyszczenia urządzenia. Resztki szronu ze skraplacza są usuwane
w celu przywrócenia pełnej zdolności wymiany ciepła. Ta proce-
dura trwa zwykle od 2 do 10 minut. Wentylator przestanie działać
podczas odnrażania. Po rozmrożeniu urządzenie automatycznie
powraca do trybu ogrzewania.
Automatyczne włączanie się urządzenia ( )
Aby zaprogramować automatyczne włączanie się urządzenia, należy je
wyłączyć.
1. Nacisnąć przycisk OPTION.
2. Za pomocą klawiszy strzałek wybrać i aż na ekranie pojawi się
” wyświetlacz pilota.
3. Nacisnąć ponownie przycisk OPTION i za pomocą klawiszy strzałek
wybrać i , aby ustawić żądany czas.
4. Potwierdzić wybór przez naciśnięcie przycisku OPTION.
WSKAZÓWKA:
Aby przerwać ustawioną funkcję, powtórzyć czynności opisane
powyżej.
Funkcję Timer można ustawić na 30-minutowe interwały.
Automatyczne wyłączanie się urządzenia ( )
Aby zaprogramować automatyczne wyłączanie się urządzenia, należy
je włączyć.
1. Nacisnąć przycisk OPTION.
2. Za pomocą klawiszy strzałek wybrać i aż na pilocie pojawi się
.
CL6045QCCB_IM 17.12.20
115
3. Nacisnąć ponownie przycisk OPTION i za pomocą klawiszy strzałek
wybrać i , aby ustawić żądany czas.
4. Potwierdzić wybór przez naciśnięcie przycisku OPTION.
WSKAZÓWKA:
Aby przerwać ustawioną funkcję, powtórzyć czynności opisane
powyżej.
Funkcję Timer można ustawić na 30-minutowe interwały.
Tryb wentylacji (FAN)
Aby włączyć tryb wentylacji, nacisnąć przycisk MODEna wyświetla-
czu pilota pojawi się „FAN”.
Naciskając klawisz FAN można regulować prędkość wentylatora w
następującej kolejności:
wył. ( )
LOW ( )
MEDIUM ( )
HIGH ( )
Turbo ( )
automatyczna
Tryb osuszania powietrza (DRY)
Ta funkcja pozwala na zmniejszenie wilgotności powietrza, a także
poprawę jakości powietrza w pomieszczeniu.
Aby włączyć tryb osuszania powietrza, nacisnąć przycisk
MODE aż na wyświetlaczu pilota pojawi się „DRY”. Wentylator włączy
się ze zmiennym cyklem chłodzenia.
Tryb automatyczny (AUTO)
Aby aktywować tryb automatyczny, nacisnąć przycisk MODE, Aż na
wyświetlaczu pilota pojawi się „AUTO”.
Prędkość wentylatora i temperatura będą sterowane automatycznie,
niezależnie od temperatury w pomieszczeniu.
Temperatura otoczenia Tryb pracy
< 20 °C Ogrzewanie
20 °C ~ 26 °C Osuszanie
> 26 °C Chłodzenie
Tryb drzemki ( )
Funkcja SLEEP automatycznie dostosowuje temperaturę, aby powie-
trze w pomieszczeniu było szczególnie przyjemne w nocy. Podczas
pracy w trybie chłodzenia / osuszania ustawiona temperatura będzie au-
tomatycznie zwiększana o 1 °C, aż do osiągnięcia wzrostu temperatury
o 2 °C w ciągu 2 godzin.
1. Aby aktywować tryb drzemki, nacisnąć przycisk OPTION.
2. Za pomocą klawiszy strzałek wybrać i aż na pilocie pojawi się
.
3. Potwierdzić wybór przez naciśnięcie przycisku OPTION.
4. Użyć przycisku OPTION , aby wyłączyć funkcję „ .
W trybie ogrzewania temperatura jest obniżana o 2 °C w ciągu pierw-
szych 2 godzin.
Po 10 godzinach w trybie drzemki urządzenie automatycznie się wyłączy.
Tryb oszczędzania energii (ECO)
Naciśnięcie przycisku ECO włącza lub wyłącza funkcję Eco. Urządzenie
przejdzie w tryb oszczędzania energii. Ustawiona temperatura jest
automatycznie, stopniowo zwiększana bez uszczerbku dla komfortu
klimatycznego. Spowoduje to niskie zużycie energii.
Naciśnięcie i przytrzymanie przycisk ECO umożliwia wyłączenie wy-
świetlacza jednostki wewnętrznej.
Maksymalna temperatura i prędkość ( )
Naciśnięcie przycisku TURBO włącza lub wyłącza Funkcje Turbo.
Pozwala to na osiągnięcie ustawionej temperatury tak szybko, jak to
możliwe.
Pleśń / Samoczyszczenie ( )
1. Aby aktywować tryb samoczyszczenia, nacisnąć przycisk OPTION.
2. Za pomocą klawiszy strzałek wybrać i aż na pilocie pojawi się
”.
3. Potwierdzić wybór przez naciśnięcie przycisku OPTION.
4. Użyć przycisku OPTION, aby wyłączyć funkcję „ .
Automatyczne obliczanie temperatury ( )
Automatyczne obliczanie temperatury za pomocą czujnika w pilocie.
Upewnić się, że pilot nie jest narażony na działanie źródeł ciepła, np.
lamp.
1. Aby aktywować ”, nacisnąć przycisk OPTION.
2. Za pomocą klawiszy strzałek wybrać i aż na pilocie pojawi się
”.
3. Potwierdzić wybór przez naciśnięcie przycisku OPTION.
4. Nacisnąć przycisk OPTION, aby wyłączyć funkcję „ ”.
Czyszczenie i konserwacja
OSTRZEŻENIE:
Upewnić się, że woda nie przedostaje się do otworów
urządzenia podczas czyszczenia. Niebezpieczeństwo
porażenia prądem lub pożaru.
UWAGA:
Regularnie konserwować urządzenie, aby zapewnić jego bez-
pieczne i wydajne działanie.
Wszystkie prace związane z czyszczeniem i konserwacją muszą
być wykonywane przez certykowaną rmę chłodniczą i klimatyza-
cyjną. Niewłaściwe zastosowanie skutkuje wygaśnięciem gwarancji.
Czyszczenie i wymiana ltra
1. Otworzyć panel przedni w kierunku wskazywanym przez strzałkę.
CL6045QCCB_IM 17.12.20
116
2. Podnieść przednią pokrywę jedną ręką, drugą ręką wyjąć ltr prze-
ciwkurzowy.
3. Oczyścić ltr wodą. W przypadku silnego zabrudzenia do czyszcze-
nia użyć ciepłej wody (nie wyższej niż 45 °C). Następnie pozostawić
ltr do wyschnięcia.
4. Ponownie włożyć ltr powietrza.
5. Zamknąć pokrywę komory.
WSKAZÓWKA:
Dodatkowe ltry z węglem aktywnym (szare) i ltry jonizujące (zie-
lone) nie mogą być czyszczone i w zależności od liczby godzin pracy
należy je wymienić na nowe. Poniższa ilustracja przedstawia proces
usuwania ltrów.
Czyszczenie jednostki wewnętrznej
1. Otworzyć przednią płytę urządzenia i zdjąć zawiasy, aby ułatwić
czyszczenie.
2. Wyczyścić jednostkę wewnętrzną za pomocą szmatki i wody (nie
wyższej niż 40 °C).
UWAGA:
Nie rozpylać środków czyszczących na urządzenie.
Nie zanurzać urządzenia w wodzie: elementy elektroniczne mogą
ulec uszkodzeniu.
Nie używać szczotki drucianej ani żadnych materiałów ściernych.
Czyszczenie jednostki zewnętrznej
Jeśli wlot powietrza na jednostce zewnętrznej jest zablokowany, usunąć
wszelkie obecne liście lub inne odpady, a następnie usunąć pozostały
kurz za pomocą sprężonego powietrza lub niewielkiej ilości wody.
Wymiana baterii
WSKAZÓWKA:
Używać tylko nowych baterii. Baterie należy wyjmować z pilota tylko
wtedy, gdy klimatyzator jest wyłączony.
Jeśli:
Nie słychać już sygnału potwierdzającego z jednostki wewnętrznej.
Wyświetlacz nie działa prawidłowo.
Jak:
Otworzyć tylną pokrywę.
Włożyć nowe baterie. Upewnić się, że polaryzacja jest prawidłowa.
Wykrywanie i usuwanie usterek
Nieprawidłowe działanie / awaria Możliwa przyczyna
Urządzenie nie działa. Awaria zasilania / wyciągnięta wtyczka
Uszkodzony silnik wentylatora jednostki wewnętrznej lub jednostki zewnętrznej
Przełącznik termomagnetyczny na sprężarce jest uszkodzony
Urządzenie ochronne jest uszkodzone lub zepsute lub ma przepalone bezpieczniki
Luźne połączenia lub wyciągnięta wtyczka
Przerwa w pracy w celu ochrony / konserwacji produktu
Napięcie za wysokie lub za niskie
Funkcja „ ” jest aktywna (automatyczne włączenie urządzenia)
Uszkodzenie elektronicznej tablicy sterowniczej
Zwykły zapach Zabrudzone lub brudne ltry powietrza
Szum wody Płynny przepływ wsteczny w obiegu czynnika chłodniczego
Z wylotu powietrza wydostaje się drobna mgiełka Dzieje się tak, gdy powietrze w pomieszczeniu staje się bardzo zimne, na przykład w trybie
„COOL” lub „DRY”.
Niezwykłe odgłosy Hałas może być spowodowany rozszerzaniem się lub kurczeniem spowodowanym wahaniami
temperatury panelu przedniego. Występowanie tych odgłosów nie oznacza, że urządzenie jest
wadliwe lub zepsute.
CL6045QCCB_IM 17.12.20
117
Nieprawidłowe działanie / awaria Możliwa przyczyna
Niepożądany przepływ powietrza (gorącego lub
zimnego)
Niewłaściwe lub nieodpowiednie ustawienia temperatury
Wlot lub wylot powietrza jest zablokowany w jednostce wewnętrznej lub jednostce zewnętrznej.
Filtr powietrza jest zatkany.
Prędkość wentylatora ustawiona na minimum
Inne źródła ciepła w pomieszczeniu
Brakujące środki chłodzące
Urządzenie nie reaguje na sygnały / wpisy. Pilot nie znajduje się wystarczająco blisko odbiornika jednostki wewnętrznej.
Baterie pilota są niewystarczające.
Przeszkody między pilotem a odbiornikiem
Wyświetlacz jest wyłączony. Aktywowana funkcja LED
Błąd napięcia
Funkcja ECO fjest aktywna (patrz rozdział dotyczący „Tryb oszczędzania energii (ECO)”)
Funkcje lub cechy są nieobecne na wyświetlaczu Nie wszystkie funkcje lub cechy są pokazane dla każdego trybu pracy (patrz rozdział dotyczący
„Działanie”)
W takim przypadku natychmiast wyłącz urządzenie i odłącz zasilanie:
Nietypowe odgłosy podczas pracy
Błąd w tablicy sterowniczej
Przepalone bezpieczniki lub uszkodzony przełącznik
Rozpylić wodę lub przedmioty w układzie
Przegrzany / spalony kabel lub wtyczka
Silny zapach wydobywający się z urządzenia
Kody błędów na wyświetlaczu
W przypadku wystąpienia błędu na wyświetlaczu jednostki wewnętrznej pojawią się następujące kody błędów:
Kontrolka Opis błędu
Miga raz Błąd czujnika temperatury wewnętrznej
Miga dwukrotnie Błąd czujnika temperatury zewnętrznej
Miga sześć razy Silnik wentylatora wewnętrznego jest uszkodzony
WSKAZÓWKA:
Dodatkowe kody błędów można znaleźć w instrukcji serwisowej.
CL6045QCCB_IM 17.12.20
118
Dane techniczne
Model:...............................................................................CL 6045 QC CB
Waga netto jednostki wewnętrznej: ............................................... ok. 7 kg
Waga netto jednostki zewnętrznej: .............................................. ok. 25 kg
Zasilanie / napięcie: ......................................................220 - 240 V~, 50 Hz
Pobór mocy podczas chłodzenia: .................................................... 800 W
Pobór mocy podczas ogrzewania: .................................................. 699 W
Pobór mocy podczas zintegrowanego trybu czuwania: ................... 5,0 W
Klasa ochrony: ..........................................................................................
Wydajność chłodnicza: ..........................................9000 BTU (2600 kW/h)
Moc cieplna: ........................................................... 9000 BTU (2610 kW/h)
Środek chłodzący: ............................................................................... R 32
Maksymalne dopuszczalne ciśnienie robocze:
Strona ciśnieniowa: .................................................................. 3,7 MPa
Strona ssawna: ......................................................................... 1,2 MPa
Model:...............................................................................CL 6046 QC CB
Waga netto jednostki wewnętrznej: ............................................ ok. 8,5 kg
Waga netto jednostki zewnętrznej: .............................................. ok. 25 kg
Zasilanie / napięcie: ......................................................220 - 240 V~, 50 Hz
Pobór mocy podczas chłodzenia: ...................................................1130 W
Pobór mocy podczas ogrzewania: .................................................. 922 W
Pobór mocy podczas zintegrowanego trybu czuwania: ................... 5,0 W
Klasa ochrony: ..........................................................................................
Wydajność chłodnicza: ........................................12000 BTU (3400 kW/h)
Moc cieplna: .........................................................12000 BTU (3420 kW/h)
Środek chłodzący: ............................................................................... R 32
Maksymalne dopuszczalne ciśnienie robocze:
Strona ciśnieniowa: .................................................................. 3,7 MPa
Strona ssawna: ......................................................................... 1,2 MPa
Model:...............................................................................CL 6047 QC CB
Waga netto jednostki wewnętrznej: .......................................... ok. 10,5 kg
Waga netto jednostki zewnętrznej: ...........................................ok. 35,5 kg
Zasilanie / napięcie: ......................................................220 - 240 V~, 50 Hz
Pobór mocy podczas chłodzenia: .................................................. 1579 W
Pobór mocy podczas ogrzewania: ................................................ 1382 W
Pobór mocy podczas zintegrowanego trybu czuwania: ................... 2,5 W
Klasa ochrony: ..........................................................................................
Wydajność chłodnicza: ........................................18000 BTU (5100 kW/h)
Moc cieplna: .........................................................18000 BTU (5130 kW/h)
Środek chłodzący: ............................................................................... R 32
Maksymalne dopuszczalne ciśnienie robocze:
Strona ciśnieniowa: .................................................................. 3,7 MPa
Strona ssawna: ......................................................................... 1,2 MPa
Wi-Fi
Obsługiwana sieć: ................................................................... 802.11 b/g/n
Maksymalna moc wyjściowa promieniowana:............................ 18,0 dBm
Zakres częstotliwości: ....................................................................2,4 GHz
Kanały: ............................................................................................... 1 - 13
Obsługiwane klucze Wi-Fi: .................................................... WPA / WPA2
Zastrzegamy sobie prawo wprowadzania zmian technicznych i projekto-
wych w trakcie ciągłego rozwoju produktu.
Ogłoszenie zgodności z dyrektywą
Clatronic International GmbH niniejszym oświadcza, że typ urządzenia
radiowego CL 6045 QC CB / CL 6046 QC CB / CL 6047 QC CB jest
zgodny z dyrektywą 2014 / 53 / UE.
Ponadto, urządzenie jest zgodne z wymaganiami dyrektywy RoHS
2011 / 65 / UE & (UE) 2015 / 863.
Pełny tekst deklaracji zgodności UE jest dostępny pod następującym
adresem internetowym: www.sli24.de
W obszarze pobierania należy wprowadzić nazwę modelu
CL 6045 QC CB.
Sprawdzono do działania w Polsce.
Warunki gwarancji
Przyznajemy 24 miesiące gwarancji na produkt licząc od daty zakupu.
W tym okresie będziemy bezpłatnie usuwać w terminie 14 dni od daty
dostarczenia wadliwego sprzętu z kartą gwarancyjną do miejsca zakupu
wszystkie uszkodzenia powstałe w tym urządzeniu na skutek wady
materiałów lub wadliwego wykonania, naprawiając oraz wymieniając
wadliwe części lub (jeśli uznamy za stosowne) wymieniając całe urzą-
dzenie na nowe.
Sprzęt do naprawy powinien być dostarczony w komplecie wraz
z dowodem zakupu oraz z ważną kartą gwarancyjną do sprzedawcy
w miarę możliwości w oryginalnym opakowaniu lub innym odpowiednim
dla zabezpieczenia przed uszkodzeniem. W razie braku kompletnego
opakowania fabrycznego, ryzyko uszkodzenia sprzętu podczas trans-
portu do i z miejsca zakupu ponosi reklamujący.
Naprawa gwarancyjna nie dotyczy czynności przewidzianych w in-
strukcji obsługi, do wykonania których zobowiązany jest użytkownik we
własnym zakresie i na własny koszt.
Gwarancja nie obejmuje:
mechanicznych, termicznych, chemicznych uszkodzeń sprzętu i wy-
wołanych nimi wad,
uszkodzeń powstałych w wyniku działania sił zewnętrznych takich
jak wyładowania atmosferyczne, zmiana napięcia zasilania i innych
zdarzeń losowych,
nieprawidłowego ustawienia wartości napięcia elektrycznego, zasila-
nie z nieodpowiedniego gniazda zasilania,
sznurów połączeniowych, sieciowych, żarówek, baterii, akumulato-
rów,
uszkodzeń wyrobu powstałych w wyniku niewłaściwego lub niezgod-
nego z instrukcją jego użytkowania, przechowywania, konserwacji,
samowolnego zrywania plomb oraz wszelkich przeróbek i zmian kon-
strukcyjnych dokonanych przez użytkownika lub osoby niepowołane,
roszczeń z tytułu parametrów technicznych wyrobu, o ile są one
zgodne z podanymi przez producenta,
prawidłowego zużycia i uszkodzeń, które mają nieistotny wpływ na
wartość lub działanie tego urządzenia.
Karta gwarancyjna bez pieczątki sklepu, daty sprzedaży, nie wypeł-
niona, źle wypełniona, ze śladami poprawek, nieczytelna wskutek znisz-
czenia, bez możliwości ustalenia miejsca sprzedaży oraz dołączonego
dowodu zakupu jest nieważna.
Korzystanie z usług gwarancyjnych nie jest możliwe po upływie daty
ważności gwarancji. Gwarancja na części lub całe urządzenie, które są
wymieniane kończy się, wraz z końcem gwarancji na to urządzenie.
Wszystkie inne roszczenia, wliczając w to odszkodowania są wyklu-
czone chyba, że prawo przewiduje inaczej. Roszczenia wykraczające
poza tą umowę nie są uwzględniane przez tą gwarancję.
Gwarancja na sprzedany towar konsumpcyjny nie wyłącza, nie ograni-
cza ani nie zawiesza uprawnień kupującego wynikających z niezgodno-
ści towaru z umową.
Gwarancja oraz zawarte w niej warunki obowiązują na terenie Rzeczpo-
spolitej Polskiej.
Dystrybutor:
CTC Clatronic Sp. z o.o
Ul. Brzeska 1
45-960 Opole
CL6045QCCB_IM 17.12.20
119
Usuwanie
Usuwanie baterii
Jako użytkownicy mają Państwo zgodny z prawem obowią-
zek do zwrotu zużytych baterii bądź akumulatorów.
Wyjąć baterie z pilota przed utylizacją urządzenia.
Zwrócić baterie do punktu zbiórki przeznaczonego do groma-
dzenia starych baterii lub niebezpiecznych odpadów. Skon-
taktować się z lokalnymi przedstawicielstwami władz w celu
pozyskania dalszych informacji.
Znaczenie symbolu „Pojemnik na śmieci”
Proszę oszczędzać nasze środowisko, sprzęt elektryczny nie
należy do śmieci domowych.
Proszę korzystać z punktów zbiorczych, przewidzianych
do zdawania sprzętu elektrycznego, i tam proszę oddawać
sprzęt elektryczny, którego już nie będą Państwo używać.
Tym sposobem pomagają Państwo unikać potencjalnych następstw
niewłaściwego usuwania odpadów, mających wpływ na środowisko
i zdrowie ludzi.
Tą drogą przyczyniają się Państwo do ponownego użycia, do recyklingu
i do innych form wykorzystania starego sprzętu elektrycznego i elektro-
nicznego.
Informacje, gdzie można zdać sprzęt, otrzymają Państwo w swoich
urzędach komunalnych lub w administracji gminy.
CL6045QCCB_IM 17.12.20
120
Használati utasítás
Köszönjük, hogy a termékünket választotta. Reméljük, elégedetten
használja majd a készüléket.
A használati útmutatóban található szimbólumok
Az ön biztonságára vonatkozó utasítások kifejezetten meg vannak -
lönböztetve. Kérjük, mindenképpen ügyeljen ezekre annak érdekében,
hogy elkerülje a baleseteket és a készülék károsodását:
FIGYELMEZTETÉS:
Egészségét károsító veszélyforrásokra gyelmeztet és rámutat a
lehetséges sérülési lehetőségekre.
VIGYÁZAT:
Lehetséges veszélyre utal, mely a készülékben vagy más tárgyakban
kárt tehet.
MEGJEGYZÉS:
Tippeket és információkat emel ki.
Általános megjegyzések
A készülék használatba vétele előtt gondosan olvassa végig a hasz-
nálati utasítást, és őrizze meg a garancialevéllel, a pénztári nyugtával
és lehetőleg a csomagolókartonnal, ill. az abban lévő bélésanyaggal
együtt! Amennyiben a készüléket harmadik személynek adja tovább, a
használati útmutatót is adja a készülékhez.
Kizárólag személyi célra használja a készüléket, és csupán arra,
amire való! A készülék nem ipari jellegű használatra készült.
Ne használja a szabadban! Ne tegye ki erős hőhatásnak, közvetlen
napsugárzásnak és nedvességnek (semmi esetre se mártsa folya-
dékba), és óvja az éles szélektől! Ne használja a készüléket vizes
kézzel!
A készüléket és a hálózati kábelt rendszeresen ellenőrizni kell, hogy
nincs-e rajta sérülés jele. Ha sérülést lát rajta, a készüléket nem
szabad használni.
Csak eredeti tartozékokat használjon!
Gyermekei biztonsága érdekében ne hagyja általuk elérhető helyen a
csomagolóelemeket (műanyag zacskó, karton, sztiropor stb.)!
FIGYELMEZTETÉS:
Kisgyermekeket ne engedjen a fóliával játszani. Fulladás veszélye
állhat fenn!
Speciális biztonsági előírások a készülékre vonatkozóan
A terméken az alábbi gyelmeztető és tájékoztató jellegű jelzések találhatóak:
Olvassa el az utasításokat!
FIGYELMEZTETÉS: Tűzveszély!
A készülék gyúlékony hűtőközeget tartalmaz!
A leolvasztási folyamat felgyorsításához csak a gyártó által engedélyezett tárgyakat használjon.
A készüléket csak olyan helyiségekben szabad tárolni, ahol nincs állandó gyújtóforrás (pl. nyílt láng, bekapcsolt
gázkészülék vagy elektromos fűtés).
Ne fúrja meg és ne égesse meg a készüléket.
Ne feledje, hogy a hűtőközegek szagtalanok.
A szervizelési útmutató elérhető a következő címen: www.sli24.de
A „Downloads” (Letöltések) területen adja meg a CL 6045 QC CB típuskódot.
Bárki, aki hűtőkörrel dolgozik vagy hűtőkört felnyit, akkreditált vizsgálati hatóság által kiállított oklevéllel kell
rendelkeznie, amely igazolja az illető kompetenciáját a hűtőközegek biztonságos kezelése terén, az iparágban
elismert vizsgálati előírásokkal összhangban.
A szervizelést csak a berendezés gyártója által ajánlott módon szabad végezni. A más képzett szakember
segítséget igénylő karbantartási és javítási munkálatokat a gyúlékony hűtőközegek kezelésében jártas személy
felügyelete alatt kell végezni.
VIGYÁZAT: Túlmelegedés veszélye!
Tartsa szabadon a szellőzőnyílásokat!
Ne takarja le a készüléket!
VIGYÁZAT:
Az 517 / 2014 / EU rendelet II. melléklete és 3. cikke alapján a szakszerűtlen ellenőrzés (pl. tanúsítvány) nélkül vég-
zett helytelen beszerelés és üzemeltetés a garancia elvesztését eredményezi.
CL6045QCCB_IM 17.12.20
121
FIGYELMEZTETÉS:
Ne használja és ne tárolja a készüléket a következő helyeken:
- Tűzforrás közelében.
- Olyan helyen, ahol víz vagy olaj fröccsenhet rá.
- Közvetlen napfénynek kitett helyen.
- A fürdőszobában, mosókonyhában vagy úszómedence mellett.
Ne érjen a készülékhez mezítláb, vagy ha testrészei nedvesek vagy nyirkosak.
A balesetek elkerülése érdekében a készülék hitelesített szaküzlet által végzett beszerelése során biztosítsa a
helyszínt. Gyermekeket és illetéktelen személyeket ne engedjen a közelbe.
Győződjön meg arról, hogy a kültéri egység aljzatát kellően biztonságos módon szerelték be.
Győződjön meg arról, hogy levegő nem juthat be a hűtőközeg-rendszerbe, és ellenőrizze, hogy a légkondicionáló
rendszer mozgatásakor nincs-e szivárgó hűtőközeg. Ne feledje, hogy a hűtőközegek szagtalanok.
A légkondicionáló rendszer beszerelését követően végezzen próbát és ellenőrizze a működési adatokat.
A beépített vezérlőegységbe beépített biztosítékok névleges értéke T 5 A / 250 V. Ellenőrizze, hogy a beltéri egy-
séet mindig a maximális bemeneti áramhoz megfelelő kapacitású biztosíték védi, vagy egy másik túlterhelés-vé-
delmi eszköz segítségével.
A készülék a beszerelés során maradjon kihúzva az elektromos hálózatból, amely több pólusú túlfeszültség-ve-
zető szétválasztást mutat, ami lehetővé teszi a teljes szétválasztást a III. túlfeszültség-védelmi kategória feltételei-
nek megfelelően. Ezeket a biztonsági előírásoknak megfelelően integrálni kell az állandó kábelezésbe. Az összes
elektromos munkát kizárólag villanyszereléssel foglalkozó szakember vagy szakember végezheti. A légkondicio-
náló egységet kizárólag szakképzett szaküzlet szerelheti be.
Ne helyezze a készüléket gyúlékony anyagok (alkohol stb.) vagy túlnyomásos tartályok (pl. spray-palackok, gáz-
palackok stb.) közelébe. Tartson legalább 50 cm távolságot a készülék és az ilyen anyagok között.
Ha a készüléket szellőzőberendezés nélküli helyeken használják, a hűtőközeg szivárgásával keletkező tűzveszély
elkerülése érdekében óvintézkedéseket kell tenni.
Vegye gyelembe a nemzeti csatlakozási szabványokat. A kábelezésnek meg kell felelnie az erre vonatkozó nem-
zeti előírásoknak.
Az összekötő bilincsek megérintése előtt minden elektromos áramkört ki kell húzni az elektromos hálózatból.
A készüléket a 8. életévüket betöltött gyermekek, illetve korlátozott testi, érzékszervi vagy szellemi képességgel
bíró, valamint megfelelő tapasztalattal és tudással nem rendelkező személyek csak felügyelet mellett, illetve a
készülék biztonságos használatának ismertetését és a használatból következő veszélyek tudomásul vételét köve-
tően használhatják.
Gyermekek nem játszhatnak a készülékkel.
Ne próbálkozzon a készülék javításával, bízza ezt képesített szakemberre.
A tisztítást és karbantartást csak képzett személyzet végezheti. Mindenesetre a tisztítási vagy karbantartási fel-
adatok elvégzése előtt a készüléket mindig húzza ki az elektromos hálózatból.
Ezt a készüléket nem azért fejlesztették ki, hogy légkondicionálást biztosítson lakótérben / lakásokban, és más
célokra használják, például ruhák szárítására, élelmiszerek hűtésére stb.
A készüléket csak behelyezett légszűrővel működtesse. A légkondicionáló készülék légszűrő nélküli használata a
por túlzott felhalmozódásához vagy a készülék belső részeinek szennyeződéséhez vezethet, és károsodást és /
vagy meghibásodást okozhat.
Ezért a felhasználó felelős azért, hogy a készüléket képzett szakember szerelje be. A képzett szakembernek
ellenőriznie kell, hogy a készüléket a hatályos törvényi előírásoknak és irányelveknek megfelelően földelték-e,
valamint arról, hogy a készüléket termomágneses megszakítóval szerelték-e fel.
Soha ne engedje, hogy a készüléket huzamosabb ideig közvetlenül érje a hideg légáram. A hideg légáram hosszú
távú közvetlen módon káros lehet az egészségre. Fokozott óvatosság ajánlott gyermekek, idősek vagy betegség-
ben szenvedők esetében.
CL6045QCCB_IM 17.12.20
122
Ha a készülék füstöt áraszt vagy égő szagot észlel a közelében, azonnal húzza ki az áramellátásból, és forduljon
a szerviz szakemberéhez. A készülék használata ilyen körülmények között és / vagy ilyen körülmények esetén
tüzet vagy áramütést okozhat.
Az gombbal kapcsolja ki a készüléket, ha hosszabb ideig nem használja.
Ellenőrizze, hogy a légfújási iránya megfelelően van-e beállítva. A szelepeknek fűtési módban lefelé, hűtési üzem-
módban pedig felfelé kell mutatniuk.
A hőmérsékleti beállítások rendkívüli ingadozásainak kiküszöbölésével elkerülhető a készülék károsodása.
Ne hajlítsa meg, ne húzza meg vagy nyomja össze a hálózati kábelt, mert károsodhat. A sérült hálózati kábel
áramütést és tüzet okozhat. A sérült hálózati kábel cseréjét csak szakképzett technikai személyzet számára enge-
délyezhető.
Ne zárja el a beltéri vagy a kültéri egység levegő be- vagy kimenetét. Ezeknek a nyílásoknak a blokkolása vagy
elzárása csökkentheti a hűtési teljesítményt, és meghibásodásokat vagy károsodásokat okozhat. Ne végezzen
engedély nélküli vagy nem megfelelő változtatásokat vagy váltásokat a készüléken.
Ne tegyen semmilyen nehéz vagy forró tárgyat a készülékre.
Ne hagyja hosszú ideig nyitva az ablakokat vagy az ajtókat, amikor a légkondicionáló egységet használja.
Ne irányítsa a légáramot növényekre vagy állatokra. Ha a hideg légáram hosszú időn keresztül közvetlen éri a
növényeket és az állatokat, negatívan hatással van rájuk.
Ne másszon a kültéri egységre, és ne tegyen semmilyen tárgyat a tetejére.
Soha ne helyezzen rudat, botot, pálcát vagy hasonló tárgyat a készülékbe. Ez személyi sérülést és anyagi kárt
okozhat.
A hűtővezetékek lefektetéséhez és meghajlításához feltétlenül használjon megfelelő, speciális szerszámot. Biz-
tonsági okokból mindenáron el kell kerülni a kényes kábelek meggörbülését. Minden munkát egy tanúsítvánnyal
rendelkező cégnek kell elvégeznie, és ennek megfelelően dokumentálnia és a készülékhez csatlakoztatott beren-
dezéssel összhangban kell meghatároznia.
A hűtővezetékeket nem szabad meghosszabbítani vagy megrövidíteni további intézkedések megtétele nélkül,
mivel a gyártás során ezeket a gyárban már gyárilag előtöltötték hűtőközeggel.
VIGYÁZAT:
A hűtőcsövek minden műszaki módosítását egy szakképzett szerviznek kell elvégeznie. A nem megfelelő módo-
sítások a garancia lejártát eredményezik.
Ellenőrizze minden cső és kábel vízhatlanságát, hogy megakadályozza a folyadékok, vízgőzök vagy konden-
zátumok képződését, és pl. megakadályozza azok behatolását a készülék belső falába. Ez megakadályozza a
nedvesség felhalmozódását, valamint a penész kialakulását
Az elemek kezelése
FIGYELMEZTETÉS:
Ne tegye ki az elemeket túlzott hőnek, például napfény, tűz vagy
hasonló hatásának. Robbanásveszélyes!
Az elem nem játék. Tartsa távol gyerekektől.
Ne nyissa fel erővel az elemeket.
Kerülje el a fém tárgyakkal való érintkezést (gyűrűk, szögek, csava-
rok stb.). Rövidzárlat léphet fel!
A rövidzárlat az elemek túlzott felmelegedését vagy meggyulladását
okozhatja, ami sérülésekhez vezethet.
A saját biztonsága érdekében a szállításhoz ragasztószalaggal
ragassza le az elemek érintkezőit.
Az elem megfolyása esetén ügyeljen rá, hogy ne dörzsölje a folya-
dékot a szemébe vagy a nyálkahártyára. Érintkezés esetén mossa
meg a kezét, és tiszta vízzel öblítse ki a szemét. Ha a tünetek nem
múlnak, forduljon orvoshoz.
Nem újratölthető elemeket nem szabad tölteni.
Az elem / elemek behelyezésekor ügyeljen a megfelelő polaritásra.
VIGYÁZAT:
Ha a távirányítót hosszabb ideig nem használja, vegye ki az eleme-
ket az elemsav megfolyásának elkerülése érdekében.
Ne keverje a különböző típusú, illetve régi és az új elemeket.
Ne dobja ki az elemeket a normál háztartási szeméttel. Vigye
vissza a lemerült elemeket a megfelelő gyűjtőpontokra vagy keres-
kedőhöz.
A készülék kicsomagolása
1. Vegye ki a készüléket a csomagolásából.
2. Távolítsa el az összes csomagolóanyagot, úgymint a fóliákat, töl-
tőanyagot és a kartondoboz csomagolást
3. Az esetleges veszélyek elkerülése érdekében győződjön meg arról,
hogy a készülék nem sérült meg a szállítás során.
4. Sérülés esetén ne használja a készüléket. Lépjen kapcsolatba a
forgalmazóval.
CL6045QCCB_IM 17.12.20
123
A csomag tartalma
Beltéri egység
a) 6 × csavar
b) 6 × tipli
c) 1 × fali tartó
Kültéri egység
d) 1 × szűrőház a kondenzátum
lefolyórendszerhez
e) 4 × állvány a kültéri egységhez
Csatlakozó kiegészítők
f) 1 × csatlakozókábel a kültéri egységhez
g) 2 × hűtőcső (szürke és kék) szigeteléssel
együttg
h) 1 × szigetelőanyag (tartalék)
i) 2 × kondenzvízcső
j) 1 × vinilszalag
k) 1 × lyukfedél
Tartozékok
m) 1 × távirányító
n) 2 × R03 „AAA” 1,5V elem
o) 2 × szűrő
p) 2 × szűrőpatron
1 × aktívszén-szűrő (szürke)
1 × ionizáló szűrő (zöld)
A kezelőelemek áttekintése
3 oldal
Készülékegység beltérre
1 Elülső panel
2 Szűrőpatron aktívszén-szűrővel (szürke)
3 Szűrőpatron ionizáló szűrővel (zöld)
4 WLAN modul
5 LED kijelző
6 Típuslemez (pozíció eltérhet)
7 Kapcsolási rajz
8 Rlektromos csatlakozó egység
9 Gomb (be / ki)
10 Légterelő lemez
11 Jelvevő
12 Légterelő
13 Távirányító
Készülékegység kültérre
14 Típuslemez kültérre (pozíció eltérhet)
15 Csatlakozó fedele
16 Hűtőfolyadék szelep
a Szürke
b Kék
17 Légkimenet
Távirányító
MEGJEGYZÉS:
Ha esetleg a modelljében nem lenne ilyen funkció, akkor egy hangjel-
zést hall, amikor lenyomja a gombot.
Távirányító gombok
Sorszám. Gomb Jelentés
1Be- / kikapcsolás
2OPTION Választógomb
3Beállítások / választógomb
4Beállítások / választógomb
5ECO ECO funkció aktiválása / inaktiválása
6TURBO TURBO funkció aktiválása / inaktiválása
7Mode Mûködési mód választógomb
8Fan Légsebesség beállítása
9Légterelő beállítása
10 Állítsa be a légterelő lemezt (nem elérhető;
manuálisan kell beállítani)
Távirányító kijelző
Hálózati kijelző
Gyerekzár
AUTO Automatikus üzemmód
COOL Hűtés üzemmód
DRY Légpárátlanító üzemmód
HEAT Fűtési üzemmód
FAN Ventilátor üzemmód
ECO Energiatakarékos üzemmód
Ventilátor sebesség kijelző
A ventilátor ki van kapcsolva
Maximális hőmérséklet és sebesség
Légterelő kijelző
CL6045QCCB_IM 17.12.20
124
Légterelő lemez kijelző (nem elérhető)
Szundi üzemmód
Automatikus be- / kikapcsoló
Automatikus hőmérséklet-szabályozás
Öntisztítás penész ellen
Egészségügyi funkció (nem elérhető)
Nem elérhető
Információ a „Smart Life - Smart Living” alkalmazásról
A Smart Life - Smart Living App alkalmazás elérhető Android és iOS
rendszerekhez. Olvassa be a megfelelő QR-kódot, hogy közvetlenül
elérje a letöltés funkciót.
MEGJEGYZÉS:
Szolgáltatótól függően az alkalmazás letöltéséért költséget számol-
hatnak fel.
Google Play App Store
Tájékoztató az applikáció használatáról
Ez a készülék működtethető az otthoni hálózaton keresztül. Előfel-
tételek: Előfeltétel az állandó Wi-Fi kapcsolat a routerrel és a „Smart
Life - Smart Living” ingyenes applikációval. Az alkalmazással a készülék
összes funkciójához könnyen hozzáférhet. Annak elkerülése érdeké-
ben, hogy a készülék véletlenül bekapcsoljon, azt javasoljuk, hogy ha
távol van az otthonától, húzza ki a készüléket a hálózatból!
Az alkalmazás használatához szükséges rendszerkövetelmények
iOs 10.0 vagy újabb verzió
Android 5.0 vagy újabb verzió
Működtetés alkalmazáson keresztül
1. Telepítse a „Smart Life - Smart Living” applikációt. Hozzon létre
felhasználói ókot.
2. Aktiválja a Wi-Fi funkciót a készülék beállításaiban.
3. Győződjön meg arról, hogy a WiFi hálózata a készülék közelében
található.
4. Kapcsolja be a beltéri egységet.
5. Indítsa el az applikációt, és válassza a „ + ” jelet.
6. Válassza ki a „Légkondicionáló egység” menüjét, és kövesse a kijel-
zőn megjelenő utasításokat.
7. Nyomja meg a távirányító ECO gombját hatszor, amíg a „CF” meg
nem jelenik a kijelzőn. Ha az „AP” jelenik meg a kijelzőn, nyomja meg
újra az ECO gombot hatszor.
8. Ebben az esetben nyomja meg a „következő lépés” gombot. Írja be a
jelszavát.
9. A készülék sikeres csatlakoztatása után a Wi-Fi jelzőfény folyamato-
san világít. Most már használhatja az alkalmazást a készülékkel.
MEGJEGYZÉS:
A készülék csak 2,4 GHz-es routerekkel működtethető.
5 GHz-es routerek nem támogatottak
Wi-Fi szétkapcsolása
Ha szét akarja kapcsolni meglévő Wi-Fi kapcsolatát (ellenőrzőlámpa
világít), az alábbiak szerint járjon el: Nyomja meg a távirányító ECO
gombját hatszor.
MEGJEGYZÉS:
Ha helyre akarja állítani a Wi-Fi kapcsolatot, járjon el a „Működtetés
alkalmazáson keresztül” pontban leírtak szerint.
Szerelési útmutató
Beltéri egység (a)
Szerelje fel a beltéri egységet kellően szilárd falra, amely megfelelő
az egység súlyának és a keltett vibrációnak az elviseléséhez.
A készülék egyik nyílását sem szabad elzárni, hogy a levegő az
egész helyiségbe áramolhasson.
Ne szerelje a készüléket hőforrások, gőzök vagy gyúlékony gázok
közelébe.
Ne szerelje a készüléket olyan helyre, ahol hosszú ideig közvetlen
napsugárzásnak van kitéve.
Válasszon egy helyet, ahol a kondenzátum könnyen elvezethető, és
ahonnan a beltéri egység könnyen csatlakoztatható a kültéri egység-
hez.
Rendszeresen ellenőrizze a készülék megfelelő működését, és
mindig tartsa be a minimális távolságokra vonatkozó irányelveket
és / vagy hagyja ezeket a tereket szabadon. Válasszon egy helyet,
ahonnan a szűrő könnyen elérhető.
Ne szerelje fel a készüléket nedves helyiségekbe, például fürdőszo-
bába, mosókonyhába stb.
Az optimális eredmény érdekében a felszerelést a padló felett a
lehető legmagasabban kell elvégezni.
Kültéri egység (b)
Ne szerelje fel a kültéri egységet hőforrások, gőzök vagy gyúlékony
gázok közelébe.
Ne helyezze a készüléket túlságosan poros helyre.
A készüléket olyan helyre szerelje fel, ahol senkit nem zavarhat az
üzemi zaj, és nem sok ember fordul meg. Szükség esetén egyeztes-
sen a szomszédokkal. Szükség esetén nézze meg az országában
érvényes károsanyag-kibocsátásra vonatkozó irányelvet.
Ne szerelje fel a készüléket olyan helyre, ahol közvetlen napfénynek
vagy rossz időjárási körülményeknek van kitéve, és ne használjon
olyan fényvédőt, amely akadályozza a légáramlást.
Mindig tartsa be az alábbi ábrán bemutatott minimális távolságokat
és / vagy hagyja szabadon a helyet ezen a távolságon belül a besze-
relés és az üzemeltetés során.
Szerelje fel stabil helyre a kültéri egységet.
Ha a kültéri egység rázkódásnak van kitéve, használjon padlón lévő
lökéshárítókat a rezgések hatásának ellensúlyozására.
CL6045QCCB_IM 17.12.20
125
DA minimális távolságok (mm-ben) vannak jelölve az ábrán
VIGYÁZAT:
A vásárlónak biztosítania kell, hogy az ilyen légkondicionáló egy-
ségeket beszerelő, karbantartó vagy javító személyek / cégek / vál-
lalatok megfelelő képesítéssel és tapasztalattal rendelkezzenek a
hűtőközegekkel kapcsolatban.
Az 517 / 2014 / EU rendelet II. melléklete és 3. cikke alapján a
szakszerűtlen ellenőrzés (pl. tanúsítvány) nélkül végzett helytelen
beszerelés és üzemeltetés a garancia elvesztését eredményezi.
Fali tartó felszerelése
VIGYÁZAT:
A fali tartó felszerelése előtt ellenőrizze, hogy megtalálta-e azt a
pontos helyet, ahol a lyukat a csövekhez kifúrhatja! Lásd a „A beltéri
egység és a fali átvezető felszerelése kívülre” című fejezetet.
1. Lazítsa meg a fali tartót a rögzítőkapcsoknál.
2. Hajtsa felfelé a fali tartót
3. Távolítsa el a fali tartót úgy, hogy elengedi a tartójából.
4. Fúrjon legalább 32 mm mély furatokat egy kemény falba a lemez
rögzítése érdekében.
5. Helyezze a műanyag tipliket a lyukba
6. Rögzítse a tartólemezt a falhoz a mellékelt csavarokkal.
7. Győződjön meg arról, hogy a tartólemez jól be van csavarva.
Hűtőcsövek beigazítása
VIGYÁZAT:
A légkondicionáló készüléket hűtő- és klímaberendezések hivatalos
szervizcégének kell felszerelnie és csatlakoztatnia. A nem megfelelő
felszerelés a garancia elvesztését eredményezi.
A hűtővezetékeket az ábrán látható számoknak megfelelően 3 irányban
lehet lefektetni. Ha a csöveket az 1. vagy a 3. opciónak megfelelően
helyezik el, akkor vágógéppel gondosan vágjon be egy bemetszést a
beltéri egység oldalán a varrat mentén.
Vezesse a csatlakozócsöveket a fal nyílásának irányába, és vinilszalag-
gal kösse össze a hűtőcsöveket, a kondenzvíz csöveket és a tápkábelt,
és mindig gondoskodjon a vízhatlan szigetelésről, hogy folyadék, vízgőz
vagy kondenzátum ne képződhessen, illetve például ne nyirkosítsa el
a falat. Ez megakadályozza a nedvesség felhalmozódását, valamint a
penész kialakulását. Ügyeljen arra, hogy a kondenzvízcsőnek enyhe
lejtése legyen, hogy ne akadályozza a víz áramlását
VIGYÁZAT:
Ügyeljen a csövek vízhatlan lezárására, hogy elkerülje a nedvesség
okozta károsodást és a penész felhalmozódását.
CL6045QCCB_IM 17.12.20
126
Hűtőcsövek letekerése
A burkolatok csak közvetlenül a hűtővezetékek csatlakoztatása előtt
távolíthatók el a szennyeződés elkerülése érdekében.
Ha a csöveket túl gyakran hajlítják vagy húzzák, akkor merevek lesz-
nek. Ne hajlítsa meg a csöveket háromnál többször.
Óvatosan tekerje ki a csöveket az A ábra szerint. Kerülje a kihajlítást.
VIGYÁZAT:
Ne húzza szét a csövet B ábra szerint. Ehelyett óvatosan tekerje ki.
Beltéri egység csatlakozások
VIGYÁZAT:
A légkondicionáló készüléket hűtő- és / vagy klímaberendezések
hivatalos szervizcégének kell felszerelnie és csatlakoztatnia. A nem
megfelelő felszerelés a garancia elvesztését eredményezi.
1. Távolítsa el a védőkupakokat.
2. Ellenőrizze a csatlakozások szennyeződését vagy sérüléseit.
3. Csatlakoztassa az összekötő anyát a beltéri egység csatlakozó me-
netéhez. Ennek során gyeljen a védőkupakok színére.
4. Megfelelő csavarkulccsal húzza meg a csatlakozást.
MEGJEGYZÉS:
Mindig tartsa be a megfelelő csavarási irányt, és gyelje a „Beszere-
lési információk” részben látható ábrákat.
A kondenzvíz cső csatlakoztatása a beltéri egységhez
Rendkívül fontos, hogy a beltéri egység kondenzvíz csöve megfelelő
módon legyen felszerelve.
1. Helyezze a leeresztő tömlőt a cső alá, és ellenőrizze, hogy nincse-
nek-e szivárgások.
2. A kondenzvíz áramlásának megkönnyítése érdekében a leeresztő
tömlőt lefelé kell dönteni.
3. Ne hajlítsa meg és ne csavarja meg a leeresztő tömlőt. Ne engedje
kiugrani. Ne merítse a végét vízbe. Ha a cső hosszabbítóhoz van
csatlakoztatva, ellenőrizze a csatlakozást, amikor behelyezi a beltéri
egységbe.
4. Ha a hűtővezetékeket a „Hűtőcsövek beigazítása” című fejezet 3.
számú ábrája szerint helyezzük el, akkor a csöveket, a kültéri egység
csatlakozó kábelét és a kondenzvíz leeresztő csövét csőkapcsolókkal
kell rögzíteni a készülék hátsó oldalán.
5. Helyezze be a csőcsatlakozót a megfelelő készülékbe.
6. Nyomja meg erősen az összekötő csövet a légkondicionáló egy-
ségbe, és ellenőrizze, hogy a csatlakozás szoros-e
VIGYÁZAT:
Kerülje a kihajlítást a pozícionálás során, és ezeket a feladatokat csak
hivatalos szakszervizek végezzék.
CL6045QCCB_IM 17.12.20
127
A beltéri egység és a fali átvezető felszerelése kívülre
Miután az utasításoknak megfelelően csatlakoztatta a hűtőcsöveket,
valamint a kondenzvíz elvezető csövét, a következőképpen járjon el:
1. Rendkívül körültekintően fektesse a csöveket, a külső egység
csatlakozókábelét és a kondenzvízcsövet arra a helyre, ahol a falon
keresztül kifelé kell vezetni.
2. Ragassza össze a kondenzvíz-vezetékeket, a kültéri egység csatla-
kozó kábelét és a kondenzvíz-csöveket vinilszalaggal, majd szorosan
tekerjen be mindent szigetelőszalaggal (a szállítási csomagnak nem
tartozéka).
VIGYÁZAT:
Ügyeljen a csövek vízhatlan lezárására, hogy elkerülje a nedvesség
okozta károsodást és a penész felhalmozódását
Ellenőrizze, hogy minden kitett csőszerű alkatrész kellőképpen
szigetelt.
3. Fúrjon ki egy lyukat, amelynek átmérője 57 mm és dőlésfoka 5 - 7 mm.
(2. kép)
MEGJEGYZÉS:
Fúrjon 5 - 7 mm-es lyukat enyhe dőléssel kifelé, hogy a kondenzvíz
elvezetésre kerüljön.
Mindenesetre ügyeljen arra, hogy a kondenzvízcső teljes hosszá-
ban a fal nyílásának irányában dőlés legyen
4. Helyezze be a furat fedelét.
5. Vezesse át a szigetelt csöveket, a kültéri egység csatlakozókábelét
és a kondenzvízcsöveket a fal nyílásán keresztül.
MEGJEGYZÉS:
A csövek felszerelése után zárja le a falon a lyukat, amelyen ke-
resztül a csöveket átvezették, hogy légmentesen és vízmentesen
is lezárja.
6. Rögzítse biztonságosan a beltéri egységet a fali rögzítőlemez felső
részéhez.
7. Nyomja határozottan a beltéri egység alsó részét a fali rögzítőlemez-
hez, amíg nincs erősen rögzítve.
Kültéri egység felszerelése
A csövek csatlakoztatása előtt döntse el, hová szeretné helyezni a
kültéri egységet, és ügyeljen arra, hogy a választott helyen legyen
elegendő tér a későbbi karbantartási munkák elvégzéséhez. (Vegye
gyelembe a minimális távolságokat)
Helyezze az állványra a védőkupakokat (szállítási csomag tartal-
mazza), és rögzítse azokat a megfelelő helyeken.
Használjon kivételesen erős csavarokat / csavarhorgonyokat, és
tartsa szem előtt a készülék súlyát is, hogy megakadályozza, hogy
a működés okozta rezgések idővel fellazítsák a csatlakozásokat.
Az egységet a vonatkozó biztonsági előírásoknak megfelelően kell
felszerelni.
Kondenzvíz elvezető cső a kültéri egységhez
A kültéri egységben a hőtermelés következtében felhalmozódó konden-
zvizet és jeget a kondenzvízcső segítségével lehet elvezetni.
1. Rögzítse a kondenzvíz-leeresztő cső tartóit az erre tervezett
25 mm-es nyílásba.
2. Csatlakoztassa a kondenzvíz-elvezető cső tartóit a kondenzvíz-
csőhöz, és gondoskodjon az áramlás megfelelő szabályozásáról a
nedvesség károsodásának elkerülése érdekében.
Elektromos csatlakozás (Kültéri egység)
Távolítsa el a csatlakozó fedelét (15) a készülék jobb oldalán. A hozzá
tartozó diagram a hátsó oldalon található.
Lásd a diagramot.
1. Csatlakoztassa a beltéri egység tápkábelét a sorkapcsokhoz.
2. Óvatosan csatlakoztassa a kültéri egység tápkábelét az összekötő
bilincsekkel.
3. Ellenőrizze, hogy a kábelek megfelelően vannak-e rögzítve. Elle-
nőrizze, hogy a földelés helyesen van-e felszerelve.
4. Helyezze vissza a védőburkolatot a készülékre.
CL6045QCCB_IM 17.12.20
128
VIGYÁZAT:
Az összes elektromos munkát csak szakképzett villanyszerelő vagy
elektronikai cég szakembere végezze. A nem megfelelő felszerelés a
garancia elvesztését eredményezi.
Gyors összekapcsolási utasítások
Gyorscsatlakozóval egyszerűen csatlakoztassa a légkondicionáló
egység beltéri és kültéri egységeit. Gyors és egyszerű eljárás, amelyre
vonatkozóan minden garanciális igény elérhető, feltéve, hogy az összes
munkát szakcég végzi.
VIGYÁZAT:
A szállításkor rendelkezésre álló hűtőcsöveket a gyártás során
előtöltötték hűtőközeggel.
A csöveket nem szabad rövidíteni vagy meghosszabbítani
Csatlakozás a beltéri egységhez
1. Óvatosan tekerje le a hűtőcsöveket a „Hűtőcsövek letekerése” című
fejezetben leírtak szerint. Mindig kerülje a csövek meghajlítását.
2. Távolítsa el a védőkupakokat (kék és szürke) a beltéri egység csatla-
kozóiról.
3. Ellenőrizze, hogy minden csavar jó állapotban van-e, és nincs-e
benne szennyeződés, por, homok és más beleakadó anyag, illetve
szennyeződés.
4. Csavarja be a hűtőcsöveket a beltéri egység csatlakozóival. Ügyeljen
arra, hogy a csatlakozások a kék / szürke színvilágnak megfelelően
legyenek behelyezve. Ezután rögzítse az anyákat két csavarkulccsal
(az egyik a csatlakozás meghúzására, a másik pedig ellensúlyo-
zásra).
MEGJEGYZÉS:
Mindig tartsa be a megfelelő csavarási irányt, és gyelje a „Besze-
relési információk” részben látható ábrákat.
Kültéri egység csatlakozások
1. Óvatosan tekerje le a hűtőcsöveket, a „Hűtőcsövek letekerése” című
fejezetben leírtak szerint. Mindig kerülje a csövek meghajlítását.
2. Távolítsa el a védőkupakokat (kék és szürke) a kültéri egység csatla-
kozóiról.
3. Ellenőrizze, hogy minden csavar jó állapotban van-e, és nincs-e
benne szennyeződés, por, homok és más beleakadó anyag, illetve
szennyeződés.
4. Csavarja be a hűtőcsöveket a kültéri egység csatlakozóival. Ügyeljen
arra, hogy a csatlakozások a kék / szürke színvilágnak megfelelően
legyenek behelyezve. Ezután rögzítse az anyákat két csavarkulccsal
(az egyik a csatlakozás meghúzására, a másik pedig ellensúlyo-
zásra).
MEGJEGYZÉS:
Mindig tartsa be a megfelelő csavarási irányt, és gyelje a „Besze-
relési információk” részben látható ábrákat.
CL6045QCCB_IM 17.12.20
129
5. Ellenőrizze, hogy a készülék hűtőköre megfelelően van-e csatlakoz-
tatva és légmentesen van-e zárva. Ellenőrizze az összekötő eleme-
ket szivárgásos permet segítségével. Ha légbuborékok jelennek meg,
akkor szivárgás van. Ebben az esetben elengedhetetlen az elzáró
szelepek tömítése. Óvatosan ellenőrizze a csöveket és a csatlakozá-
sokat.
MEGJEGYZÉS:
Az elzáró szelepet (a) a gyártás során lezárták, és nem szabad
kinyitni. A szervizszelep (b) kizárólag szervizcélokra szolgál.
VIGYÁZAT:
A légkondicionáló készüléket hűtő- és klímaberendezések hivatalos
szervizcégének kell felszerelnie és csatlakoztatnia. A nem megfelelő
felszerelés a garancia elvesztését eredményezi.
Beltéri egység tesztelése
A főkapcsoló megfelelően működik?
Működik a ventilátor?
Az üzemmódok rendesen működnek?
Pontosan beállítható a hőmérséklet és az idő?
Az összes lámpa normál módon világít?
Megfelelően működnek a légáramlás elzáró lemezek?
A kondenzvízcső rendesen működik?
VIGYÁZAT:
A fent leírt összes lépést hűtő- és klímaberendezést hivatalosan
forgalmazó cégnek kell elvégeznie. A nem megfelelő végrehajtás a
garancia elvesztését eredményezi.
Kültéri egység tesztelése
Szokatlan zaj vagy rezgés észlelhető működés közben?
A hűtőközeg szivárog?
MEGJEGYZÉS:
Az elektronikus vezérlőrendszer csak három perccel az egység be-
kapcsolása után indítja el a kompresszort.
VIGYÁZAT:
A fent leírt összes lépést hűtő- és klímaberendezést hivatalosan
forgalmazó cégnek kell elvégeznie. A nem megfelelő végrehajtás a
garancia elvesztését eredményezi.
Beszerelési információk
Beszerelési utasítások - Beszerelési információk
Tervezési modell / Hűtési teljesítmény (Btu / h) 9k 12k 15 / 18k
Hűtőcső átmérője a) 1 / 4" 6 1 / 4" 6 1 / 4" 6
Hűtőcső átmérője b) 3 / 8" 9,52 1 / 2" 12 1 / 2" 12
Normál hűtőcsőhossz 5 m 5 m 5 m
A beltéri és a kültéri egység maximális távolsága 15 m 15 m 15 m
További hűtőközeg-töltet 20 g / m 20 g / m 30 g / m
A beltéri és a kültéri egység maximális távolsága 5 m (15 m) 5 m (15 m) 5 m (15 m)
Hűtőközeg * R32 R32 R32
*) További információk a kültéri egység adattábláján találhatók
Meghúzási nyomaték a védőkupakokhoz és a karimás csatlakozásokhoz
Hűtőcső Meghúzási nyomaték (N x m) Megfelelő terhelés:
20 cm-es csavarkulcs Meghúzási nyomaték (N x m)
1 / 4" 6 15 - 20 Szorosan / kézzel szorosan Szerviz-összekötő
anyacsavar 7 - 9
3 / 8" 9,52 31 - 35 Szorosan Védőkupak 25 - 30
1 / 2" 12 35 - 45 Szorosan
5 / 8" 15,88 75 - 80 Szorosan
CL6045QCCB_IM 17.12.20
130
Kábel specikációk
Beszerelési utasítások - Információk a beszerelő számára
Modell Hűtőközeg (Btu / h) 9k 12k 15 / 18k
Hálózati kábel
N1,0 mm²
AWG18
1,0 mm² (1,5 mm²)
AWG18 (AWG16)
1,5 mm²
AWG16
L1,0 mm²
AWG18
1,0 mm² (1,5 mm²)
AWG18 (AWG16)
1,5 mm²
AWG16
E1,0 mm²
AWG18
1,0 mm² (1,5 mm²)
AWG18 (AWG16)
1,5 mm²
AWG16
Csatlakozó kábel
N1,0 mm² 1,0 mm² (1,5 mm²) 1,5 mm²
L1,0 mm² 1,0 mm² (1,5 mm²) 1,5 mm²
11,0 mm² 1,0 mm² (1,5 mm²) 1,5 mm²
20,75 mm² 0,75 mm² 0,75 mm²
30,75 mm² 0,75 mm² 0,75 mm²
Beszerelési utasítások - Beszerelési információk
Feszültség transzformátor 9k 12k 18 / 22k
Modell Hűtőközeg (Btu / h) Keresztmetszet
Hálózati kábel
N1,0 mm² (1,5 mm²)
AWG18 (AWG16)
1,0 mm² (1,5 mm²)
AWG18 (AWG16)
1,5 mm²
AWG16
L1,0 mm² (1,5 mm²)
AWG18 (AWG16)
1,0 mm² (1,5 mm²)
AWG18 (AWG16)
1,5 mm²
AWG16
E1,0 mm² (1,5 mm²)
AWG18 (AWG16)
1,0 mm² (1,5 mm²)
AWG18 (AWG16)
1,5 mm²
AWG16
Csatlakozó kábel
N1,0 mm² (1,5 mm²) 1,0 mm² (1,5 mm²) 1,5 mm²
L1,0 mm² (1,5 mm²) 1,0 mm² (1,5 mm²) 1,5 mm²
11,0 mm² (1,5 mm²) 1,0 mm² (1,5 mm²) 1,5 mm²
220 V 7 K, 9 K, 12 K, 15 K, 16 K, 18 K, 22 K, 24 K, 30 K feszültség mellett a légkondicionáló beltéri egységének biztonsági értéke: 50 T, 3,15 A
110 V 7 K, 9 K, 12 K feszültség mellett a légkondicionáló beltéri egységének biztonsági értéke 50 T, 3,15 A
125 V 7 K, 9 K, 12 K feszültség mellett a légkondicionáló kültéri egységének biztonsági értéke: 61 T, 15 A
250 V 18 K, 22 K, 24 K feszültség mellett a légkondicionáló kültéri egységének biztonsági értéke 65 T, 25 A!
Kapcsolási rajz
A kapcsolási rajz a különböző modelleknél eltérő lehet. Kérjük, vegye
gyelembe a beltéri és kültéri egységek kapcsolási rajzait.
A beltéri egységhez az előlap (1) alatt található a kapcsolási rajz (7).
A kültéri egységnél a csatlakozófedél (15) hátoldalán találja a kapcsolási
rajzot.
MEGJEGYZÉS:
Bizonyos modelleknél a kábeleket a gyártó csatlakoztatta sorkapcsok
nélkül a beltéri egység fő áramköri lapjához.
Működtetés
Asztali vezérlés
Ha a távirányító nem működik, vagy karbantartásra van szükség, az
alábbiak szerint járjon el:
1. Nyissa ki az elülső fedelet és emelje felfelé, amíg el nem éri a
gombot. .
2. A gomb megnyomásával elindul a hűtési funkció. (Sípoló hangot
hall.)
3. A gomb 3 másodpercen belüli megnyomása elindítja a fűtési funk-
ciót. (Két sípoló hangot hall.)
4. A kikapcsoláshoz nyomja meg újra a gombot. (Hosszú sípolást
hall.)
MEGJEGYZÉS:
A vízpumpa külső statikus nyomása minden modellnél 0 Pa.
CL6045QCCB_IM 17.12.20
131
Távirányító
1. Nyissa ki a távirányító hátsó oldalán található elemtartó rekesz fede-
lét a nyíl irányába tolva.
2. Helyezzen be 2 db R03 „AAA” 1,5 V-os elemet. Kérjük, ellenőrizze,
hogy a polaritás megfelelő-e. (Lásd az elemtartó rekesz alját)
MEGJEGYZÉS:
Gyerekbiztonsági zár: A gyermekbiztonsági zár aktiválásához
nyomja meg egyszerre a és a gombot.
Kijelző be- / kikapcsolása: Tartsa lenyomva az ECO gombot
3. Irányítsa a távirányítót a légkondicionáló egységre.
MEGJEGYZÉS:
Győződjön meg arról, hogy a beltéri egységben a távirányító és a
jelvevő között nincs semmilyen tárgy / akadály.
Soha ne hagyja a távirányítót hosszú ideig közvetlen napfénynek
kitéve.
A távirányítót legalább egy méterre a televíziótól vagy más elektro-
mos készülékektől használja és tárolja.
Be- / kikapcsolás
Nyomja meg a gombot a készüléken.
Nyomja meg újra a gombot a készülék újbóli bekapcsolásához.
Légfújás beállítása
A levegő áramlása egyenletesen oszlik el, amikor a szobába szökik. Az
áramlási irány optimalizálására beállítási opciók állnak rendelkezésre.
A gomb aktiválja a légterelő fedelet (1). A levegő áramlása felülről lefelé
halad, hogy garantálja a levegő egyenletes eloszlását a helyiségben.
A légterelőket (2) manuálisan kell elhelyezni, és a légterelő lemezek alatt
helyezkednek el. Ezek lehetővé teszik a légáramlás jobbra vagy balra irányí-
tását.
VIGYÁZAT:
A légterelőnek a készülék kikapcsolt állapotában kell lennie.
Soha ne helyezze manuálisan (azaz kézzel) a légterelő lemezeket. Ez súlyos károkat okozhat.
Soha ne helyezzen ujjat, botot vagy egyéb tárgyat a levegő be- / kimeneti nyílásaiba. Ez anyagi károkat és személyi sérüléseket okozhat.
MEGJEGYZÉS:
Kérjük, vegye gyelembe, hogy tervezési okokból nem minden funkció tekinthető meg a távirányító kijelzőjén minden egyes üzemmódban.
Az OPTION gomb megnyomásával megtudhatja, mely funkciók érhetők el az egyes üzemmódokhoz.
MODE gomb Válasszon egy üzemmódot
OPTION gomb Válasszon egy funkciót
Hűtés üzemmód (COOL)
A hűtési mód lehetővé teszi a helyiség egyidejű hűtését és a levegő
páratartalmának csökkentését.
1. A hűtési üzemmód aktiválásához nyomja meg a MODE gombot, amíg
a „COOL” meg nem jelenik a távirányító kijelzőjén. A hűtési funkció
akkor aktiválódik, ha a kiválasztott hőmérséklet alacsonyabb, mint a
helyiség hőmérséklete. (Kiválasztás a és a gombokkal.)
2. A légkondicionáló funkció optimalizálásához a megfelelő gombok
megnyomásával állítsa be a hőmérsékletet, a sebességet és a levegő
áramlási irányát.
Fűtési üzemmód (HEAT)
A fűtési üzemmód lehetővé teszi a helyiség fűtését.
1. A fűtési mód aktiválásához nyomja meg a MODE gombot, amíg a
„HEAT” felirat meg nem jelenik a távirányító kijelzőjén. A fűtés funkció
akkor aktiválódik, ha a kiválasztott hőmérséklet magasabb, mint a
helyiség hőmérséklete. (Kiválasztás a és a gombokkal.)
2. A fűtési funkció optimalizálásához a megfelelő gombok megnyomá-
sával állítsa be a hőmérsékletet, a sebességet és a levegő áramlási
irányát.
MEGJEGYZÉS:
Ha a készülék elektromos fűtéssel van felszerelve, akkor ez néhány
percig késlelteti az alkalmazás aktiválását.
MEGJEGYZÉS:
A fűtési üzemmódban bekapcsolhat egy automatikus leolvasztási
funkció. Ez a leolvasztási funkció nélkülözhetetlen a készülék
tisztításához. A kondenzátor fagymaradványait eltávolítják annak
teljes hőcserélő képességének helyreállítása érdekében. Ez az el-
járás általában 2-10 percet vesz igénybe. A ventilátor a leolvasztás
közben leáll. A leolvasztás után a készülék automatikusan visszatér
fűtési üzemmódba.
A készülék automatikus bekapcsolása ( )
A készülék automatikus bekapcsolásának beállításához a készüléket ki
kell kapcsolni.
1. Nyomja meg az OPTION (opció) gombot.
2. A nyílbillentyűkkel válassza ki és opciókat addig, amíg a
” felirat meg nem jelenik a távirányító kijelzőjén.
3. Nyomja meg ismét az OPTION gombot, és a és a nyílgombok-
kal állítsa be a kívánt időt.
4. Erősítse meg a választását az OPTION gomb lenyomásával.
MEGJEGYZÉS:
A beállított funkció megszakításához ismételje meg a fent leírt
lépéseket.
A Timer (Időzítő) funkció beállítható 30 perces időközökre.
A készülék automatikus kikapcsolása ( )
A készülék automatikus kapcsolásának kibeállításához a készüléket be
kell kapcsolni.
1. Nyomja meg az OPTION (opció) gombot
CL6045QCCB_IM 17.12.20
132
2. A nyílbillentyűkkel válassza ki és opciókat addig, amíg a
” felirat meg nem jelenik a távirányító kijelzőjén.
3. Nyomja meg ismét az OPTION gombot, és a és a nyílgombok-
kal állítsa be a kívánt időt.
4. Erősítse meg a választását az OPTION gomb lenyomásával.
MEGJEGYZÉS:
A beállított funkció megszakításához ismételje meg a fent leírt
lépéseket.
Az Időzítő funkció beállítható 30 perces időközökre.
Ventilátor üzemmód (FAN)
A Ventilátor mód aktiválásához nyomja meg a MODE gombot, amíg a
„FAN” felirat meg nem jelenik a távirányító kijelzőjén.
A FAN gomb megnyomásával a következő sorrendben állíthatja be a
ventilátor sebességét:
kikapcsolva ( )
LOW ( )
MEDIUM ( )
HIGH ( )
Turbo ( )
automatikus
Légpárátlanító üzemmód (DRY)
Ez a funkció lehetővé teszi a levegő páratartalmának csökkentését,
valamint a helyiség minőségének javítását.
A páramentesítés üzemmódjának bekapcsolásához nyomja meg a
MODE gombot, amíg a „DRY” felirat meg nem jelenik a távirányító kijel-
zőjén. A ventilátor változó hűtési ciklussal aktiválódik.
Automatikus üzemmód (AUTO)
Az automatikus mód aktiválásához nyomja meg a MODE gombot
amíg az „AUTO” meg nem jelenik a távirányító kijelzőjén.
A ventilátor sebességét és hőmérsékletét automatikusan szabályozzák,
függetlenül a helyiség hőmérsékletétől.
Környezeti hőmérséklet Mûködési mód
< 20 °C Melegít
20 °C ~ 26 °C Párásít
> 26 °C Lehűt
Szundi üzemmód ( )
A SLEEP funkció automatikusan beállítja a hőmérsékletet annak érde-
kében, hogy a szoba levegője különösen kellemes legyen éjszaka. Hű-
tés / párátlanítás üzemmódban a beállított hőmérséklet automatikusan
1 °C-kal emelkedik, amíg 2 órán belül 2 °C-os hőmérséklet-növekedést
nem ér el.
1. Az Szundi mód aktiválásához nyomja meg a OPTION gombot.
2. A nyílbillentyűkkel válassza ki és opciókat addig, amíg a
” felirat meg nem jelenik a távirányító kijelzőjén.
3. Erősítse meg a választását az OPTION gomb lenyomásával.
4. Az OPTION gomb a „ ” funkció kikapcsolásához. A fűtési
üzemmódban a hőmérséklet 2 °C-kal csökken az első 2 órában.
10 órás szundi üzemmódban a készülék automatikusan kikapcsol.
Energiatakarékos üzemmód (ECO)
Az ECO gomb megnyomásával be- vagy kikapcsolhatja az Eco funk-
ciót. A készülék energiatakarékos üzemmódba kapcsol. A beállított
hőmérséklet automatikusan, fokozatosan emelkedik a kényelmes
klimatikus körülmények veszélyeztetése nélkül. Ez alacsony energiafo-
gyasztást eredményez.
Az ECO gomb megnyomásával és nyomva tartásával kikapcsolhatja a
beltéri egység kijelzőjét.
Maximális hőmérséklet és sebesség ( )
A TURBO gomb megnyomásával be- vagy kikapcsolhatja a Turbo
funkciót. Ez lehetővé teszi a beállított hőmérséklet lehető leggyorsabb
elérését.
Penész- / Öntisztító ( )
1. Az Öntisztító mód aktiválásához nyomja meg a OPTION gombot.
2. A nyílbillentyűkkel válassza ki és opciókat addig, amíg a
” felirat meg nem jelenik a távirányító kijelzőjén.
3. Erősítse meg a választását az OPTION gomb lenyomásával.
4. Az OPTION gomb a „ ” funkció kikapcsolásához.
Automatikus hőmérséklet-szabályozás ( )
Automatikus hőmérséklet-szabályozás a távirányító érzékelőinek esz-
köze. Ügyeljen arra, hogy a távirányító ne legyen kitéve hőforrásoknak,
pl. lámpáknak.
1. A ” aktiváláshoz nyomja meg az OPTION gombot.
2. A nyílbillentyűkkel válassza ki és opciókat addig, amíg a
felirat meg nem jelenik a távirányító kijelzőjén.
3. Erősítse meg a választását az OPTION gomb lenyomásával.
4. Nyomja meg az OPTION gombot újra, hogy kapcsolja ki a„
funkciót.
Tisztítás és karbantartás
FIGYELMEZTETÉS:
Ügyeljen arra, hogy tisztítás közben ne jusson be víz
a készülék nyílásaiba. Áramütés- vagy tűzveszély.
VIGYÁZAT:
A készülék biztonságos és hatékony működésének biztosítása
érdekében rendszeresen végezzen karbantartást.
Minden tisztítási és karbantartási munkát a hűtő- és klímaberen-
dezés hivatalos szervizcégének kell elvégeznie. A nem megfelelő
alkalmazás a garancia elvesztését eredményezi.
Szűrő tisztítása és cseréje
1. Nyissa ki az előlapot a nyíl irányába.
CL6045QCCB_IM 17.12.20
133
2. Az egyik kezével emelje fel az elülső fedelet, a másik kezével távo-
lítsa el a porszűrőt.
3. Tisztítsa meg a szűrőt vízzel. Ha erősen szennyezett, használjon me-
leg vizet a tisztításhoz (legfeljebb 45 °C). Ezután hagyja megszáradni
a szűrőt.
4. Helyezze vissza a légszűrőt.
5. Helyezze vissza a rekesz fedelét.
MEGJEGYZÉS:
A kiegészítő aktív szénszűrőket (szürke) és az ionizáló szűrőket (zöld)
nem lehet megtisztítani, és az üzemórák számától függően új szű-
rőkre kell cserélni. Az alábbi ábra a szűrők eltávolításának folyamatát
mutatja be.
Beltéri egység tisztítása
1. Nyissa ki a készülék elülső lemezét, és a tisztítás megkönnyítése
érdekében távolítsa el a csuklópántokat.
2. Tisztítsa meg a beltéri egységet ruhával és vízzel (legfeljebb
40 °C-nál).
VIGYÁZAT:
Ne permetezzen tisztítószereket a készülékre.
Ne merítse a készüléket vízbe: az elektronikus alkatrészek megsé-
rülhetnek.
Ne használjon drótkefét vagy súrolószert.
Kültéri egység tisztítása
Ha a kültéri egység levegő bemeneti nyílása eltömődött, távolítsa el a
benne lévő leveleket vagy egyéb hulladékokat, majd sűrített levegővel
vagy kevés vízzel távolítsa el a maradék port.
Elemcsere
MEGJEGYZÉS:
Csak új elemeket használjon. Az elemeket csak akkor vegye ki a táv-
irányítóból, ha a légkondicionáló egység ki van kapcsolva.
Ha:
Már nem hall egy megerősítő sípoló hangot a beltéri egységtől.
A kijelző már nem működik megfelelően.
Hogyan:
Nyissa ki a hátsó fedelet.
Helyezzen be új elemeket. Kérjük, ellenőrizze, hogy a polaritás meg-
felelő-e.
Hibaelhárítás
Üzemzavar / meghibásodás Lehetséges okok
A készülék nem működik. Áramszünet / csatlakozódugó kihúzva
Sérült ventilátormotor a beltéri egységen vagy a kültéri egységen
A kompresszor hőmágneses kapcsolója elromlott
A védőeszköz elromlott vagy meghibásodott, vagy biztosítékok ki vannak égve
Laza csatlakozások vagy a csatlakozódugó ki van húzva
Működési megszakítás a termék védelme / megőrzése érdekében
Túl magas vagy túl alacsony feszültség
A ” funkció be van kapcsolva (a készülék automatikus bekapcsolása)
Az elektronikus vezérlőpanel sérülése
Szokásos szag A légszűrők szennyezettek vagy elkoszolódtak
Víz hangja Folyadék visszaáramlása a hűtőközeg körében
Enyhén köd szivárog a levegő
kimeneti nyílásából
Ez akkor fordul elő, ha a helyiség levegője nagyon hideg lesz, például „COOL” vagy „DRY” üzemmódban.
Szokatlan zajok Zajok jelentkezhetnek az elülső panel hőingadozásai által okozott megnyúlás vagy összehúzódás miatt. Ezek a
zajok nem azt jelentik, hogy a készülék megsérült vagy meghibásodott.
CL6045QCCB_IM 17.12.20
134
Üzemzavar / meghibásodás Lehetséges okok
Nem kívánt légáramlás (meleg
vagy hideg)
Helytelen vagy nem megfelelő hőmérséklet-beállítás
A levegő be- vagy kimeneti nyílása el van zárva a beltéri egységen vagy a kültéri egységen.
A légszűrő eltömődött.
A ventilátor sebesség a minimális fordulatszámra van beállítva
Egyéb hőforrások a helyiségben
Hiányzó hűtőközeg(ek)
A készülék nem reagál a
jelekre / beavatkozásra.
A távirányító nincs elég közel a beltéri egység vevőjéhez.
A távirányító számára nincs elegendő feszültség az elemekben.
A távvezérlő és a vevő között elhelyezett akadályok
A kijelző ki van kapcsolva. Aktivált LED funkció
Feszültséghiba
Az ECO funkció be van kapcsolva (lásd a „Energiatakarékos üzemmód (ECO)” fejezetet)
A funkciók vagy szolgáltatások
hiányoznak a kijelzőről
Nem minden funkció vagy szolgáltatás jelenik meg az egyes üzemmódokban (lásd a „Működtetés” fejezetet)
Ebben az esetben azonnal kapcsolja ki a készüléket, és húzza ki az áramból:
Szokatlan zaj működés közben
Hiba a vezérlőpanelen
Kiégett biztosítékok vagy törött kapcsoló
Vízpermet vagy tárgyak a rendszerben
Túlmelegedett / megégett kábel vagy csatlakozódugó
Erős szag árad a készülékből
Hibakódok a kijelzőn
Hiba esetén a következő hibakódok jelennek meg a beltéri egység kijelzőjén:
Lámpa világít Hiba leírása
Egyszer villog Beltéri hőmérséklet érzékelő hibája
Kétszer villog Kültéri hőmérséklet érzékelő hibája
Hatszor villog A beltéri ventilátor motorja nem működik megfele-
lően
MEGJEGYZÉS:
További hibakódok a szervizkönyvben találhatók.
CL6045QCCB_IM 17.12.20
135
Műszaki adatok
Modell: ..............................................................................CL 6045 QC CB
Beltéri egység nettó tömege: ......................................................... kb. 7 kg
Kültéri egység nettó tömege: ....................................................... kb. 25 kg
Áramelltátás / hálózati feszültség: ................................220 - 240 V~, 50 Hz
Bemeneti teljesítmény hűtés közben: .............................................. 800 W
Bemeneti teljesítmény fűtés közben: ............................................... 699 W
Bemeneti teljesítmény integrált készenléti üzemmódban: ............... 5,0 W
Védelmi osztály: ........................................................................................
Hűtőteljesítmény: ...................................................9000 BTU (2600 kW/h)
Hőteljesítmény: ......................................................9000 BTU (2610 kW/h)
Hűtőközeg(ek):: ................................................................................... R 32
Legnagyobb megengedett üzemi nyomás:
Nyomásoldal: ............................................................................ 3,7 MPa
Szívóoldal: ................................................................................ 1,2 MPa
Modell: ..............................................................................CL 6046 QC CB
Beltéri egység nettó tömege: ...................................................... kb. 8,5 kg
Kültéri egység nettó tömege: ....................................................... kb. 25 kg
Áramelltátás / hálózati feszültség: ................................220 - 240 V~, 50 Hz
Bemeneti teljesítmény hűtés közben: .............................................1130 W
Bemeneti teljesítmény fűtés közben: ............................................... 922 W
Bemeneti teljesítmény integrált készenléti üzemmódban: ............... 5,0 W
Védelmi osztály: ........................................................................................
Hűtőteljesítmény: .................................................12000 BTU (3400 kW/h)
Hőteljesítmény: ....................................................12000 BTU (3420 kW/h)
Hűtőközeg(ek):: ................................................................................... R 32
Legnagyobb megengedett üzemi nyomás:
Nyomásoldal: ............................................................................ 3,7 MPa
Szívóoldal: ................................................................................ 1,2 MPa
Modell: ..............................................................................CL 6047 QC CB
Beltéri egység nettó tömege: .....................................................kb. 10,5kg
Kültéri egység nettó tömege: ....................................................kb. 35,5 kg
Áramelltátás / hálózati feszültség: ................................220 - 240 V~, 50 Hz
Bemeneti teljesítmény hűtés közben: ............................................ 1579 W
Bemeneti teljesítmény fűtés közben: ............................................. 1382 W
Bemeneti teljesítmény integrált készenléti üzemmódban: ............... 2,5 W
Védelmi osztály: ........................................................................................
Hűtőteljesítmény: .................................................18000 BTU (5100 kW/h)
Hőteljesítmény: ....................................................18000 BTU (5130 kW/h)
Hűtőközeg(ek):: ................................................................................... R 32
Legnagyobb megengedett üzemi nyomás:
Nyomásoldal: ............................................................................ 3,7 MPa
Szívóoldal: ................................................................................ 1,2 MPa
Wi-Fi
Hálózat által támogatott: .........................................................802.11 b/g/n
Maximális kisugárzott kimeneti teljesítmény: ............................. 18,0 dBm
Frekvenciatartomány: ....................................................................2,4 GHz
Csatornák: .......................................................................................... 1 - 13
Támogatott WiFi kódok: ......................................................... WPA / WPA2
A műszaki és kivitelezési módosítások jogát a folyamatos termékfejlesz-
tés miatt fenntartjuk.
Megfelelőségi nyilatkozat
Clatronic International GmbH igazolja, hogy a CL 6045 QC CB /
CL 6046 QC CB / CL 6047 QC CB típusú rádióberendezés megfelel a
2014 / 53 / EU irányelvnek.
A készülék továbbá megfelel az RoHS irányelv (2011 / 65 / EU) & (EU)
2015 / 863 által előírt követelményeknek.
Az EU-megfelelőségi nyilatkozat teljes szövege elérhető a következő
internetes címen: www.sli24.de
A letöltés szekcióban, kérjük, adja meg a CL 6045 QC CB modellnevet.
A készülék Magyarországon való működését tesztelték.
Selejtezés
Az elemek ártalmatlanítása
Vásárlóként Önt törvény kötelezi a régi elemek / akkumuláto-
rok visszavitelére.
A készülék leselejtezése előtt vegye ki az elemeket a távirá-
nyítóból.
Vigye az elemeket egy régi elemek vagy veszélyes hulladék átvételével
foglalkozó gyűjtőpontra. További információkért lépjen kapcsolatba a
helyi hatóságokkal.
CL6045QCCB_IM 17.12.20
136
A „kuka” piktogram jelentése
Kímélje környezetünket, az elektromos készülékek nem a
háztartási szemétbe valók!
Használja az elektromos készülékek ártalmatlanítására
kijelölt gyűjtőhelyeket, ott adja le azokat az elektromos -
szülékeit, amelyeket többé már nem kíván használni!
Ezzel segítséget nyújt ahhoz, hogy elkerülhetők legyenek azok a hatá-
sok, amelyeket a helytelen „szemétre dobás” gyakorolhat a környezetre
és az emberi egészségre.
Ezzel hozzájárul az újrahasznosításhoz, a recyclinghoz és a kiöregedett
elektromos és elektronikus készülékek értékesítésének egyéb formái-
hoz.
Az önkormányzatoknál vagy a polgármesteri hivatalokban tájékoztatást
kaphat arról, hogy hova viheti a kiselejtezett készülékeket.
CL6045QCCB_IM 17.12.20
137
Руководство по эксплуатации
Спасибо за выбор нашего продукта. Надеемся, он вам понравится.
Символы применяемые в данном руководстве пользователя
Важные рекомендации для обеспечения вашей безопасности
обозначены по особенному. Обязательно следуйте этим рекомен-
дациям, чтобы предотвратить несчастный случай или поломку
изделия:
ПРЕДУПРЕЖДЕНИЕ:
Предупреждает об опасности для здоровья и возможном риске
получения травмы.
ВНИМАНИЕ:
Указывает на возможную опасность для изделия и других окру-
жающих предметов.
ПРИМЕЧАНИЯ:
Дает советы и информацию.
Общая информация
Перед началом эксплуатации прибора внимательно прочитайте
прилагаемую инструкцию по эксплуатации и сохраните ее в на-
дежном месте, вместе с гарантийным талоном, кассовым чеком и,
по возможности, картонной коробкой с упаковочным материалом.
Если даете кому- либо попользоваться прибором, обязательно
дайте в придачу данную инструкцию по эксплуатации.
Пользуйтесь прибором только частным образом и по назначе-
нию. Прибор не предназначен для коммерческого использова-
ния.
Не пользуйтесь прибором под открытым небом. Предохраняйте
прибор от жары, прямых солнечных лучей, влажности (ни в коем
случае не погружайте его в воду) и ударов об острые углы. Не
прикасайтесь к прибору влажными руками.
Прибор и кабель сетевого питания необходимо регулярно об-
следовать на наличие следов повреждения. При обнаружении
повреждения пользоваться прибором запрещается.
Используйте только оригинальные запчасти.
Из соображений безопасности для детей не оставляйте лежать
упаковку (пластиковые мешки, картон, пенопласт и т.д.) без
присмотра.
ПРЕДУПРЕЖДЕНИЕ:
Не позволяйте детям играть с полиэтиленовой пленкой. Опас-
ность удушья!
Особые указания по технике безопасности для данного устройства
На изделии можно увидеть символы, обозначающие предупреждения или дающие информацию:
Прочтите инструкцию по эксплуатации!
ПРЕДУПРЕЖДЕНИЕ: Опасность пожара!
Устройство содержит горючий хладагент!
Для ускорения процесса используйте только разрешенные производителем средства.
Прибор следует хранить в помещении вдали от источников воспламенения (например, открытый огонь,
включенный газовый прибор или электрообогреватель).
Запрещается сверлить в устройстве отверстия или воздействовать на него огнем.
Помните, что хладагент не имеет запаха.
Руководство по использованию доступно на веб-сайте: www. sli24. de
В разделе «Downloads» (Скачивание) введите название модели CL 6045 QC CB.
К работе с контуром охлаждения допускаются только специалисты с действующим сертификатом,
выданным соответствующим отраслевым органом сертификации, который подтверждает уровень квали-
фикации, необходимый для безопасной работы с охлаждающими средствами.
Использовать устройство следует в соответствии с рекомендациями производителя. Работы по обслу-
живанию и ремонту, требующие участия квалифицированных сотрудников, должны проводиться под
контролем специалиста по работе с горючими хладагентами.
ВНИМАНИЕ: Риск перегрева!
Не закрывайте слоты вентиляции!
Не накрывайте прибор!
CL6045QCCB_IM 17.12.20
138
ВНИМАНИЕ:
Неправильная установка и работа специализированной компании без подтверждения (например, без сер-
тификата) приведет к отзыву гарантии согласно EU 517 / 2014, глава II, параграф 3.
ПРЕДУПРЕЖДЕНИЕ:
Не следует использовать или хранить устройство в следующих местах:
- Рядом с источниками огня.
- В местах, где возможно разбрызгивание воды или масла.
- Под прямым солнечным светом.
- В ванных комнатах, в прачечных или рядом с плавательным бассейном.
Не прикасайтесь к прибору, когда стоите босиком, либо когда любая часть тела влажная или сырая.
Во время установки прибора сертифицированной специализированной компанией обеспечьте безопас-
ность в окружающей области для предотвращения инцидентов. Не допускается приближение детей и
посторонних лиц.
Убедитесь, что розетка для наружного применения установлена с соблюдением всех мер безопасности.
После перемещения системы кондиционирования воздуха проверьте, что в холодильную систему не по-
ступает воздух, а также на утечку хладагентов. Запомните, что хладагенты не имеют запаха.
После установки системы кондиционирования воздуха выполните тестовый прогон и проверьте рабочие
характеристики.
Предохранители, установленные во встроенный блок управления, имеют номинальную величину
T 5 A / 250 В. Проверьте, что внутренний блок прибора всегда защищен предохранителем с достаточным
номиналом для максимального входного тока или иным устройством защиты от перегрузки.
Во время установки прибор должен оставаться отключенным от сети электропитания, что подтверждается
размыканием всех контактных полюсов, т.е. полным отключением согласно нормам по максимальному
напряжению категории III. Это должно быть реализовано в постоянной кабельной проводке согласно пра-
вилам электробезопасности. Все электрические работы должно проводиться только профессиональными
электриками или сотрудниками компании, специализирующейся в области электрических работ. Блок
воздушного кондиционирования должен устанавливаться только сотрудниками специализированной сер-
тифицированной компании.
Не размещайте прибор рядом с горючими материалами (спирт и т.д.) или сосудами под давлением (на-
пример, распылительные баллончики, газовые цилиндры и т.п.). Пожалуйста, оставьте расстояние не
менее 50 см между прибором и любым таким предметом.
Если прибор эксплуатируется в помещении без системы вентиляции, следует предпринять специальные
меры предосторожности для предотвращения опасности возгорания из-за возможной утечки газообраз-
ного хладагента.
Пожалуйста, соблюдайте национальные стандарты подключения электрического оборудования. Кабель-
ная проводка должна отвечать всем применимым национальным нормам.
До возможного прикосновения к соединительным зажимам следует отключить все электрические цепи от
источника электропитания.
Прибор может использоваться детьми старше восьми (8) лет и людьми c пониженными физическими,
сенсорными или умственными способностями или с недостатком опыта и знаний, если они находятся под
присмотром или прошли инструктаж по безопасному использованию прибора и понимают связанные с
ним опасности.
Детям запрещено играть с прибором.
Запрещается ремонтировать прибор самостоятельно обратитесь к уполномоченному на это специалисту.
Очистка и техобслуживание должны проводиться квалицированным персоналом. Во всех случаях прове-
дения работ по очистке и техобслуживанию предварительно отключите прибор от источника электропита-
ния.
CL6045QCCB_IM 17.12.20
139
Прибор не предназначен для кондиционирования воздуха в жилых помещениях / квартирах и не должен
использоваться в иных целях, например для сушки одежды, охлаждения продуктов питания и т.д.
Используйте прибор только с установленным воздушным фильтром. Применение прибора воздушного
кондиционирования без воздушного фильтра может привести к избыточному накоплению пыли и грязи на
внутренних частях прибора с последующим повреждением и / или неисправностью.
Поэтому пользователь несет полную ответственность за установку прибора только квалифицированным
техником. Квалифицированный техник обязан проверить заземление прибора согласно действующим
применимым нормам и правилам, а также гарантировать оснащение прибора термомагнитным автомати-
ческим выключателем.
Не допускайте длительного прямого воздействия холодного воздуха из прибора. Длительное прямое воз-
действие холодного воздуха опасно для здоровья. В частности, это особенно рекомендуется в отношении
детей, пожилых людей и больных.
Если из прибора выходит дым или запах горелого, немедленно отключите источник электропитания и об-
ратитесь к технику сервисной службы. Использование прибора в таком состоянии и / или в таких условиях
может стать причина возгорания или удара электрическим током.
Используйте кнопку для выключения прибора, который не будет использоваться продолжительное
время.
После монтажа убедитесь в правильном направлении воздушного потока. Клапаны должны быть направ-
лены вниз в режиме обогрева и вверх во время охлаждения.
За счет недопущения высоких колебаний при настройке температуры можно предотвратить повреждение
прибора.
Не сгибайте, не тяните и не давите на кабель электропитания, чтобы не повредить его. Поврежденный
кабель электропитания может стать причиной удара электрическим током, а также возгорания. Только
специализированный технический персонал допускается к замене поврежденного кабеля электропитания.
Не перекрывайте впуск и выпуск воздуха на внутреннем и наружном блоке прибора. Блокирование или
перекрытие этих отверстий приведет к снижению охлаждающей способности и может вызвать неисправ-
ность или повреждение. Не проводите никаких несогласованных или неправильных изменений или моди-
фикаций прибора.
Не кладите на прибор тяжелые или горячие предметы.
Не оставляйте на длительный срок открытыми окна или двери, когда используется блок воздушного кон-
диционирования.
Не направляйте воздушный поток на растения и животных. Длительное прямое воздействие холодного
воздушного потока негативно влияет на растения и животных.
Не взбирайтесь на внешний блок прибора и не кладите на него посторонние предметы.
Не вставляйте внутрь прибора стержни, прутья, полосы или иные подобные предметы. Это может приве-
сти к вашей травме или повреждению предмета.
Обязательно используйте специальные приспособления и инструменты при прокладке и изгибании охлаж-
дающих трубок. По причинам безопасности следует обязательно устранить провисание чувствительных к
изгибу кабелей. Все работы должны проводиться сертифицированной компанией согласно соответствую-
щим нормативным документам, указанным в документации подключаемого к прибору оборудования.
Не следует удлинять или обрезать охлаждающие трубки без соблюдения специальных мер предосторож-
ности, поскольку трубки уже заполнены хладагентом на заводе во время производства прибора.
ВНИМАНИЕ:
Все технические изменения охлаждающих трубок должны проводить только специальная сертифициро-
ванная компания. Неправильное изменение или модификация могут привести к отзыву гарантии.
Проверьте на непроницаемость (герметичность) все трубки и кабели, чтобы избежать формирования и
проникновения внутрь корпуса прибора жидкостей, водяного пара или конденсата. Это предотвратит нако-
пление влажности, а также формирование плесени.
CL6045QCCB_IM 17.12.20
140
Как обращаться с батарейками
ПРЕДУПРЕЖДЕНИЕ:
Не подвергайте батарейки воздействию сильного тепла, как
например, солнечные лучи, огонь и т.д. Риск взрыва!
Батарейки не игрушка. Держите их вдали от детей.
Не разбирайте батарейки.
Избегайте контакта с металлическими предметами (кольца,
гвозди, болты и т.д.). Риск короткого замыкания!
Короткое замыкание может привести к перегреву и даже вос-
пламенению батареек, что может привести к травмам.
Для вашей безопасности закройте контакты батареи липкой
лентой при транспортировке.
В случае вытекания электролита, остерегайтесь попадания
кислоты в глаза и на слизистые. В случае попадания, промойте
чистой водой. Обратитесь к враче в случае сохранения диском-
форта.
Неперезаряжаемые батарейки не подлежат повторной за-
рядке.
ПРЕДУПРЕЖДЕНИЕ:
При подключении аккумуляторов проверьте полярность.
ВНИМАНИЕ:
Когда пульт ДУ долгое время не используется, достаньте бата-
рейки во избежание вытекания кислоты.
Не используйте батарейки разных типов или новые и старые
батарейки вместе.
Не выбрасывайте использованные батарейки вместе с быто-
вым мусором. Отдайте их в специальный пункт сбора.
Распаковка прибора
1. Извлеките прибор из упаковки.
2. Снимите все упаковочные материалы, например пленку, запол-
нители и картон.
3. Проверьте прибор на возможные повреждения при транспорти-
ровке, чтобы предотвратить опасность.
4. Не используйте поврежденный прибор! Свяжитесь со своим
продавцом.
Комплект поставки
Внутренний блок
a) 6 × винтов
b) 6 × дюбелей
c) 1 × настенный крепеж
Внешний блок
d) 1 × опора для каналов конденсата
e) 4 × опоры для внешнего блока
Соединительные принадлежности
f) 1 × соединительный кабель для
внешнего блока
g) 2 × охлаждающие трубки (серая и
голубая) с изоляцией
h) 1 × изоляционный материал (запасной)
i) 2 × трубки водяного конденсата
j) 1 × виниловая лента
k) 1 × крышка отверстия
Принадлежности
m) 1 × дистанционное управление
n) 2 × батарейки R03 «AAA» 1,5 В
o) 2 × фильтра
p) 2 × картриджа фильтра
1 × Aфильтр из активированного угля
(серый)
1 × ионизирующий фильтр (зеленый)
Обзор деталей прибора
Стр. 3
Блок прибора для помещений
1 Передняя панель
2 Картридж фильтр с активированным углем (серый)
3 Картридж ионизирующего фильтра (зеленый)
4 Модуль WLAN (беспроводная локальная сеть)
5 Светодиодный (LED) дисплей
6 Пластина наименования / типа (местоположение может быть
другим)
7 Электрическая схема
8 Электрический соединительный блок
9 Кнопка (включение / выключение)
10 Воздушный дефлектор
11 Приемник сигналов
12 Воздушная заслонка
13 Дистанционное управление
Блок прибора для наружного размещения
14 Наружная пластина наименования / типа (местоположение
может быть другим)
15 Крышка соединителя
16 Клапан хладагента
a серый
b голубой
17 Выпуск воздуха
CL6045QCCB_IM 17.12.20
141
Дистанционное управление
ПРИМЕЧАНИЯ:
Если в вашей модели отсутствует одна из функций, то при нажа-
тии ее кнопки все равно будет слышен гудок.
Кнопки дистанционного управления
Ном. Кнопка Описание
1Переключатель включения / выключения
2OPTION Клавиша выбора
3Настройка / клавиша выбора
4Настройка / клавиша выбора
5ECO Активация / деактивация экологической
функции
6TURBO Активация / деактивация функции турбо-ре-
жима
7Mode Клавиша выбора рабочего режима
8Fan Настройка скорости воздуха (вентилятор)
9Настройка воздушной заслонки
10 Настройка воздушного дефлектора (недо-
ступна, следует настроить вручную)
Дисплей дистанционного управления
Отображение сети
Блокировка от детей
AUTO Автоматический режим
COOL Режим охлаждения
DRY Режим осушения воздуха
HEAT Режим обогрева
FAN Режим вентилятора
ECO Режим энергосбережения
Дисплей скорости вентиляции
Вентилятор / вентиляция выключена
Максимальная температура и скорость
Отображение воздушной заслонки
Отображение воздушного дефлектора
Режим короткого сна
Переключатель автоматического включения /
выключения
Автоматическое вычисление температуры
Самоочистка от плесени
Функция здоровья (недоступно)
Недоступно
Информация в приложении
«Smart Life - Smart Living»
Приложение Smart Life - Smart Living доступно для android и
iOS. Сканируйте соответствующий код QR, чтобы сразу перейти к
загрузке.
ПРИМЕЧАНИЯ:
В зависимости от провайдера связи при загрузке приложения
может взиматься плата.
Google Play App Store
Информация об использовании приложения
Это приложение позволяет управлять прибором по домашней сети.
Условием для этого станет (1) постоянное подключение по Wi-Fi к
маршрутизатору (роутеру) и (2) наличие бесплатного приложения
«Smart Life - Smart Living». Из приложения можно легко управлять
всеми функциями прибора. Мы рекомендуем отключить прибор
от электропитания, когда никого нет дома, чтобы предотвратить
нежелательное включение без вашего присутствия!
Системные требования для использования приложения
iOs 10.0 и выше
Android 5.0 и выше
Передача в эксплуатацию из приложения
1. Установите приложение «Smart Life - Smart Living». Создайте
учетную запись (аккаунт) пользователя.
2. Активируйте функцию Wi-Fi в настройках прибора.
3. Убедитесь, что сеть WiFi действует в месте расположения при-
бора.
4. Включите внутренний блок.
5. Запустите приложение и выберите « + » .
6. Выберите меню «воздушный кондиционер» и следуйте инструк-
циям на дисплее.
7. Нажмите шесть раз кнопку ECO дистанционного управления,
чтобы на дисплее появилась надпись «CF». Нажмите шесть
раз кнопку ECO дистанционного управления, чтобы на дисплее
появилась надпись «AP».
ПРИМЕЧАНИЯ:
«CF»: Предупреждающая лампочка модуля (4) быстро мигает.
«AP»: Предупреждающая лампочка модуля (4) мигает мед-
ленно.
В этом случае нажмите «next step» (следующий шаг). Введите
свой пароль.
8. После успешного подключения прибора индикаторная лампочка
Wi-Fi будет гореть непрерывно. Теперь можно управлять прибо-
ром из приложения.
ПРИМЕЧАНИЯ:
Прибор может работать только с маршрутизаторами на частоте
2,4 ГГц. Маршрутизаторы на 5 ГГц не поддерживаются.
Отключение от Wi-Fi
Чтобы отключиться от уже установленного соединения Wi-Fi (горит
контрольная лампочка), выполните следующее:
Нажмите шесть раз кнопку ECO дистанционного управления.
ПРИМЕЧАНИЯ:
Чтобы восстановить соединение Wi-Fi, выполните действия,
рассмотренные в разделе «Передача в эксплуатацию из прило-
жения».
CL6045QCCB_IM 17.12.20
142
Установка
Внутренний блок (a)
Установите внутренний блок на прочную стену, не подверженную
никакой вибрации.
Не должно быть перекрыто ни одно из отверстий прибора, чтобы
воздух смог поступать во всё помещение.
Не устанавливаете прибор рядом с источниками тепла, паров
или горючих газов.
Не устанавливаете прибор там, где он будет длительно подвер-
гаться прямому солнечному свету.
Выберите место, где можно легко сливать конденсат и где вну-
тренний блок легко подключить к внешнему.
Регулярно проверяйте корректность работы прибора и всегда
соблюдайте рекомендации о минимальных расстояниях и / или
сохранении свободного места. Выберите место, где легко до-
браться до фильтра.
Не устанавливайте прибор во влажных помещениях, например в
ванных, прачечных и т.д.
Для оптимального результата установку следует выполнить как
можно выше от пола.
Внешний блок (b)
Не устанавливаете внешний блок рядом с источниками тепла,
паров или горючих газов.
Запрещается устанавливать прибор в местах с повышенным
уровнем пыли.
Установите прибор там, где никого не потревожит рабочий шум
и где редко бывают люди. При необходимости согласуйте место
установки с соседями. Соблюдайте немецкую федеральную
директиву по излучению, если необходимо.
Не устанавливаете прибор в местах, где он будет подвергаться
воздействию прямого солнечного света или жестким климати-
ческим условиям, либо примените солнцезащитный козырек,
который не будет отрицательно влиять на воздушный поток.
Всегда соблюдайте минимальные расстояния, указанные на
рисунке ниже и/или оставляйте свободное место согласно этим
расстояниям во время монтажа и эксплуатации.
Установите внешний блок в устойчивом положении.
Если внешний блок подвергается вибрации, используйте резино-
вые амортизаторы на полу для противодействия этой вибрации.
Минимальные расстояния (в мм) показаны на рисунке.
ВНИМАНИЕ:
Покупатель должен гарантировать наличие достаточной квали-
фикации и опыта работы с хладагентами у лиц, компаний или
организаций, который устанавливают, обслуживают или ремон-
тируют данные блоки воздушного кондиционирования.
Неправильная установка и проведение работ без разрешаю-
щих документов (например, сертификата) у специализирован-
ной компании может вызвать отзыв гарантии согласно (EU)
517 / 2014 глава II, параграф 3.
Установка настенного крепления
ВНИМАНИЕ:
Перед установкой настенного крепления убедитесь, что найдено
подходящее место, где будут просверлены отверстия для трубок!
См. главу «Установка внутреннего блока и стеновых вкладышей
наружу».
1. Ослабьте настенное крепление на фиксирующих зажимах.
2. Разверните настенное крепление вверх.
3. Снимите настенное крепление, освободив ее из держателя.
4. Просверлите отверстия глубиной не менее 32 мм в прочной
стене для крепления пластины.
5. Вставьте пластиковые дюбели в отверстия.
6. Закрепите монтажную пластину на стене винтами из комплекта
поставки.
CL6045QCCB_IM 17.12.20
143
7. Убедитесь, что настенная пластина надежно прикручена на
своем месте.
Выравнивание охлаждающих трубок
ВНИМАНИЕ:
Блок воздушного кондиционирования должен быть установлен и
подключен компанией, имеющей сертификат на работы с хлада-
гентом и системами воздушного кондиционирования. Неправиль-
ная установка может привести к отзыву гарантии.
Охлаждающие трубки можно прокладывать в 3 направлениях,
как отмечено номерами на рисунке. Если трубки прокладываются
согласно вариантам 1 или 3, необходимо использовать режущий
инструмент для аккуратного отрезания паза на боковой стороне
внутреннего блока вдоль стыка.
Направьте соединительные трубки к отверстию в стене и свяжите
вместе трубки охлаждения, трубопровод конденсированной воды
и силовой кабель, воспользовавшись виниловой лентой, причем
обязательно обеспечьте непромокаемую изоляцию, чтобы снаружи
не проникали жидкости, водяной пар или конденсат, например в
стену. Это предотвратит повышение влажности, а также форми-
рование плесени. Обеспечьте плавный наклон трубки конденсиро-
ванной воды, чтобы не был затруднен сток воды.
ВНИМАНИЕ:
Обеспечьте непромокаемую изоляцию трубок, чтобы предотвра-
тить повреждение стены из-за влажности и плесени.
Раскручивание охлаждающих трубок
Снимите закрывающие колпачки только непосредственно перед
подключением охлаждающих трубок, чтобы избежать загрязне-
ния.
Если трубки слишком часто изгибаются или вытягиваются, они
становятся жесткими. Не перегибайте трубки более трех раз.
Аккуратно раскрутите трубки, как показано на схеме A. Не допу-
скайте коробления.
ВНИМАНИЕ:
Не тяните трубку в противоположные стороны, как показано на
схеме В.
Подключение к внутреннему блоку
ВНИМАНИЕ:
Блок воздушного кондиционирования должен быть установлен
и/или подключен компанией, имеющей сертификат на работы с
хладагентом и системами воздушного кондиционирования. Не-
правильная установка может привести к отзыву гарантии.
1. Снимите защитные колпачки.
2. Проверьте соединения на загрязнение или повреждение.
3. Накрутите соединительную гайку на резьбовое соединение вну-
треннего блока. При этом обратите внимание на цвет защитного
колпачка.
4. Затяните соединение подходящим гаечным ключом.
ПРИМЕЧАНИЯ:
Всегда соблюдайте корректный момент затяжки и рекомендации
из раздела «Информация об установке».
CL6045QCCB_IM 17.12.20
144
Подключение трубки конденсированной воды к внутреннему блоку
Очень важно правильно установить трубку конденсированной воды
для внутреннего блока.
1. Проложите сливной шланг ниже трубки и убедитесь в отсутствии
провисания и изгибания.
2. Сливной шланг должен быть наклонен вниз, чтобы обеспечить
слив конденсированной воды.
3. Не сгибайте и не перекручивайте сливной шланг. Не допускайте
его выпирания. Не погружайте конец в воду. Если трубка соеди-
нена с удлинителем, сохраните целостность такого соединения
при вставке во внутренний блок.
4. Если охлаждающие трубки проложены согласно варианту 3 в
главе «Выравнивание охлаждающих трубок», то трубки, соеди-
нительный кабель для внешнего блока и сливная трубка конден-
сированной воды должны быть закреплены на задней стороне
прибора трубными соединителями.
5. Вставьте трубный соединитель в соответствующий ему прибор.
6. Аккуратно нажмите соединительную трубку вниз в блок воздуш-
ного кондиционирования и убедитесь в надежности соединения.
ВНИМАНИЕ:
Во время прокладки не допускайте коробления и проводите
соответствующие работы только силами специальной сертифи-
цированной компании!
Установка внутреннего блока и стеновых вкладышей наружу
После подключения согласно указаниям охлаждающих трубок и
сливной трубки конденсированной воды выполните следующее:
1. С повышенной осторожностью проложите трубки, соединитель-
ный кабель внешнего блока и трубку конденсированной воды к
месту, где они пройдут наружу сквозь стену.
2. Свяжите вместе виниловой лентой трубки, соединительный
кабель внешнего блока и трубку конденсированной воды, чтобы
создать плотную по всей длине оболочку из изоляционной ленты
(не входит в комплект поставки).
ВНИМАНИЕ:
Обеспечьте непромокаемую изоляцию трубок, чтобы предот-
вратить повреждение стены из-за влажности и плесени.
Убедитесь в достаточной изоляции всех выступающих частей
труб и кабеля.
3. Просверлите отверстие диаметром 57 мм с наклоном / крутизной
5 - 7 мм (рис. 2).
ПРИМЕЧАНИЯ:
Сверлите с небольшим наклоном в 5 - 7 мм наружу, чтобы
обеспечить слив конденсированной воды. Во всех случаях
убедитесь, что наклон обеспечен по всей длине трубки конден-
сированной воды в направлении отверстия в стене.
4. Вставьте крышку отверстия.
5. Проложите изолированные трубки, соединительный кабель
внешнего блока и трубку конденсированной воды через отвер-
стие в стене.
ПРИМЕЧАНИЯ:
После монтажа трубок изолируйте отверстие в стене, через
которое проходят трубки, чтобы добиться герметичности к
проникновению воздуха и воды.
6. Аккуратно закрепите внутренний блок на верхней части стеновой
монтажной пластины.
7. Аккуратно нажмите на нижнюю часть внутреннего блока в
направлении стеновой монтажной пластины до надежного заце-
пления.
CL6045QCCB_IM 17.12.20
145
Установка внешнего блока
Перед подключением трубок выберите место размещения внеш-
него блока, где будет достаточно пространства для работ техоб-
служивания в будущем (соблюдайте минимальные расстояния).
Положите защитные колпачки (из комплекта поставки) на опору
и закрепите их на соответствующих местах.
Используйте очень прочные анкерные винты / болты, учиты-
вая также вес прибора, чтобы предотвратить вибрацию из-за
ослабления со временем соединения во время работы. Блок
необходимо устанавливать в соответствии с применимыми ин-
струкциями по безопасности.
Сливная трубка конденсированной
воды для внешнего блока
Конденсированная вода и лед, формирующиеся во внешнем блоке
из-за рассеивания тепла, могут быть слиты через трубку конденси-
рованной воды.
1. Закрепите опоры для трубки слива конденсированной воды в
созданном заранее отверстии 25 мм.
2. Прикрепите эти опоры к трубке слива конденсированной воды
и проверьте, что поток течет правильно, чтобы предотвратить
повреждение от влажности.
Электрическое подключение (внешний блок)
Снимите крышку соединителя (15) на правой стороне прибора.
Соответствующая схема находится на задней стороне. См. схему.
1. Подключите силовой кабель электропитания к клеммной колодке
внутреннего блока.
2. Аккуратно подсоедините силовой кабель электропитания внеш-
него блока, воспользовавшись соединительными кабельными
зажимами.
3. Убедитесь, что кабели подключены правильно. Проверьте кор-
ректность монтажа заземления.
4. Поставьте защитную крышку обратно на прибор.
ВНИМАНИЕ:
Все электрические работы должно проводиться только сертифи-
цированными профессиональными электриками или сотрудни-
ками электрической компании. Неправильная установка может
привести к отзыву гарантии.
Инструкции для быстрого сочленения
Быстросочленяемыми соединителями удобно подключить внутрен-
ний и внешний блоки системы воздушного кондиционирования. Бы-
страя и простая процедура предполагает проведение всех работ
специализированной компаний, чтобы сохранить право на любые
гарантийные претензии.
ВНИМАНИЕ:
Охлаждающие трубки из комплекта поставки уже заполнены
хладагентом во время изготовления на заводе.
Эти трубки нельзя удлинять или обрезать.
Подключение к внутреннему блоку
1. Соблюдайте осторожность при раскручивании охлаждающих
трубок, как указано в главе «Раскручивание охлаждающих тру-
бок». Не допускайте коробления трубок.
2. Снимите защитные колпачки (голубой и серый) с соединителей
на внутреннем блоке.
3. Проверьте, что все винты в хорошем состоянии и не имеют сле-
дов грязи, пыли, песка или иных отложений или загрязнений.
4. Вкрутите охлаждающие трубки в соединители на внутреннем
блоке. Учитывайте при соединении цветовую схему (голубой/
зеленый). Затем затяните гайки двумя ключами (один затягивает
соединение, другой действует в противоположном направлении).
ПРИМЕЧАНИЯ:
Всегда соблюдайте корректный момент затяжки и рекоменда-
ции из раздела «Информация об установке».
CL6045QCCB_IM 17.12.20
146
Подключение к внутреннему блоку
1. Осторожно разверните охлаждающие трубки, как указано в главе
«Раскручивание охлаждающих трубок». Не допускайте коробле-
ния трубок.
2. Снимите защитные колпачки (голубой и серый) с соединителей
на внешнем блоке.
3. Проверьте, что все винты в хорошем состоянии и не имеют сле-
дов грязи, пыли, песка или иных отложений или загрязнений.
4. В крутите охлаждающие трубки в соединители на внешнем
блоке. Учитывайте при соединении цветовую схему (голубой / зе-
леный). Затем затяните гайки двумя ключами (один затягивает
соединение, другой действует в противоположном направлении).
ПРИМЕЧАНИЯ:
Всегда соблюдайте корректный момент затяжки и рекоменда-
ции из раздела «Информация об установке».
5. Проверьте, что контур хладагента прибора правильно подключен
и герметичен. Проверьте соединительные элементы распыли-
телем поиска утечек. Появление пузырьков свидетельствует об
утечке. В этом случае обязательно следует герметизировать оста-
новочные клапаны. Тщательно проверьте трубки и соединения.
ПРИМЕЧАНИЯ:
Остановочный клапан (а) герметизирован во время производ-
ства на заводе и не должен быть открыт. Сервисный клапан (b)
служит исключительно для техобслуживания.
ВНИМАНИЕ:
Блок воздушного кондиционирования должен быть установлен и
подключен компанией, имеющей сертификат на работы с хлада-
гентом и системами воздушного кондиционирования. Неправиль-
ная установка может привести к отзыву гарантии.
Тестирование внутреннего блока
Переключатель питания работает правильно?
Действует ли вентилятор?
Нормально ли действуют рабочие режимы?
Можно ли точно настроить температуру и время?
Горят ли все лампочки как обычно?
Правильно ли работают воздушные заслонки?
Корректно ли действует трубка конденсированной воды?
ВНИМАНИЕ:
Все рассмотренные выше операции должны выполняться
компанией, имеющей сертификат на работы с хладагентом и
системами воздушного кондиционирования. Неправильное про-
ведение работ может привести к отзыву гарантии.
Тестирование внешнего блока
Нет ли во время работы необычных шумов и вибрации?
Нет утечки хладагента?
ПРИМЕЧАНИЯ:
Электронная система управления запускает компрессор только
через три минуты после включения блока.
ВНИМАНИЕ:
Все рассмотренные выше операции должны выполняться
компанией, имеющей сертификат на работы с хладагентом и
системами воздушного кондиционирования. Неправильное про-
ведение работ может привести к отзыву гарантии.
CL6045QCCB_IM 17.12.20
147
Информация об установке
Инструкции и информация об установке
Конструкция или модель / охлаждающая способность (Btu / час) 9k 12k 15 / 18k
Диаметр охлаждающей трубки a) 1 / 4" 6 1 / 4" 6 1 / 4" 6
Диаметр охлаждающей трубки b) 3 / 8" 9,52 1 / 2" 12 1 / 2" 12
Стандартная длина охлаждающей трубки 5 м 5 м 5 м
Максимальное расстояние между внутренним и внешним блоками 15 м 15 м 15 м
Дополнительная заправка хладагентом 20 г / м 20 г / м 30 г / м
Максимальное расстояние между внутренним и внешним блоками 5 м (15 м) 5 м (15 м) 5 м (15 м)
Хладагент * R32 R32 R32
*) Дополнительная информация приведена на информационной табличке внешнего блока
Момент затяжки для защитных колпачков и фланцевых соединений
Охлаждающая трубка Момент затяжки (Н × м) Соответствующее
усилие на ключе 20 см Момент затяжки (Н × м)
1 / 4" 6 15 - 20 Крепко / вручную Сервисная соединительная гайка 7 - 9
3 / 8" 9,52 31 - 35 Крепко Защитные колпачки 25 - 30
1 / 2" 12 35 - 45 Крепко
5 / 8" 15,88 75 - 80 Крепко
Характеристики кабеля
Монтажные инструкции – информация монтажнику
Модель Хладагент (Btu / час) 9k 12k 15 / 18k
Силовой кабель
N1,0 мм²
AWG18
1,0 мм² (1,5 мм²)
AWG18 (AWG16)
1,5 мм²
AWG16
L1,0 мм²
AWG18
1,0 мм² (1,5 мм²)
AWG18 (AWG16)
1,5 мм²
AWG16
E1,0 мм²
AWG18
1,0 мм² (1,5 мм²)
AWG18 (AWG16)
1,5 мм²
AWG16
Соединительный кабель
N1,0 мм² 1,0 мм² (1,5 мм²) 1,5 мм²
L1,0 мм² 1,0 мм² (1,5 мм²) 1,5 мм²
11,0 мм² 1,0 мм² (1,5 мм²) 1,5 мм²
20,75 мм² 0,75 мм² 0,75 мм²
30,75 мм² 0,75 мм² 0,75 мм²
Инструкции и информация об установке
Трансформатор напряжения 9k 12k 18 / 22k
Модель Хладагент (Btu / час) Сечение
Силовой кабель
N1,0 мм² (1,5 мм²)
AWG18 (AWG16)
1,0 мм² (1,5 мм²)
AWG18 (AWG16)
1,5 мм²
AWG16
L1,0 мм² (1,5 мм²)
AWG18 (AWG16)
1,0 мм² (1,5 мм²)
AWG18 (AWG16)
1,5 мм²
AWG16
E1,0 мм² (1,5 мм²)
AWG18 (AWG16)
1,0 мм² (1,5 мм²)
AWG18 (AWG16)
1,5 мм²
AWG16
Соединительный кабель
N1,0 мм² (1,5 мм²) 1,0 мм² (1,5 мм²) 1,5 мм²
L1,0 мм² (1,5 мм²) 1,0 мм² (1,5 мм²) 1,5 мм²
11,0 мм² (1,5 мм²) 1,0 мм² (1,5 мм²) 1,5 мм²
При 220 В варианты 7 K, 9 K, 12 K, 15 K, 16 K, 18 K, 22 K, 24 K, 30 K, резервная величина для внутреннего блока воздушного кондиционирова-
ния 50 T, 3,15 A
При 110 В варианты 7 K, 9 K, 12 K, резервная величина для внутреннего блока воздушного кондиционирования: 50 T, 3,15 A
125 В варианты 7 K, 9 K, 12 K, резервная величина для внешнего блока воздушного кондиционирования: 61 T, 15 A
250 В варианты 18 K, 22 K, 24 K, резервная величина для внешнего блока воздушного кондиционирования 65 T, 25 A!
CL6045QCCB_IM 17.12.20
148
Электрическая схема
Электрическая схема может отличаться для разных моделей.
Пожалуйста, ознакомьтесь с электрическими схемами внутреннего
и внешнего блоков.
Электрическая схема внутреннего блока (7) находится под перед-
ней панелью (1).
Электрическая схема внешнего блока прикреплена на обратной
стороне крышки соединителя (15).
ПРИМЕЧАНИЯ:
В некоторых моделях кабели уже подключены заводом-изготови-
телем к главной печатной плате внутреннего блока без примене-
ния клеммных зажимов.
Работа
Управление на боковой стенке
Если не работает дистанционное управление или необходимо
провести техобслуживание, выполните следующее:
1. Откройте переднюю крышку и поднимите ее вверх, чтобы от-
крылся доступ к кнопке .
2. Нажатие кнопки вызовет запуск функции охлаждения (будет
слышен гудок).
3. Нажатие кнопки на 3 секунды вызовет запуск функции обо-
грева (прозвучат два гудка).
4. Для выключения снова нажмите кнопку (будет слышен длин-
ный гудок).
ПРИМЕЧАНИЯ:
Внешнее статическое давление для водяного насоса всех моде-
лей равно 0 Па.
Дистанционное управление
1. Откройте крышку отсека батареек на задней стороне дистанци-
онного управления, сдвинув ее по направлению стрелки.
2. Вставьте 2 батарейки R03 «AAA» 1,5 В. Пожалуйста, проверьте
соблюдение полярности (см. внизу отсека батареек).
ПРИМЕЧАНИЯ:
Защитная блокировка от детей: одновременно нажмите вниз
кнопки и , чтобы активировать защитную блокировку для
безопасности детей.
Включение / выключение дисплея: нажмите и удерживайте
кнопку ECO.
3. Направьте дистанционное управление на блок воздушного кон-
диционирования.
ПРИМЕЧАНИЯ:
Убедитесь, что между дистанционным управлением и прием-
ником сигнала на внутреннем блоке нет никаких посторонних
предметов / препятствий.
Не оставляйте дистанционное управление под прямыми сол-
нечными лучами на продолжительное время.
Используйте и храните дистанционное управление на расстоя-
нии не менее одного метра от других электрических приборов.
Переключатель включения / выключения
Нажмите кнопку , чтобы выключить прибор.
Снова нажмите кнопку для включения прибора.
Настройка воздушного потока
При поступлении в помещение воздушный поток будет распределяться
равномерно. Доступны средства для оптимизации направления потока.
Кнопка активирует заслонку направления воздуха (1). Воздушный
поток направляется сверху вниз для обеспечения равномерного рас-
пределения в помещении.
Воздушные дефлекторы (2), находящиеся под заслонками направления
воздуха, следует направить вручную. Это позволяет направить воздуш-
ный поток справа налево.
ВНИМАНИЕ:
Изменение направления воздушного дефлектора может произойти на выключенном приборе.
Не направляйте воздушные заслонки вручную (т.е. рукой). Это может привести к серьезному повреждению.
Не вставляйте пальцы, стержни или иные предметы во впускные / выпускные отверстия. Это может привести к повреждению оборудо-
вания и травмам людей.
ПРИМЕЧАНИЯ:
Пожалуйста учтите, что по конструктивным причинам не все функции выводятся на дисплей дистанционного управления в каждом из
рабочих режимов. Нажатие клавиши OPTION позволит узнать, какие функции доступны в определенном рабочем режиме.
Кнопка MODE выбор рабочего режима.
Кнопка OPTION выбор функции.
CL6045QCCB_IM 17.12.20
149
Режим охлаждения (COOL)
Режим охлаждения позволяет одновременно охлаждать помеще-
ние и снижать в нем влажность воздуха.
1. Для активации режима охлаждения нажмите клавишу MODE
до появления «COOL» на дисплее дистанционного управления.
Функция охлаждения будет активна, пока выбранная темпера-
тура ниже температуры в помещении (выбор величины клави-
шами и ).
2. Для оптимизации функции воздушного кондиционирования
настройте температуру, скорость и направление воздушного
потока, нажав соответствующие клавиши.
Режим обогрева (HEAT)
Режим обогрева позволяет повысить температуру в помещении.
1. Для активации режима обогрева нажмите клавишу MODE до
появления «HEAT» на дисплее дистанционного управления.
Функция обогрева будет активна, пока выбранная температура
выше температуры в помещении (выбор величины клавишами
и ).
2. Для оптимизации функции обогрева настройте температуру,
скорость и направление воздушного потока, нажав соответству-
ющие клавиши.
ПРИМЕЧАНИЯ:
Если прибор оснащен электрическим нагревателем, появится
задержка активации приложения на несколько минут.
Функцию автоматического размораживания можно активиро-
вать во время режима обогрева. Эта функция незаменима
для очистки прибора. Будут удалены замерзшие отложения
конденсата, чтобы восстановить полную способность тепло-
обмена. Процедура обычно занимает 2 - 10 минут. Во время
размораживания прекращается работа вентилятора. После
размораживания прибор автоматически вернется в режим
обогрева.
Автоматическое включение прибора ( )
Программировать автоматическое включение можно только на
выключенном приборе.
1. Нажмите кнопку OPTION.
2. Клавишами со стрелками и перейдите к « » на дис-
плее дистанционного управления.
3. Снова нажмите кнопку OPTION, затем клавишами со стрелками
и настройте нужное время.
4. Подтвердите заданный вариант кнопкой OPTION.
ПРИМЕЧАНИЯ:
Чтобы прервать функцию настройки, повторите рассмотрен-
ные выше шаги.
Функция таймера допускает настройку с 30-минутными интер-
валами.
Автоматическое выключение прибора ( )
Программировать автоматическое выключение можно только на
включенном приборе.
1. Нажмите кнопку OPTION.
2. Клавишами со стрелками и перейдите к « » на дис-
плее дистанционного управления.
3. Снова нажмите кнопку OPTION, затем клавишами со стрелками
и настройте нужное время.
4. Подтвердите заданный вариант кнопкой OPTION.
ПРИМЕЧАНИЯ:
Чтобы прервать функцию настройки, повторите рассмотрен-
ные выше шаги.
ПРИМЕЧАНИЯ:
Функция таймера допускает настройку с 30-минутными интер-
валами.
Режим вентилятора (FAN)
Для активации режима вентилятора нажмите клавишу MODE до
появления «FAN» на дисплее дистанционного управления.
Нажатием клавиши FAN можно настроить скорость вентилятора в
следующем порядке:
Выключен ( )
LOW ( ) – низкая скорость
MEDIUM ( ) – средняя скорость
HIGH ( ) – высокая скорость
Turbo ( ) – турборежим
Автоматически
Режим осушения воздуха (DRY)
Эта функция позволяет уменьшить влажность воздуха, чтобы улуч-
шить качество воздуха в помещении.
Для включения режима осушения воздуха нажмите кнопку MODE
до появления «DRY» на дисплее дистанционного управления. Вен-
тилятор будет активирован с регулируемым циклом охлаждения.
Автоматический режим (AUTO)
Для активации автоматического режима нажмите кнопку MODE до
появления «AUTO» на дисплее дистанционного управления.
Скорость вентилятора и температура будут контролироваться ав-
томатически вне зависимости от температуры в помещении.
Наружная температура Рабочий режим
< 20 °C Обогрев
20 °C ~ 26 °C Осушение
> 26 °C Охлаждение
Режим короткого сна ( )
Функция SLEEP автоматически настраивает температуру для соз-
дания в помещении воздуха, наиболее подходящего для ночного
времени суток. Когда прибор работает в режиме охлаждения / осу-
шения, заданная температура будет автоматически увеличиваться
на 1 °C до достижения повышения на 2 °C за период в 2 часа.
1. Для активации режима короткого сна нажмите кнопку OPTION.
2. Клавишами со стрелками и перейдите к « » на дис-
плее дистанционного управления.
3. Подтвердите заданный вариант кнопкой OPTION.
4. Используйте клавишу OPTION для выключения функции
« ».
Во время режима обогрева температура снижается на 2 °C за
первые 2 часа.
После 10 часов в режиме короткого сна прибор автоматически
выключится.
Энергосберегающий режим (ECO)
Нажатие кнопки ECO активирует или деактивирует функцию Eco.
Прибор перейдет в режим энергосбережения. Настроенная темпе-
ратура автоматически и плавно увеличивается без нарушения ком-
фортного климата. В результате снижается потребление энергии.
Нажатие и удерживание кнопки ECO позволяет выключить дисплей
для внутреннего блока.
CL6045QCCB_IM 17.12.20
150
Максимальная температура и скорость ( )
Нажатие кнопки TURBO активирует или деактивирует функцию
Turbo (турбо). Это позволяет наиболее быстро достичь заданной
температуры.
Удаление плесени / самоочистка ( )
1. Для активации режима самоочистки нажмите кнопку OPTION.
2. Клавишами со стрелками и перейдите к « » на
дисплее дистанционного управления.
3. Подтвердите заданный вариант кнопкой OPTION.
4. Используйте клавишу OPTION для выключения функции
« ».
Автоматическое вычисление температуры ( )
Автоматическое вычисление температуры производится по
датчику в дистанционном управлении. Убедитесь, что на дистан-
ционное управление не воздействуют источники тепла, например
лампы освещения.
1. Для активации « » нажмите кнопку OPTION.
2. Клавишами со стрелками и перейдите к « » на дис-
плее дистанционного управления.
3. Подтвердите заданный вариант кнопкой OPTION.
4. Используйте клавишу OPTION снова для выключения функции
« ».
Очистка и техобслуживание
ПРЕДУПРЕЖДЕНИЕ:
Убедитесь, что во время чистки вода не поступает
через отверстия прибора. Опасность возгорания
или удара электрическим током.
ВНИМАНИЕ:
Регулярно обслуживайте устройство для обеспечения безопас-
ной и эффективной работы.
Все операции очистки и техобслуживания должны выполняться
компанией, имеющей сертификат на работы с хладагентом
и системами воздушного кондиционирования. Неправильное
проведение работ может привести к отзыву гарантии.
Очистка и замена фильтра
1. Откройте переднюю панель в направлении, указанном стрелкой.
2. Одной рукой поднимите переднюю панель, а другой – извлеките
пылевой фильтр.
3. Очистите фильтр водой. При сильном загрязнении используйте
для очистки теплую воду (не выше 45 °C). Затем дайте фильтру
высохнуть.
4. Вставьте воздушный фильтр обратно.
5. Закройте крышку отсека.
ПРИМЕЧАНИЯ:
Дополнительные фильтры с активированным углем (серые) и
ионизирующие фильтры (зеленые) не предполагают очистку,
но должны заменяться новыми после указанного количества
рабочих часов. На рисунке ниже показан процесс извлечения
фильтров.
Очистка внутреннего блока
1. Откройте переднюю панель прибора и извлеките петли для
выполнения очистки.
2. Очистите внутренний блок мокрой тряпкой (с температурой не
выше 40 °C).
ВНИМАНИЕ:
Не распыляйте на прибор чистящие средства.
Не используйте металлическую щетку или абразивные сред-
ства.
Не используйте сильные или царапающие чистящие средства.
CL6045QCCB_IM 17.12.20
151
Очистка внешнего блока
Если блокирован впуск воздуха внешнего блока, удалите все
имеющиеся отложения и другую грязь, затем удалите оставшуюся
пыль сжатым воздухом или небольшим количеством воды.
Замена батарейки
ПРИМЕЧАНИЯ:
Используйте только новые батарейки. Извлеките батарейки из
дистанционного управления только при выключенном блоке воз-
душного кондиционирования.
Когда:
Больше не слышен подтверждающий гудок от внутреннего
блока.
Перестал корректно работать дисплей.
Как:
Откройте заднюю крышку.
Вставьте новые батарейки. Пожалуйста, проверьте соблюдение
полярности
Диагностика
Неисправность / поломка Возможная причина
Прибор не работает. Неисправность электропитания / извлечена вилка из розетки
Поврежден мотор вентилятора во внутреннем или внешнем блоке
Сломан термомагнитный переключатель компрессора
Сломано устройство защиты или дефектный / перегоревший предохранитель
Ослабленные соединения или извлечена вилка из розетки
Рабочее прерывание для защиты / предохранения оборудования
Слишком низкое или высокое напряжение
Активирована функция « » (автоматическое включение прибора)
Повреждена электронная плата управления
Необычный запах Загрязнены или запылились воздушные фильтры
Звук воды Обратный поток жидкости в контуре хладагента
Легкий дым выходит из выпуска воз-
духа
Возникает, когда воздух в помещении становится очень холодным, например в режимах
«COOL» или «DRY».
Необычные шумы Могут появиться из-за удлинения или сжатия передней панели при колебаниях температуры.
Эти шумы не означают, что прибор дефектный или неисправный.
Нежелательный воздушный поток
(горячий или холодный)
Неправильная или неподходящая настройка температуры
Поврежден мотор вентилятора во внутреннем или внешнем блоке
Перекрыт воздушный фильтр
Скорость вентилятора настроена на минимальную величину
В помещении есть другие источники тепла
Отсутствует хладагент
Прибор не откликается на сигналы /
действия
Дистанционное управление далеко от приемника на внутреннем блоке
Недостаточное напряжение от батареек в дистанционном управлении
Препятствия между дистанционным управлением и приемником
Выключен дисплей Активирована функция LED
Ошибка по напряжению
Активирована функция ECO (см. главу о сервисном обслуживании «Энергосберегающий режим
(ECO)»)
Функции или средства отсутствуют на
дисплее
Не все функции и средства выводятся для каждого рабочего режима (см. главу о «Работа»)
В этом случае немедленно выключите прибор и отключите электропитание:
Необычные шумы во время работы
Ошибка платы управления
Перегорели предохранители или сломан переключатель
Распыление воды или посторонние предметы в системе
Перегрев / перегорел кабель или вилка
Из прибора поступает сильный запах
CL6045QCCB_IM 17.12.20
152
Неисправность / поломка Возможная причина
Коды ошибок на дисплее
При возникновении ошибки на дисплей внутреннего блока выводятся следующее коды ошибок:
Состояние лампочки Описание ошибки
Однократное мигание Ошибка датчика температуры в помещении
Мигает дважды Ошибка датчика наружной температуры
Мигает шесть раз Неисправность мотора внутреннего вентилятора
ПРИМЕЧАНИЯ:
Дополнительные коды ошибок указаны в руководстве по сервис-
ному обслуживанию.
CL6045QCCB_IM 17.12.20
153
Технические данные
Модель: ........................................................................... CL 6045 QC CB
Вес нетто внутреннего блока: ................................................прибл. 7 кг
Вес нетто внешнего блока: ..................................................прибл. 25 кг
Питание / напряжение: ............................................... 220 - 240 В~, 50 Гц
Входная мощность при охлаждении: ...........................................800 Вт
Входная мощность при обогреве: ................................................699 Вт
Входная мощность в стандартном дежурном режиме: ..............5,0 Вт
Степень защиты: .....................................................................................
Способность охлаждения:...............................9000 BTU (2600 кВт/час)
Тепловой выход: ..............................................9000 BTU (2610 кВт/час)
Хладагент: .......................................................................................... R 32
Минимально допустимое рабочее давление:
Сторона наддува: ...................................................................3,7 MПa
Сторона всасывания: .............................................................1,2 MПa
Модель: ........................................................................... CL 6046 QC CB
Вес нетто внутреннего блока: ................................................прибл. 7 кг
Вес нетто внешнего блока: ..................................................прибл. 25 кг
Питание / напряжение: ............................................... 220 - 240 В~, 50 Гц
Входная мощность при охлаждении: ......................................... 1130 Вт
Входная мощность при обогреве: ................................................922 Вт
Входная мощность в стандартном дежурном режиме: ..............5,0 Вт
Степень защиты: .....................................................................................
Способность охлаждения:.............................12000 BTU (3400 кВт/час)
Тепловой выход: ............................................12000 BTU (3420 кВт/час)
Хладагент: .......................................................................................... R 32
Минимально допустимое рабочее давление:
Сторона наддува: ...................................................................3,7 MПa
Сторона всасывания: .............................................................1,2 MПa
Модель: ........................................................................... CL 6047 QC CB
Вес нетто внутреннего блока: ...........................................прибл. 10,5 кг
Вес нетто внешнего блока: ...............................................прибл. 35,5 кг
Питание / напряжение: ............................................... 220 - 240 В~, 50 Гц
Входная мощность при охлаждении: .........................................1579 Вт
Входная мощность при обогреве: ..............................................1382 Вт
Входная мощность в стандартном дежурном режиме: ..............2,5 Вт
Степень защиты: .....................................................................................
Способность охлаждения:.............................18000 BTU (5100 кВт/час)
Тепловой выход: ............................................18000 BTU (5130 кВт/час)
Хладагент: .......................................................................................... R 32
Минимально допустимое рабочее давление:
Сторона наддува: ...................................................................3,7 MПa
Сторона всасывания: .............................................................1,2 MПa
Wi-Fi
Поддерживаемые сети: ........................................................ 802.11 b/g/n
Максимальная излучаемая выходная мощность: ..................18,0 дБм
Частотный диапазон: .................................................................... 2,4 ГГц
Каналы: ............................................................................................. 1 - 13
Поддерживаемые ключи шифрования Wi-Fi: ................... WPA / WPA2
Сохранено право на технические и конструкционные изменения в
рамках продолжающейся разработки продукта.
Данное устройство соответствует всем текущим директивам CE,
таким как электромагнитная совместимость и низкое напряжение;
оно произведено в соответствии с новейшими правилами техники
безопасности.
Утилизация
Утилизация использованной батарейки
Как покупатель, вы юридически обязаны возвращать ис-
пользованные батарейки / аккумуляторы.
Перед утилизацией прибора извлеките батарейки из
пульта ДУ.
Верните батарейку на пункт сбора старых батареек или опасных
отходов. Обращайтесь к местным властям для получения более
подробной информации.
Значение символа «корзина»
Защита окружающей среды: не допускается утилизация
электроприборов вместе с бытовыми отходами.
Утилизация устаревшей техники и неисправных электро-
приборов производится в городских приёмных пунктах.
Не допускайте неправильной утилизации отходов. Это
наносит вред окружающей среде и оказывает негативное воздей-
ствие на здоровье людей.
Оказывайте содействие программе утилизации и другим формам
переработки электронной и электрической техники.
Информацию о пунктах утилизации бытовой техники можно полу-
чить в местных органах власти.
CL6045QCCB_IM 17.12.20
154
    /
:         
   
  
   
   
 /  
   
.  
:          
   
     
.     
      :
.      

CL 6045 QC CB .........................................................................................................:
  7 ...................................................................................:   
  25 .................................................................................:  
 50 ,~ 240-220 .....................................................................:/ 
 800.........................................................................................:  
 699........................................................................................:   
 5,0 ............................................................:   
I ..........................................................................................................................: 
(/  2600)    9000 ........................................: 
(/  2610)    9000 ....................................: 
R32 ......................................................................................................: () 
:    
  3,7 ..................................................................................................: 
  1,2 ..................................................................................................: 
  3,0 .........................................................:    
CL 6046 QC CB .........................................................................................................:
  8,5 ................................................................................:  
  25 .................................................................................:  
 50 ,~ 240-220 .....................................................................:/ 
 1130 ......................................................................................:  
 922........................................................................................:   
 5,0 ............................................................:   
I ..........................................................................................................................: 
(/  3400)    12000 ......................................: 
(/  3420)    12000 ..................................: 
R32 ......................................................................................................: () 
:    
  3,7 ..................................................................................................: 
  1,2 ..................................................................................................: 
  3,0 .........................................................:    
CL 6047 QC CB .........................................................................................................:
  10,5 .............................................................................:   
  35,5 .............................................................................:  
 50 ,~ 240-220 .....................................................................:/ 
 1579 ......................................................................................:  
 1382 .....................................................................................:   
 2,5 ............................................................:   
I ..........................................................................................................................: 
(/  5100)    18000 ......................................: 
(/  5130)    18000 ..................................: 
R32 ......................................................................................................: () 
:    
  3,7 ..................................................................................................: 
  1,2 ..................................................................................................: 
  3,0 .........................................................:    
 
b/g/n802.11 .................................................................................................: 
   18,0 ..................................................................:    
  2,4 ........................................................................................................: 
13-1 ...........................................................................................................................:
WPA 2/WPA .................................................................................:   
.         
     CE     
.       
     
/       
.  
.         
  .       
.    
""  
.         : 
.       
          
.   
          
.   
            
. 
CL6045QCCB_IM 17.12.20
155
3 .   )         .  
.    .(  45   4 ..     5 ..  
:
)   ( )      
  .      (
.    
 
1 ..      
2 .  40    )       
.(
: .      .    :  .      
  
          
.            
  :
        .   
.      
: 
.      .   
:
.   .     .  
       /
 /  . 
   
    
     
   
  / 
    
(  ) " "  
   
.    
.    
.() "DRY" () "COOL"                 
     .              
.    
        (  )     
.          
.  
       
    
  () 
.          ./  
.          
       
LED   .   
 
("(ECO)   " ) ECO   
("" )       .      
CL6045QCCB_IM 17.12.20
156
(FAN)  
    FAN  MODE      
. 
:     FAN  
( )  ( ) LOW
( ) MEDIUM
( ) HIGH
( ) Turbo 
(DRY)       
.       
   "DRY"  MODE       
.     .  
(AUTO) 
   "AUTO"  .MODE    
.  
.          
   
   20>
   26~20
   26<
( )  
       () SLEEP  
    /    .  
  2         1  
.
1 ..OPTION     2 .     " "     
. 3 ..OPTION   4 .." "   OPTION  
.    2       
.     10  
(ECO)   
.Eco     (  ) ECO    
      .     
.     .   
.     ECO      
( )     
  .     () TURBO    
.       
( )  /
1 ..OPTION      2 .     ")"     
.  3 ..OPTION     4 .." "   OPTION  
( )   
   .        
.       
1 ..OPTION   " "  2 .     " "     
. 3 ..OPTION   4 .." "    OPTION  
  :
  .      
.  
: .       .          
.       
  
1 ..     
2 ..          
CL6045QCCB_IM 17.12.20
157
:
. ""        
   
1 .            
. 2 . .     . 1,5  "R03" AAA    
(    )
:
.          :  
ECO    :  /
3 ..      
:
        /  
.  .                      
.  
 /
.    
.     
  
.     .       
        .(1)      
.  
           (2)    
.     
: .      .        .( )      .        . /    
    
:
 OPTION   .                 
.      MODE    OPTION
(COOL)  
.      
1 .    "COOL"  MODE      
           .  
(.    ) .  2 .        
.   
(HEAT)  
.    
1 .  "HEAT"  () MODE     
         .    
(.    ) .     2 .             
.      
:
          
.              
      .  
. 10  2     .    
    .     
. 
( )  
.        
1 ..OPTION   2 .     " "     
.  3 .      OPTION   
. 4 ..OPTION   
:
.     . 30   Timer  
( )   
.        
1 ..OPTION   2 .     " "     
. 3 .        OPTION  
. 4 ..OPTION   
:
.     . 30   "Timer"   
CL6045QCCB_IM 17.12.20
158
    
( )  (20  :)   ( )  
9-7     / 20-15 6 "4/1
30-25    35-31 9,52 "8/3
 45-35 12 "2/1
 80-75 15,88 "8/5

   
k18/15 k12 k9 (/  )   
1,5
AWG16 (1,5) 1,0
() AWG 18 1,0
AWG18 N
 
1,5
AWG16 (1,5) 1,0
() AWG 18 1,0
AWG18 L
1,5
AWG16 (1,5) 1,0
() AWG 18 1,0
AWG18 E
1,5 (1,5) 1,0 1,0 N
 
1,5 (1,5) 1,0 1,0 L
1,5 (1,5) 1,0 1,0 1
0,75 0,75 0,75 2
0,75 0,75 0,75 3
   
22/18 k12 k9   
  (/  )   
1,5
AWG16 (1,5) 1,0
() AWG 18 (1,5) 1,0
() AWG 18 N
 
1,5
AWG16 (1,5) 1,0
() AWG 18 (1,5) 1,0
() AWG 18 L
1,5
AWG16 (1,5) 1,0
() AWG 18 (1,5) 1,0
() AWG 18 E
1,5 (1,5) 1,0 (1,5) 1,0 N 1,5 (1,5) 1,0 (1,5) 1,0 L
1,5 (1,5) 1,0 (1,5) 1,0 1
50T, 3,15A :    K30 K24 K22 ,K18 K16 K15 K12 K9 K7  220 
50T, 3,15A :     ,K12 K9 K7   110 
61T, 15A :    K12 K9 K7 ,  125 
!65T, 25A :        K24 K22 K18  250
 
      .    
. 
.(1)    (7)     
.(15)        
:
          
.   
     
:           
1 ..       
2 ..    .       3 . ) .   3     
(.  4 .(.  ) .    
CL6045QCCB_IM 17.12.20
159
3 .          
.     
4 .    .      
     ./     
 
:
." "         
5 .  .        
   .      .  
.   .   
:
 (b)   .    (a)    
. 
:
   .          
.      
                                           
:
 .          
.       
                 
:
        
. 
:
 .          
.       

   
k18/15 k12 k9 (/  )  /
6 "4/1 6 "4/1 6 "4/1 (  
12 "2/112 "2/19,52 "8/3 (  
555  
15 15 15      
/30 /20 /20    
(15) 5(15) 5(15) 5      
R32 R32 R32 * 
.         (*
CL6045QCCB_IM 17.12.20
160
  
            
.            
(   ) .       ( )             /
   .       
.  
   
          
.   
1 .  25         
.  2 .            
.       
() 
       (15)    
. .     
1 ..         2 .          
.  3 ..      .      4 ..     
:
          
.        . 
  
          
             .
.       
: .         .    
   1 . "         
.  "  2 ..     ( )   
3 .        
.     
4 .    .      
     ./    
. 
:
." "         
   1 .  "          
.   " 2 ..     ( )  
CL6045QCCB_IM 17.12.20
161
    
.          
1 ..        2 ..        3 .    .   
    .  . 
.     4 . "    3          
         "
.       5 ..     6 ..        
:
         
!
      
         
:  
1 .          
.          2 .           
 )          
.(
:          
. .        3 .(2 ) . 7-5  /  57   
:
       7-5     
           . 
.  
4 ..   5 .           
.   
:
          
.    
6 ..        7 .              
.
CL6045QCCB_IM 17.12.20
162
7 ..     
   :
   .          
.      
       3   
     3  1    .
.        
         
           
 .              
    .      
.      
:
         
.
               
.     .         
.     .  .A       
:
   .B          
.  
  :
 .       /  
.     1 ..   2 ..   3 .           
.  4 ..     
:
." "         
CL6045QCCB_IM 17.12.20
163
Wi-Fi     
   ,(  )  Wi-Fi       
: 
.  "CF"        ECO  
:
      Wi-Fi        
."   "

(b)  
          
.  .                  
 .         .   
.     "      "        
            
.  /             
.          .              
. 
(a)  
.         .                         
. .                     
.             
     .       / 
.               
.          
.()      
:     //     
       
.     ( )      
.3    517/2014 ( )     
  
:
          
."      "    . 1 ..      
2 ..   
3 ..      
4 ..       32    5 ..    6 ..     
CL6045QCCB_IM 17.12.20
164
   3 
  
  1
()       2
()      3
WLAN  4
LED  5
(  )   6
   7
   8
( /)  9
  10
   11
  12
    13
  
(  )    14
  15
  16
 a
 b
 17
   :
            
.   
      
   
 / 1
  OPTION 2
/  3
/  4
ECO   / ECO 5
  / TURBO 6
   Mode 7
  Fan 8
 9
(   )    10
    

 
  AUTO
  COOL
    DRY
  HEAT
  FAN
   ECO
 
 /  
    
 
  
 
 / 
  
  
( ) 
 
"Smart Life - Smart Living"  
 .iOS Smart Life - Smart Living   
.     ( )   
:
.          
App Store Google Play
    
   (1 :   .       
Smart Life - Smart"  (2 \     Wi-Fi 
 .       ."Living
          
!
    
    iOs 10.0      Android 5.0 
   
1 ..   "Smart Life - Smart Living"  2 ..   Wi-Fi    3 ..      Wi-Fi       4 ..    5 .." +"  6 ..      "  "  7 . .  "CF"        ECO   
.    ECO      "AP"  
:
. (4)      :"CF"
. (4)       :"AP"
.   .""     8 .   . Wi-Fi       
.  
:
5   . 2.4       
.  
CL6045QCCB_IM 17.12.20
165
  
:   .           
! .  .  .     .(   )    
!           
.  .       .          
     .       
.   .        ./      
:
        .             
. 
.                  
.       
: ""            
.  .         .    
.       
   1 ..  2 .           
.  3 ..         4 ..  .    
  
a ( ×6b (×6c (  ×1
 
d (   ×1 e (   ×4
 f (    ×1 g (  ( )   ×2h (()   ×1i ( ×2 j (   ×1 k (  ×1

m (    ×1 n ("AAA"  1,5  R03 ×2o ( ×2p (  ×2
()    ×1
()  ×1
CL6045QCCB_IM 17.12.20
166
:- .          .          .        .             .         .     .                 .                          . T5A/250       
.                           
         .      .III    
.           .          .(      )    ( )       
.      50  .                 .       .     .                    (8)           
.               .    .        .             .                /       
.              .     
. /              .         
.            .          .      
.            /        .               
.         .          .          .       .              .         .         
.        .                .         
.              .      .           .             .      .      .      .           .         .         
.             .                
CL6045QCCB_IM 17.12.20
167
 
.    .   
 
  .        
:      
:
.           
:
.           
.      :

          
   .  .      
.      
  .     
.       .   
   .  (    )  
.  .         
.         .     )      
.   ( 
:
!       
  
:       
!
!  :
!      .                .(        )         .   .    
www. sli24.de :       
.() "Downloads"  CL 6045 QC CB    
                  
.               .           
.           
!   : !       !  

( )        ( )       
.3    517/2014
: :    - .    - .     - .   
CL6045QCCB_IM 17.12.20
Stand 12 / 2020
CL 6045QCCB, CL 6046 QC CB, CL 6047 QC CB
C. Bomann GmbH
Internet: www.bomann-germany.de
Made in P.R.C.
17

Hulp nodig? Stel uw vraag in het forum

Spelregels

Misbruik melden

Gebruikershandleiding.com neemt misbruik van zijn services uitermate serieus. U kunt hieronder aangeven waarom deze vraag ongepast is. Wij controleren de vraag en zonodig wordt deze verwijderd.

Product:

Bijvoorbeeld antisemitische inhoud, racistische inhoud, of materiaal dat gewelddadige fysieke handelingen tot gevolg kan hebben.

Bijvoorbeeld een creditcardnummer, een persoonlijk identificatienummer, of een geheim adres. E-mailadressen en volledige namen worden niet als privégegevens beschouwd.

Spelregels forum

Om tot zinvolle vragen te komen hanteren wij de volgende spelregels:

Belangrijk! Als er een antwoord wordt gegeven op uw vraag, dan is het voor de gever van het antwoord nuttig om te weten als u er wel (of niet) mee geholpen bent! Wij vragen u dus ook te reageren op een antwoord.

Belangrijk! Antwoorden worden ook per e-mail naar abonnees gestuurd. Laat uw emailadres achter op deze site, zodat u op de hoogte blijft. U krijgt dan ook andere vragen en antwoorden te zien.

Abonneren

Abonneer u voor het ontvangen van emails voor uw Bomann CL 6045 QC CB bij:


U ontvangt een email met instructies om u voor één of beide opties in te schrijven.


Ontvang uw handleiding per email

Vul uw emailadres in en ontvang de handleiding van Bomann CL 6045 QC CB in de taal/talen: Nederlands, Duits, Engels, Frans, Italiaans, Spaans, Pools als bijlage per email.

De handleiding is 7.76 mb groot.


U ontvangt de handleiding per email binnen enkele minuten. Als u geen email heeft ontvangen, dan heeft u waarschijnlijk een verkeerd emailadres ingevuld of is uw mailbox te vol. Daarnaast kan het zijn dat uw internetprovider een maximum heeft aan de grootte per email. Omdat hier een handleiding wordt meegestuurd, kan het voorkomen dat de email groter is dan toegestaan bij uw provider.

Stel vragen via chat aan uw handleiding

Stel uw vraag over deze PDF

Uw handleiding is per email verstuurd. Controleer uw email

Als u niet binnen een kwartier uw email met handleiding ontvangen heeft, kan het zijn dat u een verkeerd emailadres heeft ingevuld of dat uw emailprovider een maximum grootte per email heeft ingesteld die kleiner is dan de grootte van de handleiding.

Er is een email naar u verstuurd om uw inschrijving definitief te maken.

Controleer uw email en volg de aanwijzingen op om uw inschrijving definitief te maken

U heeft geen emailadres opgegeven

Als u de handleiding per email wilt ontvangen, vul dan een geldig emailadres in.

Uw vraag is op deze pagina toegevoegd

Wilt u een email ontvangen bij een antwoord en/of nieuwe vragen? Vul dan hier uw emailadres in.


Info