590378
3
Verklein
Vergroot
Pagina terug
1/24
Pagina verder
Full Color Digital Scouting Camera
Users Manual
Scouting Camera SG860C-HD
Content
1 Instruction ....................................................................................1
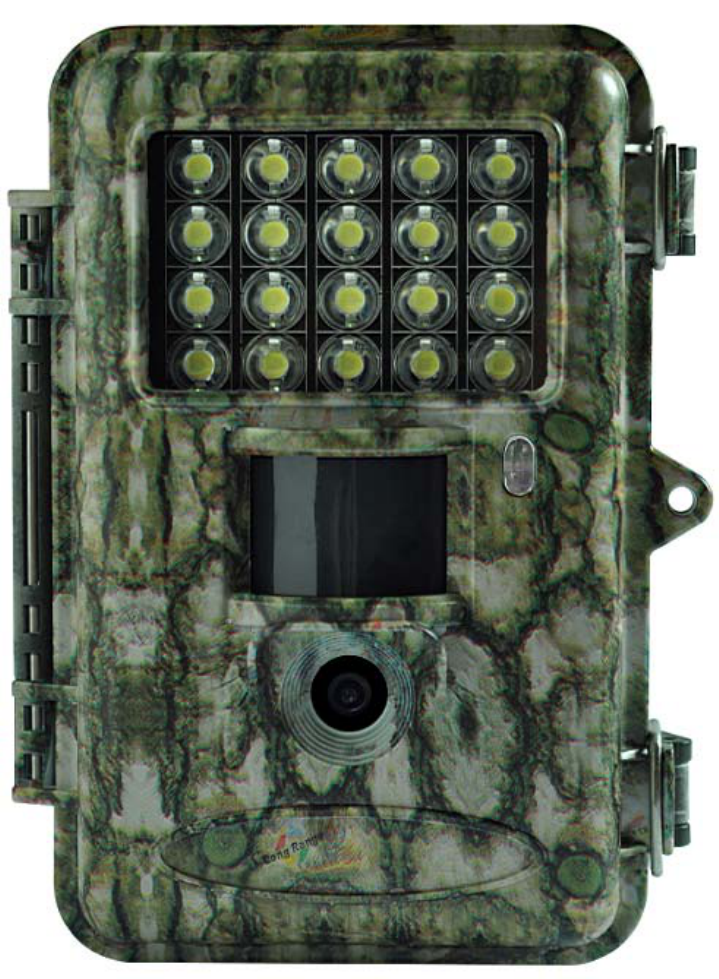
1.1 General Description.............................................................1
1.2 Application.......................................................................... 2
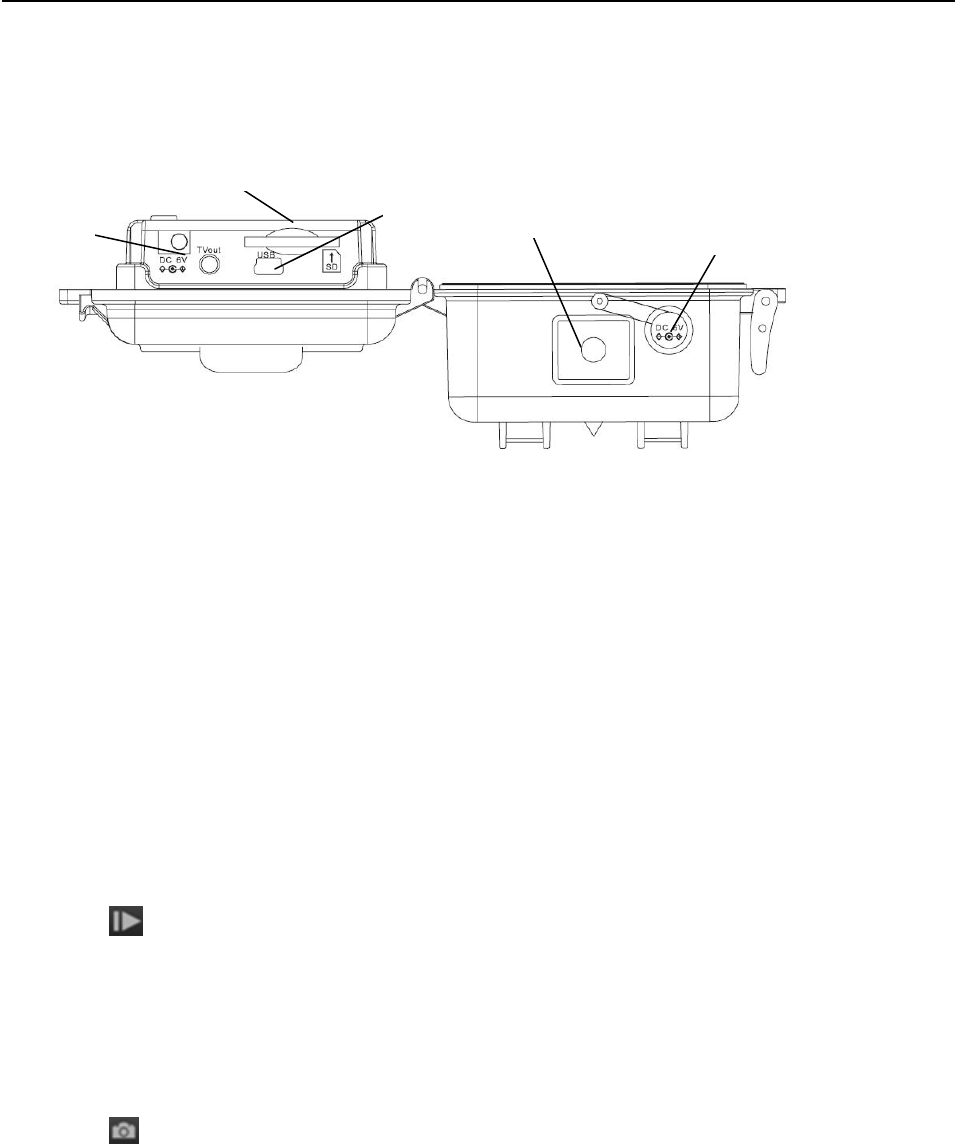
1.3 Camera Interface ................................................................ 2
1.4 Saving Images or Videos..................................................... 5
2 Cautions....................................................................................... 6
3 Easy Operations........................................................................... 7
3.1 Power Supply ...................................................................... 7
3.2 Insert the SD card ...............................................................8
3.3 Power On and Enter into the ON Mode .............................8
3.4 Enter into the SETUP Mode ............................................... 9
3.4.1 Preview ........................................................................... 9
3.4.2 Customer Settings .......................................................... 9
3.4.3 Manual Capturing........................................................... 9
3.4.4 View Images or Videos ................................................. 10
3.4.5 Delete Images or Videos............................................... 10
3.5 Triggering Modes.............................................................. 10
3.6 Power Off ........................................................................... 11
4 Advanced Operations .................................................................12
4.1 Settings Menu ....................................................................12
4.2 Default Settings and Live Monitoring .............................. 16
4.3 Firmware upgrade .............................................................17
5 Mounting the Camera ................................................................. 18
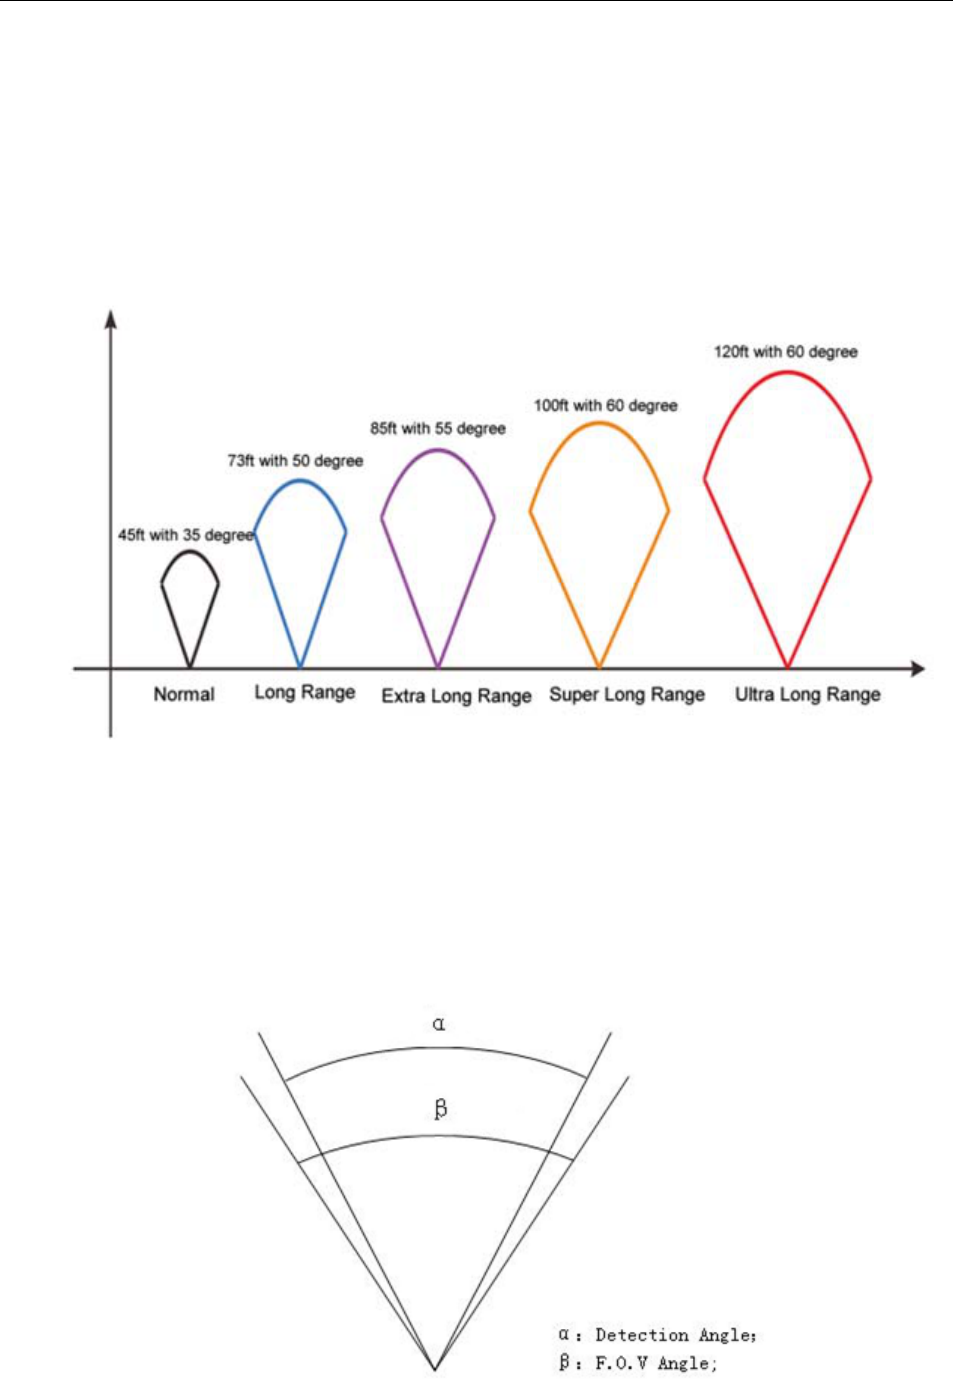
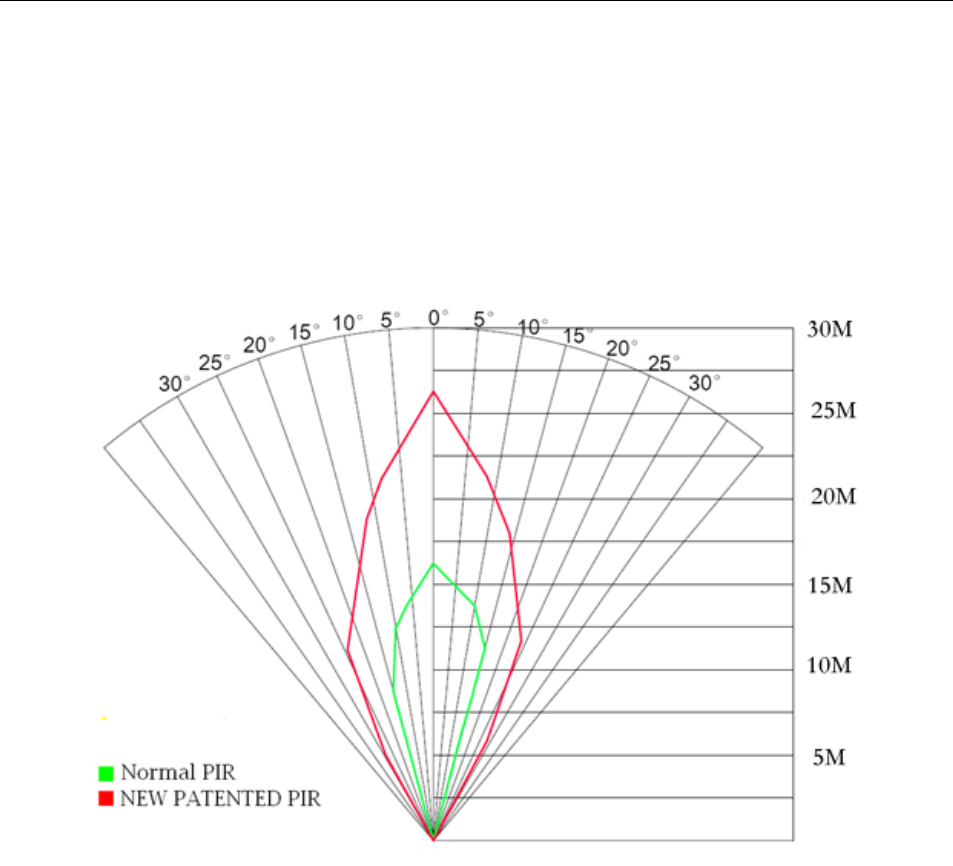
Appendix I: PIR Detection Zone ................................................... 19
Appendix: Technical Specifications............................................21
Appendix : Parts List .................................................................. 22
Scout Camera SG860C-HD 1 Instruction
Page
1
1 Instruction
1.1 General Description
This camera is a surveillance device working
automatically. It can be triggered by any movement of
human (or animal) in a certain region of interested (ROI)
monitored by a highly sensitive Passive Infra-Red (PIR)
motion sensor, and then take high quality pictures (up to 8
mega pixels) or video clips.
It also can be triggered by a timer which means the
camera can capture pictures or video clips at specified time
intervals regardless of whether there is a motion of human
or animal.
The device is equipped with built-in full color white
LED lights, it takes clear color pictures and color videos
both day and night.
The camera consumes very little power (μA level) at
surveillance mode. Powered by 8 new AA alkaline batteries,
the camera works for months. Once a motion by human or
animal is detected, the digital camera unit will be awaken
at once and then automatically take pictures or videos
according to previously programmed settings.
The device is designed for outdoor use and is resistant
against water and snow. Furthermore, the camera can be
Scout Camera SG860C-HD 1 Instruction
Page
2
used as a portable digital camera. Pictures or videos can be
taken manually by pressing
on the operation panel.
1.2 Application
This camera can be used as an automatic surveillance
device for guarding and recording unexpected intrusion to
homes, shops, schools, depots, offices, taxis, work sites, etc.
It can also be used as a trail camera for hunting or
monitoring animals by recording the traces of wild animals.
It can be left alone for weeks and months and it will save
event records automatically in digital format.
1.3 Camera Interface
1.3.1 Camera Body Interface
The camera has the following interfaces: a 2.0’’ TFT LCD
display screen, operation panel, USB connector, SD card
slot and external DC power connector. Fig. 1 shows the
front view of the camera and its function parts. Fig. 2
shows the operation panel and display screen. Fig. 3 shows
the bottom view of the camera and its I/O interface.
Take a few moments to familiarize with the camera
controls and displays. It is helpful to bookmark this section
and refer to it when reading through the rest of the manual.
Scout Camera SG860C-HD 1 Instruction
Page
3
Figure 1: Front view
Figure 2: Operation Interface
LED Lights
Indication LED
PIR
Lens
Lock
Display Screen
Operation panel
Power Switch
Battery Depot
Lock Hole
Scout Camera SG860C-HD 1 Instruction
Page
4
Figure 3: Bottom view
1.3.2 Key Notes
MENU”: to enter the program menu in preview mode;
”“”“”“”: for parameter settings as described
in the user’s manual.
OK”: to save parameter settings and play videos.
”: to exchange between playback mode and
preview mode;
DEL”: to delete an image
”: to capture a photo or record a video manually.
SD card Slot
DC In
USB
Bottom Screw
DC Hole and Stopper
Scout Camera SG860C-HD 1 Instruction
Page
5
1.3.3 Shooting Information Display
Figure 4: Display screen
1.4 Saving Images or Videos
The Camera uses a SD card to save images (in .jpg
format) and videos (in .avi format). Before inserting the SD
card, be sure that the SD card is unlocked. The camera is
compatible with SD card from 8MB to 32GB.
Scout Camera SG860C-HD 2 Cautions
Page
6
2 Cautions
The working voltage of the camera is 6V. The camera is
supplied by four or eight AA batteries.
Please install batteries according to shown polarity.
Please unlock the write-protect before inserting the SD
card.
Please insert the SD card when the power switch is at
OFF position before setting up the camera. If no SD card
is inserted, the camera will shut down automatically.
It is recommended to format the SD card by the camera
when used for the first time.
In the SETUP mode, the camera will shut down
automatically after 3 minutes if no operation is done.
Please turn on the power again if you want to continue to
work with the control.
Please avoid putting the camera in a damp place. If you
don’t use the camera, take out the battery and lock the
camera.
Scout Camera SG860C-HD 3 Easy Operations
Page
7
3 Easy Operations
3.1 Power Supply
Use 8 or 4 AA batteries or 6V external battery for power
supply.
Install the fully charged batteries into the depot
according to the polarities sign shown. The following
batteries with 1.5V output can be used:
1. High-density and high-performance alkaline batteries
(recommended)
2. Rechargeable alkaline batteries
3. Rechargeable NiMH batteries
When in low-battery state, camera will automatically
shut down after the indication LED flash for a while. Please
change the batteries in time.
Caution: Risk of explosion if battery is replaced by an
incorrect type. Also dispose of used batteries according to
the instructions.
Correct Disposal of this product. This marking
indicates that this product should not be disposed with
other household wastes throughout the EU. To prevent
possible harm to the environment or human health from
uncontrolled waste disposal, recycle it responsibly to
promote the sustainable reuse of material resources. To
Scout Camera SG860C-HD 3 Easy Operations
Page
8
return your used device, please use the return and
collection systems or contact the retailer where the product
was purchased. They can take this product for
environmental safe recycling.
3.2 Insert the SD card
The camera has no internal memory for saving images
or videos.
If no SD card is inserted, the camera will shut
down automatically.
3.3 Power On and Enter into the ON Mode
The Camera has three basic operation modes:
1. OFF mode: to turn off the camera.
2. SETUP mode: to set operational parameters, or to
playback the photos or video clips via display screen.
3. ON mode: to work under surveillance state.
After switching the camera to ON position, the motion
indication LED (red) will blink for about 10 seconds. This
time interval is for you to make the camera ready for
automatic surveillance operation, e.g., to close the bottom
cover and to lock it, to fix the camera on a tree and to walk
away. After entering into the ON mode, no manual controls
are needed and possible. The Camera will take pictures or
Scout Camera SG860C-HD 3 Easy Operations
Page
9
videos automatically according to the previous
programmed settings when human or animal enter into the
monitoring region.
3.4 Enter into the SETUP Mode
There are 3 states in SETUP Mode: preview state
(preview the scene in the front of the camera), setting state
(make customer settings), and playback state (view Photos
or videos via 2.0” TFT display).
3.4.1 Preview
After switching the camera to SETUP Mode, it enters
into the preview state.
Press
to exchange between playback mode and
preview mode.
3.4.2 Customer Settings
Press MENU to manually customizing the camera
settings which displayed on the screen. The detailed
operations will be described in “Advanced Operations”
chapter.
3.4.3 Manual Capturing
Press
to manually capture photos or record videos.
Press again
to stop the manual capturing of video clip.
Scout Camera SG860C-HD 3 Easy Operations
Page
10
3.4.4 View Images or Videos
Press
to view images or videos, the latest image or
video will be shown in the LCD screen on the control. Press
or to view the previous or next image or video.
3.4.5 Delete Images or Videos
Press DEL to delete images or videos. Note the DEL
button just works in Playback state. So if its in Preview
state, you should press
to enter into Playback state first.
3.5 Triggering Modes
There are 3 triggering modes of the camera: PIR
triggering, Timer triggering and PIR & Timer triggering.
3.5.1 PIR Triggering
PIR triggering is the default setting. The camera works
only when motions get detected, while PIR Trigger is set to
OFF, the camera will stop PIR triggering.
3.5.2 Timer triggering
The Time Lapse Default setting is OFF which means the
timer triggering is disabled. While changing the Time
Lapse to a non-zero value, the camera starts to work at a
Scout Camera SG860C-HD 3 Easy Operations
Page
11
preset time interval. User needs to OFF the PIR Trigger if
he wants the camera to work only with Time Lapse
function.
3.5.3 PIR & Timer triggering
If user wants both PIR triggering and Timer triggering,
the user needs to set PIR Trigger to ON and set Time Lapse
to a desired non-zero value. The camera will capture
pictures or videos in a preset time interval even if no
motions get detected and it will also capture pictures and
videos if motions get detected.
3.6 Power Off
Switch the camera to OFF position to power off the
camera. Please note that even in the OFF mode, the camera
still consumes certain power at μA level. Therefore, please
remove the battery if the camera will not be used for a long
time.
Scout Camera SG860C-HD 4 Advanced Operations
Page 12
4 Advanced Operations
After you are familiar with the basic operations of the
Camera, you are now ready for advanced operationsand
the options and parameters of the Camera are explained in
more detail.
4.1 Settings Menu
To view the camera settings menu, press MENU in
SETUP Mode (power switch is at SETUP position). The
settings menu will be shown on the LCD screen of the
camera.
Setting Menu Description
Camera Mode
Two camera modes: Photo or Video.
You can enter the Setup interface to set the
camera mode or use shortcut key to switch
the camera mode.
Via shortcut key: press “” key to set to
Video and press “” key to set to Photo in
SETUP mode.
Via setting menu: Press“” or “” to
select photo or video mode.
You can change the date and time of the
device by setting this parameter when
Scout Camera SG860C-HD 4 Advanced Operations
Page 13
Set Clock
necessary, e.g, after every battery change.
The date format is month/day/year, the
time format is hour: minute: second. The
valid value for year is from 2009 to 2050.
Photo Size
This parameter has two values: 5 mega
pixels (5M Pixel or 5MP) and 8 mega pixels
(8M Pixel or MP).
Photo Burst
This parameter affects the number of
pictures taken for each triggering in Camera
Mode. It has three values: “1 Photo”, “2
Photos”, and“3 Photos”.
Video Size You can choose 720P HD (1280X720) or
VGA 640X480) for video.
Video Length
This parameter is effective and can be
adjusted only when the device is in the
video. Its value extends from 5 to 60
seconds with a step of one second. Press
and to decrease or increase the
value by 1 second.
Time Lapse
This camera has time lapse function
which means the camera can capture
images or videos at a preset time interval
Scout Camera SG860C-HD 4 Advanced Operations
Page 14
(range from 5 mins to 8 hours) regardless of
whether motions get detected. The default
parameter is OFF which means the timer
function is disabled. When changing this
parameter to a non-zero value, it starts to
take photo or video at given time interval.
PIR Trigger
This parameter defines the sensitivity
of the PIR. There are four parameters:
High, Normal, Low and Off. The higher
degree indicates that the Camera is more
easily triggered by motion, taking more
pictures or recording more videos. It is
recommended to use high sensitivity degree
in room or environment with little
interference, and to use low sensitivity for
outdoor or environment with lots of
interference like hot wind, smoke, near
window, etc. Furthermore, the sensitivity of
the PIR is strongly related to the
temperature. Higher temperature leads to
lower sensitivity. Therefore it is suggested
to set a higher sensitivity for high
Scout Camera SG860C-HD 4 Advanced Operations
Page 15
temperature environment.
Please note that if Time Lapse is set to
OFF, PIR Trigger can’t be set to OFF.
PIR Interval
This parameter means how long the
PIR (Passive Infrared motion sensor) will
be disabled after each triggering in ON
mode. During this time the PIR of the
device will not react to the motion of human
(or animal). The minimum interval is 0
second, it means the PIR works all the time.
The maximum interval is 60 mins, it means
the PIR will be disabled for 1 hour after
each triggering. Press “” and “” to
decrease or increase the value.
Format SD
The system will delete all images or
videos stored in the SD card after
formatting. Please make sure that you have
made a backup of important data.
Default Set
Restore customer settings to default
values.
Table 1: Submenu
Scout Camera SG860C-HD 4 Advanced Operations
Page 16
Please press OK after you select one Item to save and
press MENU to cancel settings and return to info display if
you need.
4.2 Default Settings and Live Monitoring
Please refer to table 2 for the default settings:
Parameter
name
Default Other settings
Camera Mode Photo Video
Set Clock Enter
Photo Size 8M Pixel 5M Pixel
Photo Burst 1 Photo 2 Photos, 3 Photos
Video Size 1280X720 640X480
Video Length 10 sec 5-60 seconds
Time Lapse Off 5 Min to 8 Hour
PIR Trigger Normal
HighLowOff
PIR Interval 5 sec 0-55 Sec,
1-5 Min,
10-60 Min
Format SD Enter Yes, No
Default Set Save
Table 2: Default settings of the Camera
Scout Camera SG860C-HD 4 Advanced Operations
Page 17
4.3 Firmware upgrade
This camera provides an upgrading function for the
users. Upgrading is needed only when an improved
firmware is available.
Scout Camera SG860C-HD 5 Mounting the Camera
Page 18
5 Mounting the Camera
When use the camera in outdoor environment, such as
hunting or monitoring the living habits of wild animals,
you need to mount the device on a certain place properly. It
is recommended to mount the camera on a tree with
diameter about 15cm. To get the optimal picture quality,
the recommended distance is 5m from the tree to the target
monitoring area and recommended height from the ground
is 1.5~2 meters. Adjust the viewing angel properly (view
angle of this camera is 60°).
There are two ways to mount the camera: using a band
shaped belt or bottom screw.
Using the belt: Using the belt to fix the camera on a tree is
illustrated in Fig. 5. Take the belt toes to go through the
two back holes of the camera. At the end, tie the two toes to
the tree to finish fixing.
Using bottom screw.
Figure 5: Fixing the camera with belt
Scout Camera SG860C-HD Appendix: Detection Zone
Page 19
Appendix I: PIR Detection Zone
Fig. 6 shows Bolymedia’s 4 kinds of detection range at
different detection angles. This camera is extra long range
with 55 degree.
Figure 6:IR Detection Zone
The PIR detection angle (α) is just smaller than the
field of view angle (β). The advantage of this design is to
avoid empty pictures and get more available pictures.
Figure 7:Detection angle vs FOV angle
Scout Camera SG860C-HD Appendix: Detection Zone
Page 20
This camera has a new design of PIR which is patented.
The new patented PIR’s detection range can reach to 85 ft.
Fig. 8 shows the compared detection zone between normal
PIR and the new patented PIR.
Figure 8: Comparison of Detection Zones of
new and existing PIR
Scout Camera SG860C-HD Appendix: Technical Specifications
Page 21
Appendix: Technical Specifications
Image Sensor
5MP Color CMOS,
8MP interpolation
Lens
F/NO=2.2
FOV (Field of View)=60°
Auto IR-Cut-Remove
Detection Range Up to 85 ft
Display Screen 2.0” TFT
Memory Card Up to 32 GB
Picture Resolution
8MP = 3264 ×2448
5MP = 2560×1920
Video Resolution
1280x720
640X480
PIR Sensor Multi Zone
Trigger Time 1.2 seconds
Weight 0.24 kg
Operation/Storage
Temperature
-20 - +60°C / -30 - +70°C
Interval 0 sec – 60 Min.
Photo Burst 1–3
Video Length 5–60 seconds
Power Supply
8AA can take >500 10s video
clips
with LED lights;
Stand-by Current < 0.3 mA (<7mAh/Day)
Low Battery Alert LED Indicator
Display Screen LCD display
Mounting Rope/Belt/Python lock
Dimensions 140x 80x 50 mm
Operation Humidity 5% - 90%
Security Authentication FCC, CE, RoHS
*without battery
Scout Camera SG860C-HD Appendix : Parts List
Page 22
Appendix : Parts List
Part Name Quantity
Digital Camera One
USB Cable One
Belt One
User’s Manual One
Warranty Card One
Version 1.4
3

Hulp nodig? Stel uw vraag in het forum

Spelregels

Misbruik melden

Gebruikershandleiding.com neemt misbruik van zijn services uitermate serieus. U kunt hieronder aangeven waarom deze vraag ongepast is. Wij controleren de vraag en zonodig wordt deze verwijderd.

Product:

Bijvoorbeeld antisemitische inhoud, racistische inhoud, of materiaal dat gewelddadige fysieke handelingen tot gevolg kan hebben.

Bijvoorbeeld een creditcardnummer, een persoonlijk identificatienummer, of een geheim adres. E-mailadressen en volledige namen worden niet als privégegevens beschouwd.

Spelregels forum

Om tot zinvolle vragen te komen hanteren wij de volgende spelregels:

Belangrijk! Als er een antwoord wordt gegeven op uw vraag, dan is het voor de gever van het antwoord nuttig om te weten als u er wel (of niet) mee geholpen bent! Wij vragen u dus ook te reageren op een antwoord.

Belangrijk! Antwoorden worden ook per e-mail naar abonnees gestuurd. Laat uw emailadres achter op deze site, zodat u op de hoogte blijft. U krijgt dan ook andere vragen en antwoorden te zien.

Abonneren

Abonneer u voor het ontvangen van emails voor uw Bolyguard SG860C-HD bij:


U ontvangt een email met instructies om u voor één of beide opties in te schrijven.


Ontvang uw handleiding per email

Vul uw emailadres in en ontvang de handleiding van Bolyguard SG860C-HD in de taal/talen: Engels als bijlage per email.

De handleiding is 0,57 mb groot.


U ontvangt de handleiding per email binnen enkele minuten. Als u geen email heeft ontvangen, dan heeft u waarschijnlijk een verkeerd emailadres ingevuld of is uw mailbox te vol. Daarnaast kan het zijn dat uw internetprovider een maximum heeft aan de grootte per email. Omdat hier een handleiding wordt meegestuurd, kan het voorkomen dat de email groter is dan toegestaan bij uw provider.

Stel vragen via chat aan uw handleiding

Stel uw vraag over deze PDF

Uw handleiding is per email verstuurd. Controleer uw email

Als u niet binnen een kwartier uw email met handleiding ontvangen heeft, kan het zijn dat u een verkeerd emailadres heeft ingevuld of dat uw emailprovider een maximum grootte per email heeft ingesteld die kleiner is dan de grootte van de handleiding.

Er is een email naar u verstuurd om uw inschrijving definitief te maken.

Controleer uw email en volg de aanwijzingen op om uw inschrijving definitief te maken

U heeft geen emailadres opgegeven

Als u de handleiding per email wilt ontvangen, vul dan een geldig emailadres in.

Uw vraag is op deze pagina toegevoegd

Wilt u een email ontvangen bij een antwoord en/of nieuwe vragen? Vul dan hier uw emailadres in.


Info