590377
23
Verklein
Vergroot
Pagina terug
1/25
Pagina verder
Xenon Flash Digital Scouting Camera
User’s Manual
Pocket Camera SG565F-8mHD
Content
1 Instruction......................................................................... 1
1.1 General Description ................................................. 1
1.2 Application ............................................................... 2
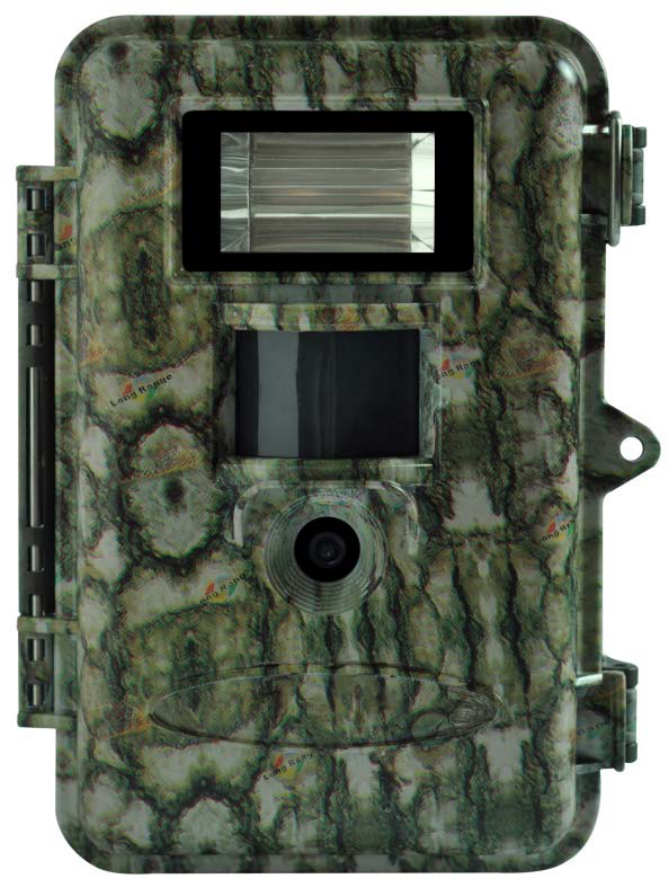
1.3 Camera Body Interface............................................. 2
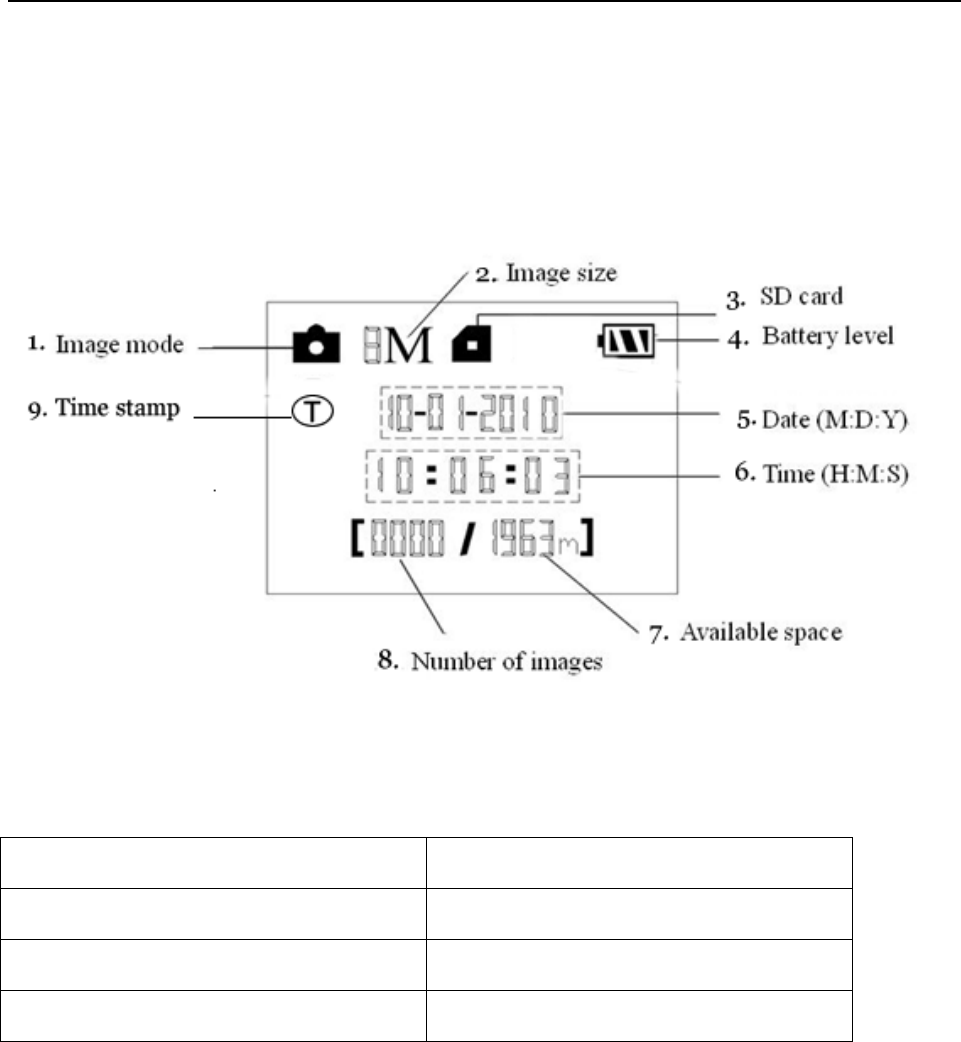
1.4 Shooting Information Display ................................. 4
1.5 Supported Format ....................................................4
2 Cautions............................................................................. 5
3 Easy Operations ................................................................ 7
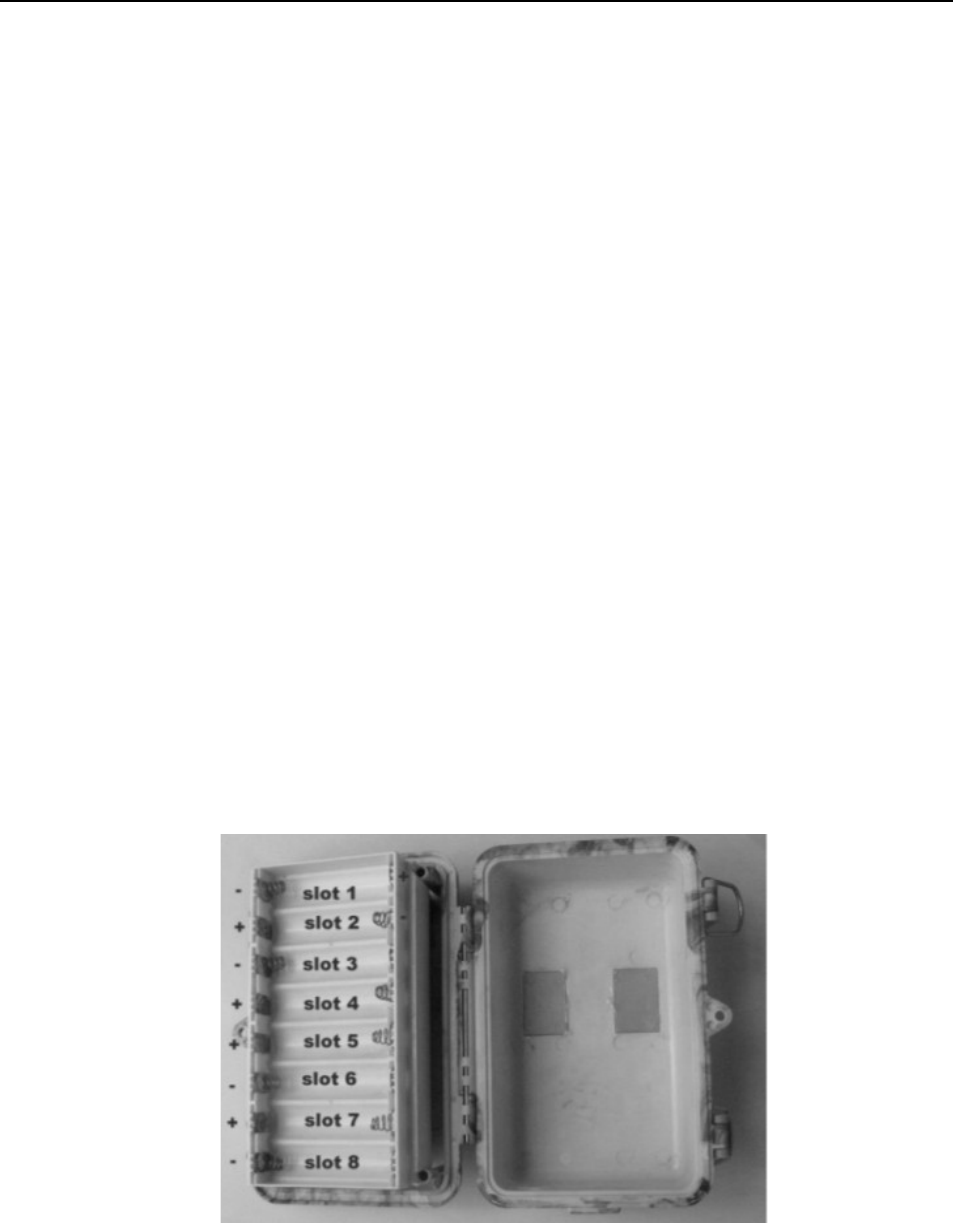
3.1 Power Supply............................................................ 7
3.2 Insert the SD card..................................................... 8
3.3 Power On and Entering into the ON Mode ............. 8
3.4 Enter into the TEST Mode ..................................... 10
3.4.1 Customer Settings.............................................. 10
3.4.2 Manually Capturing ........................................... 10
3.4.3 View Images or Videos....................................... 10
3.5 Power Off ................................................................ 11
4 Advanced Operations...................................................... 12
4.1 Settings Menu......................................................... 12
4.1.1 Default Settings.................................................. 15
4.1.2 View Image or Video.......................................... 16
4.1.3
Delete Image or Video ....................................... 16
4.2 File Numbering....................................................... 17
4.3 Firmware Upgrade ................................................. 17
5 Mounting the Camera ..................................................... 18
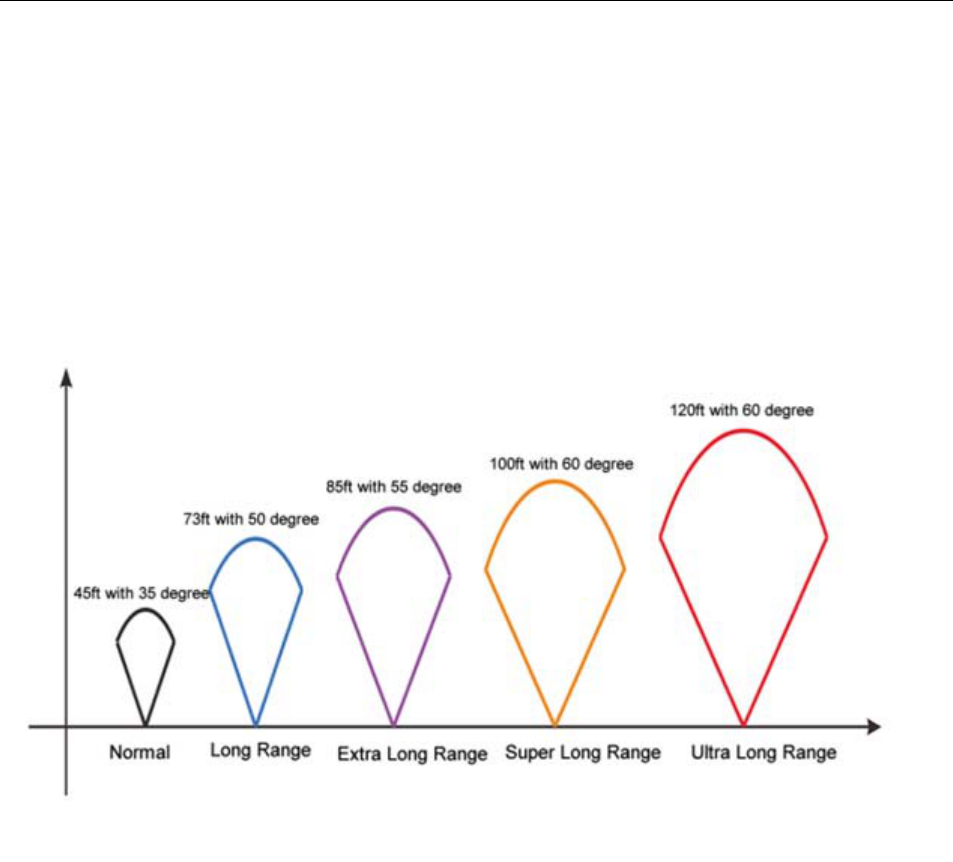
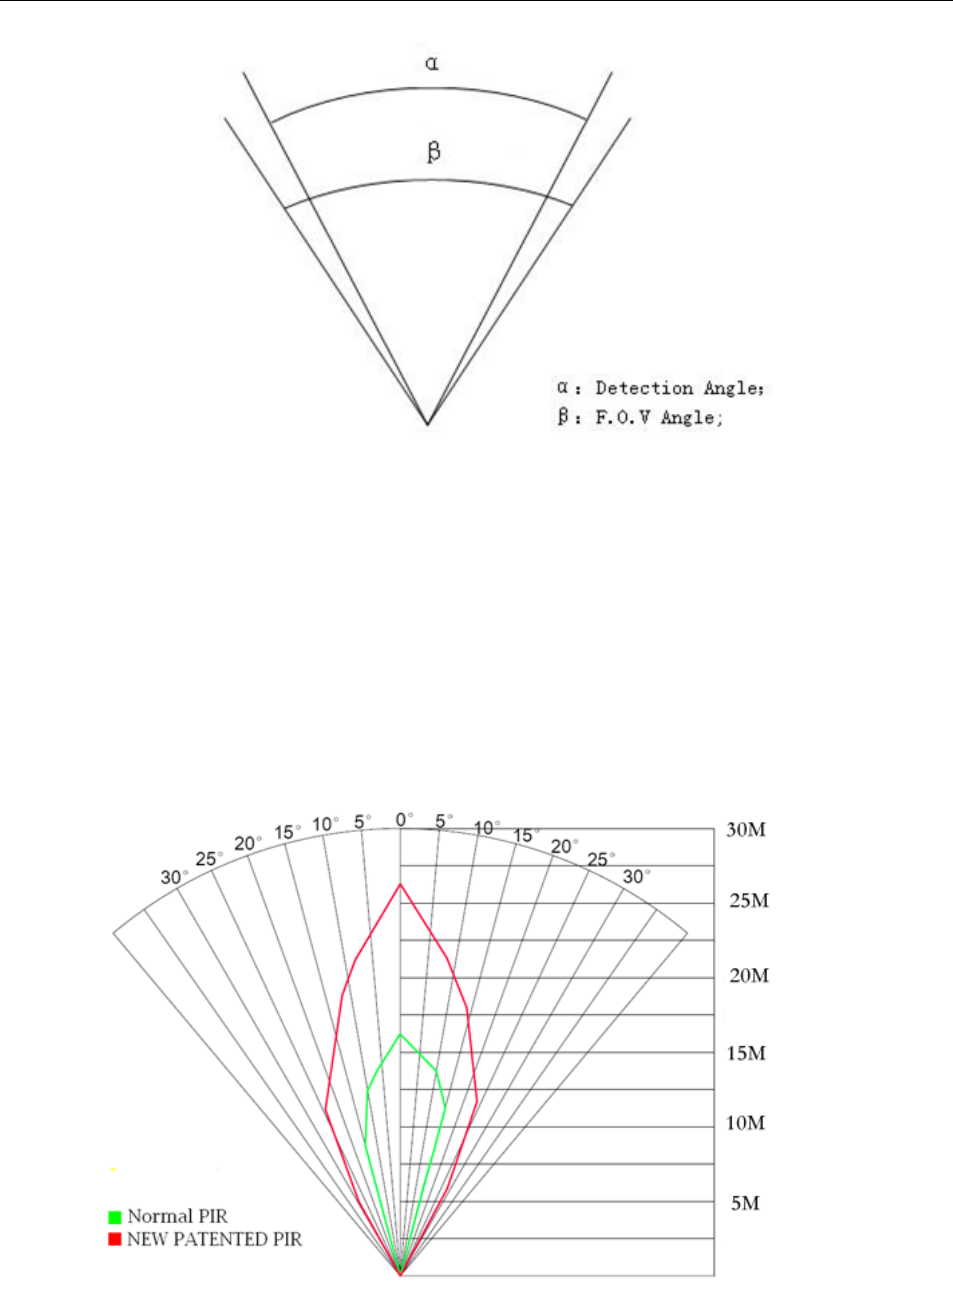
Appendix I: PIR Detection Zone......................................... 19
Appendix: Technical Specifications ................................ 21
Appendix : Parts List ...................................................... 23
SG565F-8mHD 1 Instruction
Page
1
1 Instruction
1.1 General Description
This camera is a digital scouting camera with
Incandescent Flash. It can be triggered at once
by any movement of human (or animal) in a
certain region of interested (ROI) monitored by
a high sensitive Passive Infrared (PIR) motion
sensor, and then automatically captures high
quality pictures (up to 8M pixels) or records
video clips (720P HD) according to default
settings or preset customer settings.
This camera uses integrated xenon flash
instead of IR LED lamination. It can take color
images day and night. It also can take video
clips during the day.
It has elegant and cute shape, the most
compact design in its class. And it has low
power consumption, up to 1200 flash pictures
with 8AA batteries.
The device is designed for outdoor use and is
resistant against water and snow. Furthermore,
the camera can be used as a portable digital
camera. Pictures or videos can be taken
manually by pressing SHOT on the control in
TEST mode (the wired control needs to be
connected).
SG565F-8mHD 1 Instruction
Page
2
1.2 Application
This camera can be used as an automatic
surveillance device for guarding and recording
unexpected intrusion to homes, shops, schools,
depots, offices, taxis, work sites, etc. It can also
be used as a trail camera for hunting or
monitoring animals by recording the traces of
wild animals. It can be left alone for weeks and
months and it will deliver event records
automatically in digital format.
1.3 Camera Body Interface
The camera has the following I/O interfaces:
USB connector, SD card slot and external DC
power connector.
Take a few moments to familiarize with the
camera controls and displays. It is helpful to
bookmark this section and refer to it when
reading through the rest of the manual.
SG565F-8mHD 1 Instruction
Page
3
Fig. 1 : Interface view
Fig. 2 : Inner view
SG565F-8mHD 1 Instruction
Page
4
1.4 Shooting Information Display
When the camera is turned on (the power
switch is slid to ON position), shooting
information will be displayed in the monitor.
Fig. 3 : Monitor display
1.5 Supported Format
Item Format
Image JPG
Video AVI
File format FAT32
Table 1 Format Item
You don’t need to be concerned about the
format of file in the camera unless you have
problems with reading the SD card by your other
equipment. If this happensplease format the
SD card in the camera or in a computer at first
and then reinsert the SD card to try.
SG565F-8mHD 2 Cautions
Page
5
2 Cautions
The working voltage of the camera is 6V. It is
supplied by eight or four AA batteries.
Please insert the SD card when the power
switch is at OFF position before testing the
camera. The camera has no internal memory
for saving images or videos. If no SD card is
inserted, the camera will shut down
automatically after a continuous indication
sound.
Please unlock the write-protect before
inserting the SD card. Don’t insert or take out
the SD card when power switch is at ON
position.
In the TEST mode (insert the control into the
USB interface then switch the camera to ON
position), the camera will shut down
automatically after 3 minutes if no operation is
done. Please turn on the power again if you
want to continue to work with the control.
The camera will be in USB mode when
connected to a USB port of a computer. In this
case, the SD card functions as a removable disk.
Please ensure sufficient power when having
firmware upgrade, if any fault occurs after
improper upgrading process, the camera may
SG565F-8mHD 2 Cautions
Page
6
stop functioning properly.
Please don’t disassemble the camera.
Fig. 4 : Upgrade caution
SG565F-8mHD 3 Easy Operations
Page
7
3 Easy Operations
3.1 Power Supply
To supply power for the camera, eight AA size
batteries are needed.
Open the camera to confirm that the power
switch is at OFF position. Install the fully
charged batteries into the depot according to the
polarities sign shown below. The following
batteries with 1.5V output can be used:
1. High-density and high-performance alkaline
batteries (recommended)
2. Rechargeable alkaline batteries
3. Rechargeable NiMH batteries
When in low-battery state, camera will
automatically shut down after two indication
sounds. Please change the batteries in time.
Fig. 5 :Battery slot
Caution: Risk of explosion if battery is
replaced by an incorrect type. Also dispose of
used batteries according to the instructions.
SG565F-8mHD 3 Easy Operations
Page
8
Correct Disposal of this product. This
marking indicates that this product should not
be disposed with other household wastes
throughout the EU. To prevent possible harm to
the environment or human health from
uncontrolled waste disposal, recycle it
responsibly to promote the sustainable reuse of
material resources. To return your used device,
please use the return and collection systems or
contact the retailer where the product was
purchased. They can take this product for
environmental safe recycling.
3.2 Insert the SD card
Open the bottom cover. Insert SD card into
the card slot with unmarked side upwards.
Please note that the SD card can only be plugged
in one direction. Make sure that the
write-protect switch of the SD card is on the
“write” position otherwise the camera cannot be
switched on.
3.3 Power On and Entering into the ON Mode
The Camera has three basic operation
modes:
SG565F-8mHD 3 Easy Operations
Page
9
OFF mode: to turn off the camera.
TEST mode: to set operational parameters or
to playback the photos via display screen.
ON mode: to work at surveillance state.
Before switching on, please pay attention to
the following:
1. Avoid temperature and motion disturbances
in front of the camera such as big leaf,
curtain, air-conditioner, air outlet of the
chimney, and other heat sources to prevent
false triggering.
2. The height from ground for placing the
camera should vary with the object size
appropriately. In general, one to two meters
are preferred.
In the TEST mode, it is required to connect
the control in order to do further customize
settings. When the user completes the settings,
it is required to unplug the control to enter into
normal use, that is, if the wired control is still
connected with the camera, the camera will not
work. The camera (the control must be
unplugged when in ON mode) will take pictures
or videos automatically according to the default
settings or preset customer settings.
Slide the power switch to the ON position
to power on the camera and enter into the ON
SG565F-8mHD 3 Easy Operations
Page
10
mode
.
After switching on the camera, the motion
indication LED (red) will blink for about 10
seconds. The 10 seconds is a buffering time
before autonomic capturing photos or videos,
e.g. for closing and locking the bottom cover,
fixing the camera on a tree, and walking away.
3.4 Enter into the TEST Mode
Connect the wired control, then switch to the
ON position and enter into the TEST mode.
There are some functions in TEST mode:
customer settings, manual capture, and preview.
The control is needed in this mode.
3.4.1 Customer Settings
Press MENU on the control to enter into
menu settings. The camera control can be taken
over to manually customize the camera settings
which display on the LCD screen on the camera.
The detailed operations will be described in
“Advanced Operations” chapter.
3.4.2 Manually Capturing
Press SHOT to manually capture photos or
record videos (daytime). It is also the SHOT key
to stop the manual capturing of the video.
3.4.3 View Images or Videos
Press OK to view images, the latest image will
SG565F-8mHD 3 Easy Operations
Page
11
be shown in the LCD screen on the control.
Press UP to view the previous image and press
DOWN for the next. Please note that video
cannot be played in the LCD screen and only
thumbnail of the video is showed.
3.5 Power Off
Switch the camera to OFF position to power
off the camera. Please note that even in the OFF
mode, the camera still consumes certain power
at μA level. Therefore, please remove the battery
if the camera will not be used for a long time.
SG565F-8mHD 4 Advanced Operations
Page
12
4 Advanced Operations
From the basic operations of the camera in the
previous chapter, we know that the camera has
three basic operation modes:
1. OFF mode: power switch is at OFF position.
2. ON mode: power switch is at ON position.
3. TEST mode: power switch is at ON position
and the control needs to be connected.
In the above three modes, OFF mode is the
specified safe mode when replacing the SD card
or batteries and transporting the camera.
4.1 Settings Menu
To view the camera settings menu, press
MENU in the TEST mode (power switch is at
ON position; control needs to be connected).
The settings menu will be shown on the LCD of
the control.
Setting
Items
Description
Camera
Mode
Choose capturing images or
recording videos. There are two
ways to set the camera mode.
Shortcut key
: Press UP to set
the camera mode as Video or press
DOWN to set camera mode as
Photo in info display of TEST
SG565F-8mHD 4 Advanced Operations
Page
13
mode.
Setting menu:
press RIGHT
to
select Photo or Video mode, then
press OK to save your setting.
By using white flash, the
camera can take color images day
and night, but video can just work
under sufficient daylight. If you set
v
ideo mode, it will turn to camera
mode automatically at night.
Set Clock
Set camera date and time.
The date format is
month/day/year, the time format
is hour: minute: second. The valid
value for year is between 2009 and
2050.
Photo Size
Choose the image size, 8 mega
pixels or 5 mega pixels.
Video Size
You can choose 720P HD
(1280X720) or VGA (640X480) for
video.
Video
Length
Choose duration of recording
video.
Its value extends from 5 to 60
seconds with a step of one second.
Press RIGHT
to decrease or
increase the value by 1 second.
SG565F-8mHD 4 Advanced Operations
Page
14
PIR
Sensitivity
Choose sensitivity of PIR.
This parameter defines the
sensitivity of the
PIR. There are
three values: High, Normal, and
Low. The default value is “Normal.”
The higher, the easier the motion
sensor would be triggered and
taking more pictures or recording
more videos. It is recommended to
use high sensitivity degree in room
or environment with little
interference, and to use lower
sensitivity for outdoor or
environment with lots of
interference like hot wind, smoke,
near window, etc. The sensitivity of
PIR is strongly related to the
temperature. Higher temperature
leads to lower sensitivity.
PIR
Interval
Choose how long the camera
will stop functioning after each
triggering. The camera’s PIR will
be disabled during this interval.
Illuminati
on
A
djust the brightness of the
light.
Format
SD
Format the SD card. All
images and videos in the SD card
SG565F-8mHD 4 Advanced Operations
Page
15
will be deleted.
Default
Set
Restore all customer settings
to default values.
Table 2 Setting Items
4.1.1 Default Settings
Default settings are listed below:
Setting
Items
Default
Options Submenu
Camera
Mode
Photo Video
Set Clock Enter
Adjust
Clock
Photo Size
8M
Pixel
5M Pixel
Video Size
1280X
720
640X480
Video
Length
10
Sec
5–60
seconds
PIR
Sensitivity
Norma
l
High, Low
PIR
Interval
5 Sec
0–55 sec ,
1-5 min
5-60 min
5 sec /step
1 min /step
5 min /step
Illuminati
on
Long
Range
Short
Range
Short
(1-3 m)
SG565F-8mHD 4 Advanced Operations
Page
16
Format
SD
Enter Yes, No
Default
Set
Save
Table 3 Default Settings
4.1.2 View Image or Video
Switch to TEST mode and enter into info
display, press OK to view the latest pictures on
the wired control screen and then UP or DOWN
to see other pictures. Press OK to return back.
Please note that video cannot be played in the
LCD screen and only thumbnail of the video is
shown.
4.1.3 Delete Image or Video
Choose the image or video to be deleted,
press MENU and then SHOT to decide delete
one or all, then MENU to cancel and OK to
delete.
Please note that after deleting a picture or a
video file, the deleted files can’t be restored!
Furthermore, in order to delete all images and
video clips in the SD card, it is suggested to
format the SD card.
SG565F-8mHD 4 Advanced Operations
Page
17
4.2 File Numbering
Images and videos are saved in the pre-named
folder. File numbering continues by adding one
to the last number for each new image or video.
The saving names are like IMAG0001.JPG or
IMAG0001.AVI. Through the suffix you can
distinguish whether the file is an image (with
suffix .jpg) or a video (with suffix .avi).
4.3 Firmware Upgrade
This camera is equipped with an automatic
upgrade function for you. Upgrading is needed
only when an improved firmware is available.
SG565F-8mHD 5 Mounting the Camera
Page
18
5 Mounting the Camera
When you want to use the ON mode of the
camera in the outdoors, such as hunting and
monitoring the living habits of wild animals, you
must mount the device on a certain place
properly. It is recommended to mount the
camera on a tree whose diameter is about 15 cm.
To get the optimal picture quality, the tree can
be 5 meters away from the place to be monitored,
and at a height of 1.5~2 meters. The aiming
direction of lens and the movement direction of
the object should be orthogonal.
There are two ways to mount the camera:
Use the belt: using the belt to fix the camera
on a tree is illustrated below. Take the belt toes
to go through the two back holes of the camera.
At the end, tie the two toes to the tree to finish
fixing.
Using bottom screw
Fig. 6 : Belt mount
SG565F-8mHD Appendix : PIR Detection Zone
Page
19
Appendix I: PIR Detection Zone
Fig. 7 shows Bolymedia’s 4 kinds of
detection range at different detection angles.
This camera is extra long range with 55 degree.
Fig.7 : PIR detection range
The PIR detection angle (α) is just smaller
than the field of view (FOV) angle (β). The
advantage of this design is to reduce empty
picture rate and capture most, if not all,
motions.
SG565F-8mHD Appendix : PIR Detection Zone
Page
20
Fig. 8 Detection angle vs FOV angle
This camera has a new design of PIR which is
patented. The new patented PIR’s detection
range can reach to 85 ft. Fig. 8 shows the
compared detection zone between normal PIR
and the new patented PIR.
Fig. 9 Comparison of Detection Zones of
new and normal PIR
SG565F-8mHD Appendix: Technical Specifications
Page
21
Appendix: Technical Specifications
Image Sensor
5MP Color CMOS sensor
8MP Interpolation
Lens
F/NO=2.2
FOV (Field of View)=6
Detection
Range
85ft
Memory Card 8MB to 32 GB
Image
Resolution
8MP=3264x2448
5MP=2560x1920
Video
Resolution
1280x720 (25fps)
640X480 (20fps)
PIR Sensor Multi Zone
PIR Sensitivity
Adjustable
(High/Normal/Low)
Trigger Time 1.2 second
Weight 0.26 kg
Operation/Stor
age
Temperature
-20 - +60°C / -30 - +70°C
Power Supply
8×AA (Recommend),
4× AA (Emergency)
Stand-by
Current
< 300uA
Power
Consumption
>1200 pictures
(8×AA, room temperature )
SG565F-8mHD Appendix: Technical Specifications
Page
22
Low Battery
Alert
LED indication (Note the
low battery alert LED
flashes quickly (10Hz) and
the motion indication LED
flashes slowly (2Hz).)
Display Screen LCD display on control
Mounting Rope/Belt/Python lock
Dimensions 130x 80x 50 mm
Operation
Humidity
5% - 90%
Security
authentication
FCC, CE, RoHS
*without battery
SG565F-8mHD Appendix : Parts List
23
Appendix : Parts List
Part Name Quantity
Digital
Camera
One
Wired control One
USB Cable One
Belt One
User’s Manual
One
Warranty
Card
One
Version 1.4
23

Hulp nodig? Stel uw vraag in het forum

Spelregels

Misbruik melden

Gebruikershandleiding.com neemt misbruik van zijn services uitermate serieus. U kunt hieronder aangeven waarom deze vraag ongepast is. Wij controleren de vraag en zonodig wordt deze verwijderd.

Product:

Bijvoorbeeld antisemitische inhoud, racistische inhoud, of materiaal dat gewelddadige fysieke handelingen tot gevolg kan hebben.

Bijvoorbeeld een creditcardnummer, een persoonlijk identificatienummer, of een geheim adres. E-mailadressen en volledige namen worden niet als privégegevens beschouwd.

Spelregels forum

Om tot zinvolle vragen te komen hanteren wij de volgende spelregels:

Belangrijk! Als er een antwoord wordt gegeven op uw vraag, dan is het voor de gever van het antwoord nuttig om te weten als u er wel (of niet) mee geholpen bent! Wij vragen u dus ook te reageren op een antwoord.

Belangrijk! Antwoorden worden ook per e-mail naar abonnees gestuurd. Laat uw emailadres achter op deze site, zodat u op de hoogte blijft. U krijgt dan ook andere vragen en antwoorden te zien.

Abonneren

Abonneer u voor het ontvangen van emails voor uw Bolyguard SG565F-8mHD bij:


U ontvangt een email met instructies om u voor één of beide opties in te schrijven.


Ontvang uw handleiding per email

Vul uw emailadres in en ontvang de handleiding van Bolyguard SG565F-8mHD in de taal/talen: Engels als bijlage per email.

De handleiding is 0,6 mb groot.


U ontvangt de handleiding per email binnen enkele minuten. Als u geen email heeft ontvangen, dan heeft u waarschijnlijk een verkeerd emailadres ingevuld of is uw mailbox te vol. Daarnaast kan het zijn dat uw internetprovider een maximum heeft aan de grootte per email. Omdat hier een handleiding wordt meegestuurd, kan het voorkomen dat de email groter is dan toegestaan bij uw provider.

Stel vragen via chat aan uw handleiding

Stel uw vraag over deze PDF

Uw handleiding is per email verstuurd. Controleer uw email

Als u niet binnen een kwartier uw email met handleiding ontvangen heeft, kan het zijn dat u een verkeerd emailadres heeft ingevuld of dat uw emailprovider een maximum grootte per email heeft ingesteld die kleiner is dan de grootte van de handleiding.

Er is een email naar u verstuurd om uw inschrijving definitief te maken.

Controleer uw email en volg de aanwijzingen op om uw inschrijving definitief te maken

U heeft geen emailadres opgegeven

Als u de handleiding per email wilt ontvangen, vul dan een geldig emailadres in.

Uw vraag is op deze pagina toegevoegd

Wilt u een email ontvangen bij een antwoord en/of nieuwe vragen? Vul dan hier uw emailadres in.


Info