614332
36
Verklein
Vergroot
Pagina terug
1/54
Pagina verder
Users Guide
Navigation-Software
Blaupunkt BikePilot
English
Thank you for buying the Blaupunkt navigation system.
Good choice. We wish you a lot of fun and congestion-free kilometres with your new
Blaupunkt navigation system.
In the worst case we will help you.
For technical questions and / or problems, please contact us by phone at
0511 / 123 83 506 or via E-Mail to support@first-servicegmbh.de
Manuals for other languages can be downloaded also on www.blaupunkt.de
Contents
1. Getting to know your device ........................................................................................4
2. Starting the device.......................................................................................................7
2.1. First Startup..........................................................................................................7
2.2. Second and further startup...................................................................................8
3. Main Menu.................................................................................................................10
3.1. Map ....................................................................................................................10
3.1.1. Navigation Popup........................................................................................15
3.2. Memory ..............................................................................................................15
3.2.1. My Trips ......................................................................................................15
3.2.2. Favorites .....................................................................................................17
3.2.3. Imported Trips.............................................................................................18
3.2.4. Imported POIs.............................................................................................20
3.2.5. Add On Trips...............................................................................................21
3.2.6. Statistics......................................................................................................22
3.3. Training ..............................................................................................................23
3.4. Destination .........................................................................................................26
3.4.1. Address.......................................................................................................26
3.4.2. POI..............................................................................................................31
3.4.3. Favorites .....................................................................................................32
3.4.4. Map Point....................................................................................................33
3.4.5. Coordinates.................................................................................................33
3.4.6. Trips ............................................................................................................34
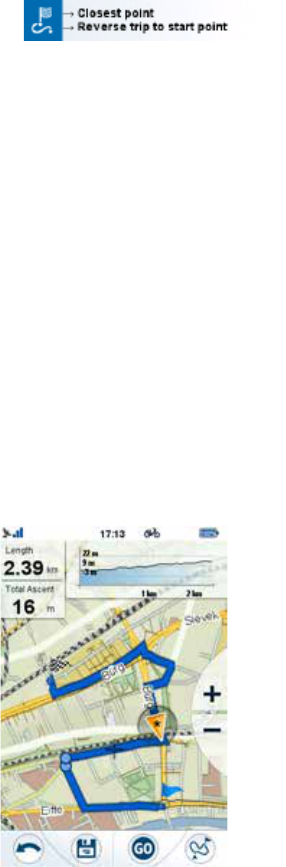
3.5. Route..................................................................................................................36
3.6. Computer ...........................................................................................................37
3.6.1. Speedometer ..............................................................................................38
3.6.2. Compass.....................................................................................................39
3.6.3. Weather Forecast .......................................................................................39
3.7. Settings ..............................................................................................................40
3.7.1. Maps ...........................................................................................................40
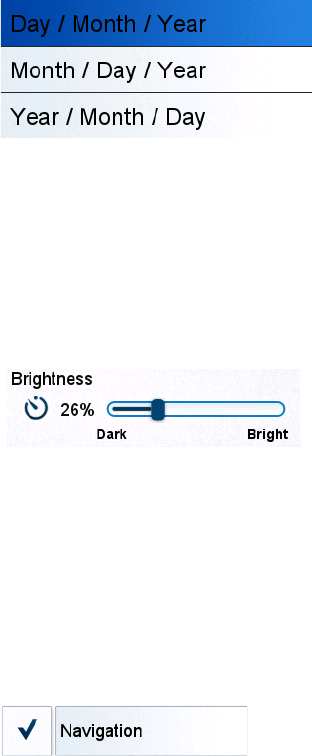
3.7.2. System ........................................................................................................41
3.7.3. Accounts .....................................................................................................42
3.7.4. Sensors.......................................................................................................44
3.7.5. Language ....................................................................................................50
3.7.6. Date & Time ................................................................................................51
3.7.7. Sound..........................................................................................................51
3.7.8. Screen.........................................................................................................52
3.7.9. Info ..............................................................................................................53
1. Getting to know your device
BikePilot has 3 hardware buttons, two of them are placed on the left side of the
device, one is on the bottom, below the display.
The lower button is responsible for switching on and off the device, and for locking
the screen.
Long pressing the power button
Long pressing this button will pop up the menu allowing the locking or the powering
on or off, and opening Bluetooth Settings menu (section 3.7.4.3.)
When the screen is locked, no input can be taken besides pressing the power button
again to unlock the screen, or power off the device. Under locked screen every
navigation and process continues to run.
Upper button allows you to have a quick access to the most important screens of
your BikePilot device: check Settings System to see which screens can be set for
quick access.
The button on the front of your device is for getting back in a menu, or getting to an
upper level of the menu system.
Most of the application flow is handled directly on the screen.
Direct selectors
Some of the settings can be chosen from only a few options. If the values can be
described graphically or shortly enough, all values are available on the screen.
For example the From GPS / Manual settings is a direct
selector
Tap one of the fields to choose the desired value.
List selectors
When more options are available, only the actual value is shown; the current value
can be changed by tapping on it. When tapped, a list will appear with the available
options.
List selector
Tap on one option to select it.
Sliders
When a feature can have values that can be assigned to a scale, the software will
show sliders that look like analogue potentiometers to set the desired value.
Slider
If the values are not shown, the values are increasing from the left to the right. You
can select the right value by dragging the slider directly to the desired value.
Checkbox switches
When a function can only be enabled or not, a switch is used. The field contains the
name of the setting, and there is a tick on the right to show whether the function is
active or not.
Checkbox switch
When the tick mark is not shown, then the function is disabled. When it is displayed,
the function is enabled. Tap on the field to change the status.
Virtual keyboards and numeric pads
As mentioned earlier, the main input method is via the touch screen.
This means that an on-screen keyboard (OSK), and numeric pad is needed for
proper input possibilities.
ABC keyboard
The keyboard is for any letter-based input.
The alphabetic keyboard in the software does not contain special characters, but
they can be substituted with their simple versions.
This means that if you want to search for the city of “Münster, you can simply type
Munster to find it.
The keyboard only allows possible characters to be tapped
Numeric Pad
Entering numbers is possible via the numeric pad.
It is also available from the ABC keyboard by the button 123”.
Numeric keypad
Power management
Power management is for saving power for the device. If no movement is detected,
and there is no ongoing recording, the device will ask whether to suspend or power
off after the set time (default is 10 minutes).
Power menu
If suspend is chosen, the device will go to sleep mode, so that the ongoing
recordings and processes will be paused, but they can be continued by waking up
the device via the power button. If power off is selected, these processes will be
ended, for example a recorded track will be saved with and end point where the
device has been turned off.
Swipe function
Swipe function is the right tool for fast and accurate navigation inside our software.
This function allows the user to get back to previous screen(s) easily.
The method is to tap on the top of the screen, and with a pulling move, move down
thumb until previous screen is reached.
Swipe function is by pulling down the previous screen from the top
If you decide to stay on the same screen, just dont finish but reverse the movement.
Note: This function is disabled on main screen.
2. Starting the device
2.1. First Startup
After the boot of the device and the initialization process have completed, the
language selection screen appears.
Tap on a language to choose your own language, then tap OK( ) button on
the bottom to move to the next screen.
Supported languages are: Czech, Danish, Dutch, English, Finnish, French,
German, Italian, Hungarian, Norwegian, Polish, Portuguese, Spanish and
Swedish.
See Settings Language for details.
After selecting a language, the End-User License Agreement will show. After
reading and accepting the EULA by pressing OK ( ) on the bottom of the
screen, date & time screen will show.
It is also essential to set up your own Profile, so BikePilot will be able to
navigate using the most preferable roads for you.
See Settings Accounts for details.
In the next step Date and Time format and value can be set by tapping on the
fields.
Time and Date can be automatically set using the GPS signal.
Select your preferred Date (Day / Month / Year, Month / Day / Year, or Year /
Month / Day), and Time (AM/PM or 24 hours) format, and if manual settings are
chosen, then set the Date and Time.
Date and time settings
When startup procedure is completed, the main menu will welcome you, with a
clock, a GPS signal icon, and battery strength indicator on the top of the screen.
2.2. Second and further startup
After the initial startup, the device boots directly into the main menu.
You can change the values set in the first startup in the settings submenu,
covered later in the manual.
3. Main Menu
Main Menu of BikePilot
From the Main Menu you are able to access all the feature of BikePilot.
In the next sections you will be able to learn what you are able to do with this device
and have the most beautiful experience during your outdoor activity.
3.1. Map
Map screen
Map is the core of BikePilot, displaying the road network and your current
location on this map.
It gives you also basic information about your trip and during the navigation it
shows you all the details about your routing.
When there is no navigation on-going, on the top of the screen you can find a
compass, and two changeable fields: by default they are Speed, and Distance
to Destination’ (which actually shows you information when you are navigating
to reach a target place).
Multiple POI selection
This screen lists the POIs available in the vicinity of the tapped area. Tapping
on one of them will bring the map over the location of the desired POI. When
the right POI is selected, tapping on Go ( ) will start routing, and tapping
on information ( ) will bring up the POI Details screen.
POI Details
Note: POIs without name will show their category as a name (for example
Café/Pub).
To separate POIs with same name you can use their address, or direction.
Favorites can also be shown on map.
The last option is for getting to the closest point from current location, then
navigating the track in reverse mode to the original start point of the track.
Selection of suggested/easiest/shortest route, and previewing on the map
works as in all the other navigation cases.
3.5. Route
Route is our unique feature to create individual tracks in real time on your
BikePilot device.
You can easily create your routes with few steps:
When you select this option from the Main Menu, a map will be displayed
Plan Route (Traning mode)
Tap on the screen to create a start point for the track (you can pan and zoom to
choose the preferred location).
If you tap the screen inside the circle that identifies your current location, then
the starting point will be automatically set to your current location.
Start point will be displayed on the map with a blue flag.
Tap on the map to select additional waypoints to customize your track.
If you want to make a circular route that ends on your starting point, then just
taps the screen close to the blue flag and BikePilot will automatically calculate a
circular route.
There are additional options on the bottom of the screen:
36

Hulp nodig? Stel uw vraag in het forum

Spelregels

Misbruik melden

Gebruikershandleiding.com neemt misbruik van zijn services uitermate serieus. U kunt hieronder aangeven waarom deze vraag ongepast is. Wij controleren de vraag en zonodig wordt deze verwijderd.

Product:

Bijvoorbeeld antisemitische inhoud, racistische inhoud, of materiaal dat gewelddadige fysieke handelingen tot gevolg kan hebben.

Bijvoorbeeld een creditcardnummer, een persoonlijk identificatienummer, of een geheim adres. E-mailadressen en volledige namen worden niet als privégegevens beschouwd.

Spelregels forum

Om tot zinvolle vragen te komen hanteren wij de volgende spelregels:

Belangrijk! Als er een antwoord wordt gegeven op uw vraag, dan is het voor de gever van het antwoord nuttig om te weten als u er wel (of niet) mee geholpen bent! Wij vragen u dus ook te reageren op een antwoord.

Belangrijk! Antwoorden worden ook per e-mail naar abonnees gestuurd. Laat uw emailadres achter op deze site, zodat u op de hoogte blijft. U krijgt dan ook andere vragen en antwoorden te zien.

Abonneren

Abonneer u voor het ontvangen van emails voor uw Blaupunkt BikePilot Navigation-Software bij:


U ontvangt een email met instructies om u voor één of beide opties in te schrijven.


Ontvang uw handleiding per email

Vul uw emailadres in en ontvang de handleiding van Blaupunkt BikePilot Navigation-Software in de taal/talen: Engels als bijlage per email.

De handleiding is 1,35 mb groot.


U ontvangt de handleiding per email binnen enkele minuten. Als u geen email heeft ontvangen, dan heeft u waarschijnlijk een verkeerd emailadres ingevuld of is uw mailbox te vol. Daarnaast kan het zijn dat uw internetprovider een maximum heeft aan de grootte per email. Omdat hier een handleiding wordt meegestuurd, kan het voorkomen dat de email groter is dan toegestaan bij uw provider.

Stel vragen via chat aan uw handleiding

Stel uw vraag over deze PDF

Andere handleiding(en) van Blaupunkt BikePilot Navigation-Software

Blaupunkt BikePilot Navigation-Software Snelstart handleiding - Nederlands, Deutsch, English, Français, Italiano, Português, Espanõl, Polski, Dansk, Svenska, Norsk, Suomi - 97 pagina's


Uw handleiding is per email verstuurd. Controleer uw email

Als u niet binnen een kwartier uw email met handleiding ontvangen heeft, kan het zijn dat u een verkeerd emailadres heeft ingevuld of dat uw emailprovider een maximum grootte per email heeft ingesteld die kleiner is dan de grootte van de handleiding.

Er is een email naar u verstuurd om uw inschrijving definitief te maken.

Controleer uw email en volg de aanwijzingen op om uw inschrijving definitief te maken

U heeft geen emailadres opgegeven

Als u de handleiding per email wilt ontvangen, vul dan een geldig emailadres in.

Uw vraag is op deze pagina toegevoegd

Wilt u een email ontvangen bij een antwoord en/of nieuwe vragen? Vul dan hier uw emailadres in.


Info