- This is not a TOY. Children should be kept out of reach
from this robot and its accessories.
- Never allow children to operate this product.
- This robot is not intended for use by someone with
reduced physical, sensory or mental capabilities or a
lack of experience and knowledge unless they have been
given instructions concerning the appliance and are under
supervision of the person responsible for their safety.
- Make sure the robot is fully immersed in the water before
operation. The minimum water level required to operate the
robot must reach above the swivel head of the robot.
Operating the robot when it is not immersed in the water
correctly could damage the unit and void the warranty as
a result.
- Maximum operating depth in water is 3 meters (10 ft.).
- Operating water temperature: 5°C (41°F) - 35°C (95°F).
- Only use the detachable supply unit (external adaptor)
provided with this robot to charge the battery.
- Detachable supply unit (external adaptor).
- WARNING - For the purposes of recharging the battery,
only use the detachable supply unit (external adaptor :
DSS18-0842000-B / DSS18-0842000-C) and charging
base that provided with this robot to charge the battery.
- WARNING - This appliance can be used by children aged
from 8 years and above and persons with reduced physical,
sensory or mental capabilities or lack of experience and
knowledge if they have been given supervision or instruction
concerning use of the appliance in a safe way and
understand the hazards involved. Children shall not play with
the appliance. Cleaning and user maintenance shall not be
made by children without supervision. (For EU market)
- WARNING - This appliance is not intended for use by
persons (including children) with reduced physical, sensory
or mental capabilities, or lack of experience and knowledge,
unless they have been given supervision or instruction
concerning use of the appliance by a person responsible for
their safety. Children should be supervised to ensure that they
do not play with the appliance. (For market other than EU)
- Connect the external adaptor to a power source through
a residential current device (RCD) / a ground fault circuit
interrupter (GFCI). If in doubt, consult a qualified
professional electrician.
- Do not use this robot if any damage is detected.
- Replace damaged parts as soon as possible. Only use
parts certified by the distributor or manufacturer.
- Turn off the robot, disconnect the external adaptor from
the power source, and unplug the external adaptor from
the charging base, before detaching the robot from the
charging base.
- Disconnect the pump from the supply mains before
carrying out user maintenance such as cleaning the filter.
- The battery installes is a rechargeable Li-ion battery
pack. Nevel attempt to replace with this product.
- The robot is only to be recharged with external adaptor
and charging base delivered with this product.
- DO NOT handle the robot, external adaptor and charging
base while it is charging with wet limbs and without shoes.
- You should not operate this robot when people/pets are
present in the water.
- DO NOT use this robot without an intact filter in place,
otherwise your warranty will be voided as a result.
- Suction entrapment hazard: This robot genrates suction.
Do not allow hair, body, and any loose parts of your clothing
to make contact with the suction hole of the robot during
its operation.
- Never insert body parts, clothing and other objects into
the openings and moving parts of the robot.
- DO NOT use this robot to pick up any toxic substance,
flammable and combustible liquids such as gasoline, and
in the presence of explosive or flammable fumes.
- Under no circumstances should you attempt to
disassemble the robot and replace the impeller, motor,
and battery by yourself.
- Never insert fingers and any object to touch the impeller.
- This robot shall not be used by children.
- The battery must be removed from the robot before it is
scrapped.
- This robot contains a battery that are only to be removed
by skilled persons.
- The robot must be disconnected from the supply mains
as the battery is removed.
- For detail regarding battery dsiposal, refer to the section
“Battery Disposal” in this manual.
- The battery must be disposed safely in accordance with
local ordinances or regulations.
- The robot contains a maintenance-free, rechargeable
lithium-ion battery pack, which must be disposed
WE SUGGEST NOT TO RETURN
THE PRODUCT TO THE STORE
QUESTIONS? PROBLEMS?
MISSING PARTS?
For FAQ, Manuals, Videos Or
Spare Parts, Please Visit
bestwaycorp.com/support
V
i
s
i
t
w
w
w
.
b
e
s
t
w
a
y
c
o
r
p
.
c
o
m
/
s
u
p
p
o
r
t
f
o
r
h
e
l
p
2
EN
properly. Recycling is required; please contact your local
authorities for more information.
- External adaptor and charging base:
• Never use the external adaptor and charging base for
anything other than charging the battery of the robot
that is supplied in the same pack.
• The external adaptor and charging base should not be
used outdoors, nor should it be exposed to rain,
humidity, any liquid or heat.
• The transformer (or external adaptor) is to be located
outside zone 1.
• Keep the external adaptor and charging base out of
reach of children.
• Never use the external adaptor and charging base if
any damage is detected.
• DO NOT handle the external adaptor and charging
base with wet hands.
• Keep the external adaptor disconnected from power
when it is not in use.
• Never attempt to open the external adaptor.
• If the supply cord is damaged, it must be replaced by
the manufacturer, its service agent or an equally-qualified
person in order to prevent hazards of any kind.
• Make sure the robot is completely dry before charging.
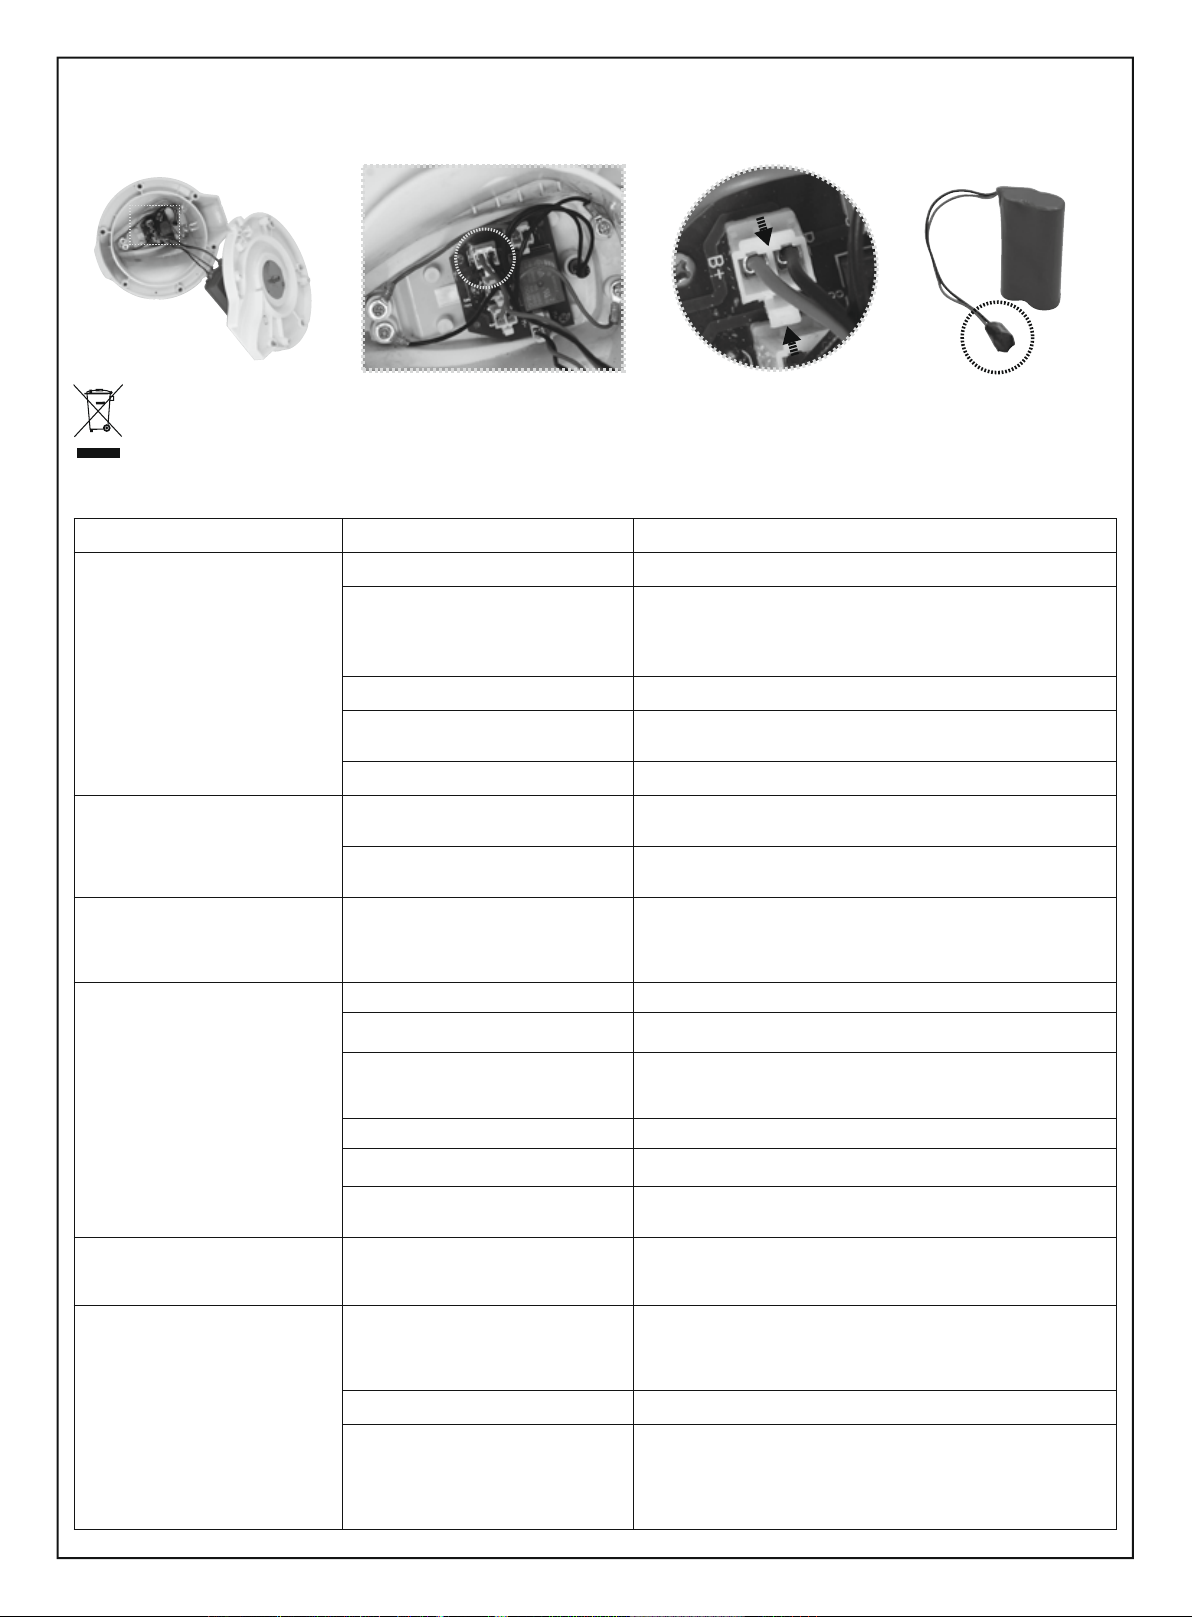
BATTERY DISPOSAL:
Recycling is required, please contact your local authority
for information.
• The battery must be removed from the pool vacuum
before it is scrapped.
• The pool vacuum must be disconnected from the supply
mains (electrical outlet) when removing the battery.
• The battery must be disposed of safely and properly.
CAUTION!
- This robot is designed for underwater use only; it is not
an all-purpose vacuum cleaner. DO NOT attempt to use
it to clean anything other than your pool.
- Use only original accessories delivered with this product.
- DO NOT use this robot right after pool-shocking. It is
recommended to first leave the pool circulating for at
least 24-48 hours.
- If you are planning on using the robot in a saltwater pool,
make sure all salt are dissolved before placing it into the
water.
- It is not recommended to use this robot with another
automatic cleaner/cleaner simultaneously.
- Avoid picking up hard, sharp objects with this product
which may damage the robot and filter.
- To avoid damaging the external adaptor and charging
base, do not attempt to carry the robot by the cable of
external adaptor or pull the cable to disconnect it from
the power source and charging base.
- Charge the robot indoors in a clean, dry area with good
ventilation and away from sunlight.
- DO NOT leave the robot charged for over 10 hours.
- If the robot will not be used for an extended period, detach
it from the charging base and use a damp cloth to clean
and dry the robot and its accessories. Make sure to charge
the robot to about 30% to 50% of the battery capacity
before it is stored. Store in a well-ventilated area away
from sunlight, heat, ignition sources, pool chemicals, and
children. Recharge the robot every three months.
- All actions concerning the disassembly of the swivel
head (ie. battery disposal) can only be carried by an
authorized technician.
Above warnings and cautions are not intended to
incorporate all possible instances for risks and / or
severe injuries. Pool / spa owners should always
exercise extra caution and common sense when utilizing
the product.
SAVE THESE INSTRUCTIONS
3
The robot has a water-propelling nozzle at the
bottom of the swivel head. Water is first sucked in
through the suction mouth at the bottom of the
robot, which then goes through the filter and is
discharged via the propelling nozzle. Water jetting
from the nozzle propels the robot forward. Once the
robot stops against an obstacle such as the pool
wall, its side flap sways and its swivel head turns
180o, allowing the robot to move in the opposite
direction. The robot moves in a generally straight
pattern in one direction and in an arc pattern in the
other direction. The robot vacuums the pool bottom
as it moves, collecting debris in its compartment.
Part List
P05622
P05623
P05625
P05624
P05620
P03880
P03879
Part No.Part CodeQTY
1
2
3
4
5
6
7
1
1
1
1
1
1
1
1
1
2
63
4
7
5
4
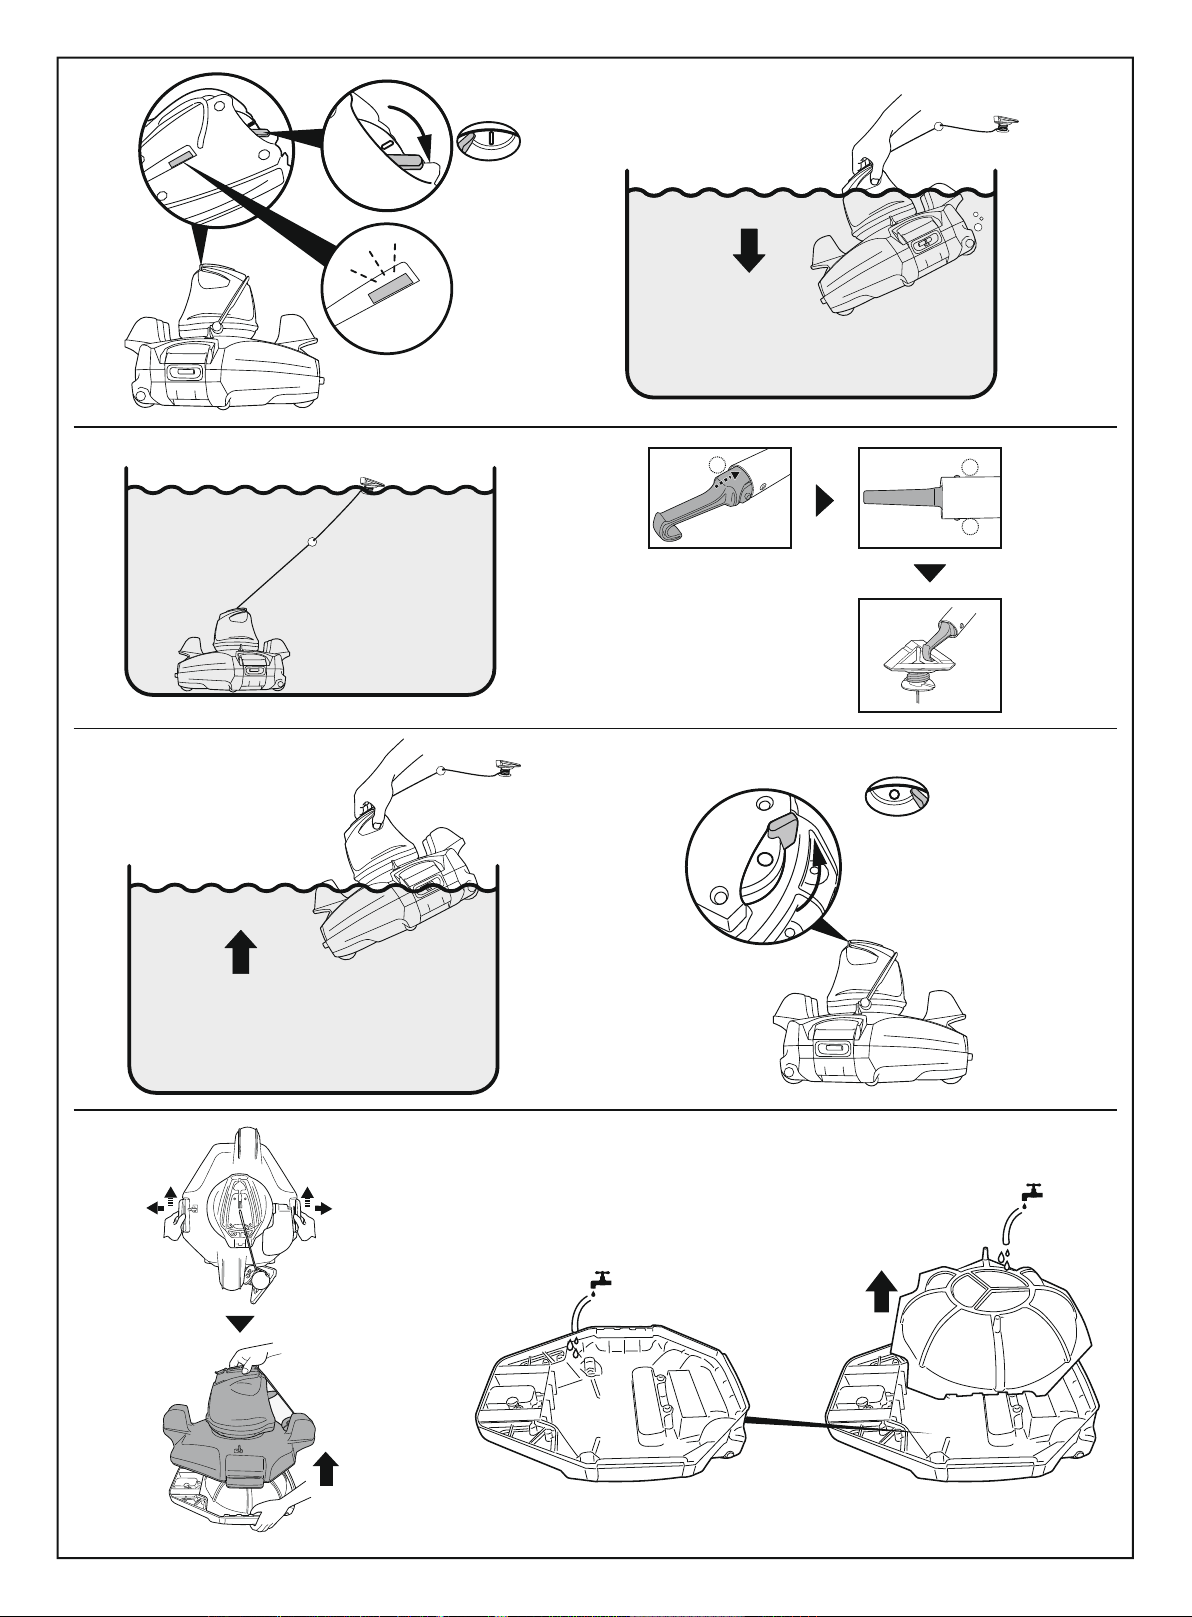
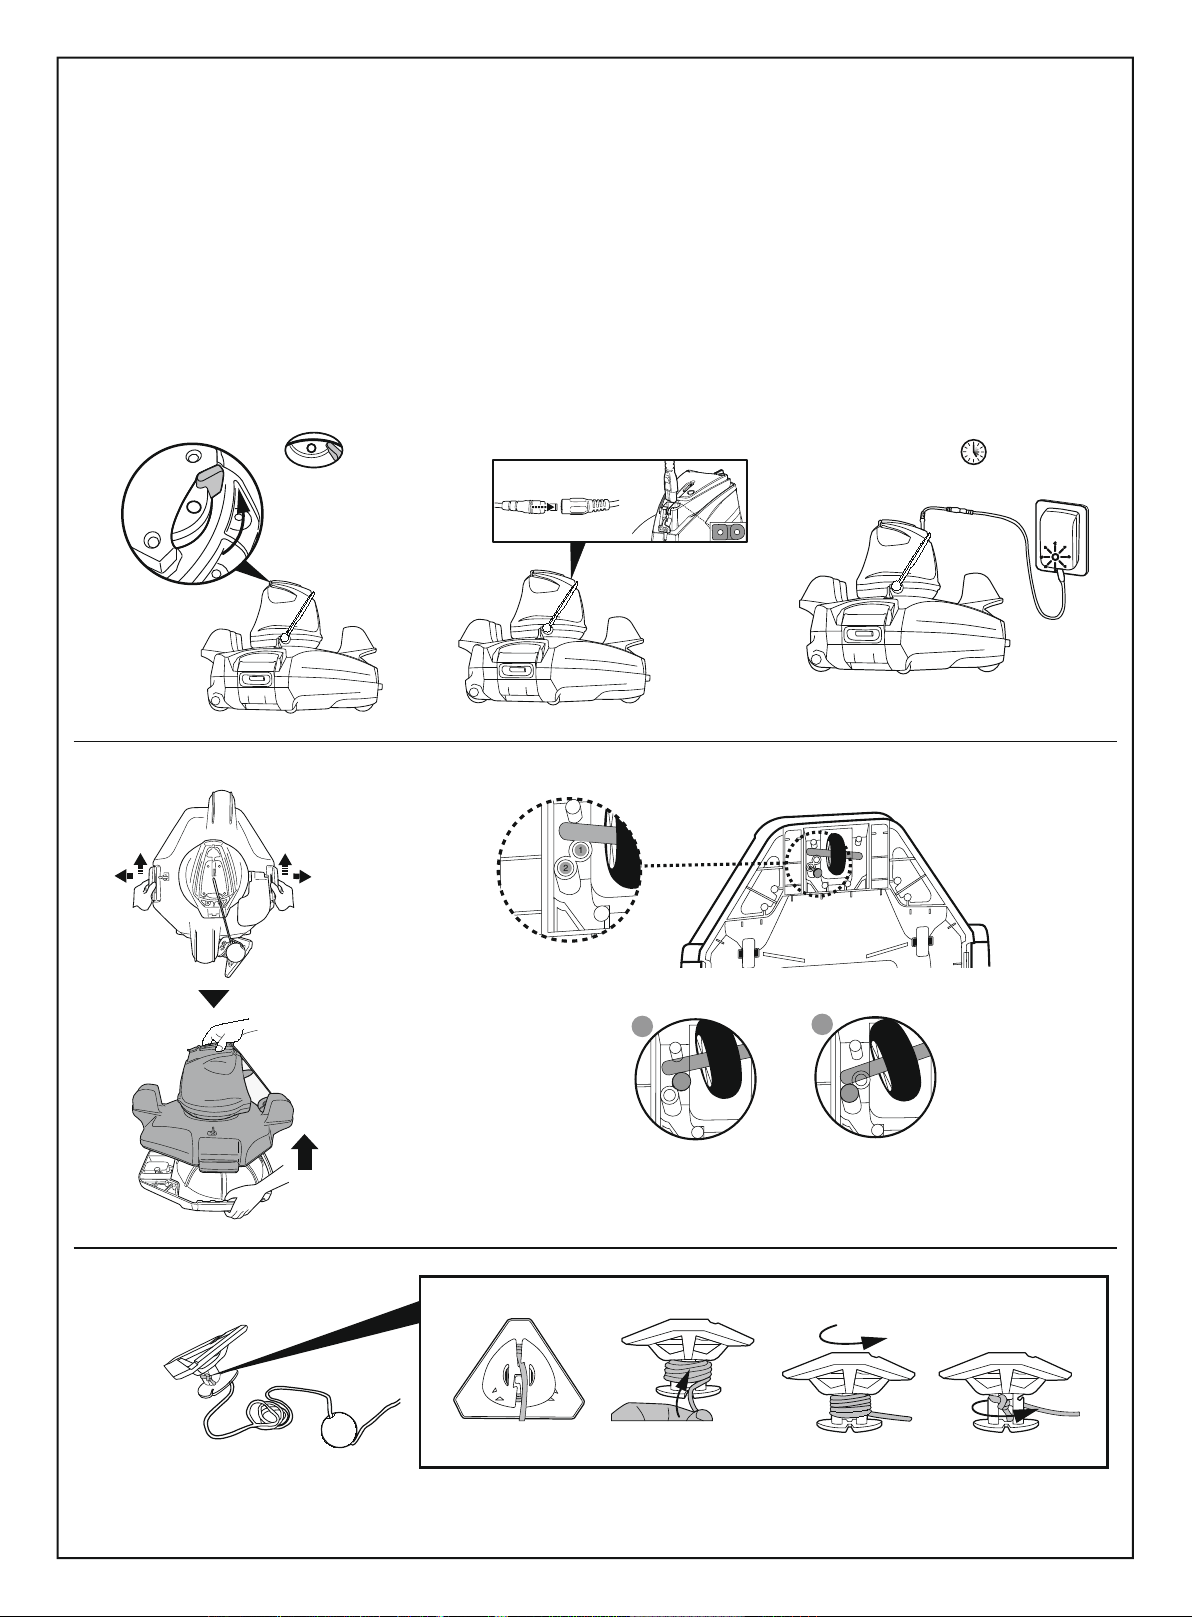
Note:Pry to detach the float cover and release the rope from the float to the depth of pool water plus about 0.5 m (19.7 in.).
RED light – Charging
GREEN light - Charged
5-6 h
31OFF2
4
1
24
3
5
For pools where the
shortest length is
2 meters or above
For pools where the
shortest length is
2 meters or below.
(Factory setting)
12
1
2
6
1.2.3.4.
Assembly and Operation
WARNING For Charging
• Use only the original external adaptor and provided charging cable.
• Make sure the robot and the charger port are clean and dry before set-up.
• Make sure that the robot is turned off by sliding the switch to OFF position prior to charging.
• Fully charge the robot (about 5-6 hrs) before using it for the first time
• Power indicator light: No light - Power off / no power
Light - Power on
Blinking light - Battery power will cease within 10 minutes.
Note: Once the robot begins charging, the indicator light on the external adaptor will turn red.
When the robot is almost fully charged, the indicator light will turn green.
5
9
11
87
10
12
ON
OFF
Note: If float is too far
to be retrieved by hand, use
the provided hook. Place the
hook on the telescopic pole
(not included) and then use
the hook to retrieve the float.
2.
2.
1314
1
24
3
1.
6
Maintenance and Storage
1. Battery discharges on its own during storage. Make sure to fully-charge the robot before storage.
2. You must re-charge the battery at least once every three months when it is not in use.
• Unplug the external adaptor from the socket and then unplug the charging cable from the external adaptor and robot.
• Detach accessories from the robot. If necessary, rinse the robot and accessories with fresh water. DO NOT use detergent.
• Be sure to drain the water from the robot before storing it.
• Use a damp cloth to clean and dry the robot and its accessories.
• Store them in a well-ventilated area away from sunlight, heat, ignition sources, pool chemicals and from children. Ambient temperature for storage should be
10˚C – 25˚C (50˚F – 77˚F). NOTE: A higher storage temperature may reduce the battery life.
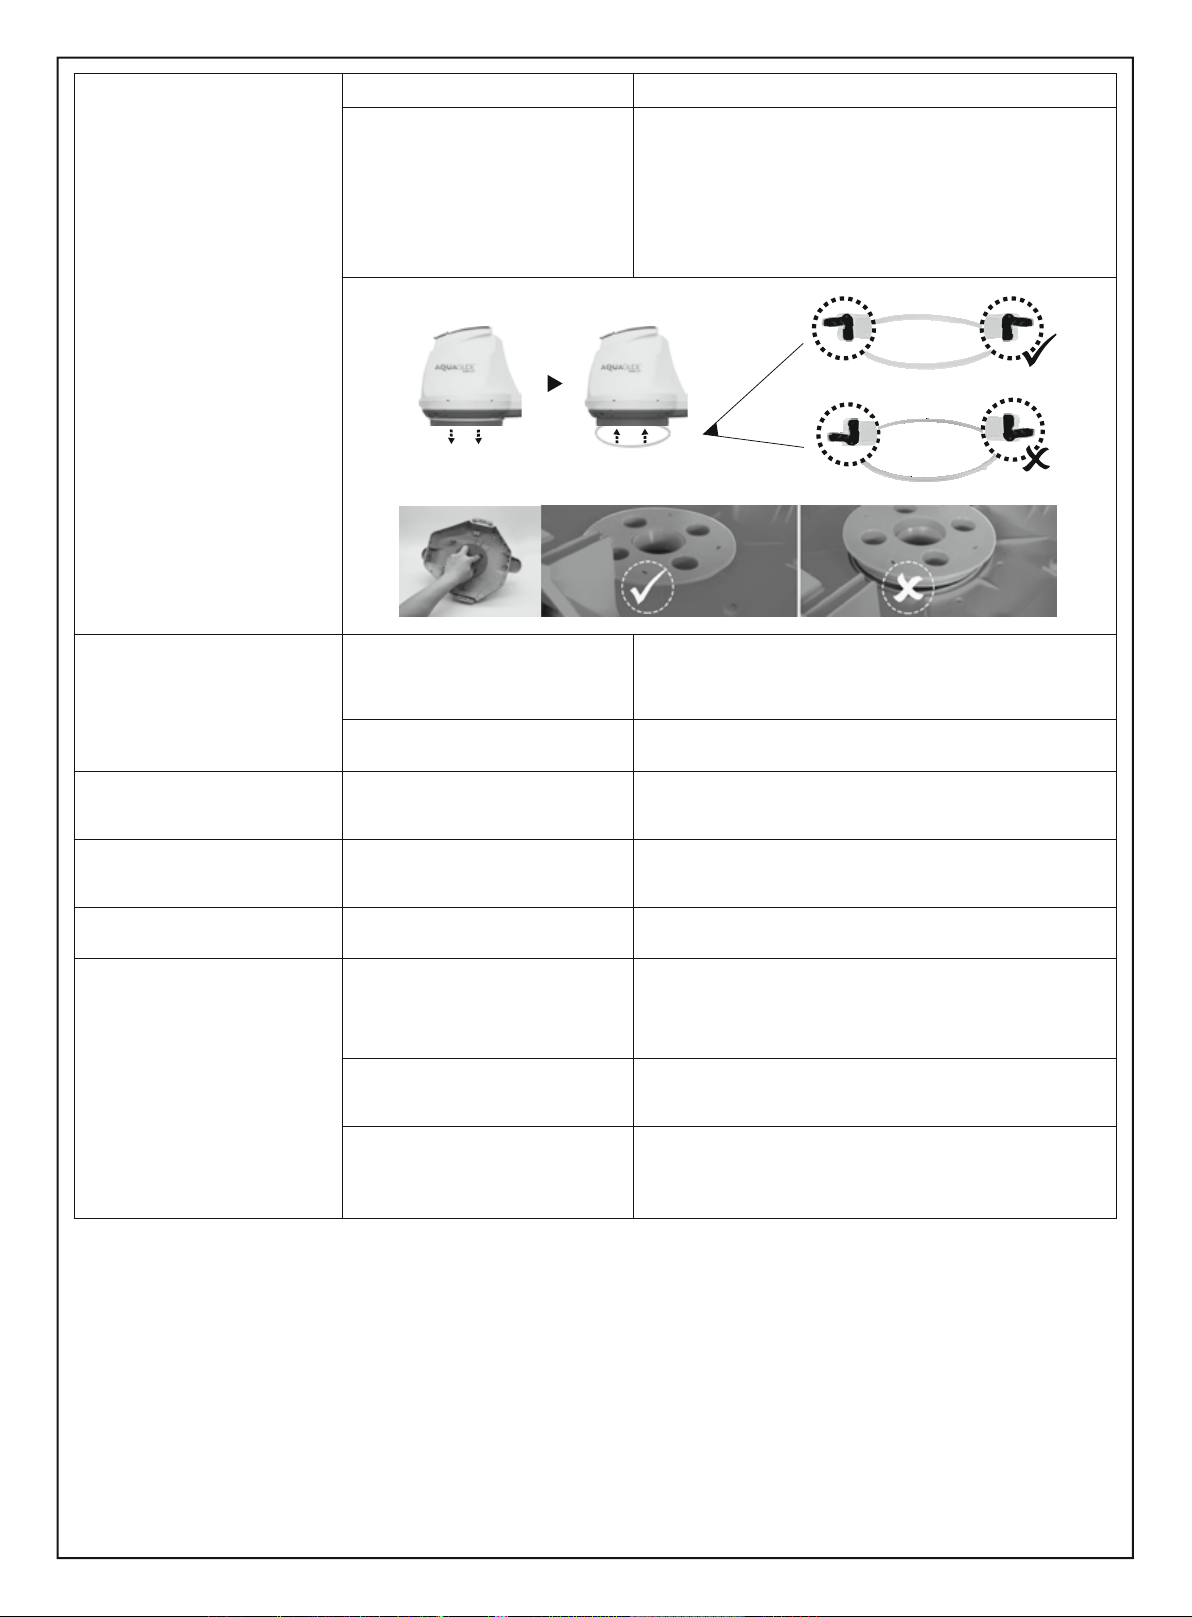
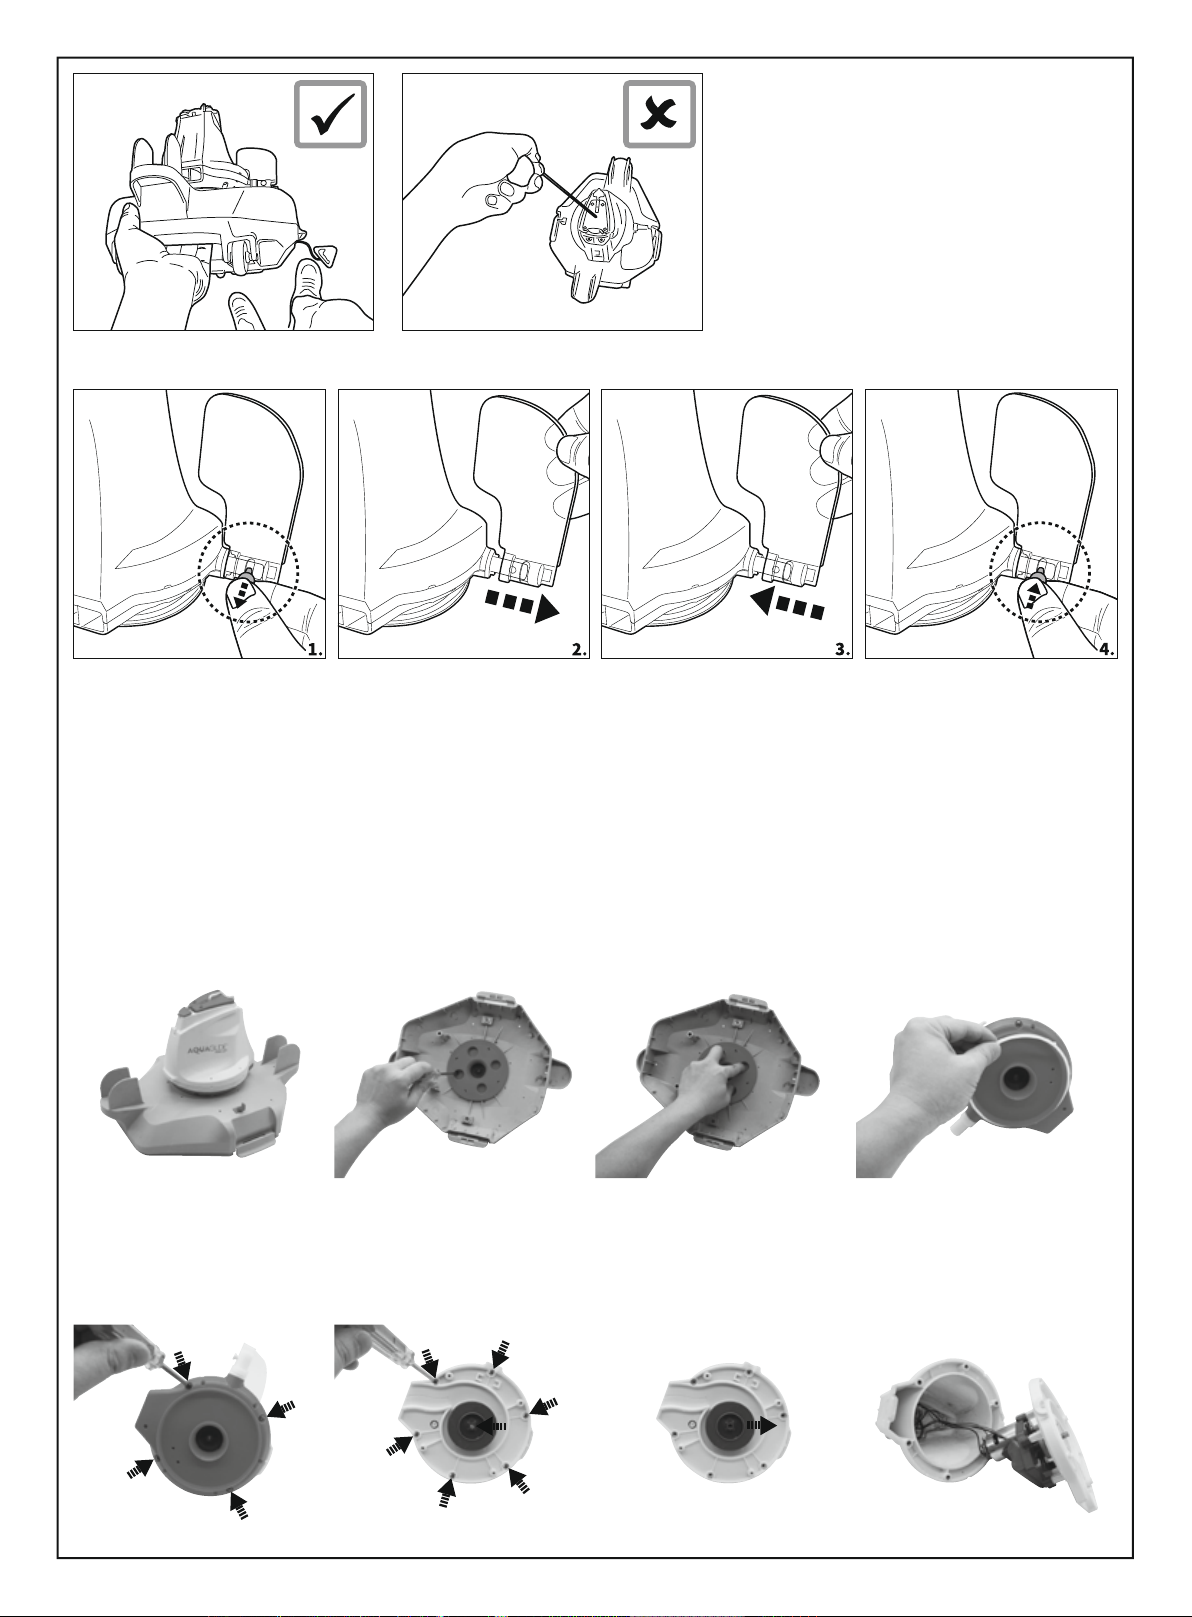
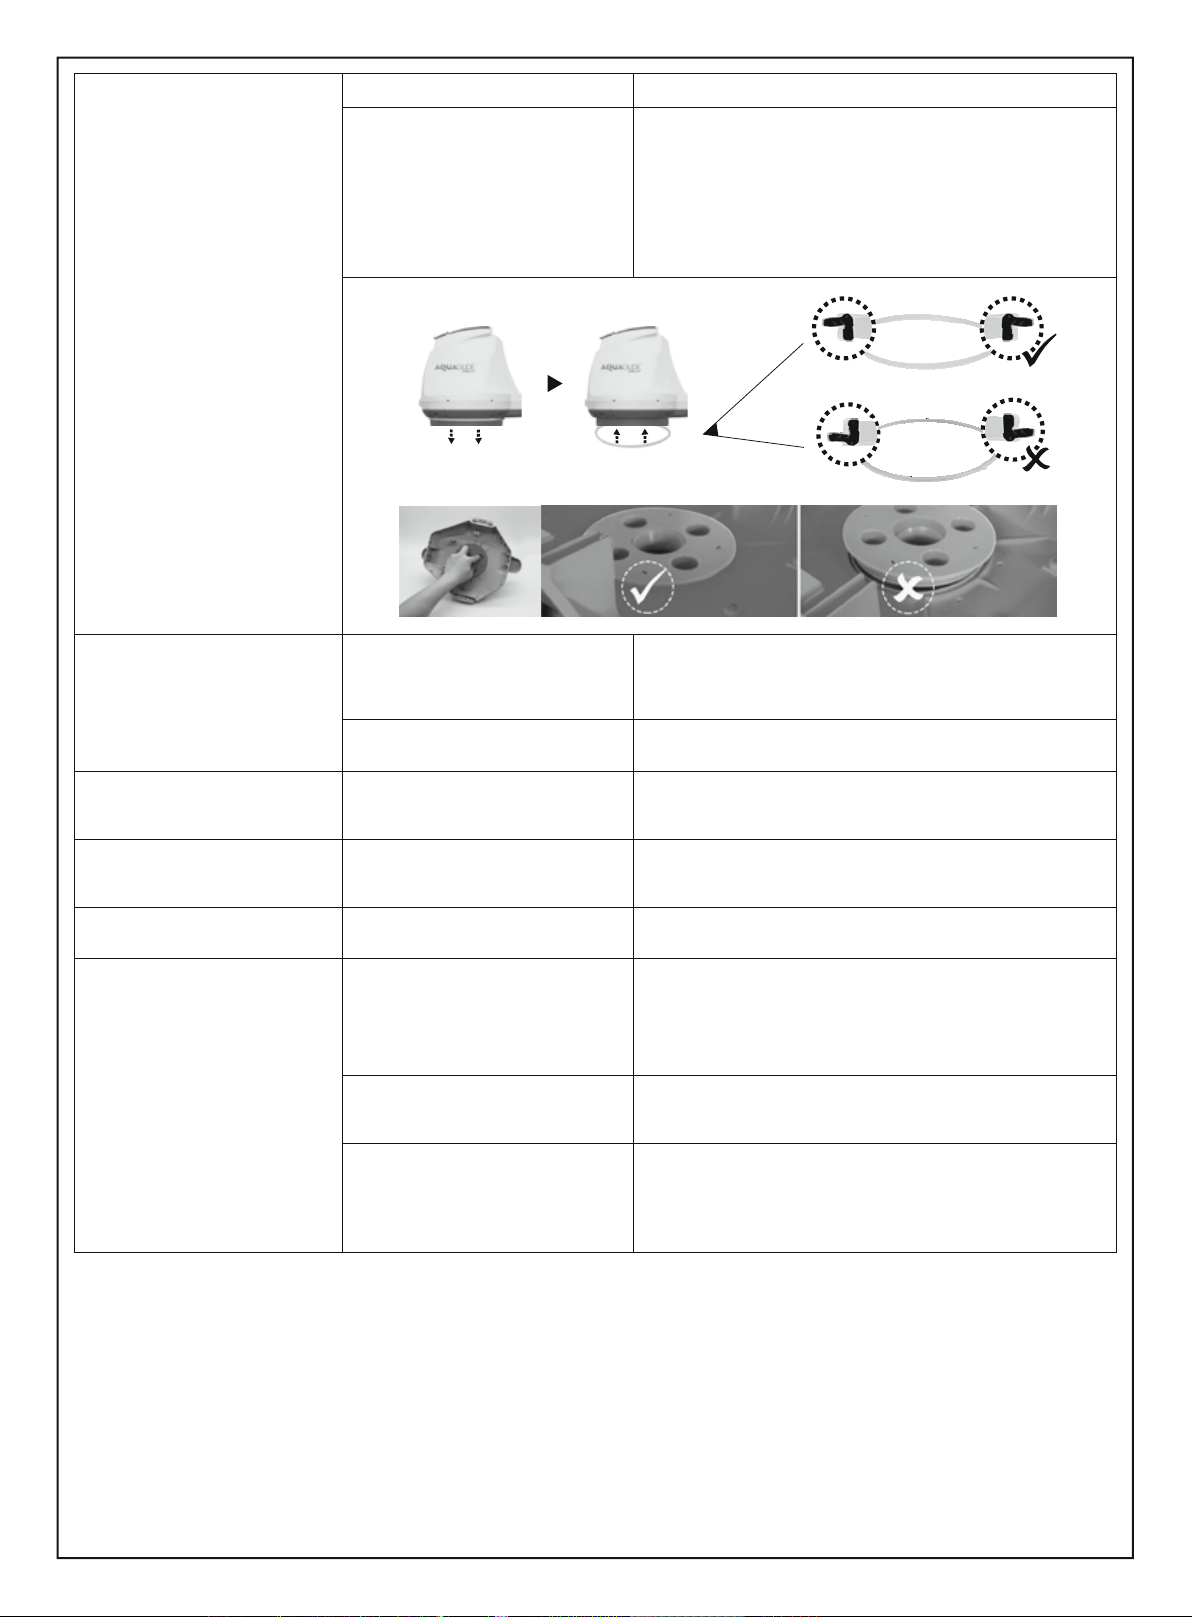
How to remove the battery pack
Recommended tools (not included): Screwdriver.
1. Release the top cover (preassembled with the swivel head). Turn the cover up side
down and release the swivel head by turning its bottom locking plate counter-clockwise.
Remove the swivel smoothing-ring.
2. Use the screwdriver to unscrew the 4 screws located on the bottom of the head to release
the bottom plate at first. Use the screwdriver to unscrew all the screws on the base as
shown. Remove the impeller and then pry up the base and remove it to expose head inside.
Flap replacement
7
3. Remove the battery pack to expose the PCBA. To detach the battery connection wire,
press the clip on the connector and then pull it out. NOTE: Wrap the connector immediately
with insulating tape in order to avoid short circuit caused by contact of both wire terminals.
DISPOSAL
Waste electrical products should not be disposed of with household waste. Please recycle where facilities exist.
Check with your local authority or retailer for recycling advice.
TROUBLESHOOTING
Problem
Robot does not capture the debris
Swivel head rotates repeatedly
Robot does not cover the entire pool
Robot moves along the pool wall
Robot stopped moving in the middle
of pool but swivel head is still turning
Robot moves slowly or does not
move at all.
Robot is stopped by suction from the
main drain of pool floor
Robot stopped by obstacle or large
creases in the pool liner.
Check to see that if there is anything obstructing the cleaner.
Remove the obstacle.
For assistance, please visit the support section on our website,
www.bestwaycorp.com.
Turn off the filtration system (as instructed in filtration manual) at
least 15 minutes before robot operation.
Follow instruction to adjust locking pin setting. Make sure that
robot’s front/back faces the pool wall at beginning.
Algae renders the pool floor slippery
which results in the robot going in circles.
Debris compartment is full or filter
cover is clogged.
Position of locking pin-is not set
properly / robot facing direction
is wrong at beginning.
Moving direction is interrupted by
water circulation generated by
filtration system
Power off the robot and inspect the hole under the swivel head to
see if the impeller is jammed by large debris. For assistance, please
visit the support section on our website, www.bestwaycorp.com.
WARNING! Make sure the robot is off before the unit is serviced.
Power off the robot and inspect the hole under the swivel head to
see if the impeller is jammed by large debris. For assistance, please
visit the support section on our website, www.bestwaycorp.com.
WARNING! Make sure the robot is off before the unit is serviced.
Possible Cause
Battery is running outCharge the robot again.
Turn off the filtration system as instructed in manual.
Clean the debris compartment
Clean the filter compartment and recharge the robot for 6 hrs
Check and remove debris from the wheel.
Follow instruction to adjust the locking pin position.
Scrub the pool bottom and robot wheels to remove the algae
Impeller is jammed
Suction mouth is clogged
Debris compartment is full
Air trapped inside the robot
Remove clogged objects from the suction mouth.
Clean both debris compartment and filter cover.
Impeller is broken
Debris compartment is full
Operation time is shorter as expected
Wheel is jammed
Position of locking pin is not set properly.
Remove clogged objects from the suction mouthSuction mouth is clogged
Impeller is jammed
Solution
The swivel head may rotate repeatedly for a few minutes once
the robot sinks to the pool bottom.
This phenomenon will stop once the air trapped inside the robot
is gradually discharged and the robot will begin to move regularly.
Clean the debris compartment. Flush the screen with water to
remove small particles. If brush is deem necessary, use a soft
brush to clean the screen gently.
Note: make sure that the filter cover is In place before next operation
1
2
8
Debris escapes from the robot
Debris leaks outside at the filter cover
Round float sinks
Robot cannot be charged / recharged
Replace with a new filter cover.
For assistance, please visit the support section on our website,
www.bestwaycorp.com.
Detach the swivel head and smoothening-ring in accordance with
instructions of section “How to remove the battery pack” from the
manual, then:
- Remove trapped debris
- Verify the smoothening-ring and bottom plate are installed
correctly (refer to below diagrams)
- Inspect the smoothening-ring for potential damages and wear
and tear. Replace with a new one if necessary
Suction mouth’s flap ( at cleaner bottom)
is damaged
Debris clogged at suction mouth and
prevents the flap to close.
Replace with a new float.
For assistance, please visit the support section on our website,
www.bestwaycorp.com.
For assistance, please visit the support section on our website,
www.bestwaycorp.com.
WARNING! DO NOT replace the battery by yourself. This could result
in severe or fatal injuries and the warranty will be voided as a result.
For assistance, please visit the support section on our website,
www.bestwaycorp.com.
WARNING! Using the wrong external adaptor will result in
damaging the robot / battery and voiding the warranty as a result.
Make sure that the charger base is connected with external
adaptor and robot properly and completely.
Refer to instruction manual.
Suction mouth’s flap works like a door to prevent the debris from
escaping from the debris compartment.
For assistance, please visit the support section on our website,
www.bestwaycorp.com.
Charging base is not completely
connected with external adaptor and
robot.
Swivel head does not turn or turn
noticeably slowly
Robot operation lasts shorter than
advertised
Check and remove any debris that hinders the movement of the flap.
Remove clogged debris from the suction mouth.
Charge the robot for at least 6 hrs.
Side flap does not come up.
Swivel head bottom is jammed
Filter cover net is damaged
Float is broken and water leaks in
Battery is not fully charged
Battery is damaged
External adaptor is out of order
INSTRUÇÕES DE SEGURANÇA IMPORTANTES
ANTES DE UTILIZAR O APARELHO, LEIA COM ATENÇÃO OS
SEGUINTES AVISOS DE SEGURANÇA E AS INSTRUÇÕES
E GUARDE-OS PARA CONSULTA FUTURA
- Isto não é um BRINQUEDO. As crianças devem ser mantidas
fora do alcance do robô e dos respetivos acessórios.
- Nunca permita a utilização do produto por crianças.
- Este robô não deve ser utilizado por pessoas com
capacidades físicas, sensoriais ou mentais reduzidas ou
com falta de experiência e conhecimentos, a menos que
tenham recebido instruções sobre o aparelho e estejam sob
a supervisão da pessoa responsável pela sua segurança.
- Certifique-se de que o robô está totalmente imerso na água
antes de o colocar em funcionamento. O nível mínimo de
água necessário para utilizar o robô deve estar acima da
cabeça rotativa do robô. Se o robô não estiver imerso
corretamente na água, a unidade pode danificar-se e,
consequentemente, anular a garantia.
-
A profundidade máxima de funcionamento na água é de 3 metros.
- Temperatura da água: 5 °C (41 °F) a 35 °C (95 °F).
- Para carregar a bateria, utilize apenas a unidade de alimentação
amovível (adaptador externo) fornecida com o robô.
- Unidade de alimentação amovível
(adaptador externo).
- AVISO - Para recarregar a bateria, utilize apenas a unidade
de alimentação amovível (adaptador externo:
DSS18-0842000-B/DSS18-0842000-C) e base de
carregamento fornecida com o robô para carregar a bateria.
- AVISO - Este aparelho pode ser utilizado por crianças com
idade igual ou superior a 8 anos e pessoas com capacidades
físicas, sensoriais ou mentais reduzidas ou falta de experiência
e conhecimento se estiverem sob vigilância ou se tiverem
recebido instruções sobre a utilização do aparelho de forma
segura e compreenderem o perigos envolvidos. As crianças
não devem brincar com o aparelho. A limpeza e a
manutenção pelo utilizador não devem ser efetuadas por
crianças sem supervisão. (Para o mercado da UE)
- AVISO - Este aparelho não deve ser utilizado por pessoas
(incluindo crianças) com capacidades físicas, sensoriais ou
mentais reduzidas ou falta de experiência e conhecimento, a
menos que estejam sob vigilância ou tenham recebido
instruções sobre a utilização do aparelho por parte de uma
pessoa responsável pela sua segurança. As crianças devem
ser supervisionadas para garantir que não brincam com o
aparelho. (Para outro mercado que não o da UE)
- Ligue o adaptador externo a uma fonte de alimentação
através de um dispositivo de corrente residual
(RCD)/disjuntor contra falhas de terra (GFCI). Em caso de
dúvida, consulte um eletricista profissional qualificado.
- Não utilize o robô se for detetado algum dano.
- Substitua as peças danificadas o mais rapidamente possível.
Utilize apenas peças certificadas pelo distribuidor ou fabricante.
- Desligue o robô, desligue o adaptador externo da fonte de
alimentação e desligue o adaptador externo da base de
carregamento antes de desligar o robô da base de carregamento.
- Desligue a bomba da corrente elétrica antes de realizar
qualquer operação de manutenção, como limpar o filtro.
- A bateria instalada é uma bateria recarregável de iões de
lítio. Nunca tente substituir por este produto.
- O robô deve ser recarregado apenas com o adaptador
externo e a base de carregamento fornecidos com o produto.
- Durante o carregamento, NÃO manipule o robô, o adaptador
externo e a base de carregamento com as mãos molhadas e
descalço.
- Não deve utilizar o robô com pessoas/animais de estimação
presentes na água.
- NÃO utilize o robô sem um filtro intacto, caso contrário, a
garantia é anulada.
- Perigo de entalamento por aspiração: O robô gera sucção.
Durante o funcionamento, não permita que cabelos, partes
do corpo e peças soltas de vestuário entrem em contacto
com o orifício de aspiração do robô.
- Não introduza nunca partes do corpo, peças de vestuário e
outros objetos nas aberturas e peças móveis do robô.
- NÃO utilize o robô para aspirar substâncias tóxicas,
inflamáveis e líquidos combustíveis, como gasolina, nem na
presença de vapores explosivos e inflamáveis.
- Não deve, em circunstância alguma, tentar desmontar o
robô e substituir o impulsor, o motor e a bateria.
- Nunca introduza os dedos nem objetos para tocar no impulsor.
- O robô não deve ser utilizado por crianças.
- A bateria deve ser retirada do robô antes de ser eliminada.
- O robô contém uma bateria que deve ser removida apenas
por pessoas qualificadas.
- O robô deve ser desligado da corrente elétrica quando
remover a bateria.
- Para obter detalhes sobre a eliminação da bateria, consulte
a secção "Eliminação da bateria" deste manual.
- A bateria deve ser eliminada com segurança, de acordo com
as leis ou regulamentos locais.
- O robô inclui uma bateria recarregável de iões de lítio, isenta
de manutenção, que deve ser eliminada de forma adequada.
É necessária reciclagem. Contacte as autoridades locais
9
PT
Visite o canal da Bestway no YouTube
MANUAL DO PROPRIETÁRIO
RECOMENDAMOS NÃO DEVOLVER
O PRODUTO PARA A LOJA
Dúvidas? Problemas?
Faltam peças?
Para FAQ, manuais, vídeos ou
peças de reposição, visite
bestwaycorp.com/support
S
e
p
r
e
c
i
s
a
d
e
a
j
u
d
a
,
v
i
s
i
t
e
w
w
w
.
b
e
s
t
w
a
y
c
o
r
p
.
c
o
m
/
s
u
p
p
o
r
t
para obter mais informações.
- Adaptador externo e base de carregamento:
• Nunca utilize o adaptador externo e a base de
carregamento para outros fins que não o carregamento da
bateria do robô fornecida na mesma embalagem.
• O adaptador externo e a base de carregamento não devem
ser utilizados no exterior, nem expostos à chuva, à
humidade, a líquidos ou ao calor.
• O transformador (ou adaptador externo) deve estar
localizado fora da zona 1.
• Mantenha o adaptador externo e a base de carregamento
fora do alcance de crianças.
• Nunca utilize o adaptador externo e a base de
carregamento caso detete algum dano.
• NÃO manuseie o adaptador externo e a base de
carregamento com as mãos molhadas.
• Mantenha o adaptador externo desligado da energia
quando não estiver a ser utilizado.
• Nunca tente abrir o adaptador externo.
• Se o cabo de alimentação estiver danificado, deve ser
substituído pelo fabricante, o seu agente de assistência
técnica ou uma pessoa com qualificações semelhantes, a
fim de evitar qualquer tipo de risco.
• Certifique-se de que o robô está completamente seco
antes de o carregar.
ELIMINAÇÃO DA BATERIA:
A reciclagem é necessária; por favor contate as autoridades
locais para obter informações.
• A bateria deve ser retirada do aspirador elétrico antes de
este ser eliminado.
• O aspirador de piscina deve ser desligado da rede elétrica
(tomada elétrica) antes de se remover a bateria.
• A bateria tem de ser eliminada de forma segura e adequada.
CUIDADO!
- O robô foi concebido apenas para ser utilizado submerso;
não é um aspirador multiusos. NÃO o tente utilizar para
limpar outros espaços para além da piscina.
- Utilize apenas acessórios originais fornecidos com o produto.
- NÃO utilize o robô logo após o tratamento de choque da
piscina. É recomendável deixar primeiro a água da piscina a
circular durante, pelo menos, 24-48 horas.
- Se pretender utilizar o robô numa piscina de água salgada,
certifique-se de que o sal se dissolveu completamente antes
de o colocar na água.
- Não é recomendável utilizar o robô em simultâneo com outro
limpador/limpador automático.
- Evite recolher objetos duros e afiados com o produto, para
não danificar o robô e o filtro.
- Para evitar danificar o adaptador externo e a base de
carregamento, não tente transportar o robô pelo cabo do
adaptador externo nem puxe o cabo para o desligar da fonte
de alimentação e da base de carregamento.
- Carregue o robô no interior, num local limpo e seco, com boa
ventilação e afastado da luz solar.
- NÃO deixe o robô ligado ao carregador por um período
superior a 10 horas.
- Se o robô não for utilizado por um longo período de tempo,
desligue-o da base de carregamento e utilize um pano
húmido para limpar e secar o robô e os respetivos
acessórios. Certifique-se de que carrega a bateria do robô
até cerca de 30% a 50% antes de o guardar. Guarde-o num
local bem ventilado, afastado da luz solar, do calor, de fontes
de ignição, de produtos químicos para piscinas e das
crianças. Recarregue o robô todos os três meses.
- Todas as ações relacionadas com a desmontagem da
cabeça rotativa (por exemplo, eliminação da bateria) só
podem ser realizadas por um técnico autorizado.
Os avisos e cuidados acima não incorporam todas as
possíveis situações de riscos e/ou lesões graves. Os
proprietários da piscina/spa devem sempre usar de cuidado e
bom senso ao utilizar o produto.
GUARDE ESTAS INSTRUÇÕES
10
O robô possui um bocal de propulsão da água na
parte inferior da cabeça rotativa. A água é primeiro
aspirada pela boca de aspiração na parte inferior do
robô e depois passa pelo filtro e é descarregada
pelo bocal de propulsão. O jato de água do bocal
impulsiona o robô para a frente. Quando o robô
para contra um obstáculo, como a parede da
piscina, a aba lateral oscila e a cabeça rotativa gira
180o, permitindo que o robô se desloque na direção
oposta. O robô desloca-se a direito numa direção e
em arco na outra direção. O robô aspira o fundo da
piscina enquanto se desloca, recolhendo os
resíduos no seu compartimento.
Lista de peças
P05622
P05623
P05625
P05624
P05620
P03880
P03879
N.º PeçaCódigo daQTD
1
2
3
4
5
6
7
1
1
1
1
1
1
1
1
1
2
63
4
7
5
11
Nota:Separe a tampa do flutuador e liberte a corda do flutuador para a fundo da água da piscina mais cerca de 0,5m (19.7 pol).
Luz VERMELHA - A carregar
Luz VERDE - Carregado
5-6 h
31DESLIGAR2
4
1
24
3
5
Para piscinas onde o
comprimento mais curto
é de 2 metros ou mais.
Para piscinas onde o
comprimento mais curto
é de 2 metros ou menos.
(Definição de fábrica)
12
1
2
6
1.2.3.4.
Montagem e operação
AVISO de carregamento
• Utilize apenas o adaptador externo original e o cabo de carga fornecido.
• Certifique-se de que o robot e a porta do carregador estão limpos e secos antes de preparar.
• Certifique-se de que o robot está desligado deslizando o interruptor para a posição OFF antes de carregar.
• Carregue completamente o robot (cerca de 5-6 h) antes de o utilizar pela primeira vez.
• Luz indicadora de alimentação : Sem luz - Desligado / sem alimentação
Luz - Ligado
Luz a piscar - A potência da bateria vaiparar dentro de 10 minutos.
Nota: Logo que o robot inicia o carregamento, a luz indicadora no adaptador externo fica vermelha.
Quando o robot está praticamente completamente carregado, a luz indicadora fica verde.
13
Manutenção e Armazenamento
1. A bateria descarrega sozinha durante o armazenamento. Certifique-se de que carrega totalmente o robot antes do seu armazenamento.
2. Deve recarregar a bateria pelo menos uma vez a cada três meses sempre que o produto não estiver a ser utilizado.
• Desligue o adaptador externo da tomada e depois desligue o cabo de carga do adaptador externo e robot.
• Desprenda os acessórios do robot. Se necessário, lave o robot e os acessórios com água fresca. NÃO utilize detergente.
• Certifique-se de que drena a água do robot antes de o guardar.
• Utilize um pano húmido para limpar e secar o robot e os seus acessórios.
• Armazene numa área bem ventilada longe da luz do sol, calor, fontes de ignição, químicos de piscina e crianças. Temperatura ambiente para o armazenamento deve
estar entre os 10˚C - e os 25˚C (50˚F - 77˚F). NOTA: Uma temperatura de armazenamento mais elevada pode reduzir a vida da bateria.
Como remover a bateria
Ferramentas recomendadas (não incluídas): Chave de parafusos.
1. Solte a tampa superior (pré-montada com a cabeça giratória). Volte a tampa ao
contrário e solte a cabeça giratória rodando a sua placa de bloqueio inferior no sentido
contrário aos ponteiros do relógio. Remova o anel giratório.
2. Utilize uma chave de parafusos para desaparafusar os 4 parafusos que se encontram
no fundo da cabeça para soltar primeiro a placa do fundo. Utilize a chave de parafusos
para desaparafusar todos os parafusos na base conforme ilustrado. Remova o impulsor
e levanter a base e remova-a para expor a cabeça no seu interior.
Substituição da aba
14
ELIMINAÇÃO
RESOLUÇÃO DE PROBLEMAS
Problema
O robot não apanha os detritos.
A cabeça rotativa gira repetidamente
O robô não cobre toda a piscina
O robô desloca-se ao longo da
parede da piscina
O robô parou no meio da piscina, mas
a cabeça rotativa continua a rodar
O robô desloca-se lentamente ou
não se move
O robô para por aspiração do ralo
principal do piso da piscina
O robô parou devido a um obstáculo ou a
vincos grandes no revestimento da piscina
Verifique se existe algo a obstruir o aspirador. Retire o obstáculo.
Para obter assistência, visite a secção de apoio no nosso sítio da
internet: www.bestwaycorp.com
Desligue o sistema de filtragem (conforme indicado no manual de
filtragem) pelo menos 15 minutos antes do funcionamento do robô.
Siga as instruções para ajustar a configuração do pino de bloqueio. Certifique-se de
que a dianteira/traseira do robô está voltada para a parede da piscina no início.
As algas tornam o piso da piscina escorregadio,
fazendo o robô andar em círculos
O compartimento de resíduos está cheio
ou a tampa do filtro está obstruída
A posição do pino de bloqueio não está
configurada corretamente/a direção do
robô está incorreta no início
A direção do movimento é interrompi-
da pela circulação da água gerada
pelo sistema de filtragem
Desligue o robô e inspecione o orifício sob a cabeça rotativa para ver se o
impulsor está congestionado por detritos grandes. Para obter assistência,
visite a secção de apoio no nosso sítio da internet: www.bestwaycorp.com
AVISO! Certifique-se de que o robô está desligado antes de reparar a unidade.
Causa Possível
A bateria está a ficar sem cargaCarregue o robot novamente.
Desligue o sistema de filtragem conforme indicado no manual.
Limpe o compartimento de resíduos.
Limpe o compartimento do filtro e recarregue o robô durante 6 horas.
Verifique e retire os resíduos da roda.
Siga as instruções para ajustar a posição do pino de bloqueio.
Escove o fundo da piscina e as rodas do robô para remover as algas
O rotor está bloqueado.
Boca de aspiração obstruída
O compartimento de resíduos está cheio
Ar retido no interior do robô
Retire objetos que estejam a obstruir a boca de aspiração.
Limpe o compartimento de resíduos e a tampa do filtro.
O rotor está quebrado
O compartimento de resíduos está cheio
O tempo de funcionamento é inferior ao esperado
A roda está encravada
A posição do pino de bloqueio não
está configurada corretamente.
Retire objetos que estejam a obstruir a boca de aspiração.Boca de aspiração obstruída
O rotor está bloqueado
Solução
A cabeça rotativa pode girar repetidamente durante alguns
minutos quando o robô mergulha até ao fundo da piscina.
Este fenómeno para assim que o ar retido no robô for gradual-
mente descarregado e o robô começar a mover-se regularmente.
Limpe o compartimento de resíduos. Lave o filtro com água para
remover pequenas partículas. Se for necessária escovagem,
utilize uma escova macia para limpar o filtro com suavidade.
Nota: certifique-se de que a tampa do filtro está no lugar antes
da próxima operação
3. Remova a bateria para expor o PCBA. Para prender o cabo de ligação da bateria, prima o
gancho no conector e puxe para fora. NOTA: Envolva o conector imediatamente com fita
isoladora de forma a evitar curto-circuito provocado pelo contacto de ambos os terminais do fio.
Os resíduos de produtos elétricos não devem ser eliminados com o lixo doméstico. Envie-os para reciclagem em
instalações apropriadas. Consulte as autoridades locais ou o revendedor para obter informações sobre a reciclagem.
1
2
20
Mantenimiento y almacenamiento
1. La batería se descarga durante el almacenamiento. Asegúrese de cargar completamente el robot antes de guardarlo.
2. Debe recargar la batería por lo menos una vez cada tres meses cuando no se use el robot.
• Desenchufe el adaptador externo de la toma de corriente, y luego desenchufe el cable de carga del adaptador externo y del robot.
• Desmonte los accesorios del robot. Si fuera necesario, aclare el robot y sus accesorios con agua limpia. NO utilice detergentes.
• Compruebe haber vaciado toda el agua del robot antes de almacenarlo.
• Use un paño húmedo para limpiar el robot y sus accesorios, y séquelos bien.
• Guárdelo en un lugar bien ventilado y protegido de la luz del sol, del calor, de fuentes de ignición, de productos químicos para piscina y fuera del alcance de los niños.
La temperatura ambiente de almacenamiento debe ser de 10°C a 25°C (50°F a 77°F). NOTA: Una temperatura más alta puede disminuir la vida útil de la batería.
Extracción de la batería
Herramientas aconsejadas (no incluidas): Destornillador.
1. Suelte la cubierta superior (premontada con el cabezal giratorio). Voltee la cubierta y
suelte el cabezal giratorio, girando hacia la izquierda su placa de bloqueo inferior.
Retire el anillo regulador giratorio.
2. Use el destornillador para aflojar los 4 tornillos presentes en la parte inferior del
cabezal, para soltar en primer lugar la placa inferior. Use el destornillador para aflojar
todos los tornillos de la base, como se ve en la figura. Retire el impulsor y luego haga
palanca en la base y retírela para dejar a la vista el interior del cabezal.
Reemplazo de la aleta
25
Hinweis:Nehmen Sie die Schwimmerabdeckung ab und lassen Sie das Schwimmerseil bis zur Tiefe des Poolwassers ab, plus circa 0,5 m (19.7in.).
ROTES Licht - Laden
GRÜNES LICHT - Aufgeladen
5-6 h
31AUS2
4
1
24
3
5
Geeignet für Pools,
deren kürzere Seite
mindestens 2 Meter
lang ist.
Geeignet für Pools,
deren kürzere Seite
maximal 2 Meter lang
ist. (Werkseinstellung)
12
1
2
6
1.2.3.4.
Montage und Betrieb
WARNUNG: Für den Ladevorgang
• Verwenden Sie ausschließlich den externen Adapter und das beiliegende Ladekabel.
• Vergewissern Sie sich bei der Ladevorbereitung, dass der Roboteranschluss und der Ladeanschluss sauber sind.
• Schalten Sie den Roboter vor dem Aufladen aus, indem Sie den Schalter in die Stellung „OFF“ (AUS) schieben.
• Laden Sie den Roboter vor der erstmaligen Verwendung vollständig auf (circa 5 bis 6 Stunden).
• Netzleuchte: Kein Licht - Ausgeschaltet/kein Strom
Licht - Eingeschaltet
Blinkendes Licht – die Batterieleistung ist nur noch für 10 Minuten ausreichend.
Hinweis: Sobald der Roboter den Ladevorgang beginnt, leuchtet die Meldeleuchte am externen Adapter rot.
Wenn der Roboter nahezu vollständig aufgeladen ist, leuchtet die Meldeleuchte Grün.
26
9
11
87
10
12
EIN
AUS
Hinweis: Wenn der Schwimmer zu weit
entfernt ist, um ihn mit der Hand
herauszunehmen, verwenden Sie bitte den
beiliegenden Haken. Befestigen Sie den
Haken an der Teleskopstange (nicht
enthalten) und verwenden Sie den Haken
dann, um den Schwimmer herauszunehmen.
1314
1
24
3
2.
2.
1.
27
Pflege und Lagerung
1. Der Akku entlädt sich während der Lagerung von selbst. Stellen Sie sicher, dass Sie den Roboter vor der Einlagerung vollständig aufladen.
2. Sie müssen den Akku mindestens einmal alle drei Monate aufladen, wenn er nicht in Gebrauch ist.
• Trennen Sie den externen Adapter vom Anschluss und ziehen Sie das externe Ladekabel vom externen Adapter und dem Roboter ab.
• Lösen Sie das Zubehör vom Roboter. Reinigen Sie den Roboter und das Zubehör ggf. mit Wasser. Verwenden Sie KEIN Reinigungsmittel.
• Lassen Sie das gesamte Wasser vor der Einlagerung aus dem Roboter ab.
• Reinigen Sie den Roboter mit einem angefeuchteten Tuch und lassen Sie ihn trocknen.
• In einem gut belüfteten Bereich lagern, fern von Sonneneinstrahlung, Hitzequellen, Zündquellen und Poolchemikalien sowie stets außerhalb der Reichweite von Kindern.
Umgebungstemperatur für die Lagerung: 10°C – 25°C (50°F – 77°F). HINWEIS: Höhere Temperaturen während der Lagerung können zu einer Verschlechterung der Akkulebensdauer beitragen.
kaapelista tai vetämällä kaapelista irrottaaksesi sen
virtalähteestä ja latausasemasta.
- Lataa robotti sisätiloissa puhtaalla, kuivalla alueella, jossa
on hyvä ilmanvaihto ja joka on kaukana auringonvalosta.
- ÄLÄ jätä robottia liitettynä laturiin yli 10 tunnin ajaksi.
- Jos robottia ei käytetä pitkään aikaan, poista se
latausasemasta ja pyyhi robotti ja sen varusteet
kostealla liinalla ja kuivaa. Lataa robotti ennen
varastointia siten, että sen latausaste on 30–50 % akun
kapasiteetista. Varastoi hyvin ilmastoidussa paikassa
poissa auringonvalosta ja kuumuudesta sekä poissa
sytytyslähteiden ja allaskemikaalien lähettyviltä. Säilytä
lasten ulottumattomissa. Lataa robotti joka kolmas kuukausi.
- Vain valtuutettu teknikko voi suorittaa kaikki nivelpään
purkamiseen (ts. akun hävittämiseen) liittyvät toimet.
Yllä olevat varoitukset ja huomautukset eivät ole
tarkoitettu kaikenkattavaksi ohjeistukseksi kaikkien
mahdollisten riskien ja/tai vakavien loukkaantumisten
varalta. Uima-altaiden/spa-altaiden omistajien tulisi aina
olla erittäin varovaisia ja käyttää tervettä järkeä
käyttäessään tuotetta.
PIDÄ NÄMÄ OHJEET TALLESSA
31
Robotissa on vettä suihkuttava suutin nivelpään
alaosassa. Vesi imetään ensin sisään robotin
pohjassa olevan imuaukon kautta suodattimeen ja
poistetaan sitten suuttimen kautta. Suuttimesta ulos
purkautuva vesi saa robotin liikkumaan eteenpäin.
Kun robotti pysähtyy estettä, kuten uima-altaan
seinää vasten, sen sivuläppä kääntyy ja nivelpää
kääntyy 180°, jolloin robotti alkaa liikkua
vastakkaiseen suuntaan. Robotti liikkuu yleensä
suoraan yhteen suuntaan ja kaartaa toiseen
suuntaan. Ollessaan liikkeellä robotti imuroi altaan
pohjan keräten roskat säiliöönsä.
Osaluettelo
P05622
P05623
P05625
P05624
P05620
P03880
P03879
OsanumeOsakoodiMÄÄR
1
2
3
4
5
6
7
1
1
1
1
1
1
1
1
1
2
63
4
7
5
39
Opmerking:Wrik het deksel van de drijver los en haal net zoveel touw uit de drijver als de diepte van het zwembadwater plus ongeveer 0,5 m (19.7in.).
ROOD licht – Opladen bezig
GROEN licht - Opgeladen
5-6 h
31OFF2
4
1
24
3
5
Voor zwembaden
waarvan de kortste zijde
2 meter of langer is.
Voor zwembaden
waarvan de kortste
zijde 2 meter of korter
is. (Fabrieksinstelling)
12
1
2
6
1.2.3.4.
Montage en bediening
WAARSCHUWING voor het opladen
• Gebruik alleen de originele externe adapter en de bijgeleverde oplaadkabel.
• Zorg ervoor dat de robot en de oplaadpoort schoon en droog zijn voor de installatie.
• Zorg ervoor dat de robot wordt uitgeschakeld door de schakelaar op de OFF-positie te
zetten voordat u hem gaat opladen.
• Laad de robot volledig (ongeveer 5-6 uur) op voor het eerste gebruik.
• Voedingsindicatielampje: Geen licht - Voeding uit/geen voeding
Licht - Voeding aan
Knipperend licht - De batterijvoeding stopt binnen 10 minuten.
Opmerking: Wanneer de robot begint op te laden, wordt het indicatielampje op de externe
adapter rood. Wanneer de robot bijna helemaal is opgeladen, wordt het indicatielampje groen.
40
9
11
87
10
12
ON
OFF
Opmerking: Als de drijver
te ver weg is om hem met de hand
te kunnen ophalen, gebruik dan de
bijgeleverde haak. Breng de haak
aan op de telescopische stang
(niet bijgeleverd) en gebruik dan
de haak om de drijver op te halen.
1314
1
24
3
2.
2.
1.
41
Onderhoud en opberging
1. Tijdens het opbergen ontlaadt de batterij zichzelf. Zorg ervoor dat de robot volledig is opgeladen voor u hem opbergt.
2. Wanneer niet in gebruik, moet u de batterij minstens eenmaal elke drie maanden opladen.
• Haal de stekker van de externe adapter uit het stopcontact en verwijder dan de oplaadkabel uit de externe adapter en de robot.
• Koppel accessoires van de robot los. Spoel indien nodig de robot en de accessoires af met schoon water. GEEN reinigingsmiddel gebruiken.
• Laat het water uit de robot weglopen voordat u deze opbergt.
• Maak de robot en de accessoires schoon met een vochtige doek en maak ze droog.
• Berg ze op in een goed geventileerde ruimte en uit de buurt van zonlicht, warmte, ontstekingsbronnen, zwembadchemicaliën en kinderen. De omgevingstemperatuur
voor opslag moet 10°C - 25°C (50°F - 77°F) zijn. OPMERKING: Een hogere opslagtemperatuur kan de levensduur van de batterij verkorten.
1. Maak het bovenste deksel los (vooraf gemonteerd met de draaikop). Draai het deksel
om en maak de draaikop los door de onderste borgplaat linksom te draaien. Verwijder
de draairing.
2. Draai de 4 schroeven op de onderkant van de draaikop los met de schroevendraaier om
de onderste plaat eerst los te maken. Gebruik de schroevendraaier om alle schroeven
op de basis los te schroeven zoals op de afbeelding. Verwijder de waaier en wrik dan
de basis los en verwijder hem zodat u bij de kop kunt komen.
Flap terugplaatsen
42
WEGGOOIEN
PROBLEMEN OPLOSSEN
Probleem
De robot vangt geen vuil op.
De draaikop draait herhaaldelijk
De robot beslaat niet het hele
zwembad
De robot beweegt langs de
zwembadwand
De robot is gestopt met bewegen
in het midden van het zwembad,
maar de draaikop draait nog
De robot beweegt langzaam of
helemaal niet
De robot wordt gestopt door de zuiging
van de hoofdafvoer van de zwembadvloer
De robot is gestopt door een obstakel
of grote kreuken in de zwembadvoering
Controleer of er iets is dat de reiniger tegenhoudt. Verwijder het
obstakel.
Voor assistentie kunt u de supportafdeling op onze website
bezoeken op www.bestwaycorp.com.
Schakel het filtratiesysteem ten minste 15 minuten voordat de robot
wordt gebruikt uit (volgens de instructies in de filtratiehandleiding).
Volg de instructies om de instelling van de borgpen aan te
passen. Zorg ervoor dat de voorkant/achterkant van de robot in
het begin naar de zwembadwand is gericht.
Algen maken de zwembadvloer glad,
waardoor de robot rondgaat in cirkels
Het vuilcompartiment is vol of het
filterdeksel is verstopt
De positie van de borgpen is niet goed
ingesteld./ De robot is verkeerd gericht
in het begin
De bewegingsrichting wordt onderbroken
door de watercirculatie die wordt
gegenereerd door het filtratiesysteem
Schakel de robot uit en inspecteer de ruimte onder de draaikop om te
zien of de waaier geblokkeerd is door groter vuil. Voor assistentie kunt u
de supportafdeling op onze website bezoeken op www.bestwaycorp.com.
WAARSCHUWING!Zorg ervoor dat de robot is uitgeschakeld voordat de
eenheid wordt gerepareerd.
Schakel de robot uit en inspecteer de ruimte onder de draaikop om te
zien of de waaier geblokkeerd is door groter vuil. Voor assistentie kunt u
de supportafdeling op onze website bezoeken op www.bestwaycorp.com.
WAARSCHUWING! Zorg ervoor dat de robot is uitgeschakeld voordat
de eenheid wordt gerepareerd.
Mogelijke oorzaak
Batterij is bijna leegLaad de robot opnieuw op.
Schakel het filtratiesysteem uit volgens de instructies in de handleiding.
Reinig het afvalcompartiment
Reinig het filtercompartiment en laad de robot opnieuw 6 uur op
Controleer het wiel en verwijder het vuil.
Volg de instructies om de positie van de borgpen aan te passen.
Schrob de zwembadbodem en de robotwielen schoon om de
algen te verwijderen
De waaier is geblokkeerd.
De zuigmond is verstopt
Het vuilcompartiment is vol
Lucht gevangen in de robot
Verwijder opgehoopte voorwerpen uit de zuigmond.
Reinig het vuilcompartiment en het filterdeksel.
De waaier is kapot
Het vuilcompartiment is vol
De werkingstijd is korter dan verwacht
Het wiel is geblokkeerd
De positie van de borgpen is niet goed
ingesteld.
Verwijder opgehoopte voorwerpen uit de zuigmondDe zuigmond is verstopt
De waaier is geblokkeerd
Oplossing
De draaikop kan enkele minuten herhaaldelijk draaien wanneer de
robot naar de zwembadbodem zinkt.
Dit fenomeen stopt wanneer de lucht die in de robot is gevangen
geleidelijk wordt afgevoerd en de robot normaal begint te bewegen.
Reinig het afvalcompartiment. Spoel het vuilscherm schoon met water om kleine
deeltjes te verwijderen. Als schoonborstelen nodig is, gebruik dan alleen een zachte
borstel om het vuilscherm voorzichtig schoon te maken.
Let op: zorg ervoor dat het filterdeksel op zijn plaats zit voor de volgende handeling
3. Verwijder de batterij om bij de printplaat te kunnen komen. Druk op de clip op de connector en trek die
dan naar buiten om de verbindingsdraad van de batterij los te maken. OPMERKING: Omwikkel de
pool onmiddellijk met isolatietape om kortsluiting door contact tussen de beide polen te voorkomen.
Afgedankte elektrische apparaten mogen niet worden weggegooid bij het huisafval. Recycle als daar
faciliteiten voor bestaan. Vraag advies over recyclen aan uw plaatselijke overheid of aan de winkelier.
1
2
49
SMALTIMENTO
RISOLUZIONE DEI PROBLEMI
Problema
Il robot non raccoglie i detriti
La testa orientabile ruota
ripetutamente
Il robot non copre l'intera superficie
della piscina
Il robot si sposta lungo la parete
della piscina
Il robot si è fermato in mezzo alla
piscina ma la testa orientabile sta
ancora girando
Il robot si muove lentamente o non
si muove affatto
Il robot è bloccato dal risucchio causato dallo
scarico principale sul fondale della piscina
Il robot si è fermato contro un ostacolo o
grosse pieghe nel rivestimento della piscina
Verificare che non vi siano ostacoli a fermare il robot. Rimuovere
l'ostacolo.
Per assistenza, visitare la sezione di supporto sul nostro sito
web, www.bestwaycorp.com.
Spegnere il sistema di filtraggio (come indicato nel manuale)
almeno 15 minuti prima di mettere in funzione il robot.
Regolare l'impostazione del perno di bloccaggio secondo istruzioni.
Assicurarsi che la parte anteriore / posteriore del robot sia rivolta verso
la parete della piscina all'inizio dell'operazione.
Le alghe rendono scivoloso il fondo della piscina,
il che fa sì che il robot si muova in cerchio
Il vano detriti è pieno o la copertura
del filtro è ostruita
La posizione del perno di bloccaggio non è
impostata correttamente / il robot è stato orientato
nella direzione errata all'inizio dell'operazione.
La traiettoria è ostacolata dal ricircolo
dell'acqua generato dal sistema di filtraggio
Spegnere il robot e ispezionare il foro sotto la testa orientabile per verificare
che la girante non sia bloccata da detriti di grandi dimensioni. Per assistenza,
visitare la sezione di supporto sul nostro sito web, www.bestwaycorp.com.
ATTENZIONE! Assicurarsi che il robot sia spento prima di eseguire la
manutenzione dell'unità.
Spegnere il robot e ispezionare il foro sotto la testa orientabile per verificare
che la girante non sia bloccata da detriti di grandi dimensioni. Per assistenza,
visitare la sezione di supporto sul nostro sito web, www.bestwaycorp.com.
ATTENZIONE!Assicurarsi che il robot sia spento prima di eseguire la
manutenzione dell'unità.
Cause possibili
La batteria si sta scaricandoCaricare di nuovo il robot.
Spegnere il sistema di filtraggio come indicato nel manuale.
Pulire il vano detriti
Pulire l'alloggiamento del filtro e ricaricare il robot per 6 ore
Controllare la ruota e rimuovere eventuali detriti.
Seguire le istruzioni per regolare la posizione del perno di bloccaggio.
Sfregare il fondo della piscina e le ruote del robot per rimuovere le alghe
La girante è inceppata
La bocchetta di aspirazione è ostruita
Il vano detriti è pieno
Aria intrappolata all'interno del robot
Rimuovere gli oggetti incastrati dalla bocchetta di aspirazione.
Pulire il vano detriti e il coperchio del filtro.
La girante è rotta
Il vano detriti è pieno
Il robot ha una autonomia inferiore al previsto
La ruota è inceppata
Il perno di bloccaggio non è nella
giusta posizione.
Rimuovere gli oggetti incastrati dalla bocchetta di aspirazioneLa bocchetta di aspirazione è ostruita
La girante è inceppata
Soluzione
La testa orientabile può mettersi a ruotare ripetutamente per alcuni
minuti quando il robot raggiunge il fondo della piscina.
Il fenomeno cesserà non appena l'aria intrappolata all'interno del robot
verrà gradualmente espulsa e il robot inizierà a spostarsi normalmente.
Pulire il vano detriti. Sciacquare lo schermo con acqua per rimuovere
i residui più piccoli. Nel caso lo si ritenga necessario, utilizzare un
pennello morbido per pulire con delicatezza lo schermo.
Nota: assicurarsi che la copertura del filtro sia posizionata
correttamente prima di rimettere in funzione il robot
3. Estrarre la batteria per localizzare il circuito stampato. Scollegare il cavo batteria premendo sulla clip
del connettore e tirando verso l’esterno. NOTA: Avvolgere i connettori con nastro isolante per
evitare corti circuiti causati dal contatto tra entrambi i terminali.
I rifiuti di prodotti elettrici non devono essere smaltiti insieme ai rifiuti domestici. Si prega di riciclare dove
esistono strutture. Verificare con l'autorità locale o il rivenditore per consigli sul riciclaggio.
1
2
50
I detriti fuoriescono dal robot
I detriti fuoriescono dalla copertura
del filtro
Il galleggiante affonda
Il robot non può essere caricato /
ricaricato
Sostituire con una nuova copertura del filtro.
Per assistenza, visitare la sezione di supporto sul nostro sito
web, www.bestwaycorp.com.
Staccare la testa orientabile e l'anello di giunzione secondo le
istruzioni del manuale alla sezione "Come rimuovere il pacco
batteria", successivamente:
- Rimuovere i detriti intrappolati
- Verificare che l'anello di giunzione e la piastra inferiore siano
installati correttamente (fare riferimento agli schemi seguenti)
- Verificare che l'anello di giunzione non sia danneggiato o presenti segni
di usura. Sostituire con un nuovo anello di giunzione, se necessario
L'aletta della bocchetta aspirante
(sul fondo dell'aspiratore) è danneggiata
I detriti ostruiscono la bocchetta aspirante,
impedendo all'aletta di chiudersi
Sostituire con un nuovo galleggiante. Per assistenza, visitare la
sezione di supporto sul nostro sito web, www.bestwaycorp.com.
Per assistenza, visitare la sezione di supporto sul nostro sito
web, www.bestwaycorp.com.
ATTENZIONE! NON sostituire la batteria da soli. Ciò potrebbe causare
lesioni gravi o anche fatali con conseguente annullamento della garanzia.
Per assistenza, visitare la sezione di supporto sul nostro sito
web, www.bestwaycorp.com.
ATTENZIONE!L'utilizzo di un adattatore esterno non idoneo potrebbe causare
danni al robot / alla batteria, facendo decadere di conseguenza la garanzia.
Assicurarsi che la base di ricarica sia connessa correttamente e
completamente all'adattatore esterno e al robot. Fare riferimento
al manuale di istruzioni.
L'aletta della bocchetta aspirante ha la funzione di una porta che
impedisce ai detriti di fuoriuscire dal vano di raccolta. Per
assistenza, visitare la sezione di supporto sul nostro sito web,
www.bestwaycorp.com.
La base di ricarica non è del tutto
collegata all'adattatore esterno e al
robot
La testa orientabile non ruota o
ruota molto lentamente
L'autonomia del robot è inferiore al
previsto
Controllare e rimuovere eventuali detriti che ostacolano il movimento dell'aletta.
Rimuovere i detriti che ostruiscono la bocchetta aspirante.
Mettere in carica il robot per almeno 6 ore.
L'aletta laterale non si alza
La parte inferiore della testa
orientabile è inceppata
La retina della copertura del filtro è
danneggiata
Il galleggiante è rotto e imbarca acqua
La batteria non è completamente carica
La batteria è danneggiata
L'adattatore esterno non funziona
54
9
11
87
10
12
MARCHE
ARRÊT
Remarque : Si le
flotteur est trop loin pour pouvoir
le récupérer à la main, utilisez le
crochet fourni. Placez le crochet
sur le manche télescopique (non
inclus) et utilisez le crochet pour
récupérer le flotteur.
1314
1
24
3
2.
2.
1.
55
Entretien et rangement
1. La batterie se décharge d’elle-même pendant le stockage. Assurez-vous de charger complètement le robot avant le stockage.
2. Vous devez recharger la batterie au moins une fois tous les trois mois lorsqu’il n’est pas utilisé.
• Débranchez l’adaptateur externe de la prise et débranchez ensuite le câble de charge de l’adaptateur externe et du robot.
• Détachez les accessoires du robot. Si nécessaire, rincez le robot et les accessoires à l’eau douce. NE PAS utiliser de détergent.
• Assurez-vous de vidanger l’eau du robot avant de le ranger.
• Utilisez un chiffon humide pour nettoyer et sécher le robot et ses accessoires.
• Conserver les dans un endroit bien aéré, hors de portée des rayons du soleil, de la chaleur, des sources d’inflammation, des produits chimiques pour piscine et des enfants.
La température ambiante de stockage doit être de 10°C-25°C (50°F-77°F). REMARQUE : Une température de stockage plus élevée peut réduire la durée de vie de la batterie.
Comment retirer le bloc batterie
Outils recommandés (non fournis) : Tournevis.
1. Libérez le couvercle supérieur (préassemblé avec la tête pivotante). Retournez le
couvercle et libérez la tête pivotante en tournant sa plaque de verrouillage inférieure
dans le sens inverse des aiguilles d'une montre. Retirez l’anneau amortisseur du pivot.
2. À l'aide du tournevis, dévissez les 4 vis situées dans la partie inférieure de la tête pour
libérer la plaque inférieure en premier. À l'aide du tournevis, dévissez toutes les vis
situées sur la base comme indiqué. Retirez le rotor puis forcez sur la base et retirez-la
pour exposez la tête à l’intérieur.
Remplacement de l’ailette
56
MISE AU REBUT
DÉPANNAGE
Problème
Le robot ne récupère pas de
débris.
La tête pivotante ne cesse de
tourner
Le robot ne couvre pas l’ensemble
de la piscine
Le robot se déplace le long de la
paroi de la piscine
Le robot s’est arrêté de bouger au
milieu de la piscine, mais la tête
pivotante continue de tourner
Le robot se déplace lentement ou
ne se déplace pas du tout
Le robot est arrêté par l’aspiration provenant
de la vidange principale du sol de la piscine
Le robot a été arrêté par un obstacle ou de
grands plis au niveau de la bâche de la piscine
Vérifiez si quelque chose obstrue le nettoyeur. Retirez l’obstacle.
Si vous avez besoin d’aide, veuillez visiter la section assistance
de notre site web, www.bestwaycorp.com.
Éteignez le système de filtration (comme cela est indiqué dans le
manuel de filtration) au moins 15 minutes avant de mettre en
marche le robot.
Suivez les instructions pour ajuster le paramètre de la goupille de
verrouillage. Assurez-vous que le devant/l’arrière du robot se
trouve face à la paroi de la piscine au début.
Les algues rendent le sol de la piscine glissant,
ce qui porte le robot à tourner en cercle
Le compartiment à débris est plein ou
le couvercle du filtre est obstrué
La goupille de verrouillage n’est pas
correcte / l’orientation du robot n’est
pas la bonne au début
Le sens de déplacement est
interrompu par la circulation d’eau
générée par le système de filtration
Mettez hors tension le robot et inspectez le trou situé sous la tête pivotante pour voir
si le rotor est bloqué par des débris de plus grande taille. Si vous avez besoin d’aide,
veuillez visiter la section assistance de notre site web, www.bestwaycorp.com.
ATTENTION !Assurez-vous que le robot est éteint lorsque l’unité est en maintenance.
Mettez hors tension le robot et inspectez le trou situé sous la tête
pivotante pour voir si le rotor est bloqué par des débris de plus
grande taille. Si vous avez besoin d’aide, veuillez visiter la
section assistance de notre site web, www.bestwaycorp.com.
ATTENTION !Assurez-vous que le robot est éteint lorsque l’unité
est en maintenance.
Cause Possible
La batterie est presque épuiséeRechargez à nouveau le robot.
Éteignez le système de filtration comme cela est indiqué dans le manuel.
Nettoyez le compartiment à débris
Nettoyez le compartiment du filtre et rechargez le robot pendant 6 heures
Vérifiez et éliminez les débris de la roue.
Suivez les instructions pour ajuster la position de la goupille de verrouillage.
Frottez le fond de la piscine et les roues du robot pour éliminer les algues
Le rotor est coincé.
La bouche d’aspiration est obstruée
Le compartiment à débris est plein
De l’air est emprisonné à l’intérieur du robot
Ôtez les objets qui obstruent la bouche d’aspiration.
Nettoyez le compartiment à débris et le couvercle du filtre.
Le rotor est cassé
Le compartiment à débris est plein
La durée de fonctionnement est plus
courte que prévu
La roue est bloquée
La position de la goupille de
verrouillage n’est pas correcte.
Ôtez les objets qui obstruent la bouche d’aspirationLa bouche d’aspiration est obstruée
Le rotor est coincé
Solution
La tête pivotante peut tourner incessamment pendant quelques minutes lorsque
le robot plonge jusqu’au fond de la piscine.
Ce phénomène s’arrêtera dès que l’air capturé à l’intérieur du robot sera
progressivement libéré et le robot commencera alors à se déplacer normalement.
Nettoyez le compartiment à débris. Rincez la grille à l’eau pour
éliminer les petites particules. S’il est nécessaire de procéder à un
brossage, utilisez une brosse douce pour la nettoyer délicatement.
Remarque : vérifiez que le couvercle du filtre est à sa place
avant l’opération suivante
3. Retirez le bloc batterie pour exposer l’assemblage de cartes de circuits imprimés. Pour détacher le câble de
connexion de la batterie, appuyez sur le clip sur le connecteur et retirezle. REMARQUE : Enroulez
immédiatement le connecteur avec du ruban isolant afin d’éviter tout court-circuit dû au contact des deux fils.
Les déchets de produits électriques ne doivent pas être jetés avec les déchets ménagers. Veuillez les recycler dans les
structures existantes. Contactez les autorités locales ou votre revendeur pour des conseils en matière de recyclage.
1
2
57
Des débris s’échappent du robot
Des débris s'échappent au niveau
du couvercle du filtre
Le flotteur rond coule
Le robot ne parvient pas être
chargé / rechargé
Remplacez-le par un autre couvercle de filtre.
Si vous avez besoin d’aide, veuillez visiter la section assistance
de notre site web, www.bestwaycorp.com.
Détachez la tête pivotante et l’anneau amortisseur conformément
aux instructions du paragraphe « Comment retirer le bloc batterie
» dans le manuel, puis :
- Ôtez les débris coincés
- Vérifiez que l’anneau amortisseur et la plaque du fond sont
installés correctement (reportez-vous aux schémas ci-dessous)
- Examinez l’anneau amortisseur pour voir s’il est abîmé ou usé.
Remplacez-le par un neuf si nécessaire
Le clapet de la bouche d’aspiration (sur
la partie inférieure du robot) est
endommagé
Débris obstruant la bouche d’aspiration
et empêchant la fermeture du clapet
Remplacez-le par un nouveau flotteur. Si vous avez besoin
d’aide, veuillez visiter la section assistance de notre site web,
www.bestwaycorp.com.
Si vous avez besoin d’aide, veuillez visiter la section assistance
de notre site web, www.bestwaycorp.com.
ATTENTION ! NE REMPLACEZ la batterie par vous-même. Cela
pourrait entraîner des blessures graves voire mortelles et cela aurait
pour conséquence l’annulation de la garantie.
Si vous avez besoin d’aide, veuillez visiter la section assistance
de notre site web, www.bestwaycorp.com.
ATTENTION !Si vous utilisez le mauvais adaptateur externe, cela
aura pour conséquence une détérioration du robot/de la batterie
et une annulation de la garantie.
Assurez-vous que la base de charge est branchée avec
l'adaptateur externe et le robot de manière correcte et complète.
Reportez-vous au manuel d’instructions.
Le clapet de la bouche d'aspiration fonctionne comme une porte
pour empêcher que les débris ne s'échappent du compartiment à
débris. Si vous avez besoin d’aide, veuillez visiter la section
assistance de notre site web, www.bestwaycorp.com.
La station de charge n’est pas
totalement raccordée à l’adaptateur
externe et au robot
La tête pivotante ne tourne pas ou
tourne lentement de manière
notable
Le fonctionnement du robot dure moins
longtemps que ce qui est indiqué
Vérifiez et éliminez tout débris qui empêche le mouvement de l’ailette.
Ôtez les débris qui obstruent la bouche d’aspiration.
ΛΥΧΝΙΑ ΑΝΑΒΟΣΒΗΝΕΙ - Η ΙΣΧΥΣ ΤΗΣ ΜΠΑΤΑΡΙΑΣ ΘΑ ΤΕΛΕΙΩΣΕΙ ΜΕΣΑ ΣΕ 10 ΛΕΠΤΑ.
ΣΗΜΕΙΩΣΗ: ΜΟΛΙΣ ΑΡΧΙΣΕΙ Η ΦΟΡΤΙΣΗ ΤΟΥ ΡΟΜΠΟΤ, Η ΕΝΔΕΙΚΤΙΚΗ ΛΥΧΝΙΑ ΣΤΟΝ ΕΞΩΤΕΡΙΚΟ ΠΡΟΣΑΡΜΟΓΕΑ ΘΑ
ΓΙΝΕΙ ΚΟΚΚΙΝΗ. ΟΤΑΝ ΤΟ ΡΟΜΠΟΤ ΚΟΝΤΕΥΕΙ ΝΑ ΦΟΡΤΙΣΤΕΙ ΠΛΗΡΩΣ, Η ΕΝΔΕΙΚΤΙΚΗ ΛΥΧΝΙΑ ΘΑ ΓΙΝΕΙ ΠΡΑΣΙΝΗ.
67
Примечание.Подденьте, чтобы отсоединить, крышку поплавка и отмотайте трос на длину, равную глубине воды в бассейне плюс около 0,5 м (19,7 дюйма).
КРАСНЫЙ светодиод – заряжается
ЗЕЛЕНЫЙ светодиод – заряжено
5-6 h
31ВЫКЛ.2
4
1
24
3
5
Для бассейнов с
наименьшим
горизонтальным
размером 2 метра и
более.
Для бассейнов с
наименьшим
горизонтальным размером
2 метра и менее.
(Заводская настройка)
12
1
2
6
1.2.3.4.
Сборка и эксплуатация
ПРЕДУПРЕЖДЕНИЕ по зарядке
• Используйте только оригинальный внешний адаптер и входящий в комплект зарядный кабель.
• Перед подключением убедитесь, что робот-пылесос и зарядный порт чистые и сухие.
• Перед началом процесса зарядки убедитесь, что робот-пылесос выключен, передвинув
выключатель в положение OFF (ВЫКЛ.).
• Перед первым использованием полностью зарядите робот-пылесос (около 5-6 часов).
• Индикатор питания: Не горит – питание отключено/отсутствует
Горит – питание включено
Мигающий индикатор – батарея разрядится в течение 10 минут.
Примечание. Как только робот-пылесос начнет заряжаться, индикатор на внешнем адаптере
загорится красным. Когда робот-пылесос будет почти полностью заряжен, индикатор станет зеленым.
68
9
11
87
10
12
ВКЛ.
ВЫКЛ.
Примечание. Если поплавок
находится слишком далеко, чтобы
достать до него рукой, воспользуйтесь
входящим в комплект крючком.
Установите крючок на телескопическую
штангу (в комплект не входит), а затем
с помощью крючка достаньте поплавок.
1314
1
24
3
2.
2.
1.
69
Обслуживание и хранение
1. Во время хранения батарея разряжается за счет саморазряда. Перед хранением полностью зарядите робот-пылесос.
2. Подзаряжайте батарею минимум раз в три месяца, когда пылесос не используется.
• Отсоедините внешний адаптер от розетки электросети, а затем отсоедините зарядный кабель от внешнего адаптера и робота-пылесоса.
• Отсоедините принадлежности от робота-пылесоса. При необходимости промойте робот-пылесос и принадлежности свежей водой. НЕ используйте моющие средства.
• Перед тем как поместить робот-пылесос на хранение обязательно слейте из него всю воду.
• Очистите робот-пылесос и принадлежности влажной тканью и дайте им высохнуть.
• Храните их в хорошо проветриваемом месте вдали от солнечного света, тепла, источников возгорания, химических средств для бассейна и от детей. Температура
окружающего воздуха при хранении должна быть в пределах от +10°C до +25°C (50-77°F). ПРИМЕЧАНИЕ. Более высокая температура может сократить срок службы батареи.
Извлечение батарейного блока
Рекомендуемые инструменты (в комплект не входят): Отвертка.
1. Отсоедините верхнюю крышку (с установленной на ней поворотной головкой) Переверните
крышку вверх дном и отсоедините поворотную головку, повернув против часовой стрелки ее
Gebruikershandleiding.com neemt misbruik van zijn services uitermate serieus. U kunt hieronder aangeven waarom deze vraag ongepast is. Wij controleren de vraag en zonodig wordt deze verwijderd.
Product:
Spelregels forum
Om tot zinvolle vragen te komen hanteren wij de volgende spelregels:
lees eerst de handleiding door;
controleer of uw vraag al eerder door iemand anders is gesteld;
probeer uw vraag zo duidelijk mogelijk te stellen;
heeft u een probleem en al geprobeerd om dit op te lossen, vermeld dit erbij aub;
heeft u een oplossing gekregen van een bezoeker dan horen wij dat graag in dit forum;
wilt u een reactie geven op een vraag of antwoord, gebruik dan niet dit formulier maar klik op de knop 'reageer op deze vraag';
uw vraag wordt direct op de website gezet; vermijd daarom persoonlijke gegevens in te vullen;
Belangrijk! Als er een antwoord wordt gegeven op uw vraag, dan is het voor de gever van het antwoord nuttig om te weten als u er wel (of niet) mee geholpen bent! Wij vragen u dus ook te reageren op een antwoord.
Belangrijk! Antwoorden worden ook per e-mail naar abonnees gestuurd. Laat uw emailadres achter op deze site, zodat u op de hoogte blijft. U krijgt dan ook andere vragen en antwoorden te zien.
Abonneren
Abonneer u voor het ontvangen van emails voor uw Bestway 58620 Robot bij:
nieuwe vragen en antwoorden
nieuwe handleidingen
U ontvangt een email met instructies om u voor één of beide opties in te schrijven.
Ontvang uw handleiding per email
Vul uw emailadres in en ontvang de handleiding van Bestway 58620 Robot in de taal/talen: Nederlands, Duits, Engels, Frans, Italiaans, Portugees, Spaans, Pools, Zweeds, Fins als bijlage per email.
De handleiding is 7,81 mb groot.
U ontvangt de handleiding per email binnen enkele minuten. Als u geen email heeft ontvangen, dan heeft u waarschijnlijk een verkeerd emailadres ingevuld of is uw mailbox te vol. Daarnaast kan het zijn dat uw internetprovider een maximum heeft aan de grootte per email. Omdat hier een handleiding wordt meegestuurd, kan het voorkomen dat de email groter is dan toegestaan bij uw provider.
Stel vragen via chat aan uw handleiding
Stel uw vraag over deze PDF
Uw handleiding is per email verstuurd. Controleer uw email
Als u niet binnen een kwartier uw email met handleiding ontvangen heeft, kan het zijn dat u een verkeerd emailadres heeft ingevuld of dat uw emailprovider een maximum grootte per email heeft ingesteld die kleiner is dan de grootte van de handleiding.
Er is een email naar u verstuurd om uw inschrijving definitief te maken.
Controleer uw email en volg de aanwijzingen op om uw inschrijving definitief te maken
U heeft geen emailadres opgegeven
Als u de handleiding per email wilt ontvangen, vul dan een geldig emailadres in.
Uw vraag is op deze pagina toegevoegd
Wilt u een email ontvangen bij een antwoord en/of nieuwe vragen? Vul dan hier uw emailadres in.