58633
2
Verklein
Vergroot
Pagina terug
1/9
Pagina verder
11
Contents
Quick Reference Guide
Programme Chart
Preparing the Laundry
Selecting a Programme and Options
Starting and Completing a Programme
Changing a Programme
Interrupting a Programme
Daily Maintenance and Cleaning
Instructions for Use
Booklet
Before Using the Dryer / Connections
Electrical connection
Precautions and General Recommendations
Description of the Dryer
Drainage System
Door Reversibility / Child Safety Lock
Heat Exchanger
Troubleshooting Guide / After-Sales Service
12
Before Using the Dryer / Connections
1. Removing the packaging
and check
After unpacking, make sure
that the dryer is undamaged. If
in doubt, do not use the dryer.
Contact After-Sales Service or
your local retailer.
Keep the packaging materials
(plastic bags, polystyrene parts,
etc.) out of reach of children, as
they are potentially dangerous.
Remove the protective foil
from the control panel.
2. Electrical Connections
Electrical connections must be
carried out by a qualified
technician in compliance with
the manufacturer's instructions
and current standard safety
regulations.
Electrical connection must
comply with local Electricity
Board regulations.
Voltage information, power
consumption and the required
fuse protection is shown on the
rating plate mounted at the
rear of the dryer.
The manufacturer cannot
accept any liability for personal
injury or damage to property
resulting from failure to
adhere to these instructions.
The dryer must be earthed as
prescribed by law.
Do not use extension leads or
multiple adaptors.
Before any maintenance on the
dryer disconnect it from the
mains supply.
Do not operate the dryer if it
has been damaged during
transport. Contact one of our
After-Sales Service technicians.
Mains cables must be replaced
by an original cable and is only
to be carried out by a
technician from After-Sales
Service or an authorized
electrician.
After installation access to the
mains plug has to be
guaranteed, or the all-pole
disconnection has to be
possible with a switch.
3. Installation
Do not install your dryer where
it can be subject to extreme
conditions, such as: poor
ventilation, temperatures
around freezing or above
35° C.
Before running the first cycle
ensure the water container and
heat exchanger are correctly
positioned.
Only for water container top
version: if possible use the hose
supplied to drain the water
directly into the domestic
plumbing system. This will
avoid having to empty the
water container at the end of
each drying cycle since the
condensation water can be
directly drained away.
Take care not to install the
dryer on a deep-pile carpet.
Take care not to trap the mains
cable between the dryer and
the wall.
Stability:
When installing the dryer
always carefully level the dryer
adjusting the four feet and
check the correct levelling with
a spirit level.
To built in the dryer
Remove the work-top and
replace it with the Built-In kit
UBS 10 (according to Eec
Electrical Regulations), which
can be ordered at your dealer.
Stacking kit
Your dryer can be stacked on
top of your front loading
washing machine. To do this,
use stacking kit AMH 752,
available at your dealer.
Minimum housing
dimensions:
Width: 600 mm
Height: 850 mm
Depth: 600 mm
13
Electrical connection
1) For Great Britain only
Warning - this appliance
must be earthed
Fuse replacement
If the mains lead of this
appliance is fitted with a
BS 1363A 13amp fused plug,
to change a fuse in this type
of plug use an A.S.T.A.
approved fuse to BS 1362
type and proceed as follows:
1.
Remove the fuse cover (
A
)
and fuse (
B
).
2.
Fit replacement 13A fuse into
fuse cover.
3.
Refit both into plug.
Important:
The fuse cover must be
refitted when changing a
fuse and if the fuse cover is
lost the plug must not be
used until a correct
replacement is fitted.
Correct replacement are
identified by the colour
insert or the colour
embossed in words on the
base of the plug.
Replacement fuse covers are
available from your local
electrical store.
2) For the Republic of
Ireland only
The information given in
respect of Great Britain will
frequently apply, but a third
type of plug and socket is also
used, the 2-pin, side earth type.
3) Socket outlet / plug
(valid for both
countries)
If the fitted plug is not suitable
for your socket outlet, Please
contact Whirlpool Service for
further instruction. Please do
not attempt to change plug
yourself. This procedure needs
to be carried out by a qualified
Whirlpool technician in
compliance with the
manufactures instructions and
current standard safety
regulations.
14
Precautions and General Recommendations
1. Packing
The packing box may be fully
recycled as confirmed by the
recycling symbol.
2. Energy saving tips
Always dry a full load:
depending on the type of
laundry and the programme/
drying time.
By preference use the
maximum spin speed allowed
by your washing machine,
since draining the water
mechanically requires less
energy. You will save time
and energy when running
your drying cycle.
Do not overdry the laundry.
Clean the lint filter after
every
drying cycle.
Place your dryer in a room
with a temperature between
15° C and 20° C. In case of
higher temperature ventilate
the room.
Always select the correct
programme/drying time for
the load in order to obtain
the desired drying results.
Select the
gentle
option only
with small loads.
When drying cotton, for
example: dry
iron
dry
and
cupboard dry
loads together.
Start with the
iron dry
programme/drying time
setting, remove the laundry
to be ironed at the end of
that cycle and dry the
remainder of the load on the
cupboard dry
setting.
3. Disposing of packaging
and old Dryer.
The dryer is built from
reusable materials. The dryer
must be disposed of in
compliance with local waste
disposal regulations.
Before scrapping, cut off the
power cable so that the dryer
cannot be connected to the
mains.
4. Child safety:
Children must not be allowed
to play with the dryer.
5. General
recommendations:
Always set the programme/
time selector knob to the “0”
position after use. This
prevents the dryer from being
switched on accidentally.
Before cleaning or carrying
out maintenance, switch off
the dryer and disconnect it
from the mains supply.
To clean the outside of the
dryer, use a neutral
detergent and a damp cloth.
Do not use abrasive
detergents.
Wipe away lint from the door
seal and the door using a
damp cloth.
If the lint filter mesh is
clogged, clean it with water
and a soft brush.
Since lint can go through the
filter it is necessary to clean,
from time to time, the
complete filter area
(including below the filter)
with a brush, a damp cloth or
with a vacuum cleaner.
If necessary, the power cable
may be replaced with an
identical one obtained from
our After-Sales Service. The
power cable must only be
replaced by a qualified
technician.
EC Declaration of
Conformity
This dryer has been designed,
constructed and distributed in
compliance with the safety
requirements of EC Directives:
73/23/EEC Low Voltage
Directive.
89/336/EEC EMC Directive.
93/68/EEC CE Marking
Directive.
The dryer must only be used
in the household for the
prescribed uses.
15
Description of the Dryer
A.
Work top.
B.
Water Container.
C.
Contact pin.
D.
Door:
To open the door: pull the
handle.
To close the door: push
gently until closed.
E.
Filter.
F.
Child Safety Lock.
G.
Button for heat exchanger
flap opening.
H.
Heat exchanger.
I.
Drum light (if available).
Only comes on when door is
open (the programme /
time has to be selected).
Light off: set the
programme/time selector
knob to “0” position, or
press the option button.
A
C
D
F
E
G
H
B
I
Reminder - Maintenance
and Cleaning
Filter
Clean the lint filter at the
end of every drying cycle.
Open the door
Pull the filter upwards
Open the filter
Remove lint using a soft
brush or your fingertips
Close the filter
Push the filter back into
place.
Heat exchanger
Clean the heat exchanger at
least every 3 months (See
"CONDENSER" chapter).
How to clean the heat
exchanger see separate
chapter.
Wipe away any lint/fluff
from the door seal and
interior using a damp cloth.
16
Drainage System
For water container top
only
To avoid having to
empty the water
container at the end of
each cycle, the
condensation water can
be drained away.
Note:
if the drain hose is not
supplied, the optional accessory
AMH 883 kit, available at your
dealer, should be used.
The connection for direct
draining is at the rear of the
dryer.
A.
Place an absorbent cloth
underneath to collect water
spillage.
B.
Remove the hose located at
the lower rear part of the
dryer and insert it in the
nearby hole.
C.
Fix the hose (length: 1.5 m)
to the outlet connection.
The height difference
between the two drainage
connections should not
exceed 1m.
D.
To avoid siphoning, the end
of the hose must not be
immersed in the drain
water. Avoid bending and
twisting the hose.
B
C
17
Door Reversibility / Child Safety Lock
Door Reversibility
A.
Unplug the dryer.
B.
Open the door.
C.
Using a spanner, turn the
contact pin in the upper
part of the door by 90° and
remove it.
D.
Unscrew the 2 screws of the
door hinge and remove the
door.
E.
Removing the door lock:
Unscrew the 2 screws above
and below the door lock
system. Lift the door lock
from the bottom, sliding it
upwards about 1,5 cm and
remove it.
F.
Reverse the door:
G.
Fasten the door on the
desired side with the 2
screws.
H.
Insert the door lock system
on the opposite side of the
hinge fixation and push it
down 1.5 cm.
I.
Fix the 2 screws above and
below the door lock system.
J.
Take care not to reverse the
sense of the door lock
system. The child safety
must be above the locking
mechanism.
K.
Replace the contact pin in
the inside of the door (top).
Child Safety Lock
How to use the child
safety lock
1.
Open the door.
2.
Using a coin or a screwdriver,
turn the plastic screw (
J
)
clockwise 90°.
Slot vertical: the door
cannot be locked.
Slot horizontal: the door can
be locked.
C
C
D
J
E
E
18
Heat Exchanger
Before cleaning or
carrying out
maintenance, switch off
the dryer.
Clean the heat exchanger
at least every three
months, proceeding as
follows:
A.
Open the door and press
the heat exchanger flap
button on the bottom of
the door entrance.
B.
The heat exchanger flap
opens.
C.
Fold the heat exchanger
handle upwards to the
horizontal position and
remove the heat
exchanger.
D.
Clean the heat exchanger
under running water by
turning it around to reach
all sides.
E.
Wipe away dust and lint
from the seals and the heat
exchanger.
F.
Remove the lint in the heat
exchanger housing. Keep
the drainage hole (left side
in front in the housing) free
from lint.
G.
Replace the condenser in its
housing (TOP or HAUT
mark upwards) and press
the handle.
H.
Close the flap.
The heat exchanger aluminium
plates may become discoloured
over time.
A
B
C
D
19
Troubleshooting Guide / After-Sales Service
Troubleshooting Guide
If a fault occurs, before
contacting our After-Sales
Service, make the following
checks to try and remedy
the problem:
Drying takes too long /
laundry is not dry enough:
Was the correct programme
selected?
Was the inserted laundry too
wet (Washing machine spin
speed less than 800 rpm)?
Is the lint filter dirty (filter
indicator lamp on)?
Is the heat exchanger dirty?
(refer to the Instructions for
use)
Is the ambient temperature
too high?
The dryer does not operate:
(after a power failure and/
or interruption to the mains
supply, always press the
Start button).
Is the plug properly inserted
into the mains electricity
socket?
Is there a power failure?
Has the fuse blown?
Is the door well closed?
Has the programme been
selected?
Has the start delay option
been selected?
Has the
Start/Pause
button
been pressed?
Lint filter indicator lamp
light on:
Is the lint filter clean?
Is the water container empty?
Is the water container
correctly positioned?
Is the heat exchanger clean?
Water droplets underneath
the dryer:
Is the heat exchanger
correctly positioned?
Has any fluff on the heat
exchanger seal been wiped
away?
Has any fluff on the door seal
been wiped away?
Has the water container been
positioned correctly?
Replacing drum light bulb
(if supplied):
If the inside lamp does not
work, the bulb may be faulty.
Unplug the dryer.
Open the door and unsrew the
glass cover inside the drum.
Replace the faulty bulb with
a new one and srew the glass
cover back on.
Replacement bulb: Philips
15W, 230/240V, E14.
After-Sales Service
If, after carrying out the
above checks the
malfunction persists or
appears again, turn the
dryer off and call our
After-Sales Service (refer to
guarantee).
Please specify:
The nature of the fault.
The dryer type and model.
The service code (the number
after the word Service on the
adhesive rating plate) on the
right-hand side when the
door is open.
Your full address and phone
number.
2

Hulp nodig? Stel uw vraag in het forum

Spelregels
1

Forum

Bauknecht-TRKD6625
  • Hoe ziet de soort rood knopje eruit
    Ik zie niet waar het zit
    Mvg willy Gesteld op 2-11-2023 om 13:42

    Reageer op deze vraag Misbruik melden
  • ik moet op een lagere temperatuur drogen hoe doe ik dit?
    Gesteld op 6-1-2020 om 10:09

    Reageer op deze vraag Misbruik melden
  • mijn droger geeft een gepiep signaal voor pluimfilter maar die is gewoon zga. schoon
    binnen is het best warm maar hij droogt niet dan.
    kan iemand aub mij hierbij helpen?
    mvg Haak Gesteld op 15-1-2017 om 10:44

    Reageer op deze vraag Misbruik melden
    • ik heb toen het rubber (soort vilt) vervangen. deze rand slijt en sluit dan niet meer goed af. na het vervangen wat de (foutieve) pluis melding weg en hebben we een droger resultaat. filmpjes voor wisselen afdichting staan op internet Geantwoord op 26-2-2017 om 13:09

      Waardeer dit antwoord Misbruik melden
  • 't water, dat in 't reservoir (bak) hoort te komen, komt onderin terecht, waar al 't stof terecht komt
    wast kan hier de oorzaak van zijn Gesteld op 15-9-2015 om 17:16

    Reageer op deze vraag Misbruik melden
  • Zie het antwoord van 6-5-2012. Geantwoord op 4-10-2015 om 23:34

    Waardeer dit antwoord (3) Misbruik melden
  • Nu weet ik het antwoord nog niet waar kan ik die vinden Geantwoord op 12-10-2018 om 18:04

    Waardeer dit antwoord Misbruik melden
  • Wij hebben deze droger maar deze maakt heel veel lawaai weet iemand de oorzaak en oplossing Gesteld op 27-7-2014 om 12:26

    Reageer op deze vraag Misbruik melden
    • goed schoon maken bij die warmte element

      haal die warmte element eruit met stofzuiger + grijs electrolen buis (flex buis ) aan de mond van stofzuiger vast plakken met tape dan zuigen

      ik bedoel bij de ventilatoren (motor) links zit warmte element haal die eruit met stofzuiger recht zuiger
      Geantwoord op 28-7-2014 om 22:32

      Waardeer dit antwoord (7) Misbruik melden
  • Wij hebben hier ook last van gehad. in de afvoer van de lucht die naar de condensator onderin loop zat veel stof. ik heb deze met de stofzuiger uitgezogen en toen ging het lampje weer normaal werken Geantwoord op 28-7-2014 om 22:53

    Waardeer dit antwoord (5) Misbruik melden
  • Droger geeft aan dat pluizenfilter vol is terwijl dat niet zo is. Ook komt er geen water in de opvangladebak. Gesteld op 3-1-2014 om 13:03

    Reageer op deze vraag Misbruik melden
    • Wij hebben hier ook last van gehad. in de afvoer van de lucht die naar de condensator onderin loop zat veel stof. ik heb deze met de stofzuiger uitgezogen en toen ging het lampje weer normaal werken Geantwoord op 27-1-2014 om 13:43

      Waardeer dit antwoord (6) Misbruik melden
6
12
  • betreft Bauknecht wasdroger TRKD 6625 - ik ontvang alleen de gebruiksaanwijzing maar ik zoek de handleiding - heb nooit iets bij de machine ontvangen.

    alvast dank, met vriendelijke groet, Y.Pals Gesteld op 16-11-2012 om 16:28

    Reageer op deze vraag Misbruik melden
  • Ik heb bij mijn ouders van 88 jaar gezien dat zij de was drogen zonder dat het reservoir vol met water loopt. Het condenswater moet toch ergens blijven?
    Nu durven ze niet meer te drogen.
    Weet iemand een tip om dit probleem op te lossen?!
    Alvast nms mijn ouders bedankt!!! Gesteld op 6-11-2012 om 17:03

    Reageer op deze vraag Misbruik melden
  • Ik heb hetzelfde probleem, de was wordt ook niet warm. Gisteren de droger open gemaakt en blijkt dat er een thermosstaat stuk is. Vandaag even een nieuwe halen. Geantwoord op 28-12-2012 om 12:09

    Waardeer dit antwoord (7) Misbruik melden
  • Hoe kan ik de aandrijfriem vervangen, hoe moet deze precies worden teruggeplaatst? Gesteld op 4-6-2012 om 17:26

    Reageer op deze vraag Misbruik melden
    • mijn aandrijfriem van TRKD6625 wasdroger is gebroken,hoe ga ik deze vervangen,heeft iemand een tekening hoe ik de nieuwe moet plaatsen

      dank Rob Geantwoord op 5-1-2014 om 13:48

      Waardeer dit antwoord (23) Misbruik melden
  • hallo , ik heb een Bauknecht TRKD 6625 droger en sinds een tijdje als ik een wasje droog , komt het water niet meer in het opvangresvoir , maar beneden bij de het warmte element eruit . Wat kan het probleem zijn ? Gesteld op 27-11-2011 om 09:47

    Reageer op deze vraag Misbruik melden
  • Hoi , ik heb hetzelfde probleem . Ik heb de afvoerslang erop gezet en zo dacht ik het probleem op te lossen , maar niks is minder waar , het water blijft bij het warmte element eruit komen . Het kan zijn dat hij egens verstopt zit en een andere weg zoekt om af te voren , vis dat element . Dus ik ben nog geen stap verder . Mocht jij de oplossing vinden , dan hoor ik het graag van je . Alvast bedankt !!!! Geantwoord op 12-2-2012 om 18:25

    Waardeer dit antwoord (8) Misbruik melden
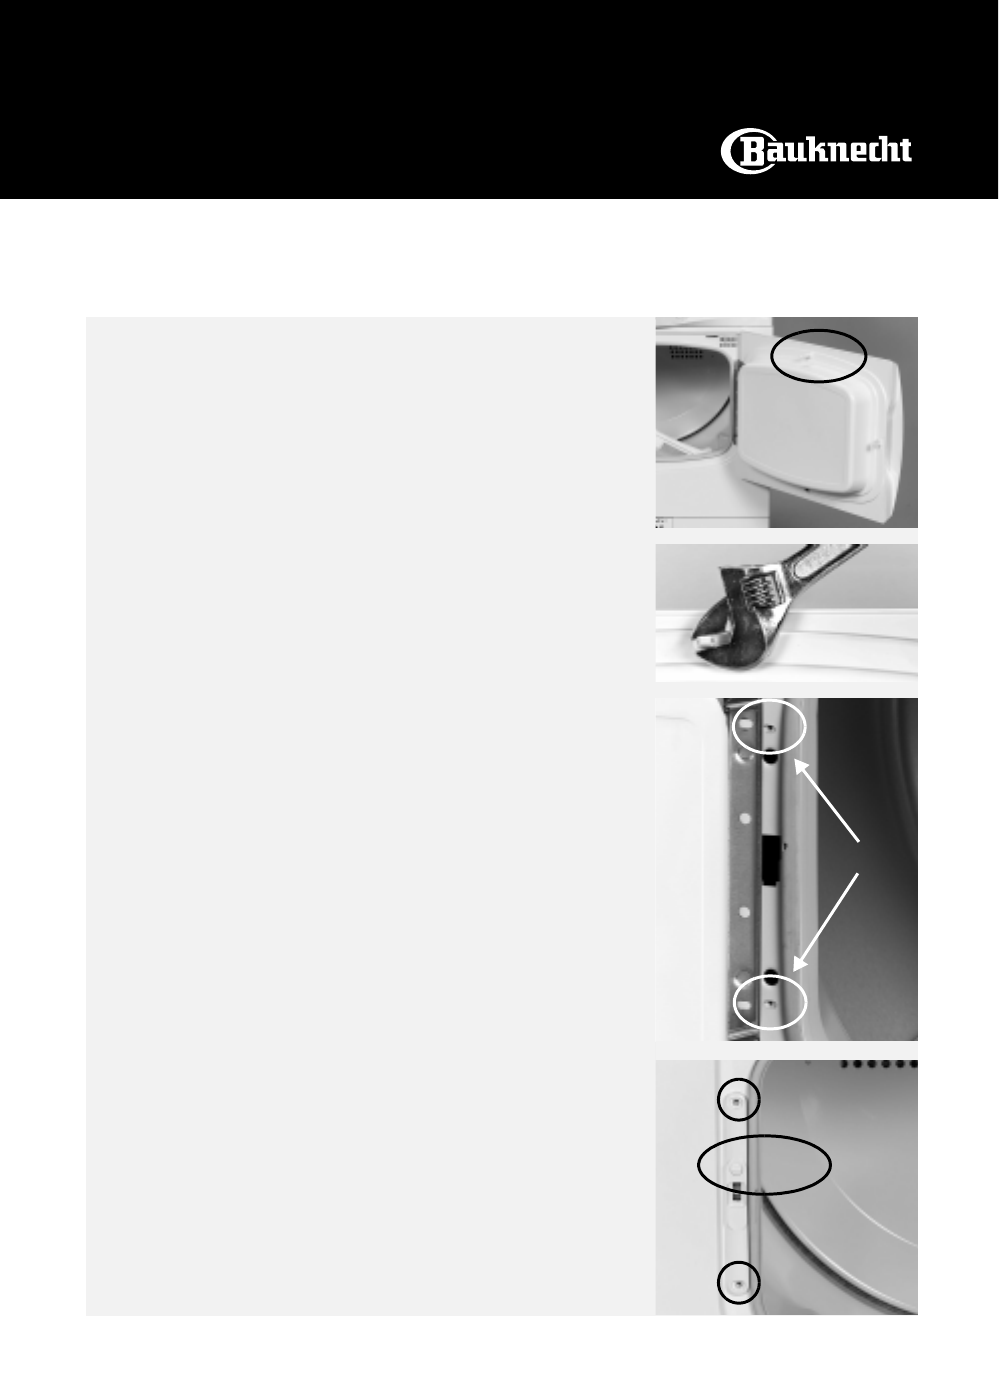
  • wanneer je de condenser er uithaalt dan zie je links voorin een klein gaatje, met een wit/grijze afdichtring.
    hoogswaarschijnlijk is dit gat verstopt met pluisjes, dit kun je er uitpeuteren met een tandenstoker, daarna de hele ruimte van de condenser schoonmaken van pluis, en uw probleem is verholpen.

    let op: wanneer er al water uitkomt, dan een paar handdoeken voor de machine leggen, want wanneer je de condenser eruit haalt, komt er nog veel meer water.
    Geantwoord op 6-5-2012 om 14:43

    Waardeer dit antwoord (15) Misbruik melden
  • Mijn pluizenfilterlampje gaat branden ( maar is schoon ) en de warmtewisselaar komt water in?

    Iemand een idee? Gesteld op 12-11-2011 om 18:28

    Reageer op deze vraag Misbruik melden
    • Ik heb hetzelfde probleem; opvangbak onder de droger waar de pomp inzit schoon gemaakt, maar pobleem is niet verholpen. Is pomp stuk? Hoe kan ik dat meten en wanneer moet die lopen? Geantwoord op 9-4-2012 om 20:25

      Waardeer dit antwoord (10) Misbruik melden
  • Wie weet hoe ik de riem van de bauknecht droger trkd6625 tussen de spanrol krijg Gesteld op 3-5-2011 om 19:44

    Reageer op deze vraag Misbruik melden
    • schroef alle vijzen los aan de achterkant.
      schuif de bovenplaat naar achteren.
      DE 2 overige schroeven dien je los te maken zodat je de riem rond de trommel kunt steken.
      DE riem loopt langs de binnenkant van de spanrollen en rond de motor.
      De spanrollen kun je opentrekken. Geantwoord op 25-5-2011 om 03:29

      Waardeer dit antwoord (2) Misbruik melden
18
  • Mijn bauknecht wasdroger TRKD6625 maakt veel lawaai waar kan dat aan liggen Gesteld op 9-10-2010 om 14:15

    Reageer op deze vraag Misbruik melden
  • mijn wasdroger maakt ook heel veel lawaai (soort geratel alsof er iets los zit). Ik zie dat er geopperd wordt om naar de spanrol te kijken....ehm maar waar zit die? onderin de machine? en wat kan ik daar aan zien?

    Geantwoord op 19-4-2011 om 09:59

    Waardeer dit antwoord (3) Misbruik melden
  • Ik heb een Bauknecht trak 6330.
    Het probleem is dat deze zeer snel aangeeft dat het pluizenfilter vuil is. Per droogbeurt wel 3 a 4 keer.
    De verwarming stopt er dan ook mee.
    Ik vermoed dat het iets in de printplaten is.
    Wie kan hier helderheid over geven?
    pvedette Gesteld op 6-7-2010 om 15:27

    Reageer op deze vraag Misbruik melden

Misbruik melden

Gebruikershandleiding.com neemt misbruik van zijn services uitermate serieus. U kunt hieronder aangeven waarom deze vraag ongepast is. Wij controleren de vraag en zonodig wordt deze verwijderd.

Product:

Bijvoorbeeld antisemitische inhoud, racistische inhoud, of materiaal dat gewelddadige fysieke handelingen tot gevolg kan hebben.

Bijvoorbeeld een creditcardnummer, een persoonlijk identificatienummer, of een geheim adres. E-mailadressen en volledige namen worden niet als privégegevens beschouwd.

Spelregels forum

Om tot zinvolle vragen te komen hanteren wij de volgende spelregels:

Belangrijk! Als er een antwoord wordt gegeven op uw vraag, dan is het voor de gever van het antwoord nuttig om te weten als u er wel (of niet) mee geholpen bent! Wij vragen u dus ook te reageren op een antwoord.

Belangrijk! Antwoorden worden ook per e-mail naar abonnees gestuurd. Laat uw emailadres achter op deze site, zodat u op de hoogte blijft. U krijgt dan ook andere vragen en antwoorden te zien.

Abonneren

Abonneer u voor het ontvangen van emails voor uw Bauknecht TRKD6625 bij:


U ontvangt een email met instructies om u voor één of beide opties in te schrijven.


Ontvang uw handleiding per email

Vul uw emailadres in en ontvang de handleiding van Bauknecht TRKD6625 in de taal/talen: Engels als bijlage per email.

De handleiding is 0,41 mb groot.


U ontvangt de handleiding per email binnen enkele minuten. Als u geen email heeft ontvangen, dan heeft u waarschijnlijk een verkeerd emailadres ingevuld of is uw mailbox te vol. Daarnaast kan het zijn dat uw internetprovider een maximum heeft aan de grootte per email. Omdat hier een handleiding wordt meegestuurd, kan het voorkomen dat de email groter is dan toegestaan bij uw provider.

Stel vragen via chat aan uw handleiding

Stel uw vraag over deze PDF

Andere handleiding(en) van Bauknecht TRKD6625

Bauknecht TRKD6625 Snelstart handleiding - Nederlands - 2 pagina's

Bauknecht TRKD6625 Gebruiksaanwijzing - Nederlands - 8 pagina's

Bauknecht TRKD6625 Snelstart handleiding - Deutsch - 2 pagina's

Bauknecht TRKD6625 Gebruiksaanwijzing - Deutsch - 8 pagina's

Bauknecht TRKD6625 Snelstart handleiding - English - 2 pagina's

Bauknecht TRKD6625 Gebruiksaanwijzing - Français - 8 pagina's


Uw handleiding is per email verstuurd. Controleer uw email

Als u niet binnen een kwartier uw email met handleiding ontvangen heeft, kan het zijn dat u een verkeerd emailadres heeft ingevuld of dat uw emailprovider een maximum grootte per email heeft ingesteld die kleiner is dan de grootte van de handleiding.

Er is een email naar u verstuurd om uw inschrijving definitief te maken.

Controleer uw email en volg de aanwijzingen op om uw inschrijving definitief te maken

U heeft geen emailadres opgegeven

Als u de handleiding per email wilt ontvangen, vul dan een geldig emailadres in.

Uw vraag is op deze pagina toegevoegd

Wilt u een email ontvangen bij een antwoord en/of nieuwe vragen? Vul dan hier uw emailadres in.


Info