139436
5
Verklein
Vergroot
Pagina terug
1/56
Pagina verder
HDR 2
Guide
Contents
Introducing the hard disc recorder and Beo4, 4
Find out how to operate the hard disc recorder with the Beo4 remote control and
bring up the menus on your television screen.
Daily use,
9
Find out about how to use the hard disc recorder at the BASIC (default) feature
level, including how to record programmes and play them back, how to view the
content list and the list of timed recordings. This chapter also contains information
about how to pause an on-going programme and replay it.
Advanced operation, 23
Find out about additional functions available when you set the feature level to
ADVANCED, such as how to activate parental lock and place your recordings in
Groups. The chapter also contains information about how to operate a connected
set-top box.
Preference settings, 36
Find out how to set, for example, a standard duration for recordings, time and date,
feature level and menu language.
Set up the hard disc recorder, 38
Find out how to handle, place and set up your product. This chapter also contains
an overview of the socket panel.
On-screen menus, 42
Overview of the on-screen menus.
3
Introducing the hard disc recorder and Beo4
With the Bang & Olufsen hard disc
recorder, you do not need to use
video tapes any more. Instead, you
can store recordings on the built-in
hard disc.
If the hard disc is full, the recorder
automatically makes space available
for new recordings. You can prevent
deletion of your most important
recordings, so they can only be
deleted on your command.
The hard disc recorder also makes it
possible for you to pause an on-going
programme for a short break and replay
it later, so you do not miss anything.
Record programmes
The hard disc recorder gives you the opportunity
to record and store TV, Satellite (DTV*) and
set-top box (STB) programmes on the hard disc.
You decide whether to store them temporarily
or permanently. The manual and timed
recordings you make are stored in HARD DISC
CONTENT, and the on-going programs you
pause and replay are put temporarily in a
three-hour replay buffer. If you wish, you can
move saved programmes from the buffer to
HARD DISC CONTENT.
HARD DISC CONTENT ALL
GO
THE SOPRANOS 12:1 4 17 JUN 1:34
CROCODILE HUNTER 9:12 17 JUN 1:00
WRC RALLY 12:00 14 JUN 1:12
AU
STRALIAN OPEN 9:00 13 JUN 3:25
SAT 117 23:00 29 MAY 2:55
TV 24 18:00 24 MAY 1:05
V.
AUX 4 23:10 22 MAY 12:30
DAYS OF THUNDER 22:00 20 MAY 1:55
CASABLANCA 21:00 13 APR 2:15
edit group
options pla
y
4
With the hard disc recorder, you do not have to clutter up your home with piles of video tapes. You can
store your recordings on the hard disc and bring up an overview of recordings on your television screen
at any time.
*NOTE! On some Beo4 remote controls, the DTV
button is called SAT and the V MEM button is
called V TAPE.
Replay buffer HARD DISC
CONTENT
TV LIGHT RADIO
DTV DVD CD
V MEM RECORD A MEM
7 8 9
4 5 6
TEXT
0
MENU
1 2 3
LIST EXIT
STOP
GO
The Beo4 remote control included with your
television gives you access to all functions.
When a function is in use, you are informed
via displays on Beo4, on the recorder or on
the television screen.
When switched on from standby, the hard
disc recorder takes up to 35 seconds to start
up. During this time, you can use the menu
system, but you can neither play recordings
nor make new recordings.
Switch on the hard disc recorder and begin
playback of a recording.
On some Beo4 remote controls, the V MEM
button is called V TAPE
Press twice to start a manual recording of the
selected source, such as TV
Enter data in on-screen menus, select a program
number, and enter a point in time to step to in a
recording
Move through menu options. During playback,
skip forward or backward in a recording one
minute at a time. Step between frames while
playback is paused
Enter data in on-screen menus. Step between
recordings during playback
Accept and store instructions and settings. Press
and hold to view the recordings you have stored*
Go back one menu level. Pause an on-going
program. Press to pause playback of a recording,
and press again to stop playback completely
The Beo4 display window shows the source you
have selected
Cue backward during playback or replay
Cue forward during playback or replay
Protect a recording from being deleted
Play a recording or replay an on-going programme
slowly. Start recording a programme
Return to the recorder’s main menu from any sub-
menu. Remove playback information from the
screen
Adjust sound volume; press in the middle to mute
the sound
Switch the recorder and the television to standby
V.MEM
V.TAPE
EXIT
V MEM
RECORD
0
9
GO
STOP
5
*NOTE! This feature is not available with
all televisions.
TIMER
Indicates that a timed recording has been
programmed into the recorder.
TIMER remains on during standby, and flashes
if a timer recording can not be executed.
RECORD
‘Recording in progress’ indication.
RECORD flashes if a manual recording can not be
executed for some reason – for example, if there
is a conflict with a timed recording.
REPLAY
The hard disc recorder allows you to ‘pause’ the
current programme if, for example, you wish to
take a short break, and replay the programme later.
REPLAY indicates that the current source, such as
V.TUNER, is being replayed from the three-hour
buffer on the hard drive.
For further information about how to replay an
on-going program, refer to the chapter ‘Pause
and replay an on-going program’ on page 20.
(Standby indicator)
The indicator shines red when you switch off the
recorder. The indicator shines green when the
recorder is in use. The indicator flashes red and
green if the recorder is overheating.
Displayed information and menus
The display on the recorder informs
you about the current status of the
recorder.
It tells you if you are replaying an
on-going program, if there are timed
recordings waiting to be executed,
and if a recording is in progress.
If two recordings overlap or if a
recording can not be executed,
this is indicated as well.
Operation of the hard disc recorder is
guided by on-screen menus accessible
via the main menu. In the menus,
move the cursor from item to item.
For each item, information can be
keyed in directly or you can browse
through the options available.
For further information, refer to the
chapter ‘On-screen menus’ on page 42.
TIMER RECORD REPLAY
How to use the on-screen
menus …
Press V MEM* then the green
button to switch on the hard disc
recorder and bring up the main
menu.
Press to move between the
different menu options
Press to reveal different settings
Press to enter data in a menu
Press to bring up a sub-menu or
store a setting you have made
Alternatively, press a coloured
button to select an option listed
in the information field
Press to return to the previous
menu
Press EXIT or V MEM to leave the
menu system and return to the
current source
The first menu in the menu system is the main
menu, where you can access the content of the
hard disc, program a timed recording, view timers,
change settings, switch on V.TUNER (the TV tuner
built into the hard disc recorder*), switch on a
connected set-top box or DVD player, and start or
stop a recording.
You can also bring up the hard disc recorder’s
menu system via the television’s main menu. Press
MENU, select V MEM or V TAPE with the arrow
buttons, and press GO.
*To be able to access V.TUNER, you must first set
the REPLAY option in the SETUP menu to either
BASIC or EXTENDED. For further information, refer
to the chapter ‘Preference setings’ on page 36.
V MEM
0
9
GO
STOP
EXIT
V MEM
MENU
HARD DISC CONTENT
TIMER PROGRAMMING
TIMER INDEX
SETUP
V.
TUNER
STB
RECORD
menu st
b
v.
tuner record
7
Menu
name
Information
field
Menu
options
*NOTE! On some Beo4 remote controls,
the V MEM button is called V TAPE.
8
Daily use
Record a programme, 10
Timer recording
Check the Timers already set
Record here and now
Timer recording via teletext
Play a recording, 14
Automatic playback
Select a recording
Play a recording
Pause and stop playback
Browse through your recordings
Edit recordings, 18
Protect a recording
Delete a recording
Pause and replay an on-going programme, 20
Pause a programme
Replay a programme
About recording
About switching sources
Copy from the buffer to the hard disc
This chapter describes the features
you might use on a daily basis. These
features are available at the BASIC
feature level, which is the default
setting from the factory.
The hard disc recorder has two
sets of features – a basic set and
an advanced set. The content of the
menu system depends on which set
you choose.
The features available at the BASIC
feature level are available at the
ADVANCED level as well.
For further information about the
FEATURE LEVEL menu, refer to the
chapter ‘Preference settings’ on
page 36.
9
Record a programme
You can make the hard disc recorder
record an available source or
programme at any time you specify.
The hard disc recorder starts and
stops the recording automatically.
You can make a Timer – a timed
recording – which takes place once,
or on certain days of the week. Enter
as many as 15 Timers at one time.
Your stored Timers are listed in the
TIMER INDEX. Here, you can edit or
delete your Timers.
You can also record the current
programme here and now.
To ensure that your Timers are executed
correctly, set the built-in clock to the
correct time and date. For further
information about the clock, refer to
the chapter ‘Preference settings’ on
page 38.
Set a Timer in the TIMER PROGRAMMING
menu. Here, you select the source to be
recorded, the programme’s start time, the
stop time and the date or days of the week
that the programme is shown.
Program a Timer …
> Press V MEM* and then the green button
to
bring up the hard disc recorder’s main menu
> Press
to highlight TIMER PROGRAMMING.
> Press GO to bring up the menu for setting
a timed recording. SOURCE is highlighted.
> Press
or to step from option to option.
> Use the number buttons or
or to enter
information for your timed recording; source,
program number, stop time, date, and so on.
To program a daily or weekly Timer, highlight DATE
and press the green button. DATE changes to
WEEKDAYS.
> Press EXIT to leave the menu, or …
> Press GO to store the recording.
Note that you cannot record programs
copy-protected by Macrovision.
The TIMER PROGRAMMING menu contains
additional options when you set the FEATURE
LEVEL to ADVANCED. For further information
about the content of the TIMER PROGRAMMING
menu, refer to the chapter ‘On-screen menus’ on
page 44.
Timer recording
TIMER PROGRAMMING
GO
SOURCE V.TUNER
PROGRAM 1
START TIME 14:41
STOP TIME 15:41
DATE THU 26 JUN
PROTECTION OFF
store
10
*NOTE! On some Beo4 remote controls, the V MEM
button is called V TAPE.
You can check the Timers that are waiting to
be executed, as well as edit or delete them. If
the Timers overlap, this is indicated when the
Timer is stored and shown in the
TIMER INDEX.
Your programmed Timers (those set for a
specific date) are listed chronologically, with
the next Timer to be executed appearing at
the top of the list. The daily and weekly
Timers appear at the bottom of the list. Each
Timer is identified by source, programme
name (if available), start and stop time and
date or day of the week.
> Press V MEM* and then the green button to
bring up the hard disc recorder’s main menu
> Press
to highlight TIMER INDEX.
> Press GO to bring up the list of Timers.
> Press
or to highlight a Timer.
To edit a highlighted Timer …
> Press GO to be able to edit the Timer.
> Press
or to change, for example, start and
stop times, date or program number.
> Press
or to step through the options.
> Press EXIT to leave the menu, or …
> Press GO to store the Timer and return to the list.
It is possible to edit a Timer while it is being
executed, but the SOURCE, PROGRAM and
QUALITY fields are inaccessible.
To delete a highlighted Timer …
> Press
to delete the Timer.
> Press the yellow button to confirm, or press
to move it back into the list.
> Press EXIT to leave the menus, or select another
Timer to delete.
Red start and stop times indicate which recordings
overlap.
Abbreviations for days of the week:
M … Monday
T … Tuesday
W … Wednesday
T … Thursday
F … Friday
S … Saturday
S … Sunday
Check the Timers already set
TIMER INDEX
GO
TV 23 12:25-13:00 17 JUN
TV TV 2 DK 14:00-14:45 17 JUN
V.AUX THE SOPRANOS 22:00- 23:20 19 JUN
TV MTV 12:25-12:00 21 JUN
V.AUX 2 121 22:00-23:20 25 JUN
SAT 1222 2:00- 3:20 25 AUG
V.AUX AUSTRALIA 12:15-12:30 25 AUG
SAT 43 23:55- 2:15 M-W---S
SAT 123 14:00-15:15 M--TF--
SAT CROCODIL 16:10-17:15 -T-TF-S
TV MTV 18:00-18:30 -T-TF-S
SAT WRC RALL 13:00-13:45 ---TF--
delete
edit
11
NOTE! If timed recordings of STB programs are
not executed, the cause may be that the set-top
box is slow to switch itself on. This can be helped
by changing a setting in a service menu. Contact
your Bang & Olufsen retailer.
>> Record a programme
There are two ways to record a programme
here and now. One allows you to watch a
source, such as TV, while recording another
source, such as STB. The source you want to
record must be built into your television (such
as TV) or connected directly to it (such as STB).
If you start a recording this way, you can watch
another source while recording is going on,
but not a previous recording. A second way
allows you to watch one recording while
making another.
If you start a manual recording from the hard
disc recorder main menu, you can then watch
a second recording at the same time.
Note that you can not start a new recording
if there is a recording already in progress, or
if the hard disc is full of protected recordings.
V.TUNER is only accessible if you set the REPLAY
option in the hard disc recorder SETUP menu to
BASIC or EXTENDED. For further information,
refer to the chapter ‘Preference settings’ on page
38.
If you start a recording while the hard disc recorder
is in standby, recording is delayed by the amount
of time it takes for the hard drive to start – up to
35 seconds.
Record a source and watch
another source at the same
time …
Press RECORD twice. The hard
disc recorder begins recording
the current programme
To watch another source during
recording, just select the desired
source on Beo4, such as DVD
Press V MEM* and then STOP
twice to stop a recording
Press to switch the system to
standby.
You can not watch one STB
programme while recording
another.
Make a recording and view a previous
recording at the same time …
> Press V MEM*, then the green button to bring
up the main menu.
> Press
to highlight a source, such as V.TUNER
(for TV programmes) or STB (for programmes
from a set-top box) and press GO to switch it
on.
> Select the program you wish to record. Press
or to step between programs or use the
number buttons to select a program directly.
> Press V MEM*, then the green button to bring
up the main menu once more.
> Press
to highlight RECORD and press GO to
start the recording. RECORD appears in the
display. You can now play a recording stored in
HARD DISC CONTENT.
> Press V MEM*, then the green button to bring
up the main menu.
> Press GO to bring up the HARD DISC CONTENT
menu.
> Press
or to highlight a previous recording
and press GO to start playback.
To stop a recording …
> Press V MEM*, then the green button to bring
up the main menu.
> Press to highlight STOP RECORDING and
press GO
.
Record here and now
RECORD
RECORD
DVD
V MEM
STOP
STOP
12
*NOTE! On some Beo4 remote controls,
the V MEM button is called V TAPE.
With some Bang & Olufsen televisions, it is
possible to start a recording by pressing RECORD
twice, and then watch a second recording while
the first is being made.
The way to determine if your television supports
this type of simultaneous playback and recording
is to do the following:
> Press RECORD twice to start a recording.
> Select another source to watch, such as DVD.
> Press V MEM. If playback begins automatically,
your television supports simultaneous playback
and recording.
Timer recording via teletext
Recordings can be programmed via the
on-screen menu or directly via the relevant
teletext page.
> Press TV to switch on TV.
> Press TEXT to switch on Teletext. With some
televisions, you can press RECORD to bring up
an on-screen menu, use
or to move the
cursor until TELETEXT is highlighted and press GO.
> Find the teletext page you want.
> Press RECORD or MENU to be able to select a
programme to record, or use to move to REC
on the teletext menu bar and press GO
.
> Press
or to move to the start time.
> Press GO to select the chosen start time.
> Press GO to select the stop time, you can
change the stop time by pressing and include
two or three programmes in a row.
> Check the status line for the recording, if
necessary, use or or the number buttons
to change and
or to move between the
entered data.
> Press GO to store the Timer recording.
PROGRAMMING STORED indicates that your
Timer is stored.
We recommend that you check the date of your
Timers in the Timer Index after storing them. This
is described on page 11.
If you have selected V.TUNER or a connected set-
top box as your source, teletext services may
either be severely limited – for example, without
number input – or they may be inaccessible. Select
TV as your source before programming a Timer
recording via teletext.
13
Play a recording
In playback situations, the hard disc
recorder behaves exactly like a video
tape recorder.
If you switch on the hard disc recorder
and wait a few seconds, playback of
stored recordings begins automatically.
If you switch it on from standby, the
hard disc recorder takes up to 35
seconds to start up. During this time,
you can use the menu system, but not
play recordings.
Browse through your stored recordings
in an on-screen menu.
Unless otherwise instructed, the
hard disc recorder plays the selected
recording through to the end. The
recording is then paused.
When you select a recording to play, the hard
disc recorder automatically resumes playback
from where you left off the last time the
same recording was played. If you have
viewed the recording to its end, playback
starts from the beginning.
Select a recording …
> Press V MEM* then the green button
to bring
up the hard disc recorder’s main menu.
> Press GO to bring up the HARD DISC CONTENT
menu.
> Press
or to highlight the recording you
wish to play. A
at the bottom of the list or
a at the top of the list indicates that more
recordings are available
> Press GO to play the selected recording.
Playback information – the time elapsed and
the total length of the recording – appears
briefly on the screen.
Playback information can be brought up at any
time during playback by pressing GO. To remove
playback information, press EXIT or wait three
seconds.
The HARD DISC CONTENT menu can be brought
up during playback by pressing and holding GO.
The bar at the top indicates how full the hard disc
is. A red dot indicates if a recording is protected.
For further information about protection, refer to
‘Edit recordings’ on page 18.
For automatic playback of recordings …
Press V MEM* to switch on the hard disc recorder.
Playback of the last recording viewed begins
automatically from where you left off. However,
other recordings may be played back instead:
If you have made timed recordings since the last
time you viewed a recording, the newest timed
recording is played from the beginning;
If a timed recording is in progress, it is played
from the beginning. This does not interrupt the
recording process!
Select a recording
HARD DISC CONTENT
GO
THE SOPRANOS 12:14 17 JUN 01:34
CROCODILE HUNTER 9:12 17 JUN 1:00
WRC RALLY 12:00 14 JUN 1:12
AUSTRALIAN OPEN 9:00 13 JUN 3:25
SAT 117 23:00 29 MAY 2:55
TV 24 18:00 24 MAY 1:05
V.AUX 4 23:10 22 MAY 12:30
DAYS OF THUNDER 22:00 20 MAY 1:55
CASABLANCA 21:00 13 APR 2:15
delete
protection on play
14
*NOTE! On some Beo4 remote controls,
the V MEM button is called V TAPE.
During playback, you can cue through a
recording forwards or backwards, play the
recording in slow motion, and step frame-by-
frame or minute-by-minute through a recording.
Play and change between
recordings …
Press to play the selected
recording
Press
or to switch to the
previous or next recording
Use the number buttons to enter
a specific point in time to go to
in the recording
Press
or repeatedly to step
minute-by-minute forwards or
backwards through a recording
Press the green button to cue
backwards during playback.
Press again to change speed
Press the yellow button to cue
forwards during playback. Press
again to change speed
Press the blue button to start
slow playback. Press again to
change speed
Backwards slow playback is not
possible.
Pause and stop playback of a
recording …
Press to pause playback
From pause mode, press
or
to step frame-by-frame
forwards or backwards through
a recording
Press STOP again to stop
playback completely. The HARD
DISC CONTENT menu appears
Press to resume playback
When playback has been paused
or the picture has remained
unchanged for eight minutes,
the hard disc recorder
automatically dims the picture
contrast and brightness.
Play a recording
STOP
STOP
GO
GO
0
9
15
During playback, you can see a short list of
recordings. The recording being played is
highlighted.
To browse through your recordings …
> During playback, press GO twice. A menu
appears on the lower half of the screen, and the
current recording is highlighted.
> Press
or to browse through the other
recordings. The highlighted recording plays in
the background.
> Press GO to select a recording for playback. The menu for browsing through recordings. The
current recording is highlighted, and you can
browse through recordings on the hard disc. Up
to five recordings can be shown at one time.
>> Play a recording
Browse through your recordings
THE SOPRANOS 12:14 17 JUN 1:34
CROCODILE HUNTER 9:12 17 JUN 1:00
WRC RALLY 12:00 14 JUN 1:12
AUSTRALIAN OPEN 9:00 13 JUN 3:25
SAT 117 23:00 29 MAY 2:55
16
NOTE! You can browse through recordings
in Groups if you have set FEATURE LEVEL to
ADVANCED and have placed recordings in the
predefined Groups. For information about how
to adjust the feature level, refer to the chapter
‘Preference settings’ on page 36. For information
about how to place recordings in Groups, refer
to the chapter Use Groups’ on page 24.
17
Protected recordings are excluded from
the space management function under all
circumstances. If the hard disc is full and all
recordings are protected, you cannot make
timed recordings or manual recordings. In
addition, any recording in process stops
automatically when the capacity of the
hard disc is reached.
To protect your recordings …
> Press V MEM* then the green button
to bring
up the hard disc recorder’s main menu.
HARD DISC CONTENT is already highlighted.
> Press GO to bring up the menu.
> Press
or to highlight the recording you
wish to protect.
> Press the red button to protect the recording.
To cancel protection, press the red button again.
> Press EXIT to leave the menu.
In the HARD DISC CONTENT menu you can select
recordings you wish to protect, as well as delete
unwanted recordings.
Edit recordings
If the hard disc is full and you
program a timed recording or initiate
a manual recording, the hard disc
recorder automatically makes room
for the new recording by deleting old
recordings.
However, you can protect your most
important recordings by excluding
them from this feature.
You can also delete recordings at any
time if you wish to manage hard disc
space yourself.
Protect a recording
HARD DISC CONTENT
GO
THE SOPRANOS 12:14 17 JUN 01:34
CROCODILE HUNTER 9:12 17 JUN 1:00
WRC RALLY 12:00 14 JUN 1:12
AUSTRALIAN OPEN 9:00 13 JUN 3:25
SAT 117 23:00 29 MAY 2:55
TV 24 18:00 24 MAY 1:05
V.AUX 4 23:10 22 MAY 12:30
DAYS OF THUNDER 22:00 20 MAY 1:55
CASABLANCA 21:00 13 APR 2:15
delete
protection on play
18
*NOTE! On some Beo4 remote controls,
the V MEM button is called V TAPE.
You can delete at any time any recordings you
do not want, including protected recordings.
To delete a recording …
> Press V MEM* then the green button
to bring
up the hard disc recorder’s main menu.
HARD DISC CONTENT is already highlighted.
> Press GO to bring up the menu.
> Press
to highlight the recording you wish to
delete.
> Press
to be able to delete the recording – the
recording is then shown in yellow.
> Press the yellow button to confirm, or press
to move the recording back into the list.
> Select another recording to delete, or press
EXIT to leave the menu.
About space management and protection
The hard disc recorder has a space management
feature which, when necessary, automatically
makes space for manual and timed recordings.
It does so by deleting the required amount of
content on the hard disc. The following principles
apply:
Protected recordings are never deleted.
Recordings that have been viewed or edited are
deleted before recordings that have not been
viewed or edited.
The oldest recordings are deleted first.
The maximum number of recordings that can be
stored on the hard disc is 300.
Timed recordings are not executed if the hard
disc is full and all recordings are protected, and
any recordings in progress are stopped auto-
matically when the hard disc capacity is reached.
Delete a recording
19
*NOTE! On some Beo4 remote controls, the V MEM
button is called V TAPE.
Pause and replay an on-going programme
The hard disc recorder lets you take
a break in the middle of a TV or STB
programme without missing any of it.
Just pause the programme and
resume it when you are ready.
The hard disc recorder begins saving the
current programme in a three-hour
buffer the moment you switch on a
source, so you can replay what you
missed during the break. The hard
disc recorder continues saving the
programme during replay, so you
are sure to see the entire programme.
You can switch directly to the live
signal at any time.
To be able to pause and replay a programme,
as well as access the built-in tuner (V.TUNER),
you must first set the REPLAY option in the
SETUP menu to BASIC or EXTENDED. These
settings determine when the hard disc
recorder starts saving a programme to the
buffer.
> Press V MEM*, then the green button to bring
up the main menu.
> Press
to highlight V.TUNER or STB and press
GO to switch it on.
> The hard disc recorder begins saving the on-
going TV or STB programme to the buffer
automatically.
> Press
or to select a program. Alternatively,
use the number buttons to select a program
directly.
> To pause the on-going programme, press STOP.
The status window appears on the screen. You
can now replay the part of the programme
saved in the buffer.
> To return to the on-going programme at any
time, press V MEM* , then the coloured button
for the desired source. You can also ‘jump’
temporarily to the on-going programme and
back to replay by pressing
and then .
Note that you cannot pause or replay a programme
while the hard disc recorder is recording another
programme or copying a recording, nor can you
pause or replay programs copy-protected by
Macrovision. If you pause a programme for two
hours, the hard disc recorder automatically starts
replay from the point at which you paused the
programme.
If you wish to be able to pause and replay an on-
going TV programme, it is important that you select
V.TUNER, instead of pressing the TV button on
Beo4!
An example of the status window. A programme is
being replayed after a pause. The time to the left
shows for how long you have been copying the on-
going programme to the buffer – 19 minutes. The
time to the right shows the time of the current
picture is five minutes behind the live signal.
In addition to TV programmes, you can pause and
replay set-top box programmes, provided you have
connected a set-top box to the hard disc recorder.
Pause a programme
- 0:19 REPLAY -0:05
MENU
Menu stb
v.
tuner record
HARD DISC CONTENT
TIMER PROGRAMMING
TIMER INDEX
SETUP
V.
TUNER
STB
RECORD
20
*NOTE! On some Beo4 remote controls,
the V MEM button is called V TAPE.
During replay, you can cue through the
replay buffer forwards or backwards, play
in slow motion, and step frame-by-frame or
minute-by-minute.
To replay a programme that
you have paused …
Press to replay the programme
Use the number buttons to enter
a specific point in time to go to
in the buffer
Press
or repeatedly to step
minute-by-minute forwards or
backwards during replay
Press the green button to cue
backwards during replay. Press
again to change speed
Press the yellow button to cue
forwards during replay. Press
again to change speed
Press the blue button to start
slow replay
Press again to change speed.
Backwards slow replay is not
possible
Press to resume replaying the
programme from the buffer
Press
to ‘jump’ temporarily
to the live signal, and
to jump
back
Press to pause replay
While replay is paused, press
or repeatedly to step frame-
by-frame forwards or backwards
through the programme
When you reach either end of
the replay buffer, replay starts
from that end automatically.
It is not possible to view Teletext
during replay.
You can switch from one live source, such as
V.TUNER, to another, such as STB, at any time, but
the source you leave is no longer saved to the buffer
after the switch. In this situation, the new source
is saved.
Switching to a non-live source, such as DVD, causes
the hard disc recorder to stop saving to the buffer
and ends replay.
Important!
Content of the replay buffer is not protected. If the
buffer is full and you continue to save programmes
to it, the oldest content is deleted as the new
programmes are saved.
If you wish to be completely sure of keeping
a programme, start a recording by selecting
RECORD from the main menu.
Replay a programme
GO
0
9
GO
STOP
21
You can copy the content of the replay buffer
to the HARD DISC CONTENT list at any time
by making a manual recording. If you start
a manual recording during replay, the
recording starts when you select RECORD in
the main menu.
> Press the green button to cue backwards to
where you want your recording to begin.
> Press STOP to pause replay.
> Press V MEM, then the blue button to start the
manual recording. The manual recording starts
from the selected point in time in the replay
buffer.
>> Pause and replay an on-going programme
Copy from the replay buffer
22
Replay buffer HARD DISC
CONTENT
Advanced operation
Use Groups, 24
Place recordings in a Group
View recordings in a Group
Rename a Group
Move a Group
Edit recordings, 28
Delete an entire recording
Split one recording into two
Trim a recording
Protect a recording
Name a recording
Copy to an external recording
Limit access to recordings – Parental lock, 32
Activate Parental lock
Set a Parental Lock code
Use connected video equipment with Beo4, 34
Peripheral Unit Controller menu
Direct Beo4 operation
Use equipment menus
Use connected equipment in a link room
Preference settings, 36
Adjust settings
Set up the hard disc recorder, 38
Placement guidelines
Connections
Cleaning
The socket panel
This chapter describes the additional
features available when you set the
FEATURE LEVEL to ADVANCED.
Features at the BASIC level are
described in the chapter ‘Daily use’
.
These features are available at the
ADVANCED level as well.
For further information about the
FEATURE LEVEL menu, refer to the
chapter ‘Preference settings’ on page
38.
This chapter also describes the built-in
Peripheral Unit Controller and how to
use equipment connected to the hard
disc recorder.
23
Use Groups
If you have stored a lot of recordings
and want to get to your favourites
quickly without going through the
list, place them in a Group.
There are eight predefined Groups –
MOVIES, SPORTS, SCIENCE, NEWS,
CHILDREN, TV DRAMA, NATURE and
TRAVEL.
Although the Groups have predefined
names, you can still name the Groups
yourself.
When you have created and selected
a particular Group, you only browse
through the recordings belonging to
this particular Group.
The contents of the hard disc is always shown
sorted by date, with the newest recording on
top. The name of the Group appears in the
top right corner of the HARD DISC CONTENT
menu.
To place a recording in a Group …
> Press V MEM* then the green button
to bring
up the hard disc recorder’s main menu.
HARD DISC CONTENT is already highlighted.
> Press GO to bring up the menu. The list of all
recordings on the hard disc appears on the
screen. ALL identifies the list as the list of all
recordings.
> Press
or to highlight the recording you
wish to place in a Group.
> Press the red button to bring up the OPTIONS
menu.
> Press
to highlight GROUP.
> Press
or to select the desired Group.
> Press EXIT to leave the menu, or …
> Press GO to store the setting.
Place a recording in a Group via the OPTIONS
menu.
Place recordings in a Group
HARD DISC CONTENT ALL
GO
THE SOPRANOS 12:14 17 JUN 1:34
CROCODILE HUNTER 9:12 17 JUN 1:00
WRC RALLY 12:00 14 JUN 1:12
AUSTRALIAN OPEN 9:00 13 JUN 3:25
SAT 117 23:00 29 MAY 2:55
TV 24 18:00 24 MAY 1:05
OPTIONS
PROTECTION ON
GROUP MOVIES
NAME THE SOPRANOS
PA
RENTAL LOCK OFF
back store
24
*NOTE! On some Beo4 remote controls,
the V MEM button is called V TAPE.
At any time, you can view the content of the
Groups. Groups with no recordings in them
do not appear in the HARD DISC CONTENT
menu.
To view recordings in a Group …
> Press V MEM* then the green button to bring
up the hard disc recorder’s main menu.
HARD DISC CONTENT is already highlighted.
> Press GO to bring up the menu. The list of all
recordings on the hard disc appears on the screen.
> Press
to view the next Group.
> Press
repeatedly to step between Groups.
When you have found the desired Group …
> Press or to step between recordings.
> Press GO to play the selected recording.
In the HARD DISC CONTENT menu, the Group
name is visible in the top right corner of the menu.
Press
or to step between Groups. ALL identifies
the list as the list of all recordings.
View recordings in a Group
HARD DISC CONTENT ALL
GO
THE SOPRANOS 12:14 17 JUN 1:34
CROCODILE HUNTER 9:12 17 JUN 1:00
WRC RALLY 12:00 14 JUN 1:12
AUSTRALIAN OPEN 9:00 13 JUN 3:25
SAT 117 23:00 29 MAY 2:55
TV 24 18:00 24 MAY 1:05
V.AUX 4 23:10 22 MAY 12:30
DAYS OF THUNDER 22:00 20 MAY 1:55
CASABLANCA 21:00 13 APR 2:15
edit group
options play
25
*NOTE! On some Beo4 remote controls, the V MEM
button is called V TAPE.
You may find it helpful to name a Group after
the type of recordings placed in it, or after
the person who made the recordings.
To rename a Group …
> Press V MEM* then the green button
to bring
up the hard disc recorder’s main menu.
> Press
to highlight SETUP and press GO to
bring up the menu.
> Press
to highlight GROUPS and press GO to
bring up the menu.
> Press
to highlight the Group you wish to
rename.
> Press the green button to be able to rename the
Group.
> Press
or to find the individual characters in
the name.
> Press
to move to the next character.
> Press GO to store the name. If necessary, repeat
the procedure and rename other Groups.
> Press EXIT to leave the menu.
>> Use Groups
Rename a Group
GROUPS
character next
store
GO
M O V I E S
SPORTS
SCIENCE
NEWS
CHILDREN
TV DRAMA
NATURE
TRAVEL
26
*NOTE! On some Beo4 remote controls,
the V MEM button is called V TAPE.
You can rearrange the order in which Groups
appear when you browse through Groups in
the HARD DISC CONTENT menu.
To move a Group …
> Press V MEM* then the green button
to bring
up the hard disc recorder’s main menu.
> Press
to highlight SETUP and press GO to
bring up the menu.
> Press
to highlight GROUPS and press GO to
bring up the menu.
> Press
to highlight the Group you wish to
move.
> Press
once to be able to move the Group. The
Group is now moved out of the list.
> Press
or to move the Group to the desired
place in the list.
> Press
to make the Group move back into the
list or change places with the Group which
occupies the desired place in the list.
> Now, move the Group with which it changed
places and repeat the procedure.
> Press EXIT to leave the menu.
Move a Group
GROUPS
move move
. . . M O V I E S
SPORTS
SCIENCE
NEWS
CHILDREN
TV DRAMA
NATURE
TRAVEL
27
*NOTE! On some Beo4 remote controls, the V MEM
button is called V TAPE.
Edit recordings
When you have made a recording,
you can delete it, shorten it, copy it
to a connected recorder (such as a
DVD recorder), or split it into two
separate recordings.
In addition, the OPTIONS menu
allows you to activate, change or
deactivate settings for the selected
recording. You can change the name
of the recording, assign the recording
to a Group, and select settings for
protection and Parental lock.
Delete an entire recording
You can delete any recordings you do not
want, including protected recordings.
To delete a recording …
> Press V MEM* then the green button
to bring
up the hard disc recorder’s main menu.
HARD DISC CONTENT is already highlighted.
> Press GO to bring up the menu.
> Press
to highlight the recording you wish to
delete.
> Press the green button to bring up the EDIT
menu.
> Press GO to be able to delete the recording –
the recording is then shown in yellow.
> Press the yellow button to confirm, or press
to move the recording back into the list.
> Select another recording to delete or press EXIT
to leave the menu.
Split one recording into two
You can divide a single recording into two.
This can make it easier for you to, for
example, find a particular scene when
browsing through a long recording.
To split a recording into two …
> Press V MEM* then the green button to bring
up the hard disc recorder’s main menu.
HARD DISC CONTENT is already highlighted.
> Press GO to bring up the menu.
> Press
to highlight the recording you wish to
split.
>
Press the green button to bring up the EDIT menu.
> Press
to highlight SPLIT and press GO. The
selected recording is paused at the point where
you left off last the time you viewed it.
> Press the green or yellow button to cue through
the recording to the point at which you wish to
split it, and press STOP to pause playback at
this point.
> To split the recording at the chosen point, press
the red button. SPLIT RECORDING? appears.
> If you change your mind, press the red button
to cancel the split function. Or …
> Press GO to confirm. The recording is split. Each
of the two ‘halves’ keeps the name of the original
recording, but you can change the names at any
time, as described on page 30. The times on the
screen – the start time and elapsed time – are
changed accordingly.
You can also select a point in time to split the
recording using the number buttons on Beo4.
28
*NOTE! On some Beo4 remote controls,
the V MEM button is called V TAPE.
You can trim away a section of a recording.
Simply choose a point in the recording and
specify whether you wish to delete the
section of the recording before or after this
point. You cannot delete a section in the
middle of the recording.
To trim a recording …
> Press V MEM* then the green button
to bring
up the hard disc recorder’s main menu.
HARD DISC CONTENT is already highlighted.
> Press GO to bring up the menu.
> Press
to highlight the recording you wish to
trim.
> Press the green button to bring up the EDIT
menu.
> Press
to highlight TRIM and press GO. The
selected recording is paused at the point where
you left off last the time you viewed it.
> Press the green or yellow button to cue through
the recording to the point you wish to trim from,
and press STOP to pause playback at this point.
> To be able to trim away the beginning of the
recording, up to the pause, press
. To be able
to trim away the end of the recording, from the
pause, press
.
> If you change your mind, press
or to cancel
the trim function. Or …
> Press the yellow button to confirm. The recording
is trimmed, and the times on the screen –
elapsed time and total time of the recording – are
changed accordingly.
Trim a recording
Split one recording into two at a point of your
choice.
Trim a recording.
trim to start trim to end
0:12 PAUSE 1:34
split
0:12 PAUSE 1:34
29
*NOTE! On some Beo4 remote controls, the V MEM
button is called V TAPE.
>> Edit recordings
Protect a recording
Protected recordings are excluded from the
space management function under all
circumstances. If the hard disc is full and all
recordings are protected, you cannot make
timed recordings or manual recordings. In
addition, any recording in process stops
automatically when the capacity of the hard
disc is reached.
To protect a recording …
> Press V MEM* then the green button
to bring
up the hard disc recorder’s main menu.
HARD DISC CONTENT is already highlighted.
> Press GO to bring up the menu.
> Press
or to highlight the recording you
wish to protect.
> Press the red button to bring up the OPTIONS
menu. PROTECTION is already highlighted.
> Press
or to select ON. To deactivate
protection for the selected recording, select OFF.
> Press EXIT to leave the menu, or …
> Press GO to store the setting.
Name a recording
If a recorded TV programme is not given a
name automatically, or you have made a
manual recording, you can make this
recording easier to find in the HARD DISC
CONTENT menu by giving it a name.
To name a recording …
> Press V MEM* then the green button
to bring
up the hard disc recorder’s main menu.
HARD DISC CONTENT is already highlighted.
> Press GO to bring up the menu.
> Press
or to highlight the recording you
wish to name.
> Press the red button to bring up the OPTIONS
menu.
> Press
to highlight NAME and press the green
button on Beo4. You can then edit the name.
> If you wish to delete the current name before
entering a new one, press the yellow button on
Beo4. The entire name is deleted.
> Press
or to find the individual characters in
the name.
> Press
to move to the next character.
> Press EXIT to leave the menu, or …
> Press GO to store the setting.
Protect recordings you wish to keep.
Give a recording its own name.
HARD DISC CONTENT ALL
GO
THE SOPRANOS 12:14 17 JUN 1:34
CROCODILE HUNTER 9:12 17 JUN 1:00
WRC RALLY 12:00 14 JUN 1:12
AUSTRALIAN OPEN 9:00 13 JUN 3:25
SAT 117 23:00 29 MAY 2:55
TV 24 18:00 24 MAY 1:05
OPTIONS
PROTECTION ON
GROUP DEFAULT
NAME THE SOPRANOS
PA
RENTAL LOCK OFF
back store
HARD DISC CONTENT ALL
GO
THE SOPRANOS 12:14 17 JUN 1:34
CROCODILE HUNTER 9:12 17 JUN 1:00
WRC RALLY 12:00 14 JUN 1:12
AUSTRALIAN OPEN 9:00 13 JUN 3:25
SAT 117 23:00 29 MAY 2:55
TV 24 18:00 24 MAY 1:05
OPTIONS
PROTECTION OFF
GROUP
NAME THE SOPRANO S
PARENTAL LOCK
character next
back accept
30
*NOTE! On some Beo4 remote controls,
the V MEM button is called V TAPE.
We recommend that you copy your most
important recordings to a recorder connected
to the hard disc recorder, such as a DVD
recorder.
To copy a recording …
> Press V MEM* then the green button to bring
up the hard disc recorder’s main menu.
HARD DISC CONTENT is already highlighted.
> Press GO to bring up the menu.
> Press
to highlight the recording you wish to
copy.
> Press the green button to bring up the EDIT
menu.
> Press
to highlight EXTERNAL COPY and press
GO
.
If the external recorder is from Bang & Olufsen, or
if you have a Bang & Olufsen DVD Controller, the
hard disc recorder starts the external recorder and
plays the selected recording from the beginning.
Otherwise, you must switch the external recorder
on and start recording manually. The main menu
appears briefly on the screen, with the message
EXTERNAL COPY IN PROGRESS and an indication
of the time remaining. After a few seconds, the
current recording is shown.
To stop copying to the external recorder …
> Press V MEM* then the green button
to bring
up the hard disc recorder’s main menu.
HARD DISC CONTENT is already highlighted.
> The main menu appears on the screen, with the
message EXTERNAL COPY IN PROGRESS and an
indication of the time remaining.
> Press the yellow button to stop the external
copy.
When copying is complete, the hard disc recorder
switches both itself and the external recorder
to standby. If your external recorder is not from
Bang & Olufsen, or you do not have a
Bang & Olufsen DVD Controller, you must
switch the external recorder off manually.
Copy to an external recorder. While a recording is
being copied to an external recorder, you cannot
play recordings on the hard disc recorder.
Copy to an external recorder
MENU
HARD DISC CONTENT
TIMER PROGRAMMING
TIMER INDEX
SETUP
stop
EXTERNAL COPY
IN PROGRESS
REMAINING TIME 1:35
31
*NOTE! On some Beo4 remote controls, the V MEM
button is called V TAPE.
Enter the Parental Lock code to view recordings
protected by Parental Lock. If an incorrect
code is entered three times, the main menu
appears.
> Press V MEM* then the green button
to bring
up the hard disc recorder’s main menu.
HARD DISC CONTENT is already highlighted.
> Press GO to bring up the menu.
> Press
or to highlight the recording to
which you wish to limit access.
> Press the red button to bring up the OPTIONS
menu.
> Press
to highlight PARENTAL LOCK. The
current setting is shown.
> Press
. The hard disc recorder prompts you for
the correct Parental Lock code.
> Enter the code using the number buttons on
Beo4. When you enter the last digit, the
PARENTAL LOCK setting changes. You have
access to all recordings until you switch the hard
disc recorder to standby.
> Press EXIT to leave the menu, or …
> Press GO to store the setting.
Limit access to recordings – Parental Lock
You can prevent access to your
recordings by activating the Parental
Lock function. This requires that you
first enter a Parental Lock code.
The PARENTAL LOCK CODE menu
allows you to set a code that limits
access to your recordings.
Activate Parental Lock
HARD DISC CONTENT ALL
THE SOPRANOS 12:14 17 JUN 1:34
CROCODILE HUNTER 9:12 17 JUN 1:00
WRC RALLY 12:00 14 JUN 1:12
AUSTRALIAN OPEN 9:00 13 JUN 3:25
SAT 117 23:00 29 MAY 2:55
TV 24 18:00 24 MAY 1:05
OPTIONS
PROTECTION OF
F
GROUP DEFAULT
NAME THE SOPRANOS
ENTER CODE . . . .
back
32
*NOTE! On some Beo4 remote controls, the V MEM
button is called V TAPE.
If, for some reason, you have forgotten your
code, then you can key in 9999 three times
when OLD CODE is highlighted. This sets the
code to 0000 and allows you to enter a new
code.
> Press V MEM* then the green button to bring
up the hard disc recorder’s main menu.
> Press
to highlight SETUP and press GO to
bring up the menu.
> Press
to highlight PARENTAL LOCK CODE and
press GO to bring up the menu.
> Enter the code with the number buttons.
> Re-enter the code to confirm.
> Press EXIT to leave the menu, or …
> Press GO to store the setting.
Set a Parental Lock code
PARENTAL LOCK CODE
OLD CODE . . . .
NEW CODE
. . . .
CONFIRM CODE . . . .
33
*NOTE! On some Beo4 remote controls, the V MEM
button is called V TAPE.
Use connected video equipment with Beo4
The built-in Peripheral Unit Controller
acts as an interpreter between video
equipment connected to the hard
disc recorder, such as a set-top box,
and the Beo4 remote control.
You can use the Beo4 remote control
to gain access to the channels and
functions offered by your equipment.
Some functions are available via Beo4
when you switch on the equipment.
Additional functions are available
through a Peripheral Unit Controller
menu that you bring up on the
screen.
For instruction in the various
functions offered by your equipment,
please refer to the product’s own
user’s guide.
For further information about
supported equipment, contact your
Bang & Olufsen retailer.
Buttons on the remote controls included with
your equipment may not match those on
Beo4. To see which Beo4 buttons activate
specific services or functions, bring up the
Peripheral Unit Controller menu on the
screen.
Press V MEM and then the
yellow button to switch on
connected equipment
Press MENU, then GO to bring
up the Peripheral Unit Controller
menu
Press the number button that
activates the function you want,
or …
… press one of the coloured
buttons to activate a function
Example of a Peripheral Unit Controller menu –
The Beo4 buttons are shown to the left on the
menu, and the functions they control are shown
to the right. The menu may also list buttons on
the remote control included with your connected
equipment.
Peripheral Unit Controller menu
V MEM
MENU
GO
1
9
GU I DE
ME N U
TE X T
IN F O
WI D E
1
2
3
4
5
GU ID E
ME NU
TE XT
IN FO
WI DE
1
2
3
4
5
34
Direct Beo4 operation
If you know which Beo4 button activates the
function you want, you can activate the
function without bringing up the Peripheral
Unit Controller menu first.
While your equipment is on …
Press GO and then the number
button that activates the
function you want
Press one of the coloured
buttons to activate a function
Press GO and then
or to
step up or down through, for
example, set-top box channels
Press and hold GO to bring up
the Program guide or the ‘Now/
Next’ banner on the screen if
you are using a set-top box that
supports these functions.
Use equipment menus
Once you have activated connected
equipment, you can operate its own menus
with Beo4.
While equipment menus are
shown …
Moves the cursor up or down
Moves the cursor left or right
Selects and activates a function
Press GO and then
or to
step between menu pages or
step in channel lists
Exits menus, or returns to a
previous menu*
Use the number keys to enter
information in menus or services
when relevant
Exits menus, enters or exits
different modes, such as radio
Use the coloured buttons as
indicated in the menus of your
connected equipment
*Depending on the source you
have selected, you may have to
press EXIT twice instead of STOP
to return to a previous menu.
Use equipment in a link room
If your set-top box is connected to the
television in the main room via the hard disc
recorder, or connected directly to the
television, you can operate the set-top box
from the link room television. However, the
Peripheral Unit Controller menu cannot be
displayed on the television screen in the link
room.
Press to switch on equipment in
the main room
Press GO and then the number
button that activates the
function you want
Press one of the coloured
buttons to activate a function
GO
1
9
GO
GO
GO
GO
GO
STOP
1 – 9
EXIT
V MEM
GO
1 9
35
Preference settings
You can activate, adjust and deactivate
functions relating to day-to-day use
of the hard disc recorder. This is done
via the SETUP menu.
In the SETUP menu, you can select
settings for the following:
Feature level, basic or advanced
Parental Lock, which limits access
to recordings
Groups, in which you can place
recordings
Recording quality
The duration of manual recordings
Registration of products connected
to the hard disc recorder, such as a
set-top box
Pause and replay of on-going
programmes
Menu language
Fine-tuning of TV programs
The built-in clock.
The two settings for feature level – BASIC and
ADVANCED – determine the content of the
SETUP menu. Settings for Parental Lock,
Groups, recording quality and replay are
only available if you set the feature level to
ADVANCED.
To adjust settings …
> Press V MEM* then the green button
to bring
up the hard disc recorder’s main menu.
> Press
to highlight SETUP and press GO to
bring up the menu.
> Press
or to move between menu options.
> Press GO to select an option.
> Press
or or the number buttons to change
settings.
> Press EXIT to leave the menu, or …
> Press GO to store the setting.
Activate, adjust and deactivate the hard disc
recorder functions via the SETUP menu.
If you have connected a set-top box to the hard
disc recorder and registered it in the hard disc
recorder CONNECTIONS menu, you must select
your particular set-top box in the above menu.
Adjust settings
SETUP
GO
FEATURE LEVEL
PARENTAL LOCK CODE
GROUPS
RECORDING QUALITY
RECORDING DURATION
CONNECTIONS
REPLAY
MENU LANGUAGE
EXTRA
select
STB SETUP
SELECTOR
NOKIA 9800S/025
NOKIA 9602S
NOKIA 9820T
NOKIA 9200
NOKIA D-BOX II
NOKIA D-BOX
NOKIA 9850T
PACE DTR730-IM
PHILIPS DTX637x
PACE DSR600
SKY DIGITAL
CANALdig DK/S/N
CANAL+ SAT r2
more store
GO
36
*NOTE! On some Beo4 remote controls,
the V MEM button is called V TAPE.
What’s on the SETUP menu …
FEATURE LEVEL … Options are BASIC and
ADVANCED. The BASIC set of features allows
you to operate the hard disc recorder like you
would a video tape recorder, while ADVANCED
also makes it possible for you to, for example,
place recordings in Groups, and limit access to
recordings via Parental Lock.
(PARENTAL LOCK CODE) … Allows you to enter
an access code, which can then be used to limit
access to recordings. Use the number buttons
to enter the code.
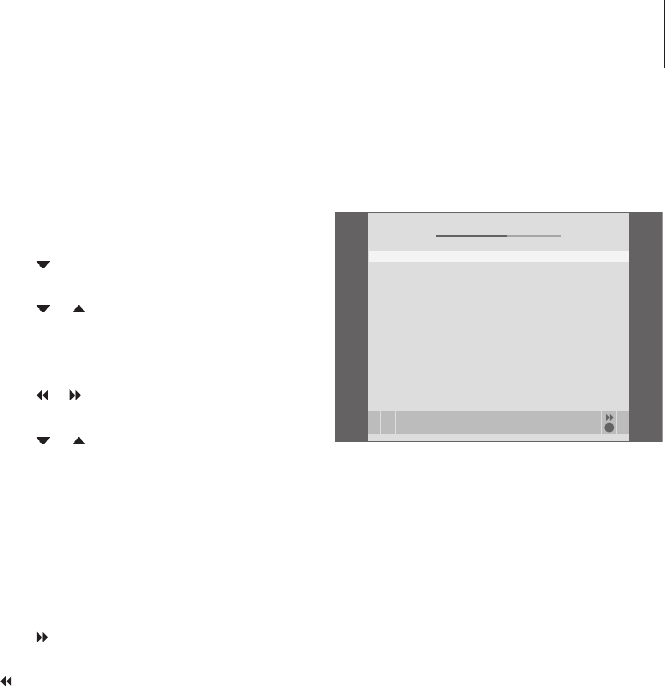
(GROUPS) … Eight predefined Groups are
available for you to place recordings in. You can
move and rename these Groups in the GROUPS
menu. Use the arrow buttons to rearrange the
order in which Groups appear. Press the green
button to be able to rename them. Press
or
to select characters, and or to move
between characters in the name. Press GO
when done.
(RECORDING QUALITY) … Indicates the quality of
recording. Options are STANDARD and HIGH.
Note that a recording occupies less space on the
hard disc if you select STANDARD.
RECORDING DURATION … Sets a standard length
of time for manual recordings. This means you
do not have to switch off a manual recording
yourself.
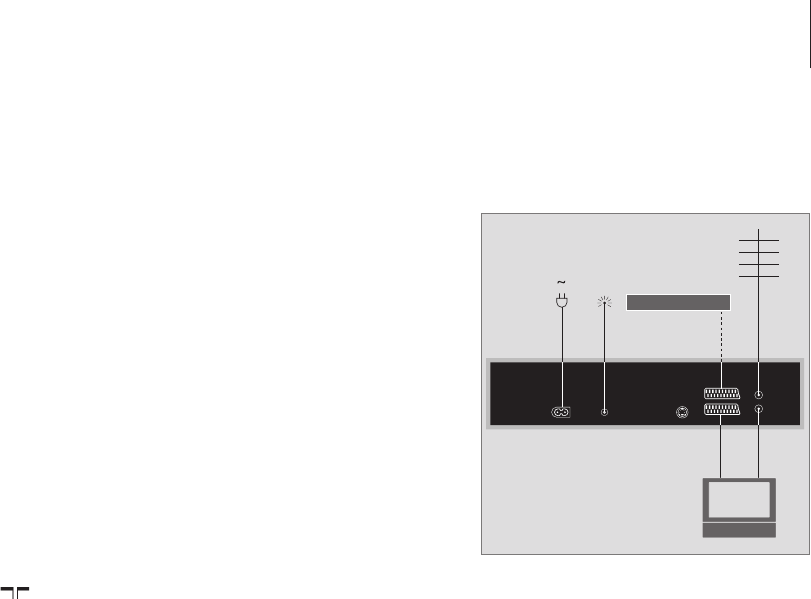
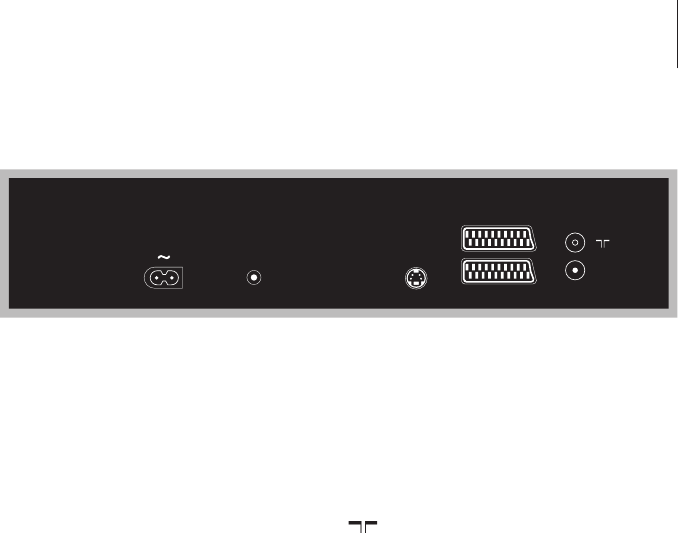
CONNECTIONS … Register any product you have
connected to the hard disc recorder: a set-top
box (STB), a video tape recorder (V.TAPE), a
DVD player (DVD), a decoder (DECODER) or
other equipment (V.AUX). Press to highlight
the product you have connected, and press GO
to store the setting. If you select STB, the STB
SETUP menu appears. Find your set-top box in
the list on the screen.
(REPLAY) … The REPLAY setting determines when
the hard disc recorder starts copying an on-
going programme to the replay buffer. Options
are OFF, BASIC and EXTENDED. Basic replay
starts copying to the buffer when you pause an
on-going program. Extended replay starts
copying to the buffer as soon as you choose a
source, such as V.TUNER. REPLAY is set to OFF
from the factory. Note that this setting makes
V.TUNER inaccessible! For further information
about replay, refer to the chapter ‘Pause and
replay an on-going program’ on page 20.
MENU LANGUAGE … Choose between eight
languages for the menu system.
TUNING … Fine-tune the programs stored on the
hard disc recorder’s own tuner. You can also
adjust the sound setting – mono or stereo. If
you have registered a decoder in the
CONNECTIONS menu, you can select the
connected decoder as well. If you have set
FEATURE LEVEL to ADVANCED, access the
TUNING menu via the EXTRA menu.
CLOCK … Set the time and date. This is important
for the correct execution of timed recordings. If
you have set FEATURE LEVEL to ADVANCED,
access the CLOCK menu via the EXTRA menu.
37
Set up the hard disc recorder
Follow the guidelines and procedures
on these pages when you set up the
hard disc recorder.
Place the hard disc recorder on a solid, level
surface. Do not place any items on top of the
hard disc recorder.
Place the hard disc recorder away from
radiators, direct sunlight and other heat
sources.
Do not place the hard disc recorder on
a carpeted surface, as carpet blocks the
ventilation holes.
The hard disc recorder is intended for indoor
use in dry, domestic environments only,
within a temperature range of 1040˚C
(50–104˚F).
What to do if the hard disc recorder
overheats
If, for example, the ventilation holes are blocked,
or if you have placed the hard disc recorder in
direct sunlight, the recorder may overheat. If this
happens, the standby indicator in the display
flashes red and green and a warning appears on
the screen.
Switch the hard disc recorder off immediately and
let it cool. Before switching it on again, ensure
that you have placed it as described on this page.
When placing the hard disc recorder, leave space
around it for adequate ventilation.
If this warning appears on the screen and you do
not switch off the hard disc recorder, it switches
itself off automatically after a few minutes, and
remains off until it has cooled sufficiently. You
cannot operate the hard disc recorder during this
time.
Placement guidelines
WARNING
THE HARD DISC RECORDER IS OVERHEATING
PLEASE SWITCH IT TO STANDBY
38
The hard disc recorder is designed for
connection to a Bang & Olufsen television
via a 21-pin AV cable. For an overview of the
socket panel, refer to page 43.
Register all equipment connected to your tele-
vision. This is done via your television’s ‘Setup’
menu. Refer to the Guide included with your
Bang & Olufsen television to ensure proper
connection and registration of extra equipment.
To connect the hard disc recorder to your
television …
> Connect the socket marked TV on the hard disc
recorder to the socket marked V.TAPE (or V MEM)
on your television using the 21-pin AV cable.
> Connect the cable from your external aerial to
the signal input socket marked
on the rear
panel of the hard disc recorder.
> Direct the aerial signal to the television, using the
aerial cable supplied with the hard disc recorder.
> Plug one end into the aerial socket marked TV
on the hard disc recorder and the other end into
the aerial socket marked TV on the television’s
socket panel.
> Connect any extra video equipment, such as a
DVD recorder, set-top box, or video tape recorder,
to the AUX socket on the hard disc recorder
with a 21-pin AV cable.
> Connect an IR-transmitter for extra video
equipment to the DATA socket on the hard disc
recorder.
> Finally, connect the hard disc recorder and all
connected equipment to the mains. The hard
disc recorder is now in standby mode, indicated
by the red light in the display panel.
Any equipment you have connected to the AUX
socket on the hard disc recorder must be registered
in the hard disc recorder’s CONNECTIONS menu –
not the television’s! For further information about
how to register connected equipment, refer to the
chapter ‘Preference settings’ on page 38.
Set-top box connection
You can connect a set-top box to the hard disc
recorder, or to your television. Regardless of the
setup you choose, you can still make manual and
timed recordings of set-top box programmes.
If you connect a set-top box to the television: You
can not use the replay function in the hard disc
recorder while watching a set-top box programme.
For information about how to connect a set-top
box to the television, refer to the television’s own
Guide.
If you connect a set-top box to the hard disc
recorder: You can use the replay function
while watching set-top box programmes.
To connect a set-top box to the hard disc
recorder …
> Connect an IR transmitter to the DATA socket.
> Fasten the IR transmitter to the IR receiver of
the set-top box.
> To be able to use the remote control included
with your set-top box, do not cover its IR
receiver entirely.
Connect any extra video equipment, such as a
DVD recorder, set-top box, or video tape recorder,
to the AUX socket on the hard disc recorder with
a 21-pin AV cable.
Connections
AUX
HDR 2
39
Cleaning
Wipe dust off the surfaces using a dry, soft
cloth. Remove grease stains or persistent dirt
with a soft, lint-free, firmly wrung cloth,
dipped in a solution of water containing only
a few drops of mild detergent, such as washing-
up liquid.
Do not attempt to open the hard disc recorder
yourself. Leave such operations to qualified
service personnel.
Never use alcohol or other solvents to clean
any part of the hard disc recorder!
>> Set up the hard disc recorder
40
The socket panel
You can connect the hard disc
recorder to your television via the
socket panel on the rear.
Consult the guide enclosed with
externally connected equipment to
ensure that it is connected correctly.
~ (mains)
Socket for connection to the mains.
DATA
For connection of an IR transmitter for use with a
set-top box.
Y/C INPUT
For connection of a set-top box or other equipment
with Y/C output.
If the product you wish to connect to the hard disc
recorder offers both 21-pin AV connection and
connection via the Y/C INPUT socket, we
recommend that you make both connections. This
ensures optimum picture quality.
TV (21-pin)
21-pin socket for connection to your television.
AUX
21-pin socket for connection of extra video
equipment, such as a set-top box.
Aerial input socket from your external aerial or
cable TV network.
TV (aerial)
Aerial output socket for connection to your tele-
vision.
TV
AUX
TV
Y/C INPUT
DATA
41
On-screen menus
In order for you to easily find your way
through the on-screen menus the
system offers, this chapter illustrates
the overall structure of the menu system.
Note that the content of the menu
hierarchy depends on the setting you
have chosen for FEATURE LEVEL in
the SETUP menu – BASIC or ADVANCED.
The default setting from the factory is
BASIC.
The chapter also gives you detailed
information about the individual
menus which offer numerous setting-
up and adjustment options.
For further information about how to
set the feature level, refer to the chapter
‘Preference settings’ on page 36.
The menu system at the BASIC feature level
Press V MEM*, then the green button to access the menu system.
MENU
HARD
DISC CONTENT
TIMER PROGRAMMIN
G
SOURCE
PROGRAM
START TIME
STOP TIME
DATE/WEEKDAYS
PROTECTION
TIMER INDE
X
SETU
P
FEATURE LEVEL
BASIC
ADVANCED
RECORDING DURATION
MANUAL
RECORDING
CONNECTIONS
NONE
ST
B
V.TAPE
DV
D
V.AU
X
MENU LANGUAGE
DANS
K
DEUTSC
H
ENGLIS
H
ESPAÑO
L
FRANÇAIS
ITALIAN
O
NEDERLANDS
SVENSK
A
TUNING
PROGRAM NUMBER
FINE
SOUN
D
CLOCK
TIME
DATE
MONT
H
YEAR
V.TUNER
STB/V.TAPE/DVD/V.AUX
RECORD/STOP RECORDING
42
*NOTE! On some Beo4 remote controls,
the V MEM button is called V TAPE.
The menu system at the ADVANCED feature level
The features available at the BASIC feature level
are available at the ADVANCED level as well.
Press V MEM*, then the green button to access
the menu system.
MENU
HARD DISC CONTENT
EDIT
DELETE
SPLI
T
TRIM
EXTE
RNAL COPY
OPTIONS
PROTECTION
GROU
P
NAME
PARENTAL LOCK
GROUP
TIMER PROGRAMMING
SOURCE
PROGRAM
START TIME
STOP TIME
DATE/WEEKDAYS
PROTECTION
QUALITY
EXTRA
GROU
P
NAME
PARENTAL LOCK
KEEP
EPISODES
TIMER INDEX
SETU
P
FEATURE LEVEL
BASIC
ADVANCED
PARENTAL LOCK CODE
OLD CODE
NEW CODE
CONFIRM CODE
GROUPS
MOVIES
SPORTS
SCIENCE
NEWS
CHILDREN
TV
DRAMA
NATURE
TRAVEL
RECORDING QUALITY
STANDARD
HIGH
RECORDING DURATION
MANUAL
RECORDING
CONNECTIONS
NONE
ST
B
V.TAPE
DV
D
V.AU
X
REPLAY
OF
F
BASI
C
EXTENDED
MENU LANGUAGE
DANS
K
DEUTSC
H
ENGLIS
H
ESPAÑO
L
FRANÇAIS
ITALIAN
O
NEDERLANDS
SVENSK
A
EXTRA
TUNING
PROGRAM NUMBE
R
FINE
SOUN
D
CLOC
K
TIME
DATE
MONT
H
YEAR
V.TUNER
STB/V.TAPE/DVD/V.AUX
RECORD/STOP RECORDING
43
*NOTE! On some Beo4 remote controls,
the V MEM button is called V TAPE.
What’s on the EDIT menu …
DELETE … Delete the selected recording.
SPLIT … Split the selected recording into two.
TRIM … Trim, or delete, the beginning or the end
of a selected recording.
EXTERNAL COPY … Copy a selected recording to
a product connected to the hard disc recorder,
such as a video recorder.
This menu is only available if you have set
FEATURE LEVEL to ADVANCED in the SETUP menu.
What’s on the OPTIONS menu …
PROTECTION … Exclude the selected recording
from the automatic space management
function, which deletes the oldest recordings to
make room for new ones. Options are ON and
OFF.
GROUP … Place the selected recording in one of
the eight predefined Groups: MOVIES, SPORTS,
SCIENCE, NEWS, CHILDREN, TV DRAMA,
NATURE and TRAVEL. Other recordings can be
stored in the DEFAULT Group.
NAME … Give the selected recording the name of
your choice. Press or to select a character
and
or to move between characters in the
name. Press GO when done.
PARENTAL LOCK … Activate or deactivate the
Parental Lock access code for the selected
recording. Options are ON and OFF.
This menu is only available if you have set
FEATURE LEVEL to ADVANCED in the SETUP menu.
What’s on the TIMER PROGRAMMING
menu …
SOURCE … Options are:
V.TUNER … TV from the tuner in the hard disc
recorder. This tuner is only accessible if you set
the REPLAY option in the SETUP menu to BASIC
or EXTENDED.
STB … A set-top box program via a set-top box
connected to the hard disc recorder.
DTV … A Satellite or set-top box program on
one of the following televisions:
BeoVision 7, BeoVision 6*, BeoVision 5*,
BeoVision 4*, BeoVision 3–32, BeoVision Avant,
BeoSystem 1.
V.AUX … A Satellite or set-top box program on
any other television. Select V.AUX as well for a
source registered in the television’s
CONNECTIONS menu as V.AUX.
V.AUX2 … The source registered in the
television’s CONNECTIONS menu as V.AUX2.
PROGRAM (Program number) … Once your
source is chosen, choose the program number.
>> On-screen menus
HARD DISC CONTENT ALL
GO
THE SOPRANOS 12:14 17 JUN 1:34
CROCODILE HUNTER 9:12 17 JUN 1:00
WRC RALLY 12:00 14 JUN 1:12
AUSTRALIAN OPEN 9:00 13 JUN 3:25
SAT 117 23:00 29 MAY 2:55
TV 24 18:00 24 MAY 1:05
OPTIONS
PROTECTION ON
GROUP DEFAULT
NAME THE SOPRANOS
PA
RENTAL LOCK OFF
back store
TIMER PROGRAMMING
GO
SOURCE V.TUNER
PROGRAM 1
START TIME 14:41
STOP TIME 15:41
DATE THU 26 JUN
PROTECTION OFF
store
HARD DISC CONTENT ALL
GO
THE SOPRANOS 12:14 17 JUN 1:34
CROCODILE HUNTER 9:12 17 JUN 1:00
WRC RALLY 12:00 14 JUN 1:12
AUSTRALIAN OPEN 9:00 13 JUN 3:25
SAT 117 23:00 29 MAY 2:55
TV 24 18:00 24 MAY 1:05
EDIT
DELETE
SPLIT
TRIM
EXTERNAL COPY
back select
44
*NOTE! Select DTV if you wish to record a Satellite
programme and your television has a built-in DVB-
S module, or if you wish to record a set-top box
programme via a set-top box connected to the
television.
START TIME and STOP TIME … Key in when you
want to start and stop recording.
DATE … The date you want your Timer executed.
(WEEKDAYS) … Appears when you highlight
DATE and press the green button on Beo4. All
the weekdays are shown – starting with M for
Monday.
PROTECTION … Select whether or not you want
to protect the recording from the space
management feature. Options are ON and OFF.
If you activate protection for a daily or weekly
Timer, all of the episodes of the programme are
protected. For further information about space
management, refer to page 19.
If FEATURE LEVEL is set to ADVANCED, as described
on page 36, the menu also contains the following
options:
QUALITY … Indicates the quality of the recording.
Options are STANDARD and HIGH. Note that a
recording occupies less space on the hard disc if
you select STANDARD.
EXTRA … Gives access to the following options:
GROUP … Indicates which Group of recordings
to place the recording in. Select one of the eight
existing Groups or DEFAULT.
NAME … Give the recording a name by using
the arrow buttons to select characters.
PARENTAL LOCK … Limit access to the
recording to those who know the correct four-
digit code. Enter the code using the number
buttons on Beo4. For further information about
the Parental Lock function, refer to the chapter
‘Preference settings’ on page 36.
KEEP EPISODES … Select a number of episodes
to keep when recording a programme on a daily
or weekly basis, such as a news programme.
This minimizes the use of hard disc space.
Options are 1–7 and ALL. If you activate
protection for a daily or weekly Timer, all of the
episodes of the programme are protected.
What’s on the PARENTAL LOCK CODE menu …
Once you have entered a code in the menu, you
can apply code protection to recordings in the
HARD DISC CONTENT menu, as well as to timed
recordings. It is then only possible to view these
recordings after entering the correct code.
Options are:
OLD CODE … Enter the current code.
NEW CODE … If you wish to change the code,
enter the new code here.
CONFIRM CODE … Enter the new code one more
time to confirm any change you have made to it.
TIMER PROGRAMMING
GO
GROUP DEFAULT
NAME . . . . . . . . . . . . . . . .
PARENTAL LOCK OFF
KEEP EPISODES
back store
PARENTAL LOCK CODE
OLD CODE . . . .
NEW CODE
. . . .
CONFIRM CODE . . . .
45
What’s on the TIMER INDEX …
You can check the Timers that are waiting to be
executed, as well as edit or delete them. If the
Timers overlap, this is indicated when the Timer is
stored and shown in the TIMER INDEX.
What’s on the FEATURE LEVEL menu …
The FEATURE LEVEL menu allows you to select a
set of functions that match the way you wish to
use the hard disc recorder:
BASIC … Gives access to recording and playback
functions, including timer programming, but
without the ability to place recordings in
Groups, select recording quality or assign a
Parental Lock code to recordings.
ADVANCED … The full set of hard disc recorder
functions.
What’s on the PARENTAL LOCK CODE menu …
The PARENTAL LOCK CODE menu allows you to
set a code that limits access to your recordings.
Once you have entered a code in the menu, you
can apply code protection to recordings in the
HARD DISC CONTENT menu, as well as to timed
recordings. It is then only possible to view these
recordings after entering the correct code.
Options are:
OLD CODE … Enter the current code.
NEW CODE … If you wish to change the code,
enter the new code here.
CONFIRM CODE … Enter the new code one more
time to confirm any change you have made to it.
This menu is only available if you have set
FEATURE LEVEL to ADVANCED in the SETUP menu.
>> On-screen menus
PARENTAL LOCK CODE
OLD CODE . . . .
NEW CODE
. . . .
CONFIRM CODE . . . .
FEATURE LEVEL
GO
BASIC
ADVANCED
store
TIMER INDEX
GO
TV 23 12:25-13:00 17 JUN
TV TV 2 DK 14:00-14:45 17 JUN
V.AUX THE SOPRANOS 22:00- 23:20 19 JUN
TV MTV 12:25-12:00 21 JUN
V.AUX 2 121 22:00-23:20 25 JUN
SAT 1222 2:00- 3:20 25 AUG
V.AUX AUSTRALIA 12:15-12:30 25 AUG
SAT 43 23:55- 2:15 M-W---S
SAT 123 14:00-15:15 M--TF--
SAT CROCODIL 16:10-17:15 -T-TF-S
TV MTV 18:00-18:30 -T-TF-S
SAT WRC RALL 13:00-13:45 ---TF--
delete
edit
46
What’s on the GROUPS menu …
There are eight predefined Groups: MOVIES,
SPORTS, SCIENCE, NEWS, CHILDREN, TV DRAMA,
NATURE and TRAVEL. These Group names are
only suggestions. You can rename any of the eight
Groups at any time, and place recordings in any
Group you choose. Groups with no recordings in
them do not appear in the HARD DISC CONTENT
menu.
This menu is only available if you have set
FEATURE LEVEL to ADVANCED in the SETUP menu.
What’s on the RECORDING QUALITY menu …
The RECORDING QUALITY menu allows you to
select the picture and sound quality of recordings.
Options are STANDARD and HIGH. Note that the
two settings affect how much hard disc space
recordings use. The amount of available hard disc
space is shown in the menu when you highlight a
setting.
This menu is only available if you have set
FEATURE LEVEL to ADVANCED in the SETUP menu.
What’s on the RECORDING DURATION
menu …
The RECORDING DURATION menu allows you to
set a default length for manual recordings. This
means that you do not have to be present to end
a manual recording at the proper time. Use the
number buttons to set the default recording
duration. Press GO when done.
RECORDING QUALITY
STANDARD
HIGH
store
TOTAL RECORDING TIME
XX HOURS
GO
GROUPS
move
rename accept
GO
MOVIES
SPORTS
SCIENCE
NEWS
CHILDREN
TV DRAMA
NATURE
TRAVEL
RECORDING DURATION
MANUAL RECORDING 3:00
store
GO
47
What’s on the CONNECTIONS menu …
Register any product you have connected to the
hard disc recorder: a set-top box (STB), a video
tape recorder (V.TAPE), a DVD player (DVD), a
decoder (DECODER) or other equipment (V.AUX).
Press
to highlight the product you have
connected, and press GO to store the setting. If
you select STB, you must find your particular set-
top box in a list.
Any equipment you have connected to the AUX
socket on the hard disc recorder must be
registered in the hard disc recorder’s
CONNECTIONS menu – not the television’s! For
further information about how to register
connected equipment, refer to the chapter
‘Preference settings’ on page 36.
What’s on the REPLAY menu …
The REPLAY setting determines when the hard disc
recorder starts copying an on-going programme
to the replay buffer. Options are OFF, BASIC and
EXTENDED. Basic replay starts copying to the
buffer when you pause an on-going program.
Extended replay starts copying to the buffer as
soon as you choose a source, such as V.TUNER.
REPLAY is set to OFF from the factory. Note that
this setting makes V.TUNER inaccessible! For
further information about replay, refer to the
chapter ‘Pause and replay an on-going program’
on page 20.
This menu is only available if you have set
FEATURE LEVEL to ADVANCED in the SETUP menu.
What’s on the MENU LANGUAGE menu …
Choose between the available languages.
>> On-screen menus
MENU LANGUAGE
DANSK
DEUTSCH
ENGLISH
ESPAÑOL
FRAAIS
ITALIANO
NEDERLANDS
SVENSKA
select accept
GO
REPLAY
GO
OFF
BASIC
EXTENDED
store
CONNECTIONS
NONE
STB
V.TAPE
DVD
V.AUX
DECODER
store
GO
48
What’s on the TUNING menu …
PROGRAM NUMBER … Select a program number.
FINE … Fine tune the frequency of a program.
You can fine tune within the range of -8 – +8.
SOUND (mono, stereo or language) … Several
types of sound may be available for different
programs, mono, stereo or different languages.
On the relevant program or frequency select the
options
MONO (FM / NICAM mono sound)
MONO1 (mono language 1)
MONO2 (mono language 2)
MONO3 (mono language 3)
STEREO (NICAM/A2 stereo sound)
STEREO2 (stereo language 2).
If program broadcasts are in two languages and
you want both languages, you can store the
program twice, once with each language.
What’s on the CLOCK menu …
TIME … Indicates the time.
DATE … Indicates the date.
MONTH … Indicates the month.
YEAR … Indicates the year.
TUNING
PROGRAM NUMBER 1
FINE 0
SOUND STEREO
store
GO
CLOCK
TIME 12:40
DATE 2
MONTH JUN
YEAR 2004
store
GO
49
Index
Beo4 remote control
Direct Beo4 operation of connected
equipment, 35
The Beo4 remote control,
5
Clock
Set the time and date, 37
What’s on the CLOCK menu, 49
Connections
Connect extra equipment, 39
Connect the hard disc recorder to your
television, 39
The socket panel, 41
What’s on the CONNECTIONS menu, 48
Content
Browse through your recordings, 16
The HARD DISC CONTENT menu, 18
Copy
Copy from the replay buffer, 22
Copy to an external recorder, 31
Cue
Cue in replay, 21
Cue through a recording, 15
The Beo4 remote control,
5
Decoder
Connect a decoder, 39
The socket panel, 41
Delete
Delete a recording – ADVANCED, 28
Delete a recording – BASIC, 19
Delete a Timer, 11
Displays and menus
Browse through your recordings, 16
Peripheral Unit Controller menu, 34
The display on the recorder,
6
Use the on-screen menus,
7
Use equipment menus, 35
View recordings in a Group, 24
What’s on the SETUP menu …, 37
DVD
Connect a DVD recorder, 39
The socket panel, 41
Edit
Delete a recording – ADVANCED, 28
Delete a recording – BASIC, 19
Edit a Timer, 11
Limit access to recordings Parental Lock, 32
Move a Group, 27
Name a recording, 30
Protect a recording – ADVANCED, 30
Protect a recording – BASIC, 18
Rename a Group, 26
Split one recording into two, 28
Trim a recording, 29
Groups
Move a Group, 27
Place recordings in a Group, 24
Rename a Group, 26
View recordings in a Group, 25
Hard disc recorder
Connect extra equipment to the hard disc
recorder, 39
Connect to your television, 39
Placement, 38
The display,
6
The socket panel, 41
How to use the on-screen menus,
7
Language
What’s on the MENU LANGUAGE menu, 48
Maintenance
Cleaning, 40
Placement guidelines, 38
Parental Lock
Limit access to recordings, 32
Set a Parental Lock code, 33
Pause
Pause and replay an on-going programme, 20
Pause and stop playback of a recording, 14
Pause replay, 21
The Beo4 remote control, 5
50
Placement
Placement guidelines, 38
Place recordings in a Group, 24
Playback
Automatic playback, 14
Cue through a recording, 15
Go to a specific point in time in playback, 15
Pause and stop playback of a recording, 15
Play a recording, 14
Select a recording, 14
Slow playback, 15
Step minute-by-minute through
a recording, 15
The Beo4 remote control,
5
Protection
Protect a recording – ADVANCED, 30
Protect a recording – BASIC, 18
Record
Check the Timers already set, 11
Copy from the replay buffer, 22
Copy to an external recorder, 31
Record here and now, 12
Stop a recording, 12
The Beo4 remote control,
5
Timer recording, 10
Timer recording via teletext, 13
Replay
Copy from the replay buffer, 22
Cue in replay, 21
Go to a specific point in time in replay, 21
Pause a programme, 20
Pause replay, 21
Replay a programme, 21
Slow replay, 21
Step minute-by-minute in replay, 21
The Beo4 remote control,
5
Search
Cue in replay, 21
Cue through a recording, 15
Go to a specific point in time in playback, 15
Go to a specific point in time in replay, 21
Slow playback, 15
Slow replay, 21
Step minute-by-minute in replay, 21
Step minute-by-minute through a
recording, 15
The Beo4 remote control, 5
Set-top box
Peripheral Unit Controller menu, 34
Direct Beo4 operation, 35
Use connected equipment in a link room, 35
Use equipment menus, 35
Socket panel
Connect the hard disc recorder to your
television, 39
The socket panel, 41
Space management
Protect a recording – ADVANCED, 30
Protect a recording – BASIC, 18
Stop
Pause and stop playback of a recording, 15
Stop a recording, 12
Stop copying to the external recorder, 31
The Beo4 remote control, 5
Teletext
Timer recording via teletext, 13
Timer recording
Check the Timers already set, 11
Delete a Timer, 11
Edit a Timer, 11
Timer recording, 10
Timer recording via teletext, 13
Tune
Fine-tune a TV program, 37
What’s on the TUNING menu, 49
TV programs
Fine-tune a TV program, 37
Pause and replay an on-going
programme, 20–21
Video tape recorder
Connect a video tape recorder, 39
Copy to an external recorder, 31
51
52
This product fulfils the conditions stated in
the EEU directives 89/336 and 73/23.
Bang & Olufsen cannot be held liable for any loss
of data due to hard disc breakdown.
Waste Electrical and Electronic Equipment
(WEEE) – Environmental protection
The European Parliament and the Council of the
European Union have issued the Waste Electrical
and Electronic Equipment Directive. The purpose of
the Directive is the prevention of waste of electrical
and electronic equipment, and to promote the reuse
and recycling and other forms of recovery of such
waste. As such the Directive concerns producers,
distributors and consumers.
The WEEE directive requires that both manufacturers
and end-consumers dispose of electrical and
electronic equipment and parts in an environmentally
safe manner, and that equipment and waste are
reused or recovered for their materials or energy.
Electrical and electronic equipment and parts must
not be disposed of with ordinary household refuse;
all electrical and electronic equipment and parts
must be collected and disposed of separately.
Products and equipment which must be collected
for reuse, recycling and other forms of recovery are
marked with the pictogram shown.
When disposing of electrical and electronic equip-
ment by use of the collection systems available in
your country, you protect the environment, human
health and contribute to the prudent and rational
use of natural resources. Collecting electrical and
electronic equipment and waste prevents the
potential contamination of nature with the
hazardous substances which may be present in
electrical and electronic products and equipment.
Your Bang & Olufsen retailer will assist with and
advise you of the correct way of disposal in your
country.
Small products may not always be marked with
the pictogram in which case this is present in the
instructions for use, on the guarantee certificate
and printed on the packaging.
For your information …
Your needs as a user are given careful
consideration during the design and
development process of a Bang & Olufsen
product and we strive to make our products
easy and comfortable to operate.
Therefore, we hope that you will take the
time to tell us about your experiences with
your Bang & Olufsen product. Anything
which you consider important – positive
or negative – may help us in our efforts to
refine our products.
Thank you!
To contact us, visit our Web-site on …
www.bang-olufsen.com
or write to:
Bang & Olufsen a/s
BeoCare
Peter Bangs Vej 15
DK–7600 Struer
or fax: Bang & Olufsen
BeoCare
+45 97 85 39 11 (fax)
54
Technical specifications, features and the use
thereof are subject to change without notice.
3507773 0705
www.bang-olufsen.com
5

Hulp nodig? Stel uw vraag in het forum

Spelregels
1

Forum

Bang-Olufsen-hdr-2
  • mijn tv start niet ik het er staat her op het scherm en ik moet op de tv ontvanger drukken om tv aan te zetten
    Gesteld op 5-11-2022 om 08:10

    Reageer op deze vraag Misbruik melden

Misbruik melden

Gebruikershandleiding.com neemt misbruik van zijn services uitermate serieus. U kunt hieronder aangeven waarom deze vraag ongepast is. Wij controleren de vraag en zonodig wordt deze verwijderd.

Product:

Bijvoorbeeld antisemitische inhoud, racistische inhoud, of materiaal dat gewelddadige fysieke handelingen tot gevolg kan hebben.

Bijvoorbeeld een creditcardnummer, een persoonlijk identificatienummer, of een geheim adres. E-mailadressen en volledige namen worden niet als privégegevens beschouwd.

Spelregels forum

Om tot zinvolle vragen te komen hanteren wij de volgende spelregels:

Belangrijk! Als er een antwoord wordt gegeven op uw vraag, dan is het voor de gever van het antwoord nuttig om te weten als u er wel (of niet) mee geholpen bent! Wij vragen u dus ook te reageren op een antwoord.

Belangrijk! Antwoorden worden ook per e-mail naar abonnees gestuurd. Laat uw emailadres achter op deze site, zodat u op de hoogte blijft. U krijgt dan ook andere vragen en antwoorden te zien.

Abonneren

Abonneer u voor het ontvangen van emails voor uw Bang Olufsen hdr 2 bij:


U ontvangt een email met instructies om u voor één of beide opties in te schrijven.


Ontvang uw handleiding per email

Vul uw emailadres in en ontvang de handleiding van Bang Olufsen hdr 2 in de taal/talen: Engels als bijlage per email.

De handleiding is 1,55 mb groot.


U ontvangt de handleiding per email binnen enkele minuten. Als u geen email heeft ontvangen, dan heeft u waarschijnlijk een verkeerd emailadres ingevuld of is uw mailbox te vol. Daarnaast kan het zijn dat uw internetprovider een maximum heeft aan de grootte per email. Omdat hier een handleiding wordt meegestuurd, kan het voorkomen dat de email groter is dan toegestaan bij uw provider.

Stel vragen via chat aan uw handleiding

Stel uw vraag over deze PDF

Andere handleiding(en) van Bang Olufsen hdr 2

Bang Olufsen hdr 2 Gebruiksaanwijzing - Nederlands - 56 pagina's

Bang Olufsen hdr 2 Gebruiksaanwijzing - Deutsch - 56 pagina's

Bang Olufsen hdr 2 Gebruiksaanwijzing - Français - 56 pagina's

Bang Olufsen hdr 2 Gebruiksaanwijzing - Espanõl - 56 pagina's


Uw handleiding is per email verstuurd. Controleer uw email

Als u niet binnen een kwartier uw email met handleiding ontvangen heeft, kan het zijn dat u een verkeerd emailadres heeft ingevuld of dat uw emailprovider een maximum grootte per email heeft ingesteld die kleiner is dan de grootte van de handleiding.

Er is een email naar u verstuurd om uw inschrijving definitief te maken.

Controleer uw email en volg de aanwijzingen op om uw inschrijving definitief te maken

U heeft geen emailadres opgegeven

Als u de handleiding per email wilt ontvangen, vul dan een geldig emailadres in.

Uw vraag is op deze pagina toegevoegd

Wilt u een email ontvangen bij een antwoord en/of nieuwe vragen? Vul dan hier uw emailadres in.


Info