650178
36
Verklein
Vergroot
Pagina terug
1/38
Pagina verder
Freestyle 130
User guide
Please open this page for an ‘At a
glance’ guide to your Freestyle 130.
A
B
C
J
K
L
T
U
V
G
H
I
P
Q
R
S
D
E
F
M
N
O
W
X
Y
Z
231
564
897
0
QUICKDIAL REDIAL
SECRECYINTERCOM
BATT
LOW
TALK
R
1471
Call
My Bill
Call
Waiting
At a glance
1
Volume control buttons
Adjusts the handset ringer volume
and earpiece speech volume.
see page 11
Talk button (and light)
For making and receiving calls.
see page 10
Intercom button (and light)
Enables communication between
the handset and base unit.
see page 14
Quickdial button
Allows you to store and dial up to
10 numbers in the memory. see
page 12
Call Return (1471) button
Lets you hear the
telephone number of the last
person who called you.
see page 18
Call My Bill button
Press for billing information.
see page 19
Charging contacts
Aerial
Does not extend, do not
pull out.
Channel seeker button
Selects the best alternative radio
frequency if interference occurs
during a call.
see page 11
Battery low light
Flashes when the handset
battery is low.
see page 8
Secrecy button
When pressed, it stops the
caller hearing you.
see page 14
Recall button
For use with PBXs and
Select Services.
see page 17
Redial button
Redials the last number dialled.
see page 11
Call Waiting button
Lets you switch between two
callers when Call Waiting has been
ordered from BT Select Services.
see page 18
POWER
IN USE
CHARGING
INTERCOM
MIC
Base unit
telescopic aerial
Microphone
In use light
Comes on when the
handset is in use.
see page 10
Intercom button
and light
Press to make or
answer an intercom
call. Light flashes when
an intercom call is
ringing and stays on
during the call.
see page 14
Charging light
Comes on when the
handset batteries are
being charged.
see page 7
Back-up battery
compartment
Holds 1 x PP3
alkaline battery.
see page 6
Power light
Lights up red when the
mains power is on.
see page 7
Intercom volume
button
Press to lower or raise
the speaker volume.
see page 15
Battery charging
contacts
PHONE LINE
12V AC
Mains power
socket
see page 7
Telephone line
cord socket
see page 7
2
In this guide
At a glance 1
Introduction 4
Setting up 5
Using your Freestyle 130 10
BT Select Services 18
Freestyle 90/130/1200 20
Additional Handsets
Help 23
Technical information 26
Maintenance 29
Index 32
Wall mounting 34
Hints and tips boxes
In this user guide, we’ve included helpful tips and
useful notes. They are shown in a grey box.
3
Introduction Your Freestyle 130 has
been designed for ease of use and made to the very high
standards set by BT.
We thank you for making the right
choice and expect that you will have
many years of quality service.
Please read the instructions carefully
before use and keep this user guide
for future reference.
For your records
Date of purchase:
Place of purchase:
Serial number:
(on the underside of the machine)
Purchase price:
For warranty purposes, proof of
purchase is required, so please keep
your receipt.
Emergency calls
The emergency services can be
contacted in the UK by dialling 999.
You may also dial 112, which is valid
in any country that is a member of the
European Community.
As the Freestyle 130 is a mains-
powered cordless telephone, in certain
situations you may not be able to make
an emergency call:
If there is severe radio interference.
If the handset batteries fail.
If there is a power cut and there is no
back-up battery in the base unit.
If your Freestyle 130 is connected to a
PBX (switchboard), you may have to
dial an access number before 999 to
contact the emergency services.
Some switchboards cannot dial out
during a power failure.
4
Check that your Freestyle 130 is
complete. When you unpack, you
should have:
Freestyle 130 handset.
Freestyle 130 base unit with
telephone line cord attached.
Mains power adaptor plug.
Wall mounting bracket with
screws.
Spare Quickdial directory label
Setting up Follow these steps to get your
Freestyle 130 ready for use.
Electrical storm warning
1
During periods of electrical storm,
you are advised to disconnect your
apparatus because damage may
occur.
2 If a fault occurs during the 12-month
warranty period and it is due to
accidental or wilful damage
(including lightning and electrical
damage), BT will not replace or
repair free of charge.
Important
As this product is rechargeable, it is
normal that a certain amount of heat
will be produced in its day-to-day
operation. While this is entirely safe,
we advise against placing this product
on antique, veneered or wooden
surfaces as damage may occur.
Plan where you will put your Freestyle
130.
It should be within two metres of a
power socket and the phone socket.
You need enough room for the base
unit’s telescopic aerial to be fully
extended.
For the best operating conditions, try
to place the base unit away from
large metal objects and other
electrical appliances.
5
3 Insert battery in base
unit (for back-up only)
To fit the back-up battery, release
the retaining clips, lift off the
battery compartment cover and
insert one new PP3 alkaline battery
(not supplied) as shown in the
diagram above. Replace the battery
compartment cover.
A good quality, fresh battery should
last about six months. To ensure
constant battery back-up, replace it
every six months.
1 Handset aerial
Your Freestyle 130 uses a compact
aerial which does not pull out.
2 Check your telephone
wall socket
If you do not have a modern phone
socket, call BT on
Freefone 0800
800 150 and ask for an engineer to
come and fit the right socket within
two metres of a mains socket.
9V
If your Freestyle 130 is your only
phone, you should fit a back-up battery
in the base unit so that your phone can
always be used in emergencies.
Like all cordless phones, your Freestyle
130 handset will need charging for 24
hours before use.
Setting up
6
If the power fails, the back-up battery
will give you up to one hour talktime
or seven hours on standby.
Setting up
7
Warnings
1
Do not try to use any power supply
other than the one provided. This
may permanently damage your
Freestyle 130.
2 Your Freestyle 130 should not be
fitted in wet or damp conditions, for
example in a bathroom. Also, the
handset should not be left out in
the rain.
3 There is a slight chance that your
phone could be damaged by an
electrical storm. We recommend
that you unplug the base unit from
the mains during storms.
4 Plug the power cable
into the back of the base
unit
Plug the adaptor cable into the
socket on the back of your
Freestyle 130.
PHONE LINE
12V AC
5 Connect the base unit
three-pin adaptor to a
power socket
When the power is switched on at
the mains, the red
POWER light on
the base unit will light up.
POWER
6 Charge the handset
When you first use your Freestyle
130, the rechargeable battery in the
handset needs charging for 24 hours.
Make sure you have connected
your Freestyle 130 to the mains
power supply; see steps 4 and 5.
Place the handset on the base
unit, ensuring the contacts are
touching. The red
CHARGING light
comes on.
The CHARGING light remains
on while the handset is on the
base unit.
When sufficiently charged for use,
the
CHARGING light turns green.
Mains power adaptor
The Freestyle 130 must only be used
with the adaptor supplied.
Using any other adaptor will result in
non-compliance with EN60950:1992,
and will invalidate the approval given
to this apparatus.
Setting up
8
7 Plug the phone into the
BT socket
You can now use the phone, store
numbers in the memory and
change some of the settings as
desired.
As a rule, placing the handset on
the base unit overnight will keep
the battery fully charged for all
normal use.
Battery care
The battery cannot be overcharged.
However, leaving the handset on the
base unit all the time can deteriorate a
rechargeable battery. To get the longest
possible life from your battery, take the
handset off the base unit for a few
hours each day.
When fully charged and in good
condition, the handset battery will
provide up to 5 hours continuous talk
time or 72 hours standby.
If the handset battery is running low,
the BATT LOW light will flash every
10-15 seconds.
If you are making a call and the
handset battery is running low, the
phone will beep every 10-15 seconds.
Place the handset on the base unit to
recharge.
BATT
LOW
Automatic Quickcharge
When the handset batteries start to
run low, your Freestyle 130 will
automatically switch to Quickcharge
when you place the handset on the
base unit.
Quickcharge is indicated by a red
CHARGING light
For the best reception
Try to avoid putting the telescopic
aerial near other electrical appliances,
fluorescent lights and large metallic
objects such as cookers, radiators and
garage doors as these may cause
interference and reduce the quality of
your calls.
8 Extend the base unit
telescopic aerial
Extend the base unit telescopic
aerial on your Freestyle 130 (as
shown below) to ensure the best
possible signal and reception.
9 To wall mount your
product
(See ‘Wall mounting’, page 34.)
To plan the location of the base unit
Your Freestyle 130 works by sending
and receiving radio signals between
the base unit and the handset.
The strength of the signal depends
on where you site the base unit and
how the aerial is deployed. The
higher the base unit is located, the
better. An upstairs room is ideal.
The following points should be
considered:
It should be within easy reach of
a mains socket and a telephone
socket. A new-style telephone
socket is needed for this product.
If you do not have one, call us on
Freefone 0800 800 150.
Try to avoid locations near
metallic obstructions or electrical
appliances, such as TV sets,
fridges, computers, fluorescent
lights, radiators, metal pipes and
metal window frames.
The Freestyle 130 can be wall
mounted by using the bracket
and screws supplied; see page 34.
PHONE LINE
12V AC
Setting up
9
10
To end a call
Press the TALK button.
Or
Replace the handset on the base unit.
To receive a call
When the phone rings:
If your handset is on the base unit,
simply pick it up to answer the
call.
Or
If your handset is off the base
unit, press the
TALK button to
answer the call.
Making and receiving
calls
The handset range is up to 250
metres from the base unit in ideal
conditions. If you start to go out of
range while using the phone, you
will hear warning beeps. If you do
not come back in range, your call
will be disconnected.
To make a call
Lift the handset off the base unit.
Press the
TALK button. The TALK
light comes on and the handset
buttons illuminate. The
IN USE
light on the base unit comes on.
Listen for the dialling tone.
Dial the number you want.
Using your Freestyle 130
If you do not hear a dialling tone after
pressing the TALK button, wait a few
seconds. On a few exchanges, there
may be a delay.
TALK
TALK
An Inductive Coupler has been
built into the handset to improve
sound quality for people using hearing
aids. Switch your hearing aid to T and
adjust the position of the handset until
you get the best reception.
TALK
Using your Freestyle 130
11
To adjust the speech volume
During a conversation you can
adjust the volume of the incoming
caller:
Press the + button (on the side of
the handset) to increase the
speech volume.
Press the - button to decrease the
speech volume.
Last number redial
Freestyle 130 remembers the last
number called and enables easy
redialling.
To redial the last number called
Press the TALK button and wait
for a dialling tone.
Press the REDIAL button. The
number is dialled automatically.
To use the channel seeker button
Your Freestyle 130 automatically
scans the available radio channels
for quality of reception, and selects
the best one to use.
If you experience interference
during your call, press the
CHANNEL SEEKER button (on the
side of the handset) to select a
different channel.
To adjust the handset ringer
volume
When the handset is not in use you
can adjust the ringer volume:
Press the + button (on the side of
the handset) to increase the
handset ringer volume.
Press the - button to decrease the
handset ringer volume.
The lowest setting will turn the
handset ringer off.
CHANNEL
SEEKER
VOLUME
VOLUME
REDIAL
Using the memory to
store and dial numbers
Your Freestyle 130 handset can store
up to ten separate phone numbers.
You can then dial each number by
pressing just two buttons.
To store a number in the memory.
Press the QUICKDIAL button.
Press one of the 0-9 buttons to set
the location code under which the
phone number will be stored.
Dial the number you want to
store. A maximum of 20 digits can
be stored in each location.
Press the QUICKDIAL button. You
hear a confirmation beep. The
number is stored.
Repeat these steps for any other
numbers you want to store, using
different
0-9 location code for
each one.
Storing a number in the memory
automatically overwrites any previous
number stored under the same location
code.
Stored numbers can include
switchboard and network services that
use the and
#
buttons as well as
PAUSE and RECALL functions.
QUICKDIAL
Quickdial directory label
Use the handset’s Quickdial directory
label to keep a record of which 0-9
location code you have used for each
number.
You can take out the label by removing
the handset battery compartment cover
and sliding out the label’s clear plastic
cover.
HANDSET NO.
MEMORY
1
MEMORY
2
MEMORY
3
MEMORY
4
MEMORY
5
MEMORY
6
MEMORY
7
MEMORY
8
MEMORY
9
MEMORY
0
Using your Freestyle 130
12
Using your Freestyle 130
13
To dial a stored number
Press the TALK button.
Press the QUICKDIAL button.
Press the 0-9 location code under
which the number you want is
stored. The number is dialled
automatically.
To store a number of more than
20 digits
Press the QUICKDIAL button.
Press one of the 0-9 buttons to set
the location code under which
your phone number will be stored.
Dial the first 20 digits.
Press the QUICKDIAL button. You
hear a confirmation beep. The
number is stored.
Press the QUICKDIAL button
again.
Press another 0-9 button to select
a second location code under
which to store the remaining
digits.
Dial the remaining digits.
Press the QUICKDIAL button. You
hear a confirmation beep. The rest
of the number is stored.
QUICKDIAL
To dial a stored number of more
than 20 digits
Press the TALK button.
Press the QUICKDIAL button, then
the first 0-9 location code
number. The number begins
dialling automatically.
When the first part of the number
has been dialled press the
QUICKDIAL button again, then the
second
0-9 location code number.
The rest of the number is dialled.
To change a stored number
Any existing number stored in the
memory can be overwritten by
entering a new number under the
same location code. Simply follow
the steps shown in ‘To store a
number in the memory’, page 12.
To clear a stored number
Press the QUICKDIAL button.
Press the 0-9 location code.
Press the QUICKDIAL button
again.
You hear a confirmation beep.
You can mix manual and memory
dialling as required. For example,
you can dial the area code 0181 380
from the memory and then complete
the number manually.
QUICKDIAL
QUICKDIAL
Using the Secrecy button
During a call, you may want to say
something to another person nearby
without your caller hearing you.
Press the SECRECY button. The
TALK light flashes. You can hear
the caller, but they cannot hear
you.
Every 7 seconds the handset beeps
to let you know there is a call on
hold.
Press the SECRECY button again
to resume your conversation. The
TALK light stops flashing.
SECRECY
Using your Freestyle 130
14
Using the Intercom
Your Freestyle 130 lets you hold a
conversation between the handset
and base unit.
To call the base unit from the
handset
At the handset:
Press the INTERCOM button on
the handset. The
INTERCOM light
and the backlit keypad come on
and flash. The base unit
INTERCOM
light flashes and both the handset
and base unit ring.
If the base unit does not reply to an
intercom call, press the
INTERCOM
button again to cancel the call.
At the base unit:
Press the INTERCOM button and
speak into the microphone. The
INTERCOM light stops flashing but
stays on.
INTERCOM
INTERCOM
Using your Freestyle 130
15
Ending an intercom call:
Press the INTERCOM button on
the handset or base unit. Both
INTERCOM lights on the handset
and base unit go out.
To call the handset from the
base unit
At the base unit:
Press the INTERCOM button on
the base unit. The base unit
INTERCOM light flashes and both
the handset and base unit ring.
If the handset does not reply to an
intercom call, press the
INTERCOM
button again to clear the call. You
cannot make an intercom call if the
handset is busy.
At the handset:
Press the INTERCOM button and
speak. The
INTERCOM light stops
flashing but stays on.
Ending an intercom call:
Press the INTERCOM button on
the handset or base unit. Both
INTERCOM lights on the handset
and base unit go out.
To adjust the INTERCOM
loudspeaker volume at the
base unit
Press the left-hand side of the
VOLUME switch to lower the
volume.
Press the right-hand side of the
VOLUME switch to raise the
volume.
You cannot use the intercom while a
call is in progress. The intercom will
beep for 60 seconds and then
automatically cut off if not answered.
INTERCOM
If there is an incoming call when using
the intercom, the base unit and
handset will ring. To take the call,
press the TALK button on the handset.
The intercom call is cut off automatically.
INTERCOM
Using your Freestyle 130
16
Changing the telephone
settings
To set the base unit ringer volume
(Located on the underside of the
base unit)
You can set the base unit ringer
volume to
HI, LO or OFF. If the base
unit ringer is switched
OFF, the
handset will still ring providing the
handset ringer is not switched to
OFF.
To set the tel mode switch
(Located on the underside of the
base unit)
The tel mode switch selects tone or
pulse dialling and earth or time
break recall:
T-TB – Your Freestyle 130 is
preset to this position. Most
modern exchanges use tone
dialling and time break recall for
faster dialling, and for services
such as BT Select Services and
telephone banking.
RINGER
HI
LO
OFF
T-E – This setting is for use if you
are connected to a tone dialling
PBX (private branch exchange)
that uses earth recall.
P-E – If you dial a number when
your Freestyle 130 is set to
T-TB
or T-E and you continue to hear
the dialling tone, you may be
connected to an older pulse
dialling exchange. Set the switch
to
P-E (pulse dialling).
To switch from Pulse to Tone
dialling during a call
If you are connected to a pulse
dialling exchange, you can still use
services such as phone banking
that require tone dialling.
Call the telephone number you
require in pulse mode as usual.
When you have been connected,
press the button on the keypad
to set your telephone to tone
dialling for the duration of the call.
When you hang up, your
Freestyle 130 will automatically
switch back to pulse dialling.
TEL
MODE
T-TB
T-E
P-E
Using your Freestyle 130
17
To insert a pause
With some switchboards, after
dialling the access code you may
have to wait for a moment while the
switchboard picks up an outside
line. If so, press the
REDIAL button
to insert a pause before keying in
the telephone number.
To use the recall button
This button signals either time break
recall or earth recall depending on
the setting of the
TEL MODE switch.
If you are connected to a PBX
(Private Branch Exchange), contact
your PBX supplier for further
information.
REDIAL
R
18
Call Waiting
If an incoming call arrives while you
are already engaged on a telephone
call you will hear a soft beep every 5
seconds (this beep is not audible to
the person you are speaking to).
Instead of the engaged tone, the
second caller will hear an
announcement to hold on as you are
aware that there is a second call.
To use Call Waiting
You can answer the second call,
without disconnecting your first
caller, by pressing the
CALL
WAITING button. The first caller
will be put on hold.
BT Select Services
If you are connected to a digital
exchange, you can subscribe to a
range of BT Select Services. If you
wish to subscribe to any of these
services contact us on Freefone
0800 800 152 business, 150
residential, 8am to 6pm, Monday to
Friday.
Call Return (1471)
This service lets you easily find who
called your number last.
To use the 1471 feature
Press the TALK button and wait
for a dialling tone.
Press the 1471 button. You hear
the number of your last caller
announced and the time they
called. If a call is made and the
caller withholds their number, the
time of the call is still stored but
not the number.
Press the TALK button again – or
replace the handset on the base
unit – to return to standby.
1471
Call
Waiting
To withhold your own number
Dial 141 before you dial the number
you want. You will need to do this even
if you are ex-directory.
BT Select Services
19
When you have spoken to the
second caller you can return to
the first caller by pressing the
CALL WAITING button again. You
can switch back and forth
between the two calls without
disconnecting either if you wish.
The second caller will only be
charged for their call from the
moment you answer and not while
they are waiting for your initial
contact.
Call My Bill
This feature gives you the cost of
calls recorded on your telephone
number since your last bill.
To use Call My Bill
Lift the handset.
Press the
TALK button and wait
for a dialling tone.
Press the
CALL MY BILL button.
The call is answered by a
recorded voice message.
Follow the instuctions given by
the voice.
When you have finished your call,
press the
TALK button or replace
the handset.
Other services
Call Barring
Call Diversion
Charge Advice
Reminder Calls
Three-way Calling
For more information about these
Select Services, call BT on
Freefone 0800 800 152. If you are
not on the BT network please ask
your telecommunications supplier
for information on their services.
Before phoning the Call My Bill service,
you need your BT customer number.
This is in the top right-hand corner of
your phone bill.
Call
My Bill
20
To register an additional handset
Press and hold the INTERCOM
button on the base unit for 5
seconds. The base unit will beep
and the
IN USE light will flash.
When the
IN USE light begins to
flash, release the
INTERCOM
button and place the additional
handset on the base unit.
Your additional handset is
registered automatically and you
will hear a confirmation beep and
the
IN USE light will stop flashing.
Freestyle 90/130/1200
Additional Handsets
You can buy and use up to 3
Freestyle additional handsets with
your Freestyle 130 to extend your
phone system, without needing to
install extension sockets for each
new phone.
Each additional handset is supplied
with its own charger and user
instructions, however the following
information will tell you how to
register and use an additional
handset with your Freestyle 130.
Registering your handset
You must register your Freestyle
additional handset before it can be
used with your Freestyle base unit.
Make sure that each additional
handset is registered with a
different number (2,3 or 4) so it can
be identified from other additional
handsets.
INTERCOM
Your additional handset must be
placed on the base unit within five
seconds of the IN USE light flashing.
Freestyle 90/130/1200 Additional Handsets
21
To erase a registration code
Press the QUICKDIAL button.
Press the
CHANNEL SEEKER
button.
Press the
button four times.
Press the
QUICKDIAL button.
You will hear a confirmation
beep, the old registration code is
now erased and you can re-
register your additional handset
following the procedure above.
To re-register an additional
handset
If necessary you can re-register
your additional handset by simply
following the steps described in ‘To
register an additional handset’on
the previous page.
Before re-registering the old
registration code must first be erased.
To check that your additional
handset is registered correctly
Lift the additional handset.
Press the TALK button.
Listen for the dial tone.
If you do not hear a dial tone, your
additional handset is either out of
range of your Freestyle 130, the
Freestyle 130 phone line cord is not
plugged in, it has not been
registered properly or you may
have purchased the wrong
handset - check that the handset
you have is item code: 871267.
This can be found on the side of
your giftbox.
Setting the handset
number
Each additional handset must be
assigned an identity number (1, 2, 3
or 4). Your Freestyle 130 handset is
already numbered as
HANDSET 1,
additional handsets can then be
numbered as they are added.
To set a handset identity number
Press and release the
QUICKDIAL button.
Press and release the
SECRECY
button.
Enter the identification number
(1-4) using the keypad.
When you have entered the
number press the
QUICKDIAL
button.
You will hear a beep confirming
that the new number has been
stored.
Your Freestyle additional handset is
pre-set to handset number 2.
Make a note of the identification
number by writing it on the handset’s
directory label.
Freestyle 90/130/1200 Additional Handsets
22
Basic use of Freestyle
additional handsets
Basic operation of additional
handsets is the same as that of your
Freestyle 130 handset.
The handset range is up to 250
metres from the base unit in ideal
conditions. If you start to go out of
range while using the phone, you
will hear warning beeps. If you do
not come back in range, your call
will be disconnected.
To make a call
Lift the handset off the charger.
Press the
TALK button. The TALK
light comes on and the handset
buttons illuminate.
Listen for the dialling tone.
Dial the number you want.
To end a call
Press the TALK button or replace
the handset.
Like all cordless phones, the Freestyle
additional handset must be charged for
24 hours.
Transferring calls
between handsets
Whilst on a call (ie. in talk mode):
Press the
SECRECY button.
Enter the number of the handset
you want to transfer the call to.
The specified handset will ring.
To answer the call press the
TALK
button.
If you do not hear a dialling tone after
pressing the TALK button, wait a few
seconds. On a few exchanges, there
may be a delay.
If the call is not answered it is
returned to the original handset after
30 seconds. The original handset will
ring to let you know if this has
happened. To avoid having to wait 30
seconds for the call to be returned, you
can press the TALK button to cancel
the transfer of the call.
23
Help If you have any problems using your
Freestyle 130, this section will give you the most common,
easy-to-follow solutions.
No dialling tone.
Telephone will not dial out.
Telephone cannot receive
calls.
Beeps six times and drops
calls.
Telephone not connected to
telephone line.
Mains disconnected and back-up
battery is not installed or is flat.
Power cut, and back-up battery is
not installed or is flat.
Handset battery pack is discharged.
Replace handset on base unit for 10
seconds and try again. If this does
not work, disconnect the handset
battery from the handset for 10
minutes. Also disconnect the mains
power and back-up battery.
Then reconnect the battery and
reconnect the base unit to the mains,
then replace the handset on the base
unit for 10 seconds and try again.
Plug the telephone into the
telephone line.
Reconnect and install or replace
the back-up battery.
Wait until the power is restored and
install or replace the back-up battery.
Place the handset on the base unit
and recharge it for 24 hours
ensuring the
CHARGING light is on.
Telephone problems Possible cause Solution
You have dialling tone but
the telephone will not dial
out.
You may be trying to use tone
dialling on a pulse dialling
exchange.
You are connected to a PBX and are
not dialling the access code.
Set the mode switch to P-E (pulse
dialling).
Use the PBX access code.
Handset does not ring.
No lights on handset.
Handset battery pack is discharged. Place the handset on the base unit
and recharge it for 24 hours.
Handset does not ring, but
lights show on the handset.
The handset ringer may be set to its
minimum setting.
Increase the handset ringer volume.
Help
24
Telephone problems Possible cause Solution
Base-unit rings too
loudly / softly
The ringer switch on the base unit is
set to
HI or LO
Set the ringer switch on the base
unit accordingly.
Neither base unit or handset
ring, but lights show on base
unit and handset.
The ringer volumes on both the
handset and base unit could be set
to minimum.
Check the REN (see page 27). If you
connect too many telephones or
devices to your line they may not all
operate correctly.
If your telephone is connected to an
extension socket, it may have been
connected incorrectly.
Increase the ringer volume on the
base unit and handset.
If the REN exceeds 4, disconnect
one or more telephones or devices.
Check with your telephone engineer
that the extension socket has been
installed correctly.
Base unit does not ring but
lights show on base unit.
Telephone is not connected to the
telephone line.
The base unit ringer switch is set to
OFF.
Line fault or faulty socket.
Plug the telephone into the
telephone socket.
Set the base unit ringer switch to
HI or LO.
Try the telephone on another socket
or another line. If the telephone
works, contact BT or your telephone
network operator for repairs to the
line or socket.
No number stored on 1471,
CALL WAITING and/or CALL MY
BILL button.
Stored number may have
inadvertently been overwritten.
Press the
QUICKDIAL button, press
the relevant Select Services button,
then press the
QUICKDIAL button
again. This will reset the button.
No Quickdial store.
You may be trying to store the
number with the
TALK light on.
Ensure that the
TALK light is off
before storing the number.
Callers are faint.
Interference.
Buzzing.
Whooshing.
Echoing.
Tinniness.
The base unit telescopic aerial is not
extended as high as possible.
You are moving out of range.
Radio channel interference.
The base unit or the handset are too
close to electrical equipment or
metal obstructions.
Extend the base unit telescopic
aerial as far as possible.
Move closer to the base unit.
Press the
CHANNEL SEEKER button on
the handset, to select a clearer channel.
Press the
CHANNEL SEEKER button on
the handset, to select a clearer channel.
Relocate the base unit or move
around with the handset until
reception improves.
Help
25
Telephone problems Possible cause Solution
Batt low light on the handset
is flashing.
The handset needs recharging. Replace the handset on the base
unit, ensuring that the base unit is
plugged in and that the
CHARGING
light is on.
No Charging light on the
base unit.
Dirty contacts on base unit or
handset.
Clean the contacts with a dry cloth.
Heavy soiling can be removed with a
pencil eraser.
Back-up battery fails
frequently.
Frequent power failures will drain
the back-up battery.
Unplugging the base unit from the
power supply drains the back-up
battery.
Switching the mains supply off will
drain the back-up battery.
Leave the base unit plugged in, or
remove the back-up battery before
unplugging.
Do not switch off, or remove the
back-up battery before switching off.
Need more help?
Call the BT Cordless Phone Helpline on
Lo-call 0845 7697146 where fully
trained staff can help you from 9.00am
to 5.30pm Monday to Friday (calls
charged at local BT rate).
It is not permitted to interfere with the
main BT socket or wiring. If you have
a problem, contact BT on Freefone
0800 800 151 for residential or
Freefone 0800 800 154 for business
lines.
Call appears to have been
cut off after pressing the
SECRECY button
You may have pressed a number key
on the handset after pressing the
SECRECY button. The current
handset will try to transfer the call
to another handset.
Wait 30 seconds; the call will return
to the current handset. Or press the
TALK button and the call will return
immediately.
Official approval
Your Freestyle 130 is tested and
approved for connection to public
networks, provided that it is used in
accordance with the guidelines in
this user guide.
You may connect it:
To direct exchange lines.
To extensions with new plug and
socket arrangements provided
with these direct exchange lines.
To compatible switchboards.
You may NOT connect it:
To shared service (party) lines.
As an extension to a payphone.
Approval for use
The base unit is intended for use
when powered from the 12V AC
mains adaptor supplied, which
conforms to EN60950. Any other
usage will invalidate the approval
Technical information
This phone is designed for UK use only.
Using it abroad may violate local
radio laws.
given to this apparatus if, as a
result, it ceases to comply with
EN60950.
Call security
Your Freestyle 130 has its own
digital security code that prevents
other cordless phone owners from
using your phone line. This ensures
that you are charged only for calls
using your phone. However, all
approved cordless phones use radio
signals to communicate between the
base unit and cordless handset units.
It is therefore possible that your
conversations could be overheard by
other people, on their cordless
phones, or on ordinary radios that
use the same radio frequencies.
As this problem applies equally to
all similar cordless phones currently
available in the UK, call privacy
cannot be guaranteed. However, the
security coding prevents
unauthorised use of your line.
26
You may find that your Freestyle
130 picks up conversations from
other cordless phones being used
nearby. If you experience this type
of interference try changing
channels using the
CHANNEL
SEEKER button on the handset.
Transmission frequencies
This cordless telephone has been
designed to operate on radio
frequencies which have been
assigned to the exclusive use of
cordless telephones. As the use of
cordless telephones becomes more
widespread, the quality of service
obtained from this apparatus may
lessen.
Transmission frequencies of
available channels:
Ringer Equivalence Number (REN)
Although you may have any
number of sockets, it is important
to limit the number of telephones
and other items of apparatus
connected to the line by those
sockets, to ensure that each
telephone will ring. Every
telephone or item of apparatus has
a Ringer Equivalence Number
(REN). In most cases a standard
line should provide enough current
for two or more telephones or items
of apparatus, if the REN's add up to
no more than 4.
Freestyle 130 has a REN of 1. Any
telephone provided by BT may be
assumed to have a REN of 1 unless
otherwise stated on the base unit.
Even where the number of
telephones has been limited, there is
no guarantee that different types of
telephone on the same line will ring.
Safety advice
Don’t use your Freestyle 130 in
the open air during
thunderstorms. Unplug it from
the telephone line and the mains
socket when there are storms in
your area.
Don’t use your Freestyle 130
outdoors in the rain, or handle it
with wet hands.
1
2
3
4
5
6
7
8
31.0375
31.0625
31.0875
31.1125
31.1375
31.1625
31.1875
31.2125
39.9375
39.9625
39.9875
40.0125
40.0375
40.0625
40.0875
40.1125
Channels Base Unit Tx Handset Tx
Freq./MHz Freq./MHz
Technical information
27
Don’t install the base unit near a
sink, bath or shower. Electrical
appliances can cause serious
injury if used when you are wet
or standing in water.
• Don’t install the base unit where
the various leads can be tripped
over or walked on. This may
cause injury, or damage to the
leads and your Freestyle 130.
Connection information
Your Freestyle 130 may be
connected to public networks in
the United Kingdom.
It may also be connected to
compatible switchboards. If in
doubt, your switch supplier or
maintainer should be able to offer
help. Advice on connection to BT
switching systems can be
obtained by dialling BT Freefone
0800 800 152.
If you do not have a compatible
switchboard, it cannot be
guaranteed that your Freestyle 130
will operate correctly under all
possible conditions of connection.
Technical information
28
Firmly hold the handset in both
hands with the back towards you
and the bottom end away from you.
Push the depression in the
battery compartment cover,
inward and away from you with
both thumbs, to remove it.
Undo the plastic belt securing the
battery pack.
Remove the old battery pack by
unplugging the small white plug
that connects it to the handset.
Insert the small white plug of the
new battery pack. (If you look at
the shape of the plug and socket,
you will see that it can only be
inserted one way).
Place the battery pack in the
recess, secure it with the plastic
belt and refit the compartment
cover.
Replace the handset on the base
unit and charge for a full 24 hours.
The battery pack must be
recycled or disposed of properly.
Do not burn or puncture as it
could release toxic material which
may cause injury.
Maintenance
Installing a handset battery pack
and recharging
Replacing the handset on the base
unit to recharge over night should
keep the Freestyle 130 operative for
normal use. In time the handset
battery pack will no longer hold a
sufficient charge and should be
replaced.
To change the handset battery
pack
The handset battery compartment
is located at the back of the handset
at the lower end.
29
Ni-Cad Battery
Ni-Cad Battery
8
MEMORY
9
MEMORY
0
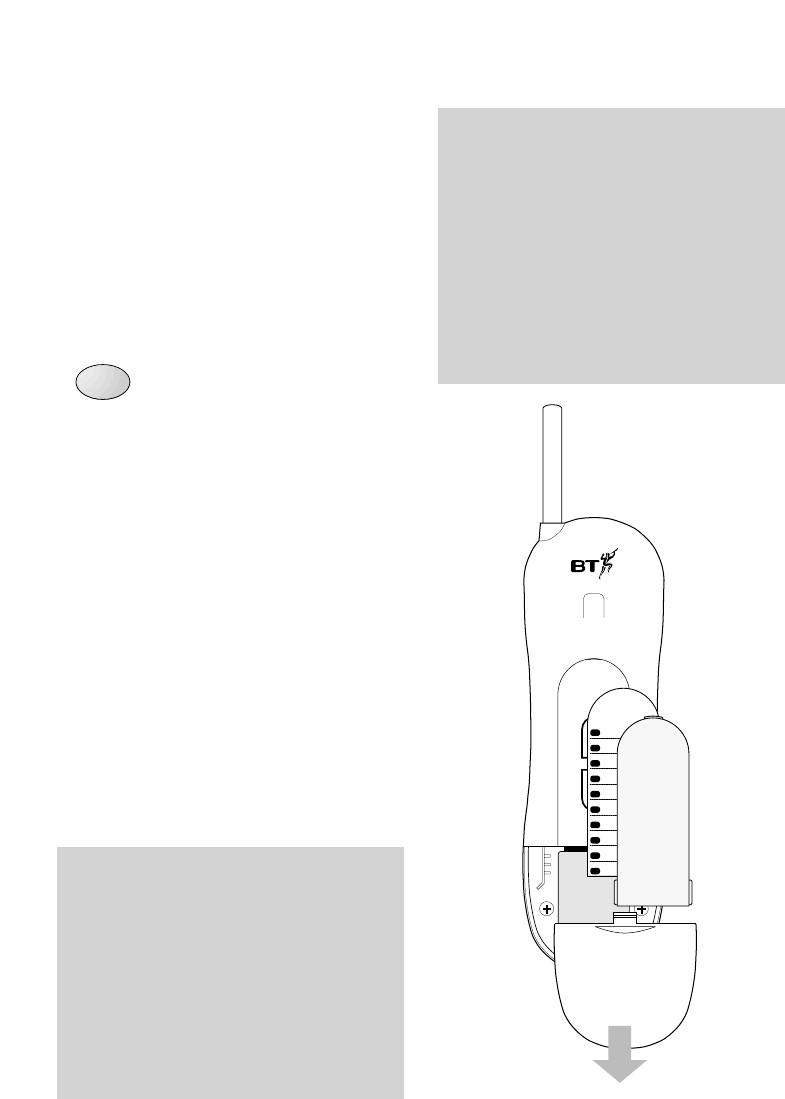
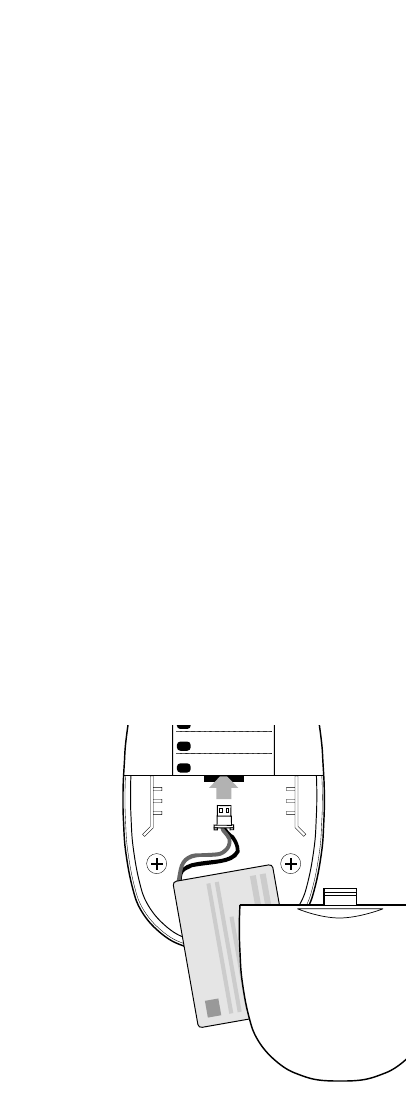
In the event of a power failure
During a power failure, if you have
fitted fresh alkaline back-up battery
in the base unit, your telephone will
continue to work for up toonehour
in use or seven hours on standby.
When power has been restored,
you are advised to renew the back-
up battery in the base unit, though
this should not be necessary if the
power has only been disconnected
momentarily.
Care of rechargeable battery
pack
When you first install the
Freestyle 130, or replace the
battery pack, the handset must be
fully charged for 24 hours before
use.
To maintain optimum charge and
battery condition, the handset
should be allowed to fully
discharge about every four months.
Dispose of Ni-Cad battery packs
safely.
Do not puncture or burn them.
They contain toxic materials
which could cause injury.
General cleaning
Clean the cabinet of the handset
and the base unit with a soft cloth
slightly dampened with a mild
solution of water and detergent.
Charging contacts should be
cleaned with a dry cloth or for
heavy soiling a pencil eraser can be
used.
Do not clean with a wet cloth.
Do not clean with abrasive
materials or solvents as these
may damage the unit.
Do not spray aerosol cleaners
onto the base unit or handset.
Extended periods of non-use
It is recommended that you:
Disconnect the base unit from
both mains supply and telephone
line.
Remove the back-up battery from
the base unit and handset.
When reconnecting, check that
the
CHARGING light on the base
unit is on. Recharge the handset
battery for 24 hours.
Maintenance
30
Spare parts for your Freestyle 130 are
available from your BT shop or
supplier, or you can contact us on
Lo-call 0845 7697146 from 9.00am
to 5.30pm Monday to Friday.
Guarantee
BT guarantees Freestyle 130 for a
year, provided that:
The goods have only been used
for their intended purpose, and
have not been subjected to
misuse, or been wilfully or
accidentally damaged.
The goods have not been
tampered with or repaired by
anyone other than BT, its staff or
agents.
If you are having problems with
your Freestyle 130, read the ‘Help
section on pages 23 to 25 of this
user guide.
If you are still having problems you
can contact the BT product helpline
on Lo-call 0845 7697146 where
fully trained staff can help you from
9.00am to 5.30pm Monday to
Friday.
If the unit is faulty within the
guarantee period, return it with
proof of purchase to your supplier,
for repair or replacement.
If the Freestyle 130 needs repair
outside the guarantee period, take
the complete Freestyle 130 to any
BT shop for forwarding to the
repair department (there will be a
carriage charge for this service).
Alternatively you can call the repair
centres on
01325 304346 or
01672 564444 between 9.00am and
4.30pm, Monday to Friday.
The terms of this guarantee do not
affect your statutory rights.
Maintenance
31
Index
At a glance 1
Introduction 4
Emergency calls 4
Setting up 5
Aerial
Base unit 9
Handset 6
Back-up battery – fit in base unit 6
Charging the handset 7
Planning location 9
Power cable 7
Telephone wall socket 8
Using your Freestyle 130 10
Base unit ringer volume 16
Channel seeker 11
Handset ringer volume 11
Last number redial 11
Intercom 14
Making a call 10
Memory
Change a stored number 13
Clear a stored number 13
Dial a stored number 13
Dial more than 20 digits 13
Quickdial directory label 12
Store a number 12
Store more than 20 digits 13
Pause 17
Pulse and Tone dialling 16
Recall button 17
Receiving a call 10
Secrecy button 14
Speech volume 11
Telephone mode switch 16
BT Select Services 18
Call My Bill 19
Call Return (1471) 18
Call Waiting 18
Other Select Services 19
Freestyle 90/130/1200 20
Additional Handsets
Basic use of additional handsets 22
Erasing a handset registration code 21
Re-registering an additional handset 21
Registering your additional handset 20
Setting the handset number 21
Transferring calls between handsets 22
32
Help 23
Technical information 26
Call security 26
Connecting to a switchboard 28
Connection information 28
REN (Ringer Equivalence Number) 27
Safety advice 27
Transmission frequencies 27
Maintenance 29
Changing handset battery pack 29
Care of handset battery pack 30
General cleaning 30
Guarantee 31
Installing handset battery pack 29
Power failure 30
Wall mounting 34
Index
33
34
Your Freestyle 130 can be wall-
mounted by using the bracket
provided.
You can use the bracket as a
template to mark where the screws
should go into the wall.
Drill two holes for the screws and
insert the wallplugs provided (if
required).
Drive the screws into the wall,
leaving about 5mm free on which
to mount the bracket.
Hook the bracket over the screw
heads to check if it fits correctly,
then remove again.
Make sure that the power supply
and the telephone cables are
connected to the base unit, then
fit the cables into the channels on
the bottom of the base unit.
Clip the bracket onto the base
unit as shown on the next page.
Hook the bracket with the phone
attached over the screw heads.
Wall mounting
Spare parts for your Freestyle 130 are
available from your BT shop or
supplier, or you can contact us on
Lo-call 0845 7697146 between 9.00am
and 5.30pm Monday to Friday.
WALL
WALL PLUG SCREW
28mm
Before you wall-mount your Freestyle
130, check that:
the wall can support the weight of
the base unit and handset;
the position you choose leaves
sufficient space so that the base unit
(which is larger than the bracket) is
clear of any obstruction on the wall,
such as a shelf or cupboard. Room
should be left so that the handset can
be placed on charge without
touching any obstructions.
leave enough room for aerial to be
extended when wall mounted.
Attach the bracket by
hooking it over the screws
protruding from the wall.
2
1
SQUEEZE
INWARDS
Wall mounting
35
APPROVED for connection to
telecommunication systems specified
in the instructions for use subject to
the conditions set out in them
504387
CE compliant to 89/336/EEC
(EMC Directive) & 73/23/EEC
(Low Voltage Directive)
Offices in Europe, North America,
Japan and Asia Pacific.
The telecommunications services described in this publication
are subject to availability and may be modified from time to time.
Services and equipment are provided subject to British
Telecommunications plc’s respective standard conditions of contract.
Nothing in this publication forms any part of any contract.
TouchTone™ is a registered trade mark of
British Telecommunications plc in the UK.
© British Telecommunications plc 1998.
Registered Office: 81 Newgate Street, London EC1A 7AJ.
Registered in England No. 1800000.
Printed in China. Freestyle 130 Issue 1 (03/98).
Designed by The Art & Design Partnership Limited.
36

Hulp nodig? Stel uw vraag in het forum

Spelregels

Misbruik melden

Gebruikershandleiding.com neemt misbruik van zijn services uitermate serieus. U kunt hieronder aangeven waarom deze vraag ongepast is. Wij controleren de vraag en zonodig wordt deze verwijderd.

Product:

Bijvoorbeeld antisemitische inhoud, racistische inhoud, of materiaal dat gewelddadige fysieke handelingen tot gevolg kan hebben.

Bijvoorbeeld een creditcardnummer, een persoonlijk identificatienummer, of een geheim adres. E-mailadressen en volledige namen worden niet als privégegevens beschouwd.

Spelregels forum

Om tot zinvolle vragen te komen hanteren wij de volgende spelregels:

Belangrijk! Als er een antwoord wordt gegeven op uw vraag, dan is het voor de gever van het antwoord nuttig om te weten als u er wel (of niet) mee geholpen bent! Wij vragen u dus ook te reageren op een antwoord.

Belangrijk! Antwoorden worden ook per e-mail naar abonnees gestuurd. Laat uw emailadres achter op deze site, zodat u op de hoogte blijft. U krijgt dan ook andere vragen en antwoorden te zien.

Abonneren

Abonneer u voor het ontvangen van emails voor uw BT Freestyle 130 bij:


U ontvangt een email met instructies om u voor één of beide opties in te schrijven.


Ontvang uw handleiding per email

Vul uw emailadres in en ontvang de handleiding van BT Freestyle 130 in de taal/talen: Engels als bijlage per email.

De handleiding is 0,39 mb groot.


U ontvangt de handleiding per email binnen enkele minuten. Als u geen email heeft ontvangen, dan heeft u waarschijnlijk een verkeerd emailadres ingevuld of is uw mailbox te vol. Daarnaast kan het zijn dat uw internetprovider een maximum heeft aan de grootte per email. Omdat hier een handleiding wordt meegestuurd, kan het voorkomen dat de email groter is dan toegestaan bij uw provider.

Stel vragen via chat aan uw handleiding

Stel uw vraag over deze PDF

Uw handleiding is per email verstuurd. Controleer uw email

Als u niet binnen een kwartier uw email met handleiding ontvangen heeft, kan het zijn dat u een verkeerd emailadres heeft ingevuld of dat uw emailprovider een maximum grootte per email heeft ingesteld die kleiner is dan de grootte van de handleiding.

Er is een email naar u verstuurd om uw inschrijving definitief te maken.

Controleer uw email en volg de aanwijzingen op om uw inschrijving definitief te maken

U heeft geen emailadres opgegeven

Als u de handleiding per email wilt ontvangen, vul dan een geldig emailadres in.

Uw vraag is op deze pagina toegevoegd

Wilt u een email ontvangen bij een antwoord en/of nieuwe vragen? Vul dan hier uw emailadres in.


Info