650266
39
Verklein
Vergroot
Pagina terug
1/76
Pagina verder
Diverse 4016 Executive ~ 7th Edition ~ 21st September ~ 4080
Diverse 4016 Executive
Digital Cordless Telephone Answering Machine
User
Guide
*
YOU MUST
SUBSCRIBE TO A
CALLER DISPLAY AND
CALL WAITING SERVICE
BEFORE YOUR DIVERSE 4016
EXECUTIVE WILL DISPLAY THIS
INFORMATION. A QUARTERLY
FEE IS PAYABLE.
This equipment is not designed for making emergency telephone calls when the power fails.
Alternative arrangements should be made for access to emergency services.
This product is intended for connection to analogue public switched telephone networks
and private switchboards in the United Kingdom.
The Art of Communication
Diverse 4016 Executive ~ 7th Edition ~ 21st September ~ 4080
Please open this page for an At a glance’ guide
to your Diverse 4016 Executive.
1
4
9
WXYZ
7
PQRS
8
TUV
GHI
3
DEF
5
JKL
2
ABC
6
MNO
0
R
INT M
At a glance
1
Diverse 4016 Executive ~ 7th Edition ~ 21st September ~ 4080
Hash/Keyguard
Hold down to switch the
keypad guard on and off.
Recall
Press for use with switchboards and certain Network Services.
Press and hold down to access an extra directory for storing
10 names and numbers.
Calls list
Lets you access your
lists – calls, text and
voice mail.
Keypad
Red phone
Press to end a call,
return the display to idle
or turn the power on and
off.
Options buttons
Lets you select from the
menu options shown in
the display.
Display
Displays the status of
your handset.
Star/bell
Switches the handset
ringer on and off.
Microphone
One button
Apart from being the
number one button hold
down to access your
answering machine
messages.
Handsfree
Use to answer calls or
make a call in handsfree
mode.
Green phone
For making and
answering calls.
Directory
Used to store numbers,
names and birthdays in
the directory.
Navigation button
Let you display and
select on-screen
options.
In use light
Lights up when the
handset is in use and
flashes to indicate calls,
messages, alarm calls or
appointment reminders.
Diverse 4016 Executive ~ 7th Edition ~ 21st September ~ 4080
2
Handset display
Display option buttons
Press this Option button
to access the main menu.
Press this Option button
to access the redial list.
Access internal handset
numbers.
Access to the directory.
Access to the main menu.
Navigation button
Idle Screen
INT M
Menu
Answering machine ON
Base Base underside
Page button
Power socket
Telephone line cord socket
Contact points
Diverse 4016 Executive ~ 7th Edition ~ 21st September ~ 4080
3
In this guide
At a glance 1
Main menu structure 4
Directory 5
Messages 5
Quick guide 6
Quick guide to
answering machine 7
Quick guide to handset
display icons 8
Introduction 9
Unpacking your
Diverse 4016 Executive 9
For your records 9
Safety instructions 10
Setting up 11
Using the telephone 16
Making and ending calls 16
Handsfree 17
Using the directory 18
Character map 19
Redial 23
Secrecy 24
Paging and internal calls 24
Caller Display and other
Select Services 27
Calls list 27
Call Waiting 31
Other Select Services 31
Additional features 34
Alarm clock and appointments 34
Walk and Talk 36
Room monitor 37
Handset settings 40
Call Barring 45
Base Station settings 46
Base Station PIN 46
Using the answering
machine 49
Selecting an outgoing message 50
Call screening 53
New message indicator 53
Playing messages 53
Call Director 55
Additional answering machine
settings 56
Remote access 58
Using additional handsets
and bases 59
Registering additional handsets 59
Help 63
General information 66
Guarantee 66
Technical information 66
Switchboard compatibility 67
Index 71
Hints and tips boxes
In this user guide, we’ve included
helpful tips and important notes.
They are shown in boxes like this.
Diverse 4016 Executive ~ 7th Edition ~ 21st September ~ 4080
4
Main menu
1 Text message 1-1 Write message
1-2 Incoming
1-3 Outgoing
1-4 Service Centr.
1
Service Centr.
2
2 Select Services 2-1 Withhold No.
2.2 Call Waiting
2.3 Ringback off
2.4 Call Divert
3 Additional Features 3-1 Room Monitor
3-2 Walk and Talk
4 Calendar Clock 4-1 Set Appoints. [entry]
4-2 Alarm Clock [entry]
4-3 Missed Dates [entry]
4-4 Date/Time [entry]
5 Sound Settings 5-1 Handset Volume [entry]
5-2 Ringer Settings [entry]
5-3 Advisory Tones [entry]
6 H/set Settings 6-1 Auto Answer
6-2 Language [list]
6-3 Register H/Set [list]
6-4 Select Base [list]
6-5 Reset Handset
7 Base Settings 7-2 System-PIN [entry]
7-3 Base Reset
7-4 Add.Features 7-4-1 Dialling mode 7-4-1-1 Tone
7-4-1-2 Pulse
7-4-1-3 DTMF
Earth
7-4-2 TBR 7-4-2-1 80ms
7-4-2-2 etc
until
7-4-2-8 600ms
7-4-3 Repeater mode
7-4-4 Access Code
7-4-5 Add. Emerg. No
7-4-6 Listening in
7-5 Call Director 7-5-1 Call Director
7-5-2 Rec Announce
7-5-3 Play Announce
7-5-4 Del Announce
8 Voice mail 8-1 Set key 1 8-1-1 Mailbox
8-2 Ans Machine
8-3 Loudspeaker 8-3-1 Handset Spkr
8-4 Record memo
8-5 Announcements
8-6 Message Set
8-7 Call Screen
8-8 Ring Delay
8-9 Voice prompts
Diverse 4016 Executive ~ 7th Edition ~ 21st September ~ 4080
Directory
Press to open the Directory.
After selecting an entry, and pressing the MENU button, the following functions
are available.
Messages
Press to get your messages from the mailbox, answering machine, message list
and text messages.
The following functions are available:
1 Display Number
2 Delete Entry
3 Copy Entry
4 Speech Copy
5 Delete List
6 Send List
7 Available Memory
1 Text Message
2 Ans M.
4 Calls List 4-1 Copy to Dir.
4-2 Del Calls List
4-3 Caller List 4-3-1 Missed Calls
4-3-2 All Calls
5
Note
If you make a mistake, you can return to the previous menu by pressing the RED
PHONE button. If you keep pressing the RED PHONE button you will return to the
idle screen.
Diverse 4016 Executive ~ 7th Edition ~ 21st September ~ 4080
Quick guide
Switch OFF the
handset:
Hold down
(default is ON)
Switch Keyguard
on/off
Hold down
Switch keypad
tones on/off
Hold down
Make a call
Redial a number
to scroll through the list to dial.
Save a displayed
number in the
to display Copy to directory add name
directory
Dial from the
directory
to name or number you want to dial
Dial from Calls list
to display Calls List to display the number you want
Adjust handsfree
to display Sound settings display shows Handset volume
volume
to decrease volume to increase volume
Adjust earpiece
to display Sound settings display shows Handset volume
volume
to decrease volume to increase volume
Make internal call
to display the list of internal users
Call all handsets
to Call All
Transfer call to
another handset
caller is on hold to display Internal Users
Put caller on hold
while you make
to put caller on hold to display Internal Users
an internal call
Set date and time
to display Calendar/Clock to display Date/Time
enter settings
Set alarm clock
to display Calendar/Clock to display Alarm clock
enter settings
Save
OK OK Menu
Save
OK OK Menu
End OK
OK
Save OK
OK Menu
Save OK
OK Menu
OK
OK Menu
OK Menu
6
Diverse 4016 Executive ~ 7th Edition ~ 21st September ~ 4080
Quick guide
Commonly used answering machine functions and
settings
Switch answering
machine on/off
Play messages
Pause/continue
playback
Skip forward to the
next message
Skip backward to the
last message
Delete current
message
Play outgoing
message
Record your outgoing
message
Delete outgoing
message
Record announcement
only message
Play announcement
only message
Delete announcement
only message
Record a memo
hold down
hold down
hold down
hold down
hold down
record your message
record your message
record your memo
END
OK Record Memo OK Voice Mail Menu
OK Sure? OK Del Anc Only
OK Announcements OK Voice Mail Menu
Play Anc Only
OK Announcements OK Voice Mail Menu
END OK Rec Anc Only
OK Announcements OK Voice Mail Menu
OK Sure? OK Del Announce
OK Announcements OK Voice Mail Menu
END OK Rec Announce
OK Announcements OK Voice Mail Menu
Play Announce
OK Announcements OK Voice Mail Menu
1
1
1
1
1
OK Ans MachineOK Voice Mail Menu
7
Diverse 4016 Executive ~ 7th Edition ~ 21st September ~ 4080
Quick guide to handset
display icons
Redial, lists up to the last 5 dialled number.
Opens up the voice mail lists.
Flashes to indicate new calls or messages.
For calling other handsets.
Opens the menu.
Shows the status of the handset battery.
Shows the range status.
Displayed when the handset ringer is set to off.
Confirms the function displayed.
Deletes numbers/characters (from left to right).
Keypad locked.
Displayed when the Alarm clock and appointments are set.
Displayed when a birthday date is set.
Indicates that the answering machine is on.
8
INT
Menu
OK
1
4
9
W
XYZ
7
PQ
RS
8
T
U
V
G
H
I
3
D
E
F
5
J
K
L
2
A
B
C
6
M
N
O
0
IN
T
M
R
Diverse 4016 Executive ~ 7th Edition ~ 21st September ~ 4080
9
Introduction
Unpacking your
Diverse 4016 Executive
If anything is missing, please contact
your place of purchase immediately.
One Diverse 4016
Executive base station
One Diverse 4000
Executive handset
One power supply
for the base station
One telephone
line cord
Two AA rechargeable
batteries
One belt clip
Battery compartment
cover
For guarantee purposes proof of
purchase is required so please keep
your receipt.
Enter your system PIN code here:
For more information on your system
PIN,
see page 46.
For your records
Date of purchase:
Place of purchase:
INTRODUCTION
Diverse 4016 Executive ~ 7th Edition ~ 21st September ~ 4080
10
Safety instructions
Safety information
General
Only use the power supply included
with the product. Using an
unauthorised power supply will
invalidate your guarantee and may
damage the telephone. Power supply
number is M-GA35-095130F.
For the handset use only approved
Nickel Metal Hydride (NiMH)
rechargeable batteries. Never use other
batteries or conventional alkaline
batteries. They could lead to a short
circuit or destroy the battery casing.
Recommended batteries should have a
power rating of at least 600mAh 1.2V.
Batteries are available from the
Diverse
Helpline 08457 908070
.
If the Keyguard is switched on, it is
NOT possible to make calls, including
emergency numbers (
999/112).
Do not open the base station or handset
(other than to change batteries). This
could expose you to high voltages or
other risks.
Radio signals transmitted between the
handset and base may cause interference
to hearing aids.
This product should not be used near
emergency/intensive care medical
equipment and we do not recommend
that they are used by people with
pacemakers.
Never dispose of batteries in a fire. There
is a serious risk of explosion and/or the
release of highly toxic chemicals.
Cleaning
Simply clean the handset and base
station with a damp (not wet) cloth, or
an anti-static wipe. Never use household
polish as this will damage the product.
Never use a dry cloth as this may cause
a static shock.
Environmental
Do not expose to direct sunlight.
The product may heat up when the
batteries are being recharged. This is
normal. However, we recommend that
you do not place the product on
antique/veneered wood to avoid damage.
Do not stand your product on carpets or
other surfaces which generate fibres, or
place it in locations preventing the free
flow of air over its surfaces.
Do not submerge any part of your
product in water and do not use it in
damp or humid conditions, such as
bathrooms.
Do not expose your product to fire,
explosive or other hazardous conditions.
There is a slight chance that your phone
could be damaged by an electrical storm.
We recommend that you unplug the
power and telephone line cord during an
electrical storm.
SAFETY INSTRUCTIONS
Diverse 4016 Executive ~ 7th Edition ~ 21st September ~ 4080
1 Connect the base station
Plug the power supply cable into the
power socket on the underside of your
base.
11
Plan the location
Situate your product close enough to
the telephone and mains power sockets
so that the cables will reach.
Make sure it is at least 1 metre away
from other electrical products to avoid
interference.
Do not situate the product in the
bathroom or other humid areas.
Please note that your handset is
NOT registered to the base station.
The Diverse 4016 handset will
be easily registered once you
complete the steps 1 to 3 below.
Setting up
WARNING
Do not connect the telephone line cord
to the phone socket until your handset
is fully charged. This will prevent the
risk of the phone being answered before
the battery is charged. Answering the
phone before the battery is fully
charged may prevent it from reaching
its optimum capacity.
2 Plug the power supply
unit into the wall socket
SETTING UP
Diverse 4016 Executive ~ 7th Edition ~ 21st September ~ 4080
12
WARNING
Under no circumstances should
non-rechargeable batteries be used.
Only use the approved batteries.
Using unapproved batteries will
invalidate your guarantee and may
damage the telephone.
3 Registering and charging
the handset
The display is protected by a plastic
film. Remove the protective plastic film
from the display.
Menu
Menu
INT 1
To register your handset, place it in the
base station with the display facing
upward. After approx. one minute, the
handset’s internal number is displayed
(e.g.: INT1). Successful registration is
signalled by a confirmation tone.
When the handset is registered the
display will show:
If the icons on the display
flash continuously...
It means that the handset is not
registered with the base station.
Ensure you have correctly carried out
step 3 above. If the product has still
not registered, please see Registering
manually on page 60.
All additional handsets you purchase
will need to be individually registered
with the base station before they will
work with the Diverse 4016 Executive.
Leave the handset for approx. 16 hours
in the base station to charge the
batteries, as they are not charged in the
factory. The charging status icon
flashes on the handset to indicate that
the batteries are being charged.
Insert the batteries
Insert the two batteries supplied, as
indicated on the label inside the battery
compartment and slide the battery
compartment cover shut.
The battery cover may be found in the
packaging with the batteries.
SETTING UP
Diverse 4016 Executive ~ 7th Edition ~ 21st September ~ 4080
Out of range?
If you go out of range of a base station
for a long time while your handset is
switched ON, it may take more than
20 minutes to find the base station
again when you come back within
range. However, by simply switching
the handset OFF for a moment, then
ON again, it will find the base station
within a few seconds.
Battery level icons
When the batteries are almost flat a
beep sounds and the display shows the
empty battery icon. You will need to
recharge your handset before you can
use it. The various states of charge
are shown below:
Batteries fully charged
Batteries at 66%
Batteries at 33%
Batteries empty
Battery performance
After charging your handset batteries
for the first time, subsequent charging
time is approximately 45 hours.
Batteries and case may become warm
during charging. This is normal.
Under ideal conditions, the handset
batteries should give about 10 hours
talktime or 150 hours standby time
on a single charge. However, new
NiMH batteries do not reach their full
capacity until they have been in
normal use for several days.
Fully discharging the batteries at least
once a week will help them last as
long as possible. However, the charge
capacity of rechargeable batteries will
reduce with time as they wear out, so
reducing the talk/standby time of the
handset. Eventually they will need to
be replaced. New batteries can be
obtained from any BT shop or from
the Diverse Helpline 08457 908070.
If you replace the handset batteries
with ones that have been fully charged,
the battery indicator will not show full
until the next charge cycle has been
completed. Charge the handset until
the batteries register full again. From
then on the display will be correct.
13
SETTING UP
Diverse 4016 Executive ~ 7th Edition ~ 21st September ~ 4080
14
4 Connect the telephone
line cord to the base and
plug into the wall socket
Ensure that each end of the line cord is
fitted into the correct socket.
Fit the belt clip onto the back of the
handset.
SSlloott
Helpline
Your Diverse 4016 Executive is now
ready for use. However, If you experience
any difficulties please call the BT
Diverse Helpline on 08457 908 070.
Setting the date and time
Press the Menu options button.
Press the
DOWN navigation
button until the display shows
Calendar/Clock
.
Press the
OK options button.
Press the
DOWN navigation
button until the display shows
Date/Time
.
Press the
OK options button.
Enter the day/month/year, e.g.
05 10 01 for 5th October 2001.
Press the
DOWN navigation
button.
Enter the time hours/minutes.
e.g.
0925 for 9:25am.
Signal strength
The range of your Diverse base
station is 300 metres outdoors and up
to 50 metres indoors under ideal
conditions. The signal strength
indicator shows the quality of contact
between the base station and handset.
receive strength 100%
receive strength 75%
receive strength 50%
low receive strength
no reception (flashes)
OK
Menu
OK
SETTING UP
Press the am/pm options button
to choose between am or pm if
in 12 hour mode.
Press the
DOWN navigation
button.
Enter the mode 12hr is the
default. If you want to keep as
12hr clock.
Press the
Save options button
if you want to change to 24hr
clock.
Press the
LEFT navigation
button the option changes to
24 hr clock.
Press the Save options button.
Press the
RED PHONE button
until you reach the idle display.
Diverse 4016 Executive ~ 7th Edition ~ 21st September ~ 4080
15
Save
Save
Note
If you subscribe to a Caller Display
service the time and date will be set
with the first incoming call.
am/pm
SETTING UP
Diverse 4016 Executive ~ 7th Edition ~ 21st September ~ 4080
To make an external call
Ensure the handset is
switched ON.
Press the
GREEN PHONE
button. You will hear the dial
tone.
Dial the number.
16
Using the telephone
Preparatory dialling
Enter the phone number first.
If you make a mistake press
the
DELETE options button to
remove any incorrect digits.
Press the
GREEN PHONE
button to dial the number.
Making and ending calls
To end a call
Press the RED PHONE button.
Note
To quit a menu at any time, press the
RED PHONE button. This will take
you back one step. Keep pressing the
RED PHONE button to return to the
idle screen.
To switch the handset power
on and off
Press and hold the RED
PHONE button to switch the
handset off.
Press and hold the
RED
PHONE button to switch the
handset on again.
Call timer
Your handset automatically times the
duration of all external calls, showing it
on the display during your call and for
a few seconds after it is finished.
USING
Diverse 4016 Executive ~ 7th Edition ~ 21st September ~ 4080
To receive an external call
When the phone rings the In
use light on top of the handset
will flash.
Press the
GREEN PHONE
button to answer the call.
Or
If the handset is on the base,
simply lift it up and speak.
You do not need to press the
GREEN PHONE button.
This is called Autotalk. You
can switch autotalk off so you
always have to press the
GREEN PHONE button to
answer a call, see page 43.
To make a handsfree call
Dial the number
Press the
HANDSFREE button.
The loudspeaker is switched
on and you hear the number
being dialled.
To switch back to using the
handset at any time, press the
GREEN PHONE button.
17
Handsfree
Handsfree allows you to talk to your
caller without holding the handset and
enables other people in the room to
listen to the conversation. Your hands
are left free, for example to take notes.
To adjust the handsfree
volume
Whilst in handsfree mode and
you want to increase or
decrease the handsfree volume
press the HANDSFREE button.
Press the
Menu options
button.
Press the
DOWN navigation
button to highlight
Handsfree
volume
.
Press the
OK options button.
Using the
RIGHT/LEFT
navigation buttons you can
either increase or decrease the
volume.
Menu
OK
USING
Diverse 4016 Executive ~ 7th Edition ~ 21st September ~ 4080
18
Note
If you need to replace the handset in
the base station during a call, for
example, because the battery is flat,
hold down the HANDSFREE button.
To switch to handsfree during
a call
During a call you can switch to
handsfree mode:
Press the
HANDSFREE button.
The call is transferred to the
loudspeaker.
Press the
GREEN PHONE
button to switch back to using
the handset.
To answer a call in handsfree
When the phone rings:
Press the
HANDSFREE button.
The call is transferred to the
loudspeaker.
To store an entry in the
directory
Press the DOWN navigation
button until the display shows
New Entry
.
Press the OK options button.
Enter the telephone number.
Press the
DOWN navigation
button to enter the name.
Enter the name.
Entering names:
Enter the name using the letters
on the keypad. For example, to
enter the name TOM:
Press the 8 button,
T
appears
on the display.
Press the 6 button three times
until the display shows
O
.
Then press the
6 button to
display
M
.
For the full character map,
see page 19.
If required, use the DOWN
navigation button and keypad
to enter birthday or special
date information. (For more
details see page 35.)
Press the
Menu options
button. Display shows
Save
Entry
.
Press the OK options button
to confirm.
Press the RED PHONE button
until you reach the idle display.
OK
Using the directory
You can store up to 200 numbers and
names in the telephone directory. You
can enter up to 32 digits and up to 16
characters. If you wish, you can also
add a birthday or special date.
8
TUV
6
MNO
6
MNO
OK
Menu
USING
Diverse 4016 Executive ~ 7th Edition ~ 21st September ~ 4080
19
Note
The first letter of each name, and the
first letter after a punctuation mark
are automatically shown as capitals.
Letters are always added to the left of
the cursor.
Press to switch between capitals
and lower case.
Press to move the cursor
Press to delete from left to right,
Press 1 to enter a blank space.
1
1x 2x 3x 4x 5x 6x 7x 8x 9x 10x 11x 12x 13x 14x
1 £$¥
abc2äáàâãç
def 3ëéèê
ghi 4ïíìî
jkl5
mn o 6 öñóòôõ
pqrs7ß
tuv8üúùû
wx y z 9 ÿ´y æø å
aA /()<=>%
.,?!0+-:¿¡ ;
#@\ &§
0
9
WXYZ
8
TUV
7
PQRS
6
MNO
5
JKL
4
GHI
3
DEF
2
ABC
1
Character map
These are the characters you can use when storing a directory entry.
USING
Diverse 4016 Executive ~ 7th Edition ~ 21st September ~ 4080
20
To dial a name and number in
the directory
Press the DOWN navigation
button to open the directory.
Enter the first letter of the
name you want, e.g. for Emma,
press
3 twice to search for
names beginning with E.
Or
Press the DOWN navigation
button to scroll through the
names which are listed in
alphabetical order.
Press the
GREEN PHONE
button. The number is dialled.
To view directory entry
Press the DOWN navigation
button to open the directory.
Press the
DOWN navigation
button to scroll through the
entries.
Or
Press the first letter of the
name you are looking for.
Press
View to display all the
details stored in the entry.
Press the
RED PHONE button
until you reach the idle display.
To edit a directory entry
Press the DOWN navigation
button to open the directory.
Press the
DOWN navigation
button to scroll to the entry
you want.
Press
View. The number is
displayed.
Press the
Change options
button to amend the details in
that entry.
Enter the changes you want.
Press the
DOWN navigation
button to move to the name.
Enter the changes you want.
Press the
DOWN navigation
button to move to the birthday
details.
Enter the changes you want.
Press the
OK options button.
Display shows
Save Entry
.
Press the
RED PHONE button
until you reach the idle display.
View
OK
View
Change
3
DEF
3
DEF
USING
Diverse 4016 Executive ~ 7th Edition ~ 21st September ~ 4080
21
To copy an entry to another
handset
You can copy individual
entries to another Diverse 4000
Executive handset.
Press the
DOWN navigation
button to open the directory.
Press the
DOWN navigation
button to scroll to the entry you
want to copy.
Press the
Menu options button.
Press the
DOWN navigation
button until the display shows
Copy Entry
.
Press the
OK options button to
confirm. You hear a confirmation
beep.
Press the
DOWN navigation
button to display the number of
the handset you want to copy
the entry to.
Press the
OK options button to
confirm. The entry is copied.
You hear a beep from the
receiving handset to confirm.
You can now copy another
entry.
Press the
Yes options button.
Press the
DOWN navigation
button to scroll to the next entry
you want to copy.
Press the
Copy options button.
The entry is copied. You can
now repeat these steps until
you have copied all the entries
you want.
When you have finished
copying
Press the
No options button.
Press the
RED PHONE button
until you reach the idle display.
No
Copy
Menu
OK
OK
Yes
To copy the entire directory
Press the DOWN navigation
button to open the directory.
Press the
DOWN navigation
button to highlight the first
entry in the directory.
Press the
Menu options button.
Press the
DOWN navigation
button until the display shows
Send List
.
Press the
OK options button
to confirm. The numbers of all
other registered handsets are
displayed.
Press the
DOWN navigation
button to select the handset you
want to copy the directory to.
Press the
OK options button to
confirm. The directory is copied.
You hear a beep from the
receiving handset to confirm.
Menu
OK
OK
USING
Diverse 4016 Executive ~ 7th Edition ~ 21st September ~ 4080
22
Note
Copying is stopped:
if the directory of the receiving
handset becomes full. If so, the last
entry is displayed.
if you receive a call. The entry
currently being copied will be
completed.
To delete an entry
Press the DOWN navigation
button to open the directory.
Press the
DOWN navigation
button to scroll to the entry
you want to delete.
Press the Menu options button.
Press the DOWN navigation
button until the display shows
Delete Entry
.
Press the
OK options button
to confirm. You hear a
confirmation beep.
Press the RED PHONE button
until you reach the idle display.
The directory will be added
to any existing entries already
stored on the receiving handset.
The receiving handset displays
how many entries have been
received. Any entries with the
same number are duplicated
so the number of stored
entries may be different from
the number of entries sent.
Press the
RED PHONE button
until you reach the idle display.
Menu
OK
To delete the entire directory
Press the DOWN navigation
button to open the directory.
Press the DOWN navigation
button to highlight the first
entry in the directory.
Press the
Menu options button.
Press the DOWN navigation
button until the display shows
Delete List
.
Press the OK options button.
Press the
Yes options button
to confirm. Or press the No
options button to cancel.
Press the
RED PHONE button
until you reach the idle display.
Menu
Yes
OK
USING
Diverse 4016 Executive ~ 7th Edition ~ 21st September ~ 4080
23
To dial a number in the
redial list
Press the REDIAL options
button. The last number
dialled will be displayed.
Press the
DOWN navigation
button to scroll through the
redial list.
Redial
Your handset automatically saves the
last five telephone numbers dialled into
a redial list.
To copy numbers shown in
the redial list to the directory
Press the REDIAL options
button.
Press the
DOWN navigation
button to highlight the number
you want to copy.
Press the
Menu options
button.
Press the
DOWN navigation
button until the display shows
Copy to Directory
.
Press the
OK options button.
If necessary, you can edit the
number.
Press the
DOWN navigation
button.
Enter the name (for details,
see page 18. You can also
enter a birthday reminder,
see page 35).
Press the Menu options
button. Display shows
Save
Entry.
Press the OK options button
to confirm.
Press the
RED PHONE button
until you reach the idle display.
OK
OK
Menu
Menu
Press the GREEN PHONE
button to dial the number.
To display the available
memory
You can see how much directory
memory is still unused.
Press the DOWN navigation
button to open the directory.
Press the DOWN navigation
button to highlight the first
entry in the directory.
Press the Menu options button.
Press the
DOWN navigation
button until the display shows
Available Memory
.
Press the OK options button.
The amount of memory
available is displayed.
Press the RED PHONE button
until you reach the idle display.
Menu
OK
USING
Diverse 4016 Executive ~ 7th Edition ~ 21st September ~ 4080
24
Secrecy
When on a call you can talk to someone
in the same room, without your caller
hearing.
Press the RETURN options
button to talk to your caller
again.
To switch secrecy on/off
During a call:
Press the
LEFT navigation
button. The microphone is
switched off. The caller hears
musical tones.
Paging and internal calls
You can alert handset users that they
are wanted, or locate a missing handset.
If you have multiple handsets
registered to the base you can make
internal calls between handsets.
Press the LEFT navigation
button.
A list of all the handsets that
are registered to the base are
listed, you can select any of
them.
Your handset is identified by
a
<
.
Highlight the handset you
want to call and press the
GREEN PHONE button to call
or page.
Or
Press the Call All options
button to page all the handsets
registered to the base.
Press the
RED PHONE button
on the handset you are paging
or calling to end the call or page.
Call All
To delete a number from the
redial list
Press the REDIAL options
button.
Press the
DOWN navigation
button.
Press the
Menu options
button.
Press the
DOWN navigation
button until the display shows
Delete Entry
.
Press
OK to confirm deletion.
Press the
RED PHONE button
until you reach the idle display.
Menu
OK
Note
To cancel any procedure, press the
RED PHONE button until the display
returns to idle.
USING
Diverse 4016 Executive ~ 7th Edition ~ 21st September ~ 4080
To put an external call on hold
and speak to another handset
This enables you to ask another
handset user a question and
then get straight back to your
caller.
During a call:
Press the LEFT navigation
button to display the list of
handsets. Your caller hears
musical tones.
Press the
UP or DOWN
navigation button to select the
handset you want to call.
Press the
GREEN PHONE
button to call.
Press the
End options button
Or
Press the RED PHONE button
to end the internal call and talk
to your external caller again.
To answer a waiting call
during an internal call
If you are making an internal
call and hear the Call Waiting
tone you can immediately take
the incoming call.
Press the
Accept options
button to speak to the external
caller and end the internal call.
End
Accept
25
To transfer an external call
between handsets
You can forward an external
call to another handset
registered to the base.
During an external call:
Press the LEFT navigation
button to display the list of
handsets. Your caller hears
musical tones.
Press the
UP or DOWN
navigation button to select the
handset you want to call.
Press the
GREEN PHONE
button to call. When the other
handset answers you can
announce the call.
Press the
RED PHONE button
to put the call through.
Note
You can also put the call through
without announcing it by immediately
by pressing the RED PHONE button
after dialling the other handset.
USING
Diverse 4016 Executive ~ 7th Edition ~ 21st September ~ 4080
26
To hold a 3-way conversation
Providing the feature is
switched on:
Your handset display shows
the line is In Use.
Press the
GREEN PHONE
button, the other two callers
will hear a beep announcing
your entry into the
conversation and the display
will show
Listening In
.
Press the
RED PHONE button
to leave the conversation, the
other two callers will hear a
beep announcing that you
have left the call.
To switch 3-way conversation
function on/off
Your Diverse 4016 can hold
3-way calls between handsets.
Press the
Menu options button.
Press the
DOWN navigation
button until the display shows
Base Settings
.
Press the
OK options button.
Press the
DOWN navigation
button until the display shows
Add. Features
.
Press the
OK options button.
Press the
DOWN navigation
button until the display shows
Listening In
.
Press the
OK options button.
A
indicates the feature is
on. Press the OK options
button again to switch it off.
Press the
RED PHONE button
until you reach the idle display.
Menu
OK
OK
OK
USING
Diverse 4016 Executive ~ 7th Edition ~ 21st September ~ 4080
27
Caller Display and other
Select Services
IMPORTANT
To use Caller Display and Call Waiting
you must first subscribe to the Services
from your Network Provider. For more
information on BTs Select Services
call BT free on 0800 800 150.
Note
Calls that are withheld, unavailable
or international are not stored in the
Calls list, as there is no telephone
number sent via the Network.
Note
If you have a new call in your Calls list,
the icon and In use light will flash.
If you subscribe to a Caller Display
Service you can see who is calling you
on your handset display, as well as the
date and time of their call (unless the
number has been withheld).
If you have stored a name to go with
the number in your handset directory,
the name will be displayed instead.
Please ensure that you have stored the
full telephone number, including the
area code, otherwise the name will not
match the number stored in the
directory.
If the caller has withheld their number,
the display will show
WITHHELD
.
If you call from another handset, the
display shows the handset number and
INT
.
Calls list
The Calls list contains the telephone
numbers of your last 30 callers.
Whether you take a call or not, the
callers details are stored in the Calls
list. You can display, scroll through and
dial numbers in the list and copy them
into the directory.
If a call is received when the Calls list
is full then the oldest entry will be
deleted automatically.
CALLER DISPLAY
Diverse 4016 Executive ~ 7th Edition ~ 21st September ~ 4080
28
To view the Calls list
When you have new calls, the
display flashes and the In
Use light flashes.
Press the
ENVELOPE button.
Press the DOWN navigation
button until the display shows
Calls List
.
Press the OK options button.
The most recently received
call is displayed.
Press the
DELETE options
button to delete the entry
displayed.
Press the UP/DOWN navigation
button to scroll through the list.
Press the RED PHONE button
until you reach the idle display.
Total number of
new calls
Serial number of
the new call
Call number or
name
Date and time
To dial from the Calls list
Press the ENVELOPE button.
Press the
DOWN navigation
button until the display shows
Calls List
.
Press the OK options button.
The most recently received
call is displayed.
Press the UP/DOWN
navigation button if necessary
to scroll through the list to the
call you want.
Press the
GREEN PHONE
button. The number displayed
is dialled.
OK
New Call
= The call is new.
Old Call
= The call has already
been viewed.
Call List
= The call has been
answered.
The button lets you open:
Text messages (SMS).
Answering machine.
Calls list.
Missed Calls
New Call 02/04
A.N. Other
12.07.2000 11:33
OK
Delete Menu
CALLER DISPLAY
Diverse 4016 Executive ~ 7th Edition ~ 21st September ~ 4080
29
To copy a number from the
Calls list to the Directory
Press the ENVELOPE button.
Press the
DOWN navigation
button until the display shows
Calls List
.
Press the
OK options button.
The most recently received
call is displayed.
Press the
UP/DOWN
navigation button if necessary
to scroll through the list to the
call you want.
Press the
Menu options button.
Press the
DOWN navigation
button until the display shows
Copy to Dir
.
Press the
OK options button.
The number is copied.
To enter a name:
Press the DOWN navigation
button to move the cursor to
the name section. The cursor
is now in a position for you to
add a name to the number if
you want to.
Enter the name.
Press the
OK options button
to save the entry.
Press the
RED PHONE button
until you reach the idle display.
To delete a call from the
Calls list
Press the ENVELOPE button.
Press the
DOWN navigation
button until
Calls List
is
highlighted.
Press the
OK options button.
The most recently received
call is shown.
Press the
DOWN navigation
button until the call is
displayed that you want to
delete.
Press the
DELETE options
button.
Display shows
Entry has been
deleted
.
Press the
RED PHONE button
until you reach the idle display.
OK
Menu
OK
OK
OK
CALLER DISPLAY
Diverse 4016 Executive ~ 7th Edition ~ 21st September ~ 4080
To delete the complete
Calls list
Press the ENVELOPE button.
Press the
DOWN navigation
button until
Calls List
is
highlighted.
Press the
OK options button.
The most recently received
call is shown on the display.
Press the
Menu options
button.
Press the
DOWN navigation
button until
Del Calls List
is
highlighted.
Press the
OK options button.
Display shows
No Entries
Found
.
Press the
RED PHONE button
until you reach the idle display.
OK
OK
Menu
To set the list to contain all
calls or missed calls
Press the ENVELOPE button.
Press the
DOWN navigation
button until
Calls List
is
highlighted.
Press the
OK options button.
The most recently received
call is displayed.
Press the
Menu options
button.
Press the
DOWN navigation
button until
Caller List
is
highlighted.
Press the
OK options button.
Highlight and press the
OK
options button for which ever
list you require. Either
All Calls
or
Missed Calls
will
have a tick by the side to tell
you which is the current setting.
Press the
RED PHONE button
until you reach the idle display.
OK
OK
OK
Menu
30
CALLER DISPLAY
Diverse 4016 Executive ~ 7th Edition ~ 21st September ~ 4080
31
To accept a waiting call
During a call when you hear
the Call Waiting beeps:
The number (or name if stored
in the directory) of the second
caller will flash on the display.
Press the
Menu options button.
Display shows
Accept
.
Press the
Recall button to
toggle between callers.
Press the
RED PHONE button
until you reach the idle display.
Call Waiting
If you also subscribe to a Call Waiting
Service, when you are on a call and
another person tries to call you, the
second callers number will appear on
the handset display and you will hear
an intermittent beep through the
handset. This is to alert you to the
other caller waiting to speak to you.
Menu
Recall
Other Select Services
Your Diverse 4000 Executive handset
helps you use your Networks special
services. For full details ask your
Network provider.
Options before you make a call
Before making a call you can:
Withhold your number from being
sent for one call.
Switch Call Waiting on/off.
Switch off Ringback.
Divert all calls to another number
(must be subscribed to).
To withhold your number
from being sent
Your number appears on the
display of the person you call.
You can withhold it from the
next call.
Press the Menu options button.
Press the DOWN navigation
button until the display shows
Select Services
highlighted.
Press the
OK options button.
Press the DOWN navigation
button until the display shows
Withhold No
highlighted.
Press the OK options button.
Enter the telephone number
you want to call.
Press the
Menu options button.
Display shows
Send
.
Press the OK options button
to dial. Or
Press GREEN PHONE to dial.
The number is dialled and your
number is withheld for this call.
Press the RED PHONE button
until you reach the idle display.
OK
OK
OK
Menu
Menu
SELECT SERVICES
Diverse 4016 Executive ~ 7th Edition ~ 21st September ~ 4080
32
To switch Call Waiting on/off
You can choose whether to have
your Call Waiting service
switched on or off depending on
what you are doing i.e. if you
are using the Internet via your
PC and do not want Call Waiting
to interrupt you.
Press the
Menu options button.
Press the
DOWN navigation
button until the display shows
Select Services
.
Press the
OK options button.
Press the
DOWN navigation
button until the display shows
Call Waiting
.
Press the
OK options button.
Press the
DOWN navigation
button to choose between
On
or
Off
.
Press the
Set options button.
Wait to hear the confirmation
announcement from your
Network.
Press the
RED PHONE button
to end the call.
Press the
RED PHONE button
until you reach the idle display.
Ring Back Off
If you make a call and the
number is engaged you can
set your telephone to ring you
back once the number is free
by pressing 5. If you want to
cancel this request i.e. if you
have to go out before the call
rings back.
Press the
Menu button.
Display shows
Select
Services
.
Press the
OK options button.
Press the
DOWN navigation
button until
Ringback Off
is
highlighted.
Press the
Set options button.
The ringback is cancelled.
Press the
RED PHONE button
until you reach the idle display.
OK
OK
Set
Menu
5
JKL
OK
Set
Menu
SELECT SERVICES
Diverse 4016 Executive ~ 7th Edition ~ 21st September ~ 4080
33
To set Call Divert
You can divert all incoming
calls to another number where
you can be reached.
You can divert calls:
Automatic
calls are put
straight through to the number
you have set.
No answer
calls are
forwarded if your phone is
not answered.
When busy
calls are
forwarded if your phone is
engaged.
Press the
Menu options button.
Press the
DOWN navigation
button until the display shows
Select Services
highlighted.
Press the
OK options button.
Press the
DOWN navigation
button until the display shows
Call Divert
.
Press the
OK options button
again.
Press the
LEFT/RIGHT
navigation button to display
the option you want
Automatic
,
No Answer
or
If Busy
.
Press the
DOWN navigation
button to scroll to the next line.
Press the
Edit options button.
Enter the telephone number
you want your calls diverted to.
Press the
Menu options button.
Display shows
Save Entry
.
Press the
OK options button.
Press the
DOWN navigation
button to scroll to the next line.
Press the
LEFT/RIGHT
navigation button to switch
Call Divert On or Off.
Press the
Send options button.
Wait to hear the confirmation
announcement from your
Network.
Press the
RED PHONE button
to end the call.
Press the
RED PHONE button
until you reach the idle display.
OK
OK
OK
Send
Menu
Menu
Edit
Note
Call Divert requires subscription
from your Network provider. You
may be charged a subscription fee.
SELECT SERVICES
Diverse 4016 Executive ~ 7th Edition ~ 21st September ~ 4080
34
Additional features
Alarm clock and
appointments
To set the alarm clock
You can use your handset as
an alarm clock. The alarm rings
every day at the time set. When
you have set a time for the
alarm, the display shows .
The original setting uses the
12 hour clock. If am or pm is
displayed, the 12 hour clock is
set. To switch between the 24
hour and 12 hour clocks
see
page 14.
Press the Menu options button.
Press the
DOWN navigation
button until the display shows
Calendar/Clock
.
Press the
OK options button.
Press the
DOWN navigation
button until the display shows
Alarm Clock
.
Press the
OK options button.
Press the
LEFT or RIGHT
navigation button to select
On
or
Off
.
Menu
OK
Press the DOWN navigation
button to scroll to the next line.
Enter the time you want the
alarm to be set for.
Press the
DOWN navigation
button. You can now choose the
ringer melody for your alarm call.
Press the
LEFT or RIGHT
navigation button to hear the
melody.
Press the
Save options button
to select the melody. Display
shows to confirm the alarm
is set.
Press the
RED PHONE button
until you reach the idle display.
OK
Save
To stop the alarm ringing
The alarm will ring for about
30 seconds.
Press any button to stop it
ringing.
ADDITIONAL FEATURES
Diverse 4016 Executive ~ 7th Edition ~ 21st September ~ 4080
35
ADDITIONAL FEATURES
To switch off the alarm clock
You have set the alarm but do
not want it to ring every day.
Press the
Menu options button.
Press the
DOWN navigation
button until the display shows
Calendar/Clock
.
Press the
OK options button.
Press the
DOWN navigation
button until the display shows
Alarm Clock
.
Press the
OK options button.
Press the
LEFT or RIGHT
navigation button to select
Off
.
Press the
Save options button
to confirm.
Press the
RED PHONE button
until you reach the idle display.
Save
OK
Menu
OK
Display shows
Set Appoints
.
Press the
OK options button.
Press the
LEFT or RIGHT
navigation button to select
Off
or
On
.
Press the
DOWN navigation
button to move to the next line.
Enter the day/month of your
appointment, e.g.
05 02 for
5th February.
Press the
DOWN navigation
button to move to the next line.
Enter the hour/minute of your
appointment, e.g.
0905 for 9:05am.
Press the
DOWN navigation
button. You can now choose the
ringer melody for your alarm call.
Press the
LEFT or RIGHT
navigation button to hear the
melody.
Press the
Save options button
to save your settings.
Press the
RED PHONE button
until you reach the idle display.
OK
To set an appointment call
You can tell your handset to
remind you of one appointment
at a specific date and time.
If
am
or
pm
is displayed you are
using the 12 hour clock.
Press the
Menu options button.
Press the
DOWN navigation
button until the display shows
Calendar/Clock
.
Press the
OK options button.
OK
Menu
Note
Your alarm call will only ring if you
are not using the handset at the time.
The call rings for about 30 seconds.
Save
Diverse 4016 Executive ~ 7th Edition ~ 21st September ~ 4080
36
ADDITIONAL FEATURES
To display/delete a missed
appointment/anniversary
If you miss an appointment or
an anniversary call, details are
saved and the display shows
Appt
.
Press the
Appt options button.
Display shows the list.
Press the
UP/DOWN
navigation button to display
Missed Appointment
.
Press the
OK options button.
Press the
Menu options button.
Press the
DOWN navigation
button until the display shows
Calendar/Clock
.
Press the
OK options button.
Press the
DOWN navigation
button until the display shows
Missed Dates
.
Press the
OK options button.
Press the
DOWN navigation
button to select a missed
appointment.
Press the
OK options button.
The information about the
appointment is displayed.
A missed appointment is
indicated by .
A missed anniversary is
indicated by .
OK
OK
Menu
Appt
Press the DELETE options
button to delete the
appointment/anniversary from
the list.
Press the
OK options button to
return to the list.
Or
Press the RED PHONE button
until you reach the idle display.
OK
OK
OK
Walk and Talk
Diverse 4000 Executive handsets can
communicate with each other outside
the range of the base station. When they
are out of range, however, they cannot
receive external calls.
Communication between two handsets
is possible when:
Handsets are registered at the same
base station and have currently
selected that base station
(see page 62).
Or
Handsets have set Best Base station
as their base station setting.
Or
The handsets are not registered with
any base station.
Range
The maximum range between two
handsets whilst in Walk and Talk mode
is up to 300 metres. Please note that
batteries are used more quickly in
Walk and Talk mode.
Diverse 4016 Executive ~ 7th Edition ~ 21st September ~ 4080
37
ADDITIONAL FEATURES
To switch Walk and Talk
mode on and off
Press the Menu options button.
Press the
DOWN navigation
button to until the display shows
Additional Features
.
Press the
OK options button.
Press the
DOWN navigation
button until the display shows
Walk and Talk
.
Press the
OK options button to
switch Walk and Talk on.
Or
Press the Off options button to
switch Walk and Talk off.
Menu
OK
OK
Off
To use Walk and Talk
Walk and Talk mode must be
switched on for at least two
handsets.
Call a handset:
Press the Call options button.
The called handset receives a
Walk and Talk message on the
display.
Answer a call:
Press the GREEN PHONE
button to take the call.
Call
Room monitor
You can use a handset as a room monitor.
If a certain noise level is reached, the
handset will automatically dial an
internal or external number which you
have set.
Note
To use the room monitor:
The answering machine must be
switched off.
Make sure that the call bar has not
been set.
The battery power is used more quickly.
Any incoming calls on the handset
which is being used as the room
monitor will not ring at the handset.
The keypad and display are not backlit.
Diverse 4016 Executive ~ 7th Edition ~ 21st September ~ 4080
38
ADDITIONAL FEATURES
To store the internal number
for your room monitor
Press the Menu options button.
Press the
DOWN navigation
button until the display shows
Additional Features
.
Press the
OK options button.
Press the
DOWN navigation
button until the display shows
Room Monitor
.
Press the
OK options button.
Press the
LEFT or RIGHT
navigation button to select
On
or
Off
.
Press the
DOWN navigation
button to move the cursor to
the next line.
Press the
Change options
button to enter the number.
If an external number has
already been entered, your can
delete it by pressing the
DELETE button.
If an internal number has been
entered, delete it by pressing
the
Yes options button.
Enter the internal number you
want the room monitor to call.
Or
Press the LEFT navigation
button to display handset
numbers.
Menu
OK
OK
Change
Press the UP or DOWN
navigation button to select the
handset you want the room
monitor to call.
Press the
Save options button
to save the number.
Press the
DOWN navigation
button to move the cursor to
the next line.
Press the
LEFT or RIGHT
navigation button to select the
noise sensitivity
High
or
Low
.
Press the
Save button to save
the setting.
Press the
RED PHONE button
until you reach the idle display.
Save
Save
To store the external number
for your room monitor
Press the Menu options button.
Press the
DOWN navigation
button until the display shows
Additional Features
.
Press the
OK options button.
Press the
DOWN navigation
button until the display shows
Room Monitor
.
Press the
OK options button.
Press the
LEFT or RIGHT
navigation button to select
On
or
Off
.
Menu
OK
OK
Diverse 4016 Executive ~ 7th Edition ~ 21st September ~ 4080
39
Press the DOWN navigation
button to move the cursor to
the next line.
Press the Change options
button to enter the number.
If an external number has
already been entered, your can
delete it by pressing the
DELETE button.
If an internal number has been
entered, delete it by pressing
the
Yes options button.
Enter the external number you
want the room monitor to call.
Or
Press the LEFT navigation
button to open the Directory.
Press the DOWN navigation
button to scroll to the entry
you want.
Press the
OK options button
to select the number.
Press the Menu options button.
Display shows
Save Entry
.
Press the OK options button.
Press the
DOWN navigation
button to move the cursor to
the next line.
Press the LEFT or RIGHT
navigation button to select the
noise sensitivity
High
or
Low
.
Press the Save button to save
the setting.
Press the
RED PHONE button
until you reach the idle display.
Change
Menu
OK
OK
Save
ADDITIONAL FEATURES
To switch off the room monitor
from another phone
When you are called by the
room monitor, you can switch
off the room monitor from
that phone.
Answer the call.
Press the
9 and 2 button. The
room monitor is switched off.
9
WXYZ
2
ABC
Diverse 4016 Executive ~ 7th Edition ~ 21st September ~ 4080
To change the earpiece volume
and loudspeaker volume
You can choose from:
3 earpiece volume levels
5 levels handsfree
loudspeaker volume levels.
Press the Menu options button.
Press the
DOWN navigation
button until the display shows
Sound Settings
.
Press the OK options button.
The display shows
Handset
Volume
.
Press the
OK options button.
You hear the current handsfree
volume.
Press the LEFT or RIGHT
navigation button to set the
volume level you want.
Press the DOWN navigation
button to select the handset
earpiece volume
Press the LEFT or RIGHT
navigation button to set the
volume level you want.
Press the
Save options button
to confirm and save the settings.
Press the RED PHONE button
until you reach the idle display.
40
Handset settings
You can choose a range of settings to suit your
personal preferences.
To set the ringer volume
and melody
You can choose from:
5 ringer volumes (original
setting = 3)
Crescendo ring (increasing
volume)
Ringer off
10 ringer melodies
Press the
Menu options button.
Press the
DOWN navigation
button until the display shows
Sound Settings
.
Press the
OK options button.
Press the
DOWN navigation
button until the display shows
Ringer Settings
.
Press the
OK options button.
You hear the current ringer
volume.
Press the
LEFT or RIGHT
navigation button to set the
ringer level you want.
Press the
DOWN navigation
button to select the ringer
melody.
Menu
OK
OK
Menu
Save
OK
OK
HANDSET SETTINGS
Diverse 4016 Executive ~ 7th Edition ~ 21st September ~ 4080
To set time control for the
ringer volume
You can set a different ringer
volume for a certain period,
e.g. If you want to lower the
volume of the ringer between
the hours of 8pm and 7am
because of children sleeping.
Press the
Menu options button.
Press the
DOWN navigation
button until the display shows
Sound Settings
.
Press the
OK options button.
Press the
DOWN navigation
button until the display shows
Ringer Settings
.
Press the
OK options button.
You hear the current ringer
volume.
Press the
Time C options button.
Press the
LEFT or RIGHT
navigation button to switch the
time control on or off.
Press the
DOWN navigation
button.
Enter the time period you want
for the ringer from.
Press the
DOWN navigation
button to scroll down to the
time you want it until.
Press the
LEFT or RIGHT
navigation button to set the
ringer volume.
Press the
Save options button
to confirm the settings.
Press the
RED PHONE button
until you reach the idle display.
Menu
OK
OK
Time C
41
Press the LEFT or RIGHT
navigation button to set the
ringer melody you want.
The melody is played and its
number shown
Press the
Save options button
to confirm and save the settings.
Press the
RED PHONE button
until you reach the idle display.
Save
Save
Status ON
or OFF
Period
Ringer
volume
Shortcut button
If you want to switch the handset
ringer off quickly you can also press
and hold the button. The
icon is displayed. To turn the handset
ringer back on press and hold down
the button again and the symbol
will disappear.
HANDSET SETTINGS
Diverse 4016 Executive ~ 7th Edition ~ 21st September ~ 4080
To switch off your handset’s
beeps and tones
You can switch off and on:
Key beeps when you press
each button on your handset
Confirmation beeps when you
have finished making a setting
or action on your handset.
Battery Low warning beep.
You can also set this to sound
only during a call.
Press the
Menu options button.
Press the
DOWN navigation
button until the display shows
Sound Settings
.
Press the
OK options button.
Press the
DOWN navigation
button until the display shows
Advisory Tones
.
Press the
OK options button.
Press the
LEFT or RIGHT
navigation button to switch the
key tones On or Off.
Press the
DOWN navigation
button to move to the next line.
Press the
LEFT or RIGHT
navigation button to switch the
confirmation tones On or Off
Press the
DOWN navigation
button to move to the next line.
Press the
LEFT or RIGHT
navigation button to switch the
battery low beep On or Off or to
sound only during a call.
Press the
Save options button
to confirm the settings.
Press the
RED PHONE button
until you reach the idle display.
Save
OK
OK
Menu
42
To change the display
language
Press the Menu options button.
Press the DOWN navigation
button until the display shows
H/Set Settings
.
Press the
OK options button.
Press the DOWN navigation
button until the display shows
Language
.
Press the OK options button.
Press the
DOWN navigation
button to display the language
you want.
Press the OK options button
to confirm.
Press the RED PHONE button
until you reach the idle display.
OK
OK
OK
Menu
HANDSET SETTINGS
Diverse 4016 Executive ~ 7th Edition ~ 21st September ~ 4080
To switch auto talk on or off
When you receive a call, you
can answer it simply by lifting
the handset off the base station.
This is called auto-talk. When
you switch auto-talk off, you
answer all calls by pressing
the GREEN PHONE button.
Press the
Menu options button.
Press the
DOWN navigation
button until the display shows
H/Set Settings
.
Press the
OK options button.
Press the
DOWN navigation
button until the display shows
Auto Answer
.
Press the
OK options button.
A
indicates auto talk is
switched on. Press the OK
options button again to switch
auto-talk off.
Press the
RED PHONE button
until you reach the idle display.
To reset a handset
You can restore a handset to
its factory settings.
Registration, the Directory
and the Calls list are not
affected.
Press the
Menu options button.
Press the
DOWN navigation
button until the display shows
H/Set Settings
.
Press the
OK options button.
Press the
DOWN navigation
button until the display shows
Reset Handset
.
Press the
OK options button.
Press the
Yes options button
to confirm reset.
The settings after a reset will be:
Ringer volume 3
Ringer melody 1
Auto talk On
Battery low beep On
Room monitor level 5
Room monitor level high
Time control off
Display language English
Redial list deleted
Press the RED PHONE button
until you reach the idle display.
Menu
Menu
OK
OK
OK
Yes
OK
43
HANDSET SETTINGS
Diverse 4016 Executive ~ 7th Edition ~ 21st September ~ 4080
44
To give a handset a name
rather than a number
The handsets when registered
are assigned numbers e.g.
INT
1
. You can give the handset a
name instead of a number to
match the user or location,
e.g.
Anne
or
Office
.
The name can be up to 10
characters long.
Press the LEFT navigation
button to display the list of
handsets.
Press the
UP or DOWN
navigation button to select the
handset you you want to change
the name or number of.
Press the Edit options button.
Enter the name you want.
Press the
Save options button
to confirm.
Press the RED PHONE button
until you reach the idle display.
Edit
Save
To change the internal number
of a handset
Your handsets are automatically
assigned internal numbers
between 1-6. You can change
these numbers.
Press the
LEFT navigation
button to display the list of
handsets.
Press the
UP or DOWN
navigation button to select the
handset you want.
Press the
Edit options button.
Enter an available number.
If the number is already
assigned to another handset
you hear a beep. Select another
number.
If required, press the
UP or
DOWN navigation button to
select another handset and use
the Keypad to change the
number.
Press the
OK options button
to confirm.
Press the
RED PHONE button
until you reach the idle display.
Edit
OK
To switch keyguard on and off
You can lock the keypad so that
it cannot be used accidentally
while carrying it around.
Press and hold the
#
button.
When the keyguard is
switched on, the display will
show the icon.
Press and hold the
#
button
to switch the keyguard off.
HANDSET SETTINGS
To set call barring
You can stop individual
handsets from dialling specific
external numbers.
You can set the following
options:
No barring (this is the
original setting)
Outgoing handset can
make internal calls and
receive external calls but
cannot make external calls.
Internal only handset can
only make internal calls.
Press the
LEFT navigation
button to display a list of
handsets.
Press the
UP or DOWN
navigation button to select the
handset you want.
Press the
Menu options button.
Press the
DOWN navigation
button until the display shows
Call Barring
.
Press the
OK options button.
Enter the PIN
(original setting =
0000
)
Press the
OK options button.
Diverse 4016 Executive ~ 7th Edition ~ 21st September ~ 4080
45
Press the DOWN navigation
button to display the setting
you want,
No barring
,
Outgoing
or
Internal only
.
Press the
OK options button.
A
will appear next to your
selection.
Press the
RED PHONE button
to cancel at any time during
these steps.
Menu
OK
OK
OK
Call Barring
HANDSET SETTINGS
Diverse 4016 Executive ~ 7th Edition ~ 21st September ~ 4080
46
Base Station settings
To set an emergency number
Emergency numbers can be
set so that even handsets that
are barred from dialling
external numbers can be used
to make an emergency calls.
Press the
Menu options button.
Press the DOWN navigation
button until the display shows
Base Settings
.
Press the OK options button.
Press the
DOWN navigation
button until the display shows
Add. Features
.
Press the OK options button.
Press the DOWN navigation
button until the display shows
Add. Emerg. No
.
Press the
OK options button.
Press the
DOWN navigation
button to scroll to the next line.
Repeat the new PIN to confirm.
Press the
Yes options button
to save the new PIN.
Press the RED PHONE button
until you reach the idle display.
Menu
OK
OK
OK
To change the base station PIN
Press the Menu options button.
Press the DOWN navigation
button until the display shows
Base Settings
.
Press the DOWN navigation
button until System PIN is
highlighted
Press the OK options button.
Enter the PIN
(original setting =
0000
).
Press the OK options button.
Enter the new PIN.
Menu
OK
OK
Yes
Base Station PIN (Personal
Identification Number)
Your base station PIN has a default
setting of
0000
but you may want to
change this to prevent unauthorised
use of the handset(s) or if you wish to
interrogate your answering machine
remotely from another Touchtone
telephone.
If you change your PIN keep a record
of the new number by writing it in the
space provided on page 9.
BASE SETTINGS
Diverse 4016 Executive ~ 7th Edition ~ 21st September ~ 4080
47
To display and dial the
emergency number
The emergency number is
saved in the base station so
any handset can dial it, even
if it barred from all other
external calls.
Press the
GREEN PHONE
button.
Press the
Emer Call options
button. Display shows the
emergency numbers you have
set.
Press the
UP or DOWN
navigation button to select the
emergency number you want.
Press the OK options button
to dial.
Press the
OK options button.
Enter the PIN (original setting
=
0000
).
Press the OK options button.
Enter the emergency number
you want up to 16 digits.
If an emergency number is
already set it is shown, you
can change it.
Press the
Menu options button.
Display shows
Save Entry
.
Press the OK options button to
confirm the setting.
Press the
RED PHONE button
until you reach the idle display.
OK
Emer
Call
Menu
OK
OK
OK
To reset the base
You can restore a base station
to its factory settings. Resetting
the base will not affect the
system PIN or handset
registration.
Press the
Menu options button.
Press the DOWN navigation
button until the display shows
Base Settings
.
Press the OK options button.
Press the
DOWN navigation
button until the display shows
Base Reset
.
Press the OK options button.
Enter the PIN (original setting
=
0000
.)
Press the
OK options button.
Press the Yes options button
to confirm reset.
The settings after a reset will be:
Calls list deleted
Join call deleted
Handset names INT 1- INT 6
Alarm clock switched off
Dialling mode tone
Flash time 100ms
Prefix deleted
Pause after prefix 3secs
SMS provider Pre-set number
number switched on
SMS incoming
and outgoing lists deleted
Voice dialling deleted
Press the RED PHONE button
until you reach the idle display.
Menu
OK
OK
OK
Yes
BASE SETTINGS
Diverse 4016 Executive ~ 7th Edition ~ 21st September ~ 4080
48
To set repeater mode
You can extend the range of
your base station by
purchasing a Diverse repeater.
This boosts the signal and
allows you to use your handset
further away from the base
station. If you want to use a
Diverse repeater, you must
switch this mode on.
Press the
Menu options button.
Press the DOWN navigation
button until the display shows
Base Settings
.
Press the OK options button.
Press the
DOWN navigation
button until the display shows
Add. Features
.
Press the OK options button.
Press the DOWN navigation
button until the display shows
Repeater Mode
.
Press the
OK options button.
Press the Yes options button.
Press the RED PHONE button
until you reach the idle display.
Menu
OK
OK
OK
Yes
BASE SETTINGS
Diverse 4016 Executive ~ 7th Edition ~ 21st September ~ 4080
49
Using the answering
machine
The answering machine is operated
entirely from the handset so you will
need to put the handset to your ear to
hear and follow instructions.
Your answering machine can be used as
soon as you have set up and powered
your Diverse 4016 Executive, as it has a
pre-recorded outgoing message Hello,
there is nobody available to take your call
right now. Please leave your message
after the tone. You also have the option
to record your own outgoing message.
You must set the time and date so that
received messages will have the time
and date added. You can set the date and
time manually (see page 14 if you have
not already done this) or if you have
subscribed to your networks Caller
Display service, the date and time will
set automatically as soon as you receive
your first call.
To switch the answering
machine on and off
Press the Menu options button.
Press the
DOWN navigation
button until the display shows
Voice Mail
.
Press the
OK options button.
Press the
DOWN navigation
button until the display shows
Ans Machine
.
Press the
OK options button.
A
confirms the answering
machine is switched on.
Press the
OK options button
again to switch it off.
Menu
OK
OK
OK
Note
The factory setting for the Diverse
4016 Executive is that the answering
machine is ON when powered up.
ANSWERING MACHINE
Diverse 4016 Executive ~ 7th Edition ~ 21st September ~ 4080
To select your own type of
outgoing message
You must first set the type of
message you want before
recording it.
Press the
Menu options button.
Press the
DOWN navigation
button until the display shows
Voice Mail
.
Press the
OK options button.
Press the
DOWN navigation
button until the display shows
Announcements
.
Press the
OK options button.
Press the
DOWN navigation
button until the display shows
Set Mode
.
Press the
OK options button.
Press the
DOWN navigation
button until the display shows
OGM
to record an outgoing
message, or
Announce Only
to
record an announcement after
which callers cannot leave a
message.
Press the
OK options button.
Menu
OK
OK
OK
OK
50
Selecting an outgoing
message
This is the greeting your callers hear
when your answering machine takes
their call.
The pre-recorded outgoing message is
used until you record your own. You
can always go back to the pre-recorded
message by deleting your own message.
You can choose from two options:
Outgoing message after which
callers can record a message.
For example,
I cannot take your call
right now, please leave a message after
the tone.
Announcement only after which
callers cannot record a message.
For example,
Our offices are closed.
Please ring back during business hours,
Monday to Friday.
ANSWERING MACHINE
Diverse 4016 Executive ~ 7th Edition ~ 21st September ~ 4080
Note
The maximum outgoing message
length is 2 minutes and 50 seconds.
If you pause during recording for
longer than 2 seconds, recording is
stopped.
Note
If the answering machine memory
becomes full, it automatically switches
off or to
Announcement Only
if you
have recorded an Announcement
message.
Remember to delete messages regularly.
To play back your outgoing
message
Press the Menu options button.
Press the
DOWN navigation
button until the display shows
Voice Mail
.
Press the
OK options button.
Press the
DOWN navigation
button until the display shows
Announcements
.
Press the
OK options button.
Press the
DOWN navigation
button until the display shows
Play Announce
to hear your
outgoing message
Menu
OK
OK
51
To record your own outgoing
message
When you have selected what
type of outgoing message you
want:
Press the
Menu options button.
Press the
DOWN navigation
button until the display shows
Voice Mail
.
Press the
OK options button.
Press the
DOWN navigation
button until the display shows
Announcements
.
Press the
OK options button.
Press the
DOWN navigation
button until the display shows
Rec Announce
callers can
leave a message.
Or
Rec Anc Only
callers cannot
leave a message.
Press the
OK options button.
Put the handset to your ear
and after the beep, speak your
outgoing message or
announcement. The display
will show
Recording
.
Press the
End options button
to stop recording.
Your recording is played back.
To cancel recording, press the
RED PHONE button or the
Return options button.
Menu
OK
OK
OK
End
ANSWERING MACHINE
Diverse 4016 Executive ~ 7th Edition ~ 21st September ~ 4080
Press the OK options button.
The display will show
Delete
OGM?
Press the Yes options button.
You will hear a confirmation
tone and the display shows
OGM deleted
.
Or
To delete your own
announcement message:
Press the DOWN navigation
button until the display shows
Del Anc only
.
Press the
OK options button.
The display shows
Delete Anc
only?
Press the Yes options button.
The display shows
Announce.
only deleted!
OK
Yes
DOWN
52
OK
Yes
Or
Play Anc Only
to hear your
Announcement message.
Press the
OK options button.
Put the handset to your ear
and you will hear the message
played back.
During playback, you can
re-record your message by
pressing the
New options
button.
To delete your outgoing
message
If you delete your own outgoing
message, the pre-recording
message is automatically
reinstated.
Press the
Menu options button.
Press the
DOWN navigation
button until the display shows
Voice Mail
.
Press the
OK options button.
Press the
DOWN navigation
button until the display shows
Announcements
.
Press the
OK options button.
To delete your own outgoing
message:
Press the DOWN navigation
button until the display shows
Del Announce
to delete your
outgoing message.
OK
New
Menu
OK
OK
ANSWERING MACHINE
Diverse 4016 Executive ~ 7th Edition ~ 21st September ~ 4080
53
Call screening
From your handset, you can listen into
a caller leaving their message. This
feature can be switched on or off. The
factory setting is on.
To switch call screening on
or off
Press the Menu options button.
Press the
DOWN navigation
button until the display shows
Voice Mail
.
Press the
OK options button.
Press the
DOWN navigation
button until the display shows
Call Screen
.
Press the
OK options button.
You will hear a confirmation
tone. A
indicates call
screening is switched on.
Press the OK options button
again to switch it off.
While the caller is leaving their
message:
Press the Talk options button.
The machine stops recording
and you can talk to your caller.
To interrupt a call
If a caller is leaving a message,
you can interrupt and take the
call at the handset.
Menu
Talk
OK
OK
Note
To switch call screening off for the
current call, press the RED PHONE
button on the handset during the call.
New message indicator
When you have new messages, the In
use light will flash and the display will
show
You have new messages
.
Playing messages
To listen to your new messages
Press the ENVELOPE button.
Put the handset to your ear
and your new messages will be
played back to you.
Playback begins with the last
message recorded. When all
new messages have been
played, old messages will follow.
At the end of all messages, you
hear the end of messages tone.
Note
By pressing and holding down the
1 button you can also access your
messages on the answering machine.
ANSWERING MACHINE
Diverse 4016 Executive ~ 7th Edition ~ 21st September ~ 4080
54
To listen to your old messages
Press the ENVELOPE button.
Press the
DOWN navigation
button until the display shows
Ans M.:
Press the OK options button.
Put the handset to your ear
and your old messages will be
played back to you, starting
with the oldest message.
Answering machine operation
during playback
Press the DOWN navigation
button to pause and resume
playback.
Press the
LEFT navigation
button to repeat message.
Press the
LEFT navigation
button twice to skip back to
previous message
Press the
RIGHT navigation
button to play next message.
Press the
RIGHT navigation
button twice to skip forward to
message after next.
Press the
Delete options
button to delete the current
message.
OK
To mark old messages as
‘new’
When a message has been
played back, it is seen as an
old message and will be shown
in the old messages counter.
However, you can play a
message and then make it a
new unplayed message again.
This means it will show in the
new message counter again,
the In use light will flash and
the display will show
You have
new messages
.
While the message is playing:
Press the STAR button. The
message is marked as new and
you will hear message marked
as new. The next message is
then played.
To delete all old messages
During playback:
Press the Menu options button.
Press the
DOWN navigation
button until the display shows
Del All Old Msg
.
Press the
OK options button.
The display will show,
Are you
sure you want to delete all
old messages?
Menu
ANSWERING MACHINE
Diverse 4016 Executive ~ 7th Edition ~ 21st September ~ 4080
55
To record a memo message
You can record a memo that
other users can listen to just
like a message that has been
received.
Press the
Menu options button.
Press the
DOWN navigation
button until the display shows
Voice Mail
.
Press the
OK options button.
Press the
DOWN navigation
button until the display shows
Record Memo
.
Press the
OK options button.
You will hear Recording
memo, after the beep, speak
your message.
Press the
End options button
to stop recording.
To cancel and delete your
memo, press the
RED PHONE
button or the RETURN button
during recording.
Press the
Yes options button
to confirm.
To delete individual messages,
see
Answering machine
operation during playback
page 54.
OK
Yes
Menu
OK
OK
End
Call Director
If you have more than one handset
registered to the base station and the
answering machine is switched on,
external callers can directly dial a
specific handset.
After dialling your phone number, the
caller hears the announcement. If it is
the internal directory announcement,
they have 5 seconds in which to dial
the internal number.
If the person dialled does not answer,
then all the handsets will ring.
If no one answers, then the answering
machine will pick up the call.
To play a memo message
Memo messages can be played
back in the same way as
normal messages, see page 53.
ANSWERING MACHINE
Diverse 4016 Executive ~ 7th Edition ~ 21st September ~ 4080
56
To pick up a call to another
handset
If the Call Director is on, and
a call to another handset is not
answered, you can pick up the
call on your handset.
When all the handsets
registered to the base station
ring:
Press the
GREEN PHONE
button.
Or
Press the Accept options
button.
Accept
To set the number of rings
You can set how many times
the answering machine will
ring before it takes the call.
You can choose for 2-9 rings or
time saver.
Time saver is the factory
setting, this can save you the
cost of a call when you want to
ring in to find out if you have
new messages.
Additional answering
machine settings
If your answering machine
answers after 3 rings, you
have new messages.
If it answers after 5 rings,
you do not have new
messages.
So if you hear more than 3 rings,
you can end the call without the
cost of being connected.
Press the
Menu options button.
Press the
DOWN navigation
button until the display shows
Voice Mail
.
Press the
OK options button.
Press the
DOWN navigation
button until the display shows
Ring Delay
.
Press the
OK options button.
Press the
LEFT or RIGHT
navigation button to display
the setting you want
<auto>
(time saver), or
<2-9 rings>
.
Press the
Save options button
to confirm. The display will
show
Entry saved
and you will
hear a confirmation tone.
Menu
OK
OK
Save
ANSWERING MACHINE
Diverse 4016 Executive ~ 7th Edition ~ 21st September ~ 4080
To adjust the message length
The pre-set message length is
120 seconds (2 minutes). You
can set the maximum message
length to 30 seconds, 60
seconds or 120 seconds.
Press the
Menu options button.
Press the
DOWN navigation
button until the display shows
Voice Mail
.
Press the
OK options button.
Press the
DOWN navigation
button until the display shows,
Message set
.
Press the
OK options button.
The display shows
Msg Length
.
Press the
OK options button.
Press the
LEFT or RIGHT
navigation button to display
the
30
,
60
,
120
, or
Maximum
.
Press the
Save options button
to confirm.
The display will show
Entry
saved
and you will hear a
confirmation tone.
Menu
OK
OK
OK
Save
57
To adjust the recording
quality
The factory setting is long play
which will allow a maximum
recording capacity of 15
minutes. If you set High Quality,
the recording capacity is cut to
7 minutes.
Press the
Menu options button.
Press the
DOWN navigation
button until the display shows
Voice Mail
.
Press the
OK options button.
Press the
DOWN navigation
button until the display shows,
Message set
.
Press the
OK options button.
Press the
DOWN navigation
button until the display shows
Rec Quality
.
Press the
OK options button.
Press the
LEFT or RIGHT
navigation button to display
Long play
or
High quality
.
Press the
Save options button
to confirm.
The display will show
Entry
saved
and you will hear a
confirmation tone.
Menu
OK
OK
OK
Save
ANSWERING MACHINE
Diverse 4016 Executive ~ 7th Edition ~ 21st September ~ 4080
To switch on your answering
machine from another phone
If you forget to switch your
answering machine on, you
can do it from another phone.
Dial your telephone number
and let the phone ring for
approximately 1 minute.
When you hear the
announcement
Please enter
your PIN code.
Enter the base PIN (must be
changed from
0000
).
The available recording time
is announced.
Your answering machine is
now switched on.
Remote access
You can operate your answering
machine from any external Touchtone
phone by phoning your Diverse 4016
Executive and entering your base
station PIN.
Using this code prevents other people
from accessing your answering machine
functions without your permission.
IMPORTANT
You must change the base station PIN
from the Original setting of
0000
for
your remote access to function. See To
change the base station PIN, page 46.
58
To access your answering
machine from another phone
Dial your number.
When you hear your outgoing
message:
Press the
9 button.
Enter your base PIN. Your
machine tells you whether
new messages have been
recorded and plays them.
To repeat the current
message. Press
twice to skip
back to previous message.
To pause/resume playback.
To skip forward to the next
message. Press
twice to skip to
the following message.
To delete the current message.
To mark the message as new.
9
WXYZ
1
2
ABC
3
DEF
0
ANSWERING MACHINE
Diverse 4016 Executive ~ 7th Edition ~ 21st September ~ 4080
59
1
4
9
WXYZ
7
PQRS
8
TUV
GHI
3
DEF
5
JKL
2
ABC
6
MNO
0
INT M
R
1
4
9
WXYZ
7
PQRS
8
TUV
GHI
3
DEF
5
JKL
2
ABC
6
MNO
0
INT M
R
1
4
9
WXYZ
7
PQRS
8
TUV
GHI
3
DEF
5
JKL
2
ABC
6
MNO
0
INT M
R
1
4
9
WXYZ
7
PQRS
8
TUV
GHI
3
DEF
5
JKL
2
ABC
6
MNO
0
INT M
R
1
4
9
WXYZ
7
PQRS
8
TUV
GHI
3
DEF
5
JKL
2
ABC
6
MNO
0
INT M
R
Using additional
handsets and bases
Registering additional
handsets
If you purchase new handsets to use with
your current Diverse 4016 Executive,
they will not be pre-registered to a base
station. You will need to do this before
you can use them.
To register a new additional
Executive handset to a 4016
base station
For this method of registration
your handset must be a
Diverse 4000 Executive.
Place your handset in the base
station.
Ensure that the handset is
switched on.
After about 1 minute, the
handsets internal number will
be displayed, e.g.
INT 2
.
The next available internal
number (
2-6) will be
automatically assigned to the
handset.
1
4
9
WXYZ
7
PQRS
8
TUV
GHI
3
DEF
5
JKL
2
ABC
6
MNO
0
INT M
R
Up to six handsets can be registered
and operated from the Diverse 4016
Executive base station. This allows you
to make internal calls between two
handsets while a third is making an
external call.
Each handset can be registered on up
to four bases.
ADDITIONAL HANDSETS
Diverse 4016 Executive ~ 7th Edition ~ 21st September ~ 4080
60
For example, if the handset is
already registered at Base 1,
you could set your base as
Base 2.
Press the
OK options button.
Enter the base station PIN
(original setting =
0000
)
Press the
OK options button.
Display shows
Registr.
Procedure Base X
.
If the base station is a Diverse
4016 or 4016 base press the
PAGE button located
underneath the base station
for approximately one second.
After approximately one
minute the handset will display
its internal number. The
handset is now registered and
the handset display will return
to the idle screen.
If the base is not a 4016 or 4016
you will need to follow the
user guide for the base station
you are registering the 4000
handset to.
Press the
RED PHONE button
until you reach the idle display.
To manually register a Diverse
4000 Executive handset to
another base station
If you want to register your
handset to another base station
you will need to manually
register it.
On the handset to be registered:
Press the Menu options button.
Press the
DOWN navigation
button until the display shows
H/Set Settings
.
Press the
OK options button.
Press the
DOWN navigation
button until the display shows
Register H/Set
.
Press the
OK options button.
Press the
DOWN navigation
button to display the Base
Station number you want
Base 1
,
Base 2
,
Base 3
,
Base 4
.
Menu
OK
OK
OK
OK
Note
If all internal numbers have been
assigned then the internal number 6
will be re-assigned.
You can change the internal handset
number if you wish, see page 44.
ADDITIONAL HANDSETS
Diverse 4016 Executive ~ 7th Edition ~ 21st September ~ 4080
61
To de-register a handset
Press the LEFT navigation
button to display the list of
internal handsets registered to
the base.
Press the
UP or DOWN
navigation button to select the
handset you want to de-register.
Press the
Menu options button.
Press the
DOWN navigation
button until the display shows
De-reg. H/Set No
.
Press the
OK options button.
Enter the base station PIN
(original setting =
0000
).
Press the
OK options button.
Press the
Yes options button.
Press the
RED PHONE button
to confirm de-registration.
Menu
OK
Yes
OK
Note
There is no confirmation tone from
the PAGE button but if you page all
handsets you will know if your
handset has registered by the handset
ringing.
To register Diverse 2000/
3000 series handsets and
other makes
Providing your handset is GAP
(Generic Access Profile)
compliant, you can register it
to your Diverse 4016 base.
Register your handset
according to the instructions
in its user guide.
When the handset is in
registration mode, you will
need to press the
PAGE button
located on the underside of
your Diverse 4016 base station,
for approximately one second.
You will hear a confirmation
tone and after a short period
of time the handset will be
registered. The Diverse 4016
will allocate the next available
handset number.
ADDITIONAL HANDSETS
Diverse 4016 Executive ~ 7th Edition ~ 21st September ~ 4080
To move between base
stations
When your handset is
registered to more than one
base station you can set it to:
Automatically connect to
the base station with the
strongest signal.
Manually select the base
station.
Press the
Menu options button.
Press the
DOWN navigation
button until the display shows
H/Set Settings
.
Press the
OK options button.
Press the
DOWN navigation
button until the display shows
Select Base
.
Press the
OK options button.
Press the
DOWN navigation
button to select the Base you
want, or Best Base for
automatic connection.
Press the
RED PHONE button
until you reach the idle display.
Menu
OK
OK
62
ADDITIONAL HANDSETS
Diverse 4016 Executive ~ 7th Edition ~ 21st September ~ 4080
63
Help
Try these solutions to the most common problems.
Problem Possible cause Solution
Handset not registering. The base is not powered.
Make sure that the power supply
There are no batteries in the
is plugged in at the base and
handset.
switched on. Make sure that the
rechargeable batteries (included)
are fitted in the handset correctly.
Switch the handset off and then
back on again, place the handset
on to the base again and leave
for approx. 1 minute to try
registering again.
You have forgotten your base You have changed the PIN. Try entering the default PIN (0000).
station PIN number. If you have changed the PIN and
cannot remember the number you
will need to contact the BT Diverse
Helpline on 08457 908070.
No display The handset is switched off. Hold down
RED PHONE for
1 second.
Charge or replace the batteries.
Nothing happens when you Keyguard may be switched on. Hold down the
#
button for
press any button. 1 second.
No connection between Are you out of range of the Move closer to the base station.
handset and base station. base station.
Handset is not registered. Register the handset.
Base station is not switched on. Check the mains power is
connected correctly.
Handset on the base does Is another handset using the Maximum charging power is only
not charge. line for a long time? possible when no calls are being made.
Is the handset placed on the Make sure that the handset is
base properly? placed on the base or in the
charger correctly. You will hear
a confirmation tone.
Are the batteries in correctly? Check that you have put the batteries
in the right way, you will hear a
confirmation tone.
HELP
Diverse 4016 Executive ~ 7th Edition ~ 21st September ~ 4080
Handset does not ring. The handset ringer may be Hold down
to switch the ringer
switched off. back on.
You cannot dial external numbers. Call barring may be set. Switch off call barring (see page 45).
Your cannot hear your caller. The LEFT navigation button has Press to switch the
been pressed and the microphone microphone back on.
is muted.
The incoming caller’s number is The caller’s number has been Caller has to allow their number to
not displayed even though you withheld. be sent.
have Caller Display.
You keep hearing the error beep You have pressed the wrong Check the prompts in the display
(a descending tone) button in a sequence. or refer to instructions in the
user guide.
The answering machine The PIN entered is the wrong Re-enter the base station PIN or set
announces “PIN is incorrect” one or it is still set to 0000. a PIN other than 0000.
during remote access.
The answering machine will The memory is full. Delete old messages. Play back and
not record. delete new messages.
Answering machine messages Date/time has not been set. Set the date and time (see page 14).
do not have the date and time
attached.
64
HELP
Diverse 4016 Executive ~ 7th Edition ~ 21st September ~ 4080
4000 Classic handset 4016/4016 Executive 3010 Executive
Caller Display/Call Waiting Yes Yes
Time displayed in idle mode Yes No
Language selection No No
SMS No No
Loudspeaker via the base No Yes
Room monitor No No
Walk and Talk mode No No
4000 Executive handset 4016/4016 Classic 3010/3016 Classic
Caller Display/Call Waiting Yes Yes*
Time/date displayed in idle mode Yes Yes
Language selection No No
SMS No No
Loudspeaker via the base Yes Yes
Directory transfer Yes No
Room monitor Yes Yes
Walk and Talk mode Yes Yes
Call Barring No Yes
Compatibility
The tables below give you a quick reference guide to compatibility when
registering different handsets to bases within the Diverse 3000 and 4000 range.
It is possible for Diverse 4000 and Diverse 3000 Executive Handsets to transfer
directory entries.
*With the Diverse 3016, although you will hear the beeps when a call is waiting, the number or name of the waiting
caller will not be shown on the handset display.
65
HELP
Diverse 4016 Executive ~ 7th Edition ~ 21st September ~ 4080
66
General information
Within the 12-month guarantee period:
If you experience difficulty using the
product, prior to returning your
product, please read the Help section
beginning on page 63, or contact the
Diverse Helpline on 08457 908070
for assistance.
In the unlikely event of a defect
occurring, please follow the Helplines
instructions for replacement or repair.
Outside the 12-month guarantee period:
If your product needs repair after the
guarantee period has ended, the repair
must meet the approval requirements
for connection to the telephone network.
We recommend that you call the Helpline
on 08457 908070 and ask for details
of our recommended repair agents.
Guarantee
Your Diverse 4016 Executive is
guaranteed for a period of 12 months
from the date of purchase.
Subject to the terms listed below the
guarantee will provide for the repair of,
or at BTs or its agents discretion the
option to replace the Diverse 4016
Executive, or any component thereof,
(other than batteries), which is
identified as faulty or below standard,
or as a result of inferior workmanship
or materials. Products over 28 days old
from the date of purchase may be
replaced with a refurbished product.
The conditions of this guarantee are:
The guarantee shall only apply to
defects that occur within the 12 month
guarantee period.
Proof of purchase is provided.
The equipment is returned to BT or
its agent as instructed.
This guarantee does not cover any
faults or defects caused by accidents,
misuse, fair wear and tear, neglect,
tampering with the equipment, or
any attempt at adjustment or repair
other than through approved agents.
This guarantee does not affect your
statutory rights.
Technical information
How many telephones can you have on
the line?
All items of equipment have a Ringer
Equivalence Number (REN) which is
used to calculate the number of items
that may be connected to any one
telephone line.
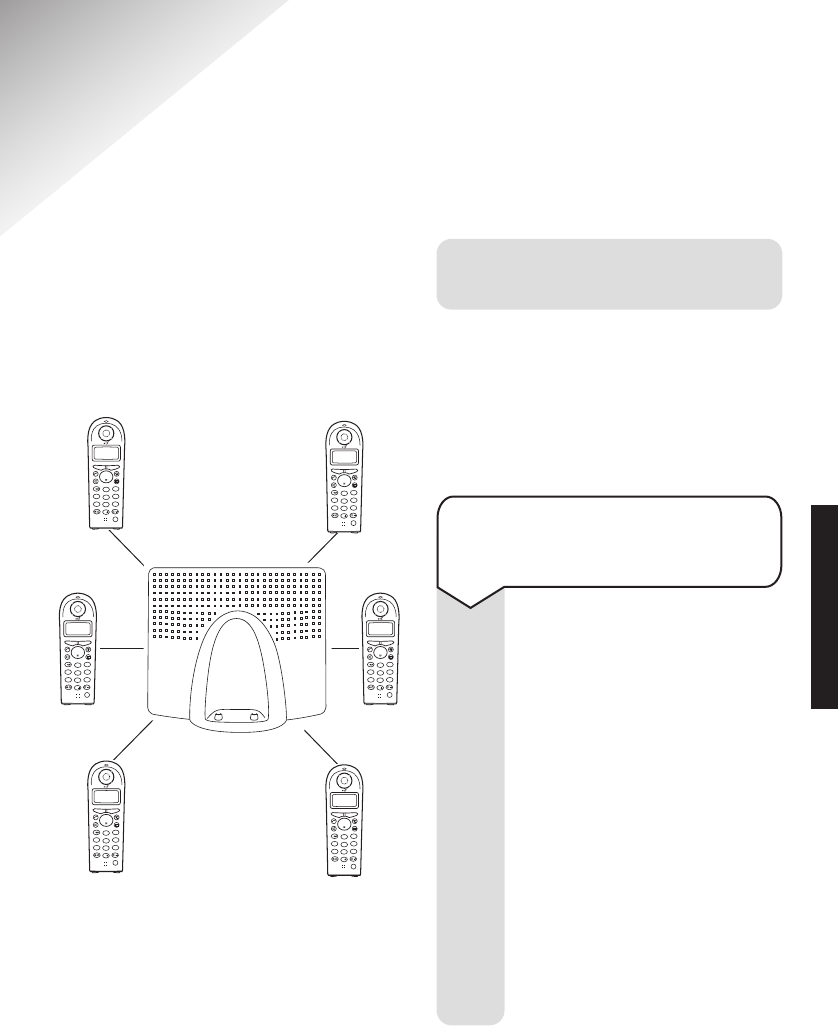
The BT Diverse 4016 Executive (with
up to 6 handsets) has a total REN of 1.
GENERAL INFORMATION
Diverse 4016 Executive ~ 7th Edition ~ 21st September ~ 4080
67
Any other instrument provided by BT
may be assumed to have a REN of 1
unless stated otherwise.
A total REN of 4 is allowed per telephone
line. (For example: if the BT Diverse 4016
is used in conjunction with three
extension telephones, each with a REN
of 1, then the total REN = 4)
Only use approved power supply item
code
M-GA35-095130F.
R&TTE
This product is intended for use within
the UK for connection to the public
telephone network and compatible
switchboards.
This equipment complies with the
essential requirements for the Radio
Equipment and Telecommunications
Terminal Equipment Directive
(1999/5/EC).
Helpline
If you are experiencing difficulty,
please call the BT Diverse Helpline
on 08457 908070.
Switchboard compatibility
Generally this telephone may be connected
to switchboards which support tone
signalling and timed break recall. In the
event of any difficulties please consult
your switchboard Service Provider.
To set the dialling mode
You need only adjust this
setting if your switchboard does
not operate with the pre-set
tone dialling. You can change
the dial mode to pulse dialling.
Press the
Menu options button.
Press the
DOWN navigation
button until the display shows
Base Set
.
Press the
OK options button.
Press the
DOWN navigation
button until display shows
Add Features
.
Press the
OK options button.
Display shows
Dial Mode
.
Press the
OK options button.
Press the
DOWN navigation
button to select:
tone (with TBR)
pulse (with Earth Recall)
DTMF-Earth (tone with
Earth loop recall)
Press the
OK options button
to confirm. The display shows
Saved
.
Press the
RED PHONE button
until you reach the idle display.
Menu
OK
OK
OK
OK
GENERAL INFORMATION
To set the recall time
You need only adjust this setting
if your switchboard requires a
different recall time to the
pre-set recall time of 100ms .
Press the
Menu options button.
Press the
DOWN navigation
button until the display shows
Base Set
.
Press the
OK options button.
Press the
DOWN navigation
button until the display shows
Add Features
.
Press the
OK options button.
Press the
DOWN navigation
button until the display shows
TBR
.
Press the
OK options button.
Press the
DOWN navigation
button to select the flash time
80
,
100
,
120
,
180
,
250
or
300ms
.
Press the
OK options button to
confirm. The display shows
Saved
.
Press the
RED PHONE button
until you reach the idle display.
Diverse 4016 Executive ~ 7th Edition ~ 21st September ~ 4080
Menu
OK
OK
OK
OK
68
To switch temporarily from
pulse to tone dialling
If you are using pulse dialling
with your switchboard but
need tone dialling to use
certain functions on your
Diverse 4016 you can switch to
tone dialling during the call.
During your call:
Press the Menu options button.
Press the
DOWN navigation
button until the display shows
Temp.Tone
.
Press the
OK options button.
Tone dialling is now active.
Press the
RED PHONE button
until you reach the idle display.
Menu
OK
Note
This setting is only for the duration of
the call.
Note
100 MS is the standard setting for
most UK switchboards.
GENERAL INFORMATION
Diverse 4016 Executive ~ 7th Edition ~ 21st September ~ 4080
69
Note
If you want to insert a pause into a
telephone number you are storing in
your directory start the number and
where the pause is needed press the
MENU button until insert pause is
displayed, press OK and the pause is
added and stored with the number.
To set a pause before dialling
You can insert a pause to allow your
switchboard time to get a line before
your Diverse 4016 dials the number.
Press the MENU button.
Press the
8 button.
Press the
9 button.
Press the
1 button.
Press the
6 button.
Enter the pause length:
1 = 1 second
2 = 3 seconds
3 = 7 seconds
4 = 2.5 seconds
1
8
TUV
9
WXYZ
6
MNO
MENU
To set a pause after pressing
Recall
You can set the length of a
pause that is inserted after
pressing the RECALL button.
Press the
MENU button.
Press the
8 button.
Press the
9 button.
Press the
1 button.
Press the
2 button.
Enter the pause length:
1 = None
2 = 800ms
3 = 1600ms
4 = 32ms
R
Setting pauses
8
TUV
9
WXYZ
1
2
ABC
MENU
OK
To switch from pulse to tone
dialling
If your switchboard uses pulse
dialling but tone dialling is
required during a call, you can
switch the call to tone dialling.
During your call:
Press the Menu options button.
Press the
DOWN navigation
button until the display shows
Temp.Tone
.
Press the
OK options button.
Tone dialling is set for the
duration of the call.
Menu
GENERAL INFORMATION
Diverse 4016 Executive ~ 7th Edition ~ 21st September ~ 4080
Press the DOWN navigation
button until the display shows
Add. Features
.
Press the
OK options button.
Press the
DOWN navigation
button until the display shows
Access code
.
Press the
OK options button.
Enter the access code, e.g.
9.
Press the
Menu options button.
Display shows
Save Entry
.
Press the
OK options button
to confirm the setting.
Press the
RED PHONE button
until you reach the idle display.
OK
OK
OK
Menu
70
Important
When storing numbers in the
Directory, you still need to enter the
switchboard access code first.
The code you store here is always
dialled automatically before telephone
numbers in the caller list and the
emergency numbers.
OK
OK
Press the DOWN navigation
button until the display shows
Add. Features
.
Press the
OK options button.
Press the
DOWN navigation
button until the display shows
TBR
.
Press the
OK options button.
Press the
UP or DOWN
navigation button to select the
flash time you want. Options
are 80ms. 100ms, 120ms,
180ms, 250ms, 300ms, 600ms.
Press the
OK options button
to confirm the setting.
Press the
RED PHONE button
until you reach the idle display.
OK
To store the switchboard
access code
If your switchboard requires a
prefix, e.g. 9, before a number
is dialled, your Diverse 4016
Executive can store it so it is
dialled automatically for
external numbers.
Press the
Menu options button.
Press the
DOWN navigation
button until the display shows
Base Settings
.
Press the
OK options button.
Menu
OK
GENERAL INFORMATION
Diverse 4016 Executive ~ 7th Edition ~ 21st September ~ 4080
71
Additional handset and bases 59
Alarm clock 34
Appointment call 35
Auto talk on/off 43
Base station PIN 46
Base station reset 47
Batteries
charging 12
installing 12
performance 13
replacing 12
warning beeps 13
Belt clip 14
Call Barring 45
Call timer 16
Call Waiting 31
Caller Display 27
Call Director 55
Call Divert 33
Calls list 27
copy to directory 29
delete a call 29
delete complete list 30
dial a number from 28
display status of call 28
display time of call 28
settings 30
view 28
Calls
end 16
external 16
handsfree 17
holding 25
internal 24
making 16
on hold 25
receiving 17
redial 23
secrecy 24
three-way 26
transferring 25
Date set 14
Delete
all directory numbers 22
calls list call 29
complete calls list 30
directory entry 22
redial list 24
De-register handset 61
Dialling mode 67
Directory 18
character map 19
copy entire directory 21
copy entry to another handset 21
delete all entries 22
delete an entry 22
dial a number 20
display available memory 23
edit an entry 20
store name and number 18
view an entry 20
Display icons 8
Emergency number set 46
Ending calls 16
External calls 16
Index
INDEX
Diverse 4016 Executive ~ 7th Edition ~ 21st September ~ 4080
72
Guarantee 66
Handset
beeps and tones 42
change internal number 44
charging 12
display 8
melody 40
on/off 16
registering 12
reset 43
ringer 40
Handset quick guide 6-8
Handsfree 17
Help 63
Holding calls 25
Internal calls 24
Internal number change 44
Keyguard 44
Language change 42
Main menu 4
Making calls 16
Melody 40
Messages 5
On/off
alarm clock 34
auto talk 43
beeps and tones 42
handset power 16
keyguard 44
room monitor 37
secrecy 24
three-way conversation 26
walk and talk 36
Page a handset 24
Pause length 69
Phone socket 14
PIN 46
Power connection 11
Preparatory dialling 16
Pulse dialling 67
Quick guide
answering machine 7
display 8
handset 6
Range warning 13
Repeater mode set 48
Recall time 68
Receiving calls 17
Redial 23
copy to directory 23
delete 24
dial number in redial list 23
Registering 12
additional handsets 59
manually 60
REN, how many phones can I have? 66
Reset
base settings 47
handset settings 43
Ring Back 32
Room monitor 37
Safety instructions 10
Secrecy 24
Select Services 27
Call Divert 33
Caller Display 27
Calls list 27
Call Waiting 31
Ring Back 32
withhold your number 31
INDEX
Diverse 4016 Executive ~ 7th Edition ~ 21st September ~ 4080
Setting up 11
Switchboard compatibility 67
Technical information 66
Telephone line cord 14
Three-way conversation 26
Time control for ringer volume 41
Time set 14
Tone dialling 68, 69
Transferring calls 25
Volume
earpiece 40
handset ringer and melody 40
handset ringer time control 41
loudspeaker 40
Walk and Talk 36
73
INDEX
Diverse 4016 Executive ~ 7th Edition ~ 21st September ~ 4080
Offices worldwide
The Telecommunications services described in this publication
are subject to availability and may be modified from time to time.
Services and equipment are provided subject to British
Telecommunications plcs respective standard conditions of contract.
Nothing in this publication forms any part of any contract.
Touchtone
TM
is a registered trade mark of
British Telecommunications plc in the UK.
© British Telecommunications plc 2001.
Registered Office: 81 Newgate Street, London EC1A 7AJ.
Registered in England No. 1800000.
Diverse 4016 Executive (09/01) 7
Designed by The Art & Design Partnership Limited.
Siemens number: A31008-G4015-P102-2-7619
CE compliant to R&TTE Directive (1999/5/EC)
0682
39

Hulp nodig? Stel uw vraag in het forum

Spelregels

Misbruik melden

Gebruikershandleiding.com neemt misbruik van zijn services uitermate serieus. U kunt hieronder aangeven waarom deze vraag ongepast is. Wij controleren de vraag en zonodig wordt deze verwijderd.

Product:

Bijvoorbeeld antisemitische inhoud, racistische inhoud, of materiaal dat gewelddadige fysieke handelingen tot gevolg kan hebben.

Bijvoorbeeld een creditcardnummer, een persoonlijk identificatienummer, of een geheim adres. E-mailadressen en volledige namen worden niet als privégegevens beschouwd.

Spelregels forum

Om tot zinvolle vragen te komen hanteren wij de volgende spelregels:

Belangrijk! Als er een antwoord wordt gegeven op uw vraag, dan is het voor de gever van het antwoord nuttig om te weten als u er wel (of niet) mee geholpen bent! Wij vragen u dus ook te reageren op een antwoord.

Belangrijk! Antwoorden worden ook per e-mail naar abonnees gestuurd. Laat uw emailadres achter op deze site, zodat u op de hoogte blijft. U krijgt dan ook andere vragen en antwoorden te zien.

Abonneren

Abonneer u voor het ontvangen van emails voor uw BT Diverse 4016 Executive bij:


U ontvangt een email met instructies om u voor één of beide opties in te schrijven.


Ontvang uw handleiding per email

Vul uw emailadres in en ontvang de handleiding van BT Diverse 4016 Executive in de taal/talen: Engels als bijlage per email.

De handleiding is 2,08 mb groot.


U ontvangt de handleiding per email binnen enkele minuten. Als u geen email heeft ontvangen, dan heeft u waarschijnlijk een verkeerd emailadres ingevuld of is uw mailbox te vol. Daarnaast kan het zijn dat uw internetprovider een maximum heeft aan de grootte per email. Omdat hier een handleiding wordt meegestuurd, kan het voorkomen dat de email groter is dan toegestaan bij uw provider.

Stel vragen via chat aan uw handleiding

Stel uw vraag over deze PDF

Uw handleiding is per email verstuurd. Controleer uw email

Als u niet binnen een kwartier uw email met handleiding ontvangen heeft, kan het zijn dat u een verkeerd emailadres heeft ingevuld of dat uw emailprovider een maximum grootte per email heeft ingesteld die kleiner is dan de grootte van de handleiding.

Er is een email naar u verstuurd om uw inschrijving definitief te maken.

Controleer uw email en volg de aanwijzingen op om uw inschrijving definitief te maken

U heeft geen emailadres opgegeven

Als u de handleiding per email wilt ontvangen, vul dan een geldig emailadres in.

Uw vraag is op deze pagina toegevoegd

Wilt u een email ontvangen bij een antwoord en/of nieuwe vragen? Vul dan hier uw emailadres in.


Info