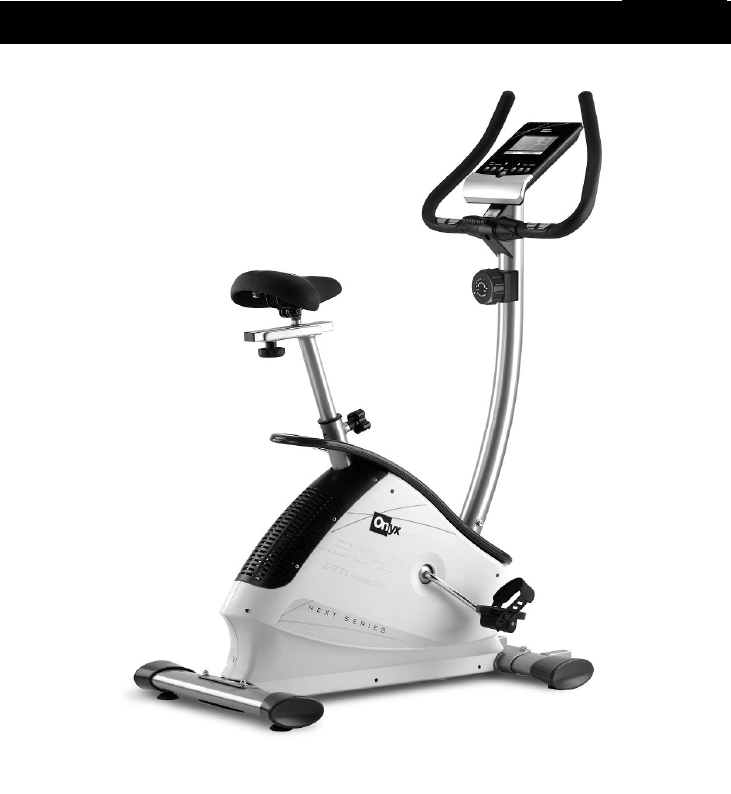
542470
30
Verklein
Vergroot
Pagina terug
1/35
Pagina verder
1
H6935
Instrucciones de montaje y utilización
Instructions for assembly and use
Instructions de montage et utilisation
Montage Und Gebrauchsanleitung
Instruções de montagem e utilização
Istruzioni di montaggio e uso
Montage-en gebruiksinstrukties
2
Fig.1
Fig.2 Fig.3
3
Fig.3A Fig.3B Fig.3C
Fig.4 Fig.5
Fig.6 Fig.7
4
Fig.8 Fig.9
Fig.10 Fig.11
5
Español
AVISO IMPORTANTE DE
SEGURIDAD.-
PRECAUCIONES.
Esta bicicleta ha sido diseñada y
construida de modo que proporcione
la máxima seguridad. Sin embargo,
deben aplicarse ciertas precauciones
al utilizar aparatos de ejercicio. Lea el
manual en su totalidad antes de
montar y utilizar la bicicleta.
Asimismo, cumpla con las siguientes
precauciones de seguridad:
1 Mantenga a los niños alejados de
esta aparto en todo momento. NO los
deje desatendidos en la habitación en
la que guarda la bicicleta.
2 Sólo puede utilizar el aparato una
persona cada vez.
3 Si sufre mareos, nauseas, dolor en
el pecho o cualquier otro síntoma
durante la utilización de este aparato,
PARE el ejercicio. ACUDA A UN
MÉDICO INMEDIATAMENTE.
4 Utilice el aparato sobre una
superficie sólida y a nivel. NO utilice la
bicicleta cerca del agua o al aire libre.
5 Mantenga las manos alejadas de las
partes en movimiento.
6 Utilice una indumentaria adecuada
para la realización de ejercicio. No
use prendas holgadas que podrían
engancharse en la bicicleta. Utilice
siempre calzado para correr o para
aerobic cuando utilice la máquina.
7 Utilice este aparato sólo para los
fines descritos en este manual. NO
utilice accesorios no recomendados
por el fabricante.
8 No coloque objetos cortantes
alrededor de la máquina.
9 Las personas discapacitadas no
deberán utilizar la máquina sin la
asistencia de una persona cualificada
o un médico.
10 Antes de utilizar este aparato,
realice un calentamiento con
ejercicios de estiramiento.
11 No utilice la bicicleta si no funciona
correctamente.
Precaución: Antes de comenzar a
utilizar la bicicleta, consulte a su
médico. Esta advertencia es
especialmente importante para
personas de edades superiores a
35 años o con problemas de salud.
Guarde estas instrucciones.
INDICACIONES GENERALES.-
1 Esta unidad esta diseñada para uso
en casa. El peso de usuario no debe
exceder de 105Kg.
2 Mantenga las manos alejadas de
cualquiera de las partes móviles de la
unidad.
3 Los padres y otras personas
responsables de los niños deben de
tener en cuenta la naturaleza curiosa
de estos y que puede llevarles a
situaciones y conductas que pueden
resultar peligrosas. Esta unidad no ha
de utilizarse en ningún caso como
juguete.
4 Es responsabilidad del propietario
asegurarse que todos los usuarios de
la máquina estén adecuados e
informados sobre todas las
precauciones necesarias.
5 Su unidad sólo puede ser usada por
una persona al mismo tiempo.
6 Utilice prendas de vestir y calzado
adecuado. Átese los cordones
correctamente.
6
INSTRUCCIONES DE
MONTAJE.-
1 Saque la unidad de la caja y
compruebe que tiene todas las piezas
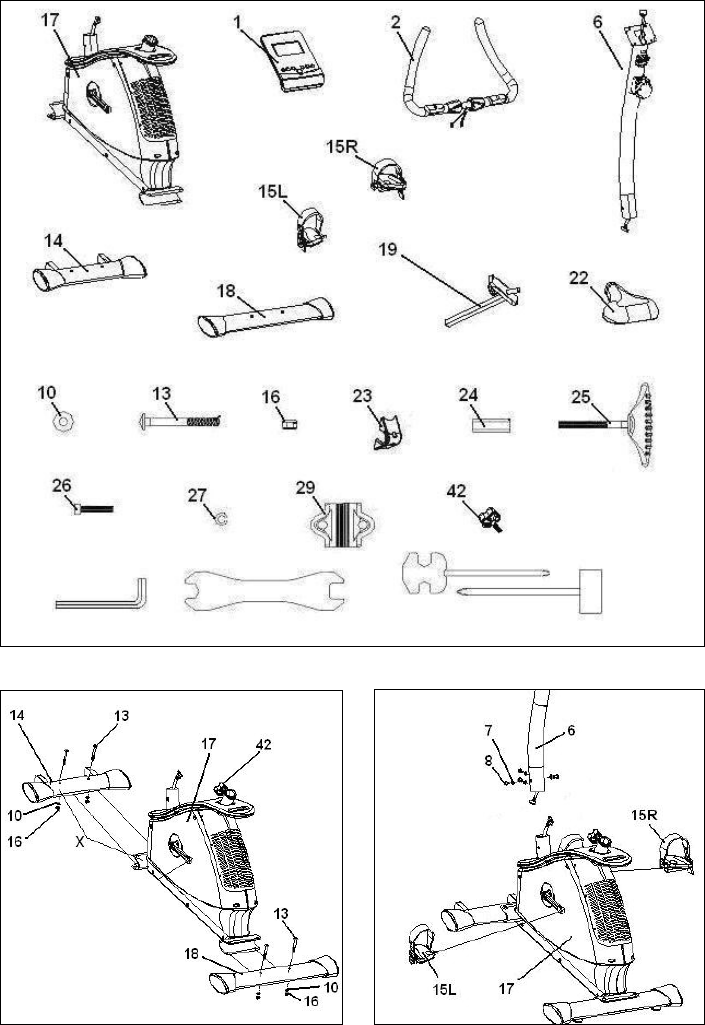
Fig.1:
(17) Cuerpo central; (6) Tubo de
manillar; (19) Tija de siln; (42) Mando
regulador de altura sillín; (14) Barra
estabilizadora con ruedas; (18) Barra
estabilizadora con tacos regulables; (22)
Sillín; (15R) y (15L) Pedales; (1)
Monitor; (2) Manillar; Bolsa de tornillos,
que contiene: (27) Arandelas de estas;
(24) Casquillo separador; (26) Tornillos
allen; (13) Tornillos de M-8x70; (28)
Arandelas planas; (16) Tuercas ciegas
M-8; (25) Maneta apriete del manillar;
(29) Abrazadera cierre manillar; (23)
Protector manillar; Llaves de montaje.
2 Coja la barra estabilizadora (18),
con tacos regulables (64), y
posiciónela en el caballete trasero de
la máquina, como muestra la Fig.2, e
introduzca los tornillos (13), coloque
las arandelas planas (10), y las
tuercas (16), apriete fuertemente.
Coja la barra estabilizadora, con
ruedas (14) y teniendo en cuenta de
posicionar los dos puntos rojos (X),
alineados, como muestra la Fig.2,
introduzca los tornillos (13), coloque
las arandelas planas (10) y las tuercas
(16) y apriete fuertemente.
3 MONTAJE DEL TUBO
MANILLAR.-
Saque los tornillos (8), del cuerpo
central (17), acerque el tubo de remo
(6), al saliente del cuerpo central
Fig.3, conexione los terminales (12) y
(9) Fig.3A. Introduzca la punta de la
sirga (5), en el soporte del cable
mando de tensión (11) como muestra
la Fig.3B, a continuación tire de la
sirga (5), hasta introducirlo por la
ranura, ver Fig.3C seguido introduzca
el tubo de remo en el saliente del
cuerpo central Fig.3, teniendo cuidado
de no pillar los cables, comprobando
que funciona correctamente el mando
de tensión (5) Fig.6.
Ponga los tornillos (8) con las
arandelas (7) Fig.3, quitados
anteriormente, comprobando antes la
alineación del manillar, apriete
fuertemente.
4 MONTAJE DE LOS PEDALES.-
Siga atentamente las instrucciones
de montaje de los pedales, una
colocación incorrecta podría dañar
la rosca del pedal o de la biela.
La posición derecha e izquierda,
habn de tomarse montado el usuario
en el sillín, en posición de hacer
ejercicio.
El pedal derecho (15R), marcado con
la letra (R), se enroscara en sentido
de giro agujas del reloj, en la biela
derecha, marcada con la letra (R).
Apriete fuertemente, Fig.3.
El pedal izquierdo (15L), marcado con
la letra (L), se enroscará en el sentido
contrario a las agujas del reloj, en la
biela izquierda, marcada con la letra
(L). Apriete fuertemente, Fig.3.
Una vez colocados los pedales,
introduzca el extremo del calapies (1)
Fig.4 por la ranura del pedal (2) y
adaptándolo a su calzado sujételo en
el saliente del pedal (3).
5 MONTAJE DEL SILLÍN.-
Coloque el sillín (22) Fig.5, en la tija
(19) como muestra la Fig.5 teniendo
en cuenta de que los agujeros de la
tija le queden hacia la parte delantera
del sillín, coloque el sillín en posición y
apriete las tuercas (Z) fuertemente.
7
Seguido introduzca el tubo de tija por
el agujero del cuerpo principal (17)
Fig.6 coloque el pomo de apriete de
tija (42), fije la tija del sillín en su
posición cómoda con el pomo de
apriete (42) y apriete en sentido de las
agujas del reloj.
6 COLOCACIÓN DEL
MANILLAR.-
Sitúe el manillar (2) junto a los
agujeros superiores del tubo remo (6).
Coloque la abrazadera 29, coja el
tornillo (26) y la arandela (28) y
enrósquelo en la parte inferior, sin
apretar fuerte Fig.7. Pase los cables
del hand-grip por la ranura del tubo
remo (6) Fig.A y sáquelo por la parte
superior del tubo remo.
Coja la protección (23) e introdúzcala
según muestra la Fig.7. Coja la
maneta (25) y el casquillo separador
(24) y atornille girando en sentido de
las agujas del reloj, en el agujero
superior Fig.7.
7 REGULACIÓN DE LA
ALTURA DEL SILLÍN.-
Aflojando un poco el pomo de apriete
(42) de tija en sentido contrario a las
agujas del reloj y tirando del mismo
hacia atrás Fig.7, cuando lo tenga a la
altura adecuada para realizar el
ejercicio, suelte el pomo y se
introducirá en los agujeros de la tija.
Apriete fuertemente el pomo (42) en el
sentido de las agujas del reloj.
8 COLOCACIÓN DEL
MONITOR ELECTRONICO.-
Suelte los tornillos (4) situados en la
parte trasera del monitor, conexione el
cable (9) que sale por el extremo
superior del tubo remo (6), en el
conector (n) situado en la parte
trasera del monitor (1) Fig.8.
Coja el extremo del cable del hand-
grip (z) e introdúzcalo por el conector
(v) de la parte trasera del monitor
Fig.8 seguido introduzca el monitor,
en la parte superior del tubo remo (6)
Fig.8, atornille los tornillos (4) soltados
anteriormente.
9 AJUSTE DEL MANILLAR.-
Coloque el manillar (2) de modo que
pueda pedalear en una posición
cómoda y sin soltar el manillar, apriete
fuertemente la maneta (25) Fig.9.
10 REGULACION DE
ESFUERZO.-
Para un control de esfuerzo regular de
su ejercicio, este aparato dispone de
un mando de tension (5) Fig.9.
11 NIVELACION.-
Una vez colocada la unidad en su
lugar definitivo, para la realización del
ejercicio, compruebe que el
asentamiento en el suelo y su
nivelación sean correctos. Esto se
conseguirá roscando más o menos los
pies regulables (64) como muestra la
Fig.10.
12 MOVIMIENTO y
ALMACENADO.-
La unidad está equipada con ruedas
(56) lo que hace más sencillo su
movimiento.
Las ruedas que se encuentran en la
parte delantera de su unidad, le
facilitarán la maniobra de colocar su
unidad en el emplazamiento escogido,
levantando, ligeramente por la parte
delantera y empujando, como muestra
la Fig.11.
8
Guarde su máquina en un lugar seco
con las menores variaciones de
temperatura posible.
BH SE RESERVA EL DERECHO A
MODIFICAR LAS ESPECIFICACIONES
DE SUS PRODUCTOS SIN PREVIO
AVISO.
Para cualquier consulta, no dude en
ponerse en contacto, llamando al
número de atención al cliente.
+34 902 170 258
sat@bhfitness.es
9
English
IMPORTANT SAFETY ADVICE
PRECAUTIONS.-
This bicycle has been designed and
constructed to provide maximum
safety. Nevertheless, certain
precautions should be taken when
using exercise equipment. Read the
whole manual before assembling and
using the bicycle. The following safety
precautions should also be observed:
1 Keep children away from this
equipment at all times. DO NOT leave
them unsupervised in the room where
this bicycle is kept.
2 It can only be used by one person at
a time.
3 If you experience dizziness, nausea,
chest pains or any other symptom
while using this appliance STOP the
exercise. SEEK MEDICAL
ATTENTION IMMEDIATELY.
4 Use the appliance on a level, solid
surface. DO NOT use the bicycle
outdoors or close to water.
5 Keep your hands well away from
any of the moving parts.
6 Wear clothing suitable for doing
exercise. Do not use baggy clothing
that might get caught up in the bicycle.
Always wear running shoes or trainers
when using the machine.
7 This appliance must only be used for
the purposes described in this manual.
DO NOT use accessories that are not
recommended by the manufacturer.
8 Do not place sharp objects near the
machine.
9 Disabled people should not use the
machine without the assistance of a
qualified person or a doctor.
10 Do warm up stretching exercises
before using the equipment.
11 Do not use the bicycle if it is not
working correctly.
Caution: Consult your doctor
before beginning to use the bicycle.
This advice is especially important
for those over 35 or suffering from
health problems. Read all of the
instructions before using any
exercise equipment.
Keep these instructions safe for
future use.
GENERAL INSTRUCTIONS.-
Carefully read through the instructions
contained in this manual. It provides
you with important information about
assembly, safety and use of the
machine.
1 This unit has been designed for
home use. The weight of the user
must not exceed 105 kg.
2 Keep your hands well away from
any of the moving parts.
3 Parents and/or those responsible for
children should always take their
curious nature into account and how
this can often lead to hazardous
situations and behaviour resulting in
accidents. Under no circumstances
should this appliance be used as a
toy.
4 The owner is responsible for
ensuring that anyone who uses the
machine is duly informed about the
necessary precautions.
5 Your unit can only be used by one
person at a time.
6 Use suitable clothing and footwear.
Make sure all laces/cords are tied
correctly.
10
ASSEMBLY INSTRUCTIONS.-
1 Take the unit out of its box and
make sure that all of the pieces are
there, Fig.1:
(17) Main body; (6) handlebar stem;
(19) Saddle post; (42) Saddle height
adjustment knob; (14) Stabiliser bar
with wheels; (18) Stabiliser bar with
adjustable blocks; (22) Saddle; (15R)
and (15L) Pedals; (1) Monitor; (2)
Handlebar; Bag of screws containing:
(27) Star washers; (24) Spacer bush;
(26) Allen screws; (13) Bolts M-8x70;
(28) Flat washers; (16) Cap nuts M-8;
(25) Handlebar clamping knob; (29)
Handlebar clamp; (23) Handlebar
guard; Spanners.
2 Take the stabiliser bar (18) with
adjustable blocks (64) and position it
on the stand at the rear of the
machine, as shown in Fig.2, and insert
bolts (13), fit the flat washers (10) and
the nuts (16), tighten securely.
Take the stabiliser bar with wheels
(14) and position it so that the two red
dots (X) line up, as shown in Fig.2A,
insert bolts (13), fit the flat washers
(10) and the nuts (16), tighten
securely.
3 FITTING THE HANDLEBAR
STEM.-
Take the screws (8) out of the main
body (17), bring the main post (6) up
to the boss on the main body, Fig.3,
and connect terminals (12) and (9)
Fig.3A. Insert the tip of the cable
sheath into the cable tension control
support (11), as shown in Fig.3B, pull
the sheath (5) up slightly and insert it
into the slot, see Fig.3C, then fit the
main mast onto the boss on the main
body, Fig.3, taking care not to pinch
the cables and make sure that the
tensioning control (5) Fig.6 operates
correctly.
Put bolts (8), along with their washers
(7) back in, Fig.3, making sure that the
handlebar is straight and then tighten
securely.
4 ATTACHING THE PEDALS.-
The assembly instructions for the
pedals must be followed to the
letter, fitting these incorrectly could
damage the screw thread on the
pedal or the crank.
Right and left refer to the position that
the user adopts when sitting on the
saddle to do the exercises.
The right-hand pedal (15R), marked
with the letter (R), screws onto the
right-hand crank, also marked with an
(R), in a clockwise direction. Tighten
securely, Fig.3.
The left-hand pedal (15L), marked
with the letter (L), screws onto the left-
hand crank, also marked with an (L),
in an anti-clockwise direction. Tighten
securely, Fig.3.
Once the pedals have been fitted,
insert the end of the pedal clip (1)
Fig.4 into the slot on the pedal (2)
adjusting it to your footwear on the
ledge of the pedal (3).
5 ATTACHING THE SADDLE.-
Place the saddle (22) Fig.5, onto the
saddle post (19), as shown in Fig.5,
bearing in mind that the holes on the
saddle post go at the front section of
the saddle, position the saddle
correctly and tighten nuts (Z) securely.
Now insert the saddle post into the
hole on the main body (17) Fig.6, fit
the saddle post knob (42) and adjust
the height of the saddle and tighten it
into position by turning the saddle post
knob (42) clockwise.
30
5
MONTEREN VAN HET
ZADEL.-
Plaats het zadel (22) Fig.5, op de
zadelpen (19) zoals wordt getoond in
Fig.5, waarbij u er rekening mee moet
houden dat de gaatjes in de zadelpen
naar de voorkant van het zadel gericht
dienen te worden, plaats het zadel en
draai de schroeven (Z) stevig vast.
Vervolgens steekt u de zadelpen in
het gat van het centrale frame (17)
Fig.6, plaatst de instelknop van de
zadelpen (42), plaats de zadelpen op
een comfortabele stand door middel
van de instelknop (42) en draait deze
met de wijzers van de klok mee, vast.
6
PLAATSING VAN DE
GREEPBEUGEL.-
Breng de greepbeugel (2) naast de
gaten van de framebuis (6). Plaats the
sluitklem (29). Neem de schroef (26)
en de ring (27) en draai dezen aan de
onderzijde, zonder dezen strak aan te
draaien, Fig.7. Ga de hand-grip kabels
door de gleuf van de framebuis (6)
FigA gehaald dienen te worden en
aan de bovenzijde van de framebuis
dienen uit te steken. Neem de
beschermkap (23) en bevestig deze
zoals wordt getoond in Fig.7. Neem de
hendel (25) en het verdelingshulsje
(24) en draai kloksgewijs vast, in het
onderste gat, Fig.7.
7
HOOGTEREGELING VAN
HET ZADEL.-
Draai instelknop (42) van de zadelpen
een beetje los door deze tegen de
wijzers van de klok in te draaien en
trekt deze uit Fig.7 en wanneer het
zadel zich op de gewenste hoogte
bevindt voor de oefening, laat u de
hoogteregelaar los en deze valt in de
gaatjes van de zadelpen. Draai
vervolgens de instelknop met de
wijzers van de klok mee, vast.
8
PLAATSING VAN DE
ELEKTRONISCHE MONITOR.-
Draai de schroeven (4), die zich aan
de achterkant van de monitor
bevinden, los, verbind de kabel (9),
die uit de bovenzijde van de framebuis
(6) steekt, met de connector (n) die
zich aan de achterzijde van de monitor
(1) Fig.8, bevindt. Neem het uiteinde
van de handgripkabel (z) en verbind
deze met de connector (v) aan de
achterkant van de monitor, Fig.8.
Vervolgens brengt u de monitor op het
bovenste gedeelte van de framebuis
(6), Fig.8, en draait de eerder
losgedraaide schroeven (4) vast.
9 REGELEN VAN HET STUUR.-
Plaats het stuur (2) zo dat u
gemakkelijk en zonder het stuur los te
laten kunt trappen, draai de het
drukhandvat (25) goed vast, Fig.9.
10
REGELEN VAN DE
INSPANNING.-
Om de te leveren inspanning bij een
oefening te kunnen regelen, beschikt
dit toestel over een span-
ningsbediening (5) in het draagstel
van de monitor met verschillende
weerstand mogelijkheden, Fig.9.
Om de weerstand van de pedalen te
verhogen, draait u de
spanningsbediening (5) met de klok
mee (+) totdat u de ideale inspanning
voor uw oefening bekomt. Om de
weerstand van de pedalen te
verminderen, draait u de
spanningsbediening (5) tegen de klok
in (-).
30

Hulp nodig? Stel uw vraag in het forum

Spelregels

Misbruik melden

Gebruikershandleiding.com neemt misbruik van zijn services uitermate serieus. U kunt hieronder aangeven waarom deze vraag ongepast is. Wij controleren de vraag en zonodig wordt deze verwijderd.

Product:

Bijvoorbeeld antisemitische inhoud, racistische inhoud, of materiaal dat gewelddadige fysieke handelingen tot gevolg kan hebben.

Bijvoorbeeld een creditcardnummer, een persoonlijk identificatienummer, of een geheim adres. E-mailadressen en volledige namen worden niet als privégegevens beschouwd.

Spelregels forum

Om tot zinvolle vragen te komen hanteren wij de volgende spelregels:

Belangrijk! Als er een antwoord wordt gegeven op uw vraag, dan is het voor de gever van het antwoord nuttig om te weten als u er wel (of niet) mee geholpen bent! Wij vragen u dus ook te reageren op een antwoord.

Belangrijk! Antwoorden worden ook per e-mail naar abonnees gestuurd. Laat uw emailadres achter op deze site, zodat u op de hoogte blijft. U krijgt dan ook andere vragen en antwoorden te zien.

Abonneren

Abonneer u voor het ontvangen van emails voor uw BH Fitness H6935 bij:


U ontvangt een email met instructies om u voor één of beide opties in te schrijven.


Ontvang uw handleiding per email

Vul uw emailadres in en ontvang de handleiding van BH Fitness H6935 in de taal/talen: Nederlands, Duits, Engels, Frans, Italiaans, Portugees, Spaans als bijlage per email.

De handleiding is 1,09 mb groot.


U ontvangt de handleiding per email binnen enkele minuten. Als u geen email heeft ontvangen, dan heeft u waarschijnlijk een verkeerd emailadres ingevuld of is uw mailbox te vol. Daarnaast kan het zijn dat uw internetprovider een maximum heeft aan de grootte per email. Omdat hier een handleiding wordt meegestuurd, kan het voorkomen dat de email groter is dan toegestaan bij uw provider.

Stel vragen via chat aan uw handleiding

Stel uw vraag over deze PDF

Uw handleiding is per email verstuurd. Controleer uw email

Als u niet binnen een kwartier uw email met handleiding ontvangen heeft, kan het zijn dat u een verkeerd emailadres heeft ingevuld of dat uw emailprovider een maximum grootte per email heeft ingesteld die kleiner is dan de grootte van de handleiding.

Er is een email naar u verstuurd om uw inschrijving definitief te maken.

Controleer uw email en volg de aanwijzingen op om uw inschrijving definitief te maken

U heeft geen emailadres opgegeven

Als u de handleiding per email wilt ontvangen, vul dan een geldig emailadres in.

Uw vraag is op deze pagina toegevoegd

Wilt u een email ontvangen bij een antwoord en/of nieuwe vragen? Vul dan hier uw emailadres in.


Info