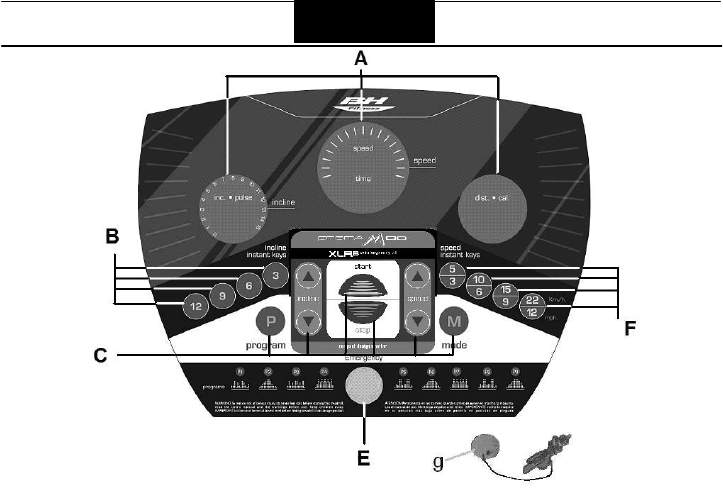
528704
22
Verklein
Vergroot
Pagina terug
1/40
Pagina verder
1
G6158
UNIDAD ELECTRÓNICA
ELECTRONIC MONITOR
UNITÉ ÉLECTRONIQUE
ELEKTRONIKEINHEIT
UNIDADE ELECTRÓNICA
IMPIANTO ELETTRONICO
ELEKTRONISCHER MONITOR
2
Fig.1 Fig.2
Fig.3
Fig.4
3
Español
ELEMENTOS DEL MONITOR.-
A: En estos 3 displays se muestran
simultáneamente la Inclinación /
Pulso; Velocidad / Tiempo; Distancia /
Calorías.
B: Pulsadores o teclas de acceso
rápido a inclinación (3- 6- 9- 12).
C: Este electrónico (Monitor) dispone
de 8 pulsadores o teclas: program;
incline (inclinación ▲▼); start; stop;
speed (velocidad km/h
+ -)
; mode.
E: Alojamiento de llave de seguridad.
F: Pulsadores o teclas de acceso
rápido a la velocidad (5-10-15-
22Km/h).
g: Llave de seguridad.
PUESTA EN MARCHA.-
Conecte la unidad a un enchufe
provisto de terminal TIERRA ponga el
interruptor (L) en posición (1). Fig.1.
La llave de seguridad (g) deberá estar
colocada en su alojamiento (E) Fig.2.
En caso contrario la máquina no se
pondrá en marcha. Al colocar la llave
de seguridad (g) en su lugar (E),
sonará un pitido y todos los displays
mostrarán el valor “00:00”, lo que
significa que la maquina esta en
posición de marcha (READY).
Pulse la tecla START.
CAMBIO DE KILÓMETROS A
MILLAS.-
La velocidad de esta máquina tiene la
opción de mostrársela en Km/h o en
Millas.
4
La velocidad de la máquina sale de
fábrica en Km/h.
Para cambiar de Km/h a Millas siga
los pasos siguientes.
Desconecte la máquina de la
alimentación eléctrica, retire la llave
de seguridad. Vuelva a conectar la
maquina a la red eléctrica, y coloque
la llave de seguridad (g) en su
alojamiento.
Pulse a la vez las teclas INCLINE y
SPEED
+
durante 5 segundos
aproximadamente y le aparecerá en la
ventana de velocidad la cifra 0,6,
dicha cifra corresponde a Millas /h.
INSTRUCCIONES DE
FUNCIONAMIENTO.-
MODO MANUAL.
Pulsando la tecla START, y la quina
se pondrá en marcha, transcurridos 3
segundos, indicados en forma
descendente en el display de tiempo
(A), con una velocidad de 1.0 Km/h.
Estando en el modo manual usted
puede aumentar o disminuir la
velocidad pulsando las teclas SPEED
(+ -)
entre los valores de 1-22Km/h,
también puede aumentar o disminuir la
velocidad, pulsando las teclas de
acceso rápido (F) dichos valores
corresponden a las velocidades (5-10-
15-22Km/h).
Pulsando las teclas de INCLINE
usted podrá controlar la elevación entre
los niveles 0-12.
Teniendo también las teclas de acceso
pido de nivel (B) cuyos valores
corresponden (3- 6- 9- 12).
Pulsando la tecla STOP o quitando la
LLAVE DE SEGURIDAD la máquina se
parará.
MODO PROGRAMAS.-
Este monitor dispone de 14
programas (MANUAL; (P_01; P_02;
P_03; P_04; P_05; P_06; P_07; P_08;
P_09; U_01; U_02; U_03; HP_1).
Dentro de los programas del P_01 al
P-09 se puede programar el Tiempo
de duración del ejercicio entre (10 y
99 Minutos), la distancia entre (0,5 y
99,9) y las calorías entre (10 y 999).
Gráficos de programas del P_1 al P_9.
Ver páginas finales.-
Estando la máquina preparada, pulse
la tecla PROGRAM y le aparecerá en
el display P_01, pulsando la tecla
PROGRAM accede a los programas
del (P1 al P9), una vez haya elegido
su programa pulse la tecla MODE y le
parpadeará el display de TIME
(Tiempo).
Para programar la duración del tiempo
en el programa elegido pulse las
teclas SPEED▲▼ (10 –99 minutos).
El monitor tiene un tiempo predefinido
de 15 minutos para la duración del
programa.
Pulse la tecla START y la máquina se
pondrá en funcionamiento
transcurridos 3 segundos, indicados
en forma descendente en el display
central de acuerdo con los valores
que haya introducido.
Usted puede variar en cualquier
momento del programa, la velocidad,
pulsando las teclas SPEED▲▼ y la
inclinación, pulsando las teclas
Inclinen del monitor.
MODO PROGRAMAS USUARIO.-
Los programas de usuario le permite
diseñar los gráficos de velocidad y de
inclinación con referencia a su forma
física.
5
Estando la quina preparada, pulse
la tecla PROGRAM y le apareceen
el display P_01, pulsando la tecla
PROGRAM accede a los programas
usuario del (U_01; U_02; U_03), una
vez haya elegido su programa pulse la
tecla MODE y visualizara en la ventana
TIME/DISTANCE que le esta indicando
el primer paso del programa que usted
esta grabando (S_01), que a su vez
también le esta parpadeando la
ventana SPEED/INCLINE.
Con las teclas INCLINE▲▼
seleccione la inclinación que usted
desee en el primer paso (entre 0 y 12
niveles), pulsando las teclas
SPEED▲▼, seleccione la velocidad
que usted desee en el primer paso
(entre 1 y 20 Km/h).
Pulse la tecla MODE y pasara al
segundo paso (S_02) realice los
mismos pasos que para el punto
(S_01) variando se lo desea la
velocidad y la inclinación y así
sucesivamente hasta el paso 20 que
esta compuesto el gráfico del
programa usuario.
Pulsando la tecla MODE le aparecerá
el tiempo de duración del ejercicio
entre (10 y 99 minutos).
Si el tiempo programado para la
realización del ejercicio ha sido de 20
minutos, cada paso corresponde a 1
minuto.
Pulse START y la máquina se pondrá
en marcha, transcurridos 3 segundos,
indicados en forma descendente en el
display central.
PROGRAMA (HP_1).-
Pulso constante
Este programa (HP_1) le sirve para
realizar el ejercicio en estaquina, con
un pulso constante que usted haya
seleccionado. Sólo funciona con banda
telemétrica.
Estando la quina preparada en
READY, pulsando la tecla PROGRAM,
puede acceder a la seleccn del
programa (HP_1, PULSE CONTROL)
indicado por el parpadeo de la ventana
correspondiente al programa HP_1, una
vez haya elegido su programa pulse la
tecla MODE para confirmarlo.
A continuación le parpadeará la ventana
(TIME) pulsando las teclas (+ - o ),
introduzca su edad entre (15 y 80 os).
Después de introducida su edad pulse
MODE y en la ventana de TIME le
habra dado un valor de pulsación
según la tabla de funciones, ver grafico
de las paginas finales de programas
(HP_1) para la edad y el ritmo
cardiaco). Si desea cambiar las
pulsaciones, introduzca el valor
pulsando las teclas (+ -, o ▲▼), sube
o baja el nivel de pulsaciones que
usted desee mantener fijo durante el
ejercicio.
Si por ejemplo usted ha programado
100 P.P.M (pulsaciones por minuto) en
el momento que se rebasa esa cifra, la
maquina le irá disminuyendo la
velocidad. Si por el contrario no llegase
a las P.P.M. programadas, la maquina
aumentara la velocidad, hasta llegar al
valor programado. Pulse la tecla MODE
y le parpadeara la ventana TIME
pulsando las teclas (+ -, o ▲▼)
seleccione su tiempo de ejercicio, (entre
10 y 99 minutos).
El tiempo predefinido en el monitor es
de 30 minutos, pulse la tecla START y
la quina se pond en marcha,
transcurridos 3 segundos, indicados en
forma descendente en el display central
de Perfiles de Programas (A).
6
PARADA DE EMERGENCIA.-
Para dar máxima seguridad al usuario,
esta unidad dispone de una llave de
seguridad (g) y de un botón de STOP.
La llave de seguridad (g) debe estar
colocada en su alojamiento (E), ver
Fig.2. En caso contrario, la quina no
se pond en marcha.
Cuando haga uso de la máquina, fije
la llave de seguridad a la ropa
mediante el clip. Con un tirón, la llave
de seguridad saldrá de su alojamiento
y la máquina se parará de forma
instantánea. Para ponerla de nuevo
en marcha, vuelva a colocar la llave
en su alojamiento.
Quite la llave de seguridad (g) si esta
no va a ser usada y guárdela fuera del
alcance de los niños. Pulsando el
botón rojo de STOP la unidad se
parará inmediatamente.
Para ponerla de nuevo en marcha
pulsar el botón START.
INCLINACIÓN.-
La inclinación es una función
independiente a todas las funciones.
Cada vez que ponga el interruptor
general (L) en la posición I, como se
indica en la puesta en marcha, Fig.1.
En el display de inclinación aparecerá
el valor de inclinación que usted ha
dejado.
Para bajar la inclinación a cero con la
unidad parada pulse la tecla START
durante cinco segundos.
Si la inclinación no está a cero cuando
comienza el ejercicio con la tecla
START, ésta irá a cero mientras la
máquina se pone en funcionamiento.
Pulsando los botones INCLINE o
INCLINE, usted podrá ajustar la
inclinación de su unidad desde el nivel
0 hasta el nivel 12 según a la
inclinación a la que desee hacer el
ejercicio. Importante. No cambie la
inclinación de su cinta de correr
poniendo objetos debajo de la banda.
IMPORTANTE: LA INCLINACN
DEBE ESTAR EN SU NIVEL S
BAJO ANTES DE PONER LA
QUINA DE ANDAR EN SU
POSICN DE PLEGADO.
MEDICIÓN DEL PULSO.-
El pulso se mide mediante la
colocación de ambas manos en los
sensores de pulso (R) que están en la
unidad electrónica. La medida de
pulso aparece después de unos
segundos.
El símbolo del corazón al lado de la
cifra de pulso parpadea al ritmo de su
pulso, Fig.4.
IMPORTANTE. Este no es un aparato
médico y por tanto la información del
ritmo cardiaco es orientativa.
BH SE RESERVA EL DERECHO A
MODIFICAR LAS ESPECIFICACIO-
NES DE SUS PRODUCTOS SIN
PREVIO AVISO.
7
LOCALIZACIÓN DE FALLOS O AVERIAS
SÍNTOMAS COMPROBACIONES SOLUCIONES
1. No se enciende el
monitor.
1) Asegúrese de que la máqunia
está enchufada a la red, el
interruptor general en posición 1 y
la llave de seguridad puesta.
1) Enchufe el cable a la red.
Coloque el interruptor en
posición 1 y ponga la llave
de seguridad.
2. Se enciende el
monitor y no
funciona el motor.
2) Comprobar que el limitador de
corriente esté hacia dentro.
2) Desconectar la máquina y
pulsar el limitador de
corriente. Lubricar la
banda.
3. Tirones al andar
encima de la banda.
3.a) Comprobar lubricación banda
3.b) Comprobar tensión banda
deslizamiento
3.c) Comprobar tensión correa de
transmisión
3.a) Lubricar la banda de
deslizamiento .
3.b) Tensar la banda de
deslizamiento.
3.c) Tensar la correa de
transmisión.
4. La máqunia se
para (salta el
limitador de
corriente).
4) Comprobar lubricación banda 4) Pulsar el limitador de
corriente con el interruptor
en 0 y lubricar la banda de
deslizamiento.
5. La barandilla da
calambres en las
manos.
5) Comprobar que el enchufe donde
está conectada tiene toma tierra
5) Enchufar la máquina en
enchufe con toma de
tierra.
6. La banda se
descentra.
6.a) Comprobar nivelación del suelo.
6.b) Comprobar la cojera de la
máquina.
ERRORES DE LA MÁQUINA
Pantalla de monitor
E1
Posible mensaje de fallo.
Conecte el cable correctamente entre el
controlador superior y el controlador inferior
Pantalla de monitor
E2
Apagado
Funcionamiento con voltaje correcto;
conecte de nuevo el cable del motor.
Pantalla de monitor
E3
Sin señal del sensor de
velocidad
Sustituya la luz del sensor del controlador
inferior o el sensor de velocidad.
Pantalla de monitor
E4
Fallo de elevación
Conecte correctamente los cables de VR y
AC. Pulse el botón pequeño del controlador
inferior durante 3 segundos.
Pantalla de monitor
E5
Posible sobrecarga del motor Lubrique la cinta.
Para cualquier consulta, no dude en ponerse en contacto, llamando al número de atención
al cliente:
+34 902 170 258
sat@bhfitness.es
8
English
ELEMENTS OF THE MONITOR.-
A: These 3 displays provide a
continuous readout of Calories;
Elevation/Pulse rate; Time; Speed and
Distance.
B: Incline function quick access keys
or buttons (3- 6- 9- 12).
C: The electronic monitor has 8 push
buttons or keys.; program; incline
(▲▼); start; stop; speed km/h
(+ -)
;
mode.
E: Slot for safety key.
F: Speed function quick access keys
or buttons (5-10-15-22Km/h).
g: Safety key.
STARTING.-
Plug the unit into a wall socket with an
EARTH terminal and set switch (L) to
position (1), Fig.1.
The safety key (g) must be inserted
into its spot (E) Fig.2, otherwise the
machine will not operate. As soon as
the safety key (g) is in place, the
machine will beep and all of the
displays will show a [00:00] value,
indicating that the machine is READY
to be used.
Press the START.
CHANGING FROM
KILOMETRES TO MILES.-
This machine has the option to display
speed in km/h or mph. The factory
setting for the machine is km/h.
To change from km/h to mph follow
these steps:
9
Unplug the machine from the mains
supply, remove the safety key. Plug
the machine back in and insert the
safety key (g) into its slot.
Press and hold the INCLINE and
SPEED
+
keys at the same time for 5
approximately seconds. The speed
display will show the number 0.6, the
said number corresponds to miles per
hour.
OPERATING INSTRUCTIONS.-
MANUAL MODE
Pressing the START key will light the
MANUAL and the machine will start
within 3 seconds, shown by a
countdown on the TIME display, at a
speed of 1.0km/h.
You can increase or decrease the
speed setting in MANUAL mode by
pressing the SPEED
(+ -)
keys,
between 1-22Km/h, you can also
increase or decrease the speed
setting by pressing the quick access
keys (F), the said keys correspond to
values of (5-10-15-22Km/h).
By pressing the inclination keys
INCLINE▼▲ you can adjust the
elevation level, for values between 0-
12.
There are also level function quick
access keys (B), whose values
correspond to 3- 6- 9– 12.
The machine will stop if you press the
STOP key or if you remove the
SAFETY KEY.
PROGRAM MODE.-
This monitor has 14 programs
(MANUAL; (P_01; P_02; P_03; P_04;
P_05; P_06; P_07; P_08; P_09; U_01;
U_02; U_03; HP_1).
For programs P_01 to P_09 you can
specify the duration of the exercise
between (10 to 99) minutes, distance
between (0.5 to 99.9) and calories
between (10 to 999).
Program graphics for P_1 to P_9.
See end pages.-
With the machine ready, press the
PROGRAM key and P_01 will appear
on the display, by pressing the
PROGRAM key you can access the
programs (P1 to P9), once you have
chosen a program press the MODE
key and the word TIME will begin to
flash.
Use the SPEED▲▼ keys to specify
the duration of the program (10 99
minutes). The monitor has a default
program setting of 15 minutes.
Press the START key and the
machine will start to operate after 3
seconds, shown by the countdown on
the central display, based on the
values it has been given.
You can change the speed settings at
any time during the exercise by
pressing the SPEED▲▼ keys, and
the inclination settings by pressing the
Incline keys.
USER PROGRAM MODE.-
The user programs allow you to
design the speed and inclination
graphs with reference to your fitness
level.
With the machine ready, press the
PROGRAM key and P_01 will appear
on the display, by pressing the
PROGRAM key you can access the
user programs (U_01; U_02; U_03),
once you have chosen a program
press the MODE key and the first step
of the program you are designing will
be shown in the TIME/DISTANCE
window, (S_01), the SPEED/INCLINE
window will also be flashing.
10
Use the INCLINE keys to select
the inclination level you want for the
first stage (between 0 to12), press the
SPEED▲▼ keys to select the speed
that you want for the first stage
between 1 and 20km/h).
Press the MODE key and this will take
you to the second stage (S_02) carry
out the same procedure as in (S_01)
varying the speed and inclination
settings for this stage, and so on up to
stage 20 to complete the User
Program Graph.
By pressing the MODE key you can
program a time limit for the exercise
(between 10 to 99 minutes).
If the programmed exercise time is 20
minutes then each stage will last 1
minute.
Press START and the machine will
start after a 3 second countdown,
shown on the central display.
HEART RATE (HP_1).-
This program (HP_1) allows you to do
exercise on the machine at a constant
user-defined pulse rate. This function
is only available with the telemetric
chest band.
Press the PROGRAM key when the
machine is READY keys to select the
program setting (HP_1 or PULSE
CONTROL) and the corresponding
HP_1 program window will start to
flash, press the MODE key to confirm
it.
Now the (TIME) window will start to
flash. Use the (+ - or ▲▼) keys to
enter your age (between 13 and 80
years).
After entering your age press the
MODE key and the corresponding
heart value according to the function
table will appear in the TIEME window
(See graph at the end of the program
section for HP_1 age and heart rate).
If you wish to change the pulse rate,
enter the value using the (+ - or ▲▼)
keys, raising or lowering the pulse rate
at which you want to do the exercise.
E.g. If you have specified 100 B.P.M
(Beats Per Minute) then the machine
will slow down automatically whenever
you go above this value. If, on the
other hand, you fail to reach the
specified BPM value, then the
machine will speed itself up until you
do. Press the MODE key and the
TIME window will flash. Use the (+ - or
▲▼) to specify the duration of the
exercise (between 10 and 99
minutes). The monitor’s default setting
is 30 minutes. Press the START key
and the machine will start to operate
after 3 seconds, shown by the
countdown on the central Program
Profile display (A).
EMERGENCY STOP.-
For the user’s maximum safety, this
unit is equipped with a safety key (g)
and a STOP button. The safety key (g)
must be slotted into its housing (E),
Fig.2, otherwise the machine will not
start.
When you are using the machine
always clip the cord on the safety key
to your clothing. Tugging on the cord
will pull the safety key out of its slot
and the machine will stop immediately.
To restart the machine simply put the
key back into the key slot.
Remove the safety key (g) whenever
the machine is not being used and
keep it out of children’s reach.
Pressing the red button marked STOP
will also stop the unit immediately.
To restart it, press the button marked
START again.
11
ELEVATION.-
The inclination function operates
independently of all other functions.
Each time that you set switch (L) to
position I, as described in the Starting
section, Fig.1. the inclination level that
was last used will be displayed.
To lower the inclination to zero with
the unit stopped, press and hold the
START key for 5 seconds.
If inclination is not at zero when the
START key is used to begin
exercising, the machine will zero itself
while it is starting.
You can adjust the elevation level by
pressing the INCLINE or INCLINE
keys to specify a value of 0 to 12,
depending on how you would like to
do the exercise.
Important: Do not change the
inclination level of your treadmill by
propping it up on objects.
IMPORTANT: THE INCLINATION
LEVEL MUST BE AT ITS LOWEST
SETTING BEFORE ATTEMPTING
TO PUT THE TREADMILL INTO THE
FOLDED POSITION.
PULSE MEASUREMENT.-
Your pulse rate is measured by
placing both hands on pulse sensors
(R) with which the electronic unitis
equipped. The pulse rate readout will
appear after a few seconds. The heart
symbol beside the pulse rate value will
flash in time with your heart rate,
Fig.4.
IMPORTANT: This is not a medical
appliance and therefore the heart rate
shown is merely for guideline
purposes.
BH RESERVES THE RIGHT TO
MODIFY THE SPECIFICATIONS OF
ITS PRODUCTS WITHOUT PRIOR
NOTICE.
12
FAULT FINDING CHART
PROBLEM CHECKS SOLUTIONS
1.The monitor does not
switch on.
1) Make sure that the
machine is plugged in, the
ON/OFF switch in position 1
and that the safety key is
inserted.
1) Plug the machine into the
mains supply. Set the switch to
position 1 and insert the safety
key.
2.The monitor switches
on but the motor fails
to start.
2) Check that the current
limiter is pressed in.
2) Switch the machine off and
press the circuit breaker in.
Lubricate the treadmill band.
3.Walking motion is
jerky on the
treadmill.
3.a) Check that the belt is
lubricated.
3.b) Check the tension on the
sliding belt.
3.c) Check the tension on the
drive belt.
3.a) Lubricate the sliding belt.
3.b) Adjust the belt tension.
3.c) Adjust the drive belt tension.
4.The machine stops
(the breaker trips).
4) Check that the band is
lubricated.
4) Reset the overload button with
the On /Off switch at „0“ and
lubricate the treadmill band.
5.Electrical shocks
through the handrail.
5) Check that the machine is
plugged into an earthed
mains socket.
5) Plug the machine into an
earthed mains socket.
6.The treadmill belt
skews off centre.
6.a) Check that the machine
is level on the floor.
6.b) Check that the machine
does not wobble.
ERROR CODES
Monitor screen display
E1
Possible message fault.
Connect the wire well between top
controller and bottom controller
Monitor screen display
E2
Burst clash.
Operating with correct voltage;Connect the
motor wire again.
Monitor screen display
E3
No speed sensor signal
Replace the sensor light on the bottom
controller or speed sensor.
Monitor screen display
E4
Elevation fault
Connect the VR and AC wires well.Press the
small button on the bottom controller for 3
seconds.
Monitor screen display
E5
Possible motor overload. Lubricate the belt.
Do not hesitate to get in touch with us if you have any queries, by calling:
+44 0844 335 3988 service@bh-uk.co.uk
13
Français
MONITEUR.-
A: Ces 3 displays affichent
simultanément les Calories / Pouls;
Durée / Distance; La vitesse et
L’Inclinaison.
B: Boutons ou touches d’accès rapide
à l’inclinaison (3- 6- 9- 12).
C: Ce moniteur dispose de 8 boutons
ou touches: program; incline (▲▼);
start; stop; speed (vitesse km/h
+ -)
;
mode.
E: Logement de la clé de sécurité.
F: Boutons ou touches d’accès rapide
à la vitesse (5-10-15-22Km/h).
g: Clé de sécurité.
MISE EN MARCHE.-
Connectez le moniteur à une prise
munie d’une mise à la TERRE. Placez
l’interrupteur (L) sur la position (1).
Fig.1.
La clé de sécurité (g) doit être
introduite dans son logement (E)
Fig.2, faute de quoi, la machine ne se
mettra pas en marche. s que la clé
de sécurité (g) sera située à sa place
(E), un signal sonore retentira et tous
les écrans afficheront la valeur “00:00”
ce qui voudra dire que lamachine se
trouve sur la position marche
(READY).
Appuyez sur la touche START.
14
PASSER DES KILOMÈTRES
AUX MILLES.-
La vitesse de cette machine peut être
affichée en km/h ou en milles.
À la sortie d’usine de la machine la
vitesse est indiquée en km/h.
Pour passer des km/h aux milles faire
comme indiqué ci-après:
Déconnecter la machine du courant
électrique et enlever la cde sécurité.
Reconnecter la machine au courant
électrique et placer la clé de sécurité
(g) dans son logement.
Appuyer 5 secondes environ et en
même temps sur les touches
INCLINE et SPEED
+
Et le chiffre
0,6 correspondant aux milles/h
s’affichera dans la fenêtre de la
vitesse.
FONCTIONNEMENT.-
MODE MANUEL
En appuyant sur la touche START,
s’allumera et la machine se mettra en
marche dans les 3 secondes qui
suivent, indiquées de manière
décroissante au display de la durée
(A) et à une vitesse de 1.0km/ h.
Dans le mode manuel, vous pourrez
augmmode ou réduire la vitesse en
appuyant sur les touches SPEED
(+ -)
entre les valeurs de 1-22Km/h,
possibilité également d’augmmode ou
de réduire la vitesse à l’aide des
touches à accès rapide (F), lesdites
valeurs correspondent aux vitesses
(
5-
10-15-22Km/h).
En appuyant sur les touches
d’inclinaison (▼▲) vous pourrez
commander l’élévation entre les
niveaux 0-12.
Vous disposez également des touches
à accès rapide de niveau (B) dont les
valeurs sont (3- 6- 9- 12).
En appuyant sur la touche STOP ou
en retirant la CLÉ DE SÉCURITÉ, la
machine s’arrête.
MODE PROGRAMMES.-
Ce moniteur dispose de 14
programmes (MANUAL; (P_01; P_02;
P_03; P_04; P_05; P_06; P_07; P_08;
P_09; U_01; U_02; U_03; HP_1).
Dans les programmes de P_01 à P-09
il est possible de programmer la
Durée de l’exercice entre (10 et 99
Minutes), la distance de (0,5 à 99,9) et
les calories, de (10 à 999).
Graphiques des programmes du P_1
au P_9.
Voir les dernières pages.-
Avec la machine pte, appuyer sur la
touche PROGRAM et P_01 s’affichera
au display. En appuyant sur la touche
PROGRAM vous pourrez accéder aux
programmes (P1 à P9). Après avoir
lectionné votre programme, appuyer
sur la touche MODE et le display TIME
(Due) clignotera.
Pour programmer la due dans le
programme choisi, appuyer sur les
touches SPEED (10–99 minutes).
Le temps prédéfini dans le moniteur
pour la durée du programme est de 15
minutes.
Appuyer sur la touche START et la
machine démarrera dans les 3
secondes, indiqes de façon
dégressive au display central selon les
valeurs entrées par l’utilisateur.
Quelle que soit la phase de l’exercice,
vous pouvez modifier la vitesse et
l’inclinaison en appuyant sur le touches
SPEED▼▲ et l’inclinaison en appuyant
sur les touches INCLINE du
moniteur.
15
MODE PROGRAMMES
UTILISATEUR.-
Les programmes de lutilisateur
permettent de dessiner les graphiques
de vitesse et d’inclinaison selon la forme
physique de l’utilisateur.
Avec la machine prête à l’emploi,
appuyer sur la touche PROGRAM et
P_01 s’affichera au display. En
appuyant sur la touche PROGRAM il
sera possible d’accéder aux
programmes utilisateur (U_01; U_02;
U_03). Aps avoir sélectionné votre
programme, appuyer sur la touche
MODE et la fetre TIME/DISTANCE
affichera la première étape du
programme en cours d’enregistrement
(S_01), et en même temps, la fetre
SPEED/INCLINE sera en train de
clignoter.
Avec les touches INCLINE
lectionner l’inclinaison souhaie pour
la première étape: de 0 à 12 niveaux.
Appuyer sur les touches SPEED
Pour sélectionner la vitesse à utiliser
dans la première étape (de 1 à 20km/h).
Appuyer sur la touche MODE pour
passer à la seconde étape (S_02). Faire
de me que pour l’étape (S_01) en
modifiant si vous le souhaitez la vitesse
et l’inclinaison et ainsi successivement
jusqu’à l’étape 20 compoe du
graphique du programme utilisateur.
En appuyant sur la touche MODE, le
sysme affichera la due de l’exercice:
(de 10 à 99 minutes).
Si le temps programmé pour la
réalisation de l’exercice est de 20
minutes, chaque étape correspond à 1
minute.
En appuyant sur la touche START, la
machine se mettra en marche dans les
3 secondes comptées de façon
dégressive sur le display central.
HEART RATE (HP_1).-
Ce programme (HP_1) permet de
aliser l’exercice sur cette machine
avec un pouls constant, sélectionné par
l’utilisateur lui-me. Ce programme
ne fonctionne qu’avec une sangle
télémétrique.
Avec la machine prépae en mode
READY, en appuyant sur la touche
PROGRAM vous pourrez accéder à la
lection du programme (HP_1 PULSE
CONTROL) indiqué par le clignotement
de la fenêtre relative au programme
HP_1,après avoir lection le
programme, appuyez sur la touche
MODE pour le confirmer.
Ensuite la fenêtre (TIME) commence à
clignoter, en appuyant sur les touches
(+ -, ou ▲▼) saisissez votre âge entre
(13 et 80 ans).
Après avoir saisi votre âge, appuyez sur
MODE et une valeur de pulsation sera
affice à la fenêtre TIME, selon le
tableau des fonctions, voir graphique en
fin des programmes (HP_1 pour l’âge et
pour la fréquence cardiaque). Pour
modifier les pulsations, introduire la
valeur en appuyant sur les touches (+ -,
ou ▲▼), augmentez ou baissez le
niveau que vous voulez maintenir fixe
durant l’exercice.
Par exemple, si vous avez program
100 P.P.M (pulsations/minute), si ce
chiffre est pas, la machine réduira
la vitesse. Par contre, si les P.P.M
programmées ne sont pas atteintes, la
machine augmentera la vitesse jusqu’à
atteindre la valeur programmée.
Appuyez sur MODE et la fenêtre TIME
clignotera. En appuyant sur les touches
(+ -, ou ▲▼) sélectionnez la durée de
l’exercice (entre 10 et 99 minutes). La
durée pfinie dans le moniteur est de
30 minutes, appuyez sur la touche
START et la machine se mettra en
16
marche dans les 3 secondes suivantes,
indiqes sous forme descendante au
display central des Profilés de
Programmes (A).
ARRÊT D’URGENCE.-
Pour que l’utilisateur puisse faire ses
exercices en toute curité, chaque
uni dispose d’une c decurité (g) et
d’un bouton STOP.
La clé de sécuri (g) doit être placée
dans son logement (E), voir Fig.2, faute
de quoi la machine ne se mettra pas en
marche.
Durant les exercices effectués sur cette
machine, l’utilisateur doit attacher la clé
de curité à l’un des vêtements qu’il
porte, par l’intermédiaire d’un clip. Toute
secousse fera sortir la clé de son
logement et la machine s’artera
instantament. Pour la remettre en
marche placez à nouveau la clé dans
son logement.
Si vous n’allez pas utiliser la machine,
retirez la clé de sécurité (g) et gardez-la
hors de la portée des enfants.
En appuyant sur le bouton rouge STOP,
l’uni s’arrête imdiatement. Pour la
remettre en marche, appuyez sur le
bouton START.
INCLINAISON.-
L’inclinaison est une fonction
indépendante de toutes les autres. À
chaque fois que L’interrupteur géral
(L) sera pla sur la position I, comme
indiq dans la mise en marche, Fig.1,
la valeur de l’inclinaison introduite par
vos soins sera affice au display.
Pour mettre l’inclinaison à ro avec
l’uni arrêtée, appuyer cinq secondes
sur la touche START.
Si l’inclinaison n’est pas sur zéro quand
lexercice commence avec la touche
START, celle-ci se rendra sur zéro
pendant que la machine se met en
marche.
En appuyant sur les boutons INCLINE
ou INCLINE, vous pourrez gler
linclinaison de l’unité et ce, depuis le
niveau 0 jusquau niveau 12 selon
linclinaison sur laquelle vous souhaitez
réaliser lexercice.
Remarque importante: Ne pas modifier
l’inclinaison du tapis de course en
plaçant des objets sous le tapis.
IMPORTANT: AVANT DE PLACER LE
TAPIS DE COURSE SUR LA
POSITION DE PLIAGE, L’INCLINAI-
SON DE LA MACHINE DOIT SE
TROUVER AU NIVEAU LE PLUS
BAS.
MESURE DU POULS.-
Pour mesurer le pouls, placez les deux
mains sur les senseurs de pouls (R) qui
se trouvent sur lunité électronique. La
mesure du pouls est affichée dans les
secondes qui suivent. Le symbole du
ur qui se trouve ps du chiffre u
pouls clignotera à la cadence de votre
pouls, Fig.4.
REMARQUE: Cette machine n’ est pas
un appareil dical et par conséquent
l’information relative à la fréquence
cardiaque doit être entendue comme
une information donnée à titre indicatif.
BH SE RÉSERVE LE DROIT DE
MODIFIER LES CARACTÉRISTI-
QUES DE SES PRODUITS SANS
PRÉAVIS.
17
DÉFAILLANCES OU PANNES
SYMPTÔMES VÉRIFICATIONS SOLUTIONS
1.Le moniteur ne
s'allume pas.
1) Vérifiez si la machine est
branchée au courant
électrique, si l'interrupteur
général se trouve sur la
position 1 et si la clé de
sécurité est bien en place.
1) Branchez le câble à la prise de
courrant. Placez
l'interrupteur sur la position 1
et la clé de securité à sa
place.
2.Le moniteur s'allume
bien cependant le
moteur ne fonctionne
pas.
2) Vérifiez si le limiteur de courant
se trouve vers l'interieur.
2) Déconnectez la machine et
appuyez sur le limiteur de
courant. Graisser la bande.
3.Tiraillements en
marchant sur le tapis.
3.a) Vérifiez la lubrification du
tapis.
3.b) Vérifiez la tension du tapis de
glissement.
3.c) Vérifiez la tension de la
courroie de transmission.
3.a) Lubrifiez le tapis de
glissement.
3.b) Tendre la tapis de
glissement.
3.c) Tendre la courroie de
transmission.
4.La machine s'arrête (le
limiteur de courant
saute).
4) Vérifiez la lubrification du tapis. 4) Placez le limiteur de courant
avec l'interrupteur sur 0 et
graissez la bande de
glissement.
5.Coups de bourre sur
les mains quand elles
touchent la main
courrante.
5) Vérifiez si la prise de courant
dispose d'une mise à la terre.
5) Branchez la machine à une
prise dotée d'une mise à la
terre.
6.Le tapis se décentre. 6.a) Vérifiez le nivellement du sol.
6.b) Vérifiez si la machine n'est
pas bancale.
ERREURS DE LA MACHINE
Écran du moniteur
E1
Possible message de
panne
Connecter le câble correctement entre le
contrôleur supérieur et le contrôleur inférieur
Écran du moniteur
E2
Éteint
Fonctionnement avec la bonne tension;
connecter à nouveau le câble du moteur
Écran du moniteur
E3
Aucun signal du
senseur de la vitesse
Remplacer la lumière du senseur controleur
inférieur ou le senseur de la vitesse.
Écran du moniteur
E4
Défaillance dans
l’élévation.
Connecter les câbles de VR et AC
correctement. Appuyer sur le bouton du
controleur inférieur 3 secondes.
Écran du moniteur
E5
Possible surcharge du
moteur.
Lubrifier le tapis.
Pour toute information complémentaire, n'hésitez pas à appeler au numéro de téléphone
suivant:
+34 902 170 258 service@bhfitness.es
18
Deutsch
ELEMENTE DES MONITORS.-
A: Auf diesen fünf Displays werden
nacheinander die Kalorien, Steigung/
Puls, die Dauer, Geschwindigkeit und
die Strecke angezeigt.
B: Drucktasten oder Schnelltasten für
die Steigungseinstellung (3- 6- 9- 12).
C: Diese Elektronikeinheit (Monitor)
verfügt über 8 Tasten: program;
incline (steigung▲▼); start; stop;
speed (Geschwindigkeit km/h
+ -)
;
mode.
E: Aufnahme des Sicherheits-
schlüssels.
F: Drucktasten oder Schnelltasten für
Geschwindigkeit (5-10-15-22 Km/h).
g: Sicherheitsschlüssel.
EINSCHALTEN.-
Schließen Sie das Gerät an einen
GEERDETEN Stecker. Stellen Sie
den Schalter (L) auf Position [1] Fig.1.
Der Sicherheitsschlüssel (g) muss in
seiner Aufnahme (E) Fig.2 stecken,
damit das Gerät gestartet werden
kann. Beim Einstecken des
Sicherheitsschlüssels (e) ertönt ein
akustisches Signal und alle Displays
zeigen den Wert [00:00]; dies
bedeutet dass sich die Maschine in
betriebsbereitem Zustand (READY)
befindet.
Betätigen Sie START.
WECHSEL VON
KILOMETERN AUF MEILEN.-
Es besteht die Möglichkeit, die
Geschwindigkeit dieser Maschine in
Km/h oder Meilen anzuzeigen.
19
Fabrikmäßig ist die Geschwindigkeit in
Km/h eingestellt.
Um von Km/h auf Meilen umzustellen,
folgen Sie diesen Schritten:
Nehmen Sie die Maschine vom
Stromnetz und ziehen Sie den
Sicherheitsschlüssel ab. Stecken Sie
die Maschine wieder ein und stecken
Sie den Sicherheitsschlüssel an
seinen Platz.
Drücken Sie die Tasten INCLINE
und SPEED
+
5 Sekunden lang und
auf der Geschwindigkeitsanzeige
erscheint die Ziffer 0,6, die Meilen/h
entspricht.
BEDIENUNGSHINWEISE.-
HANDBETRIEB.
Bei Betätigen der START-Taste auf und
die Maschine geht nach 3 Sekunden bei
einer Geschwindigkeit von 1Km/h in
Betrieb.
Im Handbetrieb können Sie die
Geschwindigkeit durch Betigen der
Tasten SPEED
(+ -)
zwischen 1-
22Km/h erhöhen bzw. reduzieren. Die
Schnelltasten für Geschwindigkeit (F)
dienen ebenfalls der Geschwindig-
keitsregulierung, sie entsprechen den
Geschwindigkeitswerten (5-10-15-
22Km/h).
Durch Betätigen der Steigungstasten
() nnen Sie die Steigung
zwischen den Niveaus 0-12 regulieren.
Auch hier stehen Ihnen Schnelltasten
(B) zur Verfügung, die folgenden
Werten entsprechen: (3- 6- 9- 12).
Durch Betätigen der Taste STOP oder
Herauszie hen des SICHERHEITS-
SCHLÜSSELS wird das
Getangehalten.
MODUS PROGRAMME.-
Dieser Monitor verfügt über 14
Programme (MANUAL; (P_01; P_02;
P_03; P_04; P_05; P_06; P_07; P_08;
P_09; U_01; U_02; U_03; HP_1).
Innerhalb der Programme von P_01
bis P-09 kann die Dauer der Übungen
zwischen (10 und 99 Minuten), die
Entfernung zwischen (0,5 und 99,9)
und die Kalorien zwischen (10 und
999) eingestellt werden.
Grafiken der Programme P_1 bis P_9.
Siehe letzte Seiten.-
Ist die Maschine vorbereitet, drücken
Sie die Taste PROGRAM und auf dem
Display erscheint P_01. Drücken Sie
PROGRAM, um Zugriff auf die
Programme von (P1 bis P9) zu haben.
Wenn Sie das Programm gewählt
haben, drücken Sie die Taste MODE
und die Anzeige TIME blinkt.
Um die Dauer im gewählten Programm
zu programmieren drücken Sie die
Tasten SPEED zwischen 10 und -
99 Minuten). Der Monitor hat eine
vordefinierte Zeit von 15 Minuten für die
Dauer des Programms.
Drücken Sie die Taste START und die
Maschine beginnt nach 3 Sekunden
gemäß den Werten, die Sie eingegeben
haben, zu funktionieren, wobei auf dem
zentralen Display die Werte in
absteigender Folge angezeigt werden.
Sie nnen zu jedem Zeitpunkt der
Übung die Geschwindigkeit und die
Neigung verändern, indem Sie die
Tasten SPEED▲▼ bzw.
INCLINEN▲▼ des Monitors dcken.
MODUS
NUTZERPROGRAMME.-
Die Nutzerprogramme erlauben das
Gestalten von Geschwindigkeits-und
Neigungsgraphiken in Bezug auf Ihre
rperliche Form.
20
Ist die Maschine vorbereitet, drücken
Sie die Taste PROGRAM und auf dem
Display erscheint P_01. Drücken Sie
PROGRAM, um Zugriff auf die
Programme von (U_01; U_02; U_03) zu
haben. Wenn Sie das Programm
gewählt haben, drücken Sie die Taste
MODE und die Anzeige
TIME/DISTANCE erscheint, womit der
erste Schritt des Programms
angegeben wird, das Sie speichern
(S_01) und gleichzeitig blinkt das
Fenster SPEED/INCLINE.
Mit den Tasten INCLINE hlen
Sie die Neigung, die Sie im ersten
Schritt wünschen (zwischen 0 und 12
Niveaus), wor die Taste SPEED▲▼
gedckt werden, mit denen die
Geschwindigkeit für den ersten Schritt
gewählt wird (zwischen 1 und 20Km/h).
Drücken Sie MODE und im zweiten
Schritt (S_02) gehen Sie genauso vor
wie im Punkt (S_01), wobei Sie nach
Wunsch die Geschwindigkeit und
Neigung nach und nach bis Schritt 20
variieren nnen.
Wen Sie MODE drücken, erscheint die
Dauer der Übung ( 10-99 Minuten).
Ist die r die Durchführung
programmierte Zeit 20 Minuten,
entspricht jeder Schritt 1 Minute.
Drücken Sie START und es stellt sich
die Maschine nach 3 rückwärts
gezählten Sekunden an.
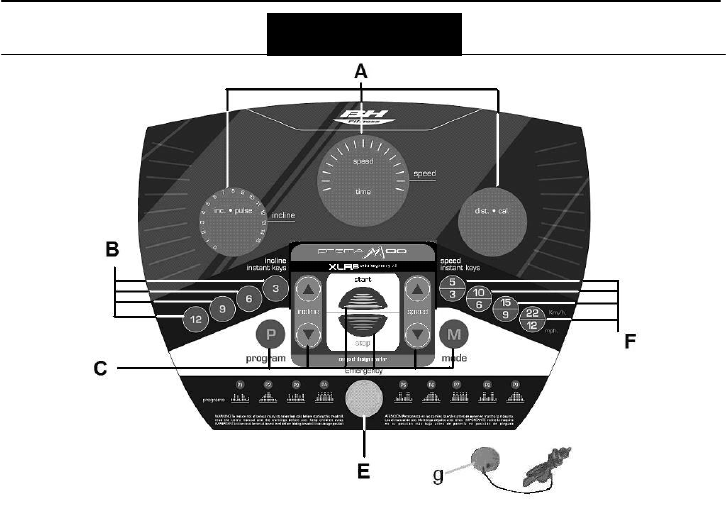
HEART RATE (HP_1).-
Dieses Programm (HP_1) ist dafür
geeignet, um mit dem Gerät Übungen
bei einem konstanten Puls
auszuführen, den Sie zuvor bestimmt
haben. Es funktioniert nur mit dem
telemetrischen Gurt.
Wenn das Gerät vorbereitet ist und
auf READY steht, drücken Sie die
Taste PROGRAM, haben Sie Zugang
zur Auswahl des Programms (HP_1,
PULSE CONTROL). Es wird über ein
Blinken des Fensters angezeigt, das
zum Programm HP_1 gehört. Haben
Sie das Programm ausgewählt, drücken
Sie die Taste MODE zur Bestätigung
Im folgenden blinkt das Fenster
(TIME). Drücken Sie die Tasten (+ -
oder ▲▼) und geben Sie ihr Alter
zwischen 13 und 80 Jahren ein.
Nachdem Sie ihr Alter eingegeben
haben, drücken Sie MODE und das
Fenster TIME gibt Ihnen, nach der
Funktionstafel, siehe Grafik am Ende
der Seiten für Programme (HP_1 für
Alter und Herzschlag) einen
Pulsschlag vor. Wenn Sie die
Pulsschläge verändern möchten,
drücken Sie die Tasten (+ - oder ▲▼)
und erhöhen oder verringern Sie die
Zahl der Pulsschläge, die Sie während
der Übung fest beibehalten wollen.
Wenn Sie zum Beispiel 100 P.P.M
(Pulsschläge pro Minute) eingestellt
haben, wird das Gerät die
Geschwindigkeit vermindern, wenn
Sie den Wert überschreiten. Wenn Sie
im gegenteiligen Fall nicht auf den
eingestellten P.P.M. Wert kommen,
wird das Gerät die Geschwindigkeit
erhöhen, bis Sie auf den eingestellten
Wert kommen.
Drücken Sie die Taste MODE und das
Fenster TIME beginnt zu blinken. Mit
den Tasten (+ - oder ▲▼) wählen Sie
die Zeit aus, die Sie für die Übung
vorgesehen haben (zwischen 10 und
99 Minuten). Die voreingestellte Zeit
sind 30 Minuten. Drücken Sie die
Taste START, wird das Gerät in
Betrieb gesetzt und zeigt dies nach
drei Sekunden an, indem in
absteigender Form auf dem zentralen
Display die Programmprofile (A)
angezeigt werden.
21
NOTAUS.-
Zur optimalen Sicherheit des
Benutzers verfügt dieses Gerät über
einen Sicherheitsschlüssel (g) und
eine STOP-Taste. Der Sicherheits-
schlüssel (g) muss in seine Aufna-
hme (E) gesteckt werden Fig.2.
Anderenfalls kann das Gerät nicht
gestartet werden. Wenn Sie das Gerät
benutzen, befestigen Sie den
Sicherheitsschlüssel mit einem Clip an
Ihrer Kleidung. Durch kräftiges Ziehen
kann der Schlüssel so aus der
Aufnahme gezogen werden und das
Gerät bleibt sofort stehen. Um es
erneut zu starten, stecken Sie den
Schlüssel einfach wieder in die
Aufnahme. Wenn das Gerät nicht
benutzt wird, ziehen Sie bitte den
Sicherheitsschlüssel ab und bewahren
Sie ihn außerhalb der Reichweite von
Kindern auf.
Durch Betätigen der roten STOP–
Taste wird das Gerät sofort
angehalten.
Um es erneut in Betrieb zu nehmen,
betätigen Sie bitte die START-Taste.
STEIGUNG.-
Die Steigung ist eine von den übrigen
Funktionen unabhängige Funktion.
Immer wenn der Hauptschalter (L) auf
Position I gestellt wird, wie bei den
Hinweisen zum Start angegeben
Fig.1, erscheint auf dem Display der
Steigungswert, den Sie eingestellt
haben.
Um die Steigung auf Null zu reduzieren,
betätigen Sie bei angehaltenem Laufband
fünf Sekunden lang die START-Taste.
Sollte die Steigung nicht auf Null sein,
wenn Sie das Training durch
Betätigen der START-Taste beginnen,
wird die Steigung automatisch auf den
Wert Null gebracht, während das
Gerät in Betrieb geht.
Durch Betätigen der Tasten
INCLINE oder INCLINE, können
Sie die Steigung des Geräts zwischen
Niveau 0 und 12 in Funktion der
Steigung, mit der Sie die Übung
ausführen möchten, einstellen.
Wichtig. Versuchen Sie niemals eine
Steigung herzustellen, indem Sie
Gegenstände unter das Laufband
legen.
WICHTIG: BEVOR SIE DAS
GERÄTZUSAM MENKLAPPEN, MUSS
DIE STEIGUNG AUF DAS NIEDRIGSTE
NIVEAU GESTELLT WER- DEN.
PULSMESSUNG.-
Die Pulsmessung erfolgt, indem man
beide Hän-de auf die Pulssensoren
(R) legt, die sich in der
Elektronikeinheit befinden. Nach
einigen Sekun- den werden die Werte
angegeben. Das Herzsymbol neben
dem Pulswert blinkt im Pulsrhythmus
Fig.4.
WICHTIG: Es handelt sich hier nicht
um ein medizinisches gerät. die
angaben zum herzrhythmus sind
daher reine richtwerte.
BH BEHÄLT SICH DAS RECHT
VOR, DIE SPEZIFIZIERUNGEN
SEINER PRODUKTE OHNE
VORHERIGE ANKÜNDIGUNG ZU
ÄNDERN.
22
AUFFINDEN VON FEHLERN UND PROBLEMEN
SYMPTOME MASSNAHMEN LÖSUNGEN
1. Der Monitor schaltet nicht
ein.
1) Vergewissern Sie sich, dass das
Gerät ans Netz angeschlossen
ist und der Hauptschalter auf
Position 1 steht. Der
Sicherheitsschlüssel muss
stecken.
1) Stecken Sie das Kabel in die
Steckdose. Stellen Sie den
Schalter auf Position 1 und
setzen Sie den
Sicherheitsschlüssel ein.
2. Der Monitor schaltet ein,
aber der Motor funktioniert
nicht.
2) Prüfen Sie, ob der
Strombegrenzer eingedrückt ist.
2) Unterbrechen Sie den
Netzanschluss der
Maschine und drücken Sie
den Strombegrenzer ein.
Schmieren Sie das Band.
3. Ruckartige Bewegungen
beim Laufen auf dem
Band.
3.a) Prüfen Sie die Schmierung des
Bandes.
3.b) Prüfen Sie die Spannung des
Gleitbandes.
3.c) Prüfen Sie die Spannung des
Antriebsriemens.
3.a) Schmieren Sie das
Gleitband.
3.b) Spannen Sie das Gleitband.
3.c) Spannen Sie den
Antriebsriemen.
4. Die
Maschine bleibt stehen
(der Strombegrenzer löst
aus).
4) Prüfen Sie die Schmierung des
Bandes.
4) Stellen Sie den Schalter auf 0
und betätigen Sie den
Strombegrenzer. Schmieren
Sie das Gleitband.
5. Elektrische Schläge beim
Berühren der
Haltestangen.
5) Prüfen Sie, ob die benutzte
Steckdose geerdet ist.
5) Schliessen Sie das Gerät an
eine geerdete Steckdose
an.
6. Das Band verrutscht. 6.a) Prüfen Sie, ob der Boden eben
ist.
6.b) Prüfen Sie, ob das Gerät fest
und ohne zu wackeln auf dem
Boden steht.
FEHLERMELDUNG DES GERÄTS
Bildschirmanzeige E1 Möglicher Meldungsfehler
Das Kabel zwischen oberer und
unterer Kontrollvorrichtung
korrekt anschließen.
Bildschirmanzeige E2 Sicherung ausgelöst.
Mit korrekter Spannung
arbeiten. Motorkabel wieder
anschließen.
Bildschirmanzeige E3
Kein Signal des
Geschwindigkeitssensors
Sensorleuchte an der unteren
Kontrollvorrichtung oder
Geschwindigkeitssensor
austauschen.
Bildschirmanzeige E4 Hubfehler
VR und AC Kabel korrekt
anschließen. Die kleine Taste an
der unteren Kontrollvorrichtung
3 Sekunden betätigen.
Bildschirmanzeige E5 Mögliche Motorüberlastung Riemen schmieren.
Für Nachfragen aller Art stehen wir Ihnen gerne zur Verfügung. Rufen Sie unseren Kundendienst an:
+34 902 170 258 service@bhfitness.es
23
Português
ELEMENTOS DO MONITOR.-
A: Nestes 3 displays mostram-se
simultaneamente as Calorias/
Pulsação; Tempo / Distância;
Velocidade e Inclinação.
B: Botões ou teclas de acesso rápido
à inclinação.(3- 6- 9- 12).
C: Este electrónico (Monitor) possui 8
botões ou teclas: program; incline
(inclinaçao▲▼); start; stop; speed
(velocidade km/h
+ -)
; mode.
E: Local da chave de segurança.
F: Botões ou teclas de acesso rápido
à velocidade (5-10-15-22Km/h).
g: Chave de segurança.
COLOCAÇÃO EM
FUNCIONAMENTO.-
Ligue a máquina a uma ficha com
ligação à terra. Coloque o interruptor
(L) na posição (1) Fig.1.
A chave de segurança (g) deve estar
introduzida no seu alojamento (E) Fig.2.
Caso contrio, a quina não entra
em funcionamento. Ao colocar a chave
de segurança (g) no seu lugar (E),
ouvir-se - á um sinal sonoro e todos os
displays mostrarão o valor «00:00», o
que significa que a máquina está na
posão de colocação em
funcionamento (READY).
Aperte a tecla START.
MUDANÇA DE QUILÓMETROS
PARA MILHAS.-
A velocidade desta máquina tem a
opção de poder ser apresentada em
Km/h ou em Milhas.
24
A máquina sai de fábrica com a opção
de velocidade em Km/h.
Para mudar de Km/h para Milhas siga
os seguintes passos:
Desligue a máquina da alimentação
elétrica, retire a chave de segurança.
Volte a ligar a máquina à rede elétrica,
e coloque a chave de segurança (g)
no seu alojamento.
Prima ao mesmo tempo as teclas
INCLINE e SPEED
+
durante 5
segundos aproximadamente e
aparecerá na janela de velocidade o
valor 0,6; o referido valor corresponde
a Milhas /h.
INSTRUÇÕES DE
FUNCIONAMENTO.-
MODO MANUAL
Apertando a tecla START, e a
máquina começará a funcionar
transcorridos 3 segundos, indicados
em forma descendente no display de
time (A), com uma velocidade de
1.0Km/h.
Estando no modo manual, poderá
aumentar ou diminuir a velocidade
apertando as teclas SPEED
(+ -)
entre
os valores de 1-22Km/h. Também
poderá aumentar ou diminuir a
velocidade, apertando as teclas de
acesso rápido (F); tais valores
correspondem às velocidades (5-10-
15-22Km/h).
Apertando as teclas de inclinação
(▼▲) poderá controlar a elevação
entre os níveis 0-12.
Tem também as teclas de acesso
rápido de nível (B), cujos valores
correspondem (3- 6- 9- 12).
Apertando a tecla STOP ou tirando a
CHAVE DE SEGURANÇA a máquina
parará.
MODO PROGRAMAS.-
Este monitor dispõe de 14 programas
(MANUAL; (P_01; P_02; P_03; P_04;
P_05; P_06; P_07; P_08; P_09; U_01;
U_02; U_03; HP_1).
Dentro dos programas de P_01 a P-
09 pode ser programado o Tempo de
duração do exercício entre (10 e 99
Minutos), a distância entre (0,5 e 99,9)
e as calorias entre (10 e 999).
Gráficos de programas do P_01 ao
P_9.
Ver paginas finais.-
Estando a quina preparada, prima a
tecla PROGRAM e aparecerá no ecrã
P_01; premindo a tecla PROGRAM
acede aos programas de (P1 a P9);
quando tiver escolhido o seu programa,
prima a tecla MODE e o ecrã de TIME
(Tempo) fica a piscar.
Para programar a duração do tempo no
programa escolhido, prima as teclas
SPEED▲▼ (10 99 minutos). O
monitor tem um tempo pré-definido de
15 minutos para a duração do
programa.
Premindo a tecla START, a máquina
inicia o funcionamento após 3
segundos, indicados de forma
descendente no ec central de acordo
com os valores que tenha introduzido.
Pode variar em qualquer momento do
programa, a velocidade, premindo as
teclas SPEED e a
INCLINAÇÃO, premindo as teclas
Incline do monitor.
MODO PROGRAMAS
UTILIZADOR.-
Os programas de utilizador permitem
desenhar os gficos de velocidade e
de inclinão adequados à sua forma
sica.
25
Estando a quina preparada, prima a
tecla PROGRAM e aparecerá no ecrã
P_01; premindo a tecla PROGRAM
acede aos programas de utilizador de
(U_01; U_02; U_03); após ter escolhido
o seu programa, prima a tecla MODE e
visualizará na janela TIME/DISTANCE
que estará a indicar o primeiro passo do
programa que es a gravar (S_01) e
que, por sua vez, também esta a
piscar na janela SPEED/INCLINE.
Com as teclas INCLINE seleccione
a inclinação que deseja num primeiro
passo (entre 0 e 12 níveis); premindo as
teclas SPEED, seleccione a
velocidade que deseja num primeiro
passo (entre 1 e 20Km/h).
Prima a tecla MODE e passa ao
segundo passo (S_02); realize os
mesmos passos que para o ponto
(S_01), variando, se o desejar, a
velocidade e a inclinação e assim
sucessivamente até ao passo 20 que
está no gfico do programa de
utilizador.
Premindo a tecla MODE, aparecerá o
tempo de duração do exercício entre
(10 - 99 minutos).
Se o tempo programado para a
realização do exercício foi de 20
minutos, cada passo corresponde a 1
minuto.
Premindo a tecla START, a máquina
inicia o funcionamento após 3
segundos, indicados de forma
descendente no ec central .
HEART RATE (HP_1).-
Este programa (HP_1) serve para
realizar o exercício nesta máquina
com uma pulsação constante, aquela
que você tiver seleccionado.
funciona com banda telemétrica.
Estando a máquina preparada em
READY, aperte a tecla PROGRAM.
Apertando as teclas (+ -, ou ▲▼),
poderá aceder à selecção do programa
(HP_1, APERTE CONTROLO),
indicado pelo piscar da janela
correspondente ao programa HP_1.
Depois de ter escolhido o seu
programa, aperte a tecla MODE para
confirmá-lo.
Depois piscará a janela (TIME).
Apertando as teclas (+ -, ou ▲▼),
introduza a sua idade entre (13 e 80
anos).
Depois de ter introduzido a sua idade,
aperte MODE e na janela de TIME
aparecerá um valor de pulsação
segundo a tabela de funções, ver
gráfico das páginas finais de
programas (HP_1 para a idade e o
ritmo cardíaco). Se deseja mudar as
pulsações, introduza o valor
apertando as teclas (+ -, ou );
subirá ou diminuirá o nível das
pulsações que deseja manter
constante durante o exercício. Se por
exemplo programou 100 P.P.M
(pulsações por minuto ) no momento
que ultrapassar essa cifra , a máquina
ira diminuindo a velocidade. Se pelo
contrário não chegar às P.P.M
programadas, a máquina aumentará a
velocidade, até chegar ao valor
programado.
Aperte a tecla MODE e começará a
piscar a janela TIME. Apertando as
teclas (+ -, ou ▲▼) seleccione o seu
tempo de exercício , (entre 10 e 99
minutos). O tempo previamente
definido no monitor é de 30 minutos.
Aperte a tecla START e a máquina
começará a funcionar transcorridos 3
segundos, indicados em forma
descendente no display central de
Perfis de Programas (A).
26
PARAGEM DE EMERNCIA.-
Para dar ao usuário a maior
segurança possível, esta unidade
possui uma chave de segurança (g) e
um botão de STOP.
A chave de segurança (g) deverá
estar colocada no seu alojamento (E),
ver Fig.2. Caso contrário a máquina
não poderá funcionar.
Ao usar a máquina, segure a corda da
chave de segurança á sua roupa
através do clipe. Com um puxão, a
chave de segurança sai do seu
alojamento e a máquina parará de
forma instantânea. Para pôla de novo
em funcionamento, volte a colocar a
chave no seu sitio. Se não for usar a
máquina retire a chave de segurança
(g) e guarde-a fora do alcance das
crianças.
Apertando o botão vermelho de STOP
a unidade parará imediatamente.
Para voltar a pôla em funciona-mento,
deverá apertar o botão START.
INCLINAÇÃO.-
A inclinação é uma função
independente de todas as funções.
Cada vez que colocar o interruptor
geral (L) na posição I, como se indica
na colocação em funcionamento,
Fig.1. No display de inclinação
aparecerá o valor da inclinação que
deixou.
Para baixar a inclinação para zero
com a unidade parada, prima a tecla
START durante cinco segundos.
Se a inclinação não estiver a zero
quando começar o exercício com a
tecla START, esta ficará a zero
enquanto a máquina inicia o
funcionamento.
Apertando os botões INCLINE ou
INCLINE , poderá regular a
inclinação da sua unidade desde o
nível 0 até ao nível 12 dependendo da
inclinação na qual deseja fazer o
exercício. Importante. Não varie a
inclinação da sua cinta de correr
colocando objectos por baixo dela.
IMPORTANTE: A INCLINAÇÃO
DEBERÁ ESTAR NO SEU NÍVEL
MAIS BAIXO ANTES DE COLOCAR
A MÁQUINA DE ANDAR NA
POSIÇÃO PARA DOBRAR.
MEDIÇÃO DA PULSAÇÃO.-
A pulsação mede-se colocando
ambas as mãos nos sensores de
pulsação (R) que estão na unidade
electrónica. A medida da pulsação
aparece depois de uns segundos. O
símbolo do coração ao lado da cifra
de pulsação piscará com o mesmo
ritmo da sua pulsação, figura 4.
IMPORTANTE. Este não é um
aparelho médico e por essa razão a
informação do ritmo cardíaco serve
ape-nas de orientação.
BH RESERVA O DIREITO DE
PODER MODIFICAR AS ESPECIFI-
CAÇÕES DOS SEUS PRODUTOS
SEM PRÉVIO AVISO.
27
LOCALIZAÇÃO DE FALHAS OU DE AVARIAS
SINTOMAS COMPROVAÇÕES SOLUÇÕES
1. O monitor não
acende.
1) Verifique se a máquina está
ligada à rede, se o
interruptor geral está na
posição 1 e se a chave de
segurança está posta.
1) Ligue o cabo à rede.
Coloque o interruptor na
posição 1 e ponha a chave
de segurança.
2. O monitor acendese e
não funciona o
motor.
2) Comprove que o limitador de
corrente está para dentro.
2) Desligar a máquina e
apertar o limitador de
corrente. Lubrificar a
banda.
3. Puxões ao andar em
cima da banda.
3.a) Comprove lubrificação
banda.
3.b) Comprove tensão banda
deslizamento.
3.c) Comprove tensão correia
de transmissão.
3.a) Lubrifique a banda de
deslizamento.
3.b) Deixe a banda de
deslizamento tensa.
3.c) Deixe a banda correia de
transmissão tensa.
4. A máquina pára (salta
o limitador de
corrente).
4) Comprove lubrificação
banda.
4) Apertar o limitador de
corrente com o interruptor
em 0 e lubrifique a banda
de deslizamento.
5. O corrimão dá
choques nas mãos.
5) Comprove se a tomada onde
está ligada tem ligação à
terra.
5) Ligar a máquina numa ficha
com ligação à terra.
6. A banda fica
descentrada.
6.a) Comprove nivelamento do
chão.
6.b) Comprove a distorção da
máqunia.
ERROS DA MÁQUINA
Ecrã do monitor E1
Possível mensagem de falha.
Conecte o cabo correctamente entre o
controlador superior e o controlador inferior
Ecrã do monitor E2 Apagado
Funcionamento com uma voltagem correcta;
conecte de novo o cabo do motor.
Ecrã do monitor E3
Sem sinal do sensor de
velocidade
Substitua a luz do sensor do controlador
inferior ou o sensor de velocidade.
Ecrã do monitor E4 Falha de elevação
Conecte os cabos de VR e AC
correctamente. Prima o botão pequeno do
controlador inferior durante 3 segundos.
Ecrã do monitor E5
Possível sobrecarga do
motor
Lubrifique a faixa.
Para qualquer consulta, não duvide em pôr-se em contacto, chamando ao número de telefone:
34 902 170 258 service@bhfitness.es
28
Italiano
ELEMENTI DEL MONITOR.-
A: In questi 3 display vengono
mostrate allo stesso tempo le
Calorie/Polso; Tempo/ Distanza;
Velocità e Inclinazione.
B: Pulsanti o tasti di entrata rapida all’
inclinazione (3- 6- 9- 12).
C: Questo elettronico (Monitor) ha a
disposizione 8 pulsanti o tasti:
program; incline (inclinazione ▲▼);
start; stop; speed (velocitá km/h
+ -)
;
mode.
E: Alloggio della chiave di sicurezza.
F: Pulsanti o tasti per l’ entrata rapida
alla velocità (5-10-15-22Km/h).
g: Chiave di sicurezza.
AVVIAMENTO.-
Colleghi l’apparecchio ad una spina
con presa a TERRA. Metta
l’interruttore (L) nella posizione (1)
Fig.1.
La chiave di sicurezza (g) dovrà trovarsi
sempre introdotta nel suo alloggio (E).
In caso contrario, l’apparecchio
nonfunzionerà. Nel collocare la chiave di
sicurezza (g) nel suo alloggio (E), si
sentirà un fischio e tutti i display
mostreranno il valore “00:00”, ciò
significa che l apparecchio si trova in
posizione pronto per il suo
funzionamento (READY).
Prema il tasto START.
CAMBIO DA CHILOMETRI A
MIGLIA.-
La velocità di questa macchina
possiede l’opzione di indicarla in km/h
o in Miglia.
29
La velocità della macchina esce dalla
fabbrica in km/h.
Per cambiare da km/h a Miglia seguire
i seguenti passi.
Scollegare la macchina dall’
alimentazione elettrica, togliere la
chiave di sicurezza. Collegare di
nuovo la macchina alla rete elettrica
ed inserire la chiave di sicurezza (g)
nell'alloggio corrispondente.
Premere contemporaneamente i tasti
INCLINE e SPEED
+
per 5 secondi
circa e vi comparirà nella finestra
corrispondente alla velocità la cifra 0,6
questa cifra corrisponde alle Miglia/h.
ISTRUZIONI DI
FUNZIONAMENTO.-
MODO MANUALE
Premendo il tasto START, l’apparecchio
si metterà in funciona-mento trascorsi 3
secondi, che appaiono indicati in modo
discendente nel display di TIME (A), con
una veloci de 1,0Km/h.
Trovandosi nel modo manuale, lei pot
aumentare o diminuire la velocità
premendo i tasti SPEED
(+ -)
fra i valori
da 1-22Km/h, pot anche aumentare o
diminuire la veloci, premendo i tasti di
entrata rapida (F) questi valori
corrispondono alle velocità (5-10-15-
22Km/h).
Premendo i tasti d inclinazione (▼▲)
lei pot controllare l’ elevazione fra i
livelli 0-12.
Ha anche a disposizione i tasti di entrata
rapida ai livelli (B) i cui valori
corrispondono a (3- 6- 9- 12).
Premendo il tasto START o togliendo la
CHIAVE DI SICUREZZA l’apparecchio
si fermerà.
MODO PROGRAMMI.-
Questo monitor è dotato di 14
programmi (MANUAL; (P_01; P_02;
P_03; P_04; P_05; P_06; P_07; P_08;
P_09; U_01; U_02; U_03; HP_1).
All’interno dei programmi dal P_01 al
P_09 si può programmare il Tempo di
durata dell’esercizio compreso tra 810
e 99 Minuti), la distanza tra (0,5 e
99,9) e le calorie tra (10 e 999).
Grafici dei programmi dal P_1 al P_9.
Vedere pagine finali.-
Mentre la macchina è pronta, premi il
tasto PROGRAM e sul display
compari P_01, presentando il tasto
PROGRAM si accede ai programmi dal
(P1 al P9), una volta prescelto il
programma premi il tasto MODE e
lampegge il display di TIME (Tempo).
Per programmare la durata del tempo
nel programma prescelto premi il tasto
SPEED▲▼ (10 -99 minuti). Il monitor
ha un tempo predefinito di 15 minuti
per la durata del programma.
Premi il tasto START e la macchina si
avvierà trascorsi 3 secondi, indicati in
modo discendente nel display centrale
in accordo con i valori che sono stati
inseriti.
Lei può variare in qualsiasi momento
del programma, la velocità premendo i
tasti SPEED▲▼ e INCLINE▲▼,
premendo i tasti Inclinare il monitor.
MODO PROGRAMMI UTENTE.-
I programmi di Utente le permettono
disegnare i grafici della velocità e
dell’inclinazione rispetto alla sua forma
fisica.
Mentre la macchina è pronta, premi il
tasto PROGRAM e sul display
comparirà P_01, premendo il tasto
PROGRAM si accede ai programmi
utente dal (U_01; U_02; U_03),
30
quando è stato prescelto il proprio
programma premi il tasto MODE e
sulla finestra TIME/DISTANCE ti sarà
indicato il primo passo del programma
che hai registrato (S_01), e che ti
starà indicando che sta registrando
(S_01), e allo stesso tempo
lampeggerà anche la finestra
SPEED/INCLINE.
Con i tasti INCLINE
▲▼
selezionare
l’inclinazione preferita per il primo
passo (tra 0 e 12 livelli), premendo i
tasti SPEED
▲▼
, selezionare la
velocità che preferite per il primo
passo (tra 1 e 20km/h).
Premi il tasto MODE e si passerà al
secondo passo (S-02) realizza gli
stessi passi che sono stati eseguiti per
il punto (S_01) cambiando se così lo
desiderate la velocità fino al passo 20
di cui è formato il grafico del
programma utente.
Premendo il tasto MODE comparirà il
tempo di durata dell’allenamento
compreso tra (10 e 99 minuti).
Se il tempo programmato per
realizzare l’allenamento è stato di 20
minuti, ogni passo corrisponderà ad 1
minuto.
Premi START e la macchina si avvierà,
trascorsi 3 secondi, indicati in modo
discendente nel display centrale.
HEART RATE (HP_1).-
Questo programma (HP_1) le serve
per realizzare l’ allenamento in questo
apparecchio con un polso constante
che lei abbia suelto. Solo funziona con
banda telemetrica.
Trovandosi l’ apparecchio pronto in
posizione di READY, premendo il
tasto PROGRAM, pot scegliere il
programma (HP_1, PULSE
CONTROL) indicato dal lampeggio
della finestra che corrisponde al
programma HP_1, una volta scelto il
suo programma prema il tasto MODE
per dare la conferma.
A continuazione lampeggerà la
finestra (TIME) premendo i tasti (+ -, o
▲▼), introduca la sua età fra i 13 e gli
80 anni.
Dopo aver introdotto la sua età, prema
MODE e nella finestra TIME le
apparirà un valore di pulsazione
secondo la tabella funzioni, vedere
grafico delle pagine finali dei
programmi (HP_1 per l’ età ed il ritmo
cardiaco). Se desidera cambiare le
pulsazioni, introduca il valore
premendo i tasti (+ -, o ▲▼), per
aumentare o diminuire il livello di
pulsazioni che lei desideri mantenere
fisso durante l’ allenamento.
Se per esempio lei ha programmato
100 P.P.M (pulsazioni per minuto) nel
momento che si sorpassa questa cifra,
l’ apparecchio diminuirà poco a poco
la velocità. Se al contrario non
dovesse raggiungere le P.P.M
programmate, l’ apparecchio
aumenterà la velocità fino a
raggiungere il valore programmato.
Prema il tasto MODE e lampeggerà la
finestra TIME premendo i tasti (+ -, o
▲▼) scelga il tempo di esecuzione
del suo allenamento. (fra 10 e 99
minuti). Il tempo preimpostato nel
monitor è di 30 minuti.
Prema il tasto START e l’ apparecchio
si metterà in funzionamento, trascorsi
3 secondi, indicati in maniera
discendente nel Display centrale dei
Profili dei Programmi (A).
FERMATA D’EMERGENZA.-
Per fornire la massima sicurezza
all’utente, questo apparecchio a
disposizione una chiave di sicurezza
(g) ed un tasto di STOP.
31
La chiave di sicurezza (g) dovrà
sempre trovarsi collocata nel suo
alloggio (E), vedere Fig.2. In caso
contrario, l’ apparecchio non si
metterà in funzionamento.
Quando faccia uso dell’ apparecchio,
fissi la chiave di sicurezza agli abiti
con il clip. Con uno strattone, la chiave
di sicurezza uscirà dal suo alloggio e l’
apparecchio si fermerà
inmediatamente. Per metterla di
nuovo in funzionamento, collochi di
nuovo la chiave nel suo alloggio.
Tolga la chiave di sicurezza (g) se non
ha intenzione di usare l’apparecchio e
la conservi lontano dalla portata dei
bambini. Premendo il tasto rosso di
STOP l’apparecchio si fermerà
inmediatamente. Per metterlo di
nuovo in funzionamento premere il
tasto START.
INCLINAZIONE.-
L’ inclinazione è una funzione
indipendente da tutte le altre funzioni.
Ogni volta che metta l’ interruttore
generale (L) nella posizione I, como
viene indicato nel punto di avviamento
Fig.1, nel display dell’inclinazione
apparirà il valore che lei ha lasciato.
Per diminuire l’inclinazione a zero
mentre l’unità è ferma premere il tasto
START per cinque secondi.
Se l’inclinazione non è a zero quando
si comincia l’allenamento con il tasto
START, questa si azzererà mentre la
macchina inizierà a funzionare.
Premendo i INCLINE o INCLINE,
lei potrà aggiustare l’inclinazione del
suo apparecchio dal livello 0 fino al
livello 12 a seconda dell’ inclinazione
con la quale lei desidera realizzare l’
allenamento. Importante. No cambi
l’inclinazione del suo tapis roulant
mettendo oggetti sotto il nastro.
IMPORTANTE: L’ INCLINAZIONE
DEVE TROVARSI NEL SUO LIVELLO
P BASSO PRIMA DI METTERE IL
TAPIS ROULANT NELLA SUA
POSIZIONE DI PIEGATURA.
MISURA DEL POLSO.-
La misura del battito cardiaco si
realizza collocando ambedue le mani
nei sensori di polso (R) che si trovano
nell’ elettronico. La misura del polso
appare passati alcuni secondi. Il
simbolo del cuore che si trova accanto
alla cifra del polso lampeggia al ritmo
del battito del suo cuore. Fig.4.
IMPORTANTE. Questo non è un
pparecchio medico e quindi l’
informazione del battito cardiaco è
solo orientativa.
BH SI RISERVA IL DIRITTO DI
MODIFICARE LE SPECIFICHE DEI
SUOI PRODOTTI SENZA AVVERTI-
MENTO PREVIO.
32
LOCALIZZAZIONI DI GUASTI O DANNI
SINTOMI VERIFICHE SOLUZIONI
1. Non si accende
il monitor.
1) Si assicuri che l'apparecchio sia
collegato alla rete elettrica,
l'interruttore generale si trovi in
posizione 1 e la chiave di sicurezza
sia inserita nel suo alloggio.
1) Colleghi il cavo alla rete
elettrica. Collochi
l'interruttore in posizione 1
e metta la chiave di
sicurezza.
2. Si accende il
monitor e non
funziona il
motore.
2) Verificare che il limitatore di
corrente sia in dentro.
2) Disinnestare la macchina e
premere il limitatore di
corrente. Lubrificare il
nastro.
3. Strattoni nel
camminare sul
nastro.
3.a) Verificare la lubrificazione del
nastro.
3.b) Verificare la tensione del nastro
di slittamento.
3.c) Verificare la tensione della
cinghia di trasmissione.
3.a) Lubrificare il nastro di
slittamento.
3.b) Tesare il nastro di
slittamento.
3.c) Tesare la cinghia di
trasmissione.
4. L'apparecchio si
ferma (salta il
limitatore di
corrente)
4) Verificare la lubrificazione del
nastro.
4) Premere il limitatore di
corrente con l'interruttore a
0 e lubrificare il nastro di
scorrimento.
5. Il corrimano
provoca
scosse nelle
mani.
5) Verificare che la presa dove è
stata collegata abbia presa a
terra.
5) Collegare l'apparecchio ad
una spina con presa a
terra.
6. Il nastro si
sposta e non è
centrato.
6.a) Verificare la livellazione del
pavimento.
6.b) Verificare se l'apparecchio ê
zoppo.
ERRORI DELL' APPARECCHIO
Schermo del
monitor E1
Eventuale messaggio de
falha
Collegare o cavo correttamente tra il controllore
superiore ed il controllore inferiore
Schermo del
monitor E1
Spento
Funzionamento con la tensione corretta;
collegare di nuevo o cabo del motore
Schermo del
monitor E3
Non si visualizza il sensore
de la velocità
Cambiare la luce del sensore controllore inferiore
o il sensore de la velocità
Schermo del
monitor E4
Falha dell’elevazione
Collegare i cavi de VR e AC correttamente.
Premere il pulsante di controllore inferiore
durante 3 secondi.
Schermo del
monitor E5
Eventuale sobrecarga del
motore
Lubrificare il camminatore
Per qualsiasi domanda, non dubiti nel mettersi in contatto chiamando al numero di telefono:
800-046137 assistenzabh@sportalliance.it
33
Nederlands
ELEMENTEN VAN DE
MONITOR.-
A: Op deze 3 displays worden
tegelijkertijd Calorieën; Hellingshoek
/Hartslag; Tijd; Snelheid en Afstand
getoond.
B: Druktoetsen of snelkeuze (druk)
toetsen helling (3- 6- 9- 12).
C: Dezee lektronischeeenheid (Monitor)
beschikt 8 zes druktoetsen: program;
incline (hellingshoek ▲▼); start; stop;
speed (snelheid km/h
+ -)
; mode.
E: Plaats voor de veiligheidssleutel.
F: Snelkeuze (druk)toetsen snelheid
(5-10-15-22 Km/h).
g: Veiligheidssleutel.
INSCHAKELEN.-
Sluit het apparaat aan op een GEAARD
stop-contact. Plaats de schakelaar (L)
op de stand (1) Fig.1.
De veiligheidssleutel dient op de
daarvoor bestemde plaats te zitten. (E)
Fig.2. Wanneer de sleutel niet op zijn
plaats zit, treedt het apparaat niet in
werking. Wanneer u de veiligheids-
sleutel (g) plaatst, klinkt er een piep en
alle displays tonen de waarde “00:00”,
wat betekent dat het apparaat gereed is
voor gebruik (READY).
Druk op de toets START.
OVERGAAN VAN
KILOMETERS OP MIJLEN.-
Dit toestel bezit de optie snelheid in
km/uur of mijl/uur weer te geven. De
fabrieksinstelling voor het toestel is
km/uur.
34
Om van km/uur over te gaan op mijl/uur,
volg deze stappen:
Haal de stekker van het toestel uit het
stopcontact, verwijder de beveilig-
ingssleutel. Doe de stekker van het
toestel opnieuw in het stopcontact en
doe de beveiligingssleutel (g) in het slot.
Houd de toetsen INCLINE en
SPEED
+
ongeveer 5 seconden
ingedrukt. De snelheidsweergave toont
het getal 0,6, dit getal komt overeen met
mijlen per uur.
GEBRUIKSAANWIJZING.-
HANDMATIGE BEDIENING
Door op de toets START branden en
het apparaat schakelt na 3 seconden,
terugtellend weergegeven in de
display Tijd (A), met een snelheid van
1.0 Km/h.
Tijdens de handmatige bediening kunt
u de snelheid verhogen of verlagen
door middel van de toetsen SPEED
(+
-)
en een snelheid kiezen tussen 1-22
Km/h. U kunt de snelheid ook
verhogen of verlagen door middel van
de snelkeuze toetsen (F), welke
waarden overeen komen met (5-10-
15-22 Km/h).
Door middel van de toetsen voor de
hellingshoek () kunt u een
hellingshoek kiezen tussen de niveaus
0-12.
U heeft ook de beschikking over de
snelkeuze toetsen (B) voor het
hellingshoekniveau, welke waarden
overeenkomen met (3- 6- 9- 12).
Door op de toets START te drukken of
door de VEILIGHEIDSSLEUTEL uit te
nemen stopt het apparaat.
PROGRAMMAMODUS.-
Deze monitor bezit 14 programma’s
(MANUAL; (P_01; P_02; P_03; P_04;
P_05; P_06; P_07; P_08; P_09; U_01;
U_02; U_03; HP_1).
Voor programma’s P_01 t/m P_09
kunt u de duur van de oefening
bepalen tussen (10 tot 99) minuten, de
afstand tussen (0,5 tot 99,9) en de
calorieën tussen (10 tot 999).
Grafieken van de programmas P_1-P_9.
Zie laatste pagina’s.-
Terwijl het toestel gereed is, druk op
PROGRAM, waarna P_01 op het
uitleesvenster verschijnt. Door op
PROGRAM te drukken kunt u toegang
verkrijgen tot de programma’s (P1 t/m
P9). Zodra u een programma hebt
gekozen, druk op MODE, waarna het
woord TIME begint te knipperen.
Gebruik de toetsen SPEED ▲▼ om de
duur van het programma te bepalen (10
- 99 minuten). De monitor heeft een
standaard programma-instelling van 15
minuten.
Druk op START, waarna het toestel na
3 seconden begint te functioneren,
getoond door de aftelling op het
middelste uitleesvenster, gebaseerd op
de opgegeven waarden.
U kunt de snelheidsinstellingen op elk
ogenblik tijdens de oefening wijzigen
door op de SPEED toetsen te
drukken, en de hellingsinstellingen door
op de hellingstoetsen te drukken.
GEBRUIKERSPROGRAMMAM
ODUS.-
De gebruikersprogramma’s bieden u
de mogelijkheid de snelheidsen
hellingsgrafieken in te stellen in
overeenstemming met uw
conditieniveau.
Terwijl het toestel gereed is, druk op
PROGRAM, waarna P_01 op het
uitleesvenster verschijnt.
35
Door op PROGRAM te drukken kunt u
toegang verkrijgen tot de
gebruikersprogramma’s (U_01; U_02;
U_03). Zodra u een programma
gekozen hebt, druk op MODE, waarna
de eerste stap van het programma dat u
aan het ontwerpen bent getoond wordt
op het TIME/DISTANCE venster,
(S_01). Tevens zal het
SPEED/INCLINE venster gaan
knipperen.
Maak gebruik van de INCLINE
toetsen om het hellingsniveau te
selecteren dat u voor de eerste fase wilt
(tussen 0 en 12). Druk op de
SPEED▲▼ toetsen om de snelheid te
selecteren die u voor de eerste fase wilt
(tussen 1 en 20km/uur).
Druk op MODE, waarna u aan de
tweede fase begint (S_02). Voer
dezelfde procedure uit als in (S_01), de
snelheids- en hellingsinstellingen voor
deze fase variërend, enzovoort tot fase
20 teneinde de gebrui-
kersprogrammagrafiek te voltooien.
Door op MODE te drukken kunt u een
tijdslimiet voor de oefening
programmeren (tussen 10 - 99minuten).
Als de geprogrammeerde oefeningstijd
20 minuten is, duurt elke fase 1 minuut.
Druk op START, waarna het toestel
begint na een aftelling van 3 seconden
die getoond wordt op het middelste
uitleesvenster.
HARTSLAGFREQUENTIE
(HP_1).-
Dit programma (HP_1) dient om de
oefening met een door u gekozen
constante hartslag uit te voeren. Het
programma werkt alleen bij het
gebruik van een hartslag
telemeetband.
Wanneer het apparaat zich in de READY
stand bevindt, drukt u op de toets
PROGRAM te drukken krijgt u toegang
tot de selectie van het programma
(HP_1, PULSE CONTROL),
aangegeven door het knipperen van het
venster overeenkomend met het
programma HP_1. Wanneer u het
programma heeft gekozen drukt u op
MODE om te confirmeren.
Vervolgens gaat het venster (TIME)
knipperen. Door op de toetsen (+ -, of
), introduceert u uw leeftijd tussen de
(13 y 80 jaar) .
Nadat u uw leeftijd heeft ingevoerd drukt
u op MODE en het venster TIME geeft
een hartslagwaarde, volgens een tabel
(zie de grafieken op de laatste pagina's
voor de programma's (HP_1 voor leeftijd
en hartslagfrequentie) Wanneer u het
aantal hartslagen wilt veranderen,
introduceert u de waarde door middel
van de toetsen (+ -, of ), en verhoogt
of verlaagt het aantal gewenste
hartslagen waarmee u de oefening wilt
uitvoeren.
Wanneer u bijvoorbeeld 100 P.P.M.
(hartslagen per minuut) heeft
geprogrammeerd, zal het apparaat de
snelheid verminderen wanneer u boven
deze waarde uitkomt. Wanneer u echter
deze geprogrammeerde P.P.M waarde
niet bereikt, zal het apparaat zijn snelheid
vermeerderen, tot dat de
geprogrammeerde waarde wordt bereikt.
Door op de toets MODE te drukken gaat
het venster TIME knipperen. De tijdsduur
van het gekozen programma kunt u
instellen stellen door middel van de
toetsen (+- of ) (tussen 10 en 99
minuten). De vooraf ingestelde tijdsduur
van de monitor bedraagt 30 minuten.
Druk op de toets START en het apparaat
schakelt, na 3 seconden, in, aftellend
weergegeven op het centrale
beeldscherm van de Programma
Profielen (A).
36
NOODSTOP.-
Om een maximale veiligheid voor de
gebruiker te waarborgen, beschikt dit
apparaat over een veiligheidssleutel
(g) en een STOP knop.
De veiligheidssleutel (g) dient op zijn
plaats te zitten (E), Fig.2. Indien dit
niet het geval is zal het apparaat niet
inschakelen.
Wanneer u het apparaat gebruikt,
dient u de veiligheidssleutel door
middel van de klip aan uw kleding te
bevestigen. De veiligheidssleutel kan
dan via een ruk verwijderd worden en
het apparaat stopt meteen. Om het
apparaat opnieuw te starten dient u de
sleutel weer op zijn plaats te brengen.
Haal de veiligheidssleutel (g) uit het
apparaat wanneer u dit niet gebruikt
en berg deze op bui- ten het bereik
van kinderen Door op de rode nop
STOP te drukken stopt het apparaat
meteen. Om START het apparaat
HELLINGSHOEK.-
De hellingshoek functioneert
onafhankelijk van alle andere functies.
Telkens wanneer u de algemene
schakelaar (L) op de stand I zet, zoals
wordt beschreven onder het
inschakelen van het apparaat,
verschijnt op de display van de
hellingshoek het getal van de
hellingshoek die u het laatst gebruikt
heeft.
Om de inclinatie naar nul te verlagen
terwijl het toestel gestopt is, druk op
de toets START en houd die 5
seconden ingedrukt.
Als de inclinatie niet op nul staat
wanneer de START-toets wordt
gebruikt om te beginnen met oefenen,
zet het toestel zichzelf op nul als het
begint.
Door op de knoppen INCLINE of
INCLINE te drukken, kunt u de
hellingshoek van het apparaat
instellen van niveau 0 tot 12, naar
gelang de inclinatie waaronder u de
oefening wilt uitvoeren.
Belangrijk: Verander de hellingshoek
van uw apparaat niet door voorwerpen
onder de band te leggen.
BELANGRIJK: DE HELLINGSHOEK
MOET OP DE LAAGSTE STAND
STAAN VÓÓRDAT U HET
APPARAAT KUNT OPKLAPPEN.
HARTSLAGMETING.-
De hartslag wordt gemeten door beide
handen op de hartslagsensoren (R),
die zich op de elektronische eenheid
bevinden, te leggen. De hartslag-
meting verschijnt na enkele seconden
in beeld. Het hart-symbooltje, dat zich
naast de cijferaanduiding bevindt,
begint op het ritme van uw hartslag te
knipperen, Fig.4.
BELANGRIJK: Dit is geen medisch
meetinstrument en daarom is de
informatie omtrent de hartfre-quentie
uitsluitend een indicatie.
BH BEHOUDT ZICH HET RECHT
VOOR DE PRODUCTSPECIFICA-
TIES TE VERANDEREN ZONDER
VOORAFGAAND BERICHT
37
STORINGS- EN FOUTMELDINGEN
SYMPTOMEN CONTROLE HANDELINGEN OPLOSSINGEN
1. De monitor schakelt niet
in.
1) Controleer of het apparaat is
aangesloten op het lichtnet, de
hoofdschakelaar op stand 1 staat en
de veiligheidssleutel correct
geplaatst is.
1) Sluit aan op het lichtnet. Zet
de hoofdschakelaar op stand
1 en plaats de
veiligheidssleutel.
2. De monitor schakelt in,
maar de motor
functioneert niet.
2) Controleer of stroombegrenzer naar
binnen gericht is.
2) Haal stekker uit stopcontact
en druk op de
stroombegrenzer. Smeer de
band.
3. Schokkende loop bij het
lopen op de band.
3.a) Controleer smering van de band.
3.b) Controleer de spanning van de
band.
3.c) Controleer spanning van de
overbrengingsriem.
3.a) Smeer de band.
3.b) Span de band.
3.c) Span de overbrengingsriem.
4. Het apparaat slat af (de
stroombegrenzer slaat
af).
4) Controleer de smering van de band.
4) Druk op de stroombegrenzer
met de schakelaar in positie 0
en smeer de band.
5. Het frame geeft
elektrische schokken in
de handen.
5) Controleer of het apparaat is
aangesloten op een geaard
stopcontact.
5) Sluit het apparaat aan op een
geaard stopcontact.
6. De band loopt niet
central.
6.a) Controleer of de ondergrond
waterpas is.
6.b) Controleer of het apparaat stevig
op de grond staat.
FOUTMELDINGEN VAN HET APPARAAT
Monitorschermweergav
e E1
Mogelijke
berichtsfout.
Sluit de draad goed aan tussen de
bovenste en onderste controller
Monitorschermweergav
e E2
Continu botsing.
Werkend met de juiste spanning; sluit
de motordraad opnieuw aan.
Monitorschermweergav
e E3
Geen signaal van
snelheidssensor
Vervang het sensorlampje op de
onderste controller of de
snelheidssensor.
Monitorschermweergav
e E4
Elevatiefout
Sluit de VR- en AC-draden goed aan.
Druk gedurende 3 seconden op de
kleine knop op de onderste
controller.
Monitorschermweergav
e E5
Mogelijke
motoroverbelasting.
Smeer de riem.
Wanneer u vragen heeft, stel u in contact met ons door het klanten-service nummer te
bellen:
+34 902 170 258 service@bhfitness.es
(E) PERFILES DE LOS PROGRAMAS;
(GB) PROGRAM PROFILES;
(F) PROFILS DES PROGRAMMES;
(D) PROGRAMMPROFILE;
(P) PERFIS DOS PROGRAMAS;
(I) PROFILI DEI PROGRAMMI;
(NL) PROGRAMMAPROFIELEN;
HP_1
BPM/PPM BPM/PPM BPM/PPM BPM/PPM
Age
Edad
H
Default
L
Age
Edad
H
Default
L
Age
Edad
H
Default
L
Age
Edad
H
Default
L
15 195
123 123
33 178
112 112
51 161
101 101
69 143
91 91
16 194
122 122
34 177
112 112
52 160
101 101
70 143
90 90
17 193
122 122
35 176
111 111
53 159
100 100
71 142
90 89
18 192
121 121
36 175
110 110
54 158
100 100
72 141
90 89
19 191
121 121
37 174
110 110
55 157
99 99
73 140
90 88
20 190
120 120
38 173
109 109
56 156
98 98
74 139
90 88
21 189
119 119
39 172
109 109
57 155
98 98
75 138
90 87
22 188
119 119
40 171
108 108
58 154
97 97
76 137
90 86
23 187
118 118
41 170
107 107
59 153
97 97
77 136
90 86
24 186
118 118
42 169
107 107
60 152
96 96
78 135
90 85
25 185
117 117
43 168
106 106
61 151
95 95
79 134
90 85
26 184
116 116
44 167
106 106
62 150
95 95
80 133
90 84
27 183
116 116
45 166
105 105
63 149
94 94
28 182
115 115
46 165
104 104
64 148
94 94
29 181
115 115
47 164
104 104
65 147
93 93
30 181
114 114
48 163
103 103
66 146
92 92
BH FITNESS SPAIN
EXERCYCLE,S.L.
(Manufacturer)
P.O.BOX 195
01080 VITORIA (SPAIN)
Tel.: +34 945 29 02 58
Fax: +34 945 29 00 49
e-mail: info@bhfitness.es
www.bhfitness.com
BH FITNESS PORTUGAL
MAQUINASPORT, S.A.
Zona Industrial Giesteira Terreirinho
3750-325 Agueda (PORTUGAL )
Tel.: +351 234 729 510
Fax: +351 234 729 519
BH FITNESS MEXICO
BH Exercycle de México S.A. de CV
Eje 132 / 136
Zona Industrial, 2A Secc.
78395 San Luis Potosi
S:L:P: MEXICO
Tel.: +52 (444) 824 00 29
Fax: +52 (444) 824 00 31
www.bh.com.mx
BH FITNESS ASIA
No.139, Jhongshan Rd.
Daya Township
Taichung 428, Taiwan. R.O.C.
Tel.: +886 4 25609200
Fax: +886 4 25609280
info@bhasia.com.tw
BH FITNESS UK
Halliards, Terrington Drive
Newcastle-under-Lyme
Staffordshire ST5 4NB
UK
Tel.: +44 (0)844 335 3988
e-mail: sales@bh-uk.co.uk
BH FITNESS FRANCE
Tel.: +33 (0)1429 61885
Fax: +33 (0)1429 66851
e-mail: bh.fitness@wanadoo.fr
BH FITNESS NORTH AMERICA
20155 Ellipse
Foothill Ranch
CA 92610
Tel:+ 1 949 206 0330
Fax:+1 949 206 0350
fitness@bhnorthamerica.com
www.bhnorthamerica.com
BH FITNESS CHINA
BH China Co., Ltd.
Block A, NO.68, Branch Lane 455, Lane 822,
Zhen Nan RD., Li Zi Yuan, Putuo, Shanghai
200331, P.R.C.
Tel: +86-021-5284 6694
Fax:+86-021-5284 6814
BH SE RESERVA EL DERECHO A MODIFICAR LAS ESPECIFICACIONES DE SUS PRODUCTOS
SIN PREVIO AVISO.
SPECIFICATIONS MAY BE CHANGED WITHOUT PRIOR NOTICE DUE TO OUR PROGRAMME OF
CONTINUOUS PRODUCT DEVELOPMENT.
BH SE RÉSERVE LE DROIT DE MODIFIER LES SPECIFICATIONS DE SES PRODUITS SANS
PRÉAVIS.
BH BEHALT SICH DAS RECHT VOR, ÄNDERUNGEN DER MODELL-ANGABEN OHRE
VORHERIGE ANKÜNDIGUNG VORZUNEHMEN.
DATI TECNICI E COMMERCIALI RELATIVI AGLI ARTICOLI DEL PRESENTE CATALOGO
POSSONO ESSERE SOGGETIL A VARIAZIONI SENZA ALGUN PREAVVISO.
BH SE RESERVA O DIREITO A MODIFICAÇÀO ESPECIFICAÇOES DOS SEUS PRODUCTOS SEM
PRÉVIO AVISO.
DOOR KONSTANTE PRODUKTVERNIEUWING EN VERBETERING HOUDEN WIJ ONS HET
RECHT VAN WIJZIGING VOOR ZONDER VOORAFGAAND BERICHT.
v1
22

Hulp nodig? Stel uw vraag in het forum

Spelregels

Misbruik melden

Gebruikershandleiding.com neemt misbruik van zijn services uitermate serieus. U kunt hieronder aangeven waarom deze vraag ongepast is. Wij controleren de vraag en zonodig wordt deze verwijderd.

Product:

Bijvoorbeeld antisemitische inhoud, racistische inhoud, of materiaal dat gewelddadige fysieke handelingen tot gevolg kan hebben.

Bijvoorbeeld een creditcardnummer, een persoonlijk identificatienummer, of een geheim adres. E-mailadressen en volledige namen worden niet als privégegevens beschouwd.

Spelregels forum

Om tot zinvolle vragen te komen hanteren wij de volgende spelregels:

Belangrijk! Als er een antwoord wordt gegeven op uw vraag, dan is het voor de gever van het antwoord nuttig om te weten als u er wel (of niet) mee geholpen bent! Wij vragen u dus ook te reageren op een antwoord.

Belangrijk! Antwoorden worden ook per e-mail naar abonnees gestuurd. Laat uw emailadres achter op deze site, zodat u op de hoogte blijft. U krijgt dan ook andere vragen en antwoorden te zien.

Abonneren

Abonneer u voor het ontvangen van emails voor uw BH Fitness G6158 Monitor bij:


U ontvangt een email met instructies om u voor één of beide opties in te schrijven.


Ontvang uw handleiding per email

Vul uw emailadres in en ontvang de handleiding van BH Fitness G6158 Monitor in de taal/talen: Nederlands, Duits, Engels, Frans, Italiaans, Portugees, Spaans als bijlage per email.

De handleiding is 1,23 mb groot.


U ontvangt de handleiding per email binnen enkele minuten. Als u geen email heeft ontvangen, dan heeft u waarschijnlijk een verkeerd emailadres ingevuld of is uw mailbox te vol. Daarnaast kan het zijn dat uw internetprovider een maximum heeft aan de grootte per email. Omdat hier een handleiding wordt meegestuurd, kan het voorkomen dat de email groter is dan toegestaan bij uw provider.

Stel vragen via chat aan uw handleiding

Stel uw vraag over deze PDF

Uw handleiding is per email verstuurd. Controleer uw email

Als u niet binnen een kwartier uw email met handleiding ontvangen heeft, kan het zijn dat u een verkeerd emailadres heeft ingevuld of dat uw emailprovider een maximum grootte per email heeft ingesteld die kleiner is dan de grootte van de handleiding.

Er is een email naar u verstuurd om uw inschrijving definitief te maken.

Controleer uw email en volg de aanwijzingen op om uw inschrijving definitief te maken

U heeft geen emailadres opgegeven

Als u de handleiding per email wilt ontvangen, vul dan een geldig emailadres in.

Uw vraag is op deze pagina toegevoegd

Wilt u een email ontvangen bij een antwoord en/of nieuwe vragen? Vul dan hier uw emailadres in.


Info