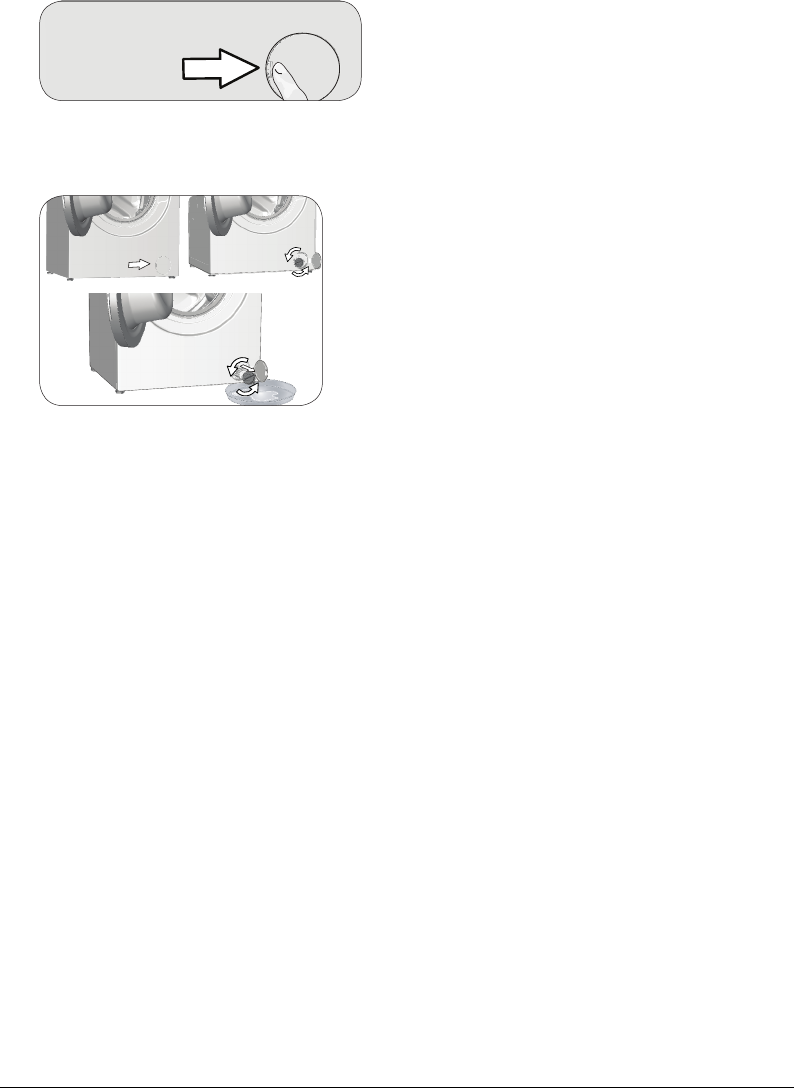
Electrical input (V/Hz)230 V / 50Hz230 V / 50Hz230 V / 50Hz
Total current (A)101010
Total power (W)220022002200
Main model code921192119211
(1)
Energy Consumption based on 220 standard washing cycles for cotton programmes at 60°C and 40°C at full and partial load, and the consumption of the low-power
modes. Actual energy consumption will depend on how the appliance is used.
(2)
Water consumption based on 220 standard washing cycles for cotton programmes at 60°C and 40°C at full and partial load. Actual water consumption will depend on how
the appliance is used.
(3)
“Standard 60°C cotton programme” and the “standard 40°C cotton programme” are the standard washing programmes to which the information in the label and the fiche
relates and these programmes are suitable to clean normally soiled cotton laundry and that they are the most efficient programmes in terms of combined energy and water
consumption.
Technical specifications may be changed without prior notice to improve the quality of the product.
7 / EN
Washing Machine / User’s Manual
4.1 Installation
• Apply to the nearest authorised service agent for the installation of your product.
• Preparation of the location and electrical, tap water and waste water installations at the place of installation
is under customer's responsibility.
• Make sure that the water inlet and discharge hoses as well as the power cable are not folded, pinched or
crushed while pushing the product into its place after installation or cleaning procedures.
• Make sure that the installation and electrical connections of the product are performed by authorised
service. Manufacturer shall not be held liable for damages that may arise from procedures carried out by
unauthorised persons.
• Prior to installation, visually check if the product has any defects on it. If so, do not have it installed.
Damaged products cause risks for your safety.
4.1.1 Appropriate installation location
• Place the product on a hard and level floor. Do not put it onto a carpet with high pile or other similar
surfaces.
• When the washing machine and dryer are placed on top of each other, their total weight –when loaded–
amounts to 180 kilograms. Place the product on a solid and flat floor that has sufficient load carrying
capacity!
• Do not place the product on the power cable.
• Do not install the product in the environments where the temperature falls below 0 ºC.
• Leaving a gap at the sides of the machine is suggested to reduce vibration and noise
• On a graduated floor, do not place the product next to the edge or on a platform.
• Do not place heat sources such as Hobs, Irons, Ovens, etc. on the washing machine and do not use them
on the product.
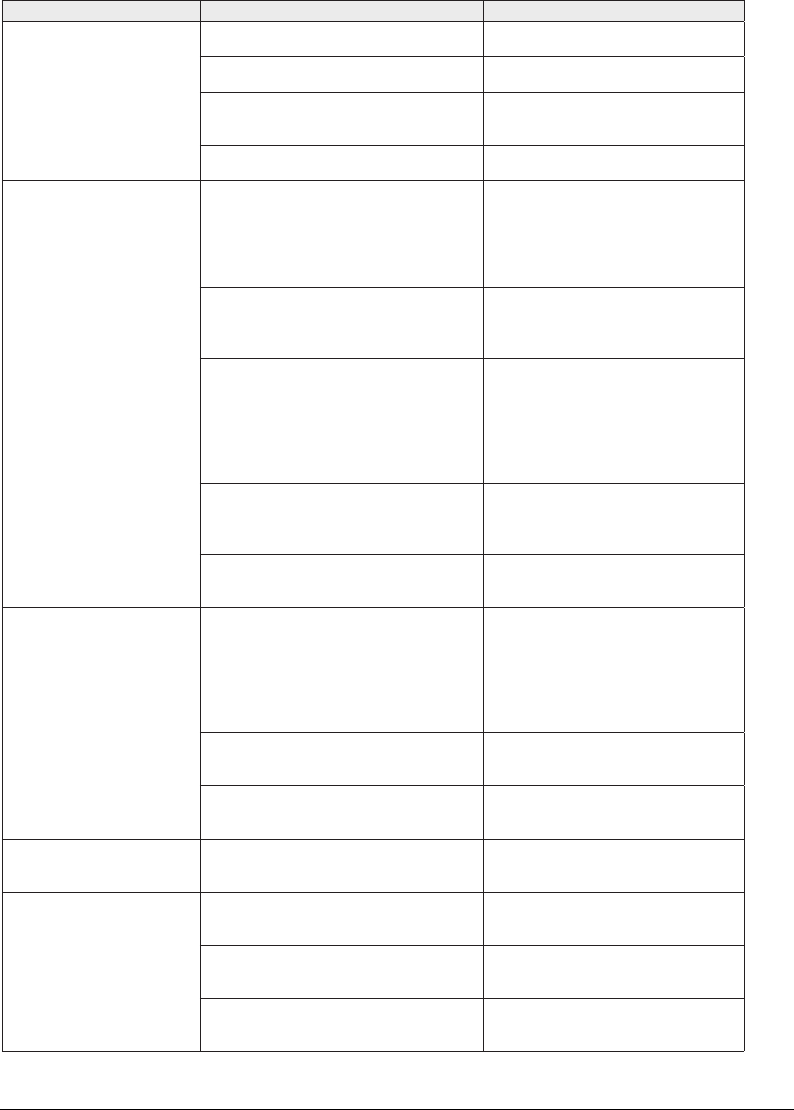
4.1.2 Removing packaging reinforcement
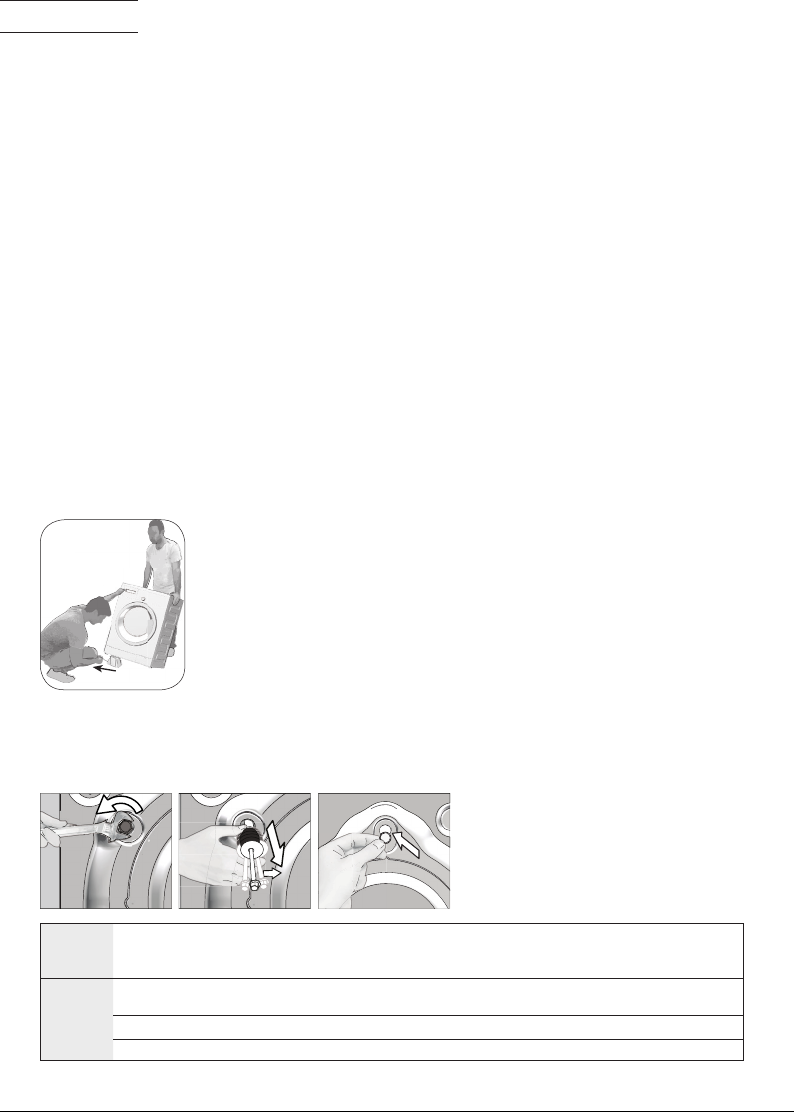
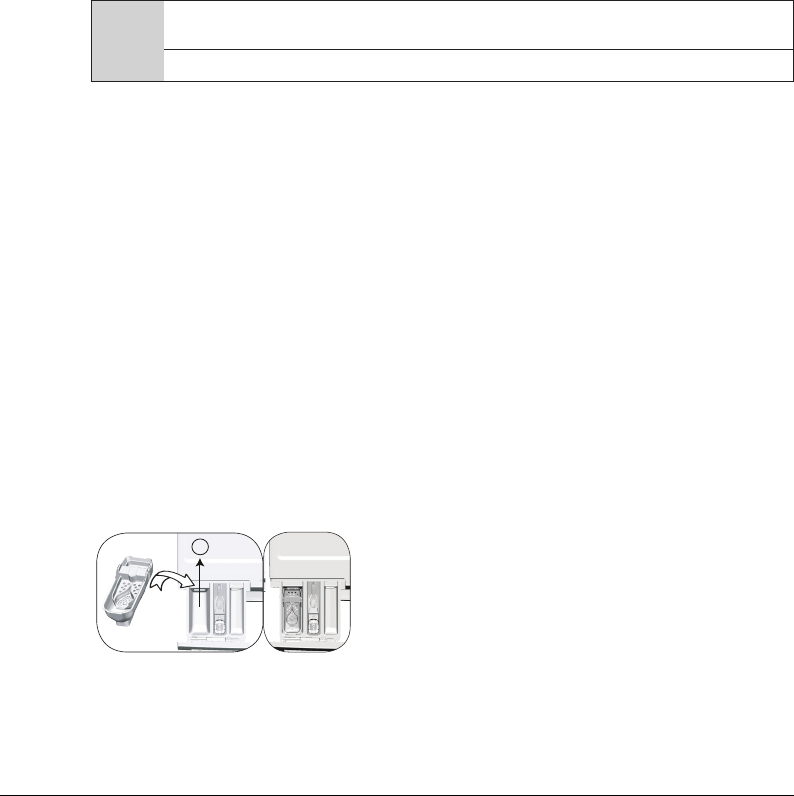
Tilt the machine backwards to remove the packaging reinforcement.
Remove the packaging reinforcement by pulling the ribbon. Do not make
this operation alone by yourself.
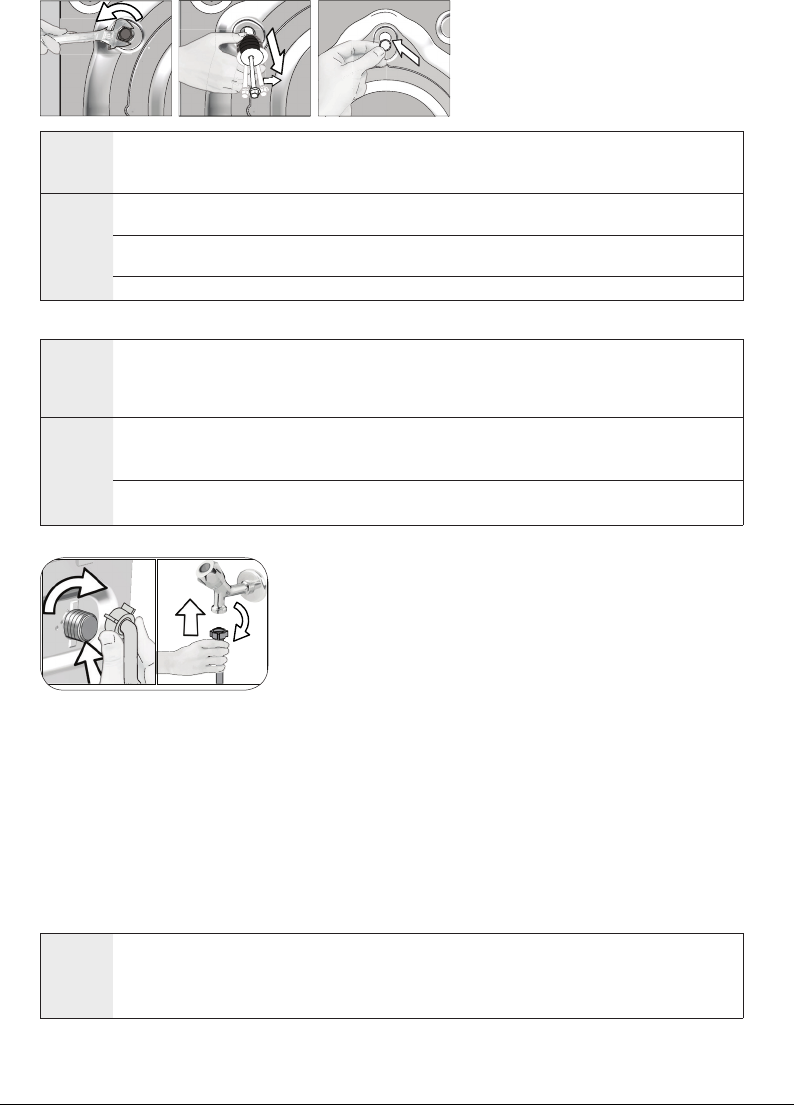
4.1.3 Removing the transportation locks
1 Loosen all bolts with an appropriate wrench until they turn freely.
2 Remove the transport safety bolts by turning them slightly.
3 Insert the plastic covers in the bag containing the user manual to the openings on the rear panel.
A
CAUTION: Remove the transportation safety bolts before operating the washing machine! Otherwise, the product will be
damaged.
C
Keep the transportation safety bolts in a safe place to reuse when the washing machine needs to be moved again in the
future.
Install the transport safety bolts in reverse order of the disassembly procedure.
Never move the product without the transportation safety bolts properly fixed in place!
8 / EN
Washing Machine / User’s Manual
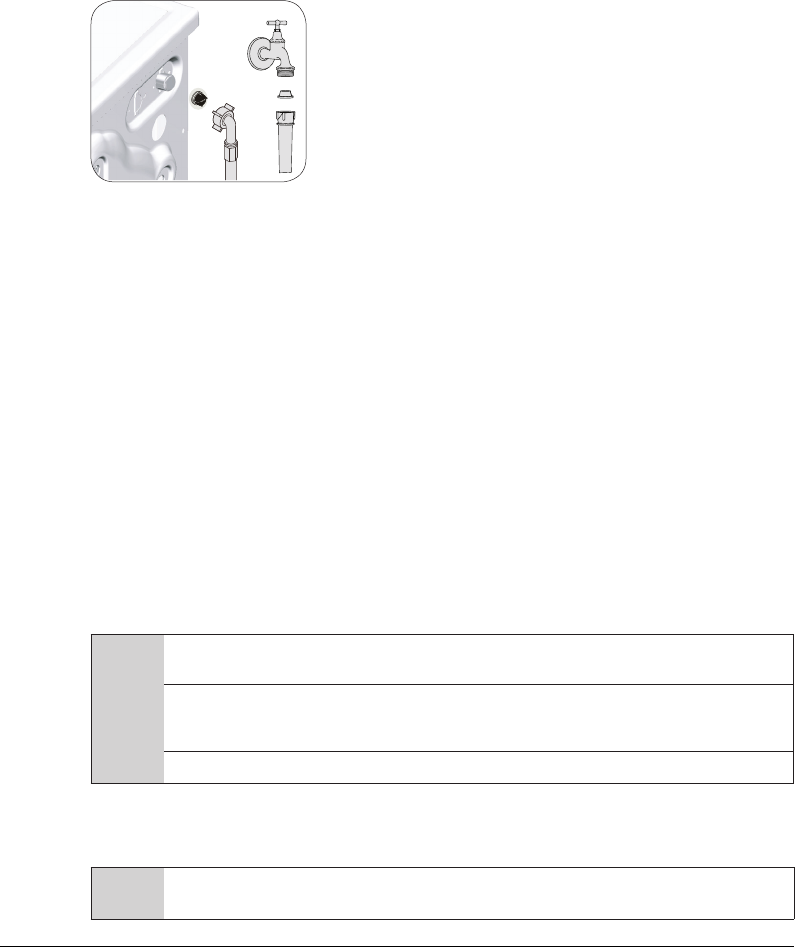
4.1.4 Connecting water supply
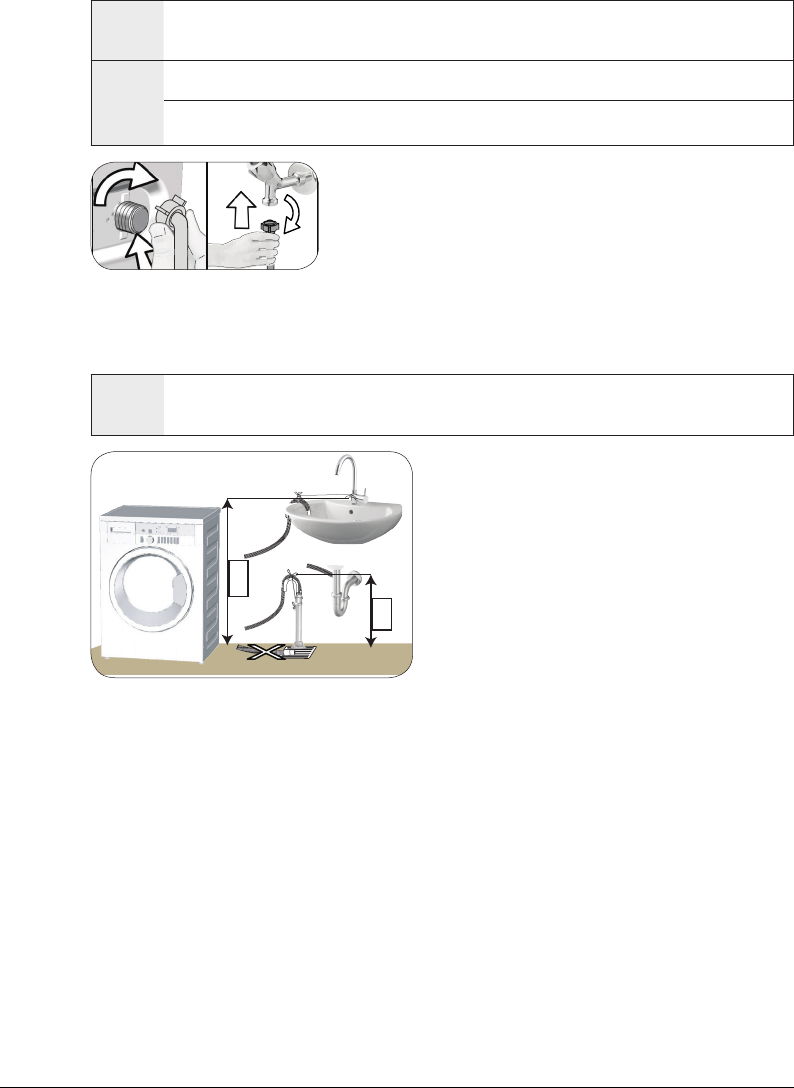
C
The water supply pressure required to run the product is between 1 to 10 bars (0.1 – 1 MPa). It is necessary to have
10 – 80 liters of water flowing from the fully open tap in one minute to have your machine run smoothly. Attach a pressure
reducing valve if water pressure is higher.
A
CAUTION: Models with a single water inlet should not be connected to the hot water tap. In such a case the laundry will
get damaged or the product will switch to protection mode and will not operate.
CAUTION: Do not use old or used water inlet hoses on the new product. It may cause stains on your laundry.
1 Tighten the nuts of the hose by hand. Never use a tool when
tightening the nuts.
2 When hose connection is completed, check whether there is leak
problems at the connection points by opening the taps fully. If any
leaks occur, turn off the tap and remove the nut. Retighten the nut
carefully after checking the seal. In order to prevent the water leaks
and resultant damages, keep the taps closed when you do not use
the product.
4.1.5 Connecting the drain hose to the drain
• Attach the end of the drain hose directly to waste water drain, lavatory or bathtub.
A
CAUTION: Your drain house will be flooded if the hose comes out of its housing during water discharge. Moreover, there
is risk of scalding due to high washing temperatures! In order to prevent such situations and make sure that the machine
performs water intake and discharge processes without any problem, fix the drain hose securely.
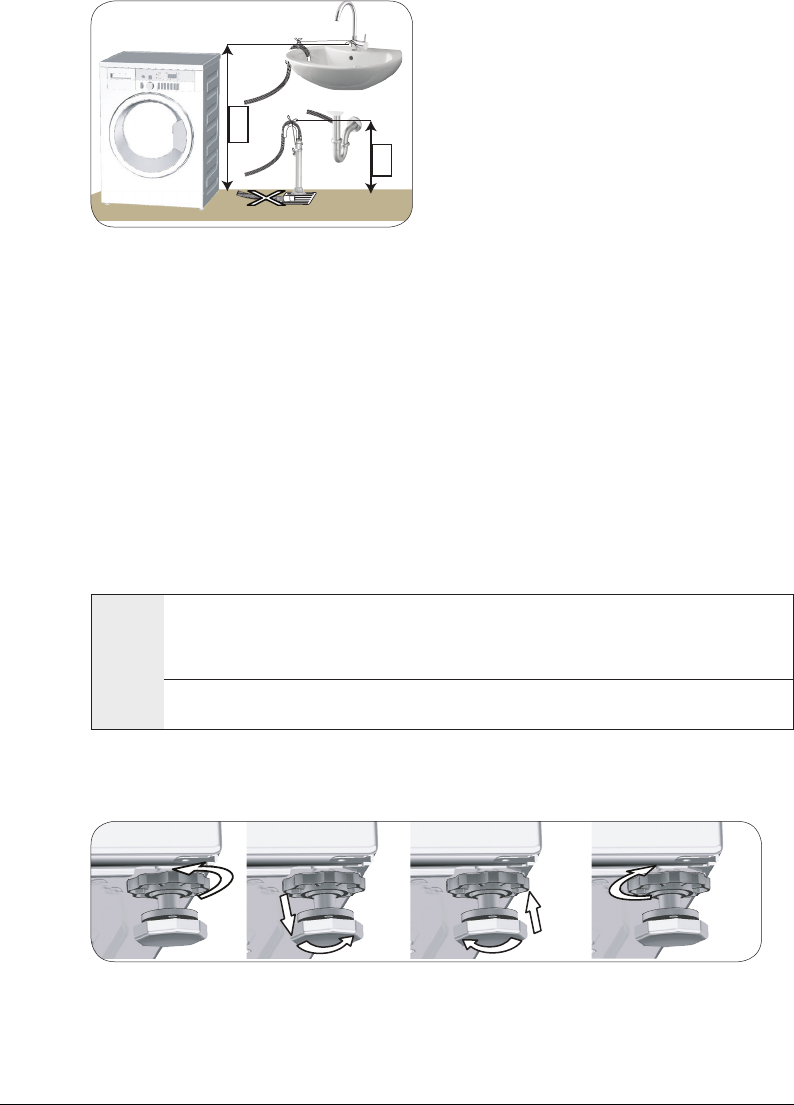
40 cm
100 cm
• Connect the drain hose to a minimum height of 40 cm
and a maximum height of 100 cm.
• In case the drain hose is elevated after laying it on the
floor level or close to the ground (less than 40 cm above
the ground), water discharge becomes more difficult and
the laundry may come out excessively wet. Therefore,
follow the heights described in the figure.
• To prevent the waste water to go back into the machine again and to ensure easy drainage, do not immerse
the end of the hose into the waste water or do not insert it into the drain for more than 15 cm. If it is too
long, cut it short.
• The end of the hose should not be bent, it should not be stepped on and the hose must not be pinched
between the drain and the machine.
• If the length of the hose is too short, use it by adding an original extension hose. Length of the hose may
not be longer than 3.2 m. To avoid water leak failures, the connection between the extension hose and the
drain hose of the product must be fitted well with an appropriate clamp as not to come off and leak.
9 / EN
Washing Machine / User’s Manual
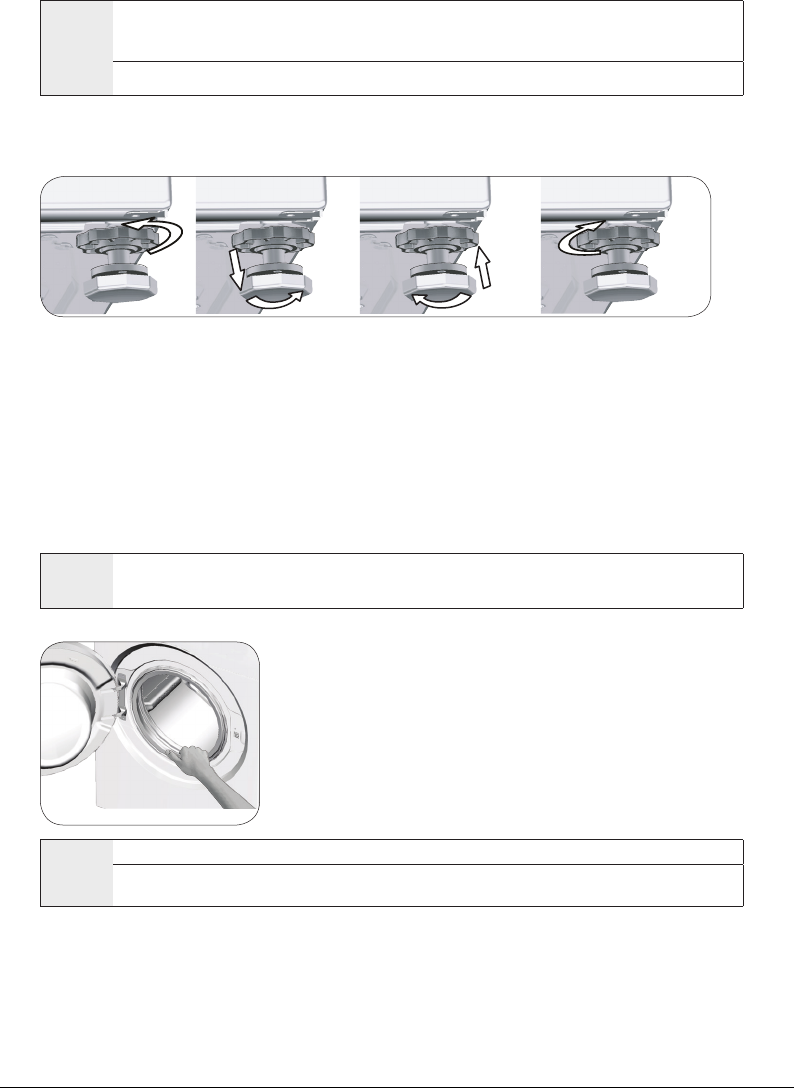
4.1.6 Adjusting the feet
A
CAUTION: In order to ensure that the product operates more silently and vibration-free, it must stand level and balanced
on its feet. Balance the machine by adjusting the feet. Otherwise, the product may move from its place and cause crushing
and vibration problems.
CAUTION: Do not use any tools to loosen the lock nuts. Otherwise, they will get damaged.
1 Loosen the lock nuts on the feet by hand.
2 Adjust the feet until the product stands in a stable and balanced way.
3. Tighten all lock nuts by hand again.
4.1.7 Electrical connection
Connect the product to a grounded outlet protected by a 16 A fuse. Our company shall not be liable for any
damages that will arise when the product is used without grounding in accordance with the local regulations.
• Connection must comply with national regulations.
• The wiring for the electrical outlet circuit must be sufficient to meet the appliance requirements. Use of a
Groud Fault Circuit Interrupter (GFCI) is recommended.
• Power cable plug must be within easy reach after installation.
• If the current value of the fuse or breaker in the house is less than 16 Amps, have a qualified electrician
install a 16 Amp fuse.
• The voltage specified in the "Technical specifications" section must be equal to your mains voltage.
• Do not make connections via extension cables or multi-plugs.
B
CAUTION: Damaged power cables must be replaced by the Authorised Service Agents.
4.1.8 Initial use
Before starting to use the product make sure that the preparations are
made which are in line with the “Important Safety and Environment
Instructions” and the instructions in the “Installation” section.
To prepare the product for washing laundry, perform first operation
in Drum Cleaning programme. If this program is not available in your
machine, apply the method which is described in the section 4.4.2.
C
Use an anti-limescale suitable for the washing machines.
Some water might have remained in the product due to the quality control processes in the production. It is not harmful for
the product.
10 / EN
Washing Machine / User’s Manual
4.2 Preparation
4.2.1 Sorting the laundry
* Sort laundry according to type of fabric, color, and degree of soiling and allowable water temperature.
* Always obey the instructions given on the garment tags.
4.2.2 Preparing laundry for washing
• Laundry items with metal attachments such as, underwired bras, belt buckles or metal buttons will damage
the machine. Remove the metal pieces or wash the clothes by putting them in a laundry bag or pillow case.
• Take out all substances in the pockets such as coins, pens and paper clips, and turn pockets inside out and
brush. Such objects may damage the product or cause noise problem.
• Put small size clothes such as infant's socks and nylon stockings in a laundry bag or pillow case.
• Place curtains in without compressing them. Remove curtain attachment items.
• Fasten zippers, sew loose buttons and mend rips and tears.
• Wash “machine washable” or “hand washable” labeled products only with an appropriate programme.
• Do not wash colours and whites together. New, dark coloured cottons release a lot of dye. Wash them
separately.
• Tough stains must be treated properly before washing. If unsure, check with a dry cleaner.
• Only use the dyes / color changers and descaling agents which are appropriate to machine wash. Always
follow the instructions on the package.
• Wash trousers and delicate laundry turned inside out.
• Keep laundry items made of Angora wool in the freezer for a few hours before washing. This will reduce
pilling.
• Laundry that are subjected to materials such as flour, lime dust, milk powder, etc. intensely must be shaken
off before placing into the machine. Such dusts and powders on the laundry may build up on the inner parts
of the machine in time and can cause damage.
4.2.3 Things to be done for energy saving
Following information will help you use the product in an ecological and energy-efficient manner.
• Operate the product in the highest capacity allowed by the programme you have selected, but do not
overload; see, "Programme and consumption table". See, “Programme and consumption table"
• Always follow the instructions on the detergent packaging.
• Wash slightly soiled laundry at low temperatures.
• Use faster programmes for small quantities of lightly soiled laundry.
• Do not use prewash and high temperatures for laundry that is not heavily soiled or stained.
• If you plan to dry your laundry in a dryer, select the highest spin speed recommended during washing
process.
• Do not use more detergent than the recommended amount specified on its package.
4.2.4 Loading the laundry
1. Open the laundry cover.
2. Put the laundry items into the machine in a loose manner.
3. Push and close the loading cover until you hear the locking sound. Ensure that no items are caught in the
door. The loading door is locked while a programme is running. The door can only be opened a while after
the programme comes to an end.
4.2.5 Correct load capacity
The maximum load capacity depends on the type of laundry, the degree of soiling and the washing
programme desired.
Machine automatically adjusts the water amount according to the weight of the laundry put inside it.
A
WARNING: Follow the information in the “Programme and consumption table”. When overloaded, machine's washing
performance will drop. Moreover, noise and vibration problems may occur.
11 / EN
Washing Machine / User’s Manual
4.2.6 Using detergent and softener
C
When using detergent, softener, starch, fabric dye, bleacher and decolorant, descaling agents; read the manufacturer's
instructions written on the package and follow the dosages specified. Use measuring cup if available.
1
3
2
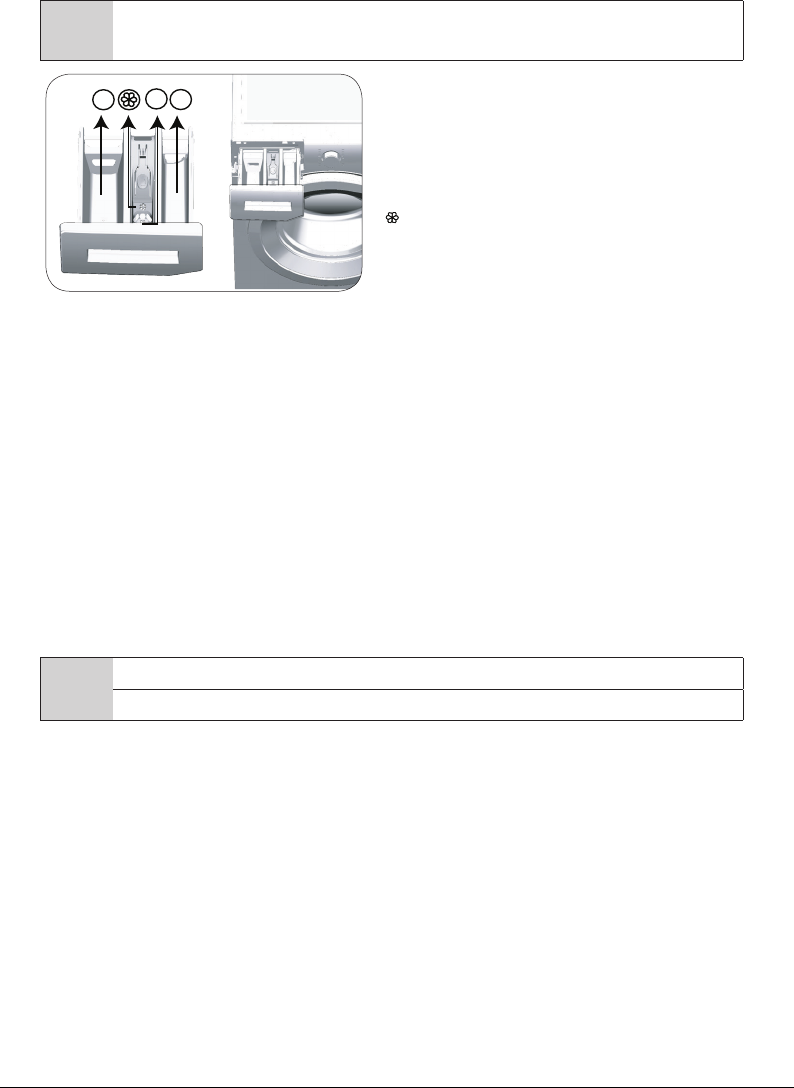
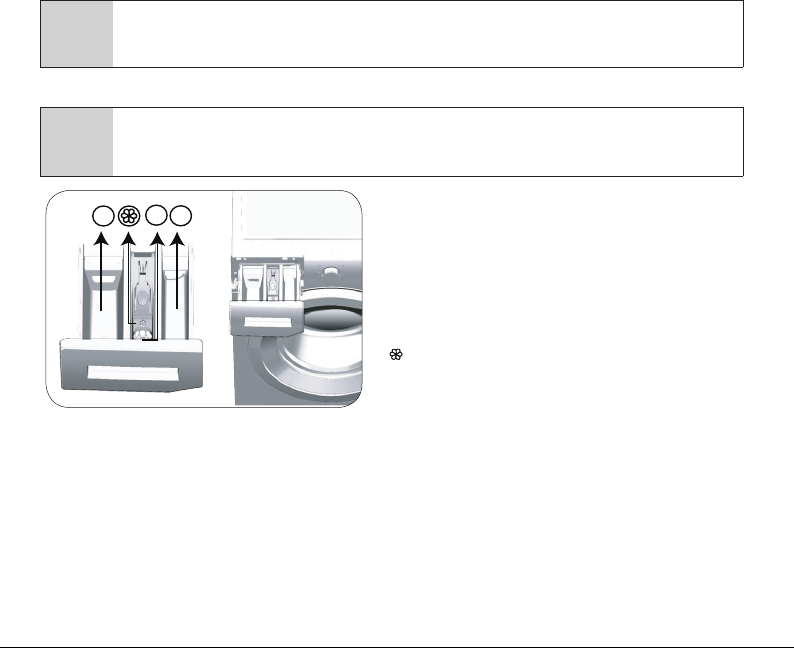
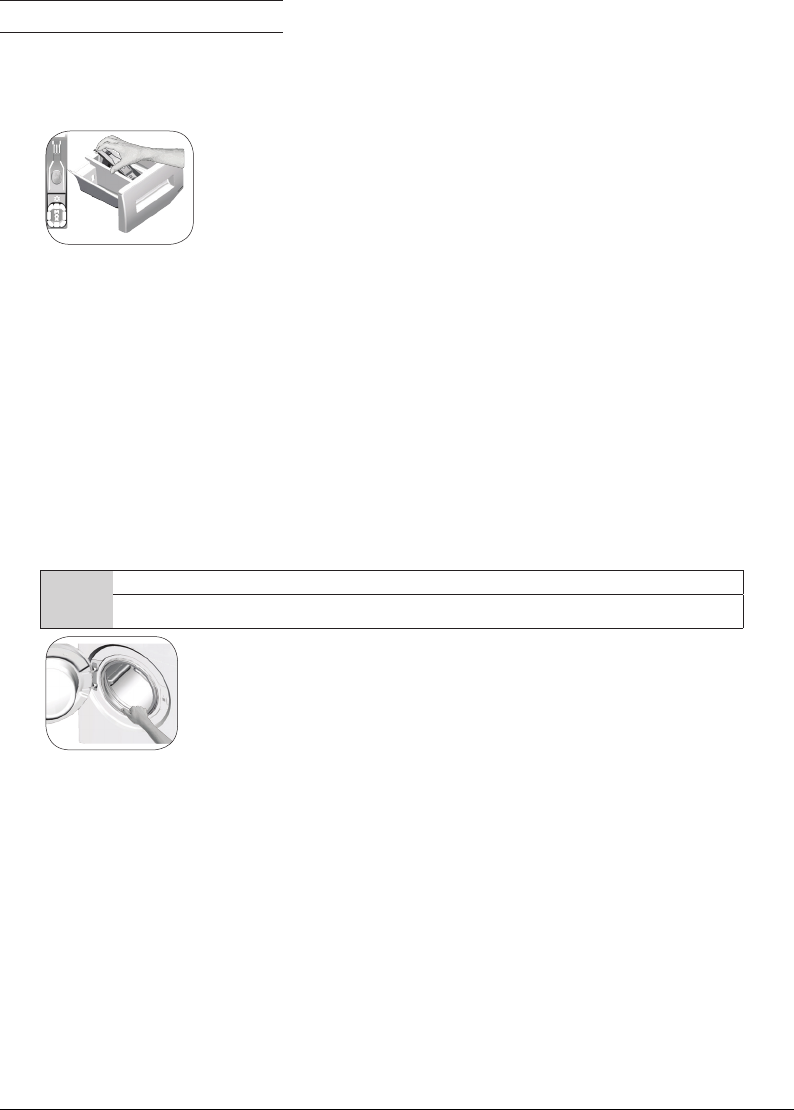
The detergent drawer is composed of three compartments:
– (1) for prewash
– (2) for main wash
– (3) for softener
– (
) in addition, there is a siphon piece in the softener
compartment.
Detergent, softener and other cleaning agents
• Add detergent and softener before starting the washing programme.
• While the washing cycle is in progress, do not leave the detergent dispenser open!
• When using a programme without prewash, do not put any detergent into the prewash compartment
(compartment nr. "1").
• In a programme with prewash, do not put liquid detergent into the prewash compartment (compartment nr.
"1").
• Do not select a programme with prewash if you are using a detergent bag or dispensing ball. Place the
detergent bag or the dispensing ball directly among the laundry in the machine.
If you are using liquid detergent, do not forget to place the liquid detergent container into the main wash
compartment (compartment number “2”).
Choosing the detergent type
Detergent type to be used depends on the fabric type and color.
• Use different detergents for coloured and white laundry.
• Wash your delicate clothes only with special detergents (liquid detergent, wool shampoo, etc.) used solely
for delicate clothes.
• When washing dark coloured clothes and quilts, it is recommended to use liquid detergent.
• Wash woolens with special detergent made specifically for woolens.
A
CAUTION: Use only detergents manufactured specifically for washing machines.
CAUTION: Do not use soap powder.
Adjusting detergent amount
The amount of washing detergent to be used depends on the amount of laundry, the degree of soiling and
water hardness.
• Do not use amounts exceeding the dosage quantities recommended on the detergent package to avoid
problems of excessive foam, poor rinsing, financial savings and finally, environmental protection.
• Use lesser detergent for small amounts or lightly soiled clothes.
Using softeners
Pour the softener into the softener compartment of the detergent drawer.
• Do not exceed the (>max<) level sign on the softener compartment.
• If the softener has lost its fluidity, dilute it with water before putting it in the detergent drawer.
12 / EN
Washing Machine / User’s Manual
Using liquid detergents
If the product contains a liquid detergent cup:
2
2
• Put the liquid detergent container into the
compartment no “2”.
• If the liquid detergent lost its fluidity, dilute it
with water before putting it into the detergent
container.
If the product does not contain a liquid detergent cup:
• Do not use liquid detergent for the prewash in a programme with prewash.
• Liquid detergent stains your clothes when used with Delayed Start function. If you are going to use the
Delayed Start function, do not use liquid detergent.
Using gel and tablet detergent
• If the gel detergent thickness is fluidal and your machine does not contain a special liquid detergent cup,
put the gel detergent into the main wash detergent compartment during first water intake. If your machine
contains a liquid detergent cup, fill the detergent into this cup before starting the programme.
• If the gel detergent thickness is not fluidal or in the shape of capsule liquid tablet, put it directly into the
drum before washing.
• Put tablet detergents into the main wash compartment (compartment nr. "2") or directly into the drum
before washing.
Using starch
• Put the liquid soda, powder soda or the fabric dye into the softener compartment.
Do not use softener and starch together in a washing cycle.
Wipe the inside of the machine with a damp and clean cloth after using starch.
Using limescale remover
• When required, use limescale removers manufactured specifically for washing machines only.
Using bleaches
Add the bleach at the beginning of the washing cycle by selecting a prewash program. Do not put detergent
in the prewash compartment. As an alternative application, select a programme with extra rinse and add
the bleaching agent while the machine is taking water from the detergent compartment during first rinsing
step.
• Do not use bleaching agent and detergent by mixing them.
• Use just a little amount (approx. 50 ml) of bleaching agent and rinse the clothes very well as it causes skin
irritation. Do not pour the bleach onto the laundry and do not use it with the colored items.
• When using oxygen-based decolorant, select a program which washes the laundry at a low temperature.
• Oxygen-based decolorant can be used with the detergent; however, if it is not at the same consistence, first
put detergent in the compartment number “2” in the detergent dispenser and wait for the machine to flush
the detergent when taking in water. While the machine continues taking in water, add decolorant in the
same compartment.
13 / EN
Washing Machine / User’s Manual
4.2.7 Tips for efficient washing
Clothes
Light Colours and
Whites
Colours
Black/Dark
Colours
Delicates/
Woolens/Silks
(Recommended temperature
range based on soiling level:
40-90
o
C)
(Recommended temperature range
based on soiling level: cold -40
o
C)
(Recommended
temperature range based
on soiling level: cold
-40
o
C)
(Recommended
temperature range
based on soiling
level: cold -30
o
C)
Soiling Level
Heavily
Soiled
(difficult stains
such as grass,
coffee, fruits and
blood.)
It may be necessary to pre-treat
the stains or perform prewash.
Powder and liquid detergents
recommended for whites can be
used at dosages recommended
for heavily soiled clothes. It is
recommended to use powder
detergents to clean clay and soil
stains and the stains that are
sensitive to bleaches.
Powder and liquid detergents
recommended for colors can be
used at dosages recommended
for heavily soiled clothes. It is
recommended to use powder
detergents to clean clay and
soil stains and the stains that
are sensitive to bleaches. Use
detergents without bleach.
Liquid detergents
suitable for colors
and dark colors can
be used at dosages
recommended for heavily
soiled clothes.
Prefer liquid
detergents produced
for delicate clothes.
Woolen and silk
clothes must be
washed with special
woolen detergents.
Normally
Soiled
(For example,
stains caused by
body on collars
and cuffs)
Powder and liquid detergents
recommended for whites can be
used at dosages recommended
for normally soiled clothes.
Powder and liquid detergents
recommended for colors can be
used at dosages recommended for
normally soiled clothes. Detergents
which do not contain bleach should
be used.
Liquid detergents
suitable for colors
and dark colors can
be used at dosages
recommended for
normally soiled clothes.
Prefer liquid
detergents produced
for delicate clothes.
Woolen and silk
clothes must be
washed with special
woolen detergents.
Lightly
Soiled
(No visible stains
exist.)
Powder and liquid detergents
recommended for whites can be
used at dosages recommended
for lightly soiled clothes.
Powder and liquid detergents
recommended for colors can be
used at dosages recommended for
lightly soiled clothes. Detergents
which do not contain bleach should
be used.
Liquid detergents
suitable for colors
and dark colors can
be used at dosages
recommended for lightly
soiled clothes.
Prefer liquid
detergents produced
for delicate clothes.
Woolen and silk
clothes must be
washed with special
woolen detergents.
14 / EN
Washing Machine / User’s Manual
4.3 Operating the product
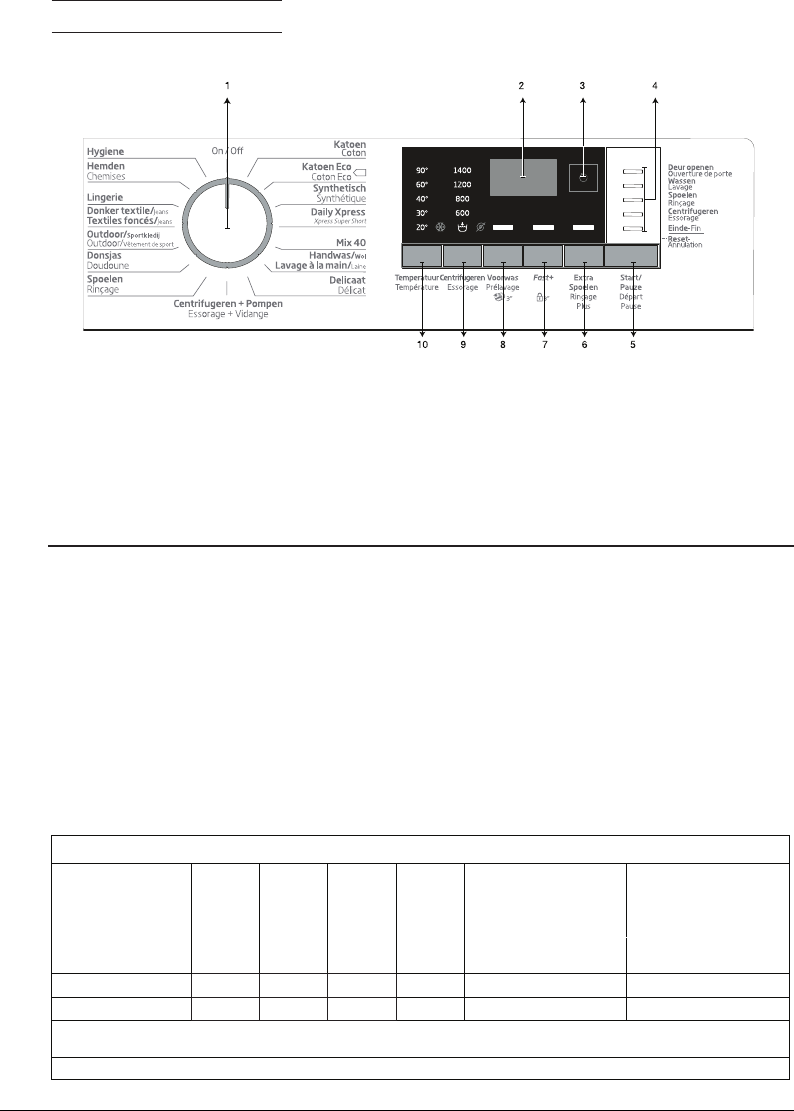
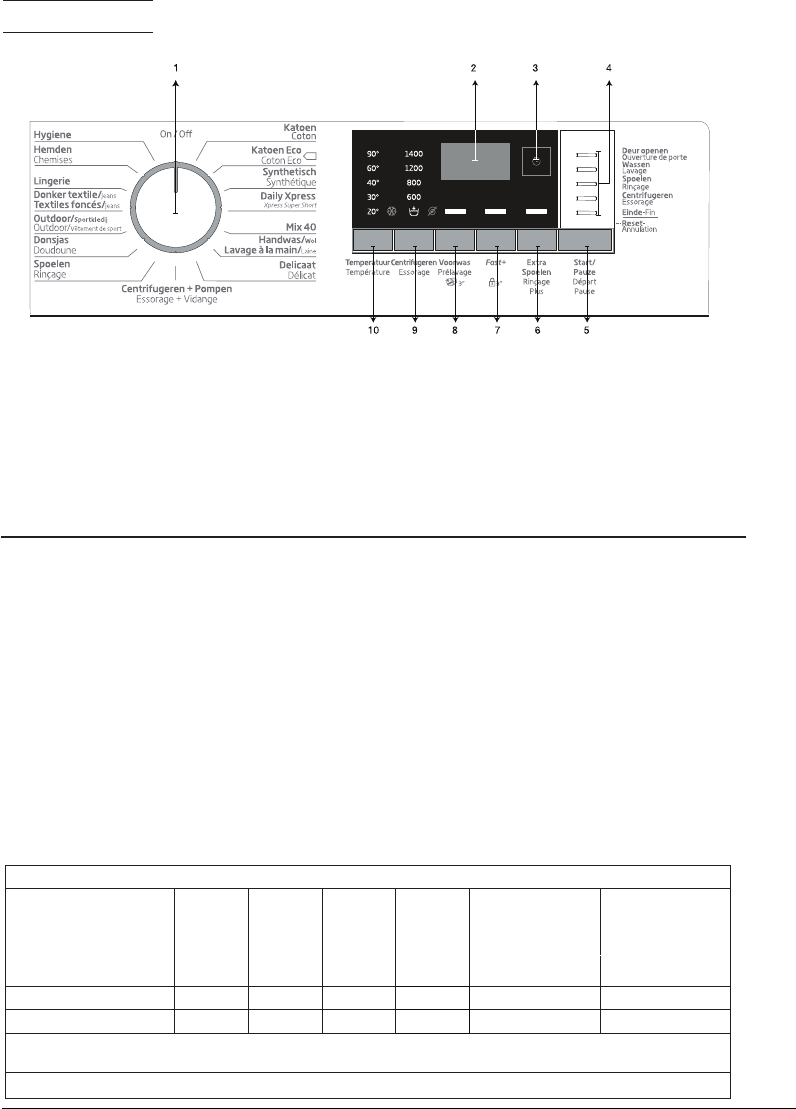
4.3.1 Control panel
1 - Programme Selection knob (Uppermost
position On / Off)
2 - Display
3 - Delayed Start Button
4 - Programme Follow-up indicator
5 - Start / Pause button
6 - Auxiliary function button 3
7 - Auxiliary function button 2
8 - Auxiliary function button 1
9 - Spin Speed Adjustment button
10 - Temperature Adjustment button
4.3.2 Preparing the machine
1.Make sure that the hoses are connected tightly.
2.Plug in your machine.
3.Turn the tap on completely.
4.Place the laundry in the machine.
5.Add detergent and fabric softener.
4.3.3 Programme selection and tips for efficient washing
1.Select the programme suitable for the type, quantity and soiling degree of the laundry in accordance with the
"Programme and consumption table" and the temperature table below.
2.Select the desired programme with the Programme Selection knob.
Indicative values for Synthetics programmes (EN)
Load (kg)
Water
Consumption (l)
Energy
Consumption
(kWh)
Programme
Duration (min) *
Remaining Moisture
Content (%) **
Remaining Moisture
Content (%) **
≤ 1000 rpm> 1000 rpm
Synthetics 60
3701,20
115/1504540
Synthetics 40
3680,75
115/1504540
* You can see the washing time of the programme you have selected on the display of the machine. It is normal that
small differences may occur between the time shown on the display and the real washing time.
** Remaining moisture content values may differ according to the selected spin speed.
15 / EN
Washing Machine / User’s Manual
4.3.4 Programme and consumption table
• : Selectable
* : Automatically selected, no canceling.
** : Energy Label programme (EN 60456 Ed.3)
***: If maximum spin speed of the machine is lower then this value, you can only select up to the maximum spin speed.
- : See the programme description for maximum load.
** "Cotton Economic 40°C and Cotton Economic 60°C are standard programmes." These programmes are known as '40°C cotton
standard programme' and '60°C cotton standard programme' and indicated with the
symbols on the panel.
C
Water and power consumption may vary subject to the changes in water pressure, water hardness and temperature, ambient
temperature, type and amount of laundry, selection of auxiliary functions and spin speed, and changes in electric voltage.
You can see the washing duration on the display of your machine while selecting a programme. Depending on the amount of
laundry you have loaded into your machine, there may be a difference of 1-1.5 hours between the duration shown on the display
and the actual duration of the wash cycle. Duration will be automatically updated soon after the washing starts.
The auxiliary functions in the table may vary according to the model of your machine.
EN
2
Auxiliary functions
Programme
Max. Load (kg)
Water Consumption (l)
Energy Consumption (kWh)
Max. Speed***
Voorwas
Fast+
Extra Spoelen
Selectable temperature
range °C
Katoen
90892,9832,251400•••
Cold-90
608931,701400•••
Cold-90
408901,051400•••
Cold-90
Katoen Eco
60**8541,101400
Cold-60
60**443,50,701400
Cold-60
40**443,50,671400
Cold-60
Synthetisch
603701,201200•••
Cold-60
403680,751200•••
Cold-60
Daily Xpress / Xpress Super Short
908672,151400••
Cold-90
608671,151400••
Cold-90
308650,201400••
Cold-90
Daily Xpress / Xpress Super Short + Fast+902410,151400••
Cold-30
Mix 40403,572,1930,80800••
Cold-40
Handwas/Wol401,5550,551200•
Cold-40
Delicaat403,5510,701200•
Cold-40
Donsjas602701,251000•
Cold-60
Outdoor/Sportkledij403,544,990,451200•
Cold-40
Donker textile/Jeans40386,4490,901200•*
Cold-40
Lingerie3011,770,15600*
Cold-30
Hemden60359,4661,20800•••
Cold-60
Hygiene9081242,401400*
20-90
Drum Cleaning90-802,30600
90
16 / EN
Washing Machine / User’s Manual
4.3.5 Main programmes
Depending on the type of fabric, use the following main programmes.
• Katoen (Cottons)
You can wash your durable cotton laundry (sheets, bedlinen, towels, bathrobes, underwear etc.) in this
programme. When the quick wash function button is pressed, programme duration becomes notably shorter
but effective washing performance is ensured with intense washing movements. If the quick wash function is
not selected, superior washing and rinsing performance is ensured for your heavily soiled laundry.
• Synthetisch (Synthetics)
You can wash your laundry (such as shirts, blouses, synthetic/cotton blended fabrics etc.) in this programme.
The programme duration gets notable shorter and washing with high performance is ensured. If the quick
wash function is not selected, superior washing and rinsing performance is ensured for your heavily soiled
laundry.
• Handwas / Wol (Hand Wash / Woollens)
Use to wash your woolen/delicate laundry. Select the appropriate temperature complying with the tag of your
clothes. Your laundry will be washed with a very gentle washing action in order not to damage the clothes.
4.3.6 Additional programmes
For special cases, additional programmes are available in the machine.
C
Additional programmes may differ according to the model of the machine.
• Katoen Eco (Cottons Eco)
Use to wash your normally soiled, durable cotton and linen laundry. Although it washes longer than all other
programmes, it provides high energy and water savings. Actual water temperature may be different from the
stated wash temperature. When you load the machine with less laundry (e.g. ½ capacity or less), periods in
programme stages may automatically get shorter. In this case, energy and water consumption will decrease
more, providing a more economic wash.
• Hygiene
This is a long-duration programme that you can use for your laundry requiring a hygienic washing at high
temperatures with intensive and long washing cycle. The high level of hygiene is ensured thanks to long
heating duration and additional rinsing step.
• Delicaat (Delicates)
You can wash your delicate clothes such as cotton/synthetic blended knitwear or hosiery in this programme.
It washes with more delicate washing action. Wash your clothes whose colour you want to preserve either at
20degrees or by selecting the cold wash option.
• Daily Xpress / Xpress Super Short
Use this programme to wash your lightly soiled or unspotted cotton clothes in a short time. The programme
duration can be reduced up to 14 minutes when the quick wash function is selected. When the quick wash
function is selected, maximum 2 (two) kg of laundry must be washed.
• Donker textile / Jeans (Dark Care / Jeans)
Use this programme to protect the colour of your dark-coloured garments or jeans. It performs high
performance washing with special drum movement even if the temperature is low. It is recommended to use
liquid detergent or woolen shampoo for dark coloured laundry. Do not wash your delicate clothes containing
wool or etc.
• Mix 40
Use to wash your cotton and synthetic clothes together without sorting them.
17 / EN
Washing Machine / User’s Manual
• Hemden (Shirts)
This programme is used to wash the shirts made from cotton, synthetic and synthetic blended fabrics
altogether. It reduces wrinkles. When the quick wash function is selected, the Pre-treatment algorithm is
executed.
• Apply the pre-treatment chemical on your garments directly or add it together with detergent when
the machine starts to take water from the main washing compartment. Thus, you can obtain the same
performance as you obtain with normal washing in a much shorter period of time. Usage life of your shirts
increases.
• Outdoor / Sportkledij (Outdoor / Sports)
You can use this programme to wash sports and outdoors garments that contain cotton/synthetics mix and
water repellent covers such as gore-tex etc. It makes sure your garments are washed gently thanks to special
rotating movements.
• Lingerie
You can use this programme to wash delicate garments that are suitable for hand wash and delicate women's
underwear. Small amount of garments must be washed in a washing net. Hooks, buttons etc. must be done up
and zips must be zipped up.
• Donsjas (Down Wear)
Use this programme to wash your coats, vest, jackets etc. containing feathers with a "machine-washable"
label on them. Thanks to special spinning profiles, it is ensured that the water reaches the air gaps amongst
the feathers.
4.3.7 Special programmes
For specific applications, select any of the following programmes.
• Spoelen (Rinse)
Use when you want to rinse or starch separately.
• Centrifugeren + Pompen (Spin+Drain)
You can use this function to remove the water on the garment of drain the water in the machine.
Before selecting this programme, select the desired spin speed and press Start / Pause button. First, the
machine will drain the water inside of it. Then, it will spin the laundry with the set spin speed and drain the
water coming out of them.
If you wish to drain only the water without spinning your laundry, select the Pump+Spin programme and then
select the No Spin function with the help of Spin Speed Adjustment button. Press Start / Pause button.
C
Use a lower spin speed for delicate laundries.
4.3.8 Temperature selection
Whenever a new programme is selected, the recommended temperature value for the selected programme
appears on the temperature indicator.
To decrease the temperature, press the Temperature Adjustment button. Temperature will decrease gradually.
Temperature level lights will not turn on when the cold level is selected.
C
If the programme has not reached the heating step, you can change the temperature without switching the machine to
Pause mode.
4.3.9 Spin speed selection
Whenever a new programme is selected, the recommended spin speed of the selected programme is
displayed on the spin speed indicator.
To decrease the spin speed, press the Spin Speed Adjustment button. Spin speed decreases gradually. Then,
depending on the model of the product, "Rinse Hold" and "No Spin" options appear on the display. When "No
Spin" is selected, the rinse level indicator lights will not turn on.
18 / EN
Washing Machine / User’s Manual
Rinse hold
If you are not going to unload your clothes immediately after the programme completes, you can use rinse
hold function to keep your laundry in the final rinsing water in order to prevent them from getting wrinkled
when there is no water in the machine. Press Start / Pause button after this process if you want to drain the
water without spinning your laundry. Programme will resume and complete after draining the water.
If you want to spin the laundry held in water, adjust the Spin Speed and press Start / Pause button.
The programme will resume. Water is drained, laundry is spun and the programme is completed.
C
If the programme has not reached the spinning step, you can change the speed without switching the machine to Pause
mode.
4.3.10 Auxiliary function selection
Select the desired auxiliary functions before starting the programme. Furthermore, you may also select or
cancel auxiliary functions that are suitable to the running programme without pressing the Start / Pause button
when the machine is operating. For this, the machine must be in a step before the auxiliary function you are
going to select or cancel.
If the auxiliary function cannot be selected or canceled, light of the relevant auxiliary function will blink 3 times
to warn the user.
C
If a second auxiliary function conflicting with the first one is selected before starting the machine, the function selected first
will be canceled and the second auxiliary function selection will remain active.
An auxiliary function that is not compatible with the programme cannot be selected. (See, "Programme and consumption
table")
Auxiliary Function buttons may vary according to the model of the machine.
4.3.10.1 Auxiliary functions
• Voorwas (Prewash)
A Prewash is only worthwhile for heavily soiled laundry. Not using the Prewash will save energy, water,
detergent and time.
C
Prewash without detergent is recommended for tulle and curtains.
• Fast+
When this function is selected, the durations of the relevant programmes get shorter by 50%.
Thanks to the optimised washing steps, high mechanic activity and optimum water consumption,
high washing performance is achieved in spite of the reduced duration.
C
When you select this function, load your machine with half of the maximum laundry specified in the programme table.
• Extra Spoelen (Extra Rinse)
This function enables the product to make another rinsing in addition to the one already made after the main
wash. Thus, the risk for sensitive skins (babies, allergic skins, etc.) to be effected by the minimal detergent
remnants on the laundry can be reduced.
19 / EN
Washing Machine / User’s Manual
4.3.10.2 Functions/Programmes Selected by Pressing the Function Buttons for 3 Seconds
• Drum Cleaning
Press and hold the auxiliary function button 1 for 3 seconds to select the programme.
Use regularly (once in every 1-2 months) to clean the drum and provide the required hygiene. Operate the
programme while the machine is completely empty. To obtain better results, put powder lime-scale remover
for washing machines into the detergent compartment no. “2”. When the programme is over, leave the loading
door ajar so that the inside of the machine gets dry.
C
This is not a washing programme. It is a maintenance programme.
Do not run the programme when there is something in the machine. If you try to do so, the machine detects that there is
load inside and aborts the programme.
• Child lock
Use Child Lock function to prevent children from tampering with the machine. Thus you can avoid any changes
in a running programme.
C
If the Programme Selection knob is turned when the Child Lock is active, "Con" appears on the display. The Child Lock does
not allow any change in the programmes and the selected temperature, speed and auxiliary functions.
Even if another programme is selected with the Programme Selection knob while the Child Lock is active, previously
selected programme will continue running.
To activate the Child Lock:
2. Pres and hold the Auxiliary Function button for 3 seconds. C03, C02, C01 will appear on the display
respectively while you keep the button pressed for 3 seconds. Then, while the light of the Auxiliary Function
button 2 is flashing, "Con" will appear on the display indicating that the child lock has been activated. If you
press any button or turn the Programme Selection knob when the Child Lock is active, same phrase will
appear on the display.
To deactivate the Child Lock:
Press and hold the Auxiliary Function button 2 for 3 seconds while a programme is running. C03, C02, C01
will appear on the display respectively while you keep the button pressed for 3 seconds. Then, while the light
of the auxiliary function button 2 is flashing, "COF" will appear on the display indicating that the child lock has
been deactivated.
C
In addition to the method above, to deactivate the Child Lock, switch the Programme Selection knob to On / Off position
when no programme is running, and select another programme.
Child Lock is not deactivated after power failures or when the machine is unplugged.
4.3.11 Delayed Start
With the Delayed Start function the startup of the programme may be delayed up to 19 hours. Delayed start
time can be increased by increments of 1 hour.
C
Do not use liquid detergents when you set Delayed Start! There is the risk of staining of the clothes.
1. Open the loading door, place the laundry and put detergent, etc.
2. Select the washing programme, temperature, spin speed and, if required, the auxiliary functions.
3. Set the desired time by pressing the Delayed Start button.
4. Press Start / Pause button. The delayed start time you have set is displayed. Delayed start countdown
starts. “_” symbol next to the delayed start time moves up and down on the display.
C
Additional laundry may be loaded during the delayed start period.
5. At the end of the countdown, duration of the selected programme will be displayed. “_” will disappear and
the selected programme will start.
20 / EN
Washing Machine / User’s Manual
Changing the delayed start period
If you want to change the time during countdown:
1. Press the Delayed Start button. Time will increase by 1 hour each time you press the button.
2. If you want to decrease the delayed start time, press Delayed Start button repeatedly until the desired
delayed start time appears on the display.
Canceling the Delayed Start function
If you want to cancel the delayed start countdown and start the programme immediately:
1. Set the Delayed Start period to zero or turn the Programme Selection knob to any programme. Thus,
Delayed Start function will be canceled. The End/Cancel light flashes continuously.
2. Then, select the programme you want to run again.
3. Press Start / Pause button to start the programme.
4.3.12 Starting the programme
1. Press Start / Pause button to start the programme.
2. Programme follow-up light showing the startup of the programme will turn on.
C
If no programme is started or no button is pressed within 1 minute during programme selection process, the machine will
switch to Pause mode and the illumination level of the temperature, speed and loading door indicator lights will decrease.
Other indicator lights and indicators will turn off. Once the Programme Selection knob is rotated or any button is pressed,
indicator lights and indicators will turn on again.
4.3.13 Progress of programme
Progress of a running programme can be followed from the Programme Follow-up indicator. At the beginning
of every programme step, the relevant indicator light will turn on and light of the completed step will turn off.
You can change the auxiliary functions, speed and temperature settings without stopping the programme flow
while the programme is running. To do this, the change you are going to make must be in a step after the
running programme step. If the change is not compatible, relevant lights will flash for 3 times.
C
If the machine does not pass to the spinning step, Rinse Hold function might be active or the automatic unbalanced load
detection system might be activated due to the unbalanced distribution of the laundry in the machine.
4.3.14 Loading door lock
There is a locking system on the loading door of the machine that prevents opening of the loading door in
cases when the water level is unsuitable.
Loading door light will start flashing when the machine is switched to Pause mode. Machine checks the level
of the water inside. If the level is suitable, Loading Door light illuminates steadily within 1-2 minutes and the
loading door can be opened.
If the level is unsuitable, Loading Door light turns off and the loading door cannot be opened. If you are obliged
to open the Loading Door while the Loading Door light is off, you must cancel the current programme. See.
"Cancelling the programme"
4.3.15 Changing the selections after programme has started
Switching the machine to pause mode
Press the Start / Pause button to switch the machine to pause mode while a programme is running. The light
of the step which the machine is in starts flashing in the Programme Follow-up indicator to show that the
machine has been switched to the pause mode.
Also, when the loading door is ready to be opened, Loading Door light will also illuminate continuously in
addition to the programme step light.
21 / EN
Washing Machine / User’s Manual
Changing the auxiliary function, speed and temperature
Depending on the step the programme has reached, you can cancel or select the auxiliary functions. See,
"Auxiliary function selection".
You can also change the speed and temperature settings. See, "Spin speed selection" and "Temperature
selection".
C
If no change is allowed, the relevant light will flash 3 times.
Adding or taking out laundry
1. Press Start / Pause button to switch the machine to pause mode. The programme follow-up light of the
relevant step during which the machine was switched into the pause mode will flash.
2. Wait until the Loading Door can be opened.
3. Open the Loading Door and add or take out the laundry.
4. Close the Loading Door.
5. Make changes in auxiliary functions, temperature and speed settings if necessary.
6. Press Start / Pause button to start the machine.
4.3.16 Cancelling the programme
To cancel the programme, turn the Programme Selection knob to select another programme. Previous
programme will be cancelled. End / Cancel light will flash continuously to notify that the programme has been
canceled.
Your machine will end the programme when you turn the Programme Selection knob; however, it does not
drain the water inside. When you select and start a new programme, the newly selected programme will start
depending on the step the previous programme was canceled in. For example, it may take in additional water
or continue to wash with the water inside.
C
Depending on the step where the programme was canceled in, you may have to put detergent and softener again for the
programme you have selected anew.
4.3.17 End of programme
“End” appears on the display at the end of the programme.
1. Wait until the loading door light illuminates steadily.
2. Press On / Off button to switch off the machine.
3. Take out your laundry and close the loading door. Your machine is ready for the next washing cycle.
4.3.18 Your machine features "Standby Mode".
After you switch on your machine with On-Off button, if no programme is started or no other procedure is
performed at the selection step or no action is taken within approx. 2 minutes after the selected programme
ends, your machine will switch to energy saving mode automatically. The brightness of the indicator lights
will decrease. Also, if your product has a display that shows programme time, this display will be completely
turned off. If you turn the Programme Selection knob or touch any button, lights and display will switch back
to previous condition. The selections which you make when exiting from the energy efficiency may change.
Please check the correctness of your selections before starting the programme. If necessary, please make
your settings again. This is not an error.
22 / EN
Washing Machine / User’s Manual
4.4 Maintenance and cleaning
Service life of product extends and frequently experienced problems will be reduced if it is cleaned at regular
intervals.
4.4.1 Cleaning the detergent drawer
Clean the detergent drawer at regular intervals (every 4-5 washing cycles) as
shown below in order to prevent accumulation of powder detergent in time.
Lift the rear part of the siphon to remove it as illustrated.
If more than normal amount of water and softener mixture starts to gather in the
softener compartment, the siphon must be cleaned.
1 Press the dotted point on the siphon in the softener compartment and pull towards you until the
compartment is removed from the machine.
2. Wash the detergent drawer and the siphon with plenty of lukewarm water in a washbasin. In order to
prevent the residues to contact your skin, clean it with an appropriate brush by wearing a pair of gloves.
3 Insert the drawer back into its place after cleaning and make sure that it is seated well.
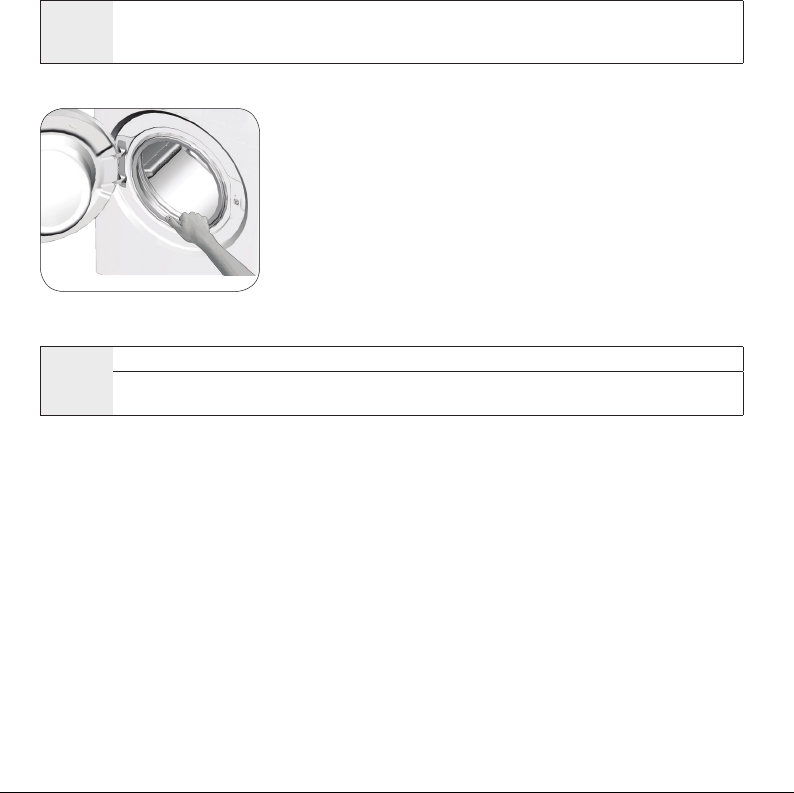
4.4.2 Cleaning the loading door and the drum
For products with drum cleaning programme, please see Operating the product - Programmes.
C
Repeat Drum Cleaning process in every 2 months.
Use an detergent / anti-limescale suitable for the washing machines.
After every washing make sure that no foreign substance is left in the drum.
If the holes on the bellow shown in the figure is blocked, open the holes using a
toothpick.
Foreign metal substances will cause rust stains in the drum. Clean the stains on the
drum surface by using cleaning agents for stainless steel.
Never use steel wool or wire wool. These will damage the painted, chromated and
plastic surfaces.
4.4.3 Cleaning the body and control panel
Wipe the body of the machine with soapy water or non-corrosive mild gel detergents as necessary, and dry
with a soft cloth.
Use only a soft and damp cloth to clean the control panel.
4.4.4 Cleaning the water intake filters
There is a filter at the end of each water intake valve at the rear of the machine and also at the end of each
water intake hose where they are connected to the tap. These filters prevent foreign substances and dirt in
the water to enter the washing machine. Filters should be cleaned as they do get dirty.
1. Close the taps.
2. Remove the nuts of the water intake hoses to access
the filters on the water intake valves. Clean them with an
appropriate brush. If the filters are too dirty, remove them
from their places with a pliers and clean in this way.
3. Take out the filters on the flat ends of the water intake
hoses together with the gaskets and clean thoroughly
under running water.
4. Replace the seals and filters carefully and tighten their
nuts by hand.
23 / EN
Washing Machine / User’s Manual
4.4.5 Draining remaining water and cleaning the pump filter
The filter system in your machine prevents solid items such as buttons, coins and fabric fibers clogging the
pump impeller during discharge of washing water. Thus, the water will be discharged without any problem and
the service life of the pump will extend.
If the machine fails to drain water, the pump filter is clogged. Filter must be cleaned whenever it is clogged or
in every 3 months. Water must be drained off first to clean the pump filter.
In addition, prior to transporting the machine (e.g., when moving to another house) and in case of freezing of
the water, water may have to be drained completely.
A
CAUTION: Foreign substances left in the pump filter may damage your machine or may cause noise problem.
CAUTION: If the product is not being used, shut the tap shut, remove mains pipe and drain the water inside the machine
against any likely freezing.
CAUTION: After each use, turn off the water tap to which the mains hose is connected.
In order to clean the dirty filter and discharge the water:
1 Unplug the machine to cut off the supply power.
A
CAUTION: Temperature of the water inside the machine may rise up to 90 ºC. To avoid the burning risk, clean the filter
after the water inside the machine is cooled down.
2. Open the filter cover.
3 Follow the below procedures in order to drain water.
The product does not have an emergency water drain hose, in order to drain the water:
a. In order to collect the water to flow out of the filter,
place a large vessel in front of the filter.
b. Turn and loosen the pump filter until water starts to
flow (counterclockwise). Fill the flowing water into
the container you have placed in front of the filter.
Always keep a piece of cloth handy to absorb any
spilled water.
c When the water inside the machine is finished, take
out the filter completely by turning it.
4. Clean any residues inside the filter as well as fibers, if any, around the pump impeller region.
5. Replace the filter.
6. If the filter cap is composed of two pieces, close the filter cap by pressing on the tab. If it is one piece, seat
the tabs in the lower part into their places first, and then press the upper part to close.
24 / EN
Washing Machine / User’s Manual
5 Troubleshooting
ProblemReasonSolution
Program does not start after
closing the door.
Start / Pause / Cancel button was not pressed.• *Press the Start / Pause / Cancel button.
It may be difficult to close the loading door in case of
excessive loading.
• Reduce the amount of laundry and make sure that
the loading door is closed properly.
Programme cannot be started or
selected.
Washing machine has switched to self protection
mode due to a supply problem (line voltage, water
pressure, etc.).
• To cancel the programme, turn the Programme
Selection knob to select another programme.
Previous programme will be canceled. (see.
“Cancellation of program”)
Water in the machine.Some water might have remained in the product due
to the quality control processes in the production.
• This is not a failure; water is not harmful to the
machine.
The machine enters standby mode
after the programme starts or it
does not take in water.
Tap is turned off.• Turn on the taps.
Water inlet hose is bent.• Flatten the hose.
Water inlet filter is clogged.• Clean the filter.
Loading door may be open.• Close the door.
The water connection may be wrong or water may be
cut off (When the water is cut off, washing or rinsing
LEDs flash).
• Check the water connection. If the water is cut
off, press the Start/Pause key after the water has
been supplied again to resume the operation from
standby mode.
Machine does not drain water.Water drain hose might be clogged or twisted.• Clean or flatten the hose.
Pump filter is clogged.• Clean the pump filter.
Machine vibrates or makes noise.Machine might be standing unbalanced.• Adjust the feet to level the machine.
A hard substance might have entered into the pump
filter.
• Clean the pump filter.
Transportation safety bolts are not removed.• Remove the transportation safety bolts.
Laundry quantity in the machine might be too little.• Add more laundry to the machine.
Machine might be overloaded with laundry.• Take out some of the laundry from the machine
or distribute the load by hand to balance it
homogenously in the machine.
Machine might be leaning on a rigid item.• Make sure that the machine is not leaning on
anything.
There is water leaking from the
bottom of the washing machine.
Water drain hose might be clogged or twisted.• Clean or flatten the hose.
Pump filter is clogged.• Clean the pump filter.
Machine stopped shortly after the
programme started.
Machine might have stopped temporarily due to low
voltage.
• It will resume running when the voltage restores to
the normal level.
Machine directly discharges the
water it takes in.
Draining hose might not be at adequate height.• Connect the water draining hose as described in
the operation manual.
No water can be seen in the
machine during washing.
The water level is not visible from outside of the
washing machine.
• This is not a failure.
Loading door cannot be opened.Door lock is activated because of the water level in
the machine.
• Drain the water by running the Pump or Spin
programme.
Machine is heating up the water or it is at the spinning
cycle.
• Wait until the programme completes.
Child lock is engaged. Door lock will be deactivated
a couple of minutes after the programme has come
to an end.
• Wait for a couple of minutes for deactivation of
the door lock.
Loading door may be stuck because of the pressure it
is subjected to.
• Grab the handle and push and pull the loading
door to release and open it.
Washing takes longer time than
specified in the manual.(*)
Water pressure is low.• Machine waits until taking in adequate amount
of water to prevent poor washing quality due to
the decreased amount of water. Therefore, the
washing time extends.
Voltage might be low.• Washing time is prolonged to avoid poor washing
results when the supply voltage is low.
Input temperature of water might be low.• Required time to heat up the water extends in cold
seasons. Also, washing time can be lengthened to
avoid poor washing results.
Number of rinses and/or amount of rinse water might
have increased.
• Machine increases the amount of rinse water
when good rinsing is needed and adds an extra
rinsing step if necessary.
Excessive foam might have occurred and automatic
foam absorption system might have been activated
due to too much detergent usage.
• Use recommended amount of detergent.
25 / EN
Washing Machine / User’s Manual
ProblemReasonSolution
Programme time does not
countdown. (On models with
display) (*)
Timer may stop during water intake. • Timer indicator will not countdown until the
machine takes in adequate amount of water. The
machine will wait until there is sufficient amount
of water to avoid poor washing results due to lack
of water. Timer indicator will resume countdown
after this.
Timer may stop during heating step. • Timer indicator will not countdown until the
machine reaches the selected temperature.
Timer may stop during spinning step. • Automatic unbalanced load detection system
might be activated due to the unbalanced
distribution of the laundry in the drum.
Programme time does not
countdown. (*)
There might be unbalanced load in the machine.• Automatic unbalanced load detection system
might be activated due to the unbalanced
distribution of the laundry in the drum.
Machine does not switch to
spinning step. (*)
There might be unbalanced load in the machine.• Automatic unbalanced load detection system
might be activated due to the unbalanced
distribution of the laundry in the drum.
The machine will not spin if water is not drained
completely.
• Check the filter and the draining hose.
Excessive foam might have occurred and automatic
foam absorption system might have been activated
due to too much detergent usage.
• Use recommended amount of detergent.
Washing performance is poor:
Laundry turns gray. (**)
Insufficient amount of detergent has been used over a
long period of time.
• Use the recommended amount of detergent
appropriate for water hardness and the laundry.
Washing was made at low temperatures for a long
time.
• Select the proper temperature for the laundry to
be washed.
Insufficient amount of detergent is used with hard
water.
• Using insufficient amount of detergent with hard
water causes the soil to stick on the cloth and
this turns the cloth into gray in time. It is difficult
to eliminate graying once it happens. Use the
recommended amount of detergent appropriate
for water hardness and the laundry.
Too much detergent is used.• Use the recommended amount of detergent
appropriate for water hardness and the laundry.
Washing performance is poor:
Stains persist or the laundry is not
whitened. (**)
Insufficient amount of detergent is used.• Use the recommended amount of detergent
appropriate for water hardness and the laundry.
Excessive laundry was loaded in.• Do not load the machine in excess. Load with
amounts recommended in the "Programme and
consumption table".
Wrong programme and temperature were selected. • Select the proper programme and temperature for
the laundry to be washed.
Wrong type of detergent is used.• Use original detergent appropriate for the
machine.
Too much detergent is used.• Put the detergent in the correct compartment. Do
not mix the bleaching agent and the detergent
with each other.
Washing performance is poor: Oily
stains appeared on the laundry. (**)
Regular drum cleaning is not applied.• Clean the drum regularly. For this, please see
4.4.2.
Washing performance is poor:
Clothes smell unpleasantly. (**)
Odours and bacteria layers are formed on the drum as
a result of continuous washing at lower temperatures
and/or in short programmes.
• Leave the detergent drawer as well as the loading
door of the machine ajar after each washing.
Thus, a humid environment favorable for bacteria
cannot occur in the machine.
Colour of the clothes faded. (**)Excessive laundry was loaded in.• Do not load the machine in excess.
Detergent in use is damp. • Keep detergents closed in an environment free
of humidity and do not expose them to excessive
temperatures.
A higher temperature is selected.• Select the proper programme and temperature
according to the type and soiling degree of the
laundry.
26 / EN
Washing Machine / User’s Manual
ProblemReasonSolution
It does not rinse well.The amount, brand and storage conditions of the
detergent used are inappropriate.
• Use a detergent appropriate for the washing
machine and your laundry. Keep detergents closed
in an environment free of humidity and do not
expose them to excessive temperatures.
Detergent is put in the wrong compartment.• If detergent is put in the prewash compartment
although prewash cycle is not selected, machine
can take this detergent during rinsing or
softener step. Put the detergent in the correct
compartment.
Pump filter is clogged.• Check the filter.
Drain hose is folded.• Check the drain hose.
Laundry became stiff after
washing. (**)
Insufficient amount of detergent is used.• Using insufficient amount of detergent for the
water hardness can cause the laundry to become
stiff in time. Use appropriate amount of detergent
according to the water hardness.
Detergent is put in the wrong compartment.• If detergent is put in the prewash compartment
although prewash cycle is not selected, machine
can take this detergent during rinsing or
softener step. Put the detergent in the correct
compartment.
Detergent might be mixed with the softener.• Do not mix the softener with detergent. Wash and
clean the dispenser with hot water.
Laundry does not smell like the
softener. (**)
Detergent is put in the wrong compartment.• If detergent is put in the prewash compartment
although prewash cycle is not selected,
machine can take this detergent during rinsing
or softener step. Wash and clean the dispenser
with hot water. Put the detergent in the correct
compartment.
Detergent might be mixed with the softener.• Do not mix the softener with detergent. Wash and
clean the dispenser with hot water.
Detergent residue in the detergent
drawer. (**)
Detergent is put in wet drawer.• Dry the detergent drawer before putting in
detergent.
Detergent has gotten damp.• Keep detergents closed in an environment free
of humidity and do not expose them to excessive
temperatures.
Water pressure is low.• Check the water pressure.
The detergent in the main wash compartment got
wet while taking in the prewash water. Holes of the
detergent compartment are blocked.
• Check the holes and clean if they are clogged.
There is a problem with the detergent drawer valves.• Call the Authorised Service Agent.
Detergent might be mixed with the softener.• Do not mix the softener with detergent. Wash and
clean the dispenser with hot water.
Regular drum cleaning is not applied.• Clean the drum regularly. For this, please see
4.4.2.
Too much foam forms in the
machine. (**)
Improper detergents for the washing machine are
being used.
• Use detergents appropriate for the washing
machine.
Excessive amount of detergent is used.• Use only sufficient amount of detergent.
Detergent was stored under improper conditions.• Store detergent in a closed and dry location. Do
not store in excessively hot places.
Some meshed laundry such as tulle may foam too
much because of their texture.
• Use smaller amounts of detergent for this type
of item.
Detergent is put in the wrong compartment.• Put the detergent in the correct compartment.
Softener is being taken early.• There may be problem in the valves or in the
detergent dispenser. Call the Authorised Service
Agent.
Foam is overflowing from the
detergent drawer.
Too much detergent is used.• Mix 1 tablespoonful softener and ½ l water and
pour into the main wash compartment of the
detergent drawer.
• Put detergent into the machine suitable for the
programmes and maximum loads indicated in the
“Programme and consumption table”. When you
use additional chemicals (stain removers, bleachs
and etc), reduce the amount of detergent.
27 / EN
Washing Machine / User’s Manual
ProblemReasonSolution
Laundry remains wet at the end of
the programme. (*)
Excessive foam might have occurred and automatic
foam absorption system might have been activated
due to too much detergent usage.
• Use recommended amount of detergent.
(*) Machine does not switch to spinning step when the laundry is not evenly distributed in the drum to prevent any damage to the machine
and to its surrounding environment. Laundry should be rearranged and re-spun.
(**) Regular drum cleaning is not applied. Clean the drum regularly. See 4.4.2
A
CAUTION: If you cannot eliminate the problem although you follow the instructions in this section, consult your dealer or the
Authorised Service Agent. Never try to repair a nonfunctional product yourself.
2820525780_DE/ 26-04-17.(10:52)
Waschmaschine
Bedienungsanleitung
1- WTV 8712 XW
3- WTV 8712 XAW
2- WTV 8712 XSW
DE
Dokument Nummer=
Dieses Produkt wurde mit Hilfe neuester Technologie unter umweltfreundlichen Bedingungen hergestellt.
31 / DE
Waschmaschine / Bedienungsanleitung
1 Allgemeine Sicherheitshinweise
Dieser Abschnitt enthält Sicherheitsanweisungen, die bei
der Verhinderung von Verletzungen und Materialschäden
helfen können. Alle Arten von Garantien erlöschen, falls diese
Anweisungen nicht beachtet werden.
1.1 Vermeidung von Personen- und Sachschäden
u
Stellen Sie das Produkt niemals auf einen Teppichboden.
Elektrische Teile überhitzen, da Luft nicht unter dem Gerät
zirkulieren kann. Dies kann zu Problemen mit Ihrem Gerät führen.
u
Ziehen Sie den Netzstecker, wenn Sie das Gerät nicht benutzen.
u
Lassen Sie Installations- und Reparaturarbeiten grundsätzlich vom
autorisierten Kundendienst ausführen. Der Hersteller haftet nicht
bei Schäden, die durch Aktivitäten nicht autorisierter Personen
entstehen.
u
Wasserzulauf- und Wasserablaufschläuche müssen fixiert und
dürfen nicht beschädigt werden. Andernfalls kann Wasser lecken.
u
Öffnen Sie niemals die Tür des Gerätes, nehmen Sie niemals
den Filter heraus, wenn sich noch Wasser im Produkt
befindet. Andernfalls besteht Überschwemmungsgefahr und
Verletzungsgefahr durch heißes Wasser.
u
Versuchen Sie niemals, die Waschmaschinentür mit Gewalt zu
öffnen. Die Tür lässt sich erst ein paar Minuten nach dem Ende
des Waschzyklus öffnen. Falls Sie versuchen, die Tür gewaltsam
zu öffnen, können Tür und Sperrmechanismus beschädigt werden.
u
Verwenden Sie ausschließlich für Waschmaschinen geeignete
Waschmittel, Weichspüler und Zusatzstoffe.
u
Halten Sie sich an die Hinweise auf Pflegeetiketten und auf der
Waschmittelpackung.
32 / DE
Waschmaschine / Bedienungsanleitung
1.2 Sicherheit von Kindern
u
Dieses Produkt kann von Kindern im Alter von mindestens 8
Jahren sowie von Personen, deren physische, sensorische oder
geistige Fähigkeiten vermindert sind oder die einen Mangel an
Erfahrung und Kenntnissen aufweisen, verwendet werden, sofern
sie beaufsichtigt bzw. über den sicheren Umgang mit dem Gerät
und den damit verbundenen Gefahren unterrichtet wurden.
Kinder dürfen niemals mit dem Gerät spielen. Reinigungs- und
Wartungsarbeiten sollten nicht von Kindern durchgeführt werden,
sofern sie nicht beaufsichtigt werden. Kinder unter 3 Jahren
sollten ferngehalten, sofern keine kontinuierliche Beaufsichtigung
gewährleistet ist.
u
Verpackungsmaterialien können für Kinder gefährlich sein. Lagern
Sie sämtliche Verpackungsmaterialien an einem sicheren Ort und
außerhalb der Reichweite von Kindern.
u
Elektrogeräte können für Kinder gefährlich sein. Halten Sie Kinder
im Betrieb daher unbedingt vom Gerät fern. Lassen Sie Kinder
nicht mit dem Gerät spielen. Nutzen Sie die Kindersicherung,
damit Kinder das Gerät nicht manipulieren können.
u
Vergessen Sie nicht, die Tür des Gerätes zu schließen, wenn Sie
den Raum verlassen.
u
Bewahren Sie alle Wasch- und Zusatzmittel an einem sicheren
Ort außerhalb der Reichweite von Kindern auf, beispielsweise
indem Sie den Deckel des Waschmittelbehälters schließen oder
die Waschmittelverpackung versiegeln.
1.3 Elektrische Sicherheit
u
Bei Fehlfunktionen darf das Gerät erst dann wieder in Betrieb
genommen werden, nachdem es durch den autorisierten
Kundendienst repariert wurde. Es besteht Stromschlaggefahr!
u
Nach einem Stromausfall setzt das Gerät den Betrieb wieder
automatisch fort. Wenn Sie ein Programm abbrechen möchten,
schauen Sie sich bitte den Abschnitt „Programm abbrechen“ an.
33 / DE
Waschmaschine / Bedienungsanleitung
u
Schließen Sie das Gerät an eine durch eine 16-A-Sicherung
geschützte geerdete Steckdose an. Die Installation der Schutzerde
muss grundsätzlich von einem qualifizierten Elektriker ausgeführt
werden. Wir haften nicht für jegliche Schäden, die durch
mangelhafte, nicht den örtlichen Vorschriften entsprechende,
Erdung entstehen.
u
Sprühen Sie niemals Wasser oder andere Flüssigkeiten direkt auf
das Gerät! Es besteht Stromschlaggefahr!
u
Berühren Sie den Netzstecker niemals mit feuchten oder gar
nassen Händen! Ziehen Sie den Netzstecker niemals, indem Sie
am Kabel ziehen. Drücken Sie immer den Stecker mit einer Hand
und ziehen ihn durch Greifen mit der anderen Hand heraus.
u
Vor Aufstellung, Wartung, Reinigung und vor Reparaturen muss
unbedingt der Netzstecker gezogen werden.
u
Falls das Netzkabel beschädigt ist, muss es zur Vermeidung
möglicher Gefahren vom Hersteller, vom autorisierten Kundendienst
oder einer ähnlich qualifizierten Person (idealerweise einem
Elektriker) bzw. einer vom Importeur zugewiesenen Person ersetzt
werden.
1.4 Richtiger Umgang mit heißen Oberflächen
Das Glas der Gerätetür wird während des
Waschens bei höheren Temperaturen
heiß. Achten Sie daher darauf, dass
insbesondere Kinder das Glas der
Gerätetür während des Waschens nicht
berühren.
34 / DE
Waschmaschine / Bedienungsanleitung
2 Wichtige Hinweise zur Umwelt
2.1 Konformität mit WEEE-Richtlinie
Dieses Produkt stimmt mit der WEEE-Richtlinie der Europäischen
Gemeinschaft (2012/19/EG) überein. Dieses Produkt trägt ein
Klassifizierungssymbol für elektrische und elektronische Altgeräte (WEEE).
Dieses Produkt wurde mit hochwertigen Teilen und Materialein gefertigt, die
recyclingfähig sind und wiederverwertet werden können. Entsorgen Sie das
Produkt am Ende seiner Einsatzzeit nicht mit dem regulären Hausmüll. Bringen
Sie es zu einer Sammelstelle zum Recycling elektrischer und elektronischer
Geräte. Erkundigen Sie sich bei Ihren örtlichen Behörden nach diesen Stellen.
Konformität mit RoHS-Richtlinie:
Das von Ihnen erworbene Produkt stimmt mit der RoHS-Richtlinie der EU überein
(2011/65/EG). Es enthält keine in der Richtlinie angegebenen schädlichen und
verbotenen Materialien.
2.2 Verpackungsinformationen
Verpackungsmaterialien des Produktes werden aus recyclingfähigen Materialien
entsprechend unseren nationalen Umweltrichtlinien hergestellt. Entsorgen Sie
Verpackungsmaterialien nicht über den Haus- oder anderen Müll. Bringen Sie sie zu den
von örtlichen Behörden zugewiesenen Sammelstellen für Verpackungsmaterialien.
3 Bestimmungsgemäßer Gebrauch
• Dieses Produkt wurde für den Hausgebrauch entwickelt. Es darf nicht für kommerzielle
Zwecke und nicht außerhalb seines bestimmungsgemäßen Einsatzgebietes eingesetzt
werden.
• Das Gerät darf nur zum Waschen und Spülen von Textilien verwendet werden, die
entsprechend gekennzeichnet sind.
• Der Hersteller haftet nicht bei Schäden, die durch falschen Gebrauch oder
unsachgemäßen Transport entstehen.
• Die Einsatzzeit Ihres Gerätes beträgt 10 Jahre. In diesem Zeitraum erhalten Sie Original-
Ersatzteile, damit Ihr Gerät seine Funktion stets optimal erfüllen kann.
35 / DE
Waschmaschine / Bedienungsanleitung
4 Technische Daten
Gemäß Verordnung der Kommission (EU) Nr. 1061/2010
Herstellername oder MarkenBekoBekoBeko
ModellnameWTV 8712 XWWTV 8712 XSWWTV 8712 XAW
Nennkapazität (kg) 888
Energieeffizienzklasse / Skala von A+++ (höchste Effizienz) bis D (niedrigste Effizienz)A+++A+++A+++
Jährlicher Energieverbrauch (kWh)
(1)
195195195
Energieverbrauch des 60 °C-Buntwäsche Eco standardprogramms bei voller Beladung (kWh)1,1001,1001,100
Energieverbrauch des 60 °C-Buntwäsche Eco standardprogramms bei teilweiser Beladung (kWh)0,7000,7000,700
Energieverbrauch des 40°C-Buntwäsche Eco standardprogramms bei teilweiser Beladung (kWh)0,6650,6650,665
Leistungsaufnahme im abgeschalteten Zustand (W)0,2500,2500,250
Leistungsaufnahme im eingeschalteten Zustand (Bereitschaft) (W)1,0001,0001,000
Jährlicher Wasserverbrauch (l)
(2)
105591055910559
Schleudertrocknen-Effizienzklasse / Skala von A (höchste Effizienz) bis G (niedrigste Effizienz)BBB
Programmdauer des 60 °C-Buntwäsche Eco standardprogramms bei voller Beladung (Min.)200200200
Programmdauer des 60°C-Buntwäsche Eco standardprogramms bei teilweiser Beladung (Min.)179179179
Programmdauer des 40 °C-Buntwäsche Eco standardprogramms bei teilweiser Beladung (Min.)179179179
Dauer Bereitschaftsmodus (Min.)N/AN/AN/A
Per Luft übertragenes Betriebsgeräusch Waschen/Schleudern (dB)61/7461/7461/74
EingebautNoNoNo
Höhe (cm)848484
Breite (cm)606060
Tiefe (cm)595959
Nettogewicht (±4 kg)707070
Einzelwassereinlass/Doppelwassereinlass
• / -• / -• / -
• Verfügbar
Stromversorgung (V/Hz)230 V / 50Hz230 V / 50Hz230 V / 50Hz
Maximaler Strom (A)101010
Gesamtleistung (W)220022002200
Hauptmodellcode921192119211
(1)
Der Energieverbrauch basiert auf 220 Standardwaschzyklen der Buntwäsche Eco programme bei 60 °C und 40 °C bei voller und teilweiser Beladung sowie dem Verbrauch
der Betriebsmodi mit geringem Energiebedarf. Der tatsächliche Energieverbrauch hängt von der Art und Weise der Nutzung des Gerätes ab.
(2)
Der Wasserverbrauch basiert auf 220 Standardwaschzyklen der Buntwäsche Eco programme bei 60 °C und 40 °C bei voller und teilweiser Beladung. Der tatsächliche
Wasserverbrauch hängt von der Art und Weise der Nutzung des Gerätes ab.
(3)
„60 °C-Buntwäsche Eco standardprogramm“ und „40 °C-Baumwollstandardprogramm“ sind die Standardwaschprogramme, auf denen die Angaben des
Kennzeichnungsschildes und des Datenblattes beruhen. Diese Programme eignen sich zum Reinigen normal verschmutzter Textilien und zählen hinsichtlich ihres
kombinierten Energie- und Wasserverbrauches zu den effizientesten Programmen.
Im Zuge der Qualitätsverbesserung können sich die technischen Daten dieses Gerätes ohne Vorankündigung ändern.
36 / DE
Waschmaschine / Bedienungsanleitung
4.1 Installation
• Lassen Sie Ihr Gerät vom autorisierten Kundendienst in Ihrer Nähe installieren.
• Die Vorbereitung des Aufstellungsortes, der Wasserzu- und -ableitung sowie des
elektrischen Anschlusses sind Sache des Kunden.
• Achten Sie darauf, dass Wasserzulauf- und -ablaufschläuche sowie das Netzkabel
nicht geknickt und nicht anderweitig beschädigt werden, wenn Sie das Gerät nach dem
Anschluss an Ort und Stelle rücken oder es reinigen.
• Stellen Sie sicher, dass Aufstellung und elektronische Anschlüsse des Produktes von
einem autorisierten Kundendienstmitarbeiter durchgeführt werden. Der Hersteller haftet
nicht bei Schäden, die durch den Eingriff nicht autorisierter Personen entstehen.
• Untersuchen Sie das Gerät vor der Installation auf eventuelle, sichtbare Defekte. Falls
Defekte vorliegen, darf das Gerät nicht installiert werden. Beschädigte Geräte können
gefährlich sein.
4.1.1 Der richtige Aufstellungsort
• Stellen Sie das Produkt auf einen harten und ebenen Untergrund. Stellen Sie es nicht
auf einen langflorigen Teppich oder vergleichbare Oberflächen.
• Eine Kombination aus Waschmaschine und Trockner kann – voll beladen – bis 180 kg
Gewicht erreichen. Stellen Sie das Gerät auf einem stabilen, ebenen Untergrund auf, der
das Gewicht der Maschine(n) mühelos tragen kann!
• Stellen Sie das Gerät nicht auf das Netzkabel.
• Stellen Sie das Gerät nicht an Orten auf, an denen die Temperatur unter 0 °C abfallen
kann.
• Wir empfehlen, an den Seiten des Gerätes etwas Platz zu lassen – so beschränken sich
Vibrationen und Betriebsgeräusche auf ein absolutes Minimum.
• Stellen Sie das Produkt auf einem erhöhten Untergrund nicht an einer Kante oder auf
einer Plattform auf.
• Platzieren Sie keine Wärmequellen, wie Kochfelder, Bügeleisen, Öfen usw., auf der
Waschmaschine und nutzen Sie sie nicht am Produkt.
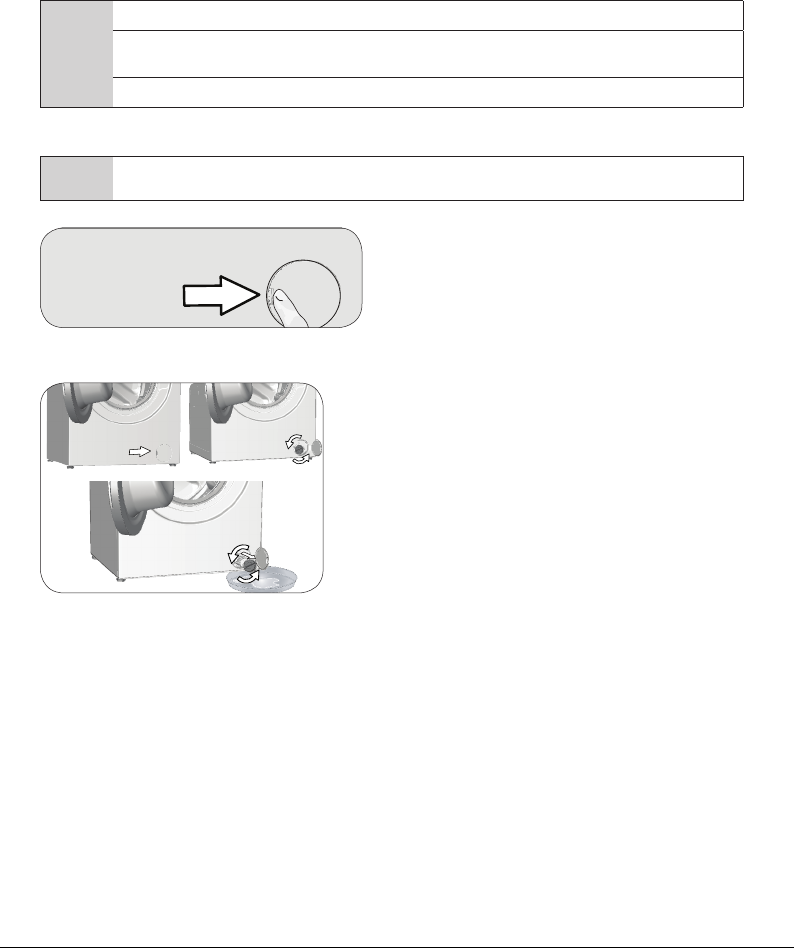
4.1.2 Transportstabilisatoren entfernen
Zum Entfernen der Transportstabilisatoren neigen Sie
die Maschine etwas nach hinten. Entfernen Sie die
Stabilisatoren durch Ziehen am Band. Führen Sie diese
Arbeit nicht alleine durch.
4.1.3 Transportsicherungen entfernen
1 Lösen Sie alle Sicherungen mit einem geeigneten Schlüssel, bis sie sich frei drehen
lassen.
2 Entfernen Sie die Transportsicherungen, indem Sie diese vorsichtig herausdrehen.
3 Setzen Sie die Kunststoffabdeckungen (diese finden Sie in der Tüte mit der
Bedienungsanleitung) in die Löcher an der Rückwand ein.
37 / DE
Waschmaschine / Bedienungsanleitung
A
ACHTUNG: Entfernen Sie die Transportsicherungen vor der Inbetriebnahme der Waschmaschine!
Andernfalls kann das Produkt beschädigt werden.
C
Bewahren Sie die Transportsicherungen an einem sicheren Ort auf. Sie brauchen sie, wenn Sie die
Waschmaschine zukünftig transportieren möchten.
Bringen Sie die Transportsicherungen (Bolzen) wieder an, indem Sie die Schritte zur Demontage in
umgekehrter Reihenfolge durchführen.
Transportieren Sie das Gerät niemals ohne korrekt angebrachte Transportsicherungen!
4.1.4 Wasseranschluss
C
Die Maschine benötigt zum Arbeiten einen Wasserdruck zwischen 1 und 10 Bar (0,1 bis 1 MPa). (In
der Praxis bedeutet dies, dass innerhalb einer Minute 10 bis 80 Liter Wasser aus dem voll geöffneten
Wasserhahn laufen müssen, damit Ihre Maschine richtig arbeiten kann.) Falls der Wasserdruck höher
sein sollte, verwenden Sie ein Druckreduzierventil.
A
ACHTUNG: Modelle mit einzelnem Wasserzulauf sollten nicht an den Warmwasserhahn
angeschlossen werden. Falls Sie dies dennoch versuchen, wird Ihre Wäsche beschädigt – oder das
Gerät wechselt in den Sicherheitsmodus und arbeitet nicht.
ACHTUNG: Verwenden Sie keine alten oder gebrauchten Wassereinlaufschläuche mit Ihrem neuen
Gerät. Diese können zu Verschmutzungen Ihrer Wäsche führen.
1 Ziehen Sie die Muttern des Schlauches von Hand fest.
Ziehen Sie die Muttern niemals mit einem Werkzeugen
an.
2 Sobald der Schlauchanschluss abgeschlossen ist,
prüfen Sie an die Anschlusspunkten auf Lecks, indem
Sie die Wasserhähne vollständig öffnen. Falls Wasser
austreten sollte, drehen Sie den Hahn zu und lösen
anschließend die Mutter. Überprüfen Sie die Dichtung
und ziehen Sie die Mutter anschließend wieder gut
an. Halten Sie zur Vermeidung von Wasserlecks und
damit verbundenen Schäden die Wasserhähne bei
Nichtbenutzung des Produktes geschlossen.
4.1.5 Ablaufschlauch an Ablauf anschließen
• Schließen Sie das Ende des Ablaufschlauchs direkt an den Wasserablauf (Abfluss), ein
WC oder eine Badewanne an.
A
ACHTUNG: Ansonsten kann es zu Überschwemmungen kommen, falls sich der Ablaufschlauch
beim Abpumpen des Wassers lösen sollte. Bei hohen Waschtemperaturen besteht Verbrühungsgefahr!
Sie können solche Situationen verhindern und sicherstellen, dass Wasserzulauf und Abpumpen
problemlos funktionieren, indem Sie den Ablaufschlauch sicher fixieren.
38 / DE
Waschmaschine / Bedienungsanleitung
40 cm
100 cm
• Verbinden Sie den Ablaufschlauch auf
einer Mindesthöhe von 40 cm und einer
Maximalhöhe von 100 cm.
• Wenn der Ablaufschlauch zuerst am Boden
(bis etwa 40 cm über dem Boden) und
danach wieder nach oben verläuft, kann es zu
Schwierigkeiten beim Wasserablauf kommen;
es kann vorkommen, dass die Wäsche beim
Herausnehmen noch sehr nass ist. Halten
Sie sich deshalb an die in der Abbildung
angegebenen Höhen.
• Damit kein verschmutztes Wasser in die Maschine zurücklaufen kann und um der
Maschine das Abpumpen zu erleichtern, darf das Ende des Schlauches nur maximal
15 cm tief in den Ablauf eingeführt werden. Falls das Schlauchende zu lang sein sollte,
schneiden Sie ein Stück ab.
• Das Schlauchende sollte nicht gebogen werden, es sollte nicht darauf getreten werden
und es darf nicht zwischen Ablauf und Maschine eingeklemmt werden.
• Falls der Schlauch zu kurz sein sollte, können Sie einen Original-Verlängerungsschlauch
verwenden. Die Gesamtlänge des Schlauches ab Austrittspunkt aus der Maschine
darf 3,2 m nicht überschreiten. Um ein Auslaufen von Wasser zu vermeiden, müssen
Ablaufschlauch und Verlängerungsschlauch mit einer passenden Schelle gesichert
werden, damit sich die Verbindung nicht lösen und kein Wasser austreten kann.
4.1.6 Füße einstellen
A
ACHTUNG: Damit Ihre Maschine leise und vibrationsfrei arbeiten kann, muss sie absolut gerade
und ausbalanciert stehen. Sie balancieren die Maschine aus, indem Sie die Füße entsprechend
einstellen. Sollte das Gerät nicht fest und gerade stehen, kann es sich im Betrieb bewegen, stark
vibrieren und gegen andere Gegenstände oder Möbelstücke stoßen.
ACHTUNG: Lösen Sie die Kontermuttern grundsätzlich nur mit den Händen, benutzen Sie keinerlei
Werkzeuge dafür. Andernfalls kann es zu Beschädigungen kommen.
1 Lösen Sie die Kontermuttern an den Füßen von Hand.
2 Stellen Sie die Füße so ein, dass das Gerät stabil und absolut gerade steht.
3 Ziehen Sie die Kontermuttern anschließend mit der Hand an.
39 / DE
Waschmaschine / Bedienungsanleitung
4.1.7 Elektrischer Anschluss
Schließen Sie das Gerät an eine durch eine 16-A-Sicherung geschützte geerdete
Steckdose an. Wir haften nicht für jegliche Schäden, die durch mangelhafte, nicht den
Gebruikershandleiding.com neemt misbruik van zijn services uitermate serieus. U kunt hieronder aangeven waarom deze vraag ongepast is. Wij controleren de vraag en zonodig wordt deze verwijderd.
Product:
Spelregels forum
Om tot zinvolle vragen te komen hanteren wij de volgende spelregels:
lees eerst de handleiding door;
controleer of uw vraag al eerder door iemand anders is gesteld;
probeer uw vraag zo duidelijk mogelijk te stellen;
heeft u een probleem en al geprobeerd om dit op te lossen, vermeld dit erbij aub;
heeft u een oplossing gekregen van een bezoeker dan horen wij dat graag in dit forum;
wilt u een reactie geven op een vraag of antwoord, gebruik dan niet dit formulier maar klik op de knop 'reageer op deze vraag';
uw vraag wordt direct op de website gezet; vermijd daarom persoonlijke gegevens in te vullen;
Belangrijk! Als er een antwoord wordt gegeven op uw vraag, dan is het voor de gever van het antwoord nuttig om te weten als u er wel (of niet) mee geholpen bent! Wij vragen u dus ook te reageren op een antwoord.
Belangrijk! Antwoorden worden ook per e-mail naar abonnees gestuurd. Laat uw emailadres achter op deze site, zodat u op de hoogte blijft. U krijgt dan ook andere vragen en antwoorden te zien.
Abonneren
Abonneer u voor het ontvangen van emails voor uw BEKO WTV 8712 XSW bij:
nieuwe vragen en antwoorden
nieuwe handleidingen
U ontvangt een email met instructies om u voor één of beide opties in te schrijven.
Ontvang uw handleiding per email
Vul uw emailadres in en ontvang de handleiding van BEKO WTV 8712 XSW in de taal/talen: Duits, Engels als bijlage per email.
De handleiding is 3,16 mb groot.
U ontvangt de handleiding per email binnen enkele minuten. Als u geen email heeft ontvangen, dan heeft u waarschijnlijk een verkeerd emailadres ingevuld of is uw mailbox te vol. Daarnaast kan het zijn dat uw internetprovider een maximum heeft aan de grootte per email. Omdat hier een handleiding wordt meegestuurd, kan het voorkomen dat de email groter is dan toegestaan bij uw provider.
Uw handleiding is per email verstuurd. Controleer uw email
Als u niet binnen een kwartier uw email met handleiding ontvangen heeft, kan het zijn dat u een verkeerd emailadres heeft ingevuld of dat uw emailprovider een maximum grootte per email heeft ingesteld die kleiner is dan de grootte van de handleiding.
Er is een email naar u verstuurd om uw inschrijving definitief te maken.
Controleer uw email en volg de aanwijzingen op om uw inschrijving definitief te maken
U heeft geen emailadres opgegeven
Als u de handleiding per email wilt ontvangen, vul dan een geldig emailadres in.
Uw vraag is op deze pagina toegevoegd
Wilt u een email ontvangen bij een antwoord en/of nieuwe vragen? Vul dan hier uw emailadres in.