Compliance to standards and test data / EC declaration of conformity
Ths product comples wth the followng EU drectves;
Development, producton and sales stages of ths product comply wth the safety
rules ncluded n all pertanng European Communty regulatons.
2006/95/EC, 2004/108/EC, 93/68/EC, IEC 60436/DIN 44990, EN 50242
Power nput220-240 V, 50 Hz (see ratng label)
Total power consumpton1800-2100 W (see ratng label)
Heater power consumpton1800 W (see ratng label)
Total current (depends on the model)10 A (see ratng label)
Dran pump power consumpton30 W (see ratng label)
Water pressure0.3 –10 bar (= 3 – 100 N/cm = 0.01-1.0
Mpa)
C
Techncal specfcatons may be changed wthout pror notce to mprove the
qualty of the product.
C
Fgures n ths manual are schematc and may not match the product exactly.
C
Values stated on the markngs of the product or n the prnted documents
accompanyng the product are obtaned n the laboratory on bass of the
relevant standards. Dependng on operatonal and envronmental condtons of
the product, these values may vary.
Note for test institutions:
Data requred for performance tests shall be provded upon request. Requests can be
e-maled to the followng address:
dishwasher@standardloading.com
Do not forget to provde the code, stock and seral numbers of the product to be tested n
your request e-mal along wth your contact nformaton. Code, stock and seral numbers of
the product may be found on the type label attached to the sde wall of the door.
Fan dryng system
Fan dryng system ensures effcent dryng of your dshes.
It s normal to hear a dfferent sound than that of washng cycle durng fan operaton.
Dishwasher / User’s Manual
9 /38
EN
3
Installaton
To make the product ready for use,
make sure that the electrcty, tap water
supply and water dranage systems are
approprate before callng the Authorsed
Servce Agent. If they are not, call a
qualfed techncan and plumber to have
any necessary arrangements carred out.
C
Preparaton of the locaton
and electrcal, tap water and
waste water nstallatons at the
place of nstallaton s under
customer's responsblty.
B
Manufacturer shall not be held
responsble for damages arsng
from processes carred out by
unauthorsed persons.
A
Pror to nstallaton, vsually
check f the product has any
defects on t. If so, do not have
t nstalled. Damaged products
cause rsks for your safety.
C
Make sure that the water nlet
and dscharge hoses are not
folded, pnched or crushed
whle pushng the product nto
ts place after nstallaton or
cleanng procedures.
When placng the product, pay attenton
not to damage the floor, walls, ppng, etc.
Do not hold the product from ts door or
panel to move t.
Approprate nstallaton
locaton
•Place the product on a sold and flat
floor that has suffcent load carryng
capacty! The product must be
nstalled on a flat surface n order for
the door to be closed comfortably and
securely.
•Do not nstall the product at places
where temperature may fall below
0ºC.
•Place the product on a rgd floor. Do
not place t on a long ple rug or smlar
surfaces.
B
Ensure the power cable does
not get trapped under the
product.
•Make sure that you select a locaton
that wll allow you to load and unload
the dshes n a fast and comfortable
manner.
•Install the product n a place close
to the tap and the dran. Select the
nstallaton locaton by consderng
that t wll not be changed after the
connectons are made.
Connectng water supply
•Do not use old or used water nlet
hose on the new product. Use the new
water nlet hose suppled wth the
product.
•Connect the water nlet hose drectly
to the water tap. Pressure comng
from the tap should be mnmum 0.3
and maxmum 10 bars. If the water
pressure exceeds 10 bars, a pressure
relef valve should be nstalled n
between.
•Open the tap completely after makng
the connectons to check for water
leaks.
A
For your safety, close the water
nlet tap completely after the
washng programme s over.
Connecton to the dran
Water dscharge hose can drectly be
connected to the dran hole or snk’s
dranage. The length of ths connecton
10
Dishwasher / User’s Manual
/38 EN
Installation
must be mn. 50 cm and max. 100 cm from
the floor. A dscharge hose longer than 4
meters wll cause washng performance
to be affected.Attach the water dscharge
hose to the dranppe wthout bendng
t. Tghtly fx the water dscharge hose
to the dranppe n order to prevent any
dslocaton of the water dscharge hose
durng operaton of the product.
min
300
min
120
max 1000
min 500
C
Dranppe must be connected
to the foul water system and t
should not be connected to any
surface water dran.
Adjustng the feet
If the door of the product cannot be closed
properly or f the product wobbles when
you push t slghtly, then you need to adjust
the feet of the product. Adjust the feet of
the product as llustrated n the relevant
secton.
Electrcal connecton
Before you nsert the plug nto the wall
socket make sure that the voltage and
the frequency shown n the ratng label
corresponds to your electrcty supply.
We recommend that ths applance be
connected to the mans supply va a
sutable swtched and fused socket n a
readly accessble poston.
If the supply cord or the mans lead s
damaged please do not replace t yourself.
The supply cord or the mans lead must be
replaced by a Authorsed Servce Agent or a
smlarly qualfed person.
A
Ths applance must
be earthed
If the ftted moulded plug s not
sutable for your socket, then
the plug should be cut off and
an approprate plug ftted.
Destroy the old plug, whch s
cut off as a plug wth a bared
cord could cause a shock
hazard f nserted nto a socket
elsewhere n the house.
The moulded plug on ths
applance ncorporates a 13A
fuse. Should the fuse need to
be replaced an ASTA approved
BS1362 fuse of the same ratng
must be used. Do not forget
to reft the fuse cover. In the
event of losng the fuse cover,
the plug must not be used
untl a replacement fuse cover
has been ftted. Colour of the
replacement fuse cover must
be the same colour as that
vsble on the pn face of the
plug. Fuse covers are avalable
from any good electrcal store.
Fttng a derent plug
As the colours of the wres n the mans
lead of ths applance may not correspond
Dishwasher / User’s Manual
11 /38
EN
Installation
•Before usng the product, fll the salt
reservor wth 1 ltre of water, add salt
(see next page) and str to dssolve.
Run the Dshwasher wthout dshes
on a short programme wth a small
amount of detergent.
A
There mght be a small amount
of water left n the product
after factory qualty control
tests. Ths causes no harm to
the product.
wth the coloured markngs dentfyng the
termnals on your plug, proceed as follows:
1. Connect the green - yellow or green
(earth) wre to the termnal n the plug
marked ‘E’ or wth the symbol or
coloured green and yellow or green.
2. Connect the blue (neutral) wre to
the termnal n the plug marked ‘N’ or
coloured black.
3. Connect the brown (lve) wre to the
termnal n the plug marked ‘L’ or
coloured red.
Wth the alternatve plugs a 13A fuse must
be ftted ether n the plug or adaptor or
n the man fuse box. If n doubt contact a
qualfed electrcan.
Intal use
Before startng to use the product, make
sure that all preparatons are made n
accordance wth the nstructons n
sectons “Important safety nstructons”
and “Installaton”.
12
Dishwasher / User’s Manual
/38 EN
Preparaton
4
Tps for energy savng
Followng nformaton wll help you use the
product n an ecologcal and energy-effcent
manner.
Wpe away any coarse food remnants on
the dshes before puttng them n the
product. Operate the product after fllng t
completely. When selectng a programme,
consder the table of “Programme data and
average consumpton values”.
Do not put more detergent than suggested
on the detergent package.
Water softenng system
C
Your dshwasher requres soft
water. If the hardness of the
water s above 6°dH, the water
must be softened and descaled.
Otherwse, ons that create
the hardness wll accumulate
on the surfaces of the dshes
and may adversely affect the
washng, shnng and dryng
performances of the product.
The product s equpped wth a water
softenng system whch reduces the
hardness of ncomng water. Ths system
softens the supply water that enters nto the
product to a level that wll allow washng the
dshes wth the requred qualty.
Adjustng the water
softenng system
Washng performance wll ncrease when
water softenng system s adjusted properly.
Adjust the new water hardness level
accordng to the Water hardness level
nstructon n ths booklet.
Addng salt
Water softenng system needs to be
regenerated n order that the product
operates wth the same performance
contnuously. Dshwasher salt s used for
ths purpose.
C
Use only specal softenng salts
produced partcularly for the
dshwashers n your machne.
C
We recommend usng granular
or powder softenng salts. Do
not use salts that are nsoluble
n water such as table salt or
common salt. Performance of
water softenng system may
get worse n tme.
C
Salt reservor wll fll wth water
when you start the product.
Therefore, add the softenng
salt before startng the
machne.
1. Frst take the lower basket out to add
softenng salt.
Dishwasher / User’s Manual
13 /38
EN
Preparation
4. Replace the ld and tghten t securely
when the reservor s full.
5. If you wll not start a washng programme
mmedately after addng the salt, run the
machne empty n the shortest programme
to dssolve and wash away the scattered
salt n the machne.
C
Snce dfferent salt brands
n the market have dfferent
partcle szes and snce the
water hardness may vary,
dssoluton of the salt n water
may take a couple of hours.
Therefore, Salt Indcator
remans on for a whle after
addng salt nto the machne.
Loose salt grans can cause rust
marks n your machne f not
rnsed away. Only fll salt just
before a programme s run.
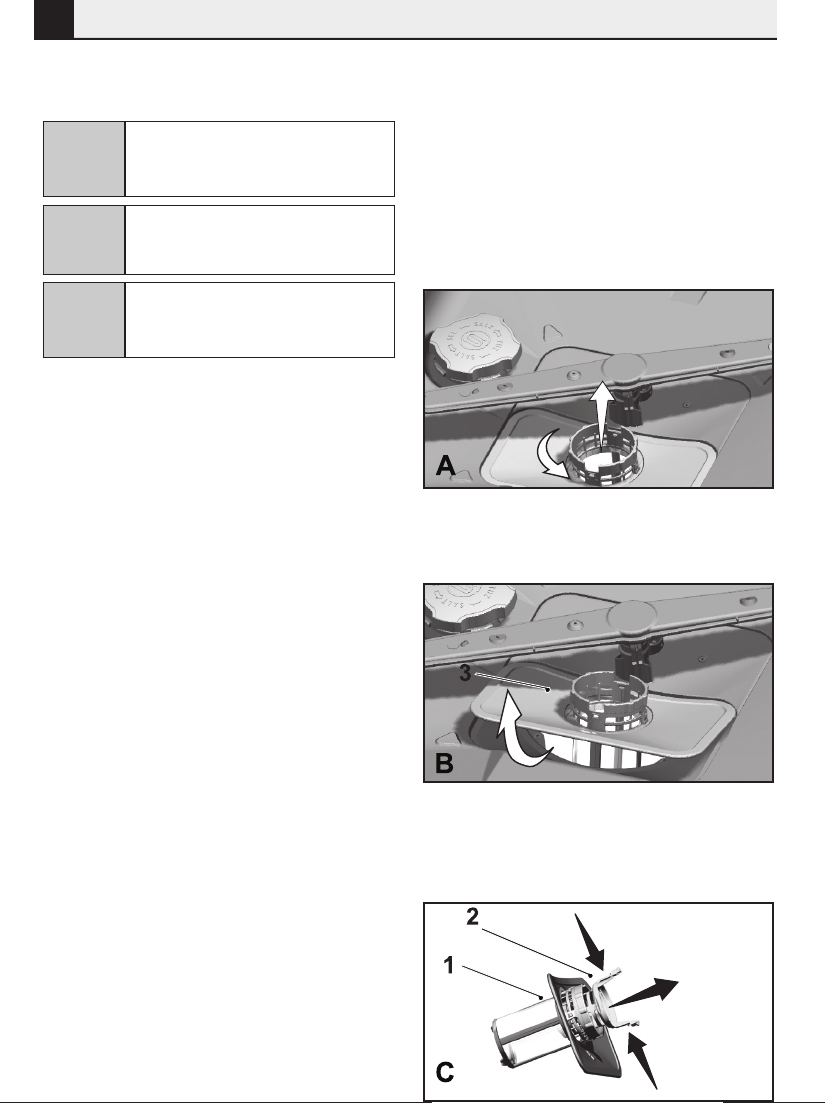
2. Turn the salt reservor ld counter
clockwse to open t (A, B).
C
Salt reservor wll fll wth water
when you start the product.
Therefore, add the softenng
salt before startng the
machne.
C
Before ntal use, fll the water
softenng system wth 1 ltre of
water (C).
3. Fll the salt reservor wth salt by usng
salt funnel (D). To speed up dssoluton rate
of salt n water, str t wth a spoon.
C
You can put about 2 kg of
Dshwasher salt nto the salt
reservor.
Water hardness &
regeneraton settngs
The dshwasher requres lme free water.
Hard water leaves watermarks on your
dshes. Your dshwasher has a specal
water softenng system to remove the
hardness of the tap water. Settng ths
system correctly wll ncrease the washng
effectveness.
To fnd out the hardness level of water n
your area, contact your local Water Board or
Determne water hardness level by the help
of test strp provded.
If you move to a different location,
the level of water hardness will
possibly be different. It is essential to
reset the water hardness in order to
obtain optimum washing efficiency.
14
Dishwasher / User’s Manual
/38 EN
Preparation
Test Strip
Let the water
flow from your
tap for 1 minute.
Remove the
test strip from
its packing.
Fill a glass with
tap water and
dip the test strip
into water for 1
second.
Take the test strip
out of the water and
shake it.
Hold for
1 minute.
Set the water hardness level of your dishwasher
according to the result shown by the test strip.
No Lime
Very low lime content
Low lime content
Medium lime content
High lime content
Very High lime content
Level 1
Level 2
Level 3
Level 4
Level 5
Level 6
To Adjust the Water Hardness
1. After turnng on the machne, press Tme Delay and P+/P keys smultaneously. After the
countdown (3,2,1) s dsplayed keep the keys pressed for a whle.
2. Press P+/P key to actvate the poston.
3. Usng Tme Delay key, adjust water hardness level accordng to the hardness of the
supply water. See “Water hardness level adjustment table” for correct settng.
4. Press On / Off key to save the settng.
Water Hardness Level Adjustment Table
Hardness
Level
English
Water
Hardness
°dE
German
Water
Hardness
°dH
French
Water
Hardness
°dF*
Position of
Regeneration
Adjustment
Switch**
Water Hardness Level Indicator
1
st
Level
0-50-40-8
Press the Tme Delay key to swtch the
water hardness level to poston 1.
2
nd
Level
6-95-79-13
3
rd
Level
10-158-1214-22
Press the Tme Delay key to swtch the
water hardness level to poston 2.
4
th
Level
16-1913-1523-27
Press the Tme Delay key to swtch the
water hardness level to poston 3.
5
th
Level
20-2416-1928-34
Press the Tme Delay key to swtch the
water hardness level to poston 4.
6
th
Level
25-6220-5035-90
Press the Tme Delay key to swtch the
water hardness level to poston 5.
Perform the same hardness
level adjustment that you
have set on the control panel
also wth the regeneraton
adjustment swtch. For
example, f you have adjusted
to “3” n the control panel,
also set the regeneraton
adjustment swtch to 3.
** Regeneraton Adjustment
Swtch
If the hardness level of the water that you use s above 90°dF (French standard for water
hardness) or f you are usng well water, than t s recommended to use flter and water
purfcaton devces.
* If the hardness level of the water that you use s below 8°dF (French standard for
water hardness), there s no need to use salt n your dshwasher. If ths s the case, Salt
Indcator (f any) llumnates contnuously on the panel of your machne.
If the water hardness s set to level 1, the Salt Indcator wll llumnate contnuously
although t s not necessary to use salt. If you use salt under ths condton, salt wll not
be consumed and the lamp wll not llumnate.
Dishwasher / User’s Manual
15 /38
EN
Preparation
Put the detergent nto the detergent
dspenser just before operatng the
machne as llustrated below.
1. Push the latch to rght to open the
detergent dspenser ld (A).
2. Put suggested amount of powder or
tablet detergent n the dspenser.
C
Insde the detergent dspenser,
there are level markngs that
help you use approprate
amount of detergent. When
brmful, detergent dspenser
wll contan 40 cm of
detergent. Fll detergent up to
15 cm or 25 cm level marks
n the detergent dspenser
accordng to fullness of the
machne and/or solng degree
of the dshes (1).
C
If you move your house, t
s very mportant to make
the water hardness level
adjustment of your machne
accordng to the new
locaton you move to n order
to preserve the washng
effcency.
If the water hardness level
of your machne s adjusted
prevously, your machne
wll dsplay the most recent
hardness level adjustment.
Adjust the new water hardness
level of the machne based on
the water hardness level of the
tap water.
Detergent
You can use powder or tablet detergent n
the machne.
C
Only use n the machne
the detergents produced
partcularly for use wth
dshwashers. We recommend
you not to use detergents that
contan chlorne and phosphate
as they are harmful for the
envronment.
C
Contact the detergent producer
f the dshes are wet and/or
f you notce lmescale spots
partcularly on glasses after the
washng programme s over.
Addng detergent
C
Refer to the “Programme
Table” to determne the correct
amount of detergent for the
selected programme.
A
Do not put solvents nto the
detergent dspenser. There s
the rsk of exploson!
16
Dishwasher / User’s Manual
/38 EN
Preparation
C
Tablet detergents gve
satsfyng results only under
certan usage condtons. The
best washng performance
n dshwashers s obtaned
by usng detergent, rnse
ad and water softenng salt
ndvdually.
C
Informaton about sutable
places (detergent dspenser,
basket etc.) n the dshwasher
to place the tablet can be found
amongst the usage nstructons
on the packages of the tablet
detergents.
Tablet detergent types commonly found n
the market:
2in1:
Contans detergent, rnse ad or
water softenng salt
3in1:
Contans detergent, rnse ad and
water softenng salt
4in1:
Contans glass protectors n addton
to detergent, rnse ad and water softenng
salt
5in1:
Contans glass and stanless steel
protectors n addton to detergent, rnse
ad and water softenng salt
C
Observe the nstructons of the
detergent manufacturer on
the package when usng tablet
detergents.
When you switch to powder
detergent from tablet detergent:
1. Make sure that salt and rnse ad
reservors are full.
2. Set the water hardness to the hghest
level and perform an empty run.
3. After the empty washng cycle, revew
the user manual and readjust the
water hardness level so as to sut the
water supply.
C
If dshes have been watng
for a long tme and have
dred resdues, fll the 5 cm
compartment too (5).
3. Close the detergent dspenser ld by
pressng on t lghtly. A “clck” wll be
heard when the ld s closed.
C
In programmes wth prewash
and at hgh temperature,
n whch you use tablet
detergents, make sure that the
detergent dspenser ld s closed
frmly.
C
Use powder detergent n short
programmes wthout prewash
snce the solublty of the tablet
detergent changes dependng
on the temperature and tme.
A
Excessve usage of powder
detergents wll cause the
detergent not dssolve
completely and wll also cause
scratches on the glassware.
Tablet detergents
Tablet detergents exhbt water softenng
and / or rnse ad effect n addton to
detergent effect. Some types of these
detergents also contan specal-purpose
washng chemcals such as glass and
stanless steel protectors.
Dishwasher / User’s Manual
17 /38
EN
Preparation
C
Wpe clean any splled rnse ad
outsde the reservor. Rnse
ad that splled accdentally
wll cause foamng and t wll
eventually decrease washng
performance.
4. Turn the rnse ad amount adjuster
manually to a poston between 1 and
6 (4). If there are stans on tableware
tems after washng, level must be
ncreased and f there s a blue trace
after wpng them by hand, t must be
decreased. Ths s set to poston 4 as
factory default.
Items not suitable for washing in the
dishwasher
•Never wash dshes soled by cgarette
ash, candle remnants, polsh, dyestuff,
chemcals, etc. n your dshwasher.
•Do not wash ron alloy tems n the
dshwasher. It can get corroded or
leave stans on other tems.
•Do not wash cutlery wth wooden or
bone stems, glued peces, or peces
that are not resstant to heat, as well
as copper and tn-plated contaners n
the dshwasher.
4. Make the approprate rnse ad
settngs.
C
Dependng on the model,
salt ndcator and/or rnse ad
ndcator must be enabled agan
f they were dsabled before.
Rnse ad
C
The rnse ad used n
dshwashers s a specal
combnaton used to ncrease
dryng effcency and prevent
water or lmescale stans on the
washed tems. For ths reason,
care must be pad to have rnse
ad n the rnse ad reservor
and to use rnse ads produced
specally for dshwashers only.
1. Open the ld of the rnse ad reservor
by pressng ts latch (B).
2. Fll the reservor untl “MAX” level.
3. Close the ld of the reservor by
pressng on t lghtly.
18
Dishwasher / User’s Manual
/38 EN
Preparation
C
Decoratve prnts of chnaware
as well as alumnum and slver
tems may get dscoloured
or tarnshed after washng
n the dshwasher just as t
happens n handwashng as
well. Some delcate glass types
and crystals may become dull n
tme. We strongly recommend
you to check f the tableware
you are gong to purchase s
sutable for washng especally
n the dshwasher.
Placing the dishes into the
dishwasher
You can use your dshwasher n the
optmum way wth respect to energy
consumpton and washng and dryng
performance only f you place the dshes n
an orderly way.
•Wpe away any coarse food
remnants (bones, seeds, etc.) on the
dshes before placng them n the
dshwasher.
•Place thn, narrow peces n the mddle
sectons of baskets f possble.
•There are two separate baskets n
whch you can place your dshes n the
dshwasher. Place the heavly soled
and bgger tems n the lower basket
and smaller, delcate and lght tems n
the upper basket.
•Place the hollowed dshes such as
bowls, glasses and pans upsde down
n the dshwasher. Thus, accumulaton
of water n deep hollows s prevented.
A
To prevent possble njures,
always place the sharp and
ponted dshes such as servce
fork, bread knfe, etc. upsde
down so as ther ponted ends
wll face down or they wll le
horzontally n the dsh basket.
Unload dshes n the lower basket frst and
then the dshes n the upper basket.
Suggestions for loading the dishwasher
Lower basket
Upper basket
Improper Loading Of Dishware
Improper Loading Of Dishware
Dishwasher / User’s Manual
19 /38
EN
Preparation
Suggestions for loading the dishwasher
Lower basket
Upper basket
Improper Loading Of Dishware
Improper Loading Of Dishware
20
Dishwasher / User’s Manual
/38 EN
Preparation
Upper basket heght
adjustable rack
Use the lower and upper parts of the heght
adjustable racks n the upper basket of
the machne by sldng them down or up
accordng to the heghts of the glasses,
cups or etc. (A, B, C).
Adjustng the heght of the
upper basket
Basket adjustment mechansm on the
loaded upper basket of the machne s
desgned to allow you create taller areas n
the upper or lower secton of the machne
based on your requrements by adjustng
the heght of the loaded basket n up or
down drectons.
To rase the basket:
Grab one of the upper basket wres (rght or
left) and lft t up (A).
Repeat the same process to rase the other
sde of the basket.
Make sure that both sdes of the loaded
basket heght adjustment mechansm are
at the same level (down or up).
To lower the basket:
Press the latch on the loaded basket
adjustment mechansm (rght and left) to
lower the basket (B).
Repeat the same process to lower the
other sde of the basket.
Make sure that both sdes of the loaded
basket heght adjustment mechansm are
at the same level (down or up).
Dishwasher / User’s Manual
21 /38
EN
Preparation
Collapsble upper basket
tnes
Upper basket of the machne s equpped
wth tnes wth gradual foldng system (A)
that you can lay down when you need a
larger space for large dshes.
To brng the collapsble tnes nto horzontal
poston, grab the tnes from md poston
and push them n the drectons of arrows.
Place your larger dshes nto the area
created. To brng the tnes back to vertcal
poston, just lft them up. Collapsble tnes
wll clck nto the latch agan.
C
Brngng the tnes to the
horzontal poston by holdng
them from the tps may cause
them to bend. Therefore, t
wll be approprate to brng the
tnes n the mddle to horzontal
or vertcal poston by holdng
them from ther stems and
pushng n the drecton of
arrow.
Cutlery basket
Cutlery basket s desgned to wash your
dshes such as knfe, fork, spoon, etc. n an
effcent manner.
Snce the cutlery basket can be moved (A,
B), you can create more space whle placng
your dshes n the lower basket and free up
space for your dshes of dfferent szes.
22
Dishwasher / User’s Manual
/38 EN
Preparation
Collapsble lower basket
tnes
The sx pece foldable tnes (A) located
at the lower basket of the machne are
desgned for an easer placement of large
peces such as pans, bowls, etc. You can
create larger spaces by foldng each tnes
ndvdually or all of them at once.
To brng the collapsble tnes nto horzontal
poston, grab the tnes from md poston
and push them n the drectons of arrows
(B). To brng the tnes back to vertcal
poston, just lft them up. Collapsble tnes
wll clck nto the latch agan (C).
C
Brngng the tnes to the
horzontal poston by holdng
them from the tps may cause
them to bend. Therefore, t
wll be approprate to brng the
tnes n the mddle to horzontal
or vertcal poston by holdng
them from ther stems and
pushng n the drecton of
arrow.
Dishwasher / User’s Manual
23 /38
EN
Operatng the product
5
Keys
On/Off key
When you press On / Off key, ndcator
lghts llumnate on the dsplay for ON
poston. The lghts turn off n OFF poston.
Programme Selecton /
Programme Cancel key
Press ths key untl the desred programme
appears n the programme ndcator.
To cancel the runnng program, keep the
Programme Selecton /Programme Cancel
key pressed for 3 seconds.
Functon keys
If you press any of the Functon keys
durng programme selecton or tme delay
selecton, an affrmatve key sgnal wll be
heard provded that the relevant functon
s supported by the selected programme.
Functon wll be deemed selected when the
ndcator of the selected functon s lt.
To cancel the selected functon, keep the
functon key pressed untl the functon
ndcator dsappears.
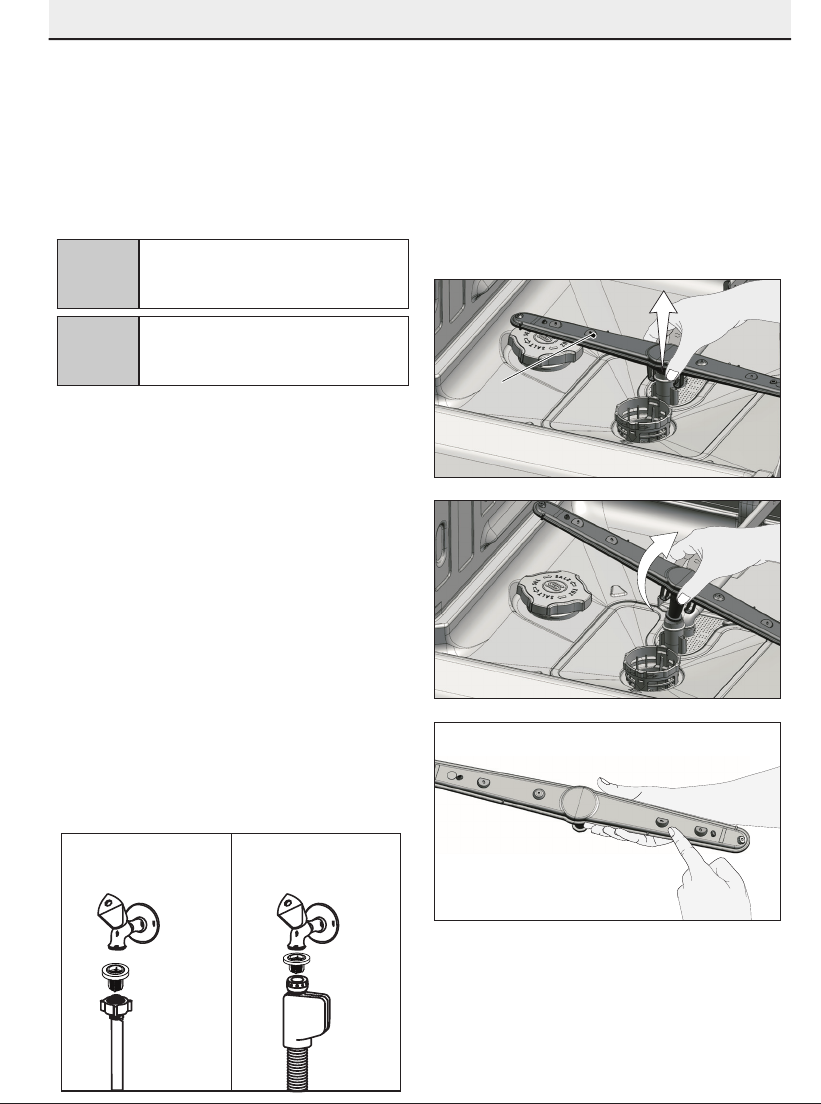
Preparng the machne
1. Open the door of the dshwasher.
2. Place the dshes n accordance wth the
nstructons n the user manual.
3. Make sure that the upper and lower
mpellers rotate freely.
4. Put adequate amount of detergent
nto the detergent dspenser.
5. Check f the Salt and Rnse Ad
ndcators lght and add salt and/or
rnse ad f needed.
Programme selecton
1. Press On/Off key to turn on your
machne.
2. Refer to the table of "Programme data
and average consumpton values"
to determne a washng programme
sutable for your dshes.
3. Selected programme wll start when
you close the door of your machne.
1. On/Off key
2. Programme Selecton / Programme
Cancel (3 seconds) key
3. Functon keys
F1
F2
F3
F4
4. Programme ndcator
5. Salt ndcator
6.
7. Start / Cancel ndcator
8. Tme Delay / Programme Tme ndcator
9. Tme Delay key
10. Tme Delay ndcator
11. End of Programme ndcator
12.
13. Rnse Ad ndcator
1
10
24567839
111213
3
Not n use
Not n use
Half Load Functon
Fast+ Functon
SteamGloss functon
AquaActve
24
Dishwasher / User’s Manual
/38 EN
Operating the product
Programme number
0123456
Programme name
InnerClean
Eco *AutoIntensiveQuick&CleanMini 30Prewash
Cleaning temperature
-
50 ºC40-65 ºC70 ºC70 ºC35 ºC-
This programme is
recommended to be
operated on each 1-2
months for machine
cleaning and
necessary hygiene.
The programme
should be operated
while the machine is
empty.
In order to achieve
an efficient result,
it is recommended
to use together with
special machine
cleaning agents
Most economical
washing programme for
the medium soiled daily
dishes that are kept
waiting.
Determines the soiling
degree of the dishes
and sets the
temperature and
amount of the washing
water as well as the
washing time
automatically. Suitable
for all types of dishes.
Suitable for heavily
soiled dishes, pots and
pans.
Daily washing
programme at which the
lightly soiled dishes that
are kept waiting are
cleaned in the fastest
way.
Suitable for lightly soiled
daily dishes that are
scraped or pre-cleaned.
Suitable for removing
the remnants on the
soiled dishes that will be
kept waiting in the
machine for a few days,
and thus, for preventing
the bad odour buildup.
-MediumMedium to highHighLow - MediumLow-
Detergents
A=25 cm³/15 cm³ B=5 cm³
-A+BAA+BA+BA-
Prewash
-+++- -+
Wash
-+++++-
Dry
-++++- -
Duration (min)
75202110-200156583015
Water (I)
14,41010,2-14,416,210,210,44
Energy (kWh)
0,700,900,90-1,451,431,300,80-
Programme Table
Degree of Soiling
* Reference programme for testing institutes. The tests in accordance with EN 50242 must be carried out with a full water softener salt dispenser and a full rinse aid reservoir, and
using the test programme. The consumption values shown in the table were determined under standard conditions. Differences may therefore occur under practical conditions.
Gebruikershandleiding.com neemt misbruik van zijn services uitermate serieus. U kunt hieronder aangeven waarom deze vraag ongepast is. Wij controleren de vraag en zonodig wordt deze verwijderd.
Product:
Spelregels forum
Om tot zinvolle vragen te komen hanteren wij de volgende spelregels:
lees eerst de handleiding door;
controleer of uw vraag al eerder door iemand anders is gesteld;
probeer uw vraag zo duidelijk mogelijk te stellen;
heeft u een probleem en al geprobeerd om dit op te lossen, vermeld dit erbij aub;
heeft u een oplossing gekregen van een bezoeker dan horen wij dat graag in dit forum;
wilt u een reactie geven op een vraag of antwoord, gebruik dan niet dit formulier maar klik op de knop 'reageer op deze vraag';
uw vraag wordt direct op de website gezet; vermijd daarom persoonlijke gegevens in te vullen;
Belangrijk! Als er een antwoord wordt gegeven op uw vraag, dan is het voor de gever van het antwoord nuttig om te weten als u er wel (of niet) mee geholpen bent! Wij vragen u dus ook te reageren op een antwoord.
Belangrijk! Antwoorden worden ook per e-mail naar abonnees gestuurd. Laat uw emailadres achter op deze site, zodat u op de hoogte blijft. U krijgt dan ook andere vragen en antwoorden te zien.
Abonneren
Abonneer u voor het ontvangen van emails voor uw BEKO DIN26X20 bij:
nieuwe vragen en antwoorden
nieuwe handleidingen
U ontvangt een email met instructies om u voor één of beide opties in te schrijven.
Ontvang uw handleiding per email
Vul uw emailadres in en ontvang de handleiding van BEKO DIN26X20 in de taal/talen: Engels als bijlage per email.
De handleiding is 10,12 mb groot.
U ontvangt de handleiding per email binnen enkele minuten. Als u geen email heeft ontvangen, dan heeft u waarschijnlijk een verkeerd emailadres ingevuld of is uw mailbox te vol. Daarnaast kan het zijn dat uw internetprovider een maximum heeft aan de grootte per email. Omdat hier een handleiding wordt meegestuurd, kan het voorkomen dat de email groter is dan toegestaan bij uw provider.
Stel vragen via chat aan uw handleiding
Stel uw vraag over deze PDF
Uw handleiding is per email verstuurd. Controleer uw email
Als u niet binnen een kwartier uw email met handleiding ontvangen heeft, kan het zijn dat u een verkeerd emailadres heeft ingevuld of dat uw emailprovider een maximum grootte per email heeft ingesteld die kleiner is dan de grootte van de handleiding.
Er is een email naar u verstuurd om uw inschrijving definitief te maken.
Controleer uw email en volg de aanwijzingen op om uw inschrijving definitief te maken
U heeft geen emailadres opgegeven
Als u de handleiding per email wilt ontvangen, vul dan een geldig emailadres in.
Uw vraag is op deze pagina toegevoegd
Wilt u een email ontvangen bij een antwoord en/of nieuwe vragen? Vul dan hier uw emailadres in.