The consumption values shown in the table were determined under standard conditions. Differences may therefore occur under practical conditions. * Reference
programme for testing institutes. The tests in accordance with EN 50242 must be carried out with a full water softener salt dispenser and a full rinse aid reservoir,
and using the test programme.
Programme number
Programme name
Cleaning temperature
Dishwasher / User’s Manual
37 / 49
EN
Operating the product
Auxlary functons
Washing programmes of your dishwasher
are designed to obtain the best cleaning
effect, considering the type of the soiling,
soiling degree and properties of the dishes
to be washed.
Auxiliary functions allow you save from
time, water and power.
C
Auxiliary functions may cause
changes in the programme
duration.
C
Auxiliary functions are not
suitable for all washing
programs. Indicator of the
auxiliary function that is not
compatible with the programme
will not be active.
Tablet detergent function
Allows to obtain a better drying
performance from the multi-purpose
detergents called as all in one detergents
such as 2in1, 3in1, 4in1, 5in1 and etc.,
depending on the hardness level of the tap
water.
C
If you have used the Tablet
features during the last washing
programme you used, Tablet
function will remain active in
the next washing programme
you will select. If you do not
want to use these functions
in the new program you have
selected, press the Tablet
Detergent key until the indicator
of the relevant function turns
off.
C
Tablet Detergent function may
cause change in the programme
duration.
Half Load function
It is used to operate the machine without
loading it completely.
1. Load your dishes in the machine as you
like.
2. Turn the machine on with On/Off key.
3. Select the desired programme and
press the Half Load key. The Half Load
indicator will light on the display in the
Function Selected indicator.
4. Close the door of the machine to start
the programme.
C
With the Half Load function you
can save both water and power
while using the lower and upper
baskets of the machine.
Super Rinse Function
Depending on the type of the detergent
used, if a detergent dissolving issue is
encountered it will remove the resulting
stains from the dishes and enables the
optimum rinsing performance.
Fast+ Function
It shortens the time of the washing cycle
selected and decreases water consumption
by enabling washing under higher pressure.
Floor illumination
Warning to show that machine is
in washing phase
(depends on the model)
Your machine reflects a light to the floor
during the washing process. This light turns
off after the washing process is complete.
C
Floor illumination is activated
automatically when the
washing programme starts and
remains lit until the end of the
programme.
C
Floor illumination cannot be
cancelled by the user.
38Dishwasher / User’s Manual/49 EN
Operating the product
Warning Sound and Interior
Lighting Settings
(depends on model)
Use the submenu settings to change the
"Warning Sound" and "Interior Lighting"
settings for your product.
Changing the Warning Sound and
Interior Lighting Settings
1. After turning on the machine, press
and hold Time Delay and Programme
keys simultaneously for 3 seconds.
2. Press the programme key until the
Rinse Aid icon starts to flash. The
applicable options will be displayed on
the programme indicator as follows:
Sound On / Interior Lighting On;–[Display
P1]
Sound Off / Interior Lighting On;–[Display
P2]
Sound On / Interior Lighting Off;–[Display
P3]
Sound Off / Interior Lighting Off;-[Display
P4]
3. You can turn ON or OFF the Warning
Sound/Interior Lighting feature with
the time delay key.
4. Turn off the machine with On/Off key
to save the changes.
C
After the "Interior Lighting ON"
is set, the interior lighting will
switch ON for 2 minutes if the
door is opened and switched
OFF after 2 minutes.
C
If "Interior Lighting OFF" is set
then interior lighting will not
switch ON.
Schedulng the washng
tme
Time Delay
If an economical electricity tariff is applied
in your region, you can use the Time
Delay function to wash your dishes during
appropriate hours.
You can delay the start of the selected
programme until 9 hours.
1. Press the Time Delay function key after
selecting the washing programme and
other auxiliary functions.
2. Once you press the Time Delay key "3
hours" Time Delay indicator will start
flashing.
3. Set the desired time by pressing the
Time Delay key. Each press on the key
will increase up to 9 hours with 3-hour
increments.
4. Close the door of your machine after
setting the Time Delay. Once the delay
time is over, the selected programme
will start automatically.
C
The time delay will start
countdown with the closing
of the door after selecting the
Time Delay function.
C
If the door is opened while the
Time Delay function is active,
the countdown will be paused
and start icon will start to flash.
Changing the settings while Time
Delay function is active
While the Time Delay function is activated,
you cannot make changes in the washing
programme, auxiliary functions or the
duration of time delay.
Dishwasher / User’s Manual
39 / 49
EN
Operating the product
C
Programme and auxiliary
functions cannot be set/
changed after the programme
has started.
To cancel the Time Delay function
To cancel the process while the Time Delay
function is active the programme should be
canceled.
C
Time Delay function cannot be
set after the programme starts.
Startng the programme
Close the door of your machine to start it
after selecting the programme and auxiliary
functions.
C
Your machine performs water
softening depending on the
hardness level of the supply
water. Washing time can
change while the programme
is running depending on the
ambient temperature where
your machine is installed,
temperature of the supply
water and amount of the dishes.
C
Pay attention not to open the
door of the machine when it is
running. There may be a rush of
vapour when you open the door
of your machine; be careful.
C
The machine will remain silent
in pause mode for some time
in order to remove the water in
the machine and on the dishes
completely and to have the
water softener cleaned, and
then it will resume running in
drying mode.
Cancellng the programme
Press and hold the Programme Selection
/ Programme Cancel keys for 3 seconds.
Release the key as the Start indicator starts
flashing.
Once you close the door of your machine,
draining is completed in 2 minutes
and the machine gives an audible warning
when it is completed.
C
There might be residues of
detergent or rinse aid in the
machine and/or on the pieces
being washed depending on the
step the programme you have
cancelled was in.
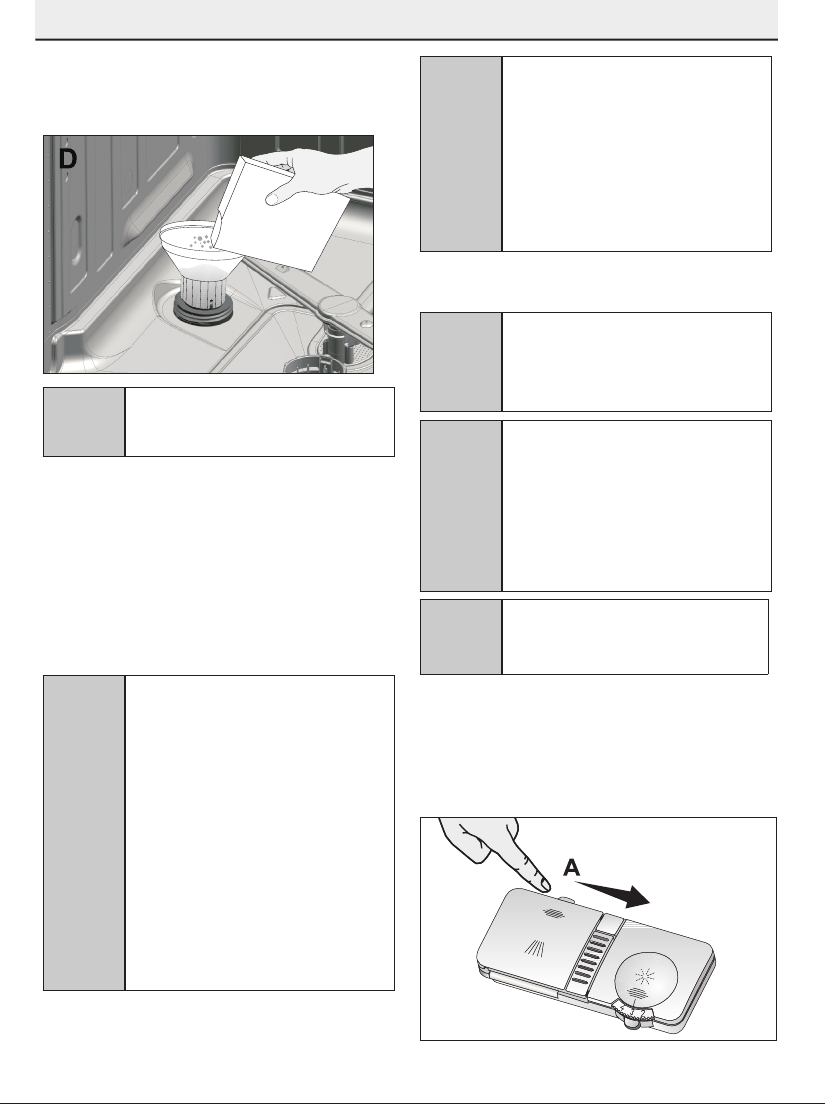
Salt ndcator ()
Please check the salt indicator on the
display to see whether there is adequate
amount of softening salt in the dishwasher
or not. You need to refill the salt reservoir
with salt whenever salt indicator appears
on the display of your machine.
C
Adjusting the water hardness
level is explained in Water
Softening System section.
Rnse Ad ndcator ()
Please check the rinse aid indicator on the
display to see whether there is adequate
amount of rinse aid in the dishwasher or
not. You need to refill the rinse aid reservoir
with rinse aid whenever rinse aid indicator
appears on the display of your machine.
40Dishwasher / User’s Manual/49 EN
Operating the product
End of programme
C
When the programme you have
selected comes to an end, an
audible warning signal will warn
you to turn off your machine.
This audible signal will warn you
with certain intervals before it
turns off.
End of Programme indicator will light up
when the washing programme is over.
1. Open the door of the machine.
2. Press On/Off key to turn off your
machine.
3. Close the tap.
4. Unplug the machine from the socket.
C
For energy saving, the machine
is automatically turned off
following the completion of the
programme or if the programme
is not started.
C
Leave your dishes in the
machine for about 15 minutes
to allow them cool down after
they are washed. Your dishes
will dry in a shorter time if you
leave the door of your machine
ajar during this period. This
process will increase the drying
effectiveness of your machine.
Water cut-o warnng
If mains water is cut or water inlet tap is
turned off the machine cannot take water
in and P2 icon will flash on the programme
indicator. As long as the problem continues,
washing programme is paused and the
water inlet is checked regularly by the
machine; when the water is restored P2
icon will disappear after a while and the
washing programme resumes.
Overowng warnng
If the machine intakes too much water or
there is leakage at any of the components
then the machine will detect this and P1
icon will flash on the Programme indicator.
As long as the overflowing continues safety
algorithm will be active and try to discharge
the water. If overflowing stops and safety
is assured, P1 icon will disappear. If P1 does
not disappear, there is a permanent fault. In
this case the authorised service should be
contacted.
Dishwasher / User’s Manual
41 / 49
EN
Maintenance and cleaning
6
Service life of the product extends and
frequently faced problems decrease if it is
cleaned at regular intervals.
A
Unplug the product and turn off
the tap before attempting any
cleaning procedures.
C
Do not use abrasive substances
for cleaning.
C
Clean the filter and impellers
at least once a week in order
for the machine operates
efficiently.
Cleanng the outer surface
of the product
Wipe the outer surface and door gaskets
of the product gently with a mild cleaning
material and damp cloth. Wipe the "Control
panel" only with a slightly damp cloth.
Cleanng the nteror of the
machne
•Clean the interior of the machine and
the tank by running a programme with
or without detergent based on the
degree of soil.
•If water has remained in the machine,
drain the water by performing the
procedures under the topic "Canceling
a programme". If the water cannot
be discharged, remove the filters
as specified in the "Cleaning the
filters" section and check if there
are any leftover deposits that have
accumulated at the bottom of the
machine, blocking the water path.
Clean if necessary.
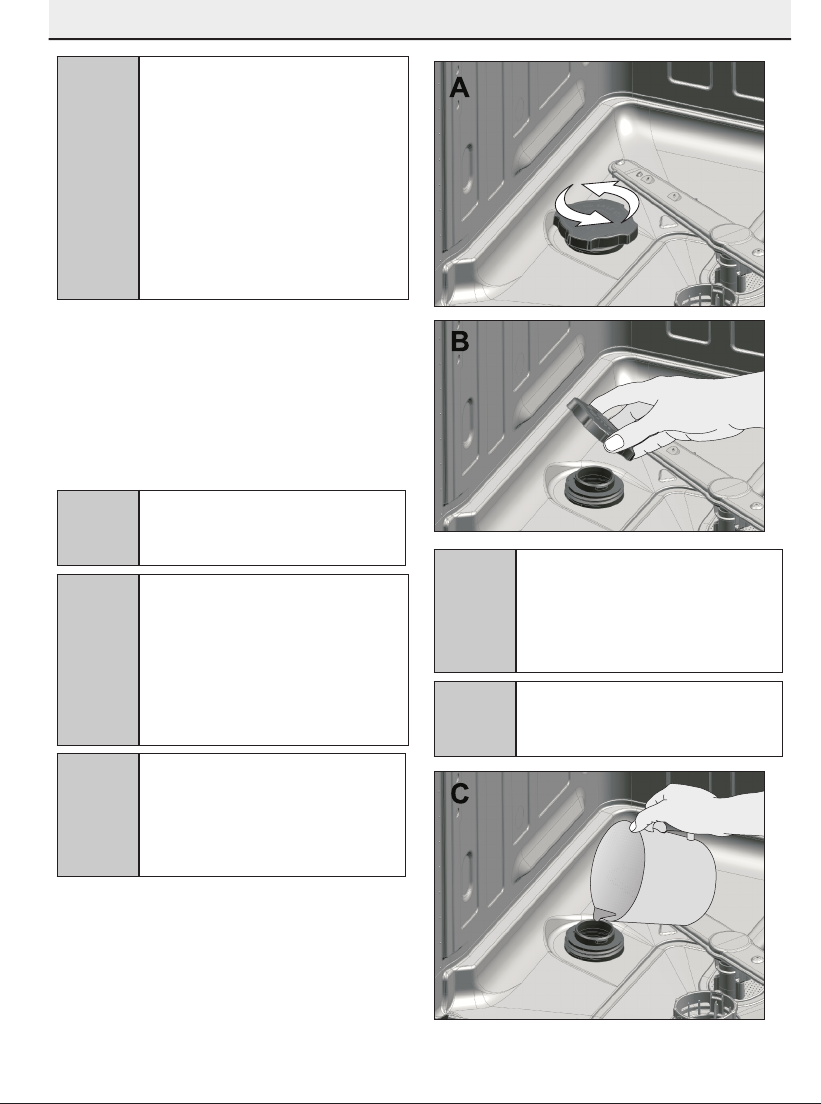
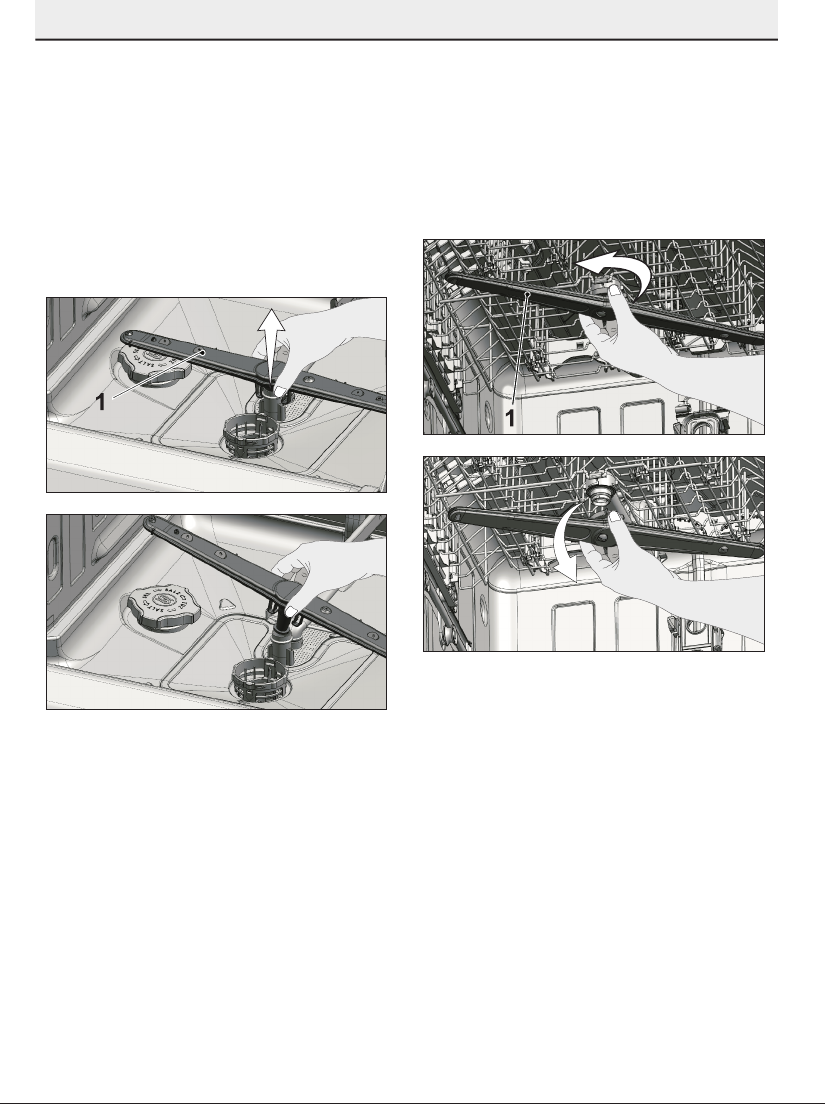
Cleanng the flters
Clean the filters at least once a week in
order for the machine operates efficiently.
Check if food residues are left on the filters.
If there are food residues on filters, take
them out and clean well under running
water.
1. Turn the micro filter (1) and coarse filter
(2) assembly counter clockwise and pull
it out from its seating.
2. Pull out the metal/plastic filter (3) from
the seating.
3. Press the two pawls on the coarse filter
inwards and separate the coarse filter
from the assembly.
42Dishwasher / User’s Manual/49 EN
Maintenance and cleaning
4. Clean all three filters under tap water
by means of a brush.
5. Place the metal/plastic filter.
6. Place the coarse filter into the micro
filter. Make sure that it is properly
seated. Turn the coarse filter clockwise
until a "click" sound is heard.
C
Do not use the dishwasher
without filter.
C
Incorrect placement of the filters
will reduce washing efficiency.
Cleanng the hose flter
Damages on the machine that may be
caused by impurities coming from the
urban supply water or your own water
installation (such as sand, dirt, rust, etc.)
can be prevented by means of the filter
attached to the water inlet hose. Check the
filter and the hose regularly and clean them
if necessary.
1. Turn off the tap and remove the hose.
2. After taking out the filter, clean it
under running tap water.
3. Place the cleaned filter back to its seat
in the hose.
4. Install the hose to tap.
(depends on model)
Dishwasher / User’s Manual
43 / 49
EN
Maintenance and cleaning
Cleanng the mpellers
Clean the impellers at least once a week in
order for the machine operates efficiently.
Lower mpeller
Check if the holes on the lower impeller (1)
are clogged. If they are clogged, remove and
clean the impeller. You can pull the lower
impeller up to remove it.
Upper mpeller
Check if the holes on the upper impeller (1)
are clogged. If they are clogged, remove
and clean the impeller. Turn its nut to left to
remove the upper impeller.
Make sure that the nut is tightened well
when installing the upper impeller.
44Dishwasher / User’s Manual/49 EN
7
Troubleshooting
Machine does not start.
• Power cable is unplugged. >>> Check if the power cable is plugged in.
• Fuse is blown. >>> Check the fuses in your house.
• Water is cut. >>> Make sure that the water inlet tap is open.
• Door of the machine is open. >>> Make sure that you have closed the door of the
machine.
• On / Off button is not pressed. >>> Make sure that you have turned on the machine by
pressing the On / Off button.
Dishes are not washed clean
• Dishes are not placed orderly in the machine. >>> Load the dishes as described in the
user manual.
• Selected programme is unsuitable. >>> Select a programme with a higher temperature
and cycle time.
• Impellers are stuck. >>> Prior to starting the programme, turn the lower and upper
impellers by hand to make sure that they rotate freely.
• Impeller holes are clogged. >>> Lower and upper impeller holes might be clogged with
food remnants such as lemon pips. Clean the impellers regularly as illustrated in section
“Cleaning and Care”.
• Filters are clogged. >>> Check if the filter system is clean. Clean the filter system
regularly as illustrated in section “Cleaning and Care”.
• Filters are installed incorrectly. >>> Check the filter system and make sure that it is
installed correctly.
• Baskets are overloaded. >>> Do not overload the baskets in excess of their capacity.
• Detergent is stored under unsuitable conditions. >>> If you are using powder
detergent, do not store the detergent package in humid places. Keep it in a closed
container if possible. For ease-of-storing, we recommend you to use tablet detergents.
• Detergent is not sufficient. >>> If you are using powder detergent, adjust the amount
of detergent according to the soiling degree of your dishes and/or programme
definitions. We recommend you to use tablet detergents for optimum results.
• Rinse aid is not sufficient. >>> Check the rinse aid indicator and add rinse aid if
necessary. Increase the rinse aid setting if there is enough amount of rinse aid in the
machine.
• Detergent dispenser lid is left open. >>> Make sure that the detergent dispenser lid is
closed tightly after adding detergent.
Dishes are not dry at the end of cycle
• Dishes are not placed orderly in the machine. >>> Place your dishes in a way that no
water will accumulate in them.
Dishwasher / User’s Manual
45 / 49
EN
Troubleshooting
• Rinse aid is not sufficient. >>> Check the rinse aid indicator and add rinse aid if
necessary. Increase the rinse aid setting if there is enough amount of rinse aid in the
machine.
• Machine is unloaded right after the programme is over. >>> Do not unload your machine
right after washing process is completed. Slightly open the door and wait for evacuation
of the steam inside for a while. Unload the dishes after the pieces cool down to a
touchable level. Start unloading process from the lower basket. Thus, dropping of water
remained on a piece at upper basket onto the pieces at lower basket is prevented.
• Selected programme is unsuitable. >>> Since rinsing temperature is low at programmes
with short duration, drying performance will also be low. Select programmes with longer
duration for a higher drying performance.
• Surface quality of the kitchen utensils is deteriorated. >>> Desired washing
performance can not be obtained on kitchen utensils with deteriorated surfaces and it
is not suitable to use such utensils in terms of hygiene as well. Also, water can not flow
easily on deteriorated surfaces. It is not recommended to wash such kitchen utensils in
dishwasher.
C
It is normal that drying complaints can be experienced with Teflon kitchen
utensils. It is associated with the structure of Teflon. Since the surface tensions
of Teflon and water are different, water droplets will remain as beads on the
Teflon surface.
Tea, cafe or lipstick stains remain on dishes.
• Selected programme is unsuitable. >>> Select a programme with a higher temperature
and cycle time.
• Surface quality of the kitchen utensils is deteriorated. >>> Tea and cafe stains or other
dye spots may not be cleaned in dishwasher when they have penetrated in deteriorated
surfaces. Desired washing performance can not be obtained on kitchen utensils with
deteriorated surfaces and it is not suitable to use such utensils in terms of hygiene as
well. It is not recommended to wash such kitchen utensils in dishwasher.
• Detergent is stored under unsuitable conditions. >>> If you are using powder detergent,
do not store the detergent package in humid places. Keep it in a closed container if
possible. For ease-of-storing, we recommend you to use tablet detergents.
Lime traces remain on dishes and glassware gains a misty appearance
• Rinse aid is not sufficient. >>> Check the rinse aid indicator and add rinse aid if
necessary. Increase the rinse aid setting if there is enough amount of rinse aid in the
machine.
• Water hardness setting is low or salt level is insufficient >>> Measure the hardness of
the supply water appropriately and check the water hardness setting.
• Salt leakage exists. >>> Pay attention not to spill salt around the salt filling hole while
adding salt. Make sure that the salt reservoir lid is tightly closed after finishing the filling
process. Run the prewash programme to remove the salt that spilled inside the machine.
46Dishwasher / User’s Manual/49 EN
Troubleshooting
Since the salt granules that will remain under the lid will dissolve during prewash,
causing the lid loosen, check the lid once again at the end of the programme.
There is a different odour in the machine
C
A new machine has a peculiar odour. It will fade out after a couple of washes.
• Filters are clogged. >>> Check if the filter system is clean. Clean the filter system
regularly as illustrated in section “Cleaning and Care”.
• Dirty dishes are kept in dishwasher for 2-3 days. >>> If you are not going to start the
machine right after you have put the dishes into it, remove the remnants on the dishes
and run the Prewash programme without detergent every 2 days. In such cases, do not
close the door of the machine completely in order to avoid odour build up in machine.
You can also use commercially available odour removers or machine cleaners.
Rust, discoloration or surface deterioration occurs on dishes
• Salt leakage exists. >>> Salt may cause deterioration and oxidation on metal surfaces.
Pay attention not to spill salt around the salt filling hole while adding salt. Make sure
that the salt reservoir lid is tightly closed after finishing the filling process. Run the
prewash programme to remove the salt that spilled inside the machine. Since the salt
granules that will remain under the lid will dissolve during prewash, causing the lid
loosen, check the lid once again at the end of the programme.
• Salty food remnants have remained on dishes for a long time. >>> If cutlery soiled
with such foods will be kept waiting in machine, dirt must be removed by prewash or
dishes must be washed without being kept waiting.
• Electric installation is not grounded. >>>Check if your machine is connected to the
actual grounding line. Otherwise, the static electric created in the product causes arcs
on the surfaces of metal items creating pores, removing the protective cover on the
surface and causing discoloration.
• Intensive cleansers such as bleaches are used. >>> Protective cover on metal surfaces
gets damaged and looses its efficiency in time when it gets in contact with cleansers
such as bleach. Do not wash your dishes with bleach.
• Metal items particularly such as knives are used for purposes other then their intended
uses. >>> Protective cover on the edges of knives may get damaged when they are
used for purposes such as opening cans. Do not use metal kitchen utensils out of their
intended uses.
• Cutlery are made of low quality stainless steel. >>> Corrosion on such items is
inevitable; they should not be washed in dishwashers.
• Kitchen utensils that are already corroded are washed in dishwasher. >>> Rust on a
corroded item can migrate to other stainless steel surfaces and cause corrosion on
those surfaces as well. Such items should not be washed in dishwashers.
Dishwasher / User’s Manual
47 / 49
EN
Troubleshooting
Detergent remains in detergent dispenser.
• Detergent dispenser was damp when adding detergent. >>> Make sure that the
detergent dispenser is dried well prior to filling it with detergent.
• Detergent is added long before the washing process. >>> Pay attention to add
detergent shortly before start-up of the washing.
• Opening of the detergent dispenser lid is prevented during washing. >>> Place the
dishes in a way that will not prevent the detergent dispenser lid from opening and the
water going into the machine from impellers.
• Detergent is stored under unsuitable conditions. >>> If you are using powder
detergent, do not store the detergent package in humid places. Keep it in a closed
container if possible. For ease-of-storing, we recommend you to use tablet detergents.
• Impeller holes are clogged. >>> Lower and upper impeller holes might be clogged with
food remnants such as lemon pips. Clean the impellers regularly as illustrated in section
“Cleaning and Care”.
Decorations and ornaments on kitchen utensils are being erased.
C
Decorated glasses and decorated lustre porcelains are not suitable for washing
in the dishwasher. Manufacturers of some glassware and porcelain tableware
items do not recommend washing such kitchen utensils in the dishwashers
either.
Dishes are scratched.
C
Kitchen utensils that contains or are made of aluminum should not be washed
in dishwasher.
• Salt leakage exists. >>> Pay attention not to spill salt around the salt filling hole while
adding salt. Spilled salt can cause scratches. Make sure that the salt reservoir lid is
tightly closed after finishing the filling process. Run the prewash programme to remove
the salt that spilled inside the machine. Since the salt granules that will remain under
the lid will dissolve during prewash, causing the lid loosen, check the lid once again at
the end of the programme.
• Water hardness setting is low or salt level is insufficient >>> Measure the hardness of
the supply water appropriately and check the water hardness setting.
• Dishes are not placed orderly in the machine. >>> When placing the glasses and other
glassware into the basket lean them not against other dishes but the edges or racks of
the basket or the glass support tines. Striking of the glasses to each other or to other
dishes due to the impact of water during washing can cause breaks, or scratches on
their surfaces.
48Dishwasher / User’s Manual/49 EN
Troubleshooting
A smear remains on glasses that resembles milk stain which can not be
removed when wiped by hand. A bluish / rainbow appearance occurs when
the glass is pointed to light.
• Excessive rinse aid is used. >>>Lower rinse aid setting. Clean the spilled rinse aid when
adding rinse aid.
• Corrosion has occurred on glass due to soft water. >>> Measure the hardness of the
supply water appropriately and check the water hardness setting. If your supply water
is soft (<5 dH), do not use salt. Choose programmes that wash in higher temperatures
(e.g. 60-65°C). You can also use glass protective detergents that are commercially
available.
Foam forms in the machine.
• Dishes are washed with hand-wash detergent by hand but not rinsed before placing
them into the machine. >>> Hand-wash detergents do not contain antifoam. There is
no need to hand-wash the dishes before placing them into the machine. Removing the
coarse soil on the dishes under tap water, with a tissue paper or fork will be sufficient.
• Rinse aid has spilled into the machine when adding rinse aid. >>> Take care that rinse
aid is not spilled in the machine when you are filling it. Clean any spilled rinse ait with
the help of a tissue paper/towel.
• Lid of the rinse aid reservoir is left open. >>> Make sure that the lid of the rinse aid
reservoir is closed after adding rinse aid.
Kitchen utensils are broken.
• Dishes are not placed orderly in the machine. >>> Load the dishes as described in the
user manual.
• Baskets are overloaded. >>> Do not overload the baskets in excess of their capacity.
Water remains in the dishwasher at the end of the programme.
• Filters are clogged. >>> Check if the filter system is clean. Clean the filter system
regularly as illustrated in section “Cleaning and Care”.
• Discharge hose is clogged/blocked. >>> Check the discharge hose. If necessary,
remove the discharge hose, clear the blockage and insert is as illustrated in the user
manual.
C
If you cannot eliminate the problem although you follow the instructions in this
section, consult your dealer or the Authorised Service Agent. Never try to repair
Gebruikershandleiding.com neemt misbruik van zijn services uitermate serieus. U kunt hieronder aangeven waarom deze vraag ongepast is. Wij controleren de vraag en zonodig wordt deze verwijderd.
Product:
Spelregels forum
Om tot zinvolle vragen te komen hanteren wij de volgende spelregels:
lees eerst de handleiding door;
controleer of uw vraag al eerder door iemand anders is gesteld;
probeer uw vraag zo duidelijk mogelijk te stellen;
heeft u een probleem en al geprobeerd om dit op te lossen, vermeld dit erbij aub;
heeft u een oplossing gekregen van een bezoeker dan horen wij dat graag in dit forum;
wilt u een reactie geven op een vraag of antwoord, gebruik dan niet dit formulier maar klik op de knop 'reageer op deze vraag';
uw vraag wordt direct op de website gezet; vermijd daarom persoonlijke gegevens in te vullen;
Belangrijk! Als er een antwoord wordt gegeven op uw vraag, dan is het voor de gever van het antwoord nuttig om te weten als u er wel (of niet) mee geholpen bent! Wij vragen u dus ook te reageren op een antwoord.
Belangrijk! Antwoorden worden ook per e-mail naar abonnees gestuurd. Laat uw emailadres achter op deze site, zodat u op de hoogte blijft. U krijgt dan ook andere vragen en antwoorden te zien.
Abonneren
Abonneer u voor het ontvangen van emails voor uw BEKO DIN15310 bij:
nieuwe vragen en antwoorden
nieuwe handleidingen
U ontvangt een email met instructies om u voor één of beide opties in te schrijven.
Ontvang uw handleiding per email
Vul uw emailadres in en ontvang de handleiding van BEKO DIN15310 in de taal/talen: Engels als bijlage per email.
De handleiding is 15,33 mb groot.
U ontvangt de handleiding per email binnen enkele minuten. Als u geen email heeft ontvangen, dan heeft u waarschijnlijk een verkeerd emailadres ingevuld of is uw mailbox te vol. Daarnaast kan het zijn dat uw internetprovider een maximum heeft aan de grootte per email. Omdat hier een handleiding wordt meegestuurd, kan het voorkomen dat de email groter is dan toegestaan bij uw provider.
Uw handleiding is per email verstuurd. Controleer uw email
Als u niet binnen een kwartier uw email met handleiding ontvangen heeft, kan het zijn dat u een verkeerd emailadres heeft ingevuld of dat uw emailprovider een maximum grootte per email heeft ingesteld die kleiner is dan de grootte van de handleiding.
Er is een email naar u verstuurd om uw inschrijving definitief te maken.
Controleer uw email en volg de aanwijzingen op om uw inschrijving definitief te maken
U heeft geen emailadres opgegeven
Als u de handleiding per email wilt ontvangen, vul dan een geldig emailadres in.
Uw vraag is op deze pagina toegevoegd
Wilt u een email ontvangen bij een antwoord en/of nieuwe vragen? Vul dan hier uw emailadres in.