Astralpool Typhoon Max Commercial Pool Cleaner Handleiding
15
Verklein
Vergroot
Pagina terug
1/22
Pagina verder
BK 0002102
Robot limpiapiscinas
Para piscinas públicas y privadas
Manual de operación
Robot nettoyeur
Pour piscines publiques et privées
Manuel d'utilisation
7
10
9
11
8
13
12
14
29
27
1
28
Floating Cable
27. floating cable
28. plug (transformer to unit)
29. E-Z Swivel
2625242322
1617181920
21
15
2
3
4
5
6
31
30
32
Control Panel
Pool Cleaner
5. Wheel Tube
4. Drive Track
3. Side Plate
2. Handle
1. Unit Body
and Brushes
6. Infrared Sensor
Remote Control
7. timer button
10. left turn button
9. right turn button
11. change direction button
8. LED
13. delay button
12. remote control mode button
14. remote control transmitter
15. Operation Time
18. Cleaning Mode
17. Delay Mode
19. OK/Error indication
16. Init. Mode
21. Full Bag
20. Test Mode
22. Information
23. Select Pool Features
25. Select Delay Time
24. Select Cleaning Type
26. Select Cleaning Cycle
Filter Assembly
30. Bottom lid assembly
31. Filter bag
32. Intake valve flaps
Power Supply
33. ON Button
34. OFF Button
35. Socket
3334
35
Pool Cleaner
Remote Control
Filter Assembly
Power Supply
Control PanelPower Supply
5
1. Before using your pool cleaner
Location of the Power Supply Unit (Transformer)
½½
Fig. 1
Power supply
Power supply
6
Shut off and unplug the power supply every
time you remove the cleaner from the water.
Clean the filter bag after every cycle.
Periodically straighten out the floating cable.
Replace worn brushes to ensure maximum
cleaning performance.
Save your cleaner's packaging for off-season
storage or for shipping the unit to your
dealer if service is required.
Leave your pool cleaner in the water for 15 to
20 minutes after every cleaning cycle.
Do not leave your cleaner in direct sunlight
when not in use.
Never leave the power supply in direct
sunlight and avoid leaving it in the rain.
Occasionally, you should rinse your cleaner
including the Lock Tabs and intake valves on
the Bottom Lid Assembly in clean, fresh
water. This will lengthen the service life of
the drive belts, drive tracks and scrubbing
brushes.
Clean the propeller once a month (see page 15)
Important Tips
1) Plug the pool cleaner cable into the power supply. Make sure the key on the plug corresponds exactly with the key slot on the socket of the power supply
(fig. 2)
2) Completely immerse the cleaner in water.
3) While the pool cleaner is in the water, gently tilt it side to side (fig. 3). This will allow any trapped air to escape through the pump outlets. Then, with a
gentle push, allow the cleaner to sink to the bottom of the pool.
NOTE: If the pool cleaner does not sink to the bottom of the pool, it’s a result of trapped air. This air must be removed for proper operation (Repeat step 3).
4) Uncoil the floating cable fully and spread it over the pool water surface as evenly as possible. Make sure the cable has no tangles or kinks. (fig. 1)
5) Plug the power supply into a proper grounded outlet. (verify the proper voltage again). Switch ON the power supply. The pool cleaner will start to operate
and clean the pool in accordance with the cleaning program that you choose. For details see next page.
To Operate Your Pool Cleaner
3
Key slot
Cable plug
Power supply
Pool Cleaner
Floating Cable
Remote control transmitter
Power
Outlet
7
Removing the unit from the pool
1. Pull the unit by the floating cable until the unit is close to the surface and the attached Rope Assembly
is within your reach.
2. Turn the unit until the brushes are close to the wall.
3. With both hands, grasp the loop at the end of the Rope Assembly and gently pull or lean backwards to
lift the far side of the unit from the water. This will allow the water to drain from the robot.
4. When the water has drained, grasp the handle with both hands and lift the unit from the water.
CAUTION: Bringing the unit side plate next to the pool wall and using the handle to lift the far side from
the water for draining may cause severe damage to the Handle Assembly.
correct wrong
Control Panel
1. Operation Time
4. Cleaning Mode
3. Delay Mode
5. OK/Error indication
2. Initial Mode
7. Full Bag
6. Test Mode
8. Information
9. Select Pool Features
11. Select Delay Time
10. Select Cleaning Type
12. Select Cleaning Cycle
Set
Select
Power ON (Green)
Starts the Pool Cleaner
Power OFF (Red)
Shuts Off the Pool Cleaner
12111098
23456
1
7
The new Power Supply allows you to program your Robotic Cleaner for:
• Operating time
• Pool length
• Surface material
• Required cleaning level
You can also select the required time delay before the start of the Cleaning Cycle.
The Power Supply LCD Display provides information about faults, total working hours
and operation details of the last Cleaning Cycle.
The Power Supply
8
Control Panel
To protect the control panel
(LCD display) do not leave the
power supply in direct sunlight
or exposed to rain.
Programs and Functions
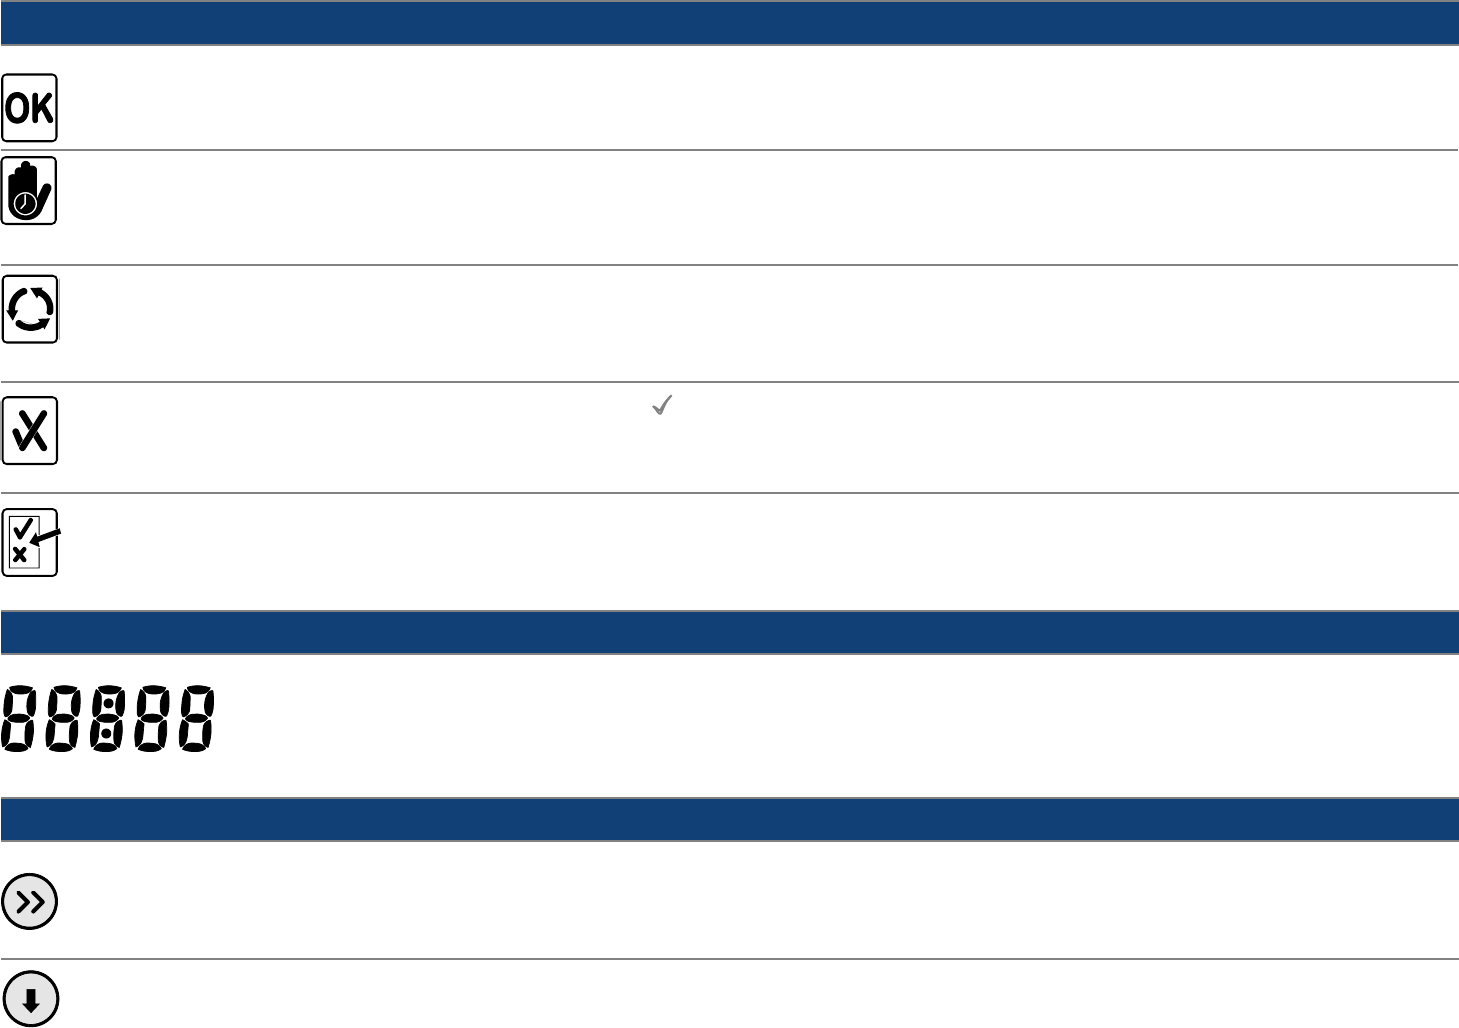
Operator Indicator
Initial Mode
Delay Mode
Indicates that the Robotic Cleaner is ready to use; no faults detected.
Indicates whether the Robotic Cleaner is in Delay Mode:
• Indicator is lit: Robotic Cleaner is in Delay Mode.
• Indicator is not lit: regular operation, Robotic Cleaner is not in Delay Mode.
Cleaning Mode
OK/Er ro r Indicatio n
T est Mode
Rotates to Indicate that Robotic Cleaner is in Cleaning Mode.
The Robotic Cleaner- cleans for a predefined period according to the current Cleaning
LARGE UNITS: 3, 5, 7 & 9 hours.
SMALL UNITS: 3, 5 & 7 hours.
OK ( ) Previous Cleaning Cycle completed successfully
Er ro r (X ) Failure occurred during the previous Cleaning Cycle.
For Technicians only
Operation Time – hh:mm
Standby Time – hh:mm
Cleaning Type, Pool Length,
Information and Error Codes.
Display
9
Select
Set
Programming Indicators – Active set up parameters
Pressing the Select button enables the user to select programming mode, while paging
between program modes.
Pressing the Set button sets the selected value while paging between the options.
10
The Robotic Cleaner is shipped with the following manufacturer
default values:
Cycle Time
Delay Time
Cleaning Level
Pool Length
Pool Type
• The Robotic Cleaner will operate according to the manufacturer
default values unless those values are manually changed (see
“Programming the Robotic Cleaner”).
• Programming values are stored in the Power Supply memory even
after the Robotic Cleaner is shut off (Power OFF).
LARGE UNITS: Are all units equipped with 2 pump motors for suction
SMALL UNITS: Are all units equipped with 1 pump motor for suction
Programming
3 hours
No delay
Regular
50m
Rough Ceramic
2. Programing your pool cleaner
Use the following procedure to program your Robotic Cleaner:
A. PRESS THE GREEN POWER “ON” BUTTON UNTIL YOU HEAR
A CLICK; OK flashes for four seconds and then disappears (the
Power Supply runs a self-test).
OFF
ON
Note: Programmed values are stored in memory. Therefore the
Robotic Cleaner will always start working according to last
programmed values.
B. IF THE (X) SYMBOL APPEARS, A FAILUREHAS OCCURRED.
See the Error code in the information page .
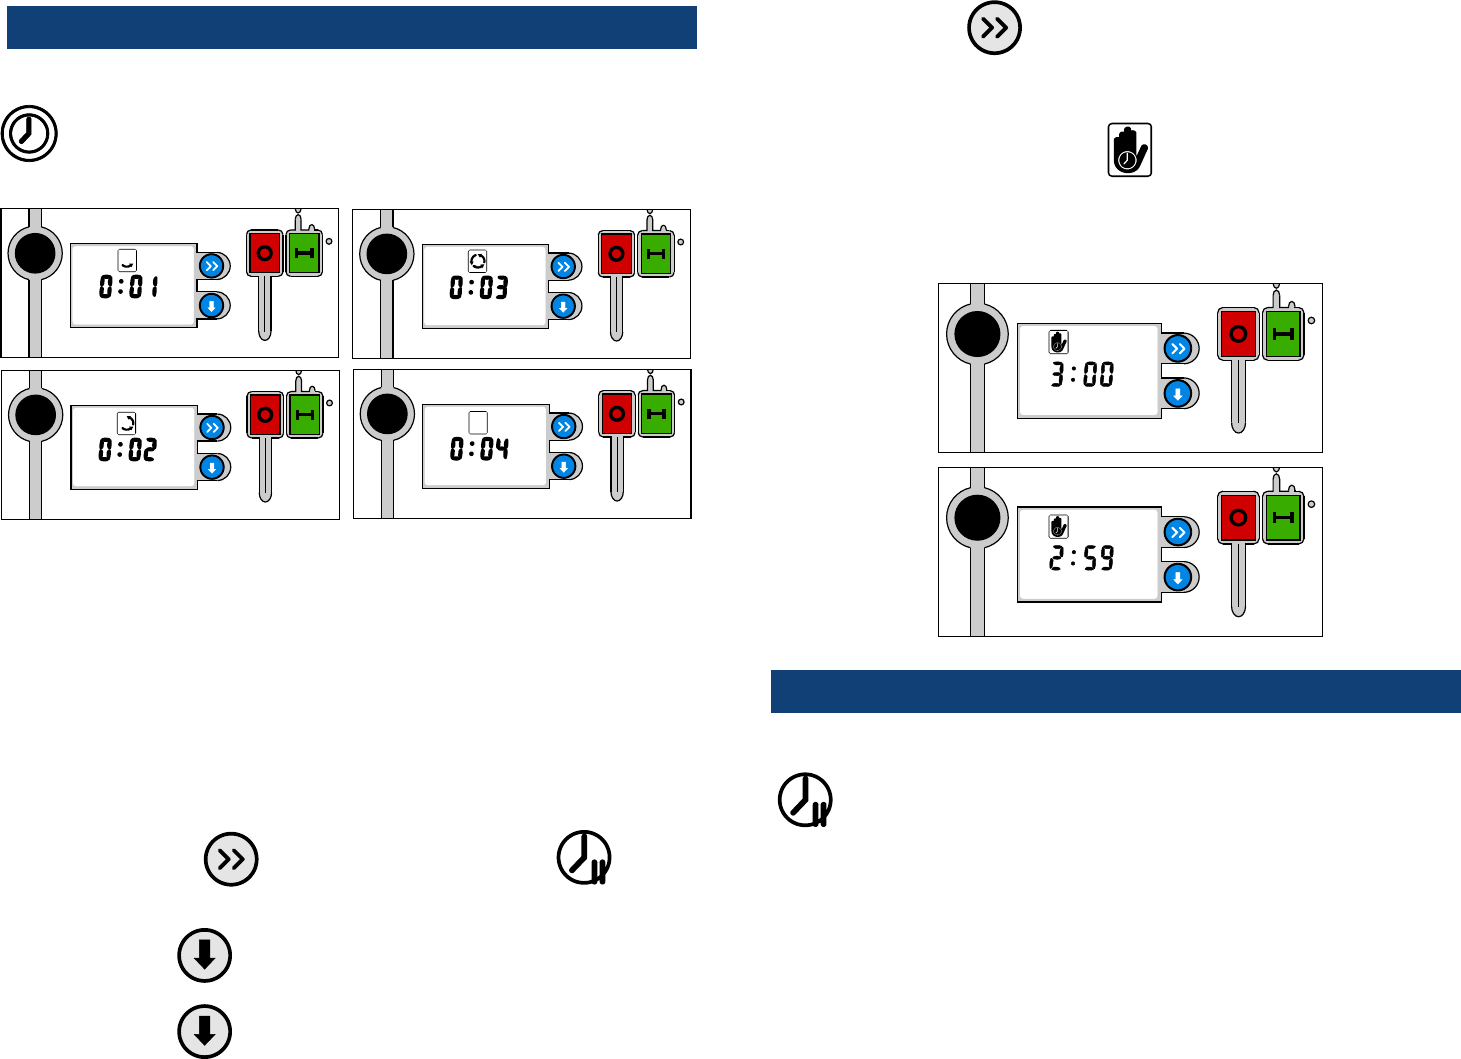
Set the Cycle Time according to the amount of debris in the pool.
Increase the Cycle Time accordingly.
a) Press Select . The Cycle Time indicator and the Time
Display 03:00 both flash.
b) Press Set until the desired Cycle Time is displayed.
For example, press twice to display a Cycle Time of 7 hours.
c) Press Select
• the Time Display stops flashing and the Cycle Time is set.
• the next programming mode appears on the display.
3. To set the operation time
Note:
• The Robotic Cleaner does not stop operating while the Cycle Time
is being set.
The Operation Time indicator is active and the Clock records the
operation time.
• If Select is not pressed after setup, the Operation Time indicator is
automatically activated after 60 seconds. Same logic applies to all
other presets
OFF
ON
11
OFF
ON
OFF
ON
OFF
ON
OFF
ON
OFF
ON
OFF
ON
d) After programing the cleaning cycle time, the current total cleaning
time appears on the power supply display. The total time is displayed
until the end of the current cleaning cycle.
Programming Indicators - Active set up parameters
Select Cleaning cycle
LARGE UNITS: 3, 5, 7 & 9 hours.
SMALL UNITS: 3, 5 & 7 hours.
4. To set the delay time
Delaying Operation of the Robotic Cleaner allows:
• Debris to sink to the bottom of the pool.
• Timing the cleaning cycle to end with the opening of the pool.
The pool will be clean and ready for swimmers.
a) Press Select until the Delay Time indicator appears
and flashes.
b) Press Set the clock flashes 0 (no delay).
c) Press Set until the desired Delay Time is displayed. For
example, press twice to display a Delay Time of 3 hours.
d) Press Select
• the Time Display stops flashing and the Delay Time is set.
• the next programming mode appears on the display.
• the Delayed Time indicator is activated and the clock
counts down the remaining time (if a Delay Time of 3 hours was
set, cleaning is now delayed by 3 hours).
Programming Indicators - Active set up parameters
Select Delay Time
LARGE UNITS: 0 (default), 2,3,4 & 5
SMALL UNITS: 0 (default), 2 & 3
5. To select cleaning level type
RECOMMENDATION:
• Before using the Robotic Cleaner for the first time, set the
Cleaning Level values according to the Cleaning Level, Pool
Length and Surface Material of the pool to be cleaned.
• When using the Robotic Cleaner to clean a different pool, set
the Cleaning Level values accordingly.
12
6. To select pool features
RECOMMENDATION:
• Before using the Robotic Cleaner for the first time, set the Pool
Feature values according to the pool to be cleaned. You can ask
your dealer to set the values.
• When using the Robotic Cleaner to clean a different pool, set
the Pool Feature values accordingly.
a) Press Select until the Pool Feature indicator
appears. The Pool Features indicator start to flash.
b) Press and hold Set and then press Select
c) Press Set until the desired Pool Length is displayed.
For example, press twice to display a Pool Length of 35.
d) Press Select
• the Pool Features indicator stops flashing and the Pool Length
is set.
• the Pool Surface indicator appears and flashes.
e) Press Set until the desired Pool Surface is displayed.
For example, press twice to display a Pool Surface value of 2.
OFF
ON
OFF
ON
a) Press and hold Set ;
and then press Select ;
both the Cleaning Level indicator and the Cleaning Level
Display (clock) start to flash.
Programming Indicators - Active set up parameters
Select Cleaning Level Type
Select one of three options:
1- Light Cleaning; short cycle
2- Regular Cleaning (default); standard cycle
3- Heavy Duty Cleaning; Long cycle with pump intake
operating at high power
Note: Simultaneously pressing Set and Select prevents unintentional
programming of the cleaning level values.
b) Press Set until the desired Cleaning Level is displayed.
For example, press twice to display a Cleaning Level of 3.
c) Press Select again
• the Cleaning Level is set.
• the next programming mode appears on the display.
13
Programming Indicators - Active set up parameters
Select Pool Features
Pool Length - select one of three options:
LARGE UNITS
25 - Pool length is 25 meters
35 - Pool length is 30 to 40 meters
50 - Pool length is 50 meters
SMALL UNITS
15 - Pool length is 15 meters
20 - Pool length is 20 meters
25 - Pool length is 25 meters
f) Press Select
• the Pool Surface indicator stops flashing and the Pool Surface is
set.
g) Press Select again
• the Information Mode indicator appears on the display.
OFF
ON
Note: Pool dimensions affect the minimum cleaning time.
Pool Surface - select one of four options:
1- Concrete surface
2- Vinyl Surface
3- Rough ceramic surface (default)
4 - Smooth ceramic surface
Matching the Remote Control Unit to the Power
Supply
It is vital that the Remote Control unit becomes matched to the
Power Supply. This process assures that the Robotic Cleaner
will be controlled only by the specified Remote Control unit.
The original remote control provided with your robot is
matched to the power supply.
To match the Remote Control Unit to the Power Supply:
On the Remote Control unit, simultaneously press the Delay
button and the R/C button; the Remote Control ID appears on
the Power Supply display and the Remote Control unit is
matched to the Power Supply.
Programming is to be active only while the RC-ID is dispalyed
in the information page
7. Using the remote control
Timer
Remote Control Functions
Sets the Cycle Time.
Pressing the Timer button changes the Cycle Time on the Power Supply.
Each press of the Timer button changes the Cycle Time to the next Cycle Time option :
3, 5, 7, 9 or 12 hours.
Change Direction
Changes the Robotic Cleaner’s current direction of motion.
• If the Robotic Cleaner is currently moving forward, pressing the Change Direction
button causes the Robotic Cleaner to move backward.
• If the Robotic Cleaner is currently moving backward, pressing the Change Direction
button causes the Robotic Cleaner to move forward.
Turn Left
Turns the Robotic Cleaner to the left for as long as the Turn Left button is pressed.
Turn Right
Turns the Robotic Cleaner to the right for as long as the Turn Right button is pressed.
Delay
Sets the Delay Time to 2 hours.
After the Delay Time has been set to 2, another press of the Delay button resets the
Delay Time to 0 (no delay).
R/C
Changes the Robotic Cleaner’s current Operating Mode: Manual Mode or Automatic
Mode.
• If the Robotic Cleaner is currently in Manual Mode, pressing the R/C button changes
the Robotic Cleaner to Automatic Mode.
• If the Robotic Cleaner is currently in Automatic Mode, pressing the R/C button
changes the Robotic Cleaner to Manual Mode.
14
Note: Pressing the Remote Control Delay Button resets the programmed Delay Time values to "0".
15
8. Information mode
The Information Mode provides information about:
• the last operation cycle (h)
• the total working hours of the Robotic Cleaner (H)
• any failures that occurred during the last cycle (F).
• RC ID
To view the Information Mode data
1. Press Select until the Information Mode indicator appears
and flashes.
2. Press Set until the desired Information option is displayed:
• h - the operation time of the last completed cycle, displayed in
HHMM format.
• H - the total operation time, displayed in HHMM format; this value
also indicates the validity of the warranty.
• F - last cycle completed successfully for the last cycle operation
was faulty.
3. Code and indicate normal operation; the cycle completed
successfully.
OFF
ON
OFF
ON
and error code Err indicates faulty operation.
OFF
ON
OFF
ON
RC-id settings of the power supply and Remote control unit. New match
between the power Supply and the RC has to be made according to the
instruction in the RC unit only when this message is displayed
Information
Displays detailed information about Robotic Cleaner operation
cycles failures and RC ID:
1. Last Cycle Operation Time
Preceded by the h symbol and displayed in the HH:MM format. This
information disappears after 10 minutes into a new Cleaning Cycle.
2. Total Operation Time
The sum total of all cleaning time, starting from the first Cleaning Cycle.
Preceded by the H symbol and displayed in the H:MM format.
3. Successful or Faulty Operation of the Previous Cycle
Normal Operation
• The Cleaning Cycle completed successfully, as indicated by the
following display;
(V) - F (Fault) symbol and error code “0000”.
Failure
• The cleaning cycle did not complete successfully, as indicated by the
following display: (X) – F symbol and Error code number (see Error
code table).
4. Remote Control ID
Displays the RC ID no chosen for that P.S. New ID could be programed
for a new RC unit- please refer to the programming instructions
Programming Indicators - Active set up parameters
16
0001
0004
0040
0044
0100
1000
0005
1001
1004
1005
1002
1008
100A
Master drive failure
Slave drive failure
Communication failure, between master and slave drives
Communication and Slave drive failure
The PS detects low power consumption, the entire robot’s
current is under the lowest limit
The PS detects high power consumption, short current – the
robot consumes more than 19 Amps.
Both motor drives failed
The PS detects high power consumption due to Master motor
drive.
The PS detects high power consumption due to Slave motor
drive.
The PS detects high power consumption due to Master and
Slave motor drive.
The PS detects high power consumption due to master side
pump.
The PS detects high power consumption due to slave side
pump.
The PS detects high power consumption due to master and
slave pumps
Contact your service center
Contact your service center
Usually caused due to bad wiring, water in
connectors and some time due to hardware
problem in master or slave drives
Contact your service center
Usually the robot is not connected or cable
problem
Contact your service center
Contact your service center
Contact your service center
Contact your service center
Contact your service center
Contact your service center
Contact your service center
Contact your service center
Error Code Table
Description
What to do
Code
17
0024
0900
0002
0008
0010
0020
0800
0012
0018
001A
Beach Boy / Low pumps power consumption has been
detected
Low power and communication failure between the robot and
power supply
Master side pump failure
Slave side pump failure
Collection bags are full
Beach Boy / Low pumps power consumption has been
detected
Communication failure between the robot and power supply
Collection bags are full and Master side pump failure
Collection bags are full and Slave side pump failure
Collection bags are full
If occurs when the robot is in water the problem
can be in the master pump or master drive.
Contact your service center
Usually the power lines in the floating cable or
the power connector are disconnected
Check pump’s connection, check if the impeller
is free to rotate. Contact your service center
Check pump’s connection, check if the impeller
is free to rotate. Contact your service center
Clean the collection bags
If occurs when the robot is in water the problem
can be in the master pump or master drive.
Contact your service center
Usually it is a floating cable or connector
problem
Clean the collection bags and if doesn't help,
Check pump’s connection, check if the impeller
is free to rotate. Contact your service center
Clean the collection bags and if doesn't help,
Check pump’s connection, check if the impeller
is free to rotate. Contact your service center
Clean the collection bags and if doesn't help,
Check pump’s connection, check if the impeller
is free to rotate. Contact your service center
Error Code Table
DescriptionWhat to do
Code
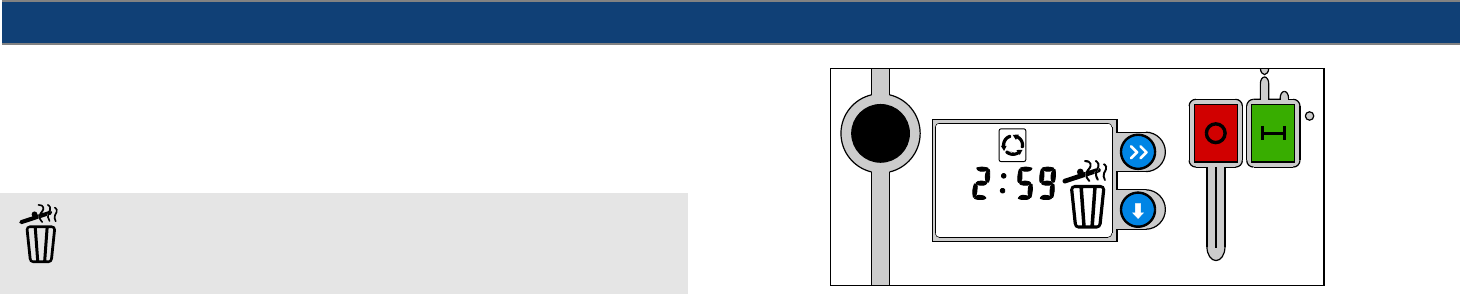
When the Filter Bag is full, the Bag Full indicator automatically lights up.
When the Bag Full indicator is activated, it is highly recommended to
empty and wash the Filter Bag. A full Filter Bag will impede the cleaning
operation and might cause the Robotic Cleaner to stop due to pump
overload.
Bag Full Mode
e\\
ed
18
Full Bag indicator
Indicates that Filter Bag is full. Empty the Filter Bag and
Gebruikershandleiding.com neemt misbruik van zijn services uitermate serieus. U kunt hieronder aangeven waarom deze vraag ongepast is. Wij controleren de vraag en zonodig wordt deze verwijderd.
Product:
Spelregels forum
Om tot zinvolle vragen te komen hanteren wij de volgende spelregels:
lees eerst de handleiding door;
controleer of uw vraag al eerder door iemand anders is gesteld;
probeer uw vraag zo duidelijk mogelijk te stellen;
heeft u een probleem en al geprobeerd om dit op te lossen, vermeld dit erbij aub;
heeft u een oplossing gekregen van een bezoeker dan horen wij dat graag in dit forum;
wilt u een reactie geven op een vraag of antwoord, gebruik dan niet dit formulier maar klik op de knop 'reageer op deze vraag';
uw vraag wordt direct op de website gezet; vermijd daarom persoonlijke gegevens in te vullen;
Belangrijk! Als er een antwoord wordt gegeven op uw vraag, dan is het voor de gever van het antwoord nuttig om te weten als u er wel (of niet) mee geholpen bent! Wij vragen u dus ook te reageren op een antwoord.
Belangrijk! Antwoorden worden ook per e-mail naar abonnees gestuurd. Laat uw emailadres achter op deze site, zodat u op de hoogte blijft. U krijgt dan ook andere vragen en antwoorden te zien.
Abonneren
Abonneer u voor het ontvangen van emails voor uw Astralpool Typhoon Max Commercial Pool Cleaner bij:
nieuwe vragen en antwoorden
nieuwe handleidingen
U ontvangt een email met instructies om u voor één of beide opties in te schrijven.
Ontvang uw handleiding per email
Vul uw emailadres in en ontvang de handleiding van Astralpool Typhoon Max Commercial Pool Cleaner in de taal/talen: Engels als bijlage per email.
De handleiding is 7,53 mb groot.
U ontvangt de handleiding per email binnen enkele minuten. Als u geen email heeft ontvangen, dan heeft u waarschijnlijk een verkeerd emailadres ingevuld of is uw mailbox te vol. Daarnaast kan het zijn dat uw internetprovider een maximum heeft aan de grootte per email. Omdat hier een handleiding wordt meegestuurd, kan het voorkomen dat de email groter is dan toegestaan bij uw provider.
Stel vragen via chat aan uw handleiding
Stel uw vraag over deze PDF
Uw handleiding is per email verstuurd. Controleer uw email
Als u niet binnen een kwartier uw email met handleiding ontvangen heeft, kan het zijn dat u een verkeerd emailadres heeft ingevuld of dat uw emailprovider een maximum grootte per email heeft ingesteld die kleiner is dan de grootte van de handleiding.
Er is een email naar u verstuurd om uw inschrijving definitief te maken.
Controleer uw email en volg de aanwijzingen op om uw inschrijving definitief te maken
U heeft geen emailadres opgegeven
Als u de handleiding per email wilt ontvangen, vul dan een geldig emailadres in.
Uw vraag is op deze pagina toegevoegd
Wilt u een email ontvangen bij een antwoord en/of nieuwe vragen? Vul dan hier uw emailadres in.