707254
3
Verklein
Vergroot
Pagina terug
1/71
Pagina verder
U
U
S
S
E
E
R
R
S
S
M
M
A
A
N
N
U
U
A
A
L
L
2 ARTURIA KeyStep USER’S MANUAL
PROGRAMMING:
Sebastien Colin
Olivier Delhomme
INDUSTRIALIZATION:
Nicolas Dubois
MANUAL:
Randy Lee
Sebastien Rochard
DESIGN:
Glen Darcey
Morgan Perrier
Axel Hartmann
© ARTURIA SA 2016 All rights reserved.
11 Chemin de la Dhuy
38240 Meylan
FRANCE
http://www.arturia.com
Information contained in this manual is subject to change without notice and does not represent a commitment
on the part of Arturia. The software described in this manual is provided under the terms of a license
agreement or non-disclosure agreement. The software license agreement specifies the terms and conditions for
its lawful use. No part of this manual may be reproduced or transmitted in any form or by any purpose other
than purchaser’s personal use, without the express written permission of ARTURIA S.A.
All other products, logos or company names quoted in this manual are trademarks or registered trademarks of
their respective owners.
March 2016 edition
ARTURIA KeyStep USER’S MANUAL 3
T
T
h
h
a
a
n
n
k
k
y
y
o
o
u
u
f
f
o
o
r
r
p
p
u
u
r
r
c
c
h
h
a
a
s
s
i
i
n
n
g
g
t
t
h
h
e
e
A
A
r
r
t
t
u
u
r
r
i
i
a
a
K
K
e
e
y
y
S
S
t
t
e
e
p
p
!
!
This manual covers the features and operation of Arturia’s KeyStep, a full-featured USB
MIDI keyboard controller complete with a polyphonic sequencer, arpeggiator, a robust
set of MIDI and C/V connections, and outfitted with our new Slimkey keyboard for
maximum playability in the minimum space.
In this package you will find:
One KeyStep controller, with a serial number and unlock code on the bottom. You
will need this information in order to register your KeyStep.
One USB Micro B / Type A cable
The Quick Start Guide for KeyStep.
Also included in the purchase of your KeyStep is a free installation of Ableton Live Lite, a
remarkably full-featured recording / sequencing application. The license number will be
provided to you when you register your KeyStep on the Arturia website. Then you can
download the installation file from ableton.com/live-lite.
Be sure to register your KeyStep as soon as possible! There is a sticker on the
bottom panel that contains the serial number of your unit and an unlock code. These
are required during the online registration process. You may want to record these
elsewhere or take a photo of the sticker in case it becomes damaged.
Registering your KeyStep provides the following benefits:
A product license key for your installation of Ableton Live Lite [see note below]
Access to the KeyStep user manual and the latest version of the MIDI Control
Center software
Special offers restricted to KeyStep owners.
You can download the installation file from ableton.com/live-lite.
4 ARTURIA KeyStep USER’S MANUAL
S
S
p
p
e
e
c
c
i
i
a
a
l
l
M
M
e
e
s
s
s
s
a
a
g
g
e
e
S
S
e
e
c
c
t
t
i
i
o
o
n
n
SPECIFICATIONS SUBJECT TO CHANGE:
The information contained in this manual is believed to be correct at the time of printing.
However, Arturia reserves the right to change or modify any of the specifications without
notice or obligation to update the hardware that has been purchased.
IMPORTANT:
The product and its software, when used in combination with an amplifier, headphones
or speakers, may be able to produce sound levels that could cause permanent hearing
loss. DO NOT operate for long periods of time at a high level or at a level that is
uncomfortable.
If you encounter any hearing loss or ringing in the ears, you should consult an
audiologist.
NOTICE:
Service charges incurred due to a lack of knowledge relating to how a function or feature
works (when the product is operating as designed) are not covered by the
manufacturer’s warranty, and are therefore the owner's responsibility. Please study this
manual carefully and consult your dealer before requesting service.
PRECAUTIONS INCLUDE, BUT ARE NOT LIMITED TO, THE FOLLOWING:
1. Read and understand all the instructions.
2. Always follow the instructions on the instrument.
3. Before cleaning the instrument, always remove the USB cable. When cleaning,
use a soft and dry cloth. Do not use gasoline, alcohol, acetone, turpentine or any
other organic solutions; do not use a liquid cleaner, spray or cloth that's too wet.
4. Do not use the instrument near water or moisture, such as a bathtub, sink,
swimming pool or similar place.
5. Do not place the instrument in an unstable position where it might accidentally
fall over.
6. Do not place heavy objects on the instrument. Do not block openings or vents of
the instrument; these locations are used for air circulation to prevent the
instrument from overheating. Do not place the instrument near a heat vent at
any location with poor air circulation.
7. Do not open or insert anything into the instrument that may cause a fire or
electrical shock.
8. Do not spill any kind of liquid onto the instrument.
9. Always take the instrument to a qualified service center. You will invalidate your
warranty if you open and remove the cover, and improper assembly may cause
electrical shock or other malfunctions.
10. Do not use the instrument with thunder and lightning present; otherwise it may
cause long distance electrical shock.
11. Do not expose the instrument to hot sunlight.
12. Do not use the instrument when there is a gas leak nearby.
13. Arturia is not responsible for any damage or data loss caused by improper
operation of the instrument.
ARTURIA KeyStep USER’S MANUAL 5
T
T
a
a
b
b
l
l
e
e
o
o
f
f
C
C
o
o
n
n
t
t
e
e
n
n
t
t
s
s
1 INTRODUCTION ........................................................................................................................................ 9
2 KEYSTEP OVERVIEW ............................................................................................................................ 10
2.1 MAKING THE CONNECTIONS .................................................................................................................. 10
2.1.1 …with a Computer ........................................................................................................................ 10
2.1.2 …with external devices ................................................................................................................. 10
2.1.2.1 CV/Mod/Gate ............................................................................................................................................ 11
2.1.2.2 MIDI devices ............................................................................................................................................ 11
2.1.2.3 Clock sources/destinations ........................................................................................................................ 11
2.1.3 …with an iPad
®
............................................................................................................................ 11
2.2 FRONT PANEL OVERVIEW ...................................................................................................................... 12
2.2.1 Sequencer / arpeggiator ................................................................................................................ 12
2.2.1.1 Seq / Arp toggle switch ............................................................................................................................. 13
2.2.1.2 Seq / Arp modes ........................................................................................................................................ 13
2.2.1.3 Time Division ........................................................................................................................................... 13
2.2.1.4 Rate ........................................................................................................................................................... 13
2.2.2 Tap Tempo / Rest / Tie .................................................................................................................. 13
2.2.3 Transport section .......................................................................................................................... 13
2.2.3.1 All Notes Off ............................................................................................................................................. 14
2.2.4 Hold / Chord button ...................................................................................................................... 14
2.2.5 Shift button .................................................................................................................................... 14
2.2.6 Oct -/+, Transpose, Kbd Play ....................................................................................................... 14
2.2.7 Pitch / Mod touch strips ................................................................................................................ 15
2.3 REAR PANEL OVERVIEW ........................................................................................................................ 15
2.3.1 USB/DC IN ................................................................................................................................... 15
2.3.2 9V DC IN (with optional adapter) ................................................................................................ 15
2.3.3 Pitch/Gate/Mod outputs ................................................................................................................ 15
2.3.4 Sustain pedal input ....................................................................................................................... 16
2.3.5 Sync input/output .......................................................................................................................... 16
2.3.6 MIDI input/output ......................................................................................................................... 16
2.3.7 Sync source selector switches ....................................................................................................... 16
2.3.8 Kensington lock port ..................................................................................................................... 16
3 BASIC OPERATIONS ............................................................................................................................... 17
3.1 PLUG AND PLAY ..................................................................................................................................... 17
3.1.1 Slimkey keyboard .......................................................................................................................... 17
3.1.2 Keyboard MIDI channel ............................................................................................................... 17
3.1.3 Pitch / Mod touch strips ................................................................................................................ 17
3.1.3.1 The Pitch strip ........................................................................................................................................... 17
3.1.3.2 The Mod strip ............................................................................................................................................ 17
3.1.4 Hold button ................................................................................................................................... 17
3.1.5 Sustain pedal ................................................................................................................................. 18
3.1.6 Oct - / Oct + .................................................................................................................................. 18
3.1.7 Factory reset ................................................................................................................................. 18
3.2 SELECT AND PLAY A SEQUENCE ............................................................................................................. 18
3.2.1 Seq / Arp toggle switch ................................................................................................................. 18
3.2.2 Seq / Arp Mode encoder ................................................................................................................ 18
3.2.3 Transport section .......................................................................................................................... 19
3.2.4 Set the tempo ................................................................................................................................. 19
3.2.5 Time Division ................................................................................................................................ 19
3.3 USING THE ARPEGGIATOR ...................................................................................................................... 19
3.3.1 Seq / Arp toggle switch ................................................................................................................. 19
3.3.2 Seq / Arp Mode encoder ................................................................................................................ 19
3.3.3 Transport section .......................................................................................................................... 19
3.3.4 Set the tempo ................................................................................................................................. 20
3.3.5 Time Division ................................................................................................................................ 20
3.3.6 Hold button ................................................................................................................................... 20
4 SHIFT FUNCTIONS .................................................................................................................................. 21
6 ARTURIA KeyStep USER’S MANUAL
4.1 CHORD MODE ........................................................................................................................................ 21
4.1.1 Chords and the sequencer ............................................................................................................. 21
4.1.1.1 Seq Recording and Chord mode ................................................................................................................ 22
4.1.1.2 Seq playback and Chord mode .................................................................................................................. 22
4.1.2 Chords and the arpeggiator .......................................................................................................... 22
4.2 KEYBOARD MIDI CHANNEL .................................................................................................................. 22
4.3 SEQ / ARP PLAYBACK FUNCTIONS .......................................................................................................... 23
4.3.1 Gate .............................................................................................................................................. 23
4.3.2 Swing ............................................................................................................................................ 23
4.3.3 Transpose / Kbd Play .................................................................................................................... 24
4.3.3.1 Transpose .................................................................................................................................................. 24
4.3.3.2 Keyboard Play ........................................................................................................................................... 24
4.3.4 Skip selections: Seq / Arp .............................................................................................................. 24
4.3.5 Skip selections: Time Division ...................................................................................................... 24
4.3.6 Restart Seq / Arp from beginning .................................................................................................. 25
4.4 SHIFT FUNCTION CHART ........................................................................................................................ 25
5 CREATING SEQUENCES ........................................................................................................................ 26
5.1 WHATS A STEP SEQUENCER? ................................................................................................................ 26
5.2 CREATING A SEQUENCE ......................................................................................................................... 26
5.2.1 Step-time recording....................................................................................................................... 27
5.2.1.1 Entering rests ............................................................................................................................................ 27
5.2.1.2 Tie notes .................................................................................................................................................... 28
5.2.1.3 Legato notes .............................................................................................................................................. 28
5.2.2 Real-time record/replace .............................................................................................................. 29
5.2.2.1 Replacing notes ......................................................................................................................................... 29
5.2.2.2 Restart ....................................................................................................................................................... 30
5.2.2.3 Time Div and recording ............................................................................................................................ 30
5.2.2.4 Time Div and Rate .................................................................................................................................... 30
5.2.3 What does it record? ..................................................................................................................... 30
5.2.3.1 A note about velocity ................................................................................................................................ 30
5.2.4 What it does not record ................................................................................................................. 31
5.3 MODIFYING A SEQUENCE ....................................................................................................................... 31
5.3.1 Append .......................................................................................................................................... 31
5.3.2 Clear Last ..................................................................................................................................... 32
5.4 SAVING SEQUENCES............................................................................................................................... 32
6 THE ARPEGGIATOR ............................................................................................................................... 33
6.1 WHATS AN ARPEGGIATOR? .................................................................................................................. 33
6.2 ARPEGGIATOR FEATURES ...................................................................................................................... 33
6.3 ARPEGGIATOR MODES ........................................................................................................................... 34
6.3.1 Start the arpeggiator ..................................................................................................................... 34
6.3.2 Arp mode: Up ............................................................................................................................... 34
6.3.3 Arp mode: Down ........................................................................................................................... 34
6.3.4 Arp mode: Inclusive ...................................................................................................................... 34
6.3.5 Arp Mode: Exclusive ..................................................................................................................... 35
6.3.6 Arp Mode: Random ....................................................................................................................... 35
6.3.7 Arp Mode: Order .......................................................................................................................... 35
6.3.8 Arp Mode: Up x2 .......................................................................................................................... 35
6.3.9 Arp Mode: Down x2 ...................................................................................................................... 36
6.4 BUILD A MULTI-OCTAVE ARPEGGIO ....................................................................................................... 36
6.4.1 Add up to 32 notes ........................................................................................................................ 36
6.5 PAUSING AN ARPEGGIO .......................................................................................................................... 37
7 SYNCHRONIZATION .............................................................................................................................. 38
7.1 AS MASTER ........................................................................................................................................... 38
7.2 AS SLAVE .............................................................................................................................................. 38
7.2.1 Sync In/Out types .......................................................................................................................... 39
7.2.2 Clock connectors .......................................................................................................................... 39
8 CV/GATE/MOD FUNCTIONS ................................................................................................................. 40
ARTURIA KeyStep USER’S MANUAL 7
8.1 PITCH AND GATE SIGNALS ..................................................................................................................... 40
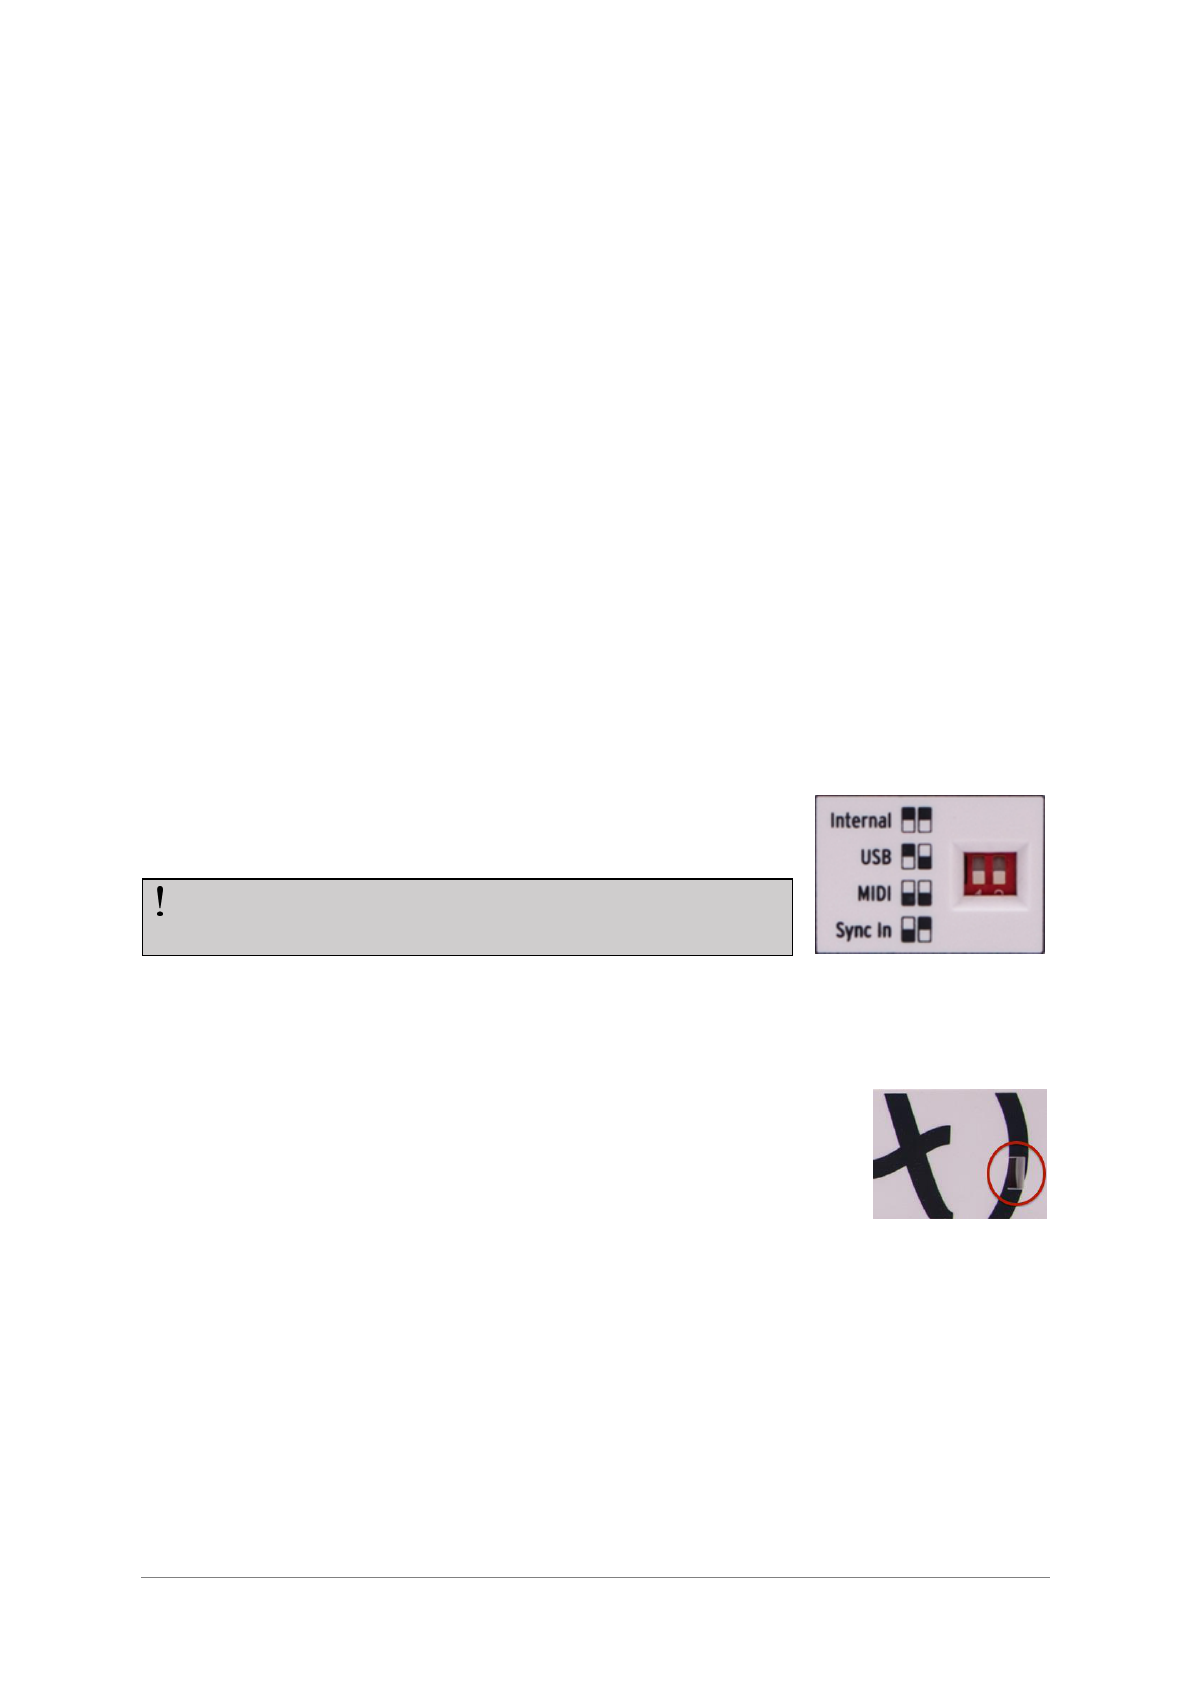
8.1.1 How do Pitch and Gate work? ...................................................................................................... 40
8.1.2 Can my DAW send CV/Gate signals? ........................................................................................... 40
8.2 MODULATION (MOD) OUTPUT ............................................................................................................... 41
8.2.1 How does the Mod output work? .................................................................................................. 41
8.2.2 Can my DAW control the Mod output? ......................................................................................... 41
8.3 ROUTING THE SIGNALS .......................................................................................................................... 41
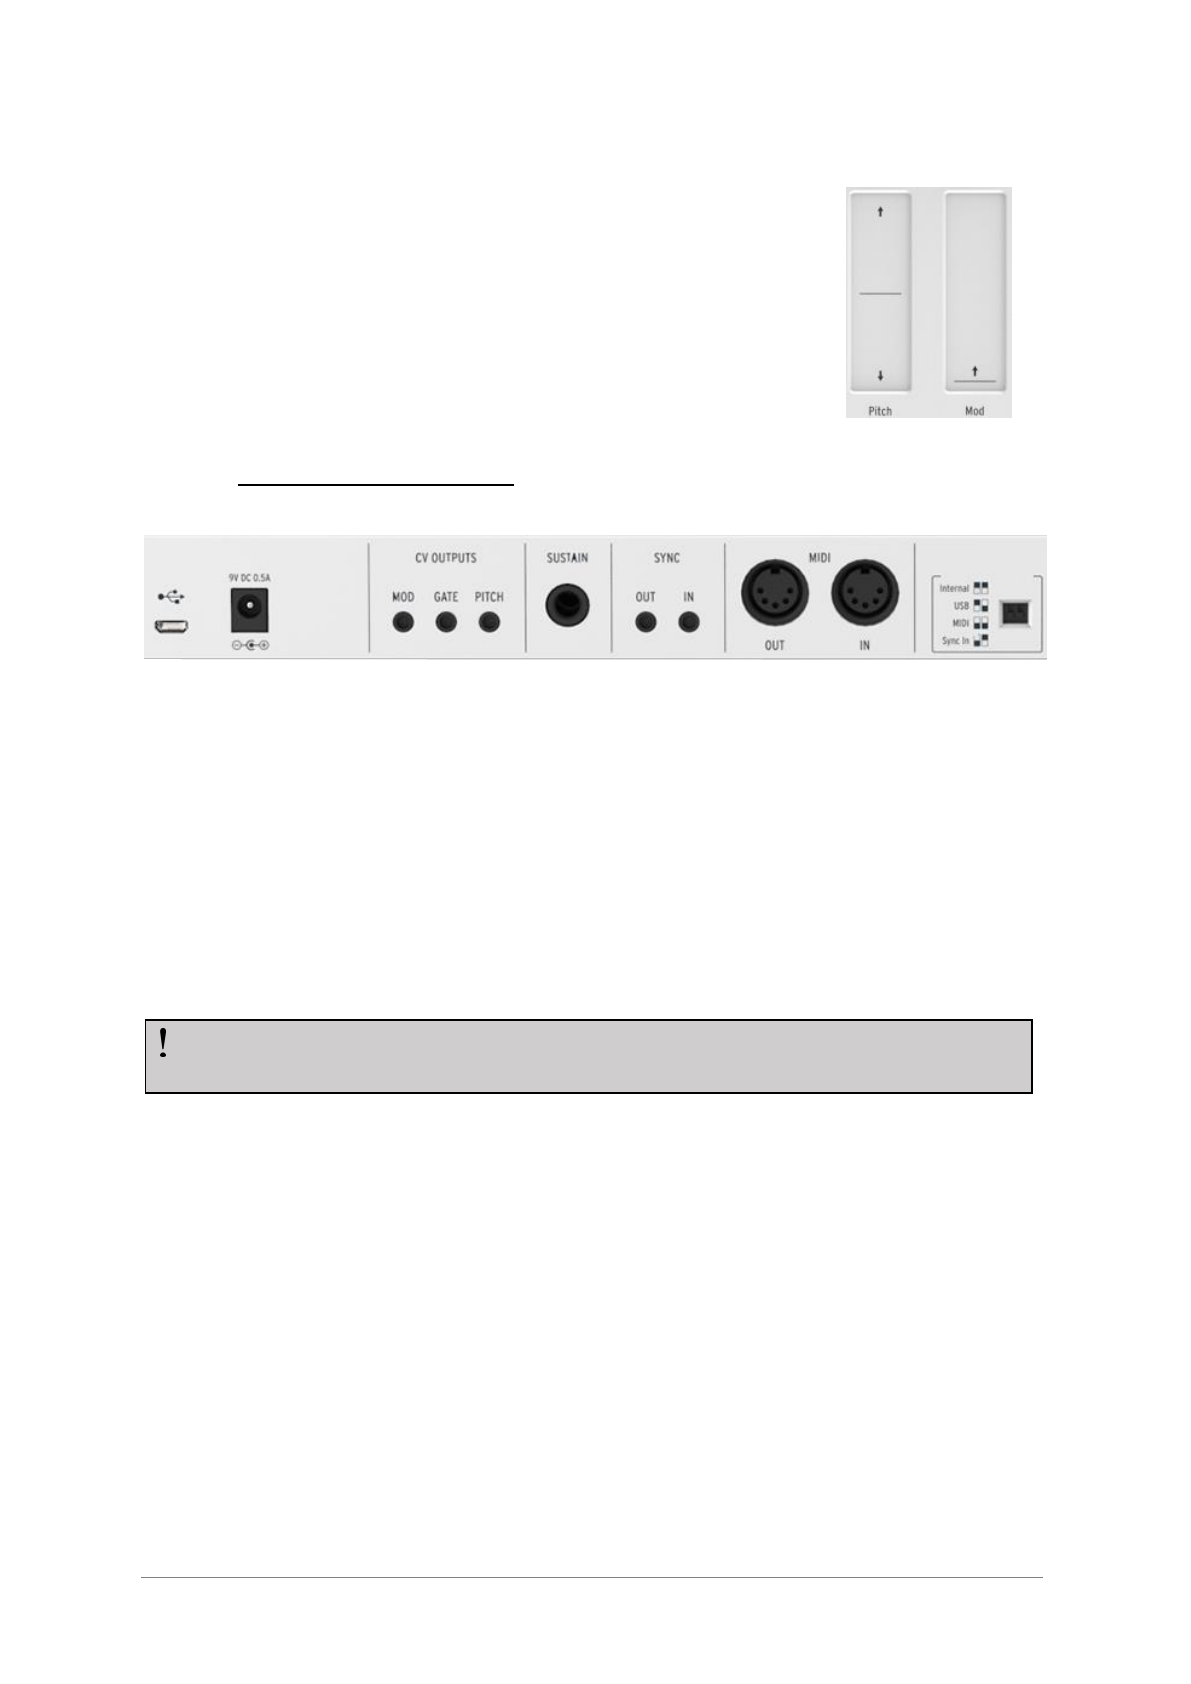
8.4 CV/GATE/MOD SPECIFICATIONS ........................................................................................................... 41
9 MIDI CONTROL CENTER BASICS ...................................................................................................... 43
9.1 SYSTEM REQUIREMENTS ........................................................................................................................ 43
9.2 INSTALLATION AND LOCATION .............................................................................................................. 43
9.3 CONNECTION ......................................................................................................................................... 43
9.4 BACK UP YOUR SEQUENCES ................................................................................................................... 44
9.5 WHERE TO FIND THE MANUAL ............................................................................................................... 44
10 USING MIDI CONTROL CENTER .................................................................................................... 45
10.1 THE SYNC OPTION ................................................................................................................................. 45
10.1.1 Sync operations ............................................................................................................................. 45
10.1.2 Non-sync operations ..................................................................................................................... 45
10.2 DEVICE PROJECTS ................................................................................................................................. 46
10.2.1 The Working Project ..................................................................................................................... 46
10.2.1.1 Live editing ........................................................................................................................................... 46
10.2.1.2 Drag and drop ....................................................................................................................................... 46
10.3 PROJECT BROWSER ................................................................................................................................ 47
10.3.1 Building a library ......................................................................................................................... 47
10.3.2 Revise a Template ......................................................................................................................... 48
10.3.2.1 While synced ........................................................................................................................................ 48
10.3.2.2 Not synced ............................................................................................................................................ 48
10.3.3 Send one sequence to KeyStep ...................................................................................................... 49
10.3.3.1 When synced ........................................................................................................................................ 49
10.3.3.2 When not synced .................................................................................................................................. 49
10.4 STORE TO/RECALL FROM ...................................................................................................................... 50
10.4.1 The ‘Store To’ button .................................................................................................................... 50
10.4.2 Recall edited sequences from KeyStep .......................................................................................... 51
10.4.3 Save, Delete, Import/Export, etc. .................................................................................................. 51
10.5 IMPORT/EXPORT DEVICE SETTINGS ....................................................................................................... 51
10.5.1 Export Device Settings .................................................................................................................. 51
10.5.2 Import Device Settings .................................................................................................................. 52
10.6 EDITING BASICS ..................................................................................................................................... 52
10.6.1 Data entry ..................................................................................................................................... 52
10.6.2 Selecting the tabs .......................................................................................................................... 52
10.6.3 Seq tab .......................................................................................................................................... 53
10.6.4 Device Settings tab........................................................................................................................ 53
10.7 SEQUENCE WINDOW .............................................................................................................................. 53
10.7.1 Navigation..................................................................................................................................... 54
10.7.1.1 Scroll .................................................................................................................................................... 54
10.7.1.2 Zoom .................................................................................................................................................... 54
10.7.2 Per-sequence parameters ............................................................................................................. 54
10.7.2.1 Seq Length ............................................................................................................................................ 55
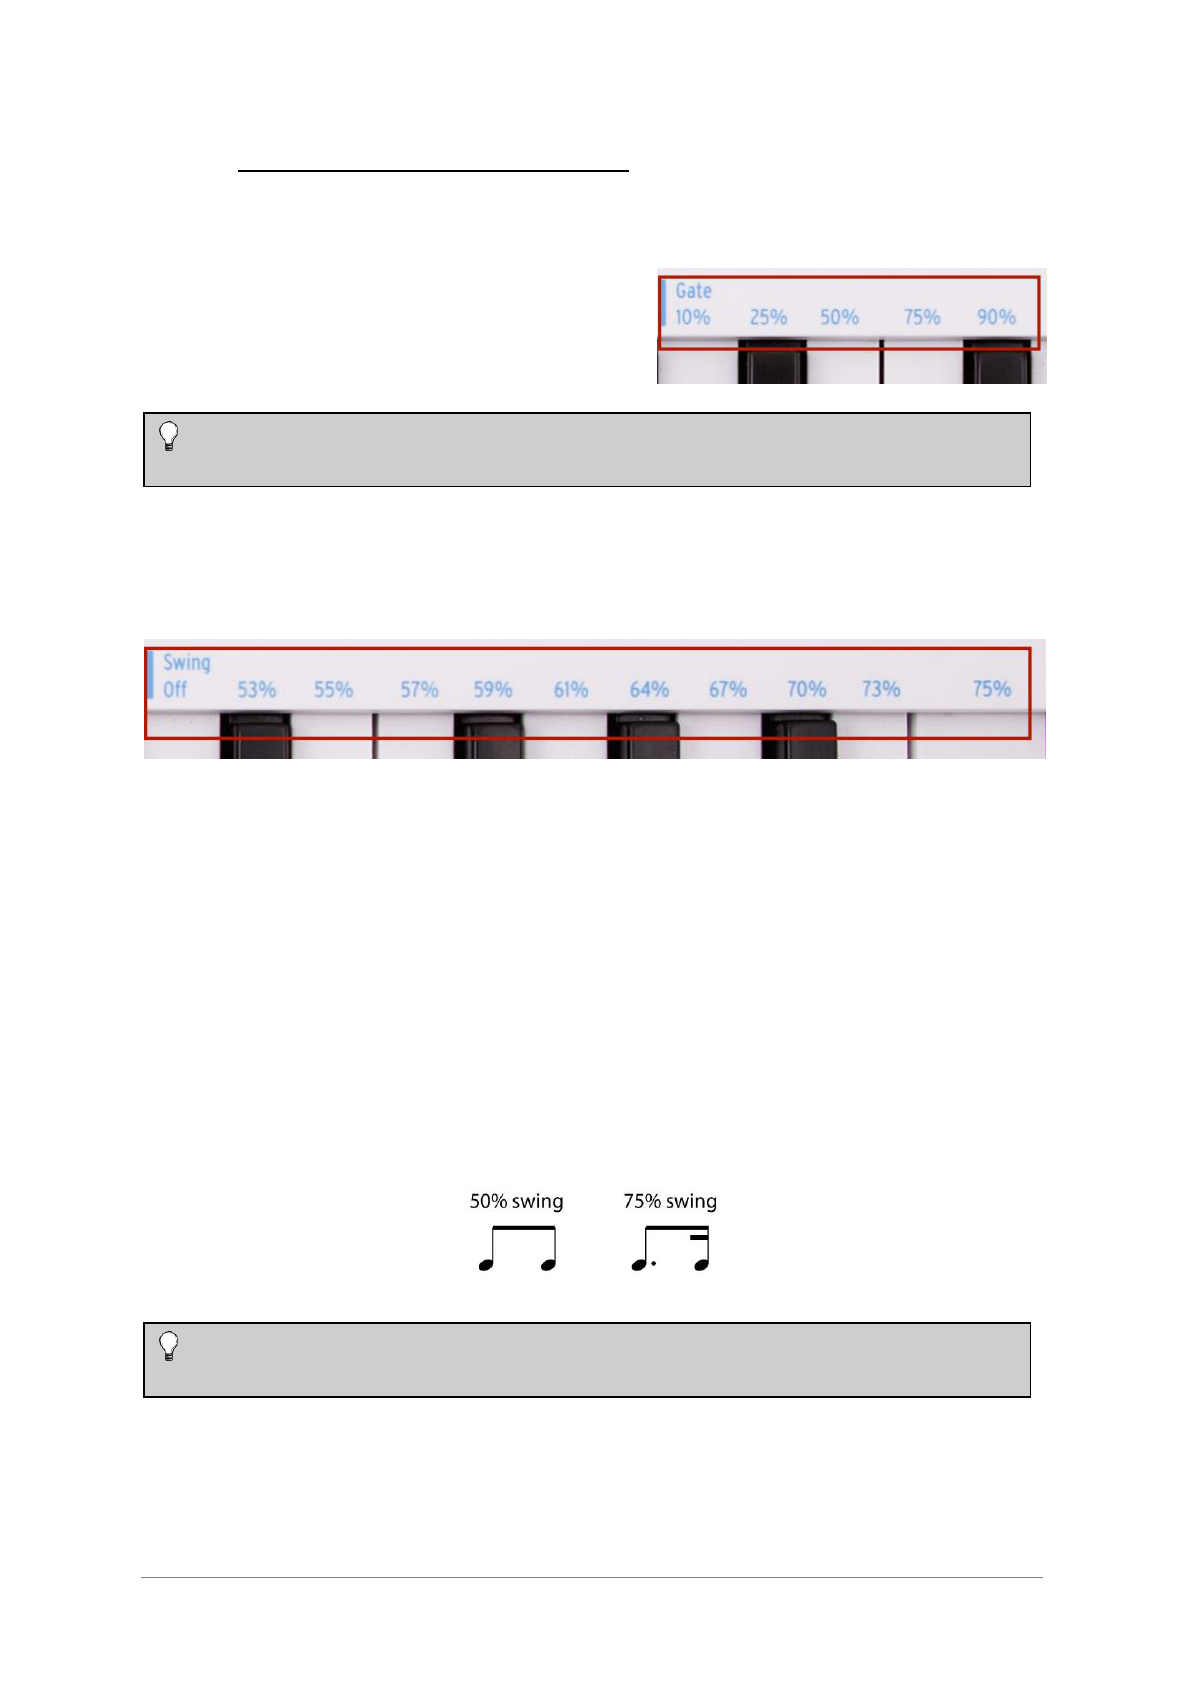
10.7.2.2 Seq Swing % ......................................................................................................................................... 55
10.7.2.3 Seq Gate length ..................................................................................................................................... 56
10.7.3 Sequence events ............................................................................................................................ 56
10.7.3.1 Enter/delete notes ................................................................................................................................. 56
10.7.3.2 Move notes ........................................................................................................................................... 56
10.7.3.3 Copy/paste notes ................................................................................................................................... 57
10.7.3.4 Note velocity ........................................................................................................................................ 57
10.7.3.5 Change the Gate time............................................................................................................................ 57
10.7.3.6 Tie a note .............................................................................................................................................. 58
10.8 SEQUENCE MANAGEMENT ..................................................................................................................... 58
10.8.1 Copy a Seq tab to another Seq tab ................................................................................................ 58
10.8.2 Drag/drop onto a tab .................................................................................................................... 59
8 ARTURIA KeyStep USER’S MANUAL
10.9 WORKING WITH DEVICE SETTINGS ........................................................................................................ 60
10.9.1 Common features .......................................................................................................................... 60
10.9.1.1 MIDI Channel ....................................................................................................................................... 60
10.9.2 MIDI Controller settings .............................................................................................................. 61
10.9.2.1 User Channel ........................................................................................................................................ 62
10.9.2.2 MIDI Input Channel ............................................................................................................................. 62
10.9.2.3 MIDI Thru ............................................................................................................................................ 62
10.9.2.4 Sustain Pedal Mode .............................................................................................................................. 62
10.9.2.5 Sustain Pedal Function ......................................................................................................................... 62
10.9.2.6 Hold Switch Mode ................................................................................................................................ 62
10.9.2.7 Hold Switch Function ........................................................................................................................... 62
10.9.2.8 Sustain Message MIDI Ch .................................................................................................................... 62
10.9.2.9 Sustain Message Range Low ................................................................................................................ 62
10.9.2.10 Sustain Message Range High ............................................................................................................... 62
10.9.2.11 Sustain Message CC ............................................................................................................................. 63
10.9.2.12 Mod strip MIDI Ch ............................................................................................................................... 63
10.9.2.13 Mod strip CC ........................................................................................................................................ 63
10.9.2.14 Pitch Bend MIDI Ch ............................................................................................................................. 63
10.9.2.15 Velocity curve ...................................................................................................................................... 63
10.9.2.16 Aftertouch curve ................................................................................................................................... 63
10.9.3 Sequence settings .......................................................................................................................... 64
10.9.3.1 Sync Clock In/Out settings ................................................................................................................... 65
10.9.3.2 Sync Clock Start ................................................................................................................................... 65
10.9.3.3 Next Seq ............................................................................................................................................... 65
10.9.3.4 Transposition Input port ....................................................................................................................... 65
10.9.3.5 Transpose Input channel ....................................................................................................................... 65
10.9.3.6 Transposition Latch .............................................................................................................................. 65
10.9.3.7 Transpose Center Pitch ......................................................................................................................... 66
10.9.3.8 Velocity ................................................................................................................................................ 66
10.9.3.9 Fixed Velocity value ............................................................................................................................. 66
10.9.3.10 Tempo knob mode ................................................................................................................................ 66
10.9.3.11 Tap Tempo average .............................................................................................................................. 66
10.9.4 CV/Gate settings ........................................................................................................................... 67
10.9.4.1 Pitch CV Output ................................................................................................................................... 67
10.9.4.2 Gate CV Output .................................................................................................................................... 68
10.9.4.3 MIDI Note reference (0V, 1V) ............................................................................................................. 68
10.9.4.4 Note Priority ......................................................................................................................................... 68
10.9.4.5 Mod CV source ..................................................................................................................................... 68
10.9.4.6 Mod CV max voltage............................................................................................................................ 68
10.9.4.7 Pitch Bend Range ................................................................................................................................. 68
10.9.5 Transport settings ......................................................................................................................... 69
11 ARTURIA KEYSTEP LEGAL INFORMATION ............................................................................ 70
11.1 FCC INFORMATION (USA) ............................................................................................................... 70
11.2 CANADA ............................................................................................................................................. 70
11.3 EUROPE ............................................................................................................................................... 70
ARTURIA KeyStep USER’S MANUAL 9
1 INTRODUCTION
Congratulations on your purchase of the Arturia KeyStep! This unique keyboard
controller gives you everything you need to make music wherever you and your portable
tech will be. Its compact size is due in part to its Slimkey keyboard; these great-feeling
keys are smaller than standard piano keys but still large enough to allow for maximum
playability. But this is no toy; as with all Arturia products, it’s built like a tank.
All the essential features of a keyboard controller are here, including aftertouch, touch-
strips for pitch bend and modulation, a footswitch input and a Hold button.
The polyphonic sequencer will capture your ideas and the arpeggiator will unleash them.
You can specify the exact feel of your music through the Swing and Gate parameters,
which are instantly accessible from the front panel. And the chord memory feature will
make you seem like even more of a musical monster than you already are.
KeyStep has an unlimited number of potential uses and setup options, thanks to its
simultaneous USB, MIDI, CV/Gate and synchronization capabilities. There’s an additional
Mod connection to complement the CV and Gate outputs, allowing for even more
creative options with external devices such as modular synthesizers. And the included
MIDI Control Center software allows you to configure KeyStep the way that works best
for your style and system.
KeyStep is very easy to use, so you’ll probably start experimenting with it right out of
the box. But be sure to read this manual completely, because in addition to covering the
basics we’ll also describe several ways to integrate this little powerhouse of a controller
with your system. You will find KeyStep to be a great source of musical inspiration and
creativity.
Be sure to visit www.arturia.com. That’s the place to go for the latest firmware and to
download the MIDI Control Center. You’ll also find links to our tutorials and FAQs.
We will leave the two of you alone now. You have a lot of great music to make!
10 ARTURIA KeyStep USER’S MANUAL
2 KEYSTEP OVERVIEW
2.1 Making the connections
There are quite a few ways to connect KeyStep with other types of equipment, from
vintage to modern. Below are some examples of potential setups:
2.1.1 with a Computer
KeyStep is a USB class-compliant controller, so at its most basic level it can be
connected to any computer with a USB port and used as an input device for various
applications. The included MIDI Control Center software lets you choose which MIDI
messages will be sent by the mod strip and pedal, and also enables you to specify the
global KeyStep parameters.
However, KeyStep can also be used without a computer attached! In this case, simply
use a 9V DC power supply (not included) or a standard USB mobile phone charger to
power the unit. Then connect everything else as shown in the following diagrams.
2.1.2 with external devices
As you can see, KeyStep can be at the center of some amazing systems.
ARTURIA KeyStep USER’S MANUAL 11
2.1.2.1 CV/Mod/Gate
KeyStep will send control voltages to non-MIDI devices through its Pitch, Mod and Gate
connectors. It also can send data to those devices from the USB port of your computer.
2.1.2.2 MIDI devices
Lots of mid-vintage devices have MIDI jacks but don’t have CV/Gate connectors or USB
ports. KeyStep can plug directly into them and also serve as a USB MIDI converter.
2.1.2.3 Clock sources/destinations
The Clock input and output connectors allow KeyStep to synchronize with lots of different
clock types: a single pulse per step, two pulses per step, 24 pulses per quarter note
(ppqn), and 48 ppqn. Between these four options you are ready to connect with almost
any imaginable music technology.
See section 7.2.2 for specific information about what cables to use for the various sync
connections and formats.
2.1.3 with an iPad
®
Add a camera connection kit and KeyStep becomes the perfect companion for an iPad.
This enables it to be used as a controller for Arturia’s iMini, iSem or iProphet
applications, for example.
If you have an iPad but you don’t already own those virtual instruments, please take a
look at them on our website! They are very affordable, and live up to Arturia’s reputation
for modeling the sound of analog synthesizers with warmth and precision.
12 ARTURIA KeyStep USER’S MANUAL
2.2 Front panel overview
1. Sequencer / Arpeggiator section (see 2.2.1)
2. Tap Tempo / Rest / Tie (see 2.2.2)
3. Transport section (see 2.2.3)
4. Hold / Chord (with Shift) (see 2.2.4)
5. Shift button (see 2.2.5)
6. Keyboard functions (with Shift) (see 2.2.5)
7. Oct - / Transpose (with Shift) (see 2.2.6)
8. Oct + / Kbd Play (with Shift) (see 2.2.6)
9. Pitch / Mod touch strips (see 2.2.7)
2.2.1 Sequencer / arpeggiator
KeyStep provides a sequencer and an arpeggiator. You can record eight different
sequences, each with up to 64 steps. The arpeggiator generates notes based on the keys
you have pressed and plays them back according to the Arp Mode setting.
The sequencer and arpeggiator have unique features, so be sure to read chapter 4 and
chapter 5 to learn more.
ARTURIA KeyStep USER’S MANUAL 13
2.2.1.1 Seq / Arp toggle switch
When this switch is set to Seq a sequence can be played or recorded. The controls in this
section select which sequence is active and the time division at which it will be played
back.
When the switch is set to Arp the controls select the pattern and the time division for the
arpeggiator.
2.2.1.2 Seq / Arp modes
The function of the Seq / Arp Mode encoder changes depending on which mode is
selected. In sequencer mode it selects which of the eight sequences is active. In
arpeggiator mode it selects which pattern will be used to play back the notes you hold on
the keyboard.
For a full explanation of these features, see chapter 6 (Projects) and chapter 10 (Control
Mode).
2.2.1.3 Time Division
The Time Div encoder determines the rhythmic value of the active sequence or arpeggio.
Eight different settings are available.
We’ll go into this in greater detail in chapter 3.
2.2.1.4 Rate
Use the Rate knob to control the tempo of the sequence or arpeggio. The Tap button can
also be used. The tempo can be set between 30-240 bpm (beats per minute).
The MIDI Control Center allows you to choose how the Rate knob responds when it is
turned: either immediately (Jump mode) or after you pass through the current value
(Pick-up mode). See chapter 10 to learn about the MIDI Control Center.
2.2.2 Tap Tempo / Rest / Tie
The Tap button allows you to set the tempo of the active sequence or
arpeggio “on the fly”. All you have to do is tap it in time with the music. The
number of taps it takes to adjust the tempo can be defined in the MIDI
Control Center.
This button is also used to enter rests or to tie two notes together when
creating a sequence. See section 5.2.1 for information about this.
2.2.3 Transport section
The Transport buttons control the sequencer, the arpeggiator, and external MIDI devices
using MIDI Machine Control. But they also can send other MIDI messages if your DAW
does not respond to MMC commands. Use the MIDI Control Center to make changes.
All three buttons are active in sequencer mode, while only Play/Pause and Stop are used
with the arpeggiator.
14 ARTURIA KeyStep USER’S MANUAL
Each button has an addition function when creating a sequence (Append, Clear Last, and
Restart). These features will be described in detail in section 5.2.1.
2.2.3.1 All Notes Off
The Stop button has an additional function. If for some reason you end up with a stuck
note, just press the Stop button quickly three times in a row. KeyStep will then send an
All Notes Off command over MIDI.
2.2.4 Hold / Chord button
The Hold button enables you to add more notes to the arpeggiator while it is running (up
to 32!). It is also used with the Shift button to toggle Chord mode on and off.
There’s more information about the Hold and Chord modes in chapters 3 and 4.
2.2.5 Shift button
The Shift button allows access to secondary functions such as Chord mode and the MIDI
channel setting for the keyboard. It also can be used to modify the feel of the sequence
“on the fly” by changing the Swing and Gate time settings. All of these features involve
holding the Shift button and pressing another button or a key.
For a complete chart of Shift functions, see section 4.4.
2.2.6 Oct -/+, Transpose, Kbd Play
These buttons are a quick way to shift the keyboard in octave increments. The further
you shift from the center, the faster they flash. Maximum transposition is +/- 4 octaves.
Press both buttons at the same time to reset the keyboard to its center octave.
The blue letters under the buttons tell you that the Shift and Oct/Oct+ buttons are used
together to change the way the keyboard behaves while a sequence is running:
Shift + Oct Minus Transpose mode: the keys will transpose the sequence while it
is running.
Shift + Oct Plus Kbd Play mode: The keys are able to play independently in
addition to the part the sequencer is playing. It is possible to specify a separate MIDI
channel for Kbd Play mode.
Transpose and Kbd Play modes are mutually exclusive. Pressing the Shift button
will light up either the Oct Minus or Oct Plus button to indicate which of the two
modes is active.
ARTURIA KeyStep USER’S MANUAL 15
More about these features in section 4.3.3.
2.2.7 Pitch / Mod touch strips
These innovative controls take the place of the standard “wheels”.
Their MIDI Channels can be assigned separately by the MIDI
Control Center, and the Mod strip can even be assigned to any
MIDI Continuous Controller number (CC#).
See chapter 10 to learn more about using the MIDI Control Center.
2.3 Rear panel overview
2.3.1 USB/DC IN
This jack provides the power and data connections to a computer. It can also be used
with a standard USB mobile phone charger, allowing you to use KeyStep even without a
computer present.
2.3.2 9V DC IN (with optional adapter)
KeyStep can be used as a stand-alone device without a computer or tablet present.
Simply connect an optional power adapter to your KeyStep (9V DC, 500ma, positive to
ground).
2.3.3 Pitch/Gate/Mod outputs
These are normally used to send electrical signals to an external device such as Arturia’s
popular analog synthesizers (MiniBrute/SE, MicroBrute/SE, MatrixBrute) or to a modular
analog synthesizer.
The Pitch output is often referred to as Control Voltage or CV. The Gate output is
sometimes known as a Trigger. The Mod output is a second type of Control Voltage
output that can be routed to any number of destinations on the target device.
The MIDI Control Center allows you to configure the type of electrical signals sent by
each output. See section 8.4 for information about the signal types that are supported.
If your mobile device does not supply enough power, you will need to connect a
power adapter as described above (not included).
16 ARTURIA KeyStep USER’S MANUAL
2.3.4 Sustain pedal input
Connect a momentary footswitch (optional) to this input. It is best to connect the pedal
before supplying power to the KeyStep so it can sense the pedal’s polarity. Be sure to
keep your foot off the pedal when first making the connection or could work backward. If
this happens, disconnect KeyStep from the power source and start over.
2.3.5 Sync input/output
These jacks allow KeyStep to interface with pre-MIDI technology that was capable of
synchronization, such as early drum machines by Korg and Roland. See section 7.2.1 for
information about the types of sync signals KeyStep can send and receive.
2.3.6 MIDI input/output
Connect standard MIDI cables and KeyStep can send MIDI data to external MIDI-
compatible devices. It will also send MIDI data to those devices from your computer.
In addition to MIDI note data from the keys, KeyStep can send and receive MIDI sync.
It’s also possible to configure some of KeyStep’s controls to send specific MIDI data
using the MIDI Control Center.
2.3.7 Sync source selector switches
There are four synchronization options which are accessed on
the rear panel. Use the small slider switches as shown in the
diagram to select the option you want.
For descriptions of the various sync settings see chapter 7.
2.3.8 Kensington lock port
KeyStep is highly portable, and it should be carried only where you
want it to go. So we’ve included a Kensington lock slot on the far
right edge of the rear panel so you can secure it to the surface of
your choice.
The picture at right has both switches down. It corresponds
to the Internal sync option.
ARTURIA KeyStep USER’S MANUAL 17
3 BASIC OPERATIONS
3.1 Plug and play
Connect KeyStep to your computer or an external device as shown in section 2.1 and
you’re ready to go! Here are a few pointers to make the most of your first session.
3.1.1 Slimkey keyboard
The Slimkey keyboard is both velocity- and pressure-sensitive (sometimes called
“aftertouch”). You can specify the velocity curve and aftertouch response using the MIDI
Control Center. See chapter 10 for details.
3.1.2 Keyboard MIDI channel
If you need to match the KeyStep MIDI channel to the external device, this is easily
done. Simply hold the Shift button and press the key that corresponds to the desired
MIDI channel.
3.1.3 Pitch / Mod touch strips
The Pitch and Mod touch strips are similar to the standard wheels in how they work,
except that you slide your finger along the track instead of moving a wheel.
3.1.3.1 The Pitch strip
The Pitch strip has a center zone which equals no change. Moving your finger forward
bends the pitch upward, and moving backward bends the pitch downward.
When you release your finger the Pitch strip will snap back to zero.
3.1.3.2 The Mod strip
The Mod strip works like a mod wheel: from minimum to maximum. Placing your finger
at the bottom of the Mod strip (the side closest to you) equals no modulation, and
moving your finger all the way up causes maximum modulation.
But when you lift your finger the Mod strip does not snap to zero.
3.1.4 Hold button
The Hold button enables the arpeggiator to keep playing after you take your fingers off
the keys. But there’s another way to use it, too: when Hold mode is active, you can keep
adding notes to an arpeggio as long as you continue holding down at least one key.
We’ll provide step-by-step instructions in chapter 6: The arpeggiator.
When the MIDI channel is changed the Kbd Play MIDI channel will change to match
it. To select an independent MIDI channel for Kbd Play mode, see section 4.3.3.2.
20 ARTURIA KeyStep USER’S MANUAL
To start an arpeggio pattern from the beginning, press the Stop button. Then press Play
again and hold down some keys.
3.3.4 Set the tempo
Use the Rate knob or the Tap button to adjust the playback tempo. You can also set the
exact tempo of the arpeggio pattern before starting the arpeggiator by pressing the Tap
button a few times.
With the MIDI Control Center you can specify how many taps of the Tap button it takes
to adjust the tempo, and also how the Rate knob will respond when it is turned. See
chapter 10 for more information.
Remember: Tap tempo and the Rate knob will not function when KeyStep is set to one of
the external sync sources.
3.3.5 Time Division
The Time Division encoder allows you to change the rhythmic relationship of the
arpeggio relative to the tempo: quarter notes (one step per beat), eighth notes (two
steps per beat), and so on. Triplet values are offered as well (1/4T, 1/8T, etc.).
3.3.6 Hold button
When the Hold button is lit you can lift your fingers off the keys and the arpeggio will
keep playing. It will keep running until you play another note or chord, at which point
the new note(s) will become a new arpeggio.
You may add as many as 32 notes to your arpeggio as long as you continue to hold
down at least one key. The notes you play will be added to the arpeggio at the nearest
time division increment.
The same rule applies with large arpeggios: once you release all of the keys the arpeggio
you have constructed will continue to run until you play another note or chord.
For even more in-depth coverage of the arpeggiator see chapter 6.
It will be more obvious what the different Arp Modes do when you are holding
down three or more keys.
ARTURIA KeyStep USER’S MANUAL 21
4 SHIFT FUNCTIONS
KeyStep has many secondary functions that can be accessed by holding the Shift button
and pressing other buttons or a key. These functions are listed in light blue text under
each button and over each key.
For a complete chart of all the Shift functions, see section 4.4.
4.1 Chord Mode
KeyStep has the ability to memorize a chord. You can then play an entire chord by
pressing a single key on the keyboard. The chord will transpose automatically as you
play different notes.
Here’s how to memorize a chord:
Hold two buttons: first the Shift button and then the Hold button. Don’t let go.
The Hold button will flash very quickly (4x per second).
Play up to 16 notes on the keyboard. These will become your chord.
When you are done, release the buttons.
Now the Hold button will flash once per second, which means KeyStep is in Chord mode.
The next key you press will play the chord you created.
The lowest note you entered will be the center key for transposition. Any key higher than
that will transpose the chord up; any key below it will transpose the chord downward.
Here are a few more things to know about this feature:
You can use the sustain pedal instead of the Hold button for all Chord mode
functions. (The pedal will not flash, of course. But that would be cool.)
When both Chord mode and Hold mode are active the Hold button will flash twice
as fast (2x per second).
To enter or exit Chord mode, hold the Shift button and then tap the Hold button.
4.1.1 Chords and the sequencer
You can use Chord mode and the sequencer together, but only under certain conditions.
The following procedure will erase the previous chord and make a new one.
Chord memory is not saved when KeyStep is powered down.
22 ARTURIA KeyStep USER’S MANUAL
4.1.1.1 Seq Recording and Chord mode
Chords from Chord mode will be recorded as independent notes in the sequencer. So if
you have a 6-note chord it will occupy 6 of the 8 note maximum that is allowed in a
sequence step.
4.1.1.2 Seq playback and Chord mode
The keyboard is in one of two modes during sequence playback: Transpose or Kbd Play.
When the keyboard is set to Transpose mode, the keys are used to transpose the
sequence. Chord mode is disabled in this case, as it would be difficult to be certain which
note in the chord was the transposition center.
When the keyboard is set to Kbd Play mode then Chord mode can be used to play chords
on the target device.
These modes are discussed further in section 4.3.3.
4.1.2 Chords and the arpeggiator
The arpeggiator can be used in conjunction with Chord mode to play arpeggiated chords.
The process is simple:
Make sure the Seq / Arp toggle switch in the Arp position
Start the arpeggiator with the Play/Pause button
Enter Chord mode by holding Shift and pressing the Hold button
Play two or more notes so you can hear the chord being transposed by the
arpeggiator.
That’s all there is to it. And it doesn’t matter whether you start the arpeggiator first and
then activate Chord mode or do it the other way around. The results will be the same.
4.2 Keyboard MIDI channel
There are numbers silkscreened above the keys under the heading “Keyboard MIDI CH”.
These represent the 16 MIDI channels to which the keyboard can be assigned. To
change the MIDI channel setting, hold the Shift button and press the key that
corresponds to the desired MIDI channel.
When the MIDI channel is changed the Kbd Play MIDI channel will change to
match it. To select an independent channel for Kbd Play mode, see section 4.3.3.2.
ARTURIA KeyStep USER’S MANUAL 23
4.3 Seq / Arp playback functions
4.3.1 Gate
The Gate time of a Seq/Arp note is the
percentage of time it stays “on” before the next
note happens, with 10% being the shortest time
and 90% being the longest. Hold Shift and press
the appropriate key to make a selection.
When creating a sequence it is also possible to enter a value of “Tie”, which holds a note
into the following step. See section 5.2.1.2 for information.
4.3.2 Swing
Swing introduces a “shuffle” feel to the active sequence or arpeggio. 11 different settings
are available, ranging from Off (no swing, or 50%) through varying degrees of swing
amount (53-75%). To make a selection, Hold Shift and press the appropriate key.
What the Swing setting does is shift the timing of the notes in a sequence, making the
first note of a pair longer and the second note shorter. Assuming the time division is set
to 1/8, here’s what will happen:
With Swing set to Off (50%) each note gets ‘equal time’, resulting in a ‘straight
1/8
th
note’ feel.
As the Swing value exceeds 50% the first 1/8
th
note is held longer and the second
is played later and shorter. You’ll notice the sequence starts to shuffle’ a bit and
perhaps sounds less ‘mechanical’ to your ear.
The maximum Swing setting is 75%, at which point the 1/8
th
notes sound more
like a 1/16
th
note figure than ‘shuffled’ 1/8
th
notes.
Here’s a graphic showing the minimum and maximum Swing values in musical notation:
Each sequence can have its own Gate setting. Arp mode has an independent Gate
setting also.
Each sequence can have its own Swing setting. Arp mode has an independent
Swing setting also.
24 ARTURIA KeyStep USER’S MANUAL
4.3.3 Transpose / Kbd Play
These two modes are mutually exclusive so we’ll cover them both in this section. You
can switch from one to the other by holding the Shift button and pressing the
appropriate Octave shift button (Oct or Oct+).
4.3.3.1 Transpose
When this mode is active you can use the keys to
transpose a sequence while it is running. To activate
Transpose mode, hold the Shift button and press the
Oct button. It will become lit and the Kbd Play button
will go dark.
The MIDI Control Center lets you specify whether the
transposition will latch or return to center when the
key is released. See chapter 10 for details.
4.3.3.2 Keyboard Play
When this mode is active the keyboard can be used to play notes on an external MIDI
device while a sequence is playing through the CV out. To activate Kbd Play mode, hold
the Shift button and press the Oct+ button. It will become lit and the Transpose button
will go dark.
You can specify a separate MIDI channel for Kbd Play mode, so the keys will play one
MIDI channel and the sequence will play another. This can be done from the front panel:
Hold the Shift and Oct+ buttons at the same time
Select a number between 1 and 16 using one of the Keyboard MIDI CH keys.
4.3.4 Skip selections: Seq / Arp
It’s possible to switch between non-adjacent sequences or arpeggio
patterns without launching the interim selections. In other words, if
sequence 1 is playing and you want segue smoothly into sequence
3, you can jump over sequence 2 without playing it.
Here’s how:
Hold the Shift button
Turn the Seq/Arp Mode encoder until you reach the desired
sequence
When you’re ready, release the Shift button and the new
sequence will launch.
There’s a parameter in the MIDI Control Center that controls whether the new sequence
will begin immediately or at the end of the sequence. The full details are in chapter 10.
4.3.5 Skip selections: Time Division
KeyStep is able to jump over one or more Time Division values
without having them affect the rhythm of your sequence or
arpeggio. So if you’d like to switch Time Div from 1/4 to 1/16
for a few beats without hearing the 1/8 value, there’s a way to
do that.
Hold the Shift button
ARTURIA KeyStep USER’S MANUAL 25
Turn the Time Div encoder until you reach the proper value
Release the Shift button and the new Time Division will take effect.
4.3.6 Restart Seq / Arp from beginning
It’s possible to repeat the first half of a sequence or
arpeggio manually, or perhaps repeat the first few
notes several times, etc., as a spontaneous
performance option.
To restart a sequence or an arpeggio pattern from its
beginning, hold the Shift button and press the
Play/Pause button.
4.4 Shift function chart
Here’s a list of all Shift button features:
Combination
Effect
Shift + Key (1 to 16)
Select user channel and reset Kbd Play Midi channel
Shift + Key (17 to 21)
Select a global gate value
Shift + Key (22 to 32)
Select a swing value
Shift + Oct Minus
Enter Transpose mode
Shift + Oct Plus
Enter Kbd Play mode
Shift + Oct Plus + Key
Selects Midi channel for Kbd play mode
Shift + HOLD
Enter/Exit chord mode
Shift + HOLD + Keys
Enter new notes for the chord mode (Hold button blinks
quickly)
Shift + REC
Enter Record-append mode
Shift + STOP
Clear last step of the sequence (only in Seq mode)
Shift + Play
Restart the playback to the first step of the Seq/Arp
Shift + Encoder
The new position of the encoder will become active
when the Shift button is released
We will cover the Shift functions that are used during sequence creation in the
next chapter.
26 ARTURIA KeyStep USER’S MANUAL
5 CREATING SEQUENCES
KeyStep holds a total of 8 sequences, and each sequence can be up to 64 steps in
length. The sequencer is polyphonic, capable of stacking up to 8 notes per step.
In this chapter we will cover the front panel features, but there are more parameters
available in the MIDI Control Center. You can also save and swap sequences using the
MIDI Control Center, so you’ll want to read chapter 10 for more information.
5.1 What’s a step sequencer?
KeyStep can record and play back music data with its step sequencer. Originally popular
in the 1960’s and 70’s, step sequencers have become popular again due to the increased
interest in modular synthesizers.
A step sequencer is usually monophonic; i.e., it will output only one note at a time. But
the KeyStep sequencer is capable of stacking up to 8 notes per sequence step.
Another way the KeyStep sequencer is more advanced than a traditional step sequencer
is that it lets you to transpose the sequence by playing a key on the keyboard. Most
early step sequencers did not do this; the pitch of each note was set with a knob or a
slider.
But as with any sequencer, a step sequencer can free the performer’s hands to adjust
other parameters such as filters, envelope settings or pitch on the target device while
the sequencer keeps looping.
KeyStep allows you to create and carry up to eight unique sequences wherever you go.
And in spite of its streamlined appearance, there are lots of ways to modify your
sequences during a performance. We’ll cover those in this chapter.
5.2 Creating a sequence
There are three things you must do when you want to create a sequence:
Move the Seq / Arp toggle switch to the Seq position, as shown
Select a sequence location with the Seq / Arp Mode encoder
If a sequence is already running, press the Stop button.
We already covered selecting and playing sequences in section 3.2, so we’ll only discuss
how to create and edit a sequence in this chapter.
KeyStep provides two ways to input notes into your sequences: a step at a time or in
real time. We’ll go through those options next.
The sequencer will not run if the sync selection switches are set to something other
than Internal and no external clock is present.
ARTURIA KeyStep USER’S MANUAL 27
5.2.1 Step-time recording
This may be the best place to start while you are learning to work with the sequencer. At
the most basic level, all you have to do to create a sequence is:
Press the Record button
Note: the next step will erase the existing sequence.
Play one or more keys at the same time
Lift all fingers to advance the step
Repeat the last two items
When you’re done, press the Stop button.
To hear your sequence, press the Play button. The results could be something like this:
5.2.1.1 Entering rests
The spaces that sometimes happen between notes are called “rests”. If you want to add
rests while creating a sequence, KeyStep provides an easy way to do it.
Take a look at the Tap button:
You’ll notice the words “Rest / Tie” underneath the button. You will use
this button to enter rests, and also to tie notes together (more about that
later).
Here’s what to do:
Press the Record button
Remember: the next step will erase the existing sequence.
Play one or more keys at the same time
Release all keys to advance the step
Press the Tap button to enter a Rest
Repeat the last three items
When you’re done, press the Stop button.
To hear your sequence, press the Play button. The results could be something like this:
You must lift all fingers between each step in order for the sequence steps to
advance. If you do not lift every finger first you will keep adding notes to the same
sequence step.
The Time Div value is ignored during step recording; it only affects sequence
playback.
28 ARTURIA KeyStep USER’S MANUAL
If you want the rest between two notes to be longer, press the Tap button as many
times as you need.
5.2.1.2 Tie notes
It’s possible to make a note hold over into the next step, or even longer. So with the
Record button lit:
Play one or more keys at the same time
Keep holding the key(s)
Press the Tap button to tie the note into the next step
If you want the note(s) to be held longer, press Tap as many times as you need
Release all keys
Repeat the process until you get the result you want.
5.2.1.3 Legato notes
The process for entering a Legato note is similar:
Press the Record button
Hold the Tap button until the end of this example
Remember: the next step will erase the existing sequence.
Play one or more keys at the same time
Release all keys to advance the step
Play another key or chord
Release the keys to advance to the next step
When you have reached the end of the legato phrase, release the Tap button.
Enter more notes as desired, or press the Stop button to exit Record mode.
On a mono synth the process above will result in a “legato” response (voltage change
without any gate events between the notes).
Press Play to hear your sequence. A combination of tied notes and legato notes might
sound something like this:
Here’s another example. This time we’ll build a chord that sustains through 3 counts:
Set Time Div to 1/4
Press the Record button
Press and hold the Tap button until the end of this example
Play a C, then release it
30 ARTURIA KeyStep USER’S MANUAL
5.2.2.2 Restart
A sequence can have up to 64 steps, which can seem like a long time when you want to
replace a note near the beginning of the sequence.
There’s a shortcut you can take if you don’t want to wait for the sequence to loop: use
the Restart function.
All you have to do is hold the Shift button and press Play/Pause. You will hear the
sequence jump immediately to its beginning. KeyStep will remain in Record mode, so
when the proper step arrives, play the notes you want and they will replace the existing
notes.
5.2.2.3 Time Div and recording
As mentioned in section 5.2.1, the Time Division setting does not allow you to enter
different step values in the middle of a sequence while recording. But you can use it to
alter the relative tempo while recording.
5.2.2.4 Time Div and Rate
The Rec button will blink at the rate of the Time Div selection while recording a
sequence.
For example, if you set Time Div to 1/4th it will blink at the same time as the Tap
button. But if you set it to 1/16th it will blink 4 times faster than the Tap button, since
there are four 16th notes in every quarter note.
5.2.3 What does it record?
The KeyStep sequencer will record certain types of data for each sequence step:
The note or notes played from the keyboard
The velocity of each note (unless you tell it not to: see section 5.2.3.1)
Rests entered by pressing the Tap button or holding it for one or more steps
Each note of a Chord from Chord mode will be recorded as an independent note
on the same step. So if you have a 6-note chord it will occupy 6 notes of the 8-
note maximum that a sequence step can hold.
5.2.3.1 A note about velocity
KeyStep will capture the velocity of each note the way it was played by default. But
there’s an option in the MIDI Control Center to make sure every recorded note has the
same velocity value. You can also specify exactly what that value will be.
Also, if a note in a sequence is too loud or soft you can edit its velocity using the MIDI
Control Center.
If you are recording a difficult passage you may want to use a different Time
Division setting while recording (i.e., use 1/4 instead of 1/8).
If a key is held for two or more steps a tied note will be recorded.
The maximum number of notes in a chord is 16 notes, which exceeds the limit of
8 notes per step in a sequence. In this case only the bottom 8 notes of the chord
will be entered.
ARTURIA KeyStep USER’S MANUAL 31
See chapter 10 for more information about these features.
5.2.4 What it does not record
Here are the types of data not captured by the KeyStep sequencer:
The duration (gate time) of the note. However, a note will be tied into the next
step if you hold it down long enough.
Time division changes
Swing percentage
Controller data
Notes from Chord mode that exceed the limit of 8 notes per step. Only the
bottom 8 notes of the chord will be recorded.
Data that arrives via MIDI or USB. However, incoming note data can be used to
transpose a sequence, and the KeyStep sequencer and arpeggiator can be slaved
to incoming clock data.
5.3 Modifying a sequence
Now let’s focus on ways to modify an existing sequence.
5.3.1 Append
You can extend your sequence by adding (appending) notes, tied notes and rests to the
end of the sequence.
To use the Append function:
Make sure the proper sequence is selected
Press Play/Pause to start the sequence.
Important: the sequence must be playing or else the note data will be erased in the
following steps.
Hold the Shift button
Press the Record button (Append). The Record button will light solid.
To add a note or chord to the end of the sequence, play the appropriate keys
To add a tied note or chord to the end of the sequence, hold Tap and play the
desired key(s). All notes in the previous step will be lengthened, and
o New notes that match the previous step will be tied (no new attack)
o New notes that do not match the previous step will be legato
To add a rest to the end of the sequence, press the Tap button (Rest / Tie).
Each time you perform one of those three functions the sequence will grow longer by
one step.
This process will not erase the sequence or replace existing notes.
32 ARTURIA KeyStep USER’S MANUAL
5.3.2 Clear Last
This feature allows you to remove the last step of a sequence. It works whether the
sequencer is playing or recording, and even works if the sequencer is not running at all.
To clear the last step of a sequence:
Make sure the proper sequence is selected
Hold the Shift button
Press the Stop button (Clear Last)
If the sequencer is running during this process, the next time it loops around to the end
of the sequence the last step will have been removed.
5.4 Saving sequences
KeyStep allows you to carry 8 sequences with you at all times. But you can store an
unlimited number of sequences using the MIDI Control Center. So be sure to back up
your hard work to your computer often.
And once the sequences are safely stored on your computer it is possible to hand-pick
sets of sequences that are aimed at particular audiences or sessions.
See chapter 10 for more information about the MIDI Control Center.
Remember: the CV/gate outputs will drive a single voice on a monophonic
synthesizer. The MIDI Control Center has a parameter that specifies which note will
be favored when a chord exists in a sequence step. See chapter 10 for details.
The Clear Last function does not undo the last recording you made; it shortens
the sequence by removing the last step
ARTURIA KeyStep USER’S MANUAL 33
6 THE ARPEGGIATOR
6.1 What’s an arpeggiator?
‘Arpeggio’ is a musical term that basically means ‘the notes of a chord played one after
the other’. For example, if you play a C chord and then play its component notes C, E,
and G independently, you have played an arpeggio in the key of C.
An example of notes in a chord The same notes as an arpeggio
And you can play those three notes in any order and still have played an arpeggio in the
key of C.
An arpeggiator, then, is a form of music technology that will take a group of notes
played simultaneously on a keyboard and turn them into an arpeggio.
6.2 Arpeggiator features
The KeyStep arpeggiator provides lots of different ways to arpeggiate the notes you play
on the keyboard. These features we’ve covered previously:
Setting the rate or tempo (section 3.3.4)
Time division settings (section 3.3.5)
Hold / sustain function (section 3.3.6)
Arpeggiate the Chord memory (section 4.1.2)
Independent swing and gate settings (section 4.3)
Skip encoder values (sections 4.3.4 and 4.3.5)
Restart arpeggio from the first note (section 4.3.6)
We’ll cover these features in the sections ahead:
The eight modes that determine the note order
Building an arpeggio of up to 32 notes
Pause an arpeggio in mid-stream and then resume the pattern
The Record button is inactive in Arp mode.
34 ARTURIA KeyStep USER’S MANUAL
6.3 Arpeggiator modes
6.3.1 Start the arpeggiator
Before we describe each of the arpeggiator modes, let’s do a quick review of how to
select a mode and start the arpeggiator:
Select Arp mode with the Seq / Arp toggle switch
Use the Seq/Arp Mode encoder to select a mode
Press the Play/Pause button
Hold down some keys
The arpeggiator will start playing the notes you are holding one after the other. The
order in which they are played is determined by the Arp mode.
All of the following examples involve holding down only 4 notes on the keyboard. But
you can add up to 32 notes to your arpeggio through clever use of the Hold button and
the Oct Minus / Plus buttons. We’ll describe these techniques in section 6.4.
6.3.2 Arp mode: Up
With the Arp mode encoder set to Up the arpeggiator will play the held notes in order
from the bottom to the top. When it reaches the top it will start again from the bottom.
The results will sound something like this:
Arp Mode: Up
6.3.3 Arp mode: Down
With the Arp mode encoder set to Dwn the arpeggiator will play the held notes in order
from top to bottom. When it reaches the bottom it will start again from the top.
Arp Mode: Down
6.3.4 Arp mode: Inclusive
With the Arp mode encoder set to Inc the arpeggiator will play the held notes in order
from low to high, then from high to low, repeating the high note and low note.
The arpeggiator will not run if the sync selection switches are set to something
other than Internal and no external clock is present.
3

Hulp nodig? Stel uw vraag in het forum

Spelregels

Misbruik melden

Gebruikershandleiding.com neemt misbruik van zijn services uitermate serieus. U kunt hieronder aangeven waarom deze vraag ongepast is. Wij controleren de vraag en zonodig wordt deze verwijderd.

Product:

Bijvoorbeeld antisemitische inhoud, racistische inhoud, of materiaal dat gewelddadige fysieke handelingen tot gevolg kan hebben.

Bijvoorbeeld een creditcardnummer, een persoonlijk identificatienummer, of een geheim adres. E-mailadressen en volledige namen worden niet als privégegevens beschouwd.

Spelregels forum

Om tot zinvolle vragen te komen hanteren wij de volgende spelregels:

Belangrijk! Als er een antwoord wordt gegeven op uw vraag, dan is het voor de gever van het antwoord nuttig om te weten als u er wel (of niet) mee geholpen bent! Wij vragen u dus ook te reageren op een antwoord.

Belangrijk! Antwoorden worden ook per e-mail naar abonnees gestuurd. Laat uw emailadres achter op deze site, zodat u op de hoogte blijft. U krijgt dan ook andere vragen en antwoorden te zien.

Abonneren

Abonneer u voor het ontvangen van emails voor uw Arturia Keystep bij:


U ontvangt een email met instructies om u voor één of beide opties in te schrijven.


Ontvang uw handleiding per email

Vul uw emailadres in en ontvang de handleiding van Arturia Keystep in de taal/talen: Engels als bijlage per email.

De handleiding is 2,13 mb groot.


U ontvangt de handleiding per email binnen enkele minuten. Als u geen email heeft ontvangen, dan heeft u waarschijnlijk een verkeerd emailadres ingevuld of is uw mailbox te vol. Daarnaast kan het zijn dat uw internetprovider een maximum heeft aan de grootte per email. Omdat hier een handleiding wordt meegestuurd, kan het voorkomen dat de email groter is dan toegestaan bij uw provider.

Stel vragen via chat aan uw handleiding

Stel uw vraag over deze PDF

Andere handleiding(en) van Arturia Keystep

Arturia Keystep Gebruiksaanwijzing - Deutsch - 93 pagina's


Uw handleiding is per email verstuurd. Controleer uw email

Als u niet binnen een kwartier uw email met handleiding ontvangen heeft, kan het zijn dat u een verkeerd emailadres heeft ingevuld of dat uw emailprovider een maximum grootte per email heeft ingesteld die kleiner is dan de grootte van de handleiding.

Er is een email naar u verstuurd om uw inschrijving definitief te maken.

Controleer uw email en volg de aanwijzingen op om uw inschrijving definitief te maken

U heeft geen emailadres opgegeven

Als u de handleiding per email wilt ontvangen, vul dan een geldig emailadres in.

Uw vraag is op deze pagina toegevoegd

Wilt u een email ontvangen bij een antwoord en/of nieuwe vragen? Vul dan hier uw emailadres in.


Info