Please make sure that the items shown below are included in the box. Should an item be
missing, please contact the local retailer from whom you purchased this product.
- ARCHOS 97 cobalt
- USB cable
- Charger
- QSG booklet
- Warranty, legal & safety booklet
3
EN
Getting Started
TIPS:
To receive more complete service, please register your product.
From a computer, go to www.archos.com/register.
Charging
Connect the supplied power cable to the ARCHOS and to a wall outlet.
The ARCHOS device will turn on and start charging.
You can use your ARCHOS whilst it charges.
- Let your device charge completely the rst time you use it.
- Use only the supplied charger.
4
4
5
7
6
8
9
10
321
12
11
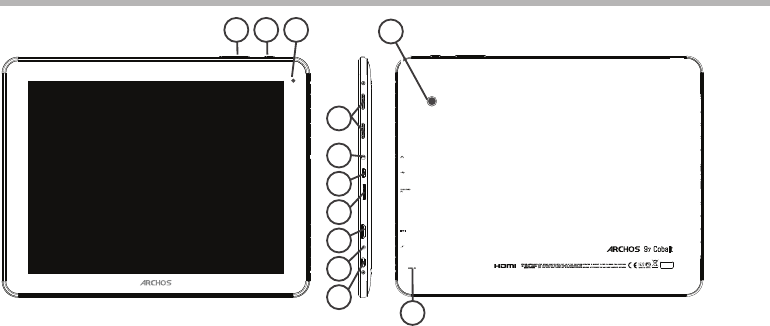
Description of the device
5
EN
Volume buttons
Back button
Webcam
Loudspeaker
Headphone jack
Micro-USB port
Micro-SD card slot
Mini-HDMI video output
*
Power connector
ON/OFF button
Reset button
Camera
19
2
10
3
4
5
6
7
8
12
11
*
With optional Mini-HDMI to HDMI cable
6
Through the Wizard
TIPS:
We recommend that you set up your device in the WiFi zone of the network that you will regularly be
using.
The rst time you start up your ARCHOS, the installation wizard will help you set up your
device:
- Language
- Date & time
- WiFi connection
- Location service options
- 3rd party apps
7
EN
Connecting to a WiFi Network
TIPS:
-When entering a WiFi password, we recommend that you select “Show password” so you can see the
characters you are typing.
-To get the correct WiFi password (or settings) for the network, contact the WiFi network provider.
-If your WiFi is on and you are in range of a network that you previously connected to, your ARCHOS
will automatically attempt to connect to it.
WARNING: Make sure that you are in a WiFi zone. You can access the WiFi settings quickly from
the status bar in the bottom right corner of the screen.
1. Touch the time in the status bar.
The status dashboard is displayed.
2. Touch the time a second time in the status dashboard.
The quick settings will be displayed.
3. Touch "Settings" to open the WiFi settings menu.
4. If the WiFi is o, slide the WiFi switch to the "ON" position.
Once the WiFi is on, the ARCHOS will scan for WiFi networks in range.
5. Touch the name of network you want to connect to.
Private networks are shown with a lock icon and will require you to enter your password.
8
1
2
3
5
6
7
4
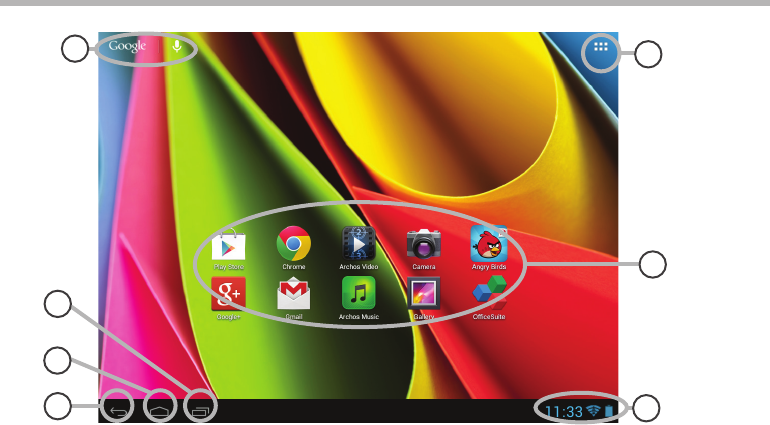
The Android
TM
Interface
9
EN
1
2
3
4
5
6
7
Google
TM
Search
>Touch "Google" for text search or touch the microphone icon for voice search.
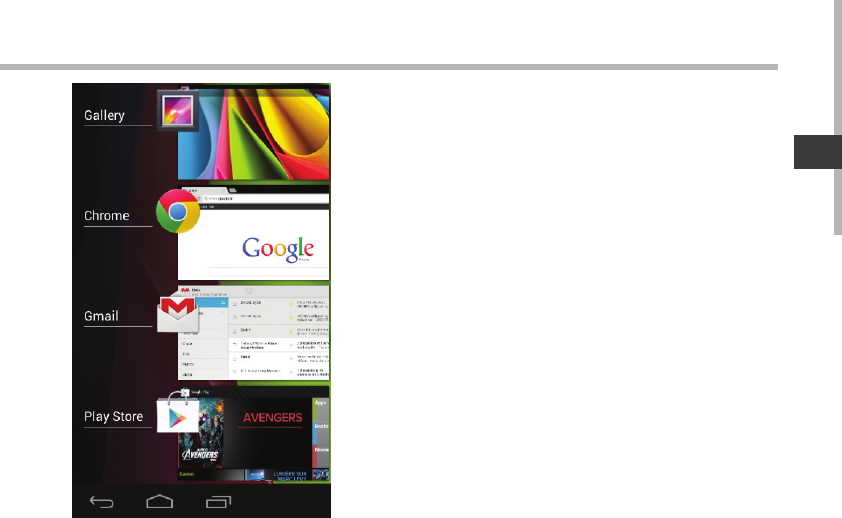
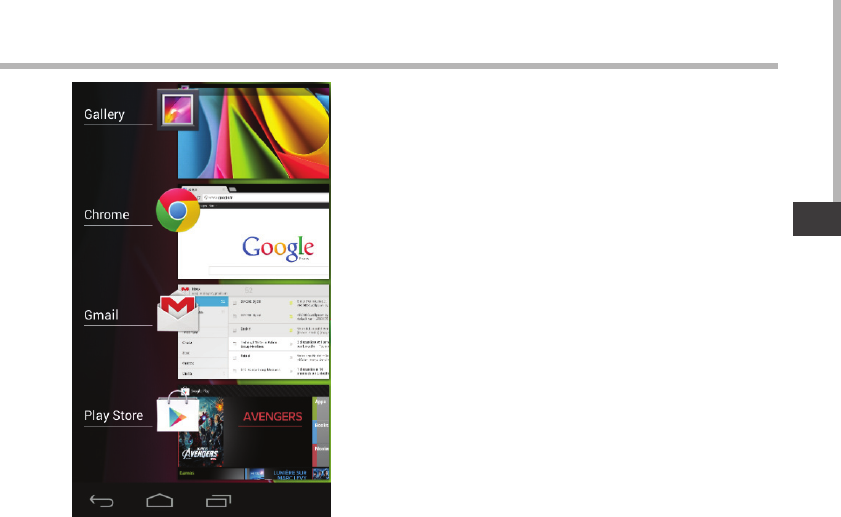
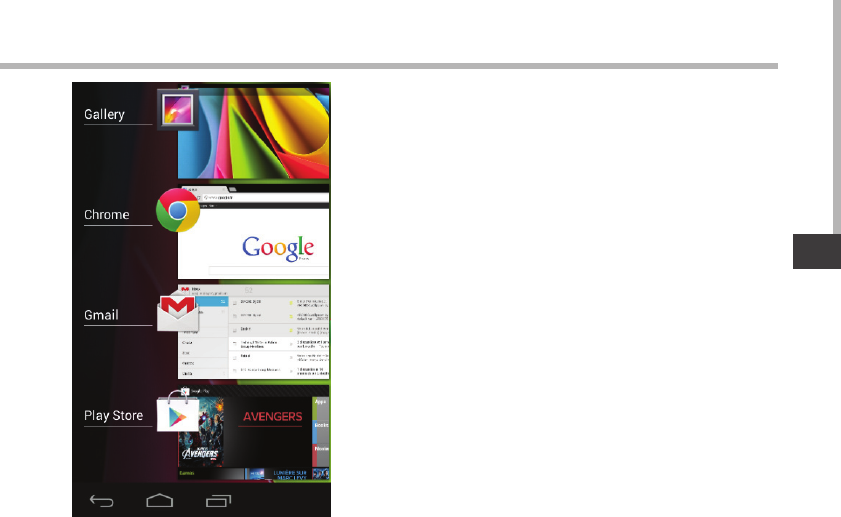
"Recent apps" button
"Home" button
"Back" button
"All Apps" button
> Touch this icon to show all the applications and widgets installed on your ARCHOS.
All your downloaded applications are here.
Android
TM
apps shortcuts
> Touch to start an application.
The status bar
> Displays notications and quick settings.
10
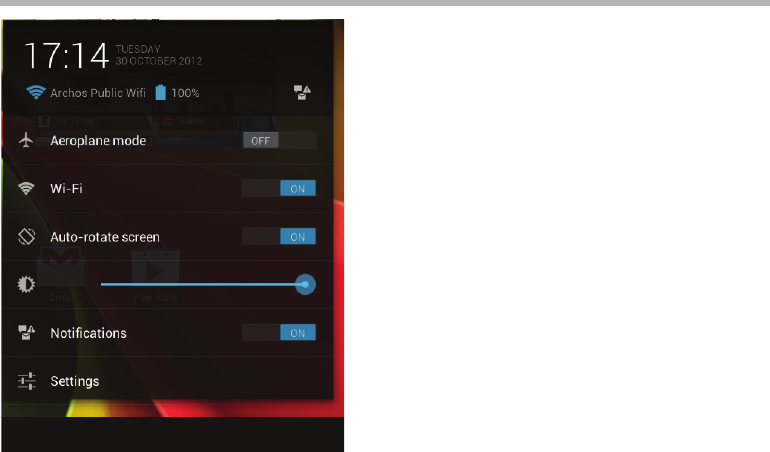
The Android
TM
Interface
The Quick settings
- Airplane mode:
To turn on/o all the wireless connections
- WiFi:
To turn on/o your WiFi connection.
- Auto-rotate screen:
To activate/deactivate automatic screen
orientation as you turn your ARCHOS.
- Brightness:
To adjust the screen brightness.
- Notications:
To activate/deactivate incoming notications.
- Settings:
To access all your settings.
11
EN
The Recent Apps
Opens a list of thumbnail images of apps you’ve worked
with recently:
- To open an app, touch it.
- To close an app, swipe it left or right.
12
Getting familiar with Android
TM
Google account
A Google account lets you take full advantage of any Google apps and services.
1. Go to "Settings" > "Accounts".
2. Select "Add account".
3. Select "Google".
4. Follow the onscreen instructions.
The extended home screen:
Navigate between dierent home screen panels by swiping left and right.
Moving a home screen item:
Touch and hold your nger onto it, then slide it to the desired location, and release your nger.
Removing a home screen item:
Touch and hold it, then slide your nger towards the top of the screen and drop it over the
"Remove" icon.
Uninstalling an item:
From the "All apps" screens, touch and hold it, then slide your nger towards the top of the
screen and drop it over the "Uninstall" bin.
13
EN
Creating application folders:
Drop one app icon over another on a home screen and the two icons will be combined.
Widgets:
Touch the "All Apps" icon on your home screen. Touch "Widgets" at the top of the screen. From
the main widgets screen, you can move around widgets just as you do for app icons.
Changing your wallpaper:
Hold your nger on a home screen at an empty location, then choose from the list.
Locking the touchscreen:
From the quick settings dashboard in the status bar, touch "Settings". In settings, scroll down
and touch "Security". Touch "Screen lock". Touch the type of lock you would like to use. After
you set a lock, a lock screen is displayed whenever your screen wakes up, requesting the
pattern, PIN or other specied key.
14
Troubleshooting
If your device is frozen:
Press the ON/OFF button for 10 seconds or use the reset button. To use the reset button, press the
“pinhole reset” button by using a sharp object such as a toothpick.
If your device doesn’t turn on:
1. Charge your device.
2. Press the ON/OFF button for 10 seconds or use the reset button.
If you want to extend the life of your battery:
Decrease the screen brightness and turn o the wireless connections if not in use.
If your device functioning is too slow:
Close all apps which are not currently used.
If your WiFi reception is too low:
Make sure you are not far from the WiFi hotspot.
Update the rmware of the device: http://www.archos.com/support.
Reset and redene your connection parameters.
Contact your WiFi connection provider.
If you want to restore your product (forgotten password? erase all your settings?) :
1. While holding Volume+, connect the supplied power cable to the ARCHOS and to a wall outlet.
2. Once the green robot ANDROID is displayed, release the volume+ button.
3. Press and hold the ON/OFF button and press once the volume+ button.
The Android system recovery is displayed.
4. Use the Volume buttons to scroll and the ON/OFF button to validate.
- Select “Wipe data/factory reset” and validate.
- Select “Yes -- delete all user data” and validate.
- Select “Reboot system now” and validate.
15
FR
Table des matières
16
17
18
20
21
22
26
28
Pour plus d’informations, consultez-les FAQs sur www.archos.com. Consultez-les avant d’envisager un éventuel retour
du produit. Le problème que vous rencontrez peut être résolu facilement. Comme nous mettons à jour et améliorons
régulièrement nos produits, le logiciel de votre appareil peut présenter une interface ou des fonctionnalités légèrement
diérentes de celles décrites dans ce guide.
Contenu de la boîte.............................................................................................................................
Mise en route..........................................................................................................................................
Description de l’appareil....................................................................................................................
Assistant de démarrage.....................................................................................................................
Se connecter à un réseau WiFi.........................................................................................................
Assurez-vous que les éléments listés ci-dessous sont présents dans la boîte. Si un élément
venait à manquer, veuillez contacter votre revendeur.
- ARCHOS 97 cobalt
- Câble USB
- Chargeur
- Guide d’utilisation rapide
- Guide des garanties et des mentions légales
17
FR
FR
Mise en route
ASTUCES:
Pour bénéficier d’une assistance complète, enregistrez votre produit.
A partir de votre ordinateur, allez sur www.archos.com/register.
Charger la batterie
Branchez le câble d’alimentation fourni sur le connecteur d’alimentation de la tablette et sur
une prise secteur.
La tablette s’allume et commence à se charger.
Vous pouvez utiliser votre tablette pendant le chargement de la batterie.
- Lors de la première utilisation, chargez complètement la batterie de la tablette.
- Utilisez uniquement le chargeur fourni.
18
4
5
7
6
8
9
10
321
12
11
Description de l’appareil
19
FR
FR
Boutons de volume
Bouton Retour
Webcam
Haut-parleur
Entrée jack audio
Port micro-USB
Lecteur carte micro-SD
Sortie vidéo mini-HDMI*
Connecteur d’alimentation
Bouton ON/OFF
Bouton de réinitialisation
Appareil photo
19
2
10
3
4
5
6
7
8
11
12
*
Câble vidéo (Mini-HDMI vers HDMI) non-fourni.
20
Assistant de démarrage
ASTUCES :
Pour le paramétrage de votre tablette, nous vous recommandons de vous placer dans la zone WiFi du
réseau que vous utilisez régulièrement.
La première fois que vous allumez votre tablette, l’assistant de démarrage vous permet de la
paramétrer :
- Langue
- Date & heure
- Connexion WiFi
- Les options du service de localisation
- Applications tierces
21
FR
FR
Se connecter à un réseau WiFi
ASTUCES :
-Lorsque vous saisissez un mot de passe, nous vous recommandons de cocher «Afficher mot de
passe» afin de voir les caractères que vous saisissez.
-Pour obtenir le mot de passe ou les paramètres du réseau WiFi, contactez le fournisseur d’accès à
Internet.
-Si votre WiFi est activé et que vous êtes à portée d’un réseau auquel vous vous êtes déjà connecté,
votre tablette tente d’établir automatiquement une connexion.
ATTENTION : assurez-vous d’être dans une zone WiFi.
Vous pouvez accéder rapidement aux paramètres WiFi à partir de la barre de statuts en bas à
droite de l’écran.
1. Sélectionnez l’heure dans la barre de statuts.
Le panneau des statuts s’ache.
2. Sélectionnez l’heure une deuxième fois dans le panneau des statuts.
Les réglages rapides s’achent.
3. Sélectionnez "Paramètres" pour acher la page des paramètres WiFi.
4. Si le WiFi est éteint, faites-glisser l’interrupteur WiFi sur la position "OUI".
Une fois que le WiFi est activé, la tablette recherche des réseaux WiFi à portée.
5. Sélectionnez le nom du réseau auquel vous voulez vous connecter.
Les réseaux privés sont achés avec un cadenas. Ils nécessitent un mot de passe.
22
1
2
3
5
6
7
4
L’interface Android
TM
23
FR
1
2
3
4
5
6
7
Google
TM
Search
> Sélectionnez "Google" pour saisir votre recherche ou l’icône microphone pour l’énoncer.
"Applications récentes"
"Accueil"
"Retour"
" Toutes les Applications"
> Sélectionnez pour acher toutes les applications et les widgets installés sur votre
tablette. Vous retrouverez toutes vos applications téléchargées.
Raccourcis d’applications Android
TM
> Sélectionnez une application pour l’ouvrir.
Barre de statuts
> Elle ache les notications et permet l’accès aux réglages rapides.
24
L’interface Android
TM
Les Réglages rapides
- Mode Avion :
pour activer/désactiver toutes les connexions sans
l.
- WiFi :
pour activer/désactiver votre connexion WiFi.
- Rotation automatique de l’écran :
pour activer/désactiver l’orientation automatique
de l’écran dès que vous tournez votre tablette.
- Luminosité :
pour ajuster la luminosité de l’écran.
- Notications :
pour activer/désactiver les notications entrantes.
- Paramètres :
pour accéder à tous vos paramètres.
25
FR
Les Applications récentes
L’application ache une liste de vignettes des
applications utilisées récemment :
- Pour acher une application, sélectionnez-la.
- Pour fermer une application, faites-la glisser vers la
gauche ou vers la droite.
26
Se familiariser avec Android
TM
Compte Google
Un compte Google vous permet de tirer pleinement parti des services et applications Google.
1. Accédez à "Paramètres" > "Comptes".
2. Appuyez sur "Ajouter un compte".
3. Sélectionnez "Google".
4. Suivez les instructions à l’écran.
L’écran d’accueil étendu :
Naviguez entre les diérents écrans d’accueil en faisant glisser votre doigt vers la gauche ou
vers la droite.
Déplacer une icône de l’écran d’accueil :
Maintenez votre doigt appuyé sur l’icône jusqu’à ce que s’achent les lignes de
positionnement, puis faites-la glisser vers l’emplacement souhaité, et relâchez.
Supprimer une icône de l’écran d’accueil :
Maintenez votre doigt appuyé sur l’icône, puis faites-la glisser vers le haut de l’écran, et
déposez-la sur l’icône "Supprimer".
Désinstaller une application :
A partir de l’écran "Toutes les applications", maintenez votre doigt appuyé sur l’icône, puis
faites-la glisser vers le haut de l’écran et déposez-la sur l’icône "Désinstaller".
27
FR
Créer des dossiers d’applications :
A partir d’un écran d’accueil, déposez une icône sur une autre pour les rassembler.
Widgets :
Sélectionnez l’icône "Toutes les applications". Sélectionnez "Widgets" en haut de l’écran. A
partir de l’écran d’accueil des widgets, vous pouvez déplacer les widgets de la même façon
que vous procédez avec les applications.
Changer le fond d’écran :
Maintenez votre doigt appuyé sur un emplacement vide de l’écran, puis choisissez parmi la
liste d’options.
Verrouiller votre tablette :
A partir du panneau des réglages rapides dans la barre de statut, sélectionnez "Paramètres".
Faites déler l’écran vers le bas, puis sélectionnez "Sécurité". Sélectionnez "Verrouillage de
l’écran". Sélectionnez le type de verrouillage que vous voulez utiliser. Une fois que vous avez
sélectionné une option, un écran de verrouillage s’ache chaque fois que votre écran est
réactivé. Vous êtes alors invité à saisir le schéma, le code PIN ou tout autre code spécié.
28
Dépannage
Si votre appareil ne répond pas :
Appuyez sur le bouton ON/OFF pendant 10 secondes ou utilisez le bouton Reset.
Appuyez sur le bouton reset en utilisant un objet pointu tel qu’un trombone.
Si votre appareil ne s’allume pas :
1. Chargez votre appareil.
2. Appuyez sur le bouton ON/OFF pendant 10 secondes ou utilisez le bouton Reset.
Si vous voulez prolonger l’autonomie de la batterie :
Diminuez la luminosité de l’écran et désactivez les connexions sans l si elles sont inutilisées.
Si votre appareil fonctionne au ralenti :
Fermez les applications qui ne sont pas en cours d’utilisation.
Si votre réception WiFi est trop faible :
Assurez-vous de ne pas être trop loin de la borne WiFi.
Mettez à jour le logiciel du produit: http://www.archos.com/support.
Réinitialisez vos paramètres de connexion WiFi.
Contactez le fournisseur d’accès.
Si vous voulez restaurer les valeurs d’usine (mot de passe oublié? eacer tous vos réglages?) :
1. En maintenant volume+ enfoncé, branchez le câble d’alimentation fourni sur le connecteur
d’alimentation et sur une prise secteur.
2. Une fois que le robot vert Android s’ache, relâchez le bouton de volume+.
3. Maintenez enfoncé le bouton ON/OFF et appuyez une fois sur le bouton volume+.
Le système de restauration d’Android est aché.
4. Utilisez les boutons de volume pour déler et le bouton ON/OFF pour valider.
- Sélectionnez “Wipe data/factory reset” et validez pour restaurer aux valeurs d’usine.
- Sélectionnez “Yes -- delete all user data” et validez pour supprimer toutes les données utilisateur.
- Sélectionnez “Reboot system now” et validez pour redémarrer le système.
29
DE
Inhaltsverzeichnis
Weitere Informationen nden Sie unter den FAQs unter www.archos.com. Bitte lesen Sie diese Informationen sorgfältig,
bevor Sie die Rückgabe eines Produkts erwägen. Möglicherweise läßt sich Ihr Problem leicht lösen. Da unsere Produkte
kontinuierlich aktualisiert und weiterentwickelt werden, kann die Software Ihres Geräts in Erscheinung und Funktionalität
geringfügige Abweichungen zu den Darstellungen in dieser Kurzbedienungsanleitung aufweisen.
Beschreibung des Packungsinhalts.................................................................................................
Erste Schritte.........................................................................................................................................
Beschreibung des Geräts..................................................................................................................
Soluzione dei problemi......................................................................................................................
58
59
60
62
63
64
68
70
58
ARchos
Contenuto della confezione
Assicurarsi che nella scatola siano inclusi gli articoli. Qualora dovesse mancare un articolo,
contattare il rivenditore locale presso il quale si è acquistato il prodotto.
- ARCHOS 97 cobalt
- Cavo USB
- Caricatore
- Guida dell’utente
- Garanzia, note legali e sulla sicurezza
59
IT
Avvio
CONSIGLI:
Per ricevere un’assistenza più completa, registrare il prodotto.
Con un computer, andare su www.archos.com/register.
Caricamento della batteria
Collegare il cavo di alimentazione fornito al dispositivo ARCHOS e a una presa a muro.
Il dispositivo ARCHOS si accenderà e inizierà a ricaricarsi.
Durante il caricamento è possibile usare ARCHOS.
- Caricare completamente il dispositivo al primo utilizzo.
- Utilizzare solo il caricabatteria incluso.
60
4
5
7
6
8
9
10
321
12
11
Descrizione del ARCHOS
61
IT
Tasti volume
Pulsante Indietro
Webcam
Altoparlante
Spinotto cue
Porta micro-USB
Lettore di schede micro SD
Uscita video mini HDMI*
Connettore di alimentazione
Pulsante ON/OFF
Ripristino hardware
Camera
1
9
2
10
3
4
5
6
7
8
11
12
* Con cavo video opzionale (HDMI / mini HDMI).
62
Installazione guidata
CONSIGLI:
Definire i parametri del dispositivo nella zona della rete WiFi si utilizzano regolarmente.
La prima volta che si avvia ARCHOS, il wizard di installazione aiuterà ad installare il dispositivo :
- Lingua
- Data e ora
- Connessione WiFi
- Il servizio di localizzazione
- Applicazioni di altri produttori
63
IT
Connessione a una rete wireless
CONSIGLI:
-Quando si inserisce una password WiFi, si consiglia di selezionare «Visualizza password» .
-Per ottenere la password (impostazioni) WiFi corretta per la rete, contattare il fornitore della rete WiFi.
-Se la rete WiFi è attiva e ci si trova all’interno di una rete precedentemente utilizzata, il vostro ARCHOS
automaticamente tenterà di collegarsi nuovamente alla stessa rete.
ATTENZIONE: Accertarsi di essere in una zona coperta da WiFi.
È possibile accedere rapidamente alle impostazioni WiFi dalla barra di stato nell’angolo in
basso a destra dello schermo.
1. Selezionare l’ora nella barra di stato.
Si visualizza il pannello di stato.
2. Selezionare l’ora una seconda volta nel pannello di stato.
Si visualizzano le impostazioni rapide.
3. Selezionare "Impostazioni" per aprire il menù delle impostazioni WiFi.
4. Se la rete WiFi è disattivata, spostare il pulsante WiFi sulla posizione "ON".
Una volta attivata la rete WiFi, ARCHOS scansionerà le reti WiFi presenti.
5. Selezionare il nome di rete a cui si desidera connettersi. Le reti private vengono visualizzate
con un lucchetto e richiedono l’inserimento di una password.
64
1
2
3
5
6
7
4
Interfaccia Android
TM
65
IT
Google
TM
Search
> Selezionare la ricerca per testo o per voce.
"Applicazioni recenti"
"Home"
"Indietro"
"Tutte le applicazioni"
> Selezionare questa icona per visualizzare tutte le applicazioni e i widget si
accenderanno sul vostro ARCHOS. Tutte le applicazioni scaricate sono qui.
Applicazioni Android
TM
> Selezionare per avviare un’applicazione.
Barra di stato
> Che visualizza le notiche e le impostazioni rapide.
1
2
3
4
5
6
7
66
Interfaccia Android
TM
Impostazioni rapide
- Modalità aereo:
Per attivare/disattivare tutte le connessioni
wireless, specialmente in volo.
- WiFi:
Per attivare/disattivare la connessione WiFi.
- Rotazione automatica schermo:
Per attivare/disattivare l’orientamento
automatico dello schermo mentre si ruota
ARCHOS.
- Luminosità:
Per regolare la luminosità dello schermo.
- Notiche:
Per attivare/disattivare le notiche in arrivo.
- Impostazioni:
Per accedere a tutte le impostazioni.
67
IT
Applicazioni recenti
Apre un elenco di immagini in miniatura delle
applicazioni su cui si è recentemente lavorato:
- Per aprire un’applicazione, selezionarla.
- Per chiudere un’applicazione, sorarla da sinistra o da
destra.
68
Conoscere Android
TM
L’account Google
L’account Google consente anche di sfruttare appieno qualsiasi altro servizio o applicazione
Google che si desidera utilizzare.
1. Selezionare "Impostazioni" > "Account".
2. Toccare"Aggiungi account".
3. Toccare il tipo di account da aggiungere.
4. Seguire la procedura visualizzata sullo schermo per inserire le informazioni sull’account.
Schermata iniziale estesa:
Navigare tra i vari pannelli della schermata iniziale sorando da sinistra o destra.
Spostare una voce della schermata iniziale:
Selezionare e tenere il dito su di essa no a quando si visualizzano le linee della griglia di
posizionamento, quindi scorrere nella posizione desiderata e togliere il dito.
Rimuovere una voce della schermata iniziale:
Selezionare e tenerla, scorrere il dito verso la parte superiore dello schermo e lasciare sull’icona
"Rimuovi".
69
IT
Disinstallare una voce:
Dalle schermate Tutte le applicazioni, selezionare e tenere, scorrere il dito verso la parte
superiore dello schermo e lasciare su "Cestino disinstalla".
Creare cartelle di applicazioni:
Lasciare un’icona di applicazione su un’altra icona della schermata iniziale e le due icone si
combineranno.
Widget:
Selezionare l’icona "Tutte le applicazioni" della schermata iniziale. Toccare i "Widget" sulla
parte superiore dello schermo. Dalla schermata principale Widget, è possibile spostare i widget
proprio come si fa per le icone delle applicazioni.
Modicare lo sfondo:
Tenere il dito sulla schermata su una posizione vuota, quindi selezionare dall’elenco.
Blocco del touchscreen:
Dal pannello delle impostazioni rapide nella barra di stato, selezionare impostazioni. Scorrere e
selezionare "Protezione" > "Bloccare il touchscreen". Selezionare il tipo di blocco che si desidera
usare. Dopo aver impostato un blocco, un lucchetto viene visualizzato ogni volta che lo
schermo si apre, richiedendo sequenza, PIN o altra chiave specicata.
70
Soluzione dei problemi
Nel caso in cui il dispositivo sembri bloccato:
Premere il pulsante ON/OFF per 10 secondi o usare l’azzeramento Hardware. Per usare
l’azzeramento Hardware, premere il pulsante «azzeramento foro» usando un oggetto appuntito
come uno stuzzicadenti.
Nel caso in cui il dispositivo non si accenda:
1. Caricare il dispositivo.
2. Premere il pulsante ON/OFF per 10 secondi o usare l’azzeramento Hardware.
Se si desidera estendere la vita della batteria:
Diminuire la luminosità dello schermo e spegnere le connessioni wireless non in uso.
Se il dispositivo funziona troppo lentamente:
Chiudere tutte le applicazioni non attualmente in uso.
Se la ricezione WiFi è troppo lenta:
Accertarsi di non essere troppo lontani dal punto WiFi.
Aggiornare il rmware del dispositivo: http://www.archos.com/support.
Ripristinare le impostazioni di connessione.
Contattare il fornitore della connessione WiFi.
Se si desidera ripristinare il prodotto (password dimenticata? cancellare tutte le
impostazioni?) :
1. Tenere premuto Volume+ e collegare il cavo di alimentazione fornito al dispositivo ARCHOS e a
una presa a muro.
2. Il verde robot Android viene visualizzato. Rilasciare il pulsante del volume+.
3. Tenere premuto il tasto ON / OFF e premere il tasto volume+.
Il ripristino del sistema Android è visualizzato.
4. Utilizzare i pulsanti del Volume per scorrere e il pulsante ON/OFF per confermare.
- Selezionare “Wipe data/factory reset” e confermare.
- Selezionare “Yes -- delete all user data” e confermare.
- Selezionare “Reboot system now” e confermare.
71
NL
Inhoudsopgave
Raadpleeg voor meer informatie de veelgestelde vragen (FAQ’s) op www.archos.com. Zorg ervoor dat u ze leest alvorens
te overwegen het product te retourneren. Uw probleem kan wel eens een probleempje blijken. Omdat we onze
producten voortdurend aanpassen en verbeteren, kan de software van uw apparaat er een beetje anders uitzien of een
licht gewijzigde functionaliteit hebben dan voorgesteld in deze Snelstartgids.
Wat zit er in de doos?.........................................................................................................................
Aan de slag.............................................................................................................................................
Gebruikershandleiding.com neemt misbruik van zijn services uitermate serieus. U kunt hieronder aangeven waarom deze vraag ongepast is. Wij controleren de vraag en zonodig wordt deze verwijderd.
Product:
Spelregels forum
Om tot zinvolle vragen te komen hanteren wij de volgende spelregels:
lees eerst de handleiding door;
controleer of uw vraag al eerder door iemand anders is gesteld;
probeer uw vraag zo duidelijk mogelijk te stellen;
heeft u een probleem en al geprobeerd om dit op te lossen, vermeld dit erbij aub;
heeft u een oplossing gekregen van een bezoeker dan horen wij dat graag in dit forum;
wilt u een reactie geven op een vraag of antwoord, gebruik dan niet dit formulier maar klik op de knop 'reageer op deze vraag';
uw vraag wordt direct op de website gezet; vermijd daarom persoonlijke gegevens in te vullen;
Belangrijk! Als er een antwoord wordt gegeven op uw vraag, dan is het voor de gever van het antwoord nuttig om te weten als u er wel (of niet) mee geholpen bent! Wij vragen u dus ook te reageren op een antwoord.
Belangrijk! Antwoorden worden ook per e-mail naar abonnees gestuurd. Laat uw emailadres achter op deze site, zodat u op de hoogte blijft. U krijgt dan ook andere vragen en antwoorden te zien.
Abonneren
Abonneer u voor het ontvangen van emails voor uw Archos 97 Cobalt bij:
nieuwe vragen en antwoorden
nieuwe handleidingen
U ontvangt een email met instructies om u voor één of beide opties in te schrijven.
Ontvang uw handleiding per email
Vul uw emailadres in en ontvang de handleiding van Archos 97 Cobalt in de taal/talen: Nederlands, Duits, Engels, Frans, Italiaans, Portugees, Spaans als bijlage per email.
De handleiding is 1,54 mb groot.
U ontvangt de handleiding per email binnen enkele minuten. Als u geen email heeft ontvangen, dan heeft u waarschijnlijk een verkeerd emailadres ingevuld of is uw mailbox te vol. Daarnaast kan het zijn dat uw internetprovider een maximum heeft aan de grootte per email. Omdat hier een handleiding wordt meegestuurd, kan het voorkomen dat de email groter is dan toegestaan bij uw provider.
Stel vragen via chat aan uw handleiding
Stel uw vraag over deze PDF
Uw handleiding is per email verstuurd. Controleer uw email
Als u niet binnen een kwartier uw email met handleiding ontvangen heeft, kan het zijn dat u een verkeerd emailadres heeft ingevuld of dat uw emailprovider een maximum grootte per email heeft ingesteld die kleiner is dan de grootte van de handleiding.
Er is een email naar u verstuurd om uw inschrijving definitief te maken.
Controleer uw email en volg de aanwijzingen op om uw inschrijving definitief te maken
U heeft geen emailadres opgegeven
Als u de handleiding per email wilt ontvangen, vul dan een geldig emailadres in.
Uw vraag is op deze pagina toegevoegd
Wilt u een email ontvangen bij een antwoord en/of nieuwe vragen? Vul dan hier uw emailadres in.