WARNING — To reduce the risk of fire or electric shock, do not
expose this apparatus to rain or moisture.
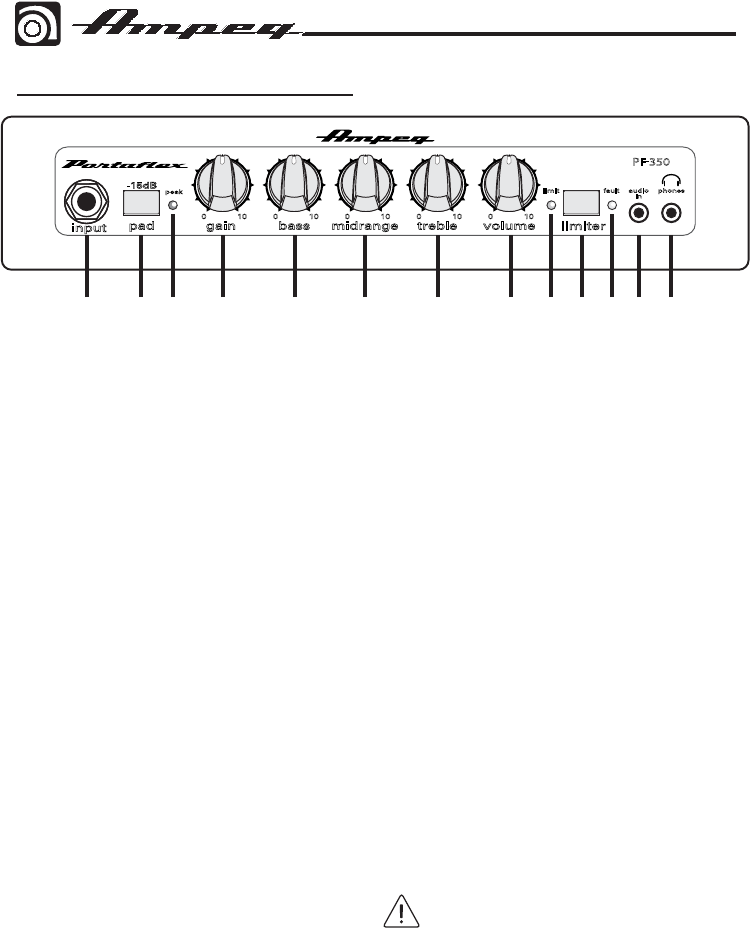
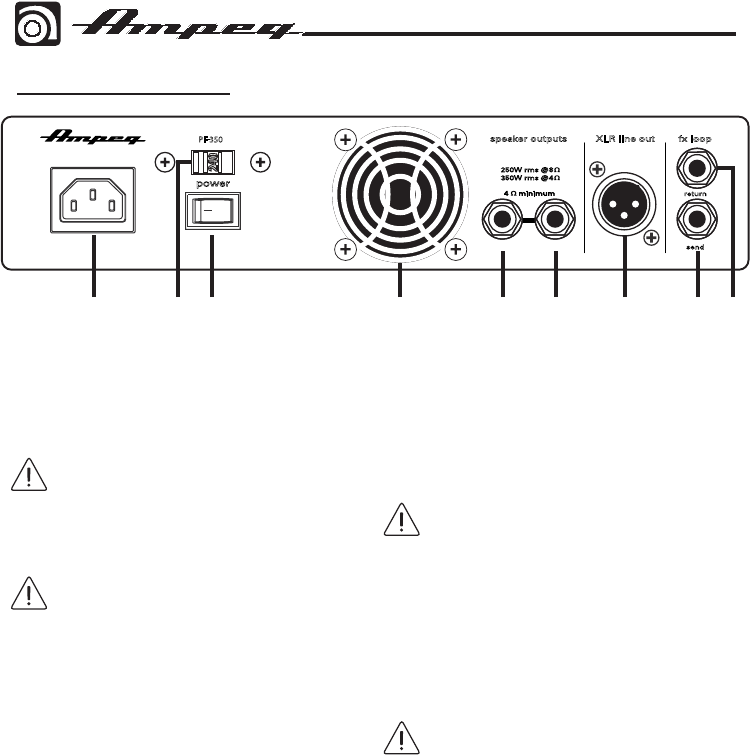
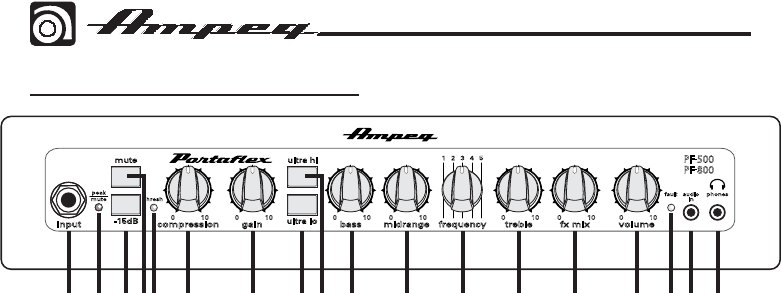
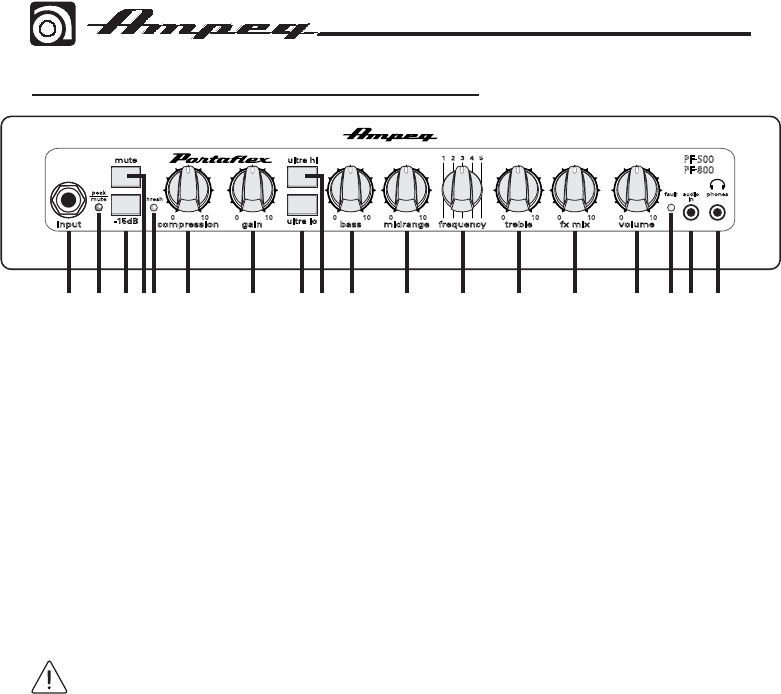
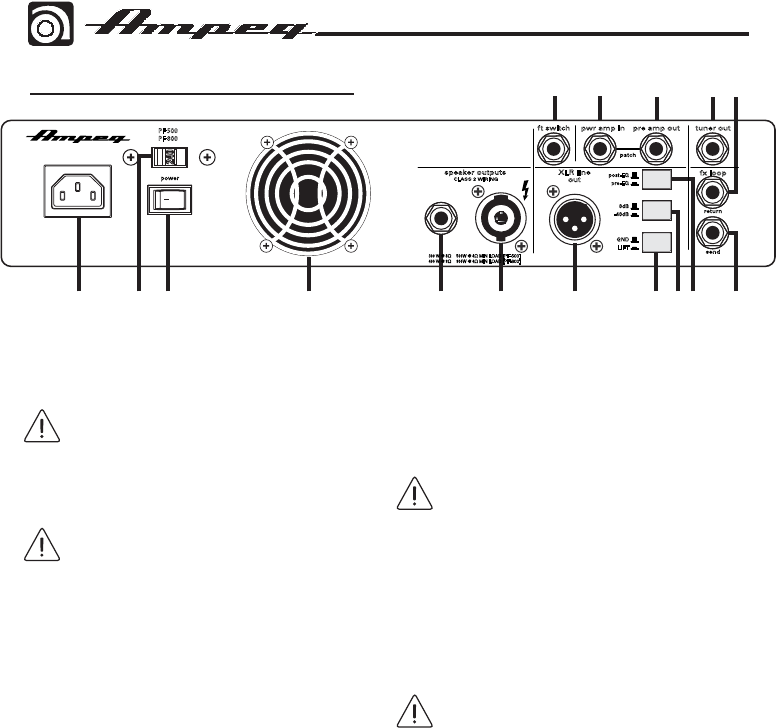
PF-350 / PF-500 / PF-800 Bass Guitar Amplifier
3
CONSIGNES DE SECURITE IMPORTANTES
- LIRE, SUIVRE TOUTES LES INSTRUCTIONS ET LES PRECAUTIONS D’UTILISATION
- NE PAS UTILISER PROCHE D’UNE SOURCE DE CHALEUR ET NE PAS BLOQUER OU OBSTRUER LE SYSTEME DE VENTILATION SUR CET APPAREIL. POUR UNE
UTILISATION CONFORME, CET APPAREIL NECESSITE ENVIRON 7CM D’ESPACE BIEN VENTILE AUTOUR DE SON SYSTEME DE REFROIDISSEMENT, AINSI QU’UN COURANT
D’AIR FRAIS CONSTANT
- NE PAS UTILISER CET APPAREIL PROCHE D’UNE SOURCE LIQUIDE
- NETTOYER SEULEMENT A L’AIDE D’UN CHIFFON DOUX ET SEC ET NE PAS UTILISER DE PRODUITS MENAGERS
- CONNECTER UNIQUEMENT LE CABLE D’ALIMENTATION FOURNI SUR UNE PRISE AVEC MISE A LA TERRE, ET COMPATIBLE AVEC LA TENSION, L’INTENSITE ET LA
FREQUENCE REQUISES INDIQUEES SUR LA FACE ARRIERE DE L’APPAREIL
- S’ASSURER DE NE PAS MARCHER, PLIER OU TIRER SUR LE CABLE D’ALIMENTATION
- DEBRANCHER L’APPAREIL LORS D’UNE TEMPETE OU LORS D’UNE TRES LONGUE PERIODE DE NON UTILISATION
- UTILISER UNIQUEMENT DES ACCESSOIRES SPECIFIES PAR LE FABRICANT POUR UNE UTILISATION EN TOUTE SECURITE ET POUR EVITER DES BLESSURES
- ATTENTION: AFIN DE PREVENIR TOUT RISQUE DE CHOCS ELECTRIQUES OU DE DEBUT D’INCENDIE, NE PAS EXPOSER CET APPAREIL A LA PLUIE ET A L’HUMIDITE
- TOUT ENTRETIEN DOIT ETRE FAIT PAR UN TECHNICIEN QUALIFIE
- NOS AMPLIFICATEURS PEUVENT PRODUIRE DE TRES HAUTES PRESSIONS ACOUSTIQUES QUI PEUVENT CAUSER DES DOMMAGES AUDITIFS PERMANENTS OU
DEFINITIFS. L’UTILISER AVEC UNE GRANDE PRECAUTION EST CONSEILLE ET DES PROTECTIONS AUDITIVES SONT RECOMMANDEES POUR UNE UTILISATION A FORT
VOLUME.
- ATTENTION: CET APPAREIL REQUIERT UNE PRISE MURALE AVEC MISE A LA TERRE, AUX NORMES ACTUELLES ET COMPATIBLE AVEC LES SPECIFICATIONS
ELECTRIQUES SE TROUVANT EN FACE ARRIERE DE L’APPAREIL. LA PRISE ELECTRIQUE DOIT RESTER ACCESSIBLE POUR DEBRANCHER L’APPAREIL EN CAS DE DEFAUT
PENDANT L’UTILISATION
- CET APPAREIL DOIT ETRE DEBRANCHE SI IL N’EST PAS UTILISE
Elimination correcte du produit : Ce symbole indique que ce produit ne doit pas être éliminé avec les ordures ménagères, comme le prévoiT la directive WEEE (2002/96/
EC) et votre loi nationale.
Ce produit doit être remis à un site de recyclage des déchets électriques et des équipements électroniques (EEE).
Un mauvais recyclage de ce type de déchet peut avoir de possibles impacts négatifs sur l’environnement et la santé humaine dus aux émanations de substances.
Dans un même temps, votre coopération à un recyclage correct de ce produit contribuera à la bonne utilisation des ressources naturelles.
Pour connaître l’endroit où il est possible de recycler ces équipements, merci de contacter votre mairie, les services de recyclages ou le service des déchets ménagers.
NOTE: This equipment has been tested and found to comply
with the limits for a Class B digital device, pursuant to part 15 of
the FCC Rules. These limits are designed to provide reasonable
protection against harmful interference in a residential installation.
This equipment generates, uses, and can radiate radio frequency
energy and, if not installed and used in accordance with the instruc-
tions, may cause harmful interference to radio communications.
However, there is no guarantee that interference will not occur in a
particular installation. If this equipment does cause harmful interfer-
ence to radio or television reception, which can be determined by
turning the equipment off and on, the user is encouraged to try to
correct the interference by one or more of the following measures:
Gebruikershandleiding.com neemt misbruik van zijn services uitermate serieus. U kunt hieronder aangeven waarom deze vraag ongepast is. Wij controleren de vraag en zonodig wordt deze verwijderd.
Product:
Spelregels forum
Om tot zinvolle vragen te komen hanteren wij de volgende spelregels:
lees eerst de handleiding door;
controleer of uw vraag al eerder door iemand anders is gesteld;
probeer uw vraag zo duidelijk mogelijk te stellen;
heeft u een probleem en al geprobeerd om dit op te lossen, vermeld dit erbij aub;
heeft u een oplossing gekregen van een bezoeker dan horen wij dat graag in dit forum;
wilt u een reactie geven op een vraag of antwoord, gebruik dan niet dit formulier maar klik op de knop 'reageer op deze vraag';
uw vraag wordt direct op de website gezet; vermijd daarom persoonlijke gegevens in te vullen;
Belangrijk! Als er een antwoord wordt gegeven op uw vraag, dan is het voor de gever van het antwoord nuttig om te weten als u er wel (of niet) mee geholpen bent! Wij vragen u dus ook te reageren op een antwoord.
Belangrijk! Antwoorden worden ook per e-mail naar abonnees gestuurd. Laat uw emailadres achter op deze site, zodat u op de hoogte blijft. U krijgt dan ook andere vragen en antwoorden te zien.
Abonneren
Abonneer u voor het ontvangen van emails voor uw Ampeg PF350 bij:
nieuwe vragen en antwoorden
nieuwe handleidingen
U ontvangt een email met instructies om u voor één of beide opties in te schrijven.
Ontvang uw handleiding per email
Vul uw emailadres in en ontvang de handleiding van Ampeg PF350 in de taal/talen: Engels als bijlage per email.
De handleiding is 3,23 mb groot.
U ontvangt de handleiding per email binnen enkele minuten. Als u geen email heeft ontvangen, dan heeft u waarschijnlijk een verkeerd emailadres ingevuld of is uw mailbox te vol. Daarnaast kan het zijn dat uw internetprovider een maximum heeft aan de grootte per email. Omdat hier een handleiding wordt meegestuurd, kan het voorkomen dat de email groter is dan toegestaan bij uw provider.
Stel vragen via chat aan uw handleiding
Stel uw vraag over deze PDF
Uw handleiding is per email verstuurd. Controleer uw email
Als u niet binnen een kwartier uw email met handleiding ontvangen heeft, kan het zijn dat u een verkeerd emailadres heeft ingevuld of dat uw emailprovider een maximum grootte per email heeft ingesteld die kleiner is dan de grootte van de handleiding.
Er is een email naar u verstuurd om uw inschrijving definitief te maken.
Controleer uw email en volg de aanwijzingen op om uw inschrijving definitief te maken
U heeft geen emailadres opgegeven
Als u de handleiding per email wilt ontvangen, vul dan een geldig emailadres in.
Uw vraag is op deze pagina toegevoegd
Wilt u een email ontvangen bij een antwoord en/of nieuwe vragen? Vul dan hier uw emailadres in.