733756
31
Verklein
Vergroot
Pagina terug
1/42
Pagina verder
USERS MANUAL
IT
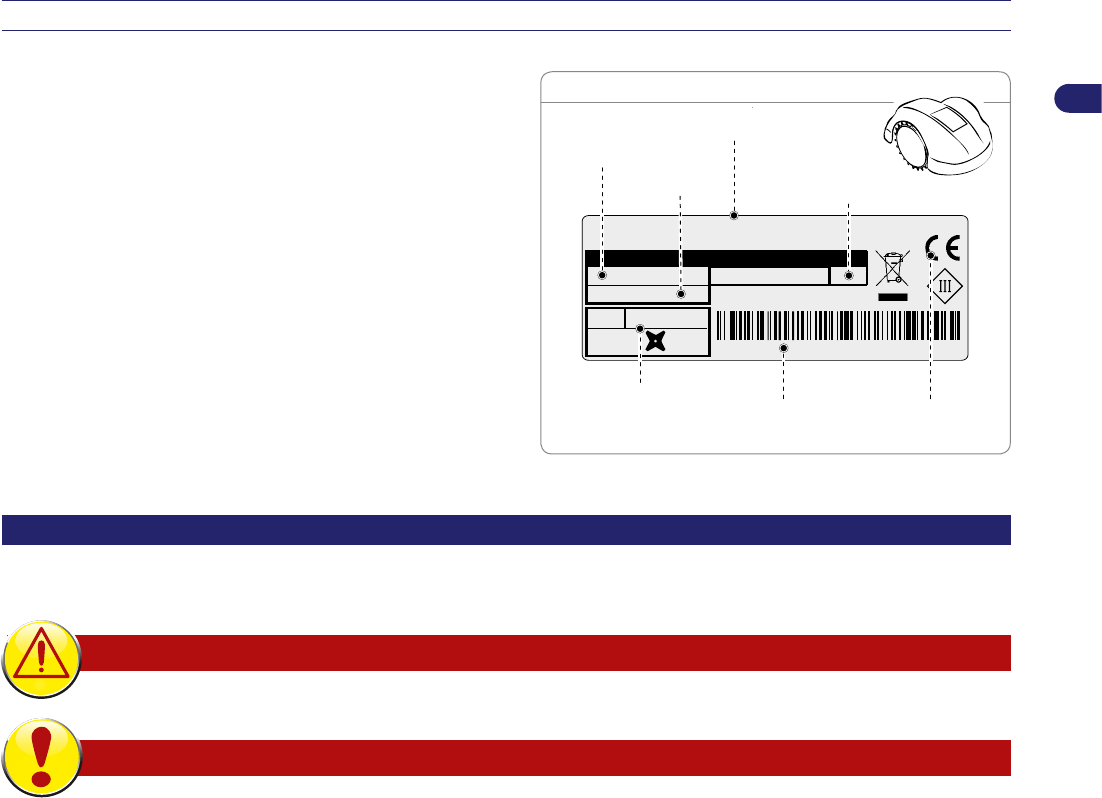
La sigla di identificazione del robot è riportata sulla targhetta applicata sul pannello frontale. Sulla base della sigla, è possibile
individuare, nella tabella riportata a piè di pagina, la denominazione commerciale del robot.
EN
The identification code of the robot can be found on the plate on the front panel. On the basic of the code you can find the trade name of
the robot in the table at the bottom of the page.
FR
Le sigle d’identification du robot est reporté sur la plaque appliquée sur le panneau avant. En se basant sur le sigle, il est possible
d’identifier la dénomination commerciale du robot dans le tableau se trouvant au bas de la page.
DE
Das Typenschild mit der Kennnummer des Roboters befindet sich auf der vorderen Abdeckung des Gerätes. Anhand der Kennung kann
die Handelsbezeichnung des Roboters mit Hilfe der Tabelle am Seitenende festgerstellt werden.
NL
Het kenteken van de robot bevindt zich op het identificatieplaatje op het frontpaneel. Aan de hand van dit kenteken kan de commerciële
benaming van de robot in de tabel onderaan de bladzijde teruggevonden worden.
DA
På frontpladen er de en model-kode på robotter. På baggrund af koden er det muligt at identificere det kommercielle navn på robotten, i
tabellen, i bunden af siden.
SV
Robotens modellkod sitter rkskylten på frontpanelen. Utifrån koden går det att identifiera robotens kommersiella beteckning, i
tabellen längst ner på sidan.
7085EV0 - Ambrogio Robot L85 Evolution
7085EL0 - Ambrogio Robot L85 Elite
1
User’s manual
EN
TABLE OF CONTENTS
General information. ................................................................................................................................................................... 2
Purpose of the manual. ............................................................................................................................................................... 2
Identication of manufacturer and equipment. ............................................................................................................................ 3
Safety information. ...................................................................................................................................................................... 3
Safety regulations. ...................................................................................................................................................................... 3
Safety devices. ............................................................................................................................................................................ 4
Safety signals. ............................................................................................................................................................................. 5
Technical information. ................................................................................................................................................................ 6
Technical specications............................................................................................................................................................... 6
General description of the appliance........................................................................................................................................... 7
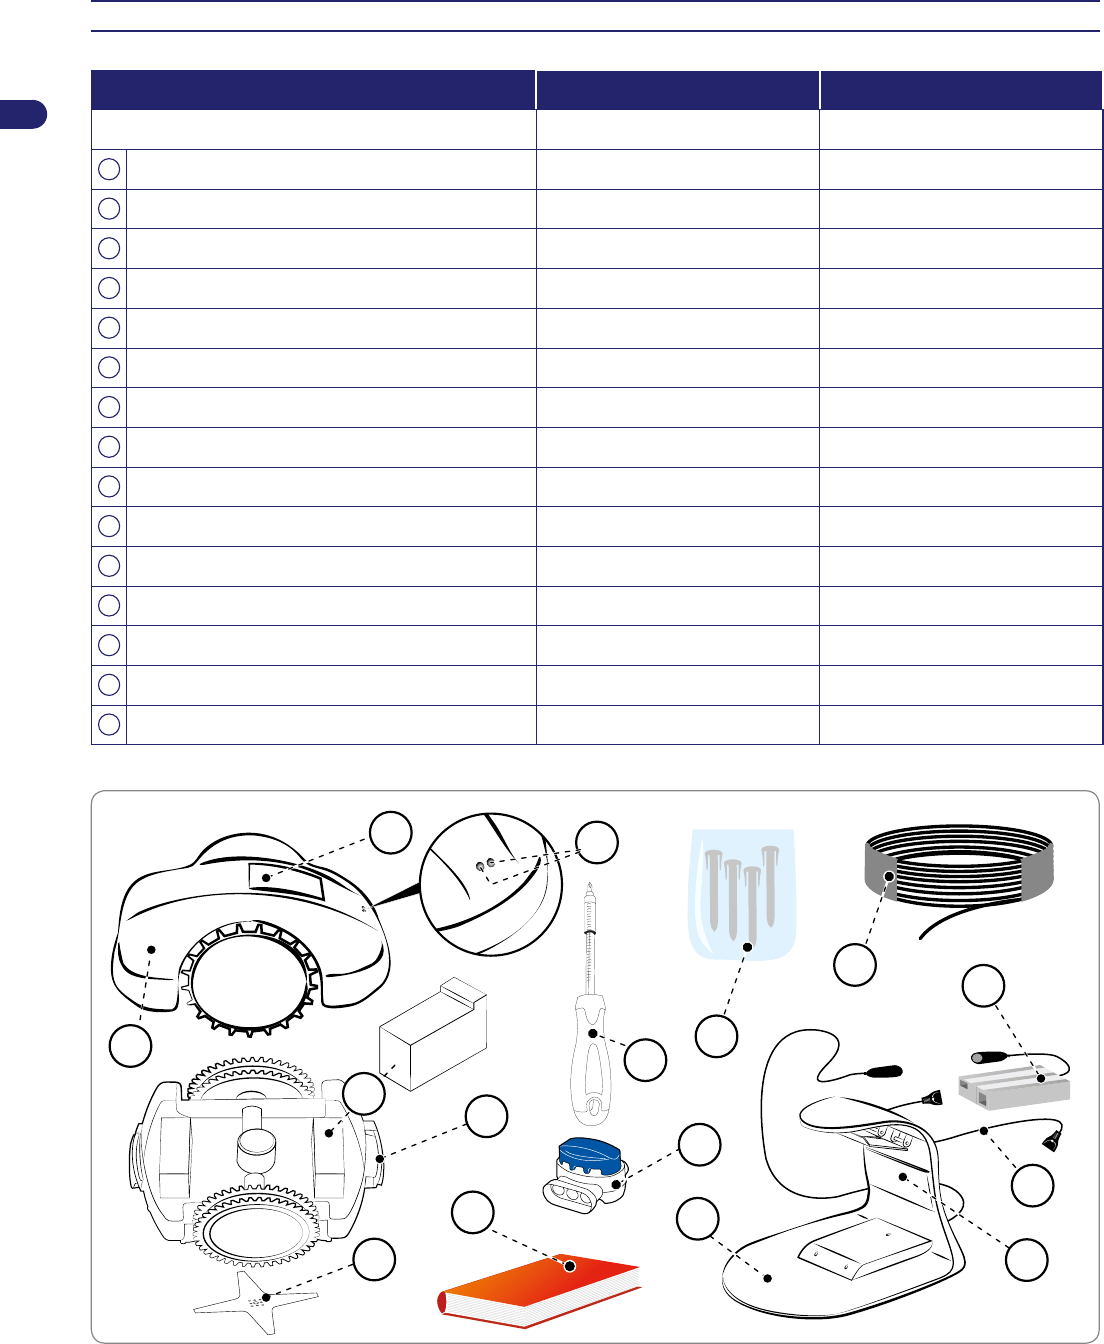
Main parts / standard equipment................................................................................................................................................. 8
Installation. ................................................................................................................................................................................... 9
Packing and unpacking. .............................................................................................................................................................. 9
Planning of system installation. ................................................................................................................................................... 9
Setting up of the perimeter wire. ................................................................................................................................................11
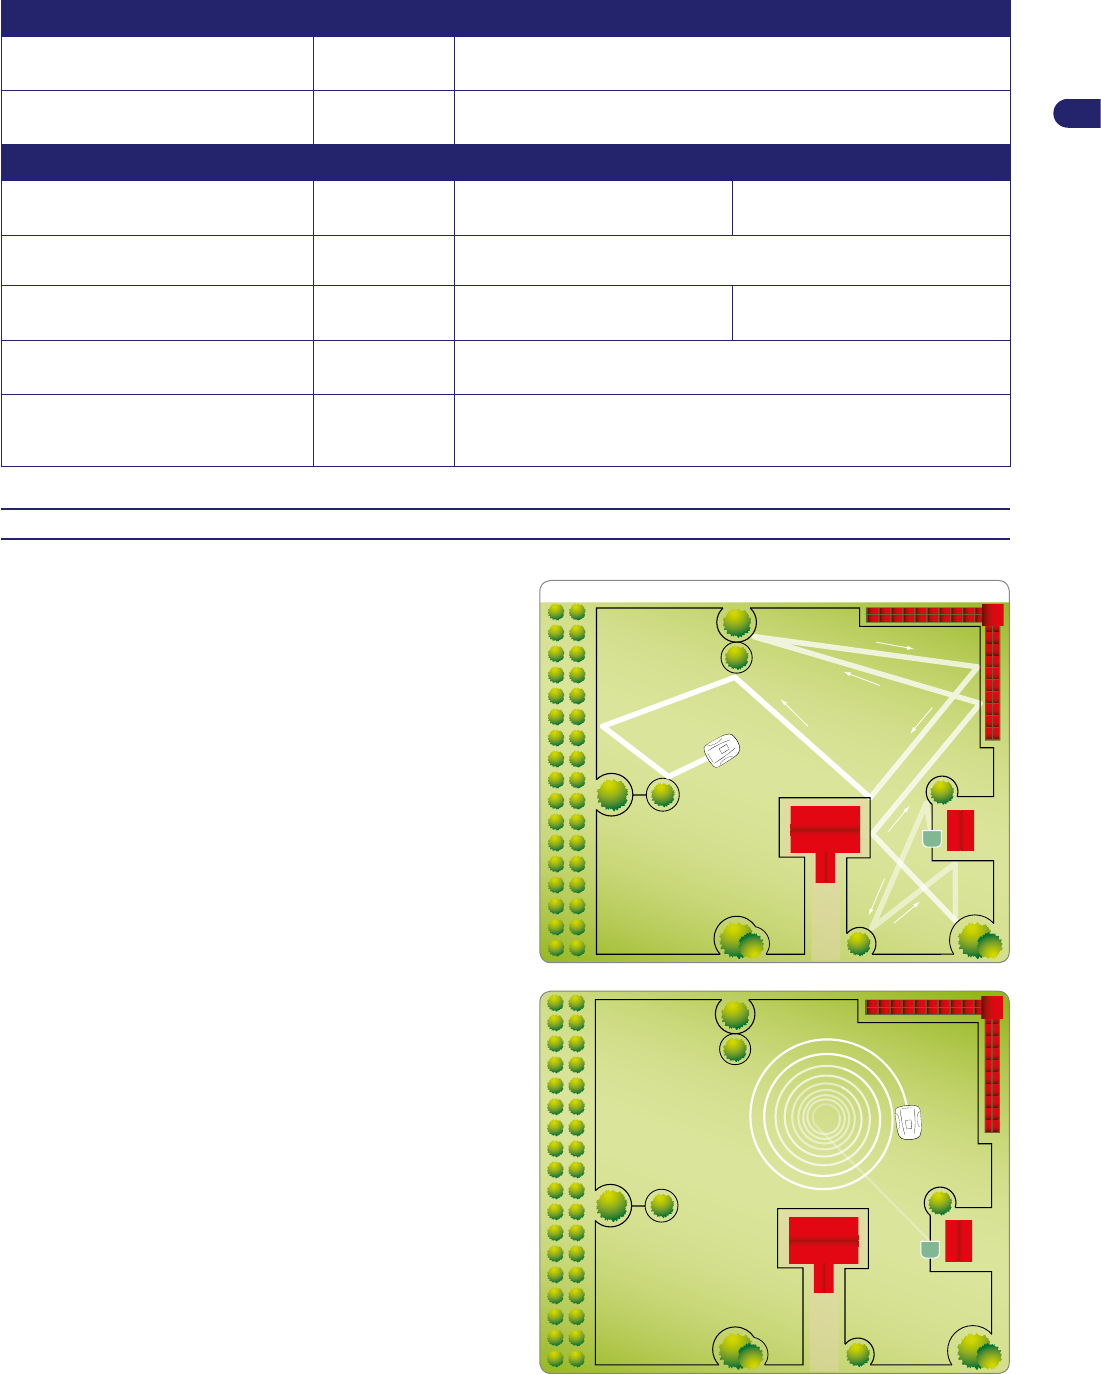
Re-entry method to the charging station. ...................................................................................................................................11
Setup of the robot’s quick re-entry to the charging station. ....................................................................................................... 12
Preparation and marking the boundaries of the work areas. .................................................................................................... 13
Installation of perimeter wire. .................................................................................................................................................... 17
Installation of the charging station and power supply unit......................................................................................................... 18
Battery charging on rst use. .................................................................................................................................................... 19
Adjustments. .............................................................................................................................................................................. 20
Adjustment recommendations................................................................................................................................................... 20
Adjustment of cutting height. ..................................................................................................................................................... 20
Use and operation. .................................................................................................................................................................... 21
Obligations for use. ................................................................................................................................................................... 21
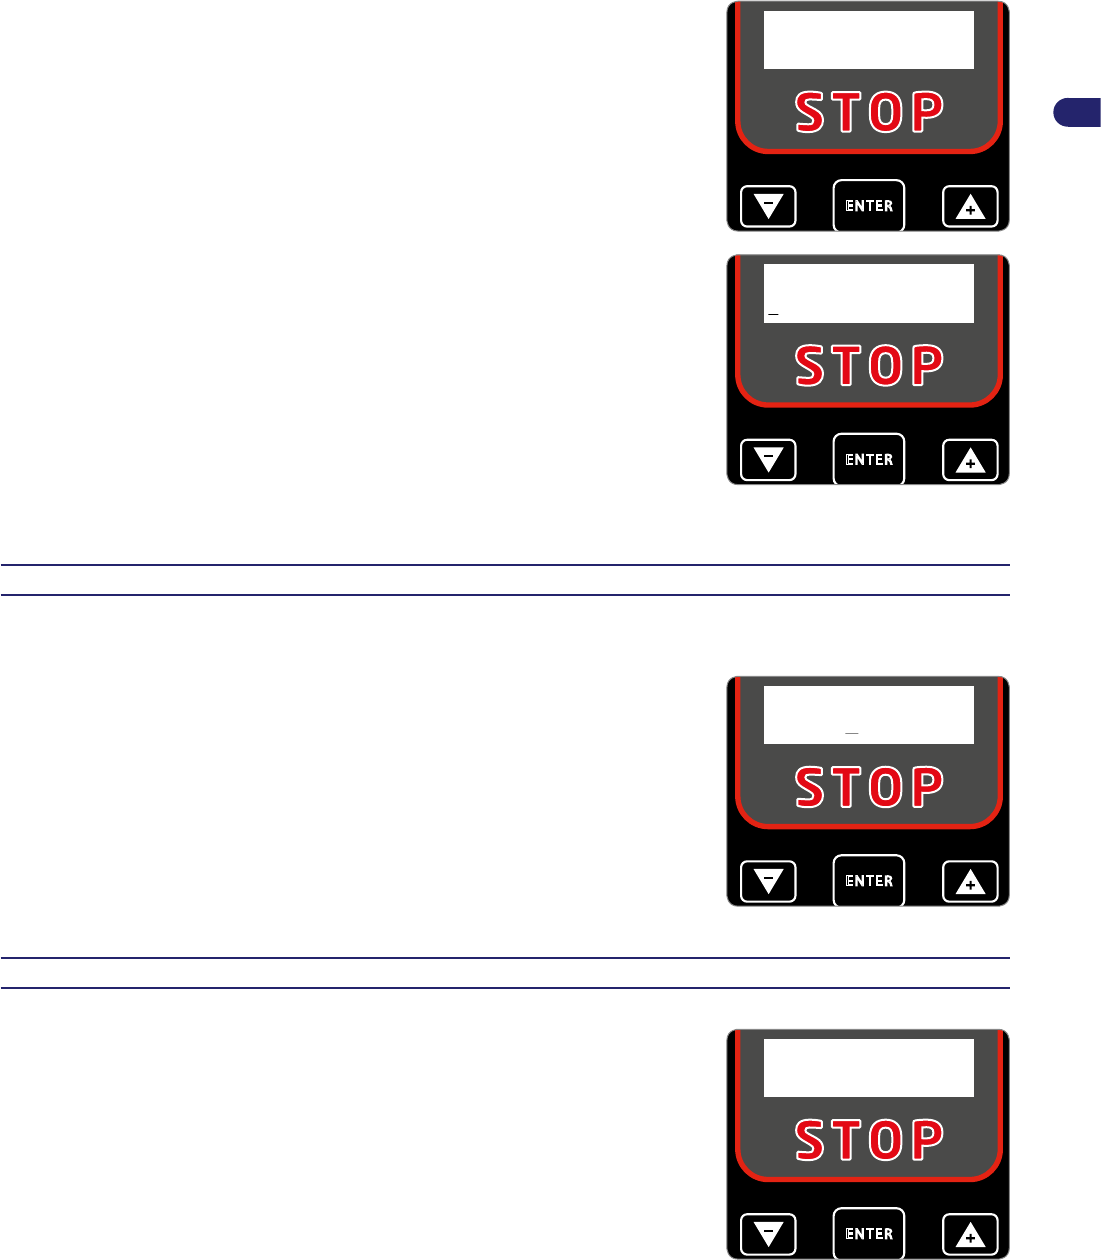
Description of robot commands. ............................................................................................................................................... 21
Menu access. ............................................................................................................................................................................ 21
Navigation. ................................................................................................................................................................................ 22
Settings – programming mode. ................................................................................................................................................. 24
Work schedules – programming mode. .................................................................................................................................... 25
Secondary areas – programming mode. ................................................................................................................................... 26
Safety – programming mode. .................................................................................................................................................... 26
Operating mode – programming mode. .................................................................................................................................... 27
Language options – programming mode. ................................................................................................................................. 27
Initial start up – automatic mode. .............................................................................................................................................. 27
Robot safety stop. ..................................................................................................................................................................... 28
Automatic return to the charging station. .................................................................................................................................. 28
Use of the robot in closed areas with no charging station......................................................................................................... 28
Password entry. ......................................................................................................................................................................... 29
Visualising the display during the work phase. ......................................................................................................................... 29
Prolonged inactivity and restarting. ........................................................................................................................................... 30
Battery charging after prolonged inactivity. ............................................................................................................................... 31
Operating tips. ........................................................................................................................................................................... 32
Routine maintenance. ............................................................................................................................................................... 32
Maintenance recommandations. ............................................................................................................................................... 32
Scheduled maintenance table. .................................................................................................................................................. 32
Robot cleaning. ......................................................................................................................................................................... 33
Troubleshooting. ....................................................................................................................................................................... 34
Troubleshooting guide. ............................................................................................................................................................. 34
Part replacement. ...................................................................................................................................................................... 37
Recommendations for replacing parts. ..................................................................................................................................... 37
Battery replacement. ................................................................................................................................................................. 37
Blade replacement. ................................................................................................................................................................... 37
Robot disposal. ......................................................................................................................................................................... 38
EC declaration of conformity. ................................................................................................................................................... 39
Reproduction, even partial, of this document without written permission by the manufacturer is strictly forbidden. The
manufacturer assumes a policy of continual improvement and reserves the right to modify this document without prior notice
on condition that the changes do not constitute health and safety risks.
© 2008 – Text, illustrations and page layout by Tipolito La Zecca. The text may be reproduced, in whole or in part, on condition
that the author is mentioned.
MD-CT-RO-07-R3.2 - EN - 10-2018
2
User’s manual
EN
GENERAL INFORMATION
PURPOSE OF THE MANUAL
This manual forms an integral part of the appliance and was produced by the Manufacturer to provide the necessary
information to people authorised to interact with it during its working life.
Operators of the appliance must adopt correct working practices and must carefully read and follow all the instructions
contained in this manual.
This manual is written by the Manufacturer in the original language of Italian and may be translated into other languages to
meet legal and/or commercial requirements.
Carefully read the instructions contained in this manual to avoid any unnecessary risks to people’s health and safety, as well
as economic damages.
Keep this manual in a safe and easily accessible place for quick reference.
Some information and illustrations contained in this manual may not perfectly correspond with the appliance in your
possession; however, this does not affect its functioning.
The Manufacturer reserves the right to make changes without any obligation to provide prior notice.
The following symbols are used throughout this manual to highlight some particularly important information or to identify
some important specications.
Danger - Attention
This symbol indicates situations involving imminent danger, which, if ignored, could put people’s health and
safety at risk.
Warning – Caution
This symbol indicates situations where it is necessary to behave in a certain way in order to avoid putting
people’s health and safety at risk, and to protect the device.
Important
This symbol identies particularly important technical information which must not be ignored.
3
User’s manual
EN
IDENTIFICATION OF MANUFACTURER AND EQUIPMENT
The nameplate shown here is applied directly onto the appliance.
It contains references and all the information essential for safely
operating the device.
For any technical requirements, please contact the Manufacturer’s
Technical Service Centre or an authorised dealer.
For technical assistance, please indicate the data reported on the
identication plate, the approximate hours of use and the type of
fault detected.
A. Name of manufacturer.
B. CE conformity label.
C. Model and Version / serial number / manufacturing year.
D. Technical data: voltage, current, protection rating, mass,
cutting width.
Serial Number :
Manufactured by
Xxxxxxxxxxxxxxxxxx, Xxxxxxxxxxxxxxxxx
XXXXX Xxxxxxxxxxxxxxxxxxxxxxxx (XX) - XXXX
XXXXXXXXXXXXXX
MODEL
TYPE MFG
(C) Manufacturing
year
(C) Model
(B) EC conformity
label
(A) Name of manufacturer
(D) Technical
specifications
(C) Serial
number
DATA PLATE
(C) Version
SAFETY INFORMATION
The manufacturer carefully considered the possible hazards and personal risks that may result from interacting with the
equipment. The purpose of this information is to inform users on the need to use extreme caution in order to avoid risks.
SAFETY REGULATIONS
THIS PRODUCT COMES WITH A BLADE AND IS NOT A TOY!
Please read the manual carefully, especially the safety instructions, and make sure you
understand them fully before using the product. Only use the equipment for the purposes
specically intended by the manufacturer. Carefully follow the instructions on operation,
maintenance and repair.
When using the robot, make sure there is no one in the working area, in particular children, the
elderly or disabled and pets. Otherwise, program the robot to operate during hours when there
is no one in this area. Keep an eye on the robot if you know that pets, children or other people
are in the area. If a person or animal is found on the robot’s path, stop it immediately.
In working areas not bounded by a fence that can not be easily climbed over, supervise the
device during the operation.
Warning signs shall be placed around the working area of the robotic lawnmower if it is used
in public areas. The signs shall have the following text: "Warning! Automatic lawnmower!
Keep away from the machine! Supervise children!"
This robot is not suitable for use by children and people with reduced physical, sensory or
mental capabilities or inexperienced people who are not familiar with the product, unless they
are supervised by a person responsible for their safety or have received instructions on how
to use the appliance. Children should be supervised to ensure that they do not play with the
appliance.
Do not allow the robot to be used by people who do not know how it works.
Operators who perform maintenance and repair work must be fully conversant with its special
features and safety regulations. Before using the robot, carefully read the operating manual and
make sure you understand the instructions.
Never remove, bypass or tamper with the safety devices installed. The Manufacturer shall not
be held liable if non-original spare parts are used. Failure to comply with this requirement may
seriously endanger the health and safety of people.
4
User’s manual
EN
Check that there are no toys, tools, branches, clothing or other objects on the lawn which
can damage the blades. Any objects on the lawn can also damage or prevent the correct
functioning of the robot.
Never allow people to sit on the robot. Never lift the robot to inspect the blade or to carry it while
it is running. Do not place hands and feet under the robot when it is in operation.
Do not use the robot when a sprinkler system is running. In this case, program the robot and
the sprinkler system so that they do not operate at the same time. Do not wash the robot with
high-pressure water jets and do not immerse it in water, partially or completely, as it is not
watertight.
Disconnect the power supply and activate the safety device before performing any adjustment
or maintenance that the user is authorised to perform. Use the personal protection devices
recommended by the Manufacturer, in particular, always wear protective gloves when handling
the cutting blade.
Cleaning and maintenance must not be performed by unsupervised children.
Do not use the robot when the cutting blade is damaged. Replace the cutting blade.
Do not use the robot with damaged external parts. If the mechanical parts of the robot are
damaged, replace them.
Do not use the robot if the power cord of the transformer is damaged. A damaged cord can lead
to contact with live parts. To avoid any risk, have the cord replaced by the manufacturer or by
its technical service centre or by a person with similar qualications.
If the power cord is damaged during use, press “STOP” to stop the robot and disconnect the
power cord from the electrical socket.
Visually check the robot regularly to make sure the blade, mounting screws and cutting
mechanism are not worn or damaged. Make sure that all the nuts, bolts and screws are
tightened to ensure that the robot is in good working condition.
If the robot starts to vibrate abnormally during use, press “STOP” and disconnect the power
cord from the electrical socket.
Never use and recharge the robot in explosive and/or ammable environments.
Only use the battery charger and power supply unit supplied by the manufacturer. Improper
use may cause electric shocks, overheating or leakage of corrosive liquids from the battery.
If any liquid leaks, wash the battery with water/neutraliser; in case of contact with eyes, seek
medical attention.
SAFETY DEVICES
1. Obstacle detector
The bumper sensor is activated if the robot strikes a solid object greater than 10 cm (3.94 ") in height, which stops the movement
in that direction and moves backwards to avoid the obstacle.
2. Inclinometer
If the robot works on a slope which is steeper than the maximum limit, or tips over, the robot will stop the cutting blade.
3. Emergency stop switch
Located on the upper part of the robot with the word "STOP" larger than the other commands on the keypad. Pressing this button
at any time during operation will immediately stop the movement of the lawnmower robot and the rotation of the blade.
4. Over-current protection
Each motor (blade and wheels) is monitored continuously during operation for any situation that may cause them to overheat. If
this occurs in the wheel motor, the robot will attempt to move in the opposite direction. If the over-current persists, the robot will
stop and signal an error. If the cutting blade motor overheats, there are two intervention ranges. If the parameters fall within the
rst range, the robot will perform the manoeuvres to unblock the cutting blade. If the over-current is below the protection range,
the robot will stop and signal a motor error.
5. No signal sensor
If there is no signal, the robot will automatically stop.
5
User’s manual
EN
SAFETY SIGNALS
Read user instructions carefully
to understand meanings before
using the machine.
STOP
Do not touch the rotary blade
and do not place your hands or
feet underneath the machine
when it is running. Wait until
the blade and rotating parts
come to a complete stop before
accessing.
Do not ride on the machine.
STOP
Operate the safety device
before working on or lifting the
machine.
Keep an adequate safe distance
from the machine while it is
running.
While the robot is working,
make sure there are no people
in the working area (especially
children, elderly or disabled
people) and pets. Keep children,
pets and other people at a safe
distance when the machine
is functioning. To prevent that
risk, we advise scheduling the
robot's mowing activities at
suitable times.
Warning! Do not spray water on
the machine to clean or wash it.
While the robot is working,
make sure there are no people
in the working area (especially
children, elderly or disabled
people) and pets. Keep children,
pets and other people at a safe
distance when the machine
is functioning. To prevent that
risk, we advise scheduling the
robot's mowing activities at
suitable times.
Use the robot only with the
power supplies indicated in
the “Technical Data” of the
“Technical Information” chapter.
6
User’s manual
EN
TECHNICAL INFORMATION
TECHNICAL SPECIFICATIONS
Description
Model
7085EVO 7085EL0
Maximum recommended surface that can be mowed
Working capacity ( -20%(*)) m
2
(sq ')
1200
(12912)
2200
(23672)
Features
Dimensions (W x H x D) mm 593x298x439
Robot weight (incl. battery) kg 12,6 13,5
Cutting height (Min-Max) mm (") 25-65 (0,98-2,56 ")
Diameter of blade with 4 cutting
edges
mm (") 250 (9,84 ") 290 (11,42 ")
Motors with brushes without brushes
Cutting blade speed RPM
3600 cutting
3000
3300 maintenance
Ground speed Metres / Minute 30 (98.43 ')
Maximum recommended slope
managed (*)
%
55% allowable, based on the lawn conditions and accessories
installed.
45% maximum managed and recommended in conditions of a
trimmed lawn.
35% in proximity of the outside edge or perimeter wire.
Ambient operating temperature Max °C
ROBOT: -10°(14 F.) (Min) +50° (122 F.) (Max)
CHARGING STATION: -10°(14 F.) (Min) +45° (113 F.) (Max)
BATTERY CHARGER: -10°(14 F.) (Min) +40° (104 F.) (Max)
Measured sound power level dB(A) 64
Water protection class IP
ROBOT: IPx4
CHARGING STATION: IPx4
BATTERY CHARGER: IPx4
Electrical features
Power supply unit (for lithium battery)
Mean Well OWA-60E-30ZCT
Input: 100 - 240 V~; 1.2 A;
50/60 Hz; Class 2
Output: 29.4 V
; 2.0 A
Mean Well ELG-150-30ZCTE
Input: 100 - 240 V~; 2 A;
50/60 Hz; Class 1
Output: 29.4 V ; 5.0 A
Type of accumulator and charging batteries
Rechargeable Lithium-Ion Battery
(rated voltage)
25.9V
2x2.5 Ah
25.9V - 7.5 Ah
Battery charger
29.4 Vcc
2.0 A
29.4 Vcc - 5.0 A
Average recharging time hh:mm 2:00 3:00
Average mowing duration after a full
charge cycle (*)
hh:mm 1:45 3:00
(*) Depends on the condition of the grass, lawn and the complexity of the mowing area.
7
User’s manual
EN
Frequencies
Transmitter for the robot driving
Frequency band of work (Hz) 500 - 60000
maximum radio frequency power (dBm) < 10
Bluetooth
Frequency band of work (MHz) 2402 - 2480
maximum radio frequency power (dBm) < 14
Equipment / Accessories / Functions
Areas managed, including the
primary one
3 4
Rain sensor standard
Mowed lawn sensor – Self-
programming (patented)
not available standard
Re-entry method to the charging
station
“V-Meter” - “follow wire”
Maximum length of perimeter wire
(approximate, calculated based on a
regular perimeter)
m (') 800 (2624 ')
(*) Depends on the condition of the grass, lawn and the complexity of the mowing area.
GENERAL DESCRIPTION OF THE APPLIANCE
The appliance is a robot designed and built to automatically trim
grass in gardens and house lawns at any time of the day or night.
It is small, compact, silent and easy to transport.
Depending on the characteristics of the surface to be trimmed,
the robot can be programmed to work on more than one area: a
primary area and secondary areas (according to the specications
of the various models).
During operation, the robot trims the area marked off by the
perimeter wire.
When the robot detects the perimeter wire or encounters an
obstacle, it changes direction in a random manner and starts
mowing again in a new direction. The robot does not cross the
perimeter wire for a distance greater than half its length.
According to its operating principle random, the robot automatically
trims the entire delimited area of the lawn (see gure).
The robot is able to recognise the presence of higher and/or thicker
grass in an area of the garden and to automatically activate, if
considered necessary, the spiral movement for a perfect nish.
The spiral movement can also be activated by pressing “ENTER”
while the robot is mowing.
The lawn surface that the robot is able to trim depends on a series
of factors, such as:
model of the robot and type of batteries installed;
characteristics of the area (irregular perimeters, uneven
surfaces, divided areas, etc.);
characteristics of the lawn (type and height of the grass,
moisture, etc.);
conditions of the blade (level of sharpness, without residuals
and deposits, etc.);
RANDOM OPERATION
8
User’s manual
EN
MAIN PARTS
MODEL 7085EV0 7085EL0
Version B B
1
Robot
2
Keyboard commands
3
Rain sensor
4
Battery
5
Handle
6
Cutting blade
7
Perimeter wire coil 0 0
8
Pegs 20 20
9
Power cord for the power supply unit
10
Power Supply unit
11
Charging station
12
Transmitter
13
User manual
14
Key for adjusting the cutting height
15
Joint for perimeter wire - -
29
User’s manual
EN
1. Press the ON key and wait a few seconds for the robot to turn on completely.
Enter the password (if prompted) (See “Password Entry”). Press “Enter” if the
information messages remain on the display.
2. The “PAUSE” function appears on the display.
ENTER
PAUSE
3. Enter into programming mode and select “WORK MODE”. Select “CLOSED
AREA” and the words “CLOSED AREA 60 Min” (default value) will appear
on the display.
4. Press either the “+” or “-” key to set the minutes.
5. Press “ENTER” to conrm.
6. Press the “PLAY/PAUSE” key to exit the programming menu and then restart
the robot. After the set time, the robot safely stops next to the perimeter wire.
7. Restore the normal functioning of the robot as described in chapter “INITIAL
START UP – AUTOMATIC MODE”.
ENTER
CLOSED AREA
60 min
PASSWORD ENTRY
The robot can be protected by a password consisting of four numbers which can be enabled, disabled and personalised by the
user (see “Programming Mode”).
1. On the display appears the message:
2. Press either the “+” or “-” key to set the rst number.
3. Press “ENTER” to conrm. The cursor moves to the next position.
4. Repeat the procedure to set all the numbers of the password.
The robot is now ready for use.
ENTER
PASSWORD
0000
VISUALISING THE DISPLAY DURING THE WORK PHASE
While in operation, the following data appears on the display of the robot:
-
speed of mower;
-
cutting blade speed;
-
percentage of battery charge.
While the robot is charging, the word “CHARGING” appears on the display.
If the robot is outside the working time, the display shows the day and time of the
next scheduled start.
ENTER
28m/min 2800rpm
Battery 75%
1
31

Hulp nodig? Stel uw vraag in het forum

Spelregels

Misbruik melden

Gebruikershandleiding.com neemt misbruik van zijn services uitermate serieus. U kunt hieronder aangeven waarom deze vraag ongepast is. Wij controleren de vraag en zonodig wordt deze verwijderd.

Product:

Bijvoorbeeld antisemitische inhoud, racistische inhoud, of materiaal dat gewelddadige fysieke handelingen tot gevolg kan hebben.

Bijvoorbeeld een creditcardnummer, een persoonlijk identificatienummer, of een geheim adres. E-mailadressen en volledige namen worden niet als privégegevens beschouwd.

Spelregels forum

Om tot zinvolle vragen te komen hanteren wij de volgende spelregels:

Belangrijk! Als er een antwoord wordt gegeven op uw vraag, dan is het voor de gever van het antwoord nuttig om te weten als u er wel (of niet) mee geholpen bent! Wij vragen u dus ook te reageren op een antwoord.

Belangrijk! Antwoorden worden ook per e-mail naar abonnees gestuurd. Laat uw emailadres achter op deze site, zodat u op de hoogte blijft. U krijgt dan ook andere vragen en antwoorden te zien.

Abonneren

Abonneer u voor het ontvangen van emails voor uw Ambrogio L85 Evolution bij:


U ontvangt een email met instructies om u voor één of beide opties in te schrijven.


Ontvang uw handleiding per email

Vul uw emailadres in en ontvang de handleiding van Ambrogio L85 Evolution in de taal/talen: Engels als bijlage per email.

De handleiding is 5,82 mb groot.


U ontvangt de handleiding per email binnen enkele minuten. Als u geen email heeft ontvangen, dan heeft u waarschijnlijk een verkeerd emailadres ingevuld of is uw mailbox te vol. Daarnaast kan het zijn dat uw internetprovider een maximum heeft aan de grootte per email. Omdat hier een handleiding wordt meegestuurd, kan het voorkomen dat de email groter is dan toegestaan bij uw provider.

Stel vragen via chat aan uw handleiding

Stel uw vraag over deze PDF

Andere handleiding(en) van Ambrogio L85 Evolution

Ambrogio L85 Evolution Gebruiksaanwijzing - Nederlands - 42 pagina's


Uw handleiding is per email verstuurd. Controleer uw email

Als u niet binnen een kwartier uw email met handleiding ontvangen heeft, kan het zijn dat u een verkeerd emailadres heeft ingevuld of dat uw emailprovider een maximum grootte per email heeft ingesteld die kleiner is dan de grootte van de handleiding.

Er is een email naar u verstuurd om uw inschrijving definitief te maken.

Controleer uw email en volg de aanwijzingen op om uw inschrijving definitief te maken

U heeft geen emailadres opgegeven

Als u de handleiding per email wilt ontvangen, vul dan een geldig emailadres in.

Uw vraag is op deze pagina toegevoegd

Wilt u een email ontvangen bij een antwoord en/of nieuwe vragen? Vul dan hier uw emailadres in.


Info