516706
1
Verklein
Vergroot
Pagina terug
1/19
Pagina verder
APD909 Manual
Index
1. Intended use
2. Safety
o 2.1. Labels in this manual
o 2.2. General safety instructions
3. Preparations for use
o 3.1. Unpacking
o 3.2. Package contents
4. Installation
o 4.1. Connections
o 4.2. Connecting to the mains
o 4.3. Positioning the system
o 4.4. Change the battery
5. Functions
o 5.1. Remote control
o 5.2. APD909 Portable DVD
6. Operation
o 6.1. Turning the device on and off.
o 6.2. General setup menu operation
o 6.3. DVD/CD functions
o 6.4. USB functions
7. Cleaning and maintenance
o 7.1. Handle and care of a disc
8. Technical data
9. Disposal of used electrical and electronic equipment
1.Intended use
The appliance functions as a portable media player. The screen of the appliance can be
folded up and down as well as rotated. This appliance lets you open music files (MP3/WMA),
video files (MPEG-4) and photo files (JPEG). These files can be accessed via DVD, CD and
USB. The appliance contains a built-in rechargeable battery.
Read the manual carefully before the first use.
2.Safety
2.1. Labels in this manual
WARNING A warning means that injury or death is possible if the instructions are not
obeyed.
CAUTION A caution means that damage to the equipment is possible.
A note gives additional information, e.g. for a procedure.
2.2. General safety instructions
This appliance employs a laser system. To prevent direct exposure to the laser beam, do not
open the appliance. Visible laser radiation when open and interlock defeated.
WARNING Do not put force on the appliance. The appliance can fall and can cause serious
injury.
CAUTION Do not block the ventilation holes.
CAUTION Do not expose the appliance to direct sunlight.
CAUTION Do not spill any liquid on the appliance.
3.Preparations for use
3.1. Unpacking
Unpack the appliance carefully.
Check the package contents as described below. If any item is missing, please contact
your reseller.
We recommend that you retain the original carton and packing materials in case it ever
becomes necessary to return your product for service. This is the only way to safely protect
the product against damage in transit. If you do dispose of the carton and the packing
materials, please remember to recycle with due care to the environment.
3.2. Package contents
The following items are included in the received package:
1 x APD909 Portable DVD
1 x Remote control
1 x Button cell
1 x Quick start guide
1 x 12V Car adapter
1 x A/V cable
NOTE: the button cell battery has already been inserted in your remote control
If any item is missing, please contact your reseller.
4.Installation
4.1. Connections
1. USB 2.0 slot
2. Headphone jack
3. AV OUT input
4. DC IN input
4.2. Connecting to the mains
Connect the female plug of the AC adapter to the DC IN jack
Connect the mains plug to a wall socket.
4.3. Positioning the system
Open the display
Rotating the screen
4.4. Change the battery
Remote control
Pull out the battery holder
Insert 1 lithium battery, type CR2025 3V battery
When inserting the battery observe the (+) and (-) polarity markings.
Insert the battery tray into the remote control.
5.Functions
5.1. Remote control
1. SEARCH button
2. ZOOM button
3. Digit buttons
4. ANGLE button
5. SUBTITLE button
6. TITLE button
7. ENTER button
8. Arrow buttons
9. SETUP button
10. AB button
11. REPEAT button
12. PROGRAM button
13. DISPLAY button
14. MUTE button
15. SOURCE button
16. STEP button
17. AUDIO button
18. MENU button
19. STOP button
20. PLAY/PAUSE button
21. RETURN button
22. VOLUME +/- button
23. REVERSE SKIP/FORWARD SKIP button
24. FAST FORWARD/FAST BACKWARD button
5.2. APD909 Portable DVD
1. PLAY/PAUSE, RETURN button
2. SETUP button
3. SOURCE button
4. On / Off key (POWER)
5. Screen
6. PLAY/PAUSE button
7. DVD compartment
8. Navigation button
6.Operation
6.1. Turning the device on and off.
Set the switch in the ON position to turn the equipment on.
Set the switch in the OFF position to switch off the device.
6.2. General setup menu operation
This chapter explains a complete setup of the appliance: settings of screen display, audio
setup and video setup.
The following actions have to be carried out with the remote control.
Press the SETUP button (9).
Press the arrow buttons (left and right) (8) to select a menu. The submenu is displayed
directly.
Press the arrow buttons (up and down) (8) to scroll through the submenu.
Press the ENTER button (7) to select a setting, or the left arrow button to cancel the
selection.
Press the SETUP (9) button to store the settings and exit.
SYSTEM SETUP
The options TV SYSTEM and TV TYPE are only applicable if the APD 909 is connected to
an external screen
TV SYSTEM
Select the video output format to match the appliance to the TV system: PAL, AUTO or
NTSC.
Please note: if the wrong option has been selected, this may result in very poor image
quality. In that case, select a different setting.
POWER RESUME
When restarting the player, select ON for the DVD to resume from the last place it was
stopped.
TV TYPE
In the TV TYPE section, press the arrow buttons (8) to select 4:3 4:3 PANSCAN or 4:3
LETTERBOX for a conventional TV set. Select 16:9 for a wide screen TV set.
PASSWORD
Change the default password. Enter the current password in the first box. Enter the new
password in the second box. Enter the new password again in the third box to confirm.
The default password (0000) is always active. Even if the password has been reset.
RATING
Set a rating for movies played by the appliance. Movies rated higher than the level set for the
parental lock can not be viewed.
DEFAULT
Restore the default settings of the appliance.
LANGUAGE SETUP
In the OSD LANG section, press the arrow buttons to choose the language.
In the AUDIO LANG section, choose the audio language.
In the SUBTITLE LANG section, choose the subtitle language.
Select the menu language in part MENU LANG.
STANDY SETTING
Set STANDY SETTING after how many hours of inactivity your APD707 is automatically
placed on standby mode
Choose from 3 hours, 4 hours or never (OFF)
VIDEO SETUP
BRIGHTNESS: Adjust the screen brightness.
CONTRAST: Adjust the contrast of the image.
HUE: Adjust the colour intensity.
SATURATION: Adjust the saturation of the image.
SHARPNESS: Adjust the screen sharpness.
6.3. DVD/CD functions
Control
After the disc has been loaded, a content menu will display on the screen.
Press the arrow buttons (8) to select a menu item.
Press the ENTER button (7) to enter the selected menu item.
Press the RETURN button (21) to return to the upper page.
During playback, the following functions are available:
To select a chapter (DVD) or track (CD), press the digit buttons (3).
In order to select a track 10 or greater, first press the 10+ button. For example; select
track 12, first press 10+, and then press number 2 button.
To pause playback, press the PLAY/PAUSE button (20) once; to resume playback,
press the button again.
To stop playback temporarily, press the STOP button (19) once. Press the button again
to stop playback permanently, or press the PLAY/PAUSE button (20) to resume
playback.
To select the next or previous chapter (DVD) or track (CD), press the PREV button (23)
or the NEXT button (23).
To forward or rewind the DVD, press the FWD button (24) or the REV button (24). The
available speed rates are: 2x, 4x, 8x, 20x.
To adjust the volume, press the VOL + button or the VOL - button (22).
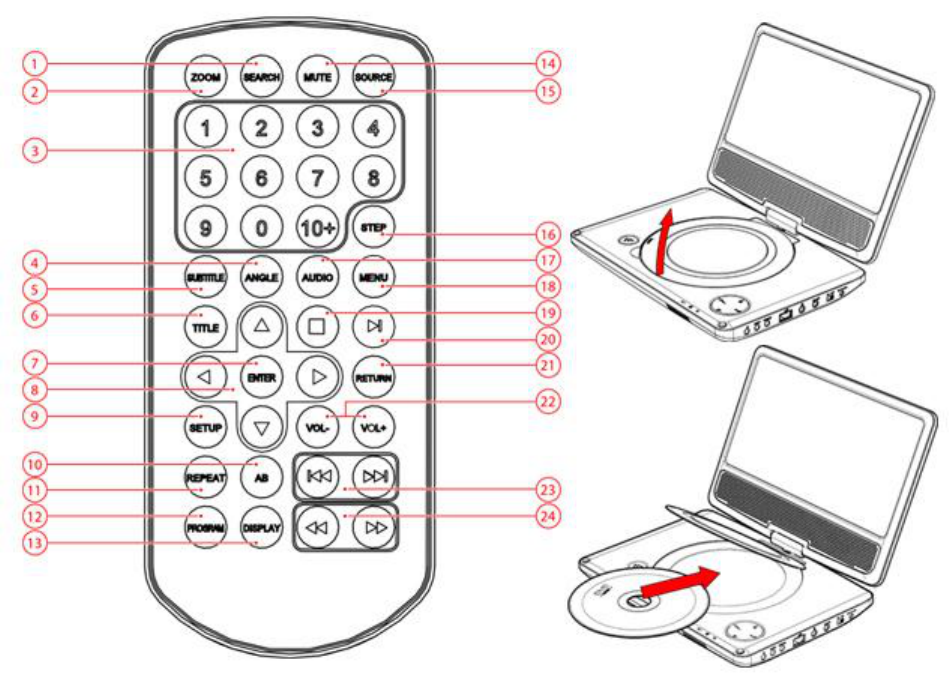
To mute or restore sound, press the MUTE button (14).
SUBTITLE (5): select the subtitles for the VIDEO file that is playing (if available)
DVD: To select the audio language of a DVD, press the AUDIO button (17) repeatedly
until the desired language is set.
CD VCD: Select the desired sound with this view (STEREO, LEFT, RIGHT)
To select the camera angle, press the ANGLE button (4).
To play the DVD frame by frame, press the STEP button (16). Press the PLAY/PAUSE
button (20) to resume normal playback.
To repeat a chapter (DVD) or one or all tracks (CD):
Press the REPEAT button (11) once to repeat the current chapter or track.
Press the button twice to repeat all chapters or tracks.
The AB (10) function can be used to repeat a specific section of a DVD.
Press the AB (10) once to select the starting point (A).
Press the AB (10) button again to select the ending point (B). The appliance plays the
section repeatedly.
Navigation
Press the MENU button (18) to return to the content menu during playback.
To view a specific title of a DVD, press the TITLE button (6). Use the arrow buttons to
select the title.
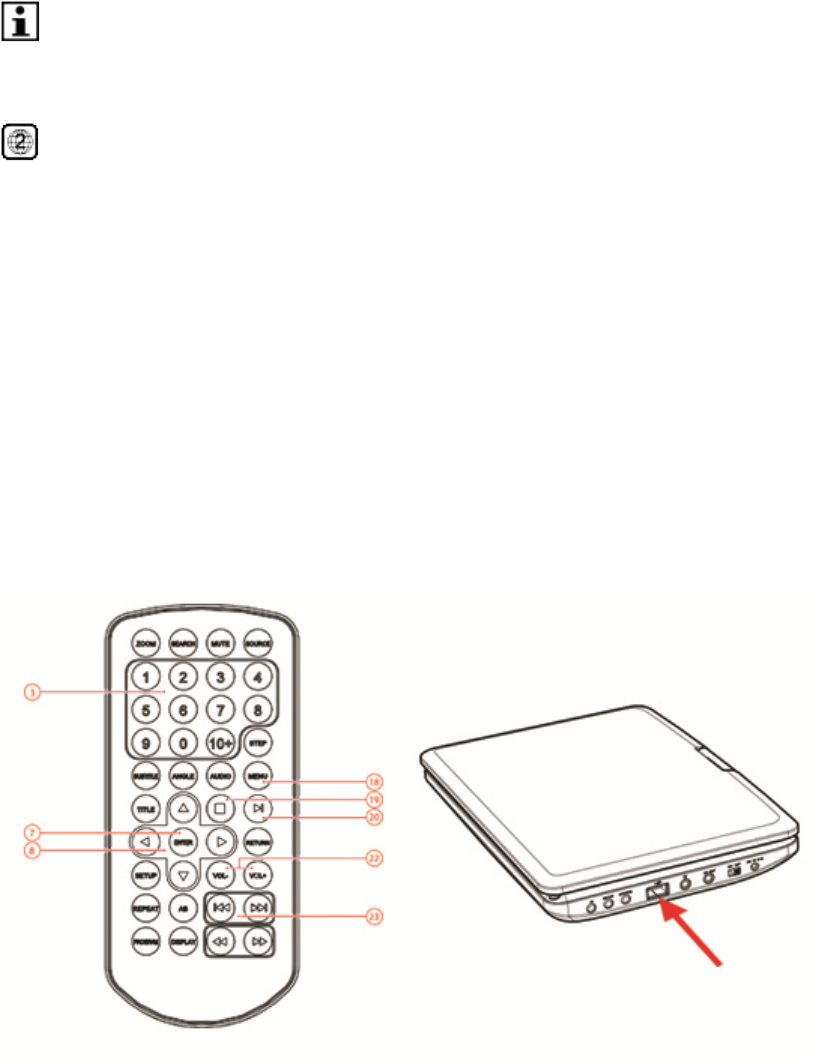
Use the SEARCH button (1) to go to a time point, title or chapter of choice in DVD Mode.
Use the SOURCE button (15) to switch between DVD or USB input.
Using the PROGRAM function
With the PROGRAM (12) function favourite tracks from the disks can be stored.
Press the PROGRAM button (12) to enter the PROGRAM function.
Press the digit buttons (8) to select a desired track, and use the arrow button down to
highlight the next entry.
Press the PROGRAM (12) button and select CLEAR in the menu to resume playback.
To view JPEG images you can press the PROGRAM button (12) repeatedly to go to
slide show mode.
Using the ZOOM function
This function can be used for zooming in and out on photos and DVDs. The available zoom
ratios are: 2x, 3x, 4x, 1/2, 1/3, 1/4.
Press the ZOOM button (1).
Press the ZOOM (1) button again to set the correct size.
Press the arrow buttons (8) to move through the picture.
Please note:
DVDs and DVD appliances are manufactured under the worldwide agreed DVD regional
code system that the appliance will operate only with corresponding disc of the same
regional code. If the code number on the label of a DVD does not match that on the label
alongside, the DVD will not play on this appliance.
If a disc contains mixed content (e.g. MP3 and video files), the appliance will only recognise,
list and play one content type.
Normally, if an MP3 disc is loaded, the unit will take longer time to read the initial data.
6.4. USB functions
Insert the USB device in the slot . The device can only be connected one way.
After the device has been connected, a content menu will display on the screen.
Press the arrow button (8) (up and down) to select a folder or a file.
Press the ENTER button (7) to enter the selected folder or file. You can also use the
digit buttons (3) to select a folder or to play the file.
Press the MENU button (18) to return to the content menu during playback.
During playback, the following functions are available:
To select a track, press the PREV button (23) or the NEXT button (8) until the desired
track is set.
To pause playback, press the PLAY/PAUSE button (20) once; to resume playback,
press the button again.
To stop playback, press the STOP button (19).
To adjust the volume, press the VOL + button or the VOL - button (22).
To remove the device, gently pull it out of the slot.
Due to the great variety of products with USB ports and their sometimes quite manufacturer-
specific functions we can neither guarantee that all devices will be recognised, nor that all
operating options that are possible in theory will actually work.
7.Cleaning and maintenance
WARNING Before performing any cleaning or maintenance, switch off and unplug the
appliance.
Clean the outside of the appliance with a soft cloth. When the appliance is very dirty, dampen
the cloth slightly with water and a neutral solution.
7.1. Handle and care of a disc
Hold the disc with fingers. Hold the disc outer edge and/or the centre spindle hole. Do
not touch the disc surface.
Do not bend or press the disc. Do not expose the disc to direct sunlight or heating
sources.
Clean the disc surface with a soft, dry cleaning cloth. Wipe the disc surface gently,
radially, from centre towards the outer edge.
Do not apply thinner, alcohol, chemical solvent, or sprays when cleaning. Such cleaning
fluids will permanently damage the disc surface.
8.Technical data
APD909 Portable DVD
Voltage: 100 - 240VAC / 50/60 Hz
Power consumption: 10W
Frequency response: 20Hz ~20KHz (1dB)
Speaker output: 2 x 1 Watt
Appliance features
16:9 aspect ratio with 22.8 cm screen (9")
USB 2.0 slot
Headphone jack
Accessories
12V Car adapter
CINCH cable
Quick start guide
Disc output
Television system: PAL/NTSC
Frequency range: 20Hz ~20KHz
Signal/noise ratio: >80dB (ANALOG OUT connectors only)
Dynamic range: >85dB (DVD/CD)
Remote control
Battery size: CR2025 (penlite)
Supported media formats
Disc types: DVD/DVD+R(W)/DVD-R(W)/(S)VCD
Picture formats: JPEG
Video formats: MPEG4
Audio formats: MP3 / WMA
Working environment
Operating temperature: - 10 ~ +35 C(elsius)
Relative humidity: 5% ~90%
9.Disposal of used electrical and electronic
equipment
The meaning of the symbol on the material, its accessory or packaging indicates that this
product shall not be treated as household waste. Please, dispose of this equipment at your
applicable collection point for the recycling of electrical and electronic equipments waste. In
the European Union and Other European countries which there are separate collection
systems for used electrical and electronic product. By ensuring the correct disposal of this
product, you will help prevent potentially hazardous to the environment and to human health,
which could otherwise be caused by unsuitable waste handling of this product. The recycling
of materials will help conserve natural resources. Please do not therefore dispose of your old
electrical and electronic equipment with your household waste.
For more detailed information about recycling of this product, please contact your local city
office, your household waste disposal service or the shop where you purchased the product.
For more information and warranty conditions, please visit: www.akai.eu
Do not dispose of batteries as household waste but take them to a battery recycling facility.
1

Hulp nodig? Stel uw vraag in het forum

Spelregels
1

Forum

Akai-APD909
  • I recently bought AKAI portable DVD-player APD909. I'm trying to play some MPEG4 recordings. I get the message Video Codec not supported! What do I do wrong?
    Thanks!
    Gesteld op 28-11-2014 om 13:58

    Reageer op deze vraag Misbruik melden

Misbruik melden

Gebruikershandleiding.com neemt misbruik van zijn services uitermate serieus. U kunt hieronder aangeven waarom deze vraag ongepast is. Wij controleren de vraag en zonodig wordt deze verwijderd.

Product:

Bijvoorbeeld antisemitische inhoud, racistische inhoud, of materiaal dat gewelddadige fysieke handelingen tot gevolg kan hebben.

Bijvoorbeeld een creditcardnummer, een persoonlijk identificatienummer, of een geheim adres. E-mailadressen en volledige namen worden niet als privégegevens beschouwd.

Spelregels forum

Om tot zinvolle vragen te komen hanteren wij de volgende spelregels:

Belangrijk! Als er een antwoord wordt gegeven op uw vraag, dan is het voor de gever van het antwoord nuttig om te weten als u er wel (of niet) mee geholpen bent! Wij vragen u dus ook te reageren op een antwoord.

Belangrijk! Antwoorden worden ook per e-mail naar abonnees gestuurd. Laat uw emailadres achter op deze site, zodat u op de hoogte blijft. U krijgt dan ook andere vragen en antwoorden te zien.

Abonneren

Abonneer u voor het ontvangen van emails voor uw Akai APD909 bij:


U ontvangt een email met instructies om u voor één of beide opties in te schrijven.


Ontvang uw handleiding per email

Vul uw emailadres in en ontvang de handleiding van Akai APD909 in de taal/talen: Engels als bijlage per email.

De handleiding is 0,36 mb groot.


U ontvangt de handleiding per email binnen enkele minuten. Als u geen email heeft ontvangen, dan heeft u waarschijnlijk een verkeerd emailadres ingevuld of is uw mailbox te vol. Daarnaast kan het zijn dat uw internetprovider een maximum heeft aan de grootte per email. Omdat hier een handleiding wordt meegestuurd, kan het voorkomen dat de email groter is dan toegestaan bij uw provider.

Stel vragen via chat aan uw handleiding

Stel uw vraag over deze PDF

Andere handleiding(en) van Akai APD909

Akai APD909 Gebruiksaanwijzing - Nederlands - 19 pagina's

Akai APD909 Gebruiksaanwijzing - Deutsch - 19 pagina's

Akai APD909 Gebruiksaanwijzing - Français - 19 pagina's

Akai APD909 Gebruiksaanwijzing - Espanõl - 19 pagina's


Uw handleiding is per email verstuurd. Controleer uw email

Als u niet binnen een kwartier uw email met handleiding ontvangen heeft, kan het zijn dat u een verkeerd emailadres heeft ingevuld of dat uw emailprovider een maximum grootte per email heeft ingesteld die kleiner is dan de grootte van de handleiding.

Er is een email naar u verstuurd om uw inschrijving definitief te maken.

Controleer uw email en volg de aanwijzingen op om uw inschrijving definitief te maken

U heeft geen emailadres opgegeven

Als u de handleiding per email wilt ontvangen, vul dan een geldig emailadres in.

Uw vraag is op deze pagina toegevoegd

Wilt u een email ontvangen bij een antwoord en/of nieuwe vragen? Vul dan hier uw emailadres in.


Info