642835
3
Verklein
Vergroot
Pagina terug
1/8
Pagina verder
EN
Electric Mini Exercise Bike
VP159R
Usage and Maintenance Instructions
Usage and Maintenance Instructions Ver.1 12/2012 (2532)
2
INTRODUCTION
Thank you for deciding to purchase the Electric Mini Exercise Bike from Aidapt. The Electric
Mini Exercise Bike is manufactured from the finest materials and components available,
when used correctly it is designed to give many years of reliable trouble-free service.
BEFORE USE
Carefully remove all packaging. Avoid using any knives of other sharp instruments
as this may damage the surface of the product.
Check the product for any visible damage If you see any damage or suspect a fault,
do not use your product, but contact your supplier for support.
INTENDED USE
The mini cycle exerciser from Aidapt can help to improve circulation and muscle strength
and is ideal for those keen to exercise from the comfort of their own homes. It can be used to
exercise your legs seated or lying down, or on a table for arm exercises.
GENERAL INSTRUCTIONS
Attention! To reduce the risk of electrical shock:
Unplug the appliance from the mains socket immediately after use and before cleaning.
Carefully read through the instructions contained in this manual. It provides you with
important information about safety, use and maintenance of the appliance.
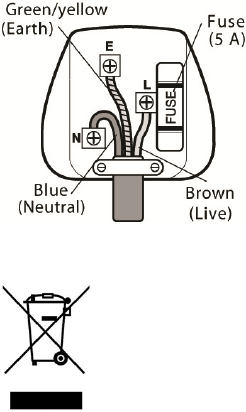
1. Make sure that the mains supply Voltage is suitable for the machine before
plugging it in (230 V). The holes in the wall socket must match the pin
configuration for the plug on the machine. If this is not the case please contact
your supplier.
2. This unit has been designed for home use only.
3. Never leave the unit unattended when it is plugged in. Unplug it from the wall
socket after each exercise session.
4. Place the appliance on a flat surface, with at least 0.5 metres of free space at the
sides and rear.
5. It is not advisable to keep you unit in a damp place for long periods as it will be
prone to rust.
6. Do not use the machine if the mains cable becomes worn or damaged.
7. Keep the mains cable away from hot surfaces.
8. Do not use the machine outdoors.
9. Do not use in bathrooms, or in wet or damp locations.
10. To unplug the machine first put the switch to the “0” position and then unplug
from the wall socket.
11. Please consult a medical professional before undertaking a new form of exercise or
using new exercise equipment.
12. As with all forms of exercise, do not use the machine if you feel unwell or
immediately after eating.
13. Always ensure that you perform an adequate Warm Up before and Cool Down after
exercising.
Usage and Maintenance Instructions Ver.1 12/2012 (2532)
3
14. Wear suitable clothing and footwear.
15. Do not touch or insert any objects into the moving parts while the machine is in
use.
16. This appliance can be used by children aged from 8 years and above and persons
with reduced physical, sensory or mental capabilities or lack of experience and
knowledge if they have been given supervision or instruction concerning use of
the appliance in a safe way and understand the hazards involved.
17. Children shall not play with the appliance.
18. Cleaning and user maintenance shall not be made by children without supervision.
19. Do not place the mains lead beneath a carpet or rug.
20. Ensure that the cable does not come into contact with the pedals while in use.
ASSEMBLY INSTRUCTIONS
Take the unit out of the box and place it on the floor as show in Figure 1.
The assistance of a second person is advisable for the assembly work.
Make sure that you have all of the pieces:
A (Main Body)
C-L (Left Pedal)
C-R (Right Pedal)
B (Stabiliser Bar1)
B1 (Rear Stabiliser Bar)
D (Screw M-4x25)
E (Grower Washer M-4)
Pedal Combination Spanner
Figure 1
Usage and Maintenance Instructions Ver.1 12/2012 (2532)
4
Fitting the Stabilisers
Take the stabiliser (B) marked with the letter (A) and place it at the front of the unit marked
with the letter (A), as shown in Figure 2. Insert the M-4x25 screws (D).
Take the rear stabiliser (B1) marked with the letter (B) and go through the same fitting
procedure as with the front stabiliser. Refer to Figure 3.
Figure 2 Figure 3
Attaching the Pedals
Right and left refer to the position that the user adopts when exercising. Insert the right-
hand pedal (C-R), marked with the letter (R), onto the right-hand crank, also marked with an
(R).
Insert the left-hand pedal (C-L), marked with the letter (L) onto the left-hand crank, also
marked with an (L). See Figure 4.
Figure 4
Usage and Maintenance Instructions Ver.1 12/2012 (2532)
5
REMOTE CONTROL
Display Indicator
Speed, Time, Distance (Distance travelled km), Calories, Scan (random display).
1 Power On/Off
2 Time (Time selection button; 1-15 min)
3 Decrease Speed (12 settings)
4 Increase Speed (12 settings)
5 Forward/Reverse (Pedal direction)
6 Mode (Press to display speed, time,
distance or calories)
NB. For faster adjustment of Time or Speed press
and hold the relevant button.
SWITCHING ON/OFF
1. Plug the socket into the wall. Switch the red button below the remote control
support to position I. To switch the machine on press (1) on the remote control.
2. To switch the machine off press (1) on the remote control. Switch the red button
below the remote control support to position 0 and then unplug the unit from the
wall.
EXERCISES
Position 1: Seated (Lower Body)
Use a stable, sturdy chair.
Place the unit at a comfortable distance from
the chair to avoid overstretching your legs.
Make sure that your lowe back is supported;
we recommend that you place a small cushion
at the base of your back.
Sit on the chair and place your feet on the
pedals.
Remove the Remote Control from the
surround on the unit. Follow the instructions
for switching the unit on/off and use of the
Remote Control.
Usage and Maintenance Instructions Ver.1 12/2012 (2532)
6
Position 2: Lying
When lying down place the unit
at a comfortable distance to
avoid overstretching your legs.
Make sure that your lowe back is
supported; we recommend that
you place a small cushion at the
base of your back.
Place your feet on the pedals.
Remove the Remote Control from
the surround on the unit. Follow
the instructions for switching the
unit on/off and use of the Remote Control.
When you finish the session, continue lying in the same position for a few
moments and then get up slowly.
Position 3: Seated (Upper Body)
Use a raised, fixed surface such as a
table so that the unit is at chest height
with the Remote Control area facing
you and sit on a stable chair.
Place the unit at a comfortable
distance to avoid overstretching your
arms.
Follow the steps for Position 1 to being
the session.
CLEANING
Switch off and unplug the unit, then clean using a non-abrasive cleaner or mild detergent
with a soft cloth. Abrasive cleaners and/ or abrasive cleaning pads may seriously damage the
product beyond repair and should not be used. Always ensure that you wipe dry the
equipment after cleaning.
CARE & MAINTENANCE
Please make a safety check of the product at regular intervals or if you have any concerns.
Pay particular attention to fastening elements and tighten if necessary. If in doubt about the
safety of the unit do not use it. Please contact your supplier in the first instance for Technical
Assistance and if you require spare parts to replace worn components.
PAT TESTING
When used in a workplace, this product must be safety-tested yearly by a qualified
electrician (PAT Tested) in order to comply with the Electricity at Work Regulations.
We recommend that it is PAT tested regularly when used in a domestic environment.
Usage and Maintenance Instructions Ver.1 12/2012 (2532)
7
GENERAL SAFETY REQUIREMENTS
Domestic wiring must be tested periodically by a qualified electrician at least once every 10
years or at every change of occupancy.
For office and retail premises, and buildings such as village halls, the wiring must be
inspected at least once every 5 years.
It is recommended that all buildings be fitted with smoke alarms (it is mandatory for new
buildings).
If the mains lead is damaged, it must be replaced by the manufacturer or an authorised
service centre. If the mains plug needs to be replaced, proceed as follows:
Connect the brown wire to the terminal labelled
"L".
Connect the blue wire to the terminal labelled
"N".
Connect the green/yellow to the terminal
labelled with the earth symbol or "E".
Make sure that the cord-grip is positioned
correctly (over the outer sheath of the cable) and
it is fully tightened.
If the plug is fitted with a 13 A fuse, replace it
with a 5 A fuse
DISPOSAL AND RECYCLING
You must not dispose of this appliance with domestic household waste.
Most local authorities have specific collection system for appliances and
disposal is free of charge to the end-user.
When replacing an existing appliance with a similar new appliance your
retailer may take the old appliance for disposal.
TECHNICAL SPECIFICATION
Power supply: 230 V ~
Power consumption: 70 W
Maximum Operating current: 0.3 A
Average running cost: 1p/3 hours
Usage and Maintenance Instructions Ver.1 12/2012 (2532)
8
IMPORTANT INFORMATION
The information given in this instruction booklet must not be taken as forming part of or
establishing any contractual or other commitment by Aidapt Bathrooms Limited, Aidapt
(Wales) Ltd or its agents or its subsidiaries and no warranty or representation concerning the
information is given.
Please exercise common sense and do not take any unnecessary risks when using this
product; as the user you must accept liability for safety when using the product.
Please do not hesitate to contact the person who issued this product to you or the
manufacturer (detailed below) if you have any queries concerning the assembly/use of your
product.
Aidapt Bathrooms Ltd, Lancots Lane, Sutton Oak, St Helens, WA9 3EX
Telephone: +44 (0) 1744 745 020 Fax: +44 (0) 1744 745 001 Web: www.aidapt.co.uk
Email: accounts@aidapt.co.uk adaptations@aidapt.co.uk sales@aidapt.co.uk
3

Hulp nodig? Stel uw vraag in het forum

Spelregels

Misbruik melden

Gebruikershandleiding.com neemt misbruik van zijn services uitermate serieus. U kunt hieronder aangeven waarom deze vraag ongepast is. Wij controleren de vraag en zonodig wordt deze verwijderd.

Product:

Bijvoorbeeld antisemitische inhoud, racistische inhoud, of materiaal dat gewelddadige fysieke handelingen tot gevolg kan hebben.

Bijvoorbeeld een creditcardnummer, een persoonlijk identificatienummer, of een geheim adres. E-mailadressen en volledige namen worden niet als privégegevens beschouwd.

Spelregels forum

Om tot zinvolle vragen te komen hanteren wij de volgende spelregels:

Belangrijk! Als er een antwoord wordt gegeven op uw vraag, dan is het voor de gever van het antwoord nuttig om te weten als u er wel (of niet) mee geholpen bent! Wij vragen u dus ook te reageren op een antwoord.

Belangrijk! Antwoorden worden ook per e-mail naar abonnees gestuurd. Laat uw emailadres achter op deze site, zodat u op de hoogte blijft. U krijgt dan ook andere vragen en antwoorden te zien.

Abonneren

Abonneer u voor het ontvangen van emails voor uw Aidapt VA129C bij:


U ontvangt een email met instructies om u voor één of beide opties in te schrijven.


Ontvang uw handleiding per email

Vul uw emailadres in en ontvang de handleiding van Aidapt VA129C in de taal/talen: Nederlands, Duits, Engels, Frans als bijlage per email.

De handleiding is 0,35 mb groot.


U ontvangt de handleiding per email binnen enkele minuten. Als u geen email heeft ontvangen, dan heeft u waarschijnlijk een verkeerd emailadres ingevuld of is uw mailbox te vol. Daarnaast kan het zijn dat uw internetprovider een maximum heeft aan de grootte per email. Omdat hier een handleiding wordt meegestuurd, kan het voorkomen dat de email groter is dan toegestaan bij uw provider.

Stel vragen via chat aan uw handleiding

Stel uw vraag over deze PDF

Andere handleiding(en) van Aidapt VA129C

Aidapt VA129C Gebruiksaanwijzing - English - 16 pagina's


Uw handleiding is per email verstuurd. Controleer uw email

Als u niet binnen een kwartier uw email met handleiding ontvangen heeft, kan het zijn dat u een verkeerd emailadres heeft ingevuld of dat uw emailprovider een maximum grootte per email heeft ingesteld die kleiner is dan de grootte van de handleiding.

Er is een email naar u verstuurd om uw inschrijving definitief te maken.

Controleer uw email en volg de aanwijzingen op om uw inschrijving definitief te maken

U heeft geen emailadres opgegeven

Als u de handleiding per email wilt ontvangen, vul dan een geldig emailadres in.

Uw vraag is op deze pagina toegevoegd

Wilt u een email ontvangen bij een antwoord en/of nieuwe vragen? Vul dan hier uw emailadres in.


Info