624465
59
Verklein
Vergroot
Pagina terug
1/59
Pagina verder
Acronis
PowerUtilities
User’s Guide
Copyright © Acronis, Inc., 2000-2004
Copyright © Acronis, Inc., 2000-2004. All rights reserved.
Linux is a registered trademark of Linus Torvalds.
Windows and MS-DOS are registered trademarks of Microsoft Corporation.
All other trademarks and copyrights referred to are the property of their
respective owners.
Distribution of substantively modified versions of this document is prohibited
without the explicit permission of the copyright holder.
Distribution of the work or derivative work in any standard (paper) book form
for commercial purposes is prohibited unless prior permission is obtained
from the copyright holder.
DOCUMENTATION IS PROVIDED «AS IS» AND ALL EXPRESS OR IMPLIED
CONDITIONS, REPRESENTATIONS AND WARRANTIES, INCLUDING ANY
IMPLIED WARRANTY OF MERCHANTABILITY, FITNESS FOR A PARTICULAR
PURPOSE OR NON-INFRINGEMENT, ARE DISCLAIMED, EXCEPT TO THE
EXTENT THAT SUCH DISCLAIMERS ARE HELD TO BE LEGALLY INVALID.
Table of Contents
CHAPTER 1. ACRONIS POWERUTILITIES .......................................................5
1.1 ABOUT ACRONIS POWERUTILITIES.................................................5
1.2 ABOUT THE ACRONIS POWERUTILITIES USERS GUIDE .................6
1.3 SOFTWARE USAGE CONDITIONS ..................................................... 7
1.4 TECHNICAL SUPPORT ......................................................................7
CHAPTER 2. INSTALLING AND STARTING TO WORK WITH ACRONIS
POWERUTILITIES ................................................................................................8
2.1 ACRONIS POWERUTILITIES SYSTEM PACKAGE............................... 8
2.2 HARDWARE AND SOFTWARE REQUIREMENTS ................................ 8
2.3 INSTALLING ACRONIS POWERUTILITIES COMPONENTS .................8
2.4 RECOVERING ACRONIS POWERUTILITIES COMPONENTS................ 8
2.5 REMOVING ACRONIS POWERUTILITIES COMPONENTS ...................9
2.6 ACRONIS POWERUTILITIES SUITE INTERFACE................................9
2.7 RUNNING A SUITE COMPONENT......................................................9
CHAPTER 3. CLEANING USER ACTIVITY TRACES FROM A COMPUTER.....10
3.1 SOFTWARE LOGICAL ORGANIZATION: SECTIONS .........................10
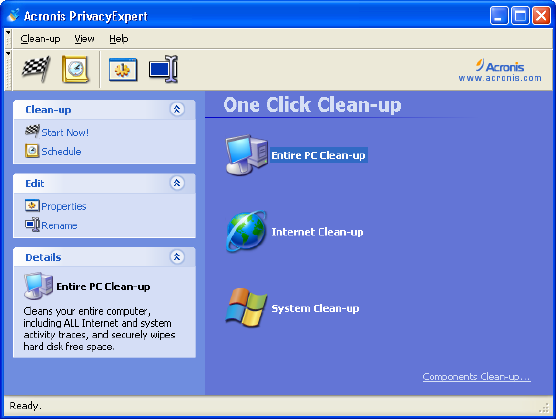
3.1.1 COMPLEX PC CLEAN-UP...........................................................................11
3.1.2 CLEANING SEPARATE SYSTEM COMPONENTS...........................................11
3.2 EXECUTING PC CLEAN-UP MANUALLY ........................................ 12
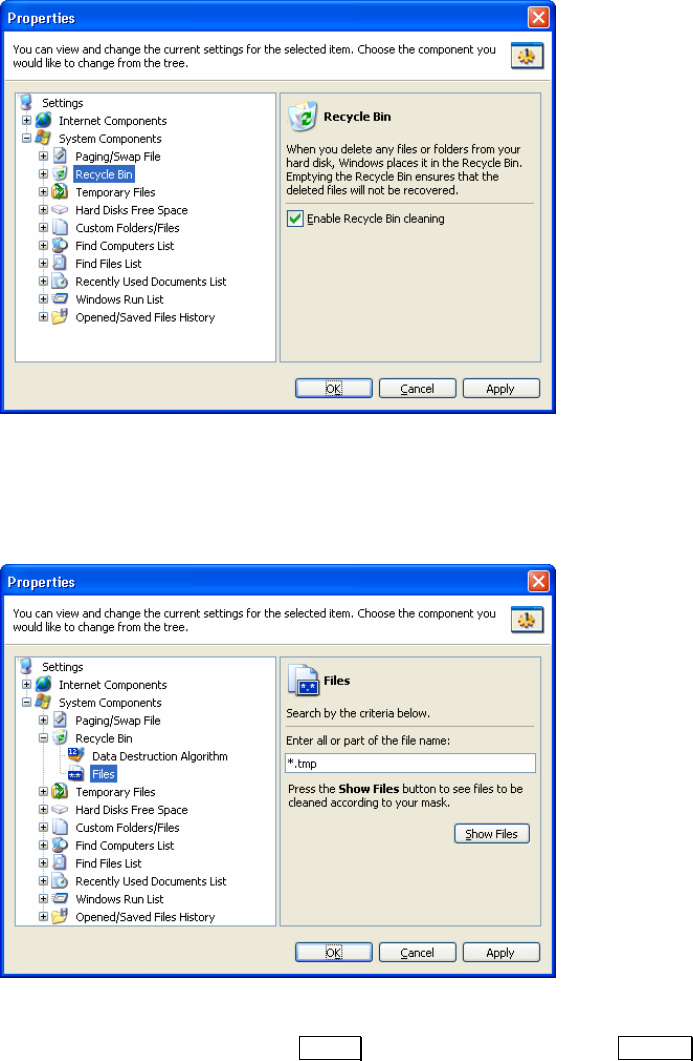
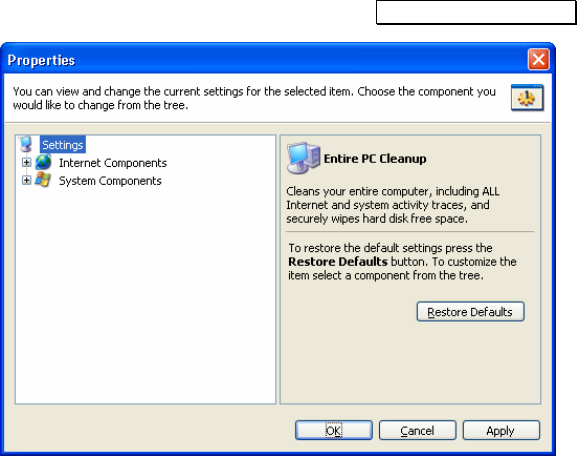
3.3 CLEAN-UP SETTINGS .....................................................................12
3.3.1 CLEAN-UP SETTINGS.................................................................................12
3.3.2 CLEAN-UP SETTINGS EDITOR....................................................................12
3.3.3 SETTING PC COMPONENT CLEAN-UP WITH THE EDITOR...........................12
3.4 SEPARATE COMPONENTS CLEAN-UP SETTINGS ............................ 14
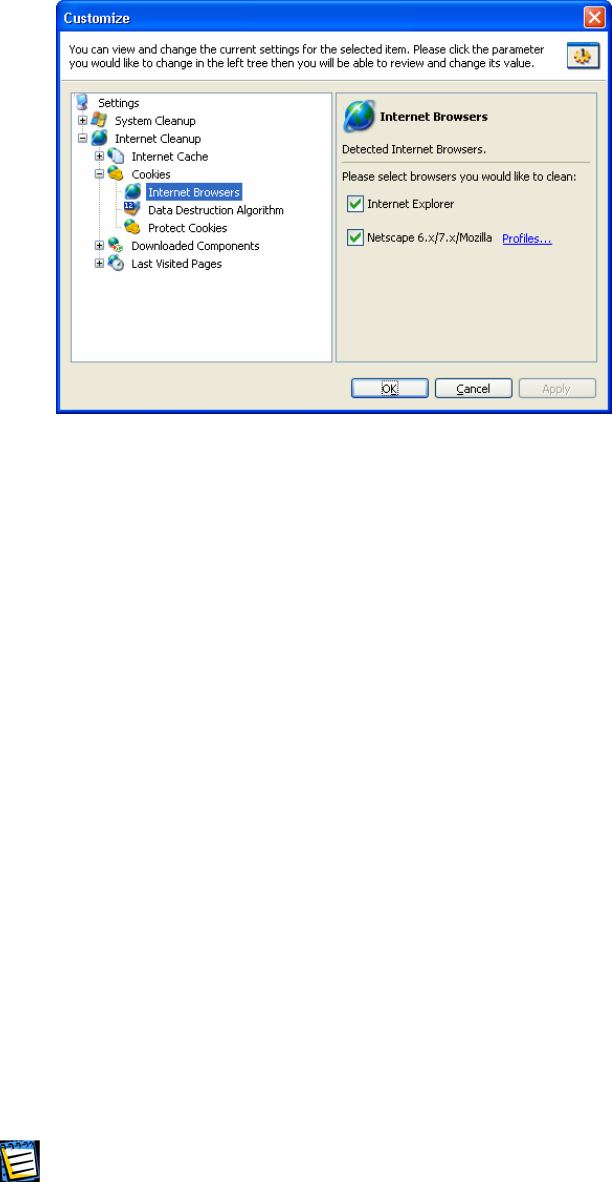
3.4.1 CLEAN-UP SETTINGS OF COMPONENTS RELATED TO WORKING ON THE INTERNET
.................................................................................................................14
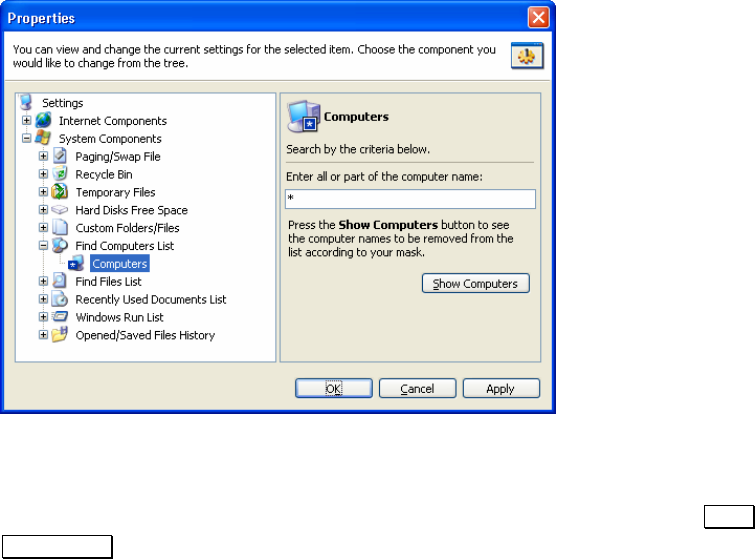
3.4.2 SYSTEM COMPONENT CLEAN-UP SETTINGS..............................................16
3.5 EXECUTING SCHEDULED PC CLEAN-UP........................................20
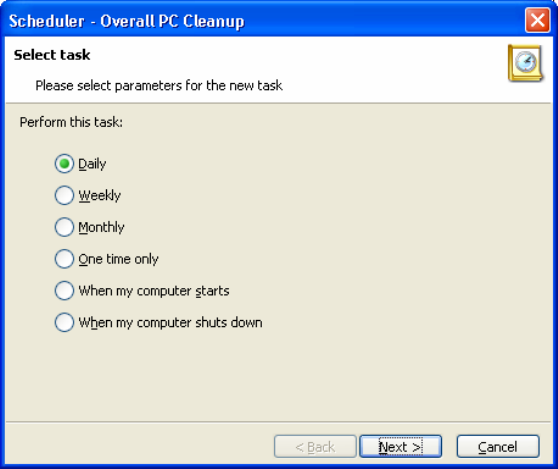
3.5.1 INVOKING THE SCHEDULER.........................................................................21
3.5.2 SCHEDULER SETTINGS..............................................................................21
3.6 RENAMING CLEAN-UP VARIANTS .................................................22
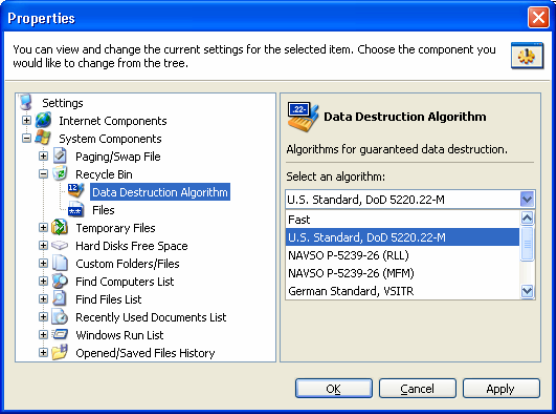
3.7 DATA CLEAN-UP ALGORITHMS..................................................... 22
3.8 COMPLEX PC CLEAN-UP ...............................................................23
3.8.1 ENTIRE PC CLEAN-UP...............................................................................23
3.8.2 SYSTEM CLEAN-UP...................................................................................24
3.8.3 INTERNET CLEAN-UP ................................................................................24
3.9 A FAST CLEANUP OF SEPARATE SYSTEM COMPONENTS .............. 25
CHAPTER 4. MIGRATING DATA TO A NEW HARD DISK ..............................26
4.1 PREPARING FOR MIGRATION......................................................... 26
4.2 HARD DISK PARTITIONS AND FILE SYSTEMS................................26
4.3 INSTALLING A HARD DISK ON YOUR COMPUTER .........................27
4.4 BIOS SET-UP .................................................................................27
4.5 STARTING WORK WITH ACRONIS MIGRATEEASY ........................28
4.6 MIGRATION SCENARIOS ................................................................ 29
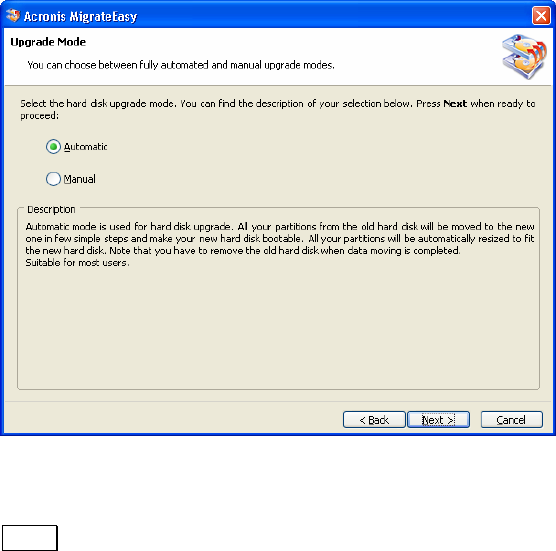
4.6.1 AUTO UPGRADE........................................................................................29
4.6.2 MANUAL UPGRADE ..................................................................................29
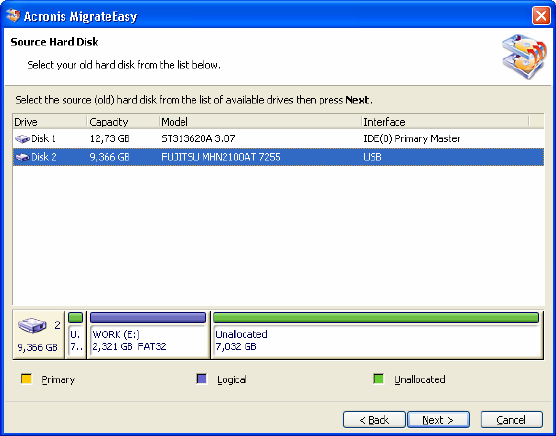
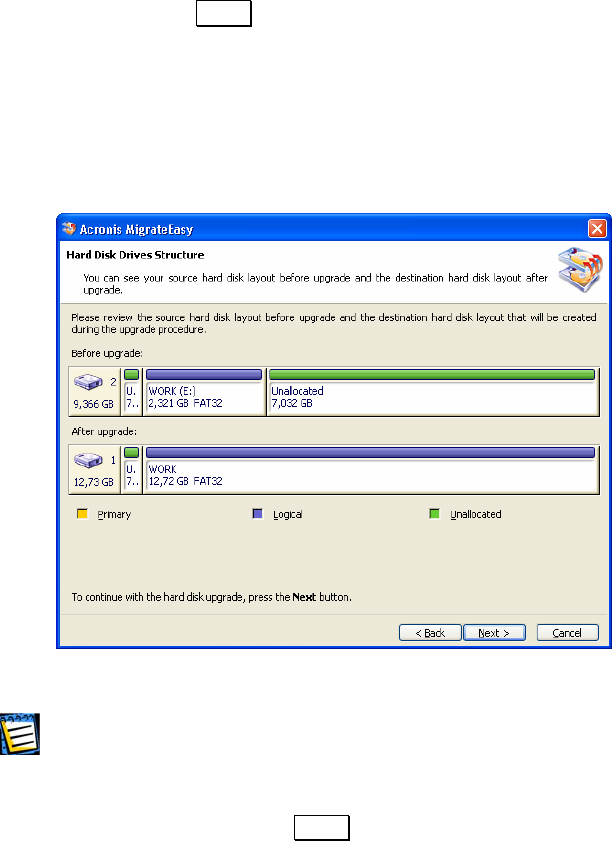
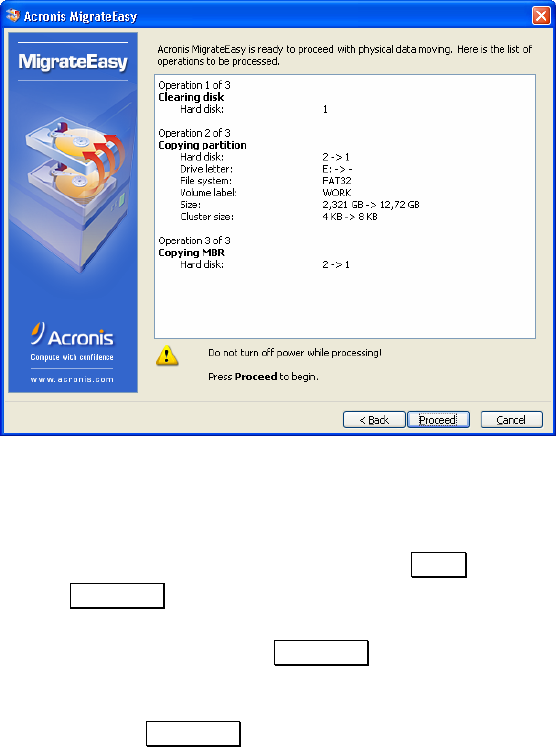
4.7 AUTO UPGRADE ............................................................................30
4.8 SAFETY.......................................................................................... 34
Acronis PowerUtilities
3
4.9 MANUAL UPGRADE ....................................................................... 35
CHAPTER 5. HARD DISK ERROR CORRECTION ...........................................36
5.1 BEGINNING TO WORK WITH THE PROGRAM ACRONIS DISKEDITOR36
5.2 MAIN WINDOW OF THE PROGRAM ................................................37
5.3 WORKING IN MULT-IWINDOWS MODE.......................................... 38
5.4 EDIT HARD DISKS.......................................................................... 40
5.5 WRITE BLOCK TO A FILE AND READ FROM A FILE........................ 42
5.6 VIEW.............................................................................................. 43
5.7 SEARCH .........................................................................................44
5.8 WORKING WITH DIFFERENT ENCODINGS...................................... 45
5.9 OTHER ACRONIS DISKEDITOR CAPABILITIES ............................... 46
CHAPTER 6. DISK DATA WIPING .................................................................. 47
6.1 CONFIDENTIAL INFORMATION ON HARD DISKS: STORAGE AND ACCESS
.......................................................................................................47
6.1.1 CONFIDENTIAL INFORMATION: DESTRUCTION..........................................47
6.1.2 DATA DELETION BY MEANS OF AN OPERATING SYSTEMS........................48
6.1.3 GUARANTEED DESTRUCTION OF CONFIDENTIAL INFORMATION: STANDARDS
.................................................................................................................49
6.2 WORKING WITH ACRONIS DRIVECLEANSER SOFTWARE.............. 50
6.2.1 RESULTS OF THE WIPING SCRIPT EXECUTION...........................................55
6.3 CREATING CUSTOM ALGORITHMS ................................................ 56
APPENDIX A. HARD DISK WIPING ALGORITHMS..........................................57
A.1 INFORMATION WIPING ALGORITHMS FUNCTIONING PRINCIPLES.57
A.2 ALGORITHMS USED BY ACRONIS PRIVACYEXPERT AND
DRIVECLEANSER .....................................................................................58
4
Table of Contents
Chapter 1. Acronis PowerUtilities
1.1 About Acronis PowerUtilities
Acronis PowerUtilities, the long-anticipated utilities suite from the technology
leader Acronis, includes four of the most popular system utilities available in
one box:
Acronis PrivacyExpert, the powerful privacy utility that keeps
computing and surfing history completely private.
Acronis MigrateEasy, the preeminent hard disk drive migration tool
available today.
Acronis DiskEditor, the technically advanced tool designed to edit
your hard disk and its partition data manually.
Acronis DriveCleanser, the proven solution to securely obliterate hard
disks clean.
Compute and Surf Without a Trace!
Acronis PrivacyExpert provides you with complete confidentiality while
working with a stand-alone or networked personal computer (PC). The
confidentiality that Acronis PrivacyExpert delivers allows you to clean-up
trace data and Windows by removing any evidence of your work or Internet
activities.
Unlike other software Acronis PrivacyExpert also increases PC performance
by cleaning out temporary files.
Acronis PrivacyExpert is PC performance improvement as a result of hard
disk cleanup from numerous temporary files.
Upgrade Your Hard Disk Drive in Minutes!
Its finally time youve put it off as long as possible, but it’s now time to
upgrade to a new larger hard disk drive. And if you’re like most, you’re not
excited. You think you’re in for a large project spanning several days of
tedious work. Luckily for you, there’s Acronis MigrateEasy, the award-winning
solution that migrates all your computer data and system files to a new hard
disk drive in minutes, while keeping all operating systems and applications
fully functional. Why take days upgrading, when you can use Acronis
MigrateEasy and be finished in minutes?
With Acronis MigrateEasy, you don’t have to be a computer scientist to
upgrade to a new hard disk drive. Simply make a few choices when
prompted, and Acronis MigrateEasy will take care of everything
Acronis PowerUtilities
5
automatically. It will even show you a preview of the migration can be
completely assured of file and system transfer. Within minutes, your data,
including applications and operating systems, will be safely on your new
large hard disk drive and ready to go!
Hard Disk Problem? Not Any More
Quite often problems can arise with hard disk drives that cannot be solved
without a technically advanced disk editor. Such problems include: back-up,
copying, and/or recover important data areas of a hard drive; search and/or
extraction of information that was removed by accident or lost due to
different soft- and hardware failures or virus attack. Acronis DiskEditor, with
booting up from a diskette, works even if your operating system does not.
Securely Obliterate Your Hard Disks
Getting rid of an old PC, upgrading to a new hard drive, returning a leased
computer, or redeploying a PC within your company? It is truly imperative to
completely destroy all data from the old hard disk.
Your confidential data should not only be safeguarded according to the strict
rules, but it should also be reliably and completely destroyed when needed.
You think you have deleted all the financial, corporate, and personal files,
and even formatted and deleted hard disk partitions – but are they really
gone from the drive? The answer is NO!
Acronis DriveCleanser guarantees the complete destruction of data on
selected partitions and/or entire disks with extremely simple Windows XP-
style interface and straight-forward actions.
1.2 About the Acronis PowerUtilities User’s Guide
This Guide briefly describes the main features of Acronis PowerUtilities suite
components, including the following chapters:
Chapter 2 «Installing and Starting to Work with Acronis
PowerUtilities» - installing, recovering and removing various suite
components;
Chapter 3 «Cleaning User Activity Traces From a Computer» -
working with Acronis PrivacyExpert: setting up and executing variants
of complex PC and system cleanup;
Chapter 4 «Migrating Data to a New Hard Disk» - working with
Acronis MigrateEasy: preparing a hard disk for installation and
automatic migration of the complete data set, including operating
system, applications, documents, etc.;
Chapter 5 «Hard Disk Error Correction» - working with Acronis
DiskEditor: low-level access to hard disk sectors, searching disk for
6
Chapter 1 : Acronis PowerUtilities
data, operating with sector byte blocks, browsing and editing the
Master Boot Record and boot sectors, File Allocation Table;
Chapter 6 «Disk Data Wiping» - working with Acronis DriveCleanser:
guaranteed wiping of confidential data on an obsolete or unused disk,
data wiping algorithms;
Appendix A. «Hard Disk Wiping Algorithms» - the necessity of strict
hard disk data wiping algorithms and the detailed description of
algorithms integrated into Acronis PrivacyExpert and Acronis
DriveCleanser.
1.3 Software Usage Conditions
The conditions of Acronis PowerUtilities software usage are described in the
«License agreement», included in this package. The supplied registration
card is the confirmation of your legal purchase and usage of Acronis
PowerUtilities software. Each registration card has its own unique registration
number.
Based on current legislation the «License agreement» is considered a
contract between a user and a software manufacturer. This contract has the
legal effect and its violation may entail a court examination.
Illegal use and distribution of software will be prosecuted.
1.4 Technical Support
Users of legally purchased and registered copies of Acronis PowerUtilities
receive free technical support from the Acronis Inc. In case you have
problems with installation or using the software, that cannot be solved with
this guide or readme, please e-mail the technical support. You will also need
to send us you the registration number for Acronis PowerUtilities. This
number is written on a registration card, supplied with this package.
Support URL:
http://www.acronis.com/support/
E-mail: support@acronis.com
Acronis PowerUtilities
7
Installing and Starting to Work with Acronis PowerUtilities
Chapter 2. Installing and Starting to Work
with Acronis PowerUtilities
2.1 Acronis PowerUtilities System Package
Acronis PowerUtilities system package includes:
an installation disc,
this guide,
license agreement,
registration card,
advertising materials.
2.2 Hardware and Software Requirements
To take a full advantage of Acronis PowerUtilities one should have:
a PC-compatible computer with a Pentium CPU or similar,
32 MB RAM,
VGA monitor,
a mouse (recommended),
free disk space for archive files.
2.3 Installing Acronis PowerUtilities Components
To install Acronis PowerUtilities suite component, please, insert the CD-ROM
into the drive, select the needed component and run the installer. Please,
carefully follow all the instructions.
Having answered Acronis PowerUtilities component installation wizard
questions, you will be prompted to create a bootable CD-R/W or diskettes (if
you purchased Acronis PowerUtilities on a bootable CD, you can skip this
step).
2.4 Recovering Acronis PowerUtilities Components
If a component of Acronis PowerUtilities failed to install or run, please,
execute the installation program again. The software will determine that the
8
Chapter 2 :
component has already been installed to your PC and prompt you to recover
(update) or completely remove it from the disk.
In the component installation wizard select Recover/update Acronis
<component> and click Next. All necessary files will be copied to your hard
disk again to properly restore software.
2.5 Removing Acronis PowerUtilities Components
To remove a component select Acronis Æ <component> Æ Remove
<component> from the Programs menu. You will see a prompt to confirm
removal of the software from your PC hard disk.
Click Yes to confirm removal. The selected component of Acronis
PowerUtilities suite will be completely removed from the PC hard disk.
2.6 Acronis PowerUtilities Suite Interface
The user interface of Acronis PowerUtilities suite features standard Windows
graphical user interface (GUI) elements. Please pay close attention to setting
and executing clean-up variants.
2.7 Running a Suite Component
To run a suite component select Programs Æ Acronis Æ <component> from
the Start menu. For example, select Programs Æ Acronis Æ Acronis
PrivacyExpert to run Acronis PrivacyExpert.
In some cases you will be prompted to load a component from a bootable
diskette or CD-R/W, that was created during the component installation.
Acronis PowerUtilities
9
Cleaning User Activity Traces From a Computer
Chapter 3. Cleaning User Activity Traces
From a Computer
Clean-up of user PC activity traces is performed by Acronis PrivacyExpert, a
part of Acronis PowerUtilities suite.
Acronis PrivacyExpert is controlled from the main window. It is shown on the
screen after selecting Acronis Æ PrivacyExpert Æ PrivacyExpert from the
Programs menu. The Acronis PrivacyExpert main window is a Windows dialog
box split into two parts:
The right part contains grouped lists of main PC cleanup variants
user may execute with Acronis PrivacyExpert;
The left part of the window, or sidebar, is an element, that was
introduced in the Windows XP. It contains grouped actions that can
be performed on objects in the right part of the window.
Main window Acronis PrivacyExpert
Clean-up variants are executed, set, scheduled, and renamed with the help
of corresponding items of the main menu, toolbar, sidebar, and context
menus.
3.1 Software Logical Organization: Sections
Logically Acronis PrivacyExpert consists of several parts, each enabling the
user to perform (1) specific variants of complex PC clean-up from PC activity
evidence or (2) clean-up separate system components.
10
Chapter 3 :
3.1.1 Complex PC Clean-up
In the One Click Clean-up section, shown by default in the right part of the
Acronis PrivacyExpert main window, the user has access to icons of three
pre-defined complex PC clean-up.
If you need to perform:
1. entire PC clean-up, including Windows system section and sections related
to working on the Internet, execute Entire PC Clean-up;
2. clean-up of sections related to working on the Internet only, execute Internet
Clean-up;
3. Windows system section and user files/folders cleanup, execute System
Cleanup.
Attention! Described clean-up variants are fully set-up by default and ready for
immediate work once Acronis PrivacyExpert is installed. They were specifically created
for the ma
j
ority of users to take advanta
g
e of them without understandin
g
all the
complex settin
g
details. Any of these variants can be executed by a click of the
mouse!
3.1.2 Cleaning Separate System Components
Internet Components and System Components sections allow you to
perform a quick clean-up of separate system components once you have
taken specific actions on your PC.
For example, you need to clean-up the browser cache from garbage after
visiting a dubious content site and remove its URL from the list of visited
sites, etc. This will not take much time compare to a full, complex clean-up.
If you need to perform:
1. a quick clean-up of only separate components of Windows system
sections and separate user files/folders, execute one of the clean-up
variants from the Components section;
2. a quick clean-up of only separate Windows components, related to
working on the Internet, execute a variant from the Internet
Components section.
Separate components clean-up takes less time than complex cleanup of
entire Windows sections.
All PC clean-up variants as well as separate components cleanup are
executed manually or by schedule and are set universally (see 3.2
«Executing PC Clean-up Manually», 3.5 «Executing Scheduled PC Clean-up»,
3.3 «Clean-up Settings») and differ only by the number of settings..
Acronis PowerUtilities
11
3.2 Executing PC Clean-up Manually
There are three ways of manually executing complex PC and component
clean-up.
PC or separate component clean-up, previously selected from the right part
of the Acronis PrivacyExpert main window, can be executed by:
1. mouse-clicking Start Now! in the Acronis PrivacyExpert main window
sidebar;
2. selecting Clean-up Æ Start Now! from the main menu;
3. selecting Start Now! from the task context menu.
If you are unable to see the clean-up variant or components to clean in the
workspace, please scroll down to make it visible.
3.3 Clean-up Settings
3.3.1 Clean-up Settings
By changing clean-up settings, you can set Acronis PrivacyExpert for your
personal needs. For example: you can select an algorithm of guaranteed
data destruction that suits you by speed and reliability, enter the type of
temporary files to clean, directly select browser used, disable separate
component clean-up, etc. This will enable Acronis PrivacyExpert to clean your
PC at maximum speed and performance.
Settings are described below.
3.3.2 Clean-up Settings Editor
Having selected a clean-up variant by mouse-clicking from the right part of
the Acronis PrivacyExpert main window, and then Properties from the sidebar
Edit list, you invoke the settings editor. You can also do this by selecting a
clean-up variant and Clean-up Æ Properties from the main menu. Finally, the
settings editor can be invoked from the context menu of a clean-up variant
by selecting Properties.
3.3.3 Setting PC Component Clean-up with the Editor
Below you can see the opened settings editor featuring two groups of
components to clean that belong to the Entire PC Clean-up. There are two
of such groups:
Internet Clean-up – this group includes clean-up of sections related to
working in the Internet,
12
Chapter 3 : Cleaning User Activity Traces From a Computer
System Clean-up – this group includes Windows system section and
user files/folders clean-up.
If you need to set up component clean-up:
1. select the component from the left part of the editor and check the
Enable <component name> box;
The description of a component to clean
2. set component clean-up; for this consecutively select each component
clean-up setting or set-up as necessary (selecting/entering clean-up
algorithm, file type, Internet browser, etc.);
«Files» setting
3. to save your settings click Apply. To discard changes click Cancel.
Acronis PowerUtilities
13
If you need to restore Acronis PrivacyExpert default clean-up settings:
1. select the component tree root – Settings;
2. in the right part of the editor click
Restore Defaults.
Restoring Acronis PrivacyExpert default settings
3.4 Separate Components Clean-up Settings
Having selected a specific component to clean from the editor, you open the
list of its clean-up settings.
Each component to clean has several settings in Acronis PrivacyExpert (from 1 to
3 depending on a component).
Below are common settings for a number of components.
3.4.1 Clean-up Settings of Components Related to Working on the Internet
«Internet Browsers» and «Address» settings are common for components
related to working on the Internet.
«Internet Browsers» Setting
Acronis PrivacyExpert automatically finds all supported browsers installed on
your PC and by default cleans structures of all browsers related to working in
the Internet.
14
Chapter 3 : Cleaning User Activity Traces From a Computer
If you have Internet Explorer installed, the structures cleaned belong to the
currently logged on user.
«Internet Browsers» setting
Netscape Navigator and Mozilla support the so-called personal profiles.
Without additional settings Acronis PrivacyExpert cleans either the «default
profile» (if it is the only one existing), or the profile of a currently logged on
user.
If you need to clean-up only one browser:
1. Set the checkbox near its name only (for example, Internet Explorer),
unchecking all other boxes;
2. If you use a version of Netscape Navigator (or Mozilla), you should
additionally select a personal profile (by clicking Profileslink).
«Address» Setting
The «Address» setting is meant for cleaning up Internet cache and the last
visited pages list. («Address» setting has only two system components to
clean: Internet Cache, Last Visited Pages.)
You can also enter any full or partial Internet addresses separated by a
semicolon as a value of the «Address» setting, for example:
*worldsoccer.com; *formula1.com;
and so on. All files downloaded from sites fully or partially corresponding to
at least one of the addresses entered will be removed.
Attention! The length of a search string with full or partial Internet addresses are
almost infinite! So you may enter any number of addresses like *worldsoccer.com or
*formula1.com separated by semicolon.
Acronis PowerUtilities
15
If you need to:
1. clean-up Internet cache (last visited pages list) from all files (lists,
elements), downloaded from specific Internet address (site), enter
addresses or their parts separated by semicolon, for example like:
*cnn*;*formula1*
As a result all files downloaded from
www.cnn.com, www.formula1.com
will be deleted.
2. clean-up Internet cache from only specific file types downloaded from
specific Internet address (site), enter addresses separated by semicolon,
for example like:
*cnn*.jpg;*cnn*.gif;*formula1*.jpg;*formula1*.gif
As a result only *.jpg, *.gif files will be deleted, and, for example, *.html
files will remain in cache.
Entering the Internet addresses list, you can browse files (visited pages)
selected according to the list. To do this click
Show URLs. You will see the
window with selected addresses. They will be deleted during at the selected
component clean-up.
3.4.2 System Component Clean-up Settings
«Data Destruction Algorithm» and «Files» settings are common for system
component cleanup.
«Data destruction algorithm» Setting
Having selected «Data Destruction Algorithm» setting you can change the
security level provided by PC clean-up and clean-up speed.
For detailed information about data destruction algorithms see 3.7 «Data
Clean-up Algorithms» and Appendix A. «Hard Disk Wiping Algorithms».
The highest level security algorithms are always very slow, and vice versa,
the quickest algorithms provide less reliability and security.
16
Chapter 3 : Cleaning User Activity Traces From a Computer
Having mouse-clicked a setting name, you will see its available element in
the right part of the editor – the selection of data destruction algorithms.
Selecting a data destruction algorithm
Mouse-clicking the drop-down list in the right part of the editor, you will see
all data destruction algorithms available in Acronis PrivacyExpert.
If you need to ensure:
1. the top security for wiping PC activity evidence, select Peter Gutmann’s
algorithm (35 data destruction cycles), but remember that it’s very slow;
2. the medium level of security at an average speed of clean-up, select VSITR
or Bruce Schneier’s algorithm (7 data destruction cycles);
3. the fast PC clean-up, with less security in mind, select any of 1-3-pass
algorithms (see A.2 «Algorithms Used by Acronis PrivacyExpert and »).
«Files» Setting
The «Files» setting is meant to provide temporary file names to clean with
Acronis PrivacyExpert (from Windows Recycle Bin and from system and user
folders) and is actually a search string.
In the Windows operating system, a search string might represent a full or
partial file name. A search string may contain any alphanumeric symbols,
including comma, * and ? symbols, and can have values similar to the
following :
*.* – to delete all files from the Recycle Bin – with any file names
and extensions;
*.doc – to delete files with specific extension – Microsoft document
files in this case;
Acronis PowerUtilities
17
read*.* – to delete all files with any extensions, and names beginning
with «read»;
read?.* – to delete all files having 5-letter names and any extensions,
names beginning with «read», the fifth letter is random.
For example, the last search string will result in removal of read1.txt,
ready.doc files, but readyness.txt will remain since it has a longer pre-fix
name (excluding the extension).
You can enter several different search strings separated by semicolon, for
example:
*.bak; *.tmp; *.~~~;
and so on. All files with names corresponding to at least one of the search
strings will be deleted.
Attention! The length of a search string with full or partial names is almost infinite!
You may enter any number of filenames or their parts like *.tmp, read?.* separated
by semicolon.
The «Files» setting has four system components to clean: Recycle Bin,
Temporary Files, Custom Folders/Files, and Find Files List.
«Files» setting
18
Chapter 3 : Cleaning User Activity Traces From a Computer
If you need to:
1. delete only specific file types from the Recycle Bin (system or user
folder), enter filenames separated by semicolon, for example, as follows:
*.jpg; *.gif;
2. delete only specific filenames from the Recycle Bin (system or user
folder), enter names, for example, as follows:
read*.txt.
This will result in removal of read!.txt, readme.txt, read1.txt, etc. files,
while read.doc, readme.doc, etc. will remain.
3. delete only specific length filenames from the Recycle Bin (system or
user folder), enter filename, for example, as follows:
read?.txt.
As a result files read!.txt, read1.txt, read2.txt, etc. will be deleted, while
read.doc, readme.doc, etc. will remain.
By entering filenames, you can browse the files selected by Acronis
PrivacyExpert. To do this click
Show Files. You will see a window containing
selected files. These files are set for destruction when you invoke the clean-up.
«Computers» Setting
The «Computers» setting is meant to clean-up the registry from search
strings for finding computers in the local network. These strings keep
information on what interested you in the network. So they should also be
deleted to maintain full confidentiality.
«Computers» setting is the same as «Files». «Computers» setting is a string
that can contain any number of full or partial computer names separated by
semicolons. The deletion of computer search strings is based on a comparison
with the «Computers» setting according to Windows rules (see ««File
Setting»).
If you simply need to delete all local network computer search strings (suitable
for the most cases):
1. select Find Computer List;
2. check the Enable the Find Computer List cleaning box;
3. select «Computers» setting; leave its default value unchanged – *.
Acronis PowerUtilities
19
As a result all computer search strings will be deleted from the registry.
«Computers» setting
On entering «Computers» setting value you can browse the search strings
kept in the registry selected by Acronis PrivacyExpert. To do this click
Show
Computers. You will see the window with full and partial computer names
searched for in the network. They will be deleted at the registry clean-up.
3.5 Executing Scheduled PC Clean-up
Each PC clean-up variant of Acronis PrivacyExpert can be executed either
manually or automatically as scheduled.
Having set PC clean-up as a daily procedure, to be performed for example, at
the end of workday before powering the PC off, you can be sure that all
evidence of your PC and Internet activity will be reliably removed each day.
Acronis PrivacyExpert features a built-in scheduler.
20
Chapter 3 : Cleaning User Activity Traces From a Computer
3.5.1 Invoking the Scheduler
Having mouse-clicked a cleanup variant in the right part of the Acronis
PrivacyExpert main window, and selected Schedule in the sidebar Clean-up
list, you invoke the scheduler. You can also do this by selecting a clean-up
variant and Clean-up Æ Schedule from the main menu. Finally, you can invoke
the scheduler from the clean-up variant context menu-selecting Schedule.
Scheduler
3.5.2 Scheduler Settings
Scheduler provides the user with flexible capabilities for automatic execution
of any PC clean-up variant.
If you need to perform automatic PC clean-up:
1. daily at specific time, only during workdays or periodically – over several
days, set the switch on the 1
st
scheduler page to Daily;
2. weekly at specific time and weekdays, say Tuesday and Friday, or
periodically – in two or three weeks, etc., set the switch on the 1
st
scheduler page to Weekly;
3. monthly at specific time and day; the ability to execute clean-up on, for
example, the <first, second, third, fourth, last> <weekday> (Monday,
Tuesday, Wednesday, Thursday, Friday, Saturday, Sunday), set the switch
on the 1
st
scheduler page to Monthly;
4. once at specific time (hours: minutes) and date (day-month-year), set
the switch on the 1
st
scheduler page to One time only;
Acronis PowerUtilities
21
5. in all of the above click Next and set additional execution settings on the
2
nd
scheduler page.
If you need automatic PC clean-up:
1. at PC start-up, set the switch on the 1
st
scheduler page to When my
computer starts;
2. at shutdown, the switch on the 1
st
scheduler page to When my computer
shuts down.
If you need to disable automatic scheduled execution:
1. invoke the scheduler again;
2. on the 1
st
scheduler page set the switch to Disable scheduled clean-up.
3.6 Renaming Clean-up Variants
Enabling/disabling separate component clean-up and selecting clean-up
settings, you set-up and customize your PC clean-up variant(s) as needed.
That said, you may want to rename a variant to better represent PC clean-up
contents.
If you want to rename a PC (or separate component) clean-up variant you can do
this by following one of three methods:
1. mouse-clicking Rename on the sidebar;
2. selecting Clean-up Æ Rename from the main menu;
3. selecting Rename from the context menu of a PC (component) cleanup
variant.
As a result of any of these actions you will see the Rename Item window
enabling you to enter a new name for PC or component clean-up variant.
3.7 Data Clean-up Algorithms
Unlike most software providing the confidentiality of PC and Internet activity,
Acronis PrivacyExpert not only deletes Windows sections (files, folders,
registry components, etc.), it also performs a thorough low-level clean-up of
hard disk sectors containing Windows components selected for cleaning.
Trace Windows data and files are cleaned with the help of integrated data
destruction algorithms. Acronis PrivacyExpert provides the user with eight
algorithms. Five of the eight meet the most popular national data destruction
standards:
(1) American: DoD 5220.22-M,
(2) American: NAVSO P-5239-26 (RLL),
22
Chapter 3 : Cleaning User Activity Traces From a Computer
(3) American: NAVSO P-5239-26 (MFM),
(4) German: VSITR,
(5) Russian: Russian Standard, GOST P50739-95.
Besides algorithms that meet national standards, Acronis PrivacyExpert
provides two far more powerful pre-defined algorithms offered by top
information security specialists:
(6) Peter Gutmann’s algorithm;
(7) Bruce Schneier’s algorithm.
After using the most powerful clean-up algorithms of Acronis PrivacyExpert
the disk data can in no way be recovered by any modern methods
including the most powerful magnetic microscopy!
The user is also provided with a simple, but fast algorithm to use in less
important situations:
(8) Fast.
The algorithm operation is based on multiple rewritin
g
of hard disk sectors
containin
g
user data with chains of lo
g
ical 0 and 1. As a result previously written
data is replaced by newer random data. For more information on the al
g
orithms see
Appendix A. «Hard Disk Wiping Algorithms». There you will also find information on
the number of hard disk passes, provided by each al
g
orithm, and numeric chains
written in the process (see A.2 «Algorithms Used by Acronis PrivacyExpert and »).
3.8 Complex PC Clean-up
Using variants of complex PC clean-up described below, you can clean a large
number of various Windows components that keep evidence of your PC
activity.
3.8.1 Entire PC Clean-up
If you need to clean a PC of any evidence of your activity, select the Entire
PC clean-up. Executing it, you’ll be able to clean all Windows components
accessible by Acronis PrivacyExpert:
1. clean Windows registry from user activity evidence;
2. delete temporary files from standard Windows folders;
3. delete any file types from user folders on any disks connected
to the PC;
4. clean Windows Recycle Bin;
5. clean Windows swap file;
6. clean hard disk free space;
Acronis PowerUtilities
23
7. clean the last visited pages and last used documents list;
8. delete the evidence of searching for files on connected disks, for
networked computers, for information on the Internet;
9. clean Internet cache;
10. delete cookies
11. delete downloaded components;
12. clean Internet history and last visited pages list.
Entire PC clean-up is executed by a mouse-click on its name in the right part
of the main window (for other execution methods see sections 3.2, 3.5).
3.8.2 System Clean-up
If you need to wipe the evidence of your PC activity from its system sections,
use the System clean-up. Executing it allows you to:
1. clean Windows registry from user activity traces;
2. delete temporary files from standard Windows folders;
3. delete any file types from user folders on any disks connected to a PC;
4. clean Windows Recycle Bin;
5. clean Windows swap file;
6. clean hard disk free space;
7. clean last used documents list;
8. delete the evidence of searching for files on connected disks, for
networked computers, for information on the Internet.
System cleanup can be executed by mouse-clicking the cleanup variant in the
right part of the main window (for other execution methods see sections 3.2, 3.5).
3.8.3 Internet Clean-up
If you need to wipe the evidence of your Internet activity, use Internet
cleanup. This variant allows you:
1. clean-up Internet cache;
2. delete cookies;
3. delete downloaded components;
4. clean Internet history and last visited pages list.
Internet clean-up can be executed by mouse-clicking its name in the right
part of the main window (for other execution methods see sections 3.2, 3.5).
24
Chapter 3 : Cleaning User Activity Traces From a Computer
3.9 A Fast Cleanup of Separate System Components
Acronis PrivacyExpert enables you to perform a fast clean-up of separate system
components. For example, you can clean just the Last Visited Pages or cookies.
A separate component is cleaned faster than a complex PC clean-up.
Separate component clean-up is performed from Internet Components and
System Components sections (see 3.1.2 «Cleaning Separate System
Components»). Setting up and executing the clean-up is similar to complex
clean-up set-up and execution.
Please note that the detailed description of Acronis PrivacyExpert actions for
each specific component clean-up case (how and what files and folders,
system or registry sections are cleaned from what data types) are included in
the .pdf file on the installation CD-ROM.
Acronis PowerUtilities
25
Migrating Data to a New Hard Disk
Chapter 4. Migrating Data
to a New Hard Disk
You can migrate your data from the old hard disk to a new one with the help
of Acronis MigrateEasy, a part or the Acronis PowerUtilities suite.
4.1 Preparing for Migration
To use the Acronis MigrateEasy application effectively you have to know at
least the basics of hard disks and how the computer works with them. Below
we will provide only the most necessary information, without covering the
technical details of inner structure of hard disks.
If you have difficulties with understanding what the application does to hard
disks, please refer to Appendices at the end of this Guide. Those appendices
contain both information on hard disk organization and on how data are
stored on it.
At the end of the Guide you will find a Glossary with explanations of terms
from this Guide that may be unknown or unclear to you.
4.2 Hard Disk Partitions and File Systems.
It would be quite inconvenient if you could only access the entire hard disk,
so a mechanism was created that allows you to divide the hard disk into
several parts for storing different types data or operating systems. This is
done by partitioning hard disks into partitions.
An operating system provides the user with ability to work with data by
supporting some type of file system on a partition. Most operating systems
support several file systems. For example, Windows 98/Me support FAT16
and FAT32 file systems, Windows NT/2000/XP support both FAT16/32 and
NTFS file systems. The popular Linux operating system supports Ext2, Ext3,
and ReiserFS (and some other) file systems.
26 Chapter 4 :
Acronis MigrateEasy works only with hard disks and the partitions contained on
them. This means that:
1. You will never see files, nor folders while working with MigrateEasy, but
only hard disks, their partitions, and the properties of both (disk
numbers, letters, capacities and sizes, etc);
2. When moving all your data to a new disk, MigrateEasy works not with
files and folders, but with more basic disk structure elements.
For more details on hard disk partitions and their usa
g
e by operatin
g
systems, see
the Guide Appendix in the .pdf file on the installation CD-ROM.
4.3 Installing a Hard Disk on Your Computer
To upgrade the disk subsystem of your computer you need to install the new
disk in the PC case and plug it into power supply block and mother board.
Before installing and fixing the hard disk you have to install a jumper on a
special connector of the disk board to which power and data cables attach.
Usually the jumper on your old disk is installed in the Master position. To
upgrade the disk first you have to install the new disk as Slave and later
position the jumper based on how you are going to use it (Master if the disk
will be the boot disk, or Slave if it will be just an extra storage).
More details of hard disk hardware installation can be found in the Guide Appendix in
the .pdf file on the installation CD-ROM.
4.4 BIOS Set-up
It is not enough to properly position jumpers on the hard disk and connect it
to power supply and data cables, you must also properly configure your hard
disk in BIOS (Basic Input/Output System).
You can enter the BIOS setup program by pressing the key combination that
is displayed right after you turn on your computer.
Hard disks can be configured in the Standard CMOS Set-up section of the
BIOS set-up menu. If you have set the hard disk jumper to Slave and have
connected the data cable to the Primary IDE plug of the motherboard, it may
only be necessary to set the TYPE and MODE parameters for the Primary
Slave disk to Auto (this information is usually sufficient for BIOS to properly
detect and configure modern hard disks.)
Acronis PowerUtilities
27
After the new disk is configured in BIOS, save the settings.
For more details about BIOS set-up and possible errors (including error messa
g
es)
see the Guide Appendix in the .pdf file on the installation CD-ROM.
4.5 Starting Work with Acronis MigrateEasy
To start a migration process under Windows, select Start Æ Programs Æ
Acronis Æ MigrateEasy Æ Acronis MigrateEasy.
If you do not have a Windows operating system installed, you should create
a bootable diskette or CD-R/W, and re-boot your PC from it, to start a
migration process. Further steps will be the same.
All operations with hard disks are done according to scenarios that are
created as a result of user’s choices and actions. Before you actually run a
scenario, no real changes are made to the existing configuration. You can
return to previous stages of scenario creation and change the parameters at
any stage of the program.
The program can work only if two or more hard disks are installed on your
computer. This means that if you have only one hard disk, you get the
following message:
The next Wizard page is the page that actually starts the work on
transferring data to the new hard disk. Let us first describe the main
scenarios of working with MigrateEasy.
28 Chapter 4 : Migrating Data to a New Hard Disk
4.6 Migration Scenarios
Before starting the program, you have to know for sure, what you can expect
from it. Below we describe the details of each of possible work scenarios.
Here we will list only the main scenarios and their outcomes.
4.6.1 Auto Upgrade
The results of auto upgrade scenario are as follows:
1. An exact copy of the source disk is created on the destination disk. It
means that literally everything is copied:
Disk partitions, file system types, volume labels;
All folders and files, installed operating systems and applications.
If the capacity of the new disk is larger than that of the old one,
partitions from the old disk are transferred to the new one with
proportional increase in size.
2. Destination disk is made bootable (if of course the source disk was
bootable in the first place) and active.
3. All data remains intact on the source disk!
4.6.2 Manual Upgrade
Manual upgrade provides you with more flexibility. You can choose how to use the
new disk and what to do with data on the old hard disk drive.
1. First you can choose from one of two main ways to configure the new
hard disk:
The disk is installed as a boot disk;
The disk is installed as additional data storage.
2. Next you have to define the way to transfer partitions and data.
MigrateEasy offers you the following options:
Partitions and data are transferred «as is»;
Disk space on the new disk is distributed proportionally among the
partitions that are transferred from the old disk;
Manual.
3. You can also choose what to do with the old disk:
Leave partitions (and data) on the old disk;
Delete partitions (and data) from the old disk.
Acronis PowerUtilities
29
If you decide to transfer partitions to the new disk and delete them from the
old one, you can repartition the old disk to use it for some other purposes.
Transferring partitions «as is» means that for each partition of the old disk
an exact copy is created on the new disk, i.e. the type, size, file system, and
label of the partition remain the same.
«Disk space on the new disk is distributed proportionally» means that if the
capacity of the new disk is larger than that of the old one, a copy is created
on the new disk for each of partitions on the old disk, but the size of each
partition is increased proportionally to the ratio between the new and old
disk capacities, so that the partitions occupy all the destination disk.
4.7 Auto Upgrade
The automatic upgrade will make an exact copy of your old hard disk by
proportionally resizing all partitions to match your new hard disk size. This
function is suitable for most users.
You get to the Upgrade Mode page right after the welcome page.
Select upgrade mode (Auto/Manual)
Switch the radio button on this page to the Auto position and press the
Next button.
30 Chapter 4 : Migrating Data to a New Hard Disk
Then you must specify which disk the data is transferred from.
Select source hard disk
Markings on this page help you to understand which disk should be the
source and which the destination one (check for disk numbers, volume
labels, partitions and file systems on disks).
In the lower part of the window you see the graphical representation (as
rectangles of various sizes) of the partitions of the selected hard disk, and
also the unallocated space. Along with the number of the disk you see some
additional information: partition number, volume label (e.g. SYSTEM), file
system type (e.g. FAT16 or FAT32), size of partition in gigabytes (GB).
Partition types (Primary and Logical) and unallocated space are shown in
different colors. All this information prevents you from being confused as to
where from and where to you are transferring your data.
Select the disk to which the data will be transferred on the Destination disk
page.
On this page you cannot select the disk that you have designated as the
source disk on the previous page, so it is grayed.
Acronis PowerUtilities
31
If only two disks are installed in your computer, you are able to select only
the second disk.
Select destination hard disk
On the next step the program checks if the destination disk is free. If it is not
free, the program notifies you about it. You get to the Nonempty destination
disk page. It means that the destination disk contains some partitions, and at
least some of them may contain data.
Nonempty destination hard disk
32 Chapter 4 : Migrating Data to a New Hard Disk
In this case you should:
1. press the Back button and select another destination disk on the Select
destination disk page;
2. allow the program to delete the existing partitions from the disk by
checking the Delete partitions on the destination disk checkbox.
The Hard disk drives structure page showing the partitions of the source disk
before transfer and of the destination disk after transfer appears.
Hard disk drives structure
Pay attention! So far the pro
g
ram has not performed any real actions, but only
creates an upgrade scenario in a dialog with the user.
If the structure shown does not suit you, you can go one or several steps
back by pressing the Back button and enter other parameters of the
scenario.
Acronis PowerUtilities
33
The text of the created scenario is shown on the next page.
Final upgrade scenario
This is the last page of the Wizard, next the scenario will be executed. So far
the program has not performed any actions and has only created the
upgrade scenario. Please notice that the Next button of the Wizard is now
called Proceed. If you are not sure that you have entered the correct
upgrade parameters, it is time to stop and think if everything has been done
correctly. If you press the Proceed button, you will be unable to reverse
the results of performing the scenario.
After pressing Proceed
MigrateEasy takes care of everything automatically.
To complete the execution of all processes, MigrateEasy will reboot your
system.
After the upgrade process is over, you get the Upgrade completed message.
Now you should turn the PC power off and change the positions of hard disk
jumpers, including that of the new disk, to match its purpose.
4.8 Safety
Please pay close attention to the following. Operations with disk can be
unsafe with respect to data integrity. If power goes off or you accidentally
unplug your PC, or power the computer off, or press the RESET button while
data transfer is in progress, the process will be unfinished, data (partitions)
will not be transferred, and the new disk will most probably be unusable.
Hence, you should take precautions during the transfer process!
34 Chapter 4 : Migrating Data to a New Hard Disk
Automatic transfer mode is completely safe for data on the old hard disk
(source disk), since in this mode the program does nothing with it except for
reading data (the disk is not repartitioned, the partitions are not resized).
We recommend you refrain from deleting data from the old disk before you
are sure that they were correctly transferred to the new disk, and that the
latter is fully functional (the computer boots from the disk, all applications
are launched properly, and files can be opened with applications).
4.9 Manual Upgrade
The manual mode of Acronis MigrateEasy upgrade gives you full control of
program performance and capabilities (see 4.6.2 «Manual Upgrade»). Auto
upgrade should be sufficient for most Acronis MigrateEasy users, but if you
require additional flexibility, use Manual Upgrade of hard disk.
In general manual hard disk upgrade is similar to automatic mode. User
should carefully follow the upgrade wizard instructions. If you have
questions, the detailed instructions for manual hard disk upgrade are
provided in the .pdf file on the installation CD-ROM.
Acronis PowerUtilities
35
Hard Disk Error Correction
Chapter 5. Hard Disk Error Correction
Hard disk error correction can be performed with Acronis DiskEditor, a part of
the Acronis PowerUtilities suite.
Acronis DiskEditor assumes user’s relatively high qualification and knowledge
of hard disk logical structures and data storage methods. Thus this chapter
only describes its interface and functionality.
5.1 Beginning to Work with the Program Acronis DiskEditor
Working with the Acronis DiskEditor program begins with the Open dialog
window that users see after clicking the Acronis DiskEditor line in the
program group of Programs desktop start menu.
The window of partition or disk selection
By default the program automatically marks the first hard disk for working.
You may select any other disk or individual partition – by clicking the left
mouse button on a corresponding rectangle.
The difference between selecting the entire disk or a partition only is the followin
g
: if
you select the entire disk you will be able to view and edit data storage structures of
the entire disk – Partition table, File Allocation Table of all disk partitions, the root
folder, data area. If you select a partition only, you will be able to view and edit only
data storage structures of this partition – File Allocation Table, the root folder and
data area of the selected partition.
36 Chapter 5 :
5.2 Main Window of the Program
The main window, showing numbers of disk and sector where the internal
program cursor is positioned, usually contains information and the working of
various modes.
Below the main window of the program is the view as Partition table mode.
The main window in the view as Partition table mode
To make the information contained in this field sensible, the current sector
should be the MBR or the extended Partition table.
The next figure shows the Partition table as a single dump (hexadecimal byte
values are on the left, and the corresponding characters are on the right).
The main window in the view as Hex mode
Acronis PowerUtilities
37
The current editing position is shown by the cursor that can be either in the
left, or right part of the window.
In this section of the Guide all examples of Acronis DiskEditor’s main window view
modes are given for demonstration purposes.
The main menu of Acronis DiskEditor contains the following items:
Disk – allows you to open the window of a hard disk partition or to
select a hard disk for editing;
Edit – allows you to operate with blocks of selected hard disk
partitions; also allows you to save contents of a disk sector after
editing;
View – allows you to select a view mode for more convenient
presentation of data;
Search – allows you to search a partition (or a hard disk) for any line
(or any sequence of characters) and go to a certain disk sector
according to its absolute offset;
Help – allows you to get help concerning the editor window or about
the program’s developer and version.
5.3 Working in Mult-iwindows Mode
The disk editor features multiple windows: from Disk menu of Acronis
DiskEditor you can open several main windows, each of them showing
various hard disk sectors.
Disk menu
38 Chapter 5 : Hard Disk Error Correction
You can switch between various Acronis DiskEditor windows with the help of
the mouse, clicking the necessary window, or consistently advancing
windows with the help of Alt+Tab
key combination.
Acronis DiskEditor as a multiwindow editor
Selecting Properties item in Disk menu allows you to get access to the
window with main properties of the computer hard disk selected for working
(or of selected partition of the given disk).
The Hard Disk Properties window
The main hard disk properties displayed in this window are:
System name – disk’s system name,
Model – hard disk model,
Sectors per track – number of sectors per a track,
Heads – number of heads,
Cylinders – number of cylinders,
Acronis PowerUtilities
39
Total size – hard disk capacity,
Interface – interface type (ATA, SCSI),
Controller – controller type.
5.4 Edit Hard Disks
Edit menu of Acronis DiskEditor’s main window allows you to access the main
operations with blocks of given hard disk sectors. You can edit hard disk data
directly in the fields of any view mode (see the View menu). You can operate
with data blocks using Edit menu in the view as Hex mode.
Edit menu
Any view mode allows you to select blocks with the help of the mouse by
clicking and holding its left button, or with the help of the keyboard
advancing the window with Shift key pressed.
40 Chapter 5 : Hard Disk Error Correction
Simply changing data in the hexadecimal or character area, in the view as
Hex mode of the main window or in any fields of other view modes, does not
lead to changes in the given disk sector. Having performed such changes,
you will see that the Save sector item in Edit menu will become enabled as
well as the appropriate toolbar button.
Save sector operation
This feature allows you to save the results of your sector editing or to reject it.
If you have made changes in a hard disk sector and decided to exit the
editor without saving them, you will see a warning about saving your
changes.
Saving modified sector
Acronis PowerUtilities
41
5.5 Write Block to a file and Read From a File
Write to file… and Read from file… menu items allow you to save the selected
block to a file or to read the block from a file and save it to a disk sector.
The selection of Write to file item results in opening the Write to file window
(the saved block should be preliminary selected). In this window enter the
file name and its path, or locate a file by clicking the Browse… button. The
file size will be calculated automatically. To save a file click the OK button.
Write to a file window
To read a block from a file, and insert it into a disk sector, you must place
the cursor on the necessary sector byte and then select Read from file
menu item. The selection of this menu item will result in opening the Read
from file.
42 Chapter 5 : Hard Disk Error Correction
In this window enter the file name and its path or locate a file by clicking the
Browse… button. To insert file contents to sector from the current cursor
position (or considering offset in the file) click the OK button.
Read from a file window
5.6 View
Information in the Acronis DiskEditor window can be viewed and edited in
several different modes. You can select the appropriate view mode with the
help of View menu.
View menu
The editor offers 7 view modes:
As Hex,
As Partition table,
As FAT16 boot sector,
As FAT32 boot sector,
Acronis PowerUtilities
43
As FAT32 FS info sector,
As NTFS boot sector,
As FAT folder.
5.7 Search
Search menu allows you to search a hard disk for some line and to go to a
disk sector according to its absolute offset.
Search Menu
Selecting Search item in the same menu will give you access to functions of
searching lines in the disk being edited. (You can do the same by pressing
Ctrl+F key combination.) Search parameters can be set in the Search
dialog window.
Search dialog window
A search line can be set both as char, and numeric (hexadecimal) value.
During a search you can ignore letter case, as well as search for a given line
at a given offset inside the sector.
During search, disk data is interpreted according to the encoding selected. If
you selected a search mode without letter case matching, not only case but
also elements above characters will be ignored for Roman character sets.
After the search process is finished, the current position will be moved to
where a line was found, or will remain the same if no lines were found. You
can search for the next line from the current position by selecting Find next
item in the Search menu or by pressing F3 key.
44 Chapter 5 : Hard Disk Error Correction
You can go to the necessary sector according to its absolute offset by
selecting the Go to… line the Search menu (or by pressing Alt+P key
combination). Selecting this line opens the Go to dialog window.
Go to sector…
The transition is performed by entering absolute sector offset, or cylinder,
head, and sector numbers. The listed parameters are bound by this
expression:
(CYL x HDS + HD) x SPT + SEC – 1,
Where CYL, HD, SEC are numbers of cylinder, head, sector in the CHS co-
ordinates (Cylinder – Head – Sector); HDS is the number of heads per disk,
SPT is the number of heads per track.
You can return to sector from another one by selecting the Back item in the
Search menu (or by pressing Ctrl+Backspace key combination).
5.8 Working with Different Encodings
The main window of the program features a list of encodings available in
Acronis DiskEditor. This list is shown closed and dropped down below.
The closed and dropped down list of encodings
The list of encodings is intended for correct interpretation of hard disk sector
contents. Selecting the necessary encoding, you will be able to view sector
contents correctly. This is interpreted in the right part of program’s main
window in the hex mode.
Acronis PowerUtilities
45
5.9 Other Acronis DiskEditor Capabilities
The description of other Acronis DiskEditor capabilities, in particular, main
window view modes for working with MBR, FAT, files, folders and subfolders
are provided in the .pdf file on the installation CD-ROM.
46 Chapter 5 : Hard Disk Error Correction
Chapter 6. Disk Data Wiping
Getting rid of an old PC, upgrading to a new hard drive, returning a leased
computer, or redeploying a PC within your company? It is truly imperative to
completely destroy all data from the old hard disk.
Acronis DriveCleanser guarantees the complete destruction of data on
selected partitions and/or entire disks with extremely simple Windows XP-
style interface and straightforward actions.
6.1 Confidential Information on Hard Disks: Storage and Access
Today more and more amounts of confidential information are created in the
digital form and consigned to storage on computers. Documents that were
previously created with the help of printing machines or table database files
are now stored on computer hard disk drives.
The enormous amount of personal data, including such important things as
personal banking account information, credit card numbers, business
application, data-banking, financial, accounting, and industrial – are all stored on
hard disks. It is impossible to enumerate all documents and data that in no
circumstances should not left behind on a hard disk drive for criminals or rivals
to possibly retrieve.
The main feature of these documents is that all of them contain confidential
information.
6.1.1 Confidential Information: Destruction
Information not only has to be stored according to specially developed rules,
but also destroyed according to the strict rules to provide confidentiality.
Computers are usually upgraded more than once during their lifetimes. In
doing so, very often the computer disk subsystem is upgraded first due to the
ever-increasing amounts of data stored on the hard disk drive. When a hard
disk of larger capacity is installed on the computer, all data from the old disk
can be transferred to the new one, but quite often the data also remains on
the old disk.
Careless storage of a hard disk that is no longer needed can result in the loss
of confidential information. The best solution is to completely destroy data on
the old disk after it is moved to the new disk. Destroy! Not to erase
information, not to delete needless files, but to destroy confidential data!
(The difference between file deleting and information destruction will be
explained later.)
Acronis PowerUtilities
47
The following real-life passage illustrations this idea:
Jack V., a computer consultant from Brighton, bought a used notebook
computer for $400.00 at the clearance sale of a bankrupt Internet company.
It was clear that the hard disk drive contained data about the company. This
data included social security numbers and salary levels of the company’s
forty-six employees, plus pay roll records, strategic company plans,
confidential board of directors minutes, and other internal documents.
There have been many cases like this concerning the sales and purchase of
used computer.
6.1.2 Data Deletion by Means of an Operating Systems
There is a considerable difference between file deletion with operating
systems (with the help of file managers) and data destruction with the help
of specialized erasing programs.
The point is that operating systems, such as Windows, do not materially
delete anything from a hard disk when deleting a file: the name of the deleted
file in the File Allocation Table (FAT) is substituted by the name which is not
assumed as a correct one by the operating system. The file only becomes
invisible for a user and the cluster chain that contains file data is considered
to be free. But the information contained within the hard disk sectors stays
permanent. It is not very difficult for someone to recover it.
File deletion under the Linux operating system is somewhat more reliable,
but even in this case it is possible to obtain software tools to recover any
important information.
Neither partitions deletion on a disk nor even disk formatting solves this
problem. When partitions are deleted on a hard disk the information of
Partition table (if it is a primary partition) or File Allocation Table is deleted.
The information contained within sectors however remains untouched and
can be recovered with the help of software tools.
Reliable information destruction on hard disks is possible only while using
specially designed programs that implement specially designed erasing
algorithms.
48 Chapter 6 : Disk Data Wiping
6.1.3 Guaranteed Destruction of Confidential Information: Standards
The Acronis DriveCleanser application offers the guaranteed destruction of
confidential information on magnetic hard disks with the help of special
algorithms.
Acronis DriveCleanser algorithms guarantee compliance with most known
national standards:
(1) American: U.S. Standard, DoD 5220.22-M;
(2) American: NAVSO P-5239-26 (RLL);
(3) American: NAVSO P-5239-26 (MFM);
(4) German: VSITR;
(5) Russian: GOST P50739-95.
Besides algorithms corresponding to national standards, Acronis
DriveCleanser supports pre-defined algorithms proposed by well-known and
authoritative specialists in the field of information security:
(6) Peter Gutmann’s algorithm – data on hard disk is destroyed with 35
passes;
(7) Bruce Schneier’s algorithm – data is destroyed with 7 passes.
The Acronis DriveCleanser also supports simple but fast algorithms for
information destruction that provide a single hard disk pass with all sectors
zeroed.
The major feature of the Acronis DriveCleanser is the opportunity for you to
create your own algorithms for data destruction.
Detailed information on data destruction standards is given in Appendix A.
«Hard Disk Wiping Algorithms» of this Guide.
Acronis PowerUtilities
49
6.2 Working with Acronis DriveCleanser Software
Working with Acronis DriveCleanser starts with the welcome screen. The
screen informs you about the basic features of the software; they are:
1. Wiping selected partitions of a hard disk (disks) with one of the
predefined wiping algorithms;
2. Creating and using custom wiping algorithms.
The Acronis DriveCleanser welcome window
All actions on hard disks are performed on the basis of scripts created during
the dialogue with the user. No data destruction occurs, until you execute the
created script. You may return to a previous stage of script creation, from
any stage of working with the software, and select other partitions and/or
disks to wipe or to change the wiping algorithm.
50 Chapter 6 : Disk Data Wiping
The following window will contain the list of hard disks connected to your
computer, and their partitions with main parameters (disk capacities and
partition sizes, file systems and labels).
The list of computer's hard disks (with partitions)
Next you will need to select the partitions on hard disks to be designated for
data destruction.
Mouse-click the rectangle representing the hard disk partition. The red cross
will appear in the top right corner of the rectangle. It means that the
partition is selected for data destruction.
You may choose to destroy data on the entire disk (or several disks). For this
purpose mouse-click the rectangle representing the hard disk (with device
icon, disk number and its capacity).
You may simultaneously select several partitions located on different disks,
or several disks.
Acronis PowerUtilities
51
In the Post-wiping actions window you may choose what to do with partition
that is the subject of data destruction. Acronis DriveCleanser offers you three
opportunities:
Leave partition as is that is just to destroy data according to the
algorithm which you will select later;
Delete partition – to destroy data and remove partition;
Format to destroy data and format partition (default).
The Post-wiping actions window
In the example below it is supposed that the switch is set to the Leave
partitions as is position. This will allow you to see the results of the data
destruction itself (without partition formatting or removal).
52 Chapter 6 : Disk Data Wiping
You need to select one of the pre-defined wiping algorithms from the list in
the Algorithm selection window.
The list of pre-defined wiping algorithms
The next window represents the created script for wiping the hard disk
partitions.
The window of the hard disk wiping script
The Acronis DriveCleanser software is now ready to perform the wiping
procedure.
Click the
Proceed button to execute the script for wiping the hard disk
partitions.
Acronis PowerUtilities
53
After pressing Proceed DriveCleanser takes care of everything automatically.
To complete the execution of all processes, Acronis DriveCleanser will reboot
your system after you have pressed the
Proceed button.
Upon completion of the data destruction execution, you will receive a
message reporting the successful completion of the disk wiping procedure.
The successful completion of the wiping procedure window
54 Chapter 6 : Disk Data Wiping
6.2.1 Results of the Wiping Script Execution
Acronis DriveCleanser software gives you another method to review the
results of partition and/or hard disk wiping. Acronis DriveCleanser has a built-
in DiskViewer utility for viewing the hard disk contents.
The algorithms described above offer different variants for data destruction.
Thus, the picture you may see on a partition and/or a disk depends on the
selected data destruction algorithm.
The sector of the disk partition after the fast algorithm execution
Acronis PowerUtilities
55
6.3 Creating Custom Algorithms
Data wiping algorithms integrated into Acronis DriveCleanser are suitable for
most users from the point of reliability and performance. Nevertheless,
Acronis DriveCleanser enables user to create and save custom algorithms.
To create a custom hard disk wiping algorithm, select and mouse-click the
«Custom…» item from the drop-down list of the Algorithm selection window.
Selecting the custom algorithm creation
Follow the instructions of Custom algorithm creation wizard.
The Saving custom algorithm window enables to you to save the algorithm
you created. This may be useful if you are going to use this algorithm in
future.
To use the previously created and saved algorithm select the «Load from
file…» item from the drop-down list in the Algorithm selection window.
If you have questions, the detailed instructions for creating custom data
wiping algorithms are provided in the .pdf file on the installation CD-ROM.
56 Chapter 6 : Disk Data Wiping
Appendix A. Hard Disk
Wiping Algorithms
Information removed from a hard disk drive by non-secure means (for
example, by simple Windows delete) can easily be recovered. Utilizing
specialized equipment, one may also be able to recover even repeatedly
overwritten information. Therefore the problem of guaranteed data wiping is
vital as never before.
The guaranteed wiping of information from magnetic media (e.g. a hard disk
drive) means the impossibility of data recovery by a qualified specialist with
the help of any known tools or recovery methods.
This problem can be explained in the following way: Data is stored on a hard
disk as a binary sequence of 1 and 0 (ones and zeros), represented by
differently magnetized parts of a magnetic disk.
Generally speaking, a 1 written to a hard disk is read as 1 by its controller,
and 0 is read as 0. However, of you write 1 over 0, the result is conditionally
0.95 and vice versa – if 1 is written over 1 the result is 1.05. These
differences are irrelevant for the controller. However using special
equipment, one can easily read the «underlying» sequence of 1 and 0.
It only requires specialized software and inexpensive hardware to read data
«deleted» this way by analyzing magnetization of hard disk sectors, residual
magnetization of tracksides and/or by using current magnetic microscopes.
Writing to magnetic media leads to subtle effects summarized as follows:
every track of a magnetic disk stores an image of every record ever written to
it, but the effect of such record (magnetic layer) becomes more subtle as
time passes.
A.1 Information Wiping Algorithms Functioning Principles
Physically the complete wiping of information from a hard disk involves the
switching of every elementary magnetic area of the recording material as
many times as possible by writing specially selected sequences of logical 1
and 0 (also known as samples).
Using logical data encoding methods in current hard disks, you can select
samples of symbol (or elementary data bit) sequences to be written to
sectors in order to repeatedly and effectively wipe confidential information.
Algorithms offered by national standards provide (single or triple) recording of
random symbols to disk sectors that are straightforward and arbitrary
Acronis PowerUtilities
57
decision, in general, but still acceptable in simple situations. The most effective
information wiping algorithm based on deep analysis of subtle features of
recording data to all types of hard disks. This knowledge speaks to the necessity
of complex multipass algorithms to guarantee information wiping.
The detailed theory of guaranteed information wiping is described in an
article of Peter Gutmann, please see:
http://www.cs.auckland.ac.nz/~pgut001/pubs/secure_del.html.
A.2 Algorithms Used by Acronis PrivacyExpert
and DriveCleanser
The table below briefly describes information wiping algorithms used by
Acronis PrivacyExpert and DriveCleanser. Each description features the
number of hard disk sector passes along with number(s) written to each
sector byte.
The description of built-in information wiping algorithms
NN
Algorithm
(writing
method)
Passes Record
1.
American: DoD
5220.22-M
4 1
st
pass – randomly selected
symbols to each byte of each sector,
2 – complementary to written during
the 1
st
pass; 3 – random symbols
again; 4 – writing verification.
2.
American:
NAVSO P-5239-
26 (RLL)
4 1
st
pass – 0x01 to all sectors, 2 -
0x27FFFFFF, 3 – random symbol
sequences, 4 – verification.
3.
American:
NAVSO P-5239-
26 (MFM)
4 1
st
pass – 0x01 to all sectors, 2 -
0x7FFFFFFF, 3 – random symbol
sequences, 4 – verification.
4.
German: VSITR 7 1
st
– 6
th
– alternate sequences of:
0x00 and 0xFF; 7
th
- 0xAA; i.e.
0x00, 0xFF, 0x00, 0xFF, 0x00, 0xFF,
0xAA.
58 Appendix A. : Hard Disk Wiping Algorithms
NN
Algorithm
(writing
method)
Passes Record
5.
Russian: GOST
P50739-95
1 Logical zeros (0x00 numbers) to
each byte of each sector for 6
th
to
4
th
security level systems.
Randomly selected symbols
(numbers) to each byte of each
sector for 3
rd
to 1
st
security level
systems.
6.
P. Gutmann’s
algorithm
35 Peter Gutmann’s algorithm is very
sophisticated. It’s based on his
theory of hard disk information
wiping (see
http://www.cs.auckland.ac.nz/
~pgut001/pubs/secure_del.html).
7.
B. Schneier’s
algorithm
7 Bruce Schneier offers seven pass
overwriting algorithm in his Applied
Cryptography book. 1
st
pass – 0xFF,
2
st
pass – 0x00, and then five times
with a cryptographically secure
pseudo-random sequence.
8.
Fast 1 Logical zeros (0x00 numbers) to all
sectors to wipe.
Acronis PowerUtilities
59
59

Hulp nodig? Stel uw vraag in het forum

Spelregels

Misbruik melden

Gebruikershandleiding.com neemt misbruik van zijn services uitermate serieus. U kunt hieronder aangeven waarom deze vraag ongepast is. Wij controleren de vraag en zonodig wordt deze verwijderd.

Product:

Bijvoorbeeld antisemitische inhoud, racistische inhoud, of materiaal dat gewelddadige fysieke handelingen tot gevolg kan hebben.

Bijvoorbeeld een creditcardnummer, een persoonlijk identificatienummer, of een geheim adres. E-mailadressen en volledige namen worden niet als privégegevens beschouwd.

Spelregels forum

Om tot zinvolle vragen te komen hanteren wij de volgende spelregels:

Belangrijk! Als er een antwoord wordt gegeven op uw vraag, dan is het voor de gever van het antwoord nuttig om te weten als u er wel (of niet) mee geholpen bent! Wij vragen u dus ook te reageren op een antwoord.

Belangrijk! Antwoorden worden ook per e-mail naar abonnees gestuurd. Laat uw emailadres achter op deze site, zodat u op de hoogte blijft. U krijgt dan ook andere vragen en antwoorden te zien.

Abonneren

Abonneer u voor het ontvangen van emails voor uw Acronis Power Utilities 2006 bij:


U ontvangt een email met instructies om u voor één of beide opties in te schrijven.


Ontvang uw handleiding per email

Vul uw emailadres in en ontvang de handleiding van Acronis Power Utilities 2006 in de taal/talen: Engels als bijlage per email.

De handleiding is 1,62 mb groot.


U ontvangt de handleiding per email binnen enkele minuten. Als u geen email heeft ontvangen, dan heeft u waarschijnlijk een verkeerd emailadres ingevuld of is uw mailbox te vol. Daarnaast kan het zijn dat uw internetprovider een maximum heeft aan de grootte per email. Omdat hier een handleiding wordt meegestuurd, kan het voorkomen dat de email groter is dan toegestaan bij uw provider.

Stel vragen via chat aan uw handleiding

Stel uw vraag over deze PDF

Andere handleiding(en) van Acronis Power Utilities 2006

Acronis Power Utilities 2006 Gebruiksaanwijzing - Deutsch - 62 pagina's


Uw handleiding is per email verstuurd. Controleer uw email

Als u niet binnen een kwartier uw email met handleiding ontvangen heeft, kan het zijn dat u een verkeerd emailadres heeft ingevuld of dat uw emailprovider een maximum grootte per email heeft ingesteld die kleiner is dan de grootte van de handleiding.

Er is een email naar u verstuurd om uw inschrijving definitief te maken.

Controleer uw email en volg de aanwijzingen op om uw inschrijving definitief te maken

U heeft geen emailadres opgegeven

Als u de handleiding per email wilt ontvangen, vul dan een geldig emailadres in.

Uw vraag is op deze pagina toegevoegd

Wilt u een email ontvangen bij een antwoord en/of nieuwe vragen? Vul dan hier uw emailadres in.


Info