Red lines are for Die Cut and folding reference...
do NOT Print Red Lines.
Thank you for purchasing this quality clock. Please read these instructions carefully
and store them in a safe place for future reference.
Smartlite is a innovated technology that automatically illuminates the display for
easy night time viewing.
FEATURES:
• LCD display
• Crescendo alarm with snooze
• SMARTLITE technology
• Superbright backlight
• Silicon rubber case
• Battery operated - requires 2 x AA batteries (not included)
CHANGING THE BATTERIES
It is recommended that you replace the batteries annually. Only use 2 x AA (1.5V)
Alkaline batteries in this clock. Insert the batteries observing the polarity markings
inside the compartment. Do not mix old and new batteries, different types or
brands. Remove the battery if the clock is stored or not in use. Remove exhausted
batteries from the product.
Warning: Do not recharge non-rechargeable batteries.
Please dispose of used batteries in a responsible manner. For more information
please contact your local authority.
MAINTENANCE
A soft paper towel may be used to clean the clock. Do not use corrosive cleaners
or chemical solutions on the clock. Keep the clock clean and dry to avoid any
problems.
YOUR GUARANTEE
Your clock is guaranteed for 12 months from the date of purchase against any
faults arising from defective materials or manufacture. Damage caused through
careless handling, misuse or in transit is expressly excluded. Should this clock fail
within 12 months please return it in the rst instance to your retailer. If you have
any queries, problems or do not understand any part of these instructions please
contact:
Customer Help Line Locall 0845 1207208 or (01908) 449208
Mon - Fri 9.00am - 4.30pm
email for service: service@acctim.com or visit www.acctim.com
ENVIRONMENTAL PROTECTION
Disposal of electrical and electronic equipment
Do not dispose of this product with household waste. For
the proper treatment, recovery and recycling please take
this product to the appropriate collection point. If you are
unsure of where this is contact your local authority.
Improper disposal may be harmful to the environment.
VIERRA SERIES
SMARTLITE ALARM CLOCK OPERATING INSTRUCTIONS
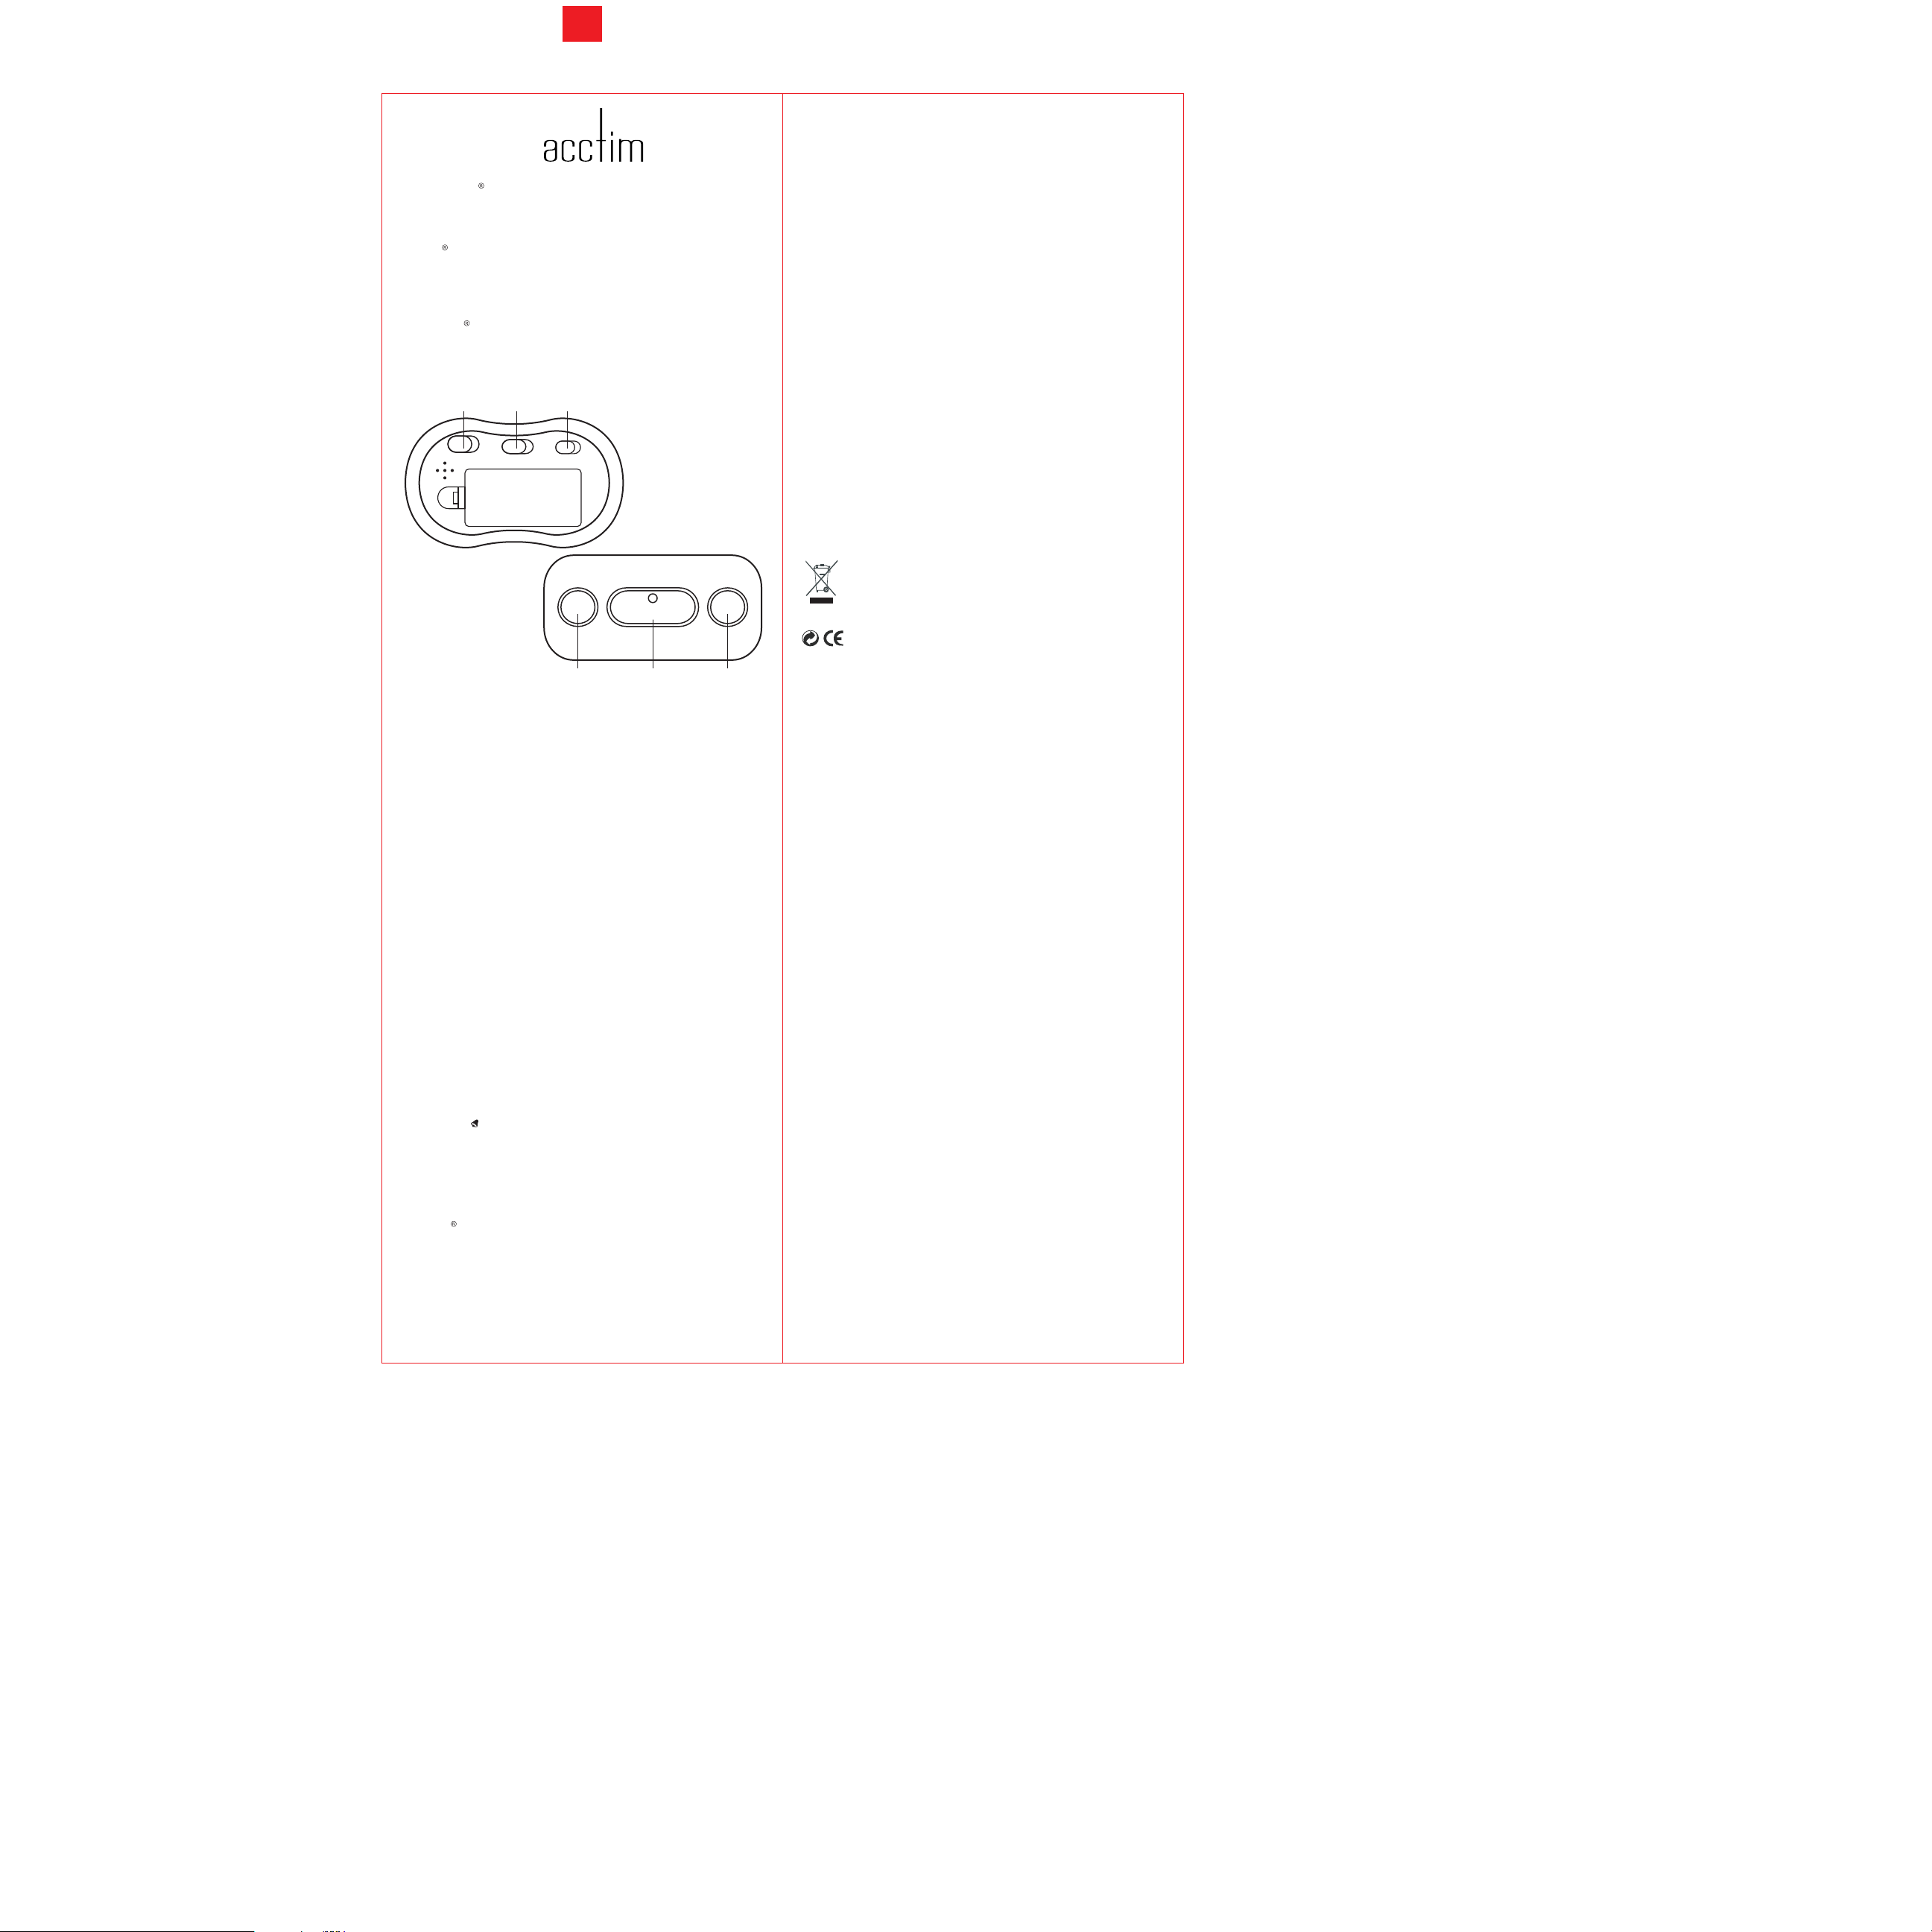
LOCATION OF CONTROLS
1. SNOOZE / LIGHT BUTTON
2. ALARM SET / TIME SET / LOCK SWITCH
3. ALARM ON / OFF SWITCH
4. LIGHT ON / OFF SWITCH
5. HOUR BUTTON
6. MINUTE BUTTON
TO INSTALL AND REPLACE BATTERIES
• Remove the battery cover located at the back of the clock.
• Insert 2 x AA alkaline batteries observing the polarity symbols indicated
inside the compartment.
• Replace the battery cover. See ‘Changing the batteries’ for more details.
TO SET THE TIME
• Slide the ALARM SET/TIME SET/LOCK (2) switch to TIME SET position.
• Press the HOUR button (5) to advance the display to the correct hour.
• Press the MINUTE button (6) to advance the display to the correct minute.
• Be careful to set the time to AM or PM correctly. When PM time is set, letters "PM"
will appear on display.
• Slide the ALARM SET/TIME SET/LOCK (3) switch to LOCK position once the time
setting is complete.
TO SET THE ALARM TIME
• Slide the ALARM SET/TIME SET/LOCK switch(2) to ALARM SET position.
• Press the HOUR button (5) to advance the display to the correct hour.
• Press the MINUTE button (6) to advance the display to the correct minute.
• Be careful to set the time to AM or PM correctly. When PM time is set, letters "PM"
will appear on display.
• Slide the ALARM SET/TIME SET/LOCK (3) switch to LOCK position once the alarm
time setting is complete.
TO TURN THE ALARM ON OR OFF
• Slide the ALARM ON / OFF switch (3) to ON position to activate the alarm.
• The symbol ( ) & ( Zz ) will be visible on the display when the alarm is activated.
The alarm will sound for 60 seconds at the selected time.
• Slide the ALARM SWITCH (4) to "OFF" position to turn the alarm off permanently.
TO USE THE SNOOZE ALARM FEATURE
• When the alarm sounds, press the SNOOZE/LIGHT BUTTON. The alarm will stop
and sound again in 5-8 minutes.
SMARTLITE FEATURE
• Slide the LIGHT ON/OFF switch (4) to the on position.
• In a dark environment or when the LIGHT SENSOR is covered, the smartlite will
automatically turn on. In bright conditions, the smartlite will automatically turn
OFF to prolong battery life.
• To turn off the smartlite slide the LIGHT ON/OFF switch (4) to the off position.
TO USE THE DISPLAY LIGHT
• Press the SNOOZE / LIGHT button (1) to light up the display in the dark.
Note: Frequent use of the light will drain the batteries more quickly.
V.1
OFF ON
ALARM
OFF ON
LIGHT
LOCK TIME ALARM
SET SET
32
516
4
SNOOZE/LIGHT
HOURMIN
BATTERY COMPARTMENT
Hulp nodig? Stel uw vraag in het forum
Misbruik melden
Gebruikershandleiding.com neemt misbruik van zijn services uitermate serieus. U kunt hieronder aangeven waarom deze vraag ongepast is. Wij controleren de vraag en zonodig wordt deze verwijderd.
Product:
Spelregels forum
Om tot zinvolle vragen te komen hanteren wij de volgende spelregels:
lees eerst de handleiding door;
controleer of uw vraag al eerder door iemand anders is gesteld;
probeer uw vraag zo duidelijk mogelijk te stellen;
heeft u een probleem en al geprobeerd om dit op te lossen, vermeld dit erbij aub;
heeft u een oplossing gekregen van een bezoeker dan horen wij dat graag in dit forum;
wilt u een reactie geven op een vraag of antwoord, gebruik dan niet dit formulier maar klik op de knop 'reageer op deze vraag';
uw vraag wordt direct op de website gezet; vermijd daarom persoonlijke gegevens in te vullen;
Belangrijk! Als er een antwoord wordt gegeven op uw vraag, dan is het voor de gever van het antwoord nuttig om te weten als u er wel (of niet) mee geholpen bent! Wij vragen u dus ook te reageren op een antwoord.
Belangrijk! Antwoorden worden ook per e-mail naar abonnees gestuurd. Laat uw emailadres achter op deze site, zodat u op de hoogte blijft. U krijgt dan ook andere vragen en antwoorden te zien.
Abonneren
Abonneer u voor het ontvangen van emails voor uw Acctim Vierra Alarm Clock bij:
nieuwe vragen en antwoorden
nieuwe handleidingen
U ontvangt een email met instructies om u voor één of beide opties in te schrijven.
Ontvang uw handleiding per email
Vul uw emailadres in en ontvang de handleiding van Acctim Vierra Alarm Clock in de taal/talen: Engels als bijlage per email.
De handleiding is 0.26 mb groot.
U ontvangt de handleiding per email binnen enkele minuten. Als u geen email heeft ontvangen, dan heeft u waarschijnlijk een verkeerd emailadres ingevuld of is uw mailbox te vol. Daarnaast kan het zijn dat uw internetprovider een maximum heeft aan de grootte per email. Omdat hier een handleiding wordt meegestuurd, kan het voorkomen dat de email groter is dan toegestaan bij uw provider.
Stel vragen via chat aan uw handleiding
Stel uw vraag over deze PDF
Uw handleiding is per email verstuurd. Controleer uw email
Als u niet binnen een kwartier uw email met handleiding ontvangen heeft, kan het zijn dat u een verkeerd emailadres heeft ingevuld of dat uw emailprovider een maximum grootte per email heeft ingesteld die kleiner is dan de grootte van de handleiding.
Er is een email naar u verstuurd om uw inschrijving definitief te maken.
Controleer uw email en volg de aanwijzingen op om uw inschrijving definitief te maken
U heeft geen emailadres opgegeven
Als u de handleiding per email wilt ontvangen, vul dan een geldig emailadres in.
Uw vraag is op deze pagina toegevoegd
Wilt u een email ontvangen bij een antwoord en/of nieuwe vragen? Vul dan hier uw emailadres in.