–For Ethernet networks that supply inline power to the phone (IEEE 802.3af) use an Ethernet cable to connect from
the phone directly to the network for power (no 48V AC power adapter required if using Power-over-Ethernet
[PoE])
–For Ethernet networks that DO NOT supply power to the phone:
Use only the GlobTek Inc. Limited Power Source [LPS] adapter model no. GT-41080-1848(sold separately) to con-
nect from the DC power port on the phone to a power source
or
–Use a PoE power injector or a PoE switch
Installation and Setup
If your System Administrator has not already setup your 6867i phone, please refer to the Aastra 6867i Installation Guide
for basic installation and physical setup information. For more advanced administration and configuration information,
System Administrators should refer to the Aastra SIP IP Phones Administrator Guide.
41-001524-00 REV00 – 04.20143
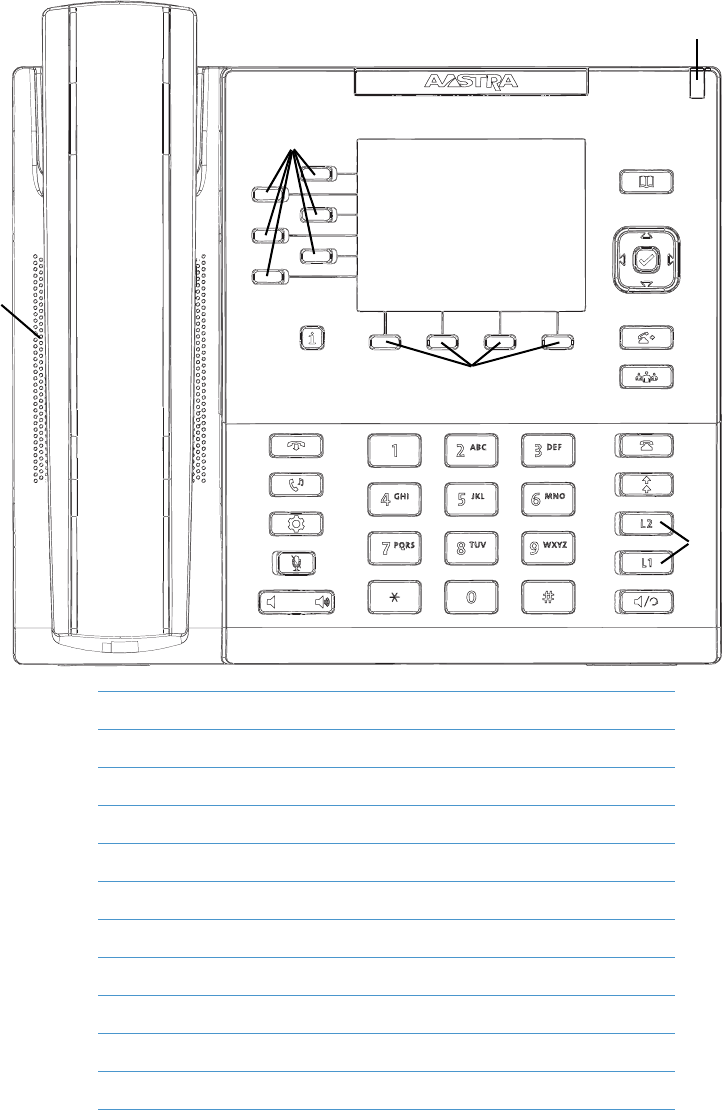
IP Phone Keys
Key Panel
The following sections describe the various 6867i phone key functions and how they can help you make and manage your
calls and caller information.
6867i Handset
Line/Call Appearance Keys
High Quality Speakerphone
Speaker/Headset Key
Message Waiting Indicator
Directory Key
Goodbye Key
Navigation Keys/Select Button
Hold Key
Transfer Key
Options Key
Conference Key
Mute Key
Presence Key
Volume Control
Programmable Softkeys
Dialpad
Context-Sensitive Softkeys
Callers List Key
TFT LCD Screen
Redial Key
IP Phone Keys
441-001524-00 REV00 – 04.2014
Key Description
The following table describes the keys on the 6867i:
KeyDescription
Goodbye Key - Ends an active call. The Goodbye key also exits an open list, such as the Options List, without saving
changes.
Hold Key - Places an active call on hold. To retrieve a held call, press the Hold key again or press the Pickup softkey
offered on the display.
For more information, see “Placing a Call on Hold” on page 110.
Options Key - Accesses services and options to customize your phone. Your System Administrator may have already cus-
tomized some of your settings. Check with your System Administrator before changing any Administrator-only options.
For more information, see “Phone Options via the IP Phone UI” on page 17.
Mute Key - Mutes the microphone so that your caller cannot hear you (the light indicator flashes when the microphone
is on mute).
For more information, see “Mute” on page 108.
Volume Controls - Adjusts the volume for the handset, ringer, and handsfree speakerphone.
Callers List Key - Accesses a list of the last 200 calls received.
For more information, see “Callers List” on page 130.
Redial Key - Accesses a list of the last 100 previously dialed numbers. Pressing the Redial key twice redials the last dialed
number.
For more information, see “Redial” on page 105.
Line/Call Appearance Keys - Connects you to a line or call. The Aastra 6867i IP phone has two default Line keys, each
with LED indicator lights.
For more information, see “Line and Call Appearances” on page55.
Speaker/Headset Key - Transfers the active call to the speaker or headset, allowing handsfree use of the phone.
For more information, see “Using Handsfree Speakerphone” on page 103.
Directory Key - Accesses a directory of names and phone numbers (stored in alphabetical order).
For more information, see “Directory” on page 122.
Navigation Keys/Select Button - Multi-directional navigation keys allow you to navigate through the phone’s user
interface. Pressing the center Select button selects/sets options and performs various actions (such as dialing out when
in the Directory, Callers, and Redial Lists).
For more information, see “UI Navigation” on page 15.
Transfer Key - Transfers the active call to another number.
For more information, see “Transferring Calls” on page 111.
IP Phone Keys
41-001524-00 REV00 – 04.20145
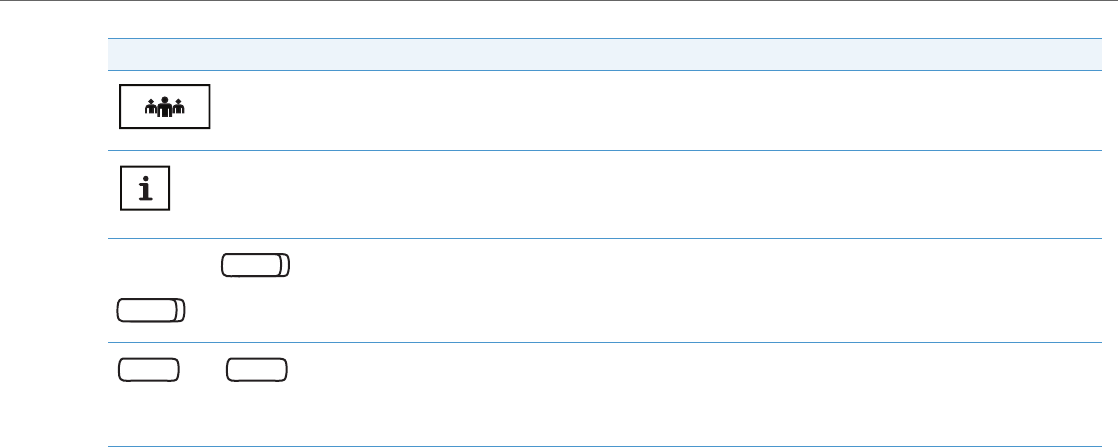
Conference Key - Begins a conference call with the active call.
For more information, see “Conferencing Calls” on page 116.
Presence Key - Accesses the partial and full contact presence information screens, which provide more detailed infor-
mation about the selected contact.
For more information see “Presence Key” on page 56.
Left Softkeys - 6 programmable keys that allow you to easily perform up to 20 specific functions and access enhanced
services provided by third parties (e.g. XML applications).
For more information see “Configuring Softkeys” on page 57.
Bottom Softkeys - 4 programmable keys that support up to 18 functions. These keys also act as state-based keys allow-
ing you to easily perform context-sensitive functions during specific states (i.e. when the phone is an idle, connected,
incoming, outgoing, or busy state).
For more information see “Configuring Softkeys” on page 57.
KeyDescription
IP Phone Keys
641-001524-00 REV00 – 04.2014
Dialpad Keys
The 6867i has a dialpad with digits from 0 through 9, a * key, and a # key. Keys 2 through 9 contain the letters of the
alphabet. The 6867i phone dialpad includes the following:
The * is called the star key. The # is called the number sign, pound key, or hash key, depending on one's nationality or
personal preference. These can be used for special functions such as accessing voicemail. The star key and pound key
functions are dependant on your country’s feature availability. Contact your System Administrator for more information
about available functions using these keys.
These dialpad keys can be used for any of the following on the phone:
•Dial a phone number to make a call (see “Dialing a Number” on page 102)
•Enter digits or letters in the IP phone user interface
•Program a speed dial number (see “Speed Dial Key” on page 62)
•Press a speed dial key (see “Speed Dial Key” on page 62)
•Press the keys associated with a called Interactive Voice Response (IVR) system
Dialpad KeyDescription
0Dials 0
Dials the Operator on a registered phone
1Dials 1
2 ABCDials 2
When entering text, this key enters A with one press, B with two presses, and C with three presses
3 DEFDials 3
When entering text, this key enters D with one press, E with two presses, and F with three presses
4 GHIDials 4
When entering text, this key enters G with one press, H with two presses, and I with three presses
5 JKLDials 5
When entering text, this key enters J with one press, K with two presses, and L with three presses
6 MNODials 6
When entering text, this key enters M with one press, N with two presses, and O with three presses
7 P QRSDials 7
When entering text, this key enters P with one press, Q with two presses, R with three presses, and S with four presses.
8 TUVDials 8
When entering text, this key enters T with one press, U with two presses, and V with three presses
9 WXYZDials 9
When entering text, this key enters W with one press, X with two presses, Y with three presses, and Z with four presses.
41-001524-00 REV00 – 04.20147
Getting Started
The 6867i must be set up and be configured prior to its first use. This section describes phone behavior and start up
screens you may see when the phone is first plugged in, or when it is restarted.
Plugging in and Starting the Phone
The 6867i automatically begins the start up sequence as soon as it is connected. The phone goes through this process the
first time you plug in your phone and every time you restart your phone.
The phone displays the following startup screens.
The 6867i phone then checks settings and looks for new configuration and firmware updates from a configuration server.
This may take a few moments while the phone downloads the latest updates.
Note:
New updates to your phone can be automatically scheduled from the server. This is set up on the phone system by your
System Administrator and should be scheduled during non-business hours or slow call periods.
Getting Started
841-001524-00 REV00 – 04.2014
If language packs were loaded to your phone by your System Administrator, the following screen displays during startup.
When the configuration update is complete, the phone displays the following screens and then displays the
Home
screen.
Important!
Do not unplug or remove power to the phone while it is checking or installing firmware and configuration information.
Getting Started
41-001524-00 REV00 – 04.20149
Network Connected/Network Disconnected
If your phone successfully connects to the network the phone will go directly to the Home screen.
If your phone did not successfully connect to the network, the Network Disconnected prompt appears on the display
and the telephone status light turns on.
Check that the cables are tightly connected to the phone and to the wall jack. The phone should automatically detect
when it is reconnected and remove the Network Disconnected prompt from the screen. However, if changes have been
made to your phone’s network settings, you may need to restart your phone. Check with your System or Network Admin-
istrator for assistance.
For more information about connecting your phone, see the Aastra 6867i IP Phone Installation Guide.
Note:
If the phone displays a No Service status message you can still use the phone but note that it is not registered with the
Registrar. For more information about registering your phone, contact your System Administrator.
Getting Started
1041-001524-00 REV00 – 04.2014
UI Overview
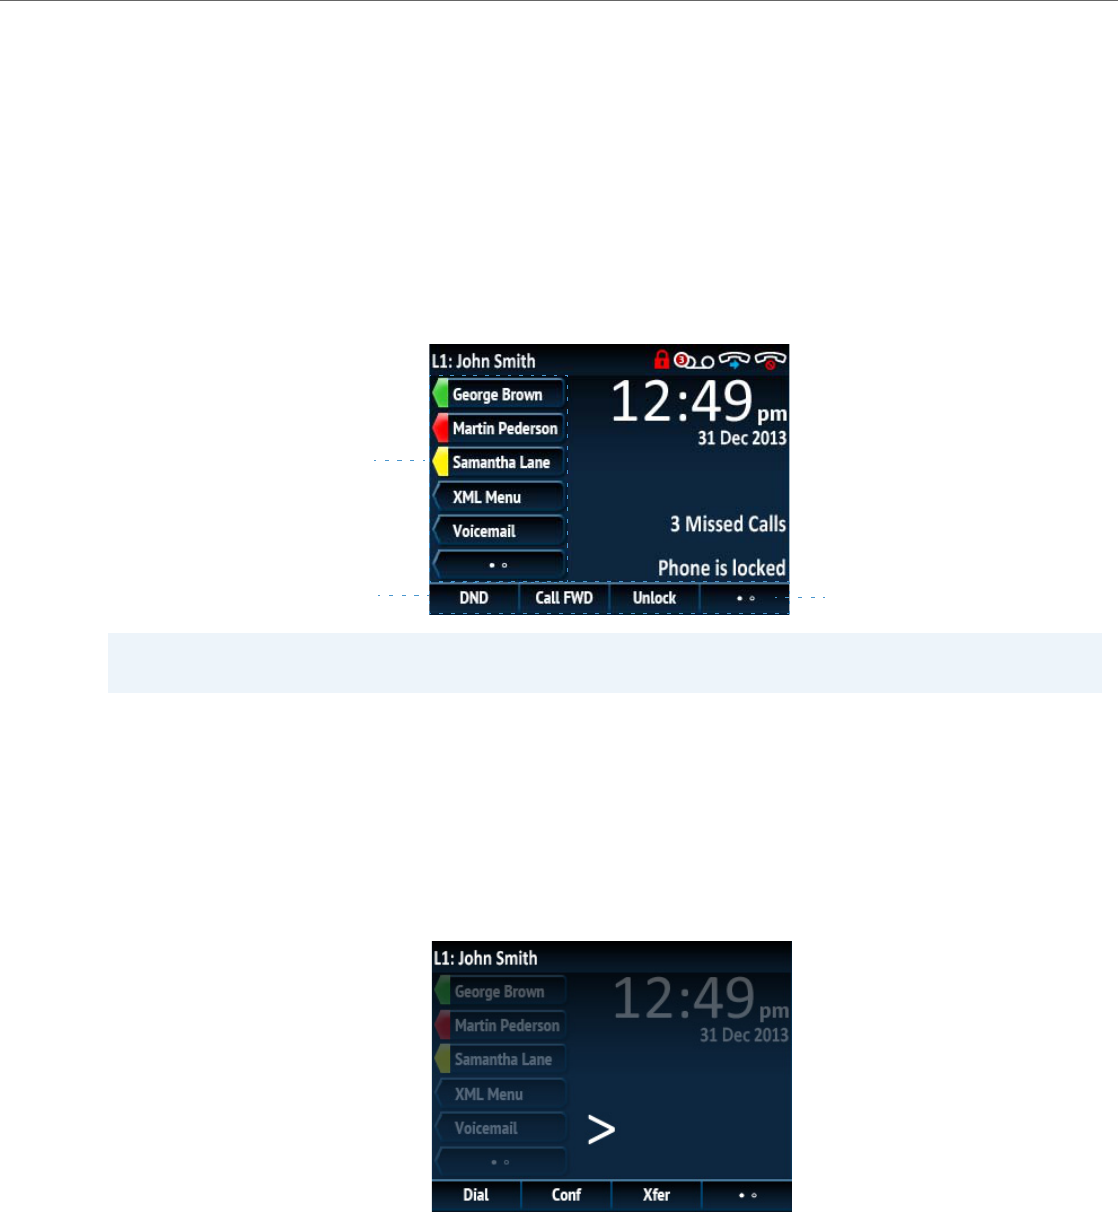
Home Screen
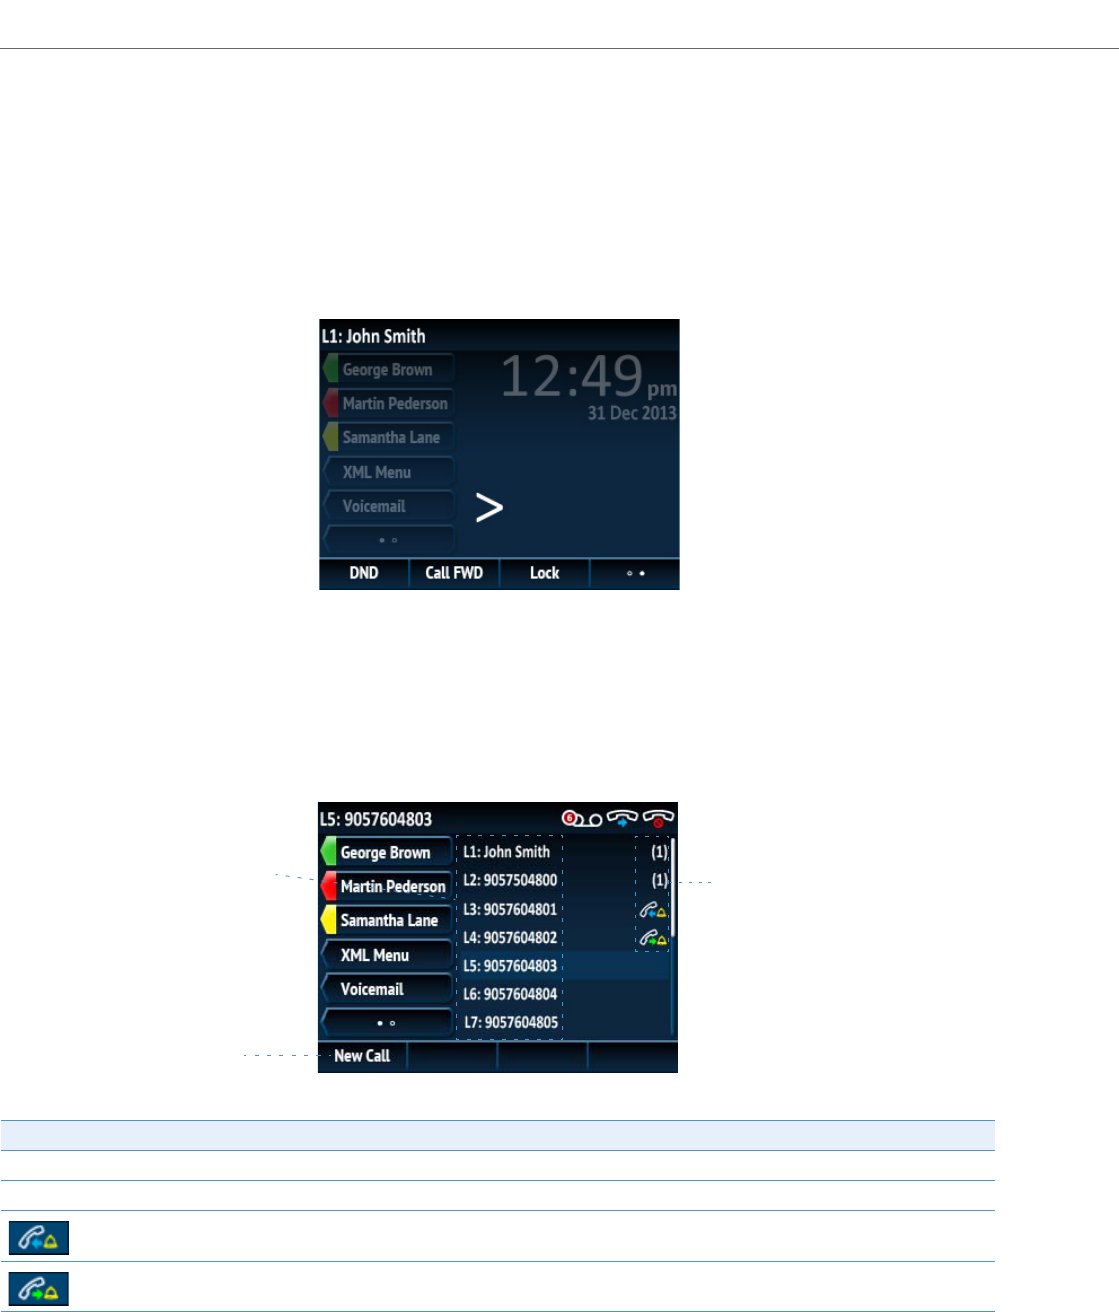
When the phone has successfully updated the configuration and connected to the network, the phone displays the
Home screen. The Home screen displays the current line, your name (SIP screen name), the date and time, and various
important status messages. It is the default screen displayed when the phone is in an idle state.
Phone/Line Status Indicators and Messages
There are icons that display on the phone to indicate the status of the phone and/or the status of the line. These icons
display on the upper right corner of the Home screen.
The following table identifies and describes the phone/line status indicators on the Home screen.
Note:
Your System Administrator should have configured your SIP screen name, line number, and any other administrative
features required. If your name does not display on the screen, contact your System Administrator.
IconDescription
Phone Locked - The lock icon displays on the Home screen indicating that the phone is in a locked state preventing the phone from
being used and preventing any changes from being made to the phone.
Voicemail - The voicemail icon displays on the Home screen only if you have new messages waiting. The number in the red circle
indicates how many new messages you have. To access your voicemail messages, use the star codes for your system if a voicemail
softkey has not been configured on your phone. For more information on your system’s star codes, please refer to the documentation
for the voicemail system you are using.
Do Not Disturb - The Do Not Disturb (DND) icon displays on the Home screen when the DND feature is enabled. When DND is enabled,
callers calling into the phone hear a busy signal or a message, depending on the configuration.
Call Forward - The Call Forward icon displays on the Home screen when the Call Forward feature is enabled. When Call Forward is ena-
bled, incoming phone calls are automatically forwarded to a defined number when your phone is in a busy state and/or when the call is
not answered after a specified number of rings.
Date and Time
Line and Name
Status indicators
Status Messages
Getting Started
41-001524-00 REV00 – 04.201411
In addition to the phone/line status indicators, status messages with regards to the following are displayed on the Home
screen when the situation arises:
•Number of missed calls
•Phone lock status
•SCA Caller IDs
•XML-related text
•Network status
Softkeys
6 left softkeys and 4 bottom softkeys are always displayed on the Home screen. You can configure the left softkeys with up
to 20 functions and configure the bottom softkeys with up to 18 functions as required.
If you or your Administrator have configured softkey functions on your phone, the labels for those functions display on the
screen. For example, in the illustration above XML Menu and Voicemail were configured as XML and speed dial keys
respectively and the remaining three left softkeys were configured as Busy Lamp Field (BLF) keys. The bottom set of
softkeys were configured as DND (Do Not Disturb), Call FWD (Call Forward), and Lock/Unlock respectively.
A More softkey as indicated by dots is also displayed at the bottom right of the screen if you have configured more
softkeys than can be displayed at one time. These dots indicate the number of softkey pages and its relative position.
Off-Hook and Dialing Screen
When you pickup the handset on the Home screen, the screen displays as follows:
Note:
For more information about configuring the left and bottom softkeys, see “Configuring Softkeys” on page 57.
More Softkey
Bottom Softkeys
Left Softkeys
Getting Started
1241-001524-00 REV00 – 04.2014
This screen displays the following bottom keys:
•Dial
•Conf (Conference)
•Xfer (Transfer)
These keys are context-sensitive and cannot be changed.
The More softkey is also displayed if you have any configured bottom softkeys. For example, in the previous figure, the
6867i has three softkeys configured that are viewable on the next softkey “page”. Pressing the More softkey toggles
between the first and second “pages” to display all the rest of the configured softkeys (as per the figure below).
Line Selection Screen
The Line Selection screen displays a list of the lines that are available on the phone as well as line usage indicators that
tell you whether or not a line is in use.
It also allows you to easily select a line to act upon. When a line is not in use, a New Call key is available allowing you to
dial out using the selected line. If the line is in use with a call on hold, a Pickup key is available allowing you to pick up
the call on hold on the respective line.
The following table identifies and describes the line usage indicators on the Line Selection screen.
Indicator/IconDescription
N/ANo icon denotes that no calls are associated with the line and the line is available to be used.
#A number denotes how many call appearances are being utilized on the respective line.
Indicates a call is incoming on the respective line.
Indicates a call is outgoing on the respective line.
Line Usage
Indicators
Available Lines
New Call/
Pickup Key
Getting Started
41-001524-00 REV00 – 04.201413
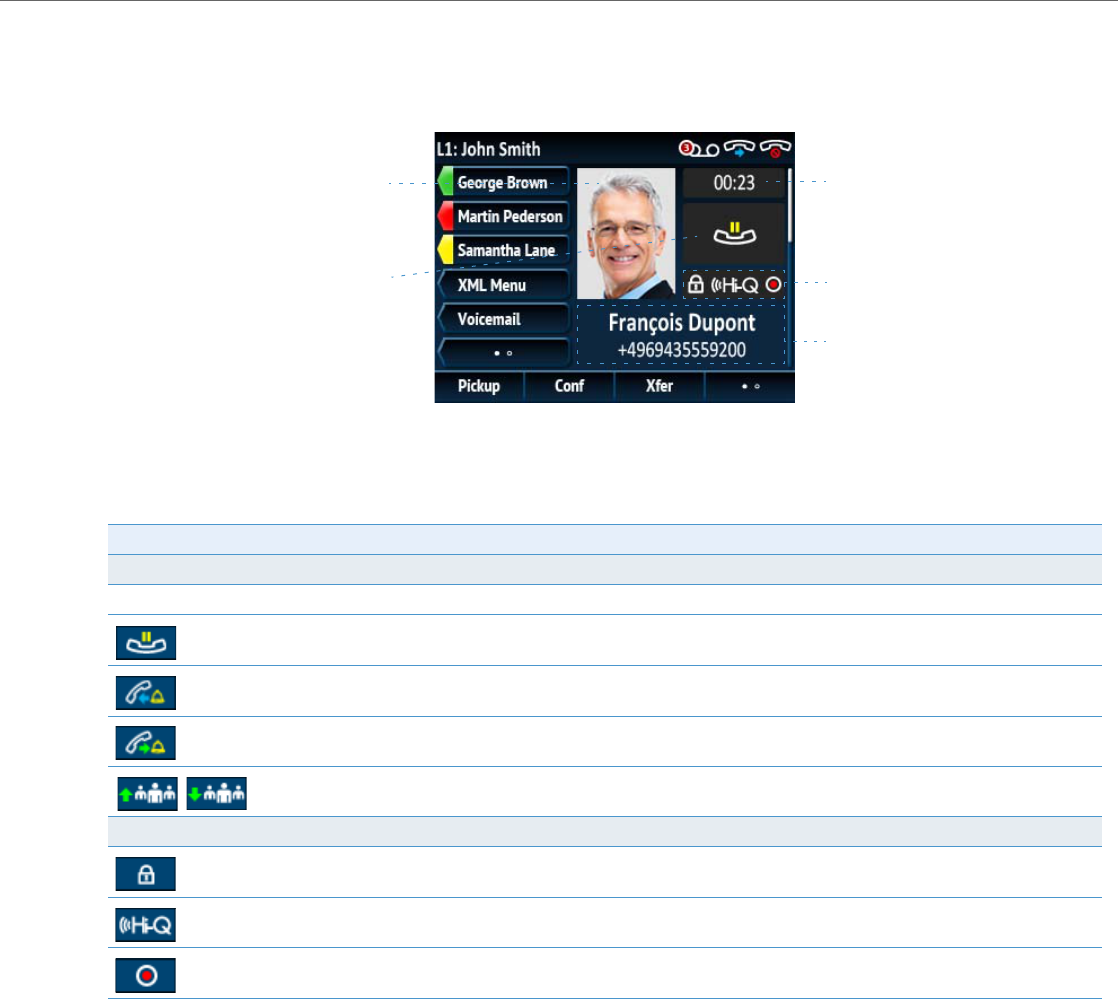
Detailed-View Call Screen
The Detailed-View Call screen brings into focus all the information available for a specific call. It is the default screen dis-
played for all active point-to-point calls.
The Detailed-View Call screen encompasses the picture ID of the remote party (if available), a call timer indicating the
duration of the call in focus (in minutes and seconds), the caller ID (name and number), and call status and feature indica-
tors.
The following table identifies and describes the call status and call feature indicators on the Detailed-View Call screen.
Indicator/IconDescription
Call Status Indicators
N/ANo icon denotes that he call is connected and in progress.
Indicates the call is on hold.
Indicates the call is an incoming call.
Indicates the call is an outgoing call.
Indicates the party is a conference call participant. The direction of the arrow denotes where the other conference call par-
ticipant is in the list of calls.
Call Feature Indicators
Indicates the call is secured using TLS/SRTP encryption.
Indicates the call is using Aastra Hi-Q™ audio.
Indicates active VoIP recording is enabled and the call is being recorded.
Call Timer
Call Feature
Indicators
Caller ID
Picture ID
Call Status
Indicators
Getting Started
1441-001524-00 REV00 – 04.2014
Multi-View Call Screen
The Multi-View Call screen allows you to manage your calls more efficiently when you have more than one call in
progress. It is particularly useful in transfer and conference scenarios. All pertinent information from the Detailed-View
Call screen is also available on the Multi-View Call screen but information for two remote parties can be seen simultane-
ously.
The following table identifies and describes the call status and call feature indicators on the Multi-View Call screen.
Indicator/IconDescription
Call Status Indicators
N/ANo icon denotes that he call is connected and in progress.
Indicates the call is on hold.
Indicates the call is an incoming call.
Indicates the call is an outgoing call.
Indicates the party is a conference call participant. The direction of the arrow (if applicable) denotes where the other confer-
ence call participant is in the list of calls.
Call Feature Indicators
Indicates the call is secured using TLS/SRTP encryption.
Indicates the call is using Aastra Hi-Q™ audio.
Indicates active VoIP recording is enabled and the call is being recorded.
Call Timer
Call Status
Indicators
Call Feature
Indicators
Caller ID
Getting Started
41-001524-00 REV00 – 04.201415
UI Navigation
UI navigation is easily performed using the navigation keys located to the right of the LCD screen.
The
3 and 4 navigation keys are used to switch to the different screens and the 5 and 2 keys are used to highlight and
scroll through the different lines/calls on the respective screen. Pressing the center
button selects/sets options and
performs various actions (such as dialing out when in the DIrectory, Callers, and Redial Lists).
Navigation Keys/
Select Button
Getting Started
1641-001524-00 REV00 – 04.2014
The figure below provides a visual representation of the different screens and the UI behavior when a navigation key is pressed.
Note:
The Detailed-View Call screen is only accessible when at least one call is in a ringing or connected state. Moreover, the Multi-View Call screen is only accessible when
more than one call is a ringing or connected state.
Home Screen
Line Selection Screen
Multi-View Call ScreenDetailed-View Call Screen
Press Right
Press Left
Press Right
Press Left
Press Right
Press Left
Press Up
Press Down
Press Up
Press Down
Press Up
Press Down
Press Right
Press Left
Press Right
Press Left
Press Right
Press Left
41-001524-00 REV00 – 04.201417
Methods of Customizing Your Phone
There are two ways to customize specific options on your phone:
•Using the Options key on the IP phone
•Using the Aastra Web UI in an Internet browser window from your PC
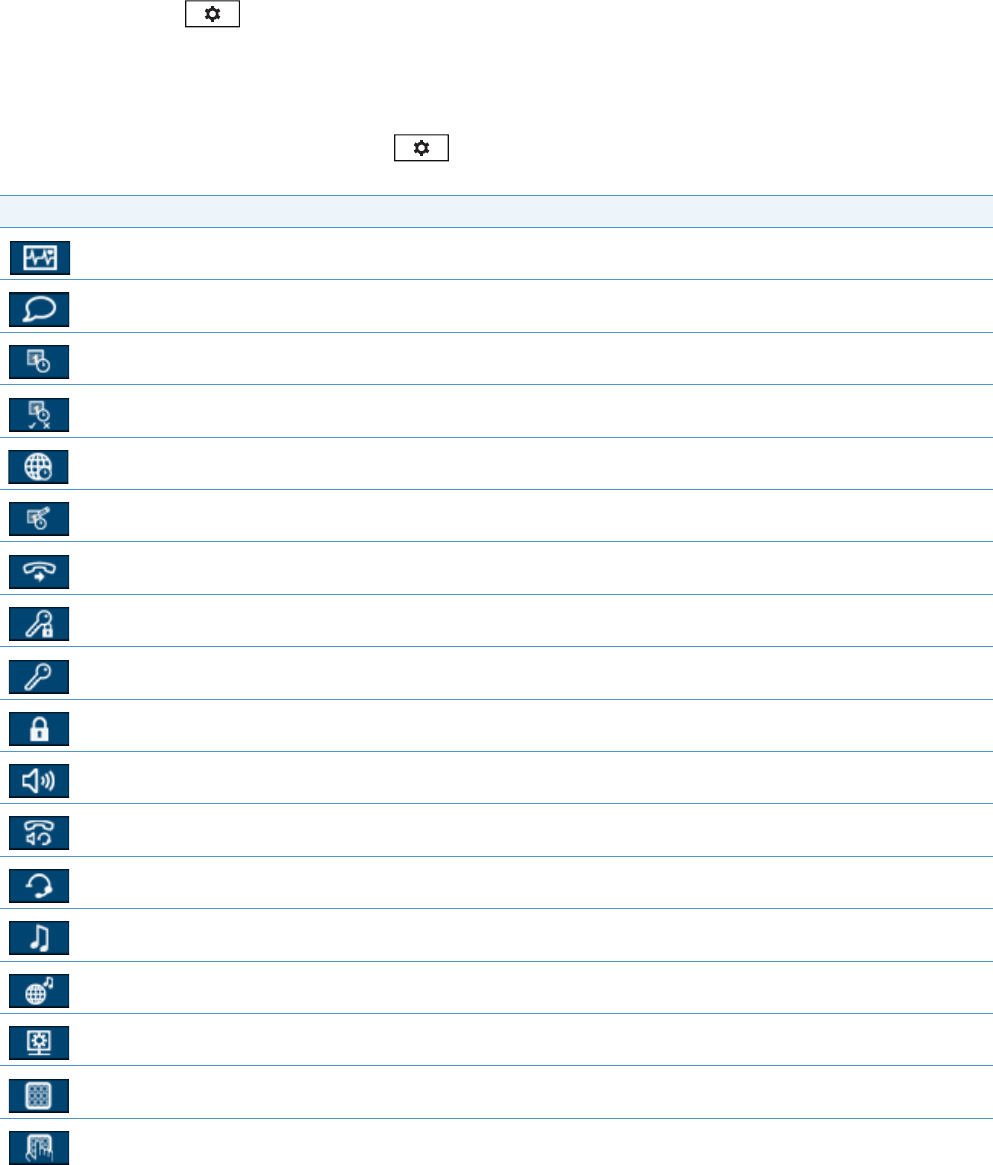
Phone Options via the IP Phone UI
You can customize your phone by pressing the key and accessing the IP phone UI. These options allow you to cus-
tomize the following phone settings:
IconOption
Status
Language
Time and Date
•Settings
•Time Zone
•Set Date and Time
Call Forward
Lock
•Password
•Phone Lock
Audio
•Audio Mode
•Headset
•Ring Tones
•Tone Set
Display
Dialpad
•Live Dialpad
Methods of Customizing Your Phone
1841-001524-00 REV00 – 04.2014
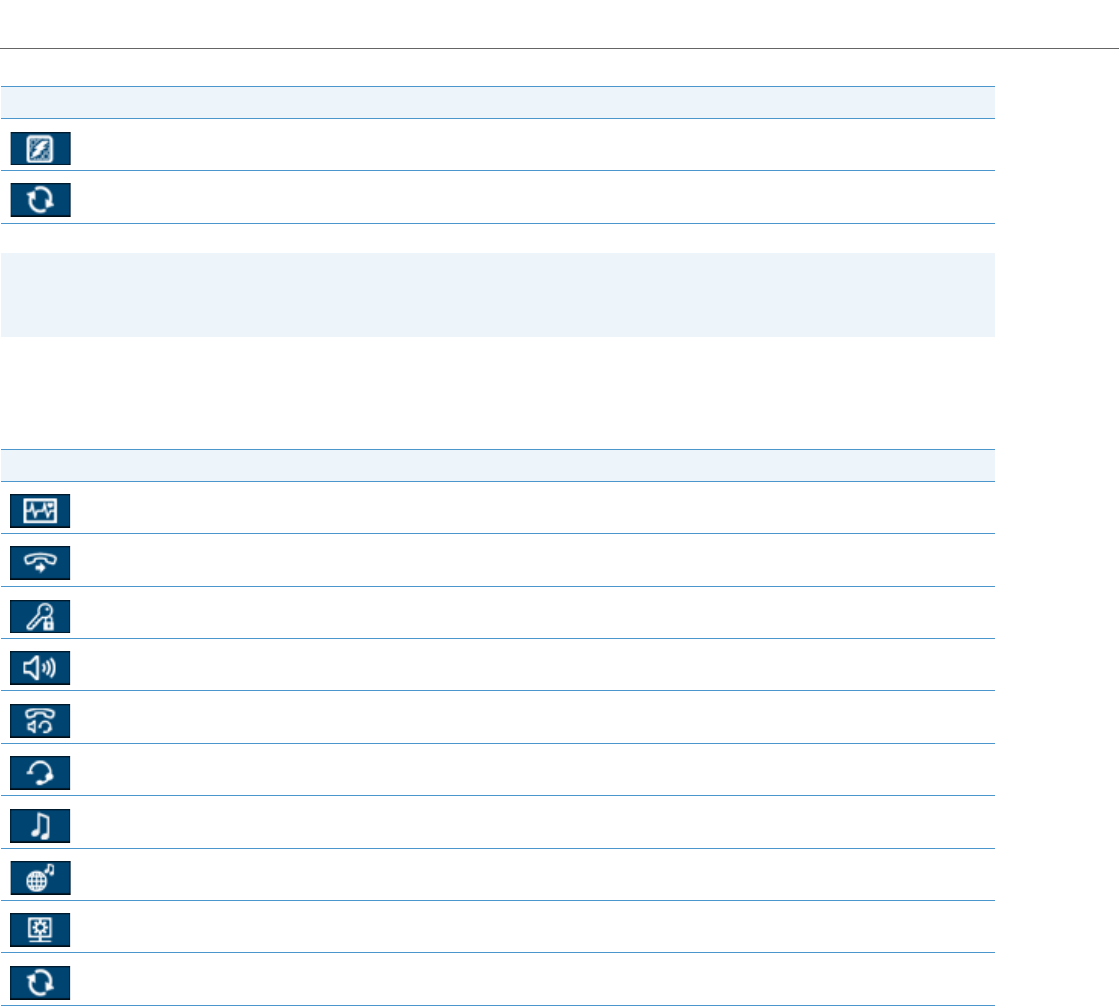
Simplified Options List
Your System Administrator may configure a simplified Options List for your phone. The following table indicates the
options that may appear on your phone if the simplified Options List is applied.
•Speed Dial Edit
Restart
Note:
The Advanced options are Administrator-level functions only, and are not accessible by the user. These options should
only be set up and changed by your System Administrator.
IconOption
Status
Call Forward
Lock
Audio
•Audio Mode
•Headset
•Ring Tones
•Tone Set
Display
Restart
IconOption
Methods of Customizing Your Phone
41-001524-00 REV00 – 04.201419
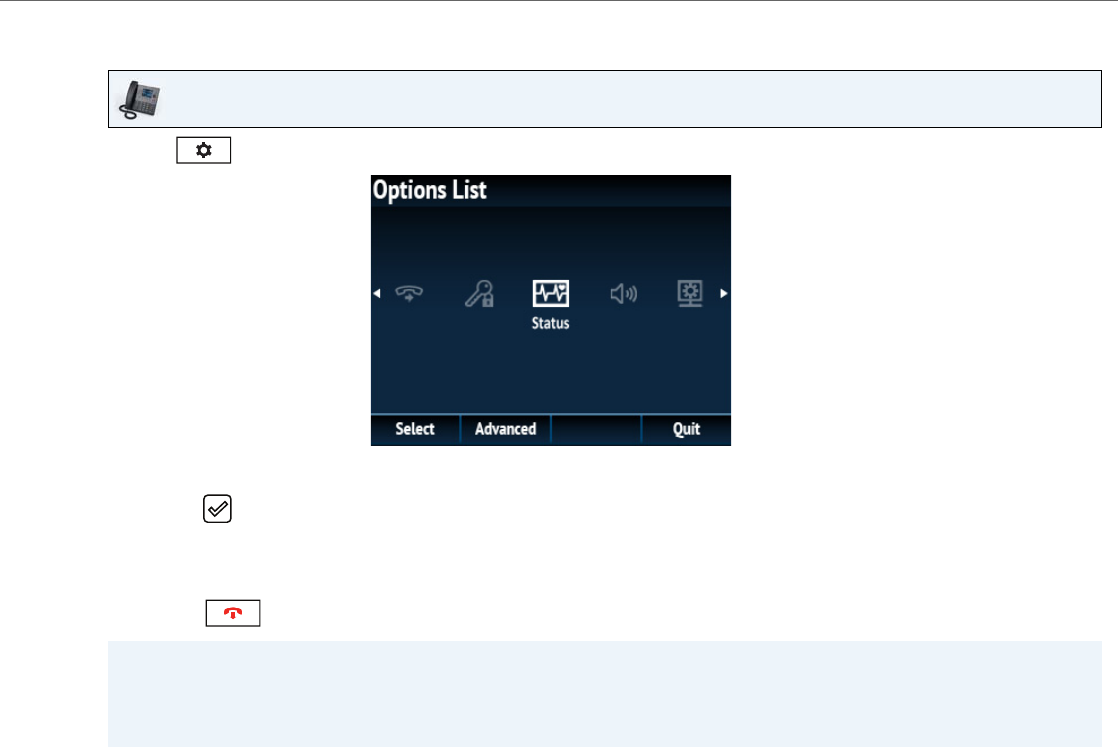
Using the IP Phone UI
IP Phone UI
1.Press on the phone to enter the Options List.
2.To go to an option, use 3 and 4 to navigate to the main option and 5 and 2 to scroll through the sub options.
3.Press the button or Select softkey to select an option.
4.Use the navigation keys, dialpad keys, and softkeys that display for each option to make any desired changes.
5.Press the Save softkey to save your changes.
6.Press the button or the Cancel softkey at any time to exit without saving changes.
Notes:
•For more information about customizing your phone using the available options from the IP phone UI, see “Custom-
izing Your Phone” on page 28.
•For more information about Advanced options, contact your System Administrator.
Methods of Customizing Your Phone
2041-001524-00 REV00 – 04.2014
Phone Options via the Aastra Web UI
In addition to the IP phone UI options, you can customize options on the IP phone using the Aastra Web UI. In order to
access your phone using the Aastra Web UI, you need to know your phone’s IP address. To find your phone’s IP address,
see “Finding Your Phone’s IP Address” on page 25.
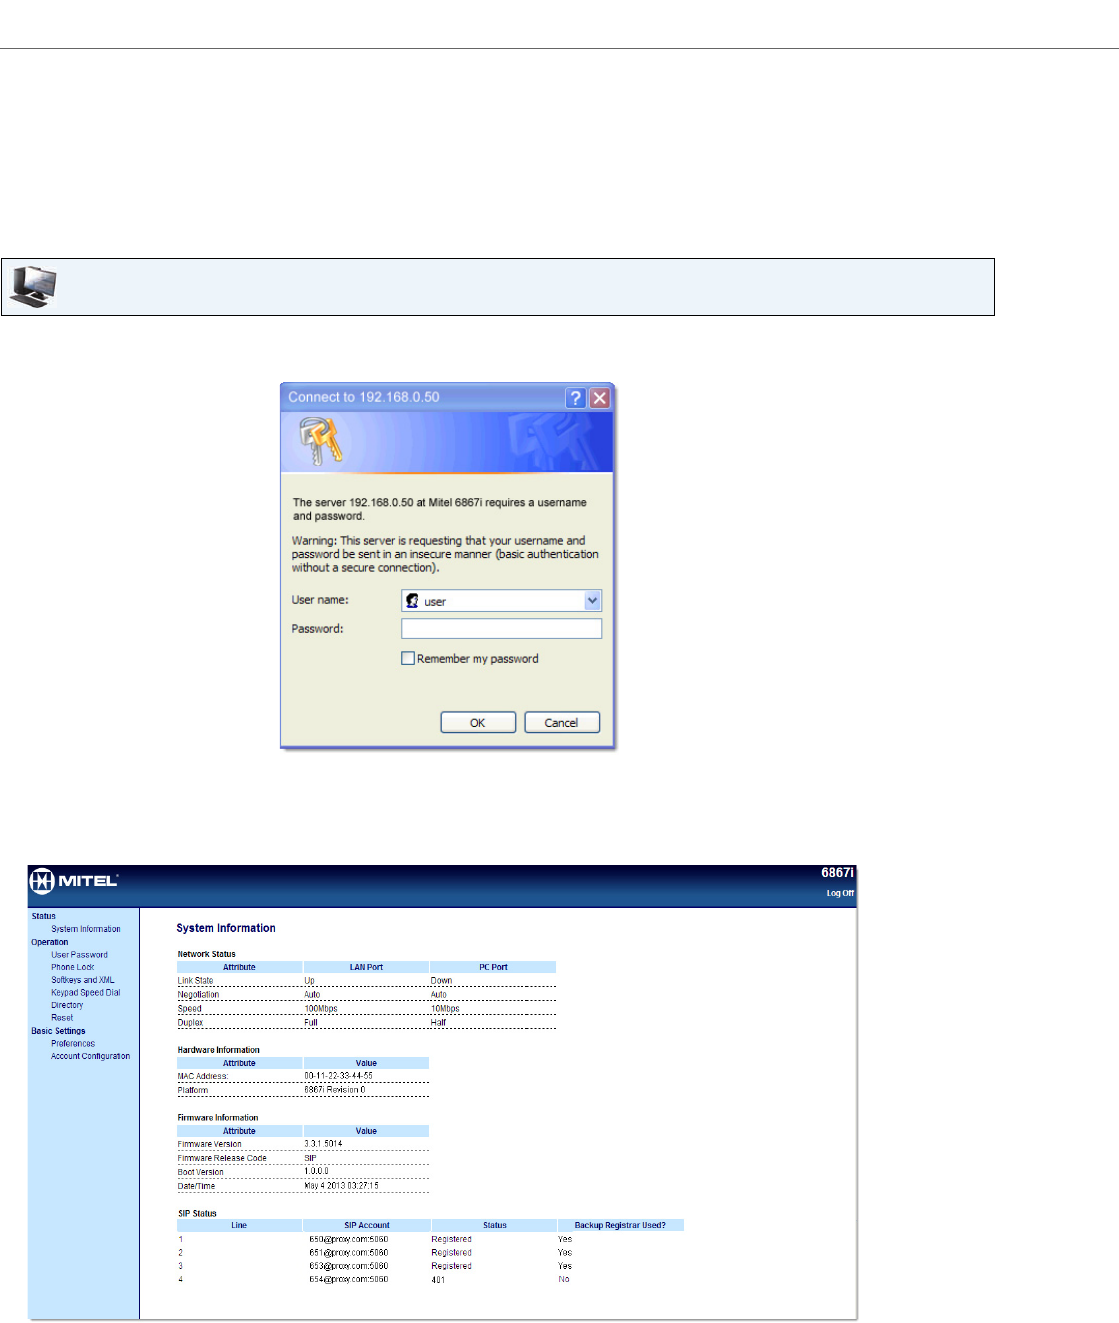
Using the Aastra Web UI
Aastra Web UI
1.Open your web browser, enter the phone’s IP address or host name into the address field and press Enter.
The following logon screen displays.
2.At the prompt, enter your username and password and click OK.
The Status window displays for the IP phone you are accessing.
Note:
For a user, the default username is “user” and the password field is left blank.
3.You can logout of the Aastra Web UI at any time by clicking Log Off.
Methods of Customizing Your Phone
41-001524-00 REV00 – 04.201421
The following categories display in the side menu of the Aastra Web UI: Status, Operation, and Basic Settings.
CategoryDescription
StatusThe Status section displays the network status and the MAC address of the IP phone. It also displays hardware and firmware infor-
mation regarding the IP phone, and information about the SIP account(s) currently configured on the phone. The information in
the Status window is read-only.
OperationUser Password - Allows you to change the user password.
Phone Lock - Allows you to assign an emergency dial plan to the phone, lock the phone to prevent any changes to the phone and
to prevent use of the phone, as well as reset the user password.
Softkeys and XML - Allows you to configure up to 6 left softkeys and 4 bottom softkeys with functions identified in the list below.
Available functions for softkeys:
Keypad Speed Dial - Allows you to assign a speed dial number to a specific digit on the phone’s keypad/dialpad for speed dialing
purposes.
Expansion Module - Allows you to configure an additional 16 softkeys with a M680i Expansion Module if it is attached to the
phone. This option displays on the side menu of the Aastra Web UI only if an Expansion Module is attached. Not all functions in the
table above apply to the expansion modules.
Directory - Allows you to copy the Callers List and Directory from your IP phone to your PC.
Reset - Allows you to restart the IP phone when required.
•None•Call Forward
•Line•BLF/Xfer
•Speed Dial•Speed Dial/Xfer
•Do Not Disturb (DND)•Speed Dial/Conf
•Busy Lamp Field (BLF)•Directory
•BLF/List•Callers List
•Auto Call Distribution (ACD)•Redial
•Extensible Markup Language (XML)•Conference
•Flash•Transfer
•Sprecode•Intercom (Icom)
•Park•Phone Lock
•Pickup•Paging
•Last Call Return•Empty
Methods of Customizing Your Phone
2241-001524-00 REV00 – 04.2014
Basic SettingsPreferences - Allows you to enable/disable the following:
•Display DTMF Digits
•Play Call Waiting Tone
•Stuttered Dial Tone
•XML Beep Support
•Status Scroll Delay (seconds)
•Switch UI Focus to Ringing Line
•Call Hold Reminder During Active Calls
•Call Hold Reminder
•Call Waiting Tone Period
•Goodbye Key Cancels Incoming Call
•Message Waiting Indicator Line
•DND Key Mode
•Call Forward Key Mode
This category also allows you to configure:
•Incoming Intercom Call Settings
•Group Paging RTP Settings
•Ring Tones (global and per-line basis)
•Time and Date Settings
•Language Settings
Account Configuration - Allows you to configure DND and Call Forward by account. You can have multiple accounts on the 6867i.
CategoryDescription
41-001524-00 REV00 – 04.201423
Phone Status
You can view the status of your phone using the IP phone UI or the Aastra Web UI.
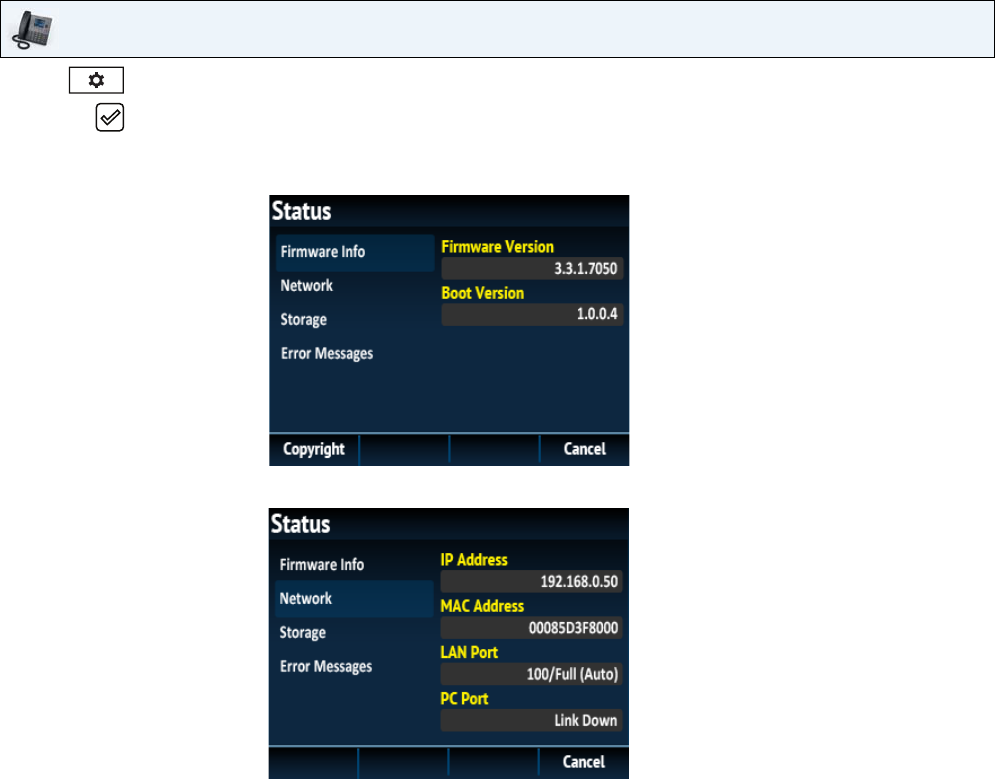
Phone Status via IP Phone UI
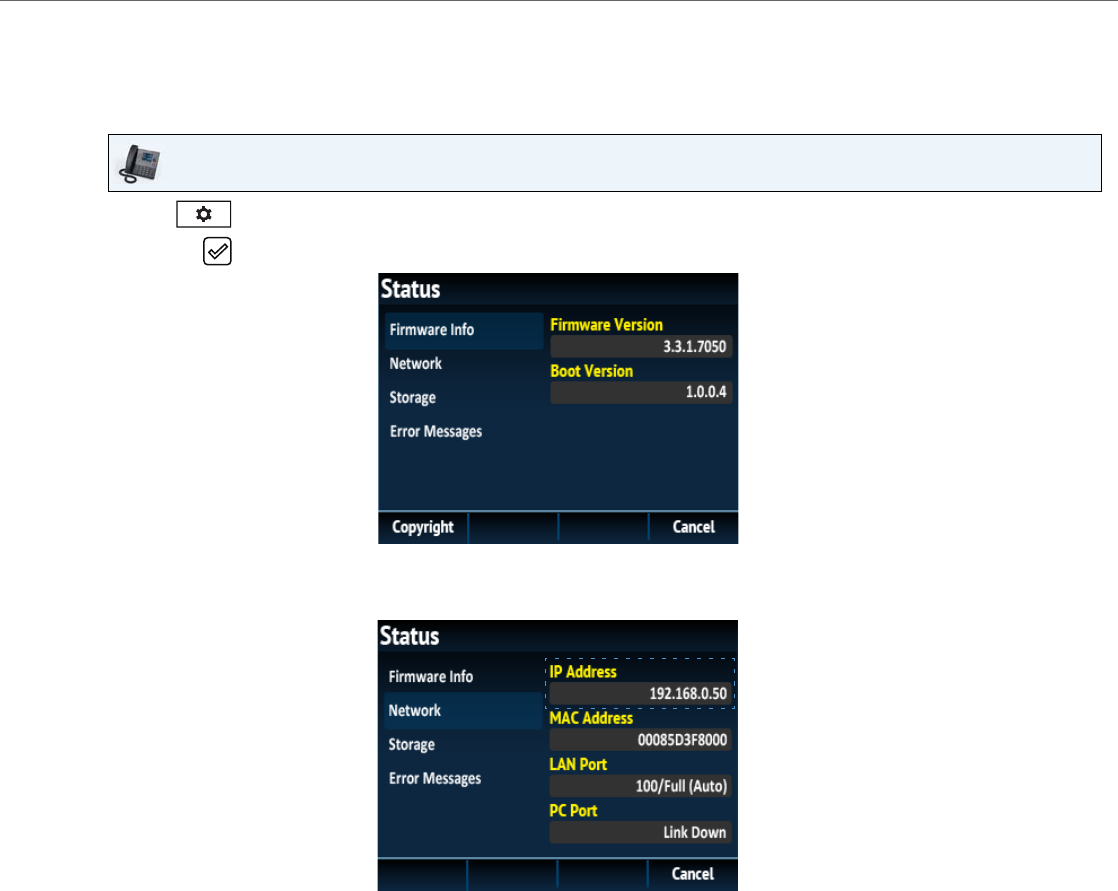
The Status option on the IP phone displays the status of your phone to the LCD display.
This option allows you to view your phone’s:
•Firmware information including firmware version and boot version
•Network status including your phone’s IP, MAC address, and LAN/PC port information
•Storage information including how many records are stored in your Directory, Callers, and Redial lists
•Error messages from the last reboot or startup
•Copyright information.
IP Phone UI
1.Press on the phone to enter the Options List.
2.Press the button to enter the Status menu.
3.Use the 5 and 2 keys to scroll the through the following status items:
•Firmware Info
•Network
Phone Status
2441-001524-00 REV00 – 04.2014
•Storage
Note:
If the Callers List or Redial List is full, the Storage screen displays information regarding the age of the oldest record
stored in memory for the respective list instead of the total number of records stored.
•Error Messages
Note:
Press the Copyright softkey to view copyright information.
Phone Status
41-001524-00 REV00 – 04.201425
Finding Your Phone’s IP Address
If you want to access your phone’s options using an Internet browser, you need to enter the IP address of the phone in the
browser to open the Aastra Web UI. Use the following procedure to find your phone’s IP address.
IP Phone UI
1.Press to enter the Options List.
2.Press the button to enter the Status menu.
3.Use the 2 key to highlight Network.
The IP address of your 6867i displays in the IP Address field in the right column.
Phone Status
2641-001524-00 REV00 – 04.2014
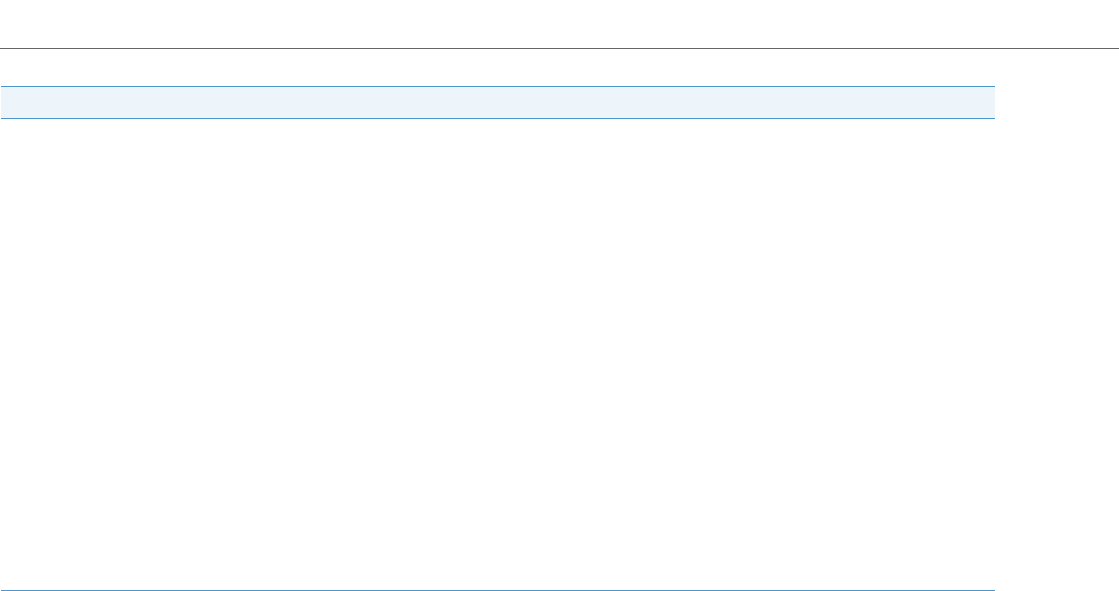
Phone Status via the Aastra Web UI
Use the following procedure to view the phone status via the Aastra Web UI.
Aastra Web UI
1.Open your web browser, enter the phone’s IP address or host name into the address field and press Enter.
2.In the Username/Password window, enter your username and password and click OK.
The Status window displays for the IP phone you are accessing.
Note:
The default username is user and the password field is left blank.
This Status window displays the status of your phone, which includes the following information:
•Network Status
•Hardware Information
•Firmware Information
•SIP Status
Phone Status
41-001524-00 REV00 – 04.201427
SIP Account Status
The IP phones show the SIP registration status on the IP phone’s Status screen in the Aastra Web UI.
The following table describes the status conditions that can display for the account.
Status ConditionDescription
RegisteredDisplays this status on accounts that HAVE been registered with the SIP proxy server.
Example:
LineSIP AccountStatusBackupRegistrar Used?
1650@proxy.com:5060RegisteredYes
where:
•Account Number is 1
•SIP Account is 650@proxy.com on port 5060
•Status is Registered
•Backup registrar is used (Yes)
SIP Error NumberDisplays on accounts when registration fails with the SIP proxy server.
Example:
LineSIP AccountStatusBackup Registrar Used?
4653@proxy.com:5060401No
where:
•Account Number is 4
•SIP Account is 653@proxy.com on port 5060
•Status is 401 - Unregistered if SIP registration fails
•Backup registrar is used (No)
2841-001524-00 REV00 – 04.2014
Customizing Your Phone
The following paragraphs describe the options available from either the IP phone UI, the Aastra Web UI, or both, and
provide procedures applicable to the option.
Language
IP Phone UI and Web UI Language
The IP phones support several different languages. You can have the IP phone UI and the Aastra Web UI display in a spe-
cific language as required. When you set the language to use, all of the display screens (menus, services, options, config-
uration parameters, etc.) display in that language. The IP phones support the following languages:
•English
•Czech
•Catalan
•Valencian
•Welsh
•German
•Danish
•Spanish
•Mexican Spanish
•Finnish
•French
•Canadian French
•Italian
•Dutch
•Dutch (Netherlands)
•Norwegian
•Polish
•Portuguese
•Portuguese Brazilian
•Romanian
•Russian
•Slovak
•Swedish
•Turkish
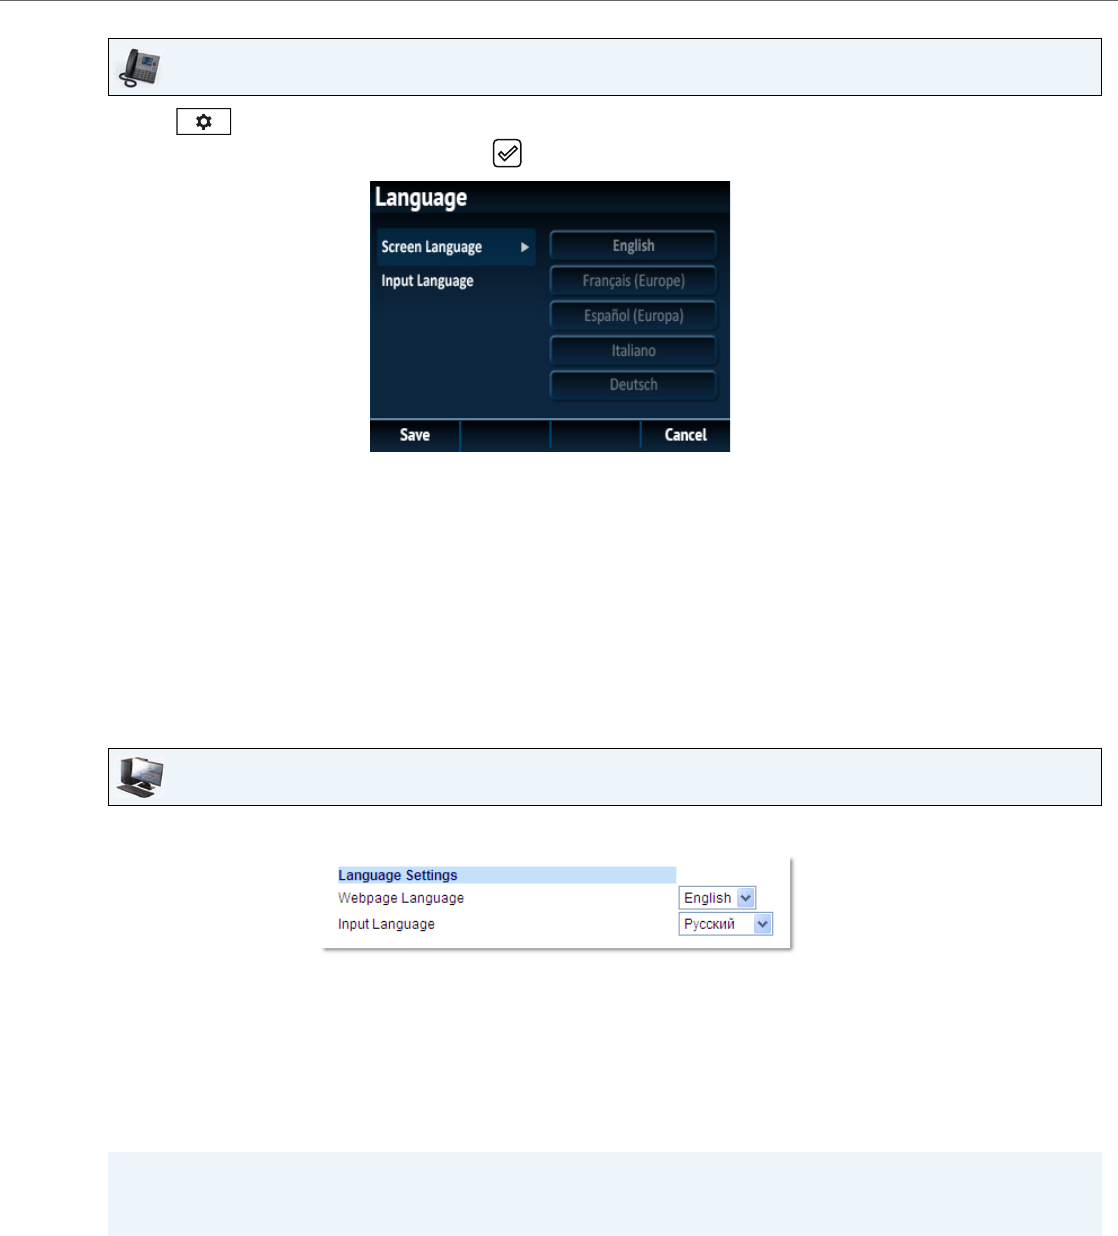
Specifying the Language to Use Using the IP Phone UI
Once the language pack(s) are available on your phone from your System Administrator, you can specify which language
to use on the phone and/or the Aastra Web UI.
Note:
All languages may not be available for selection. The available languages are dependant on the language packs cur-
rently loaded to the IP phone.
Customizing Your Phone
41-001524-00 REV00 – 04.201429
Specifying the Language to Use Using the Aastra Web UI
IP Phone UI
1.Press on the phone to enter the Options List.
2.Navigate to the Language option and press the button or Select softkey.
3.With Screen Language highlighted press the 4 key to move to selection column.
4.Use the 5 and 2 keys to scroll through and choose the desired screen language.
Note:
All languages may not be available for selection. The available languages are dependant on the language packs cur-
rently loaded to the IP phone. English is the default language and cannot be changed or removed. For more infor-
mation about loading language packs, see your System Administrator.
5.Press the Save softkey to save your changes.
The change is dynamic. When you exit the Options List, the phone and Aastra Web UI display all menu items in the
language you selected.
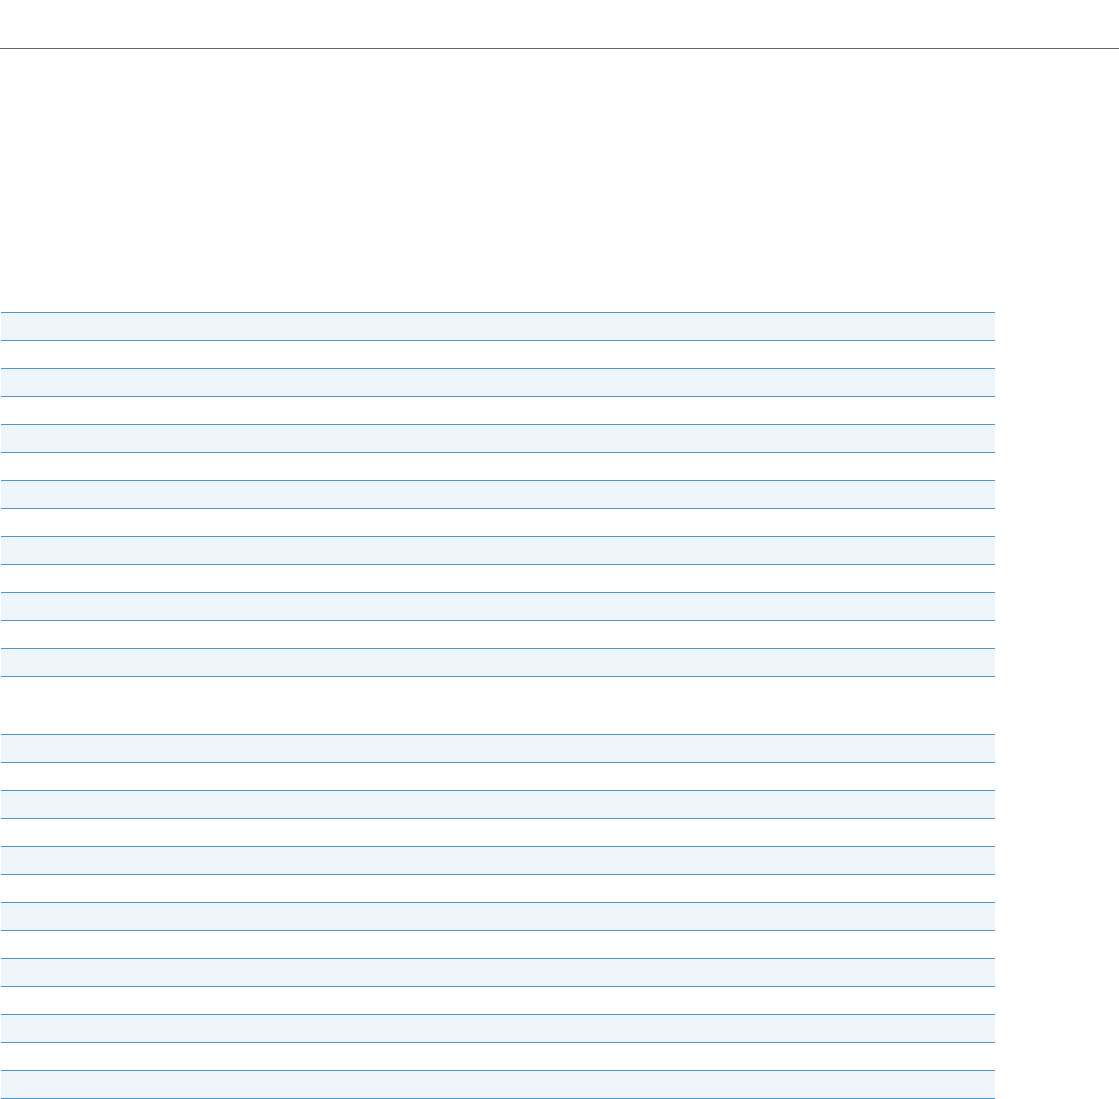
Aastra Web UI
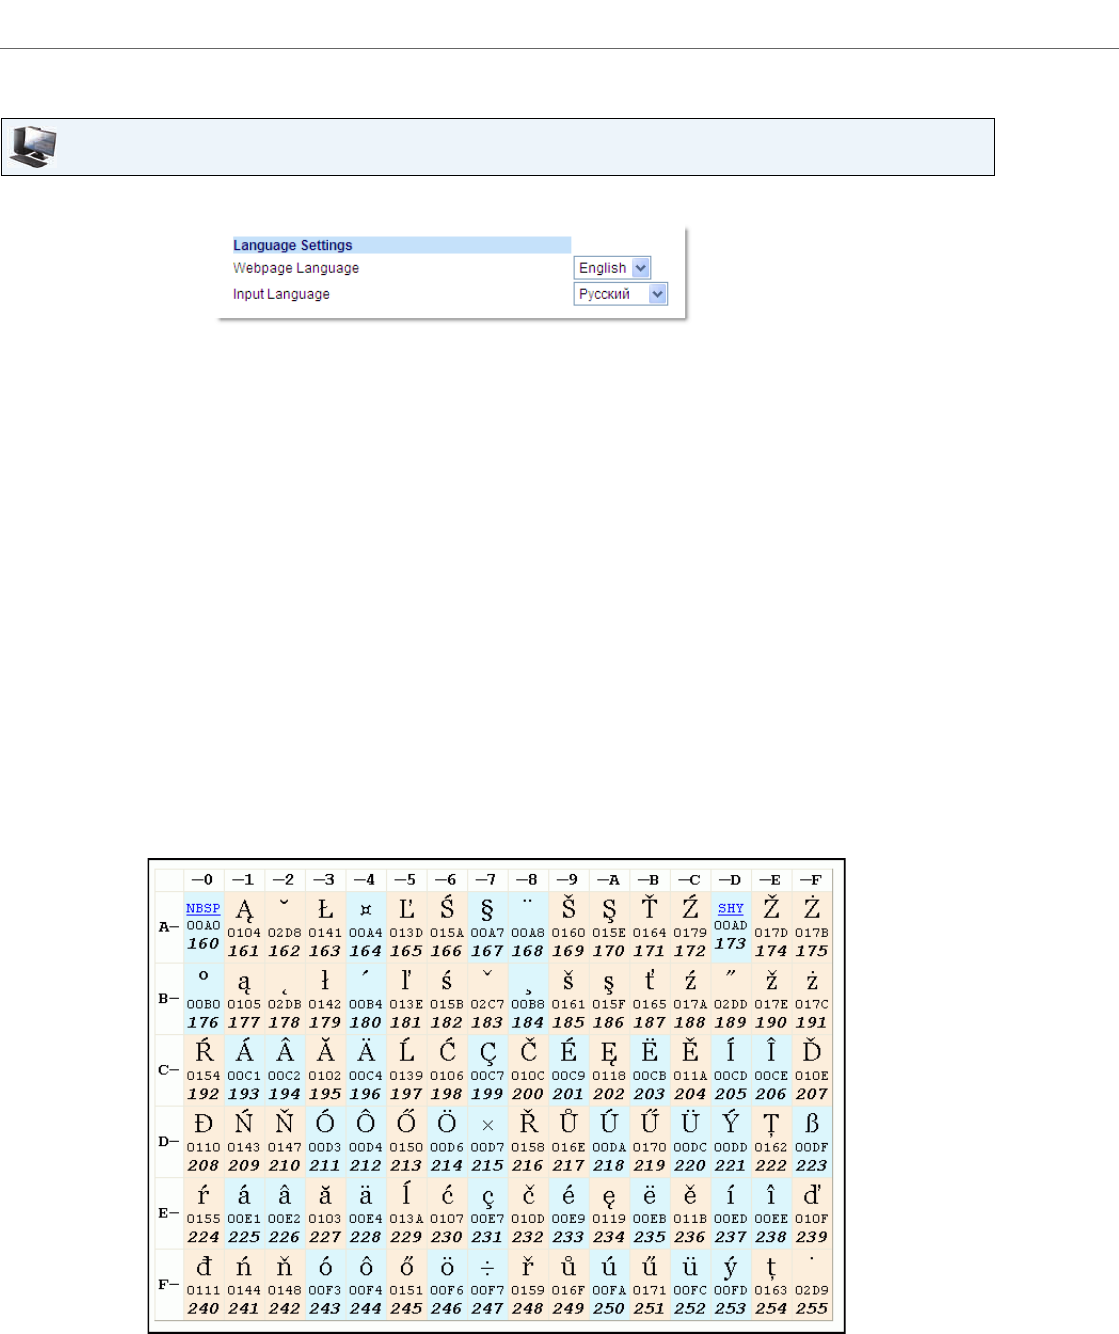
1.Click on Basic Settings > Preferences > Language Settings.
2.In the Webpage Language field, select a language to apply to the Aastra Web UI.
Note:
All languages may not be available for selection. The available languages are dependant on the language packs cur-
rently loaded to the IP phone by your System Administrator. English is the default language and cannot be changed
or removed.
3.Click Save Settings.
The change is dynamic. The phone and the Aastra Web UI display all screens in the language you selected.
Note:
You must have the language pack(s) already loaded to your phone in order to use them. For more information about
loading language packs, contact your System Administrator.
Customizing Your Phone
3041-001524-00 REV00 – 04.2014
Input Language
The 6867i supports text and character inputs in various languages (English, German, French, Spanish, Italian, Portuguese,
Russian, and Nordic). Inputting textual or character information into the IP phone UI can be done using the dialpad on
the phone. You can configure the Input Language feature using the Aastra Web UI or the IP phone UI.
The following tables identify the language characters that you can use to enter text and characters on the 6867i.
Dialpad Input Alphabet Tables
English
French
KeyUppercase CharactersLowercase Characters
000
11;=_,-'&()1.:;=_,-'&()
2ABC2 abc2
3DEF3 def3
4GHI4 ghi4
5JKL5jkl5
6MNO6 mno6
7PQRS7pqrs7
8TUV8tuv8
9WXYZ9wxyz9
** <SPACE>* <SPACE>
##/\@ #/\@
KeyUppercase CharactersLowercase Characters
000
11.:;=_,-'&()1.:;=_,-'&()
2ABC2ÀÂÇÁÅÆabc2àâçáåæ
3DEF3ÉÈÊË def3éèêë
4GHI4ÎÏghi4îï
5JKL5jkl5
6MNO6ÑÓÒÔÖ mno6ñóòôö
7PQRS7pqrs7
8TUV8tuv8úùûü
9WXYZ9wxyz9
** <SPACE>* <SPACE>
##/\@ #/\@
Customizing Your Phone
41-001524-00 REV00 – 04.201431
Spanish
German
Italian
KeyUppercase CharactersLowercase Characters
000
11.:;=_,-'&() 1.:;=_,-'&()
2ABC2ÁÀÇabc2áàç
3DEF3ÉÈdef3éè
4GHI4ÏÍghi4ïí
5JKL5jkl5
6MNO6ÑÓÒmno6ñóò
7PQRS7pqrs7
8TUV8ÚÜtuv8úü
9WXYZ9wxyz9
** <SPACE>* <SPACE>
##/\@ #/\@
KeyUppercase CharactersLowercase Characters
000
11.:;=_,-'&() 1.:;=_,-'&()
2ABC2ÄÀabc2äà
3DEF3Édef3é
4GHI4ghi4
5JKL5jkl5
6MNO6Ömno6ö
7PQRS7ßpqrs7ß
8TUV8Ü tuv8ü
9WXYZ9wxyz9
** <SPACE>* <SPACE>
##/\@ #/\@
KeyUppercase CharactersLowercase Characters
000
11.:;=_,-'&() 1.:;=_,-'&()
2ABC2ÀCÇabc2àcç
3DEF3ÉÈËdef3éèë
4GHI4ghi4
5JKL5jkl5
6MNO6ÓÒmno6óò
7PQRS7pqrs7
8TUV8Ù tuv8ù
9WXYZ9 wxyz9
** <SPACE>* <SPACE>
##/\@ #/\@
Customizing Your Phone
3241-001524-00 REV00 – 04.2014
Portuguese
Russian
Nordic
KeyUppercase CharactersLowercase Characters
000
11.:;=_,-'&() 1.:;=_,-'&()
2ABC2ÁÀÂÃÇ abc2áàâãç
3DEF3ÉÊdef3éê
4GHI4Íghi4í
5JKL5jkl5
6MNO6ÓÔÕmno6óôõ
7PQRS7pqrs7
8TUV8ÚÜtuv8úü
9WXYZ9 wxyz9
** <SPACE>* <SPACE>
##/\@ #/\@
KeyUppercase CharactersLowercase Characters
000
11.:;=_,-'&() 1.:;=_,-'&()
2АБВГ2ABC aбвг2abc
3ДЕЁЖЭ3DEFДeëжз3def
4ИЙКЛ4GHIийкл4ghi
5МНОП5JKLмноп5jkl
6РСТУ6MNOрсту6mno
7ФХЦЧ7PQRS7фхЧч7pqrs
8ШЩЪЫ8TUVшщъы8tuv
9ЬЗЮЯ9WXYZьзюя9wxyz
** <SPACE>* <SPACE>
##/\@ #/\@
KeyUppercase CharactersLowercase Characters
000
11.:;=_,-'&() 1.:;=_,-'&()
2ABC2ÅÄÆÀabc2åäæà
3DEF3Édef3é
4GHI4ghi4
5JKL5jkl5
6MNO6ÖØmno6öø
7PQRS7ßpqrs7ß
8TUV8Ü tuv8ü
9WXYZ9wxyz9
** <SPACE>* <SPACE>
##/\@ #/\@
Customizing Your Phone
41-001524-00 REV00 – 04.201433
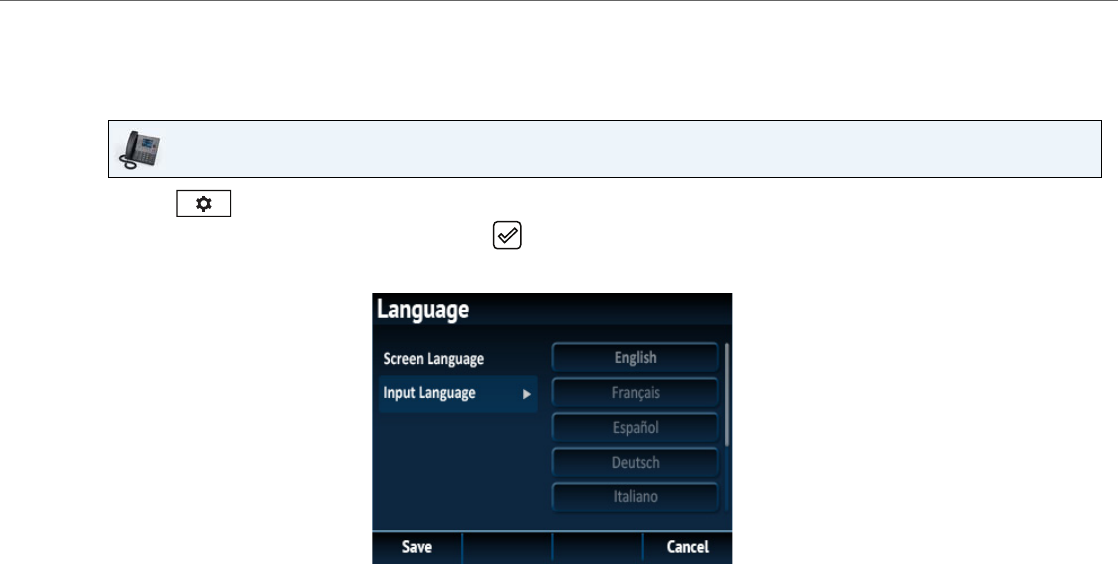
Specifying the Input Language Using the IP Phone UI
You can configure the language you use for input on the phone by setting the Input Language option. The default input
language setting is English.
IP Phone UI
1.Press on the phone to enter the Options List.
2.Navigate to the Language option and press the button or Select softkey.
3.Press the 2 key to highlight the Input Language option.
4.With Input Language highlighted press the 4 key to move to selection column.
Use the 5 and 2 keys to scroll through and choose the desired input language. Valid values are:
•English (default)
•Français (French)
•Español (Spanish)
•Deutsch (German)
•Italiano (Italian)
•Português (Portuguese)
•Русский (Russian)
•Nordic
Note:
Available input languages are dependent on the configuration enabled by your System Administrator.
5.Press the Save softkey to save your changes.
The change is dynamic. The phone and the Aastra Web UI allow you to enter text and characters in the language
you selected.
Customizing Your Phone
3441-001524-00 REV00 – 04.2014
Specifying the Input Language Using the Aastra Web UI
Latin 2 Character Set
The 6867i includes support for ISO 8859-2 (Latin2) of multi-national languages when displaying and inputting in the IP
phone UI and the Aastra Web UI. UTF-8 is also compatible with XML encoding on the IP phones.
The following table illustrates the Latin 2 character set used on the 6867i IP phone.
Aastra Web UI
1.Click on Basic Settings > Preferences > Language Settings.
2.Select a language from the Input Language field. Setting this field allows you to specify the language to use when
entering text and characters in the Aastra Web UI and IP phone UI. Valid values are:
•English (default)
•Français (French)
•Español (Spanish)
•Deutsch (German)
•Italiano (Italian)
•Português (Portuguese)
•Русский (Russian)
•Nordic
Note:
All languages may not be available for selection. The available input languages are dependant on the configuration
enabled by your System Administrator.
3.Click Save Settings.
The change is dynamic. The phone and the Aastra Web UI allow you to enter text and characters in the language you
selected.
Customizing Your Phone
41-001524-00 REV00 – 04.201435
Time and Date
On the IP phones, the following time and date sub-options are available to be configured:
•Settings:
–Time Format
–Daylight Savings
–Date Format
•Time Zone
•Set Date and Time:
–Use Network Time (configure time servers)
–Enter Time and Date
Settings
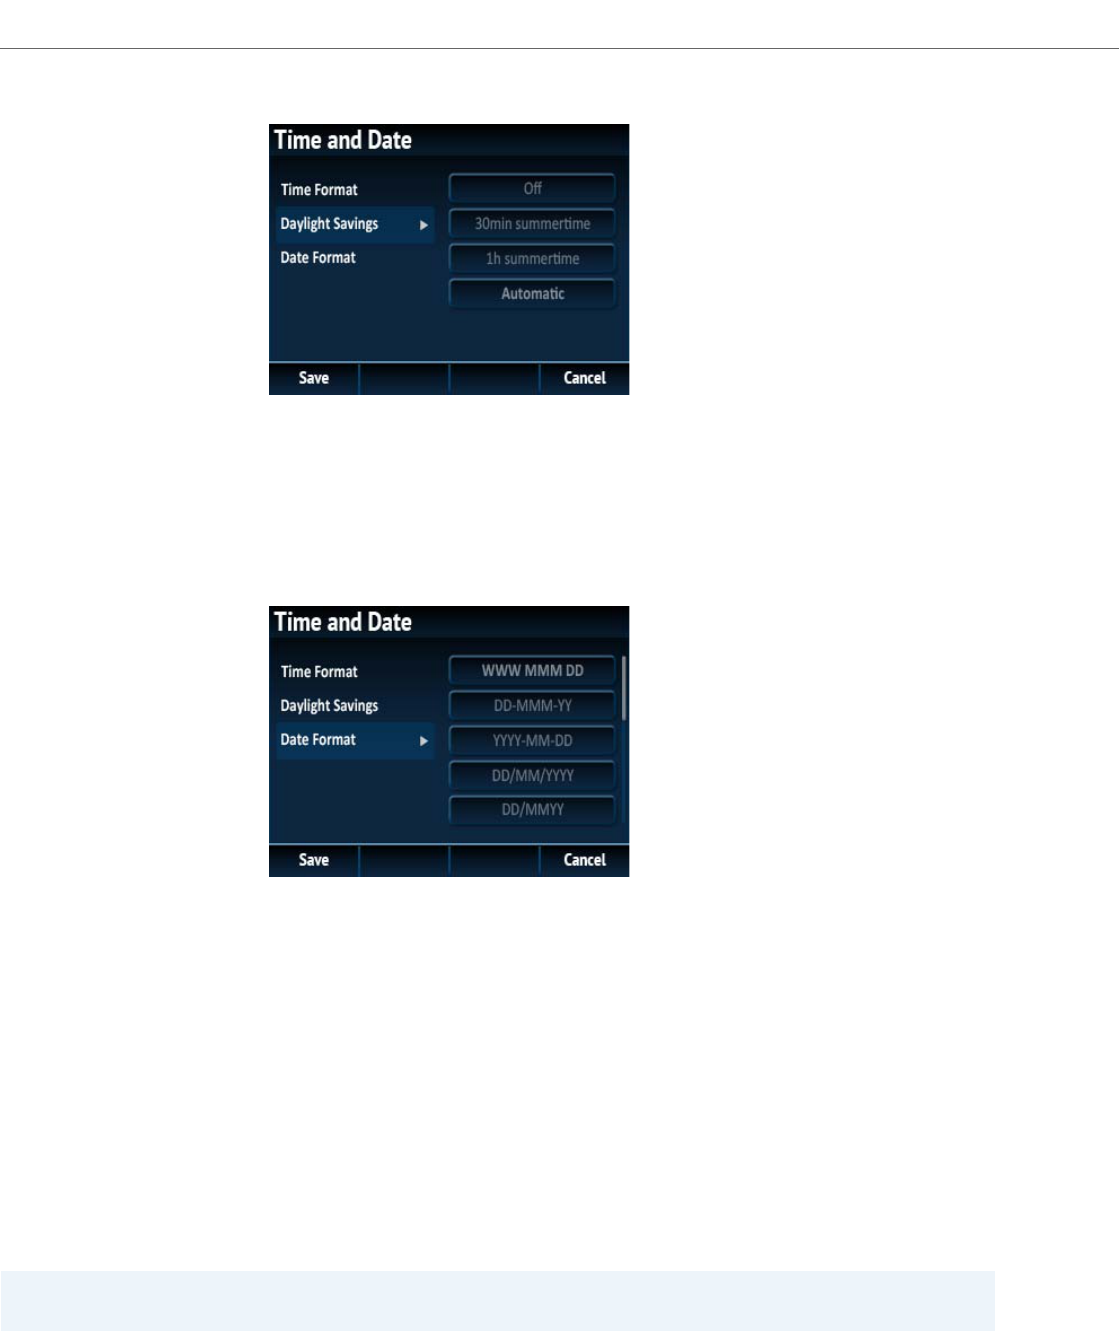
Configuring the Time Format, Daylight Savings, and Date Format Using the IP Phone UI
Note:
All time and date settings can be configured using the IP phone UI. Time/Date Formats and Time Servers are the only
two time and date settings that can be configured using the Aastra Web UI.
IP Phone UI
1.Press on the phone to enter the Options List.
2.Navigate to the Time and Date > Settings option and press the button or Select softkey.
3.With Time Format highlighted press the 4 key to move to selection column.
4.Use the 5 and 2 keys to scroll through and choose the desired time format. Valid values are 12 Hour and 24 Hour (the
default is 12 Hour).
Customizing Your Phone
3641-001524-00 REV00 – 04.2014
5.Press the 3 key to move to back to the options column and press the 2 key to highlight Daylight Savings.
6.With Daylight Savings highlighted press the 4 key to move to selection column.
7.Use the 5 and 2 keys to scroll through and choose the desired daylight savings setting. Valid values are:
•Off
•30 min summertime
•1h summertime
•Automatic (default)
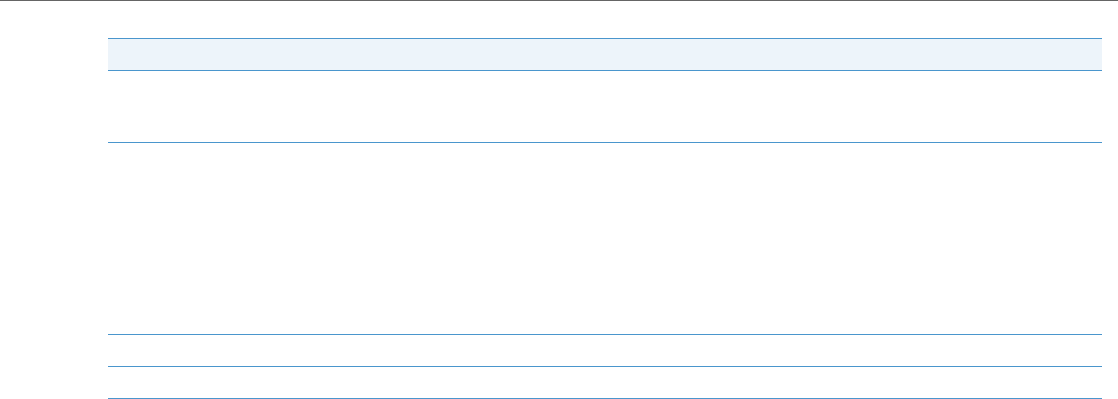
8.Press the 3 key to move to back to the options column and press the 2 key to highlight Date Format.
9.With Date Format highlighted press the 4 key to move to selection column.
10.Use the 5 and 2 keys to scroll through and choose the desired date format. Valid values are:
•WWW MMM DD (default)
•DD-MMM-YY
•YYYY-MM-DD
•DD/MM/YYYY
•DD/MM/YY
•DD-MM-YY
•MM/DD/YY
•MMM DD
•DD MMM YYYY
•WWW DD MMM
•DD MMM
•DD.MM.YYYY
11.Press the Save softkey to save your changes.
Note:
The time and date formats you configure are applicable to the Home screen, as well as the Callers and Redial lists.
Customizing Your Phone
41-001524-00 REV00 – 04.201437
Time Zone
Configuring the Time Zone Using the IP Phone UI
Set Date and Time
Configuring the Date and Time Using the IP Phone UI
With a valid time server enabled your IP phone will synchronize the time displayed with the specified configuration server.
The phone will use the time from Time Server 1 unless it is not configured or unavailable, in which case it will move on to
Time Server 2, and if necessary Time Server 3. Alternatively, you can set the date and time manually.
IP Phone UI
1.Press on the phone to enter the Options List.
2.Navigate to the Time and Date > Time Zone option and press the button or Select softkey.
A list of time zones displays for different areas of the world.
3.Use the 5 and 2 keys to scroll through and highlight the desired region. Valid values are:
•America
•Asia
•Atlantic
•Australia
•Europe
•Pacific
•Others
4.With the desired region highlighted press the 4 key to move to selection column.
5.Use the 5 and 2 keys to scroll through and choose the time zone that applies to your area. The default time zone is
US-Eastern.
Note:
For a list of the time zone values available on the IP phone, see “Appendix A - Time Zone Codes.”
6.Press the Save softkey to save your changes.
IP Phone UI
1.Press on the phone to enter the Options List.
2.Navigate to the Time and Date > Set Date and Time option and press the button or Select softkey.
Customizing Your Phone
3841-001524-00 REV00 – 04.2014
3.If you want to synchronize the time and date using a time server, ensure there is a checkmark in the box corresponding
to the Use Network Time setting. If there is no checkmark, press the button to enable the Use Network Time
setting.
a)Press the 2 key to highlight Time Server 1, Time Server 2,or Time Server 3.
b)Using the keys on the dialpad, enter an IP address or domain name for the time server.
Use the Backspace key to move back a space and delete a character. Use the Dot softkey to enter dots within the
IP address or domain name. Use the 123 4 softkey to toggle between entering numbers and entering letters.
4.If you want to manually set the date and time, press the button to clear the checkmark from the Use Network
Time box and disable the setting.
a)Press the 2 key to highlight Enter Time or Enter Date.
b)Using the keys on the dialpad, change the time and date accordingly.
When entering the time, use the AM/PM softkey to toggle between AM and PM.
5.Press the Save softkey to save your changes.
Customizing Your Phone
41-001524-00 REV00 – 04.201439
Configuring Time and Date Settings Using the Aastra Web UI
Call Forward
Aastra Web UI
1.Click on Basic Settings > Preferences > Time and Date Setting.
2.In the Time Format field, select the time format you want to use on your phone. Valid values are:
•12h (12 hour format) (default)
•24h (24 hour format)
Note:
The time format you configure is applicable to the phone’s Home screen, as well as the Callers and Redial lists.
3.In the Date Format field, select the date format you want to use on your phone. Valid values are:
•WWW MMM DD (default)
•DD-MMM-YY
•YYYY-MM-DD
•DD/MM/YYYY
•DD/MM/YY
•DD-MM-YY
•MM/DD/YY
•MMM DD
•DD MMM YYYY
•WWW DD MMM
•DD MMM
•DD.MM.YYYY
Note:
The date format you configure is applicable to the phone’s Home screen, as well as the Callers and Redial lists.
4.In the NTP Time Servers field, enable the setting by checking the box or disable the setting by unchecking the box
(default is enabled).
5.In the Time Server 1, Time Server 2, and Time Server 3 fields, enter IP addresses or qualified domain names for
the primary, secondary, and tertiary time servers.
Note:
Time servers can only be entered if NTP Time Servers is enabled.
6.Click Save Settings.
Note:
For Call Forward information and configuration details, see “Call Forward Configuration” on page 141.
Customizing Your Phone
4041-001524-00 REV00 – 04.2014
Lock
Password
This category allows you to change the user password for your phone. Changing your password ensures that only you
can alter your phone settings and helps keep your system secure. You can change your user password using the IP phone
UI or the Aastra Web UI.
Setting a User Password Using the IP Phone UI
Phone Lock
You can lock your phone to prevent the phone from being used or configured. You can lock the phone using the IP
phone UI, Aastra Web UI or by configuring a Lock softkey on your phone. For more information about configuring a
Lock/Unlock key on your phone, see “Phone Lock Key” on page 97.
Note:
Valid values when creating or changing a password are 0 to 4294967295 (integers only; symbols and alpha characters
are not allowed). The default password is an empty string (i.e. leave the field blank).
IP Phone UI
1.Press on the phone to enter the Options List.
2.Navigate to the Lock > Password option and press the button or Select softkey.
3.In the Current Password: field, enter the current user password.
4.In the New Password: field, enter the new user password.
5.In the Re-enter Password: field, re-enter the new user password.
6.Press the Save softkey to save your changes.
A Password Changed confirmation message displays on the screen.
Customizing Your Phone
41-001524-00 REV00 – 04.201441
Locking the Phone Using the IP Phone UI
IP Phone UI
1.Press on the phone to enter the Options List.
2.Navigate to the Lock > Phone Lock option and press the button or Select softkey..
3.At the Lock the phone? prompt, press the Lock softkey or navigate to the Ye s button and press the button.
The message Phone is locked and lock icon displays on the Home screen. Additionally the Message Waiting
Indicator (MWI) will turn on.
Note:
Alternatively, if configured, you can lock the phone by simply pressing a Lock softkey.
Customizing Your Phone
4241-001524-00 REV00 – 04.2014
Unlocking the Phone Using the IP Phone UI
Configuring Lock Settings Using the Aastra Web UI
Setting a User Password
IP Phone UI
1.Press on the phone to enter the Options List (or press a configured Unlock softkey).
2.At the Enter Unlock Password prompt, enter your user password and press the Enter softkey or button.
3.At the Unlock the phone? prompt, press the Unlock softkey or navigate to the Ye s button and press the button.
Aastra Web UI
1.Click on Operation > User Password.
2.In the Current Password field, enter the current user password.
Note:
By default, the user name is user (all lowercase) and the password field is left blank.
3.In the New Password field, enter the new user password.
4.In the Password Confirm field, enter the new user password again.
5.Click Save Settings.
Customizing Your Phone
41-001524-00 REV00 – 04.201443
Resetting a User Password
If you forget your password, you can reset it and enter a new password. The reset user password feature resets the pass-
word to the factory default which is blank (no password). You can reset a user password using the Aastra Web UI only.
Note:
Valid values when creating or changing a password are 0 to 4294967295 (integers only; symbols and alpha characters
are not allowed). The default password is an empty string (i.e. leave the field blank).
Aastra Web UI
1.Click on Operation > Phone Lock.
2.In the Reset User Password field, click Reset.
The following screen displays.
3.In the Current Password field, leave this blank.
4.In the New Password field, enter a new password.
5.In the Password Confirm field, re-enter your new user password.
6.Click Save Settings.
Customizing Your Phone
4441-001524-00 REV00 – 04.2014
Locking and Unlocking the Phone
Aastra Web UI
1.Click on Operation > Phone Lock.
To Lock the Phone
2.In the Lock the Phone? field, click Lock.
The message Phone is locked and lock icon displays on the Home screen. Additionally the Message Waiting
Indicator (MWI) will turn on.
Unlocking the Phone
3.Click on Operation > Phone Lock.
4.In the Unlock the Phone? field, click Unlock.
Customizing Your Phone
41-001524-00 REV00 – 04.201445
Audio
The Audio option on the IP phone allows you to set the audio mode for your IP phone, configure headset settings, and
personalize ring tones and tone sets.
Audio Mode
The 6867i allows you to use a handset, a headset, or handsfree mode to handle incoming and outgoing calls. The Audio
Mode option provides different combinations of these three methods to provide maximum flexibility in handling calls.
There are four audio mode options you can set:
Configuring the Audio Mode Using the IP Phone UI
Audio Mode OptionDescription
SpeakerThis is the default setting. Calls can be made or received using the handset or handsfree speakerphone. In handset
audio mode, pressing the button on the phone switches to handsfree speakerphone. In Speaker audio
mode, lift the handset to switch to the handset.
Headset Choose this setting if you want to make or receive all calls using a handset or headset. Calls can be switched from the
handset to headset by pressing thebutton on the phone. To switch from the headset to the handset, lift
the handset.
Speaker/Headset
Incoming calls are sent to the handsfree speakerphone first when the button is pressed. By pressing the
button again, you can switch back and forth between the handsfree speakerphone and the headset. At anytime, lift-
ing the handset switches back to the handset from either the handsfree speakerphone or the headset.
Headset/Speaker
Incoming calls are sent to the headset first when the button is pressed. By pressing the button again, you
can switch back and forth between the headset and the handsfree speakerphone. At anytime, lifting the handset
switches back to the handset from either the headset or the handsfree speakerphone.
IP Phone UI
1.Press on the phone to enter the Options List.
2.Navigate to the Audio > Audio Mode option and press the button or Select softkey.
3.Use the 5 and 2 keys to scroll through and highlight the desired audio mode. Valid values are:
•Speaker (default)
•Headset
•Speaker/Headset
•Headset/Speaker
4.Press the Save softkey to save your changes.
Customizing Your Phone
4641-001524-00 REV00 – 04.2014
Headset
The Headset option allows you to set the volume level for the headset microphone and also allows you to enable/disa-
ble DHSG.
Configuring Headset Mic Volume and DHSG Using the IP Phone UI
IP Phone UI
1.Press on the phone to enter the Options List.
2.Navigate to the Audio > Headset option and press the button or Select softkey.
3.With Headset Mic Vol highlighted press the 4 key to move to selection column.
4.Use the 5 and 2 keys to scroll through and choose the desired volume setting. Valid values are:
•Low
•Medium (default)
•High
5.Press the 3 key to move to back to the options column and press the 2 key to highlight DHSG.
6.With DHSG highlighted press the 4 key to move to selection column.
7.Use the 5 and 2 keys to scroll through and choose whether or not to enable DHSG. Valid values are:
•DHSG is OFF (default)
•DHSG is ON
8.Press the Save softkey to save your changes.
Customizing Your Phone
41-001524-00 REV00 – 04.201447
Ring Tones and Tone Sets
There are several distinct ring tones a user can select from to set on the IP phones. You can enable/disable these ring tones
on a global or per-line basis.
The following table identifies the valid settings and default values for each type of configuration method.
Ring Tones
In addition to ring tones, you can configure ring tone sets on a global-basis on the IP phone. Ring tone sets consist of tones
customized for a specific country. The ring tone sets you can configure on the IP phones are:
•Australia
•Brazil
•Europe (generic tones)
•France
•Germany
•Italy
•Italy2
•Malaysia
•Mexico
•Russia
•Slovakia
•UK
•US (Default - also used in Canada)
Configuration MethodValid ValuesDefault Value
IP Phone UIGlobal
Tone 1
Tone 2
Tone 3
Tone 4
Tone 5
Silent
Global Setting:
Tone 1
Aastra Web UIGlobal:
Tone 1
Tone 2
Tone 3
Tone 4
Tone 5
Silent
Global Setting:
Tone 1
Lines 1 to 9Per-Line Setting:
Global
Tone 1
Tone 2
Tone 3
Tone 4
Tone 5
Silent
Per-Line Setting:
Global
Customizing Your Phone
4841-001524-00 REV00 – 04.2014
When you configure the country's tone set, the country-specific tone is heard on the phone for the following:
•Dial tone
•Secondary dial tone
•Ring tone
•Busy tone
•Congestion tones
•Call waiting tone
•Ring cadence pattern
You configure global ring tones and tone sets using the IP phone UI and Aastra Web UI.
Configuring Ring Tones Using the IP Phone UI
Global configuration only
IP Phone UI
1.Press on the phone to enter the Options List.
2.Navigate to the Audio > Ring Tones option and press the button or Select softkey.
3.Use the 5 and 2 keys to scroll through and choose the desired ring tone (Tone 1 through Tone 5,or Silent).
4.Press the Save softkey to save your changes.
The ring tone you select is immediately applied to the IP phone.
Customizing Your Phone
41-001524-00 REV00 – 04.201449
Configuring Tone Sets Using the IP Phone UI
Global configuration only
IP Phone UI
1.Press on the phone to enter the Options List.
2.Navigate to the Audio > Tone Sets option and press the button or Select softkey.
3.Use the 5 and 2 keys to scroll through and choose the desired tone set. Valid values are:
•Australia
•Brazil
•Europe
•France
•Germany
•Italy
•Italy2
•Malaysia
•Mexico
•Brazil
•Russia
•Slovakia
•UK
•US (default)
4.Press the Save softkey to save your changes.
The tone set you select is immediately applied to the IP phone.
Customizing Your Phone
5041-001524-00 REV00 – 04.2014
Configuring Ring Tones and Tone Sets Using the Aastra Web UI
Aastra Web UI
1.Click on Basic Settings > Preferences > Ring Tones.
For global configuration
2.In the Ring Tones section, select a country from the Tone Set field. Valid values are:
•Australia
•Brazil
•Europe
•France
•Germany
•Italy
•Italy2
•Malaysia
•Mexico
•Brazil
•Russia
•Slovakia
•UK
•US (default)
3.Select a value from the Global Ring Tone field
.
Note:
See the “Ring Tones” on page 47 for valid values.
For per-line configuration
4.In the Ring Tone section, select a line for which you want to set ring tone.
5.Select a value from the LineN field
.
Note:
See the “Ring Tones” on page 47 for valid values.
6.Click Save Settings.
Customizing Your Phone
41-001524-00 REV00 – 04.201451
Display
The Display option allows you to set the following on your phone:
•Brightness Level
•Brightness Timer
The Brightness Level option on the IP phone allows you to set the amount of light that illuminates the LCD display. Use
this option to set the preference of brightness level.
The Brightness Timer option allows you to set the amount of time you want the LCD display to stay illuminated before
turning the backlight off during a period of inactivity. For example, if you set the brightness timer to 60, when the phone
reaches 60 seconds of inactivity, the LCD backlight goes off.
You can set the brightness level and timer using the IP phone UI only.
Setting the Brightness Level and Timer Using the IP Phone UI
IP Phone UI
1.Press on the phone to enter the Options List.
2.Navigate to the Display option and press the button or Select softkey.
3.Use the 3 and 4
navigation buttons to increase or decrease the intensity of brightness on the LCD.
4.Press the 2 key to highlight Brightness Timer.
5.Enter a value, in seconds, using the dialpad keys. You can set the timer from 1 to 7200 seconds. Default is 600 (10
minutes).
6.Press the Save softkeyto save your changes.
Customizing Your Phone
5241-001524-00 REV00 – 04.2014
Dialpad
Live Dialpad
The Live Dialpad option on the IP phone turns the live dialpad mode on or off. With the live dialpad feature enabled, the
6867i IP phone automatically dials out and turns on handsfree mode as soon as a dialpad key or softkey is pressed. With
live dialpad disabled, if you dial a number while the phone is on-hook, lifting the receiver or pressing the initi-
ates a call to that number.
You can enable/disable the live dialpad using the IP phone UI only.
Enabling/Disabling Live Dialpad Using the IP Phone UI
Speed Dial Edit
Note:
Availability of this feature is dependant on your phone system or service provider.
IP Phone UI
1.Press on the phone to enter the Options List.
2.Navigate to the Dialpad > Live Dialpad option and press the button or Select softkey.
3.Use the 5 and 2 keys to scroll through and enable (On) or disable (Off) the live dialpad feature.
4.Press the Save softkey to save your changes.
Note:.
For details on speed dial configuration, see “Speed Dial Key,” on page62.
Customizing Your Phone
41-001524-00 REV00 – 04.201453
Restart
You may want to restart your phone to check for updates on the server or you may occasionally need to restart your phone
for configuration changes to your phone or network settings to take effect. You may also need to restart your phone if you
have been asked to do so by your System Administrator or should you experience any unexpected behavior.
Restarting Your Phone Using the IP Phone UI
Restarting Your Phone Using the Aastra Web UI
IP Phone UI
1.Press the button on the phone to enter the Options List.
2.Navigate to the Restart option and press the button or Select softkey.
3.When the prompt, Restart Phone? appears, press the Restart softkey or navigate to the Ye s button and press the
button.
If you do not wish to restart your phone, press Cancel or No.
Note:
Your phone is out of service temporarily during the restart and reboot process.
Aastra Web UI
1.Click on Operation > Reset.
2.Click Restart
.
3.Click OK at the confirmation prompt.
Customizing Your Phone
5441-001524-00 REV00 – 04.2014
Emergency Dial Plan
Public telephone networks in countries around the world have a single emergency telephone number (emergency serv-
ices number), that allows a caller to contact local emergency services for assistance when required. The emergency tele-
phone number may differ from country to country. It is typically a three-digit number so that it can be easily remem-
bered and dialed quickly. Some countries have a different emergency number for each of the different emergency serv-
ices.
You can specify the digits to dial on the IP phone for contacting emergency services. Once you specify the emergency
number(s) on the phone, you can dial those numbers directly on the dialpad when required and the phone automati-
cally dials to those emergency services.
You can set the emergency dial plan using the Aastra Web UI only.
The following table describes the default emergency numbers on the IP phones.
Defining an Emergency Dial Plan Using the Aastra Web UI
Note:
Contact your local phone service provider for available emergency numbers in your area.
Emergency NumberDescription
911A United States emergency number.
999A United Kingdom emergency number.
112An international emergency telephone number for GSM mobile phone networks.
In all European Union countries it is also the emergency telephone number for both mobile and fixed-line telephones.
110A police and/or fire emergency number in Asia, Europe, Middle East, and South America.
Aastra Web UI
1.Click on Operation > Phone Lock.
2.In the Emergency Dial Plan field, enter the 3-digit number used in your local area to contact emergency services.
For multiple numbers, enter a | between each emergency number. For example:
911|110
Default for this field is 911|999|112|110.
3.Click Save Settings to save the emergency dial plan to your phone.
41-001524-00 REV00 – 04.201455
Line and Call Appearances
The 6867i has 2 hard line/call appearance buttons each with a corresponding status light.
These line/call appearance buttons and lights can represent physical lines, calls for your extension, or calls from a group
that your extension is part of. By pressing a line/call appearance button, you connect to the line or a call it represents. The
line/call appearance light indicates the status of that line or call. When the phone is taken off-hook, the phone automati-
cally selects a line for you.
When you have more than one call, you can use the 5 and 2 navigation keys to scroll up and down to view information for
the different calls. The display shows which line the call information is referring to (L1, L2, L3, L4, etc.), picture ID and Caller
ID information (name and number) if available, the call status (connected, ringing, held call, etc...), and the timer specific to
that call.
Line/Call Appearance LED BehaviorLine/Call Appearance Status
OffIdle line or no call activity
Light flashes quicklyRinging
Light is solidConnected
Light flashes slowlyHold
Line/Call
Appearances
5641-001524-00 REV00 – 04.2014
Presence Key
The Presence key is used to access the contact information screens, which provide detailed information about a
respective Busy Lamp Field (BLF) or Speed Dial contact.
When you press the key, you are able to view the contact’s BLF details (if a BLF key is selected), Picture ID (if applica-
ble), as well as all the phone numbers of the contact saved in your phone’s memory.
Using the Presence Key
IP Phone UI
1.While on the Home Screen, press the key.
2.Press a left softkey that is configured with BLF or Speed Dial functionality.
The contact information screen will be displayed.
Note:
To switch to another contact, simply press the desired BLF or Speed Dial softkey.
3.Press the button to place a call using the contact’s default phone number.
If you would like to place a call to a different phone number attached to the contact (if applicable), highlight the
desired phone number using the 5 and 2 navigation keys, and press the key.
4.Press
or the Quit softkey at any time to exit.
Presence Key
41-001524-00 REV00 – 04.201457
Configuring Softkeys
Your 6867i has 6 multi-functional left softkeys and 4 multi-functional bottom softkeys:
•6 left softkeys: programmable non-state-based softkeys (up to 20 programmable functions)
Gebruikershandleiding.com neemt misbruik van zijn services uitermate serieus. U kunt hieronder aangeven waarom deze vraag ongepast is. Wij controleren de vraag en zonodig wordt deze verwijderd.
Product:
Spelregels forum
Om tot zinvolle vragen te komen hanteren wij de volgende spelregels:
lees eerst de handleiding door;
controleer of uw vraag al eerder door iemand anders is gesteld;
probeer uw vraag zo duidelijk mogelijk te stellen;
heeft u een probleem en al geprobeerd om dit op te lossen, vermeld dit erbij aub;
heeft u een oplossing gekregen van een bezoeker dan horen wij dat graag in dit forum;
wilt u een reactie geven op een vraag of antwoord, gebruik dan niet dit formulier maar klik op de knop 'reageer op deze vraag';
uw vraag wordt direct op de website gezet; vermijd daarom persoonlijke gegevens in te vullen;
Belangrijk! Als er een antwoord wordt gegeven op uw vraag, dan is het voor de gever van het antwoord nuttig om te weten als u er wel (of niet) mee geholpen bent! Wij vragen u dus ook te reageren op een antwoord.
Belangrijk! Antwoorden worden ook per e-mail naar abonnees gestuurd. Laat uw emailadres achter op deze site, zodat u op de hoogte blijft. U krijgt dan ook andere vragen en antwoorden te zien.
Abonneren
Abonneer u voor het ontvangen van emails voor uw Aastra 6867i SIP IP Phone bij:
nieuwe vragen en antwoorden
nieuwe handleidingen
U ontvangt een email met instructies om u voor één of beide opties in te schrijven.
Ontvang uw handleiding per email
Vul uw emailadres in en ontvang de handleiding van Aastra 6867i SIP IP Phone in de taal/talen: Engels als bijlage per email.
De handleiding is 5,84 mb groot.
U ontvangt de handleiding per email binnen enkele minuten. Als u geen email heeft ontvangen, dan heeft u waarschijnlijk een verkeerd emailadres ingevuld of is uw mailbox te vol. Daarnaast kan het zijn dat uw internetprovider een maximum heeft aan de grootte per email. Omdat hier een handleiding wordt meegestuurd, kan het voorkomen dat de email groter is dan toegestaan bij uw provider.
Stel vragen via chat aan uw handleiding
Stel uw vraag over deze PDF
Uw handleiding is per email verstuurd. Controleer uw email
Als u niet binnen een kwartier uw email met handleiding ontvangen heeft, kan het zijn dat u een verkeerd emailadres heeft ingevuld of dat uw emailprovider een maximum grootte per email heeft ingesteld die kleiner is dan de grootte van de handleiding.
Er is een email naar u verstuurd om uw inschrijving definitief te maken.
Controleer uw email en volg de aanwijzingen op om uw inschrijving definitief te maken
U heeft geen emailadres opgegeven
Als u de handleiding per email wilt ontvangen, vul dan een geldig emailadres in.
Uw vraag is op deze pagina toegevoegd
Wilt u een email ontvangen bij een antwoord en/of nieuwe vragen? Vul dan hier uw emailadres in.